Blog

  • Thai Chicken Enchiladas Recipe  Cheesy Baked Chicken Dinner Idea

    Thai Chicken Enchiladas Recipe Cheesy Baked Chicken Dinner Idea

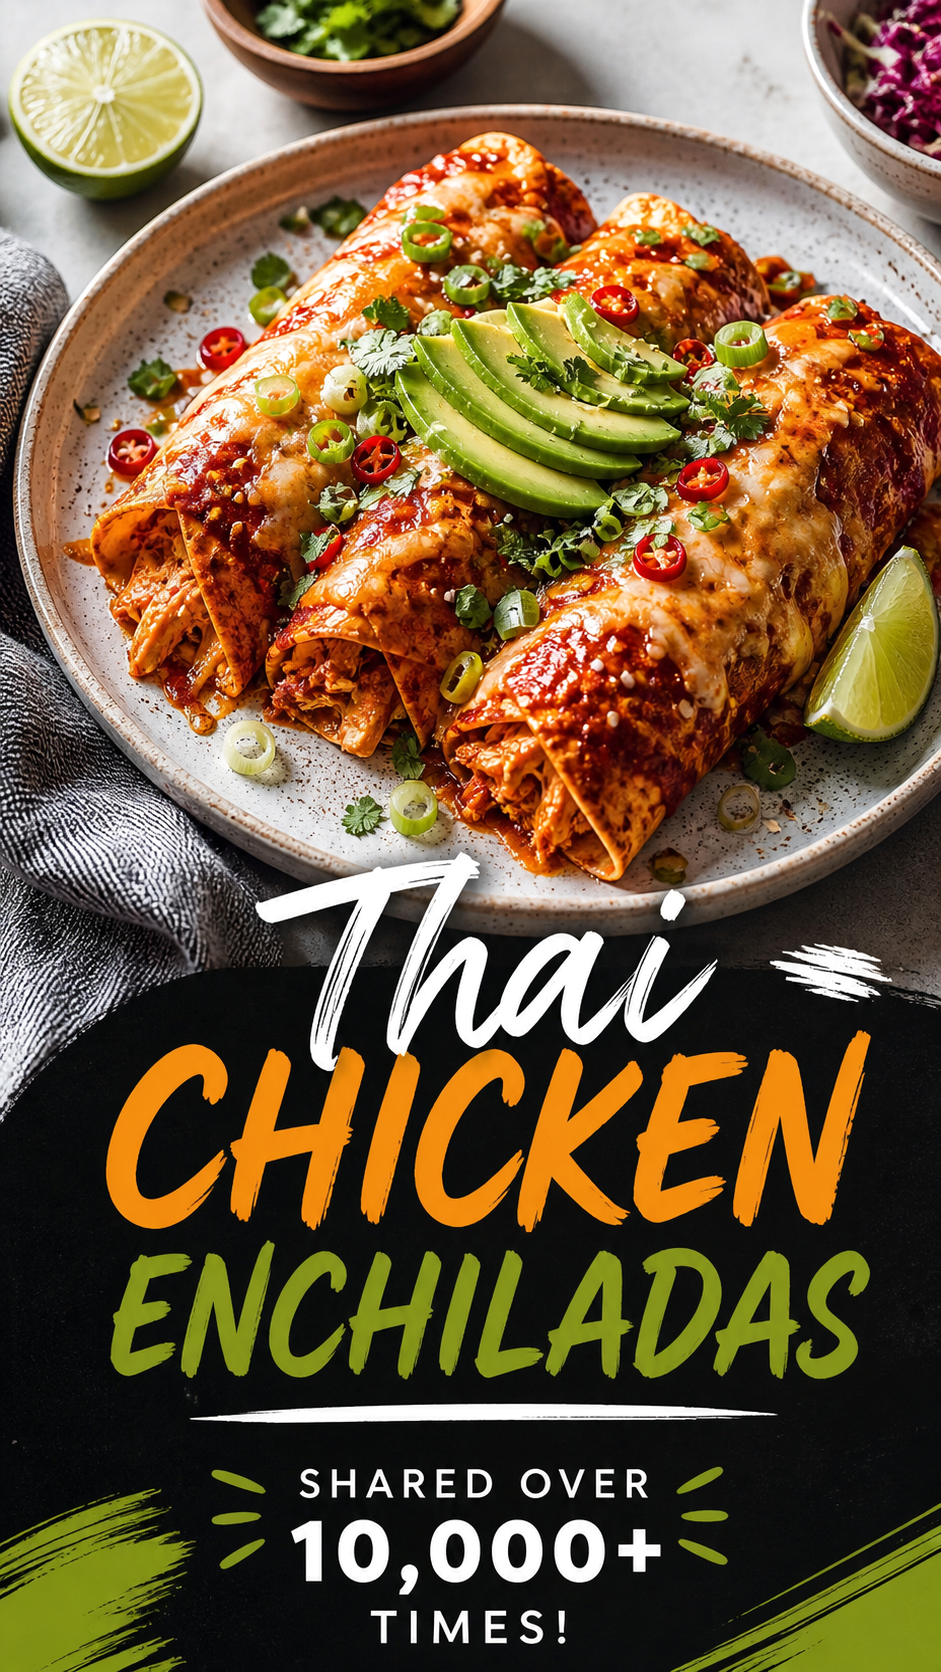
    When bold flavors meet comfort food, magic happens in the kitchen. That’s exactly what you get with Thai chicken enchiladas, a creative fusion dish that blends the creamy, cheesy goodness of classic enchiladas with vibrant, aromatic Thai-inspired flavors. This recipe is perfect for anyone craving something new while still holding onto the familiar warmth of a baked chicken dish. Whether you are cooking for family, entertaining guests, or simply upgrading your weeknight dinner routine, this dish delivers a memorable experience with every bite.

    Key Takeaways

    • Thai chicken enchiladas combine creamy textures with bold, zesty flavors
    • Perfect for meal prep, gatherings, or weeknight dinners
    • Easy to customize with toppings like avocado, herbs, and cheese
    • Offers a balanced mix of protein, richness, and freshness
    • A creative twist on traditional comfort food

    What Makes Thai Chicken Enchiladas So Special?

    This dish stands out because it bridges two beloved culinary worlds. On one hand, you have the familiar structure of enchiladas, soft tortillas filled with savory chicken and baked in a rich sauce. On the other, you experience the vibrant influence of Thai cuisine, often characterized by creamy sauces, herbs, and a hint of spice.

    The result is a layered flavor profile that feels both comforting and exciting. The melted cheese adds richness, while toppings like avocado slices and fresh herbs bring brightness and contrast. The sauce ties everything together, coating each bite with depth and warmth.

    Important: The balance between creamy, spicy, and fresh elements is what truly elevates this dish. Avoid overpowering one component to maintain harmony in every bite.

    Key Ingredients That Bring It to Life

    While variations exist, the core components remain consistent. Understanding these elements helps you recreate the dish with confidence and flexibility.

    Chicken

    Shredded or diced chicken serves as the protein base. It absorbs the flavors of the sauce beautifully, making every bite juicy and satisfying.

    Tortillas

    Soft tortillas wrap around the filling, creating that classic enchilada structure. They become tender as they bake, soaking up the sauce.

    Sauce

    The sauce is where the fusion truly shines. A creamy, slightly spicy base inspired by Thai flavors adds a unique twist. It often includes elements that create a balance of richness and heat.

    Cheese

    Melted cheese forms a golden layer on top, adding texture and indulgence. It also helps bind the dish together.

    Fresh Toppings

    Avocado slices, herbs, and even a sprinkle of seeds or crumbles introduce freshness and visual appeal. These toppings are not just decorative, they enhance flavor and texture.

    Expert Insight

    Combining warm baked dishes with fresh toppings creates a contrast that keeps each bite interesting. This technique is widely used in modern fusion cooking to elevate comfort food.

    How to Prepare Thai Chicken Enchiladas

    Creating this dish is surprisingly straightforward. With a few simple steps, you can build a layered, restaurant-quality meal at home.

    1. Prepare the Filling

    Cook and shred the chicken, then mix it with a portion of the sauce. This ensures the filling is flavorful and moist from the inside out.

    2. Assemble the Enchiladas

    Place the chicken mixture into tortillas, roll them tightly, and arrange them in a baking dish. Keep them snug so they hold their shape during baking.

    3. Add Sauce and Cheese

    Pour the remaining sauce over the rolled tortillas, ensuring even coverage. Sprinkle cheese generously on top for that irresistible melted finish.

    4. Bake to Perfection

    Bake until the cheese is bubbly and slightly golden. The aroma alone will signal that it is ready to serve.

    5. Garnish and Serve

    Top with fresh ingredients like avocado and herbs just before serving. This final step adds brightness and enhances presentation.

    Pro Tip: Let the dish rest for a few minutes after baking. This helps the enchiladas set, making them easier to serve while keeping the layers intact.

    Flavor Profile and Texture

    One of the most appealing aspects of Thai chicken enchiladas is the combination of textures and flavors. The creamy sauce coats the tender chicken, while the tortillas provide a soft structure. The melted cheese adds richness, and the fresh toppings bring a crisp, refreshing contrast.

    Each bite offers a mix of savory, creamy, slightly spicy, and fresh notes. This balance keeps the dish from feeling too heavy, making it suitable for both casual meals and special occasions.

    Serving Ideas and Pairings

    This dish is versatile enough to stand alone, but pairing it with the right sides can elevate the meal even further.

    • Light salads with citrus dressing for freshness
    • Rice or grains to complement the sauce
    • Simple vegetable sides for added balance
    • Refreshing drinks to contrast the richness

    Presentation also matters. Serve the enchiladas directly from the baking dish for a rustic feel, or plate them individually with carefully arranged toppings for a more refined look.

    Why This Dish Works for Modern Home Cooking

    In today’s fast-paced lifestyle, recipes that are both easy and impressive are highly valued. Thai chicken enchiladas check all the boxes. They are simple enough for a weeknight dinner yet unique enough to serve at gatherings.

    Important: Fusion dishes like this allow home cooks to experiment with flavors without needing advanced techniques. It’s a great way to expand your cooking repertoire while staying comfortable in the kitchen.

    Customization Options

    One of the best aspects of this recipe is its flexibility. You can easily adapt it to suit your preferences or dietary needs.

    Adjust the Spice Level

    Make it mild or spicy depending on your taste. This makes the dish suitable for both kids and spice lovers.

    Switch the Protein

    While chicken is the classic choice, other proteins can work just as well. This allows you to keep the recipe fresh and exciting.

    Experiment with Toppings

    Try different garnishes to create new flavor combinations. Each variation can bring a slightly different experience.

    Storage and Reheating Tips

    Thai chicken enchiladas are great for leftovers, making them ideal for meal prep.

    • Store in an airtight container in the refrigerator
    • Reheat in the oven to maintain texture
    • Add fresh toppings after reheating for best results

    Proper storage ensures the flavors remain intact, allowing you to enjoy the dish even days later.

    At a Glance

    • Fusion comfort food with bold flavors
    • Easy to prepare and customize
    • Perfect for both casual and special meals
    • Balanced with creamy and fresh elements

    Conclusion

    Thai chicken enchiladas offer a delicious twist on a classic favorite, combining the best of comfort food with exciting, modern flavors. With their creamy texture, vibrant toppings, and satisfying richness, they are sure to become a staple in your recipe collection.

    Whether you are cooking for yourself, your family, or guests, this dish delivers both flavor and visual appeal. It invites creativity, encourages experimentation, and most importantly, brings joy to the table.

    Tags

    chicken recipes enchiladas thai chicken easy dinner ideas baked chicken comfort food weeknight meals

  • Mexican Street Corn Pasta Salad Recipe  Creamy Elote Pasta Easy Summer Dish

    Mexican Street Corn Pasta Salad Recipe Creamy Elote Pasta Easy Summer Dish

    There is something irresistible about a bowl of creamy pasta tossed with golden corn, crumbled cheese, and a sprinkle of spices. It is colorful, comforting, and packed with bold flavor. This Mexican street corn pasta salad captures everything people love about summer cooking. It blends smoky grilled corn with tender pasta and a creamy, tangy dressing that feels both indulgent and refreshing. Whether you are planning a casual lunch, a picnic, or a backyard gathering, this dish brings a vibrant twist to your table.

    Key Takeaways

    • Combines creamy pasta with bold Mexican street corn flavors
    • Perfect for summer meals, BBQs, and meal prep
    • Quick to prepare with simple, accessible ingredients
    • Customizable with proteins or extra vegetables
    • Balances smoky, tangy, and creamy textures in every bite

    What Makes This Pasta Salad So Irresistible

    This dish stands out because it transforms a classic street food concept into a hearty, satisfying meal. The sweetness of corn pairs beautifully with the richness of a creamy dressing, while spices add depth and warmth. Crumbled cheese introduces a slightly salty contrast, and fresh herbs bring brightness to every bite.

    Important: The real magic comes from balancing textures. Soft pasta, juicy corn kernels, creamy dressing, and crumbly cheese work together to create a dish that feels layered and complete.

    The Flavor Profile Explained

    Each ingredient plays a key role. The corn offers natural sweetness, especially when lightly charred. The dressing brings creaminess with a hint of tanginess. Spices like chili powder or paprika add subtle heat, while lime juice lifts the entire dish with freshness. Together, these elements create a bold yet balanced flavor experience.

    Choosing the Right Ingredients

    Quality ingredients make all the difference. Start with a sturdy pasta shape like rotini or fusilli. These shapes hold the dressing well and add visual appeal. Fresh corn is ideal, especially when grilled or pan-roasted for a slightly smoky flavor. However, canned or frozen corn can work in a pinch.

    • Use full-fat ingredients for a richer, creamier texture
    • Choose fresh herbs for a vibrant finish
    • Opt for crumbly cheese that blends easily

    Pro Tip: Lightly charring the corn enhances its natural sweetness and adds a subtle smokiness that elevates the entire dish.

    Simple Ingredient List

    • Pasta (rotini or fusilli)
    • Sweet corn kernels
    • Creamy dressing base
    • Crumbled cheese
    • Fresh herbs and spices
    • Lime juice for brightness

    How to Prepare This Dish

    The process is simple and beginner-friendly. Cook the pasta until al dente and allow it to cool slightly. Meanwhile, prepare the corn by grilling or sautéing until lightly charred. Mix the dressing in a separate bowl, then combine everything together.

    1. Cook and drain pasta
    2. Char or sauté the corn
    3. Prepare the creamy dressing
    4. Combine pasta, corn, and dressing
    5. Add cheese and garnish with herbs

    Expert Insight

    Let the pasta salad rest for at least 15 minutes before serving. This allows the flavors to blend and intensify, resulting in a more cohesive and delicious dish.

    Serving Ideas and Occasions

    This pasta salad is incredibly versatile. It works as a side dish for grilled meals or as a standalone lunch. Its bright flavors and creamy texture make it ideal for outdoor dining, potlucks, and casual gatherings.

    • Serve chilled for a refreshing summer option
    • Pair with grilled meats or vegetables
    • Pack it for picnics or meal prep

    Important: This dish tastes even better the next day, making it perfect for make-ahead meals and busy schedules.

    Creative Variations to Try

    One of the best things about this recipe is how adaptable it is. You can easily tweak it to suit your preferences or dietary needs.

    Add Protein

    Grilled chicken, shrimp, or even beans can turn this salad into a complete meal. These additions enhance both flavor and nutritional value.

    Make It Spicier

    If you enjoy heat, consider adding chopped chili peppers or a dash of hot sauce. This brings an extra layer of excitement to the dish.

    Go Lighter

    Swap part of the creamy dressing with yogurt or a lighter alternative. This keeps the texture creamy while reducing heaviness.

    Storage and Meal Prep Tips

    Proper storage helps maintain freshness and flavor. Keep the pasta salad in an airtight container in the refrigerator. It typically stays fresh for up to three days.

    • Store dressing separately for longer freshness
    • Refresh with lime juice before serving
    • Stir well to redistribute ingredients

    Pro Tip: Add a small splash of milk or dressing before serving leftovers to restore creaminess.

    At a Glance

    • Creamy, smoky, and tangy flavor combination
    • Quick and easy preparation
    • Perfect for gatherings or meal prep
    • Highly customizable with simple swaps

    Conclusion

    This Mexican street corn pasta salad is more than just a side dish. It is a celebration of bold flavors, creamy textures, and vibrant ingredients. Easy to prepare and endlessly versatile, it fits seamlessly into everyday meals and special occasions alike. With its balance of sweetness, spice, and tang, it offers a fresh take on classic comfort food. Whether you are cooking for yourself or sharing with others, this dish is sure to leave a lasting impression.

    Tags

    pasta salad corn recipes easy recipes summer dishes meal prep ideas quick meals comfort food

  • Southwest Creamy Pasta Salad with Corn, Black Beans  Feta Easy Recipe

    Southwest Creamy Pasta Salad with Corn, Black Beans Feta Easy Recipe

    There is something irresistibly satisfying about a vibrant, creamy pasta salad that brings together bold flavors, fresh textures, and effortless preparation. This dish captures the essence of comfort and convenience, blending tender pasta with sweet corn, hearty black beans, crumbled cheese, and a rich, creamy dressing. Whether you are planning a casual lunch, prepping meals for the week, or looking for the perfect side for your next gathering, this pasta salad delivers on all fronts.

    What makes this style of pasta salad stand out is its balance. The sweetness of corn contrasts beautifully with the earthiness of black beans, while fresh herbs add brightness and the creamy base ties everything together. It is colorful, filling, and endlessly adaptable to your personal taste.

    Key Takeaways

    • A creamy pasta salad offers a perfect mix of flavor, texture, and convenience
    • Ingredients like corn and beans add both nutrition and visual appeal
    • Ideal for meal prep, picnics, and quick weeknight meals
    • Highly customizable with proteins, vegetables, or different dressings
    • Best served chilled for maximum flavor development

    What Makes This Pasta Salad So Appealing

    At first glance, the visual appeal is undeniable. The spiral pasta holds onto the creamy dressing, ensuring every bite is packed with flavor. Bright yellow corn kernels and deep black beans create a striking contrast, while flecks of green herbs add freshness.

    Beyond looks, it is the texture that keeps people coming back. You get the softness of pasta, the slight bite of beans, and the crumbly richness of cheese all in one dish. It is hearty enough to stand on its own yet versatile enough to pair with a variety of mains.

    Important: A well-balanced pasta salad is not just about ingredients but also about proportion. Too much dressing can overwhelm the dish, while too little can make it dry. Aim for a creamy coating that enhances rather than dominates.

    Ingredients That Build Flavor and Texture

    The magic of this pasta salad lies in its thoughtfully combined ingredients. Each component plays a role in creating a satisfying dish that feels both indulgent and fresh.

    • Pasta: Rotini or fusilli works best for holding creamy dressings
    • Corn: Adds natural sweetness and a juicy pop
    • Black beans: Provide protein and a hearty texture
    • Cheese: Crumbled cheese adds richness and a slight tang
    • Herbs: Fresh parsley or cilantro enhances brightness
    • Creamy dressing: Brings everything together with smooth, savory flavor

    These ingredients not only taste great together but also create a well-rounded dish that feels complete without needing much else.

    Choosing the Right Dressing

    A creamy dressing is the heart of this pasta salad. It can range from a simple mayonnaise base to a more complex blend with yogurt, spices, and a hint of citrus. The goal is to achieve a balance of richness and freshness.

    Pro Tip: Add a squeeze of lemon or lime juice to your dressing. It brightens the flavors and prevents the salad from tasting too heavy.

    Why This Matters

    The dressing not only adds flavor but also helps bind the ingredients together. A well-made dressing transforms a simple pasta salad into a dish that feels cohesive and satisfying.

    Perfect for Every Occasion

    This pasta salad is incredibly versatile. It fits seamlessly into a variety of settings, making it a staple recipe worth mastering.

    Meal Prep Made Easy

    One of the biggest advantages is how well it stores. You can prepare it in advance and enjoy it throughout the week. The flavors continue to develop over time, making leftovers even more delicious.

    A Crowd-Pleasing Side Dish

    Whether it is a picnic, barbecue, or family gathering, this dish is always a hit. Its vibrant colors and bold flavors make it stand out on any table.

    Important: Chill your pasta salad for at least one hour before serving. This allows the flavors to meld and enhances the overall taste experience.

    Customization Ideas to Make It Your Own

    One of the best things about pasta salad is how easy it is to customize. You can adapt it to suit your preferences, dietary needs, or whatever ingredients you have on hand.

    • Add grilled chicken or shrimp for extra protein
    • Incorporate diced bell peppers or cherry tomatoes for more color
    • Swap the dressing for a lighter vinaigrette if desired
    • Use different cheeses for varied flavor profiles

    These variations keep the dish exciting and ensure it never feels repetitive.

    Balancing Flavor Profiles

    A great pasta salad balances creamy, sweet, savory, and fresh elements. Adjusting seasoning and ingredients can help you achieve the perfect harmony.

    Important: Taste and adjust before serving. A pinch of salt, a dash of spice, or a splash of citrus can make a noticeable difference.

    Tips for the Best Texture and Presentation

    Texture is just as important as flavor. Cooking your pasta to the right doneness and combining ingredients thoughtfully ensures a satisfying bite every time.

    • Cook pasta until just tender, not overly soft
    • Rinse with cold water to stop cooking and cool it quickly
    • Mix gently to avoid breaking ingredients
    • Add fresh herbs just before serving for maximum freshness

    Presentation also plays a role. Serving the salad in a simple bowl with a wooden spoon gives it a rustic, inviting feel.

    Quick Points

    • Use short pasta shapes for better texture
    • Chill before serving for best flavor
    • Balance creamy and fresh elements
    • Customize with proteins or veggies

    Conclusion

    A creamy pasta salad like this is more than just a side dish. It is a versatile, flavorful option that fits effortlessly into everyday meals and special occasions alike. With its vibrant ingredients, satisfying texture, and endless customization options, it is a recipe you will find yourself returning to again and again.

    By focusing on balance, freshness, and thoughtful preparation, you can create a pasta salad that is not only delicious but also visually appealing and easy to enjoy. Whether you keep it simple or experiment with new additions, this dish is a reliable favorite that never disappoints.

    Tags

    pasta salad creamy pasta easy recipes meal prep ideas summer side dishes healthy pasta salad quick meals

  • BBQ Rib Tacos Recipe  Crispy, Juicy  Bold Easy Dinner Idea

    BBQ Rib Tacos Recipe Crispy, Juicy Bold Easy Dinner Idea

    When it comes to dinner recipes that truly impress, few dishes deliver the same level of flavor, texture, and visual appeal as BBQ rib tacos. Imagine tender, slow-cooked meat nestled in a warm tortilla, topped with crisp slaw, vibrant vegetables, and a creamy drizzle that ties everything together. This combination creates a dish that feels both indulgent and fresh, making it perfect for weeknight dinners or casual gatherings with friends and family.

    These tacos are more than just a meal. They represent a fusion of comfort food and modern flavor trends, bringing together smoky barbecue richness with the bright crunch of fresh toppings. Whether you are looking to upgrade your dinner routine or try something new, this recipe-inspired concept is guaranteed to satisfy.

    Key Takeaways

    • BBQ rib tacos combine smoky, tender meat with fresh, crunchy toppings
    • Perfect balance of textures: crispy, juicy, and creamy
    • Easy to customize with your favorite sauces and vegetables
    • Ideal for both quick dinners and entertaining guests
    • Offers a bold twist on traditional taco recipes

    What Makes BBQ Rib Tacos So Irresistible

    The appeal of BBQ rib tacos lies in their layered complexity. Each bite offers a contrast of flavors that keeps your taste buds engaged. The smoky richness of the meat pairs beautifully with the brightness of fresh herbs and vegetables, while a creamy sauce adds depth and smoothness.

    Important: The secret to unforgettable BBQ tacos is balance. Combining rich, slow-cooked meat with crisp, refreshing toppings ensures that the dish never feels too heavy.

    The tortilla acts as the perfect vessel, lightly charred for added texture and flavor. This subtle detail enhances the overall experience, making every bite feel thoughtfully crafted.

    Building the Perfect Taco

    Start with Quality Meat

    The foundation of this dish is tender, flavorful meat. BBQ ribs are ideal because they are naturally rich and infused with smoky notes. Slow cooking allows the meat to become incredibly soft, making it easy to shred and layer into tacos.

    Add Fresh and Crunchy Elements

    A vibrant slaw made from shredded cabbage and carrots adds both color and crunch. This contrast not only enhances texture but also cuts through the richness of the meat, creating a more balanced bite.

    Finish with a Creamy Sauce

    A smooth, slightly tangy sauce ties everything together. Whether it is a spiced mayo or a yogurt-based dressing, this element brings cohesion and elevates the flavor profile.

    Expert Insight

    Layering ingredients strategically makes a noticeable difference. Start with meat, add crunchy vegetables, and finish with sauce on top to ensure every bite delivers the full range of flavors.

    Why This Dish Works for Any Occasion

    One of the best things about BBQ rib tacos is their versatility. They can be dressed up for entertaining or simplified for a quick weeknight meal. Their bold flavors make them a crowd-pleaser, while the customizable nature allows you to adapt them to different tastes.

    For family dinners, they offer a fun and interactive experience. Guests can build their own tacos, choosing their preferred toppings and sauces. This not only adds variety but also makes the meal more engaging.

    Pro Tip: Prepare all toppings in advance and set up a taco bar. This makes serving effortless and allows everyone to personalize their plate.

    Flavor Combinations to Try

    Sweet and Smoky

    Pair the BBQ meat with a slightly sweet sauce and add corn for a hint of natural sweetness. This combination enhances the smoky depth of the dish.

    Fresh and Zesty

    Incorporate lime juice, fresh herbs, and a light dressing for a refreshing twist. This variation is perfect for warmer days when you want something lighter.

    Spicy and Bold

    Add chili flakes or a spicy sauce to bring heat into the mix. This option is ideal for those who enjoy a more intense flavor experience.

    Tips for Achieving the Best Texture

    Texture plays a crucial role in making these tacos stand out. The combination of tender meat, crisp vegetables, and soft tortillas creates a dynamic eating experience.

    • Lightly toast tortillas for added structure and flavor
    • Use freshly shredded vegetables for maximum crunch
    • Apply sauce sparingly to avoid sogginess
    • Serve immediately to maintain the ideal texture

    Important: Avoid overloading the taco. Keeping portions balanced ensures that each ingredient shines without overwhelming the others.

    Making It Your Own

    The beauty of BBQ rib tacos is how easily they can be customized. You can experiment with different types of tortillas, sauces, and toppings to create a version that suits your preferences.

    Consider adding pickled vegetables for extra tang or swapping out the sauce for something more herb-forward. Even small changes can create a completely new flavor profile while keeping the essence of the dish intact.

    Serving and Presentation Ideas

    Presentation can elevate the dining experience. Arrange tacos on a simple plate with a side of extra toppings or a small bowl of slaw. Garnish with fresh herbs for a pop of color.

    Using a neutral background or rustic serving pieces can make the vibrant colors of the tacos stand out even more. This is especially useful if you plan to share your dish on social platforms or with guests.

    At a Glance

    • Bold, smoky flavors balanced with fresh toppings
    • Quick to assemble once ingredients are ready
    • Highly customizable for different preferences
    • Perfect for casual meals or entertaining

    Conclusion

    BBQ rib tacos bring together everything you could want in a dinner recipe. They are rich yet balanced, simple yet impressive, and endlessly adaptable. With their combination of smoky meat, crisp vegetables, and creamy sauce, they deliver a satisfying experience that feels both comforting and exciting.

    Whether you are cooking for yourself or sharing with others, this dish offers a creative way to elevate your dinner routine. Once you try it, it is likely to become a go-to favorite for any occasion.

    Tags

    Dinner Recipes BBQ Tacos Easy Meals Taco Ideas Comfort Food Weeknight Dinner Food Inspiration

  • Easy 6 Ingredient Condensed Milk Cookies Recipe Soft Chewy Chocolate Chip Cookies

    Easy 6 Ingredient Condensed Milk Cookies Recipe Soft Chewy Chocolate Chip Cookies

    There is something irresistibly comforting about a batch of freshly baked cookies, especially when they are soft, golden, and packed with rich chocolate chips. These condensed milk cookies are the kind of treat that instantly feels like home. With their tender crumb and lightly crisp edges, they strike the perfect balance between indulgence and simplicity. Whether you are baking for a cozy afternoon, a family gathering, or simply to satisfy a sweet craving, this easy recipe brings joy with minimal effort.

    What makes these cookies truly special is their simplicity. Using condensed milk as a key ingredient creates a unique texture that is both soft and slightly chewy, while also adding a natural sweetness that reduces the need for complex additions. The result is a batch of cookies that look bakery-worthy but are surprisingly easy to recreate in your own kitchen.

    Key Takeaways

    • Condensed milk creates a soft, rich cookie texture
    • Minimal ingredients make this recipe beginner-friendly
    • Perfect balance of sweetness and buttery flavor
    • Quick to prepare with no complicated steps
    • Ideal for everyday baking or special treats

    Why Condensed Milk Cookies Are So Popular

    Condensed milk has long been a staple in desserts for its creamy consistency and natural sweetness. When used in cookies, it transforms the dough into something smoother and richer compared to traditional recipes. This creates a melt-in-your-mouth experience that is hard to replicate with standard ingredients.

    Important: The use of condensed milk not only enhances flavor but also improves moisture retention, keeping cookies soft for longer compared to traditional recipes.

    Another reason these cookies stand out is their visual appeal. Their slightly cracked tops, golden edges, and scattered chocolate chips make them look as good as they taste. They are the kind of cookies that invite you to reach for just one more.

    The Texture That Makes Them Irresistible

    The texture of these cookies is what truly defines them. Each bite offers a delicate crumb that feels soft and airy, paired with pockets of melted chocolate that add richness. The exterior remains lightly crisp, creating a satisfying contrast.

    Soft Centers with Lightly Crisp Edges

    The combination of butter and condensed milk creates a dough that spreads just enough while baking. This ensures the cookies stay thick and soft in the center while developing a subtle crispness around the edges.

    Balanced Sweetness

    Unlike overly sugary cookies, these have a balanced sweetness thanks to the condensed milk. This makes them enjoyable without feeling heavy, even after a second or third bite.

    Expert Insight

    Using high-quality chocolate chips can elevate these cookies significantly. Opt for semi-sweet or dark chocolate to balance the richness of the condensed milk and create a more layered flavor profile.

    Simple Ingredients, Big Flavor

    One of the most appealing aspects of this recipe is how approachable it is. With only a handful of ingredients, you can create cookies that taste like they came straight from a professional bakery.

    Essential Ingredients

    • Sweetened condensed milk
    • Butter for richness and structure
    • All-purpose flour for the base
    • Chocolate chips for texture and flavor
    • A touch of vanilla for aroma
    • Baking powder or soda for lift

    Pro Tip: Let the cookie dough rest for a few minutes before baking. This helps the ingredients fully combine and improves the final texture.

    Step-by-Step Baking Experience

    Making these cookies is straightforward and enjoyable, even for beginners. The process is simple enough to follow without stress, making it perfect for both experienced bakers and those just starting out.

    Preparing the Dough

    Start by mixing softened butter with condensed milk until smooth. Add vanilla for depth, then gradually incorporate flour and leavening agents. Fold in chocolate chips to complete the dough.

    Shaping and Baking

    Scoop the dough into evenly sized portions and place them on a lined baking tray. Bake until the edges turn golden while the centers remain soft. Allow them to cool slightly to set their structure.

    Serving Ideas and Variations

    These cookies are incredibly versatile. While they are delicious on their own, there are many ways to customize them to suit your taste or occasion.

    Creative Variations

    • Add chopped nuts for extra crunch
    • Use white chocolate or dark chocolate chips
    • Mix in dried fruits for a unique twist
    • Sprinkle a pinch of sea salt on top for contrast

    Perfect Pairings

    Enjoy these cookies with a warm cup of coffee, a glass of milk, or even as part of a dessert platter. Their soft texture makes them ideal for pairing with creamy beverages.

    Quick Points

    • Soft, chewy texture with golden edges
    • Quick and beginner-friendly recipe
    • Customizable with different add-ins
    • Perfect for everyday baking

    Conclusion

    Condensed milk cookies offer a perfect blend of simplicity and indulgence. With their soft centers, rich flavor, and easy preparation, they are a go-to recipe for anyone looking to create something delicious without complexity. Whether you are baking for yourself or sharing with others, these cookies bring warmth and satisfaction in every bite.

    By focusing on quality ingredients and simple techniques, you can achieve bakery-style results right at home. Once you try them, they are likely to become a regular favorite in your baking routine.

    Tags

    cookie recipes condensed milk cookies easy baking chocolate chip cookies homemade desserts simple recipes soft cookies

  • Slow Cooker Texas BBQ Ribs Recipe  Easy Crockpot Fall-Off-The-Bone Dinner

    Slow Cooker Texas BBQ Ribs Recipe Easy Crockpot Fall-Off-The-Bone Dinner

    There is something unforgettable about a plate of slow-cooked Texas BBQ ribs. The deep mahogany glaze, the tender meat that slips cleanly from the bone, and that rich smoky aroma instantly create the kind of comfort food experience people crave. Few dishes capture the spirit of low-and-slow cooking better than crockpot BBQ ribs, making them one of the most satisfying recipes for home cooks who want restaurant-quality flavor without complicated techniques.

    Slow cooker recipes continue to dominate home kitchens for a reason. They make it easy to create bold, hearty meals with minimal hands-on effort. Among all the options, crockpot Texas BBQ ribs stand out as a true crowd favorite. Whether you are cooking for a family dinner, game day gathering, or weekend comfort meal, this recipe delivers smoky, sticky, fall-off-the-bone perfection every time.

    Key Takeaways

    • Slow cooking creates tender, juicy ribs with minimal effort
    • Texas-style BBQ sauce adds bold smoky sweetness
    • Crockpot recipes are perfect for busy weeknights
    • Simple ingredients produce impressive results
    • Ideal for family meals, parties, and meal prep
    • Finishing under the broiler adds authentic caramelization

    Why Crockpot BBQ Ribs Are So Popular

    There is a reason crockpot recipes consistently rank among the most searched comfort food ideas online. Convenience matters, but flavor matters even more. Slow cookers allow ingredients to develop complexity over time, creating tender textures and deep savory notes that are difficult to replicate with faster cooking methods.

    Important: Slow cooking breaks down connective tissue gradually, resulting in incredibly tender ribs without drying out the meat. This is the secret behind that signature fall-off-the-bone texture.

    Texas BBQ ribs are especially well suited to the crockpot method. The low heat allows spice rubs, sauces, and natural juices to meld together into a glossy, flavorful coating that penetrates every bite.

    What Makes Texas BBQ Ribs Unique

    Texas barbecue has earned legendary status for its bold flavors and straightforward approach. Unlike heavily sweet regional variations, Texas-style BBQ often focuses on balancing smoky richness with peppery spice and just enough sweetness to enhance the meat.

    The Signature Flavor Profile

    • Smoky paprika and chili powder
    • Bold black pepper seasoning
    • Brown sugar for subtle sweetness
    • Tangy vinegar notes
    • Rich tomato-based barbecue glaze

    This balance creates ribs that are bold but not overpowering, making them universally appealing.

    The Best Ingredients for Slow Cooker BBQ Ribs

    The beauty of crockpot recipes lies in their simplicity. You do not need an extensive ingredient list to achieve incredible results.

    Essential Ingredients

    • Pork baby back ribs or St. Louis-style ribs
    • BBQ sauce
    • Brown sugar
    • Garlic powder
    • Smoked paprika
    • Onion powder
    • Salt and black pepper
    • Apple cider vinegar
    • Worcestershire sauce

    These pantry staples create a deeply layered flavor profile that tastes like it took hours of active cooking.

    Expert Insight

    Removing the silver skin membrane from the back of the ribs before cooking dramatically improves tenderness and allows seasoning to penetrate more effectively.

    How to Make Crockpot Texas BBQ Ribs

    One of the greatest advantages of this recipe is how approachable it is for beginners.

    Step 1: Prepare the Ribs

    Remove the membrane and pat the ribs dry. This ensures the seasoning adheres properly.

    Step 2: Apply the Dry Rub

    Generously coat the ribs with your spice mixture, pressing it firmly into the meat.

    Step 3: Arrange in the Crockpot

    Cut the racks into manageable sections and stand them upright along the slow cooker walls.

    Step 4: Add Sauce

    Pour your BBQ sauce mixture evenly over the ribs.

    Step 5: Slow Cook

    Cook on low for 7 to 8 hours or high for 4 to 5 hours.

    Pro Tip: For that irresistible sticky finish, transfer cooked ribs to a baking sheet, brush with extra sauce, and broil for 5 minutes until caramelized.

    Tips for Perfect Fall-Off-The-Bone Texture

    Even simple slow cooker recipes benefit from a few expert techniques.

    Avoid Overcrowding

    Leave enough space for heat circulation.

    Choose Quality Ribs

    Look for racks with good marbling and even thickness.

    Do Not Rush the Process

    Low heat creates superior texture compared to high heat.

    Best Side Dishes for Texas BBQ Ribs

    Great ribs deserve equally satisfying sides.

    • Creamy coleslaw
    • Classic baked beans
    • Cornbread
    • Mac and cheese
    • Potato salad
    • Grilled corn

    These pairings balance the richness of the ribs and create a complete meal.

    Why Slow Cooker Recipes Work for Busy Families

    Crockpot meals simplify dinner without sacrificing flavor. With only a few minutes of prep, you can enjoy deeply satisfying meals after a long day.

    Important: Slow cooker recipes save time, reduce cleanup, and make meal planning significantly easier for households with packed schedules.

    That combination of practicality and flavor explains why recipes like Texas BBQ ribs remain timeless favorites.

    Meal Prep and Storage Tips

    Refrigeration

    Store leftovers in an airtight container for up to 4 days.

    Freezing

    Wrap portions tightly and freeze for up to 3 months.

    Reheating

    Warm covered in the oven with extra sauce to maintain moisture.

    At a Glance

    • Prep time is minimal
    • Perfect for entertaining
    • Easy cleanup
    • Rich Texas BBQ flavor
    • Family-approved comfort food

    Conclusion

    Crockpot Texas BBQ ribs prove that extraordinary comfort food does not require complicated techniques or expensive equipment. With the right seasoning, quality ribs, and the patience of slow cooking, you can create deeply flavorful, juicy ribs that rival your favorite barbecue restaurant.

    Whether you are exploring more crockpot recipes for busy weeknights or planning a memorable meal for guests, this dish delivers every time. The smoky glaze, tender texture, and effortless preparation make it a recipe worth saving and repeating often.

    Tags

    Crockpot Recipes Slow Cooker BBQ Ribs Texas BBQ Easy Dinner Recipes Comfort Food Fall Off The Bone Ribs Family Meals

  • Hawaiian Chicken Meal Prep Recipe with Pineapple Rice  Easy Healthy Chicken Dinner

    Hawaiian Chicken Meal Prep Recipe with Pineapple Rice Easy Healthy Chicken Dinner

    When dinner needs to be fast, flavorful, and satisfying, Hawaiian chicken meal prep is one of those recipes that checks every box. This bright and colorful dish brings together tender chicken, sweet pineapple, crisp bell peppers, and fluffy rice for a balanced meal that feels both comforting and refreshing. It is the perfect combination of sweet and savory, making it a standout option for busy weeknight dinners, healthy lunch prep, or a make-ahead meal the whole family will actually look forward to eating.

    The beauty of this recipe is its simplicity. It delivers tropical-inspired flavor without requiring complicated ingredients or hours in the kitchen. Whether you are trying to streamline your weekly meal prep routine or searching for a healthy chicken recipe with bold flavor, Hawaiian chicken deserves a spot in your rotation.

    Key Takeaways

    • Quick and easy chicken meal prep idea for busy schedules
    • Perfect balance of sweet pineapple and savory glazed chicken
    • Packed with lean protein and colorful vegetables
    • Easy to customize with rice, quinoa, or cauliflower rice
    • Great for healthy lunches and simple weeknight dinners
    • Stores well for meal prep throughout the week

    Why Hawaiian Chicken Meal Prep Is So Popular

    There is something instantly appealing about the flavor profile of Hawaiian chicken. The juicy sweetness of pineapple pairs naturally with tender chicken and savory sauce, creating a dish that feels indulgent while still being wholesome.

    Meal prep recipes often struggle with one common problem. They become repetitive after a day or two. Hawaiian chicken solves that challenge with vibrant flavors and textures that stay exciting even after reheating.

    Important: One of the biggest advantages of Hawaiian chicken meal prep is how well it reheats. The sauce keeps the chicken moist, while the pineapple adds bursts of fresh sweetness that prevent the dish from tasting dull after storage.

    It also fits beautifully into multiple eating styles. Whether you are focused on balanced eating, higher protein meals, family-friendly recipes, or convenient lunch prep, this dish adapts easily.

    The Flavor Combination That Makes It Irresistible

    At the heart of Hawaiian chicken is the contrast between sweet and savory. This classic combination creates depth and excitement in every bite.

    Sweet Pineapple

    Pineapple brings brightness and natural sweetness. Its juicy texture adds freshness that balances the richness of the sauce and chicken.

    Tender Chicken

    Boneless chicken thighs or chicken breast work beautifully. The chicken absorbs the glaze while staying juicy and flavorful.

    Colorful Bell Peppers

    Red bell peppers add crunch, subtle sweetness, and visual appeal. They also provide nutrients and help round out the meal.

    Savory Glaze

    A glossy sauce made from soy sauce, garlic, ginger, and a touch of sweetness ties everything together.

    Expert Insight

    The secret to restaurant-quality Hawaiian chicken is allowing the sauce to reduce properly. A slightly thickened glaze clings to every piece of chicken and creates that glossy finish that makes the dish look and taste incredible.

    How to Build the Perfect Hawaiian Chicken Bowl

    Creating the perfect Hawaiian chicken meal prep bowl is all about layering ingredients thoughtfully.

    Start with a Base

    • Steamed jasmine rice for classic flavor
    • Brown rice for extra fiber
    • Cauliflower rice for a lighter option
    • Quinoa for added protein

    Add the Chicken Mixture

    The chicken should be generously coated in sauce and evenly distributed for balanced flavor in every serving.

    Finish with Fresh Garnishes

    • Fresh parsley
    • Green onions
    • Sesame seeds
    • Lime wedges

    Pro Tip: Pack garnishes separately if meal prepping for several days. Adding them fresh right before serving keeps the flavors vibrant and prevents sogginess.

    Health Benefits of Hawaiian Chicken Meal Prep

    This recipe is more than just delicious. It also offers several nutritional benefits.

    Lean Protein for Energy

    Chicken provides high-quality protein that supports muscle maintenance and keeps you feeling full longer.

    Vitamin-Rich Vegetables

    Bell peppers are loaded with antioxidants and vitamin C, helping support immune health.

    Natural Sweetness

    Pineapple adds flavor naturally, reducing the need for excessive added sugars.

    When portioned thoughtfully, Hawaiian chicken bowls provide balanced carbohydrates, protein, and healthy nutrients that support sustained energy throughout the day.

    Meal Prep Tips for Best Results

    Preparation makes all the difference when it comes to keeping this dish fresh and flavorful.

    Use Fresh Ingredients

    Fresh pineapple and crisp peppers create the best texture and flavor.

    Cool Before Storing

    Allow the meal to cool before sealing containers to prevent excess moisture buildup.

    Store Properly

    Use airtight glass containers for freshness and easy reheating.

    Reheat Gently

    Microwave with a splash of water or broth to keep the rice soft and the chicken tender.

    Why This Matters

    • Proper storage preserves flavor for up to four days
    • Gentle reheating keeps chicken juicy
    • Thoughtful prep reduces weekday stress

    Easy Variations to Try

    One reason Hawaiian chicken remains so popular is how versatile it is.

    Spicy Hawaiian Chicken

    Add red pepper flakes or sriracha for heat.

    Teriyaki Hawaiian Chicken

    Swap the glaze for a teriyaki-inspired sauce for deeper sweetness.

    Low Carb Option

    Replace rice with cauliflower rice or shredded cabbage.

    Extra Veggie Bowl

    Add broccoli, snap peas, or carrots for more crunch and nutrients.

    Important: Customizing your Hawaiian chicken bowls keeps meal prep interesting and helps prevent flavor fatigue, making it easier to stick to healthy eating habits all week.

    Why It Works for Busy Lifestyles

    Modern schedules often leave little time for thoughtful cooking. That is why meal prep recipes like Hawaiian chicken have become essential.

    This dish comes together quickly, stores beautifully, and provides grab-and-go convenience without sacrificing flavor. It turns healthy eating into something practical and enjoyable.

    For families, it offers broad appeal. For professionals, it saves time. For anyone trying to eat better, it removes decision fatigue from the week.

    At a Glance

    • Sweet and savory tropical-inspired flavor
    • Excellent for weekly meal prep
    • Balanced, colorful, and satisfying
    • Highly customizable for different diets
    • Family-friendly and easy to reheat

    Conclusion

    Hawaiian chicken meal prep is proof that healthy eating does not need to be boring or complicated. With tender glazed chicken, juicy pineapple, vibrant peppers, and perfectly cooked rice, this dish delivers big flavor with minimal effort.

    It is practical enough for weekly meal prep yet delicious enough to feel special every time you dig in. Whether you are prepping lunches for the week, planning simple dinners, or looking for a fresh chicken recipe to add to your collection, this tropical-inspired bowl offers everything you need.

    Sometimes the best recipes are the ones that make healthy choices feel effortless. Hawaiian chicken does exactly that.

    Tags

    Hawaiian Chicken Chicken Meal Prep Healthy Chicken Recipes Pineapple Chicken Easy Dinner Ideas Meal Prep Recipes Chicken Rice Bowl Weeknight Dinners

  • Hawaiian Chicken Drumsticks  Sweet Sticky Glazed BBQ Chicken Recipe

    Hawaiian Chicken Drumsticks Sweet Sticky Glazed BBQ Chicken Recipe

    Few dishes capture the perfect balance of sweet, savory, and smoky flavor quite like Hawaiian chicken drumsticks. With their glossy glaze, caramelized edges, and juicy interior, these drumsticks are the kind of meal that instantly elevates any dinner table. Whether you are planning a casual family meal or hosting a backyard gathering, this dish delivers bold flavor with minimal fuss.

    The appeal lies in its simplicity. A rich, sticky sauce clings to each piece of chicken, creating a mouthwatering coating that locks in moisture while adding layers of flavor. The charred bits hint at grilling or roasting, giving every bite a slightly smoky finish that pairs beautifully with the sweet glaze.

    Key Takeaways

    • Sweet and savory glaze creates bold, irresistible flavor
    • Perfect for grilling, baking, or air frying
    • Juicy drumsticks with caramelized, slightly charred edges
    • Easy to prepare with simple pantry ingredients
    • Ideal for family dinners, BBQs, and meal prep

    What Makes Hawaiian Chicken Drumsticks So Special

    The magic of Hawaiian-inspired chicken comes from its signature glaze. Typically made with a blend of sweet elements like pineapple juice or brown sugar and savory components such as soy sauce and garlic, the result is a balanced flavor profile that feels both comforting and exciting.

    As the chicken cooks, the glaze thickens and caramelizes, forming a glossy coating that enhances both texture and taste. The slightly charred spots you see are not just for looks. They add depth and a subtle smokiness that contrasts beautifully with the sweetness.

    Important: The key to achieving that signature sticky glaze is allowing the sauce to reduce properly during cooking. This ensures it clings to the chicken instead of sliding off.

    Flavor Profile That Keeps You Coming Back

    Each bite delivers a layered experience. The initial sweetness hits first, followed by a savory depth and a hint of tanginess. Fresh herbs sprinkled on top add brightness, while a squeeze of citrus can enhance the overall flavor.

    The combination is incredibly versatile. It appeals to both adults and kids, making it a go-to option for households looking for crowd-pleasing meals. The balance also makes it perfect for pairing with a wide range of sides.

    Texture That Elevates the Dish

    The texture plays a huge role in why this dish stands out. The exterior is slightly crisp and caramelized, while the inside remains tender and juicy. This contrast creates a satisfying bite every time.

    Pro Tip: For extra crispiness, finish the drumsticks under high heat for a few minutes. This helps intensify the caramelization without drying out the meat.

    Cooking Methods That Work Best

    One of the best things about Hawaiian chicken drumsticks is their flexibility in cooking methods. You can bake, grill, or even air fry them depending on your preference and available equipment.

    Oven-Baked Perfection

    Baking is one of the easiest methods. It allows the chicken to cook evenly while the glaze thickens and caramelizes. Simply coat the drumsticks and let the oven do the work.

    Grilled for Smoky Flavor

    Grilling adds an extra layer of smokiness that enhances the overall taste. The open flame helps create those charred edges that make the dish visually appealing and delicious.

    Air Fryer Convenience

    For a quicker option, the air fryer delivers crispy skin and juicy meat in less time. It is perfect for busy weeknights when you want something flavorful without a long cooking process.

    Expert Insight

    Letting the chicken marinate for at least 30 minutes before cooking enhances flavor penetration. If time allows, marinating overnight creates an even deeper, more complex taste.

    Perfect Pairings for a Complete Meal

    Hawaiian chicken drumsticks pair beautifully with a variety of sides. The sweet and savory glaze complements both light and hearty accompaniments.

    • Steamed rice or coconut rice for a classic pairing
    • Grilled vegetables for a balanced plate
    • Fresh salads with citrus dressing for brightness
    • Roasted potatoes for a comforting option

    Adding a wedge of lime or lemon on the side can elevate the dish even further. The acidity cuts through the richness and enhances the overall flavor.

    Why This Dish Works for Any Occasion

    Whether you are hosting a summer BBQ or preparing a simple weeknight dinner, these drumsticks fit seamlessly into any setting. They are easy to make in large batches, making them ideal for gatherings and meal prep.

    Important: This dish strikes the perfect balance between effort and reward. With minimal preparation, you get a restaurant-quality result that feels both indulgent and approachable.

    Tips for Getting the Best Results

    Use Fresh Ingredients

    Fresh herbs and citrus can make a noticeable difference in the final flavor. They add brightness and enhance the overall presentation.

    Don’t Skip the Glaze

    The glaze is the star of the dish. Make sure to coat the chicken generously and allow it to caramelize properly during cooking.

    Monitor Cooking Time

    Overcooking can dry out the chicken. Keep an eye on the drumsticks and remove them once they are cooked through and juicy.

    A Crowd-Pleasing Favorite

    There is something universally appealing about sticky, flavorful chicken drumsticks. They are easy to eat, packed with flavor, and visually enticing. The glossy glaze and charred edges make them look as good as they taste.

    This dish is also highly customizable. You can adjust the sweetness, add spice, or experiment with different herbs to suit your taste preferences. It is a flexible recipe that invites creativity.

    At a Glance

    • Sweet, savory, and slightly smoky flavor
    • Juicy interior with caramelized exterior
    • Works with multiple cooking methods
    • Perfect for both casual and special occasions

    Conclusion

    Hawaiian chicken drumsticks bring together bold flavor, simple preparation, and stunning presentation in one irresistible dish. The combination of a sticky glaze, tender meat, and lightly charred edges creates a meal that feels both comforting and exciting.

    Whether you are cooking for your family or entertaining guests, this dish is sure to impress. Its versatility and crowd-pleasing appeal make it a staple worth adding to your recipe rotation. Once you try it, you will find yourself coming back to it again and again.

    Tags

    chicken recipes Hawaiian chicken chicken drumsticks BBQ chicken easy dinner ideas grilled chicken sticky chicken

  • Hawaiian Chicken Sliders Recipe  Easy Pineapple BBQ Chicken Sandwiches

    Hawaiian Chicken Sliders Recipe Easy Pineapple BBQ Chicken Sandwiches

    There is something irresistible about bite-sized comfort food, especially when it blends sweet, savory, and cheesy goodness into one perfect package. Hawaiian chicken sliders are a standout example of this balance. Soft, golden buns cradle juicy shredded chicken, melted cheese, tangy sauce, and bursts of sweet pineapple. Whether you are planning a casual family dinner, prepping for game day, or hosting a party, these sliders bring bold flavor with minimal effort.

    These mini sandwiches are more than just a trendy recipe. They are practical, versatile, and incredibly satisfying. With simple ingredients and easy preparation, they have quickly become a favorite for home cooks who want something impressive without spending hours in the kitchen.

    Key Takeaways

    • Perfect blend of sweet pineapple, savory chicken, and creamy melted cheese
    • Quick and easy recipe ideal for weeknight dinners or gatherings
    • Customizable with different sauces, cheeses, and toppings
    • Great for meal prep and make-ahead convenience
    • Crowd-pleasing finger food for parties and events

    What Makes Hawaiian Chicken Sliders So Popular

    Hawaiian chicken sliders stand out because they combine contrasting flavors in a way that feels balanced and exciting. The sweetness of pineapple complements the smoky, seasoned chicken, while melted cheese ties everything together with a creamy texture. The soft slider buns add a delicate sweetness and a fluffy bite that enhances every layer.

    This combination hits multiple taste preferences at once. It is sweet, savory, slightly tangy, and rich. That versatility is why these sliders appeal to both kids and adults, making them a reliable option for nearly any occasion.

    Important: The balance of flavors is key. Too much sweetness can overwhelm the dish, while too little can make it feel flat. Keeping a harmonious ratio between pineapple, sauce, and chicken ensures the sliders stay flavorful and satisfying.

    The Perfect Ingredients for Flavorful Sliders

    Soft Slider Buns

    The base of any great slider is the bread. Soft, slightly sweet buns provide structure while absorbing the flavors of the filling. They should be sturdy enough to hold the ingredients but still tender when bitten.

    Shredded Chicken

    Juicy, well-seasoned shredded chicken forms the heart of the sliders. It works beautifully with sauces and absorbs flavor easily, making it ideal for this type of recipe.

    Pineapple Chunks

    Pineapple adds a refreshing sweetness and slight acidity that brightens the entire dish. Whether fresh or canned, it introduces a tropical element that defines the Hawaiian-inspired flavor.

    Melted Cheese

    Cheese adds richness and helps bind the filling together. When melted, it creates a creamy texture that complements both the chicken and pineapple.

    Sauce and Toppings

    A tangy, slightly sweet sauce enhances the flavor profile. Adding finely chopped onions or slaw can introduce crunch and contrast.

    Expert Insight

    Layering is essential for texture. Place the chicken first, then pineapple, followed by cheese. This ensures even melting and prevents the buns from becoming soggy.

    How to Build Hawaiian Chicken Sliders

    Creating these sliders is straightforward, but attention to detail can elevate them from good to unforgettable.

    1. Slice the slider buns horizontally without separating them individually.
    2. Layer the shredded chicken evenly across the bottom half.
    3. Add pineapple pieces for a burst of sweetness.
    4. Top with cheese to ensure a smooth, melty finish.
    5. Place the top buns back on and brush with a light glaze or butter.
    6. Bake until the cheese melts and the tops are golden.

    This method ensures each slider is consistent and packed with flavor in every bite.

    Pro Tip: Brushing the tops with butter and a sprinkle of seasoning before baking adds a golden finish and enhances the overall flavor of the sliders.

    Best Occasions to Serve These Sliders

    Hawaiian chicken sliders are incredibly versatile. They work well in a variety of settings, making them a go-to option for many home cooks.

    • Game day gatherings where finger foods are essential
    • Family dinners that need quick and satisfying meals
    • Potlucks where shareable dishes are appreciated
    • Holiday parties with diverse flavor preferences

    Their compact size makes them easy to serve and even easier to enjoy.

    Customization Ideas to Make Them Your Own

    Switch the Protein

    While chicken is the classic choice, you can substitute it with pulled pork or turkey for a different twist.

    Try Different Cheeses

    Experiment with cheeses like mozzarella, provolone, or cheddar to change the flavor profile.

    Add a Crunch Element

    Incorporate coleslaw or crispy onions for added texture and contrast.

    Spice It Up

    Add a touch of heat with chili flakes or a spicy sauce for those who enjoy bold flavors.

    Important: Customizing the sliders allows you to adapt them for different dietary preferences and flavor profiles without losing their core appeal.

    Tips for Perfect Texture and Flavor

    Achieving the perfect slider requires attention to both texture and taste.

    • Do not overload the buns to prevent sogginess
    • Use evenly shredded chicken for consistent bites
    • Balance sweet and savory elements carefully
    • Serve warm for the best flavor and texture

    These small adjustments can make a noticeable difference in the final result.

    At a Glance

    • Sweet and savory flavor combination
    • Quick preparation and baking time
    • Perfect for sharing and entertaining
    • Highly customizable ingredients

    Conclusion

    Hawaiian chicken sliders bring together everything people love about comfort food in a compact and flavorful form. The combination of juicy chicken, sweet pineapple, melted cheese, and soft buns creates a dish that is both satisfying and memorable. They are easy to prepare, adaptable to different tastes, and perfect for a wide range of occasions.

    Whether you are cooking for family or entertaining guests, these sliders offer a reliable and delicious option that never fails to impress. With just a few simple ingredients and thoughtful preparation, you can create a dish that feels both effortless and special.

    Tags

    chicken recipes hawaiian sliders easy dinner ideas party food bbq chicken slider recipes comfort food

  • Grilled Pineapple BBQ Chicken Recipe  Juicy Sweet and Smoky Chicken Dinner

    Grilled Pineapple BBQ Chicken Recipe Juicy Sweet and Smoky Chicken Dinner

    There is something irresistible about the combination of smoky grilled chicken and caramelized pineapple. The glossy glaze, the charred edges, and the juicy texture all come together to create a dish that feels both indulgent and surprisingly simple. This sweet and savory BBQ pineapple chicken is a perfect example of how a few bold ingredients can transform everyday meals into something memorable.

    Whether you are planning a casual weeknight dinner or hosting a backyard cookout, this dish delivers big flavor with minimal fuss. The balance of tangy barbecue sauce, juicy chicken, and lightly charred pineapple creates a vibrant, tropical-inspired experience that feels fresh, satisfying, and crowd-pleasing.

    Key Takeaways

    • Sweet and smoky flavors create a balanced and crave-worthy dish
    • Grilled pineapple enhances natural sugars for a rich caramelized taste
    • Perfect for summer grilling or quick indoor cooking alternatives
    • Simple ingredients with bold visual and flavor impact
    • Ideal for meal prep, gatherings, or easy weeknight dinners

    The Flavor Profile That Makes It Stand Out

    This dish thrives on contrast. The savory richness of grilled chicken pairs beautifully with the natural sweetness of pineapple. When exposed to heat, pineapple caramelizes, intensifying its flavor and adding a slightly smoky depth.

    The barbecue glaze acts as the bridge between these elements. It brings tanginess, sweetness, and a hint of spice that ties everything together. The result is a layered taste experience that feels complex but remains approachable.

    Important: The key to achieving this flavor balance is not overloading the sauce. Let the natural sweetness of the pineapple shine while the BBQ glaze enhances rather than dominates.

    Choosing the Right Ingredients

    Chicken Cuts That Work Best

    Boneless chicken thighs are often the top choice for this recipe due to their juiciness and ability to stay tender during grilling. Chicken breasts also work well if cooked carefully to avoid dryness.

    • Thighs: Rich flavor and forgiving texture
    • Breasts: Leaner option with a clean taste
    • Tenders: Quick cooking and great for smaller portions

    Fresh vs Canned Pineapple

    Fresh pineapple delivers the best texture and flavor when grilled. It holds its shape and develops a beautiful char. Canned pineapple can still work, especially for convenience, but it may be softer and slightly sweeter.

    The BBQ Sauce Factor

    Your choice of barbecue sauce will shape the final taste. A smoky sauce enhances depth, while a sweeter variety leans into the tropical notes. Experimenting with different blends can create unique variations of the dish.

    Expert Insight

    Layering flavor is essential. Marinate the chicken lightly, grill to develop char, then brush on sauce toward the end to avoid burning while still achieving a glossy finish.

    Cooking Techniques for Maximum Flavor

    Grilling for Smoky Perfection

    Grilling is the most effective way to bring out the dish’s signature flavor. The direct heat creates caramelization on both the chicken and pineapple, enhancing sweetness and adding complexity.

    1. Preheat the grill to medium-high heat
    2. Cook chicken until golden with slight char marks
    3. Add pineapple slices during the last few minutes
    4. Brush BBQ sauce just before finishing

    Indoor Alternatives

    If outdoor grilling is not an option, a grill pan or oven broiler can still deliver excellent results. The key is high heat and proper timing to replicate that caramelized texture.

    Pro Tip: Pat the chicken dry before cooking. This helps achieve a better sear and prevents steaming, which can dull the flavor.

    Serving Ideas That Elevate the Dish

    This BBQ pineapple chicken is versatile and pairs well with a wide range of sides. The goal is to complement the bold flavors without overwhelming them.

    • Steamed rice or coconut rice for a tropical touch
    • Grilled vegetables for a smoky, balanced plate
    • Fresh salads to add brightness and crunch
    • Flatbreads or wraps for a casual serving style

    For presentation, stacking the chicken over grilled pineapple slices creates a visually appealing dish that feels restaurant-worthy. A light drizzle of sauce over the top adds shine and enhances the overall look.

    Why Sweet and Savory Combinations Work

    The appeal of this dish goes beyond taste. It taps into a broader culinary principle where contrasting flavors enhance each other. Sweetness softens the intensity of savory elements, while acidity and smokiness prevent the dish from feeling overly rich.

    This balance makes the meal satisfying without being heavy, which is why it works so well for both casual and special occasions.

    Perfect Occasions for This Dish

    One of the strengths of BBQ pineapple chicken is its adaptability. It fits seamlessly into a variety of settings, making it a reliable go-to recipe.

    • Summer barbecues and outdoor gatherings
    • Quick weeknight dinners with minimal prep
    • Meal prep for flavorful leftovers
    • Family-friendly meals that appeal to all ages

    Important: This dish is especially effective for entertaining because it looks impressive while remaining easy to prepare in batches.

    Quick Points

    • Bold sweet and smoky flavor combination
    • Easy to prepare with minimal ingredients
    • Works on grill, stovetop, or oven
    • Visually appealing and perfect for sharing

    Conclusion

    BBQ pineapple chicken is more than just a meal. It is a celebration of flavor, texture, and simplicity. The combination of juicy grilled chicken, caramelized pineapple, and glossy barbecue glaze creates a dish that feels both comforting and exciting.

    With its vibrant appearance and bold taste, this recipe stands out as a must-try for anyone looking to elevate their chicken dishes. It proves that with the right ingredients and a few simple techniques, you can create something truly memorable right at home.

    Tags

    chicken recipes bbq chicken pineapple chicken grilled chicken easy dinner ideas summer recipes sweet savory meals