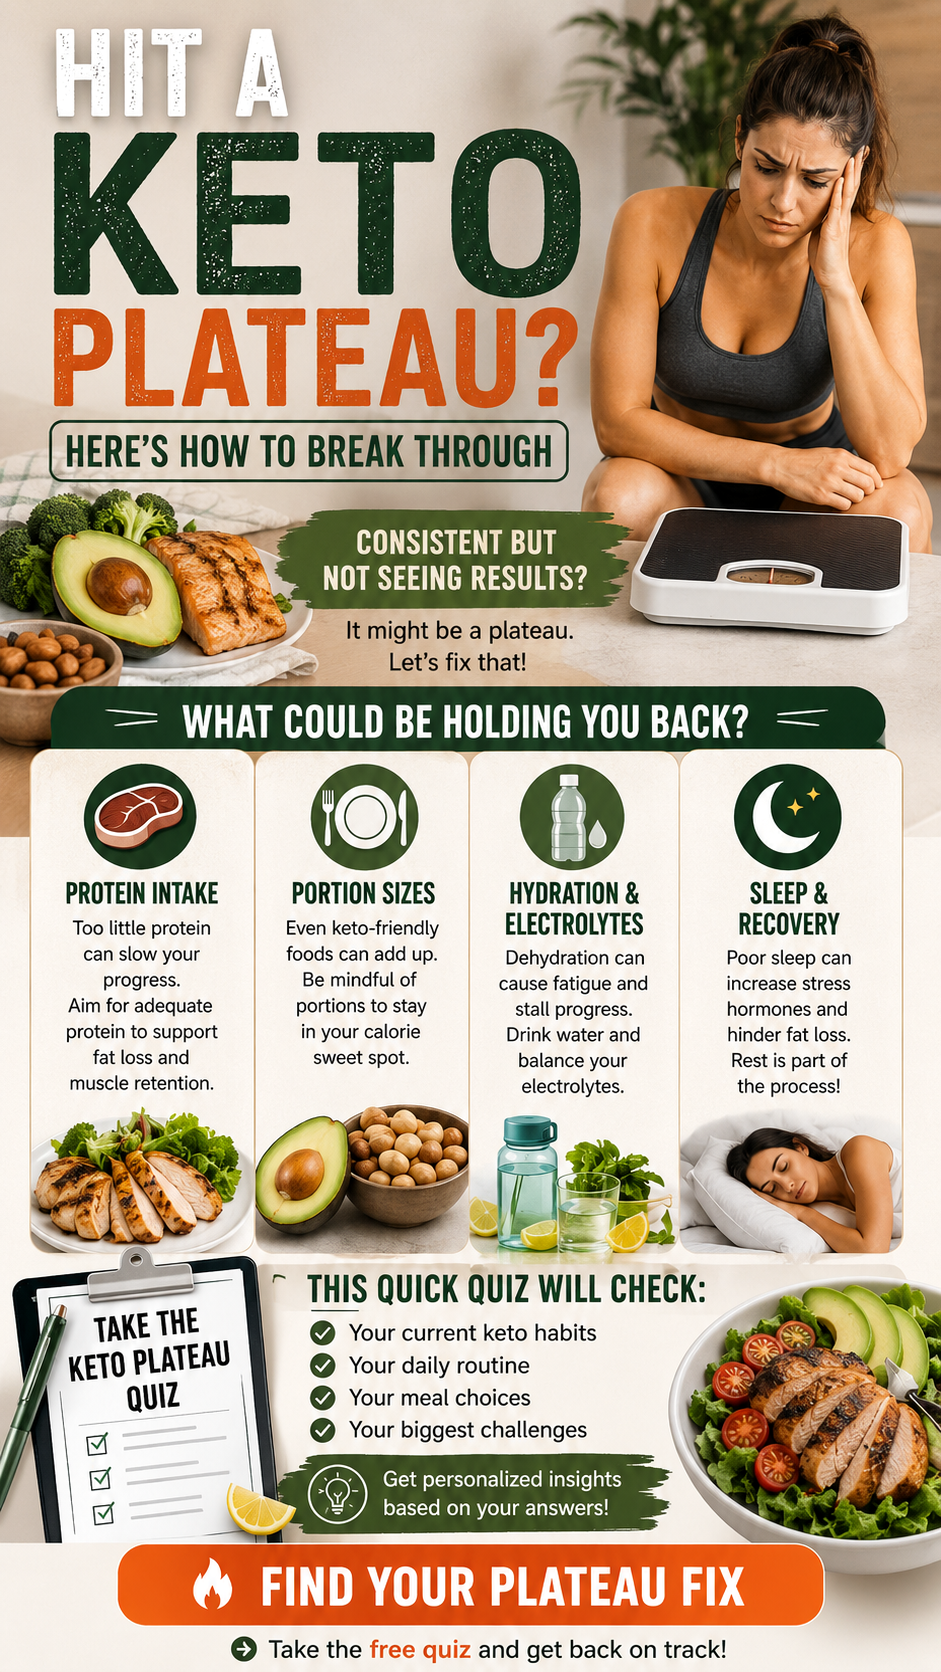
Hitting a keto weight loss plateau can feel frustrating, especially when you’ve been consistent with your meals and healthy habits. Many people experience a period where progress slows or seems to stop, even though they are following a low carb lifestyle. The good news is that a plateau does not necessarily mean your plan has stopped working. It often signals that your body has adapted, making it the perfect time to fine tune your approach. By understanding common causes such as protein intake, portion sizes, hydration, and sleep quality, you can identify small changes that may help you move forward again.
Key Takeaways
- Weight loss plateaus are a normal part of many keto journeys.
- Protein intake plays a major role in preserving muscle and supporting satiety.
- Portion sizes still matter, even with healthy keto foods.
- Hydration and electrolyte balance affect energy and consistency.
- Quality sleep and recovery support long term wellness goals.
- Small adjustments often produce better results than dramatic changes.
Understanding the Keto Plateau
A keto plateau happens when your weight or body measurements remain unchanged for an extended period despite maintaining a ketogenic eating pattern. While this can be discouraging, it is also incredibly common. During the early stages of keto, rapid changes often occur as glycogen stores decrease and excess water leaves the body. Later, progress naturally becomes slower and more gradual.
Your metabolism continuously adapts to changes in body weight, activity levels, and calorie intake. As your body becomes more efficient, the strategies that worked at the beginning may require small adjustments. Rather than viewing a plateau as failure, consider it an opportunity to evaluate your daily habits.
Important: A temporary pause in weight loss does not erase your progress. Consistency over weeks and months matters far more than what happens during a single week.
Why Progress Can Slow Down
Several factors can contribute to slower results, even when you feel committed to your healthy eating plan. Often, more than one factor is involved.
Your Body Has Adapted
As you lose weight, your body requires fewer calories for daily functions. This natural adjustment means your previous eating pattern may no longer create the same calorie deficit.
Hidden Portion Increases
Keto foods such as cheese, nuts, avocado, and healthy oils are nutritious, but they are also calorie dense. Small increases in serving sizes can gradually reduce your overall calorie deficit without you noticing.
Lifestyle Factors
Stress, inconsistent sleep, dehydration, and reduced physical activity can all influence how your body responds to your nutrition plan. Looking beyond food often reveals opportunities for improvement.
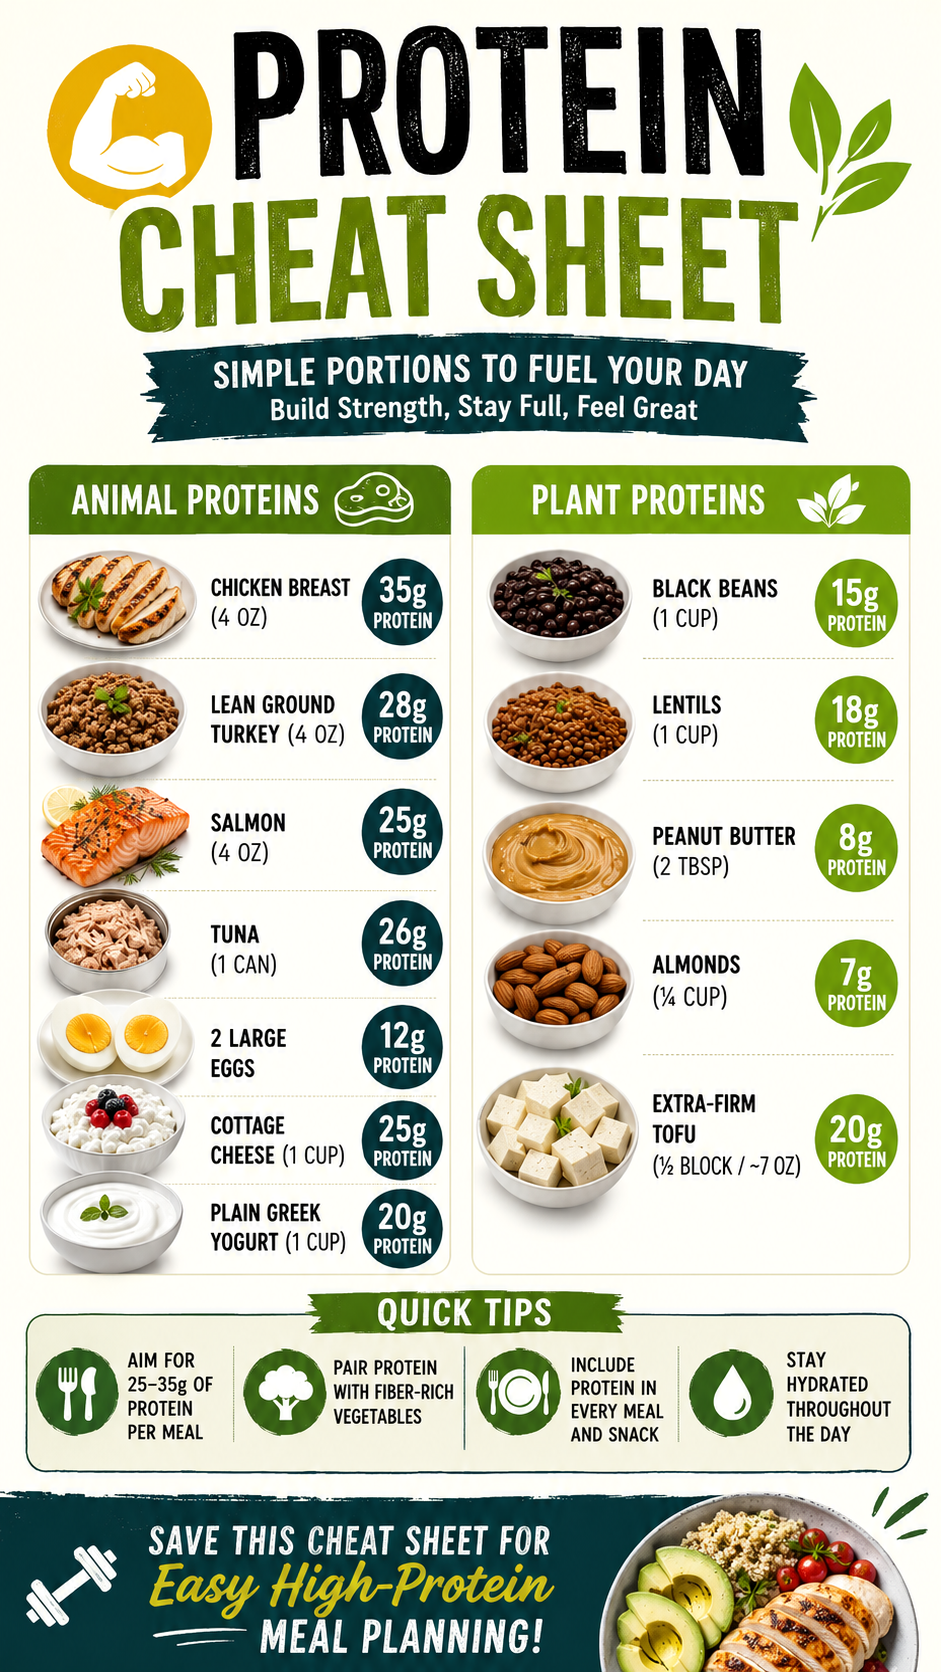
Protein Intake Matters More Than Many People Think
Protein supports muscle maintenance, promotes fullness, and plays an important role during weight loss. Eating too little protein may leave you feeling hungry while making it more difficult to preserve lean muscle.
Include high quality protein sources such as chicken, turkey, fish, eggs, lean beef, seafood, and other protein rich foods that fit your dietary preferences. Distributing protein throughout the day may also help improve satiety.
- Choose protein as the centerpiece of each meal.
- Pair protein with non starchy vegetables.
- Add healthy fats based on your hunger and energy needs.
- Review your intake if you often feel hungry between meals.
Expert Insight
Many people focus only on carbohydrates when following keto. Paying equal attention to protein, hydration, sleep, and overall eating habits often creates a more balanced and sustainable routine.
Portion Sizes Still Count
One common misconception is that portion sizes no longer matter on a ketogenic diet. While keto changes how your body uses fuel, total food intake still influences weight management.
Healthy foods remain healthy, but eating significantly more than your body needs can slow progress. Measuring portions occasionally or using smaller plates can help you become more aware of serving sizes without making every meal feel restrictive.
Pro Tip: Instead of cutting out nutritious foods, focus on mindful eating. Slow down during meals, notice your hunger signals, and stop when comfortably satisfied.
Hydration and Electrolytes Support Better Performance
Water plays a critical role in digestion, energy, exercise performance, and overall well being. People following a low carb eating pattern may need to pay closer attention to hydration because fluid balance can change during keto.
Electrolytes such as sodium, potassium, and magnesium also support normal muscle and nerve function. If you frequently feel tired or sluggish, reviewing your hydration habits may be worthwhile.
Simple Hydration Tips
- Drink water consistently throughout the day.
- Include water rich vegetables in your meals.
- Stay hydrated before and after physical activity.
- Speak with a healthcare professional if you have questions about electrolyte needs.
Do Not Underestimate Sleep and Recovery
Quality sleep influences hormones related to appetite, recovery, and energy. When sleep is limited, healthy routines often become harder to maintain. You may notice increased cravings, lower motivation, and reduced exercise performance.
Creating a consistent bedtime routine, limiting late night screen exposure, and allowing enough time for recovery can support your overall wellness goals.
Important: Nutrition and exercise are powerful, but recovery is equally valuable. Better sleep can improve your ability to make healthy decisions throughout the day.
Other Healthy Habits That Can Help
Increase Daily Movement
You do not need intense workouts every day. Walking, strength training, cycling, or other enjoyable activities can increase energy expenditure while supporting cardiovascular health.
Track Your Progress in Different Ways
The number on the scale tells only part of the story. Consider measuring waist circumference, taking progress photos, monitoring strength improvements, or noticing how your clothes fit.
Review Your Routine Regularly
Small habits can gradually change over time. Revisiting your meal planning, grocery shopping, activity levels, and hydration habits every few weeks can help keep your goals on track.
Questions to Ask Yourself During a Plateau
- Am I eating enough protein each day?
- Have my portion sizes gradually increased?
- Am I drinking enough water consistently?
- Am I getting sufficient sleep most nights?
- Have I reduced my daily activity without noticing?
- Am I expecting progress to happen faster than is realistic?
Building a Sustainable Keto Lifestyle
Long term success comes from creating habits you can maintain. Instead of searching for quick fixes, focus on balanced meals, realistic expectations, regular movement, and consistent self care. A healthy ketogenic lifestyle should support your overall well being rather than becoming a source of constant stress.
Remember that progress is rarely perfectly linear. Some weeks bring visible changes, while others are dedicated to maintaining the healthy habits that make future success possible.
Quick Points
- Stay consistent instead of making drastic changes.
- Prioritize protein, hydration, and quality sleep.
- Watch portion sizes while enjoying nutritious foods.
- Track more than just the number on the scale.
- Celebrate healthy habits along with weight loss progress.
Conclusion
A keto plateau is often a normal phase rather than a permanent obstacle. Reviewing your protein intake, serving sizes, hydration, electrolyte balance, recovery, and daily habits can reveal simple opportunities for improvement. Sustainable progress comes from consistency, patience, and a willingness to make thoughtful adjustments instead of chasing extreme solutions. Stay focused on building healthy routines that fit your lifestyle, and remember that every positive choice contributes to your long term wellness journey.
Tags
Healthy Recipes Keto Diet Weight Loss Plateau High Protein Meals Low Carb Lifestyle Healthy Eating Meal Planning Wellness Tips