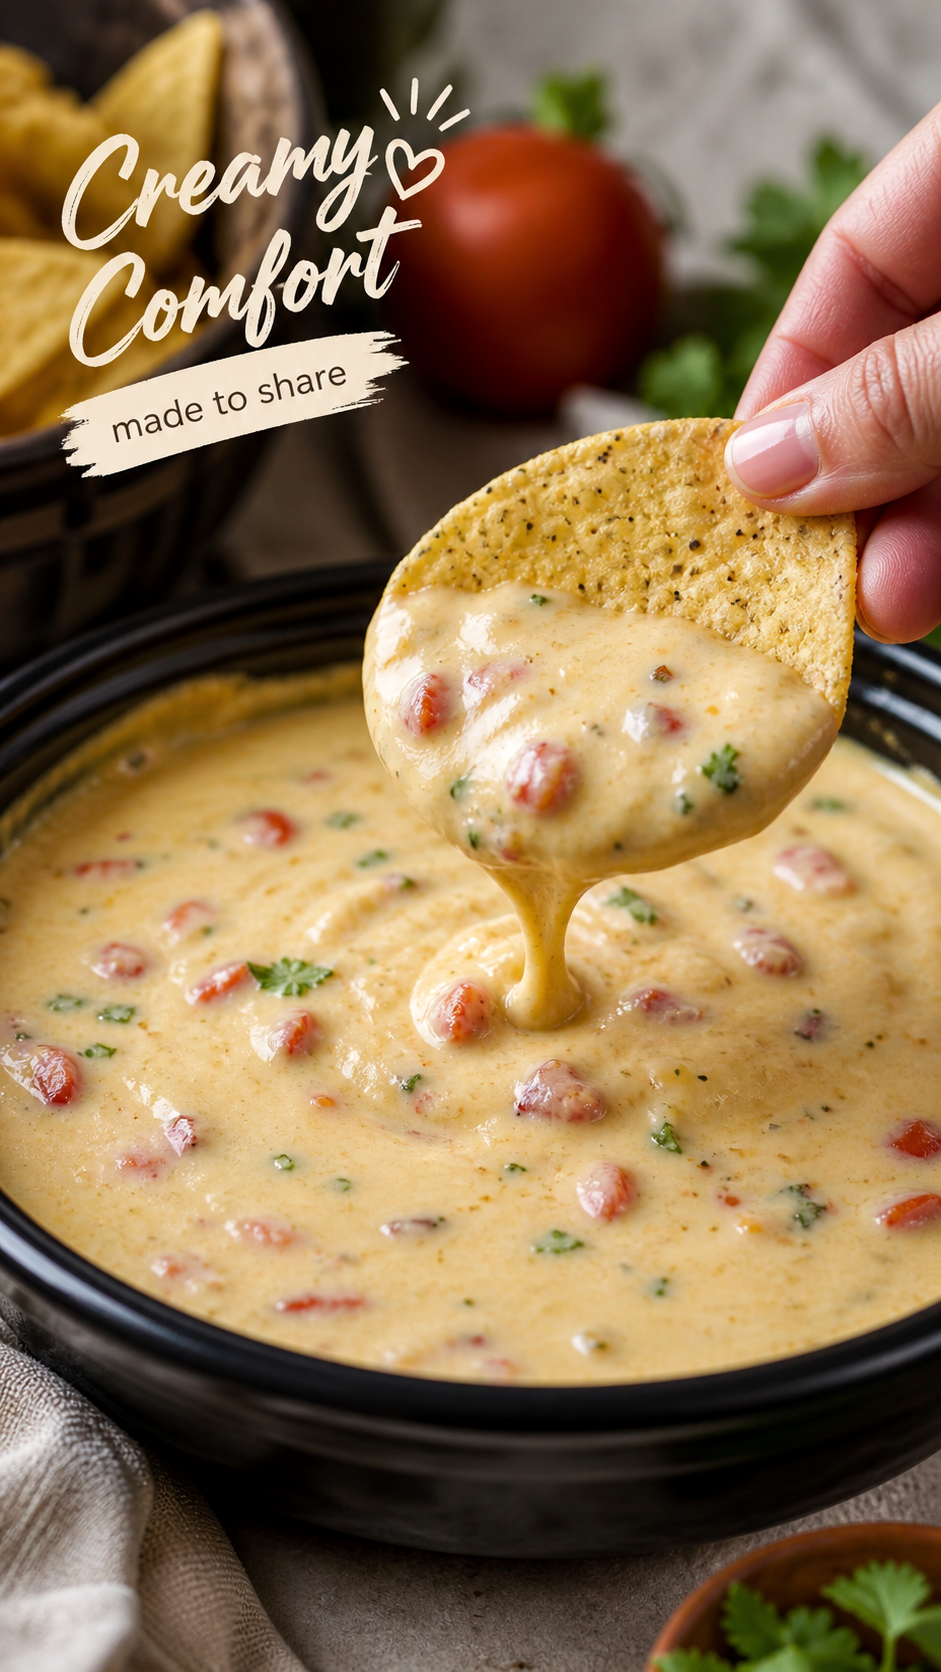
Blog

  • Wholesome Herb Lemon Chicken Soup

    Wholesome Herb Lemon Chicken Soup

    Wholesome Herb Lemon Chicken Soup: A Tropical Delight

    Introduction to Wholesome Herb Lemon Chicken Soup

    Welcome to your new favorite recipe! Wholesome Herb Lemon Chicken Soup is a delightful blend of fresh flavors and nourishing ingredients. If you’re searching for the ideal comfort food, look no further. This vibrant soup recipe isn’t only delicious; it also brings an array of health benefits every time you cook it.

    Whether you’re a busy parent seeking an easy weeknight dinner, a student juggling classes and meals, or a diet-conscious individual craving something wholesome, this recipe is perfect for you. Packed with lean protein, fresh vegetables, and zesty lemon essence, it meets various dietary needs. It’s gluten-free, can be easily adapted to be vegan, and is naturally low in calories. The simplicity of preparation makes it accessible for all home cooks, including those new to the kitchen.

    Moreover, its rich aroma fills your home, inviting your family members to gather around the table. So, grab your ingredients and get ready to refresh your cooking routine with this vibrant, wholesome dish that embodies the essence of comfort in every bite.

    Benefits and Advantages of Wholesome Herb Lemon Chicken Soup

    There are countless reasons to add Wholesome Herb Lemon Chicken Soup to your culinary repertoire. Most importantly, this soup recipe showcases the beauty of simplicity and wholesome ingredients. The process is straightforward, allowing even novice cooks to create a masterpiece without feeling overwhelmed.

    Ease of Preparation

    This delightful soup requires minimal time and effort, making it an excellent choice for busy families or working professionals. The most time-consuming part is chopping the vegetables—you can even prep them in advance for meals throughout the week. Having a big batch ready allows you to serve it warm any time your hunger strikes.

    Health Benefits

    A standout feature of this soup recipe is its numerous health benefits. It’s a nutritious source of protein thanks to the chicken, which helps to build and repair tissues. The fresh vegetables provide essential vitamins like Vitamin A, C, and K, while the herbs offer antioxidant properties. Additionally, the broth can help soothe sore throats and provide warmth during chilly days, making it an ideal comfort food.

    Dietary Flexibility

    This chicken soup is adaptable, catering to different dietary preferences and restrictions. For example, if you prefer plant-based meals, substitute chicken with chickpeas or tofu. Likewise, the recipe can easily transform into a low-carb option by reducing the amount of starchy vegetables.

    Unique Flavors

    The uniqueness of this soup lies in its vibrant lemon flavor, complemented by the richness of chicken and aromatic herbs. This soup recipe transcends traditional comfort food, introducing a refreshing addition that stimulates the taste buds. Creating a jar of homemade soup brings the essence of the tropics to your kitchen.

    In summary, Wholesome Herb Lemon Chicken Soup stands out for its ease of preparation, health benefits, and incredible adaptability, making it the perfect addition to your collection of soup recipes.

    Ingredients Overview

    Essential Ingredients for Wholesome Herb Lemon Chicken Soup

    Here is a thorough list of ingredients you will need to create this delicious and inspiring recipe:

    • 1 lb boneless, skinless chicken breasts (substitute with firm tofu for a vegan option)
    • 4 cups low-sodium chicken or vegetable broth (choose gluten-free broth if needed)
    • 2 cups fresh leafy greens (such as spinach, kale, or Swiss chard)
    • 1 large onion, chopped
    • 2 cloves garlic, minced
    • 2 carrots, sliced
    • 2 celery stalks, sliced
    • 1 medium potato, diced (optional for a heartier soup)
    • 1 teaspoon dried thyme
    • 1 teaspoon dried oregano
    • 1/2 teaspoon black pepper
    • Zest and juice of 1 large lemon
    • 2 tablespoons olive oil
    • Salt to taste

    These ingredients combine to create a nourishing dish that keeps you satisfied. Feel free to adapt the vegetable choices based on what you have available.

    Dietary Substitutions to Customize Your Wholesome Herb Lemon Chicken Soup

    1. Vegan Option: To make a vegan version, replace chicken with firm tofu or chickpeas. The texture of chickpeas closely resembles that of chicken, while tofu takes on the soup’s flavors beautifully.

    2. Gluten-Free Option: Ensure your broth is certified gluten-free. Most commercial broths are naturally gluten-free, but always check the label to be certain.

    3. Low-Calorie Variation: Skip the potatoes or use cauliflower instead for fewer carbs while retaining a hearty texture.

    4. Herb Variations: Experiment with different herbs like rosemary or cilantro to customize the flavor profile to your liking.

    By making these substitutions, you can cater the Wholesome Herb Lemon Chicken Soup to fit any dietary needs you or your guests may have.

    How to Prepare the Perfect Wholesome Herb Lemon Chicken Soup: Step-by-Step Guide

    Creating Wholesome Herb Lemon Chicken Soup is an enjoyable cooking experience suited for all skill levels. Below is a step-by-step guide ensuring that anyone can master this flavorful dish.

    1. Prepare the Base: In a large pot, heat 2 tablespoons of olive oil over medium heat. Add the chopped onion and sauté for about 5 minutes until translucent. Stir in the minced garlic and cook for an additional minute until fragrant.

    2. Add Vegetables: Incorporate the sliced carrots and celery into the pot. Sauté with the onions for another 4-5 minutes, allowing the vegetables to soften slightly.

    3. Cook the Chicken: Add the boneless, skinless chicken breasts to the pot. Pour in the 4 cups of low-sodium chicken or vegetable broth. If you’re using plant-based protein, add it in later, as it requires a shorter cooking time.

    4. Season the Broth: Sprinkle in the dried thyme, dried oregano, and black pepper. Stir well to incorporate the seasonings evenly.

    5. Bring to a Simmer: Increase the heat until the mixture reaches a gentle boil. Reduce the heat and let it simmer uncovered for 20-25 minutes or until the chicken is fully cooked.

    6. Shred the Chicken: Remove the chicken from the pot and let it cool slightly. Shred the chicken with two forks, then return it to the pot. If using tofu, add it at the same time to allow it to absorb the broth’s flavors.

    7. Add Leafy Greens: Toss in your chosen fresh greens—spinach, kale, or Swiss chard—into the soup. Allow them to wilt for about 3 minutes.

    8. Add Lemon Zest and Juice: Finally, stir in the zest and juice of one large lemon, allowing the fresh citrus to brighten the entire dish.

    9. Adjust Seasoning: Taste the soup and adjust seasoning as necessary by adding salt or additional lemon juice.

    10. Serve Warm: Ladle the soup into bowls and enjoy your heartwarming Wholesome Herb Lemon Chicken Soup! It’s perfect served with slices of crusty bread or a fresh salad on the side.

    By following these simple steps, home cooks can successfully whip up this delightful soup that fits any occasion, whether it’s a cozy dinner or a quick lunch.

    Mastering Wholesome Herb Lemon Chicken Soup: Advanced Tips and Variations

    Creating Wholesome Herb Lemon Chicken Soup doesn’t only have to stop at the basic recipe; there are numerous ways to master and enhance your cooking after making it a few times. Here are some valuable tips and variations to elevate your soup to new heights:

    Advanced Tips:

    • Fresh vs. Dried Herbs: While dried herbs provide wonderful flavor, using fresh herbs can enhance the taste significantly. Add fresh herbs like parsley or cilantro at the end to keep that vibrant color and taste.

    • Homemade Broth: If time permits, consider making your own chicken or vegetable broth from scratch. It will add depth of flavor to your soup that store-bought options often lack.

    • Flavor Complexity: For a deeper flavor, toss in a splash of soy sauce or tamari (for gluten-free) towards the end of cooking. This addition creates a delicious umami profile.

    Variations to Try:

    • Asian-inspired Twist: Add a tablespoon of ginger and replace lemon with lime for a Southeast Asian flavor. Incorporating a couple of green onions as garnishes can add a refreshing touch.

    • Creamy Version: For a rich and creamy variation, blend in a cup of coconut milk along with the broth. This twist makes the soup velvety and adds a tropical vibe.

    • Spicy Kick: Add a teaspoon of red pepper flakes or Sriracha sauce for those who prefer a little heat in their soup.

    • Rice or Quinoa Addition: For extra substance, add cooked rice or quinoa to your finished soup. Both not only bulk up your serving but also add beneficial fibers to each bowl.

    These advanced tips and variations make preparing Wholesome Herb Lemon Chicken Soup a delightful culinary adventure. Consider trying them out for an even richer experience!

    How to Store Wholesome Herb Lemon Chicken Soup: Best Practices

    Once you have created a pot of Wholesome Herb Lemon Chicken Soup, knowing how to store it properly is crucial for maintaining its flavor and freshness. Here are some best practices for refrigeration, freezing, and reheating:

    Refrigeration

    • Cool Down: Allow the soup to cool to room temperature before transferring it to an airtight container. This minimizes condensation, which can make the soup watery.

    • Storage Duration: Store the soup in the refrigerator for up to 3-4 days. The flavors will deepen over time, making it an even better option for lunch the next day!

    Freezing

    • Freeze Properly: For longer storage, consider freezing the soup. Use freezer-safe containers or zip-top bags to store portions. Leave space for expansion, especially if using containers.

    • Storage Duration: The soup can be stored in the freezer for up to 3 months. When ready to eat, simply thaw in the refrigerator overnight.

    Reheating

    • Thawing: For frozen soup, ensure it is completely thawed before reheating. You can microwave it, but stovetop reheating is preferred to maintain the texture of the ingredients.

    • Reheating Instructions: Place the soup in a pot over medium heat, stirring occasionally until warmed through. You may need to add a little more broth or water if it has thickened while stored.

    By following these best practices, you can prolong the life of your delicious Wholesome Herb Lemon Chicken Soup and enjoy its comforting essence even on busier days!

    Nutritional Value of Wholesome Herb Lemon Chicken Soup

    When crafting a wholesome dish like this soup, understanding its nutritional profile is essential, especially for the diet-conscious individual. Below is a breakdown of the nutritional value per serving (approximately 1 cup):

    • Calories: 250
    • Protein: 25g
    • Carbohydrates: 15g
      Fiber: 3g
    • Fat: 8g
      Saturated Fat: 1.5g
    • Cholesterol: 70mg
    • Sodium: 480mg
    • Vitamin A: 80%
    • Vitamin C: 90%
    • Calcium: 8%
    • Iron: 10%

    This nutritional breakdown shows that Wholesome Herb Lemon Chicken Soup is rich in protein, offering a satisfying meal while remaining low in calories. The abundance of fresh vegetables contributes vital vitamins and minerals, making it a well-rounded choice for any meal.

    Incorporating this soup recipe into your weekly meal plan ensures that you receive the necessary nutrients while indulging in a comforting dish.

    FAQs: Frequently Asked Questions About Wholesome Herb Lemon Chicken Soup

    1. Can I make Wholesome Herb Lemon Chicken Soup in advance?

    Yes, you can prepare this soup a day or two in advance! The flavors meld together nicely over time, creating an even more delicious dish. Always store it in the refrigerator in an airtight container.

    2. Is it possible to make this soup in a slow cooker?

    Absolutely! For a slow cooker version, place all ingredients into the cooker, cover, and cook on low for 6-8 hours or high for 3-4 hours until the chicken is tender, then shred and return.

    3. What type of broth is best for this soup?

    Low-sodium chicken or vegetable broth is recommended for a healthier option. If sodium is a concern, consider making homemade broth to ensure no added salt.

    4. Can I add other vegetables to the soup?

    Certainly! Feel free to experiment with different vegetables such as bell peppers, zucchini, or green beans based on personal preference or seasonal availability.

    5. How can I make this soup vegetarian?

    To make this a vegetarian soup without compromising on flavor, substitute chicken with chickpeas or lentils. Use vegetable broth and add spices to ensure a delicious taste.

    6. How can I store leftovers?

    Store any leftover soup in airtight containers in the refrigerator for up to 4 days or freeze for up to 3 months.

    Embracing the vibrant flavors of Wholesome Herb Lemon Chicken Soup is a fantastic way to delight your senses while prioritizing health. This soup recipe, with its numerous variations, is easily adaptable to fit every dietary need, making it a must-have for every home cook! So gather your ingredients and start cooking—your body will thank you!

  • My Garden MamaS Secret Recipe For Best Spring Salad

    My Garden MamaS Secret Recipe For Best Spring Salad

    My Garden Mama’S Secret Recipe For Best Spring Salad!: A Tropical Delight

    Introduction to My Garden Mama’S Secret Recipe For Best Spring Salad!

    Spring is the season of renewal, and nothing embodies this rejuvenation quite like a fresh, vibrant salad. My Garden Mama’s Secret Recipe for Best Spring Salad is a delightful blend of colors, flavors, and textures that not only tantalizes your taste buds but also nourishes your body. This recipe stands out as an ideal choice for those looking for quick and healthy spring meals that fit various dietary needs, including vegan and gluten-free options.

    Imagine crisp greens lovingly mingled with juicy fruits, crunchy vegetables, and a drizzle of zesty dressing. This salad is not just a meal; it’s a celebration of spring, bursting with essential nutrients that support your overall health. With simple ingredients and easy preparation, it’s perfect for busy parents, students, and professionals alike. Whether you’re hosting a garden party or simply enjoying a light lunch at home, this spring salad inspires every cook—from newlyweds exploring new recipes, to seniors looking for healthy options to maintain their vigor.

    This recipe brings joy and health to your table, making it truly the best spring salad. So let’s dive into the magic of this colorful dish!

    Benefits and Advantages of My Garden Mama’S Secret Recipe For Best Spring Salad!

    The allure of My Garden Mama’s Secret Recipe for Best Spring Salad goes beyond its vibrant appearance and fresh taste. Here are some compelling reasons why you should try this dish:

    1. Simplicity: Life can be hectic, but preparing a delicious salad shouldn’t add to your stress. This recipe is straightforward, allowing you to whip up a meal in just 15-20 minutes.

    2. Nutritional Powerhouse: Packed with vitamins, minerals, and fiber, this salad is a blessing for your health. The variety of ingredients ensures that you’re receiving a range of nutrients, making it one of the best spring meals for boosting immunity and energy.

    3. Versatility: Whether you’re vegan, gluten-free, or have specific dietary preferences, this salad adapts easily. You can customize it by adding or omitting ingredients, creating a version that fits your lifestyle perfectly.

    4. Seasonal Appeal: Spring is synonymous with fresh produce. The ingredients in this salad are not only seasonal but also support sustainable eating habits, encouraging you to shop locally.

    5. Great for Meal Prep: Busy lives often demand easy meal solutions. This salad can be made ahead and stored in the refrigerator, making it perfect for quick lunches or side dishes throughout the week.

    6. Dietary Friendly: With its naturally gluten-free and vegan options, this salad accommodates everyone at your table. It’s a great way to introduce healthy eating habits to children, making it suitable for families.

    7. Delicious & Refreshing: Finally, and perhaps most importantly, this salad tastes amazing! It’s refreshing and satisfying, making it a wonderful addition to any meal, especially on warm spring days.

    With these astonishing benefits, My Garden Mama’s Secret Recipe for Best Spring Salad is not just another dish—it’s a must-have in your kitchen repertoire!

    Ingredients Overview

    Essential Ingredients for My Garden Mama’S Secret Recipe For Best Spring Salad!

    To create this delightful spring salad, you’ll need the following ingredients:

    1. Mixed Greens (4 cups) – A mixture of spinach, arugula, and romaine provides both nutrition and flavor.
    2. Cherry Tomatoes (1 cup, halved) – These sweet gems are rich in vitamins and add a pop of color.
    3. Cucumber (1 medium, diced) – Crisp and refreshing, cucumbers are hydrating and low in calories.
    4. Red Bell Pepper (1, diced) – Sweet and crunchy, bell peppers enhance the recipe with a burst of vitamins A and C.
    5. Avocado (1, sliced) – Packed with healthy fats, avocado gives the salad a creamy texture.
    6. Pineapple (1 cup, diced) – This tropical fruit adds natural sweetness and is rich in bromelain, promoting digestion.
    7. Red Onion (¼ cup, thinly sliced) – It contributes a sharp crunch and is high in antioxidants.
    8. Toasted Almonds or Walnuts (½ cup) – These nuts add a satisfying crunch and healthy proteins.
    9. Fresh Cilantro (¼ cup, chopped) – Fresh herbs elevate the flavor and offer additional health benefits.
    10. Olive Oil (3 tablespoons) – A heart-healthy fat, olive oil acts as the base for the dressing.
    11. Lemon Juice (2 tablespoons) – Fresh lemon juice adds acidity and balances the flavors beautifully.
    12. Salt and Pepper – To taste.

    This salad is naturally low-calorie and gluten-free. Additionally, it’s accommodating for various dietary needs, making it an excellent choice for spring meals.

    Dietary Substitutions to Customize Your My Garden Mama’S Secret Recipe For Best Spring Salad!

    The beauty of this salad lies in its adaptability to cater to different tastes and dietary needs. Here are some substitution ideas to customize the recipe:

    • Mixed Greens: If you prefer a different base, try kale or baby greens for added nutrients. For a rustic look, you can use arugula or even a grain base like quinoa.
    • Fruits: Instead of pineapple, you can use mangos or strawberries for a change of pace. These alternatives still offer a sweet accent to the salad while providing additional vitamins.
    • Nuts: If you have nut allergies, sunflower seeds or pumpkin seeds are excellent substitutes for crunch and healthy fats.
    • Herbs: Swap cilantro with basil or mint if you prefer different herb flavors, as they also enhance freshness.
    • Oils: If you want a different oil, avocado oil or your preferred nut oil can work similarly while adding unique flavors.
    • Vegan Option: For a protein boost, consider adding chickpeas or black beans instead of nuts.
    • Dairy Option: For those who want creaminess without avocado, feta cheese can be a delightful addition.

    These substitutions ensure that even with the season’s dynamic offerings, you can enjoy My Garden Mama’s Secret Recipe for Best Spring Salad and keep it aligned with your dietary preferences!

    How to Prepare the Perfect My Garden Mama’S Secret Recipe For Best Spring Salad!: Step-by-Step Guide

    Creating a vibrant and healthy spring salad is easy and fun with this detailed step-by-step guide. Follow these simple instructions to prepare My Garden Mama’s Secret Recipe for Best Spring Salad:

    1. Prepare the Base:

    • Begin by washing your mixed greens thoroughly under cold water. Gently pat them dry with a clean towel or use a salad spinner to remove excess water. Place the greens in a large mixing bowl; this will be the foundation of your spring meal.

    2. Chop and Slice Your Vegetables:

    • Dice the cucumber, red bell pepper, and slice the red onion thinly.
    • Remember to halve the cherry tomatoes.
    • Add them all to the bowl with the greens, creating a colorful assembly!

    3. Add the Fruits:

    • Carefully peel and dice the avocado. Add it whole or in slices for a creamier texture.
    • Toss in the diced pineapple as well; its sweetness will balance the savory flavors of your vegetables.

    4. Incorporate the Nuts:

    • If you’re using almonds or walnuts, slightly toast them in a dry pan for 3-5 minutes to enhance their flavor. Let them cool before adding them to your salad for a satisfying crunch.

    5. Mix in the Fresh Herbs:

    • Chop the cilantro and sprinkle it over the salad. This fresh touch will brighten the flavors, adding a culinary lift.

    6. Prepare the Dressing:

    • In a small bowl, whisk together olive oil, lemon juice, salt, and pepper until fully combined. Adjust seasoning to taste for the perfect salad dressing.

    7. Toss Everything Together:

    • Gently pour the dressing over your salad ingredients. Using two large spoons, turn the salad gently to combine all the ingredients without breaking the delicate components.

    8. Taste and Adjust:

    • Before serving, give your salad a small taste test. Adjust any flavors—add more salt, pepper, or lemon juice as needed to enhance the overall taste.

    9. Serve:

    • Serve immediately in individual bowls or on a large platter. Consider garnishing with extra nuts or herbs for presentation.

    10. Enjoy Your Spring Meal:

    • Dig in and enjoy the vibrant flavors and textures of My Garden Mama’s Secret Recipe for Best Spring Salad!

    This refreshing dish can be enjoyed on its own or as a delightful side to various main courses. Remember, this recipe is versatile, so feel free to modify it according to your preferences and dietary requirements.

    Mastering My Garden Mama’S Secret Recipe For Best Spring Salad!: Advanced Tips and Variations

    While My Garden Mama’s Secret Recipe for Best Spring Salad is delicious on its own, you can always elevate it further. Here are some advanced tips and creative variations to enrich your salad-making experience:

    1. Add Protein: Consider adding grilled chicken, tofu, or shrimp for a filling option. This swap turns your salad into a complete meal, perfect for lunch or dinner.

    2. Use Seasonal Ingredients: Based on availability, swap in seasonal vegetables or fruits like asparagus in spring or pomegranate seeds in fall. This not only enhances flavor but supports sustainability.

    3. Spicy Kick: For those who enjoy a bit of heat, finely diced jalapeños or a dash of hot sauce can add an exciting kick to your spring salad.

    4. Cheese Options: Crumbled feta, goat cheese, or even a sprinkle of Parmesan can elevate the dish further. The creamy texture pairs beautifully with the fresh ingredients.

    5. Different Dressings: Experiment with a homemade balsamic vinaigrette or tahini dressing for variety. Each dressing will bring different flavors and complement the vegetables uniquely.

    6. Grains: Incorporate quick-cooking grains like farro, quinoa, or bulgur to make the salad heartier. These not only add texture but provide added nutrients.

    7. Make It a Wrap: For a portable option, fill a whole-grain wrap with your salad ingredients. This creates a healthy lunch that’s easy to take on-the-go.

    8. Create a Salad Bar: If hosting friends, set up a salad bar with various ingredients. This allows each guest to customize their bowl, catering to everyone’s preferences.

    9. Leftover Magic: If you have leftover salad, mix it into scrambled eggs for breakfast or incorporate it into a grain bowl, reducing waste while creating new flavors.

    These mastering tips and variations will help you explore the full potential of My Garden Mama’s Secret Recipe for Best Spring Salad, ensuring that each time you make it, the dish feels fresh and exciting!

    How to Store My Garden Mama’S Secret Recipe For Best Spring Salad!: Best Practices

    Storing My Garden Mama’s Secret Recipe for Best Spring Salad properly will help maintain its freshness and flavor. Here are best practices for refrigerating, freezing, and reheating:

    Refrigeration:

    • Short-term Storage: If you have leftover salad, place it in an airtight container and store it in the refrigerator. Consuming your salad within 1-2 days ensures the freshest taste.
    • Separating Components: If possible, keep the dressing separate until you’re ready to enjoy the leftovers. Mixed greens tend to wilt from the dressing over time, affecting overall texture.

    Freezing:

    • Not Recommended: While many salads don’t freeze well, the mixed greens and fresh ingredients used in this recipe can lose texture and taste once frozen. It’s best to enjoy this salad fresh whenever possible.

    Reheating:

    • Enjoy Cold: The appeal of spring salads typically lies in their fresh, crisp nature; hence, there’s no need to reheat. You can serve it cold or at room temperature for the best experience.

    By following these storage practices, you can enjoy My Garden Mama’s Secret Recipe for Best Spring Salad for days without sacrificing quality, making it one of your go-to spring meals!

    Nutritional Value of My Garden Mama’S Secret Recipe For Best Spring Salad!

    Understanding the nutritional content of your food can help you make informed dietary choices. Below is a breakdown of the nutrition provided by My Garden Mama’s Secret Recipe for Best Spring Salad, serving approximately 4:

    • Calories: 280 kcal
    • Protein: 7g
    • Fats: 20g
      • Saturated Fat: 2.5g
    • Carbohydrates: 23g
      • Dietary Fiber: 8g
      • Sugars: 5g
    • Vitamins and Minerals:
      • Vitamin A: 60% of DV
      • Vitamin C: 80% of DV
      • Calcium: 6% of DV
      • Iron: 10% of DV
      • Potassium: 12% of DV

    This salad is low in calories yet high in fiber, making it an ideal component for those watching their weight or those looking to increase their vegetable intake. With essential vitamins and minerals present, this salad supports immunity, skin health, and energy levels. As a delightful option for any spring meal, it’s sure to impress both health enthusiasts and casual eaters alike!

    FAQs: Frequently Asked Questions About My Garden Mama’S Secret Recipe For Best Spring Salad!

    1. Can I make this salad ahead of time?

    Absolutely! You can prepare the salad ingredients ahead of time, keeping the dressing separate until you’re ready to serve. This will help maintain freshness and prevent sogginess.

    2. Is this salad suitable for a vegan diet?

    Yes! This salad is entirely plant-based, making it a perfect choice for vegan diets. You can easily add chickpeas or sunflower seeds for extra protein!

    3. How can I make this salad gluten-free?

    The ingredients listed are naturally gluten-free; just ensure any added items, like dressings or nuts, are certified gluten-free to avoid cross-contamination.

    4. What can I substitute for avocado if I’m allergic?

    You can omit the avocado entirely and add extra nuts or seeds for creaminess; alternatively, consider using a soft tofu for a similar texture.

    5. How can I modify this recipe if I want a warm salad?

    To modify this salad into a warm dish, grill the vegetables or add roasted items to the story. Tossing the components lightly in a warm dressing can also enhance the flavor.

    6. Can this salad be eaten as a main dish?

    Definitely! By adding protein sources like beans, tofu, or grilled chicken, the salad can easily transform into a satisfying main course.

    7. What are some other dressings that would complement this salad?

    In addition to the basic dressing provided, you can try balsamic vinaigrette, a honey mustard dressing, or even a tahini-based dressing for a different flavor profile.

    8. How should I store the leftover salad?

    Store leftover salad in an airtight container in the fridge for 1-2 days, separating the dressing if possible to preserve freshness.

    With these FAQs, you should now feel well-equipped to explore and enjoy My Garden Mama’s Secret Recipe for Best Spring Salad!


    In conclusion, My Garden Mama’s Secret Recipe for Best Spring Salad is more than just a dish; it is a celebration of the vibrant flavors and health benefits of spring. As we step into the season of renewal, this salad is the perfect accompaniment to your meals, ensuring you eat fresh, feel revitalized, and relish the simplicity of homemade spring meals. Enjoy the freshness, share with loved ones, and spread the joy of healthy eating!

  • Quick Asparagus Pesto Pasta Salad

    Quick Asparagus Pesto Pasta Salad

    Quick Asparagus Pesto Pasta Salad: A Tropical Delight

    Introduction to Quick Asparagus Pesto Pasta Salad

    Are you searching for a quick and healthy dish that can energize your meal regimen? Look no further than our Quick Asparagus Pesto Pasta Salad! This delightful pasta salad is not only a burst of flavor and color, but it is also a wholesome option that fits various dietary needs. Whether you are a busy professional, a caring parent, a student on the go, or simply a lover of good food, this recipe is designed with you in mind.

    Preparing a delicious pasta salad has never been easier. With minimal effort and ingredients, you can whip up a vibrant dish that is perfect for potlucks, picnics, and weeknight dinners. Best of all, this recipe is remarkably versatile — it is vegan, gluten-free, and low in calories, making it suitable for anyone looking to maintain a healthy lifestyle without compromising on flavor.

    So grab your apron and prepare to impress your family and friends. Our Quick Asparagus Pesto Pasta Salad brings together fresh vegetables, aromatic herbs, and satisfying pasta to create a dish that is both nourishing and delightful. Let’s dive into the numerous benefits that this dish has to offer!

    Benefits and Advantages of Quick Asparagus Pesto Pasta Salad

    When it comes to preparing meals, time and health are often a priority. This Quick Asparagus Pesto Pasta Salad excels in both categories. One of the standout features of this delicious dish is its simplicity. With just a handful of ingredients, you can create a satisfying meal that is quick to prepare. This quality makes it perfect for busy parents and working professionals who may not have hours to spend in the kitchen.

    Moreover, the health benefits of this pasta salad are notable. Asparagus is packed with vitamins A, C, and K, as well as fiber and folate, contributing to overall well-being. Coupled with homemade pesto, which is rich in healthy fats from olive oil and nuts, this dish steers you away from processed sauces that are often loaded with preservatives. Transitioning to this homemade option makes it not just tasty but also a guilt-free indulgence.

    In addition to being healthy, this pasta salad is vegan and gluten-free, allowing those with dietary restrictions to enjoy it without worries. You can easily accommodate various preferences by substituting ingredients like pasta for gluten-free options or the nuts in the pesto for seed alternatives.

    To sum it up, our Quick Asparagus Pesto Pasta Salad offers simplicity in preparation, exceptional health benefits, and flexibility for various diets. It’s a well-rounded dish that caters to everyone, making it an ideal addition to your culinary arsenal.

    Ingredients Overview

    Essential Ingredients for Quick Asparagus Pesto Pasta Salad

    To create your Quick Asparagus Pesto Pasta Salad, you’ll need the following ingredients:

    • 8 ounces of pasta (use whole wheat or gluten-free pasta for a healthier option)
    • 1 bunch of fresh asparagus (about 1 pound, preferably thin asparagus)
    • 1 cup of fresh basil leaves
    • 1/4 cup of pine nuts (or use walnuts for a budget-friendly option)
    • 1/2 cup of extra virgin olive oil
    • 2 cloves of garlic (minced)
    • 1 tablespoon of nutritional yeast (for a cheesy flavor in the vegan version)
    • Salt and pepper to taste
    • Juice of 1 lemon (freshly squeezed)

    This ingredients list provides you with a flavorful base for your pasta salad. Be sure to opt for organic produce whenever possible to maximize health benefits and flavor.

    Dietary Substitutions to Customize Your Quick Asparagus Pesto Pasta Salad

    One of the most appealing aspects of this recipe is its adaptability. You can easily customize it based on your dietary needs:

    • Pasta Alternatives: For a gluten-free pasta salad, swap regular pasta for gluten-free varieties like brown rice or quinoa pasta. You can also substitute zoodles (zucchini noodles) if you prefer a low-carb option.

    • Nuts and Seeds: If you have nut allergies or want to keep the dish nut-free, you can replace pine nuts or walnuts in the pesto with sunflower seeds or pumpkin seeds. This adds a unique flavor without compromising texture.

    • Vegan Modifications: The recipe is already vegan, but you can enhance it by substituting the olive oil with avocado oil or adding more nutritional yeast for a heightened cheesy flavor.

    • Protein Boost: To make the salad heartier, consider adding chickpeas or white beans for a protein-packed dish.

    These substitutions ensure that your Quick Asparagus Pesto Pasta Salad fits perfectly into your dietary preferences without sacrificing taste or appeal.

    How to Prepare the Perfect Quick Asparagus Pesto Pasta Salad: Step-by-Step Guide

    Ready to make this delicious pasta salad? Follow this step-by-step guide to success:

    1. Prepare the Base: Start by bringing a large pot of salted water to a boil. Once boiling, add the pasta and cook according to the package instructions until al dente. Drain and rinse under cold water to stop the cooking process. Set aside.

    2. Blanch the Asparagus: While the pasta cooks, prepare the asparagus. Trim the ends, then cut the spears into 1-inch pieces. Blanch them in boiling water for 2-3 minutes until bright green and slightly tender. Immediately plunge them into ice water to retain their vibrant color and stop cooking. Drain and set aside.

    3. Make the Pesto: In a food processor, combine the fresh basil leaves, pine nuts (or chosen nuts), minced garlic, nutritional yeast, and lemon juice. Pulse until finely chopped. With the food processor running, slowly drizzle in the olive oil until smooth and creamy. Adjust the seasoning with salt and pepper.

    4. Mix Ingredients: In a large mixing bowl, combine the cooked pasta, blanched asparagus, and prepared pesto. Toss until everything is evenly coated.

    5. Taste Testing: Taste the salad and adjust seasoning as needed. If you’d like a more tangy flavor, feel free to add more lemon juice or nutritional yeast for added richness.

    6. Chill If Desired: For enhanced flavors, refrigerate the pasta salad for 30 minutes before serving. This allows the flavors to meld beautifully together.

    7. Serve: Transfer the pasta salad to a serving dish and enjoy chilled or at room temperature. It’s perfect as a main dish or a side.

    With these easy steps, you can create a fantastic Quick Asparagus Pesto Pasta Salad that woos your taste buds and delights your friends and family.

    Mastering Quick Asparagus Pesto Pasta Salad: Advanced Tips and Variations

    To truly master your Quick Asparagus Pesto Pasta Salad, here are some advanced tips and variations to elevate your dish:

    • Roasted Asparagus Variation: For a deeper, smoky flavor, consider roasting the asparagus instead of blanching it. Toss the spears in olive oil, salt, and pepper, then roast at 400°F (200°C) for about 15-20 minutes, until tender and slightly caramelized.

    • Add More Veggies: Feel free to mix seasonal vegetables like cherry tomatoes, bell peppers, or even spinach for a wealth of flavors and textures.

    • Cheesy Upgrade: If you’re not strictly vegan, a sprinkle of feta or parmesan cheese can add a creamy, tangy twist to the dish. Just mix it in right before serving.

    • Extra Crunch: For a textural contrast, toss in toasted breadcrumbs or crushed chips for added crunch on top.

    • Herb Variations: While basil is traditional, try swapping in arugula, spinach, or cilantro for a distinct flavor twist.

    These tips create endless possibilities, ensuring that your Quick Asparagus Pesto Pasta Salad remains both exciting and a staple in your meal rotation.

    How to Store Quick Asparagus Pesto Pasta Salad: Best Practices

    After preparing your pasta salad, you might want to make it ahead or store the leftovers. Here are some handy storage tips to keep your Quick Asparagus Pesto Pasta Salad fresh:

    • Refrigeration: Store the pasta salad in an airtight container in the refrigerator. It will stay fresh for up to 3 days. Just be sure to give it a good stir before serving, as the ingredients may settle.

    • Freezing: While you can freeze pasta salads, note that the texture of both the pasta and asparagus may be compromised after freezing. Nonetheless, if you want to prepare ahead, freeze the salad without dressing or freshly made pesto for up to 1 month.

    • Reheating: If you prefer your pasta salad warm, gently heat it in a skillet over low heat, adding in a bit of olive oil or water if it has dried out.

    Storing your Quick Asparagus Pesto Pasta Salad correctly will extend its shelf life, allowing you to savor the deliciousness longer!

    Nutritional Value of Quick Asparagus Pesto Pasta Salad

    Understanding the nutritional profile of your meal is crucial for making informed dietary choices. This Quick Asparagus Pesto Pasta Salad serves up a bounty of health benefits and essential nutrients. Here’s a basic breakdown of its nutrition per serving (based on the recipe serving six):

    • Calories: Approximately 300
    • Protein: 8 grams
    • Fat: 15 grams (mostly healthy fats from olive oil and nuts)
    • Carbohydrates: 35 grams
    • Fiber: 4 grams
    • Vitamins: Rich in vitamins A, C, E, and K from asparagus and basil
    • Minerals: Good source of potassium, magnesium, and iron

    This nutritional profile makes your Quick Asparagus Pesto Pasta Salad a superb choice for a healthy lifestyle.

    FAQs: Frequently Asked Questions About Quick Asparagus Pesto Pasta Salad

    Can I make this pasta salad in advance?

    Yes! You can prepare the Quick Asparagus Pesto Pasta Salad ahead of time. Just store it in the refrigerator for up to 3 days. The flavors may intensify as it sits, making it a great dish to prepare in advance.

    What can I substitute for pine nuts in the pesto?

    If you have allergies or are looking to save money, you can use walnuts, sunflower seeds, or pumpkin seeds in place of pine nuts in the pesto. Each option brings its unique flavor and texture.

    Is this recipe gluten-free?

    Yes! To make a gluten-free pasta salad, all you need to do is use gluten-free pasta. The other ingredients are naturally gluten-free as well.

    Can I add protein to this salad?

    Absolutely! If you want to make your Quick Asparagus Pesto Pasta Salad more filling, consider adding grilled chicken, chickpeas, or tofu for a boost of protein.

    How long does pesto pasta salad last?

    The pasta salad will remain fresh in the refrigerator for about 2-3 days. However, for the best flavor, it’s best enjoyed as soon as possible.

    With this guide, you are all set to create your own Quick Asparagus Pesto Pasta Salad! This dish combines simplicity, taste, and nutritional benefits, making it the ultimate choice for nearly everyone in your life. Enjoy it at home, take it to work or school, and add your unique twist to make it yours!

  • Easy Spring Mix Salad Dressing Recipe

    Easy Spring Mix Salad Dressing Recipe

    Easy Spring Mix Salad Dressing Recipe: A Tropical Delight

    Introduction to Easy Spring Mix Salad Dressing Recipe

    Are you looking for a refreshing addition to your spring meals? The Easy Spring Mix Salad Dressing Recipe is a delightful and vibrant dressing that complements a variety of salads, specifically those featuring leafy greens. With its tropical flair, this dressing allows you to transform your ordinary salad into an extraordinary culinary experience.

    What makes this dressing stand out? Quite simply, it’s exceptionally easy to prepare, making it suitable for busy parents, individuals on the go, or anyone who simply wants to enjoy nutritious food without spending hours in the kitchen. Not only is it versatile and delicious, but it’s also incredibly healthy, being entirely vegan and gluten-free.

    Crafted with simple ingredients, this dressing is a powerhouse of flavor without any guilt. It enhances the natural taste of your greens while providing essential nutrients, making it the perfect choice for health-conscious individuals. Additionally, it caters to various dietary needs—whether you’re a vegetarian, a vegan, or someone looking to cut down on calories, this spring mix dressing has you covered.

    In this article, you will find everything you need to know about this Easy Spring Mix Salad Dressing Recipe, from the key ingredients to expert preparation tips. Get your taste buds ready to embrace this delightful tropical dressing that will elevate all your spring meals.

    Benefits and Advantages of Easy Spring Mix Salad Dressing Recipe

    There are countless reasons to incorporate the Easy Spring Mix Salad Dressing Recipe into your meal planning. First and foremost, its simplicity is remarkable. The recipe requires minimal effort, yet the outcome is nothing short of gourmet. This ease of preparation allows you to whip it up in minutes, making it ideal for busy weeknights or last-minute gatherings.

    One of the significant health benefits of this dressing lies in its fresh, whole ingredients. Compared to store-bought dressings often laden with preservatives and additives, this homemade version enables you to control what goes into your dish entirely. You can enjoy the pure, wholesome flavors that pack more health benefits than their processed counterparts. Utilizing ingredients like extra virgin olive oil, fresh herbs, and citrus juice can provide healthy fats, antioxidants, and essential vitamins.

    Moreover, this dressing shines in its versatility. Perfectly suited for a variety of spring meals, it can pair wonderfully with almost any salad type, from fresh spring mixes to hearty grain salads. The flavor profile is adaptable; whether you prefer a tangy, sweet, or spicy touch, you can easily customize it to your liking. For those with dietary restrictions, the recipe caters to both vegans and gluten-free eaters, making it more accessible to a broader audience.

    Another advantage is the ability to batch-make the dressing. It stores beautifully in your refrigerator, allowing you to enjoy it throughout the week effortlessly. You save time and energy by preparing a larger quantity, ensuring you are prepared for any salad craving or impromptu spring meals that may arise.

    Overall, the Easy Spring Mix Salad Dressing Recipe stands out for its simplicity, healthiness, and versatility. By choosing this homemade option, you can enjoy delicious spring meals while keeping your nutritional goals in check.

    Ingredients Overview

    Essential Ingredients for Easy Spring Mix Salad Dressing Recipe

    To create the delightful Easy Spring Mix Salad Dressing, gather the following essential ingredients:

    • Extra Virgin Olive Oil (1/2 cup)
    • Provides healthy fats and a rich flavor.
    • Vegan, gluten-free, low-calorie.

    • Balsamic Vinegar (1/4 cup)

    • Adds acidity and depth of flavor.
    • Vegan, gluten-free, low-calorie.

    • Dijon Mustard (1 tablespoon)

    • Acts as an emulsifier and enhances the dressing’s taste.
    • Vegan, gluten-free, low-calorie.

    • Honey or Maple Syrup (1 tablespoon)

    • Sweetens the dressing naturally. Option to adjust to taste.
    • Vegan option: Use maple syrup.

    • Garlic Clove, minced (1 clove)

    • Infuses the dressing with a robust flavor.
    • Vegan, gluten-free, low-calorie.

    • Salt and Pepper (to taste)

    • Enhances all the flavors. Adjust to personal preference.
    • Vegan, gluten-free, low-calorie.

    • Fresh Herbs (such as basil or parsley), chopped (2 tablespoons)

    • Adds a vibrant touch and fresh flavor.
    • Vegan, gluten-free, low-calorie.

    These ingredients come together to create a dressing that is not only flavorful but also quite healthy. When shopping for your supplies, strive for the best quality oils and fresh herbs because they significantly impact the overall taste of your dressing.

    Dietary Substitutions to Customize Your Easy Spring Mix Salad Dressing Recipe

    While this Easy Spring Mix Salad Dressing recipe offers a delightful base, it’s also adaptable for varying dietary needs and tastes. Here are some substitutions you might consider:

    1. Oil Options: If you want to reduce calories or opt for a different flavor, you can substitute half of the olive oil with water or vegetable broth. Alternatively, avocado oil provides a similar health benefit and a unique flavor.

    2. Vinegar Variants: Instead of balsamic vinegar, try apple cider vinegar for a slightly tangy twist. Rice vinegar is also an excellent choice for a milder flavor.

    3. Sweeteners: For those avoiding sugar, consider using a sugar-free sweetener like stevia or erythritol. Additionally, you can skip the sweetener entirely for a tangier dressing, which can appeal to those with different taste preferences.

    4. Herb Substitutions: Feel free to play with different herbs such as cilantro, thyme, or dill for a distinctive twist. You can even incorporate spices like chili flakes or smoked paprika for added depth.

    5. Mustard Alternatives: If Dijon mustard isn’t your favorite, you can replace it with yellow mustard or omit it altogether for a lighter dressing.

    Overall, this versatility ensures you can cater the Easy Spring Mix Salad Dressing Recipe to any palate or dietary restriction, enhancing your enjoyment of healthy and satisfying spring meals.

    How to Prepare the Perfect Easy Spring Mix Salad Dressing Recipe: Step-by-Step Guide

    Creating the Easy Spring Mix Salad Dressing is as effortless as it is rewarding. Below is a simple step-by-step guide that guarantees a delicious outcome every time:

    1. Prepare the Base: In a medium-sized bowl or a mason jar, pour 1/2 cup of extra virgin olive oil as the foundation of your dressing. This ingredient adds healthy fats necessary for a nutritious dressing.

    2. Add the Vinegar: Pour in 1/4 cup of balsamic vinegar. This ingredient provides the tanginess and acidity that balances the dressing perfectly.

    3. Incorporate Mustard: Add 1 tablespoon of Dijon mustard. This will help emulsify the oil and vinegar, giving your dressing a smooth consistency.

    4. Sweeten It Up: Drizzle in 1 tablespoon of honey or maple syrup. Adjust depending on your sweetness preference. If avoiding sugar, use your preferred low-calorie sweetener.

    5. Mix in the Garlic: Add a minced garlic clove for an aromatic flavor and additional health benefits. This garlic infusion enhances the depth of taste in your dressing.

    6. Season to Taste: Sprinkle in salt and black pepper according to your liking. Remember, it’s easier to start with less and adjust later.

    7. Freshen with Herbs: Chop 2 tablespoons of your favorite fresh herbs and stir them into the mixture. This step adds a burst of freshness and visually appealing notes to the dressing.

    8. Combine the Ingredients: Whisk the mixture together vigorously, or if you’re using a mason jar, close it tightly and shake until all ingredients meld beautifully. This ensures an even distribution of flavors throughout the dressing.

    9. Taste Test: Always taste your dressing before serving. You may want to tweak flavors by adding more sweetness, acidity, or seasoning as needed.

    10. Store For Later: If you don’t use the dressing immediately, transfer it to an airtight jar or container. Store in the refrigerator for up to one week. If it solidifies, give it a good shake before using.

    Throughout this process, remember that adjusting the flavors according to your dietary needs or preferences is key. This Easy Spring Mix Salad Dressing is incredibly forgiving, so feel free to experiment!

    Mastering Easy Spring Mix Salad Dressing Recipe: Advanced Tips and Variations

    To take your Easy Spring Mix Salad Dressing to the next level, here are some advanced tips and exciting variations to consider:

    1. Infuse Flavors: Experiment with different flavor infusions by letting the garlic steep in the olive oil for a few hours prior to making the dressing. For a citrusy twist, incorporate the zest of a lemon or lime into the mixture, which adds brightness.

    2. Nuts and Seeds: Consider blending in a teaspoon of tahini or a handful of toasted nuts or seeds (like sunflower seeds or pine nuts) to give the dressing an extra depth of flavor and texture.

    3. Creamy Variants: For a creamier dressing option, blend all the ingredients with a dollop of yogurt or vegan mayo for added richness without heavy calories.

    4. Spicy Kick: Add a splash of hot sauce or a pinch of cayenne pepper for those who enjoy a bit of heat.

    5. Fruit-Infused Versions: Blend fresh fruit like strawberries or mango with your dressing for a fruity addition that pairs wonderfully with mixed greens. This fruity variation provides a refreshing twist perfect for hot days.

    6. Serving Suggestions: Try using this dressing not just for salads but also as a marinade for grilled veggies or as a zesty dip for fresh bread. This versatility elevates the dressing’s utility in your spring meals.

    By keeping these tips in mind, the Easy Spring Mix Salad Dressing becomes far more than a simple dressing; it transforms into a canvas for culinary creativity.

    How to Store Easy Spring Mix Salad Dressing Recipe: Best Practices

    Proper storage of your Easy Spring Mix Salad Dressing is essential to maintain its freshness and flavor. Here are some best practices to follow:

    1. Refrigeration: Store the dressing in an airtight container, such as a mason jar, and refrigerate it. It will stay fresh up to one week.

    2. Separation: You may notice the ingredients separate after a few days; simply give the jar a good shake before using to reincorporate the dressing. It is essential to do this because, as homemade dressings do not contain preservatives, settling is entirely natural.

    3. Freezing Options: While it’s not typically recommended to freeze oil-based dressings due to separation during thawing, if you prefer to prepare larger batches, consider freezing in ice cube trays. Once frozen, transfer the cubes to a resealable bag. This approach allows you to use them individually as needed.

    4. Use Fresh Ingredients: Since the dressing contains fresh herbs, ensure you use the freshest ones possible to prolong shelf life. If you plan to store it longer, consider omitting fresh herbs until just before serving.

    By adhering to these storage guidelines, you can ensure that your Easy Spring Mix Salad Dressing remains delicious and ready to enhance your spring meals whenever you need it.

    Nutritional Value of Easy Spring Mix Salad Dressing Recipe

    Understanding the nutritional value of your Easy Spring Mix Salad Dressing is crucial for maintaining a health-conscious diet. Here’s a breakdown of the main nutritional components based on standard servings:

    • Serving Size: 2 tablespoons
    • Calories: Approximately 120 calories
    • Total Fat: 14 grams
    • Saturated Fat: 2 grams
    • Polyunsaturated Fat: 1.5 grams
    • Monounsaturated Fat: 10 grams

    • Cholesterol: 0 mg

    • Sodium: 120 mg
    • Total Carbohydrates: 2 grams
    • Dietary Fiber: 0 grams
    • Sugars: 1 gram

    • Protein: 0 grams

    Health Benefits

    The Easy Spring Mix Salad Dressing is rich in healthy fats, primarily from the olive oil, which can contribute positively to heart health. The presence of antioxidants from ingredients like garlic and fresh herbs aids in enhancing immune function.

    This dressing also contains no refined sugars, which is advantageous for those monitoring their sugar intake. The combination of fresh ingredients provides not just flavor but also essential vitamins needed for a balanced diet.

    By incorporating this dressing into your meals, you enjoy not just a burst of flavor but also numerous health benefits, making it an ideal component of your healthy spring meals.

    FAQs: Frequently Asked Questions About Easy Spring Mix Salad Dressing Recipe

    Q: Can I make the dressing ahead of time?
    A: Yes! In fact, making the dressing ahead of time allows the flavors to meld beautifully. Store it in an airtight container in the refrigerator for up to one week.


    Q: Can I substitute the olive oil?
    A: Absolutely! While olive oil is preferred, you can also use avocado oil, grapeseed oil, or even a blend of oils based on your taste preferences.


    Q: Is this dressing suitable for vegans?
    A: Yes! All ingredients in this Easy Spring Mix Salad Dressing Recipe are vegan-friendly. Ensure you use maple syrup as a sweetener instead of honey.


    Q: What if I don’t have balsamic vinegar?
    A: If balsamic vinegar isn’t available, try substituting it with apple cider vinegar or white wine vinegar for a different flavor profile.


    Q: How can I make this dressing creamier?
    A: For a creamier texture, blend in a dollop of plain yogurt or vegan mayo. This addition will enhance richness while still maintaining a healthy dressing.


    Q: Can I use dried herbs instead of fresh?
    A: While fresh herbs provide superior flavor, you can use dried herbs if needed. Just adjust the quantity, as dried herbs are more concentrated (1 teaspoon of dried herbs equals about 1 tablespoon of fresh).


    Q: Is this dressing gluten-free?
    A: Yes, this dressing is gluten-free, but be sure to check that your mustard does not contain any gluten ingredients if you choose a specific brand.


    In conclusion, the Easy Spring Mix Salad Dressing Recipe is a delightful addition to your culinary repertoire. Its simplicity, healthiness, and adaptability make it a perfect choice for a wide audience. Try it out in your next spring meals, and discover the flavors and health benefits it brings!

  • Cozy Cajun White Chicken Chili Recipe

    Cozy Cajun White Chicken Chili Recipe

    Cozy Cajun White Chicken Chili Recipe: A Tropical Delight

    Introduction to Cozy Cajun White Chicken Chili Recipe

    Are you ready to embark on a culinary adventure that merges comfort food with a kick of flavor? This Cozy Cajun White Chicken Chili recipe will be your new go-to dish for chilly evenings, family gatherings, or meal prep for the week ahead. Imagine a warm bowl of tender chicken, creamy white beans, and a medley of spices that dance on your palate. This chili is not just enjoyable; it’s incredibly versatile too – perfect for busy weeknights or leisurely weekend meals.

    Beyond its delicious taste, there’s a lot to love about this healthy white chicken chili. It packs a nutritional punch, being rich in protein and fiber while low in unhealthy fats. Whether you’re a health-conscious individual or just trying to feed your family something wholesome, this recipe fits the bill. Additionally, it can be easily modified for various dietary requirements—vegan, gluten-free, or even lower-calorie options can easily be accommodated.

    One of the best parts? This white chicken chili comes together in under an hour from start to finish. It’s simple enough for novice cooks yet complex in flavor to satisfy food enthusiasts. So put on your apron and gather your ingredients; your cozy Cajun adventure awaits!

    Benefits and Advantages of Cozy Cajun White Chicken Chili Recipe

    There are countless reasons to love this Cozy Cajun White Chicken Chili recipe. First and foremost, it exemplifies ease of preparation. With straightforward instructions, this dish allows even the most busy of parents or students to whip up a hearty meal without hassle. One-pot simplicity means less time spent washing dishes and more time gathered around the table with loved ones.

    Health benefits are another compelling aspect. This white chicken chili is loaded with lean protein from chicken and fiber from white beans, which can help keep you feeling fuller longer. It’s also a great source of vitamins and minerals thanks to the variety of vegetables mixed into the pot. Moreover, with the spice blend typical of Cajun cuisine, it has antioxidant properties, helping to fight inflammation and boost immunity.

    What makes this chili truly stand out is its versatility. It seamlessly adapts to various dietary needs without sacrificing flavor. Whether you are cooking for a meat lover or a plant-based eater, you can substitute ingredients without worry. The flavors meld beautifully to create a comforting dish that feels indulgent yet is genuinely wholesome. This makes it an excellent option for anyone looking to please a crowd—be it a dinner party, a casual gathering, or just a cozy night in.

    Ingredients Overview

    Essential Ingredients for Cozy Cajun White Chicken Chili Recipe

    To create a delicious white chicken chili, you will require the following essential ingredients:

    • Chicken Breast (1 lb): Lean protein that forms the base of your chili. For a vegan alternative, use firm tofu or tempeh.
    • White Beans (2 cans, drained and rinsed): Provides creaminess and fiber. Cannellini or Great Northern beans are ideal but feel free to use cooked chickpeas as an alternative.
    • Chicken Broth (4 cups): Adds depth of flavor. For a vegetarian version, substitute with vegetable broth.
    • Coconut Milk (1 cup): Gives a creamy texture and subtle sweetness. Low-fat options can be used if you’re watching calories.
    • Onion (1 medium, diced): Adds a foundation of flavor. Can be replaced with shallots if you’re on a low-FODMAP diet.
    • Garlic (4 cloves, minced): A must-have for aromatic depth. Fresh or powdered garlic works well.
    • Bell Peppers (1 red, 1 green, diced): Color and nutrients. Substitute with zucchini or carrots for a veggie version.
    • Cajun Spice Mix (2 tablespoons): This condiment is responsible for the signature flavor. You can buy this or make your own mix with paprika, cayenne pepper, thyme, and oregano.
    • Corn (1 cup, fresh or frozen): Adds sweetness and texture. This is optional but recommend to enhance the chili.
    • Olive Oil (1 tablespoon): For sautéing. Use coconut oil for a tropical twist or omit if cooking with non-stick cookware.

    These ingredients together create a wonderfully fragrant and creamy chili that your family is sure to love!

    Dietary Substitutions to Customize Your Cozy Cajun White Chicken Chili Recipe

    To make sure everyone enjoys this cozy dish, consider the following substitutions:

    • Vegan Option: Replace chicken with extra firm tofu or vegan chick’n strips to still get that satisfying texture. Use vegetable broth instead of chicken broth and opt for cashew cream instead of coconut milk for added richness.
    • Gluten-Free: Ensuring that your broth and any packaged spices are certified gluten-free can easily adapt this recipe for gluten-sensitive individuals.
    • Lower-Calorie Version: Swap out coconut milk for low-fat or unsweetened almond milk, and reduce the quantity of olive oil used.
    • Bean-Free Version: You can omit the beans entirely, increasing the chicken quantity for those following a low-carb diet. Instead, add more vegetables like cauliflower or even sweet potatoes for texture.

    With these simple variations, you can take your Cajun white chicken chili from a classic dish to a personalized masterpiece suitable for a variety of dietary restrictions!

    How to Prepare the Perfect Cozy Cajun White Chicken Chili Recipe: Step-by-Step Guide

    Ready to dive into preparing your very own Cozy Cajun White Chicken Chili? Just follow these simple steps:

    1. Gather Your Ingredients: Start by rounding up all your ingredients from the list above. Having everything on hand makes the process smoother!

    2. Prepare the Chicken: If using chicken breasts, cut them into bite-sized pieces for quicker cooking. Season them lightly with salt and pepper.

    3. Sauté the Vegetables: In a large pot, heat the olive oil over medium heat. Add the diced onion and bell peppers, sautéing until they are soft (approximately 5 minutes). This develops a flavorful base.

    4. Add Garlic: Incorporate the minced garlic into the pot, stirring for about 30 seconds until fragrant. Be careful not to burn it!

    5. Cook the Chicken: Add the seasoned chicken to the sautéed vegetables and cook until the pieces are lightly browned on all sides (about 5-7 minutes).

    6. Mix in the Spices: Sprinkle your Cajun spice mix over the chicken and vegetables. Stir to ensure the chicken and veggies are well coated in the spices.

    7. Combine the Broth and Beans: Pour in the chicken broth, followed by adding the drained white beans. Mix well to combine the ingredients.

    8. Add Coconut Milk: Pour in the coconut milk, stirring until it’s fully incorporated. The coconut milk adds a rich creaminess that’s essential for this chili.

    9. Incorporate Corn: Toss in the corn now, which adds sweetness and texture. Stir everything together and bring the mixture to a gentle simmer.

    10. Simmer: Allow your white chicken chili to simmer for about 20-30 minutes. This gives the flavors time to meld beautifully, and as it cooks, the chili will thicken slightly.

    11. Adjust Seasoning: Taste your chili before serving, adjusting salt, pepper, or Cajun seasoning as needed. This step elevates the dish.

    12. Serve: Ladle the chili into cozy bowls. Top with optional garnishes such as sliced green onions, avocado, or fresh cilantro for an added burst of flavor.

    13. Enjoy: Relish every bite of your homemade Cajun white chicken chili! This dish is perfect for sharing with family or freezing for later.

    By following these detailed steps, you can create a bowl of creamy, comforting chili that appeals to all ages and dietary preferences. Don’t hesitate to experiment with the ingredients to suit your palate!

    Mastering Cozy Cajun White Chicken Chili Recipe: Advanced Tips and Variations

    To truly master your Cozy Cajun White Chicken Chili, consider the following advanced tips and exciting variations:

    • Cooking Method Variations: This recipe can also be made in a slow cooker or an Instant Pot. For slow cooking, combine all ingredients and cook on low for 6-8 hours. For an Instant Pot, use the sauté function for the vegetables and chicken, then add the liquids and beans before sealing the pot and cooking on high pressure for 10 minutes.

    • Flavor Enhancements: For added depth, consider adding a splash of lime juice or vinegar just before serving to brighten the flavors. The acidity balances the creaminess beautifully!

    • Spice Levels: Increase or decrease the Cajun seasoning according to your personal heat preference. Adding diced jalapeños while cooking can also give an extra kick.

    • Garnishing Options: Consider topping your chili with shredded cheese, sour cream, or crushed tortilla chips for added texture and flavor. This adds a delightful crunch and richness to your dish.

    These tips and ideas will not only elevate your cooking skills but can also make each serving of chicken chili a unique experience every time!

    How to Store Cozy Cajun White Chicken Chili Recipe: Best Practices

    If you’re lucky enough to have leftovers, storing your white chicken chili is simple!

    • Refrigeration: Allow the chili to cool to room temperature before transferring it into an airtight container. It will keep in the refrigerator for up to 4 days. When reheating, ensure it reaches a minimum internal temperature of 165°F.

    • Freezing: To freeze, portion the chili into freezer-safe bags or containers, leaving some space for expansion. It can be stored in the freezer for up to 3 months. Thaw overnight in the fridge before reheating on the stove or in the microwave.

    • Reheating Tips: When warming up your chili, add a splash of chicken broth or water if the chili has thickened too much in the fridge. Stir well while heating to ensure it warms evenly.

    These storage tips will guarantee that your Cozy Cajun White Chicken Chili remains delicious and ready to enjoy even days after it’s been cooked!

    Nutritional Value of Cozy Cajun White Chicken Chili Recipe

    Understanding the nutritional value of your meals can help you make educated dietary choices. Here’s a breakdown of the estimated nutritional information per serving (based on a recipe yielding 6 servings):

    • Calories: 320
    • Protein: 25g
    • Carbohydrates: 35g
    • Fiber: 8g
    • Sugars: 3g
    • Fat: 10g
    • Saturated Fat: 4g
    • Sodium: 600mg
    • Cholesterol: 60mg

    This white chicken chili packs a healthy punch, filled with a mix of macronutrients. Feel free to adjust the ingredients to suit specific dietary preferences to enhance the nutritional profile. For instance, using less oil, subbing coconut milk with almond milk, or incorporating more veggies can shift these values favorably.

    FAQs: Frequently Asked Questions About Cozy Cajun White Chicken Chili Recipe

    Q1: Can I make this white chicken chili in advance?

    Absolutely! This dish is perfect for meal prep as it tastes even better the next day. You can make it a day ahead and store it in the refrigerator, allowing the flavors to meld.

    Q2: Is there a vegetarian option for this recipe?

    Yes! Substitute the chicken with tofu or tempeh, and use vegetable broth and cashew cream instead of chicken broth and coconut milk. You’ll get a creamy, satisfying dish that everyone can enjoy.

    Q3: How spicy is this Cajun white chicken chili?

    The spiciness can easily be adjusted by varying the amount of Cajun seasoning or adding fresh jalapeños. Feel free to customize it according to your taste!

    Q4: How long can I refrigerate leftovers?

    You can safely refrigerate the chili for up to 4 days. Make sure to store it in an airtight container for best results.

    Q5: What can I serve with Cajun white chicken chili?

    This chili pairs beautifully with cornbread, rice, or a fresh green salad. You can also top it with avocado, cilantro, or cheese for extra flavor.

    With these FAQs, you’ll be well-equipped to tackle any challenges while preparing your Cozy Cajun White Chicken Chili. Enjoy this hearty and delicious meal with your loved ones, knowing it’s nutritious, customizable, and enjoyable for everyone at the table!

  • Easy Mediterranean Baked Fish Dinner Recipe

    Easy Mediterranean Baked Fish Dinner Recipe

    Easy Mediterranean Baked Fish Dinner Recipe: A Tropical Delight

    Introduction to Easy Mediterranean Baked Fish Dinner Recipe

    Welcome to a delightful culinary journey that will transport your taste buds straight to the sunny shores of the Mediterranean! Our Easy Mediterranean Baked Fish Dinner Recipe combines simplicity, healthfulness, and vibrant flavors to create a meal that caters to various diets. This recipe is ideal for busy home cooks, health-conscious parents, students, food enthusiasts, and anyone looking for easy dinner recipes that don’t compromise on taste or nutrition.

    In just a few simple steps, you can prepare a dish that celebrates the freshness of the sea and the aromatic herbs often found in Mediterranean cooking. It’s perfect for weeknight dinners or special occasions alike. With its emphasis on light, wholesome ingredients, this baked fish dish is simultaneously satisfying and nutritious, making it an ideal choice for those focusing on a balanced diet. Plus, it’s adaptable for gluten-free, low-calorie, or even vegan preferences!

    Imagine flaky fish fillets infused with bright lemon, fragrant garlic, and fresh herbs, baked to perfection while retaining their moisture. This recipe not only highlights the delightful essence of Mediterranean cuisine but also promotes heart health thanks to the omega-3 fatty acids found in fish. So, gather your ingredients, set your oven, and get ready to enjoy a meal that promises both ease of preparation and a taste that tantalizes your palate.

    Benefits and Advantages of Easy Mediterranean Baked Fish Dinner Recipe

    There are countless reasons why our Easy Mediterranean Baked Fish Dinner Recipe stands out among typical dinner options. Here are some of the most significant advantages that make this dish a go-to for a healthy lifestyle:

    1. Health Benefits: This recipe is rich in omega-3 fatty acids, which are essential for heart health and cognitive function. The use of fresh vegetables, herbs, and olive oil further enhances its nutritional profile. Packed with protein and low in unhealthy fats, it aligns perfectly with a variety of dietary concerns.

    2. Ease of Preparation: Tailored for both seasoned cooks and beginners, this recipe necessitates minimal cooking skills but delivers maximum flavor. The fish bakes in just 20-25 minutes, turning a potentially labor-intensive meal into a quick weeknight dinner solution. By simply layering ingredients in one dish, you minimize cleanup while maximizing your time spent enjoying the meal.

    3. Versatile and Adaptive: The beauty of this recipe lies in its versatility. You can easily swap out the type of fish depending on personal preferences or what’s available at your local market. Moreover, the ingredients can be customized to suit gluten-free or vegan diets by using legumes or plant-based protein in place of fish. This adaptability ensures that it can cater to different taste buds and dietary restrictions, making it an inclusive dish for family gatherings or dinner parties.

    4. Flavor Explosion: What sets Mediterranean cuisine apart is its use of bold flavors – think olive oil, lemon juice, garlic, and fresh herbs. This recipe effortlessly showcases these elements, allowing you to experience a culinary delight that’s not only satisfying but also delightfully fragrant.

    5. Perfect for Meal Prep: The Easy Mediterranean Baked Fish can easily be prepared ahead of time. This makes it an excellent choice for meal prepping, ensuring healthy eating even during the busiest weeks. The flavors develop beautifully when stored, making leftovers something to look forward to!

    Overall, the Easy Mediterranean Baked Fish Dinner Recipe encapsulates the magic of quick, healthful dinners without the fuss. Its accessibility makes it a staple dish for everyone — from students to full-time professionals.

    Ingredients Overview

    Essential Ingredients for Easy Mediterranean Baked Fish Dinner Recipe

    To achieve the best results, gather the following ingredients:

    • Fish Fillets (4 pieces, approximately 6 ounces each): Choose a firm white fish like cod, halibut, or tilapia for the best texture. (Gluten-free, Low-calorie)
    • Olive Oil (2 tablespoons): Extra virgin olive oil adds richness and healthy fats. (Vegan, Gluten-free)
    • Lemon Juice (1 lemon’s worth): Freshly squeezed juice brightens the dish. (Vegan, Gluten-free)
    • Garlic (4 cloves, minced): Enhances flavor with its savory depth. (Vegan, Gluten-free)
    • Cherry Tomatoes (1 cup): Halved for sweetness and color. (Vegan, Gluten-free)
    • Bell Peppers (1 cup, sliced): Any color of bell pepper adds crunch and nutrition. (Vegan, Gluten-free)
    • Red Onion (1 medium, sliced): Provides a sharp, sweet aroma when roasted. (Vegan, Gluten-free)
    • Fresh Herbs (1/4 cup each of parsley and basil): For a fresh, fragrant finish. (Vegan, Gluten-free)
    • Salt and Pepper: To taste, elevating the overall flavor. (Vegan, Gluten-free)

    Dietary Note: For a vegan option, the fish can be substituted with firm tofu or chickpeas for a protein-rich alternative that captures the essence of the Mediterranean.

    Dietary Substitutions to Customize Your Easy Mediterranean Baked Fish Dinner Recipe

    Here are a few substitution ideas to cater to different dietary requirements:

    1. Fish Types: If you’re not fond of fish, consider using:
    2. Firm Tofu: Great for a vegan approach.
    3. Chickpeas: Roasted chickpeas are a fantastic plant-based protein alternative that soaks up the Mediterranean flavors well.

    4. Vegetarian Option: Replace fish with:

    5. Grilled eggplant or zucchini slices: Perfect for a hearty vegetarian meal.

    6. Gluten-Free Needs: This recipe is already gluten-free, but ensure that any added sauces or seasonings, like soy sauce or seasoning blends, are also gluten-free.

    7. Herb Alternatives: If you don’t have fresh herbs, dried Mediterranean herb blends can work in a pinch.

    8. Low-Calorie: Use less olive oil and substitute high-calorie ingredients with lower-calorie alternatives, such as:

    9. Cooking spray: Instead of olive oil for roasting.
    10. Zoodles (zucchini noodles): Instead of pasta as a side.

    By allowing yourself the freedom to innovate with the ingredients, this recipe truly becomes an easy and inclusive dining experience for all.

    How to Prepare the Perfect Easy Mediterranean Baked Fish Dinner Recipe: Step-by-Step Guide

    Now that you’ve gathered your ingredients, let’s dive into how to prepare this crowd-pleasing dish!

    1. Prepare the Base: Preheat your oven to 400°F (200°C). Meanwhile, prepare a baking dish by lightly greasing it with a bit of olive oil to prevent sticking.

    2. Assemble Vegetables: In the greased baking dish, arrange cherry tomatoes, bell peppers, and red onion slices in an even layer. This forms a colorful base for the fish and enhances flavors during baking.

    3. Season the Fish: Place the fish fillets atop the layered vegetables. Drizzle the remaining olive oil and lemon juice over the fish. Season generously with salt, pepper, and minced garlic. The garlic will impart an aromatic flavor as it cooks.

    4. Add Fresh Herbs: Sprinkle chopped parsley and basil over the fish and veggies. These herbs will add a delightful freshness to the dish.

    5. Bake to Perfection: Carefully place the baking dish in the preheated oven. Bake for approximately 20-25 minutes or until the fish is opaque and flakes easily with a fork.

    6. Prepare a Side (Optional): While the fish bakes, consider preparing a simple side salad with mixed greens, cucumbers, and a lemon vinaigrette. This adds a refreshing crunch alongside the warm, baked dish.

    7. Serve: Once baked, remove from the oven and let it cool for a minute. Serve the dish warm, spooning some of the roasted vegetables over the fish. Enjoy your delicious Mediterranean meal!

    8. Consider Leftovers: If you have leftovers, gently reheat them in the oven to maintain texture. Adding a splash of fresh lemon juice before serving again can revive the flavors!

    This recipe’s adaptability allows you to create a vibrant meal suited to your taste preferences, all while maintaining its status as one of the easy dinner recipes in your culinary repertoire.

    Mastering Easy Mediterranean Baked Fish Dinner Recipe: Advanced Tips and Variations

    To truly make the most out of your Easy Mediterranean Baked Fish Dinner Recipe, consider the following advanced tips and variations:

    1. Marinating the Fish: For intensified flavors, marinate your fish fillets in olive oil, lemon juice, minced garlic, and herbs for one hour before baking. This extra time allows the seasonings to permeate the fish, making it even more delicious.

    2. Herb Blends: Feel free to experiment with different herbs such as dill or tarragon, which can offer a unique twist to standard flavors.

    3. Additions: Enhance the dish by incorporating olives for a briny kick or capers for extra zing. Both elements will give an authentic Mediterranean vibe.

    4. Side Dishes: Serve the baked fish with a side of couscous, quinoa, or roasted potatoes. These complement the flavors of the fish while providing a wholesome balance.

    5. Grilling Option: On warm days, consider grilling the fish in a foil packet with the vegetables. Simply wrap the ingredients in aluminum foil and grill for about 15-20 minutes; this will give the dish a smoky flavor.

    6. Flavor Boosters: If you enjoy a bit of heat, consider adding crushed red pepper flakes to spice things up.

    Each of these variations encourages you to tailor the recipe to your taste, proving that easy dinner recipes can be classic yet adaptable.

    How to Store Easy Mediterranean Baked Fish Dinner Recipe: Best Practices

    To maximize the freshness and longevity of your Easy Mediterranean Baked Fish Dinner, follow these storage tips:

    1. Refrigeration: Allow the baked fish to cool completely before transferring to an airtight container. This will maintain its texture and flavors. When stored properly, leftover fish can remain fresh for 2-3 days in the refrigerator.

    2. Freezing: For longer storage, wrap the cooled fish tightly with plastic wrap and then securely in aluminum foil before placing it in a freezer-safe container. This option preserves quality for up to 2-3 months.

    3. Reheating: To reheat, it’s best to use the oven to maintain texture. Preheat the oven to 350°F (175°C) and bake the dish for 10-15 minutes until heated through. Adding a splash of lemon juice can help refresh the flavors.

    By implementing these best practices, you ensure that your Mediterranean baked fish remains just as delightful for a second meal.

    Nutritional Value of Easy Mediterranean Baked Fish Dinner Recipe

    When preparing an Easy Mediterranean Baked Fish Dinner, you’re not just enjoying a tasty dish; you’re also investing in your health. Here’s a breakdown of the approximate nutritional values per serving (based on a typical fish fillet with a serving of vegetables):

    • Calories: 300-350 (depending on the specific fish used)
    • Protein: 28g
    • Fat: 15g (with healthy monounsaturated fats from olive oil)
    • Carbohydrates: 10g
    • Fiber: 3g
    • Sugar: 5g
    • Sodium: 300mg (depends on the amount of salt added)

    Overall, this dish helps you intake necessary nutrients while managing caloric intake, making it a wholesome choice among easy dinner recipes.

    FAQs: Frequently Asked Questions About Easy Mediterranean Baked Fish Dinner Recipe

    Q1: Can I use frozen fish in this recipe?
    A1: Absolutely! Just ensure that the fish is fully thawed before cooking to ensure even baking.

    Q2: What vegetables can I add to this dish?
    A2: Feel free to incorporate zucchini, asparagus, or spinach, which can add both flavor and nutritional value to your dish.

    Q3: How can I make this recipe spicier?
    A3: Introduce crushed red pepper flakes or chopped jalapeños based on your heat preference for an added kick.

    Q4: Is this recipe suitable for meal prep?
    A4: Yes! You can prepare this dish in advance, store it in an airtight container in the refrigerator, and enjoy it during the week for quick meals.

    Q5: Can I use other types of fish?
    A5: Certainly! Fish varieties such as salmon, trout, or snapper can offer different flavors and textures. Adjust cooking times accordingly, as firmer fish may require slightly longer baking.

    By addressing these common queries, you provide reassurance to potential cooks looking to delve into making this Mediterranean delight.


    In conclusion, the Easy Mediterranean Baked Fish Dinner Recipe stands as a beacon of simplicity and flavor in the sea of everyday meals. With its customizable ingredients, health benefits, and ease of preparation, it’s a recipe worth embracing. So why wait? Gather your ingredients and indulge in a fresh, vibrant dish that nourishes not just your body but your soul!

  • Cozy Sardinian Herb Soup Healthy Recipe

    Cozy Sardinian Herb Soup Healthy Recipe

    Cozy Sardinian Herb Soup Healthy Recipe: A Tropical Delight

    Introduction to Cozy Sardinian Herb Soup Healthy Recipe

    Are you in search of simple and delicious soup recipes that are both nourishing and satisfying? Look no further than the Cozy Sardinian Herb Soup. This delightful recipe is not just any soup; it is a celebration of vibrant flavors and wholesome ingredients. Inspired by the culinary traditions of Sardinia, this herb soup is packed with health benefits while being exceptionally easy to prepare.

    This recipe shines as a healthy option for various dietary needs, making it perfect for busy parents, students, and health-conscious individuals alike. Whether you’re a cooking novice or a seasoned chef, you’ll find that this herb soup is simple yet sophisticated, delivering a rich flavor that warms the soul.

    Most importantly, it caters to everyone – it’s vegan, gluten-free, and low in calories, ensuring that you can enjoy a comforting bowl without compromising your dietary goals. This Cozy Sardinian Herb Soup is a versatile dish that’s also great for meal prep, making it ideal for a quick lunch or a cozy dinner after a long day.

    So, gather your ingredients and prepare to discover the rich, herbal flavors that can transform any meal into a delightful experience with minimal effort!

    Benefits and Advantages of Cozy Sardinian Herb Soup Healthy Recipe

    The Cozy Sardinian Herb Soup is a remarkable dish that stands out for several reasons. Here are some of its key benefits:

    1. Ease of Preparation: One of the primary attractions of this soup is its straightforward preparation. With minimal chopping and cooking time, you can have a delicious and nutritious meal ready in no time. It’s perfect for busy parents juggling work and family responsibilities, students on a time crunch, or anyone looking for a quick yet hearty meal.

    2. Health Benefits: This herb soup is loaded with nutritious ingredients. Fresh herbs such as parsley, basil, and oregano are rich in vitamins, antioxidants, and anti-inflammatory properties, making the soup health-boosting. Additionally, it’s low in calories and high in fiber, assisting in digestion and helping you feel full.

    3. Vegan and Gluten-Free: The recipe adheres to vegan and gluten-free dietary requirements without sacrificing flavor. This makes it an excellent choice for individuals with dietary restrictions, ensuring that everyone at your table can savor this delightful dish.

    4. Budget-Friendly: Using simple, accessible ingredients, this soup won’t break the bank. It’s a wonderful way to utilize leftover vegetables and herbs, making it not only healthy but also economical.

    5. Versatile: The Cozy Sardinian Herb Soup can be customized to suit individual tastes. You can easily adjust the seasoning, add proteins like tofu or chickpeas, or include seasonal veggies for added variety.

    6. Comforting and Warm: As the name suggests, this soup is cozy! On chilly days, there’s nothing quite like a warm bowl of soup to brighten your mood and bring comfort.

    Overall, this herb-infused soup is an ideal choice for anyone looking for nutritious and satisfying soup recipes that nourish the body and delight the palate.

    Ingredients Overview

    Essential Ingredients for Cozy Sardinian Herb Soup Healthy Recipe

    To create your Cozy Sardinian Herb Soup, you will need the following ingredients:

    • 2 tablespoons olive oil: A heart-healthy fat that adds richness and depth to the dish—considered vegan-friendly.
    • 1 medium onion, diced: This aromatic vegetable forms the base of your soup, providing flavor and sweetness.
    • 2 cloves of garlic, minced: Garlic enhances the soup with its robust flavor and offers numerous health benefits, including anti-inflammatory properties.
    • 4 cups vegetable broth: Offers a flavorful liquid base that is low-calorie and gluten-free.
    • 2 medium zucchinis, diced: Adding low-calorie content while providing bulk and nutrition.
    • 1 cup kale or spinach, chopped: Leafy greens pack in vitamins and minerals, contributing to the soup’s health benefits.
    • 1 cup fresh herbs (parsley, basil, oregano): Essential for the signature Sardinian flavor; these herbs boost the nutrient content.
    • Salt and pepper to taste: Simple seasonings that enhance the soup’s overall flavor.
    • Juice of 1 lemon: Brightens the soup and adds a refreshing acidity that balances the richness.

    For a vegan twist, use nutritional yeast for a cheesy flavor without dairy!

    Dietary Substitutions to Customize Your Cozy Sardinian Herb Soup Healthy Recipe

    The flexibility of this recipe makes it perfect for customization. Here are some substitutions you can consider:

    • Olive Oil: Substitute with avocado oil or coconut oil for a different flavor and health benefits.
    • Onion and Garlic: For those sensitive to alliums, consider using leeks or shallots for milder flavors.
    • Vegetable Broth: If you have homemade stock, feel free to use it, or for added protein, consider using a bean broth.
    • Zucchini: Substitute with diced carrots or sweet potatoes for an alternate texture and sweetness.
    • Kale/Spinach: Any leafy green will work, such as Swiss chard or collard greens.
    • Fresh Herbs: If fresh herbs aren’t available, dried herbs can be used; however, adjust quantities as dried herbs are more potent.
    • Additional Proteins: For a heartier soup, consider adding canned chickpeas or white beans, which also keep the dish vegan-friendly.

    With these substitutions, you can tailor the soup to accommodate your personal preferences or available ingredients.

    How to Prepare the Perfect Cozy Sardinian Herb Soup Healthy Recipe: Step-by-Step Guide

    Now that you have your ingredients ready, let’s dive into the step-by-step guide on how to prepare this delightful soup.

    1. Prepare the Base: Heat the olive oil in a large pot over medium heat. Add the diced onion and sauté until translucent, about 5 minutes. Stir in the minced garlic and cook for an additional minute until fragrant.

    2. Add the Vegetables: Stir in the diced zucchini and cook for another 5 minutes, allowing them to soften.

    3. Pour the Broth: Add the vegetable broth to the pot, bringing it to a simmer.

    4. Incorporate Leafy Greens: Once the broth is simmering, add chopped kale or spinach to the mixture. Let it cook for about 3-4 minutes until the greens are wilted and tender.

    5. Season the Soup: Add your fresh herbs (parsley, basil, oregano) to the pot. Season the mixture with salt and pepper to taste, remembering that the flavors will intensify as the soup simmers.

    6. Let it Simmer: Reduce the heat to low and allow the soup to simmer for about 15-20 minutes. This step helps the flavors meld together beautifully.

    7. Finish with Lemon Juice: Before serving, stir in the juice of one lemon, adjusting to taste. The acidity will elevate the flavors of the soup significantly.

    8. Serve: Ladle the soup into bowls and garnish with additional fresh herbs if desired. You can serve it fresh or allow it to cool before storing for later meals.

    This straightforward process ensures a delicious, healthy soup that fits well with various dietary restrictions. Feel free to adapt the steps as needed based on your ingredients or preferences!

    Mastering Cozy Sardinian Herb Soup Healthy Recipe: Advanced Tips and Variations

    While the Cozy Sardinian Herb Soup is delicious on its own, there are several advanced tips and variations to enhance your culinary experience:

    1. Blend for Creaminess: For a creamier texture, consider puréeing half the soup in a blender and then returning it to the pot. This creates a velvety soup without the need for cream.

    2. Add Protein: To make this soup more filling, include tofu cubes, chickpeas, or lentils. They contribute protein without adding meat, keeping it vegan.

    3. Spice it Up: If you enjoy a little heat, incorporate red pepper flakes or diced jalapeños for a kick.

    4. Cheesy Flavor: To add a cheesy note without dairy, sprinkle nutritional yeast into the soup while cooking.

    5. Herb Variations: Feel free to experiment with different herbs based on your preference or seasonality. Cilantro, dill, or even mint can offer delightful twists to the base flavor.

    6. Garnish Creatively: Top your soup with homemade croutons, a drizzle of olive oil, or even freshly ground black pepper for an extra layer of taste.

    By experimenting with these variations, you can make the Cozy Sardinian Herb Soup uniquely yours while mastering its delicious flavors.

    How to Store Cozy Sardinian Herb Soup Healthy Recipe: Best Practices

    Storing your Cozy Sardinian Herb Soup properly is essential for maintaining its taste and quality. Here are the best practices for refrigeration, freezing, and reheating:

    Refrigeration

    1. Allow the soup to cool to room temperature before transferring it to an airtight container. The soup can be stored in the fridge for 3-5 days.
    2. If you plan to consume it within this time frame, simple reheating on the stove or in the microwave will work well.

    Freezing

    1. To freeze the soup, ensure it is completely cooled before pouring it into freezer-safe containers or bags. Leave some space in the container for expansion as it freezes.
    2. The soup can typically be frozen for 2-3 months without losing its quality.
    3. Label the container with the date and contents for easier identification later.

    Reheating

    1. When ready to enjoy, thaw the soup in the refrigerator overnight or use the microwave for quicker thawing.
    2. Gently reheat it on the stove over medium heat, stirring occasionally until warmed through. If the soup is too thick after freezing, add a splash of vegetable broth or water to achieve the desired consistency.

    Following these storage methods ensures that your Cozy Sardinian Herb Soup remains fresh and delicious for future meals—perfect for meal prep or enjoying your favorite soup recipes anytime!

    Nutritional Value of Cozy Sardinian Herb Soup Healthy Recipe

    Understanding the nutritional content of your dishes is important for maintaining a balanced diet. Here’s a breakdown of the approximate nutritional value of the Cozy Sardinian Herb Soup per serving (based on the recipe serving four):

    • Calories: 150
    • Protein: 4 g
    • Fat: 6 g
    • Carbohydrates: 20 g
    • Fiber: 4 g
    • Sugars: 4 g
    • Sodium: 400 mg

    Nutritional Highlights

    • Low Calorie: At just 150 calories per serving, you can enjoy a hearty meal without worrying about caloric intake.
    • High Fiber: The fiber content sourced from vegetables and herbs promotes healthy digestion and aids in weight management.
    • Vitamins: Rich in vitamins A, C, and K primarily from leafy greens like kale and herbs, the soup contributes significantly to your daily nutritional intake.

    By including the Cozy Sardinian Herb Soup in your meal planning, you can relish a nourishing meal that caters to various dietary preferences while being low in calories and high in essential nutrients.

    FAQs: Frequently Asked Questions About Cozy Sardinian Herb Soup Healthy Recipe

    How can I adjust the flavor of the Cozy Sardinian Herb Soup?

    You can enhance or alter the flavor by adjusting herbs and spices. Adding more garlic, lemon juice, or even soy sauce can create depth. Don’t hesitate to experiment with your favorite seasonings!

    Is this soup suitable for meal prep?

    Absolutely! The Cozy Sardinian Herb Soup stores well in the refrigerator for up to five days and can be frozen for two to three months. This makes it excellent for meal prepping.

    Can I add meat to this soup?

    While the recipe is vegan-friendly, if desired, you can incorporate cooked chicken or sausage for an meaty option. Just ensure it’s fully cooked before adding it to the soup.

    What’s the best way to serve this soup?

    This soup pairs wonderfully with crusty bread for dipping. You can also serve it alongside a fresh salad for a complete meal.

    Are there any alternatives to using vegetable broth?

    Homemade stock or even a light chicken broth can be used as alternatives, providing a different flavor profile while still keeping the soup hearty.

    In conclusion, the Cozy Sardinian Herb Soup is the epitome of comfort food that checks all boxes for health, flavor, and versatility. Embrace the joy of cooking with this easy recipe and indulge in a bowl of warmth and nutrition, inviting friends and family to join you on this delightful flavor journey. Explore the world of soup recipes with this gem, and let it inspire your culinary adventures today!

  • Tasty Grinder Pasta Salad Easy Recipe

    Tasty Grinder Pasta Salad Easy Recipe

    Tasty Grinder Pasta Salad Easy Recipe: A Tropical Delight

    Introduction to Tasty Grinder Pasta Salad Easy Recipe

    Welcome to a delightful culinary adventure with the Tasty Grinder Pasta Salad Easy Recipe! This vibrant and nutritious dish is more than just a simple side; it’s a colorful experience meant to tantalize your taste buds while offering a range of health benefits. Packed with essential nutrients, this pasta salad is not only simple to prepare but also adaptable for various dietary preferences. Whether you’re a busy parent looking to feed your family a delicious meal or a student seeking a quick and filling dish, this recipe is for you.

    What sets this pasta salad apart is its versatility. It can easily be made vegan, gluten-free, or tailored to fit your dietary needs without sacrificing flavor. Imagine a bowl filled with flavorful ingredients, like crisp veggies and tender pasta, paired with a zesty dressing that brings everything together. You might just discover that it is the go-to recipe for any occasion—be it a picnic, a family gathering, or a casual weeknight dinner. Dive in and explore how to make this delightful dish that can cater to home cooks at every skill level.

    Benefits and Advantages of Tasty Grinder Pasta Salad Easy Recipe

    Why choose the Tasty Grinder Pasta Salad Easy Recipe over countless other options? Here are several compelling benefits that demonstrate why this dish is a smart choice for your meals:

    1. Simplicity of Preparation: One of the standout attributes of this pasta salad is its ease of preparation. With minimal cooking involved, even beginners can manage this recipe with confidence. The ingredient list is not overly complicated, making it accessible to those who may feel intimidated by elaborate cooking procedures.

    2. Health Benefits: The ingredients in this pasta salad are carefully selected to maximize nutritional value. Whole-grain pasta reduces refined carbohydrates, while the abundance of fresh vegetables adds fiber, vitamins, and minerals to your meal. Consequently, you’ll not only satisfy your hunger but also contribute positively to your well-being.

    3. Versatility for Various Diets: This pasta salad recipe can be easily adapted to cater to different dietary requirements. For instance, using gluten-free pasta or chickpea pasta as alternatives ensures that those with gluten sensitivities can enjoy it too. Likewise, this dish can be made vegan by swapping out any dairy components for plant-based options, thereby accommodating those on vegan diets.

    4. Ideal for Meal Prep: If you’re a busy parent, student, or working professional, you’ll appreciate that this recipe is perfect for meal prep. Make a large batch at the beginning of the week, and have nutritious lunches or quick dinners ready to go. Simply store the salad in an airtight container, and you’re set for several days of easy meals.

    5. Flavorful Satisfaction: Finally, the blend of textures and tastes in this salad is what makes it truly exceptional. The zesty dressing, combined with crunchy vegetables and tender pasta, creates a refreshing and satisfying dish that pleases the palate, making it an ideal option for entertaining guests or simply treating yourself.

    In summary, the Tasty Grinder Pasta Salad Easy Recipe combines health, simplicity, and flavor, making it an excellent choice for various occasions. Whether you’re a novice in the kitchen or an experienced home chef, you’ll find great joy in preparing this delightful dish!

    Ingredients Overview

    Essential Ingredients for Tasty Grinder Pasta Salad Easy Recipe

    Here’s what you need to create this delicious pasta salad and nourish your body at the same time!

    • Pasta (8 oz.): Choose whole-grain, gluten-free, or chickpea pasta for a healthier option.
    • Cherry Tomatoes (1 cup): Halved; they add a burst of sweetness and juiciness.
    • Cucumber (1 medium): Diced; it brings a refreshing crunch.
    • Bell Peppers (1 cup): Chopped; use a mix of colors for visual appeal.
    • Red Onion (1/2 medium): Finely diced; it adds a zesty flavor that elevates the dish.
    • Black Olives (1/2 cup): Sliced; they introduce a savory depth.
    • Feta Cheese (1/2 cup): Crumbled; (optional for vegan diets; can be substituted with a plant-based cheese).
    • Fresh Parsley (1/4 cup): Chopped; it enhances freshness and flavor.
    • Olive Oil (1/4 cup): For the dressing; use extra virgin for the best flavor.
    • Red Wine Vinegar (2 tbsp): Adds acidity and brightness to the salad.
    • Dijon Mustard (1 tsp): For a tangy kick in the dressing.
    • Salt and Pepper (to taste): Essential seasonings to balance flavors.

    This combination provides an exciting medley of flavors and textures. Plus, incorporating various colors reflects not only the dish’s health benefits but also its visual appeal, making it a feast for the eyes as well as the palate.

    Dietary Substitutions to Customize Your Tasty Grinder Pasta Salad Easy Recipe

    To cater to different dietary needs or if certain ingredients aren’t available, here are some easy substitutions:

    • Pasta Options: Substituting traditional pasta with gluten-free options such as quinoa pasta or spiralized vegetables like zucchini spirals can cater to gluten-sensitive individuals.
    • Dairy Alternatives: For a vegan-friendly version, swap out feta cheese for crumbled tofu seasoned with nutritional yeast or use a favorite dairy-free cheese brand.
    • Vegetable Variations: Feel free to mix up the veggies! You can use broccoli, carrots, or even kale for a different flavor and nutrient profile. Just be sure to combine vegetables that hold up well, so they don’t become soggy.
    • Herb Substitutions: If parsley is unavailable, fresh basil or cilantro can provide a wonderful twist to your dish.
    • Proteins Addition: For added protein, consider incorporating chickpeas or grilled chicken if you are not sticking strictly to vegan or vegetarian diets.

    These substitutions ensure that your Tasty Grinder Pasta Salad can be enjoyed by everyone, regardless of dietary restrictions or personal preferences.

    How to Prepare the Perfect Tasty Grinder Pasta Salad Easy Recipe: Step-by-Step Guide

    Creating the Tasty Grinder Pasta Salad is not only rewarding but also straightforward. Here are simple step-by-step instructions to guide you through the process:

    1. Prepare the Base: Start by boiling a large pot of water. Add a generous pinch of salt and then the pasta. Cook according to package directions until al dente. Drain and rinse under cold water to cool it down. This step is vital to prevent the pasta from becoming mushy.

    2. Chop Fresh Vegetables: While the pasta is cooking, wash and chop the cherry tomatoes, cucumber, bell peppers, and red onion. The freshness of these ingredients will add vibrant flavors and colors to your salad.

    3. Mix the Dressing: In a small bowl, whisk together olive oil, red wine vinegar, Dijon mustard, salt, and pepper. Taste and adjust the seasoning as needed. This homemade dressing is far better than store-bought and allows you to customize flavors.

    4. Combine Ingredients: In a large mixing bowl, add the cooled pasta, along with the chopped vegetables, black olives, and parsley. Stir gently to combine all ingredients without breaking the pasta.

    5. Add Cheese (Optional): If you’re using feta, sprinkle it over the salad now. Gently fold it into the mixture to avoid crumbling too much.

    6. Dress the Salad: Drizzle the prepared dressing over the salad. Begin with a conservative amount and toss gently to combine. You want the pasta salad to be coated without being swimming in dressing.

    7. Taste and Adjust: At this point, taste your pasta salad for seasoning. If it needs more flavor, add a pinch more salt, pepper, or even a dash of red wine vinegar.

    8. Refrigerate: Cover the salad with plastic wrap or transfer it to an airtight container. Refrigerate for at least 30 minutes (or up to a few hours) to allow flavors to meld together. This resting period makes a significant difference in taste.

    9. Serve and Enjoy: Before serving, give the salad a gentle toss to redistribute any dressing that may have settled at the bottom. Garnish with extra parsley or cheese if desired.

    10. Store Leftovers: If there are any leftovers, store the pasta salad in the fridge for up to three days. It makes for a convenient lunch option!

    This straightforward method results in a vibrant and flavorful pasta salad that can cater to many tastes and dietary needs.

    Mastering Tasty Grinder Pasta Salad Easy Recipe: Advanced Tips and Variations

    To take your Tasty Grinder Pasta Salad Easy Recipe to the next level, consider these additional tips and variations that enhance the flavor and nutrition of your dish:

    1. Experiment with Different Pasta Shapes: While rotini or penne works well, try using farfalle (bowtie pasta) for a fun twist. The shape can affect the texture and presentation, making every bite enjoyable.

    2. Mix Up the Dressings: If you’re looking for a different flavor profile, consider swapping out the dressing entirely. A basil pesto or a sesame ginger dressing can impart a unique flair to your pasta salad.

    3. Toast the Nuts: For an added crunch, consider toasting some nuts, like almonds or walnuts, and tossing them in just before serving. They provide healthy fats and a satisfying texture.

    4. Incorporate Seasonal Ingredients: Take advantage of what’s in season! For instance, in the summer, add grilled corn and diced fresh peaches for a fruity twist. In the fall, roasted butternut squash can add warmth and depth.

    5. Spice It Up: If you enjoy heat, consider adding diced jalapeños or a pinch of red pepper flakes to the dressing for a zesty kick.

    6. Add Fruits: Sliced avocados or even berries like strawberries can add a fresh, slightly sweet element to the salad, balancing its savory components.

    By using these tips, you create a dynamic and exciting dish that keeps your palate satisfied and curious.

    How to Store Tasty Grinder Pasta Salad Easy Recipe: Best Practices

    Storing your Tasty Grinder Pasta Salad correctly ensures that leftovers stay fresh and flavorful. Here’s how to do it effectively:

    1. Refrigeration: Store the pasta salad in an airtight container in the refrigerator. It’s best consumed within three days, after which vegetables may lose their crispness, and pasta may become mushy.

    2. Freezing: While it’s not typically recommended to freeze pasta salad because of its creamy and fresh ingredients, you can freeze portions without dressing to extend its shelf life. When you’re ready to enjoy it, thaw in the refrigerator overnight and add fresh dressing and veggies before serving.

    3. Serving Suggestions: If you’re planning to serve this salad at a gathering, consider keeping the dressing separate until just before serving to keep the pasta and veggies crisp.

    Following these storage tips allows you to enjoy your pasta salad over several days without compromising on quality.

    Nutritional Value of Tasty Grinder Pasta Salad Easy Recipe

    Understanding the nutritional value of your meals is essential for maintaining a balanced diet. Here’s a breakdown of the approximate nutritional content per serving (1 cup) of the Tasty Grinder Pasta Salad if prepared as outlined:

    • Calories: 280
    • Protein: 8g
    • Carbohydrates: 40g
    • Dietary Fiber: 5g
    • Total Fat: 12g
    • Saturated Fat: 3.5g
    • Cholesterol: 10mg (if feta cheese is included)
    • Sodium: 320mg

    This pasta salad is an excellent source of vitamins and minerals from the fresh vegetables, while the whole-grain pasta provides complex carbohydrates for sustained energy. With healthy fats from olive oil and the potential for protein from added ingredients like chickpeas or grilled chicken, this dish can easily fit into a range of nutritional diets.

    FAQs: Frequently Asked Questions About Tasty Grinder Pasta Salad Easy Recipe

    1. Can I make this pasta salad ahead of time?

    Yes! One of the advantages of this pasta salad is that it can be prepared ahead of time. In fact, it tastes better after a few hours in the fridge as the flavors meld together.

    2. Is there a gluten-free version of this pasta salad?

    Absolutely! You can substitute traditional pasta with gluten-free pasta options such as quinoa or brown rice pasta. This allows those with gluten sensitivities to enjoy the recipe fully.

    3. What can I substitute for feta cheese?

    If you’re looking for a dairy-free option, use crumbled tofu seasoned with nutritional yeast or your favorite plant-based cheese.

    4. Can I add protein to this salad?

    Certainly! Grilled chicken, canned chickpeas, or even shrimp can easily be added to the pasta salad for an extra protein boost.

    5. How long will leftovers last in the fridge?

    Stored properly in an airtight container, leftovers can typically last up to three days. However, for the freshest taste and texture, enjoy it within the first two days.

    6. Are there any variations I can try?

    Yes! Feel free to experiment with various vegetables, dressings, or even fruits like avocados. Seasonal ingredients can transform this salad into something new and exciting.

    7. Can I serve this salad warm?

    This recipe is best served cold or at room temperature, but if you prefer, you can slightly warm the pasta before mixing in the additional ingredients.

    Embrace the vibrant world of flavors and textures by trying out the Tasty Grinder Pasta Salad Easy Recipe! Enjoy experimenting with its ingredients or relish it as-is; either way, you’ll have a delightful dish that satisfies your hunger while keeping health in mind.

  • The Best Chocolate Chip Cookies Recipe

    The Best Chocolate Chip Cookies Recipe

    The Best Chocolate Chip Cookies Recipe: A Tropical Delight

    Introduction to The Best Chocolate Chip Cookies Recipe

    When it comes to comfort food, few things can rival the classic appeal of chocolate chip cookies. These delightful treats have a unique place in our hearts and kitchens, embodying the balance between sweet, chewy, and slightly crisp. The Best Chocolate Chip Cookies Recipe not only captures that essence but also presents an accessible, simple, and versatile way to indulge in this beloved dessert.

    This recipe shines, making it a popular choice for home cooks, busy parents, students, and even health-conscious individuals. Crafted with wholesome ingredients, the cookies incorporate minimal sugar and can easily adapt to fit vegan or gluten-free diets. The beauty of this chocolate chip cookie recipe lies in its flexibility; you can customize it according to your tastes and dietary preferences.

    With a few basic ingredients and straightforward instructions, whipping up these cookies becomes a delightful experience for everyone involved. Whether you’re baking for a gathering, surprising a loved one, or simply enjoying a cozy evening at home, chocolate chip cookies can be your perfect partner. Join us in exploring this beautiful recipe and discover how easy and rewarding it is to make the best cookies right in your kitchen!

    Benefits and Advantages of The Best Chocolate Chip Cookies Recipe

    The Best Chocolate Chip Cookies Recipe is a standout for numerous reasons. First and foremost, it encourages inclusivity in the kitchen. As a versatile recipe, it accommodates various dietary needs—be it gluten-free, vegan, or low-calorie options—without compromising on flavor. By using alternative ingredients, you can satisfy the cravings of friends and family, ensuring that everyone can enjoy a sweet treat.

    One of the key advantages of this recipe is its simplicity. With just a handful of ingredients, you won’t find yourself overwhelmed. In fact, for busy parents or working professionals, this chocolate chip cookie recipe offers a quick solution to satisfy snack cravings without an elaborate kitchen adventure. Besides, kids love to participate, making it a fun family activity.

    Health benefits stand out as another significant factor. By choosing the right ingredients, such as whole-grain flour or natural sweeteners like coconut sugar, you can create cookies that not only please the palate but also provide nourishment. You and your family can indulge without the guilt often associated with traditional baked goods.

    Finally, this recipe stands out due to its adaptability. You can easily modify it to explore exciting variations like adding nuts, spices, or even fruits. This aspect allows bakers to express creativity and cater to personal preferences, transforming simple chocolate chip cookies into a delightful experience every time.

    Ingredients Overview

    Essential Ingredients for The Best Chocolate Chip Cookies Recipe

    To make the most delightful chocolate chip cookies, you’ll need the following essential ingredients:

    • All-Purpose Flour (2 cups): This forms the base of your cookies, providing structure.
    • Baking Soda (1 teaspoon): This ingredient helps the cookies rise and become fluffy.
    • Salt (½ teaspoon): Enhances the flavor and balances sweetness.
    • Unsalted Butter (1 cup, melted): Adds richness and moisture. For a healthier version, substitute with coconut oil or vegan butter for a dairy-free option.
    • Brown Sugar (¾ cup): This sugar gives the cookies a deeper flavor and chewy texture. Substitute with coconut sugar for a low-calorie approach.
    • Granulated Sugar (¾ cup): Provides sweetness and helps achieve the perfect cookie crisp.
    • Vanilla Extract (1 tablespoon): Enhances the flavors of your cookies.
    • Eggs (2 large): Binds all ingredients together. For a vegan alternative, use aquafaba (3 tablespoons) or flaxseeds (1 tablespoon ground flaxseed mixed with 2.5 tablespoons water).
    • Chocolate Chips (2 cups): The star of the show! Dark chocolate chips are a healthier option, while carob chips can serve as a substitute for those avoiding caffeine.

    Dietary Substitutions to Customize Your The Best Chocolate Chip Cookies Recipe

    To ensure this chocolate chip cookie recipe accommodates various dietary needs, here are some suggested substitutions:

    1. Gluten-Free Option: Replace all-purpose flour with a gluten-free flour blend. Make sure the blend contains xanthan gum, or add ½ teaspoon to help with structure.

    2. Vegan Option: Substitute eggs with flaxseed or chia egg (1 tablespoon of flaxseed/chia seeds mixed with 3 tablespoons of water, set aside until gel-like) and use vegan butter or coconut oil instead of unsalted butter.

    3. Low-Calorie Option: Use a sugar substitute like stevia or erythritol. Additionally, opt for reduced-fat margarine or applesauce in place of butter.

    4. Nut-Free Option: Ensure that any chocolate chips used are nut-free, and you can enhance flavor by adding spices such as cinnamon or nutmeg instead.

    By implementing these thoughtful substitutions, you can enjoy the deliciousness of chocolate chip cookies guilt-free!

    How to Prepare the Perfect The Best Chocolate Chip Cookies Recipe: Step-by-Step Guide

    Creating mouthwatering chocolate chip cookies is easier than you might think! Follow this step-by-step guide to bake the best cookies you’ve ever had.

    1. Preheat the Oven: Begin by preheating your oven to 350°F (175°C). This step ensures that your cookies bake evenly to perfection.

    2. Prepare Your Baking Sheet: Line a baking sheet with parchment paper. This makes transferring the cookies easy and prevents sticking.

    3. Mix Dry Ingredients: In a medium bowl, whisk together 2 cups of all-purpose flour, 1 teaspoon of baking soda, and ½ teaspoon of salt. Set this mixture aside for later.

    4. Cream Butter and Sugars: In a large bowl, combine 1 cup of melted unsalted butter, ¾ cup brown sugar, and ¾ cup granulated sugar. Using an electric mixer, beat until the mixture becomes creamy and light in color, about 2 minutes.

    5. Add Wet Ingredients: To the butter-sugar mixture, add 1 tablespoon of vanilla extract and 2 large eggs (or your vegan substitute). Beat until fully incorporated.

    6. Incorporate Dry Ingredients: Gradually add the dry mixture to the wet mixture, mixing on low speed until just combined. Avoid over-mixing, as this can lead to tough cookies.

    7. Fold in Chocolate Chips: Gently fold in 2 cups of chocolate chips with a spatula or wooden spoon, ensuring they are evenly distributed throughout the dough.

    8. Scoop the Dough: Using a cookie scoop or tablespoon, portion out the dough onto the prepared baking sheet, leaving enough space between each cookie for them to spread as they bake.

    9. Bake: Place the cookie sheet in the preheated oven and bake for 10-12 minutes, or until the edges are golden brown, and the centers are slightly undercooked.

    10. Cool on Wire Racks: Once baked, remove the cookies from the oven and allow them to cool on the baking sheet for 5 minutes before transferring to wire racks to cool completely.

    11. Store: Once cooled, enjoy these delectable cookies right away! For long-term storage, place them in an airtight container.

    The adaptability of this chocolate chip cookie recipe allows you to tweak the ingredients or baking time based on dietary preferences, making it a versatile treat!

    Mastering The Best Chocolate Chip Cookies Recipe: Advanced Tips and Variations

    For those ready to elevate their cookie game, here are some advanced tips and delightful variations to consider:

    • Brown Butter Cookies: For a nutty flavor, brown the butter before mixing it with sugars. Simply heat the butter on medium heat, stirring constantly until it turns golden brown and smells nutty. Allow it to cool slightly before continuing with the recipe.

    • Chill the Dough: Chilling the dough for 30 minutes to 2 hours can enhance the flavor and texture of your cookies. It allows the flavors to meld, resulting in a richer taste.

    • Add Nuts: For a delightful crunch, fold in 1 cup of your favorite nuts, such as walnuts or pecans, along with the chocolate chips.

    • Mix in Other Flavors: Experiment with different types of chocolate chips (milk, dark, white, or even butterscotch chips), or add a teaspoon of espresso powder for a subtle coffee flavor that enhances the chocolate.

    • Stuffed Cookies: Try stuffing your cookies by placing a chocolate piece in the center of the dough ball. This creates a melty, gooey surprise in every bite.

    These tips can transform a classic recipe into unique culinary creations, ensuring that the chocolate chip cookies never become monotonous!

    How to Store The Best Chocolate Chip Cookies Recipe: Best Practices

    Proper storage of your chocolate chip cookies is essential to preserve their taste and texture. Here are some best practices for storing these delightful treats:

    1. Room Temperature Storage: Store cooled cookies in an airtight container on the counter for 3-5 days. This helps retain their freshness, so you can easily enjoy them any time.

    2. Refrigeration: If you’d like to extend their life, consider placing the cookies in the refrigerator. Just keep in mind that chilled cookies may become slightly harder, so let them sit at room temperature for a few minutes before enjoying.

    3. Freezing: For longer storage, freeze your cookies. Place individual cookies in an even layer on a baking sheet and freeze until solid. Then, transfer them to a freezer-safe container or bag, where they’ll last for up to 3 months. When ready to eat, simply thaw them at room temperature or reheat in the microwave for a few seconds.

    These storage techniques will help ensure your cookies stay fresh and delicious, allowing you to savor each bite long after baking.

    Nutritional Value of The Best Chocolate Chip Cookies Recipe

    Understanding the nutritional value of your cookies can help you make informed choices. Below is a rough estimate of the nutritional content per cookie, based on a batch yielding 24 cookies made with conventional ingredients:

    • Calories: 150-200
    • Total Fat: 8-10g
    • Saturated Fat: 5g
    • Cholesterol: 15-25mg
    • Sodium: 90-120mg
    • Total Carbohydrates: 22-25g
    • Dietary Fiber: 1g
    • Sugars: 10-12g
    • Protein: 2-3g

    Keep in mind that these values can vary based on ingredient substitutions and add-ins. For example, using coconut sugar or reducing the amount of sugar can decrease the total calories and sugar content.

    Feel free to explore variations with whole grain flour or use dark chocolate chips to enhance antioxidants and overall health benefits.

    FAQs: Frequently Asked Questions About The Best Chocolate Chip Cookies Recipe

    Q1: Can I use margarine instead of butter?
    Absolutely! You can substitute margarine for butter in equal amounts if you’re looking for a dairy-free option.

    Q2: How do I make my chocolate chip cookies chewy?
    To achieve chewiness, be careful not to overbake your cookies. Removing them from the oven when they are slightly underbaked allows them to retain moisture as they cool.

    Q3: Can I freeze the cookie dough?
    Yes, you can freeze the cookie dough. Scoop the dough into balls and freeze them on a baking sheet. Once solid, transfer them to a freezer bag. When you are ready to bake, you can bake them directly from the freezer—just add a couple of minutes to the baking time.

    Q4: Are there any sugar substitutes that work well for this recipe?
    Sure! Coconut sugar, stevia, or erythritol are excellent sugar substitutes. They can help reduce calorie content while maintaining sweetness.

    Q5: How can I increase the flavor profile?
    Add spices like cinnamon, a pinch of nutmeg, or even espresso powder to amplify the flavor and give your chocolate chip cookies a unique twist.

    Conclusion

    Baking The Best Chocolate Chip Cookies is a delightful experience, allowing you to gather friends, family, or even enjoy some quiet moments by yourself. The versatility of this recipe means you can cater to various tastes and dietary choices while creating a luxurious treat that is both satisfying and comforting. Whether you choose the classic version or experiment with unique variations, chocolate chip cookies are bound to bring joy to your kitchen. So gather your ingredients, preheat that oven, and embark on the sweet journey to cookie perfection! Happy baking!

  • The Best Chewy Chocolate Chip Cookies Recipe

    The Best Chewy Chocolate Chip Cookies Recipe

    The Best Chewy Chocolate Chip Cookies Recipe: A Tropical Delight

    Introduction to The Best Chewy Chocolate Chip Cookies Recipe

    There’s something inexplicably comforting about biting into a warm, chewy chocolate chip cookie. The sweet aroma fills your kitchen, inviting loved ones to gather around and savor each bite. You’ve just stumbled upon the ultimate recipe for chocolate chip cookies that not only satisfies your sweet tooth but also excels in simplicity and health benefits.

    This delectable recipe offers a perfect balance of rich flavor and delightful texture, making it an ideal choice for home cooks, busy parents, students, and anyone looking to indulge their culinary passion without spending hours in the kitchen. What makes this iteration stand out is its versatility – you can easily customize it to suit various dietary needs. Whether you’re looking for a vegan-friendly version or a gluten-free option, this recipe provides simple substitutions to help you create delicious chocolate chip cookies that everyone can enjoy.

    Baking doesn’t need to be complicated or time-consuming. With straightforward steps and readily available ingredients, this recipe will inspire novice bakers and seasoned chefs alike. Join me in creating these scrumptious cookies that are sure to impress friends and family. Plus, they make a great treat for any occasion, from weekend get-togethers to midnight snacks!


    Benefits and Advantages of The Best Chewy Chocolate Chip Cookies Recipe

    Baking the best chocolate chip cookies at home comes with numerous benefits that extend beyond simply satisfying your sweet cravings. Here’s why this recipe should be your go-to when you want a reliable and delicious treat:

    1. Simplicity in Preparation: This recipe features easy-to-follow instructions, making it perfect for beginner bakers or those with limited time. With just a handful of ingredients and a few steps, you can have freshly baked cookies hot from the oven in no time.

    2. Health Benefits: While cookies are often seen as indulgent treats, this recipe allows you to incorporate healthier ingredients that can make them a guilt-free dessert option. You can use whole grain flour instead of all-purpose flour, natural sweeteners like honey or maple syrup, and high-quality chocolate to enhance the nutritional profile of your chocolate chip cookies.

    3. Dietary Adaptability: Whether you’re following a vegan diet, need to avoid gluten, or simply want to lower the calorie count, this recipe can easily be adapted. I’ll share alternatives that you can use to make these cookies fit your dietary needs without sacrificing taste or texture.

    4. Sense of Accomplishment: There’s immense satisfaction that comes from baking a batch of chocolate chip cookies from scratch. The smell of baking chocolate and the joy of sharing with family and friends make for delightful memories.

    5. Versatility: This recipe serves as a base for numerous variations. You can add nuts, dried fruits, or even experiment with different types of chocolate for unique flavor combinations.

    In a world where convenience often takes precedence, creating your own batch of cookies combines enjoyment and creativity. You’ll not only fill your home with a cozy fragrance but also experience the joy that comes from baking and sharing your personal culinary triumphs.


    Ingredients Overview

    Essential Ingredients for The Best Chewy Chocolate Chip Cookies Recipe

    Here’s a detailed breakdown of the ingredients you’ll need to create the best chewy chocolate chip cookies. Each ingredient plays a vital role in achieving that perfect texture and taste.

    1. All-Purpose Flour (2 ¼ cups): The foundation of the cookies, all-purpose flour gives them structure. For a gluten-free option, use almond flour or a gluten-free flour blend.

    2. Baking Soda (1 tsp): This leavening agent helps the cookies rise and gives them that soft, chewy interior.

    3. Salt (½ tsp): A pinch of salt enhances the sweetness of the chocolate and balances flavors beautifully.

    4. Unsalted Butter (1 cup, softened): Butter not only adds flavor but also contributes to the cookie’s chewy texture. For a vegan alternative, substitute with coconut oil or a dairy-free butter substitute.

    5. Brown Sugar (¾ cup): Packed brown sugar retains moisture, lending a rich flavor. You can also use coconut sugar for a less refined option.

    6. Granulated Sugar (½ cup): The combination of both sugars gives the cookies a delightful sweetness while allowing them to crisp up perfectly.

    7. Vanilla Extract (2 tsp): This adds depth to the flavor and enhances the overall taste of the cookies.

    8. Eggs (2 large): Eggs help bind the ingredients, contributing to the chewy texture. For a vegan substitute, use flaxseed meal or an egg replacer.

    9. Chocolate Chips (2 cups): The hero of this recipe! Use semi-sweet, dark, or even vegan chocolate chips based on your preference.

    10. Optional Add-ins: Consider adding chopped nuts, such as walnuts or pecans, or swirl in some peanut butter or butterscotch chips to create your own unique twist.

    Dietary Substitutions to Customize Your The Best Chewy Chocolate Chip Cookies Recipe

    Not only is this recipe adaptable to various palates, but it also accommodates dietary needs. Here are some suggested substitutions to cater to different preferences:

    • Gluten-Free: Use a blend of gluten-free flours, such as almond flour and coconut flour, combined with xanthan gum to mimic the elasticity of traditional flour.

    • Vegan: Substitute butter with a margarine alternative and replace eggs with flaxseed eggs (1 tablespoon of flaxseed meal mixed with 2.5 tablespoons of water per egg).

    • Low-Calorie: Swap out the sugars for stevia or erythritol, and use a light butter substitute. Alternatively, reduce the amount of chocolate chips to cut back on calories without losing flavor.

    • Nut-Free: Omit any nuts in the mix or choose sunflower seeds as a crunchy alternative for those with allergies.

    By using these substitutions, you can create a recipe that aligns perfectly with your dietary needs while still enjoying the classic taste of chocolate chip cookies.


    How to Prepare the Perfect The Best Chewy Chocolate Chip Cookies Recipe: Step-by-Step Guide

    Now that we understand the ingredients, it’s time to roll up our sleeves and dive into the baking process. Follow this step-by-step guide to create the perfect chocolate chip cookies:

    1. Preheat the Oven: Start by preheating your oven to 350°F (175°C). This ensures that the cookies bake evenly.

    2. Prepare the Baking Sheet: Line a baking sheet with parchment paper or a silicone baking mat to prevent the cookies from sticking and to ensure even baking.

    3. Mix Dry Ingredients: In a mixing bowl, combine the all-purpose flour, baking soda, and salt. Whisk together until well combined. This helps to evenly distribute the baking soda and salt throughout the flour.

    4. Cream the Butter and Sugars: In a separate large bowl, use an electric mixer to cream together the softened unsalted butter, brown sugar, and granulated sugar until the mixture is light and fluffy. This usually takes about 3-5 minutes.

    5. Add Eggs and Vanilla: Add the eggs, one at a time, to the butter-sugar mixture, mixing well after each addition. Follow up with the vanilla extract and beat until fully combined.

    6. Incorporate Dry Ingredients: Gradually add the dry ingredient mixture to the wet mixture. Stir just until combined; avoid over-mixing, as this can result in dense cookies.

    7. Fold in Chocolate Chips: Gently fold in the chocolate chips using a spatula or wooden spoon, ensuring they are evenly distributed throughout the dough.

    8. Scoop the Dough: Use a cookie scoop or tablespoon to portion out the dough onto the prepared baking sheet, leaving enough space between each cookie as they will spread while baking.

    9. Bake the Cookies: Place the baking sheet in the preheated oven and bake for 10-12 minutes or until the edges are golden brown and the centers look slightly undercooked. This will help keep them chewy.

    10. Cool the Cookies: Remove the cookies from the oven and let them cool on the baking sheet for 5 minutes before transferring them to a wire rack to cool completely.

    11. Enjoy: Once they’re cooled, dig in and savor your delicious, homemade chocolate chip cookies!

    Feel free to adjust the baking time based on your oven’s characteristics or your preferred level of chewiness. Remember, cookies continue to cook slightly after you take them out.


    Mastering The Best Chewy Chocolate Chip Cookies Recipe: Advanced Tips and Variations

    To take your cookie-making skills to the next level, here are some advanced tips and creative variations to try:

    1. Chill the Dough: For even chewier cookies, consider chilling the dough for at least an hour before baking. This allows the flavors to meld and can enhance texture.

    2. Experiment with Mix-ins: Besides chocolate chips, try adding dried cranberries, toffee bits, or even sea salt on top before baking for an elevated flavor experience.

    3. Vary Chocolate Types: Don’t be afraid to mix different types of chocolate – dark, milk, white, or even a combination of chips and chunks for a delightful texture.

    4. Add Flavor Boosts: Spice things up by incorporating a dash of cinnamon or coffee granules into the dough for a unique twist on the usual cookie flavor profile.

    5. Create Stuffed Cookies: Try stuffing your cookies with peanut butter, Nutella, or chocolate ganache for a decadent treat that takes cookie-making to new heights.

    By incorporating these advanced tips and variations into your baking routine, you’ll not only master the basic chocolate chip cookies but also create endless possibilities that will wow your family and friends.


    How to Store The Best Chewy Chocolate Chip Cookies Recipe: Best Practices

    Proper storage is essential to keep your cookies fresh and chewy. Here are the best practices for storing your homemade chocolate chip cookies:

    1. Room Temperature: Once cooled, store your cookies in an airtight container lined with parchment paper. This will keep them soft for up to a week at room temperature.

    2. Refrigeration: If you want your cookies to last longer, you can refrigerate them. Just ensure they’re in a well-sealed container to prevent drying out. They can stay good for about two weeks in the fridge.

    3. Freezing: To preserve your cookies for an extended period, freezing is the best method. Place the cookies in a single layer in a zip-top freezer bag or container, separating layers with parchment paper. They can be frozen for up to 3 months.

    4. Reheating: When you’re ready to enjoy frozen or refrigerated cookies, let them sit at room temperature for five minutes. Alternatively, you can microwave them for about 10-15 seconds to restore their softness.

    By following these storage tips, you can enjoy your homemade chocolate chip cookies whenever the craving strikes!


    Nutritional Value of The Best Chewy Chocolate Chip Cookies Recipe

    Understanding the nutritional value of your homemade chocolate chip cookies can help you enjoy them guilt-free. The nutritional content may vary based on the specific ingredients you choose, but here’s a general idea for one cookie (based on a standard recipe):

    • Calories: 150
    • Total fat: 7g (Saturated fat: 4g, Trans fat: 0g)
    • Cholesterol: 25mg
    • Sodium: 100mg
    • Total carbohydrates: 22g (Dietary fiber: 1g, Sugars: 10g)
    • Protein: 2g

    Health Considerations:

    • Fiber Intake: Incorporating whole grain flour can increase the fiber content.
    • Sugar Alternatives: Using natural sweeteners or reducing sugar can improve the overall health profile.
    • Fat Content: Opting for healthier fats, like coconut oil or nut butters, may enhance nutritional value.

    Being informed about the nutritional profile allows you to enjoy these chocolate chip cookies without compromising your dietary goals!


    FAQs: Frequently Asked Questions About The Best Chewy Chocolate Chip Cookies Recipe

    Q: Can I substitute the butter with margarine?
    A: Yes, you can use margarine as a substitute for butter in the recipe.

    Q: What can I use instead of eggs for vegan cookies?
    A: Flaxseed meal or chia seeds mixed with water can serve as a great egg substitute in vegan recipes.

    Q: How can I make my cookies chewier?
    A: To achieve a chewier consistency, you can increase the brown sugar ratio, chill the dough before baking, or slightly underbake them.

    Q: Can I freeze the cookie dough?
    A: Absolutely! You can scoop out the dough onto a baking sheet to freeze individual cookie portions. Once frozen, transfer to a zip-top freezer bag for up to three months.

    Q: How long can I store baked cookies?
    A: Baked cookies can typically be stored at room temperature in an airtight container for up to a week.

    Enjoy experimenting with this fantastic recipe for chocolate chip cookies and happy baking!