Blog

  • Cozy Blackberry Dumplings Recipe

    Cozy Blackberry Dumplings Recipe

    Cozy Blackberry Dumplings Recipe: A Tropical Delight

    Introduction to Cozy Blackberry Dumplings Recipe

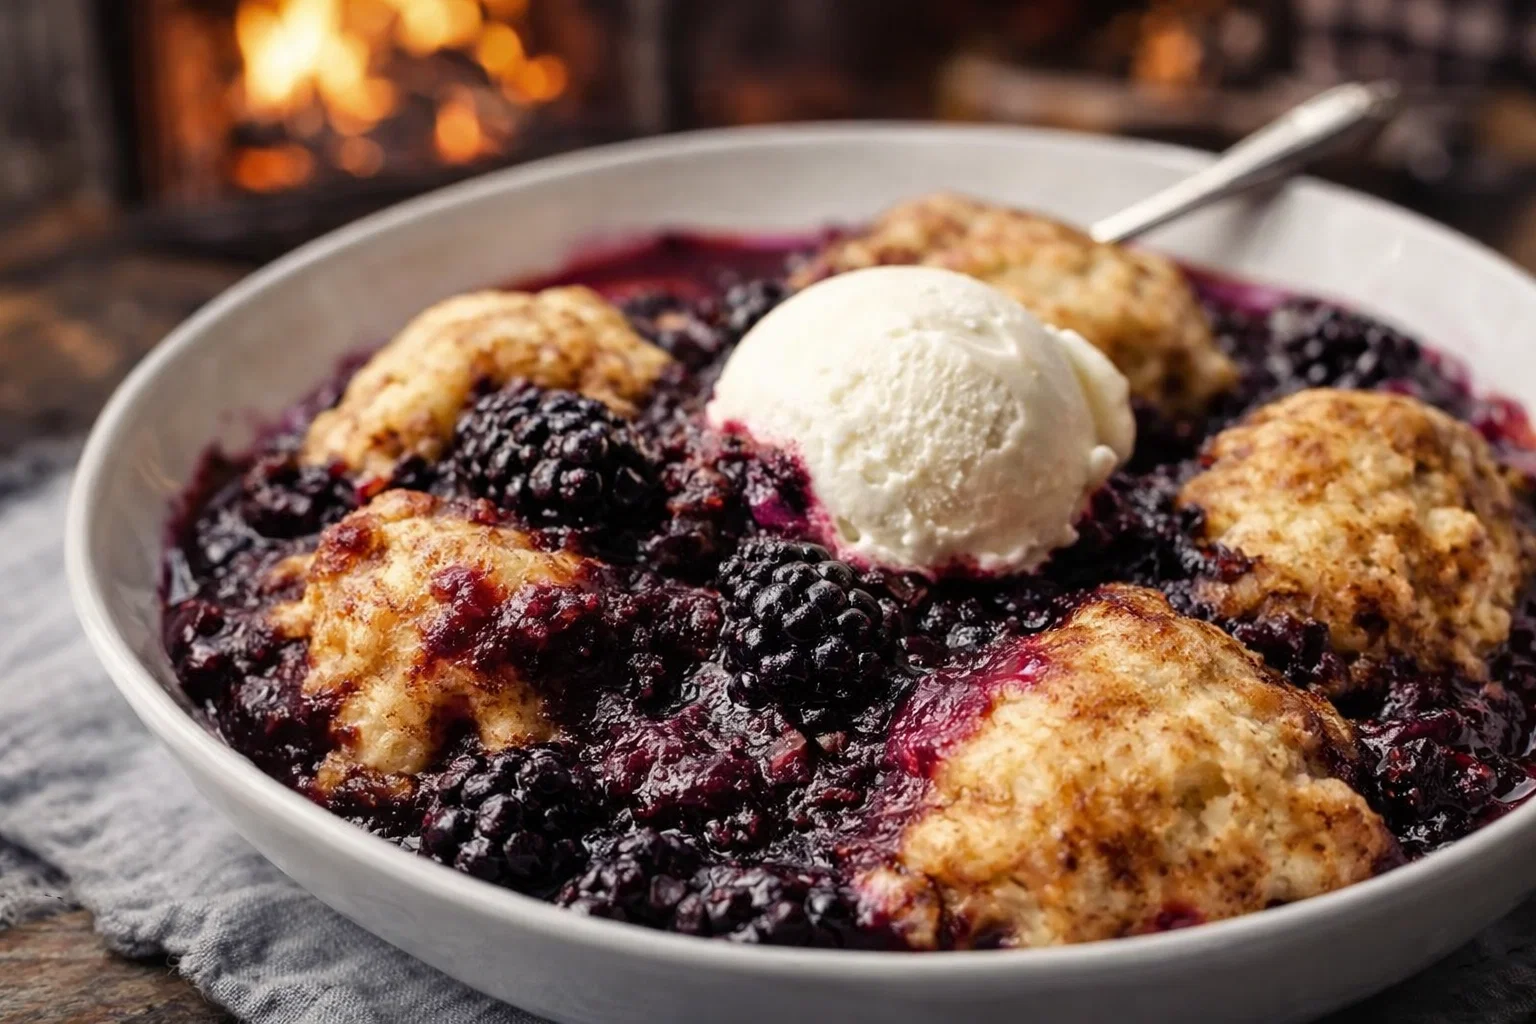
    When it comes to dessert recipes, few things can inspire a sense of warmth and happiness quite like cozy blackberry dumplings. This delightful dish perfectly marries the sweetness of ripe blackberries with tender, fluffy dumplings, making it the ideal treat for family gatherings or quiet evenings at home. Not only is it a heartwarming dessert, but it’s also impressively simple to prepare and can be made to suit a variety of dietary needs, including vegan and gluten-free options.

    Blackberries are not only delicious but also pack a nutritious punch. They are rich in antioxidants, vitamins, and fiber, making them a smart choice for a health-conscious dessert. Preparing these dumplings from scratch involves common pantry ingredients, allowing even busy parents or novice bakers to whip up this dish effortlessly.

    Imagine serving warm dumplings that cushion juicy blackberries at the center, drizzled with a hint of maple syrup or dusted with powdered sugar. With such an inviting, cozy vibe around this recipe, it’s no wonder it has become a favorite among food enthusiasts and newlyweds alike. By following this recipe, you’ll create a dessert that feels comforting yet sophisticated—a perfect end to any meal.

    Benefits and Advantages of Cozy Blackberry Dumplings Recipe

    One of the most appealing aspects of the cozy blackberry dumplings recipe is its ease of preparation. Utilizing straightforward techniques makes this dessert accessible for home cooks at any skill level. The steps are uncomplicated, allowing a busy parent or a student to create a remarkable dish without fuss. This accessibility is a hallmark of great dessert recipes; the best ones are made simple so anyone can enjoy them.

    Health Benefits

    Blackberries, the star of this dish, are not just tasty; they also provide numerous health benefits. These berries are low in calories yet high in essential vitamins such as Vitamin C and K. Additionally, they contain a wealth of dietary fiber, promoting digestive health and a feeling of fullness, making them a guilt-free indulgence. This cozy dumpling recipe also serves as a healthier alternative to traditional pastries that often load up on sugars and fats.

    Given its versatility, this dish appeals to various dietary lifestyles, including those who seek low-calorie, vegan, or gluten-free options. Whether you’re a working professional, a baking enthusiast, or a health-conscious traveler, you will find this recipe easy to adapt.

    The cozy blackberry dumplings can quickly transform into a breakfast option when paired with yogurt or a delightful afternoon snack. Not to mention, unlike many complex dessert recipes, you can incorporate personal twists to customize it to your liking effortlessly.

    Ingredients Overview

    Essential Ingredients for Cozy Blackberry Dumplings Recipe

    Crafting cozy blackberry dumplings requires basic ingredients that you probably already have in your kitchen. Here’s what you’ll need:

    1. Fresh Blackberries (4 cups)
      These provide the juicy, sweet contrast that perfectly balances out the dumplings.

    2. All-Purpose Flour (2 cups)
      The foundation of your dumpling dough. A gluten-free flour mix can substitute this.

    3. Baking Powder (2 tsp)
      This helps the dumplings rise and achieve their fluffy texture.

    4. Granulated Sugar (1/2 cup)
      Add sweetness to your dumplings and balance the tartness of the blackberries.

    5. Salt (1/4 tsp)
      Enhances the flavors of the other ingredients and should not be overlooked.

    6. Plant-Based Milk (1 cup)
      A vegan-friendly option can be almond milk, oat milk, or coconut milk.

    7. Vegan Butter or Coconut Oil (1/4 cup)
      This keeps the dumpling dough rich and moist. For a lower-calorie alternative, use unsweetened applesauce.

    8. Lemon Juice (2 tbsp)
      Brightens the flavors and complements the blackberries beautifully.

    Note: For those who are counting calories, you can opt for a sugar substitute or a sugar-free version of the syrup for topping, making this a flexible dessert recipe.

    Dietary Substitutions to Customize Your Cozy Blackberry Dumplings Recipe

    • Vegan Substitutes: Replace butter with coconut oil or an oil blend, and use plant-based milk to retain the creamy texture without any animal products.

    • Gluten-Free Option: Substitute all-purpose flour with a gluten-free flour blend. Add a few extra tablespoons of baking powder to ensure that your dumplings still rise well.

    • Lower Sugar: Using unsweetened applesauce or a natural sugar alternative can reduce calories while still ensuring flavor. Adjust the sugar level according to personal preference, especially if your blackberries are particularly ripe.

    These substitutes allow everyone to enjoy this delightful dessert while adhering to their dietary needs without sacrificing taste.

    How to Prepare the Perfect Cozy Blackberry Dumplings Recipe: Step-by-Step Guide

    Follow these simple, easy-to-understand steps to prepare the perfect batch of cozy blackberry dumplings.

    1. Prepare the Blackberries:
      Start by rinsing the blackberries gently under cold water. Remove any stems or leaves and set them in a bowl. Toss with 2 tablespoons of sugar and a splash of lemon juice. Allow them to sit while you prepare the dumplings, letting the flavors meld.

    2. Mix Dry Ingredients:
      In a large bowl, combine the all-purpose flour, baking powder, granulated sugar, and salt. Whisk until evenly mixed. For a gluten-free alternative, use your preferred gluten-free flour blend.

    3. Blend Wet Ingredients:
      In another bowl, mix the plant-based milk, melted vegan butter or coconut oil, and remaining lemon juice. Stir until smoothly combined.

    4. Combine Mixtures:
      Form a well in the center of the dry ingredients. Gradually pour the wet mixture into the well and stir using a wooden spoon until a dough starts forming. Be careful not to overmix; a few lumps are fine.

    5. Shape the Dumplings:
      Use a spoon or ice cream scoop to portion the dough into rounds. The size is up to you, but about 2 tablespoons works well for a fluffy, bite-sized dumpling.

    6. Assemble and Cook:
      In a large pot or deep skillet, bring about 2 cups of water or vegan-friendly broth to a gentle simmer. Drop in the dumplings, ensuring they float on the surface. Allow them to steam with a lid on for 15-20 minutes, or until they become fluffy. Optionally, you can stir in the macerated blackberries or spoon them over the top once the dumplings are steamed.

    7. Serve Warm:
      Spoon the warm blackberry mixture over the dumplings. Dust with powdered sugar or drizzle with maple syrup for an added touch of sweetness. Enjoy your cozy dessert!

    Adaptation for Dietary Needs

    If needed, you can modify this recipe: opt for lower-sugar options, swap non-dairy milk to fit personal preferences, or even experiment with different fruits like raspberries or blueberries for a unique twist on this beloved dessert.

    Mastering Cozy Blackberry Dumplings Recipe: Advanced Tips and Variations

    To truly make the most of your cozy blackberry dumplings, consider these tips and variations:

    • Herbaceous Twist: Infuse your dumplings with fresh herbs like mint or basil for a refreshing take on the traditional flavors. These herbs pair excellently with blackberries, adding an unexpected freshness.

    • Crispy Topping: For added texture, sprinkle a modest amount of brown sugar on top before cooking. This creates a caramelized crust, enhancing the overall experience.

    • Experiment with Flavors: Add spices like cinnamon or nutmeg to the dough mixture for a warm, comforting flavor profile.

    • Create a Sauce: For a fancier presentation and an enriched flavor experience, make a sauce from blackberry puree or a simple vanilla custard to serve alongside the dumplings.

    By adding these variations, you can expand on the cozy blackberry dumplings’ charm and keep things interesting. Each time, you might end up discovering something new that complements your taste!

    How to Store Cozy Blackberry Dumplings Recipe: Best Practices

    Keeping your cozy blackberry dumplings fresh is essential for maintaining their delightful flavors:

    • Refrigeration: Allow any leftover dumplings to cool completely before transferring them to an airtight container. They can be kept in the refrigerator for up to three days.

    • Freezing: To freeze the dumplings, place them on a baking sheet in a single layer and freeze until solid. Then transfer to a freezer-safe bag. They can last up to three months. To reheat, thaw overnight in the refrigerator and steam or microwave until warmed through.

    • Reheating: Reheat dumplings on the stove using a steamer basket to preserve their fluffy texture. If using a microwave, add a tablespoon of water to maintain moisture and heat on medium power in short increments.

    Following these storage techniques ensures that this delightful dessert maintains its cozy essence even when saved for later.

    Nutritional Value of Cozy Blackberry Dumplings Recipe

    Each serving of cozy blackberry dumplings offers a well-balanced dessert option. Here’s a look at the estimated nutritional information per serving (assuming 8 servings):

    • Calories: 180
    • Total Fat: 7g
    • Saturated Fat: 3g
    • Cholesterol: 0mg
    • Sodium: 180mg
    • Total Carbohydrates: 27g
    • Dietary Fiber: 3g
    • Sugars: 5g
    • Protein: 3g

    This nutritional breakdown highlights the role of fiber and healthy components provided by blackberries, making this dessert both satisfying and nutritious. Adjustments are easy: you can reduce sugar further or use healthier dairy substitutes.

    FAQs: Frequently Asked Questions About Cozy Blackberry Dumplings Recipe

    1. Can I use frozen blackberries instead of fresh?
      Yes! Frozen blackberries can work well. Make sure to thaw and drain extra moisture before using.

    2. How can I adjust the sweetness if I’m watching my sugar intake?
      You can reduce the sugar or use a natural sweetener. Make sure to taste-test and adjust according to your preferences.

    3. What cooking methods can I use?
      Besides steaming, you can also bake the dumplings in an oven at 350°F for about 20-25 minutes, until golden brown.

    4. Can I add different fruits?
      Absolutely! Feel free to mix in fruits like raspberries, blueberries, or even diced peaches, adjusting sugar levels based on the fruit’s tartness.

    5. What’s a good alternative for the butter?
      Coconut oil, or a plant-based spread, works well. For a low-fat option, unsweetened applesauce can substitute butter in the dumpling dough.

    By addressing common questions, you can browse this section for quick solutions that will enhance your cooking experience and encourage you to dive into making these scrumptious dumplings.


    By following this comprehensive guide to the cozy blackberry dumplings recipe, you are not just creating a dessert; you are crafting a flavorful experience that can be enjoyed by everyone. This recipe is ready to inspire many home cooks, and with its myriad of adaptations, it becomes a tantalizing staple in any household that delights in dessert recipes. Happy cooking!

  • Easy Chicken Sausage Broccoli Orzo Meal

    Easy Chicken Sausage Broccoli Orzo Meal

    Easy Chicken Sausage Broccoli Orzo Meal: A Tropical Delight

    Introduction to Easy Chicken Sausage Broccoli Orzo Meal

    Welcome to a culinary adventure that perfectly blends taste and convenience: the Easy Chicken Sausage Broccoli Orzo Meal. This dish is an exemplary choice for those seeking easy dinner recipes that don’t compromise on flavor or nutrition. Packed with vibrant ingredients and delightful textures, this meal promises to satisfy even the most discerning palates. Imagine a nourishing blend of hearty chicken sausage, tender orzo pasta, and crisp broccoli—a combination that not only pleases the taste buds but also enriches the body.

    What makes this recipe stand out is its adaptability to various dietary preferences. Whether you’re cooking for busy parents, health-conscious individuals, or spontaneous home chefs, this dish provides flexibility. It can easily be tailored to be gluten-free, low-calorie, or even vegan, making it a delightful option for everyone at the table. The simplicity of this recipe ensures that even novice cooks can whip it up in minimal time, leaving you plenty of opportunity to relax and enjoy the company of your loved ones.

    As you prepare for this flavorful journey, get ready to be inspired by the combination of wholesome ingredients and delightful seasonings that create a meal not only delicious but also easy and quick. The Easy Chicken Sausage Broccoli Orzo Meal is indeed a culinary delight that makes busy evenings more manageable without sacrificing health or taste.


    Benefits and Advantages of Easy Chicken Sausage Broccoli Orzo Meal

    The Easy Chicken Sausage Broccoli Orzo Meal comes with a myriad of benefits that make it a standout choice for easy dinner recipes. For starters, its preparation is incredibly straightforward—perfect for busy weeknights when time is of the essence. With one pot and minimal prep, home cooks can assemble a hearty meal without the hassle of multiple dishes to clean afterward.

    Moreover, the nutritional profile of this dish is highly commendable. Chicken sausage provides a lean source of protein, and coupled with orzo—a type of pasta that cooks quickly—this meal becomes a balanced option that fulfills daily energy needs. Broccoli adds a vibrant pop of color and is rich in vitamins C and K. This recipe is not just about filling the stomach; it’s about nourishing the body with wholesome ingredients.

    It also caters to various dietary needs; for instance, substituting the chicken sausage for plant-based alternatives opens up the dish for vegans or those wanting to reduce meat consumption. The same applies to making the dish gluten-free by selecting gluten-free orzo. In essence, this recipe exemplifies culinary creativity while ensuring the healthiest options remain accessible.

    Furthermore, it is an excellent way to introduce young children to healthy eating without overwhelming them. The combination of flavors and textures makes it enjoyable for even the pickiest eaters. By preparing this meal, you’re not just putting food on the table—you’re fostering healthy habits for the future.

    Additionally, the nature of this dish makes it perfect for meal prep and leftovers, allowing you to enjoy its delightful flavors multiple times throughout the week. Overall, this Easy Chicken Sausage Broccoli Orzo Meal shines as an exemplary choice for anyone seeking convenient, tasty, and nutritious easy dinner recipes.


    Ingredients Overview

    Essential Ingredients for Easy Chicken Sausage Broccoli Orzo Meal

    Here, we outline the essential ingredients for crafting your Easy Chicken Sausage Broccoli Orzo Meal:

    • 1 pound (450g) Chicken Sausage (Italian or spicy sausage works best)
    • 1 cup (200g) Orzo Pasta
    • 2 cups (300g) Fresh Broccoli Florets
    • 4 cups (950ml) Chicken Broth (for added flavor; can use vegetable broth for a vegetarian option)
    • 1 medium Yellow Onion, diced
    • 3 cloves Garlic, minced
    • 2 tablespoons Olive Oil
    • Salt and Black Pepper, to taste
    • 1 teaspoon Dried Italian Herbs (or mixed herbs)
    • Grated Parmesan Cheese (optional, can be substituted with nutritional yeast for a vegan option)

    Purpose and Benefits:
    Chicken Sausage: Offers a quick source of protein and enhances flavor without excessive fat.
    Orzo Pasta: Cooks rapidly and has a pleasing texture that complements the dish.
    Broccoli: A nutritional powerhouse that adds color and crunch, packed with vitamins and minerals.
    Olive Oil: A heart-healthy fat that adds richness to the meal.
    Garlic and Onion: Enhance flavor and provide various health benefits, including anti-inflammatory properties.

    This collection of ingredients allows you to create a dish that is not only satisfying but also supports a variety of diets.

    Dietary Substitutions to Customize Your Easy Chicken Sausage Broccoli Orzo Meal

    To ensure everyone can enjoy this delightful meal, here are some thoughtful substitutions tailored to specific dietary needs:

    1. Vegan Option: Replace chicken sausage with plant-based sausage or sautéed mushrooms for a meaty texture.

    2. Gluten-Free Option: Substitute regular orzo with gluten-free orzo or couscous made from rice or corn flour.

    3. Low-Calorie Option: Utilize turkey sausage or chicken breast instead of chicken sausage for a lower calorie count. You can also reduce the amount of pasta in the dish and increase the vegetables.

    4. Dairy-Free Option: Omit the Parmesan cheese or substitute it with vegan cheese or nutritional yeast, which adds a cheesy flavor without dairy.

    With these adjustments, the Easy Chicken Sausage Broccoli Orzo Meal remains accessible to almost everyone, demonstrating its versatility as an easy dinner recipe for all occasions.


    How to Prepare the Perfect Easy Chicken Sausage Broccoli Orzo Meal: Step-by-Step Guide

    Creating a delicious Easy Chicken Sausage Broccoli Orzo Meal is simple with this step-by-step guide. Let’s dive into the kitchen!

    1. Sauté the Aromatics:
      Heat 2 tablespoons of olive oil in a large pot over medium heat. Add the diced onion and sauté for about 2-3 minutes until it becomes translucent. Then, add the minced garlic and continue to cook for another 1 minute, ensuring you don’t burn the garlic.

    2. Add the Sausage:
      Remove the casing from the chicken sausage and crumble it into the pot. Cook for about 5-7 minutes until browned and cooked through, stirring occasionally. This step infuses the dish with rich flavors from the sausage.

    3. Combine with Broth:
      Pour-in 4 cups of chicken broth (or vegetable broth for a vegetarian option) and bring to a simmer. Stir well to combine the sausage with the broth, allowing the flavors to meld together.

    4. Stir in the Orzo:
      Add 1 cup of orzo pasta to the pot. Cook according to the package instructions, usually around 8-10 minutes, stirring occasionally. The orzo will absorb the broth and become tender.

    5. Prepare the Broccoli:
      Five minutes before the orzo is fully cooked, add 2 cups of broccoli florets to the pot. This allows for steaming the broccoli until it is tender yet still vibrant in color.

    6. Season and Flavor:
      Once the orzo and broccoli are cooked, season with salt, black pepper, and 1 teaspoon of dried Italian herbs. Adjust the seasoning according to your taste.

    7. Serve:
      Ladle the meal into bowls and garnish with grated Parmesan cheese (if desired) or a sprinkle of nutritional yeast for a dairy-free option. Serve hot and enjoy your satisfying dish!

    8. Storage Options:
      If you have leftovers, let the meal cool to room temperature, then store in airtight containers in the refrigerator for up to 3 days. You can also freeze portions for later use.


    Mastering Easy Chicken Sausage Broccoli Orzo Meal: Advanced Tips and Variations

    To elevate your Easy Chicken Sausage Broccoli Orzo Meal, consider these advanced tips and variations:

    • Flavor Enhancements: Experiment with adding a splash of white wine or a spoonful of lemon juice during the cooking process for added depth and brightness to the flavor profile.

    • Add More Vegetables: Consider incorporating other vegetables such as bell peppers, spinach, or zucchini to boost the nutritional value and add variety.

    • Cook on a Sheet Pan: For a different cooking method, you can roast the chicken sausage and vegetables on a sheet pan in the oven. This creates a caramelized flavor that enhances the overall dish.

    • Top with Fresh Herbs: Fresh herbs such as parsley or basil can dramatically uplift the dish. Just sprinkle them on right before serving for vibrant flavor.

    • Experiment with Different Sausages: Feel free to try out various flavored sausages—like apple or chorizo—to introduce exciting twists to your meal.

    By utilizing these enhancements, this recipe can suit a variety of preferences while ensuring you never get bored of the same meal.


    How to Store Easy Chicken Sausage Broccoli Orzo Meal: Best Practices

    Storing your Easy Chicken Sausage Broccoli Orzo Meal properly allows you to enjoy the leftovers while maintaining its flavor and texture. Here are the best practices:

    1. Refrigeration: Allow the meal to cool completely before transferring it to an airtight container. It can be stored in the refrigerator for up to 3 days. Make sure to reheat portions in the microwave or on the stovetop—adding a bit of water or broth can help restore moisture.

    2. Freezing: If you wish to store it for a longer period, transfer the cooled meal into freezer-safe containers or bags. It should be kept in the freezer for up to 2 months. Thaw in the refrigerator overnight before reheating.

    3. Reheating: When reheating, do so until steaming hot, which ensures any leftovers are safe to eat. Reheat slowly on the stovetop or in the microwave, adding a splash of broth or water to prevent drying out.

    By mastering these storage techniques, you can enjoy the deliciousness of this easy dinner recipe even days or weeks after preparation.


    Nutritional Value of Easy Chicken Sausage Broccoli Orzo Meal

    Understanding the nutritional value of your meals is crucial for maintaining a balanced diet. Here’s a breakdown of the Easy Chicken Sausage Broccoli Orzo Meal.

    Per Serving (Approx. 1 cup):
    – Calories: 400
    – Protein: 24g
    – Total Fat: 15g
    – Saturated Fat: 4g (depends on the sausage used)
    – Carbohydrates: 45g
    – Dietary Fiber: 4g
    – Sugars: 3g
    – Sodium: 600mg (may vary based on broth and sausage choice)

    This meal is packed with protein from the chicken sausage and wholesome carbohydrates from the orzo while offering fiber from the broccoli. The inclusion of a variety of nutrients makes this dish not just a fantastic easy dinner recipe, but also a well-rounded option for your dietary needs.

    When making substitutions to meet dietary preferences, be sure to adjust the nutritional values accordingly, especially if you choose lower-fat meats or gluten-free options.


    FAQs: Frequently Asked Questions About Easy Chicken Sausage Broccoli Orzo Meal

    1. Can I use different types of pasta?
      Absolutely! While orzo is preferred for this recipe, you can substitute it with any small pasta, such as ditalini or even gluten-free pasta.

    2. Is this recipe suitable for freezing?
      Yes! It freezes well. Just ensure it is stored in an airtight container or freezer bag with as much air removed as possible to prevent freezer burn.

    3. Can I skip the sausage for a vegetarian option?
      Certainly! Omit the sausage and replace it with sautéed mushrooms, chickpeas, or any protein of your choice.

    4. How can I make this dish spicier?
      Add red pepper flakes or a dash of hot sauce to the dish before serving. If using spicy sausage, you’re already on track for some heat.

    5. What can I serve as a side with this meal?
      While this dish is hearty enough on its own, consider serving a simple side salad or garlic bread to round out the meal.

    In conclusion, the Easy Chicken Sausage Broccoli Orzo Meal perfectly embodies the spirit of easy dinner recipes that are quick, nutritious, and delicious. With its versatility and ease of preparation, it’s an ideal candidate for those seeking to enrich their weekly dinner rotation. This meal is sure to impress your family and friends alike!

  • Tasty Italian Ground Turkey Spinach Orzo

    Tasty Italian Ground Turkey Spinach Orzo

    Tasty Italian Ground Turkey Spinach Orzo: A Tropical Delight

    Introduction to Tasty Italian Ground Turkey Spinach Orzo

    Finding easy dinner recipes can often feel like a daunting task, especially for busy home cooks and families on the go. This Tasty Italian Ground Turkey Spinach Orzo offers an ideal solution by combining simplicity, nutrition, and tantalizing flavors in one pot. With its vibrant mix of ingredients, this dish is not only effortless to prepare but also packed with health benefits that cater to various dietary needs.

    Ground turkey serves as a lean protein, making it a great alternative to traditional ground meats. Spinach adds a delightful green touch, enriching the dish with essential vitamins and minerals. Orzo, a versatile pasta option, is the perfect base to absorb the flavors, creating a satisfying meal for everyone.

    Whether you are a working professional, a busy parent, a student, or simply someone seeking healthier meal options, this crowd-pleaser guarantees to be a hit at your dinner table. Plus, it’s a great candidate for meal prep, ensuring delicious leftovers for lunches or quick snacks. Let’s explore the benefits, ingredients, preparation steps, and more that make this dish a perfect addition to your weeknight dinner repertoire.

    Benefits and Advantages of Tasty Italian Ground Turkey Spinach Orzo

    When it comes to creating easy dinner recipes, convenience should never come at the cost of nutrition. This Tasty Italian Ground Turkey Spinach Orzo recipe checks both boxes. First and foremost, its ease of preparation is a significant advantage for any home cook. With a total cooking time of just about 30 minutes, you can whip up a nourishing meal even on the busiest of days.

    The health benefits are abundant as well. Ground turkey is lower in fat than beef and pork, making this dish a heart-friendly option. Spinach is an excellent source of iron and other vital nutrients, making it a powerful addition. Orzo brings carbohydrates into the mix, providing energy and comfort, perfect for students or anyone needing a little nutritional boost after a long day.

    Furthermore, this dish can easily accommodate various dietary needs. Whether you’re looking for gluten-free options, need a vegan alternative, or are counting calories, the flexibility of this recipe allows for numerous adaptations. Each ingredient can be swapped or altered based on preferences or availability, ensuring that your family can enjoy this delightful dish without any fuss.

    Overall, Tasty Italian Ground Turkey Spinach Orzo stands out among easy dinner recipes not only for its appealing flavors but also for its commitment to health and convenience.

    Ingredients Overview

    Essential Ingredients for Tasty Italian Ground Turkey Spinach Orzo

    To create your Tasty Italian Ground Turkey Spinach Orzo, you’ll need the following essential ingredients:

    • 1 lb (450g) ground turkey: A lean protein that keeps the dish light yet satisfying.
    • 1 cup orzo pasta: This pasta is similar in size to rice and perfectly absorbs flavors.
    • 2 cups fresh spinach: Rich in vitamins A, C, and K, it’s a nutritious addition.
    • 1 medium onion, diced: This adds a base layer of flavor to the dish.
    • 2 cloves garlic, minced: Garlic brings a robust, aromatic flavor.
    • 1 can (14.5 oz) diced tomatoes: Adds moisture and a hint of sweetness.
    • 1 tsp Italian seasoning: A blend of herbs that encapsulates classic Italian flavors.
    • Salt and pepper, to taste: Essential for enhancing overall flavor.
    • 1 cup chicken or vegetable broth: For cooking the orzo and adding depth.
    • Optional: Grated Parmesan cheese for garnish.

    This recipe is easily adjustable. If you are seeking gluten-free or vegan options, consider using gluten-free orzo made from rice or lentils and substituting the ground turkey with a plant-based ground meat alternative like lentils or chickpeas.

    Dietary Substitutions to Customize Your Tasty Italian Ground Turkey Spinach Orzo

    1. For Gluten-Free Needs: Use gluten-free orzo, available in most supermarkets. This ensures that anyone with gluten intolerance can enjoy the dish.

    2. Vegan Option: Replace ground turkey with crumbled tofu or chickpeas to create a plant-based protein source. Ensure to use vegetable broth instead of chicken broth for full vegan compliance.

    3. Low-Calorie Variants: For a lighter version, decrease the amount of added oil or cheese and increase vegetable portions, yielding a lower-calorie meal without sacrificing flavor.

    4. Swap the Base: If orzo isn’t available, consider using quinoa or even rice as an alternative base, which will offer additional textures and nutritional benefits.

    These substitutions align the Tasty Italian Ground Turkey Spinach Orzo with dietary preferences while maintaining its essence as one of the best easy dinner recipes.

    How to Prepare the Perfect Tasty Italian Ground Turkey Spinach Orzo: Step-by-Step Guide

    Creating the Tasty Italian Ground Turkey Spinach Orzo involves straightforward steps that anyone can follow, making it one of the simplest easy dinner recipes available. Here’s a step-by-step guide to help you create this delightful dish.

    1. Prepare the Base:
      In a spacious pot or Dutch oven, heat a drizzle of olive oil over medium heat. Add the diced onion and sauté it for about 3-4 minutes until it becomes translucent. Next, add minced garlic and sauté for an additional minute, allowing the garlic to release its fragrant aroma.

    2. Cook the Turkey:
      Add the ground turkey to the pot. Season with salt, pepper, and Italian seasoning. Cook for around 5-7 minutes, breaking apart the meat with a spoon, until it’s browned and cooked through.

    3. Add Orzo and Liquid:
      Stir in the orzo pasta, ensuring it gets coated in the juices among the meat. Pour in the diced tomatoes and chicken or vegetable broth. Bring the mixture to a gentle boil.

    4. Simmer the Dish:
      Once boiling, reduce the heat to low. Cover the pot and let it simmer for approximately 10-12 minutes, stirring occasionally. The orzo should absorb most of the liquid and become perfectly cooked during this time.

    5. Incorporate Spinach:
      After the orzo is done, gently fold in the fresh spinach. Allow it to wilt for about 2-3 minutes, mixing it well with the rest of the ingredients.

    6. Final Seasoning:
      Taste the dish and adjust seasoning as necessary. If desired, sprinkle with grated Parmesan cheese for extra richness.

    7. Serve Hot:
      Remove from heat and serve hot. You can garnish with extra Parmesan and fresh herbs, such as basil or parsley, for a beautiful presentation.

    8. Storage Tip:
      If you have leftovers, let them cool completely and store them in an airtight container in the refrigerator for up to 3 days.

    These clear steps make it easy to enjoy a hearty, delicious meal that meets various dietary needs, further solidifying its status among the best easy dinner recipes!

    Mastering Tasty Italian Ground Turkey Spinach Orzo: Advanced Tips and Variations

    To elevate your Tasty Italian Ground Turkey Spinach Orzo, consider implementing the following tips and variations:

    • Add Extra Vegetables: For more nutrition and flavor, add bell peppers, zucchini, or mushrooms while cooking the turkey. They will enhance the dish’s color and offer a medley of textures.

    • Herbs and Spices: Experiment with fresh herbs, such as basil or oregano, or even a pinch of red pepper flakes for a bit of heat. These additions can personalize the dish further and introduce a depth of flavor.

    • Make It Creamy: If you prefer a creamier consistency, stir in a splash of heavy cream or a dollop of cream cheese right before serving. This variation transforms the dish into a decadent comfort meal without losing its fundamental characteristics.

    • Use Different Proteins: Instead of ground turkey, consider exploring different ground meats like chicken, beef, or even sausage, which can dramatically alter the flavor profile. Each option will provide a uniquely satisfying meal.

    With these tips, you can customize your dish to suit any taste or occasion, making this Tasty Italian Ground Turkey Spinach Orzo a versatile option in your collection of easy dinner recipes.

    How to Store Tasty Italian Ground Turkey Spinach Orzo: Best Practices

    Proper storage of Tasty Italian Ground Turkey Spinach Orzo helps maintain its fresh taste and prevent food waste. Follow these best practices:

    1. Refrigeration: Allow the dish to cool completely before transferring it to an airtight container. Properly stored, it can last in the refrigerator for up to 3 days. Before serving leftovers, you can quickly reheat them in the microwave or on the stove over medium heat, adding a splash of broth or water to prevent drying out.

    2. Freezing: For longer storage, this orzo dish freeze perfectly. Once cooled, divide it into serving-sized portions, placing them in freezer-safe containers or bags. Label them with a date and consume within 2-3 months for best quality. When ready to eat, defrost in the refrigerator overnight and reheat thoroughly before serving.

    By taking these steps, you ensure that your Tasty Italian Ground Turkey Spinach Orzo remains a delightful and nourishing option for your busy nights, affirming its status among your go-to easy dinner recipes.

    Nutritional Value of Tasty Italian Ground Turkey Spinach Orzo

    Understanding the nutritional value of your meals is essential for making informed dietary choices. The following is an approximate breakdown of the nutrients found in a standard serving of Tasty Italian Ground Turkey Spinach Orzo:

    • Calories: 350
    • Protein: 24g
    • Total Fat: 12g
    • Saturated Fat: 3g
    • Carbohydrates: 38g
    • Dietary Fiber: 4g
    • Sugars: 3g
    • Iron: 15% DV
    • Vitamin A: 35% DV
    • Vitamin C: 20% DV

    This nutrient profile highlights the balance of protein, healthy fats, and carbohydrates, making it a wholesome meal option for everyone. Adjusting ingredients based on dietary needs can further enhance the nutritional content, whether lowering calories, increasing protein, or avoiding certain allergens. This versatility keeps it in the running as one of the best easy dinner recipes for diverse dietary preferences.

    FAQs: Frequently Asked Questions About Tasty Italian Ground Turkey Spinach Orzo

    1. Can I prepare this dish in advance?

    Yes! Tasty Italian Ground Turkey Spinach Orzo can be made ahead of time. Prepare it in advance, cool it completely, and store it in an airtight container in the fridge for up to 3 days.

    2. How can I make this dish vegetarian?

    To make a vegetarian version, replace the ground turkey with lentils, chickpeas, or tofu. Ensure to use vegetable broth instead of chicken broth to maintain the dish’s vegetarian-friendly status.

    3. Is this dish suitable for meal prep?

    Definitely! This recipe is perfect for meal prep. You can portion out servings to grab-and-go throughout the week, making it a convenient option for busy schedules.

    4. What can I serve alongside Tasty Italian Ground Turkey Spinach Orzo?

    This dish pairs wonderfully with a fresh green salad, roasted vegetables, or garlic bread. These sides complement the orzo’s flavors and help round out your meal.

    5. How can I reheat leftovers?

    To reheat leftovers, you can microwave them for a few minutes or heat them on the stove over medium heat, adding a splash of broth to keep the dish moist.

    By addressing these common questions, you can prepare and enjoy Tasty Italian Ground Turkey Spinach Orzo with confidence, making it one of your favorite easy dinner recipes for any occasion.


    With this guide in hand, you’re well-equipped to create a delicious and nutritious meal that the whole family will love. The Tasty Italian Ground Turkey Spinach Orzo is not just a meal; it’s an experience that brings joy to your kitchen and your table! Dive into this recipe, and let it inspire your culinary adventures!

  • Easy Greek Ground Turkey Gyro Bowls

    Easy Greek Ground Turkey Gyro Bowls

    Easy Greek Ground Turkey Gyro Bowls: A Tropical Delight

    Introduction to Easy Greek Ground Turkey Gyro Bowls

    When you think of easy dinner recipes, the classic Greek gyro surely comes to mind. The flavors, the ingredients, and that delightful Mediterranean flair all converge in a dish that satisfies both your hunger and your health goals. Today, we’re introducing a refreshing twist on this beloved dish by using ground turkey, making it a healthier yet equally delicious option. These Easy Greek Ground Turkey Gyro Bowls are packed with protein, rich in flavor, and incredibly simple to prepare, ensuring that you can whip up a wholesome meal even during the busiest weeknights.

    Imagine a bowl filled with seasoned ground turkey, fresh vegetables, and a creamy tzatziki sauce served over a bed of hearty grains. Not only does this recipe cater to various dietary needs—with options for vegan, gluten-free, or low-calorie variations—but it also brings the essence of the Mediterranean right into your kitchen. Easy Greek Ground Turkey Gyro Bowls encourage you to explore bold flavors without the fuss, making it perfect for busy parents, students, or anyone who appreciates a quick, scrumptious meal.

    Let’s delve into the benefits of this dish, dig into its ingredients, and learn how to prepare it step by step!

    Benefits and Advantages of Easy Greek Ground Turkey Gyro Bowls

    Simple and Quick Preparation

    One of the hallmarks of easy dinner recipes is how effortlessly they come together. Easy Greek Ground Turkey Gyro Bowls are designed for convenience, featuring a straightforward cooking process that doesn’t require hours in the kitchen. With minimal prep time and cooking time, this recipe serves as a perfect solution for busy weeknights when you don’t want to compromise on flavor or nutrition.

    Packed with Nutrition

    Using ground turkey instead of traditional lamb or beef not only lowers the fat content but also provides ample protein to keep you satiated longer. Turkey is an excellent source of lean protein, which is essential for muscle maintenance and overall health. Combined with fresh vegetables like cucumbers, tomatoes, and red onions, you’re getting a generous dose of vitamins, minerals, and antioxidants, making this a well-rounded meal.

    Versatile Dietary Options

    This recipe is highly adaptable, catering to many different dietary restrictions. For those who are vegan or vegetarian, swapping out the ground turkey for plant-based protein like lentils or chickpeas can maintain the integrity of the dish without sacrificing flavor. Additionally, you can serve the gyro bowl with gluten-free grains, such as quinoa or brown rice, ensuring everyone at your table can enjoy this delightful meal.

    Flavorful and Satisfying

    Besides its health benefits, what sets Easy Greek Ground Turkey Gyro Bowls apart is the rich and zesty profile that captures the essence of Greek cuisine. With herbs such as oregano and dill, along with the tangy tzatziki sauce, every bite is a burst of flavor. It’s a dish that inspires not just home cooks but also food enthusiasts and culinary adventurers craving a taste of the Mediterranean.

    In a nutshell, Easy Greek Ground Turkey Gyro Bowls are the perfect example of easy dinner recipes that offer simplicity, nutrition, and mouthwatering flavor all in one bowl. These bowls make any meal feel like a special occasion, whether it’s a family dinner, a gathering with friends, or a light lunch.

    Ingredients Overview

    Essential Ingredients for Easy Greek Ground Turkey Gyro Bowls

    To craft these Easy Greek Ground Turkey Gyro Bowls, you’ll need the following ingredients:

    • 1 pound ground turkey: A lean protein source rich in nutrients.
    • 1 tablespoon olive oil: Provides healthy fats and enhances flavor.
    • 2 cloves garlic, minced: Adds an aromatic element to the turkey.
    • 1 teaspoon dried oregano: A staple in Greek cooking, offering a savory profile.
    • ½ teaspoon ground cumin: Adds warmth and depth to the dish.
    • Salt and pepper to taste
    • 1 cup cooked quinoa or brown rice: A wholesome base that keeps you full. Use quinoa for gluten-free options.
    • 1 cup chopped cucumbers: Fresh and crisp, these add crunch.
    • 1 cup diced tomatoes: Juicy and nutritious, a staple in Greek salads.
    • ¼ cup red onion, thinly sliced: Adds a nice bite.
    • ½ cup tzatziki sauce: For that creamy, tangy finish. You can make your own or buy store-bought, ensuring it meets your dietary needs.
    • Fresh parsley or dill for garnish: Brightens the dish and adds visual appeal.

    Dietary Substitutions to Customize Your Easy Greek Ground Turkey Gyro Bowls

    This recipe is designed to be versatile, and there are numerous substitutions you can make to cater to different dietary needs:

    • Vegan Option: Replace ground turkey with 1 cup of lentils or hearty mushrooms for texture. You can use a plant-based tzatziki made with cashews or coconut yogurt instead of traditional yogurt.

    • Gluten-Free: Ensure you select gluten-free grains—quinoa is an excellent choice. Additionally, double-check that your tzatziki is gluten-free or make your own to ensure it fits your dietary needs.

    • Low-Calorie Option: Reduce the amount of olive oil used for cooking or opt for leaner cuts of turkey. You can also increase the quantity of vegetables while decreasing the grains, allowing for a lighter dish.

    With these adjustments, you can tailor the Easy Greek Ground Turkey Gyro Bowls to fit nearly any dietary preference while still keeping preparations simple.

    How to Prepare the Perfect Easy Greek Ground Turkey Gyro Bowls: Step-by-Step Guide

    Creating tasty Easy Greek Ground Turkey Gyro Bowls is a breeze! Just follow these detailed step-by-step instructions. You’ll see how simple it is to prepare your next go-to easy dinner recipe.

    1. Prepare the Base

    Start by cooking your quinoa or brown rice according to package instructions. Usually, quinoa requires a ratio of 2:1 water to quinoa, while brown rice may require about 2.5:1. Once cooked, fluff with a fork and set aside.

    2. Cook the Ground Turkey

    • Heat a skillet: Add 1 tablespoon of olive oil to the skillet over medium heat.
    • Sauté garlic: Add minced garlic and sauté for about 30 seconds until fragrant.
    • Brown the turkey: Add the ground turkey, breaking it apart with a spatula. Cook for about 6-8 minutes until it’s fully cooked and browned.

    3. Season the Turkey

    • Add spices: Sprinkle dried oregano, ground cumin, salt, and pepper over the turkey. Stir well to combine and cook for an additional 2-3 minutes to allow the flavors to meld together.

    4. Assemble the Bowls

    • Layer the base: In serving bowls, add a generous scoop of quinoa or brown rice as your base.
    • Add the turkey: Top with a hearty portion of the seasoned ground turkey.

    5. Fresh Vegetables

    • Top with veggies: Add chopped cucumbers, diced tomatoes, and sliced red onions to each bowl.

    6. Drizzle with Tzatziki

    • Creamy finish: Add a spoonful of tzatziki sauce on top of each bowl, or serve it on the side for dipping. Feel free to add more, depending on your preference!

    7. Garnish to Perfection

    • Herb touch: Finish with a sprinkle of fresh parsley or dill for an aromatic note.

    8. Serve and Enjoy!

    Your Easy Greek Ground Turkey Gyro Bowls are ready to be enjoyed! These vibrant bowls are not only visually appealing but also packed with flavor and nutrition.

    Mastering Easy Greek Ground Turkey Gyro Bowls: Advanced Tips and Variations

    To take your Easy Greek Ground Turkey Gyro Bowls to the next level, consider these advanced tips and enticing variations:

    1. Marinate the Turkey

    For an extra burst of flavor, consider marinating the ground turkey in a mixture of olive oil, lemon juice, garlic, and herbs for at least 30 minutes before cooking. This technique infuses more taste right into the meat.

    2. Grill the Veggies

    For a smoky and charred flavor, grill your vegetables instead of using them raw. Zucchini, bell peppers, and eggplant can be delightful additions when grilled.

    3. Explore Different Bases

    While quinoa and brown rice are excellent starts, feel free to experiment with other grains like couscous or farro. For a low-carb option, serve the turkey and veggies in lettuce wraps or over a bed of spiralized zucchini.

    4. Introduce New Sauces

    If you’re feeling adventurous, try variations of the traditional tzatziki sauce by adding avocado to create a creamy, rich version or mixing in fresh herbs for a unique twist.

    5. Try Different Proteins

    If you’re not in the mood for turkey, lean ground chicken or a cubed chicken breast are both tasty alternatives. For a completely different flavor profile, swap in lamb for a more traditional touch.

    These tips and variations will help personalize your dish while maintaining the essential flavors that make Easy Greek Ground Turkey Gyro Bowls a winner!

    How to Store Easy Greek Ground Turkey Gyro Bowls: Best Practices

    Storing your Easy Greek Ground Turkey Gyro Bowls properly can extend their freshness and keep your meal options ready for the week ahead. Here’s how to do it:

    Refrigeration

    • Store cooked turkey and grains in separate airtight containers to maintain freshness for up to 4 days in the fridge. Keeping them apart helps prevent sogginess.

    Freezing

    • If you wish to prepare a larger batch, the turkey can be frozen in portions for up to 3 months. Make sure to let it cool before transferring to freezer bags. To use, defrost overnight in the fridge before reheating.
    • Grains can also be frozen; however, freshly cooked grains may become slightly mushy after freezing.

    Reheating

    • Reheat the turkey in a skillet over medium heat until warmed through. Add a splash of water or broth to prevent it from drying out.
    • For reheating grains, sprinkle with a bit of water or broth to keep them moist, then gently microwave or reheat on the stove.

    By following these storage guidelines, you can enjoy Easy Greek Ground Turkey Gyro Bowls on demand without sacrificing quality or taste.

    Nutritional Value of Easy Greek Ground Turkey Gyro Bowls

    Understanding the nutritional profile of your meals helps you make informed choices. Here’s a breakdown of the approximate nutritional values per serving of Easy Greek Ground Turkey Gyro Bowls:

    • Calories: 450
    • Protein: 32g
    • Fat: 20g
    • Carbohydrates: 40g
    • Fiber: 6g
    • Sugars: 4g

    These healthy gyro bowls are considered a balanced meal option, providing a generous amount of protein from ground turkey, healthy fats from olive oil and tzatziki, and carbohydrates from quinoa or grains. Plus, with the inclusion of fresh veggies, you are boosting your intake of vitamins and minerals.

    Moreover, the ability to customize and adjust ingredients lets you easily cater to specific dietary needs without sacrificing nutrition or flavor, making these easy dinner recipes an excellent addition to your weekly meal plans.

    FAQs: Frequently Asked Questions About Easy Greek Ground Turkey Gyro Bowls

    1. How can I make a vegetarian version of the Easy Greek Ground Turkey Gyro Bowls?

    You can substitute the ground turkey with lentils, chickpeas, or a plant-based meat alternative, ensuring that the flavors of the spices still shine through.

    2. Can I use a different grain instead of quinoa or brown rice?

    Absolutely! You can opt for couscous, farro, or even cauliflower rice for a lower-carb alternative.

    3. How long do Easy Greek Ground Turkey Gyro Bowls last in the fridge?

    When stored properly in airtight containers, they can last up to 4 days in the fridge.

    4. What can I serve as a side dish to complement the gyro bowls?

    Consider serving with a fresh Greek salad, pita bread with a side of hummus, or roasted vegetables for a complete meal.

    5. Can I meal prep these gyro bowls?

    Yes! These bowls are perfect for meal prep. You can cook everything in advance and store the components separately, then assemble the bowls when ready to eat.

    6. How can I adjust the recipe to make it spicier?

    To add some heat, you can incorporate red pepper flakes or cayenne pepper into the turkey seasoning or serve with a spicy tahini or harissa sauce.

    With these easy dinner recipes, you can enjoy a nutritious, delicious meal that pleases everyone. Easy Greek Ground Turkey Gyro Bowls are a celebration of flavor and health, making them a must-try for your dinner table. Give them a shot and experience the delightful flavors of the Mediterranean today!

  • The Best Salted Caramel Pretzel Cookies

    The Best Salted Caramel Pretzel Cookies

    The Best Salted Caramel Pretzel Cookies: A Tropical Delight

    Introduction to The Best Salted Caramel Pretzel Cookies

    Welcome to the ultimate cookie experience! If you’re on the hunt for delicious cookie recipes that delight your taste buds, look no further than The Best Salted Caramel Pretzel Cookies. This delightful treat combines the sweet, gooey richness of caramel with a satisfying crunch from pretzels, all while being incredibly simple to prepare. These cookies are not just a feast for the senses; they also come with a variety of health benefits that make them an ideal choice for busy households, traveling food enthusiasts, and anyone looking to indulge guilt-free.

    Crafted with a blend of wholesome ingredients, these cookies fit dietary needs without compromising on flavor. Whether you are vegan, gluten-free, or simply looking for a healthier treat, this recipe can easily be adapted to suit your needs. The balance of sweet and salty in these cookies makes them an excellent addition to any gathering, adding a touch of tropical decadence that your friends and family will love.

    So, gather your ingredients and let’s embark on this exciting journey to create The Best Salted Caramel Pretzel Cookies that will become a staple in your cookie recipes repertoire!


    Benefits and Advantages of The Best Salted Caramel Pretzel Cookies

    Crafting The Best Salted Caramel Pretzel Cookies is not just about baking; it’s about enjoying a well-rounded experience that brings people together. Here are some of the standout benefits of this delectable recipe:

    1. Easy to Prepare: Whether you are a seasoned baker or have never stepped into the kitchen before, this recipe is straightforward and user-friendly. With fewer than 10 ingredients and simple instructions, home cooking has never been more accessible.

    2. Health Benefits: Made with quality ingredients like whole grain flour and rich in antioxidants from dark chocolate and nuts, these cookies can be a healthier treat option for those who keep an eye on their diet.

    3. Versatile: This recipe can be adapted to fit various dietary preferences. For instance, you can easily substitute traditional ingredients for healthier alternatives, making this a flexible option for everyone—from gluten-free folks to vegans.

    4. Family-Friendly Fun: Baking these cookies can become a cherished family tradition, and it’s a wonderful way to spend time with loved ones. Everyone can get involved, from measuring ingredients to decorating the final treats.

    5. Deliciously Unique Flavor Profile: The unique combination of sweet caramel and crunchy pretzels creates a flavor explosion that is sure to satisfy any sweet tooth. It’s this eccentric taste that makes these cookies so memorable.

    These attributes not only make The Best Salted Caramel Pretzel Cookies a wonderful treat but also a recipe you’ll want to pass down through generations. With its array of advantages, it’s clear why this dessert is worth your time and effort!


    Ingredients Overview

    Essential Ingredients for The Best Salted Caramel Pretzel Cookies

    To create The Best Salted Caramel Pretzel Cookies, you’ll need the following ingredients:

    • 1 cup (225g) unsalted butter, softened – Adds richness and moisture.
    • 1 cup (200g) brown sugar – Provides a deep caramel flavor.
    • 1/2 cup (100g) granulated sugar – Balances the sweetness.
    • 2 large eggs – Binds ingredients together (for vegan, see substitutions).
    • 1 tsp pure vanilla extract – Enhances flavor depth.
    • 2 cups (240g) all-purpose flour (or gluten-free flour blend) – The base for the cookies.
    • 1 tsp baking soda – Leavening agent for a chewy texture.
    • 1/2 tsp salt – Balances the sweetness and enhances flavors.
    • 1 cup (150g) broken pretzel pieces – Adds a crunch.
    • 1 cup (250g) salted caramel sauce – The irresistible star ingredient.
    • 1/2 cup (90g) dark chocolate chips – For a rich chocolatey flair.

    Dietary Substitutions to Customize Your The Best Salted Caramel Pretzel Cookies

    Here’s how to customize the ingredients based on dietary needs:

    • Vegan Option: Substitute unsalted butter with coconut oil, and eggs can be replaced with flax eggs (1 tablespoon ground flaxseed mixed with 2.5 tablespoons water per egg).

    • Gluten-Free: Use a gluten-free flour blend to ensure everyone can enjoy these delicious cookies.

    • Lower-Calorie Options: Opt for applesauce to replace some of the butter, and use a sugar substitute like erythritol or stevia for reduced calories.

    By adapting your ingredients, you can cater to everyone’s dietary preferences without sacrificing the delicious flavor and satisfying crunch of these wonderful cookies!


    How to Prepare the Perfect The Best Salted Caramel Pretzel Cookies: Step-by-Step Guide

    Creating The Best Salted Caramel Pretzel Cookies is easier than you think! Follow this step-by-step guide to enjoy these delightful treats in no time.

    1. Preheat Your Oven: Start by preheating your oven to 350°F (175°C). This ensures that your cookies will bake evenly and achieve that perfect golden color.

    2. Cream the Butter and Sugars: In a large mixing bowl, combine the softened unsalted butter, brown sugar, and granulated sugar. Using a hand mixer or a stand mixer, beat until the mixture is light and fluffy, around 2-3 minutes.

    3. Add Eggs and Vanilla: Crack in the eggs (or flax eggs for a vegan option) and pour in the vanilla extract. Continue to mix until well combined.

    4. Combine Dry Ingredients: In another bowl, whisk together the all-purpose flour, baking soda, and salt. Gradually add this dry mixture to the wet ingredients, mixing until just combined. Do not overmix, as this can create tough cookies.

    5. Fold in the Pretzels and Caramel: Gently fold in the broken pretzel pieces and the salted caramel sauce. Be careful not to break up the pretzels too much; you want to keep that delightful crunch.

    6. Scoop the Dough: Using a cookie scoop or tablespoon, scoop the dough onto a prepared baking sheet lined with parchment paper. Leave enough space between each cookie, approximately 2 inches.

    7. Sprinkle with Sea Salt: For added flavor, sprinkle a small pinch of sea salt on top of each cookie dough ball before baking. This accentuates the salted caramel flavor beautifully!

    8. Bake: Place the baking sheet in the preheated oven and bake for 10-12 minutes or until the edges are golden brown. The centers will look soft; they’ll firm up as they cool.

    9. Cool and Enjoy: Once baked, remove the cookies from the oven and let them cool on the baking sheet for about 5 minutes. Then, carefully transfer them to a wire rack to cool completely.

    10. Store or Serve: These cookies are best enjoyed warm, but they also store beautifully, which we’ll discuss in the next section!

    With these easy-to-follow steps, you’ll craft the most delicious Salted Caramel Pretzel Cookies that surpass any store-bought treat.


    Mastering The Best Salted Caramel Pretzel Cookies: Advanced Tips and Variations

    To take your Salted Caramel Pretzel Cookies to the next level, try these advanced tips and variations:

    1. Add Different Mix-Ins: For variety, consider adding chopped nuts such as walnuts or pecans, or even dried fruit like cranberries for a chewy contrast.

    2. Experiment with Caramel: If you want to elevate the flavor, try adding a pinch of cinnamon to your caramel sauce or swirling in some melted chocolate for a rich twist.

    3. Chill the Dough: If you have the time, refrigerating the dough for at least an hour can enhance the flavor of the cookies and help them maintain shape while baking.

    4. Dunk in Chocolate: After they cool, consider drizzling or dipping half of your cookies in melted chocolate for an indulgent touch.

    5. Cookie Sandwiches: Create cookie sandwiches filled with whipped cream or softened ice cream for a delicious dessert that’s perfect for entertaining.

    Exploring these variations can add new life to your baking routine and provide exciting options for family gatherings and parties!


    How to Store The Best Salted Caramel Pretzel Cookies: Best Practices

    Proper storage of your newly baked Salted Caramel Pretzel Cookies will keep them fresh and delightful for days. Here are the best practices:

    1. Room Temperature: Store the cooled cookies in an airtight container at room temperature. They’ll remain fresh for about 4-5 days.

    2. Refrigeration: If you live in a warm climate or want to keep them fresh longer, refrigerate the cookies in an airtight container. They can last up to a week in the fridge.

    3. Freezing: For longer preservation, freeze the cookie dough or baked cookies. To freeze cookie dough, scoop it onto a baking sheet and freeze until solid, then transfer to a freezer-safe bag for up to 3 months. For baked cookies, wrap them well in plastic wrap and store in an airtight bag, suitable for up to 3 months.

    4. Reheating: To enjoy cookies that taste freshly baked, reheat in the microwave for about 10-15 seconds or warm them in the oven at 300°F (150°C) for a few minutes.

    By following these storage tips, you can ensure that your delectable Salted Caramel Pretzel Cookies stay tasty and satisfying long after they’re baked!


    Nutritional Value of The Best Salted Caramel Pretzel Cookies

    Understanding the nutritional profile of your cookies can help you make informed decisions about your treats. Here’s a breakdown of the approximate nutritional values per standard cookie (based on a yield of 24 cookies):

    • Calories: 150-200
    • Total Fat: 8g
    • Saturated Fat: 4g
    • Trans Fat: 0g
    • Cholesterol: 20mg
    • Sodium: 150mg
    • Total Carbohydrates: 20g
    • Dietary Fiber: 1g
    • Sugars: 10g
    • Protein: 2g

    Variations Based on Customization

    Affording the opportunity to swap ingredients can alter the nutritional content. Using whole wheat flour or oats can increase fiber, while employing a sugar substitute lowers-calories significantly. Vegan and gluten-free adaptations will also vary nutrient values, often raising healthy fat content while reducing sugar.

    While these cookies are a sweet treat, indulging responsibly and being mindful of the nutritional values allow you to enjoy them without guilt.


    FAQs: Frequently Asked Questions About The Best Salted Caramel Pretzel Cookies

    1. Can I make these cookies gluten-free?

    Absolutely! Simply swap all-purpose flour for a gluten-free flour blend. They’ll turn out just as delicious!

    2. What can I use instead of eggs?

    For vegan options, use a flax egg (1 tbsp ground flaxseed + 2.5 tbsp water) per egg needed.

    3. Can I freeze the dough?

    Yes! Freeze the dough by portioning it onto a baking sheet and place in the freezer until solid. Transfer to an airtight container for up to 3 months.

    4. How long do the cookies last?

    Stored at room temperature in an airtight container, they’ll stay fresh for about 4-5 days. For prolonged freshness, refrigerate or freeze.

    5. Can I add nuts or other mix-ins?

    Absolutely! Feel free to mix in chopped nuts, dried fruit, or swap in different types of chocolate for variety.

    6. What type of caramel should I use?

    You can use store-bought salted caramel sauce or make your own at home for an even more delicious result!

    7. Can I use a different type of chocolate?

    Definitely! You can try semi-sweet, milk, or even white chocolate chips for a different flavor profile.

    By addressing these frequently asked questions, we ensure that you’re well-equipped to create the perfect Salted Caramel Pretzel Cookies, whatever your preferences or needs may be.


    As you can see, The Best Salted Caramel Pretzel Cookies are not just another treat; they are a celebration of flavors and a versatile recipe that can adapt to any dietary need. Get ready to impress your friends, treat your family, or enjoy a little indulgence all on your own! Happy baking!

  • Easy Carrot Cake Overnight Oats Breakfast

    Easy Carrot Cake Overnight Oats Breakfast

    Easy Carrot Cake Overnight Oats Breakfast: A Tropical Delight

    Introduction to Easy Carrot Cake Overnight Oats Breakfast

    Easy Carrot Cake Overnight Oats are not just a breakfast; they’re a delightful way to start your day with a burst of flavor and nutrition. Imagine waking up to the enticing aroma of freshly baked carrot cake, now ready to enjoy without any fuss! This simple and healthy recipe is an absolute treat for anyone looking for a nutritious breakfast that feels indulgent.

    Overnight oats are a smart way to incorporate various nutrients into your diet effortlessly. With oats as the base, they provide a perfect source of fiber, which aids in digestion and keeps you full longer. The addition of carrots infuses your breakfast with vitamins A and K, potassium, and antioxidants while adding a natural sweetness that makes this dish feel like dessert.

    This Easy Carrot Cake Overnight Oats recipe is versatile enough to accommodate various dietary needs—it’s suitable for vegans, those requiring gluten-free options, and individuals aiming for low-calorie meals. Anyone from busy parents to hard-working professionals can benefit from this make-ahead breakfast that takes only minutes to prepare. So let’s dive into this deliciously easy breakfast option that will have you starting your day on the right note!

    Benefits and Advantages of Easy Carrot Cake Overnight Oats Breakfast

    There are numerous perks to choosing Easy Carrot Cake Overnight Oats for your morning routine. Firstly, the convenience of overnight oats cannot be overstated. You can prepare them in advance, allowing you to grab a nutritious breakfast on your way out the door. No cooking, no mess, just pure deliciousness ready in the morning!

    Another compelling advantage of this recipe is its impressive health benefits. The primary ingredient—oats—are rich in beta-glucans, a type of soluble fiber that promotes heart health and helps maintain stable blood sugar levels. They can also aid in weight management by keeping you feeling satiated longer. The addition of carrots offers a boost of vitamins while also providing a natural sweetness, reducing the need for added sugars.

    Moreover, making this recipe easy to digest, suitable for various dietary preferences is a breeze. Want a vegan option? Swap yogurt with your favorite plant-based alternative. Need it gluten-free? Use certified gluten-free oats! Unlike many breakfast dishes that often require specific cooking methods and lengthy preparation, these overnight oats cater to your needs without sacrificing flavor or nutrition.

    By opting for Easy Carrot Cake Overnight Oats, you’re investing in a breakfast that supports a healthy lifestyle, provides sustained energy, and can effortlessly fit into your busy schedule. Whether you’re a food enthusiast searching for new recipes or a busy individual looking for health-conscious meals, you’ll adore this delightful concoction that brings the flavors of carrot cake straight to your breakfast table.

    Ingredients Overview

    Essential Ingredients for Easy Carrot Cake Overnight Oats Breakfast

    To prepare your tasty Easy Carrot Cake Overnight Oats, you will need the following ingredients:

    • 1 cup rolled oats: The hearty base for your overnight oats, providing fiber and long-lasting energy.
    • 1 cup milk (dairy or plant-based): This adds creaminess; try almond, coconut, or soy milk for a vegan option.
    • 1/2 cup grated carrots: For that authentic carrot cake flavor and a boost of vitamins.
    • 1/4 cup plain Greek yogurt (optional for creaminess): Adds protein; opt for a dairy-free version if needed.
    • 2 tablespoons maple syrup or honey: Natural sweetener that complements the carrots and spices.
    • 1/2 teaspoon ground cinnamon: Essential for that warm, aromatic flavor synonymous with carrot cake.
    • 1/4 teaspoon nutmeg: Enhances the spiced flavor profile.
    • 1/4 cup chopped walnuts or pecans: Provides a satisfying crunch and healthy fats.
    • 1/4 cup raisins (optional): For a touch of sweetness and texture.
    • A pinch of salt: Balances flavors beautifully.

    These ingredients not only come together to create a delightful meal but also provide numerous health benefits. You can easily adapt this recipe to be gluten-free by using gluten-free rolled oats and keep it low-calorie by omitting sweeteners or using an appropriate substitute.

    Dietary Substitutions to Customize Your Easy Carrot Cake Overnight Oats Breakfast

    Making this Easy Carrot Cake Overnight Oats recipe suit your dietary needs is a breeze! Here are some great substitutions:

    • For Dairy-Free Options: Use plant-based milk, such as almond, oat, or coconut milk, and substitute the Greek yogurt with a nut-based yogurt.

    • Vegan Sweetener: Instead of honey, simply use maple syrup or agave nectar to maintain that sweet flavor without using animal products.

    • Nuts Allergy: If you have a nut allergy, you can either omit the walnuts or replace them with sunflower seeds for that same crunch.

    • Low-Calorie Adjustments: Reduce or skip the sweeteners entirely, or consider using stevia or monk fruit if you’re watching your calorie intake.

    • Gluten-Free Oats: Be sure to use certified gluten-free oats to cater to gluten intolerances or celiac disease.

    These substitutions allow everyone to enjoy the deliciousness and nutrition of Easy Carrot Cake Overnight Oats, regardless of personal preferences or dietary restrictions.

    How to Prepare the Perfect Easy Carrot Cake Overnight Oats Breakfast: Step-by-Step Guide

    Creating your Easy Carrot Cake Overnight Oats is as simple as it is rewarding. Follow these clear steps to enjoy a delicious breakfast:

    1. Prepare the Base: In a medium mixing bowl, combine 1 cup of rolled oats with a pinch of salt. This will be the foundation of your overnight oats, providing texture and sustenance.

    2. Mix the Liquid Ingredients: In a separate bowl, whisk together 1 cup of your chosen milk and 1/4 cup of Greek yogurt (if using). If you are opting for a dairy-free version, substitute accordingly. This mixture will provide creaminess and moisture to the oats.

    3. Incorporate Sweeteners: Stir in 2 tablespoons of maple syrup or honey to the liquid mixture. This step is crucial for adding sweetness and enhancing the flavor profile, so adjust according to your taste.

    4. Add Flavorings and Carrots: Into the bowl of oats, add the grated carrots, 1/2 teaspoon of ground cinnamon, and 1/4 teaspoon of nutmeg. Sprinkle in 1/4 cup of raisins if you’d like a sweeter kick. Mix everything thoroughly until well combined.

    5. Combine Dry and Wet Ingredients: Pour the liquid mixture into the bowl of oats and carrots. Stir everything together until all the oats are coated in the creamy mixture. This step ensures every bite is flavorful.

    6. Add Nuts for Crunch: Stir in 1/4 cup of chopped walnuts or pecans for added texture and health benefits. If you’re making this nut-free, you can skip this step or use seeds instead.

    7. Taste and Adjust: At this point, taste your mixture. If you prefer it sweeter, add a bit more maple syrup or honey.

    8. Transfer to Jars: Divide the mixture into individual jars or containers, ensuring everything is evenly distributed. Clear glass jars work beautifully, allowing you to showcase the colorful layers.

    9. Refrigerate Overnight: Cover the jars with lids or plastic wrap and place them in the refrigerator. This step allows the oats to absorb the liquid and become soft and creamy while you sleep.

    10. Serve and Enjoy: The next morning, grab your jars from the fridge, and dig in! You can top your Ready-to-eat overnight oats with extra toppings such as fresh fruits, a dollop of yogurt, or a sprinkle of nuts for added crunch.

    Each step is designed to ensure you create a delicious breakfast that is not only quick to prepare but also customizable to your dietary needs. Enjoy your Easy Carrot Cake Overnight Oats!

    Mastering Easy Carrot Cake Overnight Oats Breakfast: Advanced Tips and Variations

    While the basic recipe for Easy Carrot Cake Overnight Oats is fantastic on its own, here are some tips and variations to elevate your experience:

    • Add fresh fruits: Top your oats with banana slices, apples, or even pineapple to add a refreshing twist and new flavor dimensions.

    • Use spices wisely: You’re not limited to just cinnamon and nutmeg! Experiment with ginger, cardamom, or even pumpkin spice for a different spin that transforms the flavor entirely.

    • Additional flavors: A splash of vanilla extract adds depth to the oats and can elevate their taste profile even further.

    • Make mini parfaits: Layer your overnight oats with yogurt and fruits in a glass for a beautiful presentation, perfect for sharing or special occasions.

    • Nut butter heaven: Adding a spoonful of almond or peanut butter can enhance creaminess and provide extra protein, making your breakfast even more satisfying.

    • Batch preparation: Make multiple jars at once to enjoy this breakfast throughout the week. Overnight oats keep well in the fridge for up to five days, making meal prep hassle-free!

    Experimenting with these advanced tips allows you to cater the recipe to your taste preferences and keep your breakfast routine fun and exciting!

    How to Store Easy Carrot Cake Overnight Oats Breakfast: Best Practices

    Storing your Easy Carrot Cake Overnight Oats is simple and ensures the flavors develop even more. Here’s how to do it:

    • Refrigeration: The primary storage method is in the fridge. Make sure to keep your jars or containers sealed tightly to prevent them from drying out. Properly stored, your overnight oats will stay fresh in the refrigerator for up to five days.

    • Freezing: If you want to prepare ahead even more, consider freezing your oats. Just be sure to leave room in the container for the oats to expand as they freeze. When you’re ready to eat, thaw them in the refrigerator overnight before consuming.

    • Reheating: You can enjoy overnight oats cold or warmed up! If you prefer them warm, transfer the desired portion into a microwave-safe bowl and heat for about 30-60 seconds. Give it a stir and adjust the temperature as needed.

    These storage tips ensure your Easy Carrot Cake Overnight Oats remain delicious and ready to eat, making breakfast as simple and enjoyable as possible.

    Nutritional Value of Easy Carrot Cake Overnight Oats Breakfast

    Understanding the nutritional value of your food is key to maintaining a balanced diet. Here’s a breakdown of the nutritional content for one serving of Easy Carrot Cake Overnight Oats made with standard ingredients:

    • Calories: Approximately 350-400 kcal
    • Protein: 10g (assuming the use of Greek yogurt)
    • Fat: 8g (depends on nuts used)
    • Carbohydrates: 50g
    • Fiber: 7-8g
    • Sugars: 10g (from the maple syrup and carrots)
    • Vitamins and Minerals: Rich in Vitamin A from carrots, calcium and potassium from yogurt and oats, and magnesium from nuts.

    This recipe is nutritionally balanced, providing fiber to aid digestion, protein to support muscle health, and healthy fats from the nuts. Adjustments can be made depending on substitutions, whether you prefer to reduce sugar content or increase protein with higher yogurt quantities. The combinations are endless!

    FAQs: Frequently Asked Questions About Easy Carrot Cake Overnight Oats Breakfast

    Can I prepare the Easy Carrot Cake Overnight Oats in advance?

    Yes, preparing overnight oats in bulk is one of their greatest advantages! They can be stored in the fridge for up to five days, allowing you to prepare multiple portions for the week in advance.

    Can I use quick oats instead of rolled oats?

    While rolled oats create the ideal texture, you may use quick oats if you prefer a softer consistency. They will absorb liquid faster, so consider adjusting the liquid quantity.

    Can I make this recipe sugar-free?

    Absolutely! You can opt to omit the sweetener entirely or use stevia, monk fruit sweetener, or mashed bananas to achieve desired sweetness without refined sugars.

    Is it necessary to add yogurt?

    Adding Greek yogurt is optional but recommended. It adds creaminess and protein, and you can use dairy-free varieties to make it suitable for vegan diets.

    What can I substitute for walnuts if I have a nut allergy?

    If you can’t have nuts, sunflower seeds or pumpkin seeds offer a crunchy texture while maintaining nutrition without the allergy concern.

    Can I heat the overnight oats before eating?

    Yes! If you prefer warm oats, simply microwave your portion for about 30-60 seconds. Stir occasionally to ensure even heating.

    These FAQs address common curiosities and preferences while providing clarity on customizing the Easy Carrot Cake Overnight Oats to fit your lifestyle.

    In conclusion, Easy Carrot Cake Overnight Oats are not only easy to make but also deliver nutrition and convenience without losing the delightful flavors we all love. So, why not try out this recipe for yourself? Enjoy the process, tweak it to your liking, and experience the joy of having a nutritious breakfast waiting for you every morning!

  • Easy Street Corn Salad With Greek Yogurt

    Easy Street Corn Salad With Greek Yogurt

    Easy Street Corn Salad With Greek Yogurt: A Tropical Delight

    Introduction to Easy Street Corn Salad With Greek Yogurt

    If you’re on the lookout for easy dinner recipes that not only please the palate but also tick the boxes for health and simplicity, look no further than this Easy Street Corn Salad with Greek Yogurt. Inspired by the vibrant flavors of street food, this salad brings together sweet corn, zesty lime, and creamy Greek yogurt for a refreshing and satisfying dish.

    What makes this corn salad stand out? First and foremost, it’s a breeze to prepare. Whether you’re a seasoned cook or a beginner, this recipe requires minimal cooking skills and equipment—just a bowl and a spatula! Packed with essential nutrients, this dish is also a nutritious option for busy parents looking for quick meals, students needing healthy choices, and meal preppers aiming to maintain a balanced diet.

    Moreover, this recipe is versatile. It can easily accommodate various dietary preferences, making it suitable for vegans, vegetarians, and those on gluten-free diets. The addition of Greek yogurt not only enhances the flavor but also provides a creamy texture and a protein boost, making this salad perfect as a side dish or light main course.

    By combining healthiness with convenience, this Easy Street Corn Salad with Greek Yogurt promises to be a new favorite in your cookbook. Let’s dive into the myriad benefits and key ingredients that make this recipe shine!

    Benefits and Advantages of Easy Street Corn Salad With Greek Yogurt

    Turning to easy dinner recipes doesn’t mean you have to sacrifice flavor for convenience. This Easy Street Corn Salad is a prime example of how you can create a delicious, health-conscious meal quickly and efficiently. Here are some of its standout benefits:

    Simple Preparation

    As mentioned, this recipe is incredibly straightforward. It requires no elaborate cooking techniques or hard-to-find ingredients, allowing even those who are short on time to whip it up effortlessly. In just about 20 to 30 minutes, you can have a colorful and nutritious dish ready to enjoy, making it an ideal option for time-crunched evenings.

    Health Benefits

    Beyond its simplicity, this salad boasts numerous health advantages.

    • High in Nutrients: Corn is an excellent source of dietary fiber, vitamins B and C, and essential minerals such as magnesium and potassium. These nutrients can help support digestive health, boost your immune system, and enhance energy levels.

    • Protein-Packed: Using Greek yogurt provides a significant amount of protein, making this salad a fulfilling choice. This addition helps in muscle recovery and supports feelings of fullness, which can be beneficial for weight management.

    • Low in Calories: This dish is naturally low in calories, especially when you use non-fat Greek yogurt. This makes it a perfect choice for diet-conscious individuals looking to maintain a healthy lifestyle without sacrificing taste.

    Versatility

    This corn salad is wonderfully adaptable, making it suitable for various dietary needs. Whether you are vegan, vegetarian, or following a gluten-free diet, you can easily adjust the recipe. For instance, substituting Greek yogurt with coconut yogurt can cater to those avoiding dairy. With simple swaps and adjustments, this dish remains delicious and nourishing, promoting diverse eating habits.

    Great for Any Occasion

    Whether you’re preparing a casual dinner at home, bringing a side dish to a potluck, or looking for a healthy option to enjoy during your lunch breaks, Easy Street Corn Salad with Greek Yogurt fits the bill. Its bright, tropical flavors can transport your taste buds to summer, making it a beloved choice year-round.

    In summary, this salad excels in every aspect—flavor, nutritional value, and convenience. So grab your ingredients, and let’s create this delightful dish together!

    Ingredients Overview

    Essential Ingredients for Easy Street Corn Salad With Greek Yogurt

    To create this vibrant Easy Street Corn Salad with Greek Yogurt, gather the following ingredients:

    • 3 cups of fresh corn kernels (or 2 cans of corn, drained)
      Corn adds sweetness and crunch while providing a wealth of vitamins and minerals.

    • 1 cup of Greek yogurt (plain, non-fat or low-fat)
      This provides creaminess and a protein boost while minimizing calories.

    • 1/4 cup of lime juice (about 2 limes)
      Lime juice brightens the flavors and adds a zesty tang.

    • 1/2 teaspoon of chili powder
      For an extra kick! This spice enhances the salad’s overall flavor profile.

    • Salt and pepper to taste
      Essential for balancing flavors.

    • 1 cup of diced red bell pepper
      Adds color, crunch, and additional vitamins C and A.

    • 1/2 cup of chopped red onion
      Provides a mild bite and a deeper flavor.

    • 1/4 cup of fresh cilantro, chopped (optional)
      Adds a fresh herbal note; an ideal complement to the lime.

    • 1 avocado, diced (optional)
      For creaminess and healthy fats, making this dish even more nutritious.

    This ingredient list is simple yet effective, demonstrating how minimal components can yield phenomenal flavor without overwhelming your schedule. Additionally, as we focus on easy dinner recipes, these ingredients are largely accessible, allowing for fluid cooking even on busy evenings.

    Dietary Substitutions to Customize Your Easy Street Corn Salad With Greek Yogurt

    One of the best aspects of this salad is its adaptability. Below are a few suggestions for ingredient substitutions to cater to various dietary preferences or restrictions:

    • For Vegans: Replace Greek yogurt with coconut yogurt or cashew cream to maintain a similar texture and richness. This way, you preserve the creaminess while keeping it dairy-free.

    • For Gluten-Free: This recipe is naturally gluten-free, but be sure to double-check any canned products to avoid hidden gluten.

    • Low-Calorie Adjustments: Choose non-fat Greek yogurt instead of full-fat for a lighter option without sacrificing taste. You can also reduce the amount of avocado for lower fat content.

    • Additional Veggies: Feel free to toss in other vegetables like cucumbers, fresh tomatoes, or even black beans, enhancing both nutritional value and flavor complexity.

    • Spice Level: If you prefer a milder taste, you can adjust the amount of chili powder or substitute it with paprika for a slightly smoky flavor without much heat.

    With these simple substitutions, you can create a customized version of the Easy Street Corn Salad that fits your dietary needs and personal preferences while still maintaining that delectable taste.

    How to Prepare the Perfect Easy Street Corn Salad With Greek Yogurt: Step-by-Step Guide

    Ready to dive into this delicious recipe? Here’s a clear and detailed step-by-step guide to making the Easy Street Corn Salad with Greek Yogurt. Let’s make cooking fun and easy!

    1. Prepare the Base: Start by cooking your corn if using fresh. You can either boil it for about 5-7 minutes until tender or grill it for an added smoky flavor. If using canned corn, just drain and rinse under cold water to remove excess sodium.

    2. Mix Ingredients: In a large mixing bowl, combine the cooked corn, diced red bell pepper, chopped red onion, and fresh cilantro. Ensure everything is mixed evenly, allowing the flavors to meld together beautifully.

    3. Make the Dressing: In a separate small bowl, whisk together Greek yogurt, lime juice, chili powder, salt, and pepper until creamy and smooth. This dressing is the heart of your salad, so take a moment to taste and adjust the seasoning if needed.

    4. Toss the Salad: Pour the dressing over the corn mixture and gently fold it all together. Be careful not to mash the ingredients; you want to keep the salad light and airy.

    5. Add Avocado: If using, fold in the diced avocado last to preserve its shape and add a creamy texture to the salad.

    6. Refrigerate: Let the salad sit in the refrigerator for at least 30 minutes before serving. This chilling time allows the flavors to mingle and intensify, making each bite even more satisfying.

    7. Serve: Transfer the salad to a serving bowl and garnish with additional cilantro and lime wedges if desired. You can enjoy this dish chilled or at room temperature.

    Congratulations, you’ve just prepared a delicious Easy Street Corn Salad with Greek Yogurt! This recipe constitutes a true testament to how easy dinner recipes can be both nutritious and fulfilling, delighting everyone at the table.

    Mastering Easy Street Corn Salad With Greek Yogurt: Advanced Tips and Variations

    As with any great dish, there are always ways to elevate the Easy Street Corn Salad with Greek Yogurt beyond its foundational recipe. Here are some advanced tips and variations:

    Advanced Tips

    • Use Fresh Ingredients: Fresh produce significantly enhances the salad’s flavor. Whenever possible, opt for fresh corn and organically grown vegetables.

    • Experiment with Herbs: Beyond cilantro, adding chopped green onions, parsley, or even mint can give the salad a unique twist based on your taste preferences.

    • Let It Marinate: For an even richer taste, prepare your salad a few hours in advance, allowing it to marinate in the fridge. This gives the flavors ample time to develop.

    Variations to Try

    • Tex-Mex Inspired: Add black beans, corn chips, and jalapeños for a Tex-Mex version, and serve it with a side of salsa. You can even top it off with shredded cheese for a more indulgent touch.

    • Mediterranean Vibe: Incorporate chopped cucumbers, Kalamata olives, and feta cheese, swapping Greek yogurt for tzatziki for a Mediterranean flair.

    • Grilled Corn Twist: Instead of boiling, grill the corn. The char adds a delightful smoky flavor that can enhance the overall taste of your salad.

    • Tropical Twist: Mix in diced mango or pineapple for a sweet, fruity addition that pairs beautifully with lime and Greek yogurt.

    Consider these tips as guidelines to elevate your Easy Street Corn Salad and personalize it to cater to your audience or seasonal preferences. Enjoy experimenting!

    How to Store Easy Street Corn Salad With Greek Yogurt: Best Practices

    To ensure your Easy Street Corn Salad with Greek Yogurt remains fresh and delightful for later consumption, follow these storage practices:

    Refrigeration

    If you have leftovers, store the salad in an airtight container in the refrigerator. It is best consumed within 2-3 days to maintain the freshness of the ingredients, particularly the avocado.

    Freezing

    While you can freeze the salad, it’s essential to note that the texture may suffer, particularly for ingredients like Greek yogurt and avocado, which can turn watery or become grainy upon thawing. If you know you’ll have leftovers, consider storing the corn mixture separately from the dressing. This way, you can freeze the salad base and combine it with fresh dressing later.

    Reheating

    If you prefer warm salads, gently stir-fry the salad in a non-stick pan for a few minutes until heated through. Note that quality and texture best remain intact when served chilled or at room temperature.

    By following these storage guidelines, you can enjoy this Easy Street Corn Salad with Greek Yogurt even after the initial preparation day, making it an excellent option for meal prepping and minimizing food waste.

    Nutritional Value of Easy Street Corn Salad With Greek Yogurt

    Understanding the nutritional breakdown of your meals is vital for maintaining a healthy lifestyle, especially when you’re searching for easy dinner recipes. Here’s a detailed nutritional analysis of the Easy Street Corn Salad with Greek Yogurt per serving (assuming 4 servings total):

    • Calories: 180
    • Protein: 10g
    • Total Fat: 4g
    • Saturated Fat: 1g
    • Carbohydrates: 30g
    • Dietary Fiber: 6g
    • Sugar: 4g
    • Sodium: 180mg

    Nutritional Highlights

    • High in Fiber: The salad’s fiber content supports digestive health and helps keep you feeling full longer.

    • Rich in Protein: Greek yogurt’s protein content contributes to muscle repair and recovery, making this salad an excellent post-workout meal.

    • Packed with Vitamins: Ingredients like corn, bell pepper, and lime juice provide a range of vitamins and antioxidants that support overall health.

    By understanding the nutritional profile of this dish, you’ll see that the Easy Street Corn Salad with Greek Yogurt serves as a balanced meal option that aligns well with various health-focused goals.

    FAQs: Frequently Asked Questions About Easy Street Corn Salad With Greek Yogurt

    Can I make this salad ahead of time?

    Absolutely! You can prepare the salad a day in advance to allow the flavors to develop. Just hold off on adding the avocado until just before serving to prevent browning.

    Is this salad suitable for meal prep?

    Yes, this Easy Street Corn Salad is ideal for meal prep. Make a big batch and divide it into individual portions for easy lunches or snacks throughout the week.

    Can I use frozen corn instead of fresh or canned?

    Definitely! Frozen corn is a convenient option. Just thaw it and drain any excess moisture before using it in the salad.

    How can I make this salad spicier?

    If you love heat, try adding diced jalapeños or increase the amount of chili powder or hot sauce in the dressing.

    Is the salad still tasty without Greek yogurt?

    Yes! While Greek yogurt adds creaminess and protein, you can replace it with dairy-free alternatives or simply use a vinaigrette for a lighter option.

    Can I add protein sources like chicken or beans to this salad?

    Absolutely! Adding grilled chicken, black beans, or chickpeas can turn this side salad into a well-rounded main course.

    These FAQs address common concerns about the salad, ensuring that readers feel empowered to modify the recipe according to their likes and needs. Emphasize that the Easy Street Corn Salad with Greek Yogurt is not just suitable for varied diets, but is also adaptable for individual tastes and preferences.

    By allowing your culinary creativity to flourish with this dish, you’ll encourage readers to make a meal that fits their unique lifestyles while enjoying the delightful flavors of street corn!


    To summarize, the Easy Street Corn Salad with Greek Yogurt isn’t just an easy dinner recipe; it’s a versatile, nutritious dish perfect for various dietary needs and occasions. Whether served as a refreshing side or a fulfilling main dish, this salad promises to invigorate your culinary repertoire! Happy cooking!

  • Tasty Smoky Chipotle Chicken Bowl

    Tasty Smoky Chipotle Chicken Bowl

    Tasty Smoky Chipotle Chicken Bowl: A Tropical Delight

    Introduction to Tasty Smoky Chipotle Chicken Bowl

    Welcome to the world of flavors with our Tasty Smoky Chipotle Chicken Bowl! This dish is an embodiment of culinary bliss combining smoky chipotle and succulent chicken, offering a delightful experience for any home cook eager to impress. If you’re searching for mouthwatering chicken recipes, this one stands out for its simplicity and health benefits.

    This easy-to-make bowl is not only packed with flavor but also caters to busy families, busy professionals, and health-conscious individuals alike. Whether you are a seasoned cook or a beginner in the kitchen, this recipe ensures gourmet satisfaction without extensive effort. The smoky chipotle adds a kick that elevates your meal, making it a fantastic option for lunch, dinner, or even meal prep.

    Additionally, this chicken bowl can effortlessly adapt to various dietary needs. It can easily transform into a vegetarian delight by swapping chicken for hearty legumes or tofu. Moreover, gluten-free options are also available in this recipe, ensuring it caters to everyone at your table. Let’s dive into this tropical delight and embark on a delicious culinary journey!

    Benefits and Advantages of Tasty Smoky Chipotle Chicken Bowl

    The Tasty Smoky Chipotle Chicken Bowl derives its popularity from a myriad of enticing benefits. First and foremost, it’s incredibly simple to prepare. With minimal ingredients and straightforward steps, you can whip up this bowl in no time. This ease of preparation is perfect for busy parents juggling work and home life, as well as students seeking quick yet satisfying meal solutions.

    But beyond convenience, this dish is a powerhouse of health benefits! Chicken, the star ingredient, is rich in high-quality protein that supports muscle growth and repair. Coupled with nutrient-rich vegetables and whole grains, each bite contributes to a balanced diet filled with essential vitamins and minerals. The inclusion of chipotle provides not just flavor but also various antioxidants known to boost heart health.

    Not to mention, the versatile nature of this recipe allows it to cater to dietary preferences or restrictions, making it one of those go-to chicken recipes that can be easily customized. You can effortlessly adjust ingredients based on what you have on hand or what fits your dietary needs. Whether you are vegan, gluten-free, or following a low-calorie diet, this recipe can adapt seamlessly to support your lifestyle objectives.

    When you create this Smoky Chipotle Chicken Bowl, you’re not just making a meal; you’re crafting a culinary experience that celebrates flavor while prioritizing well-being. This dish embodies an exciting blend of taste, nutrition, and cultural influences, making it a standout choice for any occasion.

    Ingredients Overview

    Essential Ingredients for Tasty Smoky Chipotle Chicken Bowl

    To whip up your delicious Tasty Smoky Chipotle Chicken Bowl, you’ll need the following key ingredients:

    • 1 pound boneless, skinless chicken breasts (or 1 pound firm tofu or cauliflower for a vegetarian/vegan option)
    • 2 tablespoons olive oil (helps in cooking and adds healthy fats)
    • 1 medium onion, diced
    • 1 bell pepper, chopped (red or green for added nutrients and flavor)
    • 2 cloves garlic, minced (for a flavor boost and health benefits)
    • 2-3 tablespoons smoked chipotle sauce (adjust according to spice preference)
    • 1 cup cooked brown rice or quinoa (for gluten-free grain options; quinoa is packed with protein)
    • 1 can black beans, drained and rinsed (excellent source of fiber and protein)
    • 1 cup corn kernels (fresh or frozen)
    • 1 avocado, sliced (optional; provides healthy fats)
    • Fresh cilantro, chopped (for garnish; adds freshness)
    • Salt and pepper to taste

    This combination of ingredients not only enhances flavor but also provides essential nutrients, making this one of the most rewarding chicken recipes you could try.

    Dietary Substitutions to Customize Your Tasty Smoky Chipotle Chicken Bowl

    If you have specific dietary restrictions or want to customize the Tasty Smoky Chipotle Chicken Bowl, consider these substitutions:

    • For Protein: Instead of chicken, try grilled shrimp, tempeh, or chickpeas. Each option offers a different flavor profile and texture, while still packing in protein and nutrients.
    • For Grains: If you prefer, substitute brown rice or quinoa with cauliflower rice for a low-carb option, or couscous for a different grain experience.
    • For Vegan Options: Use vegan sour cream or guacamole in place of cheese or yogurt topping, ensuring you keep the dish completely plant-based.
    • For Gluten-Free Needs: Always check labels on sauces and grains, opting for certified gluten-free products when required.
    • For Creaminess: If you’re looking for an even smoother texture, consider adding Greek yogurt or a dairy-free alternative as a rich topping.

    With such flexibility, you can tailor this chicken bowl to meet multiple dietary preferences or ingredient availability at any time.

    How to Prepare the Perfect Tasty Smoky Chipotle Chicken Bowl: Step-by-Step Guide

    Getting started with the Tasty Smoky Chipotle Chicken Bowl is straightforward. Follow this step-by-step guide to ensure success:

    1. Prepare the Base: Begin by cooking your grain. Rinse 1 cup of brown rice or quinoa, then bring 2 cups of water to a boil. Add the grains, reduce to a simmer, cover, and let cook until all the water is absorbed (15-20 minutes for rice, around 12-15 minutes for quinoa). Set aside when done.

    2. Cook the Chicken: While the grain cooks, heat 2 tablespoons of olive oil in a large skillet over medium-high heat. Season your 1 pound of chicken breasts with salt and pepper, then add them to the skillet. Cook for approximately 5-7 minutes on each side, or until the internal temperature reaches 165°F (75°C). Once cooked, remove from the skillet and let rest for a few minutes before slicing into strips.

    3. Sauté the Vegetables: In the same skillet, add 1 diced onion and 1 chopped bell pepper. Sauté for about 4-5 minutes until softened. Add the minced garlic and sauté for an additional minute, just until fragrant.

    4. Combine Chicken and Chipotle: Lower the heat, then return the sliced chicken to the skillet. Stir in 2-3 tablespoons of smoked chipotle sauce, tasting as you go to adjust the spiciness level. Let simmer for 2-3 minutes, ensuring the chicken is well-coated with the sauce.

    5. Add Beans and Corn: Stir in the can of black beans and the corn kernels, mixing everything thoroughly. Cook until heated through, about 3-4 minutes.

    6. Assemble Your Bowl: Take your cooked grain and serve it as the base in individual bowls. Top with the chipotle chicken and vegetable mixture.

    7. Add Toppings: Finish your bowl with sliced avocado and fresh cilantro sprinkled on top for added flavor. You may also drizzle more chipotle sauce for extra heat or add lime juice for a zesty kick!

    8. Serve and Enjoy: Serve the bowls warm, enabling each guest to enjoy their creation. This bowl is perfect for meal prep—store leftovers in air-tight containers.

    These detailed steps ensure that anyone can replicate this crowd-pleasing recipe, making it a stellar addition to your collection of chicken recipes.

    Mastering Tasty Smoky Chipotle Chicken Bowl: Advanced Tips and Variations

    To truly master the Tasty Smoky Chipotle Chicken Bowl, consider exploring these advanced tips and variations:

    • Marinate Your Chicken: For an extra depth of flavor, marinate the chicken in the chipotle sauce for at least an hour before cooking. This step infuses the meat with smoky goodness.

    • Veggies Galore: Feel free to add more vegetables, such as zucchini, spinaches, or roasted sweet potatoes to increase the nutrient content and add variety.

    • Toast Your Grains: Prior to boiling, toast your brown rice or quinoa in a dry skillet for a few minutes to enhance their nutty flavor.

    • Use Leftovers Creatively: Leftover chicken or vegetables can be transformed into a smoky chipotle wrap or salad the next day.

    • Experiment with Extra Spice: If you love heat, try adding more spices or chopped jalapeños when cooking the vegetables for an extra kick.

    By incorporating these thoughtful suggestions, you’ll enhance the flavor and texture of your Smoky Chipotle Chicken Bowl, creating a unique personalized experience with each meal.

    How to Store Tasty Smoky Chipotle Chicken Bowl: Best Practices

    Proper storage is key to maximizing the longevity and freshness of your Tasty Smoky Chipotle Chicken Bowl. Here are the best practices:

    • Refrigeration: Allow the chicken bowl to cool completely before transferring it to an airtight container. Store leftovers in the fridge for up to 4 days to maintain optimal freshness.

    • Freezing: For longer storage, you can freeze the chicken bowl components separately. Cooked chicken can last in the freezer for up to 4 months. Freezing grains and sauce separately can enhance the quality upon reheating.

    • Reheating: When ready to enjoy your leftovers, simply microwave them for a few minutes until heated through. Ensure even heating by stirring the contents during reheating. If frozen, thaw in the refrigerator overnight before reheating.

    Being mindful of these practices helps this dish maintain its delicious flavors while ensuring that busy lifestyles can still enjoy wholesome meals.

    Nutritional Value of Tasty Smoky Chipotle Chicken Bowl

    Understanding the nutrition embedded in your meals is vital for making informed choices. The Tasty Smoky Chipotle Chicken Bowl offers valuable nutrition and benefits. Here’s a breakdown per serving (assuming four servings):

    • Calories: Approximately 450 calories
    • Protein: 30g
    • Fat: 15g (healthy fats from olive oil and avocado)
    • Carbohydrates: 50g (fiber content from brown rice and black beans)
    • Fiber: 10g
    • Sugar: 5g
    • Vitamins: High in Vitamin A (from bell peppers) and C (from cilantro and peppers)
    • Iron and Calcium: Sourced from black beans and quinoa

    With this nutrient-dense meal, you support bodily functions, energy levels, and a satisfying dining experience. This is why the Tasty Smoky Chipotle Chicken Bowl is not just a meal; it’s an investment in your health through one of the best chicken recipes out there!

    FAQs: Frequently Asked Questions About Tasty Smoky Chipotle Chicken Bowl

    1. How can I make the Smoky Chipotle Chicken Bowl more or less spicy?

    You can adjust the spice level based on your preference by controlling the amount of smoked chipotle sauce. Start with 1 tablespoon, and increase it to taste, or substitute with a milder spice or sauce.

    2. Can I prepare the bowl in advance for meal prep?

    Absolutely! This chicken bowl is perfect for meal prep. Prepare the components ahead of time, store them separately, and simply assemble when you’re ready to eat.

    3. What can I substitute for chicken if I’m following a vegetarian diet?

    Instead of chicken, use firm tofu, tempeh, or even grilled vegetables. All these substitute proteins can absorb the chipotle flavors beautifully.

    4. How long can I store leftovers?

    Leftovers can stay in the refrigerator for up to 4 days. Ensure they are kept in airtight containers to maintain freshness.

    5. What other toppings can I add to the chicken bowl?

    Consider topping your bowl with shredded cheese, sour cream, and lime wedges or for a vegan version, cashew cream or nutritional yeast provide delicious alternatives.

    6. Is it possible to make this meal gluten-free?

    Yes! Utilize gluten-free grains like quinoa or rice, and check the labels of your sauces to ensure they are gluten-free.

    7. Can I use canned chicken or rotisserie chicken instead of cooking my own?

    Yes, using canned chicken or rotisserie chicken is a convenient time-saver. Just shred the chicken and mix it with the other ingredients until heated through.

    Embrace your culinary creativity and make the Tasty Smoky Chipotle Chicken Bowl your own favorite dish today. Enjoy its taste and health benefits, and indulge in the excitement of cooking with varied flavors!

  • Easy Spinach And Feta Pasta Recipe

    Easy Spinach And Feta Pasta Recipe

    Easy Spinach And Feta Pasta Recipe: A Tropical Delight

    Introduction to Easy Spinach And Feta Pasta Recipe

    Welcome to a delightful culinary experience that combines simplicity, flavor, and health! Our Easy Spinach And Feta Pasta Recipe is not just another dish among countless pasta recipes; it’s a celebration of fresh ingredients and wholesome cooking that anyone can master. This recipe is designed to be straightforward and quick, making it an ideal choice for busy parents, students, and working professionals alike.

    Imagine twirling your fork into nourishing whole grain pasta, beautifully accentuated by vibrant spinach and creamy feta cheese. With its striking blend of flavors, this dish offers a balance between comfort food and nutrition, making it perfect for everyone, including health-conscious eaters, vegans, and gluten-free enthusiasts.

    As you savor each bite, you’ll appreciate the health benefits inherent in this easy recipe. Spinach provides an abundance of vitamins and minerals, while feta adds a creamy texture and rich flavor without overwhelming calories. The dish is also versatile—easy to customize based on your dietary preferences or whatever ingredients you have on hand.

    Whether you’re a seasoned chef or a novice in the kitchen, this Easy Spinach And Feta Pasta Recipe guarantees a delightful cooking experience that will inspire you to explore more pasta recipes. Get ready to be amazed at how simple ingredients can lead to extraordinary dishes!

    Benefits and Advantages of Easy Spinach And Feta Pasta Recipe

    This Easy Spinach And Feta Pasta Recipe offers numerous benefits and advantages that make it a standout option among various pasta recipes. Let’s delve into some key reasons why this dish should be on your menu.

    1. Ease of Preparation

    One of the most significant advantages of this pasta recipe is its ease of preparation. With only a few steps and minimal equipment required, it’s perfect for novice cooks who may feel intimidated by more complex dishes. Cooking pasta is very straightforward; after boiling, you simply add fresh ingredients. Within 30 minutes, you’ll have a delicious meal on the table, making it a suitable option for anyone with a busy lifestyle.

    2. Health Benefits

    Spinach is a powerhouse of nutrients. Rich in iron, calcium, and vitamins A, C, and K, it supports immune function, bone health, and overall well-being. Additionally, feta cheese offers protein and calcium; it is lower in fat compared to other cheeses, allowing you to indulge without guilt. Using whole-grain or gluten-free pasta can further enhance the meal’s fiber content.

    3. Versatility

    No matter your dietary restrictions, this Easy Spinach And Feta Pasta Recipe can be easily adjusted. Those looking for vegan options can simply skip the feta or opt for a plant-based alternative. Likewise, gluten-free pasta varieties ensure everyone can enjoy this flavorful dish.

    4. Customization

    This recipe’s basic structure allows for ample customization. Feel free to throw in additional vegetables like cherry tomatoes or bell peppers for added color and nutrition. Squash or zucchini could provide delightful variations in texture and flavor. You could also spice things up with unique seasonings or herbs—basil, oregano, or even red pepper flakes.

    5. Cost-Effectiveness

    Compared to dining out or purchasing prepared meals, making this Easy Spinach And Feta Pasta at home is cost-effective. The ingredients are generally inexpensive and easily accessible at grocery stores. Preparing this dish also gives you the opportunity to meal prep for busy weeks ahead!

    All in all, the combination of ease, health benefits, versatility, customization options, and affordability positions this Easy Spinach And Feta Pasta Recipe as a must-try for anyone interested in delightful pasta recipes!

    Ingredients Overview

    Essential Ingredients for Easy Spinach And Feta Pasta Recipe

    To make your Easy Spinach And Feta Pasta Recipe, you’ll need the following ingredients. Each one plays an important role in achieving the delicious flavor and texture of the dish:

    • 200 grams of whole grain or gluten-free pasta (or any pasta of your choice)
    • Whole grain provides more fiber, while gluten-free options cater to those with dietary restrictions.

    • 150 grams of fresh spinach

    • Packed with nutrients, spinach adds a vibrant color and a wealth of vitamins.

    • 100 grams of feta cheese (or a vegan alternative)

    • Feta adds a creamy taste while staying lower in fat than many other cheeses.

    • 3 tablespoons of olive oil

    • Healthy fats from olive oil enhance flavor and support heart health.

    • 2 cloves of garlic, minced

    • Garlic not only elevates the flavor profile but also offers health benefits.

    • Salt and pepper to taste

    • Essential for bringing out the flavors; adjust according to your preference.

    • Red pepper flakes (optional)

    • For a bit of heat and excitement in every bite!

    • Juice from half a lemon

    • To add brightness and balance to the dish.

    Dietary Substitutions to Customize Your Easy Spinach And Feta Pasta Recipe

    When preparing this Easy Spinach And Feta Pasta Recipe, customization is key. Here are some great dietary substitutions:

    • Pasta Options:
    • Quinoa or lentil pasta can be used to achieve higher protein content.

    • Feta Alternatives:

    • For a vegan version, consider using tofu feta or cashew cheese.

    • Spinach:

    • Kale, Swiss chard, or frozen spinach can be substituted in equal amounts, if necessary.

    • Olive Oil:

    • Other healthy oils like avocado oil can easily replace olive oil.

    • Garlic:

    • Garlic powder can be a useful substitute if you don’t have fresh garlic available.

    This flexibility makes the Easy Spinach And Feta Pasta Recipe suitable for various dietary needs, ensuring everyone can enjoy a plateful.

    How to Prepare the Perfect Easy Spinach And Feta Pasta Recipe: Step-by-Step Guide

    Ready to whip up your Easy Spinach And Feta Pasta Recipe? Follow these simple steps to achieve the perfect dish every time:

    1. Prepare the Base:
      Begin by bringing a large pot of salted water to a boil. Add the pasta according to the package instructions, cooking until al dente. This typically takes about 8-10 minutes for most pasta varieties.

    2. Sauté the Garlic:
      While the pasta cooks, heat a large skillet over medium heat. Add the olive oil and then the minced garlic. Sauté for 1-2 minutes until fragrant, being cautious not to burn the garlic.

    3. Add the Spinach:
      Incorporate the fresh spinach into the skillet. Stir frequently until the spinach wilts, which should take about 3-4 minutes. If you’re using frozen spinach, allow it ample time to thaw before adding it to the skillet.

    4. Combine Ingredients:
      Drain the cooked pasta, reserving about a cup of the pasta water. Add the drained pasta to the skillet with the spinach and garlic mixture, mixing thoroughly.

    5. Crumble the Feta:
      Sprinkle the feta cheese over the pasta mixture. Stir gently to combine. If the pasta appears dry, incorporate some reserved pasta water a little at a time until you reach your desired consistency.

    6. Season and Serve:
      Season the dish with salt, pepper, and red pepper flakes to taste. Drizzle fresh lemon juice over the top for brightness. Serve immediately, garnishing with additional feta or herbs if desired.

    Tips for Dietary Adaptations:

    • For a gluten-free meal, use gluten-free pasta.
    • Skip the cheese or substitute with a plant-based cheese for a vegan-friendly option.
    • Enhance the dish by adding grilled chicken or shrimp for extra protein.

    There you go! In just a few simple steps, you’ve created a comforting and delicious Easy Spinach And Feta Pasta dish that’s sure to become a staple among your preferred pasta recipes.

    Mastering Easy Spinach And Feta Pasta Recipe: Advanced Tips and Variations

    Now that you know how to make the Easy Spinach And Feta Pasta Recipe, let’s explore some advanced tips and variations to take your dish to the next level:

    1. Add a Protein:

    Incorporating grilled chicken, shrimp, or chickpeas can enhance the dish’s protein content, making it more satisfying for a main course.

    2. Vegetable Medley:

    You can increase the nutritional value by adding a variety of vegetables. Consider options like bell peppers, cherry tomatoes, or even asparagus. Each will provide a unique twist on flavor and texture.

    3. Herb Infusion:

    Fresh herbs, such as basil, parsley, or dill, can add a fragrant touch and elevate the overall taste profile. Consider tossing in fresh herbs right before serving or using dried herbs while simmering.

    4. Use Nuts or Seeds:

    To add crunch and additional nutrients, sprinkle some toasted pine nuts or sunflower seeds on top just before serving. They will provide a delightful contrast to the creamy feta.

    5. Flavor Enhancements:

    Trying different spices, like paprika or Italian seasoning, can customize the flavor further. Even a splash of balsamic vinegar or a dollop of pesto can enhance the dish’s complexity.

    With these tips and variations, you can truly make the Easy Spinach And Feta Pasta Recipe your own, ensuring it stays a favorite among your pasta recipes.

    How to Store Easy Spinach And Feta Pasta Recipe: Best Practices

    Properly storing your Easy Spinach And Feta Pasta Recipe can help you enjoy any leftovers while maintaining freshness. Here’s how to do it:

    1. Refrigeration:

    If you have leftovers, allow the dish to cool completely before transferring it to an airtight container. Refrigerated pasta dishes will keep well for up to 3-4 days.

    2. Freezing:

    To freeze your Easy Spinach And Feta Pasta, place the cooled pasta into a freezer-safe container or a heavy-duty freezer bag. Be sure to remove as much air as possible to prevent freezer burn. Use within 2-3 months for the best quality.

    3. Reheating:

    To reheat your pasta, you can opt for the microwave or stovetop. Add a splash of water or olive oil when reheating, and cover to retain humidity, ensuring the pasta doesn’t dry out.

    4. Make Ahead:

    If you’re meal prepping, consider cooking the pasta and spinach separately to combine them fresh in the week. Store the cooked pasta and toppings in separate containers to maintain quality.

    Following these storage practices ensures that you can enjoy your Easy Spinach And Feta Pasta Recipe over multiple meals while keeping it fresh and delicious!

    Nutritional Value of Easy Spinach And Feta Pasta Recipe

    Understanding the nutritional value of your meals is crucial for maintaining a balanced diet. Here’s a breakdown of the nutrition found in one serving of the Easy Spinach And Feta Pasta Recipe:

    • Calories: Approximately 350-400 calories per serving
    • Protein: 12-15 grams
    • Fat: 10-15 grams
    • Carbohydrates: 55-65 grams
    • Fiber: 5-7 grams
    • Sugar: 2-4 grams
    • Sodium: Varies based on feta and added salt

    Nutritional Highlights:

    • Vitamins and Minerals:
    • Spinach contributes significantly to vitamins A, C, and K, as well as iron and calcium.
    • Healthy Fats:
    • Olive oil and feta cheese provide healthy fats, essential for maintaining heart health.
    • High Fiber:
    • Whole grain or gluten-free pasta boosts fiber content, which is beneficial for digestion.

    This nutritional information makes the Easy Spinach And Feta Pasta Recipe a smart choice for anyone looking for satisfying pasta recipes that maintain a healthy profile!

    FAQs: Frequently Asked Questions About Easy Spinach And Feta Pasta Recipe

    Got questions about the Easy Spinach And Feta Pasta Recipe? Here are some frequently asked questions answered:

    1. Can I make this recipe vegan?

    Absolutely! You can easily make this dish vegan by omitting the feta or using a plant-based feta alternative, and just as flavorful results will follow.

    2. How can I make this dish gluten-free?

    Use gluten-free pasta options available at most grocery stores. The cooking methods remain the same.

    3. Can I add more vegetables to this recipe?

    Certainly! Feel free to experiment with ingredients like bell peppers, artichokes, or mushrooms for a more colorful and nutritious meal.

    4. How do I store any leftovers?

    Allow the dish to cool fully, then transfer it to an airtight container. Refrigerated leftovers are best consumed within 3-4 days.

    5. Can I prepare this dish in advance?

    Yes! You can cook the pasta and spinach separate from the sauce, storing them in the fridge and combining them just before serving for optimal flavor.

    These FAQs provide clarity on common concerns and ensure that you’re prepared to make the most of your Easy Spinach And Feta Pasta Recipe.


    There you have it! An easy guide to a wonderful dish that fits seamlessly into various lifestyles and dietary needs. So, grab your ingredients and give this Easy Spinach And Feta Pasta Recipe a try—taste the joy of simple, healthy cooking today!

  • The Best White Chocolate Chip Raspberry Bread

    The Best White Chocolate Chip Raspberry Bread

    The Best White Chocolate Chip Raspberry Bread: A Tropical Delight

    Introduction to The Best White Chocolate Chip Raspberry Bread

    When it comes to dessert recipes that combine convenience with delicious flavors, few can compete with The Best White Chocolate Chip Raspberry Bread. This delightful treat marries the sweetness of white chocolate with the tartness of fresh raspberries, creating a bread that is as aesthetically pleasing as it is scrumptious. Perfect for breakfast, an afternoon snack, or a light dessert, this bread is the epitome of versatility.

    What sets this recipe apart is its inherent simplicity. With minimal ingredients and straightforward instructions, even novice bakers can produce a loaf that looks and tastes gourmet. Not only is this recipe easy to whip up, but it can also cater to various dietary needs. Whether you prefer a vegan option, need gluten-free alternatives, or are counting calories, you’ll find this recipe adaptable.

    Moreover, indulging in this sweet bread doesn’t mean sacrificing health. Raspberries are packed with antioxidants and vitamins, making this treat a guilt-free pleasure. White chocolate, in moderation, adds a creamy twist without overpowering the natural flavors of the fruit. As a result, this bread becomes a delightful dessert option that allows you to enjoy sweet treats without compromising your health goals.

    In summary, The Best White Chocolate Chip Raspberry Bread is an excellent choice for home cooks, busy parents, students, and baking enthusiasts. It not only stands as a delicious treat but also serves as a testament to the idea that dessert can be both healthy and indulgent. So, roll up your sleeves, gather your ingredients, and get ready to create something spectacular!

    Benefits and Advantages of The Best White Chocolate Chip Raspberry Bread

    This recipe offers an array of benefits that make it an outstanding choice for any occasion, whether it’s a dinner party, a casual family gathering, or a simple weekday snack. One of the most significant advantages of The Best White Chocolate Chip Raspberry Bread is its ease of preparation. With straightforward instructions, you don’t need to be a masterchef to impress your friends and family. In less than an hour, you can have a loaf ready to serve.

    Another highlight of this bread is its health benefits. Raspberries are low in calories and rich in dietary fiber, which aids digestion and contributes to overall gut health. Additionally, these berries provide vitamins C and K, essential for immune function and healthy bones. The incorporation of white chocolate chips adds a touch of sweetness, elevating the flavor without making the treat overwhelmingly rich.

    The adaptability of this recipe is also a significant benefit. For those who are health-conscious, you can easily substitute ingredients to align with your dietary preferences. From vegan and gluten-free to low-calorie options, this recipe has something to offer everyone. For instance, replacing eggs with flaxseed meal and using a gluten-free flour blend can make this bread accessible for those with specific dietary restrictions.

    Moreover, this enticing baked good not only satisfies your sweet tooth but also encourages creativity in the kitchen. Feel free to toss in additional mix-ins like nuts or even coconut flakes for a tropical twist. The versatility of The Best White Chocolate Chip Raspberry Bread makes it an exemplary addition to your collection of dessert recipes, inspiring you to explore new flavors and textures with each bake.

    Ultimately, the combination of simplicity, health benefits, and versatility is what makes this raspberry bread stand out. It’s more than just a treat; it’s a delightful experience waiting to be shared with friends, family, or even enjoyed solo with a hot cup of tea.

    Ingredients Overview

    Essential Ingredients for The Best White Chocolate Chip Raspberry Bread

    To create The Best White Chocolate Chip Raspberry Bread, gather the following ingredients:

    • 1 ½ cups all-purpose flour (or gluten-free flour): The base of the bread, providing structure and texture. For a gluten-free version, use a blend designed for baking.
    • 1 cup fresh raspberries: These juicy fruits add tartness and moisture, enhancing the bread’s flavor.
    • ½ cup white chocolate chips: Offering sweetness and a creamy texture that complements the tart raspberries.
    • ½ cup granulated sugar (or coconut sugar): For sweetness; coconut sugar can add a caramel note, appealing to health-conscious bakers.
    • 2 large eggs (or flaxseed meal for vegan option): Eggs help bind the ingredients; for a vegan version, use 2 tablespoons of flaxseed meal mixed with 6 tablespoons of water.
    • ½ cup vegetable oil (or applesauce): Oil contributes to moisture; applesauce can reduce calories and fat in a low-calorie version.
    • 1 teaspoon baking powder: A vital leavening agent that makes the bread rise.
    • 1 teaspoon vanilla extract: Enhances flavor and adds depth to the bread.
    • ½ teaspoon salt: Balances sweetness and rounds out flavors.

    Dietary Substitutions to Customize Your The Best White Chocolate Chip Raspberry Bread

    This recipe is inherently versatile, allowing for multiple substitutions based on dietary needs or ingredient availability:

    • Gluten-Free: Use a gluten-free all-purpose flour blend, ensuring it contains xanthan gum or a binding agent to mimic the structure of wheat flour.
    • Vegan: Substitute eggs with flaxseed meal or a commercial egg replacer. Opt for non-dairy chocolate chips to maintain the vegan status.
    • Lower Calorie: Replace sugar with a zero-calorie sweetener or reduce the amount of white chocolate chips and substitute with a mix of fresh fruits and nuts for added nutrition without added sugars.
    • Additional Mix-ins: Feel free to add ingredients like chopped nuts, chia seeds for extra fiber, or coconut flakes for a tropical twist. Each adds unique flavors and textures, enhancing both the nutritional profile and taste of the bread.

    With these substitutions, each home cook can craft a version of The Best White Chocolate Chip Raspberry Bread that aligns with their dietary restrictions, making it a beloved masterpiece for everyone at the table.

    How to Prepare the Perfect The Best White Chocolate Chip Raspberry Bread: Step-by-Step Guide

    Baking the perfect loaf of White Chocolate Chip Raspberry Bread is a straightforward process that anyone can master. Just follow these easy steps:

    1. Preheat the Oven: Set your oven to 350°F (175°C). Preheating ensures even baking, which is crucial for the texture of the bread.

    2. Prepare the Baking Pan: Grease a 9×5 inch loaf pan with cooking spray or line it with parchment paper. This step will make it easier to remove the bread once baked.

    3. Mix Dry Ingredients: In a large mixing bowl, combine 1 ½ cups of all-purpose flour, 1 teaspoon of baking powder, and ½ teaspoon of salt. Whisk them together to ensure even distribution.

    4. Mix Wet Ingredients: In a separate bowl, whisk together ½ cup of granulated sugar, ½ cup of vegetable oil, 2 large eggs (or flaxseed meal mixed with water for the vegan option), and 1 teaspoon of vanilla extract until the mixture is smooth and well combined.

    5. Combine Dry and Wet Mixtures: Gradually add the dry ingredients to the wet mixture, stirring gently until just combined. Do not over-mix, as this can result in dense bread.

    6. Fold in Raspberries and Chocolate Chips: Carefully fold in 1 cup of fresh raspberries and ½ cup of white chocolate chips. Take care not to crush the raspberries; you want to maintain their shape for bursts of flavor in every slice.

    7. Pour into the Pan: Transfer the batter into the prepared loaf pan, spreading it evenly.

    8. Bake the Bread: Bake in the preheated oven for 50 to 60 minutes or until the top is golden brown and a toothpick inserted in the center comes out clean.

    9. Cool: Once baked, remove the pan from the oven and allow the bread to cool in the pan for about 10 minutes. Then, transfer it to a wire rack to cool completely.

    10. Slice and Serve: Once cooled, slice the bread into even pieces. Serve as is or with a spread of butter for an extra treat!

    Customizing Your Preparation

    Feel free to experiment with timing and texture based on your preferences. For instance, if you prefer a softer bread, reduce the baking time slightly. You can also add a sprinkle of powdered sugar on top for a decorative touch before serving. Enjoy this delightful dessert with friends, family, or simply as a treat for yourself!

    Mastering The Best White Chocolate Chip Raspberry Bread: Advanced Tips and Variations

    To elevate your bread-baking game, consider these advanced tips and variations:

    • Ingredient Quality: Always opt for high-quality chocolate chips and fresh raspberries. The better the ingredients, the more flavorful your bread will be.

    • Experiment with Flavors: Try adding a teaspoon of almond extract for a subtle nutty flavor that pairs wonderfully with raspberries and white chocolate.

    • Use Frozen Raspberries: If fresh raspberries are out of season, frozen raspberries work perfectly in this recipe. Just be sure to gently fold them in straight from the freezer to minimize the bleeding of color.

    • Top It Off: For an added layer of sweetness and texture, consider icing or drizzling melted white chocolate on top of the finished loaf. Simply melt some white chocolate, and use a spoon to drizzle it over the cooled bread.

    • Storage Options: For a unique twist, slice the cooled bread and assemble it into an easy trifle by layering it with whipped cream and more fresh raspberries!

    • Make Muffins Instead: If you prefer individual servings, use a muffin tin! Simply adjust the baking time to around 20-25 minutes, and you’ll have delicious raspberry white chocolate muffins perfect for on-the-go snacks.

    By incorporating these tips and suggestions, you’ll not only master The Best White Chocolate Chip Raspberry Bread but also encourage curiosity and innovation in your baking adventures.

    How to Store The Best White Chocolate Chip Raspberry Bread: Best Practices

    Storing The Best White Chocolate Chip Raspberry Bread correctly will help maintain its flavors and freshness for days:

    • Refrigeration: Once the bread has completely cooled, wrap it tightly in plastic wrap or aluminum foil. Place it in an airtight container before refrigerating. This method can keep your bread fresh for up to a week.

    • Freezing: For longer storage, consider freezing your loaf. Wrap it tightly in plastic wrap, then in aluminum foil. This double-wrapping method prevents freezer burn and can keep the bread fresh for up to three months. When ready to enjoy, simply thaw it at room temperature or warm it up in the oven.

    • Reheating: To reheat slices, place them in a toaster or oven at 350°F (175°C) for 5-10 minutes to restore some freshness. Alternatively, you can microwave slices for about 10-15 seconds for a quick warm-up.

    These storage options ensure that you can enjoy your delicious bread long after you’ve baked it.

    Nutritional Value of The Best White Chocolate Chip Raspberry Bread

    Understanding the nutritional value of The Best White Chocolate Chip Raspberry Bread can help you enjoy it guilt-free. Here’s a breakdown of the key nutritional components per slice (based on a standard recipe divided into 12 slices):

    • Calories: Approximately 180-200 calories
    • Total Fat: 7-9g
    • Saturated Fat: 3-4g
    • Cholesterol: 30mg (if using eggs)
    • Sodium: 150mg
    • Carbohydrates: 28-32g
    • Fiber: 1g
    • Sugars: 8-10g
    • Protein: 3g (varies based on egg substitute)

    Health Insights:

    • Low in Calories: The inclusion of raspberries not only adds flavor but also enhances the fruitiness of each slice while keeping the calorie count reasonable.
    • Antioxidant-Rich: Raspberries are high in antioxidants, which can boost overall health.
    • Variability: Adjustments like using applesauce instead of oil or reducing sugar can further lower calories and fat content while maintaining taste.

    Understanding the nutritional value of this dessert can allow you to make more informed choices. It serves as a sweet treat that can fit into various dietary profiles without the guilt associated with many other dessert recipes.

    FAQs: Frequently Asked Questions About The Best White Chocolate Chip Raspberry Bread

    Can I use frozen raspberries instead of fresh?

    Yes, frozen raspberries work well in this recipe! Just remember not to thaw them beforehand to prevent excessive juice from bleeding into the batter.

    Is it possible to make this bread vegan?

    Absolutely! Substitute the eggs with flaxseed meal mixed with water or a commercial egg replacer, and use non-dairy white chocolate chips for a completely vegan treat.

    How do I know when the bread is done baking?

    The bread is done when the top is golden brown, and a toothpick inserted in the center comes out clean or with just a few crumbs clinging to it.

    Can I make this bread gluten-free?

    Definitely! Just replace the all-purpose flour with a gluten-free flour mix, ensuring it has a binding agent like xanthan gum for the best results.

    How long does the bread stay fresh?

    When stored properly in an airtight container at room temperature, the bread will remain fresh for about 3-5 days. For longer storage, refrigerate or freeze it.

    What are some variations I can try?

    Feel free to add nuts, use a different type of chocolate, or add flavored extracts to experiment with new flavors! The possibilities are as endless as your creativity.

    Can I double the recipe?

    Yes, you can easily double the recipe. Just make sure to adjust your baking times slightly, especially if using larger loaf pans.

    How can I make the bread extra moist?

    Using applesauce as a substitute for some of the oil and incorporating buttermilk or yogurt into the batter can increase moisture and tenderness.

    With these frequently asked questions answered, you’ll feel confident to dive into baking The Best White Chocolate Chip Raspberry Bread, enriching your dessert recipes repertoire. Enjoy sharing it with loved ones or indulging in it all by yourself—either way, you’re in for a treat!