Easy Brown Sugar Overnight Oats Breakfast: A Tropical Delight
Introduction to Easy Brown Sugar Overnight Oats Breakfast
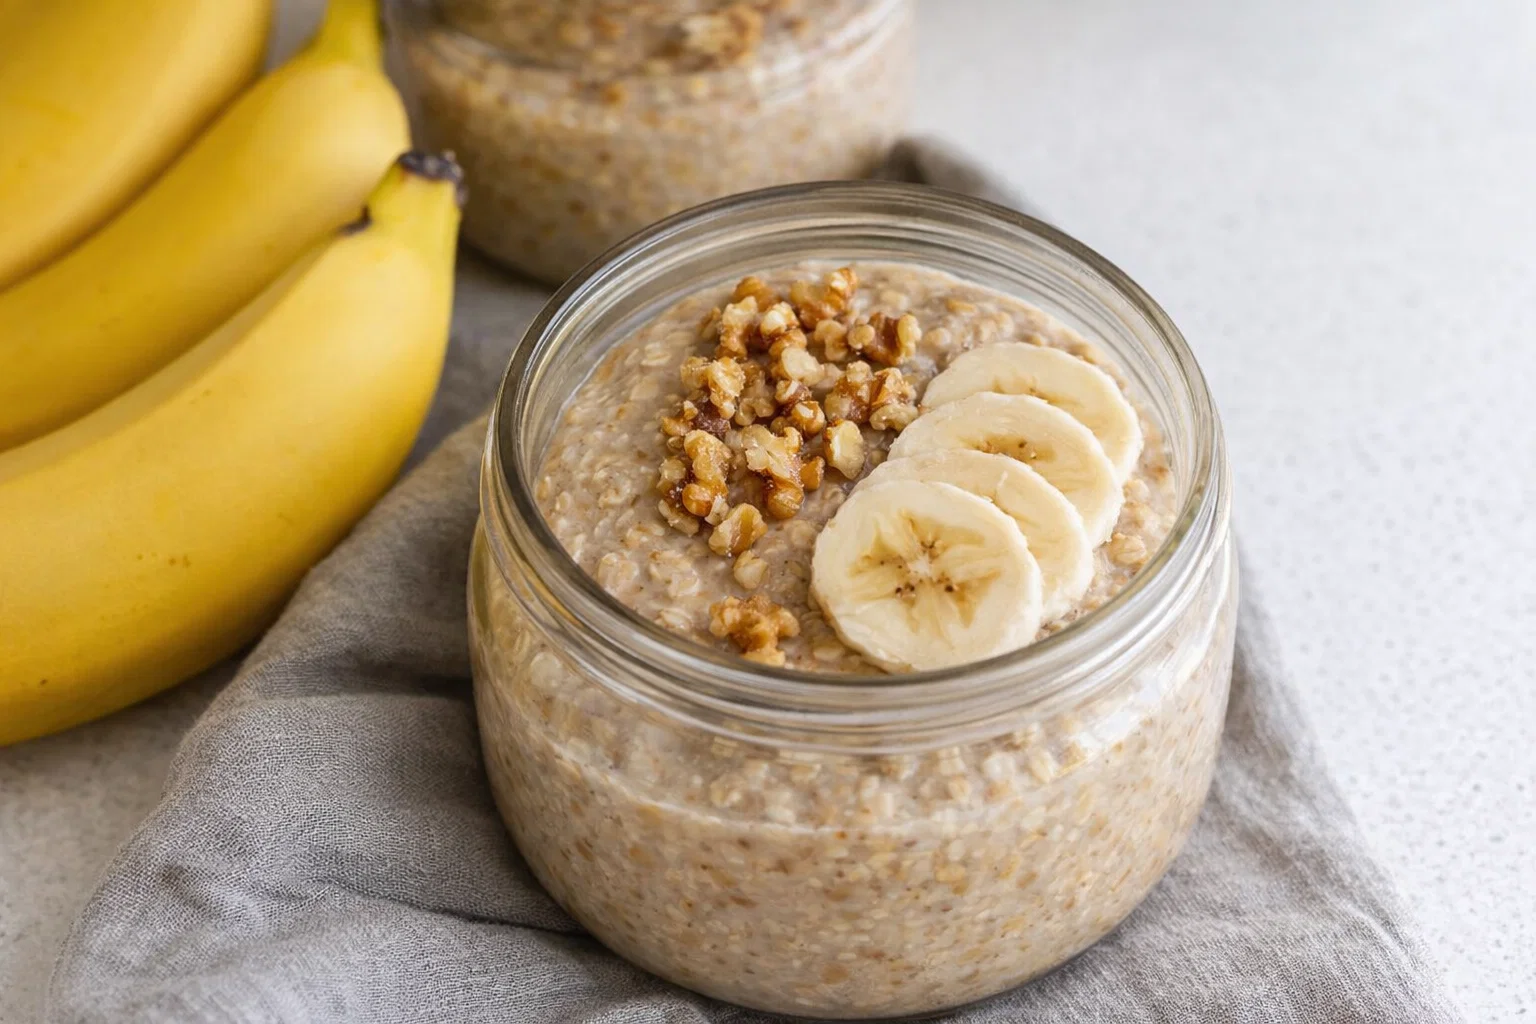
If you’re searching for a simple, nutritious breakfast that is as delicious as it is easy to prepare, look no further than this Easy Brown Sugar Overnight Oats Breakfast. Overnight oats have taken the breakfast scene by storm, and for good reason. They require minimal effort, are incredibly versatile, and can fit into a variety of dietary lifestyles, making them perfect for busy parents, students, working professionals, and health-conscious individuals alike. With just a few ingredients and a little bit of time in the fridge, you can wake up to a delightful, creamy bowl of oats that will keep you satisfied all morning long.
This recipe features brown sugar, which adds a rich sweetness to the oats, perfectly complemented by a touch of vanilla and a sprinkle of cinnamon for an extra depth of flavor. Whether you’re vegan, gluten-free, or simply focused on incorporating more nutritious options into your diet, this easy overnight oats recipe is adaptable to meet those requirements. Healthy, hearty, and undeniably delicious, it’s a perfect blend of convenience and goodness. So grab your favorite jar, mix your ingredients, and let them soak overnight for a breakfast you’ll look forward to day after day!
Benefits and Advantages of Easy Brown Sugar Overnight Oats Breakfast
Choosing overnight oats for breakfast is not just a trendy choice; it’s a practical one with multiple benefits. One major advantage of this recipe is its simplicity. Preparing overnight oats takes only a matter of minutes, making it an excellent option for those hectic mornings. With this easy recipe, you can mix your ingredients in a jar the night before and let the fridge do the work. No cooking is required, which also means fewer dishes to clean afterward!
From a health perspective, overnight oats are packed with essential nutrients. Rolled oats, the primary ingredient, are a powerhouse of whole grains, providing a significant source of dietary fiber that helps keep you feeling full longer. This makes them a smart option for anyone looking to manage their weight or simply make healthier food choices. Additionally, this breakfast is highly customizable, allowing you to tailor the ingredients to suit your dietary needs. Want to go vegan? Substitute the milk with your favorite plant-based alternative. Gluten-free? Just ensure your oats are certified gluten-free. This flexibility makes overnight oats appealing to a broad audience, ensuring there’s something for everyone.
Moreover, overnight oats can contribute to better digestion, thanks to the soluble fiber they contain. They have a low glycemic index, which helps regulate blood sugar levels, making them a suitable option for diet-conscious individuals, including those with diabetes. Ultimately, the Easy Brown Sugar Overnight Oats Breakfast combines convenience with nutrition and versatility, making it the perfect meal to kickstart your day!
Ingredients Overview
Essential Ingredients for Easy Brown Sugar Overnight Oats Breakfast
To make your Easy Brown Sugar Overnight Oats, you’ll need the following essential ingredients:
- 1/2 cup rolled oats: Provide the base of your overnight oats; they are whole grains packed with fiber and nutrients.
- 1 cup milk of choice (dairy, almond, oat, or soy): Moisture for the oats; choose plant-based milk for vegan options.
- 2 tablespoons brown sugar: Sweetens the mixture; you can adjust to taste or replace with stevia or maple syrup.
- 1/2 teaspoon vanilla extract: Adds depth of flavor.
- 1/2 teaspoon ground cinnamon: Offers a warm spice that complements the brown sugar.
- 1/4 cup yogurt (optional): Adds creaminess and additional protein; choose plant-based yogurt for a vegan option.
- Fresh fruits or nuts for topping: Adds flavor, texture, and nutrients; options like bananas, berries, or almonds work beautifully.
This combination of ingredients not only creates a delightful flavor profile but also ensures a balanced meal filled with essential nutrients, catering to various dietary needs.
Dietary Substitutions to Customize Your Easy Brown Sugar Overnight Oats Breakfast
To further make the Easy Brown Sugar Overnight Oats work for you, consider these substitutions:
- Oats: If you have sensitivities, consider using gluten-free rolled oats or quick oats for a softer texture.
- Milk: Replace dairy milk with almond milk, coconut milk, or cashew milk for a creamy, plant-based option that fits the vegan lifestyle. For lower calories, opt for unsweetened versions.
- Brown Sugar: Swap brown sugar for honey, maple syrup, or coconut sugar for a healthier sweetener. Stevia or monk fruit sweetener can be used for a lower-calorie option.
- Yogurt: Greek yogurt can be substituted for standard yogurt if you want an extra protein boost, while non-dairy yogurt can keep it vegan-friendly.
- Toppings: Customize the toppings to your liking! Try adding chia seeds for added fiber, flaxseed for Omega-3s, or various fruits based on what you have on hand.
By making these substitutions, you can ensure this delicious breakfast meets your personal dietary needs while still delivering on taste and nutrition.
How to Prepare the Perfect Easy Brown Sugar Overnight Oats Breakfast: Step-by-Step Guide
Creating your Easy Brown Sugar Overnight Oats Breakfast is a straightforward process that requires little effort while providing maximum satisfaction. Follow these steps to achieve a delicious and creamy bowl of overnight oats.
-
Prepare the Base: In a medium-sized mixing bowl or a mason jar, combine 1/2 cup rolled oats with 1 cup of milk. If you’re using dairy-free milk, feel free to choose almond, coconut, or soy milk for added flavor.
-
Add Sweetness: Stir in 2 tablespoons of brown sugar to sweeten your mixture. Adjust this according to your taste preference; if you like it sweeter, feel free to add an extra teaspoon.
-
Incorporate Flavors: Mix in 1/2 teaspoon of vanilla extract for a lovely aromatic quality, along with 1/2 teaspoon of ground cinnamon to bring warmth to the dish.
-
Creamy Addition: If you opt for yogurt, add 1/4 cup of yogurt into the mixture. This step is optional but adds a delightful creaminess and protein boost.
-
Combine Well: Stir all the ingredients until they are well combined. Make sure the oats are evenly coated with the milk and sweetener to enhance their flavor.
-
Refrigerate Overnight: Transfer the mixture into the fridge to chill overnight, or for at least 4-5 hours. This allows the oats to absorb the liquid and become creamy and ready to eat.
-
Prepare for Serving: In the morning, remove your oats from the fridge and give them a good stir. If the mixture is too thick, add a splash of milk to achieve your desired consistency.
-
Add Toppings: Finally, top your oats with your choice of fresh fruits, nuts, or seeds. Consider sliced bananas, berries, or chopped nuts for flavor and crunch.
-
Enjoy: Your Easy Brown Sugar Overnight Oats Breakfast is now ready to enjoy! This dish can be eaten cold right out of the fridge, but feel free to microwave it if you prefer it warm.
-
Store Leftovers: If you have any leftovers, store them in an airtight container in the fridge for up to 3 days.
By following these steps, you’ll create a mouth-watering, nutritious breakfast that can be enjoyed any day of the week, accommodating various tastes and dietary needs.
Mastering Easy Brown Sugar Overnight Oats Breakfast: Advanced Tips and Variations
Once you’ve mastered the basics of the Easy Brown Sugar Overnight Oats Breakfast, you may want to explore some additional tips and variations to keep things exciting.
-
Experiment with Textures: For a creamy and more filling option, consider mixing in protein powder or nut butter, such as almond or peanut butter, before refrigerating. This will not only enhance flavors but also provide extra protein to fuel your day.
-
Try Different Sweeteners: Instead of using brown sugar, try incorporating natural sweeteners like mashed banana or applesauce for a healthier twist. These options add sweetness and moisture while also giving you additional nutrients.
-
Add Superfoods: For a nutritional boost, consider mixing in superfoods like chia seeds, flaxseeds, or hemp seeds. They will add texture and are excellent sources of healthy fats and proteins.
-
Seasonal Variations: Seasonal fruits like pumpkin puree (in the fall) or fresh berries (in summer) can make your overnight oats feel fresh and exciting. Adjust your spices accordingly—like adding pumpkin spice for autumn.
-
Savory Option: If you prefer a savory take, skip the sweeteners, and mix in diced vegetables like spinach or cherry tomatoes, topped with an avocado slice or a soft-boiled egg for a filling and nutritious breakfast.
-
Batch Cooking: To save time, consider preparing multiple servings at once. Portion them into jars, and you’ll have breakfast ready for several days.
By trying out these tips and variations, you can unravel the full potential of overnight oats and keep your breakfast routine dynamic and satisfying.
How to Store Easy Brown Sugar Overnight Oats Breakfast: Best Practices
Proper storage of your Easy Brown Sugar Overnight Oats is key to ensuring freshness and flavor. Here are the best practices for refrigerating, freezing, and reheating your oats:
-
Refrigeration: Store your prepared overnight oats in an airtight container in the refrigerator. This method not only keeps them fresh but also prevents any contamination from other foods. Oats can typically last up to 3-5 days in the fridge, making it a convenient option for meal prep.
-
Freezing: If you anticipate not eating the oats within a few days, consider freezing portions. Use freezer-safe containers or jars, leaving some space at the top to allow for expansion. When you’re ready to enjoy, simply thaw overnight in the fridge or set out at room temperature for a few hours before consuming.
-
Reheating: If you prefer warm oats, you can microwave them for about 30-60 seconds. Stir well before eating. If the oats have become too thick after refrigeration, add a splash of your milk of choice to reach desired consistency, and mix before serving.
Following these storage practices ensures that your Easy Brown Sugar Overnight Oats maintain their taste, texture, and nutrition, allowing you to enjoy them anytime you like!
Nutritional Value of Easy Brown Sugar Overnight Oats Breakfast
Understanding the nutritional value of your Easy Brown Sugar Overnight Oats is essential for maintaining a balanced diet. Here’s a breakdown of approximate nutrition values per serving, based on standard ingredients:
- Calories: Approximately 350 kcal
- Total Fat: 8g
- Saturated Fat: 2g
- Cholesterol: 5mg (if using dairy milk)
- Sodium: 150mg
- Total Carbohydrates: 56g
- Dietary Fiber: 7g
- Sugars: 12g (includes natural and added sugars)
- Protein: 12g (can vary based on milk and yogurt types)
These nutritional values can vary based on substitutions and portion sizes, but this base profile gives a good idea of the health benefits. The oats provide high fiber, which helps in digestion and keeps you fuller longer, while the addition of yogurt or milk adds protein and essential nutrients for an all-around satisfying meal. Customize your recipe by choosing low-calorie sweeteners and non-fat dairy alternatives for a healthier option!
FAQs: Frequently Asked Questions About Easy Brown Sugar Overnight Oats Breakfast
1. Can I prepare overnight oats in advance?
Absolutely! Overnight oats are perfect for meal prep. You can prepare several jars at once and keep them in the fridge for up to 3-5 days.
2. Can I use instant oats instead of rolled oats?
Yes, you can use instant oats, but keep in mind that the texture will be different. They may become mushy, so adjust the liquids accordingly.
3. What can I use instead of brown sugar?
You can substitute brown sugar with honey, maple syrup, agave syrup, or any natural sweetener like stevia or erythritol.
4. Are overnight oats gluten-free?
They can be gluten-free, provided you use certified gluten-free oats, as regular oats may be processed in facilities that handle gluten.
5. How can I make my overnight oats more filling?
Adding nuts, seeds, or nut butters can increase the fiber and protein content, making the meal more satisfying and filling.
6. Can I eat overnight oats warm?
Yes! While they are commonly eaten cold, you can microwave them for a quick warm breakfast. Just be sure to add a little extra milk if needed.
7. Can I add different fruits and toppings?
Absolutely! Feel free to get creative with fruits, nuts, seeds, or nut butters. It’s the perfect recipe to experiment and customize based on your preferences.
8. How long do overnight oats last in the fridge?
Properly stored, they can last up to 3-5 days in the refrigerator, making them an ideal option for meal prep.
By providing these answers, you can address common concerns from readers and guide them toward making their own Easy Brown Sugar Overnight Oats Breakfast with confidence, reinforcing the recipe’s appeal.
By engaging with the topic intricately and holistically, this guide offers an in-depth look at creating and enjoying Easy Brown Sugar Overnight Oats for breakfast, ensuring ease of preparation while maximizing health benefits. Try it today to discover a delightful breakfast that seamlessly integrates into your lifestyle!