Crispy Celery Orange Salad: A Tropical Delight
Introduction to Crispy Celery Orange Salad
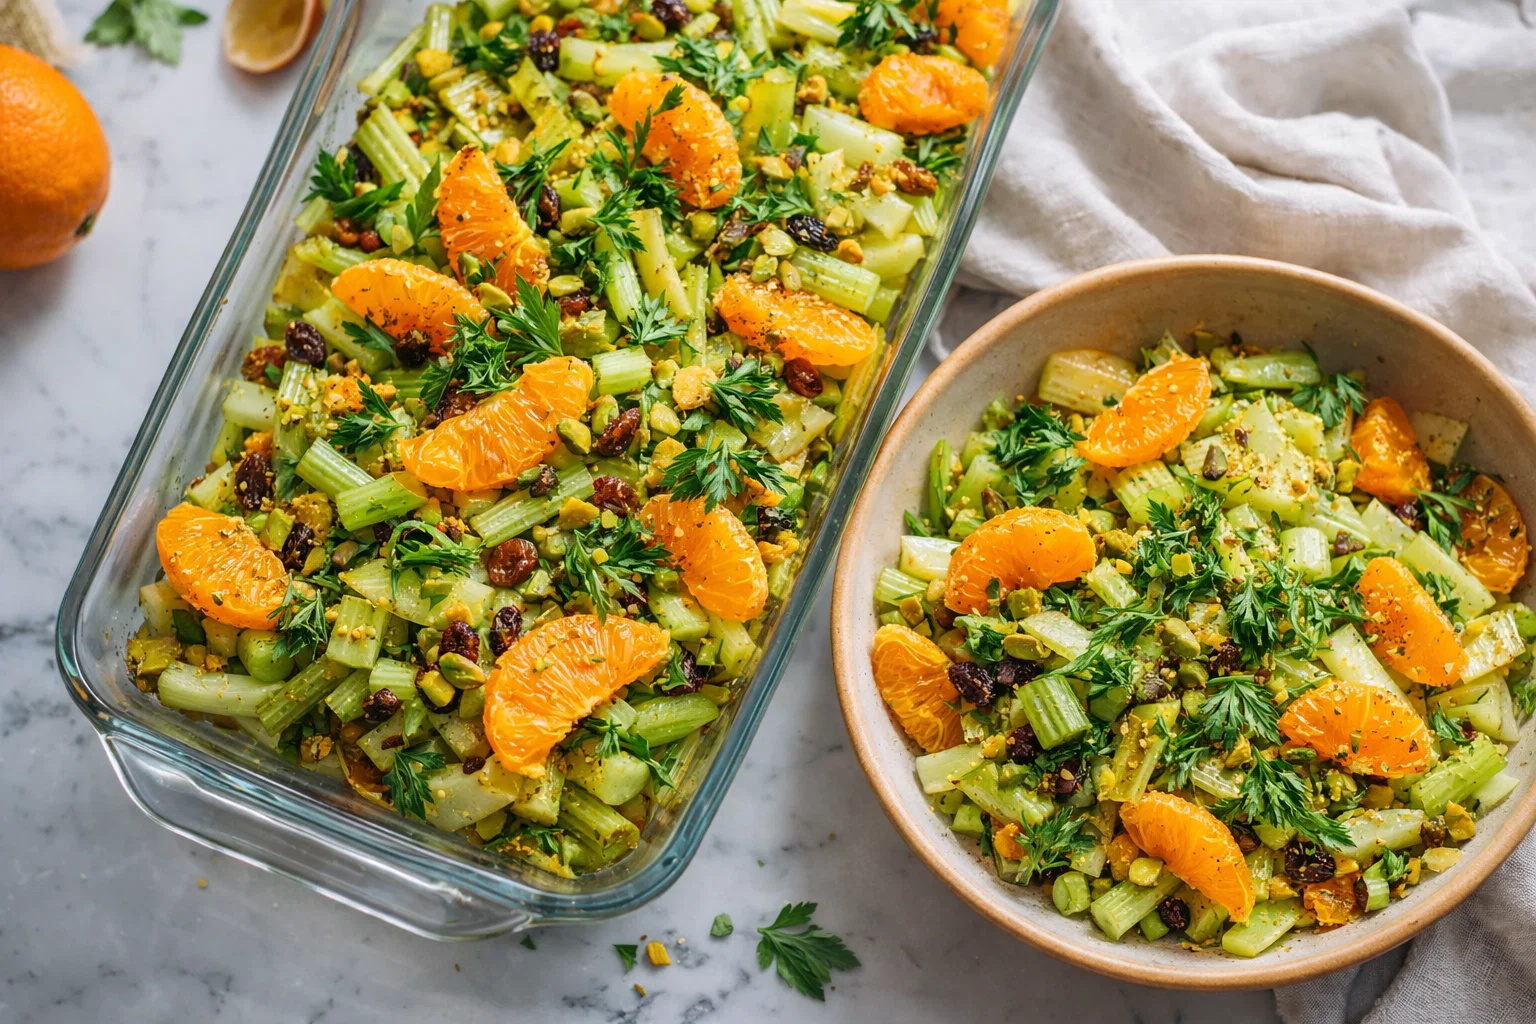
Are you on the lookout for healthy recipes that bring a delightful twist to your meals? Look no further than the Crispy Celery Orange Salad! This vibrant dish manages to balance freshness and flavor effortlessly, making it an excellent choice for a variety of occasions. The crunchy texture of celery paired with the sweet, zesty essence of oranges creates a refreshing salad that is as nourishing as it is delicious.
With its simple preparation, this salad is perfect for busy weekdays, festive gatherings, or even as a light meal on the go. Packed with vitamins and antioxidants, this dish is not only vegan and gluten-free but also low in calories. Whether you are a busy parent looking for quick healthy meal ideas or a food enthusiast eager to explore new flavors, this salad will inspire anyone to get creative in the kitchen. In addition to being a great option for those with dietary restrictions, it’s also a fantastic way to incorporate more fruits and vegetables into your diet, making it a staple in healthy cooking.
In this article, we will explore the key benefits of this unique salad, provide you with all the ingredients you need, and guide you step-by-step in creating your very own Crispy Celery Orange Salad. You’ll also find tips on storing leftovers and ways to customize the recipe to suit your taste preferences. So, let’s dive into the world of fresh, delicious flavors!
Benefits and Advantages of Crispy Celery Orange Salad
The Crispy Celery Orange Salad shines not only for its taste but also for its numerous health benefits. First and foremost, incorporating more vegetables and fruits into your diet is essential for a balanced lifestyle. The star ingredient, celery, is a powerhouse of nutrients. It is hydrating, low in calories, and abundant in both vitamins K and C, making it great for your skin and immune system.
Moreover, oranges are known for their high vitamin C content, which plays an integral role in boosting your immune system and improving skin health. This refreshing fruit also adds a natural sweetness that complements the celery perfectly. As such, this salad is an excellent choice for those who aim to maintain a healthy weight without sacrificing flavor.
Besides health advantages, one of the key features of this dish is its ease of preparation. In just a few steps, you can whip up a colorful and satisfying dish that requires minimal cooking—perfect for novice cooks or anyone who craves quick, tasty meals. Additionally, it can fit seamlessly into various dietary preferences or lifestyles, including vegan, vegetarian, and gluten-free diets.
Furthermore, this salad can be customized easily. You can introduce other healthy ingredients such as nuts, seeds, or legumes to enhance its nutritional profile. A sprinkle of walnuts or pumpkin seeds can add a dose of healthy fats and protein, making it heartier while keeping it among the best healthy recipes you can create.
In summary, the Crispy Celery Orange Salad is a standout option packed with flavor and health benefits. From its quick, simple preparation to its versatility, this dish can accommodate a wide audience, whether you’re a busy professional or someone simply looking to up their healthy eating game.
Ingredients Overview
Essential Ingredients for Crispy Celery Orange Salad
To make the Crispy Celery Orange Salad, gather the following ingredients:
- 4 stalks of celery (thinly sliced)
- Celery provides a satisfying crunch while being low in calories and high in vitamins.
- 2 medium oranges (peeled and segmented)
- Oranges add sweetness and are rich in vitamin C, enhancing your immune health.
- 1/4 cup of red onion (finely chopped)
- This brings a slight kick and flavor depth while offering anti-inflammatory benefits.
- 1/4 cup of fresh parsley (chopped)
- Parsley contributes antioxidants and gives the salad a fresh touch.
- 2 tablespoons of extra virgin olive oil
- A healthy fat source, this oil is beneficial for heart health.
- 1 tablespoon of apple cider vinegar
- Helps promote digestion and adds a tangy flavor
- Salt and pepper to taste
- Essential for balancing flavors.
This recipe is naturally gluten-free and vegan, making it suitable for those following specialized diets. If you prefer alternative dressings, consider using lemon juice or coconut yogurt to dress your salad, catering to your own taste preferences while keeping it among the nutritious recipes.
Dietary Substitutions to Customize Your Crispy Celery Orange Salad
The beauty of the Crispy Celery Orange Salad lies in its flexibility. Here are some substitutions and additions to fit various dietary needs:
- For a Protein Punch: Add chickpeas or black beans for added protein and fiber, creating a more filling meal.
- For Crunch Lovers: Top off your salad with sunflower seeds or crushed almonds for healthy fats and an extra crunch.
- For a Sweet Twist: Incorporate slices of avocado for creaminess while also boosting the nutrient content and healthy fats.
- If You Want Extra Flavor: Consider adding feta or goat cheese (if not making it vegan) for a savory note.
Feel free to experiment with ingredients based on what you have on hand. The goal is to create a salad that suits your specific tastes and nutritional needs—truly a hallmark of healthy recipes.
How to Prepare the Perfect Crispy Celery Orange Salad: Step-by-Step Guide
Ready to create your own Crispy Celery Orange Salad? Follow these simple steps:
-
Prepare the Base: Start by thoroughly washing the celery stalks under running water. Remove any dirt or debris. Once cleaned, slice them thinly on a diagonal to enhance their visual appeal.
-
Segment the Oranges: Peel the oranges carefully. Use a sharp knife to cut between the membranes and release the segments. Aim for bite-sized pieces, ensuring that you capture as much juice as possible, as this will add flavor to the salad.
-
Chop the Onions: Finely chop the red onion. If you’re sensitive to their strong flavor, consider soaking them in cold water for 10 minutes before draining to mellow the taste.
-
Chop the Parsley: Rinse the fresh parsley and shake off excess water. Remove the leaves from the stems and chop them coarsely for a burst of color and flavor.
-
Combine Ingredients: In a large mixing bowl, combine the sliced celery, orange segments, chopped onion, and parsley. Toss gently to mix the ingredients while preserving the integrity of the orange segments.
-
Make the Dressing: In a small bowl, whisk together the extra virgin olive oil, apple cider vinegar, salt, and pepper. Adjust the seasoning to your preference.
-
Dress the Salad: Pour the dressing over the salad mixture and gently toss to combine, ensuring that the dressing evenly coats all ingredients.
-
Chill and Serve: For optimal flavor, let the salad chill in the refrigerator for 15-30 minutes before serving. This time allows the flavors to meld together beautifully.
Altogether, this dish can be prepared in under 30 minutes, and it can be adjusted for any dietary needs. Feel free to use alternative bases, dressings, or toppings to cater to specific diets or preferences, making your salad truly unique while keeping it in line with the concept of healthy recipes.
Mastering Crispy Celery Orange Salad: Advanced Tips and Variations
Now that you have your base recipe, let’s take your Crispy Celery Orange Salad to the next level. Here are some advanced tips and variations to consider:
-
Experiment with Citrus: While oranges are a fantastic choice, mix it up with other citrus fruits like grapefruit or tangerines for a different flavor profile. Each fruit brings a unique sweetness or tanginess that changes the dish entirely.
-
Add Seasonal Vegetables: During different seasons, consider adding veggies like finely chopped bell peppers or grated carrots for extra color and nutrition. These additions make the salad more robust and appealing.
-
Herb Variations: Consider using basil or mint in addition to or instead of parsley. These herbs can add unexpected flavors that elevate the dish.
-
Heat Things Up: If you enjoy a little kick, add chopped jalapeño or a sprinkle of cayenne pepper to the dressing. The zing can enliven the salad and create an exciting contrast to the sweetness of the oranges.
-
Meal Prep Ready: This salad is even perfect for meal prep! Make a larger batch and store it without dressing—just add dressing when you’re ready to enjoy. This method preserves freshness and prevents sogginess.
Making these alterations ensures your Crispy Celery Orange Salad remains exciting and personalized while still aligning with the principles of healthy recipes.
How to Store Crispy Celery Orange Salad: Best Practices
Storage is key to maintaining the freshness of your Crispy Celery Orange Salad. To keep it tasting its best, follow these best practices:
-
Refrigeration: Store the prepared salad in an airtight container in the refrigerator. It typically lasts about three days. Ensure you separate any dressing if you expect to keep it for more than one day; this prevents the salad from getting soggy.
-
Freezing: It’s not recommended to freeze this salad due to the high water content in the celery and oranges, which can make them mushy upon thawing. Stick to refrigeration for best results.
-
Reheating: This salad is best served cold or at room temperature, so there’s no need for reheating. Instead, retrieve it from the fridge and enjoy it right away!
Using these methods, you can enjoy the full flavors of your Crispy Celery Orange Salad over several days, making it a convenient option within your collection of healthy recipes.
Nutritional Value of Crispy Celery Orange Salad
A brief overview of the nutritional profile of this salad will show how it aligns with a health-conscious approach to eating. Below is an estimated breakdown of the nutrition per serving (based on a 4-serving recipe):
- Calories: 100 kcal
- Protein: 2g
- Total Fat: 7g
- Saturated Fat: 1g
- Carbohydrates: 13g
- Dietary Fiber: 3g
- Sugars: 4g
- Vitamin C: 50% of the Daily Value (DV)
- Vitamin A: 20% of the DV
- Calcium: 4% of the DV
- Iron: 2% of the DV
Note that these values may fluctuate based on ingredient adjustments and additional toppings or dressings. Regardless, this salad maintains its standing as a nutrient-dense, low-calorie option, easily fitting within any roster of healthy recipes you wish to incorporate into your meals.
FAQs: Frequently Asked Questions About Crispy Celery Orange Salad
Can I make this salad ahead of time?
Yes! You can make the salad a few hours in advance. However, it’s best to dress it just before serving to maintain the crispness of the celery and prevent sogginess.
What can I substitute for the celery?
If you’re not a fan of celery, feel free to use cucumbers for a similar crunch or shredded cabbage for added texture.
Is this salad suitable for meal prep?
Absolutely! This salad is great for meal prepping. Just keep the dressing separate until you’re ready to eat, and it will stay fresh for several days.
Can I use bottled dressing instead of making my own?
Yes, using a store-bought dressing can save time. Just choose one that emphasizes fresh ingredients and flavor to keep it in line with healthy recipes.
How can I adapt this recipe for a low-carb diet?
You can replace the oranges with berries like strawberries or blueberries for a lower carbohydrate option, while still keeping the sweetness and vibrant flavors.
By addressing these common queries, we hope to equip you with the confidence you need to tackle this recipe and enjoy the benefits of incorporating more healthy recipes into your culinary repertoire.
In conclusion, the Crispy Celery Orange Salad is truly a celebration of flavors, textures, and health! With its simplistic preparation and versatile options, it’s sure to become a favorite in your kitchen. Enjoy crafting this refreshing dish that not only tantalizes your taste buds but also supports your health goals!