Blog

  • Simple Gluten Free Espresso Brownies

    Simple Gluten Free Espresso Brownies

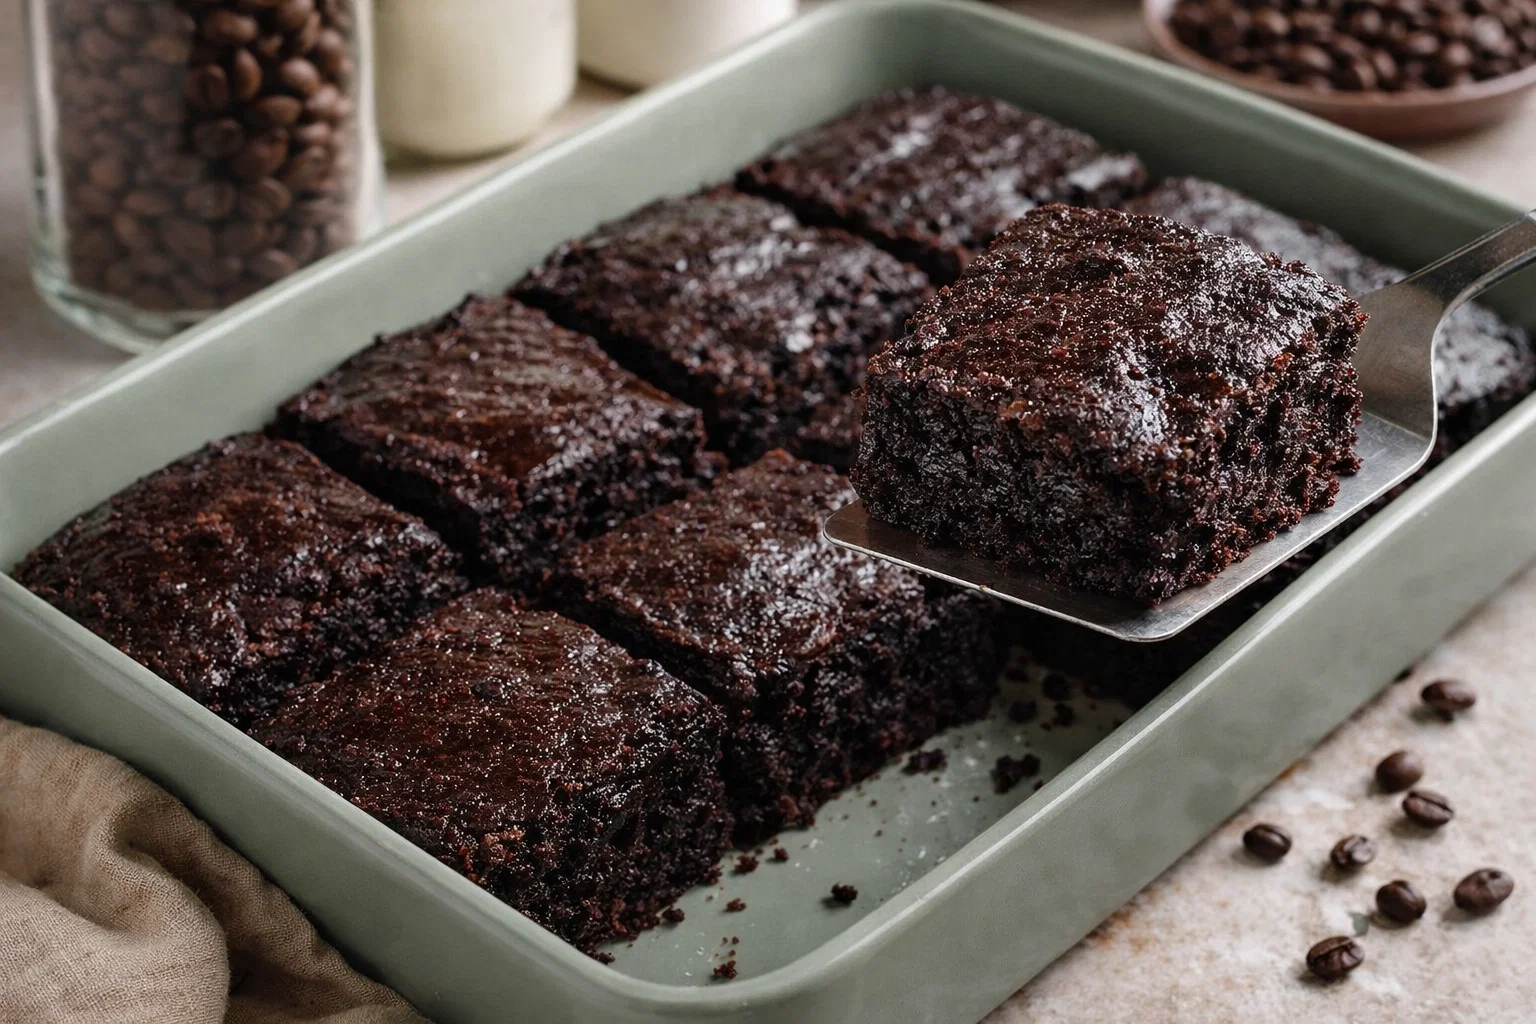
    Simple Gluten Free Espresso Brownies: A Tropical Delight

    Introduction to Simple Gluten Free Espresso Brownies

    If you’re hunting for an indulgent yet healthy treat to serve your family or friends, look no further! Welcome to the world of Simple Gluten Free Espresso Brownies—where rich chocolate and bold espresso combine to create a mouthwatering experience. Dessert recipes often fall into the trap of being overly complicated, but this delightful recipe stands against that norm. Perfect for home cooks, busy parents, students, and anyone looking for a quick and satisfying sweet treat, these brownies are not only simple to make but also cater to a variety of dietary needs.

    What makes these brownies truly irresistible? First, they are gluten-free, making them a suitable choice for those with dietary restrictions. Additionally, they can be made vegan and low in calories, meaning you can enjoy a delicious dessert without the guilt. The infusion of espresso adds a sophisticated twist that elevates the flavor profile to a whole new level. Each bite offers a luscious chocolate experience, enhanced by the rich aroma of coffee.

    Whether you’re a seasoned chef or just starting out in the kitchen, this recipe promises to inspire and guide you through the process. With its straightforward steps and readily available ingredients, you will be whipping up these brownies in no time. So, preheat that oven and get ready to impress your taste buds!

    Benefits and Advantages of Simple Gluten Free Espresso Brownies

    Easy Preparation

    One of the greatest advantages of Simple Gluten Free Espresso Brownies is their ease of preparation. For those leading busy lives, the last thing you want is a complicated dessert recipe to add stress to your day. This recipe takes minimal time and effort while delivering maximum flavor and satisfaction.

    Healthy Indulgence

    Unlike traditional brownies heavy with refined flour and sugar, this gluten-free version subverts those expectations with wholesome ingredients. Using almond flour or coconut flour not only gives these brownies their desired consistency but also adds a nutty flavor that pairs beautifully with espresso. Moreover, the substitutions for sugar can make this dessert a healthier option while still satisfying your sweet tooth.

    Versatile for Various Dietary Needs

    This recipe shines when accommodating various dietary needs. Whether you’re feeding vegan friends or looking for gluten-free options, these brownies can adapt to fit the bill. The ability to customize ingredients allows everyone to participate in the chocolatey goodness, making it a great option for potlucks, family gatherings, or even quiet nights in.

    Indulgently Delicious

    The unique combination of dark chocolate and espresso creates a decadent flavor that will please chocolate lovers and coffee aficionados alike. The richness of the brownies, combined with the coffee kick, ensures that you get a satisfying dessert experience without overwhelming sweetness. These brownies challenge conventional dessert recipes with their depth of flavor and satisfying texture, elevating them to crowd-pleaser status.

    In summary, the Simple Gluten Free Espresso Brownies not only fulfill your dessert cravings but also provide a health-conscious approach that everyone can enjoy. They are easy to make, flexible for dietary restrictions, and downright delicious, making them a staple in your baking repertoire.

    Ingredients Overview

    Essential Ingredients for Simple Gluten Free Espresso Brownies

    To create your Simple Gluten Free Espresso Brownies, you’ll need the following ingredients, along with precise measurements ensuring balanced flavors:

    • 1 cup almond flour: This gluten-free alternative to refined flour provides a perfect base for your brownies, adding a delightful nuttiness.
    • 1/2 cup unsweetened cocoa powder: Essential for that rich chocolate flavor, cocoa powder also contributes to the brownies’ fudgy texture.
    • 1/2 cup coconut sugar or maple syrup: For a healthier sweetener, you can use either option—providing a lower glycemic index than regular sugar.
    • 1/4 cup melted coconut oil or unsalted butter: This adds moisture and richness, giving your brownies that gooey texture.
    • 2 large eggs or flaxseed meal (for vegan option): If opting for a vegan version, use 2 tablespoons of flaxseed meal mixed with 5 tablespoons of water as a perfect egg substitute.
    • 2 tablespoons brewed espresso: This ingredient amplifies the chocolate taste and gives a unique coffee flavor throughout the dessert.
    • 1 teaspoon vanilla extract: Enhances overall flavor, bringing out the chocolate and coffee undertones.
    • 1/2 teaspoon baking soda: A crucial leavening agent that helps the brownies rise.
    • 1/4 teaspoon salt: Balances the sweetness while enhancing the overall flavor.

    Dietary Substitutions to Customize Your Simple Gluten Free Espresso Brownies

    While the ingredients listed above create a fantastic starting point, there are many ways to customize your brownies to fit dietary preferences or ingredient availability:

    • Flours: If almond flour is unavailable, you can substitute it with coconut flour (but reduce the amount to approximately 1/3 cup due to its absorbency) or a gluten-free all-purpose mix.

    • Sweeteners: For a low-calorie option, consider using stevia or erythritol, which can satisfy that sweet craving without the calories.

    • Butter Substitutes: If you don’t have coconut oil or want a dairy-free option, replace it with any neutral oil like avocado oil or applesauce for a lower-fat version.

    • Espresso: For those who prefer not to use coffee, you can easily swap espresso with strong brewed herbal tea (like roasted chicory) or simply leave it out for classic chocolate brownies.

    These substitutes allow you to cater to individual preferences without compromising on taste or texture, making these brownies the perfect choice for any occasion.

    How to Prepare the Perfect Simple Gluten Free Espresso Brownies: Step-by-Step Guide

    Now that you have gathered all your ingredients, it’s time to create your Simple Gluten Free Espresso Brownies. Follow these simple steps, and you will pull off a delicious dessert masterpiece effortlessly!

    1. Preheat the Oven: Preheat your oven to 350°F (175°C). This ensures even baking and helps develop the rich flavors.

    2. Prepare the Baking Dish: Grease an 8×8 inch baking pan with coconut oil or line it with parchment paper for easy removal later on.

    3. Mix Dry Ingredients: In a large mixing bowl, combine 1 cup of almond flour, 1/2 cup of unsweetened cocoa powder, 1 teaspoon of baking soda, and 1/4 teaspoon of salt. Whisk until thoroughly combined.

    4. Prepare Wet Ingredients: In another bowl, whisk together 2 large eggs (or your flaxseed mixture), 1/2 cup of coconut sugar (or choice of sweetener), 1/4 cup of melted coconut oil (or butter), 2 tablespoons of brewed espresso, and 1 teaspoon of vanilla extract. Make sure the mixture is smooth and well-blended.

    5. Combine Wet and Dry Ingredients: Pour the wet ingredients into the dry mixture. Using a spatula or wooden spoon, gently fold the ingredients together. Be careful not to overmix; a few lumps are perfectly fine.

    6. Transfer to Baking Dish: Scrape the batter into the prepared oven-safe baking pan and spread it evenly. The batter will be thick, so a spatula may help in smoothing the top.

    7. Bake the Brownies: Place in the preheated oven and bake for approximately 20-25 minutes. Make sure to check for doneness by inserting a toothpick into the center. It should come out with a few moist crumbs (not wet batter).

    8. Cool Before Serving: Once baked, remove the brownies from the oven and let them cool in the pan for 10 minutes. Then, lift the brownies out using the parchment paper (if used) and transfer them to a wire rack to cool completely.

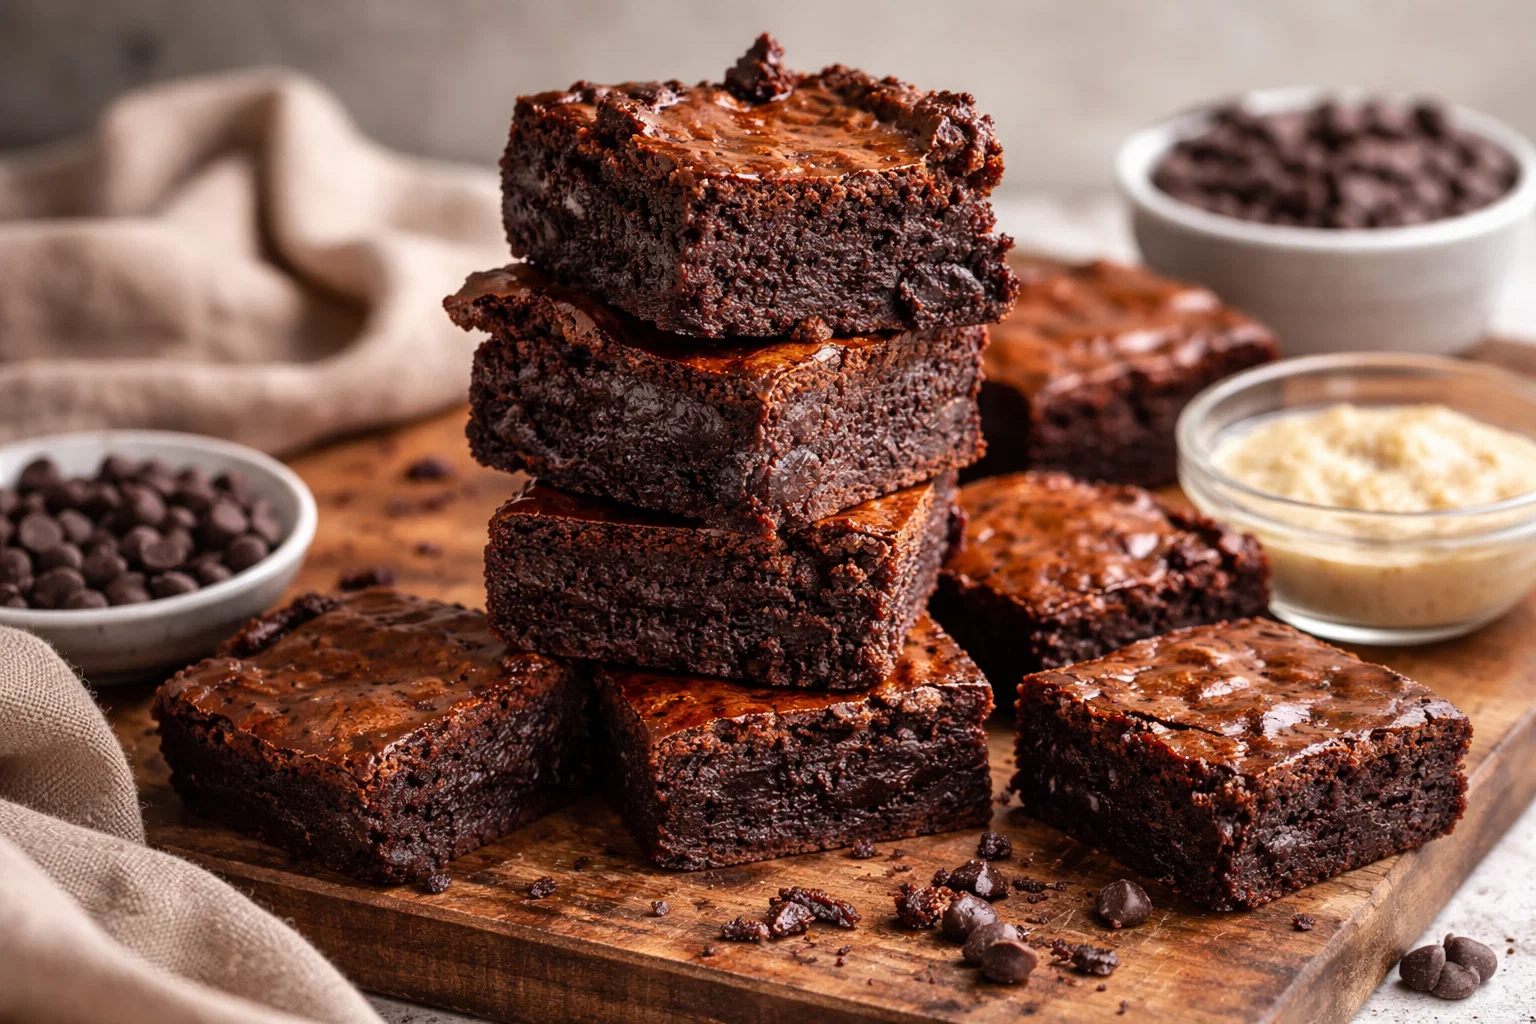
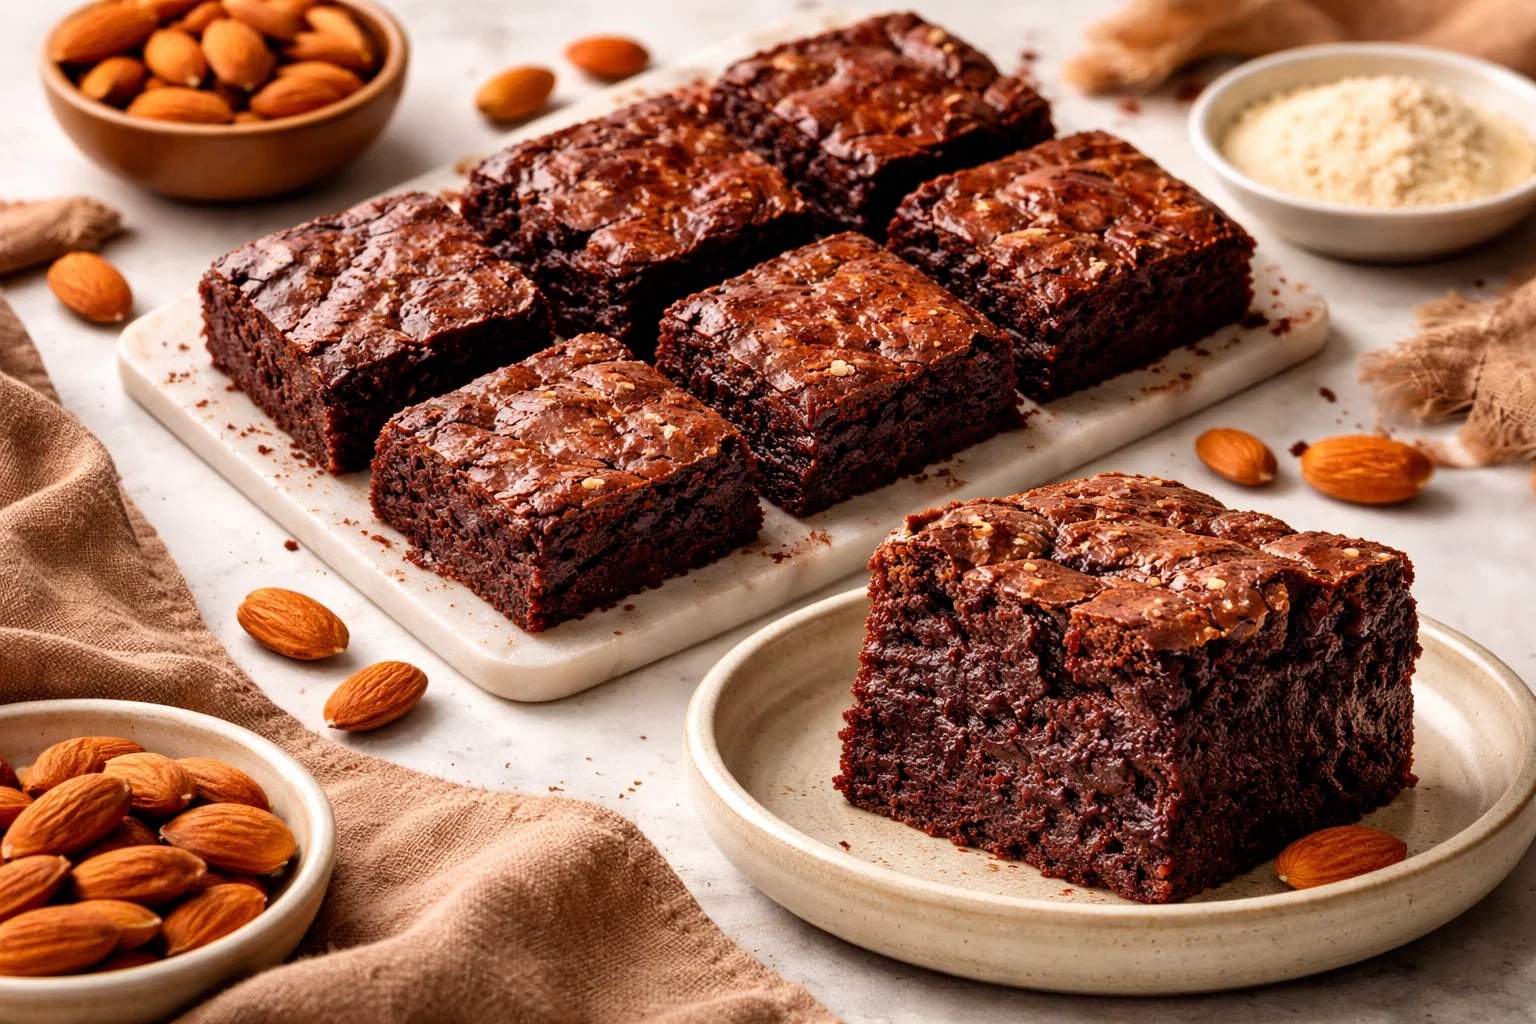
    9. Slice and Serve: After cooling, slice your brownies into squares. Drizzle with a touch of melted chocolate or sprinkle with powdered sugar if desired for extra flair. Enjoy your delightful creation!

    These brownies are perfect hot out of the oven, but they also store well and can be enjoyed later, making them an ideal choice for busy households and gatherings.

    Mastering Simple Gluten Free Espresso Brownies: Advanced Tips and Variations

    While the base recipe for Simple Gluten Free Espresso Brownies is excellent on its own, a few advanced tips will help you create a dessert that truly shines:

    Use Quality Chocolate

    For an extra indulgent experience, consider folding in chopped dark chocolate or chocolate chips into the batter before baking. This not only introduces delightful melty pockets of chocolate but also elevates the overall richness of the brownies.

    Add Nuts or Seeds

    For those who enjoy a more textured brownie, add in chopped walnuts, pecans, or seeds like chia or pumpkin seeds. This adds crunch and healthy fats—perfect for a filling snack.

    Flavor Infusions

    Spice things up by incorporating additional flavors. You can add a pinch of cinnamon or sea salt to the batter, or experiment with espresso powder instead of brewed espresso for a more intense flavor.

    How to Store Simple Gluten Free Espresso Brownies: Best Practices

    Proper storage can help extend the life of your Simple Gluten Free Espresso Brownies, ensuring they retain their deliciousness for as long as possible.

    Refrigeration

    To store brownies in the refrigerator, layer slices in an airtight container, separating each layer with parchment paper. They will last up to a week. The cold may even enhance the flavors!

    Freezing

    For longer storage, these brownies can be frozen. Wrap each brownie individually in plastic wrap and place them in a freezer-safe bag. When done correctly, they can stay fresh for up to three months.

    Reheating

    When you’re ready to enjoy a brownie from the fridge or freezer, simply heat it in the microwave for about 15-20 seconds for a warm, gooey deliciousness that tastes like fresh out of the oven.

    Nutritional Value of Simple Gluten Free Espresso Brownies

    Understanding the nutritional benefits of Simple Gluten Free Espresso Brownies can help you appreciate them even more. Here’s a breakdown of the estimated nutritional values per serving (1 brownie):

    • Calories: 150-200 (depending on sugar and oil used)
    • Fat: 10g (primarily from healthy oils)
    • Carbohydrates: 18g (from almond flour and coconut sugar)
    • Protein: 4g (sourced from almond flour and eggs)
    • Fiber: 2g (can vary based on the flours and ingredients used)

    These brownies not only satisfy your cravings but also contribute nutrients beneficial for your health, making them a wise choice among dessert recipes.

    FAQs: Frequently Asked Questions About Simple Gluten Free Espresso Brownies

    Can I substitute almond flour for another flour?

    Yes! Almond flour can be replaced with coconut flour or a gluten-free all-purpose flour, though adjustments in quantity may be necessary due to differences in absorbency.

    How can I make these brownies vegan?

    To make vegan Simple Gluten Free Espresso Brownies, substitute eggs with ground flaxseed mixed with water or a commercial egg replacer.

    Can I use instant coffee instead of espresso?

    Certainly! If you don’t have espresso, instant coffee granules dissolved in hot water can work as a substitute.

    How do I know when the brownies are done baking?

    A toothpick inserted into the center should come out with a few moist crumbs attached. If it comes out clean, the brownies may be overbaked.

    How long do brownies last?

    These brownies will typically last up to one week in the refrigerator and can be frozen for up to three months when stored properly.

    Can I make these brownies ahead of time?

    Absolutely! These brownies can be made in advance and stored in the fridge or freezer, making them a great option for company or to have on hand for any sweet cravings.

    With your questions answered and taste buds piqued, you’re now fully equipped to bring the heavenly Simple Gluten Free Espresso Brownies to life in your kitchen! Enjoy this delightful treat that’s not only delicious but also adaptable to your dietary needs. Whether you serve them for dessert or keep the tempting squares on hand for a midday snack, these brownies are sure to impress. Happy baking!

  • Fresh Greek Broccoli Salad

    Fresh Greek Broccoli Salad

    Fresh Greek Broccoli Salad: A Tropical Delight

    Introduction to Fresh Greek Broccoli Salad

    Are you looking for an exquisite side dish that elevates your meals while being healthy and convenient? Look no further! Our Fresh Greek Broccoli Salad is a perfect fit for busy schedules, meal prepping, or health-conscious dining. This vibrant salad is not just visually enticing; it is a powerhouse of nutrients and flavor. Utilizing fresh and organic ingredients, this dish showcases broccoli’s delightful crunch and Greek flavors that will tantalize your taste buds.

    When considering healthy dinner recipes, this salad shines for its simplicity and flavorful profile. It’s vegan, gluten-free, and can be prepared in under 30 minutes, making it an excellent addition to any dining occasion, from casual family meals to elegant dinner parties. The combination of fresh vegetables, zesty lemon, and olives speaks to both flavor enthusiasts and health-conscious individuals alike.

    This recipe doesn’t just deliver on taste; it also comes with a host of health benefits. Broccoli is packed with essential vitamins and minerals, making it a superb addition to anyone’s diet. Whether you are a home cook, a busy parent, or someone venturing into healthy eating, this salad is tailored to fit your dietary preferences. Let’s dive into the myriad benefits and advantages that the Fresh Greek Broccoli Salad brings to your table.

    Benefits and Advantages of Fresh Greek Broccoli Salad

    Creating an enjoyable meal doesn’t have to be time-consuming, and this Fresh Greek Broccoli Salad exemplifies convenience without compromising on nutrition or flavor. Its appeal lies in its array of health benefits. Broccoli is renowned for its cancer-fighting properties, loaded with vitamins A, C, and K, as well as dietary fiber that keeps your digestive system healthy. Additionally, this salad contains olive oil, which provides healthy fats essential for heart health.

    This salad stands out in the realm of healthy dinner recipes because of its versatile nature. It can serve as a side dish or a satisfying main course when you add protein-rich ingredients such as chickpeas or grilled chicken. Not only is it suitable for various dietary needs, but it also caters to those looking to lose weight. The combination of low-calorie vegetables ensures that you can enjoy a hearty serving without the guilt.

    Ease of preparation is another significant advantage. With minimal chopping and mixing involved, even novice cooks can master this recipe without breaking a sweat. For busy parents juggling time and energy, this dish can be made ahead, making it perfect for weeknight dinners or picnics. Iconically Mediterranean, this salad also offers a delightful culinary experience for food enthusiasts who enjoy exploring flavors from different cultures.

    In summary, the benefits of the Fresh Greek Broccoli Salad are abundant. It is delicious, nutritious, versatile, and quick to prepare. Perfect for anyone—from health-conscious eaters to busy professionals or home cooks—this salad supports a balanced diet and makes dining enjoyable. Now, let’s take a closer look at the ingredients that make this salad the star of your dinner table.

    Ingredients Overview

    Essential Ingredients for Fresh Greek Broccoli Salad

    To prepare your Fresh Greek Broccoli Salad, gather the following essential ingredients:

    • Broccoli florets (4 cups): The star of the dish, providing crunch and nutrition.
    • Cherry tomatoes (1 cup, halved): Adds vibrant color and natural sweetness.
    • Cucumber (1 medium, diced): Provides freshness and hydration.
    • Red onion (1 small, thinly sliced): Offers a mild bite, balancing flavors.
    • Kalamata olives (1/2 cup, pitted and halved): A staple in Greek cuisine for rich flavor.
    • Feta cheese (1/2 cup, crumbled): Introduces a creamy, tangy element. (optional for a vegan version)
    • Olive oil (1/4 cup): The healthy fat that elevates the overall flavor while promoting heart health.
    • Lemon juice (2 tablespoons): Freshens the salad and adds acidity.
    • Dried oregano (1 teaspoon): A classic herb that lends a Mediterranean touch.
    • Salt & pepper (to taste): Enhances the overall flavor.

    Dietary Options: All ingredients are naturally vegan and gluten-free, making it an excellent choice for various dietary restrictions. For a low-calorie alternative, reduce the feta cheese or swap it with nutritional yeast for a cheesy flavor without the calories.

    Dietary Substitutions to Customize Your Fresh Greek Broccoli Salad

    The beauty of the Fresh Greek Broccoli Salad lies in its adaptability. If you’re looking to cater to different dietary requirements, here are some simple substitutions:

    1. Cheese Alternatives: Replace feta cheese with tofu for a vegan option or omit it entirely for a lighter salad. Nutritional yeast can also provide a cheesy flavor without added fat.

    2. Oil-Free Version: For a lower-fat alternative, consider substituting the olive oil with avocado. This will still provide healthy fat while eliminating the oil.

    3. Add Protein: For added substance, mix in chickpeas or quinoa. These protein-rich ingredients not only enhance the salad’s nutritional profile but also transform it into a filling main dish.

    4. Vegetable Variations: Feel free to substitute broccoli with cauliflower or add other vegetables such as bell peppers, carrots, or spinach, depending on your preference and seasonality.

    5. Nut Crunch: Garnish with a handful of chopped almonds or walnuts for an unexpected crunch.

    Customized versions of the Fresh Greek Broccoli Salad cater to everyone from vegans and vegetarians to gluten-free eaters and those monitoring their cholesterol. The adaptability of this dish ensures that it can fit into anyone’s lifestyle, making it a staple for all occasions.

    Let’s now move on to the exciting part—preparing this delightful salad!

    How to Prepare the Perfect Fresh Greek Broccoli Salad: Step-by-Step Guide

    Follow these easy steps to create your own Fresh Greek Broccoli Salad. Each step ensures that you get the best flavor and texture while adhering to all dietary needs.

    1. Prepare the Base: Start by washing the broccoli florets thoroughly under running water. Trim off any tough stems, as you only want the florets. Next, chop the florets into bite-sized pieces, making them easy to mix and enjoyable to eat.

    2. Blanch the Broccoli (optional): For a tender, bright green salad, consider blanching your broccoli. Simply bring a pot of salted water to a boil. Add the florets and cook for 2-3 minutes until vibrant green. Then, transfer them to an ice bath immediately to stop the cooking process. If you prefer raw broccoli, skip this step.

    3. Mix Ingredients: In a large mixing bowl, add the chopped broccoli, cherry tomatoes, diced cucumber, and thinly sliced red onion.

    4. Add Olives and Cheese: Toss in the Kalamata olives and crumbled feta cheese (if using). These ingredients add saltiness and depth to your salad.

    5. Create the Dressing: In a small bowl or mason jar, mix together the olive oil, fresh lemon juice, dried oregano, salt, and pepper. Whisk or shake until fully combined for a delightful Mediterranean dressing.

    6. Combine and Toss: Drizzle the dressing over your salad. Gently toss all ingredients together until well coated with the dressing.

    7. Taste and Adjust: Sample your salad and adjust seasoning as necessary. You may want to add additional salt, pepper, or lemon juice to suit your taste.

    8. Chill or Serve: For the best flavors, allow the salad to sit in the refrigerator for at least 30 minutes before serving. This resting period allows the ingredients to meld together beautifully.

    9. Serve Again: Serve as a side dish or add some grilled chicken or chickpeas for a complete meal.

    10. Garnish: For a finishing touch, sprinkle some additional feta cheese or toasted nuts for added flavor and texture.

    Now that you know how to prepare the Fresh Greek Broccoli Salad, let’s discuss advanced tips and variations to keep your culinary adventure exciting!

    Mastering Fresh Greek Broccoli Salad: Advanced Tips and Variations

    To further enhance your experience with the Fresh Greek Broccoli Salad, consider these tips and variations that can elevate your dish beyond the ordinary:

    • Herb Infusion: Add fresh herbs such as parsley, dill, or basil for a burst of freshness. You can also use a mix of dried herbs to experiment with flavor profiles.

    • Roasted Variants: For a unique twist, roast the broccoli before adding it to the salad. This adds a smoky flavor that contrasts beautifully with the fresh ingredients.

    • Kick of Spice: If you enjoy a bit of heat, consider adding thinly sliced jalapeños, crushed red pepper flakes, or a dash of hot sauce to your dressing.

    • Seasonal Additions: Modify the salad based on what’s in season. In the summer, consider adding corn or black beans. In the fall, sweet cranberries or apples can introduce a delightful sweetness.

    • Marinated Olives: Use marinated Kalamata olives for extra flavor. The marinade will enhance the taste of the salad.

    • Nutty Flavor: Incorporate roasted sunflower seeds or pumpkin seeds for additional crunch and nutrition. These seeds are also excellent sources of healthy fats.

    • Make Ahead: The salad can be prepared up to a day in advance. However, add the dressing just before serving to maintain the freshness of the ingredients.

    These variations and tips ensure you remain engaged and inspired while working through your culinary journey. The Fresh Greek Broccoli Salad is a versatile dish that can adapt and grow, making it a fantastic staple for any kitchen.

    How to Store Fresh Greek Broccoli Salad: Best Practices

    To ensure the longevity and freshness of your Fresh Greek Broccoli Salad, it is essential to follow proper storage practices:

    • Refrigeration: Store any leftover salad in an airtight container in the refrigerator. This will keep the salad fresh for about 3 days. However, be cautious—if possible, keep the dressing separate until you are ready to serve.

    • Freezing: Freezing is not recommended due to the texture of the fresh ingredients. However, if you choose to freeze it, remove all ingredients that will not thaw well (like tomatoes and cucumbers), and use only the broccoli, olives, and dressing. This may alter the salad’s flavor.

    • Reheating: The salad is best enjoyed cold, so reheating is usually unnecessary. If you prefer warm salads, consider lightly cooking the broccoli and then letting it cool before mixing with the other ingredients.

    Proper storage not only preserves the flavors but also retains the nutritional benefits of your salad, ensuring you enjoy the full bounty of this nutrient-packed dish.

    Nutritional Value of Fresh Greek Broccoli Salad

    When considering healthy dinner recipes, understanding nutritional content is crucial. Here’s an overview of the nutritional value for a standard serving of Fresh Greek Broccoli Salad:

    • Calories: Approximately 200 kcal
    • Total Fat: 12g (of which saturated fat is 4g)
    • Cholesterol: 15mg (if feta cheese is included)
    • Sodium: 600mg (depends on olives and feta)
    • Total Carbohydrates: 18g
    • Dietary Fiber: 5g
    • Sugars: 4g
    • Protein: 6g

    This nutritional breakdown showcases how this salad incorporates healthy fats, complex carbohydrates, and a significant amount of fiber, contributing to sustained energy and satiety. Furthermore, the vitamins and minerals present in broccoli, tomatoes, and cucumbers provide essential nutrients without excessive calories, making it an excellent component of any health-conscious diet.

    Incorporating this salad into your diet supports weight management and overall wellness.

    FAQs: Frequently Asked Questions About Fresh Greek Broccoli Salad

    1. Can I use frozen broccoli instead of fresh?
      Yes, although fresh broccoli is preferred for texture and flavor, you can use frozen. Just make sure to thaw it and drain excess water before adding to the salad.

    2. How can I make this salad vegan?
      Simply omit the feta cheese or replace it with crumbled tofu or nutritional yeast for a cheesy flavor without dairy.

    3. How long can I store leftovers?
      Leftovers can be stored in the refrigerator for up to 3 days. However, for optimal freshness, it’s best to consume the salad within the first two days.

    4. Can I add proteins to this salad?
      Absolutely! Grilled chicken, chickpeas, or quinoa can enrich the salad and turn it into a satisfying main dish.

    5. What can I substitute for olives?
      If you dislike olives, consider using diced pickles, capers, or simply omitting them. Add a bit of brine from the olives to the dressing for a similar flavor impact.

    6. Is this salad suitable for meal prep?
      Yes! The salad can be prepped ahead of time. Just store the dressing separately and mix it just before serving to keep the vegetables fresh.

    7. What’s the best way to chop broccoli for this salad?
      For even cooking and crunch, chop the broccoli head into bite-sized florets and trim any excessive hard stalks.

    8. Can I use other vegetables?
      Definitely! Feel free to experiment with seasonal vegetables such as bell peppers, zucchini, or cherry tomatoes to enjoy varied flavors.

    9. Is this salad gluten-free?
      Yes, all the ingredients in this Fresh Greek Broccoli Salad are gluten-free, perfect for those with gluten sensitivities.

    10. How can I make the dressing healthier?
      Consider reducing the amount of olive oil or replacing it with avocado for a creamy texture without the oil.

    In conclusion, the Fresh Greek Broccoli Salad is not only a delightful addition to your dining table but also a nourishing blend of flavors that can be tailored to meet various dietary needs. From busy parents to newlyweds and health-conscious individuals, it’s a dish that offers simplicity and satisfaction. Enjoy the process of creating this delicious salad, and watch as it becomes a staple in your home. Whether it’s a weeknight dinner or a gathering with friends and family, this salad will always be a hit! Happy cooking!

  • Moist Vegan Sourdough Brownies

    Moist Vegan Sourdough Brownies

    Moist Vegan Sourdough Brownies: A Tropical Delight

    Introduction to Moist Vegan Sourdough Brownies

    Looking for a delectable vegan treat that caters to a variety of dietary needs while remaining simple and healthy? Look no further! These Moist Vegan Sourdough Brownies are not just another addition to your collection of dessert recipes; they represent a delightful marriage of flavor, health, and creativity. Made with the unique tanginess of sourdough, these brownies boast a rich chocolate flavor and a fudgy texture that will impress even the most discerning palates.

    This recipe is particularly beneficial for busy individuals, including parents and students, who crave indulgence but don’t have hours to spend in the kitchen. Plus, since they are vegan and can be made gluten-free, these brownies appeal to a broad audience, including health enthusiasts and those with dietary restrictions. The ingredients are pantry staples, making it easy for anyone to whip up this delightful dessert at home.

    Vegan baking often receives a bad rap for being complicated or unpalatable, but you will find that this recipe flips that narrative entirely. Indulge guilt-free with these brownies that are not only delicious but also packed with nutrients. So, whether you’re hosting a weekend gathering or treating yourself after a long day, these brownies will satisfy your sweet tooth and nourish your body, proving that you can have your cake—or brownie—in this case—and eat it, too!


    Benefits and Advantages of Moist Vegan Sourdough Brownies

    There are numerous reasons why you should consider making Moist Vegan Sourdough Brownies your go-to dessert. Firstly, this recipe is incredibly easy to prepare. With just a few simple steps, you can create an irresistible treat that everyone will love. Busy parents will appreciate how quickly this dessert can come together, making it ideal for unexpected guests or child-friendly baking sessions.

    Moreover, these brownies stand out for their health benefits. They replace traditional ingredients with vegan alternatives that pack a nutritional punch. For instance, using applesauce instead of eggs provides moisture while reducing calories. Likewise, the addition of sourdough enhances digestion and adds probiotic benefits. This means you can indulge without feeling guilty, making these brownies a wise choice for health-conscious individuals.

    Beyond health, the versatility of this recipe makes it unique. It is easily adaptable; whether you’re gluten-free, wary of sugar, or following a specific dietary lifestyle, you can customize these brownies without compromising taste. Instead of traditional wheat flour, the recipe can accommodate almond or oat flour, and the sweetness can be adjusted with natural sweeteners like maple syrup or agave.

    Additionally, this dessert can cater to diverse dietary needs. Whether you’re a busy professional craving a pick-me-up or a student looking for a quick study snack, these brownies fit the bill. The rich chocolate flavor is sure to satisfy any chocolate lover, making it an excellent option for gatherings or celebrations without the hassle of complicated dessert recipes.

    In summary, if you’re searching for an uncomplicated, healthy, and delicious vegan dessert, our Moist Vegan Sourdough Brownies deliver in every aspect. Indulge guilt-free into this fudgy delight that fits seamlessly into your lifestyle, showcasing the true beauty of what vegan baking can achieve.


    Ingredients Overview

    Essential Ingredients for Moist Vegan Sourdough Brownies

    To bring these Moist Vegan Sourdough Brownies to life, you will need the following essential ingredients:

    • 1 cup of sourdough starter (active and bubbly) – Offers a unique tang and moisture.
    • 1 cup of almond flour – Provides a nutty flavor and helps keep the brownies gluten-free. (For those avoiding nuts, coconut flour can be used, but be aware of adjustment in quantities.)
    • 1/2 cup of cocoa powder – Adds depth and richness without excess sugar.
    • 1/2 cup of maple syrup (or agave nectar) – Acts as a natural sweetener full of vitamins and minerals.
    • 1/4 cup of coconut oil (melted, or use unsweetened applesauce for a lower-calorie option) – Enhances texture and adds moisture.
    • 1 tsp of vanilla extract – Boosts flavor.
    • 1/2 tsp of baking soda – Aids in the leavening process.
    • 1/4 tsp of salt – Balances sweetness and enhances overall flavor.
    • Optional: 1/2 cup of dark chocolate chips or nuts for texture – These introduce an extra layer of flavor and texture, perfect for chocoholics.

    This collection of ingredients provides a simple yet effective base for a moist brownie that many can enjoy.

    Dietary Substitutions to Customize Your Moist Vegan Sourdough Brownies

    Understanding that everyone has unique dietary requirements is essential; this recipe offers flexibility:

    • Gluten-Free: Substitute almond flour with oat flour or a gluten-free all-purpose flour blend.
    • Sugar-Free: Use a sugar substitute like erythritol or stevia in place of maple syrup for a low-calorie option.
    • Nut-Free: Consider using sunflower seed flour or chickpea flour to replace almond flour without compromising taste.
    • Lower Fat: If you’re looking to cut down on fats, swap out coconut oil for unsweetened applesauce.

    No matter your dietary constraints, these brownies can be tailored to your individual needs without sacrificing flavor or texture.


    How to Prepare the Perfect Moist Vegan Sourdough Brownies: Step-by-Step Guide

    Ready to get baking? Follow these steps to make your own Moist Vegan Sourdough Brownies:

    1. Prepare the Base:
      Begin by preheating your oven to 350°F (175°C). Grease an 8-inch square baking pan with coconut oil or line it with parchment paper for easy removal.

    2. Mix the Dry Ingredients:
      In a large bowl, whisk together the almond flour, cocoa powder, baking soda, and salt. This ensures even distribution of the leavening agent and prevents clumping.

    3. Combine the Wet Ingredients:
      In a separate bowl, mix the sourdough starter, melted coconut oil, maple syrup, and vanilla extract. Stir until well combined, and ensure the mixture is smooth and homogeneous.

    4. Combine Wet and Dry Mixtures:
      Gradually add the wet ingredients to the dry mixture. Stir gently until everything is just combined. Avoid overmixing to keep the brownies tender and moist.

    5. Add Extras:
      If you’re using chocolate chips or nuts, fold them into the batter gently. This adds delightful bursts of flavor throughout the brownies.

    6. Pour into the Pan:
      Transfer the brownie batter into your prepared baking pan, spreading it evenly with a spatula.

    7. Bake to Perfection:
      Place the pan in the oven and bake for 25-30 minutes. Keep an eye on them; you want a toothpick to come out with moist crumbs, not wet batter.

    8. Cool Down:
      Once baked, remove from the oven and allow the brownies to cool in the pan for about 15 minutes. Then carefully lift them out using the edges of the parchment paper (if used) and let them cool completely on a wire rack.

    9. Slice and Serve:
      Once cool, slice into squares or rectangles, depending on your preference. Enjoy these brownies fresh or store them for later!


    Mastering Moist Vegan Sourdough Brownies: Advanced Tips and Variations

    To elevate your baking experience, here are some advanced tips and variations for your Moist Vegan Sourdough Brownies:

    • Experiment with Flavors: Add a pinch of cinnamon, espresso powder, or orange zest for an exciting twist.
    • Fudgier Texture: For an even richer brownie, add an extra 1/4 cup of coconut oil or double the quantity of dark chocolate chips.
    • Layered Treats: Create a brownie sundae by serving your brownies warm with a scoop of vegan ice cream, topped with a drizzle of chocolate sauce.
    • Fruit-Filled Brownies: Consider folding in pureed fruits like bananas or pumpkin for added moisture and nutrients.

    These tips allow you to customize the brownies to create multiple variations, ensuring you never tire of this delightful dessert!


    How to Store Moist Vegan Sourdough Brownies: Best Practices

    Storing your Moist Vegan Sourdough Brownies correctly will ensure they stay fresh and delicious. Here’s how:

    • Refrigeration: Place the brownies in an airtight container and store them in the refrigerator for up to 1 week. This will keep them moist and flavorful.

    • Freezing: Freeze individual brownie squares wrapped in plastic wrap and then in foil or store them in a freezer-safe container. They can last up to 3 months.

    • Reheating: To enjoy frozen brownies, simply let them thaw at room temperature for a few hours or microwave for 20-30 seconds until warmed.

    This careful storage ensures that your brownies remain moist and enjoyable, making them the perfect treat for any occasion!


    Nutritional Value of Moist Vegan Sourdough Brownies

    Understanding the nutritional benefits of your Moist Vegan Sourdough Brownies can help you make more informed dietary choices. Here’s a breakdown of the approximate nutritional values per brownie (based on a recipe cut into 12 servings):

    • Calories: 130
    • Fat: 6g
    • Saturated Fat: 3g
    • Carbohydrates: 18g
    • Sugar: 6g (natural sweeteners)
    • Protein: 3g
    • Fiber: 2g

    These brownies provide a balanced treat with healthy fats from almond flour and coconut oil, and the natural sweetness from maple syrup keeps sugar levels lower than traditional desserts. Each serving offers a delicious way to indulge while nourishing your body.


    FAQs: Frequently Asked Questions About Moist Vegan Sourdough Brownies

    Q: Can I use a gluten-free flour blend in this recipe?
    A: Yes, substituting any gluten-free flour blend for almond flour works well, but be cautious of the hydration level since different flours absorb moisture differently.

    Q: Can I use a different sweetener?
    A: Absolutely! You can replace maple syrup with agave nectar, or try stevia for a lower-calorie option; just adjust quantities accordingly.

    Q: How do I know when the brownies are done baking?
    A: Use a toothpick inserted in the center; it should come out with moist crumbs, not wet batter.

    Q: Can I modify the recipe for allergies?
    A: Yes, this recipe is versatile. Use sunflower seed flour for those with nut allergies, and replace coconut oil with applesauce to reduce fat content.

    Q: How can I add more chocolate flavor?
    A: Gently fold in chocolate chips or cocoa nibs into the batter for an extra chocolatey experience.

    Feel free to ask additional questions or share your own tips and experiences with making these delicious Moist Vegan Sourdough Brownies!


    By crafting this recipe with care, we hope to inspire you to embrace the joy of baking while enjoying a healthy, vegan treat. So roll up your sleeves and dive into a world of flavor with your delicious Moist Vegan Sourdough Brownies!

  • Decadent Sourdough Brownies With Almond Flour

    Decadent Sourdough Brownies With Almond Flour

    Decadent Sourdough Brownies With Almond Flour: A Tropical Delight

    Introduction to Decadent Sourdough Brownies With Almond Flour

    There’s something truly magical about desserts that combine unique ingredients and flavors. One such delightful creation is the Decadent Sourdough Brownies With Almond Flour. In the realm of dessert recipes, these brownies stand out not just for their incredible taste but also for their versatility and health-consciousness. This recipe is simple to make, appealing to busy parents, college students, and enthusiastic bakers alike.

    Imagine sinking your teeth into a fudgy brownie that’s rich in flavor yet surprisingly healthy! By incorporating sourdough starter and almond flour, these brownies offer a deliciously nutty texture while boasting some fantastic health benefits. They are naturally gluten-free, making them suitable for those with gluten intolerances. Furthermore, for those adhering to a vegan diet, substituting certain ingredients can provide a plant-based alternative without compromising on taste.

    This recipe not only satisfies sweet cravings but also gives you the nourishment you need thanks to its wholesome ingredients. With the right balance of chocolate, almond, and sourdough, these brownies are a guilt-free indulgence that’ll impress family and friends—perfect for get-togethers, potlucks, or a cozy night in. Let’s dive into the benefits of these decadent brownies and explore why they need to be on your baking list!

    Benefits and Advantages of Decadent Sourdough Brownies With Almond Flour

    When it comes to dessert recipes, there are a few key attributes that can make or break a dish. The Decadent Sourdough Brownies With Almond Flour checks all the boxes. Here’s a closer look at why this delightful treat deserves a special place in your recipe book:

    1. Ease of Preparation: These brownies are incredibly straightforward to prepare. With minimal ingredients and simple techniques, even novice bakers can whip them up with confidence. You won’t need any advanced skills or specialized equipment—just a bowl, a whisk, and your love for baking!

    2. Health Benefits: These brownies use almond flour, which is a nutrient-dense alternative to traditional wheat flour. This means you’re not just indulging your sweet tooth; you’re also benefiting from healthy fats, fiber, and protein. Sourdough fermentation enhances digestibility and offers the probiotics beneficial for gut health.

    3. Dietary Versatility: One of the remarkable features of this recipe is its ability to cater to various dietary preferences. Whether you’re vegan, gluten-free, or simply seeking a lower-calorie dessert option, these brownies can be adapted with swaps such as applesauce for eggs or maple syrup for refined sugars.

    4. Rich Flavor Profile: The combination of dark chocolate, almond flour, and sourdough starter creates a beautifully complex flavor. The slight tang of sourdough balances out the sweetness from chocolate, resulting in a rich, deep flavor profile that will leave you wanting more.

    5. Low Glycemic Index: With almond flour and natural sweeteners, these brownies can fit into a low glycemic diet, making them a better option for those managing blood sugar levels without sacrificing taste.

    6. Versatile Serving Options: Enjoy these decadent brownies warm fresh out of the oven, or allow them to cool and serve with a scoop of your favorite ice cream. You can dress them up with nuts, berries, or a drizzle of chocolate sauce for an extra special treat.

    These advantages make Decadent Sourdough Brownies With Almond Flour a fantastic choice for your next dessert venture. Now, let’s take a look at the essential ingredients that come together to create this crowd-pleasing delight.

    Ingredients Overview

    Essential Ingredients for Decadent Sourdough Brownies With Almond Flour

    To craft your own batch of Decadent Sourdough Brownies With Almond Flour, gather the following ingredients:

    • 1 cup almond flour: A low-carb and gluten-free alternative to traditional flour, almond flour provides a nutty flavor and protein while keeping the texture moist.

    • 1/2 cup unsweetened cocoa powder: This ingredient contributes to the deep chocolate essence of the brownies. Be sure to choose high-quality cocoa for the best flavor.

    • 1/2 cup brown sugar: For sweetness, brown sugar adds moisture and depth. Alternatively, you can use coconut sugar or maple syrup for a healthier option.

    • 3/4 cup sourdough starter: This is the secret ingredient that elevates these brownies. It adds a unique tang and enhances the texture while making them lighter.

    • 1/4 cup vegetable oil or melted coconut oil: Fat is essential for creating a rich, fudgy brownie. This can also be substituted with applesauce for vegan options.

    • 1 teaspoon vanilla extract: This adds aromatic flavor that complements the chocolate perfectly.

    • 1/4 teaspoon salt: A small amount of salt balances the sweetness and enhances all of the flavors.

    • Optional add-ins: Consider folding in dark chocolate chips, nuts, or coconut flakes for added texture and flavor.

    Dietary Substitutions to Customize Your Decadent Sourdough Brownies With Almond Flour

    One of the best aspects of baking is the opportunity to take creative liberties with ingredient substitutions. Here are some suggestions tailored to meet various dietary requirements:

    • Vegan Version: Substitute the eggs in the original brownie recipes with flax eggs (1 tablespoon of flaxseed meal mixed with 2.5 tablespoons of water = 1 egg). You can use applesauce or mashed bananas as well to provide moisture.

    • Low-Carb Option: For those following a keto or low-carb diet, consider using erythritol or monk fruit sweetener in place of brown sugar.

    • Nut-Free Version: If you have nut allergies, almond flour can be replaced with sunflower seed flour or oat flour. Just ensure to check the alternative flour’s gluten status if necessary.

    • Dairy-Free: Ensure that your chocolate chips are dairy-free or use carob chips for a different flavor.

    Emphasizing these substitutions allows for greater inclusivity and accessibility in your baking, enabling everyone to enjoy your delicious brownies. Now, let’s jump into the preparation steps!

    How to Prepare the Perfect Decadent Sourdough Brownies With Almond Flour: Step-by-Step Guide

    Creating these Decadent Sourdough Brownies With Almond Flour is an engaging process that leads to a delightful reward. Follow these straightforward steps for perfectly satisfying brownies:

    1. Prepare the Base: Preheat your oven to 350°F (175°C). Grease an 8×8-inch baking pan with oil or line it with parchment paper for easy removal.

    2. Mix Dry Ingredients: In a large mixing bowl, sift together the almond flour, cocoa powder, and salt. This helps to break up any clumps and ensures an even distribution of dry ingredients.

    3. Combine Sugar and Wet Ingredients: In a separate bowl, mix the brown sugar, melted coconut oil (or vegetable oil), and vanilla extract. Whisk until smooth.

    4. Incorporate Sourdough Starter: Add the sourdough starter to the sugar and oil mixture. Stir until fully combined.

    5. Combine All Ingredients: Pour the wet mixture into the bowl containing the dry ingredients. Stir until just combined. Be careful not to overmix, as this can affect the brownies’ texture.

    6. Add Optional Ingredients: If using, fold in chocolate chips or chopped nuts at this stage. This step can vary depending on your preference, so feel free to get creative!

    7. Transfer to Cooking Pan: Pour the brownie batter into the prepared baking pan, smoothing the top with a spatula to ensure even baking.

    8. Bake the Brownies: Place the pan in the preheated oven and bake for 25-30 minutes, or until the edges are set and a toothpick inserted into the center comes out with a few moist crumbs (not wet batter).

    9. Cool and Cut: Allow the brownies to cool in the pan for about 10 minutes before transferring them to a wire rack to cool completely. This makes cutting easier and helps achieve a fudgy texture.

    10. Serve and Enjoy: Once cooled, cut into squares and enjoy these Decadent Sourdough Brownies with your favorite ice cream or a drizzle of chocolate sauce.

    With these simple steps, you’ll impress any dessert lover with your baking prowess! Now, let’s explore some advanced tips to help you take these brownies to the next level.

    Mastering Decadent Sourdough Brownies With Almond Flour: Advanced Tips and Variations

    To elevate your experience of baking Decadent Sourdough Brownies With Almond Flour, here are some advanced tips and exciting variations:

    • Opt for Quality Chocolate: Using good quality dark chocolate, instead of just chocolate chips, can enhance the overall flavor of brownies. Melt it and mix it in for a deeper experience.

    • Flavor Enthusiast: Don’t hesitate to experiment with flavors! Adding a hint of espresso powder intensifies the chocolate and gives a unique taste. Citrus zest like orange or lemon can brighten the flavor profile.

    • Make it Frosted: For decadent indulgence, consider adding a vegan chocolate ganache frosting on top once the brownies have cooled.

    • Add Texture: Nut butters like almond or peanut can create a delicious swirl in your brownies and add a different nutty flavor.

    • Double the Batch: If you’re hosting a gathering, double the ingredients and cook them in a larger pan. Everyone will surely want seconds!

    These tips help in personalizing the brownies to match your style while making the baking process even more enjoyable. Now let’s discuss how to store them properly for optimal freshness.

    How to Store Decadent Sourdough Brownies With Almond Flour: Best Practices

    Proper storage of your Decadent Sourdough Brownies With Almond Flour can significantly prolong their freshness. Here are some best practices to keep in mind:

    • Room Temperature Storage: If you plan to consume the brownies within a few days, store them at room temperature. Place the cooled brownies in an airtight container or cover them tightly with plastic wrap to prevent them from drying out.

    • Refrigeration: For longer shelf life, refrigerate the brownies. They can last up to a week in the fridge; just be sure they are in a tightly sealed container to avoid absorbing other fridge odors.

    • Freezing: For extended storage, these brownies freeze beautifully. Cut them into squares, place them in a single layer in a freezer-safe container or bag, separating layers with parchment paper. They can last for up to three months in the freezer. When ready to enjoy, simply thaw at room temperature or warm them gently in the oven.

    Implementing these storage tips ensures your brownies remain fresh and delicious for all occasions.

    Nutritional Value of Decadent Sourdough Brownies With Almond Flour

    Understanding the nutritional value of your treats is essential, especially when looking for healthier dessert recipes. Here’s an approximate breakdown of the nutritional composition of Decadent Sourdough Brownies With Almond Flour per serving (based on a tray yielding 12 servings:

    • Calories: 180
    • Total Fat: 12 g
    • Saturated Fat: 4 g
    • Carbohydrates: 16 g
    • Dietary Fiber: 3 g
    • Sugars: 7 g
    • Protein: 4 g
    • Cholesterol: 0 mg (if using vegan substitutes)
    • Sodium: 50 mg

    These brownies provide a good source of healthy fats, fiber, and protein while keeping sugar levels moderate. They offer a winning choice for your dessert table, appealing to both taste and health-conscious minds.

    FAQs: Frequently Asked Questions About Decadent Sourdough Brownies With Almond Flour

    1. Can I use whole wheat flour instead of almond flour?

    While whole wheat flour can be used, it will make the brownies denser. Almond flour is recommended for a lighter texture and added nutrition.

    2. Is there a gluten-free substitute for the sourdough starter?

    If you don’t have a gluten-free sourdough starter, you can substitute with yogurt or buttermilk, although the flavor may vary slightly.

    3. How do I know when the brownies are done?

    The brownies are done when the edges are set and a toothpick comes out with a few moist crumbs. Be careful not to overbake them.

    4. Can I add fruit to the batter?

    Absolutely! Cherries, raspberries, or even mashed bananas can add a lovely fruity flavor and extra moisture to the brownies.

    5. How long do these brownies stay fresh?

    If stored properly in an airtight container, they will stay fresh for about four days at room temperature and up to a week in the refrigerator.

    These FAQs address common queries that often arise during the baking process. Armed with this information, you are ready to embark on your baking journey and create your own batch of Decadent Sourdough Brownies With Almond Flour!

    In conclusion, these brownies offer a delightful blend of flavors and textures, with health benefits to boot. Whether you’re following a specific dietary plan or searching for a delicious dessert to share with loved ones, this recipe is sure to tick all the boxes. So roll up your sleeves and embark on this delicious baking adventure—you deserve it!

  • Zesty Broccoli Salad With Italian Dressing

    Zesty Broccoli Salad With Italian Dressing

    Zesty Broccoli Salad With Italian Dressing: A Tropical Delight

    Introduction to Zesty Broccoli Salad With Italian Dressing

    If you’re on the hunt for healthy recipes that are not only simple to prepare but also bursting with flavor, look no further than this Zesty Broccoli Salad With Italian Dressing. This vibrant salad combines crunchy, fresh broccoli with a tangy Italian dressing, making it a go-to dish for busy parents, students, food enthusiasts, and anyone aiming for a nutritious meal. What sets this salad apart is its versatility—it’s incredibly easy to customize for different dietary needs, whether you’re vegan, gluten-free, or simply looking for a refreshing side dish.

    This salad shines in its ability to be a meal in itself or a delightful side dish. Broccoli, the star ingredient, is packed with vitamins K and C, fiber, and numerous antioxidants, making it a powerhouse of nutrition. The zesty dressing adds a burst of flavor without being heavy, keeping your conscience clear while indulging in delicious food. Plus, the recipe can be prepared in less than 30 minutes, allowing you to whip up a healthy meal even on your busiest days.

    Perfect for picnics, potlucks, or a quick lunch, our Zesty Broccoli Salad With Italian Dressing is bound to impress anyone who takes a bite. Let’s dive deeper into the benefits of this fantastic salad and discover why it should become a staple in your meal rotation.

    Benefits and Advantages of Zesty Broccoli Salad With Italian Dressing

    The appeal of Zesty Broccoli Salad With Italian Dressing goes beyond just its delightful taste. First and foremost, it captures the essence of healthy recipes that cater to various lifestyles and preferences. For anyone looking to maintain or improve their diet, this salad offers an assortment of advantages.

    Easy Preparation

    One of the standout features of this dish is its incredibly simple preparation process. In less than 30 minutes, you can have a vibrant bowl of freshness ready to serve. The minimal cooking involved—just blanching the broccoli—makes it accessible even for novice cooks. When you’re short on time, this salad proves that you don’t have to sacrifice health for convenience.

    Nutritional Benefits

    Broccoli is renowned for its health advantages. Just one cup of raw broccoli contains significant amounts of vitamins K and C, folate, and potassium. It promotes bone health, supports the immune system, and aids digestion. This salad allows you to enjoy these benefits while savoring a delicious dish. Each bite not only satisfies your hunger but also contributes positively to your overall health.

    Versatility

    This salad is highly adaptable, accommodating various dietary restrictions and preferences. Whether you’re vegan, gluten-free, or simply trying to eat less meat, this recipe is for you. The dressing can easily be modified; use a chickpea-based dressing for added protein or substitute lemon juice for vinegar for a lemony twist. This flexibility means the salad remains relevant for any gathering or meal plan, enticing everyone to join in.

    Budget-Friendly

    Another benefit to note is its budget-friendly nature. The ingredients are relatively inexpensive and often easily found in your pantry. Fresh broccoli, a few spices, and kitchen staples for the dressing create a dish that is not only enjoyable but also easy on the wallet—perfect for college students or families alike.

    A Visual Treat

    Beyond the health benefits, this salad is a feast for the eyes. The vibrant green of broccoli paired with colorful toppings creates a salad that’s as pleasing to gaze at as it is to eat. This visual appeal can be particularly enticing for children, encouraging them to make healthier choices.

    Final Remarks

    With its simplicity, nutritional benefits, adaptability, economical nature, and visual charm, Zesty Broccoli Salad With Italian Dressing stands head and shoulders above many other healthy recipes. It is a delightful, refreshing addition to any meal and is bound to leave a lasting impression on your family and friends alike.

    Ingredients Overview

    Essential Ingredients for Zesty Broccoli Salad With Italian Dressing

    To recreate this refreshing salad, you’ll need a mix of fresh ingredients and a zesty homemade dressing. Below is a detailed list of all the ingredients required, with precise measurements to assist you in creating this colorful dish.

    Salad Ingredients:

    • 4 cups fresh broccoli florets – Provides essential nutrients and fiber.
    • 1 cup cherry tomatoes, halved – Adds a sweet burst of flavor and vibrant color.
    • 1/2 cup red onion, finely diced – Delivers a bit of crunch with its sharp taste.
    • 1/2 cup shredded carrots – Offers natural sweetness and brightens the dish.
    • 1/4 cup sunflower seeds – Adds a satisfying crunch and healthy fats.
    • 1/4 cup feta cheese (optional) – Provides a creamy element; can be omitted for a vegan version.

    Italian Dressing Ingredients:

    • 1/4 cup extra virgin olive oil – Acts as a healthy fat and enhances flavor.
    • 2 tablespoons red wine vinegar or apple cider vinegar – For tanginess.
    • 1 teaspoon Italian seasoning – A blend of herbs that enhances the overall taste.
    • 1 clove garlic, minced – Offers aromatic undertones.
    • Salt and pepper, to taste – Adjusts flavor according to your preference.

    This salad is naturally gluten-free and can easily be vegan if you omit the feta cheese. If you’re searching for healthy recipes that cater to different dietary lifestyles, this salad fit the bill perfectly.

    Dietary Substitutions to Customize Your Zesty Broccoli Salad With Italian Dressing

    Adapting recipes to fit dietary requirements is essential, especially when cooking for diverse groups. Here are several substitutions that maintain the integrity of the Zesty Broccoli Salad while catering to varied dietary needs:

    • For Vegans: Simply omit the feta cheese or substitute it with vegan cheese or avocado for creaminess.

    • Nut-Free: Replace sunflower seeds with pumpkin seeds or roasted chickpeas to maintain crunch without using nuts.

    • Low-Calorie Option: Use a light dressing by substituting olive oil with a mix of low-calorie vinegar and Greek yogurt, ensuring flavor is still present.

    • Low-FODMAP: For those who are FODMAP sensitive, avoid the red onion and replace garlic with the green tops of scallions for a milder flavor.

    These substitutions ensure that everyone can enjoy this delightful salad without compromising on taste or dietary restrictions.

    How to Prepare the Perfect Zesty Broccoli Salad With Italian Dressing: Step-by-Step Guide

    To craft this delightful Zesty Broccoli Salad With Italian Dressing, follow these simple steps. Enjoy the ease of preparation and the gratifying outcome of your culinary efforts.

    1. Prepare the Base: Begin by taking 4 cups of fresh broccoli florets. Rinse them thoroughly under cold water to remove any dirt or grit. Using a sharp knife, chop the florets into smaller, bite-sized pieces. This ensures they mix well with the other salad ingredients.

    2. Blanch the Broccoli: In a large pot of boiling water, add the chopped broccoli. Blanch them for about 1-2 minutes. This quick cooking process brightens the color and enhances the crunch, making it a delightful addition to your salad. Immediately drain the broccoli and plunge it into an ice bath to stop the cooking process. Allow it to cool for a few minutes before draining again.

    3. Combine All Salad Ingredients: In a large mixing bowl, add the cooled broccoli along with 1 cup of halved cherry tomatoes, 1/2 cup of finely diced red onion, 1/2 cup of shredded carrots, and 1/4 cup of sunflower seeds for crunch. If you’re using feta cheese, add 1/4 cup of crumbled feta at this stage.

    4. Make the Dressing: In a small mixing bowl, whisk together 1/4 cup of extra virgin olive oil, 2 tablespoons of red wine vinegar or apple cider vinegar, 1 teaspoon of Italian seasoning, minced garlic, and a pinch of salt and pepper. Adjust seasoning to taste.

    5. Mix Ingredients: Pour the dressing over the salad mix in the large bowl. Gently toss everything together, ensuring the broccoli and other ingredients are evenly coated with the dressing.

    6. Chill and Serve: For optimal flavor, let the salad chill in the refrigerator for at least 20-30 minutes before serving. This allows the ingredients to meld together beautifully. Serve cold, enjoying either as a refreshing side dish or a light meal on its own.

    7. Serve or Store: This salad is best enjoyed fresh, but it can also be stored in an airtight container in the refrigerator for up to 3 days. Just give it a good toss again before serving to redistribute the dressing.

    By following these straightforward steps, creating a Zesty Broccoli Salad With Italian Dressing becomes a delightful experience. Not only do you get to enjoy the cooking process, but you also contribute a nutritious dish to your mealtime that resonates well with healthy recipes.

    Mastering Zesty Broccoli Salad With Italian Dressing: Advanced Tips and Variations

    To ensure success while preparing this Zesty Broccoli Salad, consider these advanced tips and delightful variations that can elevate this basic recipe into something extraordinary.

    Advanced Tips:

    • Quality Ingredients: Always select the freshest broccoli and seasonal veggies for the best flavor. Organic vegetables can make a significant difference.

    • Make Ahead: This salad can be made a day in advance, allowing the flavors to deepen and develop. Just keep the dressing separate and mix it in right before serving to prevent sogginess.

    • Texture Variation: For an extra crunch, consider adding crispy chickpeas or toasted nuts such as almonds or walnuts for additional texture and flavor.

    Variations:

    • Mediterranean Twist: Incorporate olives and bell peppers, and switch the dressing to a lemon-tahini mix for a Mediterranean flair.

    • Asian Inspired: Trade the Italian seasoning for sesame oil and soy sauce, and add edamame or shredded cabbage for a unique twist on the original recipe.

    • Add Protein: For a heartier meal, toss in grilled chicken or chickpeas. Both options add protein while keeping dish health-focused.

    These advanced tips and variations ensure that your Zesty Broccoli Salad is never boring and can adapt and evolve based on your preferences, complementing your goals around healthy recipes.

    How to Store Zesty Broccoli Salad With Italian Dressing: Best Practices

    Proper storage techniques can extend the lifespan of your Zesty Broccoli Salad and maintain its delightful flavors. Here’s how:

    • Refrigeration: Store the salad in an airtight container in the refrigerator. It can last for about 3 days, but it’s best enjoyed within the first 24 hours for optimal freshness and crunch. The vegetables can begin to lose their crispness after a couple of days.

    • Freezing: While it’s generally not advisable to freeze salads, if you have leftovers you want to keep longer, consider freezing the broccoli separately (blanched). However, once dressed, the salad is best consumed fresh as the textures are compromised with freezing.

    • Reheating Options: If you’ve prepared a batch with protein and want to enjoy it warm, consider gently warming the salad in a skillet over low heat until just heated through. Adding a touch of olive oil during this process can help revitalize the flavors.

    These storage tips will ensure that your Zesty Broccoli Salad remains fresh and flavorful, reinforcing the idea that healthy recipes can be made ahead of time and enjoyed whenever you need a nutritious meal.

    Nutritional Value of Zesty Broccoli Salad With Italian Dressing

    Understanding the nutritional value of your meals is essential, especially when you’re embracing healthy recipes. Below is the nutritional breakdown of the Zesty Broccoli Salad With Italian Dressing, highlighting its healthfulness:

    • Calories: Approximately 200 calories per serving (without cheese).
    • Protein: 5 grams – Beneficial for muscle maintenance and repair.
    • Fat: 14 grams (mostly healthy fats from olive oil) – Supports cell growth and nutrient absorption.
    • Carbohydrates: 12 grams – A source of energy to fuel your day.
    • Fiber: 5 grams – Important for digestive health and keeps you feeling fuller longer.
    • Vitamin C: 135% of the daily recommended value – Supports immune function.
    • Vitamin K: 160% of the daily recommended value – Crucial for bone health.

    This dish provides a well-rounded nutrition profile, offering essential vitamins and minerals without unnecessary calories. Embracing recipes like this ensures that you’re fueling your body with good food, making it truly one of the top healthy recipes in your culinary repertoire.

    FAQs: Frequently Asked Questions About Zesty Broccoli Salad With Italian Dressing

    1. Can I use frozen broccoli for this salad?

    While fresh broccoli is preferred for its crunch, you can use frozen broccoli. Be sure to thaw and drain it well to prevent excess moisture, which can make the salad soggy.

    2. How long does the salad last in the refrigerator?

    The Zesty Broccoli Salad will stay fresh for about 3 days when stored in an airtight container. However, for the best texture and flavor, enjoy it within the first 24 hours.

    3. Can I add other vegetables to this salad?

    Absolutely! Feel free to add bell peppers, cucumbers, or even avocados. The beauty of this salad lies in its versatility, allowing you to customize it to your taste preferences.

    4. Is there a way to make it spicy?

    For those who enjoy a spicy twist, consider adding red pepper flakes to the Italian dressing or chopped jalapeños into the salad mix for an exciting kick!

    5. How can I modify this salad for meal prep?

    To make this salad meal prep-friendly, keep the ingredients separate (like the dressing and seeds) until you’re ready to eat. This helps retain freshness and texture throughout the week.

    With these answers, you’ll feel prepared to create and enjoy your Zesty Broccoli Salad With Italian Dressing, ensuring it fits seamlessly into your life as one of your go-to healthy recipes. Whether you’re gathering around the dinner table or prepping meals for the week ahead, this salad is sure to be a crowd-pleaser. Enjoy!

  • No-Bake Greek Yogurt Key Lime Pie

    No-Bake Greek Yogurt Key Lime Pie

    No-Bake Greek Yogurt Key Lime Pie: A Tropical Delight

    Introduction to No-Bake Greek Yogurt Key Lime Pie

    Are you on the hunt for a delicious yet simple dessert recipe that not only satisfies your sweet tooth but is also healthy? Look no further! This No-Bake Greek Yogurt Key Lime Pie is the perfect solution for busy home cooks, parents, students, and anyone who loves a refreshing treat without the fuss of turning on the oven.

    This delightful pie offers a creamy, tangy filling made primarily with Greek yogurt, providing a boost of protein while cutting down on refined sugars. It’s a fantastic option for those who prioritize their health without sacrificing flavor. Plus, it’s versatile enough to cater to various dietary needs—think gluten-free, low-calorie, and even vegan variations! The recipe’s no-bake nature means you can whip it up in a matter of minutes, making it a go-to dessert for impromptu gatherings or family dinners.

    Whether you’re a baking enthusiast looking to craft something easy or a newlywed wanting to impress your partner, this Key Lime Pie will inspire your culinary journey. So grab your mixing bowls, and let’s dive into this tropical delight that’ll elevate your dessert game!

    Benefits and Advantages of No-Bake Greek Yogurt Key Lime Pie

    You might wonder, what makes this No-Bake Greek Yogurt Key Lime Pie stand out among the countless dessert recipes available? Here are several compelling reasons:

    1. Simplicity: With minimal cooking involved, this pie requires no special baking techniques. It can be prepared in just a few quick steps. This is ideal for busy parents or students who lack time but still want to enjoy a homemade dessert.

    2. Health Benefits: Greek yogurt packs protein, calcium, and probiotics, making this dessert a healthier alternative to traditional recipes that are often laden with heavy creams and sugars. The citrusy flavor from the key limes contributes vitamin C, and the absence of baking minimizes calorie absorption.

    3. Diet-Friendly: This pie can easily be made gluten-free by using alternative crust options such as almond flour or gluten-free cookies. For those who prefer dairy-free or vegan options, coconut yogurt can substitute Greek yogurt effortlessly, while natural sweeteners like maple syrup can make this pie truly versatile.

    4. Varied Serving Options: This recipe is adaptable to various occasions—whether it’s a summer BBQ, a birthday celebration, or a casual family dinner. Its light, refreshing taste is sure to impress guests of all ages.

    5. No Need for an Oven: In hot weather, turning on the oven can be unbearable. This dessert recipe sidesteps that entirely, providing a cool, refreshing treat that sets in the refrigerator.

    This No-Bake Greek Yogurt Key Lime Pie offers a delightful fusion of ease, health, and versatility. It’s perfect for a range of dietary needs and is sure to please any palate, all while being a breeze to prepare.

    Ingredients Overview

    Essential Ingredients for No-Bake Greek Yogurt Key Lime Pie

    Before you begin this no-bake adventure, let’s gather all the ingredients you’ll need to construct this creamy masterpiece. Each ingredient plays a crucial role in elevating the flavor and texture of this dessert.

    • For the Crust:
    • 1 and ½ cups of graham cracker crumbs (or gluten-free alternative)
    • ½ cup of unsalted butter, melted (or coconut oil for vegan)
    • 2 tablespoons of sugar (optional, adjust based on sweetness preference)

    • For the Filling:

    • 2 cups of plain Greek yogurt (or coconut yogurt for vegan)
    • ½ cup of freshly squeezed key lime juice (about 4-6 limes)
    • Zest of 2 key limes
    • ½ cup of honey or maple syrup (for vegan option)
    • 1 teaspoon of vanilla extract
    • 1 packet of gelatin (or agar-agar for vegan gelatin alternative, if desired)

    • For Garnishing:

    • Whipped cream (or coconut whipped topping for vegan)
    • Lime slices and zest

    This ingredient list not only showcases the pie’s simplicity but emphasizes the health-conscious choices available—from the protein-rich Greek yogurt to the natural sweeteners. The versatility in ingredients provides options for all dietary preferences, making it a favorite among many.

    Dietary Substitutions to Customize Your No-Bake Greek Yogurt Key Lime Pie

    To ensure that everyone can enjoy this pie, here are some recommended substitutions:

    • Gluten-Free: Use gluten-free graham cracker crumbs or even nuts ground into a fine crust. Almond flour or crushed gluten-free cookies work beautifully.

    • Dairy-Free/Vegan: Swap Greek yogurt for coconut yogurt or almond yogurt. Use coconut cream whipped for a luscious topping instead of dairy cream.

    • Sweeteners: Instead of sugar or honey, use agave nectar or stevia to lower the calorie count while still keeping the dessert sweet.

    • Flavor Variations: Add a touch of fresh mint for a refreshing twist or incorporate berries for a burst of color and additional nutrients.

    These substitutions make the No-Bake Greek Yogurt Key Lime Pie accessible and enjoyable for everyone, regardless of dietary restrictions.

    How to Prepare the Perfect No-Bake Greek Yogurt Key Lime Pie: Step-by-Step Guide

    Creating this delectable pie involves several straightforward steps. With a little patience and attention to detail, you’ll have a beautiful dessert ready to impress.

    1. Prepare the Base:
    2. In a medium bowl, combine the graham cracker crumbs and melted butter. Mix until all crumbs are evenly coated. Press the mixture firmly into the bottom of a pie dish to create an even layer. Refrigerate while preparing the filling.

    3. Mix Ingredients:

    4. In a large mixing bowl, combine the Greek yogurt, key lime juice, lime zest, honey (or maple syrup), and vanilla extract. Whisk together until smooth and creamy, ensuring there are no lumps.

    5. Add Gelatin:

    6. If using gelatin: In a small saucepan, dissolve the gelatin in a few tablespoons of water over low heat until fully dissolved. Slowly mix the dissolved gelatin into the yogurt mixture, stirring continuously to combine. If using agar-agar, follow the instructions on the package for preparation and incorporate it into the filling.

    7. Combine and Fill:

    8. Pour the yogurt filling over the chilled crust. Use a spatula to smooth the top for an even finish. Cover the pie with plastic wrap or foil. Refrigerate for at least 4-6 hours, or overnight for best results.

    9. Garnish and Serve:

    10. Once the pie is fully set, remove it from the refrigerator. Top with whipped cream or coconut topping and decorate with lime slices and additional zest. Slice into wedges and serve chilled.

    11. Enjoy Your Creation:

    12. Take a moment to appreciate your handiwork! Serve at summer gatherings, or simply enjoy it as a treat after dinner.

    This step-by-step guide not only illustrates how simple it is to make this no-bake pie but also ensures you can adapt it to suit specific dietary needs as you go along.

    Mastering No-Bake Greek Yogurt Key Lime Pie: Advanced Tips and Variations

    To elevate your No-Bake Greek Yogurt Key Lime Pie, consider these advanced tips and variations:

    1. Layering Flavors: For a unique twist, layer your filling with fruit puree or jam between sections of the yogurt mixture. This adds complexity and not only looks beautiful but also enhances the dessert’s flavor.

    2. Switching the Citrus: While key limes are traditional, try using regular limes, lemons, or even oranges for a different flavor profile. Each citrus brings its unique taste; experimentation can lead to delightful results.

    3. Enhancing Texture: To add texture, consider folding in crushed nuts or granola into the yogurt mixture. It creates a pleasant crunch against the creamy filling.

    4. Serving Suggestions: Pair the pie with tropical fruits like mangos or pineapple on the side for a festive presentation. Adding a sprig of mint can also brighten the dish.

    5. Chill Time Options: If you’re short on time, allowing the pie to set for just 2-3 hours will still yield a delicious dessert, though longer setting times (6 hours or overnight) enhance the flavors and structure.

    These advanced tips and variations will ensure each pie is uniquely yours while impressing everyone at the table.

    How to Store No-Bake Greek Yogurt Key Lime Pie: Best Practices

    Storing your No-Bake Greek Yogurt Key Lime Pie correctly is essential for preserving its freshness and flavor:

    • Refrigeration: Always keep your pie refrigerated when not being served. Cover it tightly with plastic wrap or place it in an airtight container. It will last for about 3-4 days in the refrigerator.

    • Freezing: If you want to store the pie for longer, you can freeze it. Wrap the pie tightly in plastic wrap and then in aluminum foil to prevent freezer burn. It will last for about a month. When ready to serve, thaw it in the refrigerator overnight before enjoying.

    • Reheating: Unlike baked desserts, this pie should not be reheated. The best enjoyment comes when it’s served chilled directly from the fridge.

    By following these best practices, you can enjoy your no-bake creation at its freshest and most delicious.

    Nutritional Value of No-Bake Greek Yogurt Key Lime Pie

    Understanding the nutritional value of your dessert recipe is essential, especially if you’re health-conscious. Here’s a breakdown of the approximate nutritional content per slice (1/8 of the pie):

    • Calories: 210
    • Protein: 6g
    • Carbohydrates: 28g
    • Fiber: 1g
    • Sugars: 12g
    • Fat: 9g
    • Saturated Fat: 5g
    • Cholesterol: 20mg
    • Calcium: 15% DV (Daily Value)
    • Vitamin C: 10% DV

    These values can vary based on specific ingredients used. Overall, this pie remains a healthier dessert option compared to traditional key lime pies, offering satisfying creaminess alongside nutritional benefits.

    FAQs: Frequently Asked Questions About No-Bake Greek Yogurt Key Lime Pie

    1. Can I use regular lime juice instead of key lime juice?
    Absolutely! While key limes offer a unique flavor, regular limes can be used as a substitute. Adjust the quantity slightly to taste, as regular limes can be more potent.

    2. Is it necessary to use gelatin?
    While gelatin helps the pie set, you can omit this if you prefer a softer filling. Alternatively, substitute it with agar-agar if you’re looking for a vegan option that provides similar results.

    3. How long should I refrigerate the pie before serving?
    For best results, refrigerate for at least 4-6 hours. However, overnight is recommended to achieve the optimum texture and flavor.

    4. Can I use a different sweetener instead of honey?
    Definitely! Maple syrup, agave nectar, or even stevia are great alternatives. Just keep in mind that this may slightly alter the sweetness and flavor profile.

    5. How do I know when the pie is ready to serve?
    The pie should be firm to the touch but still slightly creamy in texture. If it wobbles when shaken gently, it will need more time to set in the refrigerator.

    By addressing these common questions, you’ll make the baking experience more enjoyable and encourage more cooks to try their hands at this delightful recipe.

    Conclusion

    The No-Bake Greek Yogurt Key Lime Pie offers a fabulous combination of deliciousness, health benefits, and versatility, making it an extraordinary addition to the collection of dessert recipes out there. Whether you are looking for a quick treat for your family or a stunning dessert to impress guests, this recipe ticks all the boxes. It’s easy to prepare, adaptable for various dietary needs, and refreshingly light, perfect for any occasion. So gather your ingredients, unleash your inner chef, and savor this tropical delight that awaits!

  • The Most Addictive Broccoli Salad YouLl Ever Make

    The Most Addictive Broccoli Salad YouLl Ever Make

    The Most Addictive Broccoli Salad You’ll Ever Make!: A Tropical Delight

    Introduction to The Most Addictive Broccoli Salad You’ll Ever Make!

    Are you searching for a dish that’s not only delicious but also easy to make and packed with nutrients? Look no further! Welcome to “The Most Addictive Broccoli Salad You’ll Ever Make!” This vibrant salad is the epitome of healthy recipes, combining fresh broccoli, tropical fruits, and a mouthwatering dressing that will leave your taste buds dancing.

    This salad is not just about flavor; it also boasts numerous health benefits. Broccoli is a superfood, rich in vitamins K and C, fiber, and an array of antioxidants that support your immune system. Moreover, it’s incredibly simple to prepare, making it perfect for busy parents, students, or anyone looking to whip up a quick, nutritious meal.

    This dish is versatile and adaptable to various dietary needs. It’s gluten-free, vegan, and can easily accommodate low-calorie substitutions, making it a fantastic choice for conscious eaters and those seeking a refreshing change in their meals. Whether you’re a seasoned home cook, a newlywed or a baking enthusiast, this salad will inspire your culinary creativity while promoting a healthy lifestyle.

    Benefits and Advantages of The Most Addictive Broccoli Salad You’ll Ever Make!

    “The Most Addictive Broccoli Salad You’ll Ever Make!” stands out for multiple reasons. First and foremost, the simplicity of preparation allows anyone—from novice cooks to culinary experts—to enjoy something delightful without spending hours in the kitchen. With minimal cooking required, this salad is an excellent option for those long weekdays or busy weekends.

    In addition to its ease of preparation, the health benefits are numerous. Broccoli is not only low in calories but also high in fiber, which is essential for digestive health. Adding tropical fruits like pineapple and mango amps up the flavor while also contributing vitamins and antioxidants. The inclusion of nuts or seeds adds a satisfying crunch, healthy fats, and protein, making this dish a well-rounded choice.

    Moreover, this salad is highly customizable, allowing it to cater to various dietary preferences—whether you’re vegan, vegetarian, or gluten-sensitive. You can enjoy a satisfying meal that aligns with your lifestyle and health goals. This adaptability makes it a staple for people of all ages, whether you are serving it at family gatherings, potlucks, or just enjoying it for lunch during your hectic day.

    In summary, “The Most Addictive Broccoli Salad You’ll Ever Make!” is a delightful fusion of flavors that emphasizes health and simplicity, making it the perfect addition to your collection of healthy recipes.

    Ingredients Overview

    Essential Ingredients for The Most Addictive Broccoli Salad You’ll Ever Make!

    Let’s dive into the ingredients that make this salad truly addictive. Here’s what you need to create this delicious dish:

    • 4 cups fresh broccoli florets (chopped, the star of the salad, rich in vitamins)
    • 1 cup chopped pineapple (provides sweetness and tropical flavor)
    • 1 cup diced mango (adds juiciness and high vitamin C content)
    • ½ cup red bell pepper (for crunch and color, packed with antioxidants)
    • ½ cup chopped red onion (adds zest and flavor; omit for milder taste)
    • ½ cup walnuts or sunflower seeds (optional, for healthy fats and crunch; vegan/low-calorie option)
    • ½ cup dried cranberries (for a sweet contrast, filled with antioxidants)
    • ½ cup Greek yogurt or dairy-free yogurt (for creaminess; lower in calories with yogurt)
    • 2 tablespoons honey or agave syrup (to enhance sweetness; choose agave for vegan option)
    • 1 tablespoon apple cider vinegar (adds tanginess, boosts digestion)
    • Salt and pepper to taste

    Dietary Substitutions to Customize Your The Most Addictive Broccoli Salad You’ll Ever Make!

    This salad is already a hit for dietary-conscious individuals; however, here are some suggestions to cater to specific needs:

    • For Gluten-Free Diets: Ensure that you use gluten-free products, such as certified gluten-free yogurt or omit the flavored yogurt altogether and replace it with additional fruit.
    • Nut-Free Option: Substitute walnuts with seeds like pumpkin or sesame seeds for a nut-free alternative while retaining crunch and nutrients.
    • Low-Calorie Version: Use a lighter yogurt or reduce the amount of honey/agave syrup. You can also reduce dried cranberries for a lower sugar count.
    • Vegan-Friendly: Use plant-based yogurt and avoid honey by sticking to agave or maple syrup as sweeteners.

    These substitutions ensure that “The Most Addictive Broccoli Salad You’ll Ever Make!” remains wholesome and appealing to various dietary preferences while also embracing the spirit of healthy recipes.

    How to Prepare the Perfect The Most Addictive Broccoli Salad You’ll Ever Make!: Step-by-Step Guide

    Now that you have all the fantastic ingredients, let’s walk through the steps to prepare this delectable salad. Follow these easy instructions for a delightful outcome:

    1. Prepare the Base: Begin by washing the fresh broccoli thoroughly. Cut the florets into bite-sized pieces and set them aside. This will form the nutritious base of your salad.

    2. Dice the Fruits: Chop the pineapple and mango into small cubes. The juicy sweetness from these tropical fruits will add a refreshing taste and complement the robust flavor of broccoli.

    3. Chop Additional Veggies: Dice the red bell pepper and red onion. This adds not just color but also flavor, enhancing the overall taste of the salad.

    4. Mix the Dressing: In a small bowl, combine Greek yogurt (or dairy-free yogurt), honey (or agave syrup), and apple cider vinegar. Whisk them together until smooth and consistent. Taste and add salt and pepper as needed.

    5. Combine Ingredients: In a large salad bowl, add chopped broccoli, pineapple, mango, bell pepper, red onion, and cranberries. Gently fold these ingredients together to ensure even distribution.

    6. Add Crunch: If you’re using walnuts or sunflower seeds, sprinkle them over the salad. These will provide crunch and healthy fats, making your salad even more satisfying.

    7. Dress the Salad: Pour your dressing over the mixed ingredients. Toss gently to ensure that all components are coated with the creamy dressing.

    8. Chill Before Serving: Cover the salad with plastic wrap and let it chill in the refrigerator for about 30 minutes. This allows the flavors to meld beautifully.

    9. Serve and Enjoy: Once chilled, give it a final toss and serve! Enjoy the vibrant blend of flavors, knowing you’re indulging in a healthy dish.

    This easy-to-follow process guarantees that anyone—whether a busy parent or a culinary enthusiast—can replicate the magic of “The Most Addictive Broccoli Salad You’ll Ever Make!” while enjoying the benefits of healthy recipes.

    Mastering The Most Addictive Broccoli Salad You’ll Ever Make!: Advanced Tips and Variations

    To take this salad to the next level and add your personal touch, consider these advanced tips and variations:

    • Grilled Broccoli Variation: For a smoky flavor, consider grilling the broccoli florets for a few minutes before adding them to the salad. This enhances the taste and brings out a sweet nuttiness in the broccoli.

    • Change Up the Fruits: Feel free to swap out the fruits based on what’s in season. Strawberries, blueberries, or even peaches can work wonderfully in this salad.

    • Herbs for Extra Flavor: Adding fresh herbs like cilantro or mint can elevate the taste profile significantly. Not only do they add freshness, but they also come with additional health benefits.

    • Spicy Kick: If you enjoy a bit of heat, consider adding finely chopped jalapeño or a sprinkle of red pepper flakes to the mix.

    • Serving Suggestions: This salad can easily transition as a side dish or a main meal. Serve it alongside grilled chicken, tofu, or fish for a complete meal packed with nutrition.

    Applying these tips can make “The Most Addictive Broccoli Salad You’ll Ever Make!” a continuously evolving recipe that you can revisit and reinvent time after time, reinforcing its position among your go-to healthy recipes.

    How to Store The Most Addictive Broccoli Salad You’ll Ever Make!: Best Practices

    To ensure your salad retains its deliciousness and nutritional value, proper storage is essential. Here are the best practices for storing “The Most Addictive Broccoli Salad You’ll Ever Make!”:

    • Refrigeration: Store the salad in an airtight container in the refrigerator. It can maintain its fresh taste for up to 3 days. The ingredients may soften over time, but the flavors will continue to enhance.

    • Freezing: While freezing is not recommended due to the texture changes in broccoli and fruit, if you have leftovers that you cannot consume, try freezing individual components separately. Upon thawing, you can remix them with fresh ingredients for a quick meal later.

    • Reheating Tips: If you prefer your salad slightly warm, you can gently heat the broccoli in a microwave for about 30 seconds before mixing it with the dressing. However, it’s best served cold to appreciate the freshness.

    Storing your salad thoughtfully guarantees that you can enjoy this delight multiple times, emphasizing the convenience and health benefits of healthy recipes.

    Nutritional Value of The Most Addictive Broccoli Salad You’ll Ever Make!

    Let’s break down the impressive nutritional value of “The Most Addictive Broccoli Salad You’ll Ever Make!” Below is a general rundown of what you can expect in terms of nutrition per serving (1 cup):

    • Calories: ~180 kcal
    • Protein: 5g
    • Carbohydrates: 30g
    • Fat: 7g (healthy fats from walnuts/sunflower seeds)
    • Fiber: 5g
    • Sugar: 8g (natural sugars from fruits)
    • Vitamins and Minerals: High levels of Vitamin C (from broccoli, mango, and pineapple), Vitamin K, and significant amounts of potassium and magnesium.

    By enjoying this salad, you’re not just indulging in flavors; you’re also providing your body with essential nutrients. The combination of wholesome ingredients makes “The Most Addictive Broccoli Salad You’ll Ever Make!” a prime candidate among healthy recipes, especially for those conscious of their health.

    FAQs: Frequently Asked Questions About The Most Addictive Broccoli Salad You’ll Ever Make!

    Q: Can I prepare this salad in advance?
    A: Yes! It’s best to make it a few hours before serving to allow the flavors to meld. However, for optimal freshness, consume it within three days.

    Q: Is this salad a good option for meal prep?
    A: Absolutely! It’s a fantastic meal-prep choice. Just store it in portioned containers to grab and go.

    Q: What if I don’t like broccoli?
    A: You can substitute broccoli with cauliflower or even kale for a different flavor and texture while maintaining a nutritious profile.

    Q: How can I make this salad more filling?
    A: Adding a protein source like chickpeas, grilled chicken, or tofu will enhance the salad’s satiety, making it a complete meal.

    Q: Can I substitute the yogurt for a lower-calorie option?
    A: Yes! You can opt for a low-fat yogurt or even use mashed avocado for creaminess while retaining healthy fats.

    By addressing these common inquiries, we encourage readers to explore their variations of “The Most Addictive Broccoli Salad You’ll Ever Make!” and inspire them to try their hand at creating healthy recipes that suit their preferences and lifestyles.

    Enjoy your culinary journey with this addictive salad and bring a delightful freshness to your table!

  • 4-Ingredient Keto Greek Yogurt Cookies

    4-Ingredient Keto Greek Yogurt Cookies

    4-Ingredient Keto Greek Yogurt Cookies: A Tropical Delight

    Introduction to 4-Ingredient Keto Greek Yogurt Cookies

    If you’re on the lookout for simple and delicious cookie recipes that cater to various dietary preferences, look no further than these 4-Ingredient Keto Greek Yogurt Cookies. What’s appealing about this recipe is its sheer simplicity—requiring only a handful of ingredients that you probably have at home. These cookies are not just a delicious treat; they also align beautifully with health-conscious choices, making them a fabulous option for everyone from busy parents to health enthusiasts.

    Using Greek yogurt as a base, these cookies remain moist and flavorful while taking full advantage of lower carbs and higher protein content. This makes them not only a delightful treat but also a smart choice for those on keto diets or anyone looking to indulge in guilt-free sweetness. Moreover, the recipe is inherently gluten-free and can accommodate vegan needs with minor tweaks. Whether you’re treating yourself after a long day, or preparing snacks for a family gathering, these cookies serve as a perfect solution that everyone will enjoy.

    In the kitchen, these cookies can spark joy and creativity. The process is straightforward, making it ideal for novice bakers and seasoned cooks alike. If you are keen on health and flavor, you’ll quickly become a fan of these easy-to-make delights. So, gather your ingredients and let’s discover the many benefits and easy steps to bring these heavenly cookies to life!

    Benefits and Advantages of 4-Ingredient Keto Greek Yogurt Cookies

    When it comes to dessert, many people often find themselves torn between satisfying their cravings and staying true to their health goals. The 4-Ingredient Keto Greek Yogurt Cookies elegantly bridge this gap, making them an excellent addition to your go-to cookie recipes list. Let’s explore the numerous benefits that make these cookies stand out.

    First and foremost, simplicity reigns supreme in this recipe. With just four ingredients, you can whip up a batch in minutes. This quality is particularly appealing for busy parents or individuals who want a quick yet indulgent treat without navigating complicated instructions. Anyone can master these cookies!

    Additionally, these cookies are rich in protein thanks to Greek yogurt, which gives them a substantial nutritional profile. Each bite offers not only a delightful flavor experience but also beneficial nutrients that align with low-carb eating patterns. Unlike traditional cookies that can leave you feeling sluggish, these treats are designed to keep your energy levels stable. This is especially beneficial for those on a weight loss journey or anyone managing their diet consciously.

    Moreover, the versatility of the 4-Ingredient Keto Greek Yogurt Cookies allows for dietary substitutions and variations. For instance, if you’re vegan, substituting Greek yogurt with a plant-based alternative ensures that no one misses out on the fun. Additionally, those with gluten sensitivities can enjoy these cookies with a gluten-free flour blend, maintaining the enjoyable texture and flavor.

    These cookies fit seamlessly into various lifestyles, whether you are a student cramming for exams, a traveler looking for easy snacks, or a working professional needing a quick pick-me-up. By incorporating whole, nourishing ingredients, you can actually feel good about treating yourself. Overall, these cookies perfectly exemplify how dessert can be both delicious and healthful.

    Ingredients Overview

    Essential Ingredients for 4-Ingredient Keto Greek Yogurt Cookies

    Before diving into the preparation, here’s a breakdown of the essential ingredients you’ll need for these Keto Greek Yogurt Cookies. Each ingredient serves a unique purpose, contributing to the cookies’ flavor, texture, and nutritional value.

    1. Greek Yogurt (1 cup) – Serves as the base and provides moisture and protein. Opt for full-fat Greek yogurt for best results. A dairy-free alternative can be used for a vegan version.

    2. Almond Flour (1 ¾ cups) – This gluten-free flour is perfect for keto diets. It adds a nutty flavor and fine texture to cookies. You can substitute it with coconut flour, but make sure to adjust the amount as coconut flour is denser.

    3. Sweetener (½ cup) – Erythritol or monk fruit sweetener can be used to keep the cookies low in calories and sugar. Choose a granular sweetener that measures 1:1 with sugar.

    4. Baking Powder (1 tsp) – Ensures the cookies are light and airy. It acts as a leavening agent.

    This concise list of ingredients captures the essence of what makes these cookies special, keeping them accessible yet delightful for everyone.

    Dietary Substitutions to Customize Your 4-Ingredient Keto Greek Yogurt Cookies

    Dietary preferences often dictate what we consume, and fortunately, these 4-Ingredient Keto Greek Yogurt Cookies are easily customizable.

    • Vegan Options: Use a dairy-free yogurt or silken tofu to replace Greek yogurt. Opt for flaxseed meal mixed with water as an egg substitute if your recipe requires a binder.

    • Flour Alternatives: If you can’t find almond flour, sunflower seed flour is a fantastic nut-free option. Similarly, if you wish to avoid flour altogether, you can experiment by substituting a nut butter, but keep in mind adjustments may be needed in baking time.

    • Sugar Alternatives: If erythritol or monk fruit is not available, you can replace them with stevia; however, keep in mind that stevia is much sweeter than sugar, so adjust the quantity accordingly.

    These dietary substitutions ensure that everyone can enjoy this delightful cookie. It’s simple to make adjustments, catering to gluten-free, vegan, or low-carb diets without compromising on the delectable flavor.

    How to Prepare the Perfect 4-Ingredient Keto Greek Yogurt Cookies: Step-by-Step Guide

    Prepare to delight your taste buds with these quick and easy 4-Ingredient Keto Greek Yogurt Cookies. Follow this detailed step-by-step guide to create your homemade cookies efficiently and enjoyably.

    1. Preheat the Oven: Set your oven to preheat at 350°F (175°C). This step is essential for achieving the perfect texture and flavor of your cookies.

    2. Prepare Your Baking Sheet: Lay parchment paper on a baking sheet to prevent sticking. This will ensure a delicate and clean release of each cookie.

    3. Mix the Greek Yogurt and Sweetener: In a large mixing bowl, combine the Greek yogurt and your chosen sweetener. Use a whisk or an electric mixer on low until smooth and well-combined. This forms the base of your cookie dough and should have a creamy consistency.

    4. Add the Almond Flour: Gradually sift in the almond flour. Fold it gently into the yogurt mixture until a soft, sticky dough forms. Be careful not to overmix, as that would lead to tough cookies.

    5. Incorporate Baking Powder: Sprinkle in the baking powder and stir gently until it is evenly distributed throughout the dough. This addition is crucial for a light, fluffy texture.

    6. Scoop the Dough: Using a cookie scoop or your hands, portions of dough should be placed onto the prepared baking sheet. Leave space between the cookie dough mounds to allow for spreading during baking.

    7. Bake the Cookies: Place the tray in your preheated oven and bake for 12-15 minutes, or until the edges start forming a light golden color.

    8. Cool Your Cookies: Once out of the oven, let your cookies cool on the baking sheet for 5 minutes before transferring them to wire racks to cool completely. This cooling period solidifies their shape and texture.

    9. Enjoy: Your delightful 4-Ingredient Keto Greek Yogurt Cookies are ready for savoring! Pair them with a cup of tea or coffee for an added touch of indulgence.

    Following this detailed guide not only ensures that your cookies turn out perfectly every time but also makes it easy for you to adapt the recipe based on dietary needs or ingredient availability.

    Mastering 4-Ingredient Keto Greek Yogurt Cookies: Advanced Tips and Variations

    To truly master the art of baking these delicious cookies, consider the following advanced tips and variations. These insights not only enhance flavor but also elevate your baking skills.

    • Flavor Infusions: For an exciting twist, add a teaspoon of vanilla or almond extract to the dough. You can also consider incorporating lemon zest or orange zest for an added citrusy zing, which brightens the flavor profile.

    • Add-Ins: Toss in some sugar-free chocolate chips, nuts, or dried fruits to introduce texture and richness. Just remember to adjust for any added sweetness you might need.

    • Texture Adjustments: For those preferring crunchy over soft cookies, flatten the dough mounds slightly before baking. This will help create a crispier edge while keeping the center soft.

    • Thicker Moist Cookies: To achieve a more cake-like consistency, increase the amount of almond flour slightly. You can experiment with adding an egg to enrich flavor and provide additional moisture.

    These tips will allow you to make the 4-Ingredient Keto Greek Yogurt Cookies your own and impress anyone who gets to taste them. You’ll quickly realize that these cookies can adapt to whatever craving you have!

    How to Store 4-Ingredient Keto Greek Yogurt Cookies: Best Practices

    After indulging in your 4-Ingredient Keto Greek Yogurt Cookies, you may be wondering how to store any leftovers (if there are any!). Here’s how to properly preserve these cookies to maintain their freshness.

    • Refrigeration: Place cookies in an airtight container and store them in the refrigerator for up to a week. This method helps the cookies maintain their moisture without becoming stale.

    • Freezing: If you want to enjoy your cookies later, freeze them! Simply place the cooled cookies in a single layer on a baking sheet and freeze until solid. Then transfer them to a freezer-safe airtight container or a sealable plastic bag. They can last for up to three months in the freezer.

    • Reheating: To enjoy frozen cookies, allow them to thaw in the refrigerator overnight, then warm them in the oven or microwave before serving for that fresh-baked feel.

    Storing cookies correctly preserves their taste and texture while allowing you to enjoy the benefits of these delicious treats even longer!

    Nutritional Value of 4-Ingredient Keto Greek Yogurt Cookies

    Nutritional information is often a high priority for health-conscious individuals. Fortunately, the 4-Ingredient Keto Greek Yogurt Cookies provide a favorable nutritional profile. Let’s break down what these cookies offer per serving (assuming a yield of 12 cookies):

    • Calories: Approximately 75 calories per cookie
    • Protein: About 3 grams
    • Fat: Roughly 6 grams
    • Carbohydrates: Approximately 4 grams
    • Fiber: 2 grams
    • Net Carbs: 2 grams (after subtracting fiber)

    The cookies are a fantastic option for anyone seeking a low-carb treat without sacrificing flavor. The healthy dose of protein provides energy while keeping you satiated, making these cookies a worthy addition to your selection of cookie recipes. Not only do they cater to dietary regulations like keto, but they also offer a balanced approach to sweets.

    FAQs: Frequently Asked Questions About 4-Ingredient Keto Greek Yogurt Cookies

    If you have further questions about the 4-Ingredient Keto Greek Yogurt Cookies, you are not alone! Here are some common queries addressed for your convenience:

    1. Can I use regular yogurt instead of Greek yogurt?
    2. While you can use regular yogurt, Greek yogurt results in a thicker texture that is less runny, leading to better cookie formation. If you choose regular yogurt, consider reducing the amount slightly.

    3. What other flours can I use if I can’t find almond flour?

    4. You can try coconut flour, but use only ¼ of the amount called for as it is more absorbent. Other options such as sunflower seed flour could work as well.

    5. How do I make these cookies vegan?

    6. Simply substitute the Greek yogurt with a plant-based yogurt alternative and adjust the sweetener as needed.

    7. Are these cookies suitable for meal prep?

    8. Yes! They freeze well, making them a perfect option for meal prep. You can easily grab one whenever you need a quick snack.

    9. Can I add toppings to the cookies?

    10. Absolutely! Try drizzling melted dark chocolate or a dollop of peanut butter for an added gourmet touch.

    Answering these frequently asked questions can help clarify any uncertainties and enhance your baking experience, making it easier for you to enjoy these 4-Ingredient Keto Greek Yogurt Cookies.

    In conclusion, making 4-Ingredient Keto Greek Yogurt Cookies is not just easy but also rewarding. They embrace multiple dietary needs while satisfying any sweet tooth. So gather your ingredients and embark on a delightful baking journey that suits everyone.

  • Fluffy Keto Greek Yogurt Bagels

    Fluffy Keto Greek Yogurt Bagels

    Fluffy Keto Greek Yogurt Bagels: A Tropical Delight

    Introduction to Fluffy Keto Greek Yogurt Bagels

    Looking for delectable breakfast ideas that cater to your health-conscious lifestyle? Look no further than Fluffy Keto Greek Yogurt Bagels! These delightful bagels are not only easy to make but also packed with nutrients. They’re perfect for busy parents, students, and anyone who needs a quick yet tasty option in the morning.

    What makes these bagels truly special is their simplicity. With just a few ingredients, you can whip up these fluffy delights without the hassle of traditional dough. This recipe calls for Greek yogurt, which not only adds moisture but is also a significant source of protein. Moreover, they are low in carbs, making them a perfect fit for keto dieters.

    These bagels can be enjoyed in various ways—serve them plain, top them with cream cheese, or add your favorite spreads. They fit seamlessly into a vegan or gluten-free diet as well. If you’ve been on the lookout for healthy breakfast ideas, this recipe is your answer to quick, satisfying, and nutritious meals that everyone can enjoy.

    Benefits and Advantages of Fluffy Keto Greek Yogurt Bagels

    Fluffy Keto Greek Yogurt Bagels stand out for several reasons that make them an excellent option for breakfast. First and foremost, they highlight the ease of preparation. The entire process takes only about 30 minutes, which is a huge time-saver for busy families and working professionals. There’s no need for elaborate mixing and kneading, making this an accessible recipe for novice cooks and baking enthusiasts alike.

    In addition to their quick preparation, these bagels come with a plethora of health benefits. They are low-carb, high-protein alternatives to traditional bagels, ensuring you stay fuller for longer while keeping your blood sugar levels stable. Greek yogurt offers numerous health perks, including probiotics that support gut health.

    Another significant advantage is their versatility. Whether you’re on a keto diet, following a gluten-free regimen, or seeking healthier breakfast ideas, these bagels can easily fit into your lifestyle. Busy parents can prep a batch ahead of time and pop them in the fridge for a quick grab-and-go option. Students can make them easily in their dorm kitchens, and even working professionals can have a nutritious breakfast ready before heading out the door.

    Lastly, the flavors can be adjusted to meet your taste preferences. The base recipe lends itself well to various toppings, making it easy to keep breakfast exciting. With all these benefits, it’s hard to resist trying out this fabulous recipe!

    Ingredients Overview

    Essential Ingredients for Fluffy Keto Greek Yogurt Bagels

    To create these heavenly bagels, you’ll need the following ingredients:

    • 1 ½ cups Greek yogurt (plain, unsweetened)
      Provides moisture and enhances protein content.

    • 1 ½ cups almond flour (or your preferred low-carb flour)
      Keeps the bagels gluten-free and low in carbohydrates.

    • 1 cup shredded mozzarella cheese
      Gives the bagels their famous chewy texture and rich flavor.

    • 2 teaspoons baking powder
      Acts as a leavening agent, helping the bagels rise and remain fluffy.

    • 1 teaspoon salt
      Enhances the flavor of the bagels.

    • 1 large egg
      Binds the ingredients together for structure.

    • Optional toppings: sesame seeds, poppy seeds, garlic powder
      Adds flavor and crunch to your bagels.

    These ingredients come together to create a bagel that’s both delicious and nutritious. Each component serves a purpose, from the Greek yogurt’s creaminess to the almond flour’s lightness. You can easily find all these components at your local grocery store.

    Dietary Substitutions to Customize Your Fluffy Keto Greek Yogurt Bagels

    While the base recipe is quite flexible, here are some substitutions you can consider based on dietary needs:

    • Vegan Option: Replace Greek yogurt with a plant-based yogurt and use flaxseed meal mixed with water instead of an egg as a binder.

    • Gluten-Free Option: Almond flour is already gluten-free. Other alternatives such as coconut flour can work, but adjust flour amounts since coconut flour is more absorbent.

    • Dairy-Free Alternative: Substitute mozzarella cheese with a dairy-free cheese shred that melts well.

    • Herb Variations: Adding herbs like rosemary or basil can infuse a gourmet touch. Similarly, you may include spices like onion powder for varied flavor.

    All these substitutions ensure these Fluffy Keto Greek Yogurt Bagels can cater to various dietary preferences while remaining tasty and satisfying.

    How to Prepare the Perfect Fluffy Keto Greek Yogurt Bagels: Step-by-Step Guide

    Now that you’re all set with the ingredients, let’s dive into the preparation of these delightful bagels. Follow these simple steps to create your own Fluffy Keto Greek Yogurt Bagels.

    1. Preheat the Oven:
      Preheat your oven to 350°F (175°C) and line a baking sheet with parchment paper to prevent sticking.

    2. Prepare the Base:
      In a large mixing bowl, combine the Greek yogurt and almond flour. Stir them together until they form a cohesive mixture.

    3. Mix in the Cheese:
      Add the shredded mozzarella cheese to your mixture. Use your hands or a spatula to thoroughly blend the cheese into the dough.

    4. Incorporate Dry Ingredients:
      Sprinkle the baking powder and salt over the dough and mix well until all ingredients are evenly distributed.

    5. Add the Egg:
      Crack the egg into the dough, then mix until fully integrated. The dough should be slightly sticky yet manageable.

    6. Knead the Dough:
      Dust your hands with a bit of almond flour and knead the dough gently for a minute or two until it becomes smooth.

    7. Shape the Bagels:
      Divide the dough into 6-8 equal pieces based on your preferred bagel size. Roll each piece into a ball, then use your finger to poke a hole in the center. Gently stretch the hole to shape it into a bagel.

    8. Place on Baking Sheet:
      Arrange the shaped bagels on the prepared baking sheet, leaving some space between each one.

    9. Add Toppings (Optional):
      If desired, sprinkle your bagels with sesame seeds, poppy seeds, or anything else you like.

    10. Bake to Perfection:
      Bake in the preheated oven for 20-25 minutes or until the bagels turn golden brown and slightly firm to the touch.

    11. Cool Before Serving:
      Once baked, remove them from the oven and let the bagels cool on a wire rack.

    These Fluffy Keto Greek Yogurt Bagels can be enjoyed warm or stored for later. They’re perfect breakfast ideas to wake up to!

    Mastering Fluffy Keto Greek Yogurt Bagels: Advanced Tips and Variations

    To ensure your experience making Fluffy Keto Greek Yogurt Bagels is seamless, consider these advanced tips and variations:

    • Experiment with Cheese: While mozzarella adds great texture, feel free to try other cheese types, such as cheddar or pepper jack, for a zesty taste.

    • Infuse Flavors: Consider adding dried herbs or spices to the dough for unique flavor profiles. Garlic powder, onion powder, or even sun-dried tomatoes can elevate your bagel game.

    • Make Mini Bagels: For a fun snack or appetizer, shape your dough into mini bagels. They bake quicker and can be served with dipping sauces.

    • Include Sweet Options: If you enjoy sweeter flavors, add 1-2 tablespoons of your preferred sweetener and cinnamon to the dough for a “cinnamon roll” version.

    With these advanced tips, you can customize Fluffy Keto Greek Yogurt Bagels to satisfy any palate, ensuring they remain exciting and delicious every time you make them.

    How to Store Fluffy Keto Greek Yogurt Bagels: Best Practices

    Once you’ve prepared your Fluffy Keto Greek Yogurt Bagels, you may want to know the best storage solutions. Proper storage ensures these delightful breakfast ideas remain fresh and ready for your enjoyment.

    • Refrigeration: Store bagels in an airtight container in the refrigerator for up to 4 days. When you’re ready to eat, simply pop them in a toaster for a few minutes until warmed through.

    • Freezing: For longer storage, freeze the bagels. Place each bagel in a freezer-safe bag, sealing tightly to avoid air exposure. They will keep well for up to 3 months. To enjoy, just remove from the freezer and reheat in the oven or microwave.

    • Reheating: For the best texture, reheat frozen bagels in the oven at 350°F for about 10 minutes. Alternatively, use a toaster oven if you’re short on time.

    With these simple storage practices, you’ll always have a delightful breakfast waiting for you!

    Nutritional Value of Fluffy Keto Greek Yogurt Bagels

    Knowing the nutritional content of what you eat is paramount. Here’s a brief breakdown of the nutritional value for one Fluffy Keto Greek Yogurt Bagel (without toppings):

    • Calories: Approximately 150
    • Carbohydrates: About 6g
    • Fiber: Roughly 3g
    • Protein: Approximately 11g
    • Fat: About 8g

    These bagels are a great source of protein and healthy fats while keeping carbs low—a perfect choice for anyone seeking nutritious breakfast ideas. Adjustments to the recipe may affect the nutritional values slightly, especially if you change flours or include higher-calorie toppings.

    FAQs: Frequently Asked Questions About Fluffy Keto Greek Yogurt Bagels

    Can I make these bagels without cheese?

    Yes, you can make cheese-less dough by replacing the mozzarella with a dairy-free cheese that melts well. Alternatively, it’s possible to make a variation with just yogurt and almond flour, though the texture may change.

    How can I make these bagels sweeter?

    You can easily sweeten the dough with sweetener of your choice. Use about 1-2 tablespoons of natural sweetener, like stevia or erythritol, along with some cinnamon for a delightful sweet treat!

    Can you freeze the dough before baking?

    Yes, you can freeze the shaped bagels before baking. Arrange them on a baking sheet, freeze until solid, then transfer to a freezer bag. Bake from frozen at 350°F, adding a few extra minutes to the cooking time.

    What’s the best way to add toppings to my bagels?

    To enhance flavor and create a crispy topping, brush the bagels lightly with egg wash before adding toppings like sesame seeds or poppy seeds.

    How do I ensure my bagels come out fluffy?

    Make sure to properly measure your almond flour, as too much can make them dense. Overmixing can also lead to tougher bagels, so mix just until combined.

    In conclusion, Fluffy Keto Greek Yogurt Bagels are an easy and healthy option for breakfast loved by many. Whether you’re catering to specific dietary needs or simply seeking delicious alternatives, this recipe is a must-try that beautifully encapsulates the essence of simple, wholesome cooking. Enjoy experimenting with flavors and toppings, and let these delightful bagels become a staple in your morning routine!

  • The Best Chicken Shawarma Crispy Rice Salad

    The Best Chicken Shawarma Crispy Rice Salad

    The Best Chicken Shawarma Crispy Rice Salad: A Tropical Delight

    Introduction to The Best Chicken Shawarma Crispy Rice Salad

    Are you looking for a refreshing and delicious way to enjoy chicken recipes that captivate both the palate and the eye? Look no further than The Best Chicken Shawarma Crispy Rice Salad! This vibrant dish combines tender, flavorful chicken marinated in warm spices with crispy rice, fresh vegetables, and a zesty dressing that takes your taste buds on a tropical adventure.

    What sets this salad apart is its simplicity in preparation, making it perfect for busy parents, students, and home cooks alike. Moreover, it’s easy to customize, accommodating various dietary preferences — whether you’re seeking a gluten-free option or want a lighter, vegan version. This recipe emphasizes fresh ingredients, ensuring it boasts numerous health benefits while providing a delightful meal that’s suitable for any occasion.

    Imagine serving this dish at a family gathering or a casual dinner party. Its colorful appearance and delicious taste will impress guests, while its nutritional value keeps you on track with your health goals. Whether you’re new to cooking or a seasoned chef, you’ll find joy in preparing this dynamic chicken recipe, which melds different cultures into one delicious bowl.

    Benefits and Advantages of The Best Chicken Shawarma Crispy Rice Salad

    The Recipe’s Simplicity

    The Best Chicken Shawarma Crispy Rice Salad is not just a feast for the senses; it’s also remarkably easy to prepare. With a straightforward list of ingredients and clear steps, this dish is ideal for the home cook who may not have hours to spend in the kitchen. In under 30 minutes, you can create a wholesome meal that tastes like you spent all day crafting it.

    Health Benefits

    In today’s health-conscious world, this salad stands out for its nutritious components. The marinated chicken provides a lean source of protein, while the crisp vegetables add essential vitamins and minerals. The use of whole grains in the crispy rice contributes to your daily fiber intake, promoting digestive health. Additionally, the salad is typically low in saturated fats, especially when using healthier cooking techniques like grilling or baking.

    Versatility

    This chicken recipe caters to a multitude of dietary needs. It can easily be adapted for gluten-free diets by using rice in place of traditional grains like couscous or bulgur. For those who prefer plant-based options, swapping the chicken for marinated chickpeas not only maintains the flavor profile but also maximizes the nutritional benefits.

    Whether you’re serving a crowd or whipping up a quick weeknight dinner, The Best Chicken Shawarma Crispy Rice Salad ensures there’s something for everyone at the table. You can personalize each serving to match individual tastes by providing an array of toppings or allowing diners to mix in their favorite components.

    Ingredients Overview

    Essential Ingredients for The Best Chicken Shawarma Crispy Rice Salad

    To prepare an authentic Chicken Shawarma Crispy Rice Salad, gather the following high-quality ingredients:

    • For the Chicken Marinade:
    • 1 pound boneless, skinless chicken breasts (or thighs)
    • 2 tablespoons olive oil
    • 2 teaspoons ground cumin
    • 1 teaspoon ground coriander
    • 1 teaspoon smoked paprika
    • 1 teaspoon garlic powder
    • 1 teaspoon onion powder
    • ½ teaspoon cayenne pepper (adjust to taste)
    • Salt and pepper to taste
    • Juice of 1 lemon

    • For the Rice:

    • 1 cup jasmine or basmati rice (gluten-free option)
    • 2 cups water or chicken broth
    • ½ teaspoon salt

    • Salad Components:

    • 2 cups mixed greens (suggest baby spinach, arugula, and romaine)
    • 1 cup cherry tomatoes, halved
    • 1 medium cucumber, diced
    • ½ red onion, thinly sliced
    • ¼ cup fresh parsley, chopped
    • ¼ cup crumbled feta cheese (or plant-based alternative for a vegan salad)

    • For the Dressing:

    • 4 tablespoons tahini
    • 2 tablespoons lemon juice
    • 1 garlic clove, minced
    • 2 tablespoons water to thin (plus more if needed)
    • Salt and pepper to taste

    Dietary Substitutions to Customize Your The Best Chicken Shawarma Crispy Rice Salad

    Adapting the Best Chicken Shawarma Crispy Rice Salad for various dietary preferences can enhance its appeal. Here are some substitutions to consider:

    • For a Vegan Option:
    • Replace chicken with marinated chickpeas or sautéed tofu. Marinate the chickpeas in the same spices to infuse them with flavor.

    • For Gluten-Free:

    • Substitute rice for traditional grains or bread to create a gluten-free base, retaining the authentic flavors of the dish.

    • For a Low-Carb Version:

    • Use cauliflower rice instead of jasmine or basmati rice to significantly reduce the carbohydrate content while still providing that essential base for the salad.

    • Cheese Alternatives:

    • If you’re lactose intolerant or vegan, simply omit the feta cheese or replace it with a dairy-free alternative made from nuts or tofu.

    These substitutions ensure that The Best Chicken Shawarma Crispy Rice Salad remains inclusive and enjoyed by everyone, regardless of dietary restrictions.

    How to Prepare the Perfect The Best Chicken Shawarma Crispy Rice Salad: Step-by-Step Guide

    Getting started on your Chicken Shawarma Crispy Rice Salad is quite simple. Follow these clear, actionable steps to craft the perfect dish:

    1. Prepare the Marinade:
      In a mixing bowl, combine the olive oil, cumin, coriander, smoked paprika, garlic powder, onion powder, cayenne pepper, salt, pepper, and lemon juice. Mix well to create a marinade.

    2. Marinate the Chicken:
      Add the chicken breasts to the marinade, coating them thoroughly. Let the chicken marinate for at least 15 minutes. For best results, allow it to marinate for 1-2 hours in the refrigerator.

    3. Cook the Rice:
      Rinse the rice under cold water until the water runs clear. In a medium saucepan, combine the rice, water (or chicken broth), and salt. Bring to a boil, then reduce the heat to low, cover, and simmer for about 15-20 minutes or until the rice is tender and liquid is absorbed. Fluff with a fork and set aside.

    4. Grill or Bake the Chicken:
      Preheat your grill or oven to medium-high heat. Cook the marinated chicken for 5-7 minutes per side on the grill, or bake in the oven at 400°F (200°C) for 20-25 minutes, until fully cooked through and juices run clear. Allow the chicken to rest for a few minutes before slicing.

    5. Prepare the Salad Base:
      In a large bowl, combine the mixed greens, cherry tomatoes, cucumber, and red onion. Toss gently to mix.

    6. Make the Dressing:
      In a small bowl, whisk together tahini, lemon juice, minced garlic, and enough water to achieve a pourable consistency. Season with salt and pepper to taste.

    7. Assemble the Salad:
      Layer the cooked rice on top of the salad mixture. Next, place the sliced chicken over the rice. Drizzle the tahini dressing generously over the top.

    8. Add Final Touches:
      Top with chopped parsley and crumbled feta cheese (if using). Feel free to add additional toppings such as olives or avocado for more flavor and texture.

    9. Serve:
      Serve immediately as a main dish or store leftovers in an airtight container.

    Your Chicken Shawarma Crispy Rice Salad is now ready to impress! Enjoy this delicious blend of flavors and textures, and feel free to customize further to your liking.

    Mastering The Best Chicken Shawarma Crispy Rice Salad: Advanced Tips and Variations

    For those looking to elevate their Chicken Shawarma Crispy Rice Salad, consider these advanced tips:

    • Experiment with Spices: While the traditional marinade is delightful, don’t hesitate to play around with spices! Adding cinnamon, turmeric, or even harissa can lend new depth.

    • Add Heat: For the heat lovers out there, consider tossing in sliced jalapeños or a few dashes of hot sauce to kick things up a notch.

    • Substitute Grains: Try using quinoa or wild rice as the base instead of traditional rice for a nuttier flavor and a boost of nutrients.

    • Include Seasonal Vegetables: Customize your salad further by incorporating seasonal vegetables like bell peppers in summer or roasted squash in fall.

    Variations:

    • Mediterranean Flare: Add grilled eggplant, artichoke hearts, and olives for a Mediterranean twist.

    • Tropical Touch: Incorporate mango, pineapple, or avocado for a refreshing tropical vibe that pairs famously with the savory chicken.

    These tips and variations will ensure that your Chicken Shawarma Crispy Rice Salad remains a staple in your meal rotation while continually introducing exciting new flavors.

    How to Store The Best Chicken Shawarma Crispy Rice Salad: Best Practices

    To maintain the freshness and taste of your Chicken Shawarma Crispy Rice Salad, implement the following storage techniques:

    • Refrigeration: Store leftovers in an airtight container in the refrigerator. Ideally, consume within 3-4 days to enjoy the optimal flavor and freshness of the ingredients.

    • Freezing: For longer storage, consider freezing the cooked chicken and rice separately. Place in freezer-safe bags and label with the date for easy tracking. Defrost in the refrigerator overnight when you’re ready to enjoy it again.

    • Reheating: When reheating, avoid microwaving the salad directly, as it can make the vegetables wilted. Instead, heat the chicken and rice in a skillet over medium heat. After they’re warmed through, serve over fresh greens and topped with the dressing.

    Employing these storage practices will ensure your chicken recipes remain delicious no matter when you’re ready to indulge!

    Nutritional Value of The Best Chicken Shawarma Crispy Rice Salad

    Understanding the nutritional value of your meals can help you make more informed dietary choices. Here’s a rough breakdown of the nutritional content per serving of The Best Chicken Shawarma Crispy Rice Salad:

    • Calories: Approximately 450-550 calories (depending on portion sizes and specific ingredients)
    • Protein: 30-40 grams
    • Fat: 18-25 grams
    • Saturated Fat: 3-5 grams (if using feta cheese)
    • Carbohydrates: 50-60 grams
    • Dietary Fiber: 4-6 grams
    • Sugars: 5-8 grams
    • Cholesterol: 70-90 mg (for chicken-based recipe)

    This nutritious profile indicates that the salad is rich in protein and fiber, making it a satisfying meal option. Adjusting your portion size, healthy fat content, and protein choices will allow you to tailor the salad to fit your personal dietary goals.

    FAQs: Frequently Asked Questions About The Best Chicken Shawarma Crispy Rice Salad

    Q: Can I make this salad in advance?

    A: Yes! Prepare the chicken and rice ahead of time, and assemble just before serving for the freshest taste. Store the dressings separately until serving.

    Q: Is this salad suitable for meal prep?

    A: Absolutely! The Chicken Shawarma Crispy Rice Salad is perfect for meal prep. Divide portions into containers for easy grab-and-go lunches throughout the week.

    Q: Can I substitute other types of meat?

    A: Yes! While chicken is the star of this recipe, you can try beef or lamb, or even grilled shrimp. Just adjust the cooking times accordingly.

    Q: How can I make this dish spicier?

    A: For additional heat, you can marinate the chicken with more cayenne pepper or add spicy elements when assembling, such as jalapeños in the salad.

    Q: Is it gluten-free?

    A: Yes! When using gluten-free rice and omitting any gluten-containing dressings, this recipe is suitable for people with gluten sensitivities.

    Q: Can I use brown rice instead of white rice?

    A: Certainly! Using brown rice is a healthy alternative that adds fiber and nutrients; however, cooking time may differ.

    Q: What if I don’t have tahini for the dressing?

    A: If tahini isn’t available, try using Greek yogurt or a nut butter of your choice as a substitute for the dressing.

    This comprehensive FAQ section addresses the most common concerns for those preparing the Chicken Shawarma Crispy Rice Salad, ensuring a smooth cooking experience.


    In conclusion, The Best Chicken Shawarma Crispy Rice Salad is an exceptional dish that harmonizes flavors, health benefits, and culinary creativity. With its myriad of possibilities for customization and its simplicity in preparation, this salad is a delightful addition to your repertoire of chicken recipes. Whether you are a busy parent, a student, or simply a food enthusiast, this recipe is sure to impress at any table. Give it a try, and revel in the burst of flavors and textures that await!