Blog

  • Best Rhubarb Crisp Muffins – CanT Stop Making Them

    Best Rhubarb Crisp Muffins – CanT Stop Making Them

    Best Rhubarb Crisp Muffins – Can’t Stop Making Them!: A Tropical Delight

    Introduction to Best Rhubarb Crisp Muffins – Can’t Stop Making Them!

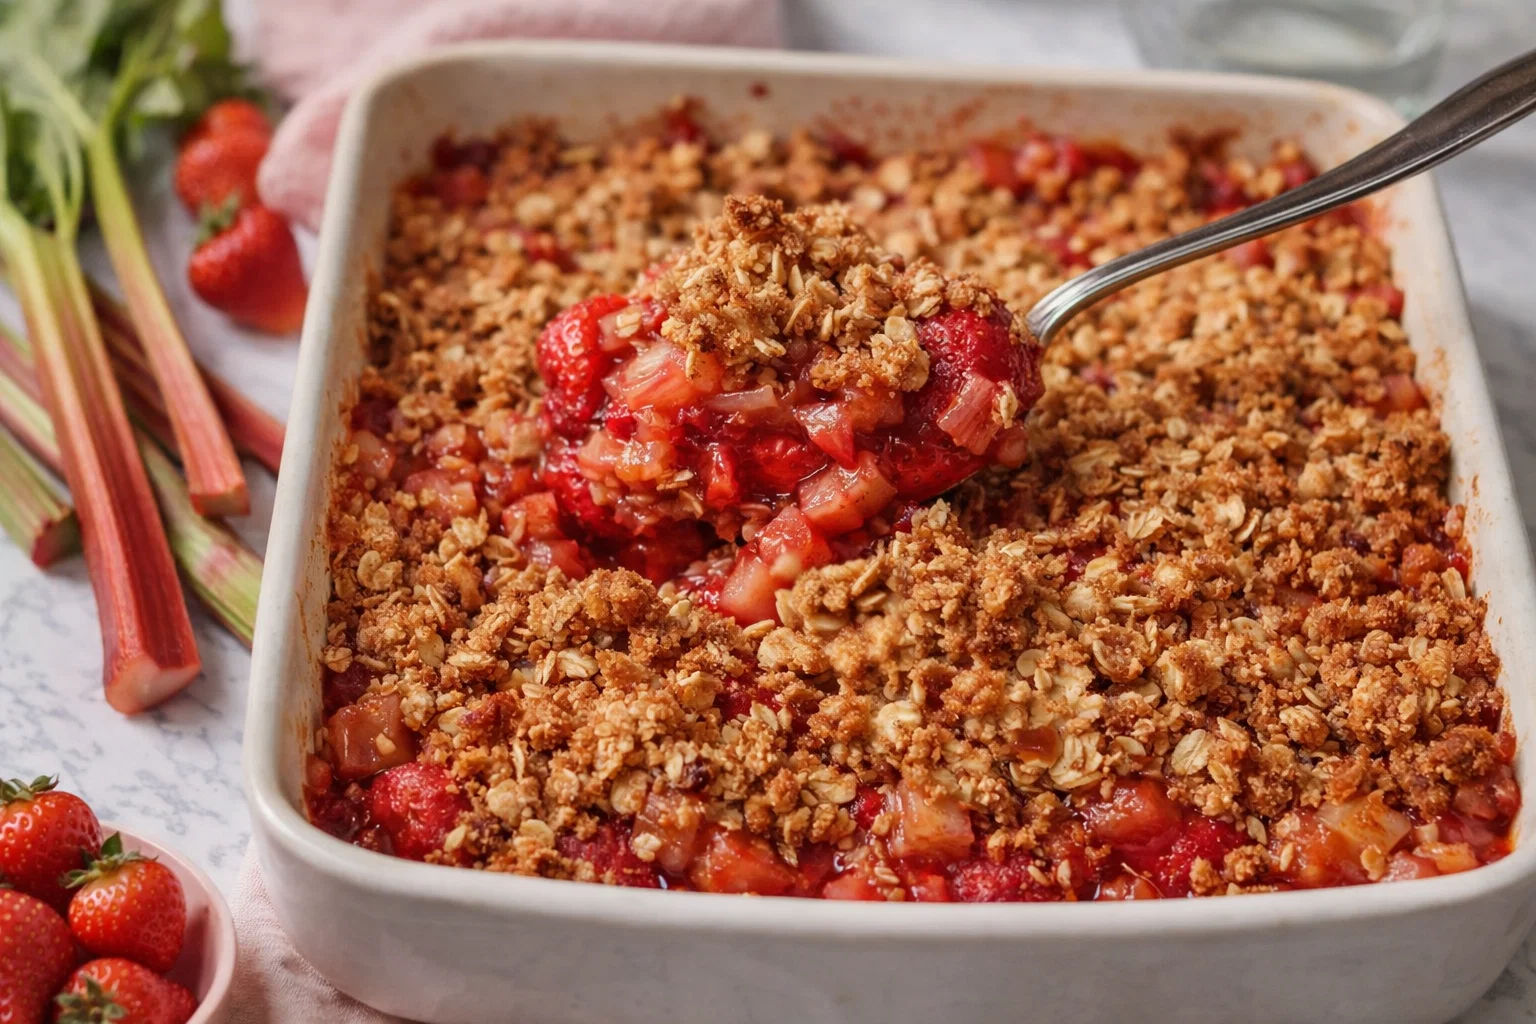
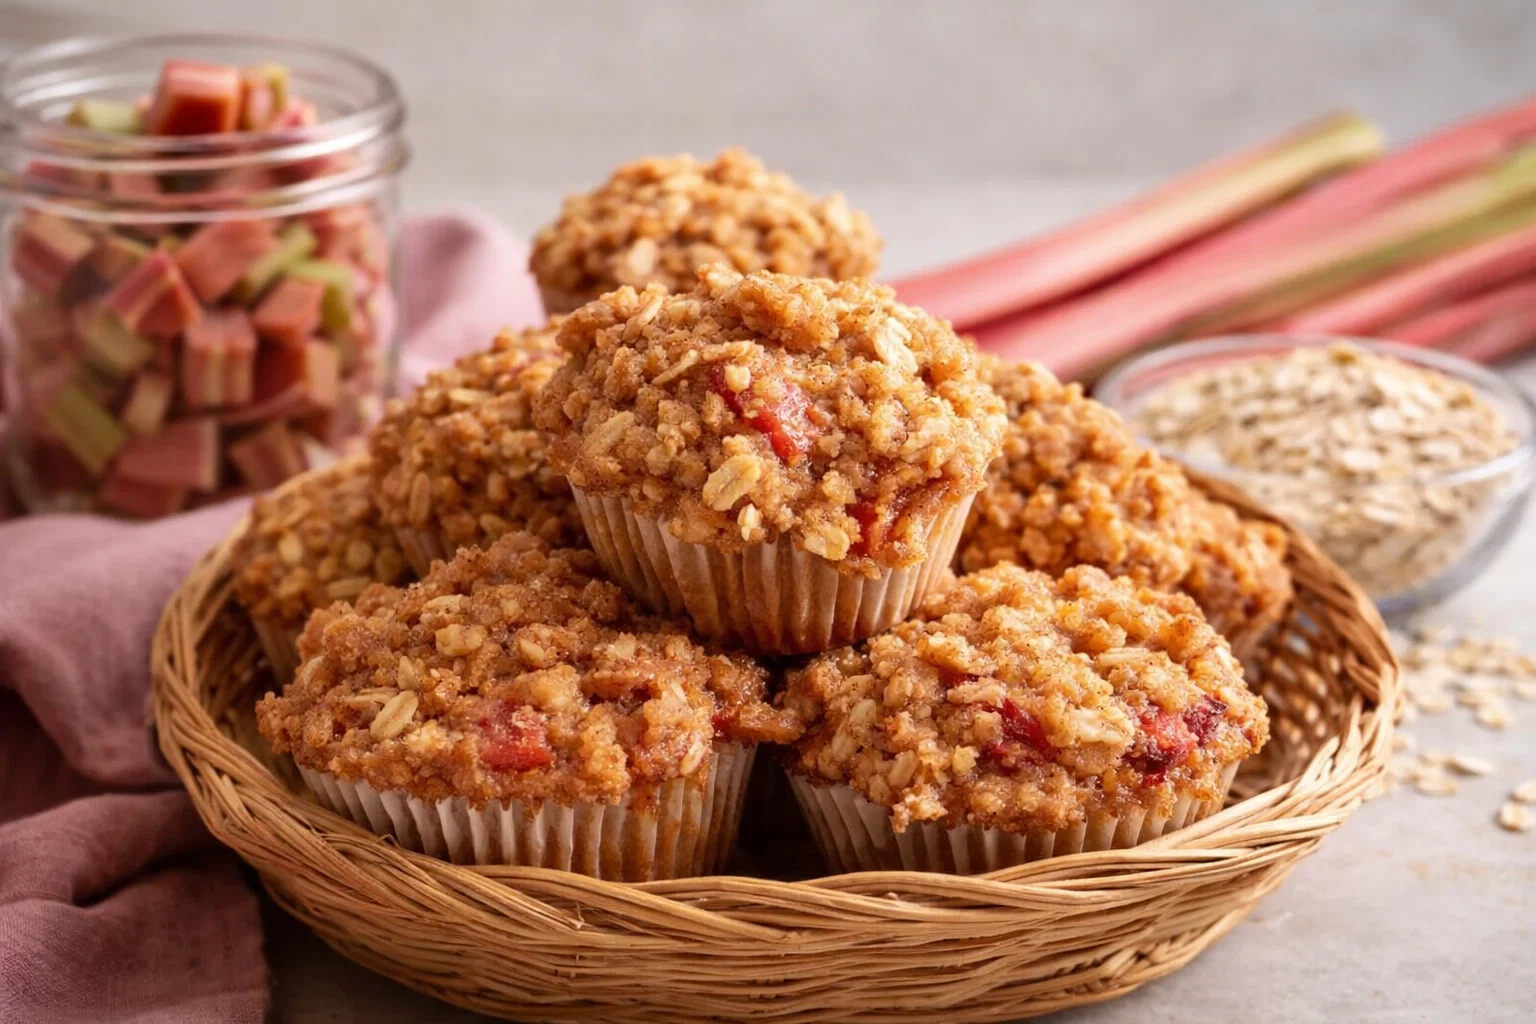
    Finding delightful and simple breakfast ideas can often be a challenge, especially for busy individuals and families. If you’re searching for a quick yet satisfying option, these Best Rhubarb Crisp Muffins are perfect! A tropical delight, these muffins blend the unique tartness of rhubarb with a sweet, crunchy topping that will leave your taste buds tingling and your breakfast routine refreshed.

    What makes these muffins stand out? They are not only easy to prepare, but they are also incredibly versatile. Whether you’re looking for a breakfast on-the-go, a healthy snack for your kids, or a delightful treat for a brunch gathering, these muffins will fit the bill. Packed with wholesome ingredients, they cater to various dietary needs, including options for vegan, gluten-free, and low-calorie variants.

    In this article, you’ll find all the necessary components to inspire your morning routine and make Best Rhubarb Crisp Muffins a staple in your kitchen. So let’s get baking and make something incredible together!

    Benefits and Advantages of Best Rhubarb Crisp Muffins – Can’t Stop Making Them!

    There are many reasons why our Best Rhubarb Crisp Muffins have become a household favorite. First, they’re incredibly easy to make. With just a few simple steps, even the busiest parents or first-time bakers can whip up a batch in no time. Plus, the muffins can be made in advance and are perfect for those hectic mornings when breakfast ideas are scarce.

    From a health perspective, rhubarb is a powerhouse of nutrients. It’s low in calories but high in vitamin K, vitamin C, and several antioxidants, which contribute to overall health. This makes our Best Rhubarb Crisp Muffins a guilt-free option compared to other sugary breakfast treats.

    Additionally, the recipe allows for customization to cater to different dietary needs. For example, substituting traditional flour with almond flour or using dairy-free alternatives will ensure everyone at the table enjoys these delightful muffins. Whether you are vegan, gluten-sensitive, or calorie-conscious, you don’t have to miss out on delicious breakfast options.

    Another advantage is the flavor. Rhubarb’s tartness offers a refreshing contrast to the sweetness of the muffin and the crispy topping. This balance creates a delicious addition to your breakfast repertoire, making it a treat you won’t want to stop making!

    Ingredients Overview

    Essential Ingredients for Best Rhubarb Crisp Muffins – Can’t Stop Making Them!

    Here’s a detailed list of ingredients you’ll need to make these incredible muffins, along with their purpose:

    • 2 cups all-purpose flour (or gluten-free flour): Forms the base for your muffins.
    • 1 cup rhubarb, chopped: Provides a tart and flavorful punch.
    • 1 cup granulated sugar (or coconut sugar for a healthier option): Sweetens the muffins without overwhelming the rhubarb flavor.
    • 1/2 cup unsalted butter (or coconut oil for a vegan option): Adds moisture and richness.
    • 1/2 cup milk (or almond milk for a dairy-free variant): Binds the ingredients together.
    • 2 large eggs (or flaxseed meal for vegan substitute): Acts as a binder and adds protein.
    • 1 tablespoon baking powder: Provides the leavening power to make muffins fluffy.
    • 1/2 teaspoon salt: Enhances the flavors.
    • 1 teaspoon vanilla extract: Adds depth of flavor.

    Dietary Substitutions to Customize Your Best Rhubarb Crisp Muffins – Can’t Stop Making Them!

    Adapting recipes to suit various dietary restrictions is key to inclusive cooking. Here are some substitutions you can consider:

    • Gluten-Free Flour: Utilize almond or coconut flour to make these muffins gluten-free. Just be sure to adjust the liquid ratio, as gluten-free flours can absorb more moisture.
    • Vegan Option: Replace butter with coconut oil and eggs with flaxseed meal (1 tablespoon flaxseed meal + 3 tablespoons water = 1 egg). Use non-dairy milk for a fully vegan dish.
    • Lower Sugar: Substitute granulated sugar with honey or maple syrup, which will also add a beautiful flavor.
    • Nut-Free: If you have a nut allergy, stick to a standard all-purpose flour and avoid nut-based milk options.

    With these substitutions, you can easily tailor the Best Rhubarb Crisp Muffins to meet the needs of your loved ones and guests alike.

    How to Prepare the Perfect Best Rhubarb Crisp Muffins – Can’t Stop Making Them!: Step-by-Step Guide

    Creating extraordinary Best Rhubarb Crisp Muffins is a straightforward process that yields delicious results. Follow these easy steps to prepare your muffins:

    1. Preheat the Oven: Start by preheating your oven to 350°F (175°C). This ensures that your muffins bake evenly.

    2. Prepare the Muffin Pan: Grease your muffin pan with cooking spray or line it with muffin liners to prevent sticking.

    3. Mix Dry Ingredients: In a large mixing bowl, combine 2 cups of flour, 1 tablespoon of baking powder, and 1/2 teaspoon of salt. Stir well to ensure they are evenly mixed.

    4. Cream the Butter and Sugar: In a separate bowl, beat 1/2 cup unsalted butter (softened) and 1 cup granulated sugar until light and fluffy. This may take about 3-5 minutes.

    5. Add Eggs and Vanilla: Add the 2 eggs (or flaxseed mixture) and 1 teaspoon of vanilla extract to the butter-sugar mixture. Mix until fully combined.

    6. Combine the Mixtures: Gradually add your dry mixture to the wet mixture. Stir just until combined; do not overmix, as this can lead to dense muffins.

    7. Add the Rhubarb: Gently fold in 1 cup of chopped rhubarb. Make sure the rhubarb is evenly distributed in the batter.

    8. Prepare the Crisp Topping: In a small bowl, combine 1/2 cup of flour, 1/4 cup of brown sugar, and 1/4 cup of oats. Cut in 1/4 cup of cold butter (or coconut oil) until you achieve a crumbly texture.

    9. Fill Muffin Cups: Spoon the muffin batter into each cup, filling them about two-thirds full. Then, sprinkle the crisp topping generously over each muffin.

    10. Bake: Place the muffin pan in your preheated oven and bake for 20-25 minutes or until the tops are golden brown and a toothpick inserted into the center comes out clean.

    11. Cool: Once baked, remove the muffins from the oven and allow them to cool in the pan for 5 minutes before transferring them to a wire rack to cool completely.

    12. Enjoy: Serve warm or at room temperature, enjoying them as a delightful breakfast idea or snack any time of the day!

    Mastering Best Rhubarb Crisp Muffins – Can’t Stop Making Them!: Advanced Tips and Variations

    To take your Best Rhubarb Crisp Muffins to the next level, consider these tips and variations:

    • Add Fruits or Nuts: Experiment by adding blueberries, strawberries, or chopped walnuts for additional flavor and texture.
    • Spices: For a little more warmth, include spices like cinnamon or nutmeg into your batter.
    • Serving Suggestions: These muffins are fantastic on their own, but you can also serve them with a dollop of yogurt, a drizzle of honey, or a sprinkle of powdered sugar for an extra special treat.
    • Mini Muffins: Try making mini versions of these muffins for bite-sized snacks perfect for kids or tea parties!

    By experimenting with these variations, the Best Rhubarb Crisp Muffins can be tailored to suit your preferences and your guests’ tastes!

    How to Store Best Rhubarb Crisp Muffins – Can’t Stop Making Them!: Best Practices

    Proper storage of your Best Rhubarb Crisp Muffins ensures they stay moist and delicious longer. Here are the best practices for storing your muffins:

    • At Room Temperature: If you plan to eat the muffins within 1-2 days, store them at room temperature in an airtight container. This retains their freshness without drying them out.
    • Refrigeration: For longer storage, you can place the muffins in the fridge, which can extend their shelf life up to a week. Ensure they are in a sealed container to prevent them from absorbing other fridge odors.
    • Freezing: For those wanting to keep muffins longer, place them in an airtight freezer bag or container after they cool completely. They can be frozen for up to 3 months. To defrost, simply remove them from the freezer and let them sit at room temperature for about an hour or heat them in the microwave for a few seconds.

    Utilizing these methods will ensure your muffins remain a delightful option for breakfast ideas or snacks!

    Nutritional Value of Best Rhubarb Crisp Muffins – Can’t Stop Making Them!

    Understanding the nutritional value of your Best Rhubarb Crisp Muffins can help you make informed choices. Here’s a breakdown of the approximate nutritional values per muffin (based on a standard recipe serving 12 muffins):

    • Calories: 170-200
    • Total Fat: 7-9g
    • Saturated Fat: 3-4g
    • Cholesterol: 30-40mg
    • Sodium: 150-200mg
    • Total Carbohydrates: 24-28g
    • Dietary Fiber: 1-2g
    • Sugars: 8-10g
    • Protein: 2-3g

    These muffins are relatively low in calories for a breakfast idea and provide essential nutrients without excess sugars or fats, allowing you to indulge guilt-free!

    FAQs: Frequently Asked Questions About Best Rhubarb Crisp Muffins – Can’t Stop Making Them!

    Q: Can I make these muffins ahead of time?
    A: Absolutely! They store well at room temperature for a couple of days or in the refrigerator for up to a week. You can also freeze them for up to 3 months.

    Q: Can I use frozen rhubarb?
    A: Yes! Frozen rhubarb works well in this recipe. Just ensure you thaw it and drain any excess juice before mixing it into the batter.

    Q: Are these muffins suitable for children?
    A: Yes! The tartness of the rhubarb adds a unique flavor that many kids enjoy. Additionally, with the option to reduce sugar or use natural sweeteners, these can be made healthier for your little ones.

    Q: How can I make these muffins sugar-free?
    A: You may substitute sugar with a natural sweetener like stevia or monk fruit sweetener. Just adjust the amount according to the packaging instructions.

    Q: How do I know when my muffins are done baking?
    A: Your muffins are ready when they are golden brown on top, and a toothpick inserted into the center comes out clean.

    With these helpful tips and answers, you can confidently prepare Best Rhubarb Crisp Muffins and enjoy them any time of day, making them a wonderful breakfast idea everyone will love! Happy baking!

  • Juicy Low Sugar Strawberry Rhubarb Crisp

    Juicy Low Sugar Strawberry Rhubarb Crisp

    Juicy Low Sugar Strawberry Rhubarb Crisp: A Tropical Delight

    Introduction to Juicy Low Sugar Strawberry Rhubarb Crisp

    Are you ready to experience a delightful treat that embodies the essence of fresh fruit and wholesome ingredients? Introducing the Juicy Low Sugar Strawberry Rhubarb Crisp—a dessert that perfectly combines the vibrant flavors of strawberries and the tartness of rhubarb, all while maintaining a low sugar content. This recipe is not only simple to make, but it is also healthy, vegan, and gluten-free, making it an incredible option for anyone looking to enjoy strawberry recipes that align with their dietary needs.

    Whether you’re a busy parent seeking a quick dessert, a health-conscious individual craving something sweet, or an enthusiastic baker wanting to impress friends, this delightful crisp is the perfect choice. Its simplicity lies in its natural ingredients and straightforward preparation, which makes it a beloved staple in many households. The Juicy Low Sugar Strawberry Rhubarb Crisp is a testament to how wholesome ingredients can combine to create something delicious and satisfying.

    Moreover, this recipe allows you to take advantage of seasonal fruits and adapt to varying dietary preferences. So, gather your ingredients and let’s get started on making this exquisite treat that is bound to excite everyone around your kitchen table!

    Benefits and Advantages of Juicy Low Sugar Strawberry Rhubarb Crisp

    When it comes to desserts, the Juicy Low Sugar Strawberry Rhubarb Crisp shines for several reasons. First and foremost, its nutrient-rich ingredients provide various health benefits. Strawberries are packed with antioxidants, vitamin C, and fiber, while rhubarb contributes an excellent source of vitamins K and C, along with dietary fiber. By combining these fruits in a low sugar recipe, you ensure that your dessert not only satisfies a sweet tooth but also supports overall health.

    One of the standout features of this crisp is its ease of preparation. In just a few simple steps, you can combine fresh fruits, oats, and a sprinkle of sweetener to create a delightful dish that requires minimal fuss. This aspect is particularly valuable for busy parents or working professionals who crave a homemade dessert without sacrificing their limited time.

    Additionally, this recipe is adaptable, allowing you to customize it according to personal preferences or dietary restrictions. Whether you’re looking for a gluten-free option or seeking a sugar substitute, you can easily modify the ingredients without compromising the dish’s integrity. Plus, this low sugar recipe is ideal for those watching their calorie intake or managing conditions like diabetes.

    Not to forget, the crisp topping made of oats and nuts adds a crunchy texture that beautifully complements the tender fruit underneath. This contrast of flavors and textures makes every bite a joy. From families to seniors or even students, anyone can enjoy this delectable dessert.

    Ultimately, the Juicy Low Sugar Strawberry Rhubarb Crisp stands out as a sweet option that brings health and indulgence together effortlessly.

    Ingredients Overview

    Essential Ingredients for Juicy Low Sugar Strawberry Rhubarb Crisp

    To create the Juicy Low Sugar Strawberry Rhubarb Crisp, you will need the following ingredients:

    • Filling:
    • 3 cups fresh strawberries, hulled and sliced
    • 2 cups rhubarb, chopped
    • 2 tablespoons maple syrup (or more to taste)
    • 1 tablespoon cornstarch (for thickening)
    • 1 teaspoon vanilla extract
    • A pinch of salt

    • Crisp Topping:

    • 1 cup rolled oats (gluten-free if desired)
    • 1/2 cup almond flour (or all-purpose flour for a non-gluten-free option)
    • 1/2 cup chopped nuts (almonds or walnuts, for added crunch)
    • 1/4 cup coconut oil or unsalted butter, melted
    • 3 tablespoons maple syrup or honey
    • 1 teaspoon cinnamon

    Dietary Notes:

    • Vegan: To keep the recipe entirely plant-based, ensure you use maple syrup and coconut oil.
    • Gluten-Free: Opt for certified gluten-free oats and almond flour.
    • Low-Calorie: For a reduced calorie version, minimize the amount of sweetener and focus on using naturally sweetened fruits like ripe strawberries.

    Dietary Substitutions to Customize Your Juicy Low Sugar Strawberry Rhubarb Crisp

    Creating a dessert that fits various dietary needs is essential for many home cooks. Here are some substitutions to consider for the Juicy Low Sugar Strawberry Rhubarb Crisp:

    • Sweeteners: Instead of maple syrup, feel free to use stevia or erythritol to reduce the overall sugar content; adjust the quantities according to sweetness preference.
    • Flours: If nut allergies are a concern, try using oat flour or a gluten-free all-purpose flour blend instead of almond flour.
    • Fats: Coconut oil can be substituted with apple sauce or Greek yogurt to provide moisture without the added fats, particularly if you want to keep it light.
    • Fruits: If strawberries and rhubarb are not in season, you can try other combinations such as blueberries and peaches or blackberries for a fun twist on the original recipe.

    By incorporating these substitutions, you can easily tailor this delightful dessert to fit various dietary preferences while enjoying the same delicious flavors.

    How to Prepare the Perfect Juicy Low Sugar Strawberry Rhubarb Crisp: Step-by-Step Guide

    Follow these easy steps to create the Juicy Low Sugar Strawberry Rhubarb Crisp:

    1. Prepare the Base: Begin by preheating your oven to 350°F (175°C). In a large mixing bowl, combine the sliced strawberries and chopped rhubarb.

    2. Mix Sweetener and Flavoring: Add the maple syrup, cornstarch, vanilla extract, and a pinch of salt to the fruit mixture. Stir gently until all the fruits are well-coated. This blend will create a juicy filling that enhances the overall flavor.

    3. Transfer to Baking Dish: Pour the fruit mixture into a greased 9×9-inch baking dish or a similar-sized casserole dish, spreading it evenly.

    4. Prepare the Crisp Topping: In another bowl, combine rolled oats, almond flour, chopped nuts, melted coconut oil, maple syrup or honey, and cinnamon. Mix well until everything is incorporated into a crumbly texture.

    5. Top the Filling: Evenly distribute the crisp topping over the fruit mixture in the baking dish, ensuring it covers every part of the filling.

    6. Bake: Place the baking dish in the preheated oven and bake for 30-35 minutes or until the topping is golden brown and the fruit is bubbling.

    7. Cool and Serve: Once baked, allow the crisp to cool slightly for 10-15 minutes before serving. This cooling step lets the juices thicken, making every bite divine.

    8. Enjoy: Serve the Juicy Low Sugar Strawberry Rhubarb Crisp on its own or with a dollop of coconut whipped cream or dairy-free ice cream to elevate your dessert experience.

    Feel free to experiment with the recipe by adding your favorite spices or fresh herbs for a local twist!

    Mastering Juicy Low Sugar Strawberry Rhubarb Crisp: Advanced Tips and Variations

    To elevate your Juicy Low Sugar Strawberry Rhubarb Crisp beyond the basic recipe, consider these master tips and creative variations:

    • Add Spices: Enhance the flavor profile by adding nutmeg or allspice in addition to cinnamon. These spices create depth and warmth in the dish.

    • Use Fresh Herbs: Mixing in fresh mint or basil with the fruit filling can add an unexpected but refreshing twist. This is particularly delightful for summer gatherings.

    • Incorporate Other Fruits: Mix the rhubarb with other fruits like apples, peaches, or cherries to create new flavor combinations. Each option brings a unique sweetness or tartness!

    • Crisp Texture: For added crunch, experiment with different nuts or seeds, such as pumpkin seeds or flaxseed meal, within the topping. These ingredients not only provide a delightful textural contrast but increase the health benefits too.

    • Make it Ahead of Time: Preparing the filling and topping separately and refrigerating them before baking can save time when you’re ready to enjoy your crisp. Simply assemble and bake when you’re ready for a warm treat.

    By considering these additional tips, you can explore the endless possibilities of strawberry recipes, ensuring your Juicy Low Sugar Strawberry Rhubarb Crisp remains a beloved, versatile dessert that suits any occasion.

    How to Store Juicy Low Sugar Strawberry Rhubarb Crisp: Best Practices

    Properly storing your Juicy Low Sugar Strawberry Rhubarb Crisp ensures it stays fresh for longer while maintaining its delicious flavor. Here are the best practices for storage:

    • Refrigeration: After allowing the crisp to cool down to room temperature, you can store it covered in an airtight container in the refrigerator for up to 5-7 days. The crisp topping may soften slightly, but it will still taste delightful.

    • Freezing: To freeze, ensure the crisp is completely cooled. Cover it tightly with plastic wrap and then aluminum foil to protect it from freezer burn. It can be frozen for up to three months. When you’re ready to enjoy it, thaw it in the refrigerator overnight and reheat in the oven at 350°F (175°C) until warmed through.

    • Reheating: To bring the crisp back to life after refrigeration or freezing, reheat it in an oven rather than the microwave. This method will help crisp the topping once again, making it even more enjoyable to eat.

    By proper care and storage, you can indulge in your Juicy Low Sugar Strawberry Rhubarb Crisp even days after preparation!

    Nutritional Value of Juicy Low Sugar Strawberry Rhubarb Crisp

    Understanding the nutritional value of your meals can greatly assist you in managing your dietary needs. Here’s a breakdown of the nutritional content in an estimated serving of the Juicy Low Sugar Strawberry Rhubarb Crisp:

    • Calories: Approximately 180-220 calories
    • Carbohydrates: 30-35 grams
    • Protein: 3-5 grams
    • Fat: 7-9 grams
    • Fiber: 4-6 grams
    • Sugar: Approximately 5 grams (natural sugars from fruit and less added sugar)

    This dessert provides a fantastic way to satisfy your sweet tooth while remaining relatively low in sugar. The combination of fiber from oats and fruits contributes to a satisfying feeling, making this crisp a wholesome treat that doesn’t compromise on flavor.

    FAQs: Frequently Asked Questions About Juicy Low Sugar Strawberry Rhubarb Crisp

    Q: Can I use frozen fruits instead of fresh?

    A: Yes! You can substitute fresh strawberries and rhubarb with frozen versions. However, you may want to reduce the sugar since frozen fruit tends to be sweeter due to the concentration of juices.

    Q: How can I make this recipe lower in calories?

    A: To reduce calories, cut back on the amount of sweetener used, swap out coconut oil for Greek yogurt, or decrease the portion size served.

    Q: Can I prepare this crisp the night before serving?

    A: Absolutely! You can assemble the fruit filling and crumb topping separately, refrigerate, and bake the next day when you want to serve it.

    Q: How do I know when the crisp is done baking?

    A: The crisp is ready when the topping turns golden brown, and the fruit filling is bubbling up around the edges.

    Q: How can I substitute for rhubarb in this recipe?

    A: If rhubarb is not available, tart apples or pears can be used as a substitute to replicate a similar tart flavor profile.

    By exploring these frequently asked questions, you can easily create your perfect Juicy Low Sugar Strawberry Rhubarb Crisp while addressing common concerns and queries!

    So gather your ingredients, prepare to mix, and indulge in a dessert that is as wholesome as it is delicious. Your Juicy Low Sugar Strawberry Rhubarb Crisp awaits!

  • Homemade Bang Bang Shrimp Pasta

    Homemade Bang Bang Shrimp Pasta

    Homemade Bang Bang Shrimp Pasta: A Tropical Delight

    Introduction to Homemade Bang Bang Shrimp Pasta

    Are you on the lookout for an exciting way to enjoy shrimp recipes? Look no further than our delightful Homemade Bang Bang Shrimp Pasta! This dish captures the flavor of the tropics while providing a feast for your taste buds. It combines succulent shrimp with perfectly cooked pasta, all enveloped in a creamy, spicy sauce. Whether you’re a busy parent needing a quick weeknight dinner or a culinary enthusiast wanting to impress your friends, this recipe is versatile enough to satisfy all types of home cooks.

    What’s more, our Bang Bang Shrimp Pasta offers various health benefits, making it an ideal meal option. It can be easily modified to cater to dietary restrictions—transforming it into a gluten-free or dairy-free dish as needed. This recipe is easy to prepare, often requiring minimal prep time, making it perfect for the hectic lifestyles of working professionals and students alike. Not only is it delicious, but it’s also packed with protein and other essential nutrients that contribute to a well-balanced meal.

    With a balance of spicy and sweet flavors, our Homemade Bang Bang Shrimp Pasta is not just a meal; it’s an experience—one that you’ll want to recreate over and over again! Ready to give this tropical dish a try? Let’s explore its benefits and advantages.

    Benefits and Advantages of Homemade Bang Bang Shrimp Pasta

    When looking for a dish that is both satisfying and easy to make, Homemade Bang Bang Shrimp Pasta should be at the top of your list. Here are some reasons why this recipe is a fantastic choice:

    1. Time-Saving: The simplicity of this recipe allows you to whip it up in just 30 minutes. This makes it ideal for busy parents, students, and working professionals who often find themselves short on time.

    2. Health Benefits: Shrimp are an excellent source of lean protein and are low in calories, making them a great addition to a balanced diet. Incorporating whole-grain pasta into the dish enhances its nutritional profile by adding more fiber and vitamins.

    3. Customizable: One of the standout features of this dish is its adaptability. Whether you are following a vegan, gluten-free, or low-carb diet, you can modify the ingredients to meet your dietary needs. You can swap traditional pasta for zucchini noodles or gluten-free pasta, providing a hearty yet healthy meal.

    4. Flavor Packed: The creamy Bang Bang sauce is where the magic happens! A combination of sweet chili sauce, mayonnaise, and sriracha creates a flavorful punch that pairs beautifully with the shrimp and pasta.

    5. Perfect for Sharing: This dish is great for meal prep or when you want to entertain guests. You can easily increase the quantity to serve large groups or save leftovers for a later date.

    6. Great for Any Occasion: Whether it’s a cozy weeknight dinner, a special date night, or even a casual gathering with friends, Bang Bang Shrimp Pasta fits the bill. Its vibrant presentation and enticing aroma are sure to wow anyone at your table!

    In summary, Homemade Bang Bang Shrimp Pasta is not only delicious but also boasts various benefits that make it a convenient, healthy, and enjoyable meal for everyone. Next, let’s delve into the ingredients that make this dish special.

    Ingredients Overview

    Essential Ingredients for Homemade Bang Bang Shrimp Pasta

    To create your very own Homemade Bang Bang Shrimp Pasta, you will need the following ingredients:

    For the Pasta:

    • 8 oz Pasta (Spaghetti or Gluten-Free Option): The base of your dish. Whole-grain or gluten-free alternatives can add nutritional value.
    • Salt (to taste): Enhances the flavor of your pasta.

    For the Bang Bang Sauce:

    • 1/2 cup Mayonnaise: Provides creaminess. Substitute with vegan mayo for a dairy-free option.
    • 1/4 cup Sweet Chili Sauce: Adds sweetness and flavor; look for low-sugar options if monitoring sugar intake.
    • 1-2 tbsp Sriracha (to taste): For a spicy kick; adjust according to your heat preference.
    • 1 tbsp Lime Juice: Brightens the flavors and adds acidity.

    For the Shrimp:

    • 1 lb Shrimp (peeled and deveined): The star ingredient; if you are looking for a low-calorie switch, choose smaller shrimp or reduce the portion size.

    Optional Garnishes:

    • Chopped Green Onions: For garnish and flavor.
    • Fresh Cilantro: Adds a fresh element.
    • Lime Wedges: For serving alongside your dish.

    These ingredients come together to create a meal that is not only robust in flavor but also visually appealing thanks to the bright colors and textures.

    Dietary Substitutions to Customize Your Homemade Bang Bang Shrimp Pasta

    Catering to various dietary needs has never been easier with this Bang Bang Shrimp Pasta. Here are some suggested substitutions to ensure everyone can enjoy this dish:

    • Pasta Alternatives: If you’re on a low-carb or keto diet, consider using zucchini noodles or spaghetti squash as a substitute for traditional pasta.

    • Vegan/Dairy-Free Options: Replace mayonnaise with vegan mayo or cashew cream to achieve the same creamy texture without animal products.

    • Shrimp Alternatives: For those with seafood allergies, try using chicken, tofu, or tempeh as a protein source. The cooking method remains the same.

    • Gluten-Free Options: Ensure your pasta is specifically labeled gluten-free. Using rice noodles might also provide an interesting twist.

    • Lower-Calorie Choices: For a lighter version, use fewer shrimp or substitute with chicken breast or legumes for plant-based proteins.

    These alternatives allow home cooks to tailor this dish to fit their preferences or dietary restrictions without sacrificing flavor or enjoyment. Now that you have an overview of the essential ingredients and substitutions, let’s dive into creating this delicious recipe.

    How to Prepare the Perfect Homemade Bang Bang Shrimp Pasta: Step-by-Step Guide

    Making Homemade Bang Bang Shrimp Pasta is a straightforward process that will have your kitchen smelling delightful in no time. Follow this clear, step-by-step guide to create a dish that’s full of flavor.

    1. Cook the Pasta:
    2. Bring a large pot of salted water to a boil. Add your pasta and cook according to package instructions until al dente. Drain and set aside, reserving a little pasta water for later.

    3. Prepare the Bang Bang Sauce:

    4. While the pasta cooks, combine the mayonnaise, sweet chili sauce, sriracha, and lime juice in a bowl. Mix well until the ingredients are fully incorporated. Adjust the spiciness by adding more sriracha if desired.

    5. Cook the Shrimp:

    6. In a large skillet over medium heat, add a drizzle of olive oil. Once hot, add the peeled and deveined shrimp. Cook for about 2-3 minutes on each side, or until they turn pink and opaque. Be sure not to overcook the shrimp to keep them tender.

    7. Combine Pasta and Sauce:

    8. In the same skillet as the shrimp, add the cooked pasta. Pour the Bang Bang sauce over the pasta and shrimp. Toss everything together gently to ensure the pasta and shrimp are well coated. If it seems a bit dry, add a splash of the reserved pasta water.

    9. Adjust Seasoning:

    10. Taste your dish. You may want to add salt, pepper, or additional lime juice to brighten the flavors.

    11. Add Garnishes:

    12. Serve immediately, garnishing with chopped green onions and cilantro. For an extra touch, place lime wedges on the side for squeezing over before eating.

    13. Enjoy Your Meal:

    14. Dig into your Homemade Bang Bang Shrimp Pasta! The creamy, spicy sauce combined with the succulent shrimp and perfectly cooked pasta is sure to satisfy your cravings.

    15. Storage Suggestions:

    16. If you have leftovers, store them in an airtight container in the refrigerator for up to three days. Reheat gently on the stove or in the microwave before serving.

    By following these simple steps, you can enjoy a delicious plate of Homemade Bang Bang Shrimp Pasta that is satisfying yet customizable to meet your dietary needs. Now, let’s explore some advanced tips and variations to take your dish to the next level.

    Mastering Homemade Bang Bang Shrimp Pasta: Advanced Tips and Variations

    Taking your Homemade Bang Bang Shrimp Pasta to new heights is easy with these advanced tips and variations:

    1. Experiment with Proteins:
    2. Swap shrimp for other seafood options like scallops or lobster for a luxurious touch or choose chicken for a comforting alternative.

    3. Add Veggies:

    4. You can easily toss in vegetables such as bell peppers, snap peas, or broccoli for added nutrition and color. Sauté them with the shrimp to infuse flavor.

    5. Herbs and Spices:

    6. Infuse additional flavor by adding chopped fresh herbs like basil or parsley. You can also experiment with spices like paprika or garlic powder for a different taste profile.

    7. Nutty Twist:

    8. For a crunchy element, consider garnishing your dish with crushed peanuts or cashews. This will add texture while complementing the spice of the Bang Bang sauce.

    9. Alternative Sauce Variations:

    10. If you would like to try a different sauce, consider swapping the Bang Bang sauce with a homemade pesto or garlic butter sauce for a unique twist on the dish.

    By incorporating these tips and variations, you can elevate this already delicious recipe to fit your personal preferences and elevate your cooking skills.

    How to Store Homemade Bang Bang Shrimp Pasta: Best Practices

    Proper storage is key to enjoying your Homemade Bang Bang Shrimp Pasta over multiple meals. Here’s how to ensure the best storage practices:

    • Refrigeration:
    • Allow the pasta to cool slightly before transferring it to an airtight container. Store in the refrigerator for up to three days.

    • Freezing:

    • While not ideal for shrimps, you can freeze the pasta if you use a non-shrimp protein. To freeze, place in a freezer-safe container and store for up to three months. Thaw in the refrigerator before reheating.

    • Reheating:

    • When ready to enjoy, reheat on the stove over low heat, adding a little reserved pasta water or broth to help loosen the sauce and prevent sticking. You can also microwave in short intervals, stirring in between.

    By following these practices, you’ll never have to worry about wasting this delightful dish again!

    Nutritional Value of Homemade Bang Bang Shrimp Pasta

    Understanding the nutritional profile of your meals can help you make wiser choices in your diet. Here’s a breakdown of the approximate nutritional value per serving, based on the ingredients listed:

    • Calories: Approximately 450-600 calories (depends on portion size and specific ingredients used)
    • Protein: 25-30 grams (primarily from shrimp)
    • Fat: 20-25 grams (depending on mayonnaise and shrimp)
    • Carbohydrates: 45-60 grams (based on pasta type)
    • Fiber: 2-5 grams (depending on pasta choice)
    • Sugar: 5-10 grams (primarily from sweet chili sauce)

    The overall nutritional values can vary based on specific ingredient choices and how each element is prepared. This dish represents a balanced combination of protein and carbohydrates, making it a great option for a refueling meal after exercise or a busy day.

    Maintaining a balanced diet will help sustain your energy, and including shrimp recipes like this can add variety to your meals.

    FAQs: Frequently Asked Questions About Homemade Bang Bang Shrimp Pasta

    Here are some common questions related to Homemade Bang Bang Shrimp Pasta, complete with answers to help you succeed:

    Q1: Can I make this dish ahead of time?

    A: Yes, you can prepare the Bang Bang sauce and shrimp ahead of time. Store them separately and combine when ready to eat for the best texture.

    Q2: Is it possible to make this dish gluten-free?

    A: Absolutely! Just use gluten-free pasta, and check the sauce ingredients for gluten content. Use a gluten-free mayo to ensure the entire dish is safe.

    Q3: How can I adjust the spiciness of the Bang Bang sauce?

    A: You can modify the spice by adjusting the amount of sriracha you add to the sauce. To tone down the heat, you can eliminate or reduce it completely.

    Q4: Can I substitute shrimp with chicken or another protein?

    A: Yes, chicken, tofu, or legumes can be used if shrimp is not preferred. Adjust cooking times accordingly to ensure they are cooked thoroughly.

    Q5: Is this pasta dish suitable for meal prep?

    A: Yes! This dish works well for meal prep. Just store in separate containers in the refrigerator for the week.

    In conclusion, Homemade Bang Bang Shrimp Pasta is a delicious and versatile dish that offers numerous benefits. With its ease of preparation, healthy ingredients, and customizable nature, it’s a perfect fit for anyone looking to add something enticing to their dinner rotation. Whether you’re cooking for yourself or sharing with loved ones, this dish is bound to impress. Happy cooking!

  • Quick Bang Bang Shrimp Noodles

    Quick Bang Bang Shrimp Noodles

    Quick Bang Bang Shrimp Noodles: A Tropical Delight

    Introduction to Quick Bang Bang Shrimp Noodles

    Quick Bang Bang Shrimp Noodles are a culinary masterpiece that brings the tropics right to your dinner table. Bursting with flavors, these shrimp recipes are as vibrant as they are delicious. Not only are they a breeze to prepare, but they also offer a nutritious meal option that can cater to various dietary needs, including those seeking gluten-free, low-calorie, or even vegan alternatives.

    This quick dish is perfect for busy weeknights, as it requires minimal prep time and cooking effort. In under 30 minutes, you can create a mouthwatering meal that’s sure to impress your family and friends. Imagine succulent shrimp tossed in a creamy, spicy sauce served over a bed of tender noodles, complemented by fresh vegetables. It’s a beautiful blend of flavors and textures that everyone will love, from busy parents and students to food enthusiasts and newlyweds.

    Moreover, this recipe evolves easily to suit your palate. Whether you prefer it extra spicy with chili flakes or mild with a touch of lime, the Quick Bang Bang Shrimp Noodles offer versatility that adapts to your cravings. Dive into this delightful dish today and experience why it’s becoming a fast favorite among shrimp recipes!

    Benefits and Advantages of Quick Bang Bang Shrimp Noodles

    When it comes to preparing Quick Bang Bang Shrimp Noodles, the benefits are abundant. Firstly, the simplicity of this dish is unmatched. The entire recipe can be completed in just a few simple steps, making it a fantastic choice for readers who are short on time or are new to cooking. The combination of the shrimp and noodles allows for a satisfying meal without the hassle of lengthy cooking processes.

    Health Benefits

    In addition to being easy to prepare, Quick Bang Bang Shrimp Noodles boast health benefits that will please diet-conscious individuals. Rich in protein, shrimp is not just lean but also packed with essential nutrients and omega-3 fatty acids, which are crucial for heart health. Paired with vegetables, this dish is a nutritional powerhouse that provides fiber and various vitamins.

    Moreover, with simple swaps, such as using zucchini noodles or whole wheat pasta, you can easily turn this dish into a gluten-free or low-carb option.

    Versatility & Customization

    Another significant advantage is the potential for customization. The recipe allows you to tailor the dish according to various dietary preferences. You can effortlessly swap shrimp for a plant-based protein or replace traditional noodles with rice noodles for a gluten-free version. This adaptability makes it a go-to choice for various audiences, ensuring that everyone can enjoy a delicious meal without compromising their dietary restrictions.

    Perfect for Any Occasion

    Whether you’re hosting a casual dinner party, preparing a quick lunch, or looking for a healthy weeknight dinner for the family, Quick Bang Bang Shrimp Noodles suit all occasions. This dish offers the perfect balance between indulgence and nourishment, allowing it to shine in any scenario while satisfying your cravings and dietary requirements.

    In short, Quick Bang Bang Shrimp Noodles combine ease, healthiness, and flexibility, making them a standout option in the vast world of shrimp recipes.

    Ingredients Overview

    Essential Ingredients for Quick Bang Bang Shrimp Noodles

    To create this delightful dish, you will need the following ingredients:

    • 8 oz. shrimp, peeled and deveined (or your choice of protein for substitutes, like tofu for a vegan option)
    • 8 oz. noodles (spaghetti, rice noodles, or gluten-free noodles)
    • 1 cup of broccoli florets (or any fresh vegetables like bell peppers or snap peas)
    • 1 tablespoon vegetable oil (or sesame oil for added flavor)
    • 3 cloves garlic, minced
    • 1 cup Thai sweet chili sauce
    • 2 tablespoons mayonnaise (or vegan mayo for a plant-based version)
    • 1 tablespoon Sriracha or other chili sauce (adjust to your heat preference)
    • 1 teaspoon lime juice
    • Green onions (for garnish)
    • Sesame seeds (optional, for topping)

    Purpose of Key Ingredients

    • Shrimp: A lean source of protein that is low in calories and high in nutrients.
    • Noodles: Serve as the satisfying base for this dish; choose according to dietary needs.
    • Vegetables: Provide fiber and vitamins, enhancing both flavor and nutrition.
    • Thai Sweet Chili Sauce: Adds a sweet yet spicy kick to the dish.
    • Mayonnaise: Creaminess to balance the sauce; can be substituted with Greek yogurt or vegan mayo.

    This straightforward ingredient list emphasizes the importance of quality components and encourages flexibility, appealing to a wide range of dietary preferences.

    Dietary Substitutions to Customize Your Quick Bang Bang Shrimp Noodles

    To make this dish accessible for all, here are some substitutions:

    1. Shrimp Alternatives:
    2. Use tofu or tempeh for a vegan version.
    3. For a lower-calorie option, consider using chicken breast or snow peas.

    4. Noodle Options:

    5. For gluten-free diets, opt for rice noodles or zucchini noodles.
    6. If you’re watching calories, spiralized veggies can make a great noodle substitute.

    7. Sauce Alternatives:

    8. To make the sauce vegan, substitute conventional mayo with plant-based mayonnaise or omit it entirely for a lighter version.
    9. You can increase the spice level by adding more Sriracha or even a few chopped fresh chili peppers.

    These substitutions not only cater to dietary needs but also allow for creativity in the kitchen. Feel free to experiment with your favorite veggies and flavors to create your version of this dish.

    How to Prepare the Perfect Quick Bang Bang Shrimp Noodles: Step-by-Step Guide

    Cooking Quick Bang Bang Shrimp Noodles is simple and straightforward. Follow these detailed steps to achieve a delightful dish that will please your palate:

    1. Cook the Noodles:
    2. Boil a large pot of salted water. Add your choice of noodles and cook according to package instructions until al dente. Drain and rinse under cold water to stop the cooking process. Set aside.

    3. Prepare the Shrimp:

    4. In a large skillet or wok, heat 1 tablespoon of vegetable oil over medium-high heat. Add the shrimp and cook for 2-3 minutes on each side until they turn pink and opaque. Remove them from the skillet and set aside.

    5. Sauté Garlic and Vegetables:

    6. In the same skillet, add minced garlic and sauté for about 30 seconds, or until fragrant. Then, add the broccoli florets (or your choice of vegetables). Stir-fry for another 3-5 minutes until the veggies are tender but crisp.

    7. Make the Bang Bang Sauce:

    8. In a small bowl, whisk together the Thai sweet chili sauce, mayonnaise, Sriracha, and lime juice. Adjust the amount of Sriracha to match your heat preference.

    9. Combine Ingredients:

    10. Return the cooked shrimp to the skillet with the vegetables. Pour in the Bang Bang sauce and toss everything together until well coated. Cook for an additional 2-3 minutes, allowing the flavors to meld.

    11. Add the Noodles:

    12. Add the cooked noodles to the skillet, tossing them gently to combine with the shrimp and sauce. Ensure all ingredients are well mixed and heated through.

    13. Serve:

    14. Transfer the Quick Bang Bang Shrimp Noodles to serving bowls. Garnish with sliced green onions and sesame seeds if desired. Serve immediately and enjoy your delicious meal!

    By following these steps, you’ll create a remarkable dish that offers a taste of the tropics in a quick, easy format. Best of all, this recipe can be easily adapted to suit your personal preferences or dietary guidelines.

    Mastering Quick Bang Bang Shrimp Noodles: Advanced Tips and Variations

    Now that you’ve mastered the basic recipe for Quick Bang Bang Shrimp Noodles, let’s explore some advanced tips and variations to elevate your dish further:

    1. Add Fresh Herbs

    Incorporate fresh herbs like cilantro or basil for added flavor and freshness. Sprinkle them on just before serving to enhance the dish’s aroma and taste.

    2. Experiment with Proteins

    For protein-rich variations, use chicken, tofu, or even chickpeas. Each alternative brings something new to the table while maintaining the dish’s essence.

    3. Spice It Up

    If you’re a heat lover, consider adding crushed red pepper flakes or fresh chili peppers to the stir-fry for an extra kick!

    4. Incorporate Other Vegetables

    Feel free to mix in a variety of vegetables based on what’s in season or your personal favorites. Carrots, bell peppers, and snap peas can drastically change the flavor profile.

    5. Add Crunch

    For added texture, top the dish with chopped peanuts or cashews. This not only provides a delightful crunch but also complements the flavors beautifully.

    6. Pairing Suggestions

    Quick Bang Bang Shrimp Noodles can be paired with a simple cucumber salad or spring rolls for a complete meal experience. Drink options like iced tea or coconut water can also enhance the tropical vibe.

    Exploring these advanced tips and variations will not only help you perfect your recipe but also allow you to customize your Quick Bang Bang Shrimp Noodles to suit every occasion and taste preference.

    How to Store Quick Bang Bang Shrimp Noodles: Best Practices

    Storing your Quick Bang Bang Shrimp Noodles properly ensures that you can enjoy your delicious meal later without any compromise in quality or flavor.

    Refrigeration

    1. Cool Down: Allow the shrimp noodles to cool down to room temperature for safety.
    2. Container: Transfer the leftovers into an airtight container. This helps keep the dish fresh.
    3. Storage Time: Store in the refrigerator for up to 3 days.

    Freezing

    1. Portioning: If you wish to freeze, consider portioning the noodles. This allows for easy reheating whenever you need a quick meal.
    2. Freezer Container: Use freezer-safe containers or bags, removing as much air as possible. This minimizes freezer burn.
    3. Storage Time: Properly frozen noodles can last up to 2 months.

    Reheating

    1. Microwave: When ready to eat, microwave the noodles for 1-2 minutes, stirring halfway through to ensure even heating.
    2. Stovetop: Alternatively, reheat in a skillet over medium heat. Add a splash of water or broth to prevent sticking.

    By following these storage tips, you’ll reduce waste and make meal prep easier, allowing you to savor your homemade Quick Bang Bang Shrimp Noodles whenever you want.

    Nutritional Value of Quick Bang Bang Shrimp Noodles

    Understanding the nutritional value of your meals is an essential component of healthy eating. Here’s a breakdown of the nutritional content per serving of Quick Bang Bang Shrimp Noodles:

    • Calories: Approximately 400-500 calories (depending on ingredient choices)
    • Protein: Around 25-30g from shrimp and noodles
    • Fat: 15-20g (primarily from mayonnaise; can be reduced by using alternatives)
    • Carbohydrates: 45-50g (varies based on noodle type)
    • Fiber: 3-5g from broccoli and other vegetables
    • Sodium: About 800-1000mg (consider low-sodium sauce to reduce this)

    Nutritional Benefits

    • High Protein: Ideal for muscle repair and growth, this dish is a great post-workout meal.
    • Low in Calories: Using light sauces and lean proteins keeps calorie counts in check.
    • Packed with Nutrients: Broccoli and other vegetables add fiber, vitamins, and antioxidants.

    Balancing nutrition and flavor, Quick Bang Bang Shrimp Noodles are a great choice for anyone looking to enjoy a delicious meal without compromising their dietary goals.

    FAQs: Frequently Asked Questions About Quick Bang Bang Shrimp Noodles

    1. Can I use frozen shrimp for this recipe?

    Yes! Frozen shrimp works well. Just ensure they’re thawed properly before cooking.

    2. How can I make this dish vegan?

    Substituting shrimp for tofu and using vegan mayonnaise will make this dish suitable for a vegan diet.

    3. Can I make this recipe ahead of time?

    While best served fresh, you can prepare the sauce and cook shrimp in advance. Assemble the dish on the day of serving for the best flavor and texture.

    4. What noodles do you recommend for a gluten-free version?

    Rice noodles, quinoa noodles, or spiralized vegetables can make excellent gluten-free alternatives.

    5. How spicy can I make this dish?

    Adjusting the amount of Sriracha in the sauce allows you to control the heat level.

    6. Can I add other vegetables to this recipe?

    Absolutely! Feel free to incorporate any vegetables you have on hand, such as bell peppers, carrots, or snap peas.

    By addressing these common questions, we hope to clarify any uncertainties and encourage you to experiment with your version of Quick Bang Bang Shrimp Noodles.

    In conclusion, Quick Bang Bang Shrimp Noodles are not just a quick meal; they’re a culinary experience waiting to unfold in your kitchen. Easy to prepare, packed with nutrition, and versatile to meet various dietary needs, this dish stands proud among the best shrimp recipes. So gather your ingredients and set out on a delicious gastronomic adventure today!

  • Mouthwatering Bang Bang Shrimp With Sweet Chili Sauce

    Mouthwatering Bang Bang Shrimp With Sweet Chili Sauce

    Mouthwatering Bang Bang Shrimp With Sweet Chili Sauce: A Tropical Delight

    Introduction to Mouthwatering Bang Bang Shrimp With Sweet Chili Sauce

    If you’re searching for irresistible shrimp recipes that pack a punch of flavor while being simple to prepare, then look no further. Mouthwatering Bang Bang Shrimp With Sweet Chili Sauce is a vibrant dish that combines succulent shrimp, a tantalizing creamy sauce, and a hint of spice. This recipe isn’t just about taste; it also brings various benefits to the table, making it ideal for any occasion.

    Whether you’re a busy parent juggling work and family, a student craving a quick and delicious meal, or a health-conscious individual looking for a nutritious option, this Bang Bang Shrimp recipe fits the bill perfectly. It’s a delightful dish that can be served as an appetizer, main course, or even as part of a healthy salad. Plus, it can be easily adapted to cater to diverse dietary needs, including gluten-free and vegan options.

    Not only is this dish quick to make, but it also satisfies a variety of taste buds with its creamy, slightly spicy, and sweet flavor profile that will have everyone coming back for seconds. So, let’s dive in and explore why Bang Bang Shrimp is the perfect dish for your next meal!

    Benefits and Advantages of Mouthwatering Bang Bang Shrimp With Sweet Chili Sauce

    One of the most exciting aspects of the Mouthwatering Bang Bang Shrimp recipe is its simplicity. In just a few quick steps, you can create a restaurant-quality dish right in your own kitchen. This makes it an ideal choice for busy families and working professionals who may not have hours to spend cooking but still want a delicious and satisfying meal.

    Health Benefits

    When it comes to health, shrimp is a lean protein that provides numerous health benefits. It’s low in calories and high in essential nutrients, making it an excellent choice for anyone looking to maintain a balanced diet. Shrimp is a good source of astaxanthin, an antioxidant that helps in combating oxidative stress. Furthermore, it is rich in Vitamin B12 and Omega-3 fatty acids, which contribute to heart health and brain function.

    Versatility

    This recipe’s versatility is exceptional. You can easily customize the level of spice to cater to your family’s preferences or dietary needs. It suits various lifestyles, whether you’re a fitness enthusiast seeking high-protein meals or someone who needs options that are low-carb or gluten-free. With easy substitutions, individuals following vegan or vegetarian diets can enjoy this recipe using plant-based or alternative proteins.

    Culinary Inspiration

    Lastly, this Bang Bang Shrimp recipe serves as a canvas for culinary inspiration. The balance of flavors allows for creativity in serving. Pair it with rice, zoodles (zucchini noodles), or a fresh salad for a refreshing summer meal. You can also present them in taco form or atop crispy lettuce wraps for a crunchy twist. The possibilities are endless!

    Ingredients Overview

    Essential Ingredients for Mouthwatering Bang Bang Shrimp With Sweet Chili Sauce

    To make the best Bang Bang Shrimp, you’ll need the following ingredients:

    • 1 pound of large shrimp (peeled and deveined – about 24 shrimp)
    • 1 cup of buttermilk (or non-dairy milk for vegan option)
    • 1 cup of all-purpose flour (or gluten-free flour for gluten-free option)
    • 1/2 cup of cornstarch (for extra crunch)
    • 1 cup of panko breadcrumbs (ensure gluten-free if needed)
    • 1 teaspoon of garlic powder
    • 1 teaspoon of paprika
    • Salt and pepper, to taste
    • Vegetable oil for frying

    For the Sweet Chili Sauce

    • 1/2 cup of sweet chili sauce
    • 1 tablespoon of mayonnaise (or vegan mayo)
    • 1 teaspoon of sriracha (adjust for heat preference)
    • Green onions for garnish
    • Sesame seeds (optional)

    Dietary Substitutions to Customize Your Mouthwatering Bang Bang Shrimp With Sweet Chili Sauce

    Understanding you may have specific dietary needs, here are some recommended substitutions:

    • Shrimp Alternatives: Replace shrimp with tofu or tempeh for a vegan version.
    • Gluten-Free Options: Use gluten-free flour and breadcrumbs instead of regular flour for those avoiding gluten.
    • Non-Dairy Alternatives: For those lactose intolerant or vegan, swap buttermilk with almond or soy milk, and replace regular mayonnaise with a vegan option.
    • Heat Control: Adjust the sriracha in the sweet chili sauce to decrease or increase spiciness based on personal preference.

    How to Prepare the Perfect Mouthwatering Bang Bang Shrimp With Sweet Chili Sauce: Step-by-Step Guide

    Preparing Mouthwatering Bang Bang Shrimp is a delightful experience that combines simplicity and flavor. Follow these steps to achieve the perfect dish. The keyphrase “shrimp recipes” reinforces the focus on our main ingredient here.

    1. Prepare the Shrimp: Start by patting the shrimp dry with paper towels. This will help to ensure they get crispy when cooked.

    2. Marinate in Buttermilk: In a bowl, pour the buttermilk over the shrimp, allowing them to marinate for at least 20 minutes. If using a non-dairy substitute, ensure it is well combined.

    3. Mix Dry Ingredients: In another bowl, combine the flour, cornstarch, garlic powder, paprika, salt, and pepper. This seasoned flour will add great flavor to the shrimp.

    4. Coat the Shrimp: Take the marinated shrimp one at a time and coat them first in the flour mixture. Shake off any excess and then dip into the panko breadcrumbs, pressing gently to ensure they stick.

    5. Heat the Oil: In a large skillet, pour vegetable oil (about 1/2 inch high) for frying. Heat the oil over medium-high heat until it’s shimmering, indicating it’s hot enough for frying.

    6. Fry the Shrimp: In batches, add the shrimp to the hot oil. Fry until golden brown and crispy on each side, about 2-3 minutes per side. Avoid overcrowding the pan, as this can lower the oil temperature.

    7. Drain Excess Oil: Once cooked, use a slotted spoon to transfer the shrimp to a plate lined with paper towels to absorb excess oil.

    8. Prepare the Sauce: In a small bowl, mix together the sweet chili sauce, mayonnaise, and sriracha. Adjust the seasoning according to your preference for spice.

    9. Combine and Serve: Toss the crispy shrimp in the sauce until they are well coated, or serve the sauce on the side for dipping.

    10. Garnish: Sprinkle with sliced green onions and sesame seeds for an appealing presentation.

    This simple, step-by-step guide makes it easy for anyone to replicate this fantastic dish.

    Mastering Mouthwatering Bang Bang Shrimp With Sweet Chili Sauce: Advanced Tips and Variations

    To elevate your Mouthwatering Bang Bang Shrimp experience, consider these tips and variations:

    • Air Fryer Variation: For a healthier option, consider cooking the shrimp in an air fryer. Coat them with a light spray of oil before air frying for a crispy result with less fat.
    • Baking Method: If frying isn’t your style, you can bake the shrimp instead. Preheat your oven to 425°F (220°C) and place the coated shrimp on a baking sheet lined with parchment paper. Bake for about 12-15 minutes until golden and crispy, flipping halfway through.
    • Serving Ideas: Experiment with serving the Bang Bang Shrimp over a bed of crunchy slaw or inside lettuce wraps for a fun finger food option. They can even make delightful tacos, topped with avocado and jalapeños.
    • Flavor Infusions: Add a squeeze of lime or a sprinkle of cilantro to the dish after garnishing to enhance freshness.

    By incorporating these advanced techniques and variations, you can master your own take on this popular South Asian-inspired dish.

    How to Store Mouthwatering Bang Bang Shrimp With Sweet Chili Sauce: Best Practices

    If you have leftovers (although we doubt there will be any!), here are some best practices for storing your Bang Bang Shrimp:

    Refrigerating

    Place the cooled shrimp in an airtight container and store it in the refrigerator. It is best consumed within 2 days to maintain its crispy texture.

    Freezing

    For longer storage, you can freeze the shrimp. Lay them flat in a single layer on a baking sheet to freeze individually for about 1-2 hours. Then transfer them to a freezer-safe bag or container. They can be stored in the freezer for up to 2 months.

    Reheating

    Reheating the shrimp can be tricky, as they may lose their crunchiness. The best way to reheat is to place them in an air fryer or a preheated oven set at 375°F (190°C) for about 5-7 minutes or until heated through. Avoid microwaving as it tends to make them soggy.

    These storage and reheating tips will ensure your leftovers still taste amazing!

    Nutritional Value of Mouthwatering Bang Bang Shrimp With Sweet Chili Sauce

    Understanding the nutritional content of your meals is essential, especially if you’re health-conscious or tracking your dietary intake. Here’s a detailed breakdown of the nutrition information per serving (based on a 4-serving recipe):

    • Calories: 320
    • Total Fat: 14g
    • Saturated Fat: 2g
    • Cholesterol: 220mg
    • Sodium: 550mg
    • Total Carbohydrates: 30g
    • Dietary Fiber: 1g
    • Sugar: 8g
    • Protein: 25g

    Healthier Alternatives

    Substituting ingredients can lower calories further—for example, using baked instead of fried shrimp can cut down on fat. Additionally, choosing a lower-calorie sweet chili sauce or reducing the amount of mayonnaise used in the sauce can enhance your culinary health without sacrificing flavor.

    FAQs: Frequently Asked Questions About Mouthwatering Bang Bang Shrimp With Sweet Chili Sauce

    1. Can I make Bang Bang Shrimp in advance?

    Yes, you can prepare the shrimp in advance but it’s best to fry them just before serving. If you need to prepare ahead, you can coat the shrimp and store them in the fridge until you’re ready to cook.

    2. Can I make this dish vegan?

    Absolutely! Substitute shrimp with tofu or tempeh, and use a plant-based milk and mayonnaise to create a delicious vegan version.

    3. Is there a gluten-free option for this recipe?

    Yes, simply replace all-purpose flour and panko breadcrumbs with gluten-free alternatives. There are many great flour blends available that work perfectly in this recipe.

    4. What can I serve with Bang Bang Shrimp?

    Bang Bang Shrimp pairs wonderfully with steamed rice, stir-fried vegetables, or fresh salads. They also make a fantastic filling for tacos or lettuce wraps!

    5. How spicy is the Bang Bang Shrimp?

    The level of spiciness can be adjusted according to your taste. If you’re sensitive to heat, you can reduce the amount of sriracha in the sauce or leave it out altogether.

    Through these FAQs, you should now have a clearer idea of how to customize and enjoy your Bang Bang Shrimp!


    With its unmatched flavor and effortless preparation, Mouthwatering Bang Bang Shrimp With Sweet Chili Sauce is poised to become a favorite in your household. Perfect for busy weeknights, gatherings, or simply treating yourself, this recipe is adaptable for various dietary needs and preferences. So grab your ingredients, get cooking, and enjoy this tropical delight!

  • Irresistible Air Fryer Bang Bang Shrimp

    Irresistible Air Fryer Bang Bang Shrimp

    Irresistible Air Fryer Bang Bang Shrimp: A Tropical Delight

    Introduction to Irresistible Air Fryer Bang Bang Shrimp

    If you’re searching for an enticing addition to your dinner table that marries taste and convenience, look no further than this Irresistible Air Fryer Bang Bang Shrimp. This dish isn’t just a feast for the palate; it’s also a beautiful representation of shrimp recipes that cater to various dietary preferences. The combination of succulent shrimp tossed in a creamy, spicy sauce is elevated further by the air fryer, which allows for a healthier preparation without compromising on flavor!

    One of the most compelling aspects of this recipe is its simplicity. With straightforward ingredients and minimal prep time, even busy parents or novice home cooks will find it easy to whip up this dish. Additionally, it caters to a range of dietary needs, being easily adaptable for gluten-free or even vegan diets. For those mindful of caloric intake, the air fryer significantly reduces the amount of oil used, allowing you to enjoy the rich flavors without the guilt.

    Prepare to impress your family or guests; this dish can serve as a stunning appetizer for a tropical-themed party or a quick weeknight dinner option. Beyond its deliciousness, Bang Bang Shrimp is an opportunity to explore flavors and techniques that can be applied to various shrimp recipes. Dive into this culinary adventure and discover how effortless and delightful home cooking can be!

    Benefits and Advantages of Irresistible Air Fryer Bang Bang Shrimp

    The Irresistible Air Fryer Bang Bang Shrimp stands out among other shrimp recipes for numerous compelling reasons. First and foremost, its preparation is incredibly easy. Thanks to the air fryer, you can achieve that crispy finish typically reserved for deep-fried dishes with only a fraction of the oil, making this version both healthier and less messy.

    One of the key health benefits comes from using shrimp, which is a high-protein, low-calorie option rich in essential nutrients. It’s a fantastic source of omega-3 fatty acids and provides significant levels of iodine, which is vital for thyroid function. In addition to the health benefits of the shrimp, the use of a light sauce made from yogurt or mayonnaise means you can enjoy a creamy texture without overloading on calories.

    Moreover, it’s highly versatile. The flavor profile complements a variety of side dishes, ranging from a fresh salad to coconut rice or grilled vegetables, making it an outstanding choice for meal prep or gatherings. For individuals following specific dietary restrictions, such as gluten sensitivity, customizing this recipe is simple and does not compromise its deliciousness.

    By integrating spice with a touch of sweetness, the sauce enhances flavor while balancing nutritional advantages. The cooking method—crucial for a speedy lifestyle—ensures that you spend less time in the kitchen and more time enjoying delicious meals with loved ones. The Irresistible Air Fryer Bang Bang Shrimp is not just another recipe; it’s your key to transforming simple ingredients into a gourmet experience!

    Ingredients Overview

    Essential Ingredients for Irresistible Air Fryer Bang Bang Shrimp

    To create the Irresistible Air Fryer Bang Bang Shrimp, gather the following essential ingredients, ensuring you have everything ready before you start cooking:

    • Shrimp (1 pound, peeled and deveined)
      Fresh or frozen shrimp both work. If using frozen, ensure they are thawed completely.

    • Cornstarch (1/2 cup)
      This ingredient helps create a crispy outer coating when cooked in the air fryer.

    • Egg (1 large, beaten)
      Acts as a binding agent for the cornstarch on the shrimp.

    • Panko Breadcrumbs (1 cup)
      For an extra crispy finish, especially when using gluten-free panko for those with dietary restrictions.

    • Olive Oil Spray
      A light mist to enhance crispiness while keeping it healthier than traditional frying methods.

    Bang Bang Sauce Ingredients:

    • Mayonnaise (1/2 cup or Greek yogurt for a lighter, healthier option)
      Provides creaminess to the sauce. Use vegan mayonnaise for a plant-based version.

    • Sweet Chili Sauce (1/4 cup)
      Adds that signature sweet and spicy flavor.

    • Sriracha (1 tablespoon)
      For some heat! Adjust this based on your spice tolerance.

    • Lime Juice (1 tablespoon)
      Adds acidity and brightness to the sauce.

    Dietary Substitutions to Customize Your Irresistible Air Fryer Bang Bang Shrimp

    This recipe is effortlessly adaptable to cater to various dietary preferences. Below are some swap ideas to customize your Irresistible Air Fryer Bang Bang Shrimp:

    • For Gluten-Free:
    • Replace regular breadcrumbs with gluten-free panko.

    • For Vegan:

    • Use plant-based shrimp alternatives or even vegetables like cauliflower. Substitute mayonnaise with a vegan version for the sauce.

    • Lower Calorie Option:

    • Use Greek yogurt instead of mayonnaise to cut down calories, while adding protein.

    • For Spicy Adjustments:

    • If you enjoy more heat, increase the amount of Sriracha in the sauce or add some red pepper flakes to the shrimp coating.

    With these substitutions, you’ll not only cater to various dietary needs but also inspire creativity in the kitchen while making this delightful dish.

    How to Prepare the Perfect Irresistible Air Fryer Bang Bang Shrimp: Step-by-Step Guide

    Follow these simple steps to prepare your Irresistible Air Fryer Bang Bang Shrimp effortlessly:

    1. Prepare the Shrimp:
      Start by rinsing the shrimp under cold water. After patting them dry with a paper towel, set them aside.

    2. Set Up the Breading Station:
      In one bowl, place the cornstarch. In a second bowl, beat the egg. And in a third bowl, add the panko breadcrumbs. If desired, season the breadcrumbs with salt, pepper, and garlic powder for extra flavor.

    3. Coat the Shrimp:
      First, dip each shrimp into the cornstarch, ensuring it’s well-coated. Shake off any excess, then dip it into the beaten egg, and finally, coat it with the panko breadcrumbs. Repeat for all shrimp.

    4. Preheat the Air Fryer:
      Before placing the shrimp in the air fryer, preheat it to 400°F (200°C) for about 5 minutes to ensure even cooking.

    5. Arrange and Spray:
      Place the coated shrimp in the air fryer basket in a single layer. Lightly spray the tops with olive oil spray for an extra crunch. Avoid overcrowding; you may need to do this in batches.

    6. Air Fry the Shrimp:
      Cook for about 8-10 minutes, turning halfway through. The shrimp should be golden brown and crispy.

    7. Prepare the Bang Bang Sauce:
      While the shrimp cooks, mix the mayonnaise (or yogurt), sweet chili sauce, Sriracha, and lime juice in a small bowl until well combined. Adjust seasonings to your taste.

    8. Serve:
      Once the shrimp are cooked, remove them from the air fryer and toss them gently in the Bang Bang sauce until evenly coated.

    9. Garnish and Enjoy:
      Serve immediately, garnished with chopped green onions or sesame seeds. Pair with fresh lime wedges for an added zing.

    Following this straightforward guide, your Irresistible Air Fryer Bang Bang Shrimp will delight both your tastebuds and your guests. This recipe is not only quick but can also easily transform for gluten-free and healthier diets.

    Mastering Irresistible Air Fryer Bang Bang Shrimp: Advanced Tips and Variations

    Here are some additional tips to elevate your Irresistible Air Fryer Bang Bang Shrimp experience:

    • Marinate for More Flavor:
      For enhanced flavor, consider marinating the shrimp in a mix of lime juice, garlic, and a sprinkle of salt for about 15-30 minutes before coating them. This will amplify the taste profile.

    • Crispier Shrimp:
      If you desire an even crispier texture, double-coat the shrimp. After the first round of breading, dip them back into the egg and bread again before air frying.

    • Alternative Sauces:
      Experiment with different sauces for variety. Try a spicy mayo made with chili oil or even a garlic butter sauce for a buttery twist. Consider a sweet and sour sauce for those who love tangy flavors.

    • Serving Options:
      Serve your Bang Bang Shrimp over a bed of jasmine rice or alongside a crunchy Asian slaw for a complete meal. These variations not only enhance your plate presentation but also add nutritional value.

    By applying these advanced tips, you can customize your Irresistible Air Fryer Bang Bang Shrimp to suit various palates, impressing everyone at your dining table.

    How to Store Irresistible Air Fryer Bang Bang Shrimp: Best Practices

    Knowing how to store any leftover Irresistible Air Fryer Bang Bang Shrimp is key to maximizing flavor and texture for future meals. Here are the best practices:

    • Refrigeration:
      Store any leftovers in an airtight container in the refrigerator. They will stay fresh for up to 3 days. Keep the Bang Bang sauce separate to maintain the crispness of the shrimp.

    • Freezing:
      While it’s best to enjoy this dish fresh, you can also freeze the cooked shrimp for up to 2 months. Place them in a freezer-safe container or resealable bag. For best results, re-crisp the shrimp in the air fryer after thawing.

    • Reheating:
      To reheat, place the shrimp back in the air fryer at 350°F (175°C) for about 5 minutes, or until they’re heated through and crispy again. Avoid using a microwave, as it may make them soggy.

    By following these storage tips, you can relish the wonderful flavors of your Irresistible Air Fryer Bang Bang Shrimp even days after making it!

    Nutritional Value of Irresistible Air Fryer Bang Bang Shrimp

    Understanding the nutritional value of your Irresistible Air Fryer Bang Bang Shrimp is essential, especially for those keeping track of health goals. Here’s a basic overview of the nutrition facts for a serving (approximately 3-4 pieces of shrimp, sauce not included):

    • Calories: Approximately 230
    • Protein: 20g
    • Total Fat: 10g
    • Saturated Fat: 2g
    • Cholesterol: 200mg
    • Sodium: 520mg
    • Carbohydrates: 18g
    • Fiber: 1g
    • Sugars: 3g

    The healthy fats from the shrimp and the light coating create a satisfying meal without excessive calories, allowing you to enjoy a delightful dish. Adjusting the sauce and side components can further modify the nutritional profile for those focused on specific dietary needs.

    FAQs: Frequently Asked Questions About Irresistible Air Fryer Bang Bang Shrimp

    1. Can I use frozen shrimp for this recipe?

    Yes, frozen shrimp can be used! Just ensure they are completely thawed and drained before coating.

    2. Is this recipe suitable for meal prep?

    Absolutely! The Irresistible Air Fryer Bang Bang Shrimp can be made in advance and stored in the fridge, making it a perfect meal prep option.

    3. How can I make this recipe vegan?

    You can substitute traditional shrimp with plant-based shrimp or even cauliflower. Replace the mayonnaise with vegan mayo and adjust seasonings accordingly.

    4. What can I serve with Bang Bang Shrimp?

    This dish pairs well with a variety of sides, such as steamed rice, salad, or Asian-style slaw. Feel free to get creative with your accompaniments!

    5. Can I reheat leftover Bang Bang Shrimp?

    Yes, the best way to reheat leftover shrimp is in the air fryer for about 5 minutes at 350°F (175°C) to ensure they stay crispy.

    6. How spicy is the Bang Bang sauce?

    The spiciness can be adjusted by modifying the Sriracha amount based on your preference. Start with less if you’re concerned about the heat, and add more as you taste.

    Incorporating these answers into your cooking experience should help clarify concerns and enhance your confidence while making this delightful Irresistible Air Fryer Bang Bang Shrimp. Enjoy the flavors and simplicity this dish brings to your kitchen!

  • Best Brown Butter Espresso Brownies

    Best Brown Butter Espresso Brownies

    Best Brown Butter Espresso Brownies: A Tropical Delight

    Introduction to Best Brown Butter Espresso Brownies

    If you’re searching for the ultimate indulgent treat that aligns with your cravings for delicious dessert recipes, look no further than these Best Brown Butter Espresso Brownies. Imagine biting into a luscious brownie, the richness of browned butter mingling perfectly with the robust flavors of espresso. This recipe is not just about satisfying your sweet tooth; it also incorporates simplicity and versatility, catering to a wide range of dietary preferences.

    These brownies are easy to whip up, making them perfect for busy parents, working professionals, or anyone looking for a quick yet decadent dessert option. Moreover, they can easily be adapted to fit vegan and gluten-free diets. The combination of nutty brown butter and espresso not only elevates the flavor profile but also offers a delightful twist that sets these brownies apart from everyday chocolate desserts.

    Whether you’re a new baker eager to impress or a seasoned cook looking for a fresh take on a classic favorite, these brownies promise a delightful experience. They are perfect for serving at gatherings, enjoying as an afternoon pick-me-up, or simply indulging in at the end of a long day.

    Benefits and Advantages of Best Brown Butter Espresso Brownies

    When it comes to dessert recipes, the Best Brown Butter Espresso Brownies stand out in several key ways. First and foremost, their ease of preparation makes them accessible for cooks of all skill levels. With just a handful of ingredients and minimal effort, you can create a decadent dessert that looks and tastes gourmet.

    Health Benefits

    These brownies not only offer a unique flavor but also provide some potential health benefits. The use of brown butter is more than just a trendy choice; it adds a depth of flavor that enhances the overall taste without the need for additional sugar. Espresso adds a natural energy boost, making them an excellent afternoon treat when you need a pick-me-up.

    Additionally, by choosing quality ingredients, you can make conscious choices to promote health, such as opting for organic cocoa powder or fair-trade coffee. Furthermore, these brownies can be made with minimal sugar or even sugar alternatives, appealing to those who are diet-conscious.

    Versatility for Dietary Needs

    Perhaps the most appealing aspect is their adaptability. Whether you are feeding a group with various dietary restrictions or simply wish to experiment with your recipes, these brownies can easily accommodate dietary substitutions. Vegan and gluten-free alternatives allow everyone to join in on the fun.

    A Crowd-Pleaser

    Finally, these brownies are sure to impress your family, friends, or guests. The rich flavors and fudgy texture will have them asking for seconds, making them a perfect addition to any gathering or special occasion.

    In summary, Best Brown Butter Espresso Brownies are uncomplicated yet impressive, healthy yet indulgent, and appealing to a broad audience. They are not just a treat but a versatile addition to your repertoire of dessert recipes.

    Ingredients Overview

    Essential Ingredients for Best Brown Butter Espresso Brownies

    To create the magic that is the Best Brown Butter Espresso Brownies, you’ll need the following ingredients:

    • 1/2 cup (1 stick) unsalted butter – Brown this to enhance the flavor profile.
    • 1 tablespoon espresso powder – This adds a strong coffee flavor.
    • 1 cup granulated sugar – For sweetness; can be substituted with coconut sugar for a healthier option.
    • 2 large eggs – Acts as a binder; for vegan options, use flaxseed eggs.
    • 1 teaspoon vanilla extract – Enhances flavor; ensure it’s pure for best results.
    • 1/2 cup all-purpose flour – Provides structure; use almond or coconut flour for gluten-free.
    • 1/2 cup unsweetened cocoa powder – The star ingredient for rich chocolate flavor.
    • 1/4 teaspoon salt – Balances the flavors; a crucial element in dessert recipes.
    • Optional: 1/2 cup chocolate chips – For added texture and chocolatey goodness.

    Dietary Substitutions to Customize Your Best Brown Butter Espresso Brownies

    1. Vegan: Replace the butter with coconut oil or vegan butter. Use 2 tablespoons of ground flaxseed mixed with 6 tablespoons of water instead of the two eggs.
    2. Gluten-Free: Substitute all-purpose flour with a 1:1 gluten-free flour mix or almond flour to maintain texture and taste.
    3. Lower Calorie: Swap out sugar for a low-calorie sweetener like erythritol or stevia. You can also reduce the amount of butter by using unsweetened apple sauce in the same quantity.

    This flexibility makes these brownies a go-to option for various dietary needs, exemplifying completion in dessert recipes.

    How to Prepare the Perfect Best Brown Butter Espresso Brownies: Step-by-Step Guide

    Getting ready to whip up these Best Brown Butter Espresso Brownies? Here’s a straightforward, step-by-step guide that ensures ease and success.

    1. Prepare the Oven: Preheat your oven to 350°F (175°C) and line an 8×8-inch baking pan with parchment paper for easy removal and cleanup.

    2. Brown the Butter: In a saucepan over medium heat, melt the unsalted butter, continuously stirring until it turns a golden brown and smells nutty. This step is crucial for flavor, so be patient and keep an eye on it.

    3. Mix Espresso Powder: Once browned, remove the saucepan from heat and whisk in the espresso powder until it’s completely dissolved. This will enhance the depth of flavor in your brownies.

    4. Combine Sugars: In a mixing bowl, combine the brown butter and granulated sugar. Mix until well-combined and the mixture becomes slightly glossy.

    5. Incorporate Eggs and Vanilla: Add the eggs, one at a time, mixing thoroughly after each addition. Stir in the vanilla extract to amplify the flavor.

    6. Sift Dry Ingredients: In a separate bowl, sift together the all-purpose flour, cocoa powder, and salt. This removes lumps and ensures an even consistency throughout your brownies.

    7. Combine Wet and Dry Ingredients: Gradually fold the dry ingredients into the wet mixture until just combined. Be careful not to overmix to afford the brownies their fudgy texture.

    8. Add Chocolate Chips (Optional): If desired, fold in the chocolate chips for extra chocolate goodness. This step can be skipped for a less intense chocolate experience.

    9. Bake the Brownies: Pour the brownie mixture into the prepared baking pan and spread it evenly. Bake for 20-25 minutes, or until a toothpick inserted in the center comes out with a few moist crumbs.

    10. Cool and Serve: Allow the brownies to cool in the pan on a wire rack for at least 10 minutes. Lift them out using the parchment paper and let them cool completely before slicing into squares.

    11. Enjoy: These brownies are delicious on their own but pair beautifully with a scoop of vanilla ice cream or a sprinkle of sea salt, creating a gourmet finish to your dessert recipes.

    Mastering Best Brown Butter Espresso Brownies: Advanced Tips and Variations

    Once you’ve mastered the basic recipe for Best Brown Butter Espresso Brownies, consider experimenting with these advanced tips and variations to take your baking to the next level:

    Advanced Tips

    1. Flavor Infusion: Try infusing the butter with herbs like rosemary or spices like cinnamon before browning for a unique flavor twist.

    2. Swirling in Flavors: After pouring the batter into the baking dish, you can swirl in caramel or peanut butter to create a marbled effect.

    3. Layering Textures: Top the brownie batter with nuts, additional chocolate, or shredded coconut before baking. This adds texture and enhances the visual appeal of your dessert recipes.

    Flavor Variations

    • Mint Chocolate: Add a few drops of peppermint extract to the brownie batter for a refreshing minty flavor paired with chocolate.

    • Spicy Kick: Incorporate a pinch of cayenne pepper for a surprising depth that complements the richness.

    • Coffee Lovers: Boost the espresso flavor with a shot of brewed coffee mixed into the batter or served alongside the brownies.

    These tips will not only enhance flavors but also allow you to showcase creativity, ensuring your dessert recipes are anything but ordinary.

    How to Store Best Brown Butter Espresso Brownies: Best Practices

    To keep your Best Brown Butter Espresso Brownies as fresh as possible, proper storage is key. Here are the best practices:

    1. Refrigerate: Store your brownies in an airtight container in the refrigerator for up to one week. This helps maintain their fudgy texture while keeping them fresh.

    2. Freezing Instructions: For longer storage, you can freeze the brownies. Wrap them tightly in plastic wrap, then place them in a freezer-safe container or bag. They can last up to three months in the freezer.

    3. Reheating: When you’re ready to enjoy them again, simply thaw the brownies in the refrigerator overnight, then reheat briefly in the microwave or enjoy at room temperature.

    Remember, properly storing your brownies helps maintain flavor and texture, ensuring that they remain a standout among your dessert recipes.

    Nutritional Value of Best Brown Butter Espresso Brownies

    Understanding the nutritional composition of your treats can help you keep your dietary goals in check. Here’s the nutritional breakdown for one serving of the Best Brown Butter Espresso Brownies, assuming you cut them into 16 pieces:

    • Calories: Approximately 150
    • Total Fat: 8g
    • Saturated Fat: 2.5g
    • Cholesterol: 30mg
    • Sodium: 50mg
    • Total Carbohydrates: 20g
    • Dietary Fiber: 1g
    • Sugars: 10g
    • Protein: 2g

    This is a fairly moderate treat compared to many other dessert recipes, making them an enjoyable guilt-free indulgence. You can further tailor the nutritional profile by modifying ingredients, like using less sugar or substituting with healthier options.

    FAQs: Frequently Asked Questions About Best Brown Butter Espresso Brownies

    Can I make these brownies gluten-free?

    Absolutely! Just use a gluten-free flour blend in place of all-purpose flour. The brownies will still be just as fudgy and delicious.

    What if I don’t have espresso powder?

    If you don’t have espresso powder on hand, you can substitute it with instant coffee granules or even a small amount of brewed espresso, though this may affect the moisture content.

    How can I make these brownies vegan?

    To make these brownies vegan, replace the eggs with a flaxseed mixture and use coconut oil instead of butter.

    Can these brownies be made ahead of time?

    Yes, you can prepare these brownies a day or two in advance. Just store them in an airtight container to maintain freshness. They often taste even better the day after baking!

    What’s the best way to serve these brownies?

    These rich brownies are excellent on their own, but they also pair beautifully with whipped cream, ice cream, or fresh berries, bringing a nice balance to the chocolate intensity.

    With these questions answered, you’re all set to make and enjoy your own batch of Best Brown Butter Espresso Brownies! They are sure to become a favorite among your collection of dessert recipes. Enjoy baking!

  • IM Obsessed Been Making This Chicken Pasta Non-Stop

    IM Obsessed Been Making This Chicken Pasta Non-Stop

    I’M Obsessed! Been Making This Chicken Pasta Non-Stop!: A Tropical Delight

    Introduction to I’M Obsessed! Been Making This Chicken Pasta Non-Stop!

    If you’re looking for a delightful addition to your collection of chicken recipes, then look no further! Introducing my latest obsession: a mouth-watering chicken pasta that has become a staple in my kitchen. This dish blends tender chicken, fresh vegetables, and al dente pasta, all tossed in a vibrant, flavorful sauce. It’s incredibly easy to prepare, making it perfect for busy weeknights or casual get-togethers with family and friends.

    The beauty of this chicken pasta is its versatility. It caters beautifully to various dietary needs; whether you’re aiming for a gluten-free, low-calorie, or even vegan twist, there’s an option for you! Not only is this recipe simple, but it’s also loaded with nutritional benefits. The dish packs protein from the chicken, healthy carbs from the pasta, and an array of vitamins from the colorful veggies, making it a balanced meal. You can create a wholesome dinner on a tight schedule without sacrificing flavor or nutrition.

    What’s more, this chicken pasta is perfect for meal prepping. A single batch can serve multiple people, accommodating busy parents, students, and working professionals alike.

    Get ready to be inspired as you dive into the details of this crowd-pleasing recipe!

    Benefits and Advantages of I’M Obsessed! Been Making This Chicken Pasta Non-Stop!

    Ease of Preparation

    One of the many reasons why I’ve been making this chicken pasta non-stop is its incredible simplicity. It takes less than 30 minutes to prepare, making it an ideal choice for busy weeknights or unexpected guests. The recipe employs straightforward cooking techniques that anyone can follow, even if you’re new to the kitchen. You’ll find that the steps are intuitive and require minimal culinary skills.

    Health Benefits

    In today’s health-conscious world, it’s essential to incorporate more nutritious options into our meals. This chicken pasta includes lean protein from the chicken, complex carbohydrates from the whole-grain pasta, and a rainbow of vegetables that add both vitamins and fiber. Moreover, you can easily customize the recipe to meet your dietary requirements. For gluten-free needs, simply substitute regular pasta for a gluten-free alternative. Additionally, opting for grilled, skinless chicken breast keeps this dish light yet fulfilling.

    Dietary Inclusivity

    This chicken pasta is versatile enough to cater to a variety of dietary preferences. If you’re on a low-calorie regimen or simply wish to incorporate more vegetables into your diet, you can add leafy greens or swap out pasta for spiralized zucchinis. Vegan variants can use tofu or chickpeas as a delicious protein substitute, ensuring that everyone enjoys a hearty, nourishing meal. Moreover, feel free to experiment with different sauces to discover your unique flavor profile.

    Overall, this chicken pasta recipe stands out due to its balance of flavor, nutrition, and ease of preparation. It satisfies cravings and promotes healthy eating, making it a great addition to any kitchen.

    Ingredients Overview

    Essential Ingredients for I’M Obsessed! Been Making This Chicken Pasta Non-Stop!

    • Chicken Breast (500g): Provides lean protein; skinless and boneless is preferred for health benefits.
    • Pasta (300g): Any variety works. Whole grain or gluten-free options are recommended.
    • Olive Oil (2 tablespoons): Adds healthy fats and flavor. You can substitute with avocado oil for a different taste.
    • Garlic (3 cloves, minced): Infuses the dish with a robust flavor while offering health benefits.
    • Bell Peppers (1 cup, chopped): High in vitamins A and C, adds color and crunch.
    • Broccoli (1 cup, chopped): Packed with nutrients; acts as a fantastic green addition.
    • Cherry Tomatoes (1 cup, halved): Brings sweetness and acid to balance flavors.
    • Italian Seasoning (2 teaspoons): Blends herbs like basil, oregano, and rosemary for depth.
    • Salt and Pepper (to taste): Essential for seasoning.
    • Parmesan Cheese (for garnishing): Offers a savory finish, but can be omitted for a vegan version.

    Dietary Substitutions to Customize Your I’M Obsessed! Been Making This Chicken Pasta Non-Stop!

    1. Vegan Substitute: Swap the chicken with firm tofu, chickpeas, or tempeh, marinated and sautéed for flavor.
    2. Gluten-Free Option: Use a gluten-free pasta such as brown rice or quinoa pasta.
    3. Low-Calorie Option: Decrease the amount of pasta and increase the vegetables; replace olive oil with vegetable broth for sautéing.
    4. Dairy-Free Alternative: Omit the Parmesan cheese or use nutritional yeast for a cheesy, plant-based option.

    By incorporating these substitutions, you can create a personalized dish that meets your specific dietary needs without sacrificing flavor.

    How to Prepare the Perfect I’M Obsessed! Been Making This Chicken Pasta Non-Stop!: Step-by-Step Guide

    Crafting this delightful chicken pasta dish is a straightforward process. Follow these easy steps to create a dish that will leave your taste buds wanting more!

    1. Prepare the Ingredients: Gather all the ingredients listed above and rinse the vegetables under cold water. Chop the chicken into bite-sized pieces and set aside.

    2. Boil the Pasta: In a large pot, fill it with salted water and bring it to a boil. Add the pasta and cook according to the package instructions until al dente. Reserve about 1 cup of pasta water, then drain the pasta and set it aside.

    3. Sauté the Chicken: In a large skillet, heat 2 tablespoons of olive oil over medium heat. Add the minced garlic and cook for about 30 seconds until fragrant. Then, add the chopped chicken pieces and season with salt and pepper. Cook until the chicken is golden brown and cooked through, about 5-7 minutes.

    4. Add the Vegetables: Once the chicken is cooked, add the chopped bell peppers and broccoli into the skillet. Sauté for about 3-4 minutes until they begin to soften. Stir in the cherry tomatoes and Italian seasoning. Cook for an additional 2-3 minutes.

    5. Combine Pasta and Chicken Mixture: Add the drained pasta into the skillet with the chicken and vegetables. Toss everything together, ensuring the pasta is well coated with the flavors from the skillet.

    6. Add Pasta Water if Necessary: If the pasta feels dry, add some reserved pasta water—slowly, about 1 tablespoon at a time—until you reach your desired consistency.

    7. Final Seasoning: Taste and adjust seasoning if necessary. Add more salt, pepper, or Italian seasoning to suit your palate.

    8. Serve and Garnish: Remove from heat and plate the chicken pasta. Top with grated Parmesan cheese or nutritional yeast if desired. Serve immediately and enjoy!

    Dietary Considerations

    Considerations like substituting whole grain pasta for spiralized vegetables, reducing oil, or increasing vegetables tailor this recipe for dietary needs.

    Mastering I’M Obsessed! Been Making This Chicken Pasta Non-Stop!: Advanced Tips and Variations

    Tips for Success

    • Don’t Overcook the Chicken: Ensure the chicken is tender and juicy by avoiding overcooking.
    • Season as You Go: Layer flavors by salting and seasoning throughout the cooking process.
    • Experiment with Sauces: Feel free to substitute the Italian seasoning with a spicy arrabbiata sauce or a creamy Alfredo for varied flavors.

    Variations to Try

    • Mediterranean Style: Incorporate olives, artichokes, and feta cheese for a Mediterranean twist.
    • Creamy Chicken Pasta: Add heavy cream or coconut milk to create a luscious creamy sauce.
    • Spicy Kick: Mix in crushed red pepper flakes for a delightful heat.

    Don’t hesitate to play around with ingredients or flavors—discover what you enjoy most!

    How to Store I’M Obsessed! Been Making This Chicken Pasta Non-Stop!: Best Practices

    Storing leftovers properly is crucial to maintaining the quality of your chicken pasta. Here are the best practices:

    1. Refrigeration: Allow the pasta to cool down to room temperature before transferring it into an airtight container. It can be stored in the refrigerator for up to 3-4 days.

    2. Freezing: If you want to prepare a larger batch, freeze portions in freezer-safe bags or containers. The chicken pasta can last up to 3 months. For best results, allow it to thaw overnight in the refrigerator before reheating.

    3. Reheating: When you’re ready to enjoy it again, reheat the pasta either in the microwave or on the stovetop. Add a splash of pasta water or broth to ensure it doesn’t dry out while reheating.

    This careful approach to storage ensures you maximize the nutritional benefits of your meal while maintaining flavor.

    Nutritional Value of I’M Obsessed! Been Making This Chicken Pasta Non-Stop!

    This chicken pasta recipe not only satisfies your taste buds, but it also packs a nutritional punch. Here’s a closer look at the potential nutritional values per serving:

    • Calories: Approximately 400-500 calories per serving (depending on pasta and additional ingredients).
    • Protein: 30-35g from the chicken (or tofu if vegan) providing essential amino acids.
    • Carbohydrates: 40-50g from the pasta, supplying energy.
    • Fat: Around 10-15g, primarily from olive oil, offering healthy unsaturated fats.
    • Fiber: 4-6g from the vegetables and whole-grain pasta, aiding digestion.

    Micronutrients

    • Vitamin A and C: From bell peppers and broccoli, supporting immune function.
    • Calcium: From the cheese (optional), important for bone health.
    • Iron: Available from the chicken, essential for blood health.

    Tailoring the recipe to suit different tastes or dietary needs can easily keep the nutritional values within your desired range.

    FAQs: Frequently Asked Questions About I’M Obsessed! Been Making This Chicken Pasta Non-Stop!

    Can I use a different type of pasta?

    Absolutely! Feel free to use any noodles you prefer—gluten-free, whole grain, or even vegetable-based pasta.

    What can I substitute for chicken?

    For a plant-based version, substitute chicken with chickpeas, tofu, or tempeh. Season well to infuse flavors.

    Can I make this dish ahead of time?

    Yes! This chicken pasta keeps well in the fridge for 3-4 days or can be frozen for up to 3 months.

    How can I add more flavor to this dish?

    Consider adding fresh herbs like basil or parsley, or even a splash of lemon juice for an extra zing.

    Is this recipe suitable for children?

    Definitely! The mild flavors and colorful veggies make it appealing to kids. You can also reduce spice levels for sensitive palates.

    What if I don’t have all the ingredients?

    Don’t worry! The beauty of this dish is adaptability—swap out any vegetables or proteins for those you already have on hand.

    How can I make this recipe lower in calories?

    Opt for a smaller portion of pasta, increase the quantity of vegetables, and use minimal olive oil during cooking for a lighter meal.


    In conclusion, this chicken pasta recipe is not only an exciting and flavorful dish but also incredibly versatile and nutritious. It serves as a canvas for your culinary creativity and meets various dietary preferences while still being easy to prepare. With its health benefits, suitability for meal prep, and numerous customization options, this dish will undoubtedly become a family favorite in your kitchen! Don’t wait any longer; embark on a culinary adventure and make this chicken pasta today!

  • Irresistible Sourdough Brownies

    Irresistible Sourdough Brownies

    Irresistible Sourdough Brownies: A Tropical Delight

    Introduction to Irresistible Sourdough Brownies

    If you’re on the hunt for new and exciting dessert recipes, look no further than these Irresistible Sourdough Brownies. Combining the tanginess of sourdough with the rich decadence of brownies, this unique recipe will quickly become a household favorite. Not only are they delicious, but they are also simple to make, accommodating various dietary preferences including vegan, gluten-free, and low-calorie options.

    This recipe is a perfect match for busy parents who need a quick dessert, students looking for a midnight snack, or anyone simply wanting to indulge sensibly. The use of sourdough starter not only adds a delightful twist to the classic brownie but also contributes beneficial probiotics. Essentially, this recipe allows you to reduce food waste by utilizing that excess starter, making these brownies not just delightful but also sustainable.

    The vibrant taste, combined with a chewy texture, ensures a satisfying experience with every bite. With minimal ingredients and straightforward steps, these brownies are effortless to whip up, even on a busy weekday. So, whether you’re entertaining guests or simply indulging yourself, these Irresistible Sourdough Brownies are sure to impress.

    Benefits and Advantages of Irresistible Sourdough Brownies

    This recipe comes packed with numerous benefits that elevate it above typical brownie dessert recipes. Here are just a few of the standout advantages you can enjoy:

    1. Ease of Preparation: Preparing these brownies is straightforward. With just a few basic ingredients, you can have your preparations done in under 15 minutes. No fancy skills or tools are needed, making this perfect for any home cook, from beginners to seasoned bakers.

    2. Health Benefits: Sourdough is known for its probiotic content, which can aid in digestion and promote gut health. The fermentation process involved with sourdough can also make the brownies easier to digest than your standard, non-fermented treats. With the use of whole ingredients, you can feel good about indulging in this decadent cake.

    3. Versatility: Whether you’re looking for gluten-free options or have specific dietary restrictions, this recipe lends itself to many modifications. You can easily swap out ingredients to cater to vegan diets or reduce sugars for those monitoring their caloric intake.

    4. Incredible Flavor: The sourdough starter adds an unexpected depth of flavor that makes these brownies stand out. The tanginess beautifully contrasts with the sweetness of the chocolate, resulting in a complex and enjoyable dessert.

    5. Perfect for Any Occasion: Whether it’s a casual get-together, a birthday party, or just a treat for yourself, these brownies fit the occasion seamlessly. They also travel well, making them an excellent choice for potlucks or gift-giving.

    By choosing this recipe, you’re not only treating yourself to something delicious, but you’re also making a healthier choice without sacrificing taste. Get ready to wow your friends and family with these wonderfully rich and chewy treats.

    Ingredients Overview

    Essential Ingredients for Irresistible Sourdough Brownies

    Here’s what you’ll need to gather in order to create your own batch of Irresistible Sourdough Brownies:

    • 1 cup sourdough starter (active and bubbly): This is the star of the recipe. Provides flavor and creates a chewy texture.

    • 1/2 cup unsweetened cocoa powder: Adds a rich chocolatey flavor.

    • 1/2 cup melted coconut oil (or unsalted butter): Serves as the fat, making the brownies moist. You can use vegan butter for a dairy-free option.

    • 1 cup sugar (or coconut sugar for a low-calorie option): Sweetens the brownies. Adjust the amount based on your sweetness preference.

    • 2 eggs (or flax eggs for a vegan option): Binds the ingredients together. For each flax egg, mix 1 tablespoon of ground flaxseed with 2.5 tablespoons of water.

    • 1 teaspoon vanilla extract: Enhances sweetness and adds additional flavor.

    • 1/4 teaspoon salt: Balances and enhances all the other flavors.

    • 1/2 cup chocolate chips (optional): For added chocolate goodness. Choose dairy-free chips for a vegan-friendly version.

    Dietary Substitutions to Customize Your Irresistible Sourdough Brownies

    1. Gluten-Free Option:
    Simply use a 1:1 gluten-free all-purpose flour instead of regular flour. Ensure your cocoa powder and baking powder are also gluten-free.

    2. Vegan Option:
    Use flax eggs and replace sugar with coconut sugar or a substitute such as maple syrup for a refined sugar-free option.

    3. Low-Calorie Option:
    Utilize stevia or erythritol as a sugar substitute while maintaining the moisture balance through ingredients such as apple sauce or unsweetened almond milk.

    With these substitutions, you can easily cater to various dietary needs while still enjoying the delicious Irresistible Sourdough Brownies.

    How to Prepare the Perfect Irresistible Sourdough Brownies: Step-by-Step Guide

    To create your very own Irresistible Sourdough Brownies, follow this simple, step-by-step guide. Each instruction is crafted to ensure a delightful outcome.

    1. Prepare the Base: Preheat your oven to 350°F (175°C). Line a 9×9-inch baking pan with parchment paper, allowing some overhang for easy removal later.

    2. Mix Ingredients: In a mixing bowl, combine the active sourdough starter, melted coconut oil, and sugar. Stir well until everything is well mixed.

    3. Add Cocoa: Sift in the unsweetened cocoa powder and salt. Mix until thoroughly combined, ensuring no lumps remain.

    4. Incorporate the Eggs: Beat in the eggs one at a time, ensuring each is fully incorporated before adding the next. For the vegan version, add in the flax eggs at this time.

    5. Include Vanilla: Add the vanilla extract to the mixture and stir until everything is well integrated.

    6. Fold in the Dry Ingredients: If you’re adding flour to the recipe, at this stage, sift in the flour and mix gently until just combined, making sure not to over-mix.

    7. Add Chocolate Chips: If desired, fold in the chocolate chips for extra indulgence.

    8. Transfer to Baking Pan: Pour the brownie mixture into the prepared baking pan and spread it evenly using a spatula.

    9. Bake: Place in the preheated oven and bake for approximately 25-30 minutes. You’ll know they’re done when the edges are set and the center has a slight jiggle. You might see a few cracks on the top.

    10. Cool Down: Remove from the oven and set aside to cool in the pan for about 10 minutes. Using the parchment overhang, lift the brownies out and transfer them to a wire rack to cool completely.

    11. Cut and Serve: Once completely cooled, cut them into squares and enjoy your delicious Irresistible Sourdough Brownies!

    This recipe allows for a variety of personal touches. Consider adding nuts, different types of chocolate, or even a sprinkle of sea salt on top before baking to elevate your brownies even further.

    Mastering Irresistible Sourdough Brownies: Advanced Tips and Variations

    To elevate your baking game with Irresistible Sourdough Brownies, try these advanced tips and variations:

    1. Brown Butter: For a deeper flavor, brown the coconut oil or butter in a saucepan before mixing it with the sugar. This adds a nutty richness that complements the chocolate beautifully.

    2. Spices: Experiment by adding spices like cinnamon or espresso powder to enhance the overall chocolate flavor. Just a tiny pinch can transform your brownies.

    3. Nut Additions: Walnuts, pecans, or almonds can add a delightful crunch and healthy fats. Toast them lightly for added flavor before folding them into your batter.

    4. Frosting: For an extra indulgent treat, consider topping your brownies with a simple ganache made from melted chocolate and coconut cream.

    5. Mini Brownie Bites: Pour the batter into mini muffin tins instead for bite-sized treats. Adjust the baking time to around 15-20 minutes for these mini versions.

    6. Swirls: Add some creamy peanut butter or Nutella by swirling it into the brownie batter just before baking. This creates a beautiful marbled effect and enhances your brownies.

    These tips ensure you can tailor your brownies for any occasion, creating a versatile dessert that’ll satisfy all palates.

    How to Store Irresistible Sourdough Brownies: Best Practices

    To keep your Irresistible Sourdough Brownies fresh and delicious, consider the following best practices:

    1. At Room Temperature: If you plan to eat your brownies within a few days, simply store them at room temperature in an airtight container. They can last about 3-4 days.

    2. Refrigeration: For longer storage, place the brownies in the fridge. They will maintain their flavor and texture for up to a week.

    3. Freezing: For extended storage, wrap individual squares in plastic wrap and then place them in an airtight container or freezer bag. These brownies can be frozen for up to 3 months.

    4. Reheating: When ready to indulge again, simply thaw them at room temperature or warm them in the microwave for a few seconds to bring back the gooey texture.

    By following these steps, you can enjoy your Irresistible Sourdough Brownies for days, ensuring no delicious bite goes to waste!

    Nutritional Value of Irresistible Sourdough Brownies

    Here’s a general nutritional breakdown for one square (approximately 2×2 inches) of Irresistible Sourdough Brownies made with conventional ingredients:

    • Calories: 180
    • Total Fat: 10g
    • Saturated Fat: 5g
    • Cholesterol: 30mg
    • Sodium: 65mg
    • Total Carbohydrates: 22g
    • Dietary Fiber: 2g
    • Sugars: 12g
    • Protein: 3g

    It’s crucial to note that nutritional values can vary based on specific ingredient choices, such as using different types of sweeteners, fats, or dairy alternatives. For a healthier brownie option, consider using low-sugar or sugar-free alternatives and substituting fats where suitable.

    Essentially, Irresistible Sourdough Brownies offer a delicious treat packed with flavor while allowing room for healthy variations.

    FAQs: Frequently Asked Questions About Irresistible Sourdough Brownies

    Can I use inactive sourdough starter for this recipe?

    Using an inactive sourdough starter won’t yield the best results, as it lacks the necessary fermentation qualities. It’s best to use an active and bubbly starter.

    How can I make these brownies gluten-free?

    You can substitute regular all-purpose flour for a gluten-free blend, ensuring all your ingredients (like the cocoa powder) are certified gluten-free.

    What’s the best way to test if the brownies are done baking?

    Check for a slight jiggle in the center and for cracks on top. You can also insert a toothpick; if it comes out with a few moist crumbs, they’re perfectly baked!

    How can I make these brownies vegan?

    By using flax eggs instead of regular eggs and ensuring that all other ingredients are plant-based (including chocolate chips), you can easily make these brownies vegan.

    Can I add nuts or other mix-ins to this recipe?

    Absolutely! Feel free to add nuts, chocolate chips, or even a swirl of peanut butter for added texture and flavor.

    These FAQs address common concerns while providing insight into making your Irresistible Sourdough Brownies even more enjoyable.


    Now, let your baking adventures begin! Try out this delightful recipe and share it with loved ones or simply enjoy it yourself. After all, who can resist the allure of Chocolatey Sourdough Brownies?

  • IM Obsessed With Super Juicy Honey Mustard Chicken

    IM Obsessed With Super Juicy Honey Mustard Chicken

    I’M Obsessed With Super Juicy Honey Mustard Chicken!: A Tropical Delight

    Introduction to I’M Obsessed With Super Juicy Honey Mustard Chicken!

    Are you on the hunt for delightful chicken recipes that elevate your dinner routine? Look no further than this Super Juicy Honey Mustard Chicken! This dish is not just a meal; it’s an experience that tantalizes your taste buds with a perfect blend of sweet and tangy flavors. With its simplicity and ease of preparation, this lovely dish is ideal for busy weeknights or laid-back weekends.

    One of the best aspects of this recipe is its adaptability. It can easily fit into various dietary preferences, making it suitable for everyone—from health-conscious individuals to adventurous food enthusiasts. Featuring wholesome ingredients, this chicken dish is packed with protein while keeping overall calories low. Plus, it’s gluten-free and can be adjusted to fit vegan needs, ensuring everyone at your table can enjoy the delightful flavors.

    So, whether you’re cooking for your family, hosting friends, or just your adventurous self, the Super Juicy Honey Mustard Chicken brings a tropical taste that inspires creativity in the kitchen. Let’s dive into why this recipe stands out and why you will become just as obsessed with it as I am!

    Benefits and Advantages of I’M Obsessed With Super Juicy Honey Mustard Chicken!

    When it comes to healthy eating, chicken recipes often take center stage due to their wonderful versatility, and this Super Juicy Honey Mustard Chicken is no exception. Here are several advantages that make this recipe a must-try:

    1. Simplicity and Speed: This dish is easy to prepare, requiring minimal ingredients and straightforward steps. Even novice cooks can impress their guests with minimal effort! Perfect for busy parents or students, it can be whipped up in 30 minutes or less.

    2. Health Benefits: Chicken is a high-protein food that helps build and repair tissues, supporting overall health. The honey mustard glaze provides a burst of flavor without excessive calories or unhealthy fats. Choosing skinless chicken breasts can further enhance the health benefits by reducing saturated fat.

    3. Adaptability: If you have specific dietary needs, this recipe can easily adapt to suit various lifestyles. Whether you need a gluten-free meal, a low-carb option, or even a vegan substitute, this dish can accommodate your preferences.

    4. Family-Friendly: Not only is this a recipe that everyone will enjoy, but it can also inspire kids to get involved in the kitchen. They’ll love the sweet honey and tangy mustard combination, making for a meal that pleases picky eaters.

    5. Meal Prep Excellence: The Super Juicy Honey Mustard Chicken is fantastic for meal prep. You can make a large batch, store it, and enjoy it throughout the week, making it a great option for working professionals or anyone looking to simplify their weeknight meals.

    In conclusion, this dish is more than just a recipe; it’s a delightful experience with healthy benefits, ease of preparation, and accessibility to all dietary needs, making it a fantastic addition to your family’s meal rotation.

    Ingredients Overview

    Essential Ingredients for I’M Obsessed With Super Juicy Honey Mustard Chicken!

    Creating mouthwatering chicken recipes requires just a few key ingredients. Here’s a detailed list to ensure your dish is rich in flavor and nutrition.

    1. Chicken Breasts (4 pieces, boneless and skinless): The lean protein base of the recipe.
    2. Honey (1/2 cup): Provides natural sweetness and enhances the glaze.
    3. Dijon Mustard (1/4 cup): Adds bold flavor to balance the honey’s sweetness.
    4. Garlic Clove (2, minced): Offers aromatic richness and health benefits.
    5. Olive Oil (2 tablespoons): Helps in cooking and adds healthy fats.
    6. Salt (1 teaspoon): Essential for enhancing flavors.
    7. Black Pepper (1/2 teaspoon): Adds spice to the mix.
    8. Fresh Thyme or Rosemary (optional, for garnish): Enhances presentation and adds fresh herbal notes.

    Dietary Options

    • Gluten-Free: All ingredients listed are gluten-free.
    • Low-Calorie: Using skinless chicken and controlling honey portions keeps calories low.
    • Vegan Option: Substitute chicken with tofu or chickpeas for a plant-based version.

    Dietary Substitutions to Customize Your I’M Obsessed With Super Juicy Honey Mustard Chicken!

    Adapting recipes is important for accommodating dietary preferences. Here are some suggestions for substitutions:

    • Honey: For vegans, agave nectar or maple syrup works as an excellent natural sweetener.
    • Dijon Mustard: You can use yellow mustard for a milder flavor or grainy mustard for added texture.
    • Chicken: Swap the chicken for extra-firm tofu for a vegan-friendly protein option. Ensure you press it well for the best texture.
    • Olive Oil: Can be replaced with avocado oil or canola oil, depending on your preference and dietary restrictions.
    • Herbs: Fresh herbs can be substituted with dried herbs if necessary, adjusting the quantity to taste.

    These substitutions not only cater to various dietary preferences but also ensure that everyone can enjoy a delicious meal that feels special and satisfying.

    How to Prepare the Perfect I’M Obsessed With Super Juicy Honey Mustard Chicken!: Step-by-Step Guide

    Ready to create a scrumptious dish that’s bound to impress? Follow these easy step-by-step instructions to whip up your Super Juicy Honey Mustard Chicken.

    1. Gather All Ingredients: Ensure you have all the ingredients prepped and ready to go. Trust me, it saves you time!

    2. Preheat the Oven: Set your oven to 400°F (200°C). This ensures an even cooking environment.

    3. Prepare the Chicken: Rinse the chicken breasts under cold water and pat them dry using paper towels. This helps the marinade stick better.

    4. Make the Marinade: In a medium bowl, combine the honey, Dijon mustard, olive oil, minced garlic, salt, and pepper. Whisk until well blended.

    5. Coat the Chicken: Place the chicken breasts in a shallow dish or a ziplock bag. Pour half of the marinade over the chicken, ensuring each piece is well-coated. Reserve the other half for later.

    6. Marinate: If time allows, marinate the chicken in the fridge for at least 30 minutes, or up to overnight for deeper flavor.

    7. Prepare for Baking: Remove the chicken from the marinade and place them on a baking sheet lined with parchment paper or greased with cooking spray.

    8. Bake: Bake the chicken for 20-25 minutes, or until cooked through (internal temperature should reach 165°F / 74°C). It’s essential to avoid overcooking for maximized juiciness!

    9. Add Final Glaze: During the last five minutes of baking, brush the reserved marinade over the chicken for an added flavor boost.

    10. Garnish and Serve: Once out of the oven, let the chicken rest for a few minutes before slicing. Garnish with fresh thyme or rosemary if desired, then serve warm.

    Extra Tip: If you’re short on time, this dish can also be grilled for a beautifully charred flavor!

    Mastering I’M Obsessed With Super Juicy Honey Mustard Chicken!: Advanced Tips and Variations

    Want to elevate your cooking game? Here are a few advanced tips and exciting variations to master the Super Juicy Honey Mustard Chicken:

    • Use Different Proteins: While chicken is a fantastic option, consider using salmon or pork for a delightful twist! Both will absorb the wonderful flavors beautifully.

    • Spice it Up: Add a pinch of cayenne pepper to the marinade for those who enjoy a bit of heat in their chicken recipes.

    • Cooking Method: For a faster option, consider using an air fryer set at 375°F (190°C) for approximately 15-20 minutes, adjusting cooking time based on size.

    • Create a Side Dish: Roast vegetables such as carrots, zucchini, and bell peppers alongside the chicken for an incredible one-pan meal that holds together beautifully and is full of color.

    • Honey Mustard Dipping Sauce: Combine sour cream or Greek yogurt with left-over honey mustard glaze for a tangy dip that works perfectly with roasted veggies or on the side.

    These tips not only guarantee a delicious experience but also encourage creativity in the kitchen!

    How to Store I’M Obsessed With Super Juicy Honey Mustard Chicken!: Best Practices

    If you’ve made a larger batch or simply have leftovers, proper storage ensures that your Super Juicy Honey Mustard Chicken remains fresh and delicious:

    • Refrigeration: Allow the chicken to cool down to room temperature. Then, place it in an airtight container. When stored correctly, it can last for 3-4 days in the refrigerator.

    • Freezing: For longer storage, freeze the chicken in an airtight container or freezer bag. Ensure to label the date, and it can last for up to 3 months. When you’re ready to eat, thaw it overnight in the refrigerator before reheating.

    • Reheating: To reheat, place the chicken in the oven at 350°F (175°C) for 20-30 minutes, adding a splash of broth or water to the pan to maintain moisture. Alternatively, you can microwave it, covering the dish with a damp paper towel for best results.

    By following these simple storage guidelines, you can enjoy your tasty chicken recipes anytime—wasting nothing and savoring every bite!

    Nutritional Value of I’M Obsessed With Super Juicy Honey Mustard Chicken!

    Knowing the nutritional value of dishes is crucial, especially when you’re mindful of your diet. Here is the approximate nutritional breakdown for one serving of Super Juicy Honey Mustard Chicken:

    • Calories: 250 kcal
    • Protein: 30 g
    • Fat: 8 g
    • Carbohydrates: 12 g
    • Fiber: 0.5 g
    • Sugar: 8 g
    • Sodium: 650 mg

    This dish not only provides high protein but keeps a healthy balance of fats and carbohydrates without excessive calorie counts. These nutritional benefits make it a great fit for athletes, busy professionals, and health-conscious eaters alike!

    FAQs: Frequently Asked Questions About I’M Obsessed With Super Juicy Honey Mustard Chicken!

    1. Can I use chicken thighs instead of chicken breasts?
    Absolutely! Chicken thighs will add a bit more flavor and moisture to your dish. You may need to adjust the cooking time slightly, ensuring they reach an internal temperature of 165°F (74°C).

    2. How can I make this recipe dairy-free?
    This recipe is already dairy-free! However, if you’d like to add something creamy (like the optional dipping sauce), substitute any dairy product with plant-based options.

    3. What can I serve with Honey Mustard Chicken?
    This dish pairs beautifully with steamed vegetables, quinoa, or a fresh salad. Roasted potatoes or sweet potatoes would also make a great side!

    4. Can I marinate the chicken overnight?
    Yes, marinating the chicken overnight can deepen the flavor and make it even more tender. Just ensure you store it in the refrigerator.

    5. Is this recipe suitable for meal prep?
    Yes! The Super Juicy Honey Mustard Chicken keeps well in the fridge and is perfect for meal prep, allowing you to enjoy healthy, homemade meals throughout the week.

    Now that you have all the tips and tricks at hand, it’s time to grab your ingredients and cook up some Super Juicy Honey Mustard Chicken! Enjoy every bite, and I hope you become just as obsessed with this recipe as I am!