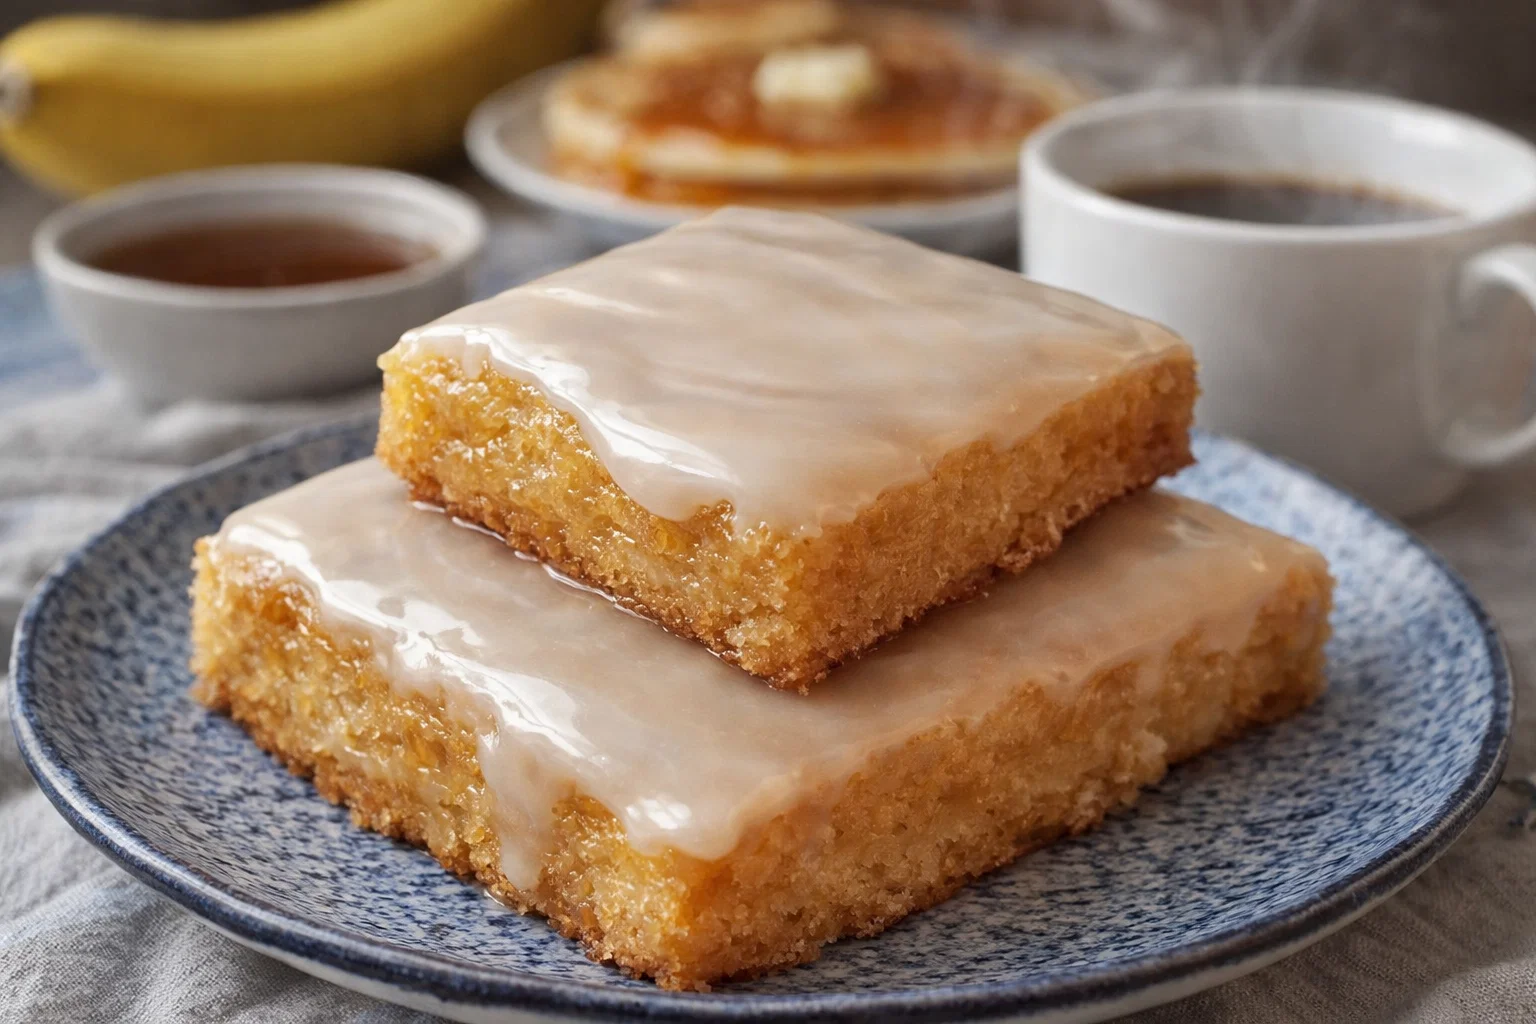
Blog

  • Decorated Bunny Cookies With Royal Icing

    Decorated Bunny Cookies With Royal Icing

    Decorated Bunny Cookies With Royal Icing: A Tropical Delight

    Introduction to Decorated Bunny Cookies With Royal Icing

    Are you searching for the perfect cookie recipes that combine creativity and flavor? Look no further than these Decorated Bunny Cookies with Royal Icing. Not only do they bring a touch of sweetness to any occasion, but they also offer an engaging project for the whole family. Whip them up for Easter gatherings, children’s birthdays, or simply as a delightful weekend treat.

    What sets these bunny cookies apart is their versatility. The base recipe is entirely adaptable, making it an excellent choice for those seeking vegan, gluten-free, or low-calorie options. The royal icing allows for an intricate touch, enabling bakers of all skill levels to unleash their artistic flair. Plus, the health-conscious will appreciate that we use simple, wholesome ingredients free from artificial additives.

    Making cookies can often seem like a daunting task, but this recipe simplifies the process, ensuring delicious results every time. With just a few key ingredients and easy-to-follow steps, these decorated bunny cookies are sure to become a favorite in your cookie collection. So gather your supplies and get ready to create heartwarming treats that delight not just the palate, but also the eye!


    Benefits and Advantages of Decorated Bunny Cookies With Royal Icing

    When it comes to baking, the appeal of cookie recipes often lies in their simplicity and satisfaction. Here’s why Decorated Bunny Cookies with Royal Icing stands out as a fantastic choice for both novice and experienced bakers alike:

    Ease of Preparation

    Unlike many elaborate dessert recipes, these bunny cookies are straightforward and can be prepared in just a few hours. Baking them does not require specialized equipment or techniques, making this recipe accessible for home cooks of all skill levels. The fun part is decorating them, allowing for creativity to shine.

    Health Benefits

    More than just a sweet treat, these cookies can be tailored to meet your dietary needs. By selecting gluten-free flour or natural sweeteners, you can create cookies that fit a healthier lifestyle. Additionally, using egg substitutes in royal icing can accommodate vegan diets, ensuring everyone enjoys a treat without feeling left out.

    A Great Interactive Activity

    For parents and children, decorating cookies can evolve into a fun, interactive experience. Let your kids dive into the world of baking, mix colors for the icing, and come up with creative designs. This enhances the joy of cooking and builds lasting memories, making the cookies not only a treat for the taste buds but for the family as well.

    Aesthetically Pleasing

    There’s something enchanting about a beautifully decorated cookie. With the royal icing, you can achieve vibrant colors and intricate designs that will impress any guest. These bunny cookies can be a centerpiece on your Easter table or a charming gift for friends and family.

    Versatility for Different Occasions

    From casual get-togethers to festive occasions, these cookies fit perfectly. They can be customized for different themes and holidays, making them an evergreen addition to your baking repertoire.

    Overall, Decorated Bunny Cookies with Royal Icing brings together ease, health benefits, and pure joy, making it an irresistible option in the realm of cookie recipes.


    Ingredients Overview

    Essential Ingredients for Decorated Bunny Cookies With Royal Icing

    To create these delightful bunny cookies, you will need the following ingredients:

    For the Cookies

    1. All-Purpose Flour (2 ½ cups) – This is the base of the cookies, providing structure.
    2. Granulated Sugar (1 cup) – Adds sweetness and helps achieve a delicate texture.
    3. Baking Powder (1 tsp) – A leavening agent that helps the cookies rise.
    4. Unsalted Butter (1 cup) – Creates a rich flavor and crumbly texture. (For a vegan option, substitute with coconut oil or vegan butter.)
    5. Eggs (2 large) – Essential for binding and moisture. (Use flaxseed meal for a vegan substitute: 1 tbsp flaxseed meal + 2.5 tbsp water = 1 egg.)
    6. Vanilla Extract (1 tsp) – Enhances the flavor profile of the dough.
    7. Salt (½ tsp) – Balances the sweetness.

    For the Royal Icing

    1. Powdered Sugar (3 cups) – Forms the base for the icing.
    2. Merengue Powder (2 tbsp) – Stabilizes the icing. (Use aquafaba or a vegan meringue alternative if desired.)
    3. Water (4-5 tbsp) – Used to achieve the desired consistency of the icing.
    4. Food Coloring – Various colors for decoration. Use natural food coloring for a healthier alternative.

    Benefits of Key Ingredients

    • Butter vs. Coconut Oil: Opting for coconut oil can create a dairy-free variant.
    • Flours: Substitute all-purpose flour with almond or oat flour for gluten-free options.
    • Icing Variants: Using aquafaba in royal icing allows this recipe to be friendly for those avoiding eggs.

    By selecting quality ingredients and considering health-conscious options, these bunny cookies can easily adapt to suit many dietary preferences, ensuring everyone can enjoy a sweet bite.


    Dietary Substitutions to Customize Your Decorated Bunny Cookies With Royal Icing

    Gluten-Free Substitutions:

    • Flour: Replace all-purpose flour with a gluten-free blend or almond flour. This will help in achieving the right texture while keeping them safe for gluten-intolerant eaters.

    Vegan Substitutions:

    • Butter: Use vegetable shortening or a dairy-free butter alternative.
    • Eggs: Flax eggs or applesauce can work well in place of conventional eggs, helping to bind the ingredients together without compromising on texture.

    Low-Calorie Options:

    • Sugar: Substitute regular sugar with coconut sugar or a stevia blend to reduce calories.
    • Royal Icing: Opt for a light version using less sugar and more water. Natural extracts can help maintain flavor without the excess calories.

    Conclusion on Customizations

    These substitutions make the Decorated Bunny Cookies with Royal Icing versatile and approachable for those adhering to various dietary restrictions. Each custom version still delivers on the delightful taste and fun presentation.


    How to Prepare the Perfect Decorated Bunny Cookies With Royal Icing: Step-by-Step Guide

    To create these decorated bunny cookies, follow this detailed step-by-step guide ensuring your baking experience is smooth and enjoyable:

    Preparing the Bunny Cookies

    1. Prepare the Base: In a large bowl, cream together the softened butter and sugar until light and fluffy.
    2. Add Eggs and Vanilla: Mix in the eggs one at a time along with the vanilla extract, ensuring each is incorporated before adding the next.
    3. Sift Dry Ingredients: In another bowl, combine the flour, baking powder, and salt. Sift to ensure there are no lumps.
    4. Combine Mixtures: Gradually add the dry mixture to the wet mixture, stirring until combined. The dough should come together but not be sticky.
    5. Chill Dough: Wrap the dough in plastic wrap and refrigerate for at least one hour, or until firm. This is crucial for easy rolling and cutting.

    Baking the Cookies

    1. Preheat Oven: Preheat your oven to 350°F (175°C).
    2. Roll & Cut: On a floured surface, roll out the chilled dough to about ¼ inch thick. Use bunny-shaped cookie cutters to cut out shaped cookies and place them on a parchment-lined baking tray.
    3. Bake: Bake the cookies for 8-10 minutes, or until the edges are just lightly golden. Allow them to cool completely on a wire rack.

    Preparing Royal Icing

    1. Mix Icing: In a mixing bowl, combine powdered sugar and meringue powder. Gradually add water and beat on medium speed until stiff peaks form.
    2. Coloring the Icing: Separate icing into smaller bowls and mix in food coloring to achieve desired colors. Keep the icing covered with a damp cloth to prevent it from drying out.

    Decorating the Cookies

    1. Outline: Using a piping bag fitted with a small round tip, outline the bunny shapes on the cookies.
    2. Flood Icing: Thin the remaining icing with a bit more water to a flood consistency, then fill in the outlined areas using the piping bag or a squeeze bottle.
    3. Add Details: Allow the base layer to dry before adding small decorative elements like eyes or patterns with different colors of royal icing.

    Final Touch

    1. Dry and Enjoy: Let the decorated cookies sit at room temperature until the royal icing has fully set, typically several hours or overnight.

    This step-by-step process ensures that even busy parents or beginners can create beautiful, delicious results that will dazzle friends and family alike. Enjoy sharing these wonderful cookie recipes with your loved ones!


    Mastering Decorated Bunny Cookies With Royal Icing: Advanced Tips and Variations

    While the basic Decorated Bunny Cookies with Royal Icing recipe is incredibly delightful, here are some advanced tips and creative variations to elevate your cookie-making skills:

    Advanced Tips

    • Chilling the Dough: Don’t skip chilling the dough! This prevents the cookies from spreading too much and helps maintain their shape.
    • Royal Icing Consistency: Practice achieving the right consistency of royal icing – stiff for outlines and flood consistency for filling. Test it out by drawing a figure-eight. If it holds its shape and settles back slowly, you’re good to go.
    • Decorative Techniques: Use toothpicks for marbling different colors of icing or creating unique patterns. Stencils can also be fun for creating consistent designs.

    Creative Variations

    • Flavor Enhancements: Consider adding almond extract for a different flavor profile or experimenting with citrus zest for brightness.
    • Different Cookie Shapes: Instead of only using bunny shapes, create an entire farmyard by including cookie cutters for chicks, eggs, and flowers.
    • Seasonal Themes: Dye the royal icing seasonal colors or add decorations relevant to different holidays and celebrations, using sprinkles, edible glitter, or fondant accents.

    Incorporating these advanced techniques and creative variations will surely impress guests and inspire future baking endeavors, making your cookie recipes even more enjoyable.


    How to Store Decorated Bunny Cookies With Royal Icing: Best Practices

    Once you have created your beautiful Decorated Bunny Cookies with Royal Icing, you might wonder how best to store them to maintain their freshness and presentation. Here are some best practices:

    At Room Temperature

    • Storage Containers: Store the cookies in an airtight container at room temperature if you plan to consume them within a week. Layer them with parchment paper to prevent sticking.
    • Humidity Caution: Keep the container away from direct sunlight and moisture, as royal icing can become sticky when exposed to humidity.

    Refrigeration

    • Cooler Climates: If you live in a particularly warm area, consider refrigerating the cookies. However, allow them to come to room temperature before serving, as this will keep the icing stable.

    Freezing

    • Long-term Storage: For longer storage, you can freeze the cookies. Place them in a single layer in an airtight container with parchment paper between layers.
    • Thawing: Let the cookies thaw in the container at room temperature to avoid condensation forming on the icing.

    By following these storage recommendations, your Decorated Bunny Cookies can retain their delightful taste and beautiful decoration, ready to be enjoyed on any occasion.


    Nutritional Value of Decorated Bunny Cookies With Royal Icing

    Understanding the nutritional composition of your decorated bunny cookies enables you to enjoy them responsibly. Here’s a general breakdown based on the classic recipe:

    Per Cookie (based on 48 cookies):

    • Calories: Approximately 130
    • Total Fat: 5g
    • Saturated Fat: 3g
    • Cholesterol: 20mg
    • Sodium: 50mg
    • Total Carbohydrates: 20g
    • Dietary Fiber: 0g
    • Sugars: 10g
    • Protein: 1g

    Health Considerations

    • Sugar Content: While these cookies offer delightful sweetness, keep in mind the sugar content—especially for those watching their intake.
    • Fat Options: The option to use unsalted butter or coconut oil can affect the total saturated fat content.
    • Custom Nutritional Profiles: If you opt for substitutions like almond flour or stevia, the nutritional values will change, often reducing calories and carbohydrates.

    By tailoring the ingredients to meet specific dietary needs, you can ensure that your Decorated Bunny Cookies with Royal Icing fit into your lifestyle while still providing a tasty treat.


    FAQs: Frequently Asked Questions About Decorated Bunny Cookies With Royal Icing

    What can I substitute for eggs in the bunny cookie recipe?

    You can use flaxseed meal (1 tablespoon flaxseed mixed with 2.5 tablespoons water), applesauce, or a commercial egg replacer for a vegan option.

    How long can I store these cookies?

    Stored properly in an airtight container, Decorated Bunny Cookies can remain fresh at room temperature for up to a week, while refrigeration extends their lifespan.

    Can I use store-bought frosting instead of royal icing?

    While store-bought frosting can be used, royal icing is recommended for its unique hardening properties that make decorating easier and more visually appealing.

    How can I achieve a smooth royal icing finish?

    Once the cookies are frosted, gently tap the cookie on the counter to help the icing settle. A little sanding sugar before icing sets can also add texture.

    How do I make my icing colors more vibrant?

    Gradually add gel food coloring, mixing well until you achieve the desired shade. Gel colors require less liquid, yielding vibrant hues.

    By providing these answers, we hope to reassure you as you bake and decorate your delightful bunny cookies, making your baking adventure more enjoyable and less stressful.


    In conclusion, these Decorated Bunny Cookies with Royal Icing offer a perfect blend of fun, creativity, and taste. Their simplicity, health benefits, and adaptability cater to a variety of dietary preferences, encouraging everyone to participate in the joy of baking. Whether you’re a novice or a seasoned baker, this cookie recipe promises an enjoyable experience that will soon become a staple in your kitchen. Get ready to impress friends and family with your beautiful creations, just in time for your next gathering! Happy baking!

  • This Healthy Potato Side Dish Will Change Your Life

    This Healthy Potato Side Dish Will Change Your Life

    This Healthy Potato Side Dish Will Change Your Life!: A Tropical Delight

    Introduction to This Healthy Potato Side Dish Will Change Your Life!

    If you’re searching for healthy dinner recipes that pack flavor and nutrition, this healthy potato side dish is your answer. Imagine a dish that is not only easy to prepare but also caters to various dietary needs, including gluten-free and vegan options. This delightful recipe combines simple ingredients that you probably already have in your kitchen, making it an ideal choice for busy parents, students, and anyone who enjoys a wholesome meal without spending hours in the kitchen.

    This healthy potato side dish features fresh herbs and a hint of tropical flair, ensuring it’s as flavorful as it is nutritious. It serves as a great complement to any main dish—whether you’re grilling veggies, baking fish, or serving a hearty meat entrée. Plus, it’s a fantastic way to elevate the humble potato into a vibrant, lively dish that your whole family will love. With its low-calorie profile, it aligns perfectly with a variety of dietary plans. So, roll up your sleeves and get ready to whip up something that will not only satisfy your hunger but also nourish your body.

    Benefits and Advantages of This Healthy Potato Side Dish Will Change Your Life!

    This healthy potato side dish is the epitome of versatility and convenience. One of the key advantages is its simplicity. With just a few ingredients and minimal prep time, you can create a colorful and satisfying side that enhances any meal. Whether you’re a seasoned cook or a kitchen novice, this recipe empowers you to experiment without fear.

    Health-wise, potatoes are a fantastic source of essential vitamins and minerals. They are rich in potassium, which helps manage blood pressure, and contain vitamins C and B6, which support immune function and energy metabolism. When prepared healthily, such as by baking or steaming instead of frying, potatoes remain a nutritious option for any meal.

    Furthermore, this recipe is adaptable to various dietary restrictions. Whether you’re following a vegan, gluten-free, or low-carb diet, this side dish can easily be tailored to fit your needs. By substituting key ingredients or adjusting cooking methods, you can create a dish that’s suitable for everyone at the table. Overall, this healthy potato side dish not only satisfies hunger but contributes positively to your well-being, making it a staple in the realm of healthy dinner recipes.

    Ingredients Overview

    Essential Ingredients for This Healthy Potato Side Dish Will Change Your Life!

    • Potatoes (4 medium-sized): Choose russet or Yukon gold for the best texture.
    • Olive Oil (2 tablespoons): A key player in heart-healthy fats. Can substitute with avocado oil for a different flavor profile.
    • Fresh Herbs (1/4 cup, chopped): Consider parsley, cilantro, or chives for freshness. These herbs elevate the dish while offering additional vitamins.
    • Garlic (2 cloves, minced): Adds a savory depth to the flavor. You can use garlic powder as a substitute.
    • Salt (to taste): Enhances flavor. Use sea salt or kosher salt for additional minerals.
    • Black Pepper (to taste): A touch adds a lovely kick. Use cayenne pepper for added heat if desired.

    Dietary Note: This recipe is vegan, gluten-free, and low-calorie, making it an excellent fit for diet-conscious readers.

    Dietary Substitutions to Customize Your This Healthy Potato Side Dish Will Change Your Life!

    1. Potato Alternatives: If you want to lower the carb count, consider using sweet potatoes or cauliflower as a substitute.

    2. Oil Options: Instead of olive oil, feel free to opt for coconut oil for a hint of sweetness or ghee for a slight creaminess.

    3. Herbal Variations: If fresh herbs aren’t available, dried herbs like oregano or Italian seasoning can work as great alternatives.

    4. Garlic Variations: Use shallots or onion powder instead of fresh garlic if you’re looking for a milder flavor.

    5. Flavor Additions: Incorporate spices like smoked paprika or curry powder for a twist on the flavor. These add complexity and excitement to the dish.

    By tailoring your ingredients, you can cater to various preferences while maintaining the dish’s healthful profile, ensuring that it fits seamlessly into your collection of healthy dinner recipes.

    How to Prepare the Perfect This Healthy Potato Side Dish Will Change Your Life!: Step-by-Step Guide

    Preparation of this healthy potato side dish is simple, yet the outcome is nothing short of spectacular. Let’s delve into the step-by-step process to ensure you achieve the best results.

    1. Prepare the Base: Start by preheating your oven to 425°F (220°C). While the oven heats, scrub the potatoes under cold water to remove any dirt. Once clean, chop them into even-sized cubes (about 1 inch) for uniform cooking.

    2. Season the Potatoes: Place the chopped potatoes into a large mixing bowl. Drizzle with 2 tablespoons of olive oil and add minced garlic, salt, and black pepper. Toss to coat the potatoes evenly with the seasoning.

    3. Add Fresh Herbs: Gently fold in the chopped fresh herbs of your choice. This step will infuse the potatoes with vibrant flavors that brightens the dish.

    4. Transfer to Baking Sheet: Line a baking sheet with parchment paper for easy cleanup. Spread the seasoned potatoes in a single layer, ensuring they’re not crowded. This allows for even roasting and crispy edges.

    5. Bake the Potatoes: Place the baking sheet in the oven and bake for 25-30 minutes. Halfway through, stir the potatoes to ensure they brown evenly. They should be golden and tender when finished.

    6. Final Touches: Once out of the oven, give the potatoes a quick taste and adjust the seasoning if necessary. A sprinkle of extra herbs or a dash of lemon juice can elevate the flavors even further.

    7. Serve and Enjoy: Serve these healthy potato delights as a side dish with your favorite entrées. They pair beautifully with grilled vegetables, fish, or chicken.

    With every step, you have the opportunity to adapt the recipe for various dietary needs, bringing versatility to your healthy dinner recipes banquet.

    Mastering This Healthy Potato Side Dish Will Change Your Life!: Advanced Tips and Variations

    Once you’ve mastered the basics, consider experimenting with these advanced tips and variations to keep your healthy potato dish exciting:

    1. Herb Mix: Try using different herb mixes like Herbes de Provence or a spicy blend to change the flavor profile dramatically.

    2. Cheesy Twist: For those who can have dairy, sprinkling some grated Parmesan cheese before the last few minutes of baking adds a wonderful umami flavor.

    3. Mouthwatering Stovetop Version: If you’re short on time, sauté the potatoes in a skillet on medium heat, adding a splash of broth or water to steam them for about 15-20 minutes.

    4. Squeeze of Citrus: Finish the dish with a squeeze of fresh lemon or lime, which will brighten the flavors and offer a fresh, zesty taste.

    5. Add-ins for More Nutrition: Consider tossing in other veggies like bell peppers, zucchini, or carrots during the last 10 minutes of baking for added color and nutrients.

    By thinking outside the box and modifying the recipe to your taste, you can easily incorporate this dish into your repertoire of healthy dinner recipes that your friends and family will love.

    How to Store This Healthy Potato Side Dish Will Change Your Life!: Best Practices

    To keep your healthy potato side dish fresh and delicious, follow these storage guidelines:

    • Refrigeration: Allow the potatoes to cool completely before transferring them to an airtight container. They can be stored in the refrigerator for up to 3-5 days.

    • Freezing: If you want to freeze leftovers, let the dish cool before portioning it into freezer-safe containers. Label with dates, and your healthy potato dish can last in the freezer for up to 2-3 months.

    • Reheating: To reheat, thaw frozen potatoes in the refrigerator overnight. Then, warm them in the oven at 375°F (190°C) for about 10-15 minutes, or microwave them for quicker results. For best texture, reheating in the oven allows the potatoes to regain their crispy edges.

    Following these storage methods ensures that your healthy potato side dish will hold onto its flavor and texture, making it an easy addition to your collection of healthy dinner recipes.

    Nutritional Value of This Healthy Potato Side Dish Will Change Your Life!

    Understanding the nutritional value of your meals can significantly impact your diet. Here’s a breakdown of the key nutrients found in this healthy potato side dish:

    • Calories: Approximately 150-200 calories per serving, depending on the oil used and additional ingredients.
    • Total Fat: Around 7 grams, primarily from healthy fats in the olive oil.
    • Carbohydrates: Roughly 30 grams, providing energy and sustaining you throughout the day.
    • Protein: About 3 grams per serving, useful for muscle repair and building.
    • Fiber: Around 3-4 grams, which aids in digestion and helps you feel full longer.
    • Vitamins and Minerals: Rich in vitamin C, potassium, and vitamin B6, these nutrients support immune health and energy levels.

    By including this healthy potato dish into your lineup of healthy dinner recipes, you’ll not only enjoy great flavors but also assure yourself of vital nutrients that nourish your body.

    FAQs: Frequently Asked Questions About This Healthy Potato Side Dish Will Change Your Life!

    Can I use other types of potatoes?

    Absolutely! While russet and Yukon gold potatoes give the best texture, feel free to experiment with sweet potatoes or red potatoes for a different taste.

    Is this dish suitable for meal prep?

    Yes! This healthy potato side dish stores well in the refrigerator and can be portioned out for easy meal planning throughout the week.

    What’s the best way to reheat leftover potatoes?

    For the best texture, reheat in the oven. If you’re short on time, the microwave works as well, though it may not retain the crispy edges.

    Can I make this dish ahead of time?

    Yes, you can prepare the dish ahead and store it in the refrigerator. If you prefer, prep the ingredients and season them the night before and bake them just before serving.

    How can I make this dish even healthier?

    Feel free to limit the amount of oil used, or substitute with a lighter option such as vegetable broth for sautéing. Add more vegetables to boost fiber and micronutrient content.

    By answering these common queries, you can feel even more confident about incorporating this healthy potato side dish into your everyday cooking as one of your go-to healthy dinner recipes.


    Armed with this comprehensive guide, you’re ready to create a healthy potato side dish that not only transforms your meals but also keeps you on track with your health goals. Enjoy the journey of cooking and the delights it brings!

  • Quick Cashew Pea Salad

    Quick Cashew Pea Salad

    Quick Cashew Pea Salad: A Tropical Delight

    Introduction to Quick Cashew Pea Salad

    Are you looking for a fresh and delightful dish that can be made in a jiffy? The Quick Cashew Pea Salad is here to satisfy your cravings while also catering to your dietary needs. Packed with vibrant colors and flavors, this salad isn’t just your ordinary side dish; it’s a wholesome and nourishing option that fits perfectly within the realm of healthy recipes. Whether you’re a busy parent trying to whip up a quick meal, a student who needs a nutritious snack, or someone who simply enjoys vibrant flavors, this recipe is tailored for you.

    One of the most appealing aspects of this salad is its simplicity. With just a handful of fresh ingredients, you can create a dish that is not only pleasing to the eye but also packed with vital nutrients. It is a wonderful blend of sweet peas and crunchy cashews, making for a delightful texture that can complement any meal. Plus, this salad is suitable for various dietary preferences: it’s vegan, gluten-free, and low-calorie, making it an inclusive choice for your gatherings or everyday meals.

    This versatile salad is ideal not just for lunch or dinner but also as a quick snack and pairs nicely with grilled dishes, sandwiches, or wraps. In addition, it’s a fantastic option for potlucks or road trips. So grab your mixing bowl and let’s explore how to make this delicious Quick Cashew Pea Salad!

    Benefits and Advantages of Quick Cashew Pea Salad

    The Quick Cashew Pea Salad stands out not only for its flavor but also for its numerous health benefits and easy preparation. In today’s fast-paced world, finding quick yet healthy recipes can be challenging, but this salad offers convenience without compromising nutrition.

    Easy to Prepare

    One of the most significant advantages of this salad is its straightforward preparation. You won’t need to spend hours in the kitchen. Simply mix the ingredients, and you’re ready to enjoy. This makes it an excellent choice for busy individuals and families who want to eat healthily but lack time for elaborate meal prep.

    Rich in Nutrients

    This salad is a powerhouse of nutrients. Sweet peas are rich in protein, fiber, and essential vitamins like A, C, and K. Cashews not only add an appealing crunch but are also packed with healthy fats, such as omega-3 fatty acids, which can promote heart health. Together, these ingredients create a nutrient-dense dish that supports brain function and enhances physical performance.

    Vegan and Gluten-Free

    If you or your family members have dietary restrictions, this salad checks all the boxes. It is vegan-friendly, meaning no animal products are used, making it suitable for vegetarians and vegans alike. For those who are gluten-sensitive, this dish is also gluten-free. By choosing ingredients carefully, you can make this salad fit various dietary preferences, whether you’re following a keto diet or keeping your meals plant-based.

    Suitable for Any Occasion

    The Quick Cashew Pea Salad is incredibly versatile. Based on your preference, it can serve as a light lunch, a side dish for dinner, or even a picnic snack. Its colorful appeal makes it a fantastic addition to any table setting, ensuring it will be a delightful dish to share with friends and family.

    Ingredients Overview

    Essential Ingredients for Quick Cashew Pea Salad

    Here’s what you’ll need to make your own Quick Cashew Pea Salad:

    • 1 cup sweet peas (fresh or frozen) – Provides vitamins, minerals, and fiber.
    • 1 cup cashews (raw or roasted) – Adds protein and healthy fats.
    • 1/2 cup red bell pepper (diced) – Rich in vitamin C and adds a lovely crunch.
    • 1/4 cup red onion (finely chopped) – Offers flavor and health benefits.
    • 1/4 cup fresh cilantro (chopped) – Adds freshness and aids digestion.
    • 2 tablespoons olive oil – Healthy fat that aids in nutrient absorption.
    • 2 tablespoons lemon juice – Provides acidity and vitamin C.
    • Salt and pepper to taste – Enhances flavor.

    These ingredients form a brilliant combination for a light yet satisfying salad. The recipe is naturally low in calories while providing essential nutrients.

    Dietary Substitutions to Customize Your Quick Cashew Pea Salad

    While this salad is inherently nutritious, personalizing it based on dietary preferences can take it to the next level. Here are some substitution suggestions:

    • Cashews: If you’re allergic to nuts, consider replacing cashews with seeds, such as sunflower or pumpkin seeds. These options will still give you the crunch and nutrients.

    • Sweet Peas: If fresh peas are not available, canned peas can be a quick substitute, though ensure they are rinsed well. Alternatively, you can opt for edamame for a fun twist, as they’re also rich in protein.

    • Olive Oil: For a different flavor, you may use avocado oil or apple cider vinegar. Both provide healthy fats and enhance the flavor profile.

    • Veggies: Customize by adding other vegetables like chopped cucumber or cherry tomatoes for a refreshing twist.

    By adjusting these ingredients, individuals can cater to various dietary restrictions without losing the essence of the dish.

    How to Prepare the Perfect Quick Cashew Pea Salad: Step-by-Step Guide

    Creating the Quick Cashew Pea Salad is easier than you might think! Just follow these steps:

    1. Prepare the Base: Start by rinsing the sweet peas if they are fresh. If using frozen peas, thaw them under warm water for a few minutes. Set them aside.

    2. Chop the Vegetables: Next, chop the red bell pepper and red onion into small, bite-sized pieces. Finely chop the fresh cilantro and set them aside.

    3. Mix Ingredients: In a large mixing bowl, combine all the prepared vegetables (sweet peas, bell pepper, red onion, and cilantro).

    4. Prepare the Dressing: In a small bowl, whisk together the olive oil, lemon juice, salt, and pepper. Adjust the seasoning to your taste.

    5. Combine Dressing and Salad: Pour the dressing over the mixed ingredients and toss everything together until well combined.

    6. Add Cashews: Gently fold in the cashews, making sure they are evenly distributed throughout the salad.

    7. Chill: Refrigerate the salad for at least 15-30 minutes before serving. This allows the flavors to meld beautifully.

    8. Serve: Serve chilled or at room temperature. Garnish with extra cilantro or cashews for added flair!

    Adapting for Dietary Needs

    Throughout the steps, consider using different oils or dressings based on your dietary needs. For a vegan dressing, consider a tahini-based sauce or omit the oil for a lighter version.

    Mastering Quick Cashew Pea Salad: Advanced Tips and Variations

    To elevate your Quick Cashew Pea Salad, here are some tips and variations:

    • Add Protein: For a more filling meal, consider adding grilled chicken, tofu, or chickpeas to create a well-rounded dish.

    • Spicy Kick: If you enjoy a bit of heat, include diced jalapeños or a sprinkle of cayenne pepper for an extra zing.

    • Make it a Meal: Serve the salad on a bed of greens like spinach or kale to transform it into a hearty meal.

    • Explore Textures: Experiment with roasted cashews instead of raw for a deeper flavor and crunch.

    • Herb Variations: Instead of cilantro, try basil or parsley for a different aromatic profile.

    Each of these variations ensures your salad remains exciting, so feel free to mix and match.

    How to Store Quick Cashew Pea Salad: Best Practices

    When it comes to storing your Quick Cashew Pea Salad, follow these best practices to keep it fresh:

    • Refrigeration: If you have leftovers, store them in an airtight container in the fridge. This salad is best enjoyed within three days of preparation.

    • Freezing: While this salad is not ideal for freezing due to its fresh ingredients, if you want to prepare it ahead, freeze the peas and cashews separately. You can mix them when you are ready to enjoy the salad.

    • Reheating: For those who choose to add cooked proteins, ensure they are reheated properly before mixing them with the salad.

    By following these storage guidelines, you can extend the life of your delicious salad, ensuring it’s a go-to option even for busy days.

    Nutritional Value of Quick Cashew Pea Salad

    Understanding the nutritional value of your dish is crucial, especially when considering healthy recipes. Here’s a breakdown of the approximate nutritional content per serving of the Quick Cashew Pea Salad:

    • Calories: 220
    • Protein: 8 grams
    • Fat: 15 grams (with healthy fats from olive oil and cashews)
    • Carbohydrates: 22 grams
    • Fiber: 6 grams
    • Sugars: 4 grams (naturally occurring from peas and bell peppers)
    • Vitamin A: 25% of RDA
    • Vitamin C: 30% of RDA
    • Iron: 10% of RDA

    With this salad, you’re getting a great mix of healthy fats, fiber, and essential vitamins, making it a smart choice for maintaining a balanced diet.

    FAQs: Frequently Asked Questions About Quick Cashew Pea Salad

    1. Can I add other nuts instead of cashews?
    2. Yes, you can substitute cashews with walnuts, pecans, or seeds like sunflower or pumpkin for added crunch and variation.

    3. How can I make this salad low-calorie?

    4. To reduce calories, you can use less olive oil and opt for a vinegar-based dressing. Additionally, you might want to limit the amount of cashews.

    5. Is it possible to omit the onions?

    6. Absolutely! If you’re sensitive to onions or just prefer not to include them, feel free to leave them out.

    7. How long does the salad last in the fridge?

    8. The salad can last up to three days in the refrigerator when stored properly in an airtight container.

    9. Can I prepare this salad in advance?

    10. You can prep the ingredients ahead of time but combine the salad with the dressing just before serving for the best flavor and texture.

    In conclusion, the Quick Cashew Pea Salad embodies the essence of healthy recipes with its vibrant ingredients, easy preparation, and versatility. Whether you are hosting friends or just want a nutritious lunch, this salad is a fantastic addition to your culinary repertoire. So, gather your ingredients and start mixing—you won’t be disappointed!

  • Easy Creamy Sour Cream Potato Salad

    Easy Creamy Sour Cream Potato Salad

    Easy Creamy Sour Cream Potato Salad: A Tropical Delight

    Introduction to Easy Creamy Sour Cream Potato Salad

    Are you looking for a simple, delicious side dish that can elevate any meal? Look no further than our Easy Creamy Sour Cream Potato Salad! This recipe is not only easy to prepare, but it also shines with flavor, making it a perfect accompaniment for summer barbecues, picnics, or family dinners. Within minutes, you’ll have a creamy, hearty potato salad that everyone will adore.

    What makes this dish even more appealing is its versatility. Whether you are a busy parent looking for quick meal solutions, a student living on a budget, or a health-conscious individual, this sour cream potato salad can cater to your dietary needs. The use of fresh ingredients ensures that every bite is nutritious and satisfying. Plus, with its combination of creamy texture and savory flavors, this dish can easily compete with potato soup as a comforting favorite.

    Crafted with a blend of sour cream, spices, and crunchy vegetables, it’s a dish that is not only fulfilling but also light on the stomach. Moreover, the salad can be modified for various dietary needs, making it suitable for almost everyone. With just a few ingredients, you can create a potato salad that’s rich in flavor but doesn’t weigh you down. Let’s explore how to whip up this delightful dish that’s sure to leave your taste buds dancing!

    Benefits and Advantages of Easy Creamy Sour Cream Potato Salad

    Easy Creamy Sour Cream Potato Salad stands out for several reasons. Firstly, it’s incredibly easy to prepare, requiring minimal cooking skills and just a handful of ingredients. You don’t need to be a culinary expert to create a dish that impresses family and friends. Secondly, this potato salad offers notable health benefits. Made with wholesome potatoes, it provides essential nutrients like vitamins C and B6, potassium, and dietary fiber.

    Many people love this salad because it’s packed with flavor but doesn’t rely on heavy mayonnaise. Instead, the creamy sour cream provides the perfect consistency and tang, making for a delightful experience in every bite. Additionally, if you opt for low-fat sour cream or yogurt, you can make this dish even more diet-friendly while still enjoying its rich flavors.

    Moreover, this recipe is highly adaptable. Want to make it vegan? Simply substitute the sour cream with a dairy-free alternative, such as cashew cream or coconut yogurt. Gluten-free? No problem! This recipe is naturally gluten-free, allowing you to enjoy it without worry.

    As a side dish or even a light meal on its own, Easy Creamy Sour Cream Potato Salad is a fantastic choice for busy professionals, students, and anyone cooking on a tight schedule. Its versatility makes it fitting for all occasions, whether you’re serving it at a family gathering, a potluck, or a backyard barbecue. The vibrant colors of the vegetables create an appealing presentation, making this dish as attractive as it is delicious. So, let’s dive deeper into the specifics of ingredients and how to prepare this scrumptious salad!

    Ingredients Overview

    Essential Ingredients for Easy Creamy Sour Cream Potato Salad

    To make the Easy Creamy Sour Cream Potato Salad, you will need the following ingredients:

    Potato Salad Ingredients:

    • 2 pounds of potatoes (Yukon Gold or red-skinned, peeled and cubed)
    • Potatoes provide the creamy base for the salad and are a source of complex carbohydrates.

    • 1 cup sour cream (can be substituted with low-fat or dairy-free options for healthier choices)

    • Sour cream adds creaminess and a slight tang, elevating the flavor.

    • 1/2 cup mayonnaise (optional, use vegan mayo for vegan options)

    • For those seeking an extra creamy consistency.

    • 1 cup celery (finely chopped)

    • Celery adds crunch and freshness, enhancing the overall texture.

    • 1/2 cup red onions (finely chopped)

    • Onions provide a mild sharpness that complements the creamy dressing.

    • 2 tablespoons Dijon mustard

    • Mustard adds a tangy kick and depth of flavor.

    • Salt and pepper (to taste)

    • Essential seasonings that enhance the overall flavor of the salad.

    • Fresh herbs (such as dill or parsley, chopped for garnish)

    • Herbs contribute fresh aromas and flavors, brightening the dish.

    Dietary Substitutions to Customize Your Easy Creamy Sour Cream Potato Salad

    This potato salad can be easily customized to meet different dietary needs. Consider these substitutions:

    • Vegan Option: Use dairy-free sour cream or yogurt.

    • Gluten-Free Option: The recipe is naturally gluten-free; just ensure that any additional toppings or dressings are also gluten-free.

    • Low-Calorie Option: Swap out full-fat sour cream for low-fat or Greek yogurt to reduce calories while maintaining creaminess.

    • Herb Alternatives: Feel free to experiment with different herbs, like chives or cilantro, to alter the flavor profile.

    This flexibility allows everyone at your table to enjoy this delightful dish, making it perfect for various dietary restrictions.

    How to Prepare the Perfect Easy Creamy Sour Cream Potato Salad: Step-by-Step Guide

    Making the Easy Creamy Sour Cream Potato Salad is a straightforward process, so even novice cooks can achieve greatness. Follow these simple steps for a stellar side dish:

    1. Prepare the Potatoes:

    • Start by cleaning and peeling the potatoes. Cut them into even-sized cubes to ensure uniform cooking.
    • Place the cubed potatoes in a large pot and cover them with cold water. This step helps to avoid oxidation.

    2. Cook the Potatoes:

    • Bring the pot to a boil over high heat. Once boiling, add a generous pinch of salt.
    • Reduce the heat and let the potatoes simmer for about 15 minutes, or until they are fork-tender but not mushy. This quality is crucial for a great salad.

    3. Drain and Cool:

    • Drain the cooked potatoes and allow them to cool. It’s important to let them cool completely to prevent the dressing from becoming watery.

    4. Mix the Dressing:

    • In a separate mixing bowl, combine the sour cream, mayonnaise (if using), Dijon mustard, salt, and pepper.
    • Whisk together until smooth and creamy. Adjust the seasonings according to your taste.

    5. Combine Ingredients:

    • Once the potatoes are cool, gently fold them into the dressing. The aim here is to coat the potatoes thoroughly while keeping them intact.
    • Add chopped celery and red onions to the mixture for added crunch and flavor.

    6. Incorporate Fresh Herbs:

    • If you’re using herbs, incorporate them at this stage. Fresh herbs bring brightness to the dish, enhancing the overall flavor profile.

    7. Chill the Salad:

    • Cover the bowl with plastic wrap or transfer the salad to an airtight container. Refrigerate for at least 30 minutes to let the flavors meld together.

    8. Serve:

    • Before serving, give the salad a quick stir and adjust any seasoning if necessary. Garnish with extra fresh herbs if desired. This dish pairs beautifully with grilled meats, sandwiches, or even as a light meal on its own.

    Additional Tips:

    • If you’re pressed for time, consider using pre-cooked potatoes available in some grocery stores.
    • For added texture, you can toss in cooked bacon or hard-boiled eggs for an extra protein punch.

    By following these steps, you’ll master the perfect Easy Creamy Sour Cream Potato Salad that your family and friends will rave about!

    Mastering Easy Creamy Sour Cream Potato Salad: Advanced Tips and Variations

    Now that you have the basic recipe down, you can experiment further with these advanced tips and variations for a personalized touch:

    • Spicy Kick: Add diced jalapeños or a dash of hot sauce if you enjoy a bit of heat in your salads.

    • Cheesy Delight: Fold in shredded cheddar or blue cheese for an indulgent twist on the classic recipe.

    • Vegetable Boost: Incorporate other vegetables like bell peppers, peas, or grated carrots for added nutrition and color.

    • Fruitiness: Experiment with diced apples or grapes for a sweet contrast against the savory flavors.

    Each of these variations can add a unique twist to your Easy Creamy Sour Cream Potato Salad, ensuring that every time you make it, it feels fresh and exciting.

    How to Store Easy Creamy Sour Cream Potato Salad: Best Practices

    Storing your Easy Creamy Sour Cream Potato Salad properly helps retain its flavors and textures. Here are some best practices:

    • Refrigeration: Store the salad in an airtight container in the refrigerator. It will keep well for about 3 to 5 days. Before serving leftovers, stir the salad thoroughly as some separation may occur.

    • Freezing: While it is generally not recommended to freeze potato salad due to the texture changes that may occur, you can freeze only the potato mixture without dressing. When you’re ready to serve again, simply thaw and mix with freshly prepared dressing.

    • Reheating: If you do choose to warm the dish, be mindful not to overheat it. Gently reheat it in a microwave or on the stove, adding a splash of additional sour cream if necessary to keep it creamy is encouraged.

    Taking these storage steps into consideration ensures that you can enjoy your potato salad over multiple meals without sacrificing taste or texture.

    Nutritional Value of Easy Creamy Sour Cream Potato Salad

    Understanding the nutritional value of your dishes is essential, especially when preparing healthy meals. Here’s a breakdown of the approximate nutritional content per serving (1 cup):

    • Calories: 250-300
    • Protein: 4.5g
    • Fat: 12g
    • Saturated Fat: 4g
    • Carbohydrates: 36g
    • Fiber: 3g
    • Sugar: 1g

    This potato salad provides a good balance of nutrients while being relatively low in calories, particularly when made with lighter options. The dish’s high fiber content from potatoes and vegetables makes it filling, while the inclusion of low-fat ingredients can help maintain a health-conscious approach.

    FAQs: Frequently Asked Questions About Easy Creamy Sour Cream Potato Salad

    1. Can I make this salad in advance?

    Yes! This salad can be made a day ahead of time. It actually tastes better when allowed to sit, as the flavors have time to meld.

    2. What kind of potatoes should I use?

    Yukon Gold or red-skinned potatoes are best for potato salad due to their creamy texture. Avoid using starchy potatoes like russets, which become mushy.

    3. Can I make this recipe vegan?

    Absolutely! Simply substitute the dairy sour cream with a plant-based alternative, such as almond or coconut yogurt.

    4. Is this salad gluten-free?

    Yes! The recipe is naturally gluten-free. Just ensure that any additional dressings you might use are also gluten-free.

    5. What can I serve with potato salad?

    This creamy potato salad pairs wonderfully with grilled meats, sandwiches, and even veggie burgers. It’s also excellent as a standalone light meal.

    6. How do I know when my potatoes are done cooking?

    Your potatoes are ready when they can be easily pierced with a fork but remain intact. Avoid overcooking to maintain their structure.

    By addressing these common questions, you can ease any concerns potential cooks might have about trying the recipe for the Easy Creamy Sour Cream Potato Salad. You’ll be ready to whip up this dish in no time, and your family and friends will be asking for seconds!

    In conclusion, the Easy Creamy Sour Cream Potato Salad is not just a side dish; it’s a delightful culinary experience. With its simplicity, health benefits, and adaptability, this recipe is bound to become a staple in your cooking repertoire. Whether you’re serving it for a casual lunch or a festive gathering, every bite will transport you to a tropical paradise of flavors. Enjoy your cooking adventure!

  • Easy Shrimp Spring Rolls Fresh Healthy Appetizer

    Easy Shrimp Spring Rolls Fresh Healthy Appetizer

    Easy Shrimp Spring Rolls Fresh Healthy Appetizer: A Tropical Delight

    Introduction to Easy Shrimp Spring Rolls Fresh Healthy Appetizer

    If you’re looking for a delicious and refreshing appetizer, Easy Shrimp Spring Rolls Fresh Healthy Appetizer might just be the perfect dish for you. Bursting with vibrant flavors and a crunch, these spring rolls are not only easy to prepare but are also an excellent choice for health-conscious individuals. This delectable recipe is a terrific way to incorporate shrimp into your meals, making it a fantastic addition to your collection of shrimp recipes.

    These spring rolls are ideal for any occasion, from casual family dinners to elegant gatherings. They offer a delightful combination of fresh shrimp, crispy vegetables, and aromatic herbs, all wrapped in delicate rice paper. Each bite is a perfect marriage of texture and taste. Plus, they are very adaptable—whether you’re gluten-free, following a vegan diet, or simply looking for a low-calorie appetizer, this recipe has got you covered. By using fresh ingredients, you can enjoy a satisfying, nutrient-rich dish that aligns perfectly with a variety of dietary preferences.

    Get ready to impress your family and friends with this simple yet stunning appetizer. With such a balanced combination of protein, vitamins, and healthy fats, not only will you be tantalizing your taste buds, but also nourishing your body. So, let’s dive in and discover the enjoyable process of crafting these incredible shrimp spring rolls!

    Benefits and Advantages of Easy Shrimp Spring Rolls Fresh Healthy Appetizer

    The Easy Shrimp Spring Rolls Fresh Healthy Appetizer offers a plethora of benefits that make it a standout dish. One of the key factors is its simplicity. With just a handful of ingredients and straightforward preparation methods, even busy parents or novice cooks can whip up this dish in no time. There’s no intricate cooking needed—raw shrimp, fresh vegetables, and rice paper come together seamlessly to create a mouth-watering appetizer.

    Health Benefits

    These spring rolls are undeniably a health-conscious choice. Shrimp is a lean protein source, low in calories and high in nutrients. Rich in omega-3 fatty acids, shrimp can support heart health while playing a role in brain function. Pairing shrimp with fresh vegetables like carrots, cucumbers, and bell peppers adds fiber, vitamins, and minerals to your meal, enhancing its overall nutritional value. Furthermore, this dish is a glorious way to incorporate more plant-based foods into your diet. You can easily customize the ingredients to suit different dietary preferences and needs.

    Variety for Everyone

    The versatility of this appetizer makes it suitable for countless occasions. Whether you’re entertaining friends, preparing a family meal, or seeking a quick lunch, shrimp spring rolls fit the bill perfectly. Gluten-free and vegan options are easily attainable, allowing everyone to enjoy this dish. By simply swapping out specific ingredients—like using tofu instead of shrimp—you can create a completely new dish that caters to vegetarians or those avoiding gluten.

    Overall, Easy Shrimp Spring Rolls are a fantastic choice that provides endless opportunities for creativity in the kitchen. With their combination of health, taste, and visual appeal, these rolls are sure to become a favorite in your home and featured prominently in your shrimp recipes collection.

    Ingredients Overview

    Essential Ingredients for Easy Shrimp Spring Rolls Fresh Healthy Appetizer

    To create your own batch of these delightful shrimp spring rolls, gather the following essential ingredients:

    • Shrimp: 1 pound of medium or large shrimp, peeled and deveined.
      Purpose: The primary protein source, rich in nutrients and flavor.

    • Rice Paper Wrappers: 10-12 sheets.
      Purpose: The outer layer, providing a delicate and chewy texture.

    • Fresh Vegetables (Julienned):

    • 1 medium carrot, peeled and julienned
      Purpose: Adds crunch and sweetness.
    • 1 cucumber, julienned
      Purpose: Refreshing and hydrating component.
    • 1 bell pepper, any color, thinly sliced
      Purpose: Enhances flavor and texture.

    • Fresh Herbs:

    • ½ cup of fresh cilantro, roughly chopped
      Purpose: Brightens the dish with fresh flavor.
    • ½ cup of fresh mint or basil (optional)
      Purpose: Offers aromatic notes and additional flavor variety.

    • Lettuce Leaves: 5-6 large leaves (butter or romaine).
      Purpose: Adds volume and a crunchy texture.

    • Dipping Sauce:

    • ¼ cup peanut sauce or hoisin sauce
      Purpose: Complements the spring rolls with rich flavor.

    • Cooking Equipment:

    • A wide and shallow bowl (for soaking rice papers)
    • A large cutting board
    • A sharp knife for cutting veggies

    Dietary Substitutions to Customize Your Easy Shrimp Spring Rolls Fresh Healthy Appetizer

    While the above list offers a great baseline for your spring rolls, it is easy to customize based on dietary preferences or available ingredients. Here are some substitutions:

    1. Vegan Option: Replace shrimp with baked tofu or marinated tempeh for a plant-based protein that still packs a punch.

    2. Gluten-Free Option: Ensure your dipping sauce is gluten-free or use a homemade sauce made with coconut aminos instead of soy sauce.

    3. Extra Veggies: Feel free to add in additional vegetables such as avocado, sprouts, or shredded cabbage for enhanced texture and nutrition.

    4. Herb Variations: If you’re not a fan of cilantro, parsley or chives can be lovely substitutes, maintaining the fresh taste.

    5. Spice it Up: For those who enjoy a little heat, adding thin slices of jalapeños or a dash of Sriracha to your dipping sauce can elevate the flavor.

    These alternatives allow you to enjoy the spring rolls regardless of dietary constraints while ensuring everyone can partake in the delightful goodness of this versatile dish.

    How to Prepare the Perfect Easy Shrimp Spring Rolls Fresh Healthy Appetizer: Step-by-Step Guide

    Now, let’s get down to the fun part—preparing your Easy Shrimp Spring Rolls! Follow these simple steps to assemble your fresh and tasty appetizer.

    1. Prepare the Shrimp:
      Begin by boiling a pot of water. Add the peeled and deveined shrimp and cook for about 2-3 minutes until they turn pink and opaque. Remove and let them cool before slicing them in half lengthwise, making them easier to roll.

    2. Soak the Rice Paper:
      Fill a shallow bowl with warm water. Dip one rice paper wrapper into the warm water for about 10-15 seconds or until it becomes soft and pliable. Remove from water and place it on a clean cutting board.

    3. Layer Your Ingredients:
      On the lower third of the softened rice paper, place a small piece of lettuce, followed by a few slices of shrimp, a small handful of julienned vegetables (carrot, cucumber, and bell pepper), and a couple of herb leaves.

    4. Roll It Up:
      To roll, fold the bottom of the rice paper over the filling, then fold in the sides snugly and continue rolling until you reach the top. Ensure that it’s tightly wrapped. Repeat this process for the remaining rice paper wrappers and filling.

    5. Make the Dipping Sauce:
      While assembling the rolls, you can prepare the dipping sauce. Mix your chosen sauce in a bowl and adjust for flavor; for example, adding a bit of water to thin it or lime juice for tang.

    6. Serve and Enjoy:
      Arrange the spring rolls on a serving platter and serve them with your dipping sauce. You can garnish with additional herbs for presentation.

    Serving Tips:

    • Keep the spring rolls covered with a damp cloth or plastic wrap until ready to serve to maintain their softness.
    • Consider serving these alongside other Asian-style appetizers for a delightful spread.

    By following these steps, you’ll create a beautiful and delicious appetizer that showcases your culinary skills while keeping health in mind. The potential for customization means you can adapt this recipe further to suit your taste or dietary requirements.

    Mastering Easy Shrimp Spring Rolls Fresh Healthy Appetizer: Advanced Tips and Variations

    Once you’ve mastered the basics, here are additional tips and delightful variations to enhance your spring rolls experience.

    1. Presentation Matters:
      Consider cutting the spring rolls in half to showcase the beautiful colors of the ingredients. This step can make the dish more visually appealing, especially when serving at parties.

    2. Add Texture:
      To incorporate additional crunch, include roasted nuts or seeds inside the roll or as a topping on your dipping sauce. Chopped peanuts or sesame seeds can add a delightful finishing touch.

    3. Flavor Infusion:
      For added flavor, marinate the shrimp in a bit of garlic, lime juice, and fish sauce or soy sauce before cooking. This step will elevate the taste of its main ingredient even further.

    4. Creative Dipping Sauces:
      Although peanut or hoisin sauce works wonderfully, try experimenting with other sauces like a sesame ginger dressing or a sweet chili sauce for an interesting twist.

    5. Utilize Seasonal Ingredients:
      Don’t hesitate to switch up the vegetables based on what’s in season. Fresh asparagus or thinly sliced radish can bring a new flavor profile to your spring rolls.

    6. Make it a Meal:
      Transform your appetizer into a full meal by adding cooked rice noodles to the spring rolls for substance. They make the rolls more filling and provide extra texture.

    By playing with these variations and tips, you can personalize your shrimp spring rolls, continuously keeping them exciting and ensuring they never feel repetitive.

    How to Store Easy Shrimp Spring Rolls Fresh Healthy Appetizer: Best Practices

    If you have leftovers or want to prepare your shrimp spring rolls in advance, it’s essential to store them correctly to retain their freshness.

    Refrigeration:

    • Before Serving: Keep uncooked spring rolls in an airtight container layered between damp paper towels to prevent them from drying out. Consume them within a day or two for optimal freshness.
    • After Serving: Ensure any leftover cooked rolls are stored using the same method in the refrigerator. However, they tend to be best enjoyed fresh.

    Freezing:

    • If you want to extend their lifespan, you can freeze the uncooked shrimp spring rolls. To do so, lay them flat on a baking sheet lined with parchment paper, ensuring they don’t touch. Freeze until solid, then transfer to a freezer-safe bag. They can be frozen for up to three months.
    • When ready to enjoy, simply take them out and let them thaw in the refrigerator overnight before cooking.

    Reheating:

    • For reheating, it’s best to use a steaming method or briefly pan-fry them in a bit of oil. This approach can help retain their texture. However, once reheated, aim to consume them immediately to maintain their quality.

    Following these storage tips will help you get the most out of your Easy Shrimp Spring Rolls, making them a convenient option for future meals or entertaining.

    Nutritional Value of Easy Shrimp Spring Rolls Fresh Healthy Appetizer

    Understanding the nutritional value of your meals is crucial, especially when making conscious dietary choices. Here’s a breakdown of the nutritional content you can typically expect from a serving (about three spring rolls):

    • Calories: Approximately 150-200 calories
    • Protein: About 15-20g (depending on the amount of shrimp used)
    • Fat: 6-8g (mostly healthy fats from shrimp and optional nut-based sauces)
    • Carbohydrates: 20-25g (coming mostly from vegetables and rice paper)
    • Fiber: 2-4g (from fresh veggies)
    • Vitamins & Minerals: Rich in Vitamin A (from the carrots and herbs), calcium (from potential dipping sauces), and iron (from shrimp).

    Keep in mind that these figures can vary based on specific ingredient choices and portion sizes. Feel free to adjust the ingredients according to your nutritional needs and preferences. Feel confident that these spring rolls offer a balanced mix of proteins, greens, and healthy fats, making them a nutritious choice for your diet.

    FAQs: Frequently Asked Questions About Easy Shrimp Spring Rolls Fresh Healthy Appetizer

    1. Can I use frozen shrimp for this recipe?

    Yes, frozen shrimp can be used; just make sure to thaw them completely before cooking. Fresh shrimp can have a slightly better texture, but frozen is a great and convenient alternative.

    2. Can these spring rolls be made ahead of time?

    Absolutely! You can prepare your spring rolls a few hours ahead of serving. Just cover them with a damp cloth to keep them moist, or store them in an airtight container until you’re ready to serve.

    3. What if I don’t have rice paper wraps?

    If rice paper wraps aren’t available, you can use lettuce leaves or even tortilla wraps as alternatives. While they won’t provide the same texture, they can still create a great roll!

    4. Can I make these spring rolls vegan?

    Yes, simply substitute the shrimp for marinated tofu or tempeh, and you can enjoy a delicious vegan version of this dish.

    5. Is there a low-carb version of this recipe?

    You can create a low-carb version by eliminating the rice paper and using just vegetables like cucumbers and lettuce to wrap the filling.

    6. How do I prevent my spring rolls from sticking together?

    Ensure that the spring rolls are not touching each other when stored. Always layer them with parchment paper or damp cloths before placing them in a container.

    With these FAQs, you now have comprehensive insights that will support your kitchen endeavors, making Easy Shrimp Spring Rolls Fresh Healthy Appetizer a fun and versatile dish to master.

    In conclusion, these shrimp spring rolls are much more than just an appetizer; they represent a world of flavors, health benefits, and culinary creativity. With a few simple steps and fresh ingredients, anyone can prepare a dish that is not only enjoyable but also nutritious. Whether for a busy weeknight or a special gathering, this recipe has something to offer everyone. Dive into these delicious rolls and enjoy the burst of freshness with every bite!

  • Buttery Rhubarb Crisp Muffins

    Buttery Rhubarb Crisp Muffins

    Buttery Rhubarb Crisp Muffins: A Tropical Delight

    Introduction to Buttery Rhubarb Crisp Muffins

    Welcome to your next favorite recipe—Buttery Rhubarb Crisp Muffins! In the ever-evolving world of breakfast ideas, these delightful muffins stand out, providing a unique blend of flavor, health, and convenience. Not only are they incredibly easy to make, but they also incorporate the tangy freshness of rhubarb, a fruit often overlooked in baked goods.

    These muffins are perfect for busy parents looking to whip up a quick breakfast for their kids or for students seeking a nutritious snack between classes. The vibrant color and rich flavor of rhubarb make for a visually appealing and delicious addition to any breakfast spread. Including ingredients like oats and whole flour, these muffins are also a healthier choice. They’re suitable for many dietary preferences, including vegan and gluten-free options!

    Imagine starting your day with a warm muffin that not only satisfies your taste buds but also offers numerous health benefits. With the right balance of sweetness from a touch of sugar and tartness from the rhubarb, this recipe promises a delightful experience. So, gather your ingredients, preheat your oven, and let’s embark on this baking adventure together.


    Benefits and Advantages of Buttery Rhubarb Crisp Muffins

    Buttery Rhubarb Crisp Muffins offer a plethora of advantages that set them apart from ordinary breakfast ideas. Here, we’ll explore why these muffins are not only delicious but also a smart choice for various lifestyles.

    1. Simplicity: One of the greatest advantages of this recipe is its straightforward preparation. Even beginner bakers can achieve bakery-quality results with minimal effort. The step-by-step instructions are designed to guide you through the entire process, ensuring that you can enjoy these muffins without stress.

    2. Health Benefits: Rhubarb is often overlooked in discussions of healthy foods, yet it boasts numerous health benefits. Packed with vitamins K and C, as well as antioxidants, rhubarb is excellent for digestion and may even aid in weight loss. Additionally, substituting butter with healthier fats and using whole grain flour increases the muffins’ nutrient profile.

    3. Dietary Flexibility: Whether you’re vegan, gluten-free, or simply looking to cut down on sugar, this recipe can easily accommodate various dietary preferences. With simple substitutions, you can make this dish fit your needs. For instance, using almond flour in place of regular flour can yield a satisfying gluten-free option.

    4. Versatility: These muffins can serve as breakfast, a snack, or even a dessert! You can easily enjoy them at any time of the day, making them a convenient choice for busy individuals. Plus, you can personalize them with additional mix-ins like nuts or chocolate chips for an extra touch.

    5. Flexibility in Preparation: These muffins are also freezer-friendly, meaning that you can make a big batch ahead of time and have them on hand for last-minute breakfasts. All you have to do is pop one in the microwave for a minute, and you can enjoy a warm, comforting treat in seconds.

    By incorporating these muffins into your breakfast ideas, you’re not just offering a delicious treat; you’re also providing a health-conscious option that can easily adapt to fit your lifestyle.


    Ingredients Overview

    Essential Ingredients for Buttery Rhubarb Crisp Muffins

    To make your Buttery Rhubarb Crisp Muffins come to life, you’ll need the following ingredients:

    • 1 cup all-purpose flour (or gluten-free flour)
    • 1 cup rolled oats
    • 1 cup rhubarb, diced
    • ¾ cup brown sugar (or coconut sugar for a lower glycemic index)
    • ½ cup unsalted butter (or coconut oil for a vegan option)
    • 2 large eggs (or flax eggs for vegan option)
    • 1 teaspoon baking powder
    • ½ teaspoon baking soda
    • ½ teaspoon salt
    • 1 teaspoon vanilla extract
    • Zest of 1 lemon (for added flavor)

    By using high-quality ingredients, you not only enhance the flavor of your muffins but also their nutritional value. The oats add heartiness, while the rhubarb brings a tartness that balances perfectly with the sweetness of the sugar.

    Dietary Substitutions to Customize Your Buttery Rhubarb Crisp Muffins

    1. Gluten-Free Option: You can easily substitute regular flour with a gluten-free flour blend. Look for blends that include xanthan gum to help bind the ingredients.

    2. Vegan Option: Replace the eggs with flax eggs (1 tablespoon ground flaxseed mixed with 2.5 tablespoons of water, letting sit for a few minutes). Use coconut oil in place of butter to maintain that rich taste without dairy.

    3. Sugar Alternatives: For a lower caloric option, you can substitute brown sugar with Stevia or erythritol. Keep in mind that the sweetness of different sugar substitutes varies, so adjust to your taste.

    4. Add Extra Nutrients: Consider adding walnuts or pecans for a protein boost. You can also replace some of the flour with ground almonds to enhance the nutritional profile further.


    How to Prepare the Perfect Buttery Rhubarb Crisp Muffins: Step-by-Step Guide

    Now that we have our ingredients ready, it’s time to create these delicious muffins! Follow this step-by-step guide, perfect for both novice and seasoned bakers.

    1. Preheat the Oven: Set your oven to 350°F (175°C) to ensure it’s ready to bake those muffins to perfection.

    2. Prepare the Muffin Tin: Line a muffin tin with paper liners or lightly grease it to prevent sticking.

    3. Mix Dry Ingredients: In a large bowl, combine the flour, oats, baking powder, baking soda, and salt. Stir well to ensure everything is evenly distributed.

    4. Melt the Butter: In a small saucepan, melt the butter over medium heat. If you’re using coconut oil, melt it until it’s liquid, then let it cool slightly.

    5. Combine Wet Ingredients: In a separate bowl, mix together the brown sugar and melted butter (or coconut oil) until smooth. Add in the eggs (or flax eggs), vanilla extract, and lemon zest, mixing until well combined.

    6. Combine Wet and Dry Mixes: Pour the wet mixture into the dry ingredients, stirring gently until just combined. Be careful not to over-mix as it can result in dense muffins.

    7. Fold in Rhubarb: Lastly, gently fold in the diced rhubarb, ensuring it’s evenly distributed throughout the batter.

    8. Fill Muffin Tins: Using a scoop or your hands, fill each muffin liner about three-quarters full with batter. This allows enough room for them to rise without overflowing.

    9. Bake: Place the muffin tin in the preheated oven and bake for approximately 20-25 minutes, or until the tops are golden brown and a toothpick inserted into the center comes out clean.

    10. Cool: Once baked, remove the muffins from the oven and allow them to cool in the pan for about 5 minutes before transferring them to a wire rack to cool completely.

    Alternative methods can serve various dietary needs; for instance, if baking without eggs, the flax eggs will still help bind the mixture securely.


    Mastering Buttery Rhubarb Crisp Muffins: Advanced Tips and Variations

    While the base recipe is delicious, you might want to experiment with various enhancements and tips to truly master your Buttery Rhubarb Crisp Muffins.

    1. Top Off with a Streusel: For an added crunch, consider creating a streusel topping using oats, flour, a bit of sugar, and cold butter. Just sprinkle it on top of the batter before baking.

    2. Flavor Infusions: Enhance the flavor profile even further by adding spices such as cinnamon or nutmeg. These spices pair beautifully with the tartness of rhubarb, giving your muffins an aromatic touch.

    3. Additional Fruits: Mix in other fruits like strawberries or blueberries for added sweetness and color. Adjust the sugar down if you find the combination too sweet.

    4. Batch Cooking: These muffins freeze wonderfully. Prepare a double batch, let them cool completely, and store them in an airtight container in the freezer. When you’re ready for a muffin, simply reheat!

    5. Presentation: For special occasions, consider dusting your muffins with powdered sugar before serving, or drizzle a simple glaze made of powdered sugar and lemon juice over them for an impressive finish.

    Integrating these tips and variations into your baking routine will elevate your muffins from delightful to extraordinary as you explore new flavors and ideas.


    How to Store Buttery Rhubarb Crisp Muffins: Best Practices

    Proper storage of your Buttery Rhubarb Crisp Muffins is essential to maintaining their freshness and taste. Here’s how to keep your muffins tasty for days to come:

    1. Cooling: Always allow your muffins to cool completely before storage. This prevents condensation which can make them soggy.

    2. At Room Temperature: If you plan to eat them within a few days, store your muffins in an airtight container at room temperature. They should remain fresh for about 2-3 days.

    3. Refrigeration: If you want to keep them a little longer, store your muffins in the fridge. They can last up to a week when properly sealed.

    4. Freezing: For longer storage, wrap each muffin in plastic wrap, followed by aluminum foil, to prevent freezer burn. When you’re ready to eat, simply thaw them overnight in the refrigerator or pop them directly into the microwave for a quick thaw.

    These storage strategies will help ensure that your breakfast ideas stay fresh and ready to enjoy whenever you crave a muffin!


    Nutritional Value of Buttery Rhubarb Crisp Muffins

    Understanding the nutritional profile of your Buttery Rhubarb Crisp Muffins is key for those who are health-conscious. Here’s a breakdown of the nutrition for one muffin, considering the recipe makes 12 muffins:

    • Calories: Approximately 150-180 calories
    • Fat: 7-8 grams
    • Carbohydrates: 22-25 grams
    • Fiber: 2-3 grams
    • Protein: 3-4 grams
    • Sugars: 6-8 grams

    These muffins are not just delicious but also provide wholesome nutrients, making them an ideal part of your breakfast ideas. You can adjust ingredients, such as using less sugar or substituting healthier fats, to suit your dietary requirements.


    FAQs: Frequently Asked Questions About Buttery Rhubarb Crisp Muffins

    Q: Can I make this recipe without any sugar?
    A: Yes, you can substitute the sugar with alternatives like Stevia or a sugar-free sweetener. Just keep in mind that you may need to adjust the amount to suit your taste.

    Q: What can I substitute for rhubarb if I can’t find it?
    A: You can use similar tart fruits like cranberries or cherries. Adjust the sweetness according to the fruit you choose, as they may differ in glycemic index.

    Q: How long will the muffins last in the freezer?
    A: When properly wrapped, your muffins will last in the freezer for up to three months. Just remember to label them with the date!

    Q: Can I make these muffins without eggs?
    A: Absolutely! Flax eggs are a great alternative. Combine 1 tablespoon of ground flaxseed with 2.5 tablespoons of water, and let it sit for a few moments before using it in the recipe.

    Q: Can I add nuts to the muffins?
    A: Definitely! Chopped walnuts or pecans can add a nice crunch and boost the healthy fats. Just make sure not to overdo it—stick to about ½ cup.

    Q: Are these muffins suitable for kids?
    A: Yes! Kids often love the sweet and tangy flavor. You can reduce the sugar if preferred, and they’re great for breakfast ideas or snacks after school.

    By answering these frequently asked questions, I hope to provide clarity and encourage you to experiment with making Buttery Rhubarb Crisp Muffins your own!


    With every delicious bite of Buttery Rhubarb Crisp Muffins, you’ll find joy in elevating your breakfast game. This recipe is not only a treat for your taste buds but also a nourishing option for various dietary needs. So why wait? Gather your ingredients and start baking today!

  • I CanT Stop Making This Creamy Shrimp Pasta Dish

    I CanT Stop Making This Creamy Shrimp Pasta Dish

    I Can’T Stop Making This Creamy Shrimp Pasta Dish: A Tropical Delight

    Introduction to I Can’T Stop Making This Creamy Shrimp Pasta Dish

    Are you searching for a delightful and uncomplicated meal that will impress your family and friends? Look no further! This creamy shrimp pasta dish is not only a quick recipe but also incredibly versatile, making it ideal for a variety of dietary needs. Packed with fresh ingredients, this dish offers a satisfying meal that is both indulgent and healthy. Whether you are a busy parent, a student, or just someone who loves shrimp recipes, this creamy shrimp pasta can come to your rescue.

    Imagine succulent shrimp bathed in a luscious, velvety sauce, perfectly coating your favorite pasta while offering a burst of flavor in every bite. This recipe supports a healthy lifestyle by providing essential proteins and nutrients from the shrimp and other ingredients, ensuring that your meals are balanced and delicious. Plus, you can easily adapt this dish to fit vegan, gluten-free, or calorie-conscious diets. Best of all, it takes minimal time to prepare, making it a go-to for weeknight dinners or special occasions. Prepare to be amazed by how simple it is to create a restaurant-quality dish right in your own kitchen.

    Benefits and Advantages of I Can’T Stop Making This Creamy Shrimp Pasta Dish

    One of the standout features of this creamy shrimp pasta dish is its simplicity. Busy lifestyles often mean we run short on time, but with this recipe, you can whip up a delicious meal in just under 30 minutes! The use of accessible ingredients also means that there’s no need for elaborate preparations or cooking techniques that might overwhelm novice cooks. Plus, this dish is adaptable, enabling you to customize it according to your tastes or dietary restrictions.

    In terms of health benefits, shrimp is an excellent source of lean protein and is low in calories, making it a fitting choice for diet-conscious individuals. It is also loaded with vitamins and minerals, including selenium, vitamin B12, and iodine, which support metabolic processes, promote energy, and nourish the body. Additionally, if you use whole grain or gluten-free pasta, you can increase dietary fiber, making the meal even healthier.

    The creamy sauce, created from natural ingredients, avoids the heavy additives that can detract from wholesome eating. Ingredients like garlic, herbs, and fresh vegetables not only enhance the flavor but also provide added nutrition, creating a balanced dish that satisfies both the palate and dietary needs. Ultimately, this creamy shrimp pasta is not just another recipe; it’s a reliable solution for home cooks of all types, from busy parents to food enthusiasts, all looking to savor a quick yet delicious meal.

    Ingredients Overview

    Essential Ingredients for I Can’T Stop Making This Creamy Shrimp Pasta Dish

    To make this delightful dish, you will need the following essential ingredients:

    • 8 oz of Pasta: Choose your favorite type (spaghetti, fettuccine, or gluten-free options).
    • 1 lb of Shrimp: Fresh, uncooked shrimp (peeled and deveined). Opt for wild-caught shrimp for health benefits.
    • 1 cup of Heavy Cream: Provides the creaminess. For vegan options, use coconut cream or cashew cream.
    • 2 tbsp of Olive Oil: Healthy fat for sautéing, which is suitable for heart-healthy cooking.
    • 3 cloves of Garlic: Minced, for flavor enhancement and its numerous health benefits.
    • 1/2 cup of Parmesan Cheese: Freshly grated, for an authentic Italian flavor. A vegan cheese alternative can be used as a substitute.
    • Salt and Pepper: To taste.
    • 1 tsp of Paprika: Adds a layer of warmth to the dish.
    • 1/4 cup of Fresh Parsley: Chopped, for garnish and freshness.

    Each ingredient adds its unique contribution to the dish, elevating both flavor and nutrition. For instance, using olive oil provides health benefits over butter, while fresh shrimp offers lean protein compared to processed meats.

    Dietary Substitutions to Customize Your I Can’T Stop Making This Creamy Shrimp Pasta Dish

    This dish is designed to be easily adaptable. Here are some substitutions you can consider based on various dietary restrictions or ingredient availability:

    • Gluten-Free: Replace regular pasta with gluten-free pasta made from rice or quinoa.
    • Vegan: Substitute shrimp with plant-based alternatives or chickpeas, and use coconut cream instead of heavy cream. Nutritional yeast can replace Parmesan cheese.
    • Low-Calorie: Use a lighter version of heavy cream, like half-and-half or even almond milk, and consider using shirataki noodles for a lower-calorie pasta option.
    • Dairy-Free: Apart from sticking with vegan cheese, consider using a blend of tahini and lemon juice to mimic the creamy texture while being dairy-free.

    These substitutions ensure that anyone can enjoy this dish without compromising on taste or their dietary preferences.

    How to Prepare the Perfect I Can’T Stop Making This Creamy Shrimp Pasta Dish: Step-by-Step Guide

    Step 1: Cook the Pasta

    Begin by bringing a large pot of salted water to a boil. Add your chosen pasta (about 8 oz) and cook according to package instructions until al dente.

    Step 2: Sauté Shrimp

    While the pasta is cooking, heat 2 tablespoons of olive oil in a large skillet over medium heat. Once heated, add 1 lb of peeled and deveined shrimp. Sauté the shrimp for about 3-4 minutes, or until they turn pink and opaque. Season them with salt, pepper, and 1 teaspoon of paprika.

    Step 3: Prepare the Creamy Sauce

    Add 3 minced cloves of garlic to the skillet, cooking for an additional minute until fragrant. Then, pour in 1 cup of heavy cream (or your selected alternative). Stir to combine and let the mixture gently simmer.

    Step 4: Add Cheese

    Once the cream is simmering, mix in 1/2 cup of grated Parmesan cheese. Stir until the cheese has melted completely into the sauce. If the sauce seems too thick, consider adding a splash of pasta water to reach your desired consistency.

    Step 5: Combine Pasta and Sauce

    Drain the pasta and reserve a bit of the cooking water. Add the cooked pasta directly into the skillet with the creamy shrimp sauce. Toss everything together, making sure the noodles are thoroughly coated. If needed, add a little reserved pasta water to loosen the sauce.

    Step 6: Garnish and Serve

    Remove from heat and sprinkle chopped fresh parsley over the dish for added flavor and color. Serve warm, and enjoy a tropical delight that the whole family will love!

    Step 7: Enjoy

    This recipe is not merely about feeding your hunger; it’s an experience. Savor each bite of this creamy shrimp pasta, knowing that you’ve created a meal that’s not only delicious but also supports your dietary preferences.

    Mastering I Can’T Stop Making This Creamy Shrimp Pasta Dish: Advanced Tips and Variations

    To elevate your cooking experience and customize your creamy shrimp pasta, consider these advanced tips:

    • Infuse Flavor: Experiment with adding different herbs such as basil, thyme, or oregano to the creamy sauce to enhance flavor depth.
    • Extra Vegetables: Add a variety of vegetables such as spinach, cherry tomatoes, or bell peppers for an added burst of nutrition and color.
    • Spicy Kick: For those who love some heat, toss in red pepper flakes or diced jalapeños while sautéing the shrimp.
    • Create a One-Pot Version: To save on cleanup, make this dish in one pot. Simply sauté the shrimp and add the pasta simultaneously, allowing it to cook in the sauce for a few minutes.

    By incorporating these variations, you can master this recipe and keep it fresh and exciting every time you prepare it!

    How to Store I Can’T Stop Making This Creamy Shrimp Pasta Dish: Best Practices

    Storing your creamy shrimp pasta properly can help maintain its flavors and texture. Here are the best practices for refrigerating, freezing, and reheating this dish:

    • Refrigeration: Allow the pasta to cool completely before transferring it to an airtight container. Store it in the refrigerator for up to three days maximum. When you’re ready to enjoy it again, simply reheat on the stovetop over low heat until warmed through, adding a splash of water or cream if needed to revive the sauce.

    • Freezing: While shrimp is best eaten fresh, this dish can be frozen if necessary. Make sure to cool the pasta and shrimp mixture thoroughly and store it in a freezer-safe container. Consume within three months for optimal quality. To reheat, thaw it overnight in the fridge and reheat in a skillet with a little added cream.

    • Avoiding Sogginess: If you know you’ll have leftovers, consider cooking the pasta separately from the sauce to prevent it from absorbing too much liquid during storage.

    Nutritional Value of I Can’T Stop Making This Creamy Shrimp Pasta Dish

    The nutritional benefits of this creamy shrimp pasta are impressive. Below is an estimated breakdown per serving (based on four servings):

    • Calories: 450-500 calories
    • Protein: 30-35g
    • Fat: 25-30g
    • Carbohydrates: 40g
    • Fiber: 2g
    • Sugars: 3g

    This dish, with its rich source of protein from shrimp, combined with healthy fats from the olive oil and carbohydrates from pasta, provides complete nutrition for a well-rounded meal. The nutritional breakdown may vary based on your ingredient choices, but overall, this recipe remains a healthy option.

    FAQs: Frequently Asked Questions About I Can’T Stop Making This Creamy Shrimp Pasta Dish

    Q1: Can I use frozen shrimp for this recipe?
    A1: Absolutely! Just thaw them completely before cooking. Make sure they are peeled and deveined.

    Q2: Is there a way to make this dish gluten-free?
    A2: Yes, use gluten-free pasta alternatives available in most grocery stores. They work just as well without losing flavor.

    Q3: How can I make this creamy shrimp pasta dish lighter in calories?
    A3: You can substitute heavy cream with lower-calorie alternatives, and consider portion sizes to manage your intake.

    Q4: Can I prepare the sauce in advance?
    A4: Yes, you can prepare the sauce ahead of time and store it in the fridge. Just reheat it gently before mixing it with fresh pasta.

    Q5: What other proteins can I use instead of shrimp?
    A5: Chicken, scallops, or tofu are great alternatives that can work well in this creamy pasta dish. Just adjust cooking times accordingly.

    With this recipe, you are set to enjoy an exceptional creamy shrimp pasta dish that resonates with flavor, health benefits, and adaptability. The elegance of this dish is sure to impress whether it’s a simple family dinner or a gathering of friends. Dive into this culinary adventure!

  • I CanT Stop Making This Spicy Shrimp Pasta

    I CanT Stop Making This Spicy Shrimp Pasta

    I Can’T Stop Making This Spicy Shrimp Pasta: A Tropical Delight

    Introduction to I Can’T Stop Making This Spicy Shrimp Pasta

    If you’re on the lookout for quick and delicious shrimp recipes, look no further! I Can’t Stop Making This Spicy Shrimp Pasta is not only simple to prepare, but it also offers an incredible explosion of flavors that will keep your taste buds dancing. This dish packs a spicy punch with aromatic garlic, zesty lemon, and succulent shrimp, marrying perfectly with al dente pasta to create a tropical delight on your dinner table. It’s ideal for busy weeknights, special occasions, or when you’re simply craving something vibrant and healthy.

    The best part? This spicy shrimp pasta is versatile, allowing you to customize it to fit various dietary needs. Whether you’re gluten-free, watching your calories, or following a vegan diet, this recipe can accommodate your lifestyle. Packed with lean protein from shrimp and fresh veggies, it is a smart choice for health-conscious individuals. Plus, it can be prepped in under 30 minutes, making it a go-to option for students, busy parents, and working professionals alike.

    Don’t just take my word for it—give it a try, and you might find yourself making this scrumptious dish on repeat!

    Benefits and Advantages of I Can’T Stop Making This Spicy Shrimp Pasta

    This Spicy Shrimp Pasta stands out not only for its vibrant flavors but also for numerous benefits that cater to a wide audience. The ease of preparation makes it particularly appealing. With just a handful of ingredients and minimal hands-on cooking time, it’s an excellent option for anyone who feels pressed for time. The simplicity of this recipe means that it’s approachable for novice cooks while still impressing seasoned chefs.

    Health Benefits: Shrimp is a fantastic source of lean protein, providing essential nutrients while remaining low in calories. The use of wholesome ingredients like olive oil, garlic, and vegetables contributes to the dish’s health benefits. Research suggests that incorporating seafood into your diet can offer cardiovascular benefits, thanks to healthy omega-3 fatty acids. Furthermore, with the option to use whole-grain or gluten-free pasta, you can easily adapt this dish to fit various diets, from low-carb to whole-foods focused.

    Vegan & Gluten-Free Options: For those on vegan diets, simply substitute shrimp with a plant-based protein like chickpeas or tofu. You can replace traditional pasta with gluten-free varieties or vegetable noodles to make it a gluten-free meal without compromising on taste. This flexibility ensures that everybody can enjoy a delightful plate of Spicy Shrimp Pasta.

    Ultimately, what makes this dish a standout choice is how it brings people together with its exotic flavors and healthy profile. Whether you’re hosting a dinner, cooking for your family, or enjoying a quiet meal alone, this recipe allows you to relish in the fresh taste of shrimp while knowing you’re nourishing your body.

    Ingredients Overview

    Essential Ingredients for I Can’T Stop Making This Spicy Shrimp Pasta

    To prepare I Can’t Stop Making This Spicy Shrimp Pasta, gather the following ingredients:

    • 8 oz of spaghetti (or your choice of gluten-free pasta)
    • 1 lb of large shrimp, peeled and deveined (or a plant-based alternative for vegan)
    • 2 tbsp olive oil
    • 4 cloves garlic, minced
    • 1/2 tsp red pepper flakes (adjust according to your spice preference)
    • 1/2 cup cherry tomatoes, halved
    • 1/2 cup bell peppers, sliced (any color)
    • 1/4 cup chicken or vegetable broth
    • Juice of 1 lemon
    • Zest of 1 lemon
    • Salt and pepper, to taste
    • Fresh parsley, chopped, for garnish

    Key Ingredient Benefits:
    Shrimp: Low in calories and high in protein; an excellent source of essential nutrients.
    Garlic: Known for its medicinal properties and distinctive flavor.
    Olive Oil: A healthier fat choice rich in antioxidants.

    With this list, you can create a dish that satisfies your palate while aligning with various dietary preferences!

    Dietary Substitutions to Customize Your I Can’T Stop Making This Spicy Shrimp Pasta

    • For a Vegan Version: Substitute shrimp with chickpeas or tofu. Tofu soaks up the flavors beautifully and adds protein.
    • Gluten-Free: Choose gluten-free pasta varieties or spiralize zucchini or carrots for a refreshing noodle alternative.
    • Lower-Calorie: Lighten the dish further by using less oil or opting for a tomato-based sauce instead of using broth.
    • Add More Vegetables: Feel free to include vegetables like spinach or kale for added vitamins, fiber, and volume without significantly impacting caloric content.

    By customizing ingredients, you ensure that everyone has a chance to enjoy this Spicy Shrimp Pasta in a way that fit best for their dietary requirements!

    How to Prepare the Perfect I Can’T Stop Making This Spicy Shrimp Pasta: Step-by-Step Guide

    Preparing this Spicy Shrimp Pasta is a straightforward process that anyone can master. Follow this step-by-step guide for an irresistible dish!

    1. Prepare the Pasta: Start by bringing a large pot of salted water to a boil. Add your spaghetti or any pasta of your choice and cook it according to package instructions until al dente. Save about 1/2 cup of pasta water for later, then drain and set the pasta aside.

    2. Sauté the Aromatics: While the pasta is cooking, heat olive oil in a large skillet over medium heat. Add minced garlic and sauté for about 30 seconds until fragrant—be cautious not to burn it.

    3. Cook the Shrimp: Next, add the shrimp to the skillet. Sprinkle salt, pepper, and red pepper flakes over them. Cook for roughly 2-3 minutes, flipping halfway through, until they turn pink and opaque.

    4. Incorporate Vegetables: Toss in the halved cherry tomatoes and sliced bell peppers. Stir well and sauté for another 2-3 minutes until the vegetables soften slightly.

    5. Add Liquid Ingredients: Pour in the chicken or vegetable broth along with the lemon juice and zest. Mix thoroughly, allowing the sauce to simmer for about 3-4 minutes. You can add a splash of reserved pasta water for a more cohesive sauce if needed.

    6. Combine Pasta and Shrimp Mixture: Add the drained pasta directly into the skillet with the shrimp and veggies. Toss to combine, making sure the pasta is well-coated with the sauce. Adjust seasoning, adding more salt, pepper, or red pepper flakes to suit your taste.

    7. Finish with Garnish: Remove the skillet from the heat. Use freshly chopped parsley to garnish your beautiful dish, serving it warm.

    8. Adjust for Dietary Preferences: If using vegan alternatives, follow the same cooking steps but sauté tofu instead of shrimp, ensuring it’s golden and crispy.

    By following these steps, you achieve a perfect plate of Spicy Shrimp Pasta that is bound to impress anyone who tries it!

    Mastering I Can’T Stop Making This Spicy Shrimp Pasta: Advanced Tips and Variations

    To elevate your Spicy Shrimp Pasta experience, consider these advanced tips and variations:

    • Spice It Up: If you love heat, consider adding chopped jalapeños or a dash of hot sauce in addition to red pepper flakes.
    • Add Creaminess: For a richer dish, stir in a quarter cup of heavy cream or coconut milk during step 5 for a creamy sauce.
    • Herb Variations: Experiment with fresh herbs like basil or cilantro for different flavor profiles. A sprinkle of fresh dill can also enhance the dish spectacularly.
    • Pasta Alternatives: Try using whole-wheat pasta or legume-based pasta for added fiber. Such options not only cater to various dietary needs but also change the dish’s nutritional profile.

    Using these tips ensures that you’ll never get bored with Spicy Shrimp Pasta, allowing everyone to pick their favorite version!

    How to Store I Can’T Stop Making This Spicy Shrimp Pasta: Best Practices

    Storing your leftover Spicy Shrimp Pasta properly ensures it’s delicious when you reheat it.

    1. Refrigeration: Place portions in airtight containers, and store them in the refrigerator. They will typically stay fresh for up to three days.

    2. Freezing: For longer storage, you can freeze portions of the dish. Ensure the pasta is cooled down before placing it in freezer-safe bags or containers. This way, it can last up to 2 months in the freezer.

    3. Reheating: To reheat, use the microwave or a skillet over low heat. If the pasta seems dry, add a splash of reserved pasta water or broth to revive the sauce and mix well.

    These methods ensure that the flavors remain intact so you can enjoy your Spicy Shrimp Pasta later!

    Nutritional Value of I Can’T Stop Making This Spicy Shrimp Pasta

    Let’s break down the nutritional value of this vibrant dish based on standard ingredients (per serving):

    • Calories: Approximately 380
    • Protein: 34g
    • Fat: 10g (healthy fats from olive oil)
    • Carbohydrates: 45g
    • Fiber: 4g
    • Sodium: 600mg (adjustable by using low-sodium broth)

    This nutritional breakdown makes it clear that I Can’t Stop Making This Spicy Shrimp Pasta not only satisfies your taste buds but also fuels your body with essential nutrients, making it an excellent option for a balanced meal.

    FAQs: Frequently Asked Questions About I Can’T Stop Making This Spicy Shrimp Pasta

    Can I use frozen shrimp instead of fresh?

    Yes! Frozen shrimp works perfectly. Just ensure they are fully thawed and drained before cooking.

    How can I make this recipe dairy-free?

    This recipe is naturally dairy-free! Just be cautious about any creamy additions you might consider using—opt for coconut milk or non-dairy creamer instead.

    What pasta alternatives do you recommend?

    You can use gluten-free pasta, zucchini noodles, or even whole wheat pasta as alternatives based on dietary preferences.

    Is this dish suitable for meal prep?

    Absolutely! This recipe is perfect for meal prep. Just divide it into containers after cooking, and you’re good to go for the week!

    Can I substitute the vegetables?

    Certainly! Feel free to add any vegetables you love or have on hand, such as spinach, asparagus, or even broccoli.

    In conclusion, I Can’t Stop Making This Spicy Shrimp Pasta is not only a quick and easy recipe; it’s also nutritious and adaptable to various dietary needs. By following this guide, you’re set to create a dish that both you and your loved ones will adore! So get into your kitchen and give it a try—you might just find yourself making it over and over again!

  • Golden Bang Bang Shrimp With Sweet Chili Sauce

    Golden Bang Bang Shrimp With Sweet Chili Sauce

    Golden Bang Bang Shrimp With Sweet Chili Sauce: A Tropical Delight

    Introduction to Golden Bang Bang Shrimp With Sweet Chili Sauce

    Are you looking for a vibrant dish that brightens your dinner table and tantalizes your taste buds? Golden Bang Bang Shrimp with Sweet Chili Sauce is a tantalizing combination of crispy shrimp and a luscious, sweet kick that makes it an irresistible option among shrimp recipes. This delightful dish is not only simple to prepare but also caters to various dietary preferences. Packed with flavor and crunch, it’s a great choice for family meals, entertaining guests, or even satisfying your midnight cravings.

    One of the many advantages of this recipe is its versatility. You can easily adapt it to fit health-conscious choices, as it can be made gluten-free and even vegan by substituting the shrimp with plant-based alternatives. If you’re a busy parent, a student, or someone with a hectic work schedule, you’ll surely appreciate this quick and easy recipe. What’s more, it’s suitable for food enthusiasts who appreciate the rich flavors of Asian cuisine.

    The engaging blend of crispy textures and zesty flavors makes the Golden Bang Bang Shrimp a delightful centerpiece for dinner parties and gatherings. It brings a taste of the tropics right to your home, allowing you to explore culinary adventures with ease. Let’s dive deeper into the benefits and advantages of cooking this exquisite dish!

    Benefits and Advantages of Golden Bang Bang Shrimp With Sweet Chili Sauce

    Golden Bang Bang Shrimp with Sweet Chili Sauce stands out in a sea of shrimp recipes due to its unique flavor profile and health benefits. Here are some key reasons why you should add it to your culinary repertoire:

    1. Simplicity of Preparation: This recipe features straightforward steps, making it perfect for both novice and experienced cooks. With only a handful of ingredients, you can whip up this dish in under 30 minutes. This is particularly beneficial for busy parents or professionals who crave a delicious meal without spending hours in the kitchen.

    2. Health Benefits: Shrimp is a low-calorie protein source, rich in essential nutrients like omega-3 fatty acids, vitamin B12, and selenium. This seafood option contributes to heart health, supports brain function, and aids in muscle maintenance—making it an excellent choice for health-conscious individuals. Paired with a homemade sweet chili sauce, you can control your sugar intake, providing you with a sweeter yet healthier substitute compared to store-bought sauces that may contain preservatives.

    3. Versatility: This dish can easily cater to different dietary needs. By using alternatives like tempeh, cauliflower, or even tofu in place of shrimp, you can make it vegan while maintaining the same delicious flavor. Gluten-free breadcrumbs or almond flour can replace regular breadcrumbs to ensure it matches your dietary preferences.

    4. Flavor Explosion: The delightful balance of spice and sweetness in this dish creates a culinary experience that excites the palate. The crispy shrimp pairs perfectly with the creamy sauce, creating a luscious, delectable bite.

    5. Sharing and Entertaining: Golden Bang Bang Shrimp not only tastes amazing, but it also makes for a fantastic sharing dish at gatherings. Its pretty presentation in a bowl, topped with a sprinkle of sesame seeds or green onions, makes it look as good as it tastes, impressing your guests and encouraging seconds!

    With these remarkable attributes, Golden Bang Bang Shrimp with Sweet Chili Sauce truly is a standout recipe that brings joy to any dining experience. Whether you’re cooking for yourself, catering to a crowd, or simply experimenting with flavors, this dish will not disappoint!

    Ingredients Overview

    Essential Ingredients for Golden Bang Bang Shrimp With Sweet Chili Sauce

    To create this scrumptious dish, you will need the following ingredients:

    For the Shrimp:

    • 1 lb (450g) large shrimp (peeled and deveined)
    • 1 cup gluten-free breadcrumbs (or regular for non-restricted diets)
    • ½ cup cornstarch
    • 2 large eggs (beaten)
    • ½ tsp salt
    • ½ tsp black pepper
    • ½ tsp garlic powder
    • ½ tsp paprika

    For the Sweet Chili Sauce:

    • ½ cup sweet chili sauce (store-bought or homemade)
    • 2 tbsp mayonnaise (or vegan mayo for dairy-free options)
    • 1 tsp sriracha or chili flakes (adjust based on spice preference)
    • 1 tsp lime juice (freshly squeezed)

    Dietary Substitutions to Customize Your Golden Bang Bang Shrimp With Sweet Chili Sauce

    • For Vegan Options: Substitute shrimp with tempeh, tofu, or vegetable bites. Use vegan mayo for the sauce.

    • Gluten-Free Options: Ensure that your breadcrumbs are labeled gluten-free, and you can use almond flour instead of cornstarch for breading.

    • Lower Calorie Options: Baked shrimp instead of fried can significantly reduce calories. Use less sweet chili sauce or thin it out with water for a lighter sauce.

    These ingredient lists and substitutions open up a world of possibilities for any home cook, allowing you to tailor this fantastic recipe to meet your dietary desires.

    How to Prepare the Perfect Golden Bang Bang Shrimp With Sweet Chili Sauce: Step-by-Step Guide

    Ready to whip up this tantalizing dish? Follow these easy steps to create Golden Bang Bang Shrimp with Sweet Chili Sauce that’s bursting with flavor!

    1. Prepare the Shrimp: Start by patting the shrimp dry with paper towels. This helps the coating stick better. In a large bowl, combine cornstarch, salt, black pepper, garlic powder, and paprika. Toss the dried shrimp into this mixture, ensuring they are evenly coated.

    2. Create the Breading Station: Set up a breading station by placing the beaten eggs in one bowl and the gluten-free breadcrumbs in another. Dip each coated shrimp into the egg, allowing the excess to drip off before transferring it to the breadcrumbs. Press lightly to ensure the breadcrumbs adhere well.

    3. Fry the Shrimp: In a large skillet, heat about an inch of oil over medium-high heat. Once hot, carefully add the breaded shrimp in batches, making sure not to overcrowd the pan. Fry for about 2-3 minutes per side or until the shrimp are golden brown and crispy. Remove the shrimp from the skillet and place them on a paper towel-lined plate to absorb excess oil.

    4. Make the Sweet Chili Sauce: In a separate small bowl, mix together the sweet chili sauce, mayonnaise, sriracha or chili flakes, and lime juice. Adjust the heat level based on your preference.

    5. Combine and Serve: In a large mixing bowl, gently toss the crispy shrimp with your prepared sweet chili sauce until well coated. Serve immediately on a platter, garnished with sesame seeds and sliced green onions for added flair.

    6. Enjoy: For an added crunch, pair the shrimp with rice noodles, steamed veggies, or a fresh salad. Your Golden Bang Bang Shrimp is now ready to impress your family and friends!

    With these steps, your dish is sure to be a hit at any gathering or meal. Don’t hesitate to explore variations and personalize your preparation further!

    Mastering Golden Bang Bang Shrimp With Sweet Chili Sauce: Advanced Tips and Variations

    To take your Golden Bang Bang Shrimp with Sweet Chili Sauce to the next level, consider the following tips and variations:

    • Baking Instead of Frying: For a healthier option, you can bake the breaded shrimp. Preheat your oven to 400°F (200°C) and place the shrimp on a baking sheet lined with parchment paper. Bake for 15-20 minutes, flipping halfway through, until crispy and golden.

    • Change the Sauce Flavor: Experiment with different sauces! Instead of sweet chili sauce, you could create a tropical mango salsa or a zingy ginger-garlic sauce for an Asian twist.

    • Add Vegetables: Amp up the nutritional value by tossing in some vegetables. Bell peppers, snap peas, or zucchini can be sautéed and served alongside your shrimp for a colorful, balanced plate.

    • Make it Spicy: If you enjoy heat, elevate the spice level of your dish by adding more sriracha or incorporating sliced jalapeños into your sauce.

    • Serve with Exciting Sides: Pair this dish with coconut rice, quinoa, or a fresh salad, and you’ll create a well-rounded meal that’s both delicious and satisfying.

    With these advanced tips and variations, you’ll keep the dish fresh, exciting, and tailored to your unique palate while enjoying this signature shrimp recipe!

    How to Store Golden Bang Bang Shrimp With Sweet Chili Sauce: Best Practices

    Proper storage of your Golden Bang Bang Shrimp with Sweet Chili Sauce ensures that leftovers remain delicious for future enjoyment. Here are some best practices:

    1. Refrigeration: After the shrimp cool down to room temperature, transfer any leftovers to an airtight container. This keeps them fresh in the refrigerator for up to 2 days. Reheat in the oven or an air fryer for optimal crispiness before serving.

    2. Freezing: For longer storage, you can freeze the cooked shrimp. Place them on a baking sheet in a single layer to freeze them individually before transferring them to a freezer-safe container or zip-top bag. This method prevents them from sticking together. Frozen shrimp can last up to 2 months.

    3. Reheating: If you’ve got some thawed shrimp and sauce, consider reheating in a preheated oven at 350°F (175°C) for about 10-15 minutes, or until heated through. Avoid using a microwave, as it can make the shrimp, soggy.

    By following these best practices, you can enjoy the delightful flavors of Golden Bang Bang Shrimp well beyond the initial cooking!

    Nutritional Value of Golden Bang Bang Shrimp With Sweet Chili Sauce

    Knowing the nutritional breakdown of your dish can help you manage dietary choices while still enjoying delicious meals. Here’s a general overview of the nutritional content per serving of Golden Bang Bang Shrimp with Sweet Chili Sauce:

    • Calories: Approximately 400
    • Protein: 28g
    • Fat: 20g
    • Carbohydrates: 30g
    • Fiber: 2g
    • Sugar: 5g
    • Sodium: 600mg

    The nutritional values can vary based on specifics like cooking method or substitutions made. To maximize health benefits, consider making your sweet chili sauce and lowering sugar content by using natural sweeteners. Pair the dish with vibrant veggies or whole grains for additional nutrition and a complete meal.

    Understanding the nutritional aspects of your meals, especially shrimp recipes, is essential for maintaining a balanced and healthy diet without forgoing flavor!

    FAQs: Frequently Asked Questions About Golden Bang Bang Shrimp With Sweet Chili Sauce

    Q1: Can I make Golden Bang Bang Shrimp gluten-free?
    Absolutely! Simply use gluten-free breadcrumbs and ensure other ingredients, such as sauces, are gluten-free.

    Q2: What can I substitute for shrimp in this recipe?
    You can use tempeh, tofu, or even jackfruit for a vegan option that retains flavor and texture.

    Q3: How can I make the sweetness in the sauce less intense?
    To reduce sweetness, use a yogurt or sour cream base instead of mayonnaise for the sauce. You may also dilute the sweet chili sauce in cooking to bring down the sweetness while preserving taste.

    Q4: How can I store leftovers?
    Store the cooked shrimp in an airtight container in the refrigerator for up to 2 days or freeze for up to 2 months.

    Q5: Can I bake the shrimp instead of frying them?
    Yes! Baking is a great healthier option—just preheat your oven to 400°F (200°C) and bake until crispy.

    With these FAQs, you’ll get answers to common concerns that can help ensure your shrimp recipes are successful and enjoyable every time!


    By following this guide, even the busiest of cooks can create Golden Bang Bang Shrimp with Sweet Chili Sauce that will wow anyone at the dinner table. Explore this recipe, embrace creativity in your cooking, and enjoy this tropical delight!

  • Raspberry Greek Yogurt Jello Fluff

    Raspberry Greek Yogurt Jello Fluff

    Raspberry Greek Yogurt Jello Fluff: A Tropical Delight

    Introduction to Raspberry Greek Yogurt Jello Fluff

    Welcome to the world of delightful dessert recipes, where taste meets health and simplicity! If you’re searching for a light, fluffy, and creamy dessert that captivates both the eye and the palate, look no further than the Raspberry Greek Yogurt Jello Fluff. This scrumptious concoction combines the tartness of fresh raspberries with the creamy goodness of Greek yogurt, creating a treat that is not only refreshing but also packed with benefits.

    Made with only a handful of ingredients, this recipe comes together in just minutes, making it perfect for busy parents, students, or anyone in need of a simple yet satisfying dessert. With its vibrant colors and light texture, this dish is bound to impress guests at gatherings or simply provide you with a sweet escape from the daily grind.

    Health benefits abound in this dessert. Greek yogurt is renowned for its probiotic properties, which support gut health and overall well-being. Paired with raspberries, which boast high levels of antioxidants and fiber, this treat works wonders for your body. Additionally, this recipe is adaptable, allowing for vegan and gluten-free options, ensuring that everyone can indulge without worry. Dive into this easy-to-make Raspberry Greek Yogurt Jello Fluff and elevate your dessert game!

    Benefits and Advantages of Raspberry Greek Yogurt Jello Fluff

    When it comes to dessert recipes, the Raspberry Greek Yogurt Jello Fluff stands out for several reasons. Here are some compelling benefits that make this dish an excellent choice for everyone:

    1. Ease of Preparation: One of the best things about this fluffy dessert is its simplicity. With minimal ingredients and utensils, even novice cooks can whip it up in no time. The quick prep means you can spend less time in the kitchen and more time enjoying the fruits of your labor.

    2. Health Benefits: Greek yogurt is a powerhouse ingredient. Rich in protein and probiotics, it helps boost your metabolism and supports digestive health. Raspberries add a refreshing flavor while providing vitamins, minerals, and antioxidants, supporting your immune system.

    3. Adaptable for Dietary Needs: The versatility of this dessert is unrivaled. With a few simple substitutions, you can create a delightful vegan or gluten-free version, making it suitable for various dietary requirements. Whether you’re catering to a friend with dietary restrictions or simply trying to eat healthier, this recipe can be customized to fit your needs.

    4. Light and Satisfying: This dessert offers a light texture that doesn’t weigh you down while still delivering satisfaction when your sweet tooth kicks in. Perfect for warmer months or whenever you’re craving something sweet but not too heavy.

    5. Ideal for Any Occasion: Hosting a party, celebrating a special occasion, or just looking for a post-dinner sweet treat? Raspberry Greek Yogurt Jello Fluff is your best friend. It appeals to both kids and adults alike, making it a fantastic centerpiece for any gathering.

    6. Great for Meal Prep: This delightful fluff can be made ahead of time and stored in the fridge, making it a convenient choice for those who like to plan their meals. You can make a batch and savor it throughout the week, ensuring that healthier dessert options are always available.

    By integrating these elements into your cooking, you not only enhance your dessert-making skills but also enjoy the numerous health perks this recipe brings to your table.

    Ingredients Overview

    Essential Ingredients for Raspberry Greek Yogurt Jello Fluff

    Here’s what you’ll need to create this light, velvety delight:

    • 1 cup Greek yogurt (plain or vanilla): Adds creaminess and is rich in protein. Make sure to choose low-fat or fat-free for a lighter option.
    • 1 package (3 oz) raspberry-flavored gelatin: Provides that vibrant raspberry flavor and a fun, jiggly texture.
    • 1 cup boiling water: Required to dissolve the gelatin and blend it smoothly with yogurt.
    • 1-2 cups fresh raspberries: A nutritious addition, packed with flavor, antioxidants, and fiber.
    • Optional Sweetener (honey or maple syrup): Depending on your preference for sweetness, you may wish to add a natural sweetener to balance tartness from the raspberries.

    Dietary options:
    – For a vegan version, substitute Greek yogurt with a coconut-based or almond-based yogurt.
    – Choose a gelatin substitute such as agar-agar to make it suitable for vegetarians and vegans.
    – Make it gluten-free by ensuring all ingredients (especially the gelatin) are certified gluten-free.

    Dietary Substitutions to Customize Your Raspberry Greek Yogurt Jello Fluff

    This recipe can be tailored to meet various dietary needs seamlessly:

    • Plant-Based Yogurt: As mentioned, replace Greek yogurt with a plant-based alternative like coconut, soy, or almond yogurt. This retains the creamy texture while making it suitable for vegans.
    • Sugar-Free Gelatin: If you’re watching your sugar intake, use a sugar-free gelatin option. These alternatives maintain taste without the extra calories.
    • Fruit Variations: While raspberries shine at the forefront, feel free to experiment with other berries like blueberries, strawberries, or blackberries. Each offers unique flavors and nutrients.

    In this way, you can place your own twist on the Raspberry Greek Yogurt Jello Fluff while catering to the dietary preferences and restrictions of your family and friends.

    How to Prepare the Perfect Raspberry Greek Yogurt Jello Fluff: Step-by-Step Guide

    Creating the Raspberry Greek Yogurt Jello Fluff is a breeze with these straightforward steps. Follow along for a delightful dessert that your taste buds will love!

    1. Prepare the Gelatin Mixture: In a medium-sized bowl, dissolve the raspberry-flavored gelatin in 1 cup of boiling water. Stir thoroughly until fully dissolved and let it cool slightly. This mixture provides the base for your fluffy delight.

    2. Combine the Yogurt: In another bowl, add 1 cup of Greek yogurt. If you prefer it sweeter, now’s the time to stir in honey or maple syrup. This enriches the flavor and balances the tartness of the raspberries.

    3. Fold in the Gelatin: Gradually pour the slightly cooled gelatin mixture into the Greek yogurt. Gently fold the two components together using a spatula. Be careful not to overmix, as you want to maintain a light, airy texture.

    4. Add Fresh Raspberries: Gently fold in 1 cup of fresh raspberries. You can reserve a handful for garnishing later. The berries will add delicious bites and enhance both the presentation and taste of the dish.

    5. Chill the Mixture: Transfer the fluff mixture into serving bowls or cups. Cover them with plastic wrap or lids and refrigerate for at least 2-3 hours, allowing the gelatin to set properly. This chilling stage is essential to achieving the delightful fluffiness.

    6. Serve and Garnish: Once set, remove the bowls from the fridge. Optionally, top with additional fresh raspberries and a dollop of yogurt or whipped topping for an extra touch.

    7. Enjoy!: Your Raspberry Greek Yogurt Jello Fluff is now ready to dazzle your family and friends. Serve it at a gathering, or simply indulge in its creamy, fruity goodness.

    In these simple steps, you’ve created a delightful dessert that’s perfect for all occasions, and aligns with many dietary preferences. By following the process carefully, you not only ensure a delicious result but also make this beautiful dessert accessible to all.

    Mastering Raspberry Greek Yogurt Jello Fluff: Advanced Tips and Variations

    Once you have mastered the basics of Raspberry Greek Yogurt Jello Fluff, consider these advanced tips and variations to elevate your dessert even further:

    1. Flavored Yogurt: Experiment with different flavors of Greek yogurt, such as lemon or peach, to create unique adaptations of the classic recipe. Each flavor will bring a distinct profile, enhancing the overall experience.

    2. Add a Crunch: For a textural contrast, consider folding in some granola or crushed nuts before chilling. This adds a delightful crunch and enhances the health benefits even more.

    3. Layered Presentation: For a stunning visual presentation, try making layers with the yogurt fluff and additional fruits or pureed fruits in clear glasses. This creates an eye-catching dessert that’s sure to impress.

    4. Infuse with Herbs: For an added twist, infuse flavors using fresh herbs like mint or basil, which pair beautifully with raspberries. Incorporate finely chopped herbs into the yogurt mixture for a refreshing surprise.

    5. Fruity Sauces: Drizzle a homemade raspberry sauce over the top for even more flavor. Simmer fresh raspberries with a touch of water and honey until they break down into a coulis, then top the fluff just before serving.

    These variations will not only intrigue your palate but also invite you to explore endless adaptations, making Raspberry Greek Yogurt Jello Fluff a beloved staple in your collection of dessert recipes.

    How to Store Raspberry Greek Yogurt Jello Fluff: Best Practices

    Proper storage of your Raspberry Greek Yogurt Jello Fluff ensures that you can enjoy this delightful dessert over several days without losing its texture or flavor. Here are some best practices for storage:

    • Refrigeration: Store the fluff in airtight containers in the refrigerator. It will stay fresh for up to 5 days. Make sure the container is sealed tightly to prevent any absorption of odors from other foods.

    • Freezing (Not Recommended): While this dessert can be stored in the freezer, freezing may alter its texture, making it less fluffy upon thawing. If you do freeze it, consume within 1 month for the best taste.

    • Reheating: The fluff is best enjoyed chilled, so there’s no need for reheating. If you prefer to serve it warm, let it come to room temperature for 15-20 minutes before serving.

    Following these storage guidelines will help you savor the refreshing taste of Raspberry Greek Yogurt Jello Fluff long after it’s been made, making it a go-to for meal prep or a quick sweet fix.

    Nutritional Value of Raspberry Greek Yogurt Jello Fluff

    Understanding the nutritional value of your dessert can be crucial for those who monitor their dietary intake. Below is an estimated nutritional breakdown for one serving of Raspberry Greek Yogurt Jello Fluff (assuming the recipe yields four servings):

    | Nutrient | Amount per serving |
    |——————–|——————–|
    | Calories | 120 |
    | Protein | 8g |
    | Carbohydrates | 20g |
    | Sugars | 10g |
    | Fat | 2g |
    | Fiber | 2g |
    | Calcium | 150 mg |
    | Iron | 0.5 mg |

    Raspberry Greek Yogurt Jello Fluff is a guilt-free dessert that provides a healthy dose of protein and fiber. Its relatively low calorie count makes it an excellent dessert option for health-conscious individuals looking to satisfy their sweet cravings without going overboard. The abundance of antioxidants from raspberries also makes it an ideal choice for a health-forward dessert.

    Knowing the nutritional data can help you align your sweet indulgences with your dietary goals, making it an invaluable aspect of your dessert recipes.

    FAQs: Frequently Asked Questions About Raspberry Greek Yogurt Jello Fluff

    Q1: Can I use a different flavor of gelatin?
    Yes! Feel free to experiment with other gelatin flavors to change the taste profile of the fluff. Just ensure the flavor matches the yogurt you’re using to maintain harmony in taste.

    Q2: Is it possible to make this dessert vegan?
    Absolutely! Use a dairy-free yogurt substitute and a plant-based gelatin alternative like agar-agar.

    Q3: How long does Raspberry Greek Yogurt Jello Fluff last in the fridge?
    When stored in airtight containers, the fluff can stay fresh for up to 5 days in the refrigerator.

    Q4: Can I add other fruits beyond raspberries?
    Yes! This recipe is flexible; you can incorporate strawberries, blueberries, or any other favorite fruit. Just adjust the quantity according to personal preference.

    Q5: What if I want a sugar-free version of this dessert?
    To make a sugar-free Raspberry Greek Yogurt Jello Fluff, opt for sugar-free gelatin and a low-calorie sweetener to achieve the sweetness without added sugar.

    By addressing these common questions, readers can feel more comfortable and informed about trying their hand at this delightful recipe. Raspberry Greek Yogurt Jello Fluff is a versatile and easy-to-follow treat that can bring joy to all.


    This Raspberry Greek Yogurt Jello Fluff recipe is a fun and healthy dessert to enjoy any time of day. Packed with benefits, simple to make, and adaptable for various dietary preferences, it is sure to become a favorite among both seasoned cooks and beginners alike. Don’t miss out on this tropical delight—grab your ingredients and start creating today!