Blog

  • Homemade Brisket For Thanksgiving

    Homemade Brisket For Thanksgiving

    Homemade Brisket For Thanksgiving: A Tropical Delight

    Introduction to Homemade Brisket For Thanksgiving

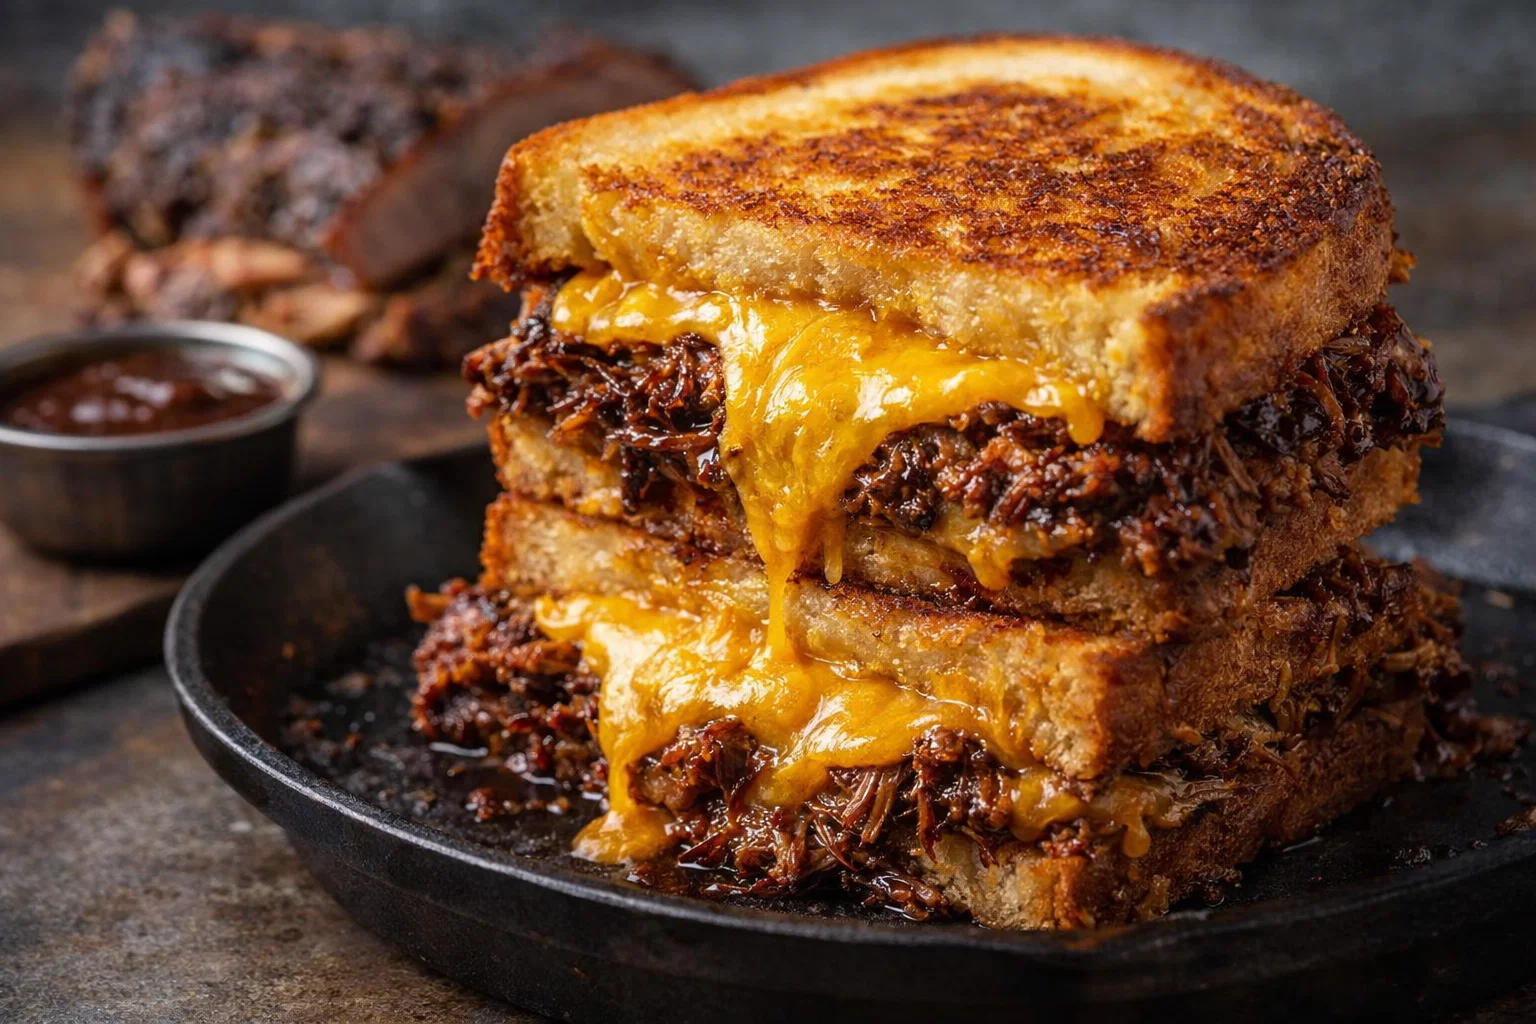
    As you gather around the table for one of the most cherished holidays of the year, Thanksgiving, consider introducing a dish that marries traditional flavors with modern culinary ease—Homemade Brisket. This savory, succulent brisket recipe showcases a blend of spices and aromatics that uplift the entire meal and create lasting memories. It’s not just another one of those Thanksgiving recipes; it’s a flavorful journey that any home cook can embark on with confidence.

    What makes this brisket a notable choice for your Thanksgiving feast? For starters, its simplicity appeals to home cooks at every level. The recipe calls for easily accessible ingredients, ensuring you won’t be scrambling at the last minute. Moreover, it offers a range of benefits for various dietary needs; brisket can be both gluten-free and adaptable for different diets. You can effortlessly tailor the seasoning to cater to vegetarian preferences with a few adjustments, making it an inclusive option for everyone at your table.

    Packed with protein, iron, and essential nutrients, homemade brisket embodies a hearty, wholesome meal that is both satisfying and nourishing. With a step-by-step guide and variations included, this recipe invites even the busiest of parents or culinary beginners to serve a restaurant-quality dish at home. So, let’s dive into this mouthwatering brisket dish, ensuring your Thanksgiving gathering is a memorable culinary experience.

    Benefits and Advantages of Homemade Brisket For Thanksgiving

    Homemade brisket not only delights the palate but also brings numerous benefits that make it a fantastic choice for Thanksgiving recipes. One significant advantage is the ease of preparation. Even during the hustle and bustle of holiday planning, you can prepare this dish within a reasonable time frame, allowing you to spend more quality time with loved ones. The slow-cooking process breaks down the meat’s fibers, rendering it tender enough to pull apart with a fork, leaving your family and friends in awe of your culinary skills.

    Another appealing aspect of homemade brisket is its health benefits. While brisket itself is a cut of beef that is high in protein and essential nutrients, the health-conscious cook can easily customize the recipe to suit specific dietary needs. For individuals focused on a low-fat diet, choosing a lean cut of brisket allows you to reduce overall fat content without sacrificing flavor. Moreover, by balancing the dish with vegetables and whole grains, you can easily create a nutritious meal that caters to health-conscious diners at your Thanksgiving gathering.

    Additionally, homemade brisket can serve various dietary preferences. Those following gluten-free diets can enjoy this dish without concerns. Furthermore, if you’re looking to cater to a vegan or vegetarian audience, you can use a plant-based alternative that mimics the brisket’s savory depth. The versatility of this dish makes it stand out among Thanksgiving recipes, offering something for everyone, even those with different dietary restrictions.

    Ingredients Overview

    Essential Ingredients for Homemade Brisket For Thanksgiving

    To make your homemade brisket for Thanksgiving, you’ll need the following essential ingredients:

    • 5 lbs Beef Brisket: Choose a well-marbled cut for maximum flavor and tenderness. (For a leaner option, consider using a 3 lbs flat-cut brisket.)
    • 1 tablespoon Olive Oil: Adds moisture and assists in browning the meat.
    • 2 teaspoons Kosher Salt: Essential for seasoning the brisket and drawing out its natural flavors.
    • 1 teaspoon Black Pepper: Provides a spicy kick to balance the richness of the meat.
    • 1 tablespoon Paprika: Offers sweetness and vibrant color to the dish.
    • 2 teaspoons Garlic Powder: Infuses an aromatic quality that complements the brisket.
    • 1 tablespoon Onion Powder: Enhances the flavor profile with its savory undertones.
    • 1 cup Beef Broth or Vegetable Broth (Vegan): Keeps the brisket moist while cooking and adds additional flavor.
    • 2-3 Bay Leaves: Infuses subtle herbal notes.
    • Optional: Fresh herbs such as thyme or rosemary: For a fragrant garnish.

    By choosing high-quality ingredients, you’re enhancing both the taste and nutritional profile, ensuring your brisket becomes a memorable centerpiece this Thanksgiving.

    Dietary Substitutions to Customize Your Homemade Brisket For Thanksgiving

    • Gluten-Free Version: Ensure your broth is gluten-free and opt for gluten-free soy sauce for added umami flavor during marination.
    • Vegan/Vegetarian Version: Use a thick plant-based substitute like seitan or jackfruit to create a satisfying plant-based alternative to brisket. The seasoning remains the same for flavor enhancement.
    • Low-Calorie Option: Trim off excess fat from the brisket and substitute a low-sodium broth to make the dish healthier.

    By providing dietary substitutions, your homemade brisket will appeal to a wider audience and firmly establish its place among the best Thanksgiving recipes.

    How to Prepare the Perfect Homemade Brisket For Thanksgiving: Step-by-Step Guide

    Homemade brisket might sound intimidating, but with this simple step-by-step guide, you’ll be set up for success. The key to a perfect brisket lies in the preparation and slow cooking.

    1. Prepare the Base: Start by preheating your oven to 300°F (150°C). This lower temperature allows the brisket to cook slowly, breaking down tough fibers for a tender texture.

    2. Season the Brisket: Rub your brisket thoroughly with olive oil, kosher salt, black pepper, paprika, garlic powder, and onion powder. Ensure that the seasoning is evenly distributed.

    3. Sear the Brisket: In a large oven-safe skillet or Dutch oven, heat a little more olive oil over medium-high heat. Once hot, sear the brisket for about 4-5 minutes on each side until browned. This locks in the juices and enhances flavor.

    4. Add Flavor Elements: Pour one cup of beef or vegetable broth around the brisket and add bay leaves. If you’re using herbs like thyme or rosemary, add them now for a fragrant touch.

    5. Cover and Cook: Cover the skillet with a tight-fitting lid or aluminum foil. Transfer it to the oven and let it cook for 4-5 hours, or until the brisket is fork-tender. Check periodically to ensure liquid does not evaporate completely.

    6. Baste the Brisket: Every hour, take a moment to baste the brisket with the cooking liquid. This adds moisture and helps develop flavor.

    7. Rest the Meat: Once cooked, remove the brisket from the oven and let it rest for at least 30 minutes. This allows the juices to redistribute throughout the meat, making it juicy and tender when sliced.

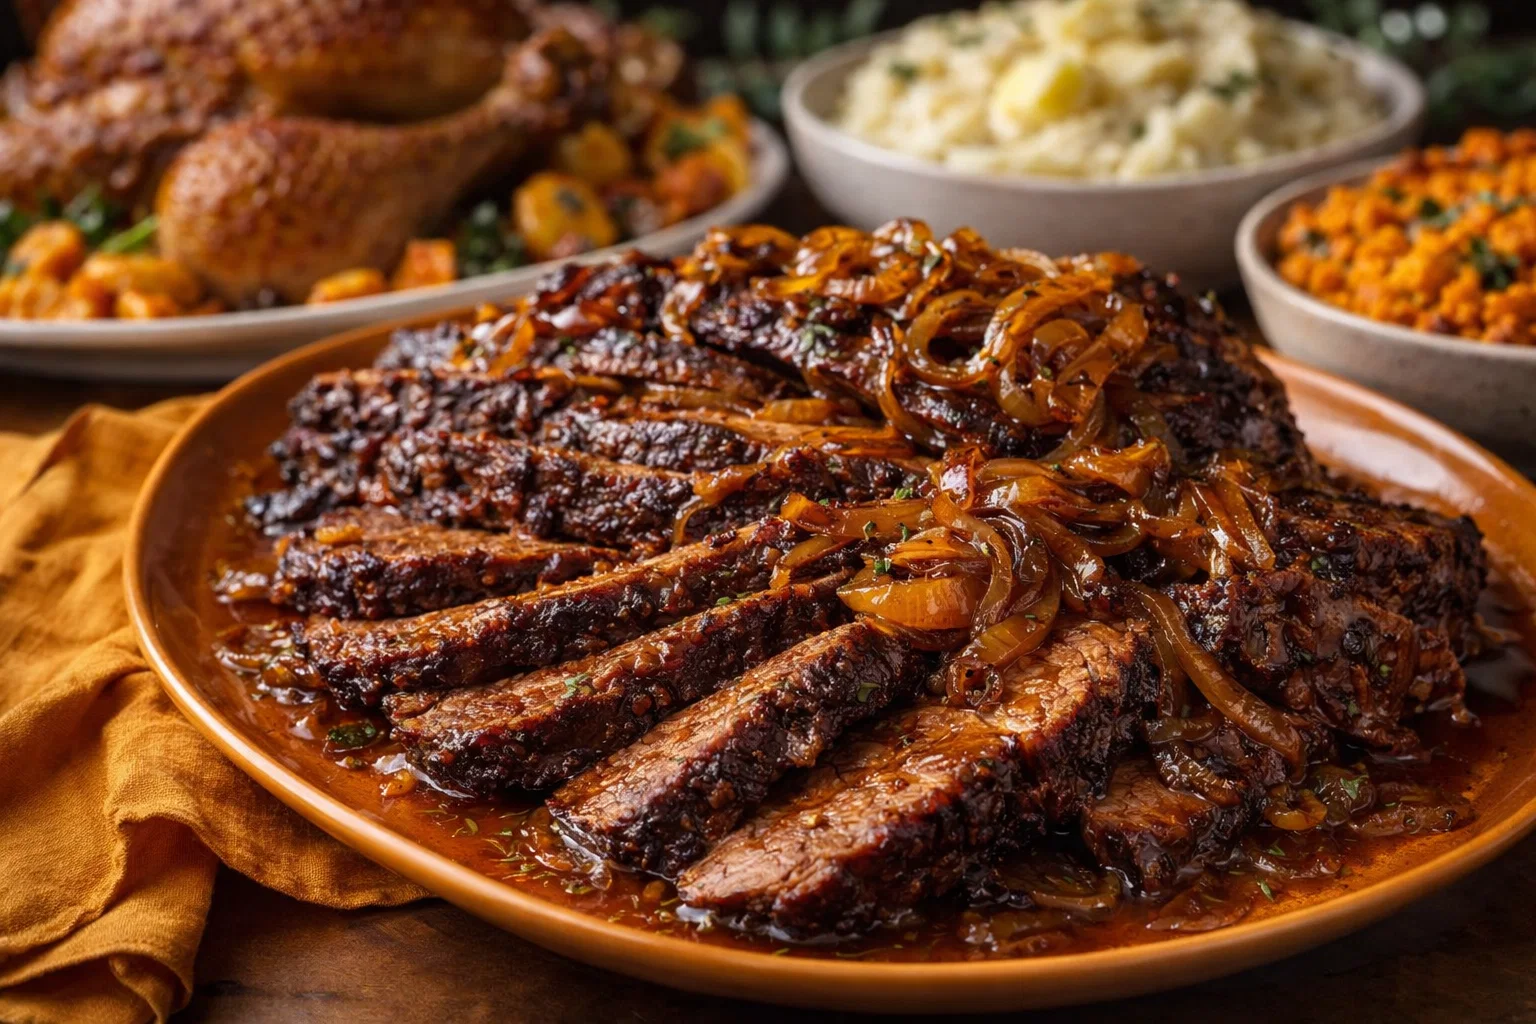
    8. Slice and Serve: Using a sharp knife, slice the brisket against the grain into thin pieces. Serve with the cooking juices spooned over the top for added flavor.

    With this detailed guide, anyone can create a delicious homemade brisket that will leave a lasting impression at Thanksgiving dinner. Remember, it’s a versatile dish that can be personalized for dietary needs easily.

    Mastering Homemade Brisket For Thanksgiving: Advanced Tips and Variations

    Once you’ve mastered the basic recipe for homemade brisket, consider exploring a few advanced tips and variations that can elevate your dish to gourmet status.

    • Marinate Overnight: For deeper flavors, consider marinating the brisket overnight. Use a mixture of your spices along with some apple cider vinegar or red wine for a tenderizing effect.

    • Add a Sweet Element: Incorporating a touch of brown sugar or maple syrup into your spice rub can balance the savory notes with a hint of sweetness. It’s an unexpected twist that can make your brisket unique among Thanksgiving recipes.

    • Experiment with Spices: Feel free to add spices such as cumin, coriander, or chili powder for a regional twist. Each addition can create a different flavor profile, catering to various palates.

    • Slow Cooker Variation: If you prefer, you can adapt this recipe for a slow cooker. Simply follow the steps for seasoning and browning, then place everything in the slow cooker, adding additional broth if needed, and cook on low for 8-10 hours.

    These advanced tips and variations not only enhance your homemade brisket but also inspire creativity in the kitchen, encouraging you to innovate beyond typical Thanksgiving recipes.

    How to Store Homemade Brisket For Thanksgiving: Best Practices

    Once you’ve prepared your delicious homemade brisket and perhaps have some leftovers, it’s essential to know the best storage practices. Properly storing brisket can help maintain its flavor and quality for days to come.

    • Refrigeration: Allow the brisket to cool completely before wrapping it tightly in plastic wrap or aluminum foil. Store it in an airtight container in the refrigerator for up to three days. The juices will help keep the meat moist.

    • Freezing: If you want to store the brisket for longer, consider freezing it. Wrap the sliced brisket tightly in plastic wrap, then in aluminum foil for added protection against freezer burn. Properly stored, it can last for up to two months in the freezer.

    • Reheating: To reheat, thaw the brisket in the refrigerator overnight. Place it in a baking dish with some of its reserved cooking liquid or brisket broth, cover with foil, and reheat in a 300°F (150°C) oven until warmed through (about 20-30 minutes). This method helps retain moisture and flavor.

    Understanding storage practices ensures that your delicious dish can be enjoyed beyond just Thanksgiving dinner.

    Nutritional Value of Homemade Brisket For Thanksgiving

    When preparing a homemade brisket, being aware of its nutritional value can help you make informed choices for your Thanksgiving meal. Below are estimated values for a 3 oz serving of cooked brisket:

    • Calories: Approximately 240
    • Protein: 22g
    • Total Fat: 16g
      • Saturated Fat: 6g
    • Cholesterol: 70mg
    • Sodium: 400mg
    • Carbohydrates: 0g (no carbs)

    Brisket is an excellent source of high-quality protein, essential for muscle repair and growth. It also provides essential vitamins and minerals such as iron, which helps in the production of red blood cells, and B vitamins that are crucial for energy metabolism.

    For those focusing on health-conscious options, trimming visible fat can help reduce calorie intake, ensuring that your homemade brisket is a delicious yet nutritious meal choice this Thanksgiving.

    FAQs: Frequently Asked Questions About Homemade Brisket For Thanksgiving

    Q1: Can I use a different meat for this recipe?

    Absolutely! While brisket is traditional, you can use other cuts like chuck roast or even pork. Adjust cooking times according to the thickness of the cut.

    Q2: How can I make this recipe gluten-free?

    Simply choose gluten-free broth and ensure all your spices are free of gluten contamination.

    Q3: Is it necessary to sear the brisket?

    Searing the meat is highly recommended, as it creates a flavorful crust that enhances the overall taste of the dish.

    Q4: How can I ensure my brisket remains tender?

    Low and slow cooking is key to a tender brisket. Avoid high heat, as it can lead to a tougher texture.

    Q5: Can I cook this dish in advance?

    Yes! Brisket often tastes better the next day, as the flavors deepen. Just reheat gently before serving.

    Incorporating these FAQs provides clarity on common concerns, showcasing your expertise and inviting more exploration into your homemade brisket recipe. By making this recipe accessible and easy, you enrich the Thanksgiving experience for all your loved ones.

  • IM Obsessed Been Making This Brisket Sandwich Non-Stop

    IM Obsessed Been Making This Brisket Sandwich Non-Stop

    I’M Obsessed! Been Making This Brisket Sandwich Non-Stop!: A Tropical Delight

    Introduction to I’M Obsessed! Been Making This Brisket Sandwich Non-Stop!

    Are you on the hunt for new dinner recipes to spice up your mealtime routine? Look no further! The brisket sandwich has taken my kitchen by storm, and for good reason. It’s not only an exceptionally tasty option but also quite simple to prepare. The delightful blend of tender brisket, zesty condiments, and fresh toppings creates a satisfying meal that caters to diverse tastes.

    One of the fantastic aspects of this brisket sandwich is its adaptability. You can easily make it suitable for various dietary needs, whether you’re catering to vegan friends or gluten-intolerant family members. By utilizing alternatives, you can create a low-calorie version of this dish without sacrificing taste. Moreover, preparing this recipe is a wonderful bonding experience for families or friends, making it a perfect culinary adventure to share. So let’s dive into the world of this delicious brisket sandwich and discover why it has become my newfound obsession.

    Benefits and Advantages of I’M Obsessed! Been Making This Brisket Sandwich Non-Stop!

    This brisket sandwich isn’t just another addition to your dinner recipes collection; it represents a culinary strategy that makes meal preparation a delightful experience. One of the biggest advantages is the ease of preparation. With just a handful of ingredients and minimal time commitment, you can whip up a dish that impresses family and friends.

    Health Benefits

    The nutritional profile of this sandwich can be tailored to meet several dietary requirements. For instance, brisket is a source of protein, essential for muscle building and repair, while the choice of fresh veggies as toppings ensures you get your daily vitamins and minerals. Opting for whole-grain bread instead of white can add fiber to your meal, contributing to better digestion.

    Versatility and Flavor

    What sets this recipe apart is its versatility. You can experiment with various condiments, toppings, and seasonings to create a unique flavor profile that suits your palate. Whether you prefer a spicy kick with jalapeños or a sweet crunch with pickles, this sandwich can evolve.

    Family-Friendly

    This brisket sandwich is perfect for family dinners, busy parents looking for quick yet nutritious meals, or college students who want something delicious without breaking the bank. The simplicity of ingredients makes it easy for anyone, from newlyweds to seasoned chefs, to put together and enjoy. It encourages creativity in the kitchen, allowing you to involve little hands in the crafting process.

    In summary, the combination of convenience, adaptability for dietary needs, and rich flavors makes this brisket sandwich an all-star choice among dinner recipes.

    Ingredients Overview

    Essential Ingredients for I’M Obsessed! Been Making This Brisket Sandwich Non-Stop!

    Here’s your comprehensive list of ingredients needed for this scrumptious sandwich:

    • For the Brisket:
    • 2 lbs beef brisket
    • 2 tablespoons olive oil
    • 1 cup beef broth (or vegetable broth for a vegan option)
    • 1 tablespoon garlic powder
    • 1 tablespoon onion powder
    • 1 tablespoon smoked paprika
    • Salt and pepper to taste

    • For the Sandwich:

    • 4 large whole-grain sandwich rolls (gluten-free rolls available)
    • 1 cup shredded lettuce
    • 1 medium tomato, sliced
    • 1 avocado, sliced (optional for a healthy fat boost)
    • Your choice of condiments (barbecue sauce, mustard, or aioli)

    Dietary Substitutions to Customize Your I’M Obsessed! Been Making This Brisket Sandwich Non-Stop!

    Vegan Option: Substitute the brisket with jackfruit or seitan, and replace beef broth with vegetable broth. The same spices can be applied to achieve a satisfying flavor.

    Gluten-Free Option: Use gluten-free sandwich rolls, which ensure that everyone can enjoy this delicious meal without dietary concerns.

    Low-Calorie Option: For a lighter sandwich, skip the bread altogether and serve the brisket over a bed of greens. This substitution not only reduces calories but also packs in nutrition.

    Feel free to swap out any ingredient to suit your taste preferences or dietary restrictions. The goal is to create a meal that everyone can enjoy!

    How to Prepare the Perfect I’M Obsessed! Been Making This Brisket Sandwich Non-Stop!: Step-by-Step Guide

    Get ready to embark on a cooking adventure! Below is a straightforward, step-by-step guide to creating your very own brisket sandwich masterpiece.

    1. Prepare the Brisket:
    2. Begin by preheating your oven to 300°F (150°C). Pat the brisket dry with paper towels, which helps it brown nicely when cooking.

    3. Season the Meat:

    4. Rub the brisket generously with olive oil, salt, pepper, garlic powder, onion powder, and smoked paprika. Make sure to coat the meat evenly for maximum flavor.

    5. Cooking the Brisket:

    6. Place the brisket in a roasting pan. Pour the beef broth around the meat (don’t pour it directly over or you’ll wash off the seasoning). Cover the pan tightly with aluminum foil.

    7. Slow Cook:

    8. Cook in the preheated oven for about 3 to 4 hours or until the meat is fork-tender and easily shreds. This slow cooking allows flavors to meld beautifully.

    9. Shred the Brisket:

    10. Once cooked, remove the brisket from the oven. Let it rest for about 20 minutes, then use two forks to shred the meat.

    11. Assemble the Sandwich:

    12. Take your sandwich roll and layer a generous amount of shredded brisket. Top with shredded lettuce, tomato slices, and avocado (if using). Drizzle your choice of condiments over the top.

    13. Serve:

    14. Place the sandwiches on a serving platter and dig in! This brisket sandwich pairs wonderfully with a side of sweet potato fries or a simple salad.

    Feel free to alter any portion of this recipe to meet dietary preferences, making it a versatile and essential part of your dinner recipes repertoire.

    Mastering I’M Obsessed! Been Making This Brisket Sandwich Non-Stop!: Advanced Tips and Variations

    To elevate your brisket sandwich experience, consider these advanced tips and variations:

    • Marinate the Brisket: For deeper flavor, consider marinating the brisket overnight with the spices and a splash of vinegar. This can enhance tenderness and infusion of flavors.

    • Grill It: If you’re aiming for a smoky flavor, grill your bread before assembling the sandwich. The added char offers a delightful contrast to the juicy brisket.

    • Try Different Breads: Experiment with various bread types—ciabatta, baguette, or even a pretzel bun! The right bread can elevate your sandwich to the next level.

    • Trash Can Nacho Twist: Turn your brisket leftovers into trash can nachos. Layer tortilla chips with shredded brisket, cheese, jalapeños, and your favorite toppings for a fun party snack.

    Using these advanced tips will not only help you master this recipe but also spark creativity in your kitchen, allowing you to craft unique variations time and again.

    How to Store I’M Obsessed! Been Making This Brisket Sandwich Non-Stop!: Best Practices

    Let’s talk about the best storage methods for maintaining the integrity of your brisket sandwich:

    • Refrigeration: Store any leftover brisket in an airtight container for up to four days. To keep the bread crisp, store it separately.

    • Freezing: If you want to preserve leftovers for longer, shredded brisket can be frozen. Place it in a freezer-safe bag, pushing out as much air as possible. It will last for about three months.

    • Reheating: To reheat brisket, place it in a saucepan over low heat with a splash of broth or water to prevent it from drying out. Warm on the stovetop until heated through. For sandwiches, toast the bread lightly before assembling.

    Proper storage ensures that you can enjoy your delicious brisket creation for days to come, fitting into your hectic schedule while offering the allure of comfort food at its best.

    Nutritional Value of I’M Obsessed! Been Making This Brisket Sandwich Non-Stop!

    Understanding the nutrition behind your meals is essential. Here’s a nutritional breakdown of a standard brisket sandwich (excluding condiments):

    • Calories: Approximately 450
    • Protein: 30g
    • Fat: 25g (can be reduced with leaner cuts and low-fat condiments)
    • Carbohydrates: 40g (can be lowered by opting for fewer carbs or alternate bases)
    • Fiber: 6g (more fiber if using whole-grain or adding veggies)

    These values will vary based on specific ingredient choices, so be sure to modify your recipe to meet your particular dietary goals. The brisket serves as a great source of protein, while the vegetables contribute to your overall nutrient intake.

    FAQs: Frequently Asked Questions About I’M Obsessed! Been Making This Brisket Sandwich Non-Stop!

    Q: Can I make this brisket sandwich in a slow cooker?
    A: Absolutely! You can follow the same seasoning and preparation steps, then cook on low in your slow cooker for 6-8 hours. The brisket will become incredibly tender and flavorful.

    Q: How can I make this sandwich kid-friendly?
    A: Adjust the seasonings and stick with milder condiments. Instead of adding spicy toppings, go for slightly sweet sauces or simply stick to classic mayo or ketchup.

    Q: What can I use instead of brisket?
    A: If brisket isn’t available, you can substitute other meat cuts, such as chuck roast or even pulled pork. For a vegetarian option, jackfruit works well.

    Q: Is it possible to make this dish spicy?
    A: Certainly! Add chili powder to the spice mixture for the brisket or layer on jalapeños and spicy barbecue sauce to kick things up a notch.

    Q: How do I ensure my brisket stays moist while cooking?
    A: Protect the brisket with foil while it cooks, and make sure the broth surrounds the meat to provide moisture. Letting it rest after cooking also helps retain juiciness.

    This brisket sandwich recipe offers endless opportunities to explore culinary creativity while addressing various dietary requirements. Enjoy the journey as you dive into this delicious world of flavors!

  • IM Obsessed Been Making This Carrot Cake Non-Stop

    IM Obsessed Been Making This Carrot Cake Non-Stop

    I’M Obsessed! Been Making This Carrot Cake Non-Stop!: A Tropical Delight

    Introduction to I’M Obsessed! Been Making This Carrot Cake Non-Stop!

    If you’re in the search for extraordinary dessert recipes that strike the perfect balance between indulgence and nourishment, look no further! This carrot cake recipe has captured my heart (and my taste buds) and has been my go-to treat. Not only is it unbelievably easy to make, but it also offers amazing health benefits. Made with wholesome ingredients, this cake is rich in nutrients, moist, and fluffy, all while being suitable for various dietary preferences.

    The beauty of this carrot cake lies in its versatility. It can easily be made vegan or gluten-free without sacrificing flavor or texture. Whether you’re a busy parent looking for a quick dessert to whip up for a school bake sale, a student who wants a sweet treat after a hectic day of classes, or someone who simply enjoys baking, this cake is a fantastic choice. Trust me, once you try it, you’ll understand why I can’t stop making it!

    With the perfect mix of spices and natural sweetness from carrots, this carrot cake not only satisfies your sweet tooth but also aligns with your health goals. Let’s dive into this delectable recipe and discover the many reasons why you’ll fall in love with it, just like I have.

    Benefits and Advantages of I’M Obsessed! Been Making This Carrot Cake Non-Stop!

    Why should you add this carrot cake to your repertoire of dessert recipes? Here are just a few reasons that make it a standout option for home cooks from all walks of life:

    1. Simplicity in Preparation: This delightful carrot cake requires minimal effort to prepare, making it perfect even for novice bakers. With straightforward steps and readily available ingredients, you won’t have to worry about complicated techniques or special equipment.

    2. Health Benefits: Carrots are packed with vitamins and antioxidants, making this cake a guilt-free indulgence. Rich in beta-carotene, they contribute to better vision and skin health while providing dietary fiber for digestive health. When combined with wholesome ingredients like whole wheat flour or almond flour, the nutritional profile improves significantly.

    3. Versatile for Dietary Needs: Whether you’re following a vegan diet, gluten-free lifestyle, or trying to cut back on sugar, this cake can accommodate various preferences. Substitutions can be made easily, allowing everyone to enjoy a piece of this moist and flavorful carrot cake.

    4. Great for Any Occasion: This carrot cake is not just for dessert; it can also serve as a birthday cake, dessert for family gatherings, or a sweet treat to offer guests. Its beautiful appearance and delightful aroma will undoubtedly impress anyone who tries it.

    5. Make-Ahead Friendly: Another advantage is that this cake can be made in advance. Whether you want to prepare it for a special event or simply to have on hand for snacking, it keeps well, allowing you to enjoy it throughout the week.

    With these benefits in mind, it’s clear why you’ll want to keep making this delectable carrot cake. It’s a treat that checks off every box, from flavor and convenience to health and inclusivity!

    Ingredients Overview

    Essential Ingredients for I’M Obsessed! Been Making This Carrot Cake Non-Stop!

    Here is a list of the essential ingredients you’ll need to create this scrumptious carrot cake, along with their measurements and purposes:

    • 2 cups all-purpose flour (or gluten-free flour for a gluten-free option)
    • 1 ½ cups granulated sugar (or coconut sugar or maple syrup for a healthier choice)
    • 1 teaspoon baking soda
    • 1 teaspoon baking powder
    • 1 teaspoon ground cinnamon
    • ½ teaspoon ground nutmeg
    • ½ teaspoon salt
    • 1 cup vegetable oil (or unsweetened applesauce for a lower-calorie option)
    • 4 large eggs (or flaxseed eggs for a vegan option)
    • 3 cups grated carrots (freshly shredded)
    • 1 cup crushed pineapple, drained (adds moisture and sweetness)
    • 1 cup chopped walnuts or pecans (optional, but adds texture)
    • 1 teaspoon vanilla extract

    It’s essential to choose quality ingredients to achieve the best results. For instance, opting for fresh, organic carrots and high-quality spices enhances the flavor profile of your carrot cake.

    Dietary Substitutions to Customize Your I’M Obsessed! Been Making This Carrot Cake Non-Stop!

    There’s always room for customization in any recipe! Here are some suggested substitutions to cater to different dietary needs:

    1. Vegan Version: Replace eggs with flaxseed eggs (mix 1 tablespoon ground flaxseed with 2.5 tablespoons water and let sit for 5 minutes) or unsweetened applesauce (¼ cup per egg).

    2. Gluten-Free Version: Use a gluten-free flour blend instead of all-purpose flour and ensure any baking powder is also gluten-free.

    3. Reduced Sugar Option: Substitute granulated sugar for coconut sugar, monk fruit sweetener, or reduce sugar and enhance natural sweetness with more carrots and pineapple.

    4. Lower-Calorie Option: Substitute vegetable oil with unsweetened applesauce or yogurt, allowing for moistness without as many calories.

    5. Nuts-Free: Omit the walnuts or pecans entirely or replace them with seeds like sunflower or pumpkin seeds to provide texture without the allergen.

    These substitutions not only make the recipe easier to adapt to your specific needs, but they also maintain the deliciousness that makes this cake so appealing.

    How to Prepare the Perfect I’M Obsessed! Been Making This Carrot Cake Non-Stop!: Step-by-Step Guide

    Are you ready to create your own delightful carrot cake? Follow this step-by-step guide to ensure success every time you whip up this dessert recipe:

    1. Preheat the Oven: Start by preheating your oven to 350°F (175°C). Greasing and flouring two 9-inch round cake pans will help your cakes release easily once they’re done baking.

    2. Prepare Dry Ingredients: In a large mixing bowl, sift together the all-purpose flour, baking powder, baking soda, cinnamon, nutmeg, and salt. This ensures all dry ingredients are evenly mixed and free of lumps.

    3. Mix the Wet Ingredients: In another bowl, whisk together the vegetable oil and granulated sugar until fully combined. Incorporate the eggs one at a time, mixing well between each addition. If you’re using flaxseed eggs or applesauce, add them at this stage.

    4. Combine Mixtures: Gradually add the dry ingredients to the wet mixture. Be careful not to overmix; stir until just combined, allowing for small lumps.

    5. Add the Good Stuff: Gently fold in the grated carrots, drained crushed pineapple, and chopped nuts (if using). This is where the flavor and texture come together beautifully.

    6. Pour Batter into Pans: Divide the batter evenly between the prepared cake pans, smoothing the tops with a spatula.

    7. Bake: Place the cake pans into the preheated oven and bake for 25-30 minutes. Your cakes are done when a toothpick inserted in the center comes out clean.

    8. Cool: Allow the cakes to cool in their pans for about 10 minutes before inverting them onto a wire rack to cool completely. Cooling is crucial for icing and ensure the cake retains its shape.

    9. Prepare Your Favorite Frosting: While the cake cools, prepare a cream cheese frosting or vegan frosting if required. Mix your cream cheese with powdered sugar, butter (or coconut oil), and vanilla until well blended.

    10. Frost the Cake: Once cooled, layer your carrot cake. Spread frosting between the layers and on top, making it as lavish as you desire!

    11. Serve: Let the cake sit for about 30 minutes to set before slicing. Serve it with coffee, tea, or as a sweet ending to any meal.

    12. Enjoy and Share: Enjoy your homemade carrot cake responsibly—though I guarantee you’ll be tempted to eat more than one slice!

    By following these simple steps, you will create a show-stopping carrot cake everyone will want to enjoy. Don’t forget to customize your cake based on dietary preferences for the best experience!

    Mastering I’M Obsessed! Been Making This Carrot Cake Non-Stop!: Advanced Tips and Variations

    Once you master this carrot cake, you can explore various tips and flavor variations that will elevate your baking game. Here are some suggestions:

    • Add Spices: Don’t stop at cinnamon and nutmeg. Feel free to experiment with cardamom, ginger, or allspice to introduce unique flavor dimensions.

    • Frosting Options: Instead of cream cheese frosting, consider coconut cream frosting or a simple dusting of powdered sugar for a lighter finish. Chocolate lovers can also experiment with chocolate ganache!

    • Mix-Ins: Include shredded coconut, raisins, or even apple chunks for additional flavors and textures. These additions can personalize the carrot cake to your liking.

    • Storage Variations: Make cupcake versions of this carrot cake! Use a standard cupcake tin and bake for about 15-20 minutes for individual-sized treats perfect for lunchboxes or gatherings.

    • Decorative Toppings: Add fresh fruit, nuts, or even edible flowers as decorative toppings for a professional touch when serving your cake at gatherings.

    With these tips, you can turn a simple cake into a show-stopping dessert that delights everyone!

    How to Store I’M Obsessed! Been Making This Carrot Cake Non-Stop!: Best Practices

    Proper storage is vital to keep your carrot cake moist and flavorful. Follow these best practices to maintain its deliciousness:

    • Refrigeration: Store any leftover carrot cake in an airtight container in the fridge. If you used cream cheese frosting, it’s essential to refrigerate the cake to prevent spoilage.

    • Freezing: For longer storage, freeze your carrot cake. Wrap individual slices in plastic wrap and place them in a freezer bag. Thaw overnight in the refrigerator before serving.

    • Room Temperature: If the cake is unfrosted, you can store it at room temperature for a few days, covered in plastic wrap. However, frosting should always go in the fridge.

    This cake is best enjoyed fresh, but with proper storing methods, you can keep it around for days and even weeks.

    Nutritional Value of I’M Obsessed! Been Making This Carrot Cake Non-Stop!

    Understanding the nutritional value of your carrot cake can keep your health goals in check while enjoying a slice of this delightful treat. Here’s a breakdown:

    • Serving Size: Approx. 1 slice (1/12 of a cake)
    • Calories: 350-400 calories (can vary based on ingredients used)
    • Total Fat: 18g (varies with oil or applesauce)
    • Saturated Fat: 2g
    • Cholesterol: 50mg (optional for vegan)
    • Sodium: 220mg
    • Total Carbohydrates: 50g
    • Dietary Fiber: 2g
    • Sugars: 25g
    • Protein: 4g

    This cake offers a moderate number of calories along with a fair amount of fiber from the carrots, making it a more nutritious choice compared to traditional desserts. Just keep portion control in mind, especially if you’re focusing on healthful eating!

    FAQs: Frequently Asked Questions About I’M Obsessed! Been Making This Carrot Cake Non-Stop!

    Can I make this carrot cake ahead of time?

    Absolutely! Carrot cake can be made up to a few days in advance. Just wrap it in plastic wrap or store it in an airtight container in the refrigerator until you’re ready to serve.

    What can I use instead of eggs?

    If you’re looking for an egg substitute, consider using flaxseed eggs (mixing 1 tablespoon ground flaxseed with 2.5 tablespoons water) or unsweetened applesauce (¼ cup for each egg).

    How do I store leftovers?

    Leftover carrot cake should be kept in an airtight container in the fridge, especially if frosted. You can keep it at room temperature for a couple of days if it’s unfrosted.

    Can I freeze the carrot cake?

    Yes! You can freeze the un-frosted carrot cake. Wrap it tightly in plastic wrap and aluminum foil and place it in a freezer-safe bag. It can last for up to three months.

    How can I make the cake gluten-free?

    You can easily substitute regular flour with a gluten-free flour blend. Ensure the baking powder is also gluten-free to keep the recipe compliant.

    Is it possible to reduce the sugar content?

    Certainly! You can reduce the amount of sugar in the recipe and add extra shredded carrots or pineapple to maintain sweetness.

    Can I add other fruits to the cake?

    Yes! Feel free to add fruits like apples, bananas, or even dried fruits like raisins or cranberries for a flavor twist.

    Try this carrot cake today and share in the deliciousness that has me hooked! Once you’ve tasted how easy it is to create an impressive dessert that satisfies your cravings and fits into your dietary needs, you’ll want to make it again and again!

  • I CanT Stop Making This Traditional German Side Dish

    I CanT Stop Making This Traditional German Side Dish

    I Can’T Stop Making This Traditional German Side Dish: A Tropical Delight

    Introduction to I Can’T Stop Making This Traditional German Side Dish

    If you are searching for an easy addition to your dinner recipes that is both authentic and delicious, look no further than this classic German side dish. With its tantalizing flavor and simple preparation, this dish is an excellent choice for home cooks of all skill levels. Whether you’re a busy parent looking for a quick meal solution, a student on a budget, or a seasoned chef seeking to wow your guests, this traditional German side dish is versatile and satisfying.

    Not only is it easy to make, but it also boasts several health benefits. Packed with wholesome ingredients, this recipe can be effortlessly adapted to suit various dietary needs. Whether you’re vegan, gluten-free, or simply seeking a healthier option, this dish can be customized without sacrificing flavor. It’s also perfect for various occasions, from casual family dinners to festive gatherings.

    In the following sections, we will delve into the benefits of making this delightful side dish, provide a comprehensive list of ingredients, and guide you step by step through the cooking process. Get ready to discover a culinary gem that you won’t be able to resist making over and over again!

    Benefits and Advantages of I Can’T Stop Making This Traditional German Side Dish

    Let’s explore what makes this German side dish a standout in the world of dinner recipes. First and foremost, its simplicity is a significant advantage. With just a handful of ingredients, you can create a tasty accompaniment that complements various main dishes—be it roasted meat, grilled vegetables, or even a hearty plant-based entrée.

    Health Benefits

    In addition to its ease of preparation, this side dish is incredibly nutritious. Here are some key health benefits:

    • Rich in Nutrients: The primary ingredients are often vegetables and herbs rich in vitamins, minerals, and fiber, supporting a balanced diet.
    • Low in Calories: When prepared using fresh, minimally processed ingredients, this dish is relatively low in calories, making it suitable for those who are calorie-conscious.
    • Customizable Nutrition: With the option to use gluten-free grains, low-fat dairy, or plant-based proteins, you can easily adapt this dish to align with your dietary preferences.

    Versatility

    One of the most exciting aspects of this traditional German side dish is its versatility. It pairs beautifully with a wide array of main courses, making it perfect for any occasion. Whether you’re preparing a festive holiday meal or a quick weeknight dinner, this dish will elevate your table. Moreover, it’s equally delightful served warm or cold, allowing for creative leftovers the next day.

    As you can see, the benefits of this traditional German side dish extend beyond its delicious taste. Its simplicity, health benefits, and adaptability are just a few reasons why it deserves a place in your kitchen repertoire.

    Ingredients Overview

    Essential Ingredients for I Can’T Stop Making This Traditional German Side Dish

    To prepare this traditional German side dish, you’ll need the following ingredients. Each ingredient plays a specific role for flavor and texture:

    1. Potatoes (2 lbs)
    2. Base of the dish, provides starchiness and comfort.
    3. Option: Sweet potatoes for extra nutrition (gluten-free, vegan).

    4. Onion (1 medium, diced)

    5. Adds depth and sweetness.
    6. Option: Use shallots for a subtler flavor.

    7. Vegetable Broth (2 cups)

    8. Enhances flavor while keeping the dish moist.
    9. Option: Low-sodium broth for a healthier option (vegan, gluten-free).

    10. Olive Oil (1/4 cup)

    11. For sautéing the vegetables and enriching flavor.
    12. Option: Avocado oil for a high smoke point (vegan, gluten-free).

    13. Fresh Parsley (1/4 cup, chopped)

    14. Brightens the dish with its fresh flavor.
    15. Option: Use green onions for a milder taste.

    16. Salt and Pepper (to taste)

    17. Essential seasonings to enhance flavors.

    By selecting fresh, high-quality ingredients, you can create a dish that’s not only satisfying but also bursting with vibrant flavors.

    Dietary Substitutions to Customize Your I Can’T Stop Making This Traditional German Side Dish

    This recipe is incredibly adaptable, allowing for various substitutions based on dietary requirements or ingredient availability:

    • Vegan Option: Replace vegetable broth with a vegan-friendly version. Ensure any cheese used is plant-based.
    • Gluten-Free Option: This dish is naturally gluten-free as it primarily uses vegetables and broth.
    • Low-Calorie Option: Use less oil, or substitute with a cooking spray to reduce calorie intake while still achieving that perfect sauté.

    Considering these substitutions ensures that everyone can enjoy this delightful side dish, no matter their dietary restrictions.

    How to Prepare the Perfect I Can’T Stop Making This Traditional German Side Dish: Step-by-Step Guide

    Now that we’ve covered the ingredients and their benefits, let’s dive into the step-by-step process for preparing this traditional German side dish. Follow these clear instructions for an easy cooking experience:

    1. Prepare the Base:
    2. Begin by peeling the potatoes and cutting them into small, even-sized cubes. This will ensure they cook uniformly. Rinse the cubed potatoes under cold water to remove excess starch.

    3. Sauté the Onion:

    4. In a large skillet or pot, heat the olive oil over medium heat. Add the diced onion and sauté for about 5 minutes until translucent and slightly golden.

    5. Cook the Potatoes:

    6. Add the cubed potatoes to the skillet. Stir well to coat them in the oil. Sauté for another 5-7 minutes, allowing the potatoes to slightly brown. This technique enhances their flavor.

    7. Add the Broth:

    8. Pour in the vegetable broth, bringing the mixture to a gentle boil. Reduce the heat to low and cover the skillet. Allow the potatoes to simmer for about 15-20 minutes, or until they are fork-tender.

    9. Season the Dish:

    10. Once the potatoes are cooked, season with salt and pepper according to your taste. It’s essential to taste as you go!

    11. Incorporate Fresh Herbs:

    12. Stir in the chopped parsley, mixing thoroughly to distribute the fresh flavor throughout the dish.

    13. Final Touches:

    14. If desired, you can sprinkle additional herbs or a squeeze of lemon juice for brightness before serving.

    15. Serve and Enjoy:

    16. Serve warm alongside your favorite main dishes, and enjoy the delightful flavors of this traditional German side dish.

    This recipe not only provides a delicious side option but also serves as a base for creativity. You can add your favorite vegetables or proteins to make it even more wholesome.

    Mastering I Can’T Stop Making This Traditional German Side Dish: Advanced Tips and Variations

    To elevate your experience with this traditional German side dish, consider these advanced tips and exciting variations:

    • Experiment with Spices:
      Incorporate spices like smoked paprika or nutmeg for added depth. A touch of garlic can also elevate the overall flavor profile.

    • Add Protein:
      For a heartier meal, consider mixing in cooked sausages or chickpeas. This addition makes the dish more filling and turns it into a complete dinner option.

    • Herbed Variations:
      Switch out parsley for dill or chives to give it a fresh twist on the traditional flavor. Experimenting with different herbs can reinvigorate the dish each time you prepare it.

    • Texture Additions:
      Try garnishing with toasted nuts or seeds like sunflower seeds or almonds for a satisfying crunch. This addition also introduces healthy fats and protein.

    Maximizing your enjoyment of this dish can lead to creating new family favorites, making it an exciting culinary adventure.

    How to Store I Can’T Stop Making This Traditional German Side Dish: Best Practices

    Proper storage can help you maximize the lifespan and flavor of this traditional German side dish. Here are the best practices for refrigeration and reheating:

    • Refrigeration:
      After cooking, allow the dish to cool to room temperature. Transfer it into an airtight container and store it in the refrigerator for up to 3-5 days. Keeping the dish sealed prevents moisture loss and flavor evaporation.

    • Freezing:
      If you wish to make this ahead of time, you can freeze it. Place the cooled dish into freezer-safe containers, leaving about an inch of space at the top for expansion. This dish can be frozen for up to 2-3 months.

    • Reheating:
      When you’re ready to eat, thaw the frozen dish overnight in the refrigerator. Reheat it gently on the stove over low heat, adding a splash of vegetable broth or water if it seems dry. You can also reheat portions in the microwave, ensuring even heating.

    Following these storage practices ensures that you enjoy the dish with all its delicious flavors intact.

    Nutritional Value of I Can’T Stop Making This Traditional German Side Dish

    Understanding the nutritional value of your meals is crucial for maintaining a balanced diet. Here’s a breakdown of the nutrition per serving of this delightful traditional German side dish (estimated for four servings):

    • Calories: 180
    • Protein: 4g
    • Fat: 7g (Saturated Fat: 1g)
    • Carbohydrates: 27g
    • Fiber: 4g
    • Sugars: 1g
    • Sodium: 150mg (varies based on the broth used)

    This dish is not only a great accompaniment to your meals but also provides essential nutrients to support your health and well-being.

    FAQs: Frequently Asked Questions About I Can’T Stop Making This Traditional German Side Dish

    Q1: Can I customize the vegetables in this dish?

    Absolutely! You can incorporate seasonal vegetables like carrots, green beans, or kale for extra nutrition and flavor.

    Q2: How do I make it vegan?

    To ensure this dish aligns with vegan requirements, simply use vegetable broth and omit any dairy ingredients.

    Q3: Can I make this dish ahead of time?

    Yes, this dish can be prepared in advance. Just store it properly in the refrigerator or freezer, as previously mentioned.

    Q4: What main dishes pair well with this side?

    This traditional German side dish pairs well with grilled meats, roasted vegetables, and any hearty main courses like sausages or pot roasts.

    Q5: Is there a quick method to prepare this side dish?

    If you’re pressed for time, you can use pre-cut vegetables and store-bought broth to significantly reduce prep time.

    This traditional German side dish is sure to become a staple in your dinner recipes collection. Whether enjoyed fresh or as leftovers, it’s a comforting, delightful addition to any meal. Happy cooking!

  • Spiced Carrot Cake Jam

    Spiced Carrot Cake Jam

    Spiced Carrot Cake Jam: A Tropical Delight

    Introduction to Spiced Carrot Cake Jam

    Are you ready to embark on a culinary journey that harmonizes the warmth of baking with the delightful spreadability of jam? Look no further than this Spiced Carrot Cake Jam, a unique twist on traditional dessert recipes that captivates your taste buds while also offering a plethora of health benefits. With its harmonious blend of spices and the natural sweetness of carrots, this jam not only serves as an outstanding topping but also stands out as a wholesome dessert alternative.

    This recipe is remarkable for several reasons. First and foremost, its preparation is incredibly straightforward, making it ideal for busy parents, students, or anyone who wishes to whip up something delicious without delving into complex baking techniques. Additionally, it caters to various dietary needs—being naturally vegan, gluten-free, and low-calorie, it bridges dietary preferences while still providing comfort and flavor.

    Imagine spreading this spiced jam on your morning toast, dolloping it on pancakes, or using it as a unique filling for pastries. Versatile and delightful, Spiced Carrot Cake Jam makes every meal feel special. Not only does it add a tropical touch to your breakfast, but it serves as a vibrant companion for cheese platters and enhances desserts with that needed zing.

    If you’re looking for an innovative addition to your repertoire of dessert recipes or a healthy, tasty gift for loved ones, this jam is the perfect choice. Ready to dive into the world of wholesome indulgence? Let’s begin!

    Benefits and Advantages of Spiced Carrot Cake Jam

    Spiced Carrot Cake Jam is much more than just a delicious spread; it offers a variety of benefits that make it an essential addition to your kitchen. Here’s why you should consider incorporating this delightful recipe into your culinary creations.

    1. Easy Preparation

    One of the primary advantages of making Spiced Carrot Cake Jam is its simplicity. Even if you’re new to jam-making, you’ll find that the process is beginner-friendly. The ingredients are generally easy to find, and the steps are straightforward, which makes it a great project for busy parents looking to involve kids in the kitchen or for students preparing quick snacks.

    2. Health Benefits

    Carrots are not only naturally sweet but also packed with essential nutrients. They are a fantastic source of beta-carotene, fiber, vitamin K1, potassium, and antioxidants. This jam allows you to leverage the nutritional benefits of carrots while enjoying them in a unique form. Additionally, this recipe utilizes minimal sugar compared to traditional jams, providing a healthier alternative. The spices—like cinnamon and nutmeg—also contribute antioxidants and anti-inflammatory properties, making this dessert not just a treat but also a little health boost.

    3. Versatility

    This jam can easily transition across different meals and occasions, making it a versatile dish. Whether you want a sweet topping for breakfast, a flavorful addition to a cheese board, or a dessert filling, this jam fits the bill. You can serve it warm or cold, and it pairs well with various foods, from bagels to ice cream.

    4. Dietary Accommodating

    With the rising demand for inclusive cooking, this Spiced Carrot Cake Jam caters to various dietary requirements. It is vegan, gluten-free, and low in refined sugars, making it suitable for individuals with dietary restrictions or those simply trying to eat healthier. Whether you have family members with allergies or are simply conscious of what you’re consuming, this recipe adapts seamlessly.

    5. Gift-Worthy

    In today’s fast-paced world, homemade gifts carry a special sentiment. Spiced Carrot Cake Jam can easily be jarred and decorated, making it not just a treat for you but a thoughtful present for friends and family on special occasions. It showcases both your culinary skills and your consideration for loved ones’ taste preferences.

    By embracing Spiced Carrot Cake Jam in your cooking endeavors, you’re not only treating yourself to an exquisite taste experience but also making a wholesome choice that benefits your overall well-being and that of your family and friends.

    Ingredients Overview

    Essential Ingredients for Spiced Carrot Cake Jam

    To create your own batch of Spiced Carrot Cake Jam, gather the following ingredients:

    • 2 cups finely grated carrots (about 4-5 medium carrots)
    • Benefit: Packed with vitamins and adds natural sweetness.
    • 1 cup granulated sugar (or coconut sugar for a lower glycemic option)
    • Benefit: Acts as a preservative and sweetener.
    • 1/2 cup apple cider
    • Benefit: Adds acidity and depth while being low in calories.
    • 1 tablespoon lemon juice (freshly squeezed)
    • Benefit: Brightens flavors and aids in preservation.
    • 1 teaspoon ground cinnamon
    • Benefit: Known for anti-inflammatory properties.
    • 1/2 teaspoon ground nutmeg
    • Benefit: Enhances the warm flavor profile.
    • 1/4 teaspoon ground allspice
    • Benefit: Provides a unique flavor twist.
    • 1/4 teaspoon ground ginger
    • Benefit: Adds warmth and has digestive properties.
    • 1 tablespoon cornstarch (optional, for thicker jam)
    • Benefit: Helps in gel-forming, does not add calories if omitted.
    • 1/2 cup crushed walnuts or pecans (optional)
    • Benefit: Adds richness and healthy fats.

    Make sure to double-check the labels on your ingredients to ensure they fit any specific dietary needs you or your loved ones might have. Each ingredient contributes to the balance of flavor and nutrition, making this jam not only tasty but also wholesome.

    Dietary Substitutions to Customize Your Spiced Carrot Cake Jam

    Customization can enhance satisfaction, especially when accommodating different dietary preferences:

    • Sugar Alternatives: Substitute granulated sugar for honey, agave nectar, or a sugar substitute like Stevia or monk fruit for a low-sugar version.
    • Gluten-Free Options: Ensure that your cornstarch is certified gluten-free if you choose to use any, as some brands may contain gluten.
    • Nuts: If allergies are a concern, skip the nuts, or replace them with sunflower seeds for crunch without the allergen.
    • Spices: Consider adding a dash of cardamom or cloves for added flavor complexity if you enjoy experimenting with spices.

    Your Spiced Carrot Cake Jam can be tailored to fit your needs, ensuring everyone at the table can indulge in a guilt-free delight that mirrors their dietary requirements.

    How to Prepare the Perfect Spiced Carrot Cake Jam: Step-by-Step Guide

    Now that we’ve gathered all the essential ingredients and considered our dietary preferences, let’s dive into the process of making this delicious jam. Follow these clear, actionable steps to achieve the perfect consistency and flavor for your Spiced Carrot Cake Jam.

    1. Prepare the Carrots:
    2. Begin by washing and peeling 4-5 medium carrots. Finely grate them using a box grater or food processor; ensure you have about 2 cups of grated carrots.

    3. Combine Ingredients in a Pot:

    4. In a medium-sized saucepan, combine the grated carrots, 1 cup of sugar (or sweetener), 1/2 cup of apple cider, 1 tablespoon of freshly squeezed lemon juice, 1 teaspoon of ground cinnamon, 1/2 teaspoon of ground nutmeg, 1/4 teaspoon of ground allspice, and 1/4 teaspoon of ground ginger. This mixture will become the flavorful base for your jam.

    5. Cook the Mixture:

    6. Place the saucepan over medium heat. Stir the ingredients together until the sugar has dissolved completely and the mixture begins to simmer.

    7. Simmer and Stir:

    8. Allow the mixture to simmer for about 10-15 minutes, stirring frequently to prevent sticking. The carrots will soften, and the flavors will meld beautifully.

    9. Thicken the Jam (Optional):

    10. If you prefer a thicker jam, mix 1 tablespoon of cornstarch with a few tablespoons of cold water to create a slurry. Slowly add it to the simmering pot while stirring continuously to avoid lumps. Cook for an additional 3-5 minutes until thickened.

    11. Add Nuts (Optional):

    12. If using crushed walnuts or pecans, fold them in now for added texture and flavor. They will enhance both the taste and visual appeal of your jam.

    13. Select Containers:

    14. Prepare your jars: If you’re planning to store the jam for an extended period, ensure you are using sterilized jars. To sterilize, place the clean jars in a hot oven for about 10 minutes, or boil them in water.

    15. Fill the Jars:

    16. Carefully pour the hot jam into the sterilized jars, leaving about 1/4 inch of headspace at the top.

    17. Seal and Cool:

    18. Seal the jars with lids tightly and let them cool to room temperature. This step helps to create a vacuum seal, which extends the shelf life of your jam.

    19. Store the Jam:

    20. Once cooled, store your Spiced Carrot Cake Jam in the refrigerator for up to three weeks, or follow proper canning procedures for longer preservation.

    Each step in this recipe offers you the chance to alter it based on your taste or dietary requirements. Enjoy the delightful aroma that fills your kitchen as you prepare a batch of this tropical-inspired jam that celebrates the essence of dessert recipes!

    Mastering Spiced Carrot Cake Jam: Advanced Tips and Variations

    Creating an extraordinary Spiced Carrot Cake Jam isn’t just about following the recipe—it’s also about being creative and adapting to personal taste preferences. Here are some advanced tips and exciting variations to elevate your jam-making experience:

    Tips for Success:

    • Use Fresh Ingredients: Always use fresh organic carrots; they are sweeter and have a better texture.
    • Monitor Cooking Time: It’s crucial to pay attention to cooking times. Overcooking may lead to a burnt flavor, while undercooking prevents the flavors from melding well.
    • Taste as You Go: As you cook, don’t hesitate to taste your jam and adjust the spices or sweetness according to your preference.
    • Experiment with Citrus Zest: Adding zest from the lemon or even an orange can give your jam a bright, zesty flavor that complements the spices beautifully.

    Variations to Try:

    • Spiced Carrot Pineapple Jam: Add 1 cup of crushed pineapple to the mix to enhance the tropical aspect, while still maintaining the spiced flavor of the original recipe.
    • Chai-Spiced Carrot Jam: Infuse your jam with chai tea bags—just steep a couple of chai tea bags in the apple cider for about 10 minutes before adding it to the mixture. This will add a delightful depth of flavor.
    • Cream Cheese Jam: For a sweeter dessert, mix the jam with softened cream cheese in a 1:1 ratio to use as a spread for bagels or toast.

    By implementing these advanced tips and unique spins, you can masterfully create a Spiced Carrot Cake Jam that not only satisfies your cravings but also impresses everyone around you!

    How to Store Spiced Carrot Cake Jam: Best Practices

    Proper storage of your Spiced Carrot Cake Jam is essential to ensure it remains fresh and flavorful. Here are the best practices for refrigeration, freezing, and reheating your delicious creation:

    Refrigeration

    Once your jam has cooled, you can store it in the refrigerator for up to three weeks. Make sure to keep it in an airtight container or jar to prevent exposure to air, which can lead to spoilage.

    Freezing

    If you wish to extend the shelf life of your jam, you can freeze it! Here’s how:
    Choose Freezer-Safe Containers: Use glass or plastic containers designed for freezing. Jam may expand while freezing, so leave some space at the top.
    Label and Date: Always label your jars with the date and contents to keep track of your jam’s freshness.
    Defrosting: To use frozen jam, transfer it to the refrigerator to thaw overnight. Avoid microwave thawing, as this can alter the texture.

    Reheating

    Although the jam is best served fresh or at room temperature, if you prefer it warm, you can gently reheat small amounts in the microwave or on the stovetop. Be sure not to overheat, as it can change the consistency and flavor.

    With these effective storage methods, you can enjoy your delicious Spiced Carrot Cake Jam at any time, making it a perfect addition to your pantry!

    Nutritional Value of Spiced Carrot Cake Jam

    Understanding the nutritional value of your Spiced Carrot Cake Jam can enhance the experience of enjoying it without guilt. Below is a general breakdown of the possible nutritional content per serving (1 tablespoon):

    | Nutrient | Amount per Serving |
    |——————–|——————–|
    | Calories | 45-60 |
    | Total Fat | 0-2g |
    | Saturated Fat | 0g |
    | Carbohydrates | 12-15g |
    | Dietary Fiber | 0.5-1g |
    | Sugars | 10-12g |
    | Protein | 0-1g |
    | Vitamin A | 100-150% DV |
    | Vitamin C | 2% DV |
    | Calcium | 0-2% DV |
    | Iron | 0-2% DV |

    Key Nutritional Notes:

    • Carbohydrates and Sugars: While the jam does contain natural and added sugars, it’s lower in sugar than conventional jams, making it a healthier choice.
    • Vitamins: Carrots are rich in vitamin A, which is vital for healthy vision and skin, as well as immune function.
    • Low Fat: The jam is virtually fat-free, making it a light addition to your meals.

    This sweet treat not only serves as a delightful condiment but also provides essential nutrients, aligning perfectly with various health-conscious diets.

    FAQs: Frequently Asked Questions About Spiced Carrot Cake Jam

    1. Can I use pre-grated carrots for this jam?

    Yes, you can, but freshly grated carrots yield a better texture and flavor. Pre-grated carrots may also contain preservatives, affecting the taste.

    2. How can I reduce the sugar content in this recipe?

    You can use natural sweeteners like honey, maple syrup, or stevia to maintain sweetness with fewer calories. You may need to adjust quantities slightly, so start with less and taste as you go.

    3. How do I ensure my jam is properly canned for longer storage?

    Make sure to follow proper canning techniques, including sterilizing jars and lids, using a hot water bath if necessary, and ensuring that the jars are sealed correctly.

    4. Can I use spices other than those listed?

    Definitely! Feel free to experiment with various spices like cardamom, cloves, or lemon zest to customize flavors according to your taste preference.

    5. How long can I store Spiced Carrot Cake Jam?

    When stored in a sealed container in the refrigerator, the jam can last for up to three weeks. If frozen, it can last for about six months.

    6. What can I serve with Spiced Carrot Cake Jam?

    This jam pairs wonderfully with toast, bagels, pancakes, or waffles. It’s also perfect for cheese boards, ice cream, or as a filling for pastries.

    With these answers and insights, you’re now fully equipped to delve into the world of Spiced Carrot Cake Jam. Whether you’re looking to indulge your sweet tooth or impress your guests with homemade delicacies, this jam is the versatile and nutritious choice you’ve been searching for. Enjoy your culinary adventures and the delightful flavors of this unique dessert recipe!

  • Tasty Air Fryer Shrimp Boil

    Tasty Air Fryer Shrimp Boil

    Tasty Air Fryer Shrimp Boil: A Tropical Delight

    Introduction to Tasty Air Fryer Shrimp Boil

    Welcome to your new favorite recipe: Tasty Air Fryer Shrimp Boil! If you’re searching for delectable shrimp recipes, then you’re in for a treat. This dish effortlessly combines the rich flavors of shrimp with aromatic spices, bringing the taste of the tropics right into your kitchen. Imagine sizzling shrimp perfectly cooked in a matter of minutes, making it an ideal choice for busy weekdays, impromptu gatherings, or cozy meal prep for the week ahead.

    Not only is this shrimp boil quick to prepare, but it is also incredibly healthy. Packed with lean protein, low in calories, and customizable to meet various dietary needs, this shrimp recipe is suitable for everyone, including busy parents, students, and health-conscious individuals. It’s perfect for those who prefer gluten-free or low-carb options, as it caters to a wide range of palates and dietary restrictions.

    In just a few simple steps, you can whip up a restaurant-quality dish that boasts bold flavors and colorful ingredients. Whether you’re a cooking novice or a seasoned pro, the Tasty Air Fryer Shrimp Boil is a dish that inspires creativity in the kitchen. So grab your air fryer and get ready to make a delightful, nutritious meal that will impress your family and friends!

    Benefits and Advantages of Tasty Air Fryer Shrimp Boil

    The Tasty Air Fryer Shrimp Boil stands out not only for its simplicity but also for its myriad of health benefits. Let’s dive into why this recipe deserves a spot in your culinary repertoire.

    Ease of Preparation

    One of the most significant advantages of cooking shrimp in an air fryer is the ease of preparation. There’s no need to deal with steamy pots and pans; simply combine your ingredients, toss them into the air fryer, and let it do the work while you relax or prepare your side dishes. This makes it a fantastic option for busy parents, working professionals, or anyone short on time.

    Health Benefits

    Using fresh shrimp not only elevates taste but also enhances health benefits. Shrimp is naturally low in calorie content and high in protein, making it a great choice for those looking to maintain a balanced diet. Additionally, the air frying process reduces the need for excessive oils and fats, keeping your meal light yet satisfying.

    Diverse Dietary Options

    This shrimp recipe is incredibly versatile and adaptable. Whether you’re vegan, gluten-free, or following a specific nutritional plan, this recipe can be customized just for you. By incorporating seasonal vegetables and spices, you can modify it to match your dietary preferences without sacrificing flavor.

    In summary, the Tasty Air Fryer Shrimp Boil combines ease, healthfulness, and versatility. It’s no wonder this dish is gaining recognition among home cooks, food enthusiasts, and those who value nutritious, delicious meals. You’ll find your family asking for this delightful recipe time and again!

    Ingredients Overview

    Essential Ingredients for Tasty Air Fryer Shrimp Boil

    To create your Tasty Air Fryer Shrimp Boil, you’ll need the following ingredients:

    • 1 pound large shrimp (peeled and deveined): Shrimp serves as the star of this shrimp recipe, providing protein and essential nutrients.
    • 2 cups baby potatoes: These tender potatoes add heartiness to the dish. You can use small red or yellow potatoes.
    • 1 cup corn on the cob (cut into 1-inch pieces): Corn contributes sweetness and texture.
    • 3 tablespoons olive oil: This healthy fat enhances flavor and helps with browning.
    • 1 tablespoon Old Bay seasoning: A blend of spices that brings classic seafood flavors to your boil.
    • 1 teaspoon garlic powder: Adds an aromatic element to the dish.
    • Salt and pepper, to taste: Essential for balancing flavors.

    Optional Ingredients

    • Fresh parsley for garnish: This adds freshness and color.
    • Lemon wedges: Serve on the side for that zesty finish.

    For dietary-conscious readers, all listed ingredients can support various diets, such as paleo, gluten-free, and low-calorie meal plans.

    Dietary Substitutions to Customize Your Tasty Air Fryer Shrimp Boil

    Customization is vital when preparing meals, especially for those with dietary restrictions. Here are some thoughtful substitutions to cater to everyone:

    1. For Vegans: Replace shrimp with tofu or chickpeas. This substitution keeps your dish protein-packed while keeping it plant-based. Consider marinating the tofu in a similar spice blend to maintain flavor.

    2. For a Gluten-Free Option: This recipe is inherently gluten-free, but be sure to check that your seasoning and other ingredients are certified gluten-free.

    3. Low-Carb Alternatives: Swap out the potatoes for cauliflower florets or zucchini slices. This change lowers the carbohydrate content and adds more vegetables to your meal.

    4. Allergy Substitutions: If you have a shellfish allergy, shrimp can be replaced with chicken breast or firm white fish, ensuring that you still get a hearty meal that adheres to your dietary needs.

    By incorporating these substitutions, you empower your guests to enjoy delicious food without worry, allowing the Tasty Air Fryer Shrimp Boil to be universally enjoyed.

    How to Prepare the Perfect Tasty Air Fryer Shrimp Boil: Step-by-Step Guide

    Getting started with your Tasty Air Fryer Shrimp Boil is easier than you might think! Follow these simple steps to achieve succulent shrimp and perfectly cooked vegetables:

    1. Prepare the Base: Start by washing and cutting your baby potatoes into halves. If they are larger, consider quartering them for even cooking.

    2. Season the Potatoes: In a mixing bowl, combine the potatoes with 2 tablespoons of olive oil, Old Bay seasoning, garlic powder, salt, and pepper. Toss thoroughly until all potatoes are well-coated.

    3. Begin Cooking the Potatoes: Preheat your air fryer to 380°F (190°C). Add the seasoned potatoes to the air fryer basket and cook for about 10 minutes. This will give them a head start on cooking.

    4. Prep the Corn: While the potatoes are cooking, take your corn on the cob and cut it into 1-inch segments.

    5. Combine Ingredients: Once the potatoes have cooked for 10 minutes, pull the basket out and add the corn pieces. Give the corn a light drizzle with olive oil and a sprinkle of additional seasoning, if desired.

    6. Air Fry Again: Cook the potatoes and corn together for another 6-8 minutes. They should be tender and lightly crisped.

    7. Add the Shrimp: After the corn and potatoes are done, take the basket out again, and add your peeled and deveined shrimp. Make sure to toss them with the remaining olive oil and any extra seasoning to ensure maximum flavor.

    8. Final Cook: Return the basket to the air fryer and cook for an additional 6-8 minutes, or until the shrimp turns pink and opaque. Avoid overcooking, as shrimp can become rubbery.

    9. Garnish and Serve: Once everything is cooked, carefully remove the basket. Serve your Tasty Air Fryer Shrimp Boil on a large platter, garnished with fresh parsley and lemon wedges.

    Tips for Adaptation

    • Flavor Adjustments: Feel free to experiment with spices! Consider adding cayenne pepper for heat or smoked paprika for a different depth of flavor.
    • Vegetable Varieties: Feel encouraged to add other veggies like bell peppers or asparagus based on what’s in season or available at your local market.

    By following these steps, you will soon be enjoying a delightful, healthful shrimp boil that will melt in your mouth!

    Mastering Tasty Air Fryer Shrimp Boil: Advanced Tips and Variations

    To truly master your Tasty Air Fryer Shrimp Boil, consider these advanced tips and variations that can enhance your cooking experience:

    1. Spice It Up: Try different seasoning blends, such as Cajun or Mediterranean, and give your dish a unique twist. The flavor possibilities are endless!

    2. Add Spice: If you enjoy a kick, mix in some diced jalapeños or a dash of hot sauce before cooking the shrimp.

    3. Experiment with Marinades: Marinate your shrimp briefly in a mixture of lemon juice, garlic, and olive oil for an extra layer of flavor.

    4. Create a Shrimp Boil Pasta: Turn your leftovers into a quick pasta dish. Just toss the shrimp, potatoes, and corn with cooked pasta and a splash of olive oil for a hearty meal.

    5. Explore Sides: Consider serving your shrimp boil with a fresh side salad or coleslaw for a full meal.

    By incorporating these variations and tips, you can elevate your Tasty Air Fryer Shrimp Boil to a new level of deliciousness!

    How to Store Tasty Air Fryer Shrimp Boil: Best Practices

    Proper storage of your Tasty Air Fryer Shrimp Boil ensures leftover enjoyment without compromising flavor or safety. Follow these guidelines:

    • Refrigeration: Allow your shrimp boil to cool to room temperature before placing it in an airtight container. It can be stored in the refrigerator for up to 3 days.

    • Freezing: If you’d like to keep it longer, consider freezing the components (shrimp, potatoes, corn) separately. This way, you can reheat them without diminishing texture. Use freezer-safe bags, and it should be consumed within 1 month.

    • Reheating: To reheat refrigerated shrimp boil, use your air fryer at 350°F (175°C) for about 5-7 minutes, tossing halfway. For frozen leftovers, thaw them overnight in the refrigerator first, then air fry as mentioned.

    With these best practices, you can enjoy your shrimp recipes even days after preparation without sacrificing quality!

    Nutritional Value of Tasty Air Fryer Shrimp Boil

    Understanding the nutritional profile of your Tasty Air Fryer Shrimp Boil can help you appreciate its health benefits even further. Here is a general overview of the nutritional content in one serving (assuming a total of four servings):

    • Calories: Approximately 300 calories
    • Protein: 25 grams
    • Total Fat: 10 grams (mostly healthy fats from olive oil)
    • Carbohydrates: 30 grams
    • Dietary Fiber: 5 grams
    • Sodium: 600 mg (depending on your salt usage)

    Nutritional Benefits

    • High Protein: Shrimp provides a substantial amount of protein, vital for muscle growth and repair.
    • Low Calorie: This recipe is designed to be filling while being low in calories, making it an excellent choice for those on weight-loss journeys.
    • Rich in Nutrients: In addition to protein, shrimp offers essential vitamins and minerals such as selenium and vitamin B12. Potatoes and corn contribute important vitamins and fiber to your meal.

    With these impressive nutritional stats, you can confidently serve your Tasty Air Fryer Shrimp Boil to family and friends, knowing that it not only tastes great but is also good for their health!

    FAQs: Frequently Asked Questions About Tasty Air Fryer Shrimp Boil

    Can I Use Frozen Shrimp for This Recipe?

    Yes! Frozen shrimp are perfectly acceptable for this recipe, although you should thaw them in the refrigerator beforehand for better seasoning adherence.

    How Do I Know When Shrimp Is Cooked?

    Shrimp turns pink and opaque when fully cooked, usually taking around 6-8 minutes in the air fryer.

    Can I Substitute Other Vegetables?

    Absolutely! Feel free to add or replace vegetables based on your preferences or what you have available. Bell peppers, zucchini, or asparagus can make excellent additions.

    Is This Recipe Suitable for Meal Prep?

    Yes! This Tasty Air Fryer Shrimp Boil is ideal for meal prep. Just store it in the refrigerator and reheat as desired.

    How Can I Make This Dish Spicy?

    Increase the heat by adding cayenne pepper, red pepper flakes, or hot sauce before cooking the shrimp. Adjust according to your taste.

    Can I Make This Recipe Vegan?

    While shrimp is irreplaceable in a traditional shrimp boil, you can use marinated tofu or chickpeas to make a delicious vegan version.

    By addressing these commonly asked questions, you can help readers navigate through their cooking experiences, ensuring they enjoy the Tasty Air Fryer Shrimp Boil to the fullest.


    Now go ahead and whip up this enticing Tasty Air Fryer Shrimp Boil! Your kitchen will soon be filled with wonderful aromas and flavors that will tantalize your taste buds and those of your loved ones. Happy cooking!

  • Homemade Shrimp Boil With Garlic Butter Sauce

    Homemade Shrimp Boil With Garlic Butter Sauce

    Homemade Shrimp Boil With Garlic Butter Sauce: A Tropical Delight

    Introduction to Homemade Shrimp Boil With Garlic Butter Sauce

    If you’re looking for an exciting way to spice up your dinner routine, look no further than this Homemade Shrimp Boil With Garlic Butter Sauce. This delightful dish effortlessly combines the juicy, succulent flavors of shrimp with an aromatic garlic butter sauce, making it one of the best shrimp recipes you can whip up in your own kitchen. With its straightforward preparation, it’s perfect for busy weeknights or festive gatherings. What’s more, this recipe is a fantastic option for health-conscious individuals, featuring low-calorie ingredients and offering a gluten-free and customizable base that can cater to various dietary needs.

    This shrimp boil not only tantalizes your taste buds but also provides numerous health benefits. Shrimp is a fantastic source of protein, low in calories, and packed with essential nutrients like selenium and vitamin B12. In addition, the garlic butter sauce adds a burst of flavor that complements the shrimp perfectly, turning a simple meal into a five-star experience. Whether you’re a busy parent scrambling to put dinner on the table, a newlywed hoping to impress your spouse, or a seasoned culinary enthusiast eager to learn new techniques, creating a shrimp boil is an enchanting cooking adventure that everyone can enjoy.

    In this article, I’ll guide you through the entire process of preparing this exquisite dish—from the essential ingredients to it being a delightful meal for your friends and family. So, roll up your sleeves and get ready to master one of the most delightful shrimp recipes in your collection!

    Benefits and Advantages of Homemade Shrimp Boil With Garlic Butter Sauce

    One of the standout features of a Homemade Shrimp Boil With Garlic Butter Sauce is its incredible ease of preparation. Unlike complicated recipes that require hours in the kitchen, this dish can be made in under an hour, making it ideal for busy home cooks. The simplicity of boiling and tossing the ingredients together not only saves you time but also minimizes the clean-up process. That means more time to enjoy your meal and less time worrying about the dishes!

    Health-wise, shrimp is a lean protein that is low in calories yet rich in vital nutrients. Each serving provides a hearty dose of omega-3 fatty acids essential for heart health. The garlic and butter in the sauce complement this health profile beautifully. Garlic, known for its antioxidant properties, adds depth to your dish while providing additional health benefits. Even better, you can easily make substitutions for those who may be vegan or require gluten-free options, ensuring everyone can enjoy this succulent shrimp boil.

    In comparison to other seafood recipes, this one stands out for its combination of flavors and textures. The seasonal vegetables, such as corn and potatoes, provide added nutritional value, turning your shrimp boil into a complete meal. Whether served as a crowd-pleaser at a summer barbecue or a cozy dinner at home, this dish is versatile enough to fit any occasion.

    The Homemade Shrimp Boil With Garlic Butter Sauce is not only a culinary marvel but also a social experience. There’s something undeniably fun about gathering around a pot of flavorful shrimp, indulging in good food and even better conversation. With the right recipe in hand, you can create a memorable dining experience that will have your guests raving long after the last bite. Truly, it’s an irresistible option for your dinner rotation!

    Ingredients Overview

    Essential Ingredients for Homemade Shrimp Boil With Garlic Butter Sauce

    Below is a detailed list of all the ingredients you’ll need to create the ideal Homemade Shrimp Boil With Garlic Butter Sauce. Measurements are provided for your convenience, along with a breakdown of the purpose behind each key ingredient.

    • 1 pound of shrimp (medium to large; deveined and peeled): The star of the dish! Provides protein and essential nutrients.

    • 2 tablespoons of olive oil: A heart-healthy fat that adds richness to the sauce.

    • 4 cloves of garlic (minced): Elevates flavors and offers health benefits.

    • 1 stick of unsalted butter (8 tablespoons): Adds richness and a creamy texture to the sauce. For a lighter version, you can use a plant-based butter substitute.

    • 1 lemon (juiced): Adds acidity that balances the richness of the butter and enhances the shrimp flavor.

    • 1 teaspoon of paprika: Provides warmth and color to the dish.

    • 1 teaspoon of smoked paprika: For an added depth of flavor.

    • 1 teaspoon of cayenne pepper: Adds heat. Adjust according to your spice preference.

    • 4 ears of corn (cut into halves): Adds sweetness and texture; use yellow or white corn.

    • 1-2 lbs of small potatoes (halved or quartered): Offer a hearty side and soak up the garlic butter sauce.

    • Fresh parsley (for garnish): Adds a pop of color and freshness to your dish.

    You can easily substitute the ingredients to meet dietary requirements. For example, opting for vegetable broth in place of butter can yield a vegan-friendly version.

    Dietary Substitutions to Customize Your Homemade Shrimp Boil With Garlic Butter Sauce

    This recipe allows for various substitutions to cater to different dietary restrictions or personal preferences:

    • Vegan Option: Instead of shrimp, consider using plant-based shrimp alternatives available at many grocery stores. Use a vegan butter substitute to enhance the flavor of your sauce.

    • Gluten-Free Option: This recipe is naturally gluten-free; however, always check that your seasoning blends do not contain gluten.

    • Low-Calorie Option: Replace butter with a non-fat cooking spray and use less oil. You can also incorporate more vegetables like zucchini or bell peppers for a lower-calorie version while maintaining volume.

    • Spicy Version: Increase the amount of cayenne pepper or even add diced jalapeños to ramp up the heat.

    These substitutions not only ensure that you can cater to various diets but also encourage creativity in the kitchen, allowing you to put your stamp on this classic shrimp boil recipe!

    How to Prepare the Perfect Homemade Shrimp Boil With Garlic Butter Sauce: Step-by-Step Guide

    Now it’s time to dive into the preparation of your Homemade Shrimp Boil With Garlic Butter Sauce. Follow these straightforward instructions for a successful seafood feast.

    1. Prepare the Base: Start by filling a large pot with water and add a generous pinch of salt. Bring it to a boil.

    2. Cook the Potatoes: Once the water is boiling, add the halved or quartered small potatoes. Cook for about 10-15 minutes, or until the potatoes are tender. You can use a fork to check doneness.

    3. Add the Corn: After the potatoes have cooked, add the corn into the pot. Let it cook for another 5-7 minutes until the corn is tender and bright yellow.

    4. Prepare the Shrimp Sauce: While you’re waiting for the potatoes and corn, heat a separate skillet over medium heat. Add olive oil and let it warm up, then add minced garlic. Sauté until fragrant, about 1-2 minutes.

    5. Add the Butter and Seasoning: Once the garlic is fragrant, toss in the stick of unsalted butter. Allow it to melt completely. Afterward, add lemon juice, paprika, smoked paprika, and cayenne pepper. Stir until the mixture is well combined and simmering.

    6. Combine Shrimp with the Sauce: Add the peeled and deveined shrimp to the garlic butter sauce. Cook for about 3-5 minutes or until the shrimp turns pink and opaque. Be careful not to overcook!

    7. Drain the Potatoes and Corn: Once the potatoes and corn are cooked through, drain them in a colander.

    8. Toss Everything Together: In the skillet, toss the drained potatoes and corn with the garlic butter shrimp. Mix everything well until the potatoes and corn are coated with the garlicky goodness.

    9. Garnish and Serve: Chop fresh parsley for garnish. Sprinkle it over the top of your shrimp boil just before serving. This adds a vibrant touch to the dish!

    10. Enjoy Your Meal: Serve hot with extra lemon wedges on the side. Gather around the table and enjoy this crowd-favorite shrimp recipe!

    Adapting the process for various dietary needs is easy. For example, if preparing a vegan version, skip the shrimp and add extra vegetables instead, following the same steps for the rest of the ingredients.

    Mastering Homemade Shrimp Boil With Garlic Butter Sauce: Advanced Tips and Variations

    To elevate your shrimp boil game, consider these advanced tips and variations:

    • Herb Infusion: Before adding the vegetables, you can toss in fresh herbs like oregano or thyme into the boiling water. This infuses an aromatic flavor into the potatoes and corn.

    • Seafood Medley: If you want to diversify your protein, feel free to add mussels, clams, or crab legs to your pot during the last 5 minutes of cooking. This turns a simple shrimp boil into an impressive seafood extravaganza.

    • Make it Spicy: If you and your guests enjoy a kick, add diced jalapeños or a spicier hot sauce to the garlic butter sauce. You can even swap the cayenne for a hotter chili powder.

    • Experiment with Vegetables: Aside from corn and potatoes, feel free to add other vegetables such as green beans, asparagus, or even mushrooms. They will absorb the shrimp’s flavors and enhance your dish.

    • Use a Grill: For an outdoor twist, you can marinate the shrimp in the garlic butter sauce and grill them instead. You can grill the corn and potato packets wrapped in aluminum foil for maximum flavor.

    By exploring these variations and tips, you’ll create a unique dish every time, keeping your shrimp recipes exciting and fresh!

    How to Store Homemade Shrimp Boil With Garlic Butter Sauce: Best Practices

    If you happen to have leftovers after your delicious shrimp boil, storing it properly is essential for maintaining flavor and freshness.

    1. Refrigeration: Allow the shrimp boil to cool to room temperature. Once cooled, transfer it to an airtight container. It can be stored in the refrigerator for up to 3 days.

    2. Freezing: For longer storage, consider freezing your shrimp boil. Be sure to place it in a freezer-safe container or bag. It can last up to 3 months in the freezer.

    3. Reheating: To reheat, thaw in the refrigerator overnight if frozen. Then, gently reheat on the stovetop over low heat. You can add a little bit of extra butter to regain some moisture and flavor.

    Storing and reheating shrimp recipes can sometimes lead to a change in texture. To combat this, avoid microwaving for reheating as it can overcook the shrimp. Instead, use the stovetop method for the best results.

    Nutritional Value of Homemade Shrimp Boil With Garlic Butter Sauce

    Understanding the nutritional profile of your dish can be essential for those who are health-conscious. Here is a breakdown of the average nutritional value per serving (based on a recipe serving 4):

    • Calories: Approximately 350-400 calories
    • Protein: 25g
    • Fat: 20g (primarily healthy fats from butter)
    • Carbohydrates: 30g
    • Fiber: 3g
    • Sodium: Depends on the amount of salt used; aim for low-sodium options.

    This homemade shrimp boil is a great source of protein and healthy fats, while the added vegetables contribute to fiber intake. You can adapt the recipe to fit your nutritional needs, like reducing fat through substitutions or altering portion sizes.

    Always check labels if using store-bought ingredients such as seasoning blends, as sodium content can vary.

    FAQs: Frequently Asked Questions About Homemade Shrimp Boil With Garlic Butter Sauce

    Can I use frozen shrimp for this recipe?

    Yes, frozen shrimp can be used. Just ensure to thaw them fully before cooking to avoid uneven cooking.

    How do I know when the shrimp is fully cooked?

    Shrimp is fully cooked when it turns pink and opaque. It will curl into a C-shape as it cooks.

    Is this recipe suitable for a gluten-free diet?

    Absolutely! This shrimp boil can be made gluten-free. Just make sure all your seasonings are gluten-free.

    Can I make this recipe in advance?

    While the shrimp boil tastes best when freshly made, you can prepare the sauce and vegetables in advance. However, avoid pre-cooking the shrimp until you’re ready to serve for the best flavor.

    What can I serve with my shrimp boil?

    It’s delicious on its own, but you can serve it alongside a simple green salad, crusty bread, or even a refreshing coleslaw.

    By providing clear answers to your questions, we hope to guide your cooking experience and make it smooth. Enjoy crafting this delightful Homemade Shrimp Boil With Garlic Butter Sauce and serve it with pride!


    In this article, you’ve discovered how to create a versatile and delicious Homemade Shrimp Boil With Garlic Butter Sauce—one of the most delightful shrimp recipes around. Whether you choose to keep it classic or make personalized adaptations, it’s sure to be a hit at your dinner table. Happy cooking!

  • Honey Roasted Carrots With Whipped Feta

    Honey Roasted Carrots With Whipped Feta

    Honey Roasted Carrots With Whipped Feta: A Tropical Delight

    Introduction to Honey Roasted Carrots With Whipped Feta

    Are you looking for a scrumptious addition to your meal that stands out with vibrant flavors and health benefits? Introducing Honey Roasted Carrots With Whipped Feta, a dish that not only excites your palate but also aligns perfectly with your quest for healthy dinner recipes. This elegant, yet simple dish combines the natural sweetness of carrots with the creamy texture of whipped feta and a drizzle of honey, creating a delightful balance of flavors that is hard to resist.

    The allure of Honey Roasted Carrots With Whipped Feta lies in its ease of preparation and its impressive taste. It’s perfect for busy parents looking to whip up something nutritious or for food enthusiasts eager to impress at their next dinner party. This recipe is not just delicious; it’s also versatile. It caters to various dietary needs, being gluten-free and easily adaptable for vegans. Moreover, it’s a dish filled with vitamins and minerals, thanks to the carrots, making it an ideal side for anyone conscious about their health.

    In this article, we’ll explore the numerous benefits of this recipe, list its essential ingredients, and guide you through the preparation process. Whether you’re a newlywed creating culinary experiences together or a busy professional seeking quick yet healthy options, this Honey Roasted Carrots With Whipped Feta recipe will surely become a staple in your healthy dinner repertoire.

    Benefits and Advantages of Honey Roasted Carrots With Whipped Feta

    When it comes to preparing healthy dinner recipes, simplicity and flavor are key. Honey Roasted Carrots With Whipped Feta checks both of these boxes beautifully. The recipe requires minimal ingredients and can be made in just a few steps, making it accessible for cooks of all levels. Moreover, the whole process is straightforward and does not demand hours spent in the kitchen, offering a perfect solution for busy weeknights.

    Health Benefits

    The primary ingredient, carrots, are renowned for their high beta-carotene content, which is converted to vitamin A in the body. This vital vitamin promotes healthy vision, supports immune function, and contributes to skin health. Additionally, they offer dietary fiber, which aids in digestion and promotes a sense of fullness, making this dish an excellent option for those following a weight management plan.

    Furthermore, the whipped feta brings another layer of health benefits to the meal. Feta is typically lower in calories compared to many other cheeses and provides a source of protein, calcium, and beneficial bacteria. When whipped, the feta becomes creamy and indulgent while still being healthier than traditional cheesy sauces. Those who are vegan can easily substitute whipped feta with a plant-based alternative without sacrificing flavor.

    Ingredients Overview

    Essential Ingredients for Honey Roasted Carrots With Whipped Feta

    To create your own Honey Roasted Carrots With Whipped Feta, gather the following ingredients:

    • Carrots: 4 cups, peeled and cut into sticks (about 1/2 inch thick)
    • Health Benefit: Rich in vitamins A, C, and K; promotes eye health.

    • Honey: 3 tablespoons (or maple syrup for a vegan version)

    • Health Benefit: Natural sweetener that contains antioxidants.

    • Feta Cheese: 1 cup, crumbled (or vegan feta for a dairy-free option)

    • Health Benefit: Offers protein and calcium.

    • Olive Oil: 2 tablespoons

    • Health Benefit: Healthy monounsaturated fats good for heart health.

    • Salt and Black Pepper: To taste

    • Purpose: Enhances flavor.

    • Fresh Thyme or Rosemary: 1 tablespoon, chopped (optional)

    • Health Benefit: Contains antioxidants and adds aroma.

    Each ingredient serves a distinct purpose, ensuring that the final product not only tastes good but also packs a nutritional punch.

    Dietary Substitutions to Customize Your Honey Roasted Carrots With Whipped Feta

    The beauty of Honey Roasted Carrots With Whipped Feta lies in its adaptability for various dietary needs. Here are some suggested substitutions:

    • Vegan Options:
    • Substitute honey with maple syrup or agave nectar. This not only fits a vegan lifestyle but gives a unique flavor hint that pairs well with carrots.
    • Use vegan feta or simply blend silken tofu with lemon juice and salt to achieve a creamy texture without dairy.

    • Gluten-Free Needs:

    • This recipe is inherently gluten-free, making it suitable for those with gluten intolerance.

    • Low-Calorie Alternatives:

    • Reduce honey if you’re looking to cut back on sugar. Opt for a sugar-free sweetener like erythritol or stevia, adjusting to taste.

    • Herb Variations:

    • If you’re not a fan of thyme or rosemary, consider using dried oregano or parsley for a different twist.

    By customizing the ingredients, you can cater to your family’s or guests’ dietary restrictions while still serving a delicious and nutritious side dish.

    How to Prepare the Perfect Honey Roasted Carrots With Whipped Feta: Step-by-Step Guide

    Ready to bring your cooking skills to the next level? Follow this detailed, step-by-step guide to prepare Honey Roasted Carrots With Whipped Feta, an easy addition to your list of healthy dinner recipes.

    1. Prepare the Oven: Preheat your oven to 425°F (220°C). This ensures a perfect roasting temperature that gives the carrots a nice caramelization.

    2. Prep the Carrots: Wash and peel the carrots. Cut them into uniform sticks, roughly 1/2 inch thick. This consistency helps them cook evenly.

    3. Toss with Olive Oil: In a large bowl, add the carrot sticks and drizzle 2 tablespoons of olive oil over them. Toss well to ensure all pieces are coated. This step is crucial as it allows for uniform cooking and flavors.

    4. Seasoning: Add salt and black pepper to the oiled carrots to taste. If you’re using fresh herbs like thyme or rosemary, include them now to infuse flavor.

    5. Roasting: Spread the carrots in a single layer on a baking sheet. This prevents steaming and promotes that irresistible caramelized exterior. Roast in your preheated oven for about 25–30 minutes, turning halfway through to ensure even roasting.

    6. Prepare the Whipped Feta: While the carrots are roasting, it’s time to whip the feta. In a food processor, combine 1 cup of crumbled feta with 2 tablespoons of honey (or the vegan alternative). Blend until the mixture is smooth and creamy. If it’s too thick, add a splash of milk (dairy or plant-based) to achieve your desired consistency.

    7. Check the Carrots: The carrots are done when they’re golden brown and tender. You can check doneness by poking them with a fork—if they’re easily pierced, they’re ready!

    8. Assemble the Dish: To serve, plate the roasted carrots, and generously dollop the whipped feta on top. Drizzle with a little more honey for added sweetness if desired.

    9. Garnish: Finish off with an additional sprinkle of fresh herbs for color and flavor.

    10. Serve and Enjoy: Enjoy your Honey Roasted Carrots With Whipped Feta warm, either as a side or a focal point of your meal.

    By following these steps, you can successfully create a dish that is not only visually appealing but also packed with flavor and nutrition, making it perfect for healthy dinner recipes.

    Mastering Honey Roasted Carrots With Whipped Feta: Advanced Tips and Variations

    To elevate your Honey Roasted Carrots With Whipped Feta, consider these advanced tips and variations:

    • Add Nuts: Top the dish with toasted walnuts or pecans for added crunch and healthy fats. Just toss them in the oven for the last 5-10 minutes of roasting.

    • Experiment with Spices: For a kick, add a pinch of cayenne pepper or smoked paprika to the carrots before roasting. This will enhance their flavor profile and create an exciting contrast with the sweetness of the honey.

    • Mix in Other Vegetables: For a medley, mix in parsnips, sweet potatoes, or even Brussels sprouts with the carrots. Just ensure to cut them to similar sizes for even cooking.

    • Use Different Cheeses: If feta isn’t your preference, consider using goat cheese or ricotta for a twist. Each will impart a different flavor but still contribute creaminess.

    • Make It a Meal: Serve the roasted carrots over a bed of quinoa or farro, and add grilled chicken or chickpeas on top for a complete meal.

    These variations not only enhance flavor but also transform Honey Roasted Carrots With Whipped Feta from a side dish to a main event, making it an exciting option for your healthy dinner recipes.

    How to Store Honey Roasted Carrots With Whipped Feta: Best Practices

    If you have leftovers (if you can resist!), proper storage is essential to maintain their flavor and texture. Here are best practices:

    • Refrigeration: Allow the Honey Roasted Carrots With Whipped Feta to cool completely at room temperature. Store them in an airtight container in the fridge. They can typically last up to 3–5 days.

    • Freezing: While freezing roasted carrots isn’t ideal due to texture changes, if you must, place them in a freezer-safe container after cooling. Try to consume them within 2-3 months for quality.

    • Reheating: To reheat, place the carrots in a preheated oven at 350°F (175°C) for about 10-15 minutes, or until warmed through. This will help to retain their original flavor and texture. If you’re reheating the whipped feta, do so in the microwave for short bursts, stirring in between.

    By following these storage tips, you can enjoy Honey Roasted Carrots With Whipped Feta even days after your initial preparation, maintaining its status as one of your go-to healthy dinner recipes.

    Nutritional Value of Honey Roasted Carrots With Whipped Feta

    Understanding the nutritional value of your meals is essential, especially when aiming for healthy dinner recipes. Here’s an estimated breakdown per serving of Honey Roasted Carrots With Whipped Feta (based on the recipe serving 4 people):

    • Calories: 220
    • Protein: 6g
    • Total Fat: 10g
    • Saturated Fat: 4g
    • Carbohydrates: 27g
    • Fiber: 5g
    • Sugars: 10g
    • Vitamin A: 120% DV
    • Vitamin C: 8% DV
    • Calcium: 15% DV
    • Iron: 5% DV

    These values can vary based on ingredient choices (like the type of sweetener used or the fat percentage of the feta), but they illustrate the overall health benefits of this recipe. Rich in vitamins and minerals, Honey Roasted Carrots With Whipped Feta is a nutritious option that supports many dietary goals. By featuring this dish in your meals, you not only enjoy a delicious creation but also contribute positively to your dietary wellbeing.

    FAQs: Frequently Asked Questions About Honey Roasted Carrots With Whipped Feta

    Q1: Can I make Honey Roasted Carrots With Whipped Feta ahead of time?

    Absolutely! You can prepare the carrots a day in advance and reheat them when ready to serve. However, it’s best to whip the feta right before serving for the best taste and texture.

    Q2: What can I substitute for honey?

    If you’re looking for a vegan option or simply want to reduce sugar, maple syrup or agave nectar works great as a substitute. Adjust to your taste preference!

    Q3: How can I make this dish spicier?

    Want to add some heat? You can mix a pinch of cayenne pepper or red pepper flakes into your caramelized carrots before serving. The sweetness of the carrots balances well with the spice!

    Q4: How do I know when my carrots are done roasting?

    Carrots are done when they are tender and slightly caramelized, which typically takes 25-30 minutes at 425°F (220°C). A fork should slide in easily without much resistance.

    Q5: Can I use other vegetables in this recipe?

    Absolutely! This recipe is versatile. You can add other root vegetables like parsnips or sweet potatoes for additional flavor and nutrients. Just make sure to cut them into similar sizes for even cooking.

    Engage with these FAQs to enhance reader understanding and interest in making one of the best healthy dinner recipes available!


    With this guide, you’re now equipped to create Honey Roasted Carrots With Whipped Feta, a dish bursting with flavor and nutritional benefits. Enjoy the journey of cooking and the delight of sharing a healthy meal with others!

  • Quick Blackstone Griddle Shrimp Boil

    Quick Blackstone Griddle Shrimp Boil

    Quick Blackstone Griddle Shrimp Boil: A Tropical Delight

    Introduction to Quick Blackstone Griddle Shrimp Boil

    Do you want to impress your family and friends with an easy-to-make yet mouthwatering dish? Look no further than the Quick Blackstone Griddle Shrimp Boil! This gem of a recipe is a fantastic addition to your collection of beloved shrimp recipes. It showcases succulent shrimp cooked to perfection alongside vibrant vegetables, all seasoned to delight your palate.

    One of the main attractions of this dish is its flexibility—it can cater to various dietary preferences, including gluten-free and low-calorie needs. Created with simplicity in mind, the shrimp boil can be prepared in under 30 minutes, making it perfect for busy parents, working professionals, or anyone looking for a hearty meal after a long day.

    In addition to its flavor and convenience, this recipe is packed with nutritional benefits. Shrimp is an excellent source of lean protein and is low in calories, making it an ideal choice for those watching their dietary intake. With the inclusion of colorful veggies, this dish becomes a one-pan wonder full of essential vitamins, minerals, and antioxidants. Whether you’re a student looking for quick lunch options or a newlywed trying to impress your partner, this recipe is calling your name. Let’s dive into the benefits and advantages of preparing this delightful seafood dish!

    Benefits and Advantages of Quick Blackstone Griddle Shrimp Boil

    The Quick Blackstone Griddle Shrimp Boil stands out for numerous reasons, making it an exceptional choice in the realm of shrimp recipes. First and foremost, the preparation process is incredibly straightforward. You don’t need a culinary degree to whip this up; all you need is some fresh ingredients, your Blackstone griddle, and about 20 to 30 minutes of your time.

    The health benefits of shrimp are noteworthy. With less than 200 calories per serving and low levels of saturated fat, shrimp is a lean protein that supports muscle growth and repair. The addition of vegetables such as bell peppers, corn, and zucchini not only adds flavor but also provides fiber, vitamins, and antioxidants that bolster overall health. These ingredients work together to create a satisfying meal without the heaviness that often accompanies traditional boil recipes.

    Moreover, the versatility of this shrimp boil allows for customization based on individual dietary needs. Whether you need a vegan version (by substituting shrimp with tofu or chickpeas) or a gluten-free option (by ensuring your seasonings are gluten-free), this recipe can easily adapt to satisfy various tastes.

    Lastly, the combination of vibrant colors and aromatic flavors makes this dish visually appealing, perfect for gatherings and dinner parties. It’s sure to be a crowd-pleaser, as it allows everyone to dig in and enjoy a truly delightful meal. So, what are you waiting for? Gather your ingredients, and let’s look at what you’ll need to make this shrimp boil truly shine!

    Ingredients Overview

    Essential Ingredients for Quick Blackstone Griddle Shrimp Boil

    Here’s a detailed list of all the ingredients you will need for the Quick Blackstone Griddle Shrimp Boil, along with measurements and the benefits of key ingredients:

    • 1 pound of shrimp (peeled and deveined): Provides lean protein and is full of nutrients like vitamin B12 and selenium.
    • 2 ears of corn (halved): Adds sweetness and contains fiber to aid digestion.
    • 1 bell pepper (cut into strips): Provides antioxidants and adds a vibrant color to your dish.
    • 1 zucchini (sliced): Low in calories and packed with vitamins, it brings moisture to the boil.
    • 3 cloves of garlic (minced): Offers flavor and potential health benefits such as boosting your immune system.
    • 2 tablespoons of olive oil: A heart-healthy fat that helps absorb vitamins.
    • 2 teaspoons of Old Bay seasoning (or to taste): Traditional seasoning for seafood that enhances flavor without added calories.
    • 1 lemon (juiced): Brings brightness and acidity, balancing the flavors beautifully.
    • Salt and pepper (to taste): Basic seasoning essentials that enhance all the flavors.

    Dietary notes: This recipe is gluten-free as long as the seasonings used are free from gluten. To make it lower in calories, reduce the amount of olive oil, or consider using a non-stick spray.

    Dietary Substitutions to Customize Your Quick Blackstone Griddle Shrimp Boil

    Catering to different dietary needs is easy with this recipe. Here are some suggested substitutions:

    • Shrimp alternatives: If you’re looking for a vegan option, replace shrimp with marinated tofu or chickpeas, which provide a hearty texture and absorb flavors well.
    • Vegetable swaps: You can easily switch out vegetables. Try broccoli, asparagus, or even sweet potatoes, based on what you have available or what you prefer.
    • Seasoning changes: For those sensitive to certain seasonings, homemade blends can replace store-bought options. A simple mix of smoked paprika, cayenne pepper, and dried herbs can replicate the flavors of Old Bay without added preservatives.

    These substitutions ensure that everyone can enjoy the Quick Blackstone Griddle Shrimp Boil, regardless of dietary restrictions.

    How to Prepare the Perfect Quick Blackstone Griddle Shrimp Boil: Step-by-Step Guide

    Now that you have your ingredients ready, it’s time to cook! Follow these simple steps to prepare a delicious Quick Blackstone Griddle Shrimp Boil.

    1. Prepare the Base: Start by preheating your Blackstone griddle over medium-high heat for about 5 minutes. A well-heated griddle will ensure that everything cooks evenly.

    2. Add Olive Oil: Drizzle the olive oil across the surface of the griddle. Allow it to warm up for a minute to receive that beautiful sear on your ingredients.

    3. Cook the Corn: Place the halved corn on the griddle. Allow it to cook for about 4-5 minutes, turning occasionally until it’s slightly charred. This adds a lovely depth of flavor. Once cooked, remove the corn and set it aside.

    4. Sauté the Vegetables: In the same space, add the minced garlic, bell pepper, and zucchini. Sauté for about 4 minutes until they begin to soften but still retain some crunch. Stirring them continuously helps prevent burning.

    5. Add the Shrimp: Next, toss the shrimp onto the griddle. Cook for another 3-4 minutes, flipping them occasionally until they turn pink and opaque.

    6. Season: Sprinkle the Old Bay seasoning over the shrimp and vegetables. Squeeze fresh lemon juice on top, and stir everything well to combine flavors.

    7. Combine Ingredients: Reintroduce the corn to the griddle. Stir everything together to make sure the shrimp and vegetables are well-mixed and heated through.

    8. Taste and Adjust: Sample a small portion and adjust seasoning with salt and pepper as needed. You can add more lemon juice for extra brightness!

    9. Serve: Remove from the heat and serve immediately. Garnish with extra lemon wedges or parsley, if desired.

    Following these steps will yield a flavorful and visually appealing dish that can be enjoyed by all.

    Mastering Quick Blackstone Griddle Shrimp Boil: Advanced Tips and Variations

    To take your Quick Blackstone Griddle Shrimp Boil to the next level, consider these advanced tips and variations:

    • Experiment with spices: Don’t hesitate to explore other seasonings outside of Old Bay. Cajun seasoning, lemon pepper, or even a dash of coconut milk for a tropical twist can enhance the dish greatly.

    • Add more seafood: Want to elevate your shrimp boil? Incorporate pieces of crab legs or small scallops alongside the shrimp.

    • Make it spicy: If you enjoy heat, adding some crushed red pepper flakes or diced jalapeños can give your shrimp boil an exciting kick.

    • Change the cooking method: While a griddle works wonders, try cooking everything in a large pot on the stove for a traditional shrimp boil experience, or consider grilling for an added smokiness.

    These variations not only enhance the flavor but also keep the dish exciting whenever you decide to make it.

    How to Store Quick Blackstone Griddle Shrimp Boil: Best Practices

    If you have leftovers (which is unlikely given how delicious it is), here’s how to store your Quick Blackstone Griddle Shrimp Boil properly.

    • Refrigeration: Allow the shrimp boil to cool to room temperature before transferring it to an airtight container. Store it in the refrigerator for up to 2-3 days.

    • Freezing: While not always recommended due to shrimp’s texture after freezing, you can freeze leftovers. Ensure they are stored in a freezer-safe container for up to 1 month. When ready to eat, thaw overnight in the refrigerator before reheating.

    • Reheating: To reheat, simply place it back on the Blackstone griddle over medium-low heat, stirring gently until heated through. Alternatively, you can microwave it in short intervals (30 seconds at a time) to avoid overcooking.

    Keeping these best practices in mind ensures that your Quick Blackstone Griddle Shrimp Boil stays fresh and delicious!

    Nutritional Value of Quick Blackstone Griddle Shrimp Boil

    For health-conscious cooks looking to keep track of nutritional values, here’s a breakdown for a single serving of the Quick Blackstone Griddle Shrimp Boil:

    • Calories: Approximately 250
    • Protein: 25g
    • Fat: 9g
    • Carbohydrates: 20g
    • Fiber: 4g
    • Cholesterol: 150mg
    • Sodium: 450mg (may vary based on added salt and seasonings)

    This dish fits the bill for a nutritious meal, providing ample protein while keeping calories in check. The balance of shrimp with colorful vegetables creates a wholesome dish that meets various dietary needs.

    FAQs: Frequently Asked Questions About Quick Blackstone Griddle Shrimp Boil

    1. Can I use frozen shrimp for this recipe?

    Yes! If you’re short on time, frozen shrimp are a great alternative. Just ensure they are thawed before cooking to achieve an even cook.

    2. How can I make this recipe vegan?

    You can substitute shrimp with marinated firm tofu or chickpeas. Both options will blend perfectly with the other ingredients while providing a similar texture.

    3. What type of vegetables can I include in this shrimp boil?

    Feel free to get creative! Broccoli, asparagus, or even diced potatoes can make a delicious addition to the boil.

    4. How do I ensure the shrimp are cooked correctly?

    Shrimp are done cooking when they turn pink and opaque. They only need about 3-4 minutes on a hot griddle, so watch them closely to avoid overcooking.

    5. Can I prepare this ahead of time?

    While this shrimp boil is best served fresh, you can prep the veggies and seasonings ahead of time. Cook the shrimp right before serving for the best flavor and texture.

    By answering these frequently asked questions, we aim to clarify any concerns and enhance your cooking experience with the Quick Blackstone Griddle Shrimp Boil.


    With its delightful flavors, nutrition-packed ingredients, and adaptability to various dietary preferences, the Quick Blackstone Griddle Shrimp Boil is the perfect recipe to spice up your culinary repertoire. Gather your ingredients, fire up that griddle, and indulge in this tropical delight that everyone’s sure to enjoy!

  • The Best Butterscotch Ice Cream Recipe

    The Best Butterscotch Ice Cream Recipe

    The Best Butterscotch Ice Cream Recipe: A Tropical Delight

    Introduction to The Best Butterscotch Ice Cream Recipe

    Are you on the hunt for scrumptious dessert recipes that require minimal effort but yield maximum satisfaction? Look no further! This best butterscotch ice cream recipe is perfect for home cooks, including busy parents who crave a simple treat at the end of the day, students looking for an easy culinary project, and food enthusiasts eager to create a delightful homemade dessert.

    Not only does this recipe embody the rich, creamy essence of butterscotch, but it can also accommodate various dietary preferences, being easily modified to fit vegan, gluten-free, or low-calorie diets. The beauty of this ice cream lies in its uncomplicated preparation—using basic ingredients you likely already have in your pantry.

    Butterscotch ice cream is not just a sweet indulgence; it carries the warmth of nostalgia, reminiscent of homemade kitchens and family gatherings. As you savor each spoonful of this creamy delight, you’re essentially enjoying a moment of bliss and satisfaction—the perfect antidote to a stressful day or a sweet reward to share with loved ones. Let’s dive into the benefits and advantages of making this delightful dessert recipe at home!

    Benefits and Advantages of The Best Butterscotch Ice Cream Recipe

    The best butterscotch ice cream recipe isn’t just delicious—it’s also packed with advantages that make it the ideal choice for dessert lovers of all kinds. The simplicity of its preparation is a significant benefit; even those with the most hectic of schedules can whip up this creamy concoction without needing extensive culinary skills. Additionally, the ingredients can be easily sourced at your local grocery store, making it budget-friendly for families and individuals alike.

    One of the standout features of this recipe is its versatility. Do you have dietary restrictions? No problem! This ice cream can be adapted to be cholesterol-free and lower in calories if you choose dairy-free alternatives, such as almond milk or coconut cream. Plus, it can easily cater to gluten-free diets by ensuring all your components are certified gluten-free.

    Not only does butterscotch ice cream offer a sinfully sweet experience, but it also contains health benefits when prepared thoughtfully. Choosing natural sweeteners like maple syrup or coconut sugar can reduce the glycemic impact of your dessert while providing a delightful caramel flavor. With these alternatives, you can indulge in a sweet treat without the guilt that often accompanies traditional dessert recipes.

    So whether you’re a busy parent, a student, or simply someone looking for a delicious ice cream option that doesn’t compromise on dietary needs or flavor, this butterscotch ice cream recipe covers all bases!

    Ingredients Overview

    Essential Ingredients for The Best Butterscotch Ice Cream Recipe

    Here’s what you’ll need to make the best butterscotch ice cream:

    1. Heavy Cream (2 cups): The richness of heavy cream is essential for that dense, creamy texture. For a vegan option, substitute with coconut cream or cashew cream.

    2. Whole Milk (1 cup): Adds a smoothness to the ice cream base. If you prefer dairy-free, opt for almond milk or oat milk.

    3. Brown Sugar (¾ cup): This is the primary sweetener, providing that deep butterscotch flavor. Coconut sugar is a great alternative.

    4. Granulated Sugar (¼ cup): Adjust for sweetness. Feel free to use agave syrup or another sweetener suitable for your diet.

    5. Vanilla Extract (2 teaspoons): Enhances the flavors; use pure vanilla for the best quality.

    6. Salt (¼ teaspoon): Just a pinch brings out the sweetness of butterscotch.

    7. Egg Yolks (4): Essential for a custard-style ice cream. If you want an egg-free alternative, look for a vegan egg replacer or simply skip this step—though the texture may differ slightly.

    8. Butter (½ cup): The key to that luscious, buttery flavor. For a healthier twist, use coconut oil or a vegan butter substitute.

    Dietary Substitutions to Customize Your The Best Butterscotch Ice Cream Recipe

    Tailoring the best butterscotch ice cream recipe to suit various dietary needs is easier than you might think! Here are some suggested substitutions:

    • Dairy-Free: Use coconut cream instead of heavy cream, and choose almond or cashew milk in place of whole milk.

    • Lower-Calorie: Replace brown sugar with a sugar substitute like erythritol or stevia, making this a guilt-free dessert option.

    • Egg-Free: Skip the egg yolks and opt for a store-bought egg substitute or simply thicken your ice cream base with cornstarch or arrowroot powder.

    • Gluten-Free: This recipe is naturally gluten-free, but ensure that any add-ins (like toppings) are certified gluten-free.

    By making these adjustments, you can enjoy a bowl of creamy butterscotch ice cream that fits perfectly into your lifestyle and dietary restrictions!

    How to Prepare the Perfect The Best Butterscotch Ice Cream Recipe: Step-by-Step Guide

    Creating the best butterscotch ice cream is an enjoyable and straightforward process. Here’s your step-by-step guide to crafting this indulgent dessert recipe:

    1. Prepare the Base: In a medium saucepan over low heat, combine the heavy cream, whole milk, and brown sugar. Stir gently until the sugar is fully dissolved.

    2. Melt the Butter: Add the butter to the mixture and continue stirring until it melts into the creamy base, enriching its flavor.

    3. Whisk Egg Yolks: In a separate bowl, whisk the egg yolks until they are light and frothy. This helps achieve that smooth texture you crave.

    4. Temper the Eggs: Slowly pour a small amount of the warm cream mixture into the egg yolks while continuously whisking. This step prevents the eggs from cooking too quickly. Gradually add the rest of the cream mixture to the yolks.

    5. Cook the Mixture: Return the entire mixture to the saucepan over medium heat. Stir constantly until the mixture thickens enough to coat the back of a spoon (about 10 minutes).

    6. Strain the Custard (Optional): If you prefer an ultra-smooth ice cream, strain the custard through a fine sieve into a clean bowl, eliminating any potential egg bits.

    7. Add Vanilla and Salt: Stir in the vanilla extract and salt, combining well.

    8. Cool the Base: Allow the base to cool at room temperature for about 30 minutes, then refrigerate until chilled (at least 4 hours or overnight for best results).

    9. Churn the Ice Cream: Pour the chilled base into an ice cream maker and churn according to your machine’s instructions until it reaches a soft-serve consistency.

    10. Freeze the Ice Cream: Transfer the churned ice cream into an air-tight container. Freeze for at least 4-6 hours to firm up before serving.

    11. Serve and Enjoy: Scoop the butterscotch ice cream into bowls and enjoy! It pairs wonderfully with chopped nuts, drizzles of chocolate sauce, or a sprinkle of sea salt for added flavor.

    Variations: You might also consider adding things like crushed graham crackers or caramel swirls during the churn for additional textures and flavors. Customizing the recipe can be a joyful endeavor!

    Mastering The Best Butterscotch Ice Cream Recipe: Advanced Tips and Variations

    To elevate the experience and help you perfect your best butterscotch ice cream, consider these advanced tips and variations:

    • Infuse Flavors: Add a pinch of cinnamon or nutmeg to give your butterscotch a unique twist. You can also infuse your cream mixture with flavors like espresso or orange zest to create a surprising depth of taste.

    • Experiment with Mix-ins: Chopped nuts, crushed cookies, or even pieces of your favorite candy can add delightful textures. Consider folding these in just before you transfer the mixture to the freezer.

    • Garnish Creatively: Serve your ice cream with toppings like hot fudge, extra butterscotch sauce, or caramelized bananas to impress your guests further.

    • Make Ice Cream Sandwiches: Use this butterscotch ice cream as a filling between cookies for a fun, nostalgic treat.

    These tips will not only enhance your ice cream but inspire you to get creative in the kitchen.

    How to Store The Best Butterscotch Ice Cream Recipe: Best Practices

    To enjoy your best butterscotch ice cream at its finest, proper storage is key. After churning, transfer the ice cream into a sturdy, airtight container. Make sure to press a piece of wax paper or parchment paper directly onto the surface of the ice cream before securing the lid. This helps prevent ice crystals from forming and keeps it creamy.

    Store your ice cream in the freezer, where it will last for about 2-3 weeks. However, for the best texture and flavor, consume it within the first week. If it hardens too much, let it thaw for a few minutes at room temperature before scooping to enjoy its creamy goodness.

    Nutritional Value of The Best Butterscotch Ice Cream Recipe

    Understanding the nutritional profile of your dessert can help you enjoy it more mindfully. Here’s a breakdown of the approximate nutritional values per serving (1/2 cup) of butterscotch ice cream, based on the traditional recipe:

    • Calories: 250
    • Total Fat: 15g
    • Saturated Fat: 9g
    • Cholesterol: 90mg
    • Sodium: 50mg
    • Carbohydrates: 30g
    • Sugar: 24g
    • Protein: 3g

    By substituting with lower-calorie options or using alternative ingredients, you can substantially lower these values. For example, using coconut cream instead of heavy cream will reduce calories and fat content, while maintaining that creamy texture you love.

    FAQs: Frequently Asked Questions About The Best Butterscotch Ice Cream Recipe

    Q1: Can I make this butterscotch ice cream without an ice cream maker?
    A1: Yes! If you don’t have an ice cream maker, pour the mixture into a shallow dish and freeze it. Stir every 30 minutes until it’s adequately frozen and creamy (about 3-4 hours).

    Q2: How do I adjust the sweetness?
    A2: You can easily modify the sweetness by using less sugar or replacing sugar with a healthier sweetener like honey or agave.

    Q3: Can I add mix-ins to the ice cream?
    A3: Absolutely! Add your favorite mix-ins, like crushed cookies, chocolate chips, or chopped nuts, during the last few minutes of churning.

    Q4: How can I make this recipe vegan?
    A4: Substitute the heavy cream and milk with coconut cream and almond milk, and replace the egg yolks with a vegan egg substitute or just omit them for a lighter version.

    Q5: What goes well with butterscotch ice cream?
    A5: Serve your butterscotch ice cream with chocolate sauce, caramel drizzle, or alongside pies and cakes for a delightful combination.

    With this comprehensive guide to the best butterscotch ice cream recipe, you’re all set to create a delicious treat that can impress your friends, family, or even just yourself on a warm day. Enjoy experimenting with flavors and toppings, and most importantly, delight in the sweet results!