Tasty Southwest Pasta Salad With Chipotle Greek Yogurt Dressing: A Tropical Delight
Introduction to Tasty Southwest Pasta Salad With Chipotle Greek Yogurt Dressing
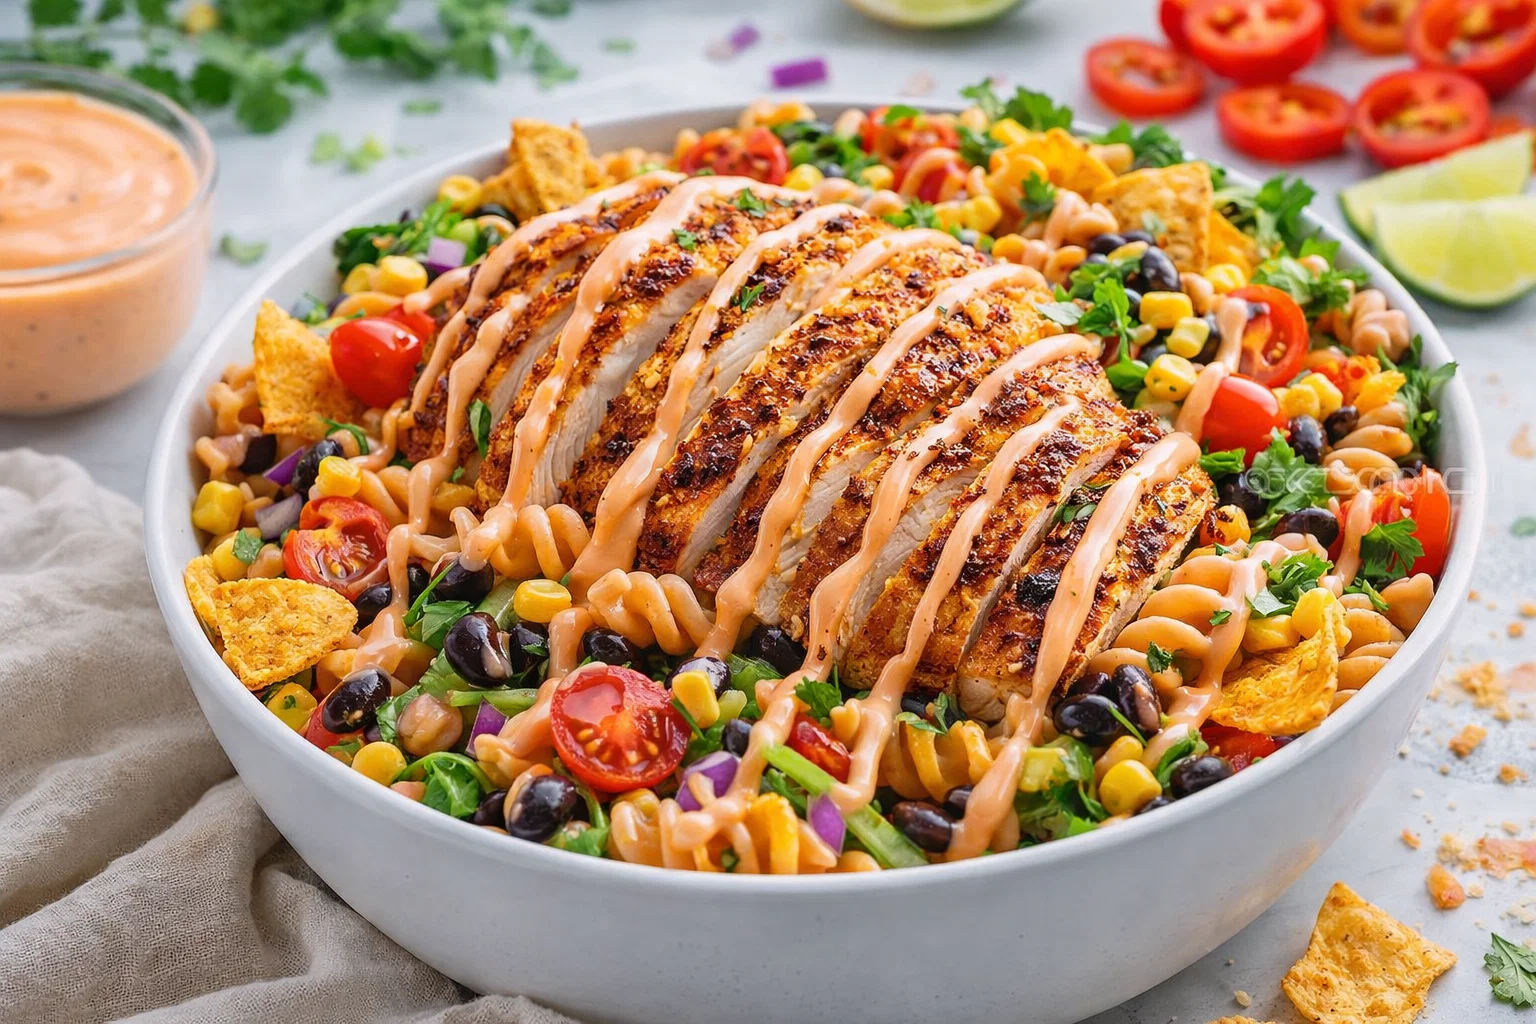
If you’re on the hunt for a refreshing and fulfilling dish that is as delightful as it is nutritious, look no further than the Tasty Southwest Pasta Salad with Chipotle Greek Yogurt Dressing. This vibrant pasta salad is not only bursting with flavor but also packed with health benefits, making it an ideal option for busy home cooks, students, and health-conscious individuals alike. The wonderful combination of fresh vegetables, hearty pasta, and a creamy, zesty dressing will undoubtedly appeal to a wide audience, from newlyweds to seniors and baking enthusiasts.
This pasta salad is simple to prepare, ensuring you spend less time in the kitchen and more time enjoying your meal. Furthermore, it’s versatile enough to cater to various dietary preferences; it can be made gluten-free, vegan, or even low-calorie without sacrificing taste. You can serve it as a main dish or pair it with grilled proteins for a sumptuous meal. So why not take a culinary journey to the Southwest with this delectable dish? You’ll find that it satisfies your cravings and inspires you to get creative in the kitchen.
Benefits and Advantages of Tasty Southwest Pasta Salad With Chipotle Greek Yogurt Dressing
One of the primary benefits of this Tasty Southwest Pasta Salad with Chipotle Greek Yogurt Dressing is its unparalleled ease of preparation. With just a few steps involved, even the busiest parents and working professionals can whip up a delicious meal in no time. The beauty of this salad lies in its ability to bring balance to your plate; combining protein, healthy fats, and an abundance of vegetables, it creates a nutrient-rich meal that will leave you feeling satisfied and energized.
Health-conscious individuals will appreciate that this recipe accommodates various diets. The core ingredients, such as whole wheat pasta, black beans, and fresh vegetables, provide a balance of complex carbohydrates and fiber, making this pasta salad a hearty option. The chipotle Greek yogurt dressing adds a layer of creaminess while significantly reducing the fat content compared to traditional dressings. Thus, it’s a fabulous choice for anyone who is looking to enjoy a salad without the guilt.
Moreover, the bold flavors make this pasta salad stand out from the crowd. The chipotle seasoning adds a smoky kick that perfectly complements the sweetness of corn and bell peppers, while cilantro gives a fresh finish. This beautifully colored dish not only pleases the taste buds but also welcomes vibrant aesthetics to your dining table. Finally, the versatility of the salad allows for endless adaptations, suitable for various occasions, from casual lunches to festive gatherings.
Ingredients Overview
Essential Ingredients for Tasty Southwest Pasta Salad With Chipotle Greek Yogurt Dressing
Here’s a detailed list of the essential ingredients needed to prepare your Tasty Southwest Pasta Salad with Chipotle Greek Yogurt Dressing:
For the Pasta Salad:
-
8 ounces whole wheat pasta (or gluten-free pasta): Using whole wheat enhances fiber content; a gluten-free option accommodates those with gluten sensitivities.
-
1 can (15 ounces) black beans, rinsed and drained: An excellent source of protein and fiber.
-
1 cup corn (canned or frozen): Adds a sweet crunch, rich in vitamins and minerals.
-
1 red bell pepper, diced: Provides a pop of color and vitamin C.
-
1 cup cherry tomatoes, halved: Juicy and vibrant, these tomatoes add freshness.
-
1 ripe avocado, diced: Creamy and packed with healthy fats, perfect for a nourishing boost.
-
1/2 cup red onion, finely chopped: Adds a sharp flavor that beautifully complements the other ingredients.
-
1/4 cup fresh cilantro, chopped: Offers a refreshing herbal note.
For the Chipotle Greek Yogurt Dressing:
-
1 cup plain Greek yogurt: A low-calorie option that adds creaminess and protein.
-
2 tablespoons lime juice: Brightens the dressing and adds a zesty kick.
-
1-2 teaspoons chipotle powder (adjust according to spice preference): Delivers the smoky flavor signature to Southwest cuisine.
-
1 garlic clove, minced: Enhances the flavor profile with its robust taste.
-
Salt and pepper to taste: Essential for tuning the dressing.
Dietary Considerations:
- Vegan Option: Substitute Greek yogurt with dairy-free yogurt or silken tofu blended until smooth.
- Gluten-Free Option: Ensure the pasta is labeled gluten-free.
- Low-Calorie Option: Opt for low-fat Greek yogurt or use less dressing.
Dietary Substitutions to Customize Your Tasty Southwest Pasta Salad With Chipotle Greek Yogurt Dressing
This recipe can be easily adapted to meet a variety of dietary needs. Here are some ideal substitutions:
-
Pasta Choice: For a low-carb option, substitute traditional pasta with spiralized zucchini or cauliflower rice. They provide volume with significantly fewer calories.
-
Protein Source: If you’re looking for additional protein, include grilled chicken or shrimp. For a vegetarian-friendly option, consider adding cubes of cheese or nuts like walnuts or almonds for extra crunch.
-
Beans Alternatives: You could replace black beans with chickpeas, kidney beans, or edamame to switch up the flavor and texture.
-
Vegetable Variations: Feel free to swap or add other vegetables, such as diced cucumbers, carrots, or even radishes, based on your preference or what you have on hand.
-
Dressing Variability: If you desire a spicier kick, add chopped jalapeños or more chipotle powder. Alternatively, for a lighter dressing, mix Greek yogurt with vinegar and herbs.
-
Herb Choice: If cilantro isn’t your favorite, basil or parsley can serve as a delightful substitute.
Whether you choose to keep it simple or explore these variations, your pasta salad will remain a vibrant and exciting dish.
How to Prepare the Perfect Tasty Southwest Pasta Salad With Chipotle Greek Yogurt Dressing: Step-by-Step Guide
Creating the Tasty Southwest Pasta Salad is not only straightforward but incredibly satisfying. Follow this step-by-step guide to ensure success:
-
Prepare the Pasta: Begin by cooking the whole wheat pasta according to package instructions. Make sure to season the boiling water with a pinch of salt. Once cooked, drain and rinse with cold water to stop the cooking process. This step helps maintain the pasta’s firmness as well.
-
Mix the Dressing: In a medium bowl, combine the Greek yogurt, lime juice, chipotle powder, minced garlic, salt, and pepper. Whisk until smooth and creamy. Taste and adjust seasoning if desired. To reduce calories, you can also use less dressing according to preference.
-
Chop the Vegetables: While the pasta cooks, chop the red bell pepper, cherry tomatoes, red onion, and avocado into bite-sized pieces. Rinse and drain the canned black beans and corn. Each component contributes to the salad’s texture and overall flavor.
-
Combine the Ingredients: In a large serving bowl, add the cooled pasta, black beans, corn, diced bell pepper, tomatoes, red onion, and avocado. Toss gently to combine all the ingredients evenly.
-
Add the Dressing: Pour the chipotle Greek yogurt dressing over the pasta salad mixture. Using clean hands or utensils, gently toss the salad to distribute the dressing evenly. Be careful not to mash the avocado!
-
Incorporate Fresh Herbs: Finally, sprinkle the chopped cilantro over the salad and give it one last gentle toss. Cilantro adds freshness and brightens the dish, enhancing its appeal.
-
Taste Test: Before serving, do a taste test to ensure that the seasoning and flavor are to your liking. If desired, add more lime juice, chipotle, or salt to enhance the flavor further.
-
Chill and Serve: For the best flavor experience, cover the pasta salad and let it chill in the refrigerator for at least 30 minutes before serving. This allows the flavors to meld beautifully.
-
Serve: When ready, scoop portions into bowls and enjoy! This salad can be served as a standalone dish or as a side along grilled meats or fish for a complete Southwest-inspired meal.
This pasta salad is sure to impress your family and guests with its vibrant flavors and textures. Moreover, remember that preparation can be made in advance, making it a hit for meal prepping too!
Mastering Tasty Southwest Pasta Salad With Chipotle Greek Yogurt Dressing: Advanced Tips and Variations
To take your Tasty Southwest Pasta Salad up a notch, consider these advanced tips and variations that will elevate your dish:
-
Customizable Heat Level: If you love spicy flavors, consider adding diced jalapeños directly into the salad or choosing a spicier chipotle yogurt. For milder variations, simply reduce the amount of chipotle seasoning.
-
Meal Prep: This salad holds well in the refrigerator for several days. Prepare large batches to enjoy throughout the week; just remember to keep the dressing separate if you are storing it for longer periods. This keeps the pasta from becoming soggy.
-
Replacing Ingredients: Think of seasonal vegetables! In the summer, you could add grilled zucchini or summer squash. In winter, roasted vegetables like butternut squash or brussels sprouts can bring warmth and flavor.
-
Incorporating Nuts: For those who enjoy crunch, adding sunflower seeds or pumpkin seeds not only gives a delightful texture but also introduces healthy fats and protein that enhance nutritional value.
-
Pairing Ideas: This pasta salad pairs beautifully with grilled chicken, shrimp tacos, or even as a side with your favorite chili. The possibilities are delightful and varied.
These tips will help you master the recipe and adapt it to your unique palate while keeping it fun and exciting.
How to Store Tasty Southwest Pasta Salad With Chipotle Greek Yogurt Dressing: Best Practices
Storing your Tasty Southwest Pasta Salad is quite easy, ensuring you enjoy delicious leftovers for days to come. Here’s how to store and preserve this delightful dish properly:
Refrigeration:
-
Sealed Container: Transfer the pasta salad into an airtight container. Make sure the lid closes tightly to prevent any air from spoiling the meal.
-
Chill Immediately: Place the container in the refrigerator if you’re not serving it right away. It can be stored for up to three to four days. The flavors meld beautifully over time, enhancing the overall taste.
Freezing:
-
Avoid Freezing with Dressing: It’s not advisable to freeze the pasta salad with the dressing. Components like avocado and dressing can degrade in texture when thawed.
-
Prep for Freezing: If you intend to freeze it, consider freezing the pasta and the vegetable mixture separately. Cooked pasta can be frozen for up to a month. When ready to consume, thaw in the refrigerator overnight.
Reheating:
-
Thaw Properly: If you’ve frozen the pasta, thaw it in the refrigerator rather than at room temperature for safety.
-
Add Fresh Ingredients: Before serving leftovers, consider adding some fresh herbs or a drizzle of extra dressing to revitalize the dish.
By following these proper storage methods, you’ll ensure that your pasta salad remains fresh, flavorful, and ready to enjoy whenever you desire.
Nutritional Value of Tasty Southwest Pasta Salad With Chipotle Greek Yogurt Dressing
Understanding the nutritional value of your meals is essential for maintaining a healthy lifestyle. Here is a breakdown of the crucial nutritional components of the Tasty Southwest Pasta Salad with Chipotle Greek Yogurt Dressing per serving (based on approximately 1.5 cups):
- Calories: 380 kcal
- Total Fat: 10g
- Saturated Fat: 2g
- Protein: 15g
- Carbohydrates: 55g
- Dietary Fiber: 12g
- Sugars: 6g
- Cholesterol: 5mg
- Sodium: 350mg
- Vitamin A: 25% DV
- Vitamin C: 30% DV
- Calcium: 10% DV
- Iron: 20% DV
This pasta salad serves as a fantastic source of protein, essential vitamins, and minerals, thanks to the array of vegetables and the Greek yogurt dressing. Additionally, it’s rich in fiber due to the whole wheat pasta and beans, making it a filling yet nutritious meal option.
Feel free to adjust the ingredients or portion sizes to fit your dietary goals or needs. Understanding what’s in the food you eat fosters informed choices and promotes a balanced lifestyle.
FAQs: Frequently Asked Questions About Tasty Southwest Pasta Salad With Chipotle Greek Yogurt Dressing
- Can I make this pasta salad ahead of time?
-
Absolutely! The Tasty Southwest Pasta Salad can be made a day ahead. Just store it in the refrigerator, allowing the flavors to meld together.
-
How do I make it vegan?
-
To make the salad vegan, simply substitute the Greek yogurt with a plant-based yogurt alternative. This maintains the creamy texture while keeping it dairy-free.
-
Is this pasta salad gluten-free?
-
Yes, it can be gluten-free! Just make sure to use gluten-free pasta.
-
How long will it last in the fridge?
-
The pasta salad can last up to four days when stored properly in an airtight container in the refrigerator.
-
Can I freeze the Tasty Southwest Pasta Salad?
-
It’s not recommended to freeze it once you’ve added the dressing. However, you can freeze the pasta and veggies separately without the dressing and thaw them together before serving.
-
How can I customize the dressing?
-
Feel free to customize the dressing by adding extra lime juice for tanginess or incorporating different herbs or spices based on your preference.
-
What else can I add to enhance flavor?
- Consider adding roasted veggies, nuts, or seeds for added texture and flavors, and don’t forget about a squeeze of fresh lime juice before serving!
This FAQ section aims to address common concerns and questions that cooking enthusiasts may have about the Tasty Southwest Pasta Salad, making it even easier for you to create a fabulous dish that aligns with your dietary preferences.
With this detailed guide to the Tasty Southwest Pasta Salad with Chipotle Greek Yogurt Dressing, you are equipped to create a nutritious and delicious meal that delights your palate and fits seamlessly into your lifestyle. Whether you are feeding a family, preparing for meal prep, or hosting a gathering, this pasta salad is sure to impress and satisfy! Enjoy!