Blog

  • Tasty Grinder Pasta Salad Easy Recipe

    Tasty Grinder Pasta Salad Easy Recipe

    Tasty Grinder Pasta Salad Easy Recipe: A Tropical Delight

    Introduction to Tasty Grinder Pasta Salad Easy Recipe

    Welcome to a delightful culinary adventure with the Tasty Grinder Pasta Salad Easy Recipe! This vibrant and nutritious dish is more than just a simple side; it’s a colorful experience meant to tantalize your taste buds while offering a range of health benefits. Packed with essential nutrients, this pasta salad is not only simple to prepare but also adaptable for various dietary preferences. Whether you’re a busy parent looking to feed your family a delicious meal or a student seeking a quick and filling dish, this recipe is for you.

    What sets this pasta salad apart is its versatility. It can easily be made vegan, gluten-free, or tailored to fit your dietary needs without sacrificing flavor. Imagine a bowl filled with flavorful ingredients, like crisp veggies and tender pasta, paired with a zesty dressing that brings everything together. You might just discover that it is the go-to recipe for any occasion—be it a picnic, a family gathering, or a casual weeknight dinner. Dive in and explore how to make this delightful dish that can cater to home cooks at every skill level.

    Benefits and Advantages of Tasty Grinder Pasta Salad Easy Recipe

    Why choose the Tasty Grinder Pasta Salad Easy Recipe over countless other options? Here are several compelling benefits that demonstrate why this dish is a smart choice for your meals:

    1. Simplicity of Preparation: One of the standout attributes of this pasta salad is its ease of preparation. With minimal cooking involved, even beginners can manage this recipe with confidence. The ingredient list is not overly complicated, making it accessible to those who may feel intimidated by elaborate cooking procedures.

    2. Health Benefits: The ingredients in this pasta salad are carefully selected to maximize nutritional value. Whole-grain pasta reduces refined carbohydrates, while the abundance of fresh vegetables adds fiber, vitamins, and minerals to your meal. Consequently, you’ll not only satisfy your hunger but also contribute positively to your well-being.

    3. Versatility for Various Diets: This pasta salad recipe can be easily adapted to cater to different dietary requirements. For instance, using gluten-free pasta or chickpea pasta as alternatives ensures that those with gluten sensitivities can enjoy it too. Likewise, this dish can be made vegan by swapping out any dairy components for plant-based options, thereby accommodating those on vegan diets.

    4. Ideal for Meal Prep: If you’re a busy parent, student, or working professional, you’ll appreciate that this recipe is perfect for meal prep. Make a large batch at the beginning of the week, and have nutritious lunches or quick dinners ready to go. Simply store the salad in an airtight container, and you’re set for several days of easy meals.

    5. Flavorful Satisfaction: Finally, the blend of textures and tastes in this salad is what makes it truly exceptional. The zesty dressing, combined with crunchy vegetables and tender pasta, creates a refreshing and satisfying dish that pleases the palate, making it an ideal option for entertaining guests or simply treating yourself.

    In summary, the Tasty Grinder Pasta Salad Easy Recipe combines health, simplicity, and flavor, making it an excellent choice for various occasions. Whether you’re a novice in the kitchen or an experienced home chef, you’ll find great joy in preparing this delightful dish!

    Ingredients Overview

    Essential Ingredients for Tasty Grinder Pasta Salad Easy Recipe

    Here’s what you need to create this delicious pasta salad and nourish your body at the same time!

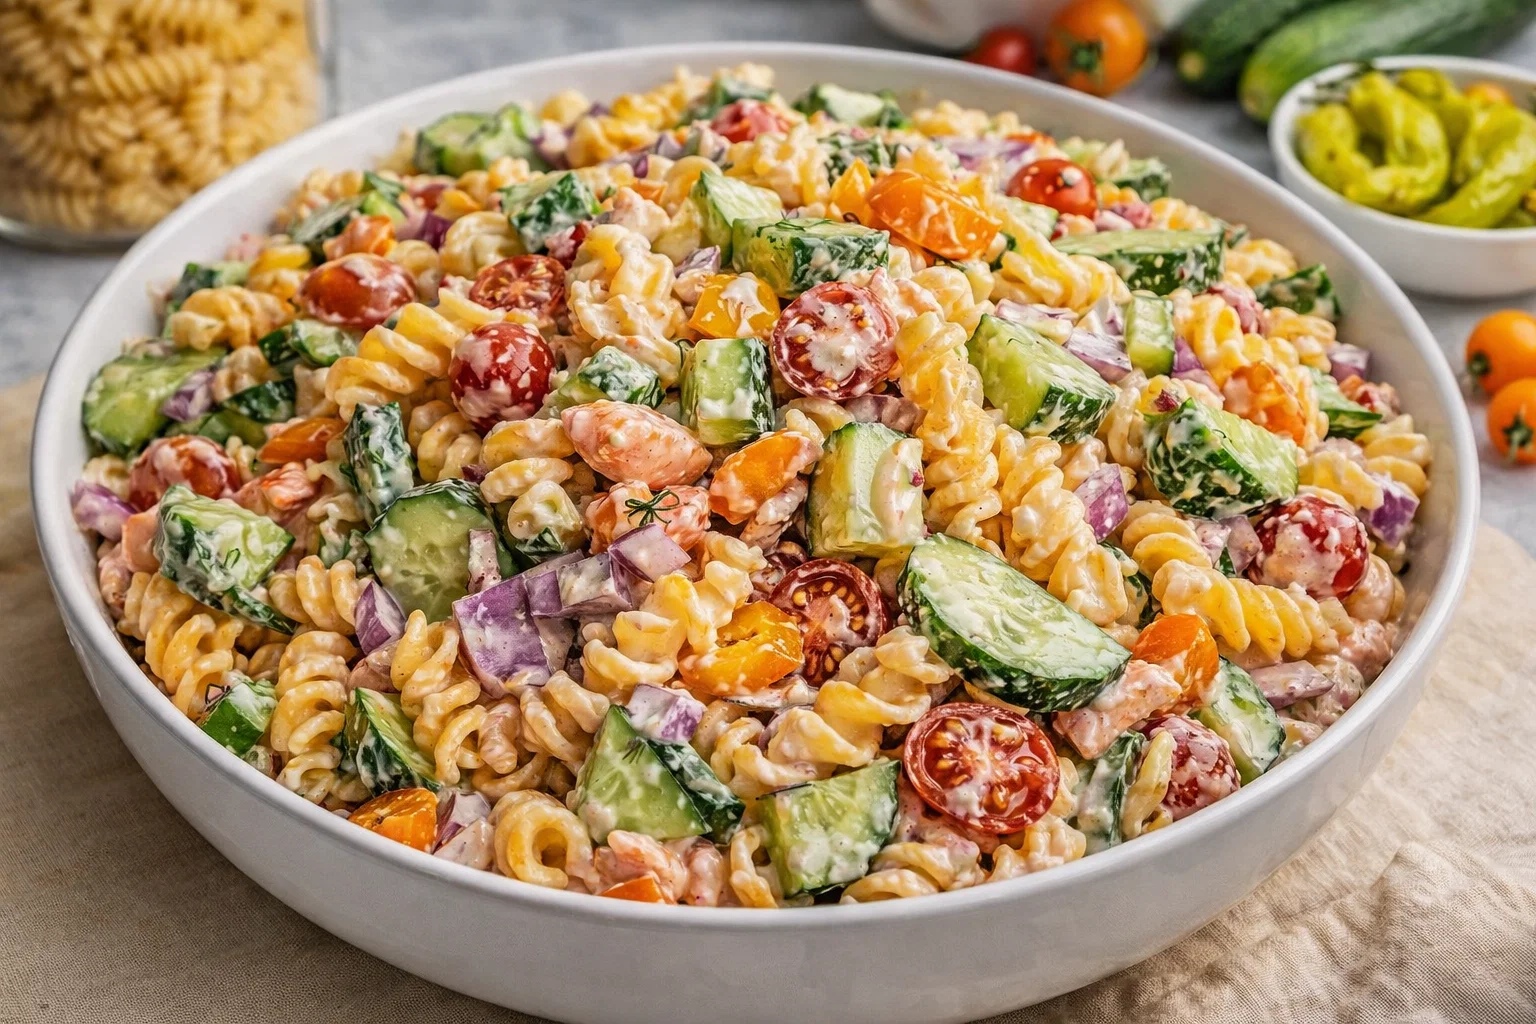
    • Pasta (8 oz.): Choose whole-grain, gluten-free, or chickpea pasta for a healthier option.
    • Cherry Tomatoes (1 cup): Halved; they add a burst of sweetness and juiciness.
    • Cucumber (1 medium): Diced; it brings a refreshing crunch.
    • Bell Peppers (1 cup): Chopped; use a mix of colors for visual appeal.
    • Red Onion (1/2 medium): Finely diced; it adds a zesty flavor that elevates the dish.
    • Black Olives (1/2 cup): Sliced; they introduce a savory depth.
    • Feta Cheese (1/2 cup): Crumbled; (optional for vegan diets; can be substituted with a plant-based cheese).
    • Fresh Parsley (1/4 cup): Chopped; it enhances freshness and flavor.
    • Olive Oil (1/4 cup): For the dressing; use extra virgin for the best flavor.
    • Red Wine Vinegar (2 tbsp): Adds acidity and brightness to the salad.
    • Dijon Mustard (1 tsp): For a tangy kick in the dressing.
    • Salt and Pepper (to taste): Essential seasonings to balance flavors.

    This combination provides an exciting medley of flavors and textures. Plus, incorporating various colors reflects not only the dish’s health benefits but also its visual appeal, making it a feast for the eyes as well as the palate.

    Dietary Substitutions to Customize Your Tasty Grinder Pasta Salad Easy Recipe

    To cater to different dietary needs or if certain ingredients aren’t available, here are some easy substitutions:

    • Pasta Options: Substituting traditional pasta with gluten-free options such as quinoa pasta or spiralized vegetables like zucchini spirals can cater to gluten-sensitive individuals.
    • Dairy Alternatives: For a vegan-friendly version, swap out feta cheese for crumbled tofu seasoned with nutritional yeast or use a favorite dairy-free cheese brand.
    • Vegetable Variations: Feel free to mix up the veggies! You can use broccoli, carrots, or even kale for a different flavor and nutrient profile. Just be sure to combine vegetables that hold up well, so they don’t become soggy.
    • Herb Substitutions: If parsley is unavailable, fresh basil or cilantro can provide a wonderful twist to your dish.
    • Proteins Addition: For added protein, consider incorporating chickpeas or grilled chicken if you are not sticking strictly to vegan or vegetarian diets.

    These substitutions ensure that your Tasty Grinder Pasta Salad can be enjoyed by everyone, regardless of dietary restrictions or personal preferences.

    How to Prepare the Perfect Tasty Grinder Pasta Salad Easy Recipe: Step-by-Step Guide

    Creating the Tasty Grinder Pasta Salad is not only rewarding but also straightforward. Here are simple step-by-step instructions to guide you through the process:

    1. Prepare the Base: Start by boiling a large pot of water. Add a generous pinch of salt and then the pasta. Cook according to package directions until al dente. Drain and rinse under cold water to cool it down. This step is vital to prevent the pasta from becoming mushy.

    2. Chop Fresh Vegetables: While the pasta is cooking, wash and chop the cherry tomatoes, cucumber, bell peppers, and red onion. The freshness of these ingredients will add vibrant flavors and colors to your salad.

    3. Mix the Dressing: In a small bowl, whisk together olive oil, red wine vinegar, Dijon mustard, salt, and pepper. Taste and adjust the seasoning as needed. This homemade dressing is far better than store-bought and allows you to customize flavors.

    4. Combine Ingredients: In a large mixing bowl, add the cooled pasta, along with the chopped vegetables, black olives, and parsley. Stir gently to combine all ingredients without breaking the pasta.

    5. Add Cheese (Optional): If you’re using feta, sprinkle it over the salad now. Gently fold it into the mixture to avoid crumbling too much.

    6. Dress the Salad: Drizzle the prepared dressing over the salad. Begin with a conservative amount and toss gently to combine. You want the pasta salad to be coated without being swimming in dressing.

    7. Taste and Adjust: At this point, taste your pasta salad for seasoning. If it needs more flavor, add a pinch more salt, pepper, or even a dash of red wine vinegar.

    8. Refrigerate: Cover the salad with plastic wrap or transfer it to an airtight container. Refrigerate for at least 30 minutes (or up to a few hours) to allow flavors to meld together. This resting period makes a significant difference in taste.

    9. Serve and Enjoy: Before serving, give the salad a gentle toss to redistribute any dressing that may have settled at the bottom. Garnish with extra parsley or cheese if desired.

    10. Store Leftovers: If there are any leftovers, store the pasta salad in the fridge for up to three days. It makes for a convenient lunch option!

    This straightforward method results in a vibrant and flavorful pasta salad that can cater to many tastes and dietary needs.

    Mastering Tasty Grinder Pasta Salad Easy Recipe: Advanced Tips and Variations

    To take your Tasty Grinder Pasta Salad Easy Recipe to the next level, consider these additional tips and variations that enhance the flavor and nutrition of your dish:

    1. Experiment with Different Pasta Shapes: While rotini or penne works well, try using farfalle (bowtie pasta) for a fun twist. The shape can affect the texture and presentation, making every bite enjoyable.

    2. Mix Up the Dressings: If you’re looking for a different flavor profile, consider swapping out the dressing entirely. A basil pesto or a sesame ginger dressing can impart a unique flair to your pasta salad.

    3. Toast the Nuts: For an added crunch, consider toasting some nuts, like almonds or walnuts, and tossing them in just before serving. They provide healthy fats and a satisfying texture.

    4. Incorporate Seasonal Ingredients: Take advantage of what’s in season! For instance, in the summer, add grilled corn and diced fresh peaches for a fruity twist. In the fall, roasted butternut squash can add warmth and depth.

    5. Spice It Up: If you enjoy heat, consider adding diced jalapeños or a pinch of red pepper flakes to the dressing for a zesty kick.

    6. Add Fruits: Sliced avocados or even berries like strawberries can add a fresh, slightly sweet element to the salad, balancing its savory components.

    By using these tips, you create a dynamic and exciting dish that keeps your palate satisfied and curious.

    How to Store Tasty Grinder Pasta Salad Easy Recipe: Best Practices

    Storing your Tasty Grinder Pasta Salad correctly ensures that leftovers stay fresh and flavorful. Here’s how to do it effectively:

    1. Refrigeration: Store the pasta salad in an airtight container in the refrigerator. It’s best consumed within three days, after which vegetables may lose their crispness, and pasta may become mushy.

    2. Freezing: While it’s not typically recommended to freeze pasta salad because of its creamy and fresh ingredients, you can freeze portions without dressing to extend its shelf life. When you’re ready to enjoy it, thaw in the refrigerator overnight and add fresh dressing and veggies before serving.

    3. Serving Suggestions: If you’re planning to serve this salad at a gathering, consider keeping the dressing separate until just before serving to keep the pasta and veggies crisp.

    Following these storage tips allows you to enjoy your pasta salad over several days without compromising on quality.

    Nutritional Value of Tasty Grinder Pasta Salad Easy Recipe

    Understanding the nutritional value of your meals is essential for maintaining a balanced diet. Here’s a breakdown of the approximate nutritional content per serving (1 cup) of the Tasty Grinder Pasta Salad if prepared as outlined:

    • Calories: 280
    • Protein: 8g
    • Carbohydrates: 40g
    • Dietary Fiber: 5g
    • Total Fat: 12g
    • Saturated Fat: 3.5g
    • Cholesterol: 10mg (if feta cheese is included)
    • Sodium: 320mg

    This pasta salad is an excellent source of vitamins and minerals from the fresh vegetables, while the whole-grain pasta provides complex carbohydrates for sustained energy. With healthy fats from olive oil and the potential for protein from added ingredients like chickpeas or grilled chicken, this dish can easily fit into a range of nutritional diets.

    FAQs: Frequently Asked Questions About Tasty Grinder Pasta Salad Easy Recipe

    1. Can I make this pasta salad ahead of time?

    Yes! One of the advantages of this pasta salad is that it can be prepared ahead of time. In fact, it tastes better after a few hours in the fridge as the flavors meld together.

    2. Is there a gluten-free version of this pasta salad?

    Absolutely! You can substitute traditional pasta with gluten-free pasta options such as quinoa or brown rice pasta. This allows those with gluten sensitivities to enjoy the recipe fully.

    3. What can I substitute for feta cheese?

    If you’re looking for a dairy-free option, use crumbled tofu seasoned with nutritional yeast or your favorite plant-based cheese.

    4. Can I add protein to this salad?

    Certainly! Grilled chicken, canned chickpeas, or even shrimp can easily be added to the pasta salad for an extra protein boost.

    5. How long will leftovers last in the fridge?

    Stored properly in an airtight container, leftovers can typically last up to three days. However, for the freshest taste and texture, enjoy it within the first two days.

    6. Are there any variations I can try?

    Yes! Feel free to experiment with various vegetables, dressings, or even fruits like avocados. Seasonal ingredients can transform this salad into something new and exciting.

    7. Can I serve this salad warm?

    This recipe is best served cold or at room temperature, but if you prefer, you can slightly warm the pasta before mixing in the additional ingredients.

    Embrace the vibrant world of flavors and textures by trying out the Tasty Grinder Pasta Salad Easy Recipe! Enjoy experimenting with its ingredients or relish it as-is; either way, you’ll have a delightful dish that satisfies your hunger while keeping health in mind.

  • The Best Chocolate Chip Cookies Recipe

    The Best Chocolate Chip Cookies Recipe

    The Best Chocolate Chip Cookies Recipe: A Tropical Delight

    Introduction to The Best Chocolate Chip Cookies Recipe

    When it comes to comfort food, few things can rival the classic appeal of chocolate chip cookies. These delightful treats have a unique place in our hearts and kitchens, embodying the balance between sweet, chewy, and slightly crisp. The Best Chocolate Chip Cookies Recipe not only captures that essence but also presents an accessible, simple, and versatile way to indulge in this beloved dessert.

    This recipe shines, making it a popular choice for home cooks, busy parents, students, and even health-conscious individuals. Crafted with wholesome ingredients, the cookies incorporate minimal sugar and can easily adapt to fit vegan or gluten-free diets. The beauty of this chocolate chip cookie recipe lies in its flexibility; you can customize it according to your tastes and dietary preferences.

    With a few basic ingredients and straightforward instructions, whipping up these cookies becomes a delightful experience for everyone involved. Whether you’re baking for a gathering, surprising a loved one, or simply enjoying a cozy evening at home, chocolate chip cookies can be your perfect partner. Join us in exploring this beautiful recipe and discover how easy and rewarding it is to make the best cookies right in your kitchen!

    Benefits and Advantages of The Best Chocolate Chip Cookies Recipe

    The Best Chocolate Chip Cookies Recipe is a standout for numerous reasons. First and foremost, it encourages inclusivity in the kitchen. As a versatile recipe, it accommodates various dietary needs—be it gluten-free, vegan, or low-calorie options—without compromising on flavor. By using alternative ingredients, you can satisfy the cravings of friends and family, ensuring that everyone can enjoy a sweet treat.

    One of the key advantages of this recipe is its simplicity. With just a handful of ingredients, you won’t find yourself overwhelmed. In fact, for busy parents or working professionals, this chocolate chip cookie recipe offers a quick solution to satisfy snack cravings without an elaborate kitchen adventure. Besides, kids love to participate, making it a fun family activity.

    Health benefits stand out as another significant factor. By choosing the right ingredients, such as whole-grain flour or natural sweeteners like coconut sugar, you can create cookies that not only please the palate but also provide nourishment. You and your family can indulge without the guilt often associated with traditional baked goods.

    Finally, this recipe stands out due to its adaptability. You can easily modify it to explore exciting variations like adding nuts, spices, or even fruits. This aspect allows bakers to express creativity and cater to personal preferences, transforming simple chocolate chip cookies into a delightful experience every time.

    Ingredients Overview

    Essential Ingredients for The Best Chocolate Chip Cookies Recipe

    To make the most delightful chocolate chip cookies, you’ll need the following essential ingredients:

    • All-Purpose Flour (2 cups): This forms the base of your cookies, providing structure.
    • Baking Soda (1 teaspoon): This ingredient helps the cookies rise and become fluffy.
    • Salt (½ teaspoon): Enhances the flavor and balances sweetness.
    • Unsalted Butter (1 cup, melted): Adds richness and moisture. For a healthier version, substitute with coconut oil or vegan butter for a dairy-free option.
    • Brown Sugar (¾ cup): This sugar gives the cookies a deeper flavor and chewy texture. Substitute with coconut sugar for a low-calorie approach.
    • Granulated Sugar (¾ cup): Provides sweetness and helps achieve the perfect cookie crisp.
    • Vanilla Extract (1 tablespoon): Enhances the flavors of your cookies.
    • Eggs (2 large): Binds all ingredients together. For a vegan alternative, use aquafaba (3 tablespoons) or flaxseeds (1 tablespoon ground flaxseed mixed with 2.5 tablespoons water).
    • Chocolate Chips (2 cups): The star of the show! Dark chocolate chips are a healthier option, while carob chips can serve as a substitute for those avoiding caffeine.

    Dietary Substitutions to Customize Your The Best Chocolate Chip Cookies Recipe

    To ensure this chocolate chip cookie recipe accommodates various dietary needs, here are some suggested substitutions:

    1. Gluten-Free Option: Replace all-purpose flour with a gluten-free flour blend. Make sure the blend contains xanthan gum, or add ½ teaspoon to help with structure.

    2. Vegan Option: Substitute eggs with flaxseed or chia egg (1 tablespoon of flaxseed/chia seeds mixed with 3 tablespoons of water, set aside until gel-like) and use vegan butter or coconut oil instead of unsalted butter.

    3. Low-Calorie Option: Use a sugar substitute like stevia or erythritol. Additionally, opt for reduced-fat margarine or applesauce in place of butter.

    4. Nut-Free Option: Ensure that any chocolate chips used are nut-free, and you can enhance flavor by adding spices such as cinnamon or nutmeg instead.

    By implementing these thoughtful substitutions, you can enjoy the deliciousness of chocolate chip cookies guilt-free!

    How to Prepare the Perfect The Best Chocolate Chip Cookies Recipe: Step-by-Step Guide

    Creating mouthwatering chocolate chip cookies is easier than you might think! Follow this step-by-step guide to bake the best cookies you’ve ever had.

    1. Preheat the Oven: Begin by preheating your oven to 350°F (175°C). This step ensures that your cookies bake evenly to perfection.

    2. Prepare Your Baking Sheet: Line a baking sheet with parchment paper. This makes transferring the cookies easy and prevents sticking.

    3. Mix Dry Ingredients: In a medium bowl, whisk together 2 cups of all-purpose flour, 1 teaspoon of baking soda, and ½ teaspoon of salt. Set this mixture aside for later.

    4. Cream Butter and Sugars: In a large bowl, combine 1 cup of melted unsalted butter, ¾ cup brown sugar, and ¾ cup granulated sugar. Using an electric mixer, beat until the mixture becomes creamy and light in color, about 2 minutes.

    5. Add Wet Ingredients: To the butter-sugar mixture, add 1 tablespoon of vanilla extract and 2 large eggs (or your vegan substitute). Beat until fully incorporated.

    6. Incorporate Dry Ingredients: Gradually add the dry mixture to the wet mixture, mixing on low speed until just combined. Avoid over-mixing, as this can lead to tough cookies.

    7. Fold in Chocolate Chips: Gently fold in 2 cups of chocolate chips with a spatula or wooden spoon, ensuring they are evenly distributed throughout the dough.

    8. Scoop the Dough: Using a cookie scoop or tablespoon, portion out the dough onto the prepared baking sheet, leaving enough space between each cookie for them to spread as they bake.

    9. Bake: Place the cookie sheet in the preheated oven and bake for 10-12 minutes, or until the edges are golden brown, and the centers are slightly undercooked.

    10. Cool on Wire Racks: Once baked, remove the cookies from the oven and allow them to cool on the baking sheet for 5 minutes before transferring to wire racks to cool completely.

    11. Store: Once cooled, enjoy these delectable cookies right away! For long-term storage, place them in an airtight container.

    The adaptability of this chocolate chip cookie recipe allows you to tweak the ingredients or baking time based on dietary preferences, making it a versatile treat!

    Mastering The Best Chocolate Chip Cookies Recipe: Advanced Tips and Variations

    For those ready to elevate their cookie game, here are some advanced tips and delightful variations to consider:

    • Brown Butter Cookies: For a nutty flavor, brown the butter before mixing it with sugars. Simply heat the butter on medium heat, stirring constantly until it turns golden brown and smells nutty. Allow it to cool slightly before continuing with the recipe.

    • Chill the Dough: Chilling the dough for 30 minutes to 2 hours can enhance the flavor and texture of your cookies. It allows the flavors to meld, resulting in a richer taste.

    • Add Nuts: For a delightful crunch, fold in 1 cup of your favorite nuts, such as walnuts or pecans, along with the chocolate chips.

    • Mix in Other Flavors: Experiment with different types of chocolate chips (milk, dark, white, or even butterscotch chips), or add a teaspoon of espresso powder for a subtle coffee flavor that enhances the chocolate.

    • Stuffed Cookies: Try stuffing your cookies by placing a chocolate piece in the center of the dough ball. This creates a melty, gooey surprise in every bite.

    These tips can transform a classic recipe into unique culinary creations, ensuring that the chocolate chip cookies never become monotonous!

    How to Store The Best Chocolate Chip Cookies Recipe: Best Practices

    Proper storage of your chocolate chip cookies is essential to preserve their taste and texture. Here are some best practices for storing these delightful treats:

    1. Room Temperature Storage: Store cooled cookies in an airtight container on the counter for 3-5 days. This helps retain their freshness, so you can easily enjoy them any time.

    2. Refrigeration: If you’d like to extend their life, consider placing the cookies in the refrigerator. Just keep in mind that chilled cookies may become slightly harder, so let them sit at room temperature for a few minutes before enjoying.

    3. Freezing: For longer storage, freeze your cookies. Place individual cookies in an even layer on a baking sheet and freeze until solid. Then, transfer them to a freezer-safe container or bag, where they’ll last for up to 3 months. When ready to eat, simply thaw them at room temperature or reheat in the microwave for a few seconds.

    These storage techniques will help ensure your cookies stay fresh and delicious, allowing you to savor each bite long after baking.

    Nutritional Value of The Best Chocolate Chip Cookies Recipe

    Understanding the nutritional value of your cookies can help you make informed choices. Below is a rough estimate of the nutritional content per cookie, based on a batch yielding 24 cookies made with conventional ingredients:

    • Calories: 150-200
    • Total Fat: 8-10g
    • Saturated Fat: 5g
    • Cholesterol: 15-25mg
    • Sodium: 90-120mg
    • Total Carbohydrates: 22-25g
    • Dietary Fiber: 1g
    • Sugars: 10-12g
    • Protein: 2-3g

    Keep in mind that these values can vary based on ingredient substitutions and add-ins. For example, using coconut sugar or reducing the amount of sugar can decrease the total calories and sugar content.

    Feel free to explore variations with whole grain flour or use dark chocolate chips to enhance antioxidants and overall health benefits.

    FAQs: Frequently Asked Questions About The Best Chocolate Chip Cookies Recipe

    Q1: Can I use margarine instead of butter?
    Absolutely! You can substitute margarine for butter in equal amounts if you’re looking for a dairy-free option.

    Q2: How do I make my chocolate chip cookies chewy?
    To achieve chewiness, be careful not to overbake your cookies. Removing them from the oven when they are slightly underbaked allows them to retain moisture as they cool.

    Q3: Can I freeze the cookie dough?
    Yes, you can freeze the cookie dough. Scoop the dough into balls and freeze them on a baking sheet. Once solid, transfer them to a freezer bag. When you are ready to bake, you can bake them directly from the freezer—just add a couple of minutes to the baking time.

    Q4: Are there any sugar substitutes that work well for this recipe?
    Sure! Coconut sugar, stevia, or erythritol are excellent sugar substitutes. They can help reduce calorie content while maintaining sweetness.

    Q5: How can I increase the flavor profile?
    Add spices like cinnamon, a pinch of nutmeg, or even espresso powder to amplify the flavor and give your chocolate chip cookies a unique twist.

    Conclusion

    Baking The Best Chocolate Chip Cookies is a delightful experience, allowing you to gather friends, family, or even enjoy some quiet moments by yourself. The versatility of this recipe means you can cater to various tastes and dietary choices while creating a luxurious treat that is both satisfying and comforting. Whether you choose the classic version or experiment with unique variations, chocolate chip cookies are bound to bring joy to your kitchen. So gather your ingredients, preheat that oven, and embark on the sweet journey to cookie perfection! Happy baking!

  • The Best Chewy Chocolate Chip Cookies Recipe

    The Best Chewy Chocolate Chip Cookies Recipe

    The Best Chewy Chocolate Chip Cookies Recipe: A Tropical Delight

    Introduction to The Best Chewy Chocolate Chip Cookies Recipe

    There’s something inexplicably comforting about biting into a warm, chewy chocolate chip cookie. The sweet aroma fills your kitchen, inviting loved ones to gather around and savor each bite. You’ve just stumbled upon the ultimate recipe for chocolate chip cookies that not only satisfies your sweet tooth but also excels in simplicity and health benefits.

    This delectable recipe offers a perfect balance of rich flavor and delightful texture, making it an ideal choice for home cooks, busy parents, students, and anyone looking to indulge their culinary passion without spending hours in the kitchen. What makes this iteration stand out is its versatility – you can easily customize it to suit various dietary needs. Whether you’re looking for a vegan-friendly version or a gluten-free option, this recipe provides simple substitutions to help you create delicious chocolate chip cookies that everyone can enjoy.

    Baking doesn’t need to be complicated or time-consuming. With straightforward steps and readily available ingredients, this recipe will inspire novice bakers and seasoned chefs alike. Join me in creating these scrumptious cookies that are sure to impress friends and family. Plus, they make a great treat for any occasion, from weekend get-togethers to midnight snacks!


    Benefits and Advantages of The Best Chewy Chocolate Chip Cookies Recipe

    Baking the best chocolate chip cookies at home comes with numerous benefits that extend beyond simply satisfying your sweet cravings. Here’s why this recipe should be your go-to when you want a reliable and delicious treat:

    1. Simplicity in Preparation: This recipe features easy-to-follow instructions, making it perfect for beginner bakers or those with limited time. With just a handful of ingredients and a few steps, you can have freshly baked cookies hot from the oven in no time.

    2. Health Benefits: While cookies are often seen as indulgent treats, this recipe allows you to incorporate healthier ingredients that can make them a guilt-free dessert option. You can use whole grain flour instead of all-purpose flour, natural sweeteners like honey or maple syrup, and high-quality chocolate to enhance the nutritional profile of your chocolate chip cookies.

    3. Dietary Adaptability: Whether you’re following a vegan diet, need to avoid gluten, or simply want to lower the calorie count, this recipe can easily be adapted. I’ll share alternatives that you can use to make these cookies fit your dietary needs without sacrificing taste or texture.

    4. Sense of Accomplishment: There’s immense satisfaction that comes from baking a batch of chocolate chip cookies from scratch. The smell of baking chocolate and the joy of sharing with family and friends make for delightful memories.

    5. Versatility: This recipe serves as a base for numerous variations. You can add nuts, dried fruits, or even experiment with different types of chocolate for unique flavor combinations.

    In a world where convenience often takes precedence, creating your own batch of cookies combines enjoyment and creativity. You’ll not only fill your home with a cozy fragrance but also experience the joy that comes from baking and sharing your personal culinary triumphs.


    Ingredients Overview

    Essential Ingredients for The Best Chewy Chocolate Chip Cookies Recipe

    Here’s a detailed breakdown of the ingredients you’ll need to create the best chewy chocolate chip cookies. Each ingredient plays a vital role in achieving that perfect texture and taste.

    1. All-Purpose Flour (2 ¼ cups): The foundation of the cookies, all-purpose flour gives them structure. For a gluten-free option, use almond flour or a gluten-free flour blend.

    2. Baking Soda (1 tsp): This leavening agent helps the cookies rise and gives them that soft, chewy interior.

    3. Salt (½ tsp): A pinch of salt enhances the sweetness of the chocolate and balances flavors beautifully.

    4. Unsalted Butter (1 cup, softened): Butter not only adds flavor but also contributes to the cookie’s chewy texture. For a vegan alternative, substitute with coconut oil or a dairy-free butter substitute.

    5. Brown Sugar (¾ cup): Packed brown sugar retains moisture, lending a rich flavor. You can also use coconut sugar for a less refined option.

    6. Granulated Sugar (½ cup): The combination of both sugars gives the cookies a delightful sweetness while allowing them to crisp up perfectly.

    7. Vanilla Extract (2 tsp): This adds depth to the flavor and enhances the overall taste of the cookies.

    8. Eggs (2 large): Eggs help bind the ingredients, contributing to the chewy texture. For a vegan substitute, use flaxseed meal or an egg replacer.

    9. Chocolate Chips (2 cups): The hero of this recipe! Use semi-sweet, dark, or even vegan chocolate chips based on your preference.

    10. Optional Add-ins: Consider adding chopped nuts, such as walnuts or pecans, or swirl in some peanut butter or butterscotch chips to create your own unique twist.

    Dietary Substitutions to Customize Your The Best Chewy Chocolate Chip Cookies Recipe

    Not only is this recipe adaptable to various palates, but it also accommodates dietary needs. Here are some suggested substitutions to cater to different preferences:

    • Gluten-Free: Use a blend of gluten-free flours, such as almond flour and coconut flour, combined with xanthan gum to mimic the elasticity of traditional flour.

    • Vegan: Substitute butter with a margarine alternative and replace eggs with flaxseed eggs (1 tablespoon of flaxseed meal mixed with 2.5 tablespoons of water per egg).

    • Low-Calorie: Swap out the sugars for stevia or erythritol, and use a light butter substitute. Alternatively, reduce the amount of chocolate chips to cut back on calories without losing flavor.

    • Nut-Free: Omit any nuts in the mix or choose sunflower seeds as a crunchy alternative for those with allergies.

    By using these substitutions, you can create a recipe that aligns perfectly with your dietary needs while still enjoying the classic taste of chocolate chip cookies.


    How to Prepare the Perfect The Best Chewy Chocolate Chip Cookies Recipe: Step-by-Step Guide

    Now that we understand the ingredients, it’s time to roll up our sleeves and dive into the baking process. Follow this step-by-step guide to create the perfect chocolate chip cookies:

    1. Preheat the Oven: Start by preheating your oven to 350°F (175°C). This ensures that the cookies bake evenly.

    2. Prepare the Baking Sheet: Line a baking sheet with parchment paper or a silicone baking mat to prevent the cookies from sticking and to ensure even baking.

    3. Mix Dry Ingredients: In a mixing bowl, combine the all-purpose flour, baking soda, and salt. Whisk together until well combined. This helps to evenly distribute the baking soda and salt throughout the flour.

    4. Cream the Butter and Sugars: In a separate large bowl, use an electric mixer to cream together the softened unsalted butter, brown sugar, and granulated sugar until the mixture is light and fluffy. This usually takes about 3-5 minutes.

    5. Add Eggs and Vanilla: Add the eggs, one at a time, to the butter-sugar mixture, mixing well after each addition. Follow up with the vanilla extract and beat until fully combined.

    6. Incorporate Dry Ingredients: Gradually add the dry ingredient mixture to the wet mixture. Stir just until combined; avoid over-mixing, as this can result in dense cookies.

    7. Fold in Chocolate Chips: Gently fold in the chocolate chips using a spatula or wooden spoon, ensuring they are evenly distributed throughout the dough.

    8. Scoop the Dough: Use a cookie scoop or tablespoon to portion out the dough onto the prepared baking sheet, leaving enough space between each cookie as they will spread while baking.

    9. Bake the Cookies: Place the baking sheet in the preheated oven and bake for 10-12 minutes or until the edges are golden brown and the centers look slightly undercooked. This will help keep them chewy.

    10. Cool the Cookies: Remove the cookies from the oven and let them cool on the baking sheet for 5 minutes before transferring them to a wire rack to cool completely.

    11. Enjoy: Once they’re cooled, dig in and savor your delicious, homemade chocolate chip cookies!

    Feel free to adjust the baking time based on your oven’s characteristics or your preferred level of chewiness. Remember, cookies continue to cook slightly after you take them out.


    Mastering The Best Chewy Chocolate Chip Cookies Recipe: Advanced Tips and Variations

    To take your cookie-making skills to the next level, here are some advanced tips and creative variations to try:

    1. Chill the Dough: For even chewier cookies, consider chilling the dough for at least an hour before baking. This allows the flavors to meld and can enhance texture.

    2. Experiment with Mix-ins: Besides chocolate chips, try adding dried cranberries, toffee bits, or even sea salt on top before baking for an elevated flavor experience.

    3. Vary Chocolate Types: Don’t be afraid to mix different types of chocolate – dark, milk, white, or even a combination of chips and chunks for a delightful texture.

    4. Add Flavor Boosts: Spice things up by incorporating a dash of cinnamon or coffee granules into the dough for a unique twist on the usual cookie flavor profile.

    5. Create Stuffed Cookies: Try stuffing your cookies with peanut butter, Nutella, or chocolate ganache for a decadent treat that takes cookie-making to new heights.

    By incorporating these advanced tips and variations into your baking routine, you’ll not only master the basic chocolate chip cookies but also create endless possibilities that will wow your family and friends.


    How to Store The Best Chewy Chocolate Chip Cookies Recipe: Best Practices

    Proper storage is essential to keep your cookies fresh and chewy. Here are the best practices for storing your homemade chocolate chip cookies:

    1. Room Temperature: Once cooled, store your cookies in an airtight container lined with parchment paper. This will keep them soft for up to a week at room temperature.

    2. Refrigeration: If you want your cookies to last longer, you can refrigerate them. Just ensure they’re in a well-sealed container to prevent drying out. They can stay good for about two weeks in the fridge.

    3. Freezing: To preserve your cookies for an extended period, freezing is the best method. Place the cookies in a single layer in a zip-top freezer bag or container, separating layers with parchment paper. They can be frozen for up to 3 months.

    4. Reheating: When you’re ready to enjoy frozen or refrigerated cookies, let them sit at room temperature for five minutes. Alternatively, you can microwave them for about 10-15 seconds to restore their softness.

    By following these storage tips, you can enjoy your homemade chocolate chip cookies whenever the craving strikes!


    Nutritional Value of The Best Chewy Chocolate Chip Cookies Recipe

    Understanding the nutritional value of your homemade chocolate chip cookies can help you enjoy them guilt-free. The nutritional content may vary based on the specific ingredients you choose, but here’s a general idea for one cookie (based on a standard recipe):

    • Calories: 150
    • Total fat: 7g (Saturated fat: 4g, Trans fat: 0g)
    • Cholesterol: 25mg
    • Sodium: 100mg
    • Total carbohydrates: 22g (Dietary fiber: 1g, Sugars: 10g)
    • Protein: 2g

    Health Considerations:

    • Fiber Intake: Incorporating whole grain flour can increase the fiber content.
    • Sugar Alternatives: Using natural sweeteners or reducing sugar can improve the overall health profile.
    • Fat Content: Opting for healthier fats, like coconut oil or nut butters, may enhance nutritional value.

    Being informed about the nutritional profile allows you to enjoy these chocolate chip cookies without compromising your dietary goals!


    FAQs: Frequently Asked Questions About The Best Chewy Chocolate Chip Cookies Recipe

    Q: Can I substitute the butter with margarine?
    A: Yes, you can use margarine as a substitute for butter in the recipe.

    Q: What can I use instead of eggs for vegan cookies?
    A: Flaxseed meal or chia seeds mixed with water can serve as a great egg substitute in vegan recipes.

    Q: How can I make my cookies chewier?
    A: To achieve a chewier consistency, you can increase the brown sugar ratio, chill the dough before baking, or slightly underbake them.

    Q: Can I freeze the cookie dough?
    A: Absolutely! You can scoop out the dough onto a baking sheet to freeze individual cookie portions. Once frozen, transfer to a zip-top freezer bag for up to three months.

    Q: How long can I store baked cookies?
    A: Baked cookies can typically be stored at room temperature in an airtight container for up to a week.

    Enjoy experimenting with this fantastic recipe for chocolate chip cookies and happy baking!

  • Easy Slow Cooker Mediterranean Chicken Dinner

    Easy Slow Cooker Mediterranean Chicken Dinner

    Easy Slow Cooker Mediterranean Chicken Dinner: A Tropical Delight

    Introduction to Easy Slow Cooker Mediterranean Chicken Dinner

    Welcome to a culinary journey that promises to simplify your weeknight dinners while delivering vibrant Mediterranean flavors! The Easy Slow Cooker Mediterranean Chicken Dinner is a must-try for anyone seeking delicious and wholesome meal options. As part of a collection of engaging crockpot recipes, this dish shines with its simplicity and health benefits.

    Imagine coming home to the enticing aroma of tender chicken simmered with colorful vegetables, olives, and aromatic herbs—all done effortlessly in your slow cooker! Not only is this recipe easy to prepare, but it also accommodates various dietary preferences. Whether you are looking for a gluten-free feast or a low-calorie dinner, this dish fits the bill perfectly.

    Moreover, preparing meals in a slow cooker allows you to retain the essential nutrients of your ingredients, promoting healthier eating habits. You can savor this dish with confidence, knowing it’s crafted to nourish both the body and the soul. From busy parents juggling family schedules to students looking for quick meal prep, and working professionals in need of easy dinner solutions, this recipe caters to everyone.

    So, gather your ingredients and get ready to create a Mediterranean-inspired meal that elevates your dining experience effortlessly!

    Benefits and Advantages of Easy Slow Cooker Mediterranean Chicken Dinner

    The Easy Slow Cooker Mediterranean Chicken Dinner is not just another recipe; it’s a celebration of flavors and ease, making it a standout choice among other crockpot recipes. Below are some key benefits that set it apart:

    1. Simplicity of Preparation

    One of the most attractive features of this slow cooker dish is its straightforward preparation method. With a few simple steps, you can surf through your busy day while your slow cooker does the heavy lifting. Toss in your ingredients, set the timer, and let the magic happen as it cooks slowly to enhance the flavors.

    2. Health Benefits

    This Mediterranean recipe is packed with nutritious ingredients. Lean chicken breast is rich in protein while an array of fresh vegetables—including bell peppers, tomatoes, and spinach—adds dietary fiber and a wealth of vitamins and minerals. Furthermore, olive oil provides heart-healthy fats, making it a balanced meal option for weight watchers and health enthusiasts alike.

    3. Customizable and Versatile

    Another advantage of this dish is its adaptability. You can easily modify it to cater to specific dietary needs. Whether opting for a veggie-based version for your plant-based friends or swapping chicken for turkey for a leaner alternative, this recipe offers endless possibilities.

    4. Ideal for Meal Prep

    The Easy Slow Cooker Mediterranean Chicken Dinner is perfect for meal prep. You can whip up a big batch on Sunday and enjoy it throughout the week, making it ideal for busy parents, professionals, and students. This not only saves time but ensures you have nutritious meals ready to go!

    5. Family-Friendly Appeal

    With its mild flavors and colorful presentation, this dish is sure to please even the pickiest eaters. It’s a fantastic way to introduce children to Mediterranean cuisine, showcasing a range of ingredients that can spark curiosity and adventurous eating.

    In summary, when considering meal options, this dish emerges as a fabulous choice due to its simplicity, health benefits, and versatility. It’s not merely about feeding the family; it’s about indulging in an enjoyable cooking experience.

    Ingredients Overview

    Essential Ingredients for Easy Slow Cooker Mediterranean Chicken Dinner

    To create this delightful dish, you will need the following ingredients, ensuring a flavor-packed experience:

    • 2 lbs boneless, skinless chicken breasts: This serves as the protein base, providing nutrients and flavor.
    • 1 cup cherry tomatoes, halved: These tomatoes add freshness and a hint of sweetness.
    • 1 bell pepper (any color), diced: Adds crunch and complements the flavors beautifully.
    • 1 medium onion, chopped: Provides a savory foundation.
    • 2 cloves garlic, minced: Enhances the dish with aromatic flavor.
    • 1 cup low-sodium chicken broth: Keeps the chicken moist and flavorful while adding depth to the dish.
    • 1/4 cup Kalamata olives, pitted and halved: Contributes authentic Mediterranean flavors.
    • 2 tsp dried oregano or Italian seasoning: Brings the essence of the Mediterranean to your table.
    • 1/4 cup olive oil: A heart-healthy fat that adds richness.
    • Salt and pepper to taste: Enhances the overall flavor presentation.
    • Optional: Fresh parsley for garnish: Adds a pop of color and brightness to the dish.

    Dietary Options

    • Vegan Option: Substitute chicken with chickpeas or a plant-based protein.
    • Gluten-free: This recipe is inherently gluten-free, making it suitable for those with gluten sensitivities.
    • Low-calorie: Skipping olive oil or using less chicken can help you reduce calorie intake while still enjoying flavor.

    Dietary Substitutions to Customize Your Easy Slow Cooker Mediterranean Chicken Dinner

    Customizing the Easy Slow Cooker Mediterranean Chicken Dinner to fit various dietary preferences is as simple as making a few substitutions. Here are some suggestions:

    1. For a Vegetarian or Vegan Delight:
    2. Replace the chicken with canned chickpeas or a plant-based protein like tofu or tempeh. Make sure to season adequately to infuse the flavors into the plant base.

    3. Gluten-Free Needs:

    4. Since all ingredients are naturally gluten-free, there’s no need for any changes. Just ensure your chicken broth is labeled gluten-free, as some brands might contain gluten.

    5. Lower-Calorie Option:

    6. Opt for skinless chicken thighs instead of breast for a juicier texture but keep an eye on portion sizes. (Keep in mind, adjustments may increase calorie count slightly but can offer more flavor.)

    7. For Those Avoiding Certain Vegetables:

    8. If bell peppers aren’t your favorite, consider adding zucchini, yellow squash, or carrots, which will complement the other flavors while still achieving that beautiful Mediterranean essence.

    By considering these substitutions, everyone can enjoy the Easy Slow Cooker Mediterranean Chicken Dinner while catering to their dietary requirements—all without sacrificing on taste.

    How to Prepare the Perfect Easy Slow Cooker Mediterranean Chicken Dinner: Step-by-Step Guide

    Making the Easy Slow Cooker Mediterranean Chicken Dinner is effortless, with straightforward instructions designed for cooks of all skill levels. Let’s walk through the process step-by-step:

    1. Prepare the Base:
    2. Start by preparing your slow cooker. Add the chopped onions, and minced garlic to the bottom. This forms a flavorful base that will infuse into the chicken.

    3. Add Chicken:

    4. Place the boneless, skinless chicken breasts on top of the onion and garlic mixture.

    5. Mix Ingredients:

    6. In a bowl, combine the cherry tomatoes, diced bell pepper, Kalamata olives, chicken broth, olive oil, oregano, salt, and pepper. Stir to incorporate all the flavors evenly.

    7. Layer the Mixture:

    8. Pour the tomato and vegetable mixture over the chicken breasts, ensuring they are partially submerged in the liquid for even cooking.

    9. Cook:

    10. Cover your slow cooker with a lid. Set it on low heat for 6-8 hours or high heat for 3-4 hours. This slow approach allows the flavors to meld beautifully while ensuring the chicken remains tender and juicy.

    11. Shred the Chicken:

    12. Once cooked, remove the chicken breasts from the slow cooker. Shred the chicken using two forks, then return it to the pot, mixing it with the sauce and vegetables.

    13. Final Touches:

    14. Garnish with fresh parsley if desired. This adds visual appeal and enhances the freshness of the dish.

    15. Serve:

    16. Serve hot over a bed of rice, quinoa, or with crusty bread to sop up the delightful sauce.

    By following these steps, you will prepare an unforgettable Mediterranean meal that will be a highlight on your dining table. And remember, if you’re adapting for dietary preferences, the method remains the same—just adjust the ingredients as necessary!

    Mastering Easy Slow Cooker Mediterranean Chicken Dinner: Advanced Tips and Variations

    To elevate your cooking experience with the Easy Slow Cooker Mediterranean Chicken Dinner, consider these advanced tips and potential variations:

    1. Build Flavor with Extra Herbs

    Incorporate fresh herbs like basil or thyme to amplify the flavors. Add them in the last hour of cooking for the freshest taste. Alternatively, for a quick version, opt for high-quality dried herbs.

    2. Try Different Proteins

    While chicken works wonderfully, consider experimenting with turkey or even fish, like tilapia or salmon, which cook quickly and offer a different texture profile. Keep an eye on cooking time to prevent overcooking fish.

    3. Experiment with Veggies

    Feel free to play with the vegetable combinations used in the recipe. Include seasonal produce such as zucchini, asparagus, or eggplant to keep the dish exciting. Each vegetable will bring a unique texture and flavor to the mix.

    4. Delight in Different Sauces

    Add a twist by substituting chicken broth with vegetable stock, white wine, or even tomato sauce for a rich sauce-like end product. Each option provides a different flavor adventure.

    5. Use Leftovers Creatively

    If you have leftovers, transform them into wraps or sandwiches with fresh greens and yogurt-based dressing. Alternatively, serve the dish over pasta for a filling lunch or dinner.

    These tips and variations will inspire creativity in your cooking while enhancing the familiar comfort of the Easy Slow Cooker Mediterranean Chicken Dinner.

    How to Store Easy Slow Cooker Mediterranean Chicken Dinner: Best Practices

    To properly store your Easy Slow Cooker Mediterranean Chicken Dinner, follow these guidelines for refrigeration, freezing, and reheating:

    Refrigeration:

    • Allow the dish to cool entirely before transferring it to airtight containers. You can refrigerate the dish for up to three days without losing flavor or texture. Be sure to label the container with the date.

    Freezing:

    • For longer storage, this dish freezes exceptionally well. Portion it into freezer-safe containers, ensuring there’s minimal exposure to air. You can freeze it for up to three months. When ready to enjoy, it’s best to thaw in the refrigerator overnight before reheating.

    Reheating:

    • Reheat leftovers in the microwave or on the stove over low heat, stirring occasionally to ensure even warming. If the dish appears dry when reheated, add a splash of chicken broth to rejuvenate the moisture.

    By following these storage practices, you can enjoy the delicious flavors of the Easy Slow Cooker Mediterranean Chicken Dinner even multiple days after preparing it.

    Nutritional Value of Easy Slow Cooker Mediterranean Chicken Dinner

    When looking for healthy options, the Easy Slow Cooker Mediterranean Chicken Dinner is an excellent choice. Here’s a nutritional breakdown per serving (based on a recipe serving 6):

    • Calories: Approximately 300 kcal
    • Protein: 30 g
    • Fat: 14 g
    • Carbohydrates: 20 g
    • Fiber: 3 g
    • Sodium: 400 mg
    • Cholesterol: 70 mg

    This nutrient-rich dish combines lean protein, healthy fats, and fiber from veggies, making it a balanced meal option. The low-calorie count also ensures you are enjoying delectable meals without compromising your health goals.

    Additionally, you can adjust any ingredients—like using low-sodium broth or reducing olive oil—to accommodate any specific dietary factors while keeping the essence of the dish intact.

    FAQs: Frequently Asked Questions About Easy Slow Cooker Mediterranean Chicken Dinner

    1. Can I use frozen chicken in this recipe?

    Yes, you can use frozen chicken; however, increase the cooking time by an hour. It’s advised to thaw it beforehand for the best results.

    2. How can I make this recipe spicier?

    To spice things up, add some crushed red pepper flakes or a dash of cayenne pepper, adjusting it based on your heat preference.

    3. Can I melt cheese on top of the dish?

    Absolutely! Adding a sprinkle of crumbled feta cheese just before serving enhances the dish’s Mediterranean flair.

    4. Is there a vegan option for this recipe?

    You can substitute chicken with chickpeas or lentils, maintaining the same cooking methods. Be mindful of altering the broth to a vegetable-based option.

    5. How do I adjust this recipe for a slow cooker with a smaller capacity?

    If using a smaller slow cooker, consider cutting the ingredients in half, ensuring cooking times may vary. Always check the internal temperature of the chicken to ensure it reaches 165°F.

    This FAQ section provides useful insights for anyone eager to try the Easy Slow Cooker Mediterranean Chicken Dinner, addressing common concerns and enhancing your cooking experience.

    In conclusion, this recipe is more than just a dinner idea; it represents a convenient, nutritious, and delicious way to embrace healthy eating without overwhelming your schedule. Enjoy cooking and savor the flavors of the Mediterranean!

  • Homemade Tangzhong Hot Cross Buns

    Homemade Tangzhong Hot Cross Buns

    Homemade Tangzhong Hot Cross Buns: A Tropical Delight

    Introduction to Homemade Tangzhong Hot Cross Buns

    Nothing captures the essence of celebration and comfort quite like the smell of freshly baked Hot Cross Buns. Whether you’re a busy parent seeking easy recipe ideas for family breakfasts or a baking enthusiast looking to expand your repertoire, this recipe for Homemade Tangzhong Hot Cross Buns is perfect for you. These decadent buns are not only delicious but also incredibly simple to make, allowing even novice bakers to enjoy homemade delights.

    What makes these buns truly special is the use of the tangzhong method, which involves cooking a small amount of flour and water to form a roux. This unique technique contributes to a softer, fluffier texture that keeps these buns fresh for days, making them perfect for meal prep or on-the-go snacks for students and professionals alike. Furthermore, they can easily be adapted to suit various dietary needs – from vegan to gluten-free options, making them inclusive for all.

    With their rich cinnamon spices and delightful cross-topping, these buns are more than just a treat; they’re a heartfelt way to bring family and friends together. So roll up your sleeves and get ready to embark on a journey of flavor and warmth. Let’s dive into the delicious world of Tangzhong Hot Cross Buns!

    Benefits and Advantages of Homemade Tangzhong Hot Cross Buns

    The Homemade Tangzhong Hot Cross Buns recipe doesn’t just offer a delightful end result. It comes with numerous benefits that can serve various dietary preferences and lifestyles.

    1. Ease of Preparation: One of the standout features of this recipe is its simplicity. With straightforward ingredients and easy-to-follow steps, even those with minimal baking experience can achieve professional-grade results in their own kitchens.

    2. Health Benefits: These buns are packed with whole grains and spices known for their health properties. Ingredients like whole wheat flour enhance the bun’s fiber content, promoting digestive health. Spices such as cinnamon have been shown to have anti-inflammatory properties, providing additional health benefits that are often overlooked in traditional recipes.

    3. Diet-Friendly Variations: The tangzhong method allows for substitutions to make the buns vegan, gluten-free, or low-calorie. For instance, incorporating a gluten-free flour blend can support those with gluten sensitivities, while using almond or coconut milk instead of dairy makes them suitable for vegan diets.

    4. Versatility: Aside from traditional uses during Easter and other celebrations, these hot cross buns can serve as a delicious breakfast or an afternoon snack. They can be enjoyed with butter, jam, or toasted, revealing a spectrum of delightful flavors that suit different palates.

    5. ** crowd-pleaser**: These buns are ideal for gatherings or family events, catering to a range of tastes. Whether you serve them as a holiday treat or anytime comfort food, they are sure to impress guests and loved ones.

    By understanding these benefits, you can appreciate why Homemade Tangzhong Hot Cross Buns are a fantastic addition to your baking repertoire. As you explore more recipe ideas, you will find that enhancing this classic with health-forward practices elevates both flavor and nutrition.

    Ingredients Overview

    Essential Ingredients for Homemade Tangzhong Hot Cross Buns

    For the perfect Tangzhong Hot Cross Buns, having the right ingredients on hand is key. Here’s a detailed list of what you’ll need, along with their purpose or benefits:

    For the Tangzhong

    • Water: 1/2 cup (120 ml) – Hydrates the flour, improving the final texture.
    • Bread Flour: 1/4 cup (30 g) – Adds structure to the roux, contributing to the softness of the buns.

    For the Dough

    • All-Purpose Flour: 3 cups (360 g) – The primary ingredient for the bun structure.
    • Granulated Sugar: 1/4 cup (50 g) – Sweetens the buns; feel free to reduce for a lower-calorie option.
    • Instant Yeast: 2 1/4 teaspoons (1 packet) – Helps the dough rise quickly and easily.
    • Salt: 1 teaspoon – Enhances flavor and strengthens gluten.
    • Milk: 3/4 cup (180 ml) – Adds moistness; consider almond or soy milk for a vegan option.
    • Unsalted Butter: 1/4 cup (60 g), softened – Improves flavor and texture; can be substituted with coconut oil for a dairy-free version.
    • Egg: 1 large – Provides richness and helps bind the dough; use flaxseed meal for a vegan alternative.
    • Cinnamon: 2 teaspoons – Adds warmth and classic flavor; you could also explore nutmeg or allspice for variation.
    • Raisins or Currants: 1 cup (150 g) – Sweet additions; can be swapped with chopped dried fruits for diversity.

    For the Glaze

    • Milk: 2 tablespoons – For brushing the tops for a glossy finish.
    • Granulated Sugar: 2 tablespoons (optional) – Sweetens the glaze; honey can be used for a different twist.

    Each ingredient plays a crucial part in achieving the perfect texture and flavor that defines these exquisite buns. Don’t hesitate to explore various substitutes based on your dietary preferences, and remember that these small adjustments can lead to a delightful variation in your homemade recipe ideas.

    Dietary Substitutions to Customize Your Homemade Tangzhong Hot Cross Buns

    Getting creative with substitutions not only makes your Tangzhong Hot Cross Buns healthier but also allows you to cater to specific dietary needs:

    1. Gluten-Free Option: Substitute all-purpose flour with a 1:1 gluten-free flour blend. Add a teaspoon of xanthan gum to ensure the buns maintain their structure.

    2. Vegan Option: Replace milk with almond or oat milk, butter with coconut oil or vegan margarine, and the egg can be substituted with a flaxseed mixture (1 tbsp flaxseed meal + 2.5 tbsp water, combined and set aside for 5 minutes).

    3. Low-Calorie Option: Reduce sugar to 2 tbsp and use unsweetened applesauce as a sweetener; this adds moisture while cutting down on calories.

    4. Nut-Free Option: Ensure to check brands for cross-contamination; if using any alternative milk, select ones free from nut traces.

    5. Spice Variations: For those who enjoy adventurous flavors, consider adding orange zest, cardamom, or anise seed to the dough for a unique twist.

    These substitutions not only accommodate various dietary needs but also encourage creativity in the kitchen. Embrace the chance to personalize your Homemade Tangzhong Hot Cross Buns, and enjoy the endless recipe ideas that follow!

    How to Prepare the Perfect Homemade Tangzhong Hot Cross Buns: Step-by-Step Guide

    Now that you have your ingredients ready and understand the benefits, it’s time to craft these delightful buns. Follow this step-by-step guide to achieve perfection every time:

    1. Prepare the Tangzhong: In a small saucepan over medium heat, whisk together the water and 1/4 cup bread flour. Stir continuously until it resembles a thick pudding (about 3-5 minutes). Remove from heat and let it cool to room temperature.

    2. Combine Dry Ingredients: In a large mixing bowl, combine the all-purpose flour, sugar, instant yeast, cinnamon, and salt. Whisk to distribute evenly.

    3. Incorporate Wet Ingredients: Make a well in the center of the dry mixture, and add the milk, softened butter, and egg. Add the cooled tangzhong to the same well.

    4. Mix Dough: Using a wooden spoon, mix until the dough begins to come together. If the mixture is too dry, add a splash of milk until it’s workable.

    5. Knead the Dough: Transfer the dough onto a lightly floured surface. Knead for about 10 minutes, or until smooth and elastic. (For a hands-free method, use a stand mixer with a dough hook.)

    6. Add Raisins: Flatten the dough slightly, sprinkle the raisins or currants, and fold the dough over. Knead once more until the fruit is evenly distributed.

    7. First Rise: Place the dough in a greased bowl, cover with a clean cloth or plastic wrap, and let it rise in a warm environment until it doubles in size (approximately 1-1.5 hours).

    8. Shape the Buns: Once risen, punch down the dough and divide it into 12 equal pieces. Shape each piece into a smooth ball and place them in a greased baking dish, ensuring they are touching slightly.

    9. Second Rise: Cover the baking dish again and let the dough rise for another 30-45 minutes, or until puffy.

    10. Preheat the Oven: During the second rising period, preheat your oven to 375°F (190°C).

    11. Create Crosses: Make a paste using 1/4 cup flour, water, and a pinch of salt. Use a piping bag or a zip-top bag with a corner snipped off to pipe crosses on top of each bun.

    12. Bake: Bake for 20-25 minutes or until golden brown.

    13. Glaze: Remove from the oven, and brush with a mixture of milk and sugar for a glossy finish.

    14. Cool: Allow the buns to cool for a few minutes before serving. Enjoy them warm!

    This step-by-step guide simplifies the process of making Homemade Tangzhong Hot Cross Buns. Feel free to adapt any steps according to your dietary needs. Such versatility keeps your baking exciting and provides a chance to try out various recipe ideas!

    Mastering Homemade Tangzhong Hot Cross Buns: Advanced Tips and Variations

    Once you’ve mastered the basic recipe, you might want to elevate your baking game further. Here are some advanced tips and variations for your Homemade Tangzhong Hot Cross Buns:

    1. Flavor Infusions: For an exotic twist, infuse your milk with spices like cardamom or brew in some chai before adding it to the dough. This subtle infusion will enhance the overall flavor profile.

    2. Gourmet Toppings: Instead of just a traditional cross, top the buns with a drizzle of lemon glaze or sprinkle with coarse sugar before baking.

    3. Fillings: Consider adding fillings such as lemon curd, chocolate chips, or even a cream cheese filling within the buns before their second rise for a surprise burst of flavor.

    4. Smaller Buns: For mini versions, divide the dough into smaller pieces and reduce baking time to 15-20 minutes. This way, you can create bite-sized delights perfect for gatherings.

    5. Reheating Techniques: If buns have been refrigerated, steam them lightly before serving to regain their fresh softness.

    Experimenting with these advanced techniques allows you to create signature versions of Homemade Tangzhong Hot Cross Buns that cater specifically to your tastes and those of your family and friends. Every new creation can serve as fresh recipe ideas to delight your loved ones and expand your baking horizons!

    How to Store Homemade Tangzhong Hot Cross Buns: Best Practices

    Proper storage of your Homemade Tangzhong Hot Cross Buns is essential to maintain their deliciousness. Here are some effective methods to ensure they last:

    1. Refrigeration: Once cooled, store the buns in an airtight container or wrap them tightly in plastic wrap. They can stay fresh in the refrigerator for up to a week.

    2. Freezing: For longer storage, freeze the buns. Place them in a single layer on a baking sheet to flash freeze them for about 1-2 hours, then transfer to a freezer-safe container or bag. They can be stored this way for up to three months.

    3. Thawing and Reheating: When ready to enjoy, simply remove the desired amount from the freezer. Leave them to thaw at room temperature for a couple of hours, or reheat straight from the freezer directly in the oven at 350°F (175°C) for about 10-15 minutes, just until warmed through.

    4. Avoid Moisture: Ensure buns are completely cool before storing to prevent them from becoming soggy due to trapped moisture.

    By following these storage methods, you can enjoy your Homemade Tangzhong Hot Cross Buns anytime without losing their delightful texture and flavor. You’ll not only save time but also have delicious homemade treats ready to accompany any meal!

    Nutritional Value of Homemade Tangzhong Hot Cross Buns

    Understanding the nutritional composition of your Homemade Tangzhong Hot Cross Buns empowers you to make informed decisions about your eating habits. Below is a breakdown of the approximate nutritional value per bun (based on traditional ingredients and without optional toppings):

    • Calories: 210
    • Total Fat: 5g
    • Saturated Fat: 3g
    • Cholesterol: 25mg
    • Sodium: 130mg
    • Total Carbohydrates: 38g
    • Dietary Fiber: 2g
    • Sugars: 6g
    • Protein: 5g

    If you opt for dietary substitutions, such as reducing the sugar or using gluten-free flours, the nutritional values may vary accordingly, often resulting in lower calorie and fat content.

    Keep in mind that the health benefits of the various spices used (like cinnamon) and any potential fiber enhancements from whole grain flours can positively affect your overall nutrition too. This holistic view presents your Homemade Tangzhong Hot Cross Buns as not just a delicious treat, but a mindful part of your diet. In this way, you can seamlessly intertwine fun baking experiences with valuable recipe ideas that contribute to healthful living!

    FAQs: Frequently Asked Questions About Homemade Tangzhong Hot Cross Buns

    1. Can I use all-purpose flour instead of bread flour for the tangzhong?

    Yes, you can use all-purpose flour in the tangzhong, but using bread flour will provide a slightly better texture due to its higher protein content.

    2. How can I ensure my buns are soft and fluffy?

    Make sure not to over-knead your dough and allow it to rise in a warm, draft-free area. Proper hydration with the tangzhong method also helps keep the buns soft.

    3. Are there gluten-free alternatives for this recipe?

    Absolutely! Replace all-purpose flour with a gluten-free blend that includes xanthan gum for the best results. Make sure to check that your other ingredients are gluten-free, too.

    4. How long do these buns last?

    Stored in an airtight container, they can last up to a week in the refrigerator or about three months in the freezer.

    5. Can I make these buns without sugar?

    You can opt to use sugar substitutes like honey or maple syrup, but remember that sugar contributes to the yeast’s activation, affecting the final texture.

    6. Is there a way to add more flavor?

    Definitely! Consider adding ingredients like zest from citrus fruits, cardamom, or vanilla for a more complex flavor profile.

    With these FAQs, you can troubleshoot common issues and enhance your baking experience as you create your Homemade Tangzhong Hot Cross Buns. These delightful treats are a wonderful way to impress guests, pamper your family, or simply indulge yourself with a bit of homemade nostalgia. Keep these tips in mind, and let the recipe ideas flourish in your kitchen!

  • Best Traditional British Hot Cross Buns

    Best Traditional British Hot Cross Buns

    Best Traditional British Hot Cross Buns: A Tropical Delight

    Introduction to Best Traditional British Hot Cross Buns

    As we celebrate the arrival of spring meals, it’s time to indulge in a delightful tradition: Hot Cross Buns. These delicious spiced sweet rolls, marked with a cross on top, are not only a culinary favorite but also a symbol of Easter in British culture. This recipe offers a lovely opportunity to bond with family and friends while enjoying a homemade treat that echoes the warm, inviting essence of springtime celebrations.

    Making these hot cross buns is incredibly straightforward, allowing even novice bakers to create a masterpiece. They’re inherently nutritious, packed with fruits and spices, and you can easily modify them to fit various dietary preferences. Whether you prefer vegan, gluten-free, or a lower-calorie version, this recipe caters to everyone without compromising on taste. You’ll discover that the aroma of freshly baked buns fills your kitchen, setting a joyful backdrop for any spring gathering or cozy morning at home.

    Involving simple ingredients like flour, yeast, and spices, the making of hot cross buns can be a delightful bonding experience, especially for busy parents, students, or newlywed couples. Indulging in this traditional British delicacy can nourish not just the body but also the soul, making it an integral part of your spring meals.

    Benefits and Advantages of Best Traditional British Hot Cross Buns

    Hot cross buns retain their charm due to their ease of preparation and multitude of benefits. Firstly, they serve as a fantastic treat for both celebrations and regular meals, introducing a touch of sweetness without overwhelming your palate. These little buns are perfect for breakfast or as an afternoon snack, making them a versatile piece in your culinary repertoire.

    Health-wise, traditional hot cross buns are enriched with dried fruits, which provide essential vitamins and nutrients. For instance, raisins and currants are excellent sources of iron and antioxidants, promoting overall health. Additionally, the spices—like cinnamon and nutmeg—are known for their anti-inflammatory properties, contributing to better digestion. Thus, incorporating hot cross buns into your spring meals can add not only flavor but also nutritional value to your diet.

    Importantly, with the recipe’s flexibility, you can adapt it to meet various dietary preferences. Whether you are vegan, gluten-free, or simply looking to lower calorie intake, this recipe accommodates all. Embracing the spirit of spring while prioritizing health and inclusivity resonates well with home cooks from all walks of life, making hot cross buns a timeless classic.

    Ingredients Overview

    Essential Ingredients for Best Traditional British Hot Cross Buns

    Here’s a detailed list of all the ingredients you’ll need to create these delicious hot cross buns, along with precise measurements and the role of each component:

    • Flour (500g, all-purpose or bread flour): Forms the base of the dough, providing structure and texture.

    • Sugar (75g, granulated or brown): Sweetens the buns and helps to activate the yeast.

    • Salt (1 tsp): Enhances the flavor while balancing sweetness.

    • Yeast (7g, dried active): The key ingredient that causes the buns to rise.

    • Milk (300ml, dairy or plant-based): Adds moisture to the dough. For a vegan option, opt for almond milk or oat milk.

    • Butter (50g, unsalted or vegan): Aids in flavor and tenderness.

    • Mixed spices (2 tsp, cinnamon, nutmeg): Provide the characteristic warm flavor profile.

    • Dried fruits (200g, mixed raisins and currants): Infuses sweetness and texture; rich in vitamins.

    • Egg (1, optional): Adds richness; for a vegan alternative, you can use a flax egg (1 tbsp flaxseed meal + 2.5 tbsp water).

    • For the cross (optional): A simple mix of flour and water creates the iconic topping.

    Dietary Substitutions to Customize Your Best Traditional British Hot Cross Buns

    1. Gluten-Free Option:

      • Substitute all-purpose flour with a gluten-free flour blend. Ensure the blend contains xanthan gum for better texture.
    2. Vegan Substitute:

      • Replace cow’s milk with almond, soy, or oat milk. Use plant-based butter or coconut oil instead of regular butter. Implement a flax egg in place of a chicken egg for binding.
    3. Lower-Calorie Variation:

      • Reduce sugar to 50g and replace half of the butter with unsweetened applesauce for a healthier fat alternative.
    4. Baked Additions:

      • Enhance them with nuts (e.g., walnuts or pecans) or seeds (like sunflower seeds) for added texture and nutrition.

    These substitutions allow for a custom experience that caters to diverse dietary needs, ensuring everyone can enjoy your homemade hot cross buns!

    How to Prepare the Perfect Best Traditional British Hot Cross Buns: Step-by-Step Guide

    Creating the perfect hot cross buns is a rewarding endeavor. Follow this easy step-by-step guide, and you’ll have spiced, fluffy buns ready in no time!

    1. Prepare the Base:
      In a large mixing bowl, combine the flour, sugar, spices, and salt. Make a well in the center for the yeast.

    2. Activate the Yeast:
      In a separate bowl, warm the milk (it should be lukewarm, not hot) and combine it with dried yeast. Let it sit for about 5-10 minutes until frothy.

    3. Mix in Wet Ingredients:
      Add the melted butter (or vegan substitute) and the frothy yeast mixture into the well in your dry ingredients.

    4. Add the Egg:
      If you’re using an egg, add it at this point to enrich the mixture. For vegan buns, use your flax egg.

    5. Incorporate Dried Fruits:
      Slowly fold in the mixed dried fruits to the dough until evenly distributed.

    6. Form the Dough:
      Knead the mixture in the bowl for about 10 minutes or until it becomes a smooth and elastic dough. If it’s too sticky, sprinkle a little more flour.

    7. First Rise:
      Cover the bowl with a damp cloth and let it rise in a warm place for about 1-2 hours, or until doubled in size.

    8. Shape the Buns:
      Punch down the risen dough and turn it onto a floured surface. Divide the dough into 12 equal pieces and shape each piece into a ball.

    9. Second Rise:
      Place the balls on a baking tray lined with parchment paper, ensuring they’re touching. Cover with a cloth, allowing them to rise again for about 30-45 minutes.

    10. Preheat the Oven:
      Preheat your oven to 220°C (430°F).

    11. Prepare the Cross Mixture:
      Mix equal parts of flour and water to create a thick paste. Use a piping bag or a small plastic bag with a corner cut off to pipe crosses onto the buns.

    12. Bake:
      Bake the buns in the preheated oven for 20-25 minutes until golden brown.

    13. Glaze (optional):
      Once baked, brush warm buns with a honey or syrup glaze to add shine and sweetness.

    14. Cool Down:
      Allow the buns to cool on a wire rack before serving.

    With each step guiding you through the process, you’ll be on your way to incorporating an iconic aspect of spring meals into your culinary collection!

    Mastering Best Traditional British Hot Cross Buns: Advanced Tips and Variations

    While the traditional recipe shines on its own, consider these advanced tips and fun variations to elevate your baking skills:

    1. Spice It Up:
    2. Experiment with spices! Adding ginger, allspice, or cardamom can deepen flavor and create a unique twist.

    3. Herbal Infusion:

    4. Incorporate a zest of citrus, like orange or lemon, into the dough for a refreshing taste.

    5. Sweet-Filling Variations:

    6. Try adding chocolate chips or a cinnamon and sugar filling inside the buns for a delightful surprise.

    7. Customize the Topping:

    8. Instead of the traditional cross, create a lattice pattern with pastry dough for a visually stunning effect.

    9. Serve with a Twist:

    10. Pair your hot cross buns with spreads like clotted cream, butter, or your favorite jams for an extra touch of indulgence during spring meals.

    With these variations and tips, you can tailor your hot cross buns to your tastes or the season, increasing their appeal and making every baking session a delightful exploration.

    How to Store Best Traditional British Hot Cross Buns: Best Practices

    To keep your hot cross buns fresh and flavorful, follow these best storage practices:

    Refrigeration

    • Store leftover buns in an airtight container in the refrigerator for up to 3 days. This method keeps them moist but may slightly harden their texture.

    Freezing

    • To freeze, wrap individual buns tightly in plastic wrap, then place them in a freezer-safe bag or container. They can stay frozen for up to 3 months. When ready to enjoy, simply take out and thaw at room temperature, or microwave for a few seconds.

    Reheating

    • For the best taste, reheat buns in a preheated oven at 180°C (350°F) for about 5-10 minutes. Alternatively, use a microwave for a quick serving, but be cautious as it can make them too soft.

    Employing these techniques ensures your hot cross buns remain delicious, making them an ideal component of your spring meals for weeks to come!

    Nutritional Value of Best Traditional British Hot Cross Buns

    Understanding the nutritional profile of your hot cross buns will encourage healthier eating habits while still indulging your sweet tooth. Below is the approximate nutritional breakdown per bun based on traditional recipes:

    • Calories: 200-250
    • Fat: 5g (0g saturated fat)
    • Carbohydrates: 45g
    • Fiber: 2g
    • Sugar: 10g
    • Protein: 5-6g

    Note: Nutritional values may vary based on substitutions and portion sizes.

    In addition to being delicious, hot cross buns can be a source of energy due to their carbohydrate content and provide essential nutrients. Incorporating dried fruits ensures you are also getting vitamins and minerals, making them a wholesome choice among your spring meals.

    FAQs: Frequently Asked Questions About Best Traditional British Hot Cross Buns

    1. Can I make Hot Cross Buns in advance?
    Yes, you can prepare the dough ahead of time and let it rise in the refrigerator overnight. In the morning, shape and bake them fresh!

    2. My buns didn’t rise as expected. What went wrong?
    This could be due to inactive yeast. Ensure your yeast is fresh and that your liquid is warm (not hot) when activating.

    3. How can I make Hot Cross Buns vegan?
    Replace dairy milk with any plant-based milk and use a flax egg instead of a chicken egg. Use vegan butter for a rich texture.

    4. Can I freeze Hot Cross Buns?
    Absolutely! Freeze them after baking, tightly wrapped. Thaw and refresh in the oven for a delicious treat.

    5. What should I serve with Hot Cross Buns?
    Enjoy them with butter, jam, or even cream cheese. They pair well with a cup of tea or coffee for a delightful spring meal.

    By addressing these common queries, you can ensure successful baking and enhance your experience with hot cross buns—perfect for anyone looking to add a delightful touch to their spring meals.


    This article is a comprehensive guide to creating the best traditional British hot cross buns, balancing ease and adaptability with deliciousness and tradition. Happy baking!

  • Tasty Hot Cross Buns With Greek Yogurt

    Tasty Hot Cross Buns With Greek Yogurt

    Tasty Hot Cross Buns With Greek Yogurt: A Tropical Delight

    Introduction to Tasty Hot Cross Buns With Greek Yogurt

    When it comes to breakfast ideas, few dishes can rival the delightful aroma and taste of freshly baked hot cross buns. This recipe for Tasty Hot Cross Buns With Greek Yogurt elevates the traditional favorite into a light and healthy treat that can easily be enjoyed any time of day. Packed with protein from Greek yogurt, these buns not only satisfy your morning cravings but also introduce a healthier twist to an age-old recipe.

    Picture this: soft, fluffy buns infused with warm spices, adorned with a light glaze, and a hint of sweetness. Whether you enjoy them plain or slathered with butter, they are a versatile choice for busy parents, food enthusiasts, and everyone in between. Plus, this recipe can be tailored to fit various dietary needs, including gluten-free and vegan diets, making them a universally appealing option.

    Whether you are a busy professional looking for quick breakfast ideas or a young couple wanting to bake together, these buns offer a unique experience that’s both simple and rewarding. The best part? They are incredibly easy to whip up, allowing you to enjoy warm, home-baked goods without the fuss. Dive into this article to discover how to make these tasty hot cross buns a staple in your kitchen!

    Benefits and Advantages of Tasty Hot Cross Buns With Greek Yogurt

    Creating delicious baked goods doesn’t have to be complicated! This recipe for Tasty Hot Cross Buns With Greek Yogurt proves that you can create something special without spending hours in the kitchen. These buns are not only straightforward to make, but they also come with several health benefits that set them apart from traditional options.

    Ease of Preparation

    The preparation process is streamlined, allowing even novice bakers to succeed. With just a handful of ingredients and minimal equipment, you can produce a batch of sweet, fragrant buns in no time. Perfect for those hectic mornings, they can be made in advance and warmed up as needed, saving valuable time for busy parents or working professionals.

    Health Benefits

    Greek yogurt is an excellent source of protein and probiotics, making it a wonderful addition to your diet. By swapping out the usual butter or shortening for Greek yogurt, you significantly reduce the fat content while boosting the nutritional profile. The yogurt not only enhances the texture of the buns, making them soft and pillowy, but also adds a subtle tang, ensuring that these breakfast ideas are as nutritious as they are delicious.

    Customizable for Dietary Needs

    This recipe is exceptionally flexible, accommodating various dietary preferences. With easy substitutions, these buns can be made vegan by using a plant-based yogurt or gluten-free by using a suitable flour blend. This adaptability means that no one has to miss out on the joy of freshly baked goods, making it an inspiring choice for families and friends with differing dietary requirements.

    By embracing simplicity and health, these Tasty Hot Cross Buns With Greek Yogurt provide a delightful and nutritious option for your breakfast ideas that everyone will love!

    Ingredients Overview

    Essential Ingredients for Tasty Hot Cross Buns With Greek Yogurt

    To create these Tasty Hot Cross Buns With Greek Yogurt, you will need the following essential ingredients:

    • 2 cups all-purpose flour (or gluten-free flour blend)
    • 1/2 cup Greek yogurt (or dairy-free yogurt for vegan options)
    • 1/2 cup warm milk (or almond milk for lactose-free)
    • 1/4 cup sugar (brown sugar or coconut sugar for a healthier option)
    • 1/4 cup butter (or coconut oil for a dairy-free version)
    • 1 packet (2.25 tsp) instant yeast
    • 1 tsp vanilla extract
    • 1 tsp cinnamon (for warm flavor)
    • 1/2 tsp nutmeg
    • 1/4 tsp salt
    • 1/4 cup mixed dried fruits or currants (substitute with nuts or seeds if desired)
    • 1 egg (or flaxseed egg for vegan alternative)

    Dietary Substitutions to Customize Your Tasty Hot Cross Buns With Greek Yogurt

    Baking is all about creativity! Here are some suggested substitutions to cater to various dietary needs:

    • Vegan Option: Substitute Greek yogurt with a plant-based yogurt. Use a flaxseed egg or chia egg instead of a chicken egg. Coconut oil can replace butter.

    • Gluten-Free Option: Use a gluten-free all-purpose flour blend. Make sure the flour contains xanthan gum for the best texture.

    • Low-Calorie Option: Use a sugar substitute like stevia or erythritol, and incorporate whole wheat flour instead of all-purpose flour to increase fiber.

    • Nut-Free: Omit any nuts from your mix-ins or replace them with seeds, like sunflower seeds or pumpkin seeds, to maintain a similar crunch without allergens.

    These substitutions ensure that everyone can enjoy the Tasty Hot Cross Buns with Greek Yogurt, regardless of dietary restrictions!

    How to Prepare the Perfect Tasty Hot Cross Buns With Greek Yogurt: Step-by-Step Guide

    Making Tasty Hot Cross Buns With Greek Yogurt is a straightforward process that can be completed in just a few simple steps. Here’s how to prepare them perfectly:

    1. Prepare the Base: In a large mixing bowl, combine the warm milk, Greek yogurt, and sugar. Stir until the sugar has dissolved, ensuring the mixture is warm but not hot (107°F-110°F is ideal).

    2. Activate the Yeast: Add the instant yeast to the mixture and let it sit for about 5 minutes. This allows the yeast to activate and starts the rising process.

    3. Combine Dry Ingredients: While the yeast is activating, in another bowl, whisk together the flour, cinnamon, nutmeg, and salt. This step ensures that the spices are evenly distributed throughout the dough.

    4. Mix Ingredients: Pour the dry mixture into the wet ingredients, adding the vanilla extract and mixed dried fruits. Incorporate the ingredients using a wooden spoon or spatula until a soft dough forms.

    5. Knead the Dough: Lightly flour a clean surface and transfer the dough to it. Knead the dough for about 5-7 minutes until it becomes smooth and elastic. If the dough is sticky, dust with a bit more flour as needed.

    6. First Rise: Place the dough in a greased bowl, cover it with a clean kitchen towel or plastic wrap, and let it rise in a warm environment for about 1 hour, or until it doubles in size.

    7. Shape the Buns: After the first rise, punch down the dough to release air. Divide it into 8 equal portions and shape each into a round bun. Place the buns on a greased baking sheet, ensuring they are close but not touching.

    8. Second Rise: Cover the buns again and let them rise for another 30 minutes. This will enhance their fluffiness.

    9. Preheat the Oven: While the buns are rising, preheat the oven to 375°F (190°C).

    10. Prepare the Crosses: In a small bowl, mix equal parts flour and water to create a paste. Using a piping bag or a plastic bag with a corner snipped off, pipe a cross over each bun.

    11. Bake: Bake the buns for 15-20 minutes, or until they are golden brown and sound hollow when tapped on the bottom.

    12. Glaze: While the buns are baking, create a simple glaze by mixing equal parts water and sugar in a saucepan until the sugar dissolves. Brush the glaze over the warm buns as soon as they come out of the oven for a shiny finish.

    13. Cool and Enjoy: Let the buns cool slightly on a wire rack before serving.

    Each step is designed for optimal success, ensuring a lovely batch of Tasty Hot Cross Buns With Greek Yogurt that is perfect for breakfast, snacks, or dessert!

    Mastering Tasty Hot Cross Buns With Greek Yogurt: Advanced Tips and Variations

    To elevate your baking experience, consider these advanced tips and variations when making your Tasty Hot Cross Buns With Greek Yogurt:

    • Incorporate Citrus: Zest a lemon or orange into your dough for a fresh, citrusy flavor.

    • Experiment with Spices: Add a pinch of ground ginger or cardamom for an exotic twist.

    • Chocolate Chip Variation: For a dessert-inspired version, fold in chocolate chips instead of dried fruit, creating a sweet treat that’s irresistible!

    • Use a Slow Cooker: If you want to try an innovative approach, you can also make these buns in a slow cooker for a softer texture.

    • Make Mini Buns: If you prefer smaller portions, divide your dough into 12-16 pieces instead of 8, and enjoy bite-sized hot cross buns perfect for kids or entertaining guests.

    These variations allow you to customize the recipe to fit your adventurous spirit in the kitchen while keeping the core elements intact.

    How to Store Tasty Hot Cross Buns With Greek Yogurt: Best Practices

    Proper storage of your Tasty Hot Cross Buns With Greek Yogurt ensures that they maintain their delightful freshness. Here are a few best practices:

    • At Room Temperature: Store the buns in an airtight container at room temperature for up to 3 days. Ensure they are completely cooled before sealing to prevent moisture buildup.

    • Refrigeration: If you plan to keep them longer, you can refrigerate the buns for up to a week. Just remember to wrap them tightly in plastic wrap or place them in an airtight container to prevent them from drying out.

    • Freezing: To extend their shelf life even further, freeze the buns. Wrap each bun individually in plastic wrap and place them in a freezer-safe bag. They can be frozen for up to 3 months. To enjoy, simply thaw at room temperature or reheat in a microwave for a few seconds.

    By following these storage solutions, you can ensure that your breakfast ideas remain delicious and ready to enjoy whenever a craving strikes!

    Nutritional Value of Tasty Hot Cross Buns With Greek Yogurt

    Understanding the nutritional value of your food is essential, especially for diet-conscious individuals. Here’s a breakdown of the estimated nutrition per bun (based on the recipe making 8 buns):

    • Calories: 190 kcal
    • Total Fat: 4g (Saturated fat: 2g)
    • Cholesterol: 30mg
    • Sodium: 150mg
    • Total Carbohydrates: 33g
    • Dietary Fiber: 1g
    • Sugars: 5g
    • Protein: 5g

    These buns offer a balanced combination of macronutrients, making them a wholesome option for your breakfast ideas. With lower fat content, a good source of protein from Greek yogurt, and the option to incorporate healthy substitutions, you can enjoy a delicious treat that fuels your day right!

    FAQs: Frequently Asked Questions About Tasty Hot Cross Buns With Greek Yogurt

    Q1: Can I make these hot cross buns ahead of time?
    Yes, you can prepare the dough the night before and refrigerate it after the first rise. On baking day, simply bring the dough to room temperature, shape, and complete the second rise before baking.

    Q2: What can I use instead of Greek yogurt?
    You can substitute Greek yogurt with any type of plain, unsweetened yogurt, including dairy-free options like almond or coconut yogurt.

    Q3: How can I make these buns sweeter?
    If you prefer a sweeter taste, increase the sugar in the dough or drizzle some honey or maple syrup on top after baking.

    Q4: Can I add fillings to the buns?
    Absolutely! Feel free to add chocolate chips, nuts, or even a cream cheese filling for an extra indulgent treat.

    Q5: What is the best way to reheat the buns?
    The best way to reheat these buns is in the microwave for about 10-15 seconds or in the oven at 350°F for 5-10 minutes until warmed through.

    By addressing these common questions, readers can approach the recipe with confidence and creativity, ensuring a satisfying baking experience while enjoying their delicious hot cross buns.


    With their delightful flavor and healthy ingredients, Tasty Hot Cross Buns With Greek Yogurt is a fantastic addition to your breakfast ideas or any time snack. The combination of simplicity, health benefits, and adaptability makes them an excellent choice for every type of cook. Grab your ingredients, roll up your sleeves, and embark on this baking adventure today!

  • Delicious Creamy Potato Salad With Eggs

    Delicious Creamy Potato Salad With Eggs

    Delicious Creamy Potato Salad With Eggs: A Tropical Delight

    Introduction to Delicious Creamy Potato Salad With Eggs

    When it comes to simple, satisfying, and delicious meal options, Delicious Creamy Potato Salad With Eggs stands out among top recipe ideas. This dish combines tender potatoes and creamy dressing with protein-packed eggs to create a side that is perfect for any gathering or as a light meal on its own. This potato salad is versatile, easy to prepare, and can cater to various dietary needs, making it an ideal choice for home cooks, busy parents, students, and everyone in between.

    Simplicity is the hallmark of this beloved dish. With just a handful of ingredients, you can create a flavorful potato salad that is both fulfilling and nutritious. It’s also highly adaptable; whether you’re preparing it for a summer picnic, BBQ, or family dinner, this creamy delight can just as easily fit into your meal prep routine.

    Besides, the recipe is gluten-free and can be easily modified to suit vegan and low-calorie diets through simple substitutions. With this salad, you not only enjoy a dish that tastes wonderful, but you also provide your body with essential nutrients. Let’s dive deeper into the deliciousness and all the incredible benefits that Delicious Creamy Potato Salad With Eggs has to offer!

    Benefits and Advantages of Delicious Creamy Potato Salad With Eggs

    One of the main advantages of Delicious Creamy Potato Salad With Eggs is its ease of preparation. Regardless of your cooking skills, you’ll find this dish straightforward and quick to make. This is especially important for busy individuals or families with hectic schedules looking for filling meal solutions. A potato salad can be prepared in under an hour, making it a fantastic quick-fix.

    In addition, this potato salad is packed with health benefits. Potatoes are a rich source of vitamins and minerals, including Vitamin C and B6, potassium, and fiber, contributing to heart health and digestive wellness. Eggs add an additional punch of protein and essential amino acids, further elevating the nutritional profile of the dish. When combined, these ingredients create a balanced meal that keeps you satisfied without excess calories.

    Moreover, the versatility of this recipe means it can fit into almost any dietary plan. Family members can customize the potato salad using various add-ins or swaps based on personal preferences. Whether you prefer a classic version or something with a twist, such as adding herbs or various vegetables, the base of this potato salad serves as a blank canvas.

    Finally, Delicious Creamy Potato Salad With Eggs makes for great meal prep. It’s the perfect recipe for preparing ahead, allowing the flavors to meld together, creating an even more intense taste. This adds convenience for busy professionals and serves as the perfect dish for gatherings or picnics, ensuring you have a favorite recipe on hand whenever needed.

    Ingredients Overview

    Essential Ingredients for Delicious Creamy Potato Salad With Eggs

    To prepare the perfect Delicious Creamy Potato Salad With Eggs, gather the following essential ingredients:

    1. Potatoes (1.5 pounds, preferably Yukon Gold or Red Potatoes): These varieties are waxy, ensuring they hold their shape after boiling.

    2. Hard-Boiled Eggs (4 large eggs): A fantastic source of protein, remember to peel and chop these before mixing them into the salad.

    3. Mayonnaise (½ cup): This serves as the base dressing; you can choose low-fat or vegan mayonnaise for healthier options.

    4. Mustard (1 tablespoon): Adds tanginess; Dijon mustard works fantastically.

    5. Celery (1 cup, diced): Provides a satisfying crunch and freshness.

    6. Red Onion (½ cup, finely chopped): Provides a punch of flavor; consider soaking in water for milder taste.

    7. Salt (to taste): Enhances the flavor balance.

    8. Pepper (to taste): Adds warmth, use fresh ground if available.

    9. Fresh Herbs (like parsley or dill, optional; ¼ cup): Brightens the dish and adds color.

    Vegan Option: Swap traditional mayonnaise with egg-free mayonnaise or a homemade version using cashews or silken tofu.

    Gluten-Free Option: All ingredients listed are naturally gluten-free, making this dish suitable for those with gluten sensitivities.

    Dietary Substitutions to Customize Your Delicious Creamy Potato Salad With Eggs

    To make this dish suit various dietary needs, here are some clever substitutions to consider:

    1. For a Vegan Version: As mentioned, use plant-based mayonnaise and substitute eggs with chickpeas or vegan egg alternatives to maintain protein content.

    2. For a Lower-Calorie Option: Opt for Greek yogurt or just substitute some mayonnaise with low-fat sour cream. This will cut down on calories while adding a creamy texture.

    3. For a Flavor Boost: Consider adding chopped pickles, relish, or even avocado for a creamier texture while enhancing nutrition and flavor.

    4. For Added Crunch and Nutrients: Incorporate other vegetables, like bell peppers or shredded carrots, ensuring colorful and nutritious diversity in your salad.

    These substitutions allow the Delicious Creamy Potato Salad With Eggs to remain a staple among various lifestyles, contributing to the ease of preparation and inclusion in diverse meal plans.

    How to Prepare the Perfect Delicious Creamy Potato Salad With Eggs: Step-by-Step Guide

    Creating the Delicious Creamy Potato Salad With Eggs is a joy, and here’s how you can make it perfectly:

    1. Prepare the Potatoes: Begin by washing the potatoes thoroughly. Cut them into cubes, ensuring they are evenly sized for uniform cooking. Place them in a large pot and cover with salted water. Bring to a boil, then reduce the heat to medium and let simmer for about 10-15 minutes until they are tender but still firm. You can test doneness by inserting a fork; they should slide off easily but not disintegrate.

    2. Cook the Eggs: While the potatoes are cooking, prepare the hard-boiled eggs. Place them in a saucepan and cover with cold water. Bring it to a boil, then cover the pot and remove it from heat. Allow the eggs to sit for about 12 minutes. Once done, transfer them to an ice bath immediately to stop cooking. After they’ve cooled, peel the shells and chop them into small pieces.

    3. Mix Ingredients: In a large bowl, combine the mayonnaise and mustard, mixing well to create a cohesive dressing. To this, add the diced celery, chopped red onion, salt, and pepper. Mix thoroughly to ensure even distribution.

    4. Combine Potatoes and Eggs: After draining the cooked potatoes, let them cool for a few minutes. Once they are warm but not hot, gently fold the potatoes and chopped eggs into the bowl with the dressing mixture. Be careful not to over-mix, as you want to keep the potatoes and eggs intact.

    5. Adjust Seasoning: Taste your salad and adjust the seasoning by adding more salt, pepper, or even some fresh herbs to enhance flavor.

    6. Chill Before Serving: Refrigerate the salad for at least 30 minutes to let the flavors meld together beautifully. This step is crucial as it enhances the overall taste!

    7. Serve and Enjoy: Give the salad a gentle stir before serving, garnish with extra herbs if desired, and enjoy your Delicious Creamy Potato Salad With Eggs chilled or at room temperature.

    This recipe features versatility with numerous ways to personalize it, ensuring that it is suitable for everyone. Experiment with different ingredients that suit your taste or dietary needs!

    Mastering Delicious Creamy Potato Salad With Eggs: Advanced Tips and Variations

    To elevate your potato salad experience, here are some advanced tips and variations:

    1. Texture Variety: Consider using roasted potatoes instead of boiling them for added depth of flavor. This variation adds a delightful texture.

    2. Fusion Flavors: Add a touch of curry powder for a unique twist. This not only enhances flavor but also introduces a pleasing color.

    3. Vegan Mayo Alternatives: Explore different brands of vegan mayonnaise, such as whipped tofu or avocado mayo, to discover which flavors you enjoy the most.

    4. Herb Infusion: Experiment with various herbs such as chives, tarragon, or even cilantro, depending on your taste preferences. These variations not only enhance flavor but can make the dish feel entirely new.

    5. Theme Dinner Ideas: Pair the potato salad with grilled meats for BBQ nights, use it as a side for picnics, or even as part of a brunch spread alongside deviled eggs and fruit salads.

    Incorporating these advanced tips can transform your Delicious Creamy Potato Salad With Eggs into a timeless dish that continues to impress friends and family.

    How to Store Delicious Creamy Potato Salad With Eggs: Best Practices

    Proper storage will extend the life of your Delicious Creamy Potato Salad With Eggs and keep it fresh for future meals. Here are the best practices:

    1. Refrigeration: Store the salad in an airtight container in the fridge. It will keep well for about 3-5 days. When returning to enjoy it, simply stir and taste to see if additional seasoning is needed.

    2. Freezing: While not commonly recommended, if you need to freeze the salad, consider omitting the eggs or keeping the dressing separate. Freezing may affect the texture when thawed.

    3. Reheating: If you’ve prepared it with eggs, avoid freezing as they may not maintain their texture after thawing. Instead, use within the recommended time in the fridge and serve chilled.

    When considering storage solutions, remember that well-stored potato salad is not only convenient but also a great option to have on hand for quick meals and snacks throughout the week.

    Nutritional Value of Delicious Creamy Potato Salad With Eggs

    Understanding the nutritional value can help you appreciate how beneficial the Delicious Creamy Potato Salad With Eggs is for you. Here’s a breakdown of what you’re getting in one serving (approximately 1 cup):

    • Calories: 290
    • Total Fat: 16g
    • Saturated Fat: 3g
    • Cholesterol: 100mg
    • Sodium: 500mg
    • Total Carbohydrates: 31g
    • Dietary Fiber: 3g
    • Sugars: 2g
    • Protein: 9g

    Including ingredients like potatoes and eggs synergizes to not only provide energy but also deliver key nutrients. Potatoes are filling, while eggs contribute protein, making this dish appealing to various dietary preferences. It can easily fit within a balanced eating plan for many individuals, whether they are students, professionals on the go, or seniors seeking nutritious options.

    FAQs: Frequently Asked Questions About Delicious Creamy Potato Salad With Eggs

    Q1: Can I prepare this salad in advance?

    Yes! In fact, preparing the Delicious Creamy Potato Salad With Eggs a day ahead can enhance the flavors as they meld together. Store it in an airtight container in the refrigerator.

    Q2: What if I want to cut down on calories?

    Consider using low-fat or Greek yogurt as a mayonnaise substitute to reduce calories while maintaining creaminess and flavor.

    Q3: Can I make this dish vegan?

    Absolutely! Use a plant-based mayonnaise and substitute the eggs with equal parts of mashed chickpeas or tofu, ensuring you achieve the desired texture and taste.

    Q4: How long can I keep the potato salad?

    Stored correctly in an airtight container, the salad can last in the refrigerator for 3-5 days.

    Q5: Are there any other add-ins I can include?

    You can get creative with your potato salad! For a burst of flavor, consider adding diced pickles, olives, or blending in other veggies such as bell peppers or cucumbers.

    With its straightforward preparation, adaptability, and nutritional value, Delicious Creamy Potato Salad With Eggs is a dish that will undoubtedly impress your family and friends, making it a staple for potlucks, picnics, and meal preps. Enjoy crafting this delightful recipe and happy cooking!

  • Homemade Creamy Dill Potato Salad

    Homemade Creamy Dill Potato Salad

    Homemade Creamy Dill Potato Salad: A Tropical Delight

    Introduction to Homemade Creamy Dill Potato Salad

    If you’re in search of delectable recipe ideas that combine simplicity with incredible flavor, look no further than this Homemade Creamy Dill Potato Salad. This dish features tender potatoes, fragrant dill, and a luscious creamy dressing, delivering a delightful burst of taste in every bite. Ideal for sunny picnics or casual family gatherings, this potato salad not only satisfies but also caters to various dietary preferences.

    One of the standout features of this recipe is its balance of ease and healthfulness. It can easily be made vegan and gluten-free, providing flexibility for those with dietary restrictions. Rich in potassium and vitamins from the potatoes, and fortified with the fresh goodness of dill, this salad supports your health without compromising flavor.

    Whether you’re a busy parent looking for quick meal options, students wanting nutritious snacks, or a food enthusiast seeking out new dishes to impress your friends, this creamy dill potato salad is versatile enough for all occasions. In this article, we will delve deeper into its benefits, ingredients, preparation, and storage tips, ensuring you make the most out of this delightful recipe.


    Benefits and Advantages of Homemade Creamy Dill Potato Salad

    Homemade Creamy Dill Potato Salad is not just a crowd-pleaser; it brings numerous advantages that make it a staple in many kitchens. First and foremost, it is incredibly easy to prepare. You can whip it together in under an hour, making it the perfect side dish for weeknight dinners or backyard BBQs. The straightforward cooking method, which involves boiling and mixing, means less fuss and more fun in the kitchen.

    Additionally, the health benefits are hard to overlook. Potatoes are a great source of complex carbohydrates and are rich in essential nutrients such as Vitamin C, B6, and potassium. By opting for a creamy dressing made with yogurt or avocado, you can further elevate the nutritional profile without sacrificing the dish’s richness. This recipe can also be tailored for various diets; it can be made vegan using plant-based yogurt or mayonnaise and remains gluten-free, ensuring a wide audience can enjoy a bowl of this creamy delight.

    Moreover, this potato salad stands out by being customizable; you can add various mix-ins like chopped celery, red onions, or even olives, depending on personal preference. Such variations enrich the texture and flavor, allowing it to evolve from a simple dish into a gourmet experience. Whether you’re preparing it for an intimate dinner, a party, or simply to enjoy over a few days, this Homemade Creamy Dill Potato Salad delivers joy on every plate.


    Ingredients Overview

    Essential Ingredients for Homemade Creamy Dill Potato Salad

    To create the perfect Homemade Creamy Dill Potato Salad, gather the following ingredients:

    • 2 pounds of Yukon Gold potatoes (or your favorite variety, peeled and cubed)
    • 1 cup of mayonnaise (or vegan mayo for a dairy-free option)
    • 1 tablespoon of Dijon mustard
    • 1 tablespoon of apple cider vinegar (adds brightness)
    • 1 teaspoon of garlic powder
    • 1 cup of finely chopped fresh dill (for that signature flavor)
    • 1 teaspoon of salt (adjust to taste)
    • 1/2 teaspoon of black pepper (for a bit of spice)
    • Optional: 1 cup of finely diced red onion or celery for crunch!

    These ingredients form a solid foundation, ensuring your potato salad is creamy, flavorful, and satisfying. The unique tanginess of the dill paired with the creamy dressing creates an unforgettable flavor profile.


    Dietary Substitutions to Customize Your Homemade Creamy Dill Potato Salad

    Creating a customized version of Homemade Creamy Dill Potato Salad is simple. Consider these substitutions to meet different dietary needs:

    1. For Vegan Options:
    2. Use plant-based mayonnaise, such as soy or aquafaba-based mayo, instead of regular mayonnaise to maintain creaminess while keeping it entirely vegan.

    3. Gluten-Free Choices:

    4. Rest assured, this recipe is naturally gluten-free. Just ensure any add-ins (like seasonings) are certified gluten-free.

    5. Low-Calorie Alterations:

    6. Substitute half of the mayonnaise with Greek yogurt, which not only slashes calories but also adds protein to the dish.

    7. Flavor Variations:

    8. If fresh dill isn’t available, try using dill weed or even other fresh herbs like parsley or coriander for a unique twist.

    9. Additional Crunch:

    10. Consider adding in finely chopped pickles or capers for added flavor and crunch, appealing to those looking for a more gourmet touch.

    These substitutions ensure that everyone can enjoy this classic dish, making it a preferred choice regardless of dietary restrictions or preferences.


    How to Prepare the Perfect Homemade Creamy Dill Potato Salad: Step-by-Step Guide

    Follow these steps to prepare a delightful Homemade Creamy Dill Potato Salad that everyone will enjoy.

    1. Prepare the Base:
      Begin by washing the Yukon Gold potatoes thoroughly. Remove any blemishes, then peel and cut them into evenly sized cubes (about 1-inch pieces) for uniform cooking.

    2. Boil the Potatoes:
      Fill a large pot with water, adding a pinch of salt. Bring the water to a boil over medium-high heat. Once boiling, add the potato cubes. Cook for about 12-15 minutes, or until they are fork-tender but not mushy. You’ll want them to hold their shape.

    3. Drain and Cool:
      After cooking, drain the potatoes in a colander and rinse them under cold water to stop the cooking. Allow them to cool completely; this step is crucial to prevent soggy salad.

    4. Mix Ingredients:
      In a large mixing bowl, combine the mayonnaise, Dijon mustard, apple cider vinegar, garlic powder, salt, and black pepper. Stir well until the mixture is smooth and evenly blended.

    5. Add Fresh Dill:
      Incorporate the freshly chopped dill into the creamy dressing. This aromatic herb will infuse the salad with a wonderful flavor that elevates the whole dish.

    6. Combine Potatoes with Dressing:
      Gently fold the cooled potato cubes into the dressing mixture. Make sure all potato pieces are coated without breaking them apart.

    7. Incorporate Additional Veggies:
      If using, add in diced red onion or celery at this stage. Stir gently to ensure the ingredients are well mixed.

    8. Chill:
      Cover the bowl with plastic wrap or transfer the potato salad to an airtight container. Let it chill in the refrigerator for at least 1 hour, allowing the flavors to meld together beautifully.

    9. Taste and Adjust:
      Before serving, taste the salad and adjust seasoning if needed. You can add a bit more salt, pepper, or fresh dill to suit your palate.

    10. Serve:
      Present the potato salad in a beautiful serving bowl, garnished with a sprig of fresh dill for aesthetics. Enjoy this creamy delight alongside grilled meats, sandwiches, or as a standalone dish!

    By following this step-by-step guide, you’ll create a delicious and enticing potato salad. Remember, you can always adapt these instructions to incorporate various ingredients based on dietary preferences—after all, recipe ideas should provide flexibility.


    Mastering Homemade Creamy Dill Potato Salad: Advanced Tips and Variations

    To elevate your Homemade Creamy Dill Potato Salad and truly impress your guests, consider these advanced tips and variations:

    • Use Different Potatoes: While Yukon Golds are a fantastic choice, experimenting with red potatoes or fingerlings can create varied textures and flavors. The skins of these potatoes can also add a beautiful color.

    • Herb Infusions: For those who want to explore different flavor profiles, try adding chopped chives, green onions, or even a bit of lemon zest. Each will add a unique twist that freshens the dish.

    • Spicy Kick: If you enjoy a little heat, add diced jalapeños or a splash of hot sauce to the dressing. This can transform your salad into a bold flavor experience.

    • Nuts or Seeds: For an added crunch and nutritional boost, stir in some toasted sunflower seeds or chopped walnuts. They pair excellently with the creaminess of the dressing.

    • Meal Prep: This potato salad is perfect for batch cooking. Make a large batch at the beginning of the week and enjoy it as a side or quick lunch option throughout the week. The flavors will deepen over time.

    These tips not only enhance the dish’s flavor but also grant you the opportunity to personalize it according to your taste or the preferences of those you’re serving. Creativity in the kitchen leads to exciting recipe ideas!


    How to Store Homemade Creamy Dill Potato Salad: Best Practices

    Storing your Homemade Creamy Dill Potato Salad correctly is crucial to maintaining its freshness and flavor. Here are the best practices to follow:

    • Refrigeration: Keep your potato salad in an airtight container in the fridge if you plan to enjoy it within the next 3-5 days. Make sure it is completely cooled before sealing, to avoid condensation inside the container.

    • Freezing: While potato salad is best when fresh, you can freeze it in a suitable container if necessary. However, keep in mind that the texture may change upon thawing. To freeze, divide it into smaller portions, allowing for easier thawing later.

    • Thawing and Reheating: When ready to enjoy your frozen salad, transfer it to the fridge and let it thaw overnight. Reheat gently in the microwave if desired, although serving it cold is typically preferred and recommended.

    Utilizing proper storage methods will allow you to keep this recipe on hand for those spontaneous gatherings or busy weeknights. After all, aligning storage with recipe ideas can save time and reduce waste.


    Nutritional Value of Homemade Creamy Dill Potato Salad

    Knowing the nutritional breakdown of your food can help with meal planning and dietary choices. Here’s the estimated nutritional value per serving (based on an 8-serving recipe):

    • Calories: 220 kcal
    • Protein: 3g
    • Fat: 12g (includes healthy fats from mayo)
    • Carbohydrates: 29g
    • Fiber: 3g
    • Sodium: 300mg

    The homemade creamy dill potato salad is filling and healthy, offering a balance of carbohydrates and healthy fats. If you use low-fat mayo or yogurt, this dish can be even lighter.

    The nutritional values can vary based on the ingredient substitutions you choose, so feel free to adjust those figures according to your specific options. Being mindful of the nutrition in your meals allows you to enjoy using diverse recipe ideas without guilt.


    FAQs: Frequently Asked Questions About Homemade Creamy Dill Potato Salad

    Q1: Can I prepare the salad a day ahead?
    A1: Absolutely! In fact, making this potato salad a day before allows the flavors to marry beautifully, enhancing the overall taste.

    Q2: Is this potato salad gluten-free?
    A2: Yes, this recipe is naturally gluten-free as long as you use gluten-free certified ingredients.

    Q3: How can I make this recipe lower in calories?
    A3: To reduce the calorie content, try substituting half of the mayonnaise with Greek yogurt or using a lighter alternative mayo.

    Q4: Can I use new potatoes for this recipe?
    A4: Yes! New potatoes can offer a great flavor and texture as well, making them an excellent alternative.

    Q5: What can I add to mix things up a bit?
    A5: You can add chopped pickles, red bell pepper, or even bacon bits for additional flavor and texture variations, depending on your preferences.

    These FAQs cover common concerns and curiosities about the recipe, helping you navigate the preparation and adjustments seamlessly. By expanding your knowledge base, you can get even more creative, exploring various recipe ideas that align with your taste.


    Homemade Creamy Dill Potato Salad is not only a scrumptious dish but also a flexible, healthy choice for various diets and occasions. Armed with this comprehensive guide, you’re all set to embark on a culinary adventure that brings together the classic flavors of potato salad with fresh dill and creamy goodness. Enjoy making it!

  • Mouthwatering Creamy Sour Cream Potato Salad

    Mouthwatering Creamy Sour Cream Potato Salad

    Mouthwatering Creamy Sour Cream Potato Salad: A Tropical Delight

    Introduction to Mouthwatering Creamy Sour Cream Potato Salad

    Mouthwatering Creamy Sour Cream Potato Salad is the ultimate comfort food that brings a taste of summer to any table. This recipe combines the rich flavors of creamy sour cream with tender potatoes to create a delightful dish that stands out. Beyond its deliciousness, this potato salad is simple to make, healthy, and adaptable for various dietary needs, making it an ideal choice for everyone from busy parents to diet-conscious individuals.

    Whether you’re enjoying it as a side dish at a summer barbecue, a picnic in the park, or as an addition to your weekly meal prep, this potato salad offers a creamy texture and refreshing taste that keeps you coming back for more. Not only is it perfect for potlucks and gatherings, but it can also be made ahead of time, helping busy students or working professionals get ahead in their meal planning.

    Moreover, this potato salad can easily be tweaked to suit different dietary preferences, being naturally gluten-free and offering options for vegan and low-calorie diets. There’s truly something for everyone! So, if you’re looking for a dish that’s just as exciting as a warm bowl of potato soup but with the bonus of a delightful crunch from fresh vegetables, read on and discover how to create this tropical delight at home.

    Benefits and Advantages of Mouthwatering Creamy Sour Cream Potato Salad

    Creating the perfect potato salad may seem daunting, but the truth is that this creamy recipe comes together effortlessly. The primary advantage lies in its simplicity. With just a few readily available ingredients, you can whip up a dish that’s both wholesome and filling. Potatoes serve as the base, providing essential nutrients such as vitamin C, potassium, and dietary fiber. Not only do they enhance the overall texture of the salad, but they also add significant health benefits.

    Unlike traditional mayo-based potato salads, the inclusion of sour cream reduces the overall calorie content while enhancing the creaminess. Sour cream is also a source of beneficial probiotics, promoting gut health. Furthermore, this recipe is versatile; simply switch out or add ingredients based on what you have on hand. Throw in some crisp celery, green onions, or even a hint of dill for extra flavor!

    To top it off, making this potato salad takes minimal time, making it perfect for busy parents balancing work and family life. It also remains an excellent choice for students living in dorms or shared spaces with limited cooking facilities. Whether you’re preparing a side for a family meal or a dish for friends, this creamy potato salad delivers not just on flavor but also convenience. Thus, it’s a great alternative to heavier dishes like potato soup, allowing you to enjoy the taste without the extra calories.

    Ingredients Overview

    Essential Ingredients for Mouthwatering Creamy Sour Cream Potato Salad

    Creating a delightful creamy potato salad begins with selecting the right ingredients. Below is a list of all the essentials you’ll need for making this mouthwatering dish:

    • 2 pounds of potatoes (Yukon Gold or red): Offers a creamy texture when cooked.
    • 1 cup sour cream (use plain dairy-free or low-fat for alternative options): Provides creaminess and tanginess.
    • 1 tablespoon Dijon mustard: Adds depth to the flavor.
    • 1 tablespoon apple cider vinegar: Brightens the taste and helps balance flavors.
    • Salt and pepper to taste: Essential for elevating flavors.
    • 1/2 cup celery, finely chopped: Adds crunch and freshness.
    • 1/2 cup red onion, finely chopped: Provides zing and color.
    • 1/4 cup fresh parsley, chopped: For garnish and added flavor.
    • Optional: 2 boiled eggs, chopped (omit for vegan): Adds richness and protein.

    For those looking for dietary alternatives, consider the following options:

    • Vegan alternatives: Substitute sour cream with cashew cream or a vegan yogurt.
    • Gluten-free: This recipe is gluten-free, making it suitable for those with celiac disease or gluten intolerance.
    • Low-calorie options: Use low-fat or light sour cream for a healthier twist.

    Dietary Substitutions to Customize Your Mouthwatering Creamy Sour Cream Potato Salad

    Customization is key when it comes to serving a diverse crowd. Here are a few substitutions to make this potato salad fit a variety of dietary restrictions:

    • For a lighter version: Swap sour cream for Greek yogurt. This not only reduces calories but also boosts the protein content.
    • Herbs: If you’re not a fan of parsley, try using dill, chives, or cilantro to create different flavor profiles.
    • Veggies: To add an extra punch, toss in some cherry tomatoes, shredded carrots, or bell peppers for additional nutrition and taste.
    • Protein boost: For a more filling dish, add ingredients like shredded chicken, chickpeas, or even diced bacon for a smoky flavor.

    By adapting this creamy potato salad, you can cater to any palate, ensuring everyone leaves the table satisfied!

    How to Prepare the Perfect Mouthwatering Creamy Sour Cream Potato Salad: Step-by-Step Guide

    Preparing Mouthwatering Creamy Sour Cream Potato Salad is a straightforward and enjoyable process. Follow these steps to achieve the perfect blend of flavors and textures, making it a hit at any gathering:

    1. Prepare the Potatoes: Begin by washing the potatoes thoroughly. Cut them into even-sized cubes (about 1-inch pieces) to ensure they cook evenly. Place them in a large pot, cover with cold water, and add a pinch of salt. Bring the water to a boil, then reduce to a simmer and cook until the potatoes are tender yet firm, usually around 10-15 minutes.

    2. Drain and Cool: Once cooked, drain the potatoes in a colander and allow them to sit for 5-10 minutes. This step is crucial as it prevents the salad from becoming overly watery. You can also spread them out on a clean kitchen towel to help them cool faster.

    3. Prepare the Dressing: In a medium-sized mixing bowl, combine the sour cream, Dijon mustard, apple cider vinegar, salt, and pepper. Whisk until the mixture is smooth and creamy. This dressing is what transforms basic potatoes into a delightful dish reminiscent of potato soup’s comfort.

    4. Mix Ingredients: Once the potatoes have cooled, transfer them to a large mixing bowl. Gently fold in the chopped celery, red onion, and optional boiled eggs. Pour the dressing over the potato mixture and carefully mix until everything is evenly coated.

    5. Adjust to Taste: After mixing, taste your potato salad and adjust the seasoning as needed. You can add more salt, pepper, or a splash of vinegar for tanginess. Always remember that flavors deepen after resting in the refrigerator.

    6. Chill the Salad: Cover the potato salad with plastic wrap or place it in an airtight container. Refrigerate for at least 1 hour before serving. This waiting time allows all the flavors to meld beautifully, enhancing the overall taste.

    7. Garnish and Serve: Before serving, sprinkle fresh parsley on top for an added pop of color and flavor. Now your Mouthwatering Creamy Sour Cream Potato Salad is ready to impress your guests!

    By following these steps, you can create a creamy, tangy potato salad that stands out as a crowd-pleaser. Whether you’re preparing it for a family dinner or a friendly gathering, this dish is sure to satisfy.

    Mastering Mouthwatering Creamy Sour Cream Potato Salad: Advanced Tips and Variations

    To elevate your potato salad experience, here are a few advanced tips and creative variations:

    • Flavor Infusions: Incorporate spices and herbs such as dill, paprika, or garlic powder to give your potato salad an unexpected twist. A teaspoon of smoked paprika can offer a barbecue flair.

    • Mediterranean Version: Add olives, sun-dried tomatoes, and feta cheese for a Mediterranean twist. These additions not only provide a burst of flavor but also a delightful texture contrast.

    • Bacon Lovers: For those who enjoy smoky flavors, mix in cooked bacon bits for richness. This creates a smoky potato salad that tastes gourmet.

    • Crunch Factor: Introduce nuts or seeds, such as sunflower seeds or almonds, for an additional crunch. This addition not only changes up the texture but also adds healthy fats.

    • Serving Ideas: Serve the potato salad on a bed of greens as a light meal or share it in lettuce wraps for a fresh take. You can also pair it with grilled meats for a delicious summer meal.

    Remember, the beauty of potato salad lies in its versatility. Don’t hesitate to experiment with different ingredients to find the combination that you and your family love best!

    How to Store Mouthwatering Creamy Sour Cream Potato Salad: Best Practices

    Proper storage is crucial to extending the life of your Mouthwatering Creamy Sour Cream Potato Salad. Here are some best practices to keep your dish fresh:

    • Refrigeration: Store the potato salad in an airtight container in the refrigerator for up to 3-5 days. The cool temperature preserves the flavors while keeping the ingredients crisp.

    • Freezing: While it’s best enjoyed fresh, you can freeze the salad for longer storage. However, be mindful that freezing may alter the texture of the potatoes and fresh ingredients. If you do freeze it, place the salad in a freezer-safe container and consume it within 1-2 months.

    • Reheating: When you’re ready to enjoy leftovers, allow the salad to thaw in the refrigerator overnight if frozen. Stir well to redistribute any settled dressing and enjoy it cold or at room temperature.

    Keeping these storage tips in mind will help maintain the integrity and taste of your potato salad, so it remains an enjoyable dish every time you serve it!

    Nutritional Value of Mouthwatering Creamy Sour Cream Potato Salad

    Understanding the nutritional equilibrium of your meals can enhance your dining experience. Here’s a detailed breakdown of the nutritional value for one serving (1 cup) of Mouthwatering Creamy Sour Cream Potato Salad:

    • Calories: Approximately 250-300 calories
    • Total Fat: 10-15g
    • Saturated Fat: 5-7g
    • Cholesterol: 30-80mg (variable based on the use of boiled eggs)
    • Sodium: 350mg
    • Total Carbohydrates: 35-40g
    • Dietary Fiber: 4g
    • Sugars: 1-2g
    • Protein: 4-6g

    This breakdown provides insights into the health benefits of the dish, allowing you to enjoy it guilt-free. With its balance of carbohydrates, fats, and proteins, this potato salad can be a satisfying side dish or a stand-alone meal when paired with greens or protein.

    FAQs: Frequently Asked Questions About Mouthwatering Creamy Sour Cream Potato Salad

    Q1: Can I make this potato salad ahead of time?
    Absolutely! This salad tastes even better after a night in the fridge as the flavors develop. It can be prepared up to 24 hours in advance.

    Q2: How can I make this recipe dairy-free?
    To create a dairy-free version of the potato salad, substitute sour cream with a plant-based alternative like cashew cream or coconut yogurt.

    Q3: Will the potatoes get mushy if I prep the salad ahead of time?
    If cooked correctly (not overcooked), the potatoes should remain perfectly tender without becoming mushy, even after a day in the refrigerator.

    Q4: Can I add other ingredients?
    Yes, feel free to add any favorite mix-ins such as diced pickles, capers, or different veggies. The recipe is versatile enough to handle various ingredients.

    Q5: How do I make this potato salad vegan?
    You can easily make the salad vegan by omitting the boiled eggs and replacing sour cream with a plant-based alternative.

    By addressing these common questions, you can ensure your potato salad journey is enjoyable and effortless, providing delightful results every time. So, go ahead and embrace the versatility of this creamy potato salad while savoring its myriad flavors and textures!

    This Mouthwatering Creamy Sour Cream Potato Salad not only offers a tantalizing taste but also aligns with dietary needs, ensuring it’s a favorite for all occasions. Happy cooking!