Blog

  • Simple Dairy-Free Spring Salad

    Simple Dairy-Free Spring Salad

    Simple Dairy-Free Spring Salad: A Tropical Delight

    Introduction to Simple Dairy-Free Spring Salad

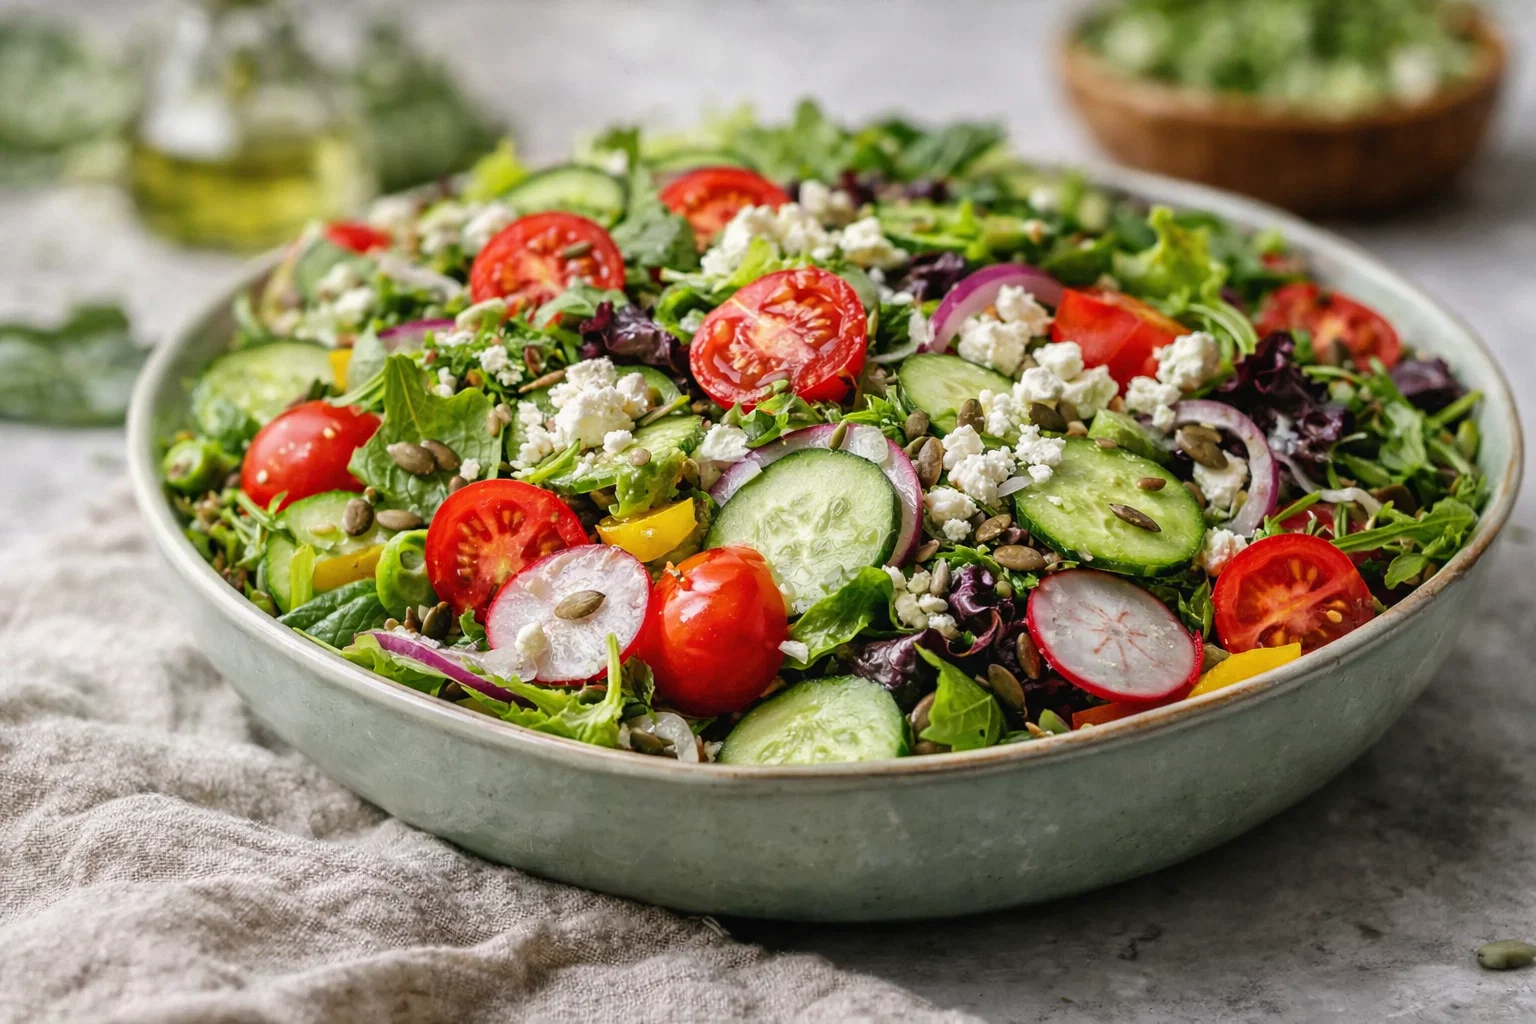
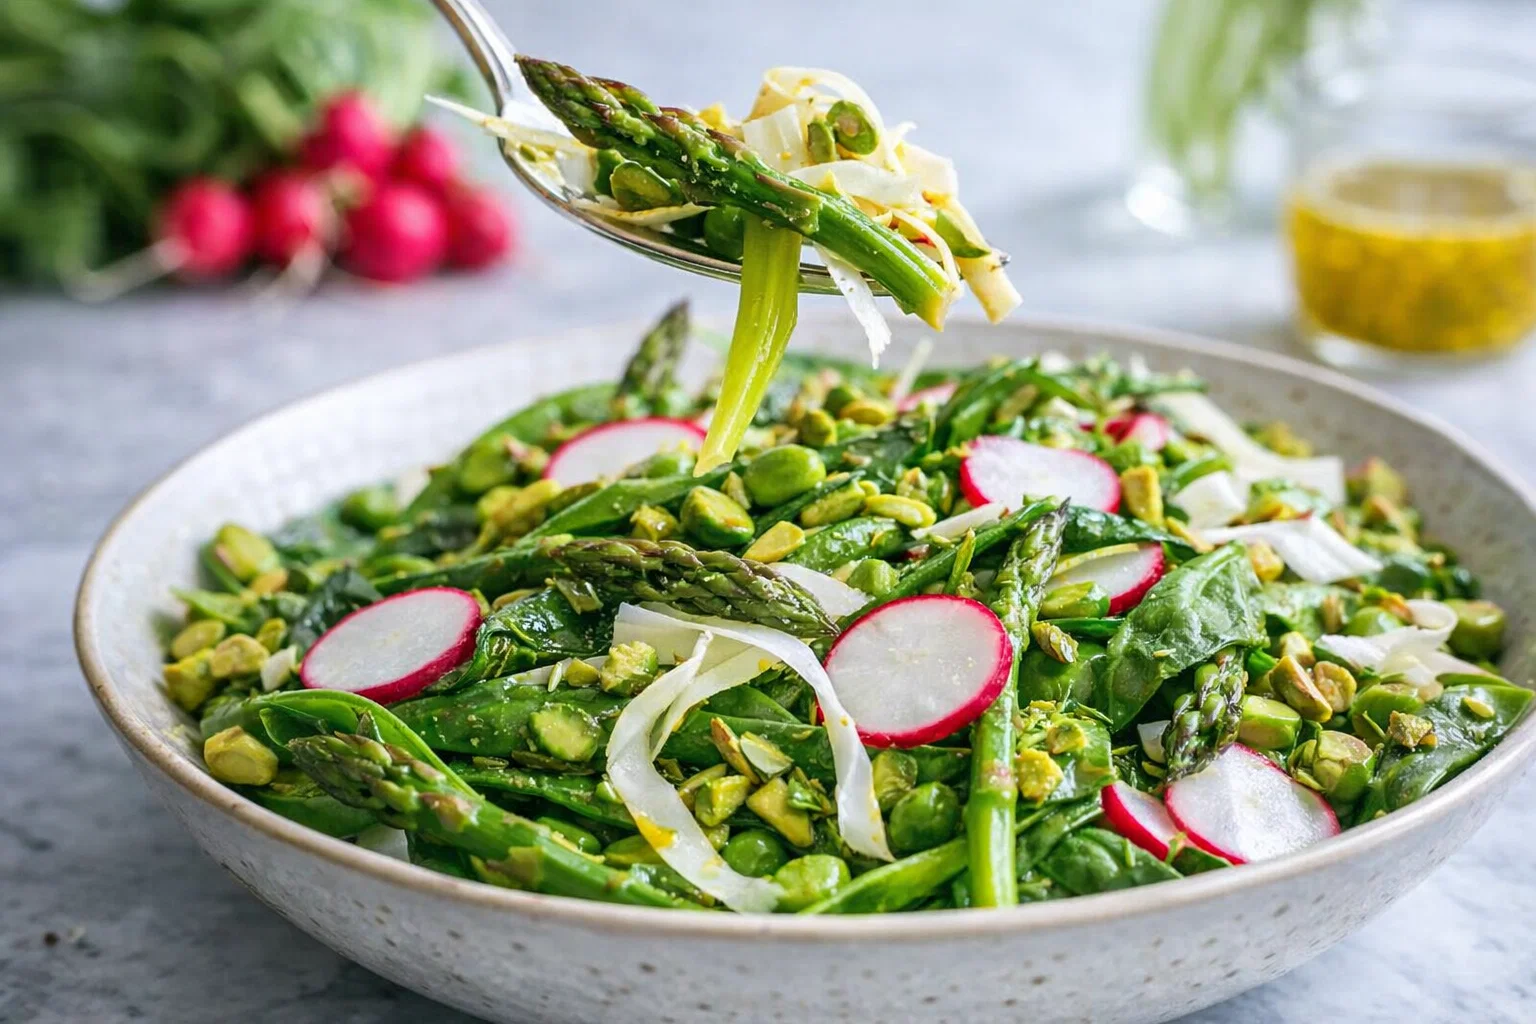
    As the weather warms and blooms emerge, there’s nothing quite like enjoying a fresh salad to celebrate the arrival of spring. Simple Dairy-Free Spring Salad is not only a feast for the eyes but also a nutritious and satisfying dish that can effortlessly fit into your healthy lifestyle. This salad is the perfect embodiment of spring meals, combining vibrant ingredients that celebrate the season’s bounty.

    It’s a breeze to prepare, making it an ideal option for busy parents, students, working professionals, and anyone who seeks quick yet healthy meal solutions. Crafted to be both vegan and gluten-free, our Simple Dairy-Free Spring Salad showcases a colorful array of fresh vegetables and fruits, ensuring that it meets various dietary preferences.

    Imagine crunchy greens and tart fruits mixed with an assortment of wholesome toppings that lend not just flavor but also a plethora of health benefits! With a balance of nutrients and a heartiness that comes from natural ingredients, this salad will inspire home cooks and food enthusiasts alike. Whether you serve it as a light main dish or a vibrant side, this salad is sure to be a hit at picnics, family gatherings, or even weeknight dinners. Let’s dive into the details of creating this delightful dish that perfectly complements your spring meals.

    Benefits and Advantages of Simple Dairy-Free Spring Salad

    One of the standout qualities of the Simple Dairy-Free Spring Salad is its remarkable ease of preparation. In just a matter of minutes, you can assemble an enticing dish that satisfies both taste buds and dietary requirements. This simplicity is a game-changer for parents juggling busy schedules or individuals seeking quick meal solutions without sacrificing health or flavor.

    Packed with vibrant, seasonal ingredients, this salad is also a powerhouse of nutritional benefits. Leafy greens, like spinach and kale, are rich in vitamins A, C, and K, while a variety of colorful vegetables like bell peppers and carrots provide essential antioxidants. The addition of fruits, such as strawberries or mangoes, not only enhances the richness of flavor but also boosts fiber intake, aiding digestion and promoting overall health. This combination of nutrients makes it an ideal choice for anyone aiming to incorporate more plant-based meals into their diet, which is increasingly popular in today’s health-conscious society.

    Moreover, our dairy-free spring salad stands out for its versatility. Whether you are catering to vegan friends, gluten-sensitive individuals, or simply attempting to make healthier choices, this salad accommodates all dietary needs. Plus, it can be customized with different toppings or dressings, ensuring that every bite remains exciting. In addition, this dish satisfies not only your hunger but also keeps your energy levels high—perfect for travel, outdoor activities, or busy workdays. Risotto in spring meals never looked so good!

    Ingredients Overview

    Essential Ingredients for Simple Dairy-Free Spring Salad

    To create your Simple Dairy-Free Spring Salad, you’ll need the following ingredients:

    • 4 cups mixed leafy greens (arugula, baby spinach, or kale)
    • Collectively packed with vitamins, these greens form a nutrient-dense base.
    • 1 cup cherry tomatoes, halved
    • Brimming with antioxidants, these add a juicy, sweet flavor.
    • 1 cup cucumber, diced
    • Provides a refreshing crunch and hydrating element while being low in calories.
    • 1 cup bell pepper, diced (red, yellow, or orange)
    • Adds vibrant color, and flavor, and is rich in immune-boosting vitamin C.
    • 1 medium avocado, diced
    • Avocados are full of healthy fats that support heart health.
    • 1/2 cup red onion, thinly sliced (optional)
    • For an added bite, but can be omitted for a milder flavor.
    • 1 cup strawberries or mango, diced (seasonal fruit options)
    • Offers a hint of sweetness and fiber.
    • 3-4 tablespoons olive oil
    • A healthy fat option that helps in nutrient absorption.
    • 2 tablespoons apple cider vinegar or lemon juice
    • For a tangy kick that complements the fresh ingredients.
    • Salt and pepper, to taste
    • Essential for enhancing flavors.

    Note: All ingredients are vegan, gluten-free, and low-calorie, making this Simple Dairy-Free Spring Salad a fitting choice in your spring meals repertoire.

    Dietary Substitutions to Customize Your Simple Dairy-Free Spring Salad

    Tailoring your salad to fit dietary restrictions or personal preferences is straightforward! Here are some delightful substitutions:

    1. Greens: If leafy greens aren’t your thing, consider substituting with cabbage or shredded carrots.
    2. Fruits: Feel free to use any seasonal fruit in place of strawberries or mangoes, such as blueberries or diced apples, which are all excellent options for spring meals.
    3. Fats: Instead of avocado, you can opt for walnuts or sunflower seeds for added crunch and healthy fats.
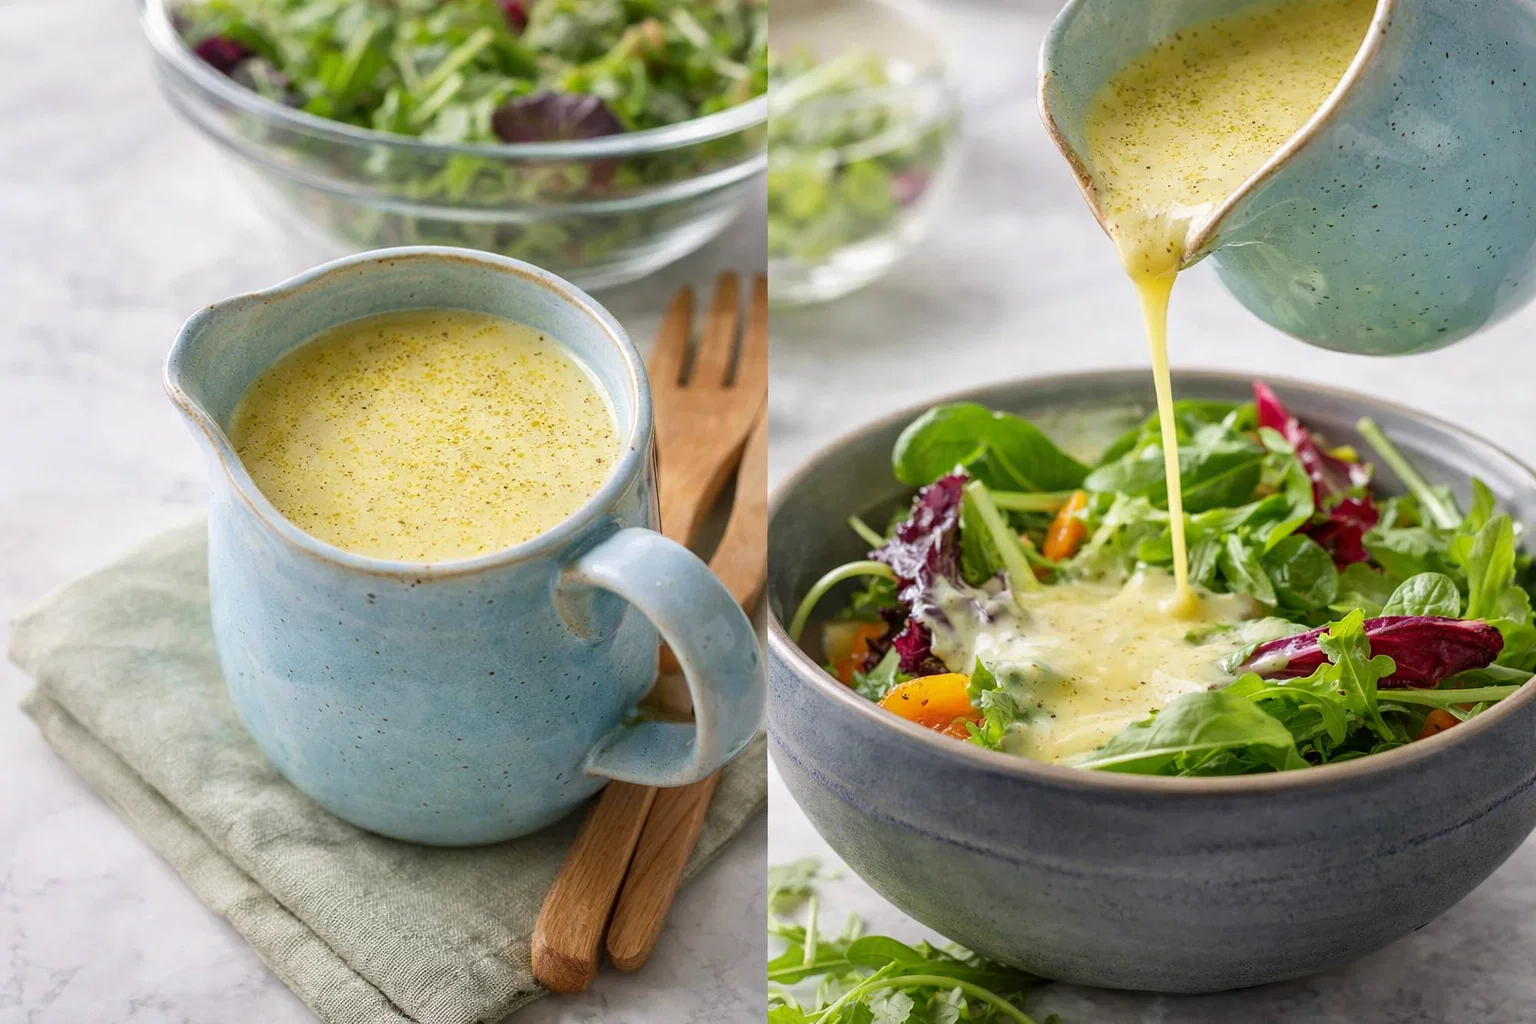
    4. Dressings: If you’re looking for a creamier texture while maintaining the dairy-free aspect, try blending tahini with lemon juice and garlic for a rich dressing.
    5. Proteins: Add chickpeas, quinoa, or tofu to make your salad heartier, perfect for serving as a standalone meal.

    By adjusting the existing ingredients or adding your favorites, you can create an array of variations that keep your spring meals fresh and exciting.

    How to Prepare the Perfect Simple Dairy-Free Spring Salad: Step-by-Step Guide

    Creating your Simple Dairy-Free Spring Salad is both fun and easy. Follow this step-by-step guide to achieve the perfect balance of flavors and textures:

    1. Prepare the Base:
    2. Rinse and dry your chosen leafy greens thoroughly. Place them in a large mixing bowl.

    3. Chop the Vegetables:

    4. Dice the cucumber, bell pepper, and cherry tomatoes. Add them to the bowl with the greens.

    5. Include Fruits:

    6. If using strawberries or mango, slice the fruit and gently toss them into the mixture. The sweetness will give contrast to the savory elements.

    7. Prepare the Avocado:

    8. Slice the avocado just before serving. This prevents browning and ensures it remains fresh. Add the diced avocado to the salad.

    9. Onion Time:

    10. If you’re using red onion, slice it thinly and scatter it over the salad for an extra layer of flavor.

    11. Whisk the Dressing:

    12. In a separate small bowl, whisk together the olive oil, apple cider vinegar or lemon juice, salt, and pepper to create your dressing. Taste and adjust seasoning if needed.

    13. Combine Ingredients:

    14. Drizzle the dressing over the salad. Using tongs or your hands, gently toss all the ingredients together until well-coated.

    15. Serve:

    16. For an elegant presentation, serve immediately on plates or in bowls, arranged artfully.

    17. Storing Leftovers:

    18. If you have any salad left, store it in an airtight container in the refrigerator for up to a day, keeping the dressing separate to maintain freshness.

    Making this salad can easily shift from a simple dish to a culinary adventure. Just imagine the variety of flavors you can produce with the right combinations for your spring meals!

    Mastering Simple Dairy-Free Spring Salad: Advanced Tips and Variations

    To truly master the Simple Dairy-Free Spring Salad, here are some advanced tips and variations to elevate your creation:

    • Add Crunch: Consider adding toasted nuts like sliced almonds or pecans for extra crunchiness. Seed options like pumpkin seeds can also enhance texture.
    • Herbs and Spices: For a flavor explosion, incorporate fresh herbs like basil, mint, or cilantro—these can elevate your salad’s freshness. A dash of smoked paprika or cumin can introduce exciting flavors, too.
    • Marinated Veggies: Marinating red onions or cucumbers in a mixture of vinegar and a pinch of sugar the night before can offer a tangy burst when added to the salad, creating an intriguing flavor dimension.
    • Grilled Vegetables: Incorporate grilled vegetables such as zucchini or asparagus for a smoky flavor that adds complexity and makes your salad even more filling.
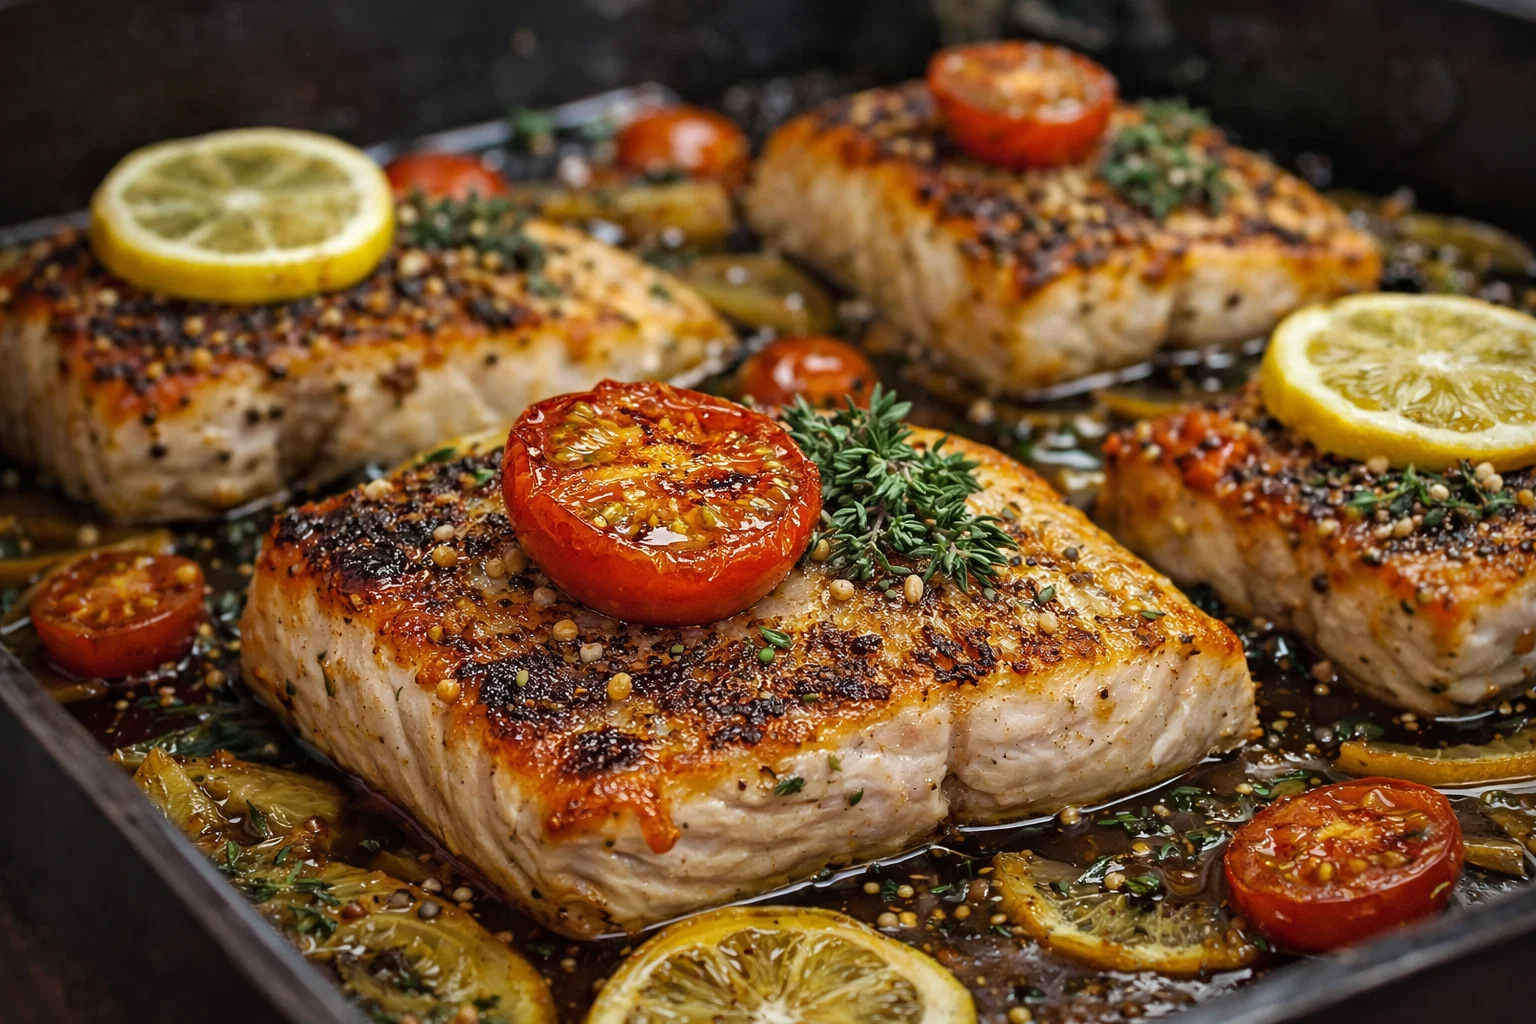
    • Protein Packed: For a heartier version, add grilled chicken, shrimp, or chickpeas, which make perfect additions for any meal while accommodating those looking for protein-rich options.

    Experimenting with different components can make your Simple Dairy-Free Spring Salad uniquely yours. After all, spring meals are all about creativity and celebrating the season’s vibrant flavors!

    How to Store Simple Dairy-Free Spring Salad: Best Practices

    Storing your Simple Dairy-Free Spring Salad efficiently is key to maintaining freshness, especially when preparing in advance for busy days or potlucks. Follow these best practices for storing your salad:

    • Refrigeration: If you have any leftover salad, transfer it into an airtight container. Remove any toppings, especially dressings and fragile ingredients like avocado and strawberries, to prevent sogginess. Properly stored, it will last for 1-2 days in the fridge.
    • Freezing: While it is not recommended to freeze salads, you can freeze leftover vegetables (not mixed with greens) separately if they were not already seasoned. You can defrost and use them in stir-fries or as additions to soups.
    • Reheating Options: For any warm components (like quinoa or chickpeas), you can reheat them on the stovetop or microwave before tossing them back into the salad. However, avoid reheating leafy greens as they become wilted.

    Following these storage tips ensures that you can savor your spring meals for days without losing quality or taste!

    Nutritional Value of Simple Dairy-Free Spring Salad

    The Simple Dairy-Free Spring Salad is not only visually appealing but also nutritionally robust. Here’s a breakdown of its nutritional value based on typical servings:

    • Calories: Approximately 150-200 (depending on portion sizes and specific ingredients)
    • Fat: 10-15g (mostly from healthy fats like avocado and olive oil)
    • Protein: 3-5g (depends on the inclusion of beans or nuts)
    • Carbohydrates: 15-20g (primarily from vegetables and fruit)
    • Fiber: 4-6g (due to the fiber-rich vegetables and fruits)
    • Vitamins and Minerals: High levels of vitamins A, C, K, and several B vitamins along with potassium, magnesium, and dietary fiber.

    This salad is low in calories yet high in nutrients, making it ideal for those watching their dietary intake. Each ingredient contributes essential vitamins and minerals that offer numerous health benefits. In addition, this salad fits perfectly into various healthy diets, thus catering to those aiming for nutritious spring meals!

    FAQs: Frequently Asked Questions About Simple Dairy-Free Spring Salad

    Here are some commonly asked questions regarding the Simple Dairy-Free Spring Salad:

    1. Can I make this salad in advance?
    Yes! You can prepare the salad a day in advance, but do not add the dressing until ready to serve to keep the greens crisp.

    2. What can I substitute for avocado?
    If you are allergic or prefer not to use avocado, substitute with nuts like walnuts or a dollop of hummus for creaminess.

    3. How can I make this salad more filling?
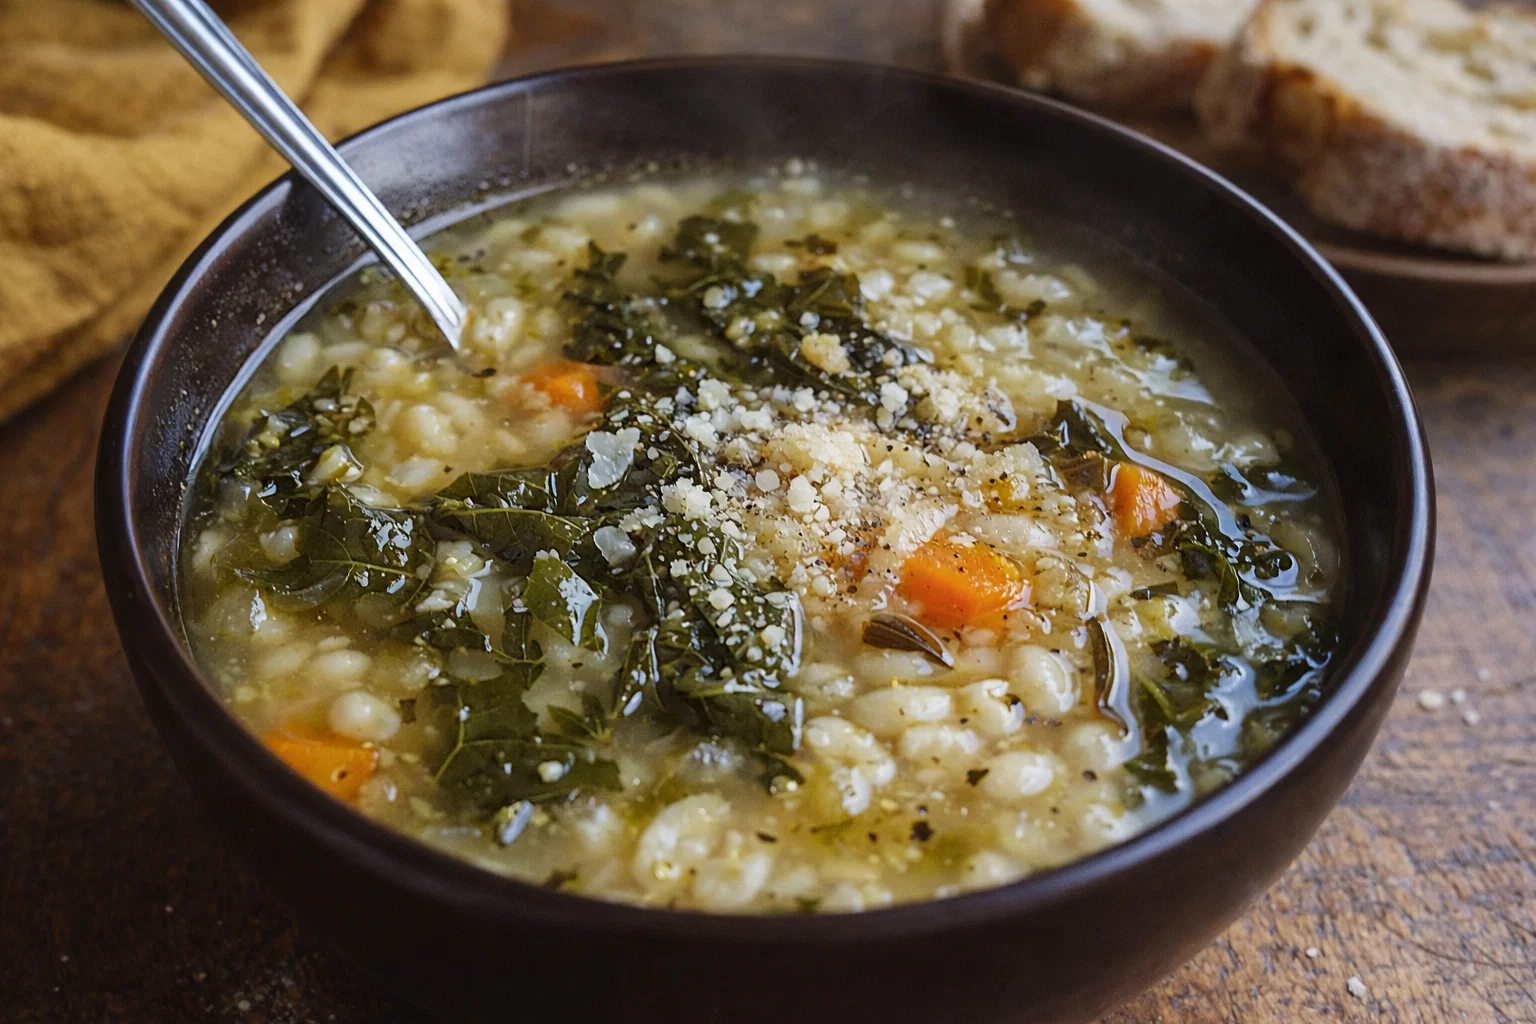
    To enhance the salad’s heartiness, consider adding grains like quinoa or brown rice, along with protein sources such as beans or tofu.

    4. How do I prevent the ingredients from getting soggy?
    Store components separately and mix only when ready to serve. This way, your salad remains fresh and the texture is maintained.

    5. Is this salad family-friendly?
    Absolutely! Its colorful presentation and variety of flavors make it appealing to both kids and adults. Adjusting spiciness and flavors can accommodate even the pickiest eaters.

    In crafting the Simple Dairy-Free Spring Salad, we invite home cooks, busy parents, and anyone looking for tantalizing yet straightforward spring meals to try this vibrant recipe. The beauty of this salad lies in its versatility and health benefits, making it a must-try dish this season! Enjoy your culinary adventure, and happy cooking!

  • Irresistible Honey Mustard Chicken Wrap

    Irresistible Honey Mustard Chicken Wrap

    Irresistible Honey Mustard Chicken Wrap: A Tropical Delight

    Introduction to Irresistible Honey Mustard Chicken Wrap

    Welcome to the world of delicious and easy chicken recipes! Today, we’re diving into the delightful realm of the Irresistible Honey Mustard Chicken Wrap. This recipe serves as an epitome of simplicity, flavor, and health consciousness, making it an ideal fit for everyone—from busy parents looking for quick weeknight meals to health-conscious individuals seeking nutritious options.

    Imagine tender chicken coated in a sweet and tangy honey mustard glaze, nestled within a fresh wrap loaded with crunchy vegetables. It’s an experience that tantalizes your taste buds while also providing a nutritious meal that is both satisfying and fulfilling. The best part? This recipe can easily adapt to meet various dietary needs, whether you’re vegan, gluten-free, or simply seeking a low-calorie option.

    Not only do honey mustard chicken wraps offer a burst of flavors, but they are also perfect for meal prep and can be designed to suit your personal preferences. With a few easy adjustments, you can create a dish that’s tailor-made for your unique dietary requirements. Get ready to explore this incredible recipe that promises to become your go-to meal for casual lunches, picnics, or even fancy dinner parties!

    Benefits and Advantages of Irresistible Honey Mustard Chicken Wrap

    The Irresistible Honey Mustard Chicken Wrap stands out as a shining example of what modern chicken recipes should be—a perfect blend of convenience, flavor, and health benefits.

    Simple and Quick Preparation

    Preparation is hassle-free, making it perfect for busy individuals who may not have hours to spend in the kitchen. With just a few essential ingredients, you can whip up this delectable meal in under 30 minutes. This is particularly advantageous for working professionals, students, or anyone who needs to prepare meals quickly without sacrificing quality or flavor.

    Health Benefits

    Beyond mere convenience, this chicken wrap offers significant health benefits. Chicken is a great source of lean protein, essential for muscle health and overall bodily function. Additionally, the inclusion of fresh vegetables—like lettuce, tomatoes, and bell peppers—boosts the nutritional value, providing vitamins and antioxidants that support a healthy immune system.

    Furthermore, honey and mustard aren’t just tasty; they come loaded with health benefits as well. Honey is a natural sweetener that has antioxidant properties, while mustard helps in digestion and may even boost metabolism. These ingredients elevate the dish beyond just a satisfying wrap to a wholesome meal.

    Versatility to Cater to All Diets

    One of the standout features of the Irresistible Honey Mustard Chicken Wrap is its versatility. This dish can easily adapt to various dietary preferences and restrictions—making it suitable for vegan, low-carb, and gluten-free diets. With simple substitutions, such as using plant-based proteins or gluten-free wraps, everyone can enjoy this delectable meal regardless of their dietary needs.

    Overall, the Irresistible Honey Mustard Chicken Wrap is more than just a delightful dish; it’s a nutritious powerhouse that satisfies a variety of tastes while being flexible enough to cater to everyone at the dining table.

    Ingredients Overview

    Essential Ingredients for Irresistible Honey Mustard Chicken Wrap

    To create the Irresistible Honey Mustard Chicken Wrap, you’ll need the following key ingredients:

    • Chicken Breast (2 boneless, skinless breasts): This is the primary protein source.

    • Honey (2 tablespoons): Adds sweetness and offers antioxidants.

    • Mustard (2 tablespoons): Provides flavor and may aid digestion.

    • Greek Yogurt (1/4 cup): A creamy base that can substitute mayonnaise for a healthier option.

    • Whole Wheat Tortilla or Gluten-Free Wrap (2 wraps): The essential vehicle for your ingredients.

    • Lettuce (1 cup, shredded): Adds crunch and nutrients.

    • Tomato (1 medium, sliced): For freshness and flavor.

    • Bell Peppers (1/2 cup, sliced, any color): Provides vitamins and a pop of color.

    • Salt and Pepper (to taste): Essential seasonings for flavor enhancement.

    • Olive Oil (1 tablespoon): Useful for cooking the chicken, adding healthy fats.

    Vegan, Gluten-Free, and Low-Calorie Options

    • Vegan Option: Substitute chicken with tempeh or a plant-based protein like chickpeas and replace Greek yogurt with coconut yogurt.

    • Gluten-Free Option: Use gluten-free wraps or lettuce leaves for a lighter, carb-conscious choice.

    • Low-Calorie Option: Use skinless chicken breast and limit honey to 1 tablespoon or omit altogether for a sugar-free version.

    Dietary Substitutions to Customize Your Irresistible Honey Mustard Chicken Wrap

    Customize your Irresistible Honey Mustard Chicken Wrap further with these dietary substitution options:

    • Protein Options:
    • Plant-Based Protein: Use chickpeas, tofu, or lentils for a satisfying vegan wrap.
    • Lean Turkey: Swap chicken with lean turkey breast for a different taste, while still maintaining a lean protein source.

    • Acidity and Flavor:

    • Vegan Honey Substitute: Use agave nectar or maple syrup if you want a vegan-friendly sweetener.
    • Additional Spices: Add flavors like smoked paprika or cayenne pepper for a spicy kick.

    • Vegetable Variety:

    • Use Avocado: Incorporate sliced avocado for creaminess and beneficial fats.
    • Mixed Greens Instead of Lettuce: Use a mix of arugula, spinach, and kale for added nutritional benefits.

    With these substitutes, you can enjoy a guilt-free meal that aligns with your dietary preferences and still satisfies your palate.

    How to Prepare the Perfect Irresistible Honey Mustard Chicken Wrap: Step-by-Step Guide

    Creating the Irresistible Honey Mustard Chicken Wrap is an exciting and relatively simple process. Just follow these easy steps to deliver a mouthwatering dish that everyone will love.

    Step 1: Prepare the Chicken

    1. Marinate the Chicken: Begin by combining honey, mustard, Greek yogurt, salt, and pepper in a bowl. Mix until well-blended.
    2. Coat the Chicken: Place the chicken breast in this mixture and coat both sides. Allow it to marinate for at least 15 minutes – longer if time permits, as this will enhance flavor.

    Step 2: Cook the Chicken

    1. Heat the Olive Oil: In a skillet over medium heat, pour in the olive oil.
    2. Cook the Chicken: Add the marinated chicken breasts to the skillet. Cook for about 6-7 minutes on each side or until the internal temperature reads 165°F (75°C).

    Step 3: Prepare the Wrap

    1. Cool and Slice: Once cooked, remove the chicken from the skillet and let it cool slightly before slicing it into strips.
    2. Warm the Wrap: If desired, warm the whole wheat or gluten-free wrap in the microwave for about 10 seconds to make it more pliable.

    Step 4: Assemble the Wrap

    1. Layer the Ingredients: On each wrap, place a generous handful of shredded lettuce, a few slices of tomato, and bell peppers.
    2. Add the Chicken: Lay the sliced chicken strips on top of the veggies.

    Step 5: Dress the Wrap

    1. Drizzle Extra Sauce: If you enjoy extra flavor, drizzle some additional honey mustard sauce (reserved from the marinade) over the chicken and veg mix.

    Step 6: Roll the Wrap

    1. Fold the Wrap: Begin by folding over one side of the wrap, then roll it tightly from one end to the other. Secure with a toothpick if needed.

    Step 7: Serve

    1. Cut and Serve: Slice the wrap in half and serve with extra veggies or a side salad.

    By following these simple steps, anyone can master the Irresistible Honey Mustard Chicken Wrap and impress family and friends with their cooking skills! Feel free to adjust the ingredients and layers based on personal preferences, making this a custom dish every time.

    Mastering Irresistible Honey Mustard Chicken Wrap: Advanced Tips and Variations

    To elevate your experience with the Irresistible Honey Mustard Chicken Wrap, here are some advanced tips and exciting variations to try:

    1. Experiment with Dipping Sauces

    • Spicy Mayo or Aioli: A drizzle of spicy mayo or garlic aioli can add richness and flavor.
    • Salsa or Hot Sauce: For a zesty kick, add fresh salsa or a splash of your favorite hot sauce.

    2. Add Extra Crunch

    • Nuts or Seeds: Toss in some sunflower seeds, almonds, or walnuts for an unexpected crunch that enhances both texture and nutrition.

    3. Grill for Flavor

    • Consider grilling the chicken for a smoky flavor instead of pan-frying. Marinate with smoked honey for an incredible twist.

    4. Try Different Wraps

    • Switch out the traditional wraps for alternatives like lettuce wraps for a fresh and low-carb version, or try pita bread for a fun twist.

    5. Infuse with Citrus

    • Adding a squeeze of lemon or lime juice can brighten the flavors, apart from balancing the sweetness of the honey.

    6. Wrap and Roll Variations

    • Consider making mini versions of the wrap for appetizers or snacks, using smaller tortillas or lettuce leaves.

    By employing these tips and variations, you enable your Irresistible Honey Mustard Chicken Wrap to reflect your tastes and encourage others to embrace creativity in their cooking endeavors.

    How to Store Irresistible Honey Mustard Chicken Wrap: Best Practices

    Storing your Irresistible Honey Mustard Chicken Wrap is easy and ensures you enjoy the flavors even after the initial meal.

    Refrigeration

    • Wrap leftovers tightly in parchment paper or foil, or place them in an airtight container to prevent them from drying out. Refrigerate for up to 3-4 days.

    Freezing

    • For longer storage, consider freezing the prepared wraps. Wrap them in plastic wrap and then place them in a freezer-safe bag. They can be frozen for up to 2 months.

    Reheating

    • For refrigeration, reheat the wrap in a microwave for about 30 seconds to 1 minute until warmed through. When reheating frozen wraps, allow them to thaw overnight in the refrigerator before microwaving.

    By following these best practices, your Irresistible Honey Mustard Chicken Wrap will maintain flavor and texture, making leftovers just as tempting as the freshly made version.

    Nutritional Value of Irresistible Honey Mustard Chicken Wrap

    Understanding the nutritional value of your meals enhances your cooking experience. For the Irresistible Honey Mustard Chicken Wrap, here’s a breakdown of the approximate nutritional content per wrap:

    • Calories: ~350 kcal
    • Protein: ~30 g
    • Total Fat: ~15 g
    • Saturated Fat: ~3 g
    • Cholesterol: ~70 mg
    • Carbohydrates: ~30 g
    • Fiber: ~4 g
    • Sugars: ~7 g

    These values may vary based on ingredient brands and specific quantities. Nevertheless, they indicate a well-balanced meal that provides energy, aids in muscle recovery, and contributes to a wholesome diet. The inclusion of fresh vegetables adds additional vitamins and minerals, enhancing overall nutritional benefits.

    FAQs: Frequently Asked Questions About Irresistible Honey Mustard Chicken Wrap

    1. Can I make this recipe ahead of time?

    Yes, this wrap can easily be made in advance. Simply prepare the chicken and the sauce the day before, and assemble them when ready to serve for maximum freshness.

    2. Is it suitable for children?

    Absolutely! The Irresistible Honey Mustard Chicken Wrap is a fun and colorful way to introduce healthy eating to children. The sweetness of the honey makes it more appealing.

    3. What can I substitute for honey in this recipe?

    For a sugar-free option, you can replace honey with stevia or monk fruit sweetener, depending on your dietary preferences.

    4. How can I make this wrap gluten-free?

    To make the wrap gluten-free, simply opt for gluten-free tortillas or lettuce leaves as a wrap substitute.

    5. Can I add more vegetables to the wrap?

    Definitely! Feel free to experiment with your favorite vegetables. Other great options include shredded carrots, cucumbers, or even roasted vegetables for added flavor.

    With these FAQs clarified, you are now ready to craft your own Irresistible Honey Mustard Chicken Wrap! Whether you are gathering for a family meal or preparing lunch for the week, this recipe presents itself as an excellent choice for various occasions. Enjoy cooking and savoring every delicious bite!

  • Crispy Spring Mix Salad

    Crispy Spring Mix Salad

    Crispy Spring Mix Salad: A Tropical Delight

    Introduction to Crispy Spring Mix Salad

    Are you ready to elevate your culinary skills while keeping your meals light, fresh, and utterly delightful? One such dish that brings a burst of vibrant flavors to your table is the Crispy Spring Mix Salad. This dish not only embodies the essence of spring meals with its refreshing ingredients but also offers a plethora of health benefits, making it perfect for a variety of dietary needs.

    Whether you’re a busy parent rushed for time, a health-conscious student, a food enthusiast eager for new recipes, or someone simply looking for satisfying vegan and gluten-free options, this salad hits the mark. It’s quick to prepare—taking less than 30 minutes from start to finish—so you can whip it up even on your busiest days. The crunchiness of fresh spring greens combined with sweet fruits and a zesty dressing makes this salad an absolute winner.

    Filled with essential vitamins and minerals, the Crispy Spring Mix Salad serves as an excellent choice for those looking to maintain a healthy lifestyle without compromising on flavor. It’s great for spring meals or any occasion that calls for vibrant, colorful dishes that please both the palate and the eyes. Not only is this dish a feast for the senses, but it also promotes wellness, making it an all-around healthy choice for you and your loved ones.

    So, gather your ingredients as we dive into the benefits and advantages of this delectable dish!

    Benefits and Advantages of Crispy Spring Mix Salad

    When it comes to finding a balanced dish that can easily fit into various dietary preferences, the Crispy Spring Mix Salad is an extraordinary choice for numerous reasons.

    Health Benefits

    First and foremost, this salad is packed with nutrients. The base of spring mix is typically composed of baby greens, including arugula, spinach, and leaf lettuce, all of which are low in calories yet high in vitamins A, C, and K. These nutrients support vital bodily functions, from boosting the immune system to enhancing skin health. The fresh vegetables and fruits provide a significant dose of antioxidants, which combat free radicals and promote overall well-being.

    Preparation Made Easy

    Moreover, one of the standout features of this salad is its simplicity. You don’t need to be a master chef to whip it up! With minimal preparation time, you can have this beautiful salad on your table in no time. Just chop, mix, and toss—all steps that even busy parents or students can manage with ease.

    Versatility for All Dietary Needs

    The Crispy Spring Mix Salad is also exceptionally versatile. Whether you’re vegan, gluten-free, or simply trying to lower your carb intake, this recipe naturally accommodates various dietary needs. Each ingredient can be swapped out with alternatives that suit your dietary restrictions or preferences, making it a perfect match for everyone around the table.

    Additionally, incorporating seasonal ingredients allows you to tailor the dish to what’s fresh and available, further enriching your spring meals and keeping the recipe exciting each time you prepare it.

    In summary, the Crispy Spring Mix Salad is a perfect embodiment of nutritious eating, effortless preparation, and adaptability for all kinds of dietary requirements. It’s a refreshing addition to your spring meals rotation that leaves diners satisfied yet energized.

    Ingredients Overview

    Essential Ingredients for Crispy Spring Mix Salad

    To create your Crispy Spring Mix Salad, you’ll need the following ingredients:

    • 4 cups spring mix salad greens (vegan, gluten-free): The base of the salad, providing essential vitamins and minerals.
    • 1 cup cherry tomatoes (halved): Adds sweetness and vibrant color, rich in antioxidants.
    • 1 cucumber (sliced): Provides a refreshing crunch, low in calories and high in hydration.
    • 1/2 cup red bell pepper (chopped): Brings flavor and vitamin C.
    • 1/2 cup carrots (shredded): Adds natural sweetness and a good source of fiber.
    • 1/4 cup red onion (thinly sliced): Provides a sharp flavor contrast, packed with antioxidants.
    • 1/2 cup sliced almonds (or sunflower seeds for nut-free): Adds crunch and healthy fats; opt for seeds for a nut-free version.
    • 1 avocado (sliced, optional): Adds creaminess and healthy fats; can be omitted for a lower-calorie version.
    • Fresh herbs (such as cilantro or parsley): Enhances flavor and offers additional nutrients.

    Dressing Ingredients:

    • 1/4 cup olive oil (or avocado oil for a different flavor): A healthy fat that helps absorb fat-soluble vitamins.
    • 2 tablespoons balsamic vinegar: Gives the salad a zesty kick while being low in calories.
    • 1 tablespoon Dijon mustard: Adds depth of flavor; use less for a milder taste.
    • 1 tablespoon honey or maple syrup (to taste; omit for vegan): Provides a natural sweetness.
    • Salt and pepper to taste: Essential for enhancing all flavors.

    Dietary Substitutions to Customize Your Crispy Spring Mix Salad

    Don’t hesitate to personalize the Crispy Spring Mix Salad based on what you have at home or your dietary requirements. Here are some substitution ideas:

    • Greens: While spring mix is a classic choice, consider using kale, arugula, or spinach for a different texture and nutritional profile.
    • Fruits: Swap cherry tomatoes for seasonal fruits like strawberries or mangoes to introduce appealing sweetness.
    • Crunch Factor: Instead of almonds, try walnuts, pecans, or pumpkin seeds for a nutty flavor or even crispy chickpeas for added protein.
    • Dressing options: If you’re avoiding oil, try using a squeeze of lemon or lime juice combined with vinegar for a lighter dressing.
    • Grains: For a more filling salad, add cooked quinoa, farro, or brown rice.

    With these substitutions, your Crispy Spring Mix Salad can be adjusted for any dietary preference or food craving, ensuring no one misses out on this delicious spring meal.

    How to Prepare the Perfect Crispy Spring Mix Salad: Step-by-Step Guide

    Creating the perfect Crispy Spring Mix Salad is not only about tossing ingredients together but also about layering flavors to make each bite harmonious. Here’s a detailed step-by-step guide to prepare this delightful salad:

    1. Prepare the Base: Start by thoroughly washing your spring mix greens under cold running water to remove any dirt or grit. Pat them dry using a salad spinner or clean kitchen towel.

    2. Chop Your Vegetables: Slice the cucumbers, halve the cherry tomatoes, chop the red bell pepper, and shred the carrots. The salad gets its vibrant colors from these fresh veggies.

    3. Slice the Red Onion: Using a sharp knife, thinly slice the red onion. If you’re sensitive to raw onion, soak the slices in cold water for 10 minutes to mellow their flavor.

    4. Toast the Nuts/Seeds (Optional): In a dry skillet over medium heat, toast sliced almonds or sunflower seeds until golden and fragrant—just 2–3 minutes. Keep an eye on them to prevent burning!

    5. Prepare the Dressing: In a small bowl or mason jar, combine olive oil, balsamic vinegar, Dijon mustard, and honey or maple syrup. Season with salt and pepper to taste. Whisk or shake until fully combined.

    6. Assemble the Salad: In a large mixing bowl, combine the cleaned spring mix with chopped vegetables, toasted nuts/seeds, and any additional toppings like avocado or fresh herbs.

    7. Dress the Salad: Drizzle the dressing over the salad just before serving, and toss gently to ensure all ingredients are evenly coated. This ensures the greens remain crispy and fresh.

    8. Serve Immediately: Transfer the salad to a serving platter or individual bowls. Enjoy immediately or store for later as needed.

    Tips for Future Preparations

    • Make Dressing in Advance: Preparing the dressing a day ahead allows the flavors to meld beautifully.
    • Meal Prep Friendly: You can prepare individual salad components and store them separately in airtight containers for quick meal assembly during the week.

    With these step-by-step instructions, you’ll have a delicious and visually appealing Crispy Spring Mix Salad ready to nourish you and your loved ones, making it a delightful choice for your upcoming spring meals.

    Mastering Crispy Spring Mix Salad: Advanced Tips and Variations

    While the Crispy Spring Mix Salad is inherently delightful, there are additional tips and variations to truly master this dish:

    Advanced Preparations

    • Grill Your Vegetables: Instead of raw veggies, try grilling the bell peppers and zucchini for a smoky flavor twist.
    • Add a Protein Boost: Consider adding grilled chicken, shrimp, or firm tofu for added protein. This makes the salad heartier and suitable as a main dish.
    • Whole Grains: Mix in some cooked quinoa or bulgur for a filling meal. Whole grains give a chewy texture and additional fiber.

    Creative Variations

    • Mediterranean Twist: Incorporate kalamata olives, feta cheese, and a lemon-oregano dressing for a Mediterranean experience.
    • Tropical Salad: Mix in fruits like mango, pineapple, or coconut for a tropical vibe. Toss in some toasted coconut for a chewy texture.
    • Asian Fusion: Add edamame, sesame seeds, and a ginger-soy dressing for an Asian-inspired version.

    By playing with flavors, textures, and ingredients, the Crispy Spring Mix Salad can continuously evolve, offering new and exciting tastes, making it a staple for your spring meals or year-round dining!

    How to Store Crispy Spring Mix Salad: Best Practices

    To maintain the crispiness and freshness of your Crispy Spring Mix Salad, proper storage is essential:

    Refrigeration

    • Use Airtight Containers: Leftover salad can be stored in the fridge in an airtight container. However, it’s best to keep the dressing separate until you’re ready to serve to prevent sogginess.

    • Shelf Life: The prepared salad should ideally be consumed within 2 days for optimal taste and freshness.

    Freezing

    Freezing salads is usually not recommended as leafy greens lose their crisp texture once thawed. However, if you choose to freeze components like grilled proteins or grains, make sure to do so separately.

    Reheating

    Since the Crispy Spring Mix Salad is best enjoyed cold, reheating is generally not an option. Instead, consider transforming leftover ingredients into a wrap, sandwich, or another cooked meal.

    With these storage tips, you can enjoy the delightful flavors and health benefits of your salad over several days, ensuring that your spring meals remain fresh and delicious.

    Nutritional Value of Crispy Spring Mix Salad

    Understanding the nutritional profile of your food is essential, particularly when making health-conscious choices. Below is an estimated nutritional breakdown for the Crispy Spring Mix Salad based on typical servings. (Note: This may vary based on specific ingredient choices.)

    Nutritional Information (per serving, assuming 4 servings total):

    • Calories: Approximately 150-250 (varies depending on additions)
    • Protein: 5-10 grams
    • Fat: 10-15 grams (considering healthy fats from dressing and avocado)
    • Carbohydrates: 20-25 grams
    • Fiber: 5-8 grams
    • Sugars: 4-6 grams
    • Vitamin A: 80-100% of daily value (from greens and fresh veggies)
    • Vitamin C: 20-30% of daily value (from tomatoes and peppers)
    • Calcium: 5-10% of daily value
    • Iron: 5-10% of daily value

    The Crispy Spring Mix Salad not only fills your plate with colorful ingredients but also delivers essential nutrients that promote various aspects of health, making it a fantastic addition to any spring meals you have planned.

    FAQs: Frequently Asked Questions About Crispy Spring Mix Salad

    1. Can I make the Crispy Spring Mix Salad ahead of time?

    Yes! You can prepare the vegetables and dressing separately a day in advance. Combine them just before serving to keep the salad fresh and crispy.

    2. What can I add for extra protein?

    You can grill chicken, toss in chickpeas, shrimp, or even mix in some Greek yogurt for added flavor and nutritional value.

    3. Is this salad suitable for a vegan diet?

    Absolutely! By omitting the honey or opting for maple syrup in the dressing, and avoiding any dairy, this salad fits perfectly within a vegan diet.

    4. Can I substitute any ingredients?

    Certainly! Feel free to customize based on your preferences or ingredient availability. Use different greens, add seasonal vegetables, or swap the nuts for seeds.

    5. How necessary is it to wash the spring mix before using?

    While some pre-packaged spring mixes claim to be washed, it’s always recommended to give them a thorough rinse to remove any residual dirt or contaminants.

    6. What dressing can I use instead of balsamic vinegar?

    If balsamic vinegar isn’t your preference, consider using apple cider vinegar, red wine vinegar, or a light citrus vinaigrette for a fresh twist.

    7. How long can I keep leftovers?

    Ideally, leftovers should be consumed within 2 days for the best flavor and texture. Store any components separately when possible.

    With these FAQs, you’re now equipped with all the essential knowledge to create and enjoy your Crispy Spring Mix Salad to its fullest! Reap the benefits of this delightful dish as part of your rotating spring meals, and share it with families and friends to brighten up any dining experience.

  • Wholesome Herb Lemon Chicken Soup

    Wholesome Herb Lemon Chicken Soup

    Wholesome Herb Lemon Chicken Soup: A Tropical Delight

    Introduction to Wholesome Herb Lemon Chicken Soup

    Welcome to your new favorite recipe! Wholesome Herb Lemon Chicken Soup is a delightful blend of fresh flavors and nourishing ingredients. If you’re searching for the ideal comfort food, look no further. This vibrant soup recipe isn’t only delicious; it also brings an array of health benefits every time you cook it.

    Whether you’re a busy parent seeking an easy weeknight dinner, a student juggling classes and meals, or a diet-conscious individual craving something wholesome, this recipe is perfect for you. Packed with lean protein, fresh vegetables, and zesty lemon essence, it meets various dietary needs. It’s gluten-free, can be easily adapted to be vegan, and is naturally low in calories. The simplicity of preparation makes it accessible for all home cooks, including those new to the kitchen.

    Moreover, its rich aroma fills your home, inviting your family members to gather around the table. So, grab your ingredients and get ready to refresh your cooking routine with this vibrant, wholesome dish that embodies the essence of comfort in every bite.

    Benefits and Advantages of Wholesome Herb Lemon Chicken Soup

    There are countless reasons to add Wholesome Herb Lemon Chicken Soup to your culinary repertoire. Most importantly, this soup recipe showcases the beauty of simplicity and wholesome ingredients. The process is straightforward, allowing even novice cooks to create a masterpiece without feeling overwhelmed.

    Ease of Preparation

    This delightful soup requires minimal time and effort, making it an excellent choice for busy families or working professionals. The most time-consuming part is chopping the vegetables—you can even prep them in advance for meals throughout the week. Having a big batch ready allows you to serve it warm any time your hunger strikes.

    Health Benefits

    A standout feature of this soup recipe is its numerous health benefits. It’s a nutritious source of protein thanks to the chicken, which helps to build and repair tissues. The fresh vegetables provide essential vitamins like Vitamin A, C, and K, while the herbs offer antioxidant properties. Additionally, the broth can help soothe sore throats and provide warmth during chilly days, making it an ideal comfort food.

    Dietary Flexibility

    This chicken soup is adaptable, catering to different dietary preferences and restrictions. For example, if you prefer plant-based meals, substitute chicken with chickpeas or tofu. Likewise, the recipe can easily transform into a low-carb option by reducing the amount of starchy vegetables.

    Unique Flavors

    The uniqueness of this soup lies in its vibrant lemon flavor, complemented by the richness of chicken and aromatic herbs. This soup recipe transcends traditional comfort food, introducing a refreshing addition that stimulates the taste buds. Creating a jar of homemade soup brings the essence of the tropics to your kitchen.

    In summary, Wholesome Herb Lemon Chicken Soup stands out for its ease of preparation, health benefits, and incredible adaptability, making it the perfect addition to your collection of soup recipes.

    Ingredients Overview

    Essential Ingredients for Wholesome Herb Lemon Chicken Soup

    Here is a thorough list of ingredients you will need to create this delicious and inspiring recipe:

    • 1 lb boneless, skinless chicken breasts (substitute with firm tofu for a vegan option)
    • 4 cups low-sodium chicken or vegetable broth (choose gluten-free broth if needed)
    • 2 cups fresh leafy greens (such as spinach, kale, or Swiss chard)
    • 1 large onion, chopped
    • 2 cloves garlic, minced
    • 2 carrots, sliced
    • 2 celery stalks, sliced
    • 1 medium potato, diced (optional for a heartier soup)
    • 1 teaspoon dried thyme
    • 1 teaspoon dried oregano
    • 1/2 teaspoon black pepper
    • Zest and juice of 1 large lemon
    • 2 tablespoons olive oil
    • Salt to taste

    These ingredients combine to create a nourishing dish that keeps you satisfied. Feel free to adapt the vegetable choices based on what you have available.

    Dietary Substitutions to Customize Your Wholesome Herb Lemon Chicken Soup

    1. Vegan Option: To make a vegan version, replace chicken with firm tofu or chickpeas. The texture of chickpeas closely resembles that of chicken, while tofu takes on the soup’s flavors beautifully.

    2. Gluten-Free Option: Ensure your broth is certified gluten-free. Most commercial broths are naturally gluten-free, but always check the label to be certain.

    3. Low-Calorie Variation: Skip the potatoes or use cauliflower instead for fewer carbs while retaining a hearty texture.

    4. Herb Variations: Experiment with different herbs like rosemary or cilantro to customize the flavor profile to your liking.

    By making these substitutions, you can cater the Wholesome Herb Lemon Chicken Soup to fit any dietary needs you or your guests may have.

    How to Prepare the Perfect Wholesome Herb Lemon Chicken Soup: Step-by-Step Guide

    Creating Wholesome Herb Lemon Chicken Soup is an enjoyable cooking experience suited for all skill levels. Below is a step-by-step guide ensuring that anyone can master this flavorful dish.

    1. Prepare the Base: In a large pot, heat 2 tablespoons of olive oil over medium heat. Add the chopped onion and sauté for about 5 minutes until translucent. Stir in the minced garlic and cook for an additional minute until fragrant.

    2. Add Vegetables: Incorporate the sliced carrots and celery into the pot. Sauté with the onions for another 4-5 minutes, allowing the vegetables to soften slightly.

    3. Cook the Chicken: Add the boneless, skinless chicken breasts to the pot. Pour in the 4 cups of low-sodium chicken or vegetable broth. If you’re using plant-based protein, add it in later, as it requires a shorter cooking time.

    4. Season the Broth: Sprinkle in the dried thyme, dried oregano, and black pepper. Stir well to incorporate the seasonings evenly.

    5. Bring to a Simmer: Increase the heat until the mixture reaches a gentle boil. Reduce the heat and let it simmer uncovered for 20-25 minutes or until the chicken is fully cooked.

    6. Shred the Chicken: Remove the chicken from the pot and let it cool slightly. Shred the chicken with two forks, then return it to the pot. If using tofu, add it at the same time to allow it to absorb the broth’s flavors.

    7. Add Leafy Greens: Toss in your chosen fresh greens—spinach, kale, or Swiss chard—into the soup. Allow them to wilt for about 3 minutes.

    8. Add Lemon Zest and Juice: Finally, stir in the zest and juice of one large lemon, allowing the fresh citrus to brighten the entire dish.

    9. Adjust Seasoning: Taste the soup and adjust seasoning as necessary by adding salt or additional lemon juice.

    10. Serve Warm: Ladle the soup into bowls and enjoy your heartwarming Wholesome Herb Lemon Chicken Soup! It’s perfect served with slices of crusty bread or a fresh salad on the side.

    By following these simple steps, home cooks can successfully whip up this delightful soup that fits any occasion, whether it’s a cozy dinner or a quick lunch.

    Mastering Wholesome Herb Lemon Chicken Soup: Advanced Tips and Variations

    Creating Wholesome Herb Lemon Chicken Soup doesn’t only have to stop at the basic recipe; there are numerous ways to master and enhance your cooking after making it a few times. Here are some valuable tips and variations to elevate your soup to new heights:

    Advanced Tips:

    • Fresh vs. Dried Herbs: While dried herbs provide wonderful flavor, using fresh herbs can enhance the taste significantly. Add fresh herbs like parsley or cilantro at the end to keep that vibrant color and taste.

    • Homemade Broth: If time permits, consider making your own chicken or vegetable broth from scratch. It will add depth of flavor to your soup that store-bought options often lack.

    • Flavor Complexity: For a deeper flavor, toss in a splash of soy sauce or tamari (for gluten-free) towards the end of cooking. This addition creates a delicious umami profile.

    Variations to Try:

    • Asian-inspired Twist: Add a tablespoon of ginger and replace lemon with lime for a Southeast Asian flavor. Incorporating a couple of green onions as garnishes can add a refreshing touch.

    • Creamy Version: For a rich and creamy variation, blend in a cup of coconut milk along with the broth. This twist makes the soup velvety and adds a tropical vibe.

    • Spicy Kick: Add a teaspoon of red pepper flakes or Sriracha sauce for those who prefer a little heat in their soup.

    • Rice or Quinoa Addition: For extra substance, add cooked rice or quinoa to your finished soup. Both not only bulk up your serving but also add beneficial fibers to each bowl.

    These advanced tips and variations make preparing Wholesome Herb Lemon Chicken Soup a delightful culinary adventure. Consider trying them out for an even richer experience!

    How to Store Wholesome Herb Lemon Chicken Soup: Best Practices

    Once you have created a pot of Wholesome Herb Lemon Chicken Soup, knowing how to store it properly is crucial for maintaining its flavor and freshness. Here are some best practices for refrigeration, freezing, and reheating:

    Refrigeration

    • Cool Down: Allow the soup to cool to room temperature before transferring it to an airtight container. This minimizes condensation, which can make the soup watery.

    • Storage Duration: Store the soup in the refrigerator for up to 3-4 days. The flavors will deepen over time, making it an even better option for lunch the next day!

    Freezing

    • Freeze Properly: For longer storage, consider freezing the soup. Use freezer-safe containers or zip-top bags to store portions. Leave space for expansion, especially if using containers.

    • Storage Duration: The soup can be stored in the freezer for up to 3 months. When ready to eat, simply thaw in the refrigerator overnight.

    Reheating

    • Thawing: For frozen soup, ensure it is completely thawed before reheating. You can microwave it, but stovetop reheating is preferred to maintain the texture of the ingredients.

    • Reheating Instructions: Place the soup in a pot over medium heat, stirring occasionally until warmed through. You may need to add a little more broth or water if it has thickened while stored.

    By following these best practices, you can prolong the life of your delicious Wholesome Herb Lemon Chicken Soup and enjoy its comforting essence even on busier days!

    Nutritional Value of Wholesome Herb Lemon Chicken Soup

    When crafting a wholesome dish like this soup, understanding its nutritional profile is essential, especially for the diet-conscious individual. Below is a breakdown of the nutritional value per serving (approximately 1 cup):

    • Calories: 250
    • Protein: 25g
    • Carbohydrates: 15g
      Fiber: 3g
    • Fat: 8g
      Saturated Fat: 1.5g
    • Cholesterol: 70mg
    • Sodium: 480mg
    • Vitamin A: 80%
    • Vitamin C: 90%
    • Calcium: 8%
    • Iron: 10%

    This nutritional breakdown shows that Wholesome Herb Lemon Chicken Soup is rich in protein, offering a satisfying meal while remaining low in calories. The abundance of fresh vegetables contributes vital vitamins and minerals, making it a well-rounded choice for any meal.

    Incorporating this soup recipe into your weekly meal plan ensures that you receive the necessary nutrients while indulging in a comforting dish.

    FAQs: Frequently Asked Questions About Wholesome Herb Lemon Chicken Soup

    1. Can I make Wholesome Herb Lemon Chicken Soup in advance?

    Yes, you can prepare this soup a day or two in advance! The flavors meld together nicely over time, creating an even more delicious dish. Always store it in the refrigerator in an airtight container.

    2. Is it possible to make this soup in a slow cooker?

    Absolutely! For a slow cooker version, place all ingredients into the cooker, cover, and cook on low for 6-8 hours or high for 3-4 hours until the chicken is tender, then shred and return.

    3. What type of broth is best for this soup?

    Low-sodium chicken or vegetable broth is recommended for a healthier option. If sodium is a concern, consider making homemade broth to ensure no added salt.

    4. Can I add other vegetables to the soup?

    Certainly! Feel free to experiment with different vegetables such as bell peppers, zucchini, or green beans based on personal preference or seasonal availability.

    5. How can I make this soup vegetarian?

    To make this a vegetarian soup without compromising on flavor, substitute chicken with chickpeas or lentils. Use vegetable broth and add spices to ensure a delicious taste.

    6. How can I store leftovers?

    Store any leftover soup in airtight containers in the refrigerator for up to 4 days or freeze for up to 3 months.

    Embracing the vibrant flavors of Wholesome Herb Lemon Chicken Soup is a fantastic way to delight your senses while prioritizing health. This soup recipe, with its numerous variations, is easily adaptable to fit every dietary need, making it a must-have for every home cook! So gather your ingredients and start cooking—your body will thank you!

  • My Garden MamaS Secret Recipe For Best Spring Salad

    My Garden MamaS Secret Recipe For Best Spring Salad

    My Garden Mama’S Secret Recipe For Best Spring Salad!: A Tropical Delight

    Introduction to My Garden Mama’S Secret Recipe For Best Spring Salad!

    Spring is the season of renewal, and nothing embodies this rejuvenation quite like a fresh, vibrant salad. My Garden Mama’s Secret Recipe for Best Spring Salad is a delightful blend of colors, flavors, and textures that not only tantalizes your taste buds but also nourishes your body. This recipe stands out as an ideal choice for those looking for quick and healthy spring meals that fit various dietary needs, including vegan and gluten-free options.

    Imagine crisp greens lovingly mingled with juicy fruits, crunchy vegetables, and a drizzle of zesty dressing. This salad is not just a meal; it’s a celebration of spring, bursting with essential nutrients that support your overall health. With simple ingredients and easy preparation, it’s perfect for busy parents, students, and professionals alike. Whether you’re hosting a garden party or simply enjoying a light lunch at home, this spring salad inspires every cook—from newlyweds exploring new recipes, to seniors looking for healthy options to maintain their vigor.

    This recipe brings joy and health to your table, making it truly the best spring salad. So let’s dive into the magic of this colorful dish!

    Benefits and Advantages of My Garden Mama’S Secret Recipe For Best Spring Salad!

    The allure of My Garden Mama’s Secret Recipe for Best Spring Salad goes beyond its vibrant appearance and fresh taste. Here are some compelling reasons why you should try this dish:

    1. Simplicity: Life can be hectic, but preparing a delicious salad shouldn’t add to your stress. This recipe is straightforward, allowing you to whip up a meal in just 15-20 minutes.

    2. Nutritional Powerhouse: Packed with vitamins, minerals, and fiber, this salad is a blessing for your health. The variety of ingredients ensures that you’re receiving a range of nutrients, making it one of the best spring meals for boosting immunity and energy.

    3. Versatility: Whether you’re vegan, gluten-free, or have specific dietary preferences, this salad adapts easily. You can customize it by adding or omitting ingredients, creating a version that fits your lifestyle perfectly.

    4. Seasonal Appeal: Spring is synonymous with fresh produce. The ingredients in this salad are not only seasonal but also support sustainable eating habits, encouraging you to shop locally.

    5. Great for Meal Prep: Busy lives often demand easy meal solutions. This salad can be made ahead and stored in the refrigerator, making it perfect for quick lunches or side dishes throughout the week.

    6. Dietary Friendly: With its naturally gluten-free and vegan options, this salad accommodates everyone at your table. It’s a great way to introduce healthy eating habits to children, making it suitable for families.

    7. Delicious & Refreshing: Finally, and perhaps most importantly, this salad tastes amazing! It’s refreshing and satisfying, making it a wonderful addition to any meal, especially on warm spring days.

    With these astonishing benefits, My Garden Mama’s Secret Recipe for Best Spring Salad is not just another dish—it’s a must-have in your kitchen repertoire!

    Ingredients Overview

    Essential Ingredients for My Garden Mama’S Secret Recipe For Best Spring Salad!

    To create this delightful spring salad, you’ll need the following ingredients:

    1. Mixed Greens (4 cups) – A mixture of spinach, arugula, and romaine provides both nutrition and flavor.
    2. Cherry Tomatoes (1 cup, halved) – These sweet gems are rich in vitamins and add a pop of color.
    3. Cucumber (1 medium, diced) – Crisp and refreshing, cucumbers are hydrating and low in calories.
    4. Red Bell Pepper (1, diced) – Sweet and crunchy, bell peppers enhance the recipe with a burst of vitamins A and C.
    5. Avocado (1, sliced) – Packed with healthy fats, avocado gives the salad a creamy texture.
    6. Pineapple (1 cup, diced) – This tropical fruit adds natural sweetness and is rich in bromelain, promoting digestion.
    7. Red Onion (¼ cup, thinly sliced) – It contributes a sharp crunch and is high in antioxidants.
    8. Toasted Almonds or Walnuts (½ cup) – These nuts add a satisfying crunch and healthy proteins.
    9. Fresh Cilantro (¼ cup, chopped) – Fresh herbs elevate the flavor and offer additional health benefits.
    10. Olive Oil (3 tablespoons) – A heart-healthy fat, olive oil acts as the base for the dressing.
    11. Lemon Juice (2 tablespoons) – Fresh lemon juice adds acidity and balances the flavors beautifully.
    12. Salt and Pepper – To taste.

    This salad is naturally low-calorie and gluten-free. Additionally, it’s accommodating for various dietary needs, making it an excellent choice for spring meals.

    Dietary Substitutions to Customize Your My Garden Mama’S Secret Recipe For Best Spring Salad!

    The beauty of this salad lies in its adaptability to cater to different tastes and dietary needs. Here are some substitution ideas to customize the recipe:

    • Mixed Greens: If you prefer a different base, try kale or baby greens for added nutrients. For a rustic look, you can use arugula or even a grain base like quinoa.
    • Fruits: Instead of pineapple, you can use mangos or strawberries for a change of pace. These alternatives still offer a sweet accent to the salad while providing additional vitamins.
    • Nuts: If you have nut allergies, sunflower seeds or pumpkin seeds are excellent substitutes for crunch and healthy fats.
    • Herbs: Swap cilantro with basil or mint if you prefer different herb flavors, as they also enhance freshness.
    • Oils: If you want a different oil, avocado oil or your preferred nut oil can work similarly while adding unique flavors.
    • Vegan Option: For a protein boost, consider adding chickpeas or black beans instead of nuts.
    • Dairy Option: For those who want creaminess without avocado, feta cheese can be a delightful addition.

    These substitutions ensure that even with the season’s dynamic offerings, you can enjoy My Garden Mama’s Secret Recipe for Best Spring Salad and keep it aligned with your dietary preferences!

    How to Prepare the Perfect My Garden Mama’S Secret Recipe For Best Spring Salad!: Step-by-Step Guide

    Creating a vibrant and healthy spring salad is easy and fun with this detailed step-by-step guide. Follow these simple instructions to prepare My Garden Mama’s Secret Recipe for Best Spring Salad:

    1. Prepare the Base:

    • Begin by washing your mixed greens thoroughly under cold water. Gently pat them dry with a clean towel or use a salad spinner to remove excess water. Place the greens in a large mixing bowl; this will be the foundation of your spring meal.

    2. Chop and Slice Your Vegetables:

    • Dice the cucumber, red bell pepper, and slice the red onion thinly.
    • Remember to halve the cherry tomatoes.
    • Add them all to the bowl with the greens, creating a colorful assembly!

    3. Add the Fruits:

    • Carefully peel and dice the avocado. Add it whole or in slices for a creamier texture.
    • Toss in the diced pineapple as well; its sweetness will balance the savory flavors of your vegetables.

    4. Incorporate the Nuts:

    • If you’re using almonds or walnuts, slightly toast them in a dry pan for 3-5 minutes to enhance their flavor. Let them cool before adding them to your salad for a satisfying crunch.

    5. Mix in the Fresh Herbs:

    • Chop the cilantro and sprinkle it over the salad. This fresh touch will brighten the flavors, adding a culinary lift.

    6. Prepare the Dressing:

    • In a small bowl, whisk together olive oil, lemon juice, salt, and pepper until fully combined. Adjust seasoning to taste for the perfect salad dressing.

    7. Toss Everything Together:

    • Gently pour the dressing over your salad ingredients. Using two large spoons, turn the salad gently to combine all the ingredients without breaking the delicate components.

    8. Taste and Adjust:

    • Before serving, give your salad a small taste test. Adjust any flavors—add more salt, pepper, or lemon juice as needed to enhance the overall taste.

    9. Serve:

    • Serve immediately in individual bowls or on a large platter. Consider garnishing with extra nuts or herbs for presentation.

    10. Enjoy Your Spring Meal:

    • Dig in and enjoy the vibrant flavors and textures of My Garden Mama’s Secret Recipe for Best Spring Salad!

    This refreshing dish can be enjoyed on its own or as a delightful side to various main courses. Remember, this recipe is versatile, so feel free to modify it according to your preferences and dietary requirements.

    Mastering My Garden Mama’S Secret Recipe For Best Spring Salad!: Advanced Tips and Variations

    While My Garden Mama’s Secret Recipe for Best Spring Salad is delicious on its own, you can always elevate it further. Here are some advanced tips and creative variations to enrich your salad-making experience:

    1. Add Protein: Consider adding grilled chicken, tofu, or shrimp for a filling option. This swap turns your salad into a complete meal, perfect for lunch or dinner.

    2. Use Seasonal Ingredients: Based on availability, swap in seasonal vegetables or fruits like asparagus in spring or pomegranate seeds in fall. This not only enhances flavor but supports sustainability.

    3. Spicy Kick: For those who enjoy a bit of heat, finely diced jalapeños or a dash of hot sauce can add an exciting kick to your spring salad.

    4. Cheese Options: Crumbled feta, goat cheese, or even a sprinkle of Parmesan can elevate the dish further. The creamy texture pairs beautifully with the fresh ingredients.

    5. Different Dressings: Experiment with a homemade balsamic vinaigrette or tahini dressing for variety. Each dressing will bring different flavors and complement the vegetables uniquely.

    6. Grains: Incorporate quick-cooking grains like farro, quinoa, or bulgur to make the salad heartier. These not only add texture but provide added nutrients.

    7. Make It a Wrap: For a portable option, fill a whole-grain wrap with your salad ingredients. This creates a healthy lunch that’s easy to take on-the-go.

    8. Create a Salad Bar: If hosting friends, set up a salad bar with various ingredients. This allows each guest to customize their bowl, catering to everyone’s preferences.

    9. Leftover Magic: If you have leftover salad, mix it into scrambled eggs for breakfast or incorporate it into a grain bowl, reducing waste while creating new flavors.

    These mastering tips and variations will help you explore the full potential of My Garden Mama’s Secret Recipe for Best Spring Salad, ensuring that each time you make it, the dish feels fresh and exciting!

    How to Store My Garden Mama’S Secret Recipe For Best Spring Salad!: Best Practices

    Storing My Garden Mama’s Secret Recipe for Best Spring Salad properly will help maintain its freshness and flavor. Here are best practices for refrigerating, freezing, and reheating:

    Refrigeration:

    • Short-term Storage: If you have leftover salad, place it in an airtight container and store it in the refrigerator. Consuming your salad within 1-2 days ensures the freshest taste.
    • Separating Components: If possible, keep the dressing separate until you’re ready to enjoy the leftovers. Mixed greens tend to wilt from the dressing over time, affecting overall texture.

    Freezing:

    • Not Recommended: While many salads don’t freeze well, the mixed greens and fresh ingredients used in this recipe can lose texture and taste once frozen. It’s best to enjoy this salad fresh whenever possible.

    Reheating:

    • Enjoy Cold: The appeal of spring salads typically lies in their fresh, crisp nature; hence, there’s no need to reheat. You can serve it cold or at room temperature for the best experience.

    By following these storage practices, you can enjoy My Garden Mama’s Secret Recipe for Best Spring Salad for days without sacrificing quality, making it one of your go-to spring meals!

    Nutritional Value of My Garden Mama’S Secret Recipe For Best Spring Salad!

    Understanding the nutritional content of your food can help you make informed dietary choices. Below is a breakdown of the nutrition provided by My Garden Mama’s Secret Recipe for Best Spring Salad, serving approximately 4:

    • Calories: 280 kcal
    • Protein: 7g
    • Fats: 20g
      • Saturated Fat: 2.5g
    • Carbohydrates: 23g
      • Dietary Fiber: 8g
      • Sugars: 5g
    • Vitamins and Minerals:
      • Vitamin A: 60% of DV
      • Vitamin C: 80% of DV
      • Calcium: 6% of DV
      • Iron: 10% of DV
      • Potassium: 12% of DV

    This salad is low in calories yet high in fiber, making it an ideal component for those watching their weight or those looking to increase their vegetable intake. With essential vitamins and minerals present, this salad supports immunity, skin health, and energy levels. As a delightful option for any spring meal, it’s sure to impress both health enthusiasts and casual eaters alike!

    FAQs: Frequently Asked Questions About My Garden Mama’S Secret Recipe For Best Spring Salad!

    1. Can I make this salad ahead of time?

    Absolutely! You can prepare the salad ingredients ahead of time, keeping the dressing separate until you’re ready to serve. This will help maintain freshness and prevent sogginess.

    2. Is this salad suitable for a vegan diet?

    Yes! This salad is entirely plant-based, making it a perfect choice for vegan diets. You can easily add chickpeas or sunflower seeds for extra protein!

    3. How can I make this salad gluten-free?

    The ingredients listed are naturally gluten-free; just ensure any added items, like dressings or nuts, are certified gluten-free to avoid cross-contamination.

    4. What can I substitute for avocado if I’m allergic?

    You can omit the avocado entirely and add extra nuts or seeds for creaminess; alternatively, consider using a soft tofu for a similar texture.

    5. How can I modify this recipe if I want a warm salad?

    To modify this salad into a warm dish, grill the vegetables or add roasted items to the story. Tossing the components lightly in a warm dressing can also enhance the flavor.

    6. Can this salad be eaten as a main dish?

    Definitely! By adding protein sources like beans, tofu, or grilled chicken, the salad can easily transform into a satisfying main course.

    7. What are some other dressings that would complement this salad?

    In addition to the basic dressing provided, you can try balsamic vinaigrette, a honey mustard dressing, or even a tahini-based dressing for a different flavor profile.

    8. How should I store the leftover salad?

    Store leftover salad in an airtight container in the fridge for 1-2 days, separating the dressing if possible to preserve freshness.

    With these FAQs, you should now feel well-equipped to explore and enjoy My Garden Mama’s Secret Recipe for Best Spring Salad!


    In conclusion, My Garden Mama’s Secret Recipe for Best Spring Salad is more than just a dish; it is a celebration of the vibrant flavors and health benefits of spring. As we step into the season of renewal, this salad is the perfect accompaniment to your meals, ensuring you eat fresh, feel revitalized, and relish the simplicity of homemade spring meals. Enjoy the freshness, share with loved ones, and spread the joy of healthy eating!

  • Quick Asparagus Pesto Pasta Salad

    Quick Asparagus Pesto Pasta Salad

    Quick Asparagus Pesto Pasta Salad: A Tropical Delight

    Introduction to Quick Asparagus Pesto Pasta Salad

    Are you searching for a quick and healthy dish that can energize your meal regimen? Look no further than our Quick Asparagus Pesto Pasta Salad! This delightful pasta salad is not only a burst of flavor and color, but it is also a wholesome option that fits various dietary needs. Whether you are a busy professional, a caring parent, a student on the go, or simply a lover of good food, this recipe is designed with you in mind.

    Preparing a delicious pasta salad has never been easier. With minimal effort and ingredients, you can whip up a vibrant dish that is perfect for potlucks, picnics, and weeknight dinners. Best of all, this recipe is remarkably versatile — it is vegan, gluten-free, and low in calories, making it suitable for anyone looking to maintain a healthy lifestyle without compromising on flavor.

    So grab your apron and prepare to impress your family and friends. Our Quick Asparagus Pesto Pasta Salad brings together fresh vegetables, aromatic herbs, and satisfying pasta to create a dish that is both nourishing and delightful. Let’s dive into the numerous benefits that this dish has to offer!

    Benefits and Advantages of Quick Asparagus Pesto Pasta Salad

    When it comes to preparing meals, time and health are often a priority. This Quick Asparagus Pesto Pasta Salad excels in both categories. One of the standout features of this delicious dish is its simplicity. With just a handful of ingredients, you can create a satisfying meal that is quick to prepare. This quality makes it perfect for busy parents and working professionals who may not have hours to spend in the kitchen.

    Moreover, the health benefits of this pasta salad are notable. Asparagus is packed with vitamins A, C, and K, as well as fiber and folate, contributing to overall well-being. Coupled with homemade pesto, which is rich in healthy fats from olive oil and nuts, this dish steers you away from processed sauces that are often loaded with preservatives. Transitioning to this homemade option makes it not just tasty but also a guilt-free indulgence.

    In addition to being healthy, this pasta salad is vegan and gluten-free, allowing those with dietary restrictions to enjoy it without worries. You can easily accommodate various preferences by substituting ingredients like pasta for gluten-free options or the nuts in the pesto for seed alternatives.

    To sum it up, our Quick Asparagus Pesto Pasta Salad offers simplicity in preparation, exceptional health benefits, and flexibility for various diets. It’s a well-rounded dish that caters to everyone, making it an ideal addition to your culinary arsenal.

    Ingredients Overview

    Essential Ingredients for Quick Asparagus Pesto Pasta Salad

    To create your Quick Asparagus Pesto Pasta Salad, you’ll need the following ingredients:

    • 8 ounces of pasta (use whole wheat or gluten-free pasta for a healthier option)
    • 1 bunch of fresh asparagus (about 1 pound, preferably thin asparagus)
    • 1 cup of fresh basil leaves
    • 1/4 cup of pine nuts (or use walnuts for a budget-friendly option)
    • 1/2 cup of extra virgin olive oil
    • 2 cloves of garlic (minced)
    • 1 tablespoon of nutritional yeast (for a cheesy flavor in the vegan version)
    • Salt and pepper to taste
    • Juice of 1 lemon (freshly squeezed)

    This ingredients list provides you with a flavorful base for your pasta salad. Be sure to opt for organic produce whenever possible to maximize health benefits and flavor.

    Dietary Substitutions to Customize Your Quick Asparagus Pesto Pasta Salad

    One of the most appealing aspects of this recipe is its adaptability. You can easily customize it based on your dietary needs:

    • Pasta Alternatives: For a gluten-free pasta salad, swap regular pasta for gluten-free varieties like brown rice or quinoa pasta. You can also substitute zoodles (zucchini noodles) if you prefer a low-carb option.

    • Nuts and Seeds: If you have nut allergies or want to keep the dish nut-free, you can replace pine nuts or walnuts in the pesto with sunflower seeds or pumpkin seeds. This adds a unique flavor without compromising texture.

    • Vegan Modifications: The recipe is already vegan, but you can enhance it by substituting the olive oil with avocado oil or adding more nutritional yeast for a heightened cheesy flavor.

    • Protein Boost: To make the salad heartier, consider adding chickpeas or white beans for a protein-packed dish.

    These substitutions ensure that your Quick Asparagus Pesto Pasta Salad fits perfectly into your dietary preferences without sacrificing taste or appeal.

    How to Prepare the Perfect Quick Asparagus Pesto Pasta Salad: Step-by-Step Guide

    Ready to make this delicious pasta salad? Follow this step-by-step guide to success:

    1. Prepare the Base: Start by bringing a large pot of salted water to a boil. Once boiling, add the pasta and cook according to the package instructions until al dente. Drain and rinse under cold water to stop the cooking process. Set aside.

    2. Blanch the Asparagus: While the pasta cooks, prepare the asparagus. Trim the ends, then cut the spears into 1-inch pieces. Blanch them in boiling water for 2-3 minutes until bright green and slightly tender. Immediately plunge them into ice water to retain their vibrant color and stop cooking. Drain and set aside.

    3. Make the Pesto: In a food processor, combine the fresh basil leaves, pine nuts (or chosen nuts), minced garlic, nutritional yeast, and lemon juice. Pulse until finely chopped. With the food processor running, slowly drizzle in the olive oil until smooth and creamy. Adjust the seasoning with salt and pepper.

    4. Mix Ingredients: In a large mixing bowl, combine the cooked pasta, blanched asparagus, and prepared pesto. Toss until everything is evenly coated.

    5. Taste Testing: Taste the salad and adjust seasoning as needed. If you’d like a more tangy flavor, feel free to add more lemon juice or nutritional yeast for added richness.

    6. Chill If Desired: For enhanced flavors, refrigerate the pasta salad for 30 minutes before serving. This allows the flavors to meld beautifully together.

    7. Serve: Transfer the pasta salad to a serving dish and enjoy chilled or at room temperature. It’s perfect as a main dish or a side.

    With these easy steps, you can create a fantastic Quick Asparagus Pesto Pasta Salad that woos your taste buds and delights your friends and family.

    Mastering Quick Asparagus Pesto Pasta Salad: Advanced Tips and Variations

    To truly master your Quick Asparagus Pesto Pasta Salad, here are some advanced tips and variations to elevate your dish:

    • Roasted Asparagus Variation: For a deeper, smoky flavor, consider roasting the asparagus instead of blanching it. Toss the spears in olive oil, salt, and pepper, then roast at 400°F (200°C) for about 15-20 minutes, until tender and slightly caramelized.

    • Add More Veggies: Feel free to mix seasonal vegetables like cherry tomatoes, bell peppers, or even spinach for a wealth of flavors and textures.

    • Cheesy Upgrade: If you’re not strictly vegan, a sprinkle of feta or parmesan cheese can add a creamy, tangy twist to the dish. Just mix it in right before serving.

    • Extra Crunch: For a textural contrast, toss in toasted breadcrumbs or crushed chips for added crunch on top.

    • Herb Variations: While basil is traditional, try swapping in arugula, spinach, or cilantro for a distinct flavor twist.

    These tips create endless possibilities, ensuring that your Quick Asparagus Pesto Pasta Salad remains both exciting and a staple in your meal rotation.

    How to Store Quick Asparagus Pesto Pasta Salad: Best Practices

    After preparing your pasta salad, you might want to make it ahead or store the leftovers. Here are some handy storage tips to keep your Quick Asparagus Pesto Pasta Salad fresh:

    • Refrigeration: Store the pasta salad in an airtight container in the refrigerator. It will stay fresh for up to 3 days. Just be sure to give it a good stir before serving, as the ingredients may settle.

    • Freezing: While you can freeze pasta salads, note that the texture of both the pasta and asparagus may be compromised after freezing. Nonetheless, if you want to prepare ahead, freeze the salad without dressing or freshly made pesto for up to 1 month.

    • Reheating: If you prefer your pasta salad warm, gently heat it in a skillet over low heat, adding in a bit of olive oil or water if it has dried out.

    Storing your Quick Asparagus Pesto Pasta Salad correctly will extend its shelf life, allowing you to savor the deliciousness longer!

    Nutritional Value of Quick Asparagus Pesto Pasta Salad

    Understanding the nutritional profile of your meal is crucial for making informed dietary choices. This Quick Asparagus Pesto Pasta Salad serves up a bounty of health benefits and essential nutrients. Here’s a basic breakdown of its nutrition per serving (based on the recipe serving six):

    • Calories: Approximately 300
    • Protein: 8 grams
    • Fat: 15 grams (mostly healthy fats from olive oil and nuts)
    • Carbohydrates: 35 grams
    • Fiber: 4 grams
    • Vitamins: Rich in vitamins A, C, E, and K from asparagus and basil
    • Minerals: Good source of potassium, magnesium, and iron

    This nutritional profile makes your Quick Asparagus Pesto Pasta Salad a superb choice for a healthy lifestyle.

    FAQs: Frequently Asked Questions About Quick Asparagus Pesto Pasta Salad

    Can I make this pasta salad in advance?

    Yes! You can prepare the Quick Asparagus Pesto Pasta Salad ahead of time. Just store it in the refrigerator for up to 3 days. The flavors may intensify as it sits, making it a great dish to prepare in advance.

    What can I substitute for pine nuts in the pesto?

    If you have allergies or are looking to save money, you can use walnuts, sunflower seeds, or pumpkin seeds in place of pine nuts in the pesto. Each option brings its unique flavor and texture.

    Is this recipe gluten-free?

    Yes! To make a gluten-free pasta salad, all you need to do is use gluten-free pasta. The other ingredients are naturally gluten-free as well.

    Can I add protein to this salad?

    Absolutely! If you want to make your Quick Asparagus Pesto Pasta Salad more filling, consider adding grilled chicken, chickpeas, or tofu for a boost of protein.

    How long does pesto pasta salad last?

    The pasta salad will remain fresh in the refrigerator for about 2-3 days. However, for the best flavor, it’s best enjoyed as soon as possible.

    With this guide, you are all set to create your own Quick Asparagus Pesto Pasta Salad! This dish combines simplicity, taste, and nutritional benefits, making it the ultimate choice for nearly everyone in your life. Enjoy it at home, take it to work or school, and add your unique twist to make it yours!

  • Easy Spring Mix Salad Dressing Recipe

    Easy Spring Mix Salad Dressing Recipe

    Easy Spring Mix Salad Dressing Recipe: A Tropical Delight

    Introduction to Easy Spring Mix Salad Dressing Recipe

    Are you looking for a refreshing addition to your spring meals? The Easy Spring Mix Salad Dressing Recipe is a delightful and vibrant dressing that complements a variety of salads, specifically those featuring leafy greens. With its tropical flair, this dressing allows you to transform your ordinary salad into an extraordinary culinary experience.

    What makes this dressing stand out? Quite simply, it’s exceptionally easy to prepare, making it suitable for busy parents, individuals on the go, or anyone who simply wants to enjoy nutritious food without spending hours in the kitchen. Not only is it versatile and delicious, but it’s also incredibly healthy, being entirely vegan and gluten-free.

    Crafted with simple ingredients, this dressing is a powerhouse of flavor without any guilt. It enhances the natural taste of your greens while providing essential nutrients, making it the perfect choice for health-conscious individuals. Additionally, it caters to various dietary needs—whether you’re a vegetarian, a vegan, or someone looking to cut down on calories, this spring mix dressing has you covered.

    In this article, you will find everything you need to know about this Easy Spring Mix Salad Dressing Recipe, from the key ingredients to expert preparation tips. Get your taste buds ready to embrace this delightful tropical dressing that will elevate all your spring meals.

    Benefits and Advantages of Easy Spring Mix Salad Dressing Recipe

    There are countless reasons to incorporate the Easy Spring Mix Salad Dressing Recipe into your meal planning. First and foremost, its simplicity is remarkable. The recipe requires minimal effort, yet the outcome is nothing short of gourmet. This ease of preparation allows you to whip it up in minutes, making it ideal for busy weeknights or last-minute gatherings.

    One of the significant health benefits of this dressing lies in its fresh, whole ingredients. Compared to store-bought dressings often laden with preservatives and additives, this homemade version enables you to control what goes into your dish entirely. You can enjoy the pure, wholesome flavors that pack more health benefits than their processed counterparts. Utilizing ingredients like extra virgin olive oil, fresh herbs, and citrus juice can provide healthy fats, antioxidants, and essential vitamins.

    Moreover, this dressing shines in its versatility. Perfectly suited for a variety of spring meals, it can pair wonderfully with almost any salad type, from fresh spring mixes to hearty grain salads. The flavor profile is adaptable; whether you prefer a tangy, sweet, or spicy touch, you can easily customize it to your liking. For those with dietary restrictions, the recipe caters to both vegans and gluten-free eaters, making it more accessible to a broader audience.

    Another advantage is the ability to batch-make the dressing. It stores beautifully in your refrigerator, allowing you to enjoy it throughout the week effortlessly. You save time and energy by preparing a larger quantity, ensuring you are prepared for any salad craving or impromptu spring meals that may arise.

    Overall, the Easy Spring Mix Salad Dressing Recipe stands out for its simplicity, healthiness, and versatility. By choosing this homemade option, you can enjoy delicious spring meals while keeping your nutritional goals in check.

    Ingredients Overview

    Essential Ingredients for Easy Spring Mix Salad Dressing Recipe

    To create the delightful Easy Spring Mix Salad Dressing, gather the following essential ingredients:

    • Extra Virgin Olive Oil (1/2 cup)
    • Provides healthy fats and a rich flavor.
    • Vegan, gluten-free, low-calorie.

    • Balsamic Vinegar (1/4 cup)

    • Adds acidity and depth of flavor.
    • Vegan, gluten-free, low-calorie.

    • Dijon Mustard (1 tablespoon)

    • Acts as an emulsifier and enhances the dressing’s taste.
    • Vegan, gluten-free, low-calorie.

    • Honey or Maple Syrup (1 tablespoon)

    • Sweetens the dressing naturally. Option to adjust to taste.
    • Vegan option: Use maple syrup.

    • Garlic Clove, minced (1 clove)

    • Infuses the dressing with a robust flavor.
    • Vegan, gluten-free, low-calorie.

    • Salt and Pepper (to taste)

    • Enhances all the flavors. Adjust to personal preference.
    • Vegan, gluten-free, low-calorie.

    • Fresh Herbs (such as basil or parsley), chopped (2 tablespoons)

    • Adds a vibrant touch and fresh flavor.
    • Vegan, gluten-free, low-calorie.

    These ingredients come together to create a dressing that is not only flavorful but also quite healthy. When shopping for your supplies, strive for the best quality oils and fresh herbs because they significantly impact the overall taste of your dressing.

    Dietary Substitutions to Customize Your Easy Spring Mix Salad Dressing Recipe

    While this Easy Spring Mix Salad Dressing recipe offers a delightful base, it’s also adaptable for varying dietary needs and tastes. Here are some substitutions you might consider:

    1. Oil Options: If you want to reduce calories or opt for a different flavor, you can substitute half of the olive oil with water or vegetable broth. Alternatively, avocado oil provides a similar health benefit and a unique flavor.

    2. Vinegar Variants: Instead of balsamic vinegar, try apple cider vinegar for a slightly tangy twist. Rice vinegar is also an excellent choice for a milder flavor.

    3. Sweeteners: For those avoiding sugar, consider using a sugar-free sweetener like stevia or erythritol. Additionally, you can skip the sweetener entirely for a tangier dressing, which can appeal to those with different taste preferences.

    4. Herb Substitutions: Feel free to play with different herbs such as cilantro, thyme, or dill for a distinctive twist. You can even incorporate spices like chili flakes or smoked paprika for added depth.

    5. Mustard Alternatives: If Dijon mustard isn’t your favorite, you can replace it with yellow mustard or omit it altogether for a lighter dressing.

    Overall, this versatility ensures you can cater the Easy Spring Mix Salad Dressing Recipe to any palate or dietary restriction, enhancing your enjoyment of healthy and satisfying spring meals.

    How to Prepare the Perfect Easy Spring Mix Salad Dressing Recipe: Step-by-Step Guide

    Creating the Easy Spring Mix Salad Dressing is as effortless as it is rewarding. Below is a simple step-by-step guide that guarantees a delicious outcome every time:

    1. Prepare the Base: In a medium-sized bowl or a mason jar, pour 1/2 cup of extra virgin olive oil as the foundation of your dressing. This ingredient adds healthy fats necessary for a nutritious dressing.

    2. Add the Vinegar: Pour in 1/4 cup of balsamic vinegar. This ingredient provides the tanginess and acidity that balances the dressing perfectly.

    3. Incorporate Mustard: Add 1 tablespoon of Dijon mustard. This will help emulsify the oil and vinegar, giving your dressing a smooth consistency.

    4. Sweeten It Up: Drizzle in 1 tablespoon of honey or maple syrup. Adjust depending on your sweetness preference. If avoiding sugar, use your preferred low-calorie sweetener.

    5. Mix in the Garlic: Add a minced garlic clove for an aromatic flavor and additional health benefits. This garlic infusion enhances the depth of taste in your dressing.

    6. Season to Taste: Sprinkle in salt and black pepper according to your liking. Remember, it’s easier to start with less and adjust later.

    7. Freshen with Herbs: Chop 2 tablespoons of your favorite fresh herbs and stir them into the mixture. This step adds a burst of freshness and visually appealing notes to the dressing.

    8. Combine the Ingredients: Whisk the mixture together vigorously, or if you’re using a mason jar, close it tightly and shake until all ingredients meld beautifully. This ensures an even distribution of flavors throughout the dressing.

    9. Taste Test: Always taste your dressing before serving. You may want to tweak flavors by adding more sweetness, acidity, or seasoning as needed.

    10. Store For Later: If you don’t use the dressing immediately, transfer it to an airtight jar or container. Store in the refrigerator for up to one week. If it solidifies, give it a good shake before using.

    Throughout this process, remember that adjusting the flavors according to your dietary needs or preferences is key. This Easy Spring Mix Salad Dressing is incredibly forgiving, so feel free to experiment!

    Mastering Easy Spring Mix Salad Dressing Recipe: Advanced Tips and Variations

    To take your Easy Spring Mix Salad Dressing to the next level, here are some advanced tips and exciting variations to consider:

    1. Infuse Flavors: Experiment with different flavor infusions by letting the garlic steep in the olive oil for a few hours prior to making the dressing. For a citrusy twist, incorporate the zest of a lemon or lime into the mixture, which adds brightness.

    2. Nuts and Seeds: Consider blending in a teaspoon of tahini or a handful of toasted nuts or seeds (like sunflower seeds or pine nuts) to give the dressing an extra depth of flavor and texture.

    3. Creamy Variants: For a creamier dressing option, blend all the ingredients with a dollop of yogurt or vegan mayo for added richness without heavy calories.

    4. Spicy Kick: Add a splash of hot sauce or a pinch of cayenne pepper for those who enjoy a bit of heat.

    5. Fruit-Infused Versions: Blend fresh fruit like strawberries or mango with your dressing for a fruity addition that pairs wonderfully with mixed greens. This fruity variation provides a refreshing twist perfect for hot days.

    6. Serving Suggestions: Try using this dressing not just for salads but also as a marinade for grilled veggies or as a zesty dip for fresh bread. This versatility elevates the dressing’s utility in your spring meals.

    By keeping these tips in mind, the Easy Spring Mix Salad Dressing becomes far more than a simple dressing; it transforms into a canvas for culinary creativity.

    How to Store Easy Spring Mix Salad Dressing Recipe: Best Practices

    Proper storage of your Easy Spring Mix Salad Dressing is essential to maintain its freshness and flavor. Here are some best practices to follow:

    1. Refrigeration: Store the dressing in an airtight container, such as a mason jar, and refrigerate it. It will stay fresh up to one week.

    2. Separation: You may notice the ingredients separate after a few days; simply give the jar a good shake before using to reincorporate the dressing. It is essential to do this because, as homemade dressings do not contain preservatives, settling is entirely natural.

    3. Freezing Options: While it’s not typically recommended to freeze oil-based dressings due to separation during thawing, if you prefer to prepare larger batches, consider freezing in ice cube trays. Once frozen, transfer the cubes to a resealable bag. This approach allows you to use them individually as needed.

    4. Use Fresh Ingredients: Since the dressing contains fresh herbs, ensure you use the freshest ones possible to prolong shelf life. If you plan to store it longer, consider omitting fresh herbs until just before serving.

    By adhering to these storage guidelines, you can ensure that your Easy Spring Mix Salad Dressing remains delicious and ready to enhance your spring meals whenever you need it.

    Nutritional Value of Easy Spring Mix Salad Dressing Recipe

    Understanding the nutritional value of your Easy Spring Mix Salad Dressing is crucial for maintaining a health-conscious diet. Here’s a breakdown of the main nutritional components based on standard servings:

    • Serving Size: 2 tablespoons
    • Calories: Approximately 120 calories
    • Total Fat: 14 grams
    • Saturated Fat: 2 grams
    • Polyunsaturated Fat: 1.5 grams
    • Monounsaturated Fat: 10 grams

    • Cholesterol: 0 mg

    • Sodium: 120 mg
    • Total Carbohydrates: 2 grams
    • Dietary Fiber: 0 grams
    • Sugars: 1 gram

    • Protein: 0 grams

    Health Benefits

    The Easy Spring Mix Salad Dressing is rich in healthy fats, primarily from the olive oil, which can contribute positively to heart health. The presence of antioxidants from ingredients like garlic and fresh herbs aids in enhancing immune function.

    This dressing also contains no refined sugars, which is advantageous for those monitoring their sugar intake. The combination of fresh ingredients provides not just flavor but also essential vitamins needed for a balanced diet.

    By incorporating this dressing into your meals, you enjoy not just a burst of flavor but also numerous health benefits, making it an ideal component of your healthy spring meals.

    FAQs: Frequently Asked Questions About Easy Spring Mix Salad Dressing Recipe

    Q: Can I make the dressing ahead of time?
    A: Yes! In fact, making the dressing ahead of time allows the flavors to meld beautifully. Store it in an airtight container in the refrigerator for up to one week.


    Q: Can I substitute the olive oil?
    A: Absolutely! While olive oil is preferred, you can also use avocado oil, grapeseed oil, or even a blend of oils based on your taste preferences.


    Q: Is this dressing suitable for vegans?
    A: Yes! All ingredients in this Easy Spring Mix Salad Dressing Recipe are vegan-friendly. Ensure you use maple syrup as a sweetener instead of honey.


    Q: What if I don’t have balsamic vinegar?
    A: If balsamic vinegar isn’t available, try substituting it with apple cider vinegar or white wine vinegar for a different flavor profile.


    Q: How can I make this dressing creamier?
    A: For a creamier texture, blend in a dollop of plain yogurt or vegan mayo. This addition will enhance richness while still maintaining a healthy dressing.


    Q: Can I use dried herbs instead of fresh?
    A: While fresh herbs provide superior flavor, you can use dried herbs if needed. Just adjust the quantity, as dried herbs are more concentrated (1 teaspoon of dried herbs equals about 1 tablespoon of fresh).


    Q: Is this dressing gluten-free?
    A: Yes, this dressing is gluten-free, but be sure to check that your mustard does not contain any gluten ingredients if you choose a specific brand.


    In conclusion, the Easy Spring Mix Salad Dressing Recipe is a delightful addition to your culinary repertoire. Its simplicity, healthiness, and adaptability make it a perfect choice for a wide audience. Try it out in your next spring meals, and discover the flavors and health benefits it brings!

  • Cozy Cajun White Chicken Chili Recipe

    Cozy Cajun White Chicken Chili Recipe

    Cozy Cajun White Chicken Chili Recipe: A Tropical Delight

    Introduction to Cozy Cajun White Chicken Chili Recipe

    Are you ready to embark on a culinary adventure that merges comfort food with a kick of flavor? This Cozy Cajun White Chicken Chili recipe will be your new go-to dish for chilly evenings, family gatherings, or meal prep for the week ahead. Imagine a warm bowl of tender chicken, creamy white beans, and a medley of spices that dance on your palate. This chili is not just enjoyable; it’s incredibly versatile too – perfect for busy weeknights or leisurely weekend meals.

    Beyond its delicious taste, there’s a lot to love about this healthy white chicken chili. It packs a nutritional punch, being rich in protein and fiber while low in unhealthy fats. Whether you’re a health-conscious individual or just trying to feed your family something wholesome, this recipe fits the bill. Additionally, it can be easily modified for various dietary requirements—vegan, gluten-free, or even lower-calorie options can easily be accommodated.

    One of the best parts? This white chicken chili comes together in under an hour from start to finish. It’s simple enough for novice cooks yet complex in flavor to satisfy food enthusiasts. So put on your apron and gather your ingredients; your cozy Cajun adventure awaits!

    Benefits and Advantages of Cozy Cajun White Chicken Chili Recipe

    There are countless reasons to love this Cozy Cajun White Chicken Chili recipe. First and foremost, it exemplifies ease of preparation. With straightforward instructions, this dish allows even the most busy of parents or students to whip up a hearty meal without hassle. One-pot simplicity means less time spent washing dishes and more time gathered around the table with loved ones.

    Health benefits are another compelling aspect. This white chicken chili is loaded with lean protein from chicken and fiber from white beans, which can help keep you feeling fuller longer. It’s also a great source of vitamins and minerals thanks to the variety of vegetables mixed into the pot. Moreover, with the spice blend typical of Cajun cuisine, it has antioxidant properties, helping to fight inflammation and boost immunity.

    What makes this chili truly stand out is its versatility. It seamlessly adapts to various dietary needs without sacrificing flavor. Whether you are cooking for a meat lover or a plant-based eater, you can substitute ingredients without worry. The flavors meld beautifully to create a comforting dish that feels indulgent yet is genuinely wholesome. This makes it an excellent option for anyone looking to please a crowd—be it a dinner party, a casual gathering, or just a cozy night in.

    Ingredients Overview

    Essential Ingredients for Cozy Cajun White Chicken Chili Recipe

    To create a delicious white chicken chili, you will require the following essential ingredients:

    • Chicken Breast (1 lb): Lean protein that forms the base of your chili. For a vegan alternative, use firm tofu or tempeh.
    • White Beans (2 cans, drained and rinsed): Provides creaminess and fiber. Cannellini or Great Northern beans are ideal but feel free to use cooked chickpeas as an alternative.
    • Chicken Broth (4 cups): Adds depth of flavor. For a vegetarian version, substitute with vegetable broth.
    • Coconut Milk (1 cup): Gives a creamy texture and subtle sweetness. Low-fat options can be used if you’re watching calories.
    • Onion (1 medium, diced): Adds a foundation of flavor. Can be replaced with shallots if you’re on a low-FODMAP diet.
    • Garlic (4 cloves, minced): A must-have for aromatic depth. Fresh or powdered garlic works well.
    • Bell Peppers (1 red, 1 green, diced): Color and nutrients. Substitute with zucchini or carrots for a veggie version.
    • Cajun Spice Mix (2 tablespoons): This condiment is responsible for the signature flavor. You can buy this or make your own mix with paprika, cayenne pepper, thyme, and oregano.
    • Corn (1 cup, fresh or frozen): Adds sweetness and texture. This is optional but recommend to enhance the chili.
    • Olive Oil (1 tablespoon): For sautéing. Use coconut oil for a tropical twist or omit if cooking with non-stick cookware.

    These ingredients together create a wonderfully fragrant and creamy chili that your family is sure to love!

    Dietary Substitutions to Customize Your Cozy Cajun White Chicken Chili Recipe

    To make sure everyone enjoys this cozy dish, consider the following substitutions:

    • Vegan Option: Replace chicken with extra firm tofu or vegan chick’n strips to still get that satisfying texture. Use vegetable broth instead of chicken broth and opt for cashew cream instead of coconut milk for added richness.
    • Gluten-Free: Ensuring that your broth and any packaged spices are certified gluten-free can easily adapt this recipe for gluten-sensitive individuals.
    • Lower-Calorie Version: Swap out coconut milk for low-fat or unsweetened almond milk, and reduce the quantity of olive oil used.
    • Bean-Free Version: You can omit the beans entirely, increasing the chicken quantity for those following a low-carb diet. Instead, add more vegetables like cauliflower or even sweet potatoes for texture.

    With these simple variations, you can take your Cajun white chicken chili from a classic dish to a personalized masterpiece suitable for a variety of dietary restrictions!

    How to Prepare the Perfect Cozy Cajun White Chicken Chili Recipe: Step-by-Step Guide

    Ready to dive into preparing your very own Cozy Cajun White Chicken Chili? Just follow these simple steps:

    1. Gather Your Ingredients: Start by rounding up all your ingredients from the list above. Having everything on hand makes the process smoother!

    2. Prepare the Chicken: If using chicken breasts, cut them into bite-sized pieces for quicker cooking. Season them lightly with salt and pepper.

    3. Sauté the Vegetables: In a large pot, heat the olive oil over medium heat. Add the diced onion and bell peppers, sautéing until they are soft (approximately 5 minutes). This develops a flavorful base.

    4. Add Garlic: Incorporate the minced garlic into the pot, stirring for about 30 seconds until fragrant. Be careful not to burn it!

    5. Cook the Chicken: Add the seasoned chicken to the sautéed vegetables and cook until the pieces are lightly browned on all sides (about 5-7 minutes).

    6. Mix in the Spices: Sprinkle your Cajun spice mix over the chicken and vegetables. Stir to ensure the chicken and veggies are well coated in the spices.

    7. Combine the Broth and Beans: Pour in the chicken broth, followed by adding the drained white beans. Mix well to combine the ingredients.

    8. Add Coconut Milk: Pour in the coconut milk, stirring until it’s fully incorporated. The coconut milk adds a rich creaminess that’s essential for this chili.

    9. Incorporate Corn: Toss in the corn now, which adds sweetness and texture. Stir everything together and bring the mixture to a gentle simmer.

    10. Simmer: Allow your white chicken chili to simmer for about 20-30 minutes. This gives the flavors time to meld beautifully, and as it cooks, the chili will thicken slightly.

    11. Adjust Seasoning: Taste your chili before serving, adjusting salt, pepper, or Cajun seasoning as needed. This step elevates the dish.

    12. Serve: Ladle the chili into cozy bowls. Top with optional garnishes such as sliced green onions, avocado, or fresh cilantro for an added burst of flavor.

    13. Enjoy: Relish every bite of your homemade Cajun white chicken chili! This dish is perfect for sharing with family or freezing for later.

    By following these detailed steps, you can create a bowl of creamy, comforting chili that appeals to all ages and dietary preferences. Don’t hesitate to experiment with the ingredients to suit your palate!

    Mastering Cozy Cajun White Chicken Chili Recipe: Advanced Tips and Variations

    To truly master your Cozy Cajun White Chicken Chili, consider the following advanced tips and exciting variations:

    • Cooking Method Variations: This recipe can also be made in a slow cooker or an Instant Pot. For slow cooking, combine all ingredients and cook on low for 6-8 hours. For an Instant Pot, use the sauté function for the vegetables and chicken, then add the liquids and beans before sealing the pot and cooking on high pressure for 10 minutes.

    • Flavor Enhancements: For added depth, consider adding a splash of lime juice or vinegar just before serving to brighten the flavors. The acidity balances the creaminess beautifully!

    • Spice Levels: Increase or decrease the Cajun seasoning according to your personal heat preference. Adding diced jalapeños while cooking can also give an extra kick.

    • Garnishing Options: Consider topping your chili with shredded cheese, sour cream, or crushed tortilla chips for added texture and flavor. This adds a delightful crunch and richness to your dish.

    These tips and ideas will not only elevate your cooking skills but can also make each serving of chicken chili a unique experience every time!

    How to Store Cozy Cajun White Chicken Chili Recipe: Best Practices

    If you’re lucky enough to have leftovers, storing your white chicken chili is simple!

    • Refrigeration: Allow the chili to cool to room temperature before transferring it into an airtight container. It will keep in the refrigerator for up to 4 days. When reheating, ensure it reaches a minimum internal temperature of 165°F.

    • Freezing: To freeze, portion the chili into freezer-safe bags or containers, leaving some space for expansion. It can be stored in the freezer for up to 3 months. Thaw overnight in the fridge before reheating on the stove or in the microwave.

    • Reheating Tips: When warming up your chili, add a splash of chicken broth or water if the chili has thickened too much in the fridge. Stir well while heating to ensure it warms evenly.

    These storage tips will guarantee that your Cozy Cajun White Chicken Chili remains delicious and ready to enjoy even days after it’s been cooked!

    Nutritional Value of Cozy Cajun White Chicken Chili Recipe

    Understanding the nutritional value of your meals can help you make educated dietary choices. Here’s a breakdown of the estimated nutritional information per serving (based on a recipe yielding 6 servings):

    • Calories: 320
    • Protein: 25g
    • Carbohydrates: 35g
    • Fiber: 8g
    • Sugars: 3g
    • Fat: 10g
    • Saturated Fat: 4g
    • Sodium: 600mg
    • Cholesterol: 60mg

    This white chicken chili packs a healthy punch, filled with a mix of macronutrients. Feel free to adjust the ingredients to suit specific dietary preferences to enhance the nutritional profile. For instance, using less oil, subbing coconut milk with almond milk, or incorporating more veggies can shift these values favorably.

    FAQs: Frequently Asked Questions About Cozy Cajun White Chicken Chili Recipe

    Q1: Can I make this white chicken chili in advance?

    Absolutely! This dish is perfect for meal prep as it tastes even better the next day. You can make it a day ahead and store it in the refrigerator, allowing the flavors to meld.

    Q2: Is there a vegetarian option for this recipe?

    Yes! Substitute the chicken with tofu or tempeh, and use vegetable broth and cashew cream instead of chicken broth and coconut milk. You’ll get a creamy, satisfying dish that everyone can enjoy.

    Q3: How spicy is this Cajun white chicken chili?

    The spiciness can easily be adjusted by varying the amount of Cajun seasoning or adding fresh jalapeños. Feel free to customize it according to your taste!

    Q4: How long can I refrigerate leftovers?

    You can safely refrigerate the chili for up to 4 days. Make sure to store it in an airtight container for best results.

    Q5: What can I serve with Cajun white chicken chili?

    This chili pairs beautifully with cornbread, rice, or a fresh green salad. You can also top it with avocado, cilantro, or cheese for extra flavor.

    With these FAQs, you’ll be well-equipped to tackle any challenges while preparing your Cozy Cajun White Chicken Chili. Enjoy this hearty and delicious meal with your loved ones, knowing it’s nutritious, customizable, and enjoyable for everyone at the table!

  • Easy Mediterranean Baked Fish Dinner Recipe

    Easy Mediterranean Baked Fish Dinner Recipe

    Easy Mediterranean Baked Fish Dinner Recipe: A Tropical Delight

    Introduction to Easy Mediterranean Baked Fish Dinner Recipe

    Welcome to a delightful culinary journey that will transport your taste buds straight to the sunny shores of the Mediterranean! Our Easy Mediterranean Baked Fish Dinner Recipe combines simplicity, healthfulness, and vibrant flavors to create a meal that caters to various diets. This recipe is ideal for busy home cooks, health-conscious parents, students, food enthusiasts, and anyone looking for easy dinner recipes that don’t compromise on taste or nutrition.

    In just a few simple steps, you can prepare a dish that celebrates the freshness of the sea and the aromatic herbs often found in Mediterranean cooking. It’s perfect for weeknight dinners or special occasions alike. With its emphasis on light, wholesome ingredients, this baked fish dish is simultaneously satisfying and nutritious, making it an ideal choice for those focusing on a balanced diet. Plus, it’s adaptable for gluten-free, low-calorie, or even vegan preferences!

    Imagine flaky fish fillets infused with bright lemon, fragrant garlic, and fresh herbs, baked to perfection while retaining their moisture. This recipe not only highlights the delightful essence of Mediterranean cuisine but also promotes heart health thanks to the omega-3 fatty acids found in fish. So, gather your ingredients, set your oven, and get ready to enjoy a meal that promises both ease of preparation and a taste that tantalizes your palate.

    Benefits and Advantages of Easy Mediterranean Baked Fish Dinner Recipe

    There are countless reasons why our Easy Mediterranean Baked Fish Dinner Recipe stands out among typical dinner options. Here are some of the most significant advantages that make this dish a go-to for a healthy lifestyle:

    1. Health Benefits: This recipe is rich in omega-3 fatty acids, which are essential for heart health and cognitive function. The use of fresh vegetables, herbs, and olive oil further enhances its nutritional profile. Packed with protein and low in unhealthy fats, it aligns perfectly with a variety of dietary concerns.

    2. Ease of Preparation: Tailored for both seasoned cooks and beginners, this recipe necessitates minimal cooking skills but delivers maximum flavor. The fish bakes in just 20-25 minutes, turning a potentially labor-intensive meal into a quick weeknight dinner solution. By simply layering ingredients in one dish, you minimize cleanup while maximizing your time spent enjoying the meal.

    3. Versatile and Adaptive: The beauty of this recipe lies in its versatility. You can easily swap out the type of fish depending on personal preferences or what’s available at your local market. Moreover, the ingredients can be customized to suit gluten-free or vegan diets by using legumes or plant-based protein in place of fish. This adaptability ensures that it can cater to different taste buds and dietary restrictions, making it an inclusive dish for family gatherings or dinner parties.

    4. Flavor Explosion: What sets Mediterranean cuisine apart is its use of bold flavors – think olive oil, lemon juice, garlic, and fresh herbs. This recipe effortlessly showcases these elements, allowing you to experience a culinary delight that’s not only satisfying but also delightfully fragrant.

    5. Perfect for Meal Prep: The Easy Mediterranean Baked Fish can easily be prepared ahead of time. This makes it an excellent choice for meal prepping, ensuring healthy eating even during the busiest weeks. The flavors develop beautifully when stored, making leftovers something to look forward to!

    Overall, the Easy Mediterranean Baked Fish Dinner Recipe encapsulates the magic of quick, healthful dinners without the fuss. Its accessibility makes it a staple dish for everyone — from students to full-time professionals.

    Ingredients Overview

    Essential Ingredients for Easy Mediterranean Baked Fish Dinner Recipe

    To achieve the best results, gather the following ingredients:

    • Fish Fillets (4 pieces, approximately 6 ounces each): Choose a firm white fish like cod, halibut, or tilapia for the best texture. (Gluten-free, Low-calorie)
    • Olive Oil (2 tablespoons): Extra virgin olive oil adds richness and healthy fats. (Vegan, Gluten-free)
    • Lemon Juice (1 lemon’s worth): Freshly squeezed juice brightens the dish. (Vegan, Gluten-free)
    • Garlic (4 cloves, minced): Enhances flavor with its savory depth. (Vegan, Gluten-free)
    • Cherry Tomatoes (1 cup): Halved for sweetness and color. (Vegan, Gluten-free)
    • Bell Peppers (1 cup, sliced): Any color of bell pepper adds crunch and nutrition. (Vegan, Gluten-free)
    • Red Onion (1 medium, sliced): Provides a sharp, sweet aroma when roasted. (Vegan, Gluten-free)
    • Fresh Herbs (1/4 cup each of parsley and basil): For a fresh, fragrant finish. (Vegan, Gluten-free)
    • Salt and Pepper: To taste, elevating the overall flavor. (Vegan, Gluten-free)

    Dietary Note: For a vegan option, the fish can be substituted with firm tofu or chickpeas for a protein-rich alternative that captures the essence of the Mediterranean.

    Dietary Substitutions to Customize Your Easy Mediterranean Baked Fish Dinner Recipe

    Here are a few substitution ideas to cater to different dietary requirements:

    1. Fish Types: If you’re not fond of fish, consider using:
    2. Firm Tofu: Great for a vegan approach.
    3. Chickpeas: Roasted chickpeas are a fantastic plant-based protein alternative that soaks up the Mediterranean flavors well.

    4. Vegetarian Option: Replace fish with:

    5. Grilled eggplant or zucchini slices: Perfect for a hearty vegetarian meal.

    6. Gluten-Free Needs: This recipe is already gluten-free, but ensure that any added sauces or seasonings, like soy sauce or seasoning blends, are also gluten-free.

    7. Herb Alternatives: If you don’t have fresh herbs, dried Mediterranean herb blends can work in a pinch.

    8. Low-Calorie: Use less olive oil and substitute high-calorie ingredients with lower-calorie alternatives, such as:

    9. Cooking spray: Instead of olive oil for roasting.
    10. Zoodles (zucchini noodles): Instead of pasta as a side.

    By allowing yourself the freedom to innovate with the ingredients, this recipe truly becomes an easy and inclusive dining experience for all.

    How to Prepare the Perfect Easy Mediterranean Baked Fish Dinner Recipe: Step-by-Step Guide

    Now that you’ve gathered your ingredients, let’s dive into how to prepare this crowd-pleasing dish!

    1. Prepare the Base: Preheat your oven to 400°F (200°C). Meanwhile, prepare a baking dish by lightly greasing it with a bit of olive oil to prevent sticking.

    2. Assemble Vegetables: In the greased baking dish, arrange cherry tomatoes, bell peppers, and red onion slices in an even layer. This forms a colorful base for the fish and enhances flavors during baking.

    3. Season the Fish: Place the fish fillets atop the layered vegetables. Drizzle the remaining olive oil and lemon juice over the fish. Season generously with salt, pepper, and minced garlic. The garlic will impart an aromatic flavor as it cooks.

    4. Add Fresh Herbs: Sprinkle chopped parsley and basil over the fish and veggies. These herbs will add a delightful freshness to the dish.

    5. Bake to Perfection: Carefully place the baking dish in the preheated oven. Bake for approximately 20-25 minutes or until the fish is opaque and flakes easily with a fork.

    6. Prepare a Side (Optional): While the fish bakes, consider preparing a simple side salad with mixed greens, cucumbers, and a lemon vinaigrette. This adds a refreshing crunch alongside the warm, baked dish.

    7. Serve: Once baked, remove from the oven and let it cool for a minute. Serve the dish warm, spooning some of the roasted vegetables over the fish. Enjoy your delicious Mediterranean meal!

    8. Consider Leftovers: If you have leftovers, gently reheat them in the oven to maintain texture. Adding a splash of fresh lemon juice before serving again can revive the flavors!

    This recipe’s adaptability allows you to create a vibrant meal suited to your taste preferences, all while maintaining its status as one of the easy dinner recipes in your culinary repertoire.

    Mastering Easy Mediterranean Baked Fish Dinner Recipe: Advanced Tips and Variations

    To truly make the most out of your Easy Mediterranean Baked Fish Dinner Recipe, consider the following advanced tips and variations:

    1. Marinating the Fish: For intensified flavors, marinate your fish fillets in olive oil, lemon juice, minced garlic, and herbs for one hour before baking. This extra time allows the seasonings to permeate the fish, making it even more delicious.

    2. Herb Blends: Feel free to experiment with different herbs such as dill or tarragon, which can offer a unique twist to standard flavors.

    3. Additions: Enhance the dish by incorporating olives for a briny kick or capers for extra zing. Both elements will give an authentic Mediterranean vibe.

    4. Side Dishes: Serve the baked fish with a side of couscous, quinoa, or roasted potatoes. These complement the flavors of the fish while providing a wholesome balance.

    5. Grilling Option: On warm days, consider grilling the fish in a foil packet with the vegetables. Simply wrap the ingredients in aluminum foil and grill for about 15-20 minutes; this will give the dish a smoky flavor.

    6. Flavor Boosters: If you enjoy a bit of heat, consider adding crushed red pepper flakes to spice things up.

    Each of these variations encourages you to tailor the recipe to your taste, proving that easy dinner recipes can be classic yet adaptable.

    How to Store Easy Mediterranean Baked Fish Dinner Recipe: Best Practices

    To maximize the freshness and longevity of your Easy Mediterranean Baked Fish Dinner, follow these storage tips:

    1. Refrigeration: Allow the baked fish to cool completely before transferring to an airtight container. This will maintain its texture and flavors. When stored properly, leftover fish can remain fresh for 2-3 days in the refrigerator.

    2. Freezing: For longer storage, wrap the cooled fish tightly with plastic wrap and then securely in aluminum foil before placing it in a freezer-safe container. This option preserves quality for up to 2-3 months.

    3. Reheating: To reheat, it’s best to use the oven to maintain texture. Preheat the oven to 350°F (175°C) and bake the dish for 10-15 minutes until heated through. Adding a splash of lemon juice can help refresh the flavors.

    By implementing these best practices, you ensure that your Mediterranean baked fish remains just as delightful for a second meal.

    Nutritional Value of Easy Mediterranean Baked Fish Dinner Recipe

    When preparing an Easy Mediterranean Baked Fish Dinner, you’re not just enjoying a tasty dish; you’re also investing in your health. Here’s a breakdown of the approximate nutritional values per serving (based on a typical fish fillet with a serving of vegetables):

    • Calories: 300-350 (depending on the specific fish used)
    • Protein: 28g
    • Fat: 15g (with healthy monounsaturated fats from olive oil)
    • Carbohydrates: 10g
    • Fiber: 3g
    • Sugar: 5g
    • Sodium: 300mg (depends on the amount of salt added)

    Overall, this dish helps you intake necessary nutrients while managing caloric intake, making it a wholesome choice among easy dinner recipes.

    FAQs: Frequently Asked Questions About Easy Mediterranean Baked Fish Dinner Recipe

    Q1: Can I use frozen fish in this recipe?
    A1: Absolutely! Just ensure that the fish is fully thawed before cooking to ensure even baking.

    Q2: What vegetables can I add to this dish?
    A2: Feel free to incorporate zucchini, asparagus, or spinach, which can add both flavor and nutritional value to your dish.

    Q3: How can I make this recipe spicier?
    A3: Introduce crushed red pepper flakes or chopped jalapeños based on your heat preference for an added kick.

    Q4: Is this recipe suitable for meal prep?
    A4: Yes! You can prepare this dish in advance, store it in an airtight container in the refrigerator, and enjoy it during the week for quick meals.

    Q5: Can I use other types of fish?
    A5: Certainly! Fish varieties such as salmon, trout, or snapper can offer different flavors and textures. Adjust cooking times accordingly, as firmer fish may require slightly longer baking.

    By addressing these common queries, you provide reassurance to potential cooks looking to delve into making this Mediterranean delight.


    In conclusion, the Easy Mediterranean Baked Fish Dinner Recipe stands as a beacon of simplicity and flavor in the sea of everyday meals. With its customizable ingredients, health benefits, and ease of preparation, it’s a recipe worth embracing. So why wait? Gather your ingredients and indulge in a fresh, vibrant dish that nourishes not just your body but your soul!

  • Cozy Sardinian Herb Soup Healthy Recipe

    Cozy Sardinian Herb Soup Healthy Recipe

    Cozy Sardinian Herb Soup Healthy Recipe: A Tropical Delight

    Introduction to Cozy Sardinian Herb Soup Healthy Recipe

    Are you in search of simple and delicious soup recipes that are both nourishing and satisfying? Look no further than the Cozy Sardinian Herb Soup. This delightful recipe is not just any soup; it is a celebration of vibrant flavors and wholesome ingredients. Inspired by the culinary traditions of Sardinia, this herb soup is packed with health benefits while being exceptionally easy to prepare.

    This recipe shines as a healthy option for various dietary needs, making it perfect for busy parents, students, and health-conscious individuals alike. Whether you’re a cooking novice or a seasoned chef, you’ll find that this herb soup is simple yet sophisticated, delivering a rich flavor that warms the soul.

    Most importantly, it caters to everyone – it’s vegan, gluten-free, and low in calories, ensuring that you can enjoy a comforting bowl without compromising your dietary goals. This Cozy Sardinian Herb Soup is a versatile dish that’s also great for meal prep, making it ideal for a quick lunch or a cozy dinner after a long day.

    So, gather your ingredients and prepare to discover the rich, herbal flavors that can transform any meal into a delightful experience with minimal effort!

    Benefits and Advantages of Cozy Sardinian Herb Soup Healthy Recipe

    The Cozy Sardinian Herb Soup is a remarkable dish that stands out for several reasons. Here are some of its key benefits:

    1. Ease of Preparation: One of the primary attractions of this soup is its straightforward preparation. With minimal chopping and cooking time, you can have a delicious and nutritious meal ready in no time. It’s perfect for busy parents juggling work and family responsibilities, students on a time crunch, or anyone looking for a quick yet hearty meal.

    2. Health Benefits: This herb soup is loaded with nutritious ingredients. Fresh herbs such as parsley, basil, and oregano are rich in vitamins, antioxidants, and anti-inflammatory properties, making the soup health-boosting. Additionally, it’s low in calories and high in fiber, assisting in digestion and helping you feel full.

    3. Vegan and Gluten-Free: The recipe adheres to vegan and gluten-free dietary requirements without sacrificing flavor. This makes it an excellent choice for individuals with dietary restrictions, ensuring that everyone at your table can savor this delightful dish.

    4. Budget-Friendly: Using simple, accessible ingredients, this soup won’t break the bank. It’s a wonderful way to utilize leftover vegetables and herbs, making it not only healthy but also economical.

    5. Versatile: The Cozy Sardinian Herb Soup can be customized to suit individual tastes. You can easily adjust the seasoning, add proteins like tofu or chickpeas, or include seasonal veggies for added variety.

    6. Comforting and Warm: As the name suggests, this soup is cozy! On chilly days, there’s nothing quite like a warm bowl of soup to brighten your mood and bring comfort.

    Overall, this herb-infused soup is an ideal choice for anyone looking for nutritious and satisfying soup recipes that nourish the body and delight the palate.

    Ingredients Overview

    Essential Ingredients for Cozy Sardinian Herb Soup Healthy Recipe

    To create your Cozy Sardinian Herb Soup, you will need the following ingredients:

    • 2 tablespoons olive oil: A heart-healthy fat that adds richness and depth to the dish—considered vegan-friendly.
    • 1 medium onion, diced: This aromatic vegetable forms the base of your soup, providing flavor and sweetness.
    • 2 cloves of garlic, minced: Garlic enhances the soup with its robust flavor and offers numerous health benefits, including anti-inflammatory properties.
    • 4 cups vegetable broth: Offers a flavorful liquid base that is low-calorie and gluten-free.
    • 2 medium zucchinis, diced: Adding low-calorie content while providing bulk and nutrition.
    • 1 cup kale or spinach, chopped: Leafy greens pack in vitamins and minerals, contributing to the soup’s health benefits.
    • 1 cup fresh herbs (parsley, basil, oregano): Essential for the signature Sardinian flavor; these herbs boost the nutrient content.
    • Salt and pepper to taste: Simple seasonings that enhance the soup’s overall flavor.
    • Juice of 1 lemon: Brightens the soup and adds a refreshing acidity that balances the richness.

    For a vegan twist, use nutritional yeast for a cheesy flavor without dairy!

    Dietary Substitutions to Customize Your Cozy Sardinian Herb Soup Healthy Recipe

    The flexibility of this recipe makes it perfect for customization. Here are some substitutions you can consider:

    • Olive Oil: Substitute with avocado oil or coconut oil for a different flavor and health benefits.
    • Onion and Garlic: For those sensitive to alliums, consider using leeks or shallots for milder flavors.
    • Vegetable Broth: If you have homemade stock, feel free to use it, or for added protein, consider using a bean broth.
    • Zucchini: Substitute with diced carrots or sweet potatoes for an alternate texture and sweetness.
    • Kale/Spinach: Any leafy green will work, such as Swiss chard or collard greens.
    • Fresh Herbs: If fresh herbs aren’t available, dried herbs can be used; however, adjust quantities as dried herbs are more potent.
    • Additional Proteins: For a heartier soup, consider adding canned chickpeas or white beans, which also keep the dish vegan-friendly.

    With these substitutions, you can tailor the soup to accommodate your personal preferences or available ingredients.

    How to Prepare the Perfect Cozy Sardinian Herb Soup Healthy Recipe: Step-by-Step Guide

    Now that you have your ingredients ready, let’s dive into the step-by-step guide on how to prepare this delightful soup.

    1. Prepare the Base: Heat the olive oil in a large pot over medium heat. Add the diced onion and sauté until translucent, about 5 minutes. Stir in the minced garlic and cook for an additional minute until fragrant.

    2. Add the Vegetables: Stir in the diced zucchini and cook for another 5 minutes, allowing them to soften.

    3. Pour the Broth: Add the vegetable broth to the pot, bringing it to a simmer.

    4. Incorporate Leafy Greens: Once the broth is simmering, add chopped kale or spinach to the mixture. Let it cook for about 3-4 minutes until the greens are wilted and tender.

    5. Season the Soup: Add your fresh herbs (parsley, basil, oregano) to the pot. Season the mixture with salt and pepper to taste, remembering that the flavors will intensify as the soup simmers.

    6. Let it Simmer: Reduce the heat to low and allow the soup to simmer for about 15-20 minutes. This step helps the flavors meld together beautifully.

    7. Finish with Lemon Juice: Before serving, stir in the juice of one lemon, adjusting to taste. The acidity will elevate the flavors of the soup significantly.

    8. Serve: Ladle the soup into bowls and garnish with additional fresh herbs if desired. You can serve it fresh or allow it to cool before storing for later meals.

    This straightforward process ensures a delicious, healthy soup that fits well with various dietary restrictions. Feel free to adapt the steps as needed based on your ingredients or preferences!

    Mastering Cozy Sardinian Herb Soup Healthy Recipe: Advanced Tips and Variations

    While the Cozy Sardinian Herb Soup is delicious on its own, there are several advanced tips and variations to enhance your culinary experience:

    1. Blend for Creaminess: For a creamier texture, consider puréeing half the soup in a blender and then returning it to the pot. This creates a velvety soup without the need for cream.

    2. Add Protein: To make this soup more filling, include tofu cubes, chickpeas, or lentils. They contribute protein without adding meat, keeping it vegan.

    3. Spice it Up: If you enjoy a little heat, incorporate red pepper flakes or diced jalapeños for a kick.

    4. Cheesy Flavor: To add a cheesy note without dairy, sprinkle nutritional yeast into the soup while cooking.

    5. Herb Variations: Feel free to experiment with different herbs based on your preference or seasonality. Cilantro, dill, or even mint can offer delightful twists to the base flavor.

    6. Garnish Creatively: Top your soup with homemade croutons, a drizzle of olive oil, or even freshly ground black pepper for an extra layer of taste.

    By experimenting with these variations, you can make the Cozy Sardinian Herb Soup uniquely yours while mastering its delicious flavors.

    How to Store Cozy Sardinian Herb Soup Healthy Recipe: Best Practices

    Storing your Cozy Sardinian Herb Soup properly is essential for maintaining its taste and quality. Here are the best practices for refrigeration, freezing, and reheating:

    Refrigeration

    1. Allow the soup to cool to room temperature before transferring it to an airtight container. The soup can be stored in the fridge for 3-5 days.
    2. If you plan to consume it within this time frame, simple reheating on the stove or in the microwave will work well.

    Freezing

    1. To freeze the soup, ensure it is completely cooled before pouring it into freezer-safe containers or bags. Leave some space in the container for expansion as it freezes.
    2. The soup can typically be frozen for 2-3 months without losing its quality.
    3. Label the container with the date and contents for easier identification later.

    Reheating

    1. When ready to enjoy, thaw the soup in the refrigerator overnight or use the microwave for quicker thawing.
    2. Gently reheat it on the stove over medium heat, stirring occasionally until warmed through. If the soup is too thick after freezing, add a splash of vegetable broth or water to achieve the desired consistency.

    Following these storage methods ensures that your Cozy Sardinian Herb Soup remains fresh and delicious for future meals—perfect for meal prep or enjoying your favorite soup recipes anytime!

    Nutritional Value of Cozy Sardinian Herb Soup Healthy Recipe

    Understanding the nutritional content of your dishes is important for maintaining a balanced diet. Here’s a breakdown of the approximate nutritional value of the Cozy Sardinian Herb Soup per serving (based on the recipe serving four):

    • Calories: 150
    • Protein: 4 g
    • Fat: 6 g
    • Carbohydrates: 20 g
    • Fiber: 4 g
    • Sugars: 4 g
    • Sodium: 400 mg

    Nutritional Highlights

    • Low Calorie: At just 150 calories per serving, you can enjoy a hearty meal without worrying about caloric intake.
    • High Fiber: The fiber content sourced from vegetables and herbs promotes healthy digestion and aids in weight management.
    • Vitamins: Rich in vitamins A, C, and K primarily from leafy greens like kale and herbs, the soup contributes significantly to your daily nutritional intake.

    By including the Cozy Sardinian Herb Soup in your meal planning, you can relish a nourishing meal that caters to various dietary preferences while being low in calories and high in essential nutrients.

    FAQs: Frequently Asked Questions About Cozy Sardinian Herb Soup Healthy Recipe

    How can I adjust the flavor of the Cozy Sardinian Herb Soup?

    You can enhance or alter the flavor by adjusting herbs and spices. Adding more garlic, lemon juice, or even soy sauce can create depth. Don’t hesitate to experiment with your favorite seasonings!

    Is this soup suitable for meal prep?

    Absolutely! The Cozy Sardinian Herb Soup stores well in the refrigerator for up to five days and can be frozen for two to three months. This makes it excellent for meal prepping.

    Can I add meat to this soup?

    While the recipe is vegan-friendly, if desired, you can incorporate cooked chicken or sausage for an meaty option. Just ensure it’s fully cooked before adding it to the soup.

    What’s the best way to serve this soup?

    This soup pairs wonderfully with crusty bread for dipping. You can also serve it alongside a fresh salad for a complete meal.

    Are there any alternatives to using vegetable broth?

    Homemade stock or even a light chicken broth can be used as alternatives, providing a different flavor profile while still keeping the soup hearty.

    In conclusion, the Cozy Sardinian Herb Soup is the epitome of comfort food that checks all boxes for health, flavor, and versatility. Embrace the joy of cooking with this easy recipe and indulge in a bowl of warmth and nutrition, inviting friends and family to join you on this delightful flavor journey. Explore the world of soup recipes with this gem, and let it inspire your culinary adventures today!