Tag: desserts

  • Sweet Crustless Rhubarb Pie

    Sweet Crustless Rhubarb Pie

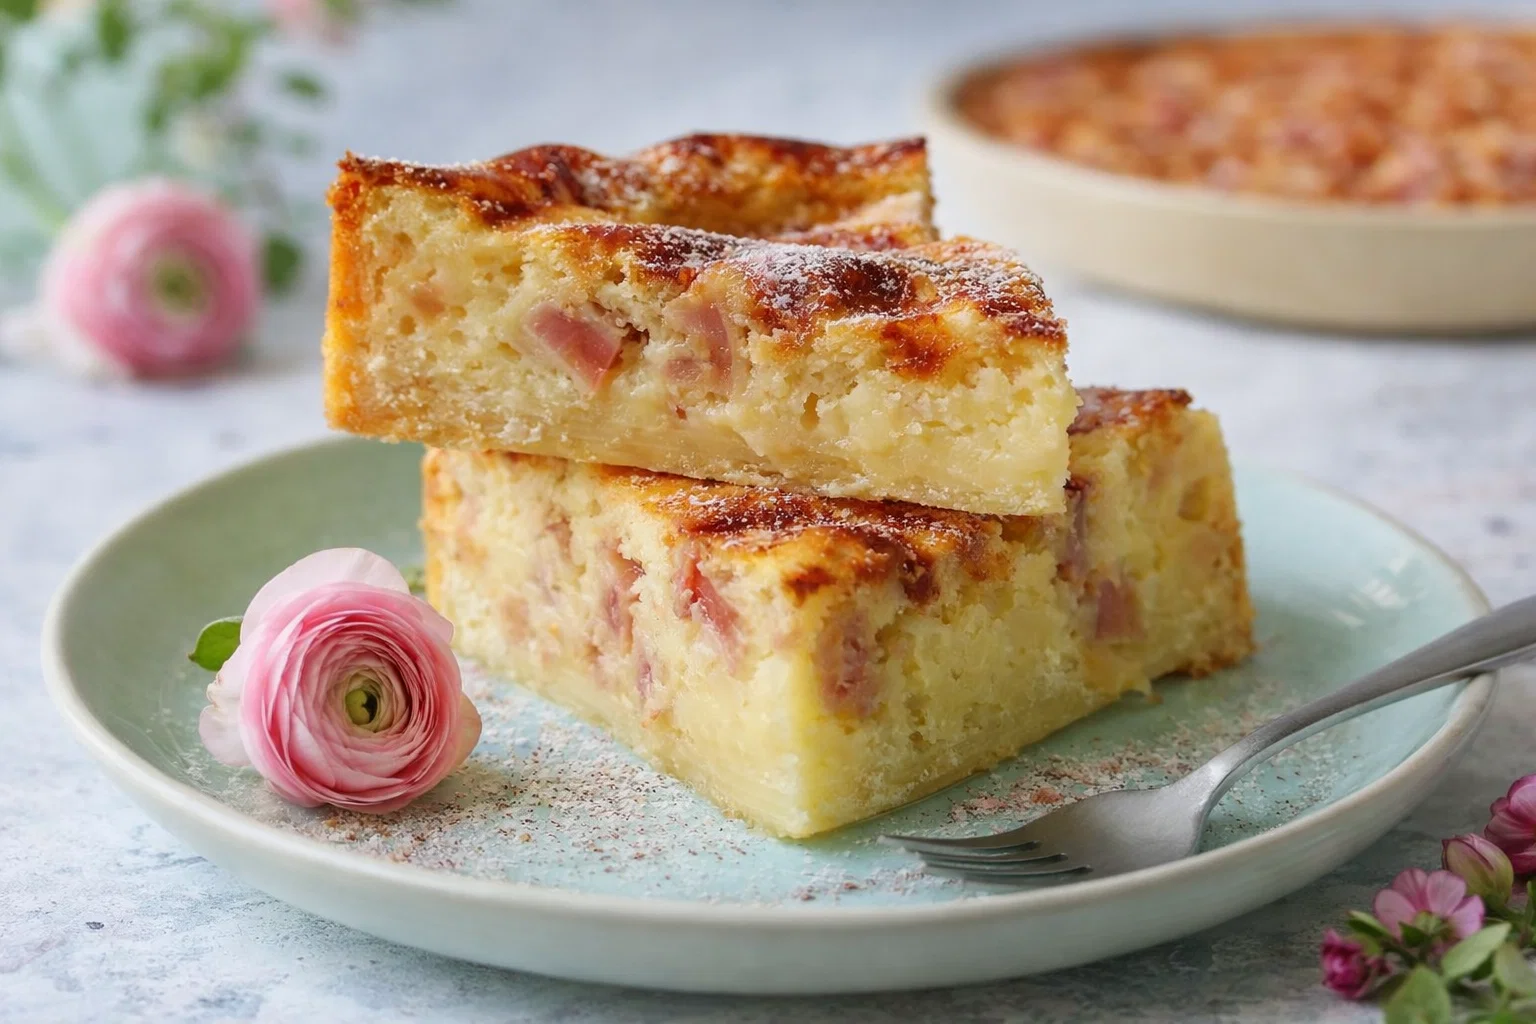
    Sweet Crustless Rhubarb Pie: A Tropical Delight

    Introduction to Sweet Crustless Rhubarb Pie

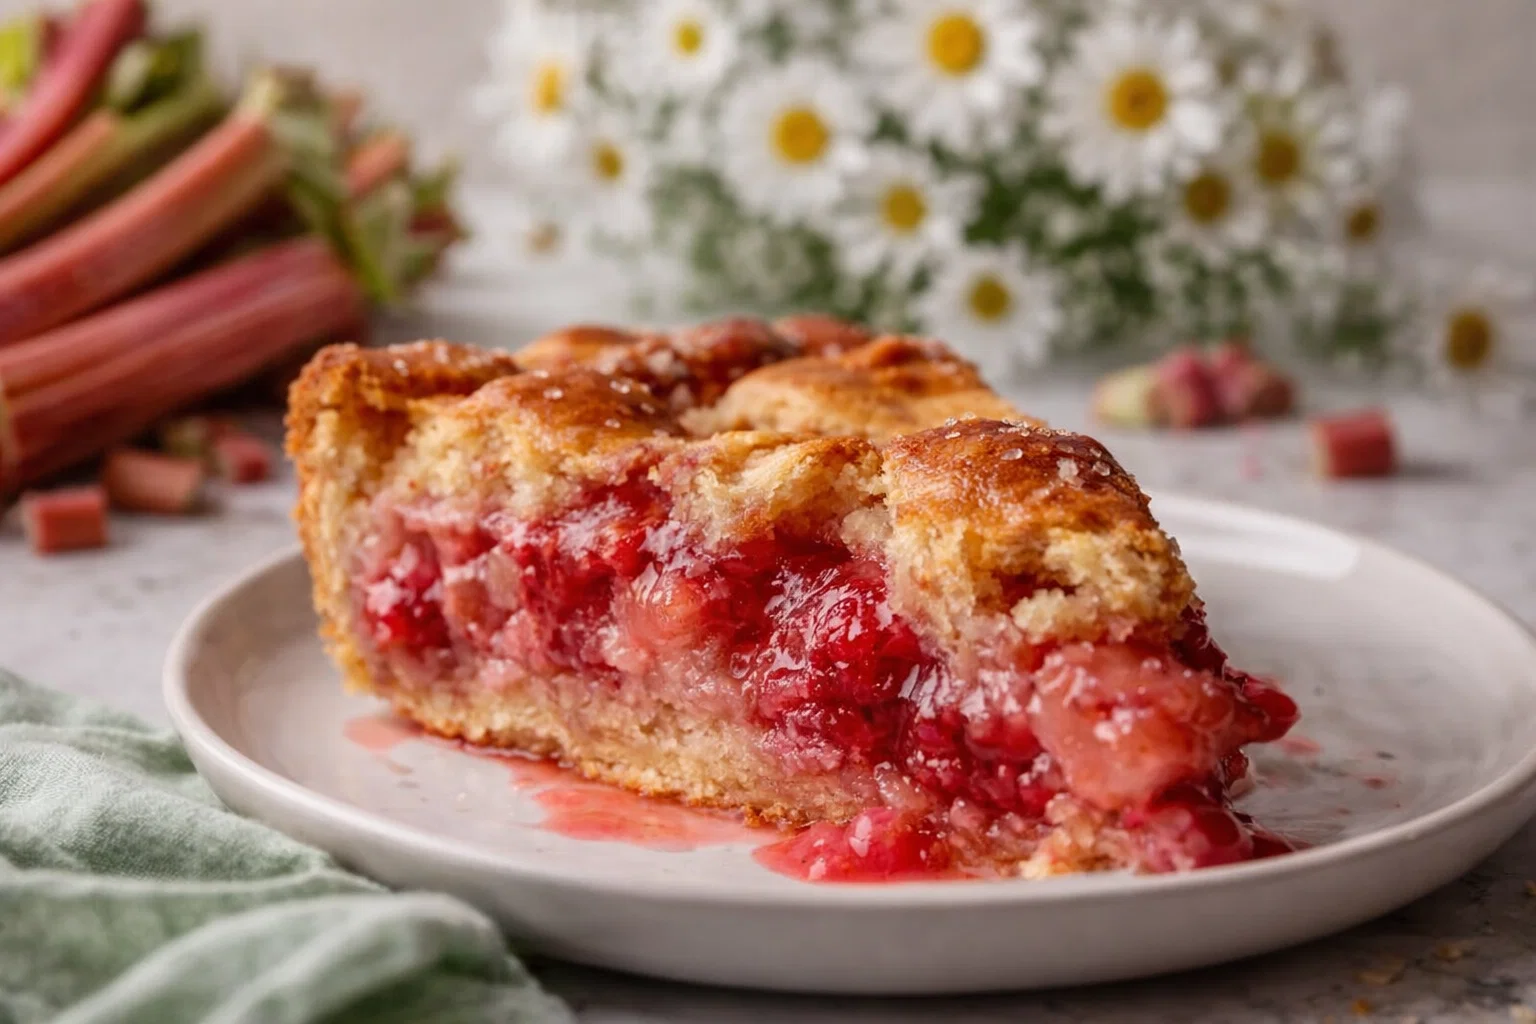
    Are you on the lookout for delightful dessert recipes that are not only easy to make but also cater to various dietary needs? Look no further! Sweet Crustless Rhubarb Pie is a scrumptious option that checks all the boxes: it’s simple, healthy, and suitable for vegan and gluten-free diets. This pie bursts with the tangy flavor of rhubarb, harmoniously balanced by natural sweetness, making it a refreshing treat any time of the year.

    One of the best things about this crustless pie is its ease of preparation. You can whip it up in no time even on your busiest days. With minimal ingredients required, this recipe allows you to savor every moment in the kitchen without the hassle of rolling out pastry dough.

    Health-conscious individuals will appreciate that rhubarb is low in calories but high in fiber, and it’s a rich source of antioxidants. Thus, this pie serves as a guilt-free indulgence that does not compromise your health goals. Moreover, it’s an excellent choice for families, whether you are serving it at special occasions, potlucks, or just a cozy night in.

    In a world where dessert options often border on the overly complicated, Sweet Crustless Rhubarb Pie stands out as an approachable, unforgettable dish. So, grab your ingredients and let’s dive into the wonderful world of this easy-to-make pie that’s sure to inspire both novice and experienced cooks alike!

    Benefits and Advantages of Sweet Crustless Rhubarb Pie

    There are numerous advantages to making Sweet Crustless Rhubarb Pie, from simplicity to health benefits. First and foremost, you’re looking at a desert recipe that is not bogged down by intricate steps or complicated techniques. The simplicity of this dish allows even the most novice baker to succeed. The recipe requires minimal preparation and a short baking time, making it perfect for busy parents, students, or anyone with a packed schedule.

    In addition, the health benefits of rhubarb are worth mentioning. This plant is a nutritional powerhouse, packed with vitamins C and K, calcium, and potassium. Plus, rhubarb is incredibly low in calories, making this pie a smart dessert choice. It’s high in fiber, which aids digestion, making the pie not just a treat for the taste buds but beneficial for your health too.

    Moreover, for those who are health-conscious or have dietary restrictions, this pie caters to various needs. The absence of a traditional crust means it’s naturally gluten-free. Substitutions like using almond or oat flour can make it suitable for gluten-sensitive individuals and those exploring gluten-free living. Plus, with the option to sweeten it with alternatives like maple syrup or stevia, this pie can fit right into a low-sugar or vegan lifestyle.

    This Sweet Crustless Rhubarb Pie truly shines in its versatility. You can enjoy it warm from the oven or chilled straight from the fridge. It’s an adaptable dessert that lends itself beautifully to lending your personal flair—be it adding spices like cinnamon for warmth or a dollop of dairy-free whipped cream for a creamy finish. The possibilities are endless, and that’s what makes this pie a gem in any baker’s repertoire!

    Ingredients Overview

    Essential Ingredients for Sweet Crustless Rhubarb Pie

    To create your Sweet Crustless Rhubarb Pie, you will need the following ingredients:

    • 2 cups chopped rhubarb – Fresh or frozen, rhubarb gives the pie its signature tanginess.
    • 1 cup granulated sugar (or maple syrup for a healthier alternative) – Sweetens the pie and balances rhubarb’s natural tartness.
    • 1/2 cup almond flour – A great gluten-free flour to replace traditional flour while adding a nutty flavor.
    • 1/2 cup unsweetened applesauce – Acts as a binding agent and gives moisture without the need for eggs, making it vegan.
    • 1 teaspoon vanilla extract – Adds depth and enhances the overall flavor of the pie.
    • 1/2 teaspoon cinnamon (optional) – Introduces a warm note that pairs well with rhubarb.
    • 1/4 teaspoon salt – Balances the flavors within the pie.

    Diet-Conscious Options:

    • To make it gluten-free: Stick with almond flour or substitute with oat flour.
    • Low-calorie sweeteners: Use stevia or erythritol instead of sugar for a low-calorie treat.
    • Vegan: Already vegan due to applesauce usage, but ensure your sugar is unrefined.

    Dietary Substitutions to Customize Your Sweet Crustless Rhubarb Pie

    Customization is key to a great recipe! Here are some substitutions you can consider based on dietary requirements or preferences:

    1. Sweeteners: Feel free to adjust the sweetness based on your taste. Maple syrup, honey, or coconut sugar can replace granulated sugar, while stevia or agave can provide a sugar-free alternative.
    2. Flour Variety: If you’re not a fan of almond flour, you could easily switch to coconut flour or even traditional all-purpose flour if gluten isn’t a concern.
    3. Fat Sources: For a nut-free version, use unsweetened pumpkin puree instead of applesauce, which maintains moisture and adds creaminess.
    4. Fruit Variety: While rhubarb is the star, feel free to mix with strawberries or blueberries for a fruit medley that allows for even more flavor.

    With these substitutions, you can make the Sweet Crustless Rhubarb Pie suitable for any dietary restriction without jeopardizing the delightful taste!

    How to Prepare the Perfect Sweet Crustless Rhubarb Pie: Step-by-Step Guide

    Now that you have gathered your ingredients, let’s dive into preparing the Sweet Crustless Rhubarb Pie. To maximize your enjoyment of this delightful dessert, follow these simple steps closely:

    1. Preheat the Oven: Set your oven to 350°F (175°C) to prepare for baking.

    2. Prep the Baking Dish: Grease a 9-inch pie dish with a little oil or cooking spray to prevent sticking.

    3. Combine Rhubarb and Sugar: In a large mixing bowl, add the chopped rhubarb and granulated sugar. Stir gently and let it sit for about 10-15 minutes. This allows the rhubarb to release some of its natural juices, enhancing the flavor.

    4. Mix Dry Ingredients: In a separate bowl, whisk together the almond flour, salt, and cinnamon (if using). This will ensure an even distribution of ingredients.

    5. Blend the Wet Ingredients: In another bowl, combine the applesauce and vanilla extract. Mix until smooth.

    6. Combine All Ingredients: Gradually fold the dry mixture into the rhubarb mixture. Then, pour in the applesauce blend. Stir until everything is just combined. Avoid overmixing to keep the texture nice.

    7. Pour Into the Dish: Transfer the mixture into the prepared pie dish, spreading it out evenly. Don’t worry about smoothing the top perfectly; it will settle during baking.

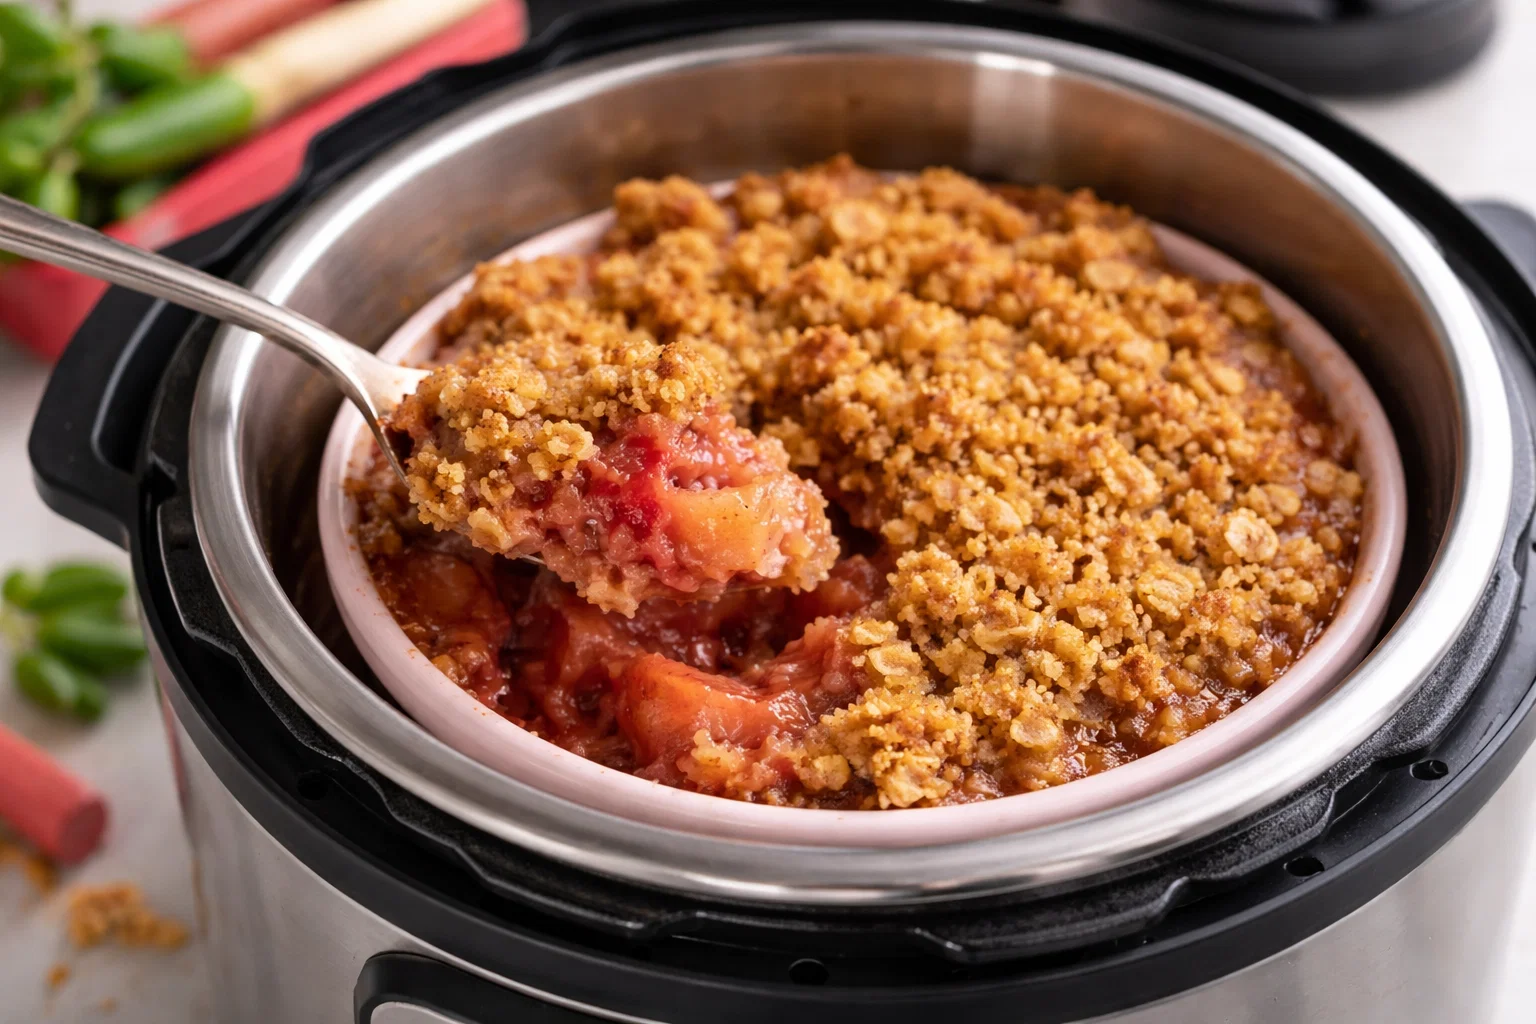
    8. Bake the Pie: Place the pie in the preheated oven and bake for 35-40 minutes, or until the top is set and slightly golden.

    9. Cool the Pie: Allow the pie to cool for about 15 minutes before serving, as this will help it slice better.

    10. Serve and Enjoy: Enjoy your Sweet Crustless Rhubarb Pie warm, or chill it in the refrigerator for a refreshing treat later.

    Every step is simple and adaptable to various dietary needs, making this pie not just easy to make but wholly satisfying to eat!

    Mastering Sweet Crustless Rhubarb Pie: Advanced Tips and Variations

    Ready to take your Sweet Crustless Rhubarb Pie to the next level? Here are some advanced tips and tantalizing variations that will keep your pie game fresh:

    1. Flavor Infusions: Explore different flavors by incorporating lemon zest or ginger into the filling. These flavors enhance rhubarb’s tart profile beautifully.

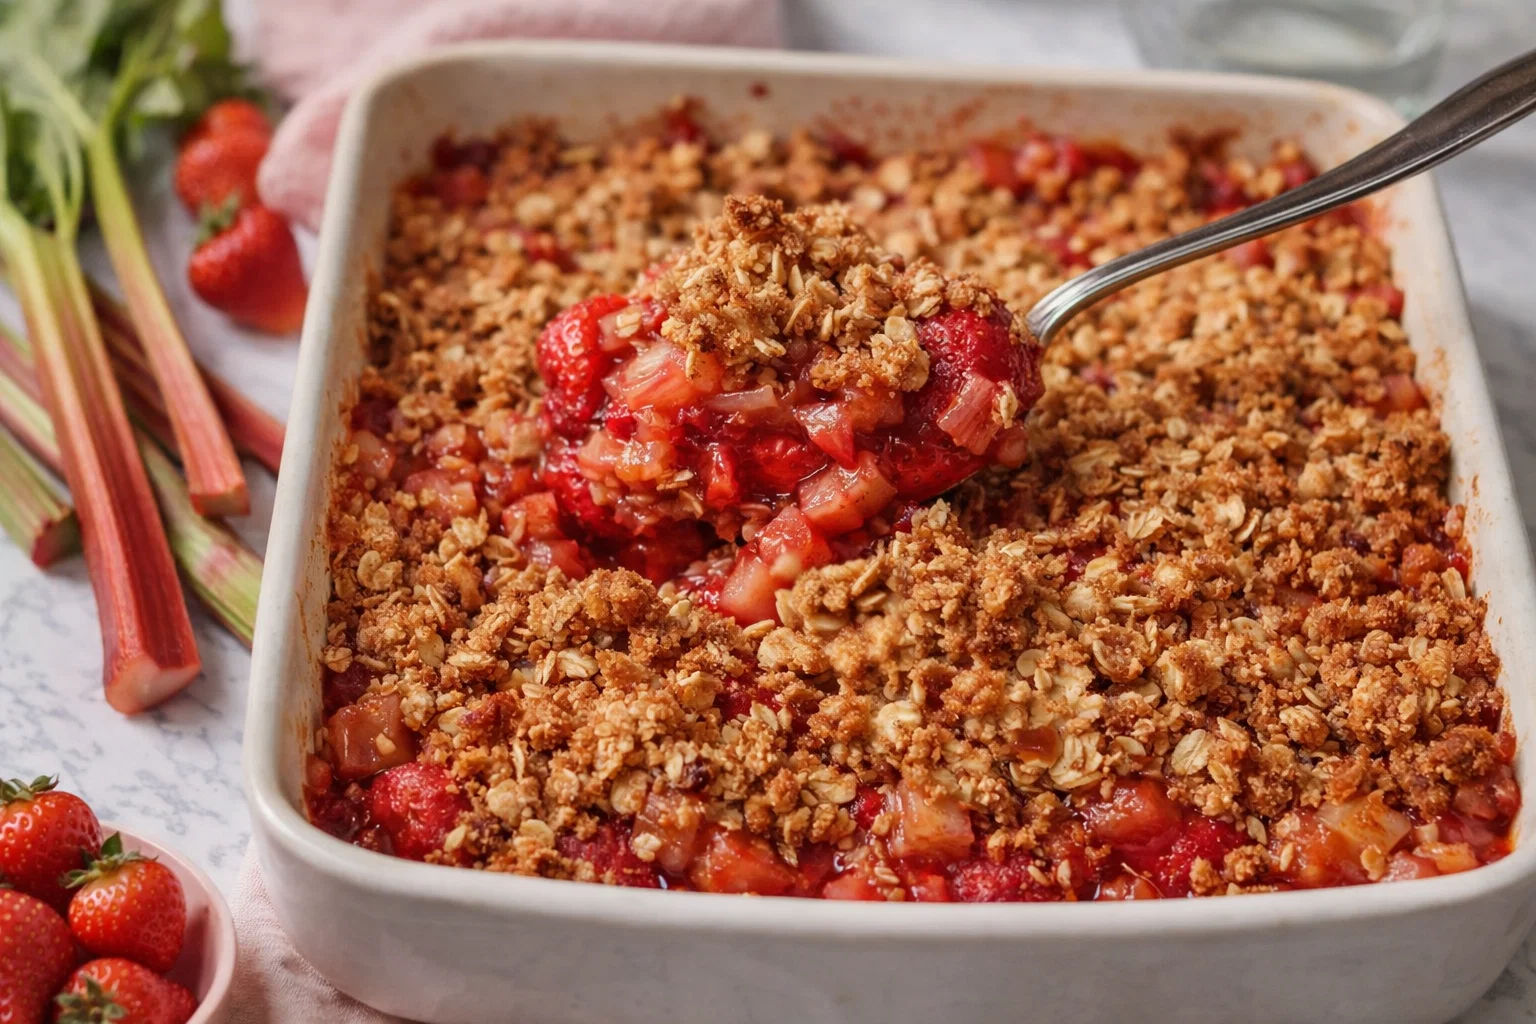
    2. Add More Fruits: Combine rhubarb with other fruits like strawberries, blackberries, or apples to create a mixed fruit pie. Each fruit adds a unique flavor and texture.

    3. Top It Off: While this recipe is crustless, you can sprinkle a crunchy topping made from oats, nuts, and a bit of brown sugar before baking to add texture.

    4. Serving Suggestions: Pair your pie with a scoop of coconut ice cream or yogurt. This contrasts the warm pie and adds a creamy element to your dessert experience.

    5. Garnish Creatively: Add fresh mint or edible flowers as a garnish for a delightful presentation that makes your dish visually stunning.

    By mastering these advanced techniques, you’ll not only enhance the flavor of your Sweet Crustless Rhubarb Pie but also enjoy it in a multitude of ways!

    How to Store Sweet Crustless Rhubarb Pie: Best Practices

    To keep your Sweet Crustless Rhubarb Pie fresh, follow these storage practices:

    • Refrigeration: Wrap the pie in plastic wrap or store it in an airtight container to refrigerate. It can last in the fridge for about 3-5 days, making it perfectly suitable for meal prep.

    • Freezing: If you want to stock up, Sweet Crustless Rhubarb Pie can be frozen for up to 3 months. Just ensure it cools completely before wrapping it tightly in plastic wrap and placing it in an airtight container.

    • Reheating: For serving after refrigeration or freezing, reheat slices in the oven at 350°F (175°C) for about 10-15 minutes until warmed through. For quick reheating, microwave individual slices for about 30 seconds.

    These storage methods ensure your dessert remains delicious and ready to enjoy whenever you crave it.

    Nutritional Value of Sweet Crustless Rhubarb Pie

    Understanding the nutritional value of your dessert can help you make informed choices while also allowing you to enjoy your Sweet Crustless Rhubarb Pie without guilt! Here’s a breakdown of the nutritional content per slice (assuming 8 slices):

    • Calories: Approximately 150
    • Total Fat: 5g
    • Saturated Fat: 0.5g
    • Cholesterol: 0mg (Vegan)
    • Sodium: 40mg
    • Total Carbohydrates: 25g
    • Dietary Fiber: 2g
    • Sugars: 10g
    • Protein: 2g

    The presence of fiber from both rhubarb and almond flour contributes to digestive health. Moreover, this dessert has the advantage of being lower in calories compared to traditional pie recipes, making it appealing to diet-conscious individuals. Enjoy your pie knowing you’re treating your body well!

    FAQs: Frequently Asked Questions About Sweet Crustless Rhubarb Pie

    1. Can I use frozen rhubarb for this recipe?

    Yes, frozen rhubarb works great! Just allow it to thaw and drain excess water before using it in the pie.

    2. Can I substitute the almond flour with all-purpose flour?

    Absolutely! If gluten tolerance is not an issue, feel free to use all-purpose flour as a direct substitute for almond flour.

    3. How can I make this pie lower in sugar?

    Replace sugar with a sugar substitute like stevia or erythritol to reduce sugar content while still maintaining sweetness.

    4. What toppings would you recommend?

    Serve it with whipped coconut cream, vanilla ice cream, or yogurt for added creaminess and flavor.

    5. Is this pie suitable for meal prep?

    Yes! It is an excellent option for meal prep, lasting several days in the fridge or up to three months in the freezer.

    6. How do I know when the pie is done baking?

    The top should appear slightly golden and set. You can also gently shake the pan; if it jiggles slightly in the center, that’s fine; it will firm up while cooling.

    Embrace the joy of baking with this Sweet Crustless Rhubarb Pie! As you serve it to your friends and family, you’re not just sharing a dessert; you’re sharing a delightful experience that caters to every taste and dietary preference. Happy baking!

  • I CanT Stop Making This Tangy Rhubarb Dessert

    I CanT Stop Making This Tangy Rhubarb Dessert

    I Can’T Stop Making This Tangy Rhubarb Dessert: A Tropical Delight

    Introduction to I Can’T Stop Making This Tangy Rhubarb Dessert

    Welcome to a culinary adventure featuring I Can’T Stop Making This Tangy Rhubarb Dessert! This tantalizing recipe combines the unique tartness of rhubarb with complementary flavors to create a refreshing dessert that is perfect for any occasion. With an emphasis on simplicity, this dish caters to a variety of dietary needs, whether you’re a busy parent, a health-conscious individual, or just someone who loves exploring delectable flavors.

    Rhubarb often takes the spotlight in spring and summer, thanks to its vibrant color and zesty taste. And what’s more, this dessert serves as a delicious canvas for creativity! It’s simple to prepare, making it an excellent choice for beginner cooks and seasoned bakers alike. Plus, this delightful dish is not just about flavor; it’s packed with health benefits, including high fiber content and essential vitamins.

    Whether you’re hunting for vegan dessert recipes, gluten-free options, or a tasty treat that everyone can enjoy, this tangy rhubarb dessert is remarkably versatile, fitting seamlessly into different dietary lifestyles. Get ready to impress your friends and family with this unique dessert that is sure to inspire repeat requests!

    Benefits and Advantages of I Can’T Stop Making This Tangy Rhubarb Dessert

    This Tangy Rhubarb Dessert is not just another item on your dessert recipes list; it stands out in its simplicity, health benefits, and adaptability. Let’s dive into the numerous advantages of preparing this delightful dish.

    Ease of Preparation

    One of the main attractions of this recipe is its straightforward process. Minimal cooking skills are required, making it accessible for newer cooks or those with a busy lifestyle. With just a handful of ingredients, you can whip up a batch of this dessert in no time. Consider it a great option for surprise guests or potlucks—effortlessly impressive!

    Health Benefits

    Packed with essential nutrients, rhubarb is a powerhouse ingredient. It’s low in calories but high in fiber, promoting better digestion and a feeling of fullness. Rich in antioxidants, rhubarb can help combat oxidative stress, contributing to overall health. Plus, when prepared without refined sugars and enriched with natural sweeteners, this dessert can be suitable for those keeping an eye on their sugar intake.

    Dietary Compatibility

    This recipe shines in its versatility. By offering vegan and gluten-free adaptations, you can cater to various dietary preferences. Busy parents can serve this to their kids without guilt, while health enthusiasts can indulge in a treat that nourishes their bodies. Whether you’re a student living in a dorm or a working professional seeking a nutritious snack, this dessert ticks all the right boxes.

    Creative Culinary Exploration

    Have some fun with this recipe! It serves as a base for experimentation, whether you wish to add different fruit combinations to the tangy rhubarb or swap out ingredients based on what you have on hand. With this dessert, the possibilities are as vast as your imagination!

    In essence, this rhubarb dessert is an exemplary choice for those searching for health-conscious, uncomplicated, and absolutely delicious dessert recipes that everyone can enjoy.

    Ingredients Overview

    Essential Ingredients for I Can’T Stop Making This Tangy Rhubarb Dessert

    Let’s discuss the star ingredients you’ll need for this delightful Tangy Rhubarb Dessert.

    • Fresh Rhubarb (4 cups, chopped): The star of the show, bringing that iconic tangy flavor. Whole-food enthusiasts will appreciate its health benefits.

    • Granulated Sugar (1 cup): This typical sweetener balances rhubarb’s tartness. For a healthier alternative, consider using coconut sugar or a sugar substitute.

    • Lemon Juice (2 tablespoons): Freshly squeezed lemon juice brightens the flavor profile and enhances the rhubarb’s natural acidity.

    • All-Purpose Flour (1 cup): Provides structure to the dessert. For gluten-free options, substitute with almond flour, oat flour, or a blended gluten-free flour mix.

    • Baking Powder (1 teaspoon): This ensures your dessert has a light, fluffy texture.

    • Coconut Oil (½ cup, melted): This acts as the fat component, lending flavor and moisture while also being vegan. You can substitute it with butter if you’re not vegan.

    • Almond Milk (½ cup): A non-dairy milk adds moisture. Any milk (dairy or plant-based) will work here, ensuring it matches your dietary needs.

    • Salt (½ teaspoon): Enhances the overall flavor of the dessert.

    • Optional Toppings: You may sprinkle on some chopped nuts or a dollop of whipped coconut cream for an extraordinary finish.

    Remember, you can adjust these ingredients based on dietary preferences or what is available in your pantry!

    Dietary Substitutions to Customize Your I Can’T Stop Making This Tangy Rhubarb Dessert

    Customizing your Tangy Rhubarb Dessert to suit various dietary needs has never been easier! Here are some substitutions and adaptations to consider:

    • Vegan Options: Instead of traditional butter, use coconut oil, and for an egg replacement if needed, try flaxseed meal mixed with water (1 tablespoon of flaxseed meal + 3 tablespoons of water = 1 egg).

    • Gluten-Free: Replace all-purpose flour with gluten-free blends or almond flour for a nutty flavor.

    • Lower Sugar: Opt for sugar substitutes like stevia or monk fruit sweetener for a lower-calorie dessert without sacrificing sweetness.

    • No Nuts: If allergies are a concern, you can easily omit nuts or replace them with seeds like pumpkin or sunflower seeds.

    In Summary

    With these ingredient options and substitutions, you can adapt the Tangy Rhubarb Dessert to meet the individual dietary preferences and restrictions of your family and friends! Each version maintains the essence of the original recipe, ensuring everyone gets to enjoy this delightful treat.

    How to Prepare the Perfect I Can’T Stop Making This Tangy Rhubarb Dessert: Step-by-Step Guide

    Now, let’s dive into the fun part—creating this exquisite dessert! Follow these easy steps to achieve the perfect Tangy Rhubarb Dessert.

    1. Prepare the Base:
      Start by preheating your oven to 350°F (175°C). Grease a baking dish with a bit of coconut oil or cooking spray to prevent sticking.

    2. Chop the Rhubarb:
      Wash and chop 4 cups of fresh rhubarb into small, bite-sized pieces. This will help the rhubarb cook evenly and allow its tangy flavor to distribute throughout the dessert.

    3. Mix Rhubarb with Sugar & Lemon Juice:
      In a mixing bowl, combine the chopped rhubarb with 1 cup of granulated sugar and 2 tablespoons of lemon juice. Toss to coat the rhubarb evenly. Let it sit for about 10 minutes to allow the flavors to meld.

    4. Prepare the Dry Ingredients:
      In another bowl, whisk together 1 cup of all-purpose flour, 1 teaspoon of baking powder, and ½ teaspoon of salt. If using gluten-free flour, ensure it’s well-mixed for even consistency.

    5. Combine the Wet Ingredients:
      In a separate bowl, melt ½ cup of coconut oil (or butter) and let it cool slightly. Then, mix in ½ cup of almond milk. If desired, you can add a splash of vanilla extract for an aromatic touch.

    6. Combine Dry and Wet Ingredients:
      Gradually add the dry ingredients to the wet ingredients, stirring until the mixture is just combined. Avoid over-mixing to ensure a fluffy texture.

    7. Assemble:
      In your greased baking dish, spread half of the batter evenly across the bottom. Then, add the rhubarb filling on top, creating an even layer. Finally, spoon the remaining batter over the rhubarb layer—it doesn’t need to be perfect!

    8. Bake to Perfection:
      Place the baking dish in the preheated oven. Bake for approximately 35-40 minutes or until the top is golden brown and a toothpick inserted into the center comes out clean.

    9. Cool and Serve:
      After removing the dessert from the oven, allow it to cool for about 20 minutes before slicing it into squares. This cooling time allows the dessert to set for easier serving.

    10. Enjoy Your Creation:
      Serve it warm or at room temperature, perhaps with a scoop of your favorite ice cream or whipped topping. Enjoy this irresistible dessert with family and friends!

    The beauty of this recipe is its adaptability. You can customize it as needed for dietary preferences, whether you require vegan, gluten-free, or reduced-sugar options.

    Mastering I Can’T Stop Making This Tangy Rhubarb Dessert: Advanced Tips and Variations

    Once you’ve successfully made this dessert, consider these tips and variations to enhance your experience and share with others:

    • Fruit Combinations: Feel free to mix in berries like strawberries or blueberries for a burst of additional flavor and color. The sweetness of the berries contrasts beautifully with rhubarb’s tanginess.

    • Spice it Up: Add a touch of cinnamon or ginger to the batter for a warming note that complements the tangy rhubarb.

    • Create a Crumble Topping: For an extra crunchy texture, mix oats, almond flour, and a small amount of melted coconut oil and sprinkle it over the top before baking.

    • Lemon Zest: Incorporating the zest of a lemon into the batter will elevate the flavor profile and add a fresh citrusy aroma.

    • Sauces: Serve your dessert drizzled with a homemade fruit sauce or a light vanilla glaze to add elegance and sweetness.

    These techniques will not only elevate your Tangy Rhubarb Dessert but will also give you a chance to personalize it further according to your taste. Enjoy the exploration and creativity that cooking this dessert brings!

    How to Store I Can’T Stop Making This Tangy Rhubarb Dessert: Best Practices

    To ensure your Tangy Rhubarb Dessert remains fresh and delicious, follow these storage suggestions:

    Refrigeration

    After cooling, cover the dessert with plastic wrap or transfer it to an airtight container. Store it in the refrigerator for up to four days. The flavors meld together beautifully during the refrigeration period, enhancing the overall taste.

    Freezing

    If you want to keep this dessert longer, it can be frozen. Cut it into squares and wrap each piece tightly in plastic wrap or aluminum foil. Place the wrapped slices into a freezer-safe bag or container. It can be stored in the freezer for up to three months. To thaw, place it in the refrigerator overnight before enjoying.

    Reheating

    To reheat, simply pop it in the oven at 350°F (175°C) for 10-15 minutes, or until warmed through. If you prefer, using a microwave works well, too—heat in 30-second intervals until just warm.

    Proper storage not only extends the life of your dessert but also maintains its delightful texture and taste, ensuring that every bite is just as good as the first!

    Nutritional Value of I Can’T Stop Making This Tangy Rhubarb Dessert

    Understanding the nutritional profile of your Tangy Rhubarb Dessert can enhance your appreciation, especially when it aligns with health goals. Here’s a rough breakdown of the nutritional value per serving (assuming the dessert is divided into 12 portions):

    • Calories: Approximately 180 calories per serving
    • Total Fat: 8g
    • Saturated Fat: 6g (if using coconut oil; less if using butter)
    • Cholesterol: 0mg (if vegan)
    • Sodium: 120mg
    • Total Carbohydrates: 26g
    • Dietary Fiber: 2g
    • Sugars: 10g (may vary based on research on sweeteners used)
    • Protein: 3g

    Vitamins & Minerals

    • Calcium: Contributes to bone health
    • Vitamin K: Promotes proper blood clotting and bone metabolism
    • Manganese: Supports metabolism and bone formation

    The nutritional benefits of rhubarb, and other healthy additions make this dessert not just a treat but also a thoughtful way to indulge without derailing your healthy eating plan. This dessert caters to various dietary needs and preferences, so you can enjoy a delicious and nutrient-rich experience.

    FAQs: Frequently Asked Questions About I Can’T Stop Making This Tangy Rhubarb Dessert

    1. Can I use frozen rhubarb for this recipe?

    Yes, frozen rhubarb works well in this dessert. Just let it thaw and drain excess moisture before using.

    2. How can I make this dessert lower in sugar?

    You can substitute granulated sugar with coconut sugar, stevia, or monk fruit sweetener to reduce the sugar content.

    3. Can I skip the lemon juice?

    While the lemon juice enhances flavor, if you don’t have it, you can omit it but consider using a little more sweetener to balance the tartness.

    4. Is this dessert suitable for a vegan diet?

    Absolutely! Simply use coconut oil instead of butter and any plant-based milk to keep it vegan-friendly.

    5. What can I serve with this dessert?

    This Tangy Rhubarb Dessert is delightful on its own, but serving it with vanilla ice cream, whipped coconut cream, or fresh fruit makes it even more satisfying!

    6. How long can I keep leftovers?

    Stored properly in an airtight container, it can last in the refrigerator for up to four days, and in the freezer for three months.

    7. Can I add nuts or seeds to this recipe?

    Definitely! Chopped almonds or walnuts work wonderfully mixed into the batter or sprinkled on top before baking.

    8. Is it possible to reduce the baking time?

    If you’re using smaller baking dishes or making individual servings, check for doneness earlier, as the baking time may be reduced.

    Through these FAQs, aspiring cooks will feel more confident to dive into making this delightful Tangy Rhubarb Dessert and experience the joy of cooking unique dishes, tailored to personal lifestyle choices and dietary needs.


    Feel free to adapt the recipe as needed while enjoying the journey of creating and savoring this irresistible Tangy Rhubarb Dessert! Happy cooking! 🍰

  • Easy Cinnamon Sugar Air Fryer Banana Chips

    Easy Cinnamon Sugar Air Fryer Banana Chips

    Easy Cinnamon Sugar Air Fryer Banana Chips: A Tropical Delight

    Introduction to Easy Cinnamon Sugar Air Fryer Banana Chips

    If you’re in search of delicious healthy snacks that are easy to prepare, then look no further than these Easy Cinnamon Sugar Air Fryer Banana Chips. This recipe is a fantastic way to turn ripe bananas into a crispy treat that satisfies your sweet tooth without compromising your health goals.

    The beauty of making banana chips in an air fryer lies in their simplicity. Not only does this method ensure a wonderfully crispy texture with less oil compared to traditional frying methods, but it also delivers that scrumptious cinnamon sugar flavor that will keep your family reaching for more. These banana chips are not just a hit among kids; they delight adults too, making them a versatile snack for every member of the family.

    Moreover, these chips are not only vegan and gluten-free but also low in calories, making them an ideal option for health-conscious eaters. Whether you’re a busy parent looking for quick, nutritious snacks for your kids, a student needing a study break, or a newlywed looking to impress your spouse with delicious treats, these banana chips will surely be a crowd-pleaser. So, grab your air fryer, and let’s dive into this delightful recipe!


    Benefits and Advantages of Easy Cinnamon Sugar Air Fryer Banana Chips

    When it comes to preparing healthy snacks, few options are as appealing and straightforward as Easy Cinnamon Sugar Air Fryer Banana Chips. Here’s why this recipe stands out:

    1. Quick and Easy Preparation:
      The air fryer cooks bananas to perfection in a fraction of time compared to traditional methods. In less than 30 minutes, you can transform simple bananas into a delectable snack without spending hours in the kitchen.

    2. Health Benefits:
      Bananas are a powerhouse of nutrients. Rich in potassium, vitamin C, and vitamin B6, they contribute to heart health, improved digestion, and enhanced mood. Making chips from bananas can be a way to preserve their nutrients while enjoying a satisfyingly crunchy texture. By choosing air frying over deep frying, the overall fat content remains low, making these chips a guilt-free pleasure.

    3. Customizable Flavor:
      Although cinnamon sugar is a classic flavor pairing, these banana chips can easily be modified to fit different taste preferences. You might consider adding a pinch of nutmeg, incorporating cocoa powder for a chocolatey twist, or even using spices like cayenne for a kick!

    4. Diet-Friendly:
      This recipe fits various dietary needs, including vegan, gluten-free, and low-calorie diets. With simple substitutions, you can cater to your specific dietary preferences while still enjoying a tasty snack. It allows you to avoid the preservatives and added sugar often found in store-bought snacks.

    5. Perfect for Meal Prep:
      Making a large batch of banana chips for the week is not only easy but also a smart choice for those busy days when you need a healthy on-the-go option. You can prep these chips in advance and have a crispy snack ready whenever hunger strikes.

    In conclusion, the Easy Cinnamon Sugar Air Fryer Banana Chips combine ease of preparation, health benefits, and flavor versatility. They make snacking enjoyable and guilt-free, ensuring that you stay on track with your healthy lifestyle!


    Ingredients Overview

    Essential Ingredients for Easy Cinnamon Sugar Air Fryer Banana Chips

    Making Easy Cinnamon Sugar Air Fryer Banana Chips requires just a handful of ingredients. Here’s what you’ll need:

    1. Ripe Bananas: 3 large
    2. Bananas should be perfectly ripe for maximum sweetness. Overripe bananas work best as they are sweeter, which means less added sugar!

    3. Cinnamon: 1 tablespoon

    4. Cinnamon adds a warm, aromatic flavor that complements the sweetness of the bananas and may help regulate blood sugar levels.

    5. Sugar (or Sugar Substitute): 2 tablespoons

    6. You can use granulated sugar, coconut sugar, or a sugar substitute like Stevia to keep the calorie count down, depending on your dietary preference.

    7. Cooking Oil (optional): 1 teaspoon

    8. A light coating of oil (like coconut or olive oil) can help achieve that extra crispiness, but it’s optional if you’re aiming for the lowest calorie option.

    9. Salt: A pinch

    10. A small amount of salt enhances the flavor profile, balancing the sweetness of the cinnamon sugar.

    Dietary Substitutions to Customize Your Easy Cinnamon Sugar Air Fryer Banana Chips

    Healthy snacks can and should cater to various dietary preferences. Here are some suggested substitutions to customize your Easy Cinnamon Sugar Air Fryer Banana Chips:

    • Banana Alternative: If you want to try a different base, consider using plantains! Plantains have a starchier texture and can provide a different yet delightful flavor when cooked.

    • Sugar Alternatives: For a sugar-free option, replace granulated sugar with erythritol, monk fruit, or another zero-calorie sweetener. This substitution makes the snack suitable for diabetics or those watching their sugar intake.

    • Gluten-Free Considerations: The entire recipe is inherently gluten-free; however, if you add additional spices or toppings, make sure they are labeled gluten-free.

    • Add-Ins: To add variety, try mixing in chopped nuts or seeds for a crunchy texture, or sprinkles of unsweetened cocoa powder for a chocolate flavor.

    • Flavor Variations: Instead of cinnamon, feel free to experiment with other spices like vanilla powder or nutmeg to switch things up.

    These substitutions not only cater to dietary needs but also encourage creativity in the kitchen. Have fun customizing your Easy Cinnamon Sugar Air Fryer Banana Chips to fit your health preferences while exploring new flavors!


    How to Prepare the Perfect Easy Cinnamon Sugar Air Fryer Banana Chips: Step-by-Step Guide

    Follow these straightforward steps to create your own batch of Easy Cinnamon Sugar Air Fryer Banana Chips that are delicious, crisp, and packed with flavor:

    1. Prepare the Base: Begin by selecting 3 ripe bananas. Peel and slice them into 1/8-inch thick rounds. The thickness is crucial—too thick, and they won’t crisp up; too thin, and they may burn.

    2. Mix Ingredients: In a mixing bowl, combine the cinnamon, sugar, and a pinch of salt. This blend will coat the banana slices irregularly, providing that classic cinnamon sugar flavor.

    3. Coat the Banana Slices: Gently mix the sliced bananas with the cinnamon-sugar mixture until they are uniformly coated. If using oil, lightly drizzle it over the bananas before coating them to help them crisp up.

    4. Preheat the Air Fryer: Preheat your air fryer to 350°F (175°C) for about 3-5 minutes. Preheating ensures an even cooking temperature, giving you that desired crunch.

    5. Arrange the Banana Slices: Place the bananas in a single layer within the air fryer basket. Avoid overcrowding; if needed, cook in batches for the best results.

    6. Air Fry the Chips: Cook the bananas at 350°F (175°C) for about 10-15 minutes. Check halfway through and shake the basket to ensure even cooking. The chips will be done when they are golden brown and crispy.

    7. Cool and Crisp: Once cooked, remove the chips from the air fryer and let them cool on a wire rack. Cooling helps them become even crisper.

    8. Store Properly: If you have any leftover chips, store them in an airtight container once completely cooled to prolong their crispiness.

    Make sure to monitor the cooking time closely as some air fryers may vary. This simple, step-by-step approach ensures that you create perfect Easy Cinnamon Sugar Air Fryer Banana Chips every time, making them one of the best healthy snacks you can offer yourself and your loved ones!


    Mastering Easy Cinnamon Sugar Air Fryer Banana Chips: Advanced Tips and Variations

    To take your Easy Cinnamon Sugar Air Fryer Banana Chips to the next level, consider these advanced tips and fun variations:

    1. Use Perfectly Ripe Bananas: Selecting your bananas is key. The ideal banana for chips is one that’s slightly overripe, providing natural sweetness for your healthy snack. Avoid any bananas that have green tinges—they’re not sweet enough.

    2. Experiment with Different Spices: While cinnamon sugar is delightful, innovate with a mix of spices like pumpkin spice or cardamom. They can introduce a new flavor profile that enchants the palate.

    3. Add Other Fruits: Feel free to mix in apple or pear slices. They can cook at similar times as bananas, creating a delightful medley of flavors.

    4. Try Sweet and Savory Together: For an unexpected twist, sprinkle some chili powder or cayenne for a sweet and spicy version of your banana chips.

    5. Sugary Crunch: If you want a bit of extra crunch, consider adding finely crushed nuts such as almonds or walnuts to your cinnamon-sugar mixture. They won’t just add flavor, but extra nutrients as well!

    6. Food Pairing Ideas: Enhance your healthy snacking experience by pairing these chips with nut butter for a protein boost or a yogurt dip for additional freshness. This combination can make your snack more filling and satisfying.

    By following these tips and experimenting with variations, your Easy Cinnamon Sugar Air Fryer Banana Chips can be an exciting endeavor each time you make them. Such creativity keeps snacking engaging and can help maintain a healthy lifestyle—a perfect example of how healthy snacks can be full of variety and flavor!


    How to Store Easy Cinnamon Sugar Air Fryer Banana Chips: Best Practices

    Storing your freshly made Easy Cinnamon Sugar Air Fryer Banana Chips requires some special care to retain their delightful crunch:

    1. Cooling is Crucial: First, always allow your banana chips to cool completely before placing them in storage. This step prevents moisture from trapping, which can make your chips soggy.

    2. Airtight Containers: Store cooled banana chips in airtight containers. Glass jars, zip-lock bags, or plastic containers can all work well, but ensure they are sealed tightly to keep air out.

    3. Room Temperature Storage: For best results, keep your banana chips at room temperature in a cool, dry place. Never refrigerate them, as this will change the texture and lead to moisture buildup.

    4. Longer Storage Option: If you want to store your banana chips for an extended period, consider freezing them. Lay them out on parchment paper in a single layer and freeze until solid. Once frozen, transfer them to a freezer-safe bag or container. Note that they may lose some crispiness upon thawing, so they’re best enjoyed fresh.

    By following these best practices for storage, you can enjoy your Easy Cinnamon Sugar Air Fryer Banana Chips as healthy snacks that remain fresh and crispy over several days. Knowing how to store your snacks properly means you can indulge guilt-free whenever the craving arises.


    Nutritional Value of Easy Cinnamon Sugar Air Fryer Banana Chips

    When considering healthy snacks, understanding the nutritional value is vital. Here’s a breakdown of the approximate nutritional value per serving (based on a 1-ounce serving size, or about 10 chips):

    • Calories: Approximately 150 calories
    • Total fat: 2g
    • Saturated fat: 1g
    • Carbohydrates: 34g
    • Dietary fiber: 3g
    • Sugars: 12g (includes both naturally occurring sugars and any added sugars)
    • Protein: 1g
    • Potassium: 300mg
    • Vitamin C: 10% of daily value
    • Calcium: 2% of daily value
    • Iron: 2% of daily value

    Health Benefits:

    • Low in calories: These chips offer a guilt-free option for snacking.
    • Nutrient-rich: Naturally rich in potassium, bananas support heart health and blood pressure regulation.
    • Dietary fiber: The presence of dietary fiber promotes healthy digestion and can help you feel fuller longer.

    Adopting these Easy Cinnamon Sugar Air Fryer Banana Chips into your array of healthy snacks provides not only a delectable treat but also nutritional benefits that support your overall health. Made with simple, wholesome ingredients, you can enjoy them without any of the guilt associated with typical junk food!


    FAQs: Frequently Asked Questions About Easy Cinnamon Sugar Air Fryer Banana Chips

    Q: Can I use green bananas to make these chips?
    A: It’s best to use ripe bananas for the ideal sweetness and texture. Green bananas are too starchy and won’t provide the same flavor or crispiness.

    Q: How long do the banana chips last?
    A: When stored in an airtight container at room temperature, they can last up to one week. For longer preservation, freeze them as detailed above.

    Q: Can I make these banana chips without cinnamon?
    A: Absolutely! Feel free to omit cinnamon and substitute it with other spices like nutmeg or even flavored extracts to customize them to your taste.

    Q: How do I know when the banana chips are done?
    A: The chips should be golden brown and crispy to the touch. Each air fryer may vary, so check frequently during the cooking process.

    Q: Are these chips suitable for kids?
    A: Yes! These banana chips are a fun, healthy snack that kids usually love. They are a great alternative to sugary and processed snacks.

    Q: How can I make them spicier?
    A: You can add a pinch of chili powder or cayenne pepper to the cinnamon sugar mixture for a sweet and spicy flavor that’s both exciting and unique!

    These frequently asked questions should help clarify any uncertainties and encourage readers to take the plunge into making these wonderful healthy snacks, allowing everyone to enjoy their homemade Easy Cinnamon Sugar Air Fryer Banana Chips!

    In conclusion, by embracing this deliciously simple recipe, you’re not just making snacks but also creating healthier habits for yourself and your loved ones. Enjoy the crispy crunch and delightful sweetness any time you need a quick, nutritious bite!

  • Homemade Crustless Rhubarb Pie

    Homemade Crustless Rhubarb Pie

    Homemade Crustless Rhubarb Pie: A Tropical Delight

    Introduction to Homemade Crustless Rhubarb Pie

    Are you a fan of easy and delectable dessert recipes that don’t require complicated steps or extensive ingredients? If so, then this homemade crustless rhubarb pie is just what you need! This recipe not only simplifies the traditional pie-making process but also embraces the vibrant, tart flavor of rhubarb, making it a delightful treat for any occasion. The beauty of this pie is that you can enjoy it without the added calories and carbs from a crust, allowing the rhubarb to shine as the star ingredient.

    What sets our crustless rhubarb pie apart is its versatility; it’s a fantastic option for various dietary needs. Whether you’re looking for a vegan, gluten-free, or low-calorie dessert, this pie has got you covered. Made with fresh rhubarb and simple pantry staples, this recipe will inspire busy parents, health-conscious individuals, and anyone who loves baked goods to whip it up in no time. Plus, it’s a delightful way to introduce your family to the wonderful taste of rhubarb, often overlooked in the world of dessert recipes.

    Why You Should Try This Recipe

    With its straightforward preparation, minimal cooking skills required, and nourishing properties, homemade crustless rhubarb pie is a fabulous choice for home cooks of all levels. It makes a charming end to family dinners, a sweet surprise for guests, or even a post-work treat for yourself. Let’s dive deeper into the benefits and advantages of this scrumptious dessert!

    Benefits and Advantages of Homemade Crustless Rhubarb Pie

    Crafting a delicious pie doesn’t have to be a daunting task. This homemade crustless rhubarb pie is perfect for those who want to indulge without the hassle of making a traditional pie crust. Here are the benefits of choosing this delightful dessert:

    1. Simplicity: With just a handful of ingredients, you can create a beautiful pie without the fuss. There is no rolling, shaping, or baking a separate crust to worry about — you simply focus on the filling.

    2. Health Benefits: Rhubarb is incredibly nutritious, offering a good amount of dietary fiber, calcium, and vitamins. By omitting the crust, you cut down on calories and carbs, which is always a plus for those watching their diet.

    3. Versatile for Dietary Needs: This recipe can easily accommodate various dietary requirements. Whether you’re vegan, gluten-free, or need a low-calorie treat, this pie can be adapted accordingly. Use plant-based milk and egg substitutes for a vegan version, and ensure your sweeteners align with gluten-free needs.

    4. Perfect for All Occasions: Whether you’re hosting a dinner party, celebrating a special occasion, or simply want a comforting dessert at home, this pie fits all situations. It’s light enough for summer gatherings and cozy enough for winter nights.

    5. Quick Preparation: Ideal for busy parents or students, this recipe yields a delicious dessert with minimal time investment. It’s an excellent way to surprise and delight family or roommates without spending hours in the kitchen.

    By creating this homemade crustless rhubarb pie, you will not only satisfy your sweet tooth but also serve up a dish rich in flavor and nutrients. Let’s explore the essential ingredients that make this pie a winner.

    Ingredients Overview

    Essential Ingredients for Homemade Crustless Rhubarb Pie

    This crustless pie requires a short list of ingredients to deliver incredible taste and texture. Here’s what you’ll need:

    • 4 cups of fresh rhubarb, chopped
    • Rhubarb gives this pie its signature tangy flavor. Make sure to use fresh, tender stalks for the best results.

    • 1 1/2 cups of granulated sugar (or your choice of natural sweetener)

    • Sweetens the filling. If you’re looking for a low-calorie option, consider using stevia or monk fruit sweetener to reduce sugar content.

    • 4 large eggs (or flax eggs for vegan option)

    • Acts as a binder to hold the pie together. For a vegan alternative, mix 1 tablespoon of ground flaxseed with 2.5 tablespoons of water to create a flax egg.

    • 1 cup of milk (dairy or plant-based)

    • Adds creaminess to the filling. Almond milk, coconut milk, or oat milk works as excellent vegan alternatives.

    • 1 cup of all-purpose flour (or a gluten-free flour blend)

    • This provides structure. For a gluten-free option, choose a gluten-free 1:1 baking flour.

    • 1 teaspoon of vanilla extract

    • Enhances the flavor, adding a warm depth to the pie.

    • 1 teaspoon of baking powder

    • Gives the pie an airy texture.

    • Pinch of salt

    • Balances sweetness and enhances flavor.

    These ingredients come together to create a light and fluffy pie, bursting with the bright flavors of rhubarb. Next, we’ll discuss how to customize this recipe for various dietary needs with substitutions.

    Dietary Substitutions to Customize Your Homemade Crustless Rhubarb Pie

    Customization is key when it comes to accommodating different dietary preferences. Here are some smart substitutions that you can make in this crustless rhubarb pie:

    • Flour: If you’re gluten-free, opt for almond flour or a certified gluten-free all-purpose blend. Not only does this work perfectly, but it can also add a lovely nutty flavor to your pie.

    • Sweeteners: If you want a healthier sweetener option, consider using dates or maple syrup instead of granulated sugar. Just make sure to adjust the amount accordingly, as these natural sweeteners are often sweeter.

    • Dairy Alternatives: For lactose intolerance or a vegan diet, swapping regular milk for almond, soy, or coconut milk works seamlessly. The flavor will still shine through, ensuring you don’t miss out on the creamy texture.

    • Egg Replacement: Besides flax eggs, you can use unsweetened applesauce (1/4 cup = 1 egg) or silken tofu blended until smooth as viable substitutes for eggs in a vegan diet.

    How to Prepare the Perfect Homemade Crustless Rhubarb Pie: Step-by-Step Guide

    Creating this delicious homemade crustless rhubarb pie is a seamless process, even for novice bakers. Follow this step-by-step guide to ensure your pie turns out perfectly every time:

    1. Preheat the Oven: Set your oven to 350°F (175°C) to ensure it’s hot when your pie is ready to bake.

    2. Prepare Your Dish: Grease a 9-inch pie pan or round baking dish with a bit of oil or cooking spray to prevent sticking.

    3. Chop the Rhubarb: Wash and chop your rhubarb into small, even pieces (about 1-inch long). This helps ensure consistent cooking.

    4. Mix the Dry Ingredients: In a large bowl, whisk together the flour, sugar, baking powder, and salt until combined. If you’re using gluten-free flour, ensure it’s blended well with the other dry ingredients.

    5. Combine the Wet Ingredients: In a separate bowl, beat the eggs (or flax eggs), vanilla extract, and milk until well combined.

    6. Combine Wet and Dry Ingredients: Slowly pour the wet mixture into the dry ingredients, stirring until just combined. Keep mixing until you achieve a smooth batter – it’s okay to have a few lumps!

    7. Fold in the Rhubarb: Gently fold in the rhubarb pieces until they are coated evenly with the batter. This ensures every bite is filled with the delightful flavor of the fruit.

    8. Pour into the Baking Dish: Transfer the mixture into your prepared pie pan, scraping the bowl to ensure no batter is left behind.

    9. Bake the Pie: Place the pie dish in your preheated oven and bake for 40-45 minutes, or until the top is golden and the center is set. A toothpick inserted into the center should come out clean.

    10. Cool the Pie: Once baked, remove it from the oven and allow it to cool completely on a wire rack. This will help the pie firm up as it cools.

    11. Serve: Slice and serve your delicious crustless rhubarb pie plain, or with a dollop of whipped cream or dairy-free alternative, if desired.

    Following these steps ensures you create a delightful pie that resonates with both traditional and innovative dessert recipes. Ready for some advanced tips and variations to elevate your pie game?

    Mastering Homemade Crustless Rhubarb Pie: Advanced Tips and Variations

    While the basic recipe for homemade crustless rhubarb pie is fantastic on its own, experimenting with variations can take your baking experience to another level. Here are some advanced tips and ideas for variations:

    • Add Spices: Enhance the flavor by adding ground cinnamon or nutmeg. A teaspoon of cinnamon can add warmth and complement the tartness of the rhubarb beautifully.

    • Fruit Blends: Consider mixing rhubarb with other fruits like strawberries or blueberries. Not only does this add color, but it can also enhance sweetness and complexity in flavor.

    • Nuts and Seeds: For a delightful crunch, fold in some chopped nuts or seeds, such as walnuts or pumpkin seeds. They add texture and healthy fats to the dish.

    • Zest for Flavor: Grate some lemon or orange zest into the batter for a refreshing citrus touch that brightens up the overall flavor profile of the pie.

    • Top with Oats: For a streusel-like topping, mix oats with a bit of melted coconut oil or butter, brown sugar, and a sprinkle of cinnamon. Spread this mixture over the pie before baking for an enticing crunchy top.

    These simple variations can transform your crustless rhubarb pie from ordinary to extraordinary, making it a hit at any gathering.

    How to Store Homemade Crustless Rhubarb Pie: Best Practices

    Storing your homemade crustless rhubarb pie properly can keep it fresh and delicious for several days. Here are the best practices for storage:

    • Room Temperature: If you plan to eat the pie within a day or two, it’s perfectly safe to leave it covered at room temperature.

    • Refrigeration: For longer storage, cover the pie with plastic wrap or transfer it to an airtight container and refrigerate it. It can last up to one week in the fridge.

    • Freezing: If you’d like to store it for even longer, consider freezing your pie. Slice it into individual portions, wrap each slice in plastic wrap, and place it in a freezer-safe bag or container. This allows you to enjoy it later without defrosting the entire pie. It can be frozen for up to three months.

    • Reheating: To reheat, take a slice straight from the fridge or freezer, and warm it in the oven at 350°F (175°C) for about 10-15 minutes, or until heated through. Enjoy with a scoop of ice cream or whipped topping for a comforting dessert experience.

    By following these storage methods, your homemade crustless rhubarb pie will stay fresh and ready to relish at any time.

    Nutritional Value of Homemade Crustless Rhubarb Pie

    Understanding the nutritional content of your homemade crustless rhubarb pie can help you make informed choices about indulging in this delicious dessert. Here’s a general breakdown based on typical ingredients:

    • Serving Size: 1 slice (1/8 of pie)
    • Calories: Approximately 180
    • Total Fat: 5g
    • Saturated Fat: 1.5g
    • Cholesterol: 35mg
    • Sodium: 50mg
    • Total Carbohydrates: 30g
    • Dietary Fiber: 2g
    • Sugars: 15g
    • Protein: 4g

    This crustless pie is relatively low in calories and fat compared to traditional pies, making it a more nutritious dessert option. Adjustments for ingredients like using a sugar substitute or alternative flour can further impact the nutritional profile, giving you the flexibility to create a dessert that fits your dietary needs.

    FAQs: Frequently Asked Questions About Homemade Crustless Rhubarb Pie

    Q1: Can I use frozen rhubarb for this recipe?
    Yes, you can use frozen rhubarb! Just remember to thaw and drain excess moisture before adding it to the mixture to prevent extra liquid.

    Q2: How do I know when my rhubarb pie is done?
    Your pie is done when the top is golden brown and a toothpick inserted into the center comes out clean.

    Q3: Is rhubarb pie gluten-free?
    The traditional recipe isn’t gluten-free but can easily be made gluten-free by substituting all-purpose flour with a gluten-free flour blend.

    Q4: Can I make this pie without eggs?
    Absolutely! You can use flax eggs or applesauce as a substitute. Check the earlier section on ingredient substitutions for specific measurements.

    Q5: How can I enhance the sweetness without adding sugar?
    Try natural sweeteners like agave syrup, maple syrup, or stevia. These alternatives can provide sweetness without the calories of refined sugar.

    By addressing these frequently asked questions, you can make informed decisions and adjustments to ensure your rhubarb pie is a true reflection of your taste preferences and dietary needs.


    Now that you have a comprehensive guide to making a delightful homemade crustless rhubarb pie, it’s time to gather your ingredients and get baking! This simple yet satisfying dessert is bound to amaze your friends and family, and it’s a wonderful way to celebrate the vibrant flavors of rhubarb in a healthier way. Enjoy your culinary adventure!

  • No-Bake Greek Yogurt Key Lime Pie

    No-Bake Greek Yogurt Key Lime Pie

    No-Bake Greek Yogurt Key Lime Pie: A Tropical Delight

    Introduction to No-Bake Greek Yogurt Key Lime Pie

    Are you on the hunt for a delicious yet simple dessert recipe that not only satisfies your sweet tooth but is also healthy? Look no further! This No-Bake Greek Yogurt Key Lime Pie is the perfect solution for busy home cooks, parents, students, and anyone who loves a refreshing treat without the fuss of turning on the oven.

    This delightful pie offers a creamy, tangy filling made primarily with Greek yogurt, providing a boost of protein while cutting down on refined sugars. It’s a fantastic option for those who prioritize their health without sacrificing flavor. Plus, it’s versatile enough to cater to various dietary needs—think gluten-free, low-calorie, and even vegan variations! The recipe’s no-bake nature means you can whip it up in a matter of minutes, making it a go-to dessert for impromptu gatherings or family dinners.

    Whether you’re a baking enthusiast looking to craft something easy or a newlywed wanting to impress your partner, this Key Lime Pie will inspire your culinary journey. So grab your mixing bowls, and let’s dive into this tropical delight that’ll elevate your dessert game!

    Benefits and Advantages of No-Bake Greek Yogurt Key Lime Pie

    You might wonder, what makes this No-Bake Greek Yogurt Key Lime Pie stand out among the countless dessert recipes available? Here are several compelling reasons:

    1. Simplicity: With minimal cooking involved, this pie requires no special baking techniques. It can be prepared in just a few quick steps. This is ideal for busy parents or students who lack time but still want to enjoy a homemade dessert.

    2. Health Benefits: Greek yogurt packs protein, calcium, and probiotics, making this dessert a healthier alternative to traditional recipes that are often laden with heavy creams and sugars. The citrusy flavor from the key limes contributes vitamin C, and the absence of baking minimizes calorie absorption.

    3. Diet-Friendly: This pie can easily be made gluten-free by using alternative crust options such as almond flour or gluten-free cookies. For those who prefer dairy-free or vegan options, coconut yogurt can substitute Greek yogurt effortlessly, while natural sweeteners like maple syrup can make this pie truly versatile.

    4. Varied Serving Options: This recipe is adaptable to various occasions—whether it’s a summer BBQ, a birthday celebration, or a casual family dinner. Its light, refreshing taste is sure to impress guests of all ages.

    5. No Need for an Oven: In hot weather, turning on the oven can be unbearable. This dessert recipe sidesteps that entirely, providing a cool, refreshing treat that sets in the refrigerator.

    This No-Bake Greek Yogurt Key Lime Pie offers a delightful fusion of ease, health, and versatility. It’s perfect for a range of dietary needs and is sure to please any palate, all while being a breeze to prepare.

    Ingredients Overview

    Essential Ingredients for No-Bake Greek Yogurt Key Lime Pie

    Before you begin this no-bake adventure, let’s gather all the ingredients you’ll need to construct this creamy masterpiece. Each ingredient plays a crucial role in elevating the flavor and texture of this dessert.

    • For the Crust:
    • 1 and ½ cups of graham cracker crumbs (or gluten-free alternative)
    • ½ cup of unsalted butter, melted (or coconut oil for vegan)
    • 2 tablespoons of sugar (optional, adjust based on sweetness preference)

    • For the Filling:

    • 2 cups of plain Greek yogurt (or coconut yogurt for vegan)
    • ½ cup of freshly squeezed key lime juice (about 4-6 limes)
    • Zest of 2 key limes
    • ½ cup of honey or maple syrup (for vegan option)
    • 1 teaspoon of vanilla extract
    • 1 packet of gelatin (or agar-agar for vegan gelatin alternative, if desired)

    • For Garnishing:

    • Whipped cream (or coconut whipped topping for vegan)
    • Lime slices and zest

    This ingredient list not only showcases the pie’s simplicity but emphasizes the health-conscious choices available—from the protein-rich Greek yogurt to the natural sweeteners. The versatility in ingredients provides options for all dietary preferences, making it a favorite among many.

    Dietary Substitutions to Customize Your No-Bake Greek Yogurt Key Lime Pie

    To ensure that everyone can enjoy this pie, here are some recommended substitutions:

    • Gluten-Free: Use gluten-free graham cracker crumbs or even nuts ground into a fine crust. Almond flour or crushed gluten-free cookies work beautifully.

    • Dairy-Free/Vegan: Swap Greek yogurt for coconut yogurt or almond yogurt. Use coconut cream whipped for a luscious topping instead of dairy cream.

    • Sweeteners: Instead of sugar or honey, use agave nectar or stevia to lower the calorie count while still keeping the dessert sweet.

    • Flavor Variations: Add a touch of fresh mint for a refreshing twist or incorporate berries for a burst of color and additional nutrients.

    These substitutions make the No-Bake Greek Yogurt Key Lime Pie accessible and enjoyable for everyone, regardless of dietary restrictions.

    How to Prepare the Perfect No-Bake Greek Yogurt Key Lime Pie: Step-by-Step Guide

    Creating this delectable pie involves several straightforward steps. With a little patience and attention to detail, you’ll have a beautiful dessert ready to impress.

    1. Prepare the Base:
    2. In a medium bowl, combine the graham cracker crumbs and melted butter. Mix until all crumbs are evenly coated. Press the mixture firmly into the bottom of a pie dish to create an even layer. Refrigerate while preparing the filling.

    3. Mix Ingredients:

    4. In a large mixing bowl, combine the Greek yogurt, key lime juice, lime zest, honey (or maple syrup), and vanilla extract. Whisk together until smooth and creamy, ensuring there are no lumps.

    5. Add Gelatin:

    6. If using gelatin: In a small saucepan, dissolve the gelatin in a few tablespoons of water over low heat until fully dissolved. Slowly mix the dissolved gelatin into the yogurt mixture, stirring continuously to combine. If using agar-agar, follow the instructions on the package for preparation and incorporate it into the filling.

    7. Combine and Fill:

    8. Pour the yogurt filling over the chilled crust. Use a spatula to smooth the top for an even finish. Cover the pie with plastic wrap or foil. Refrigerate for at least 4-6 hours, or overnight for best results.

    9. Garnish and Serve:

    10. Once the pie is fully set, remove it from the refrigerator. Top with whipped cream or coconut topping and decorate with lime slices and additional zest. Slice into wedges and serve chilled.

    11. Enjoy Your Creation:

    12. Take a moment to appreciate your handiwork! Serve at summer gatherings, or simply enjoy it as a treat after dinner.

    This step-by-step guide not only illustrates how simple it is to make this no-bake pie but also ensures you can adapt it to suit specific dietary needs as you go along.

    Mastering No-Bake Greek Yogurt Key Lime Pie: Advanced Tips and Variations

    To elevate your No-Bake Greek Yogurt Key Lime Pie, consider these advanced tips and variations:

    1. Layering Flavors: For a unique twist, layer your filling with fruit puree or jam between sections of the yogurt mixture. This adds complexity and not only looks beautiful but also enhances the dessert’s flavor.

    2. Switching the Citrus: While key limes are traditional, try using regular limes, lemons, or even oranges for a different flavor profile. Each citrus brings its unique taste; experimentation can lead to delightful results.

    3. Enhancing Texture: To add texture, consider folding in crushed nuts or granola into the yogurt mixture. It creates a pleasant crunch against the creamy filling.

    4. Serving Suggestions: Pair the pie with tropical fruits like mangos or pineapple on the side for a festive presentation. Adding a sprig of mint can also brighten the dish.

    5. Chill Time Options: If you’re short on time, allowing the pie to set for just 2-3 hours will still yield a delicious dessert, though longer setting times (6 hours or overnight) enhance the flavors and structure.

    These advanced tips and variations will ensure each pie is uniquely yours while impressing everyone at the table.

    How to Store No-Bake Greek Yogurt Key Lime Pie: Best Practices

    Storing your No-Bake Greek Yogurt Key Lime Pie correctly is essential for preserving its freshness and flavor:

    • Refrigeration: Always keep your pie refrigerated when not being served. Cover it tightly with plastic wrap or place it in an airtight container. It will last for about 3-4 days in the refrigerator.

    • Freezing: If you want to store the pie for longer, you can freeze it. Wrap the pie tightly in plastic wrap and then in aluminum foil to prevent freezer burn. It will last for about a month. When ready to serve, thaw it in the refrigerator overnight before enjoying.

    • Reheating: Unlike baked desserts, this pie should not be reheated. The best enjoyment comes when it’s served chilled directly from the fridge.

    By following these best practices, you can enjoy your no-bake creation at its freshest and most delicious.

    Nutritional Value of No-Bake Greek Yogurt Key Lime Pie

    Understanding the nutritional value of your dessert recipe is essential, especially if you’re health-conscious. Here’s a breakdown of the approximate nutritional content per slice (1/8 of the pie):

    • Calories: 210
    • Protein: 6g
    • Carbohydrates: 28g
    • Fiber: 1g
    • Sugars: 12g
    • Fat: 9g
    • Saturated Fat: 5g
    • Cholesterol: 20mg
    • Calcium: 15% DV (Daily Value)
    • Vitamin C: 10% DV

    These values can vary based on specific ingredients used. Overall, this pie remains a healthier dessert option compared to traditional key lime pies, offering satisfying creaminess alongside nutritional benefits.

    FAQs: Frequently Asked Questions About No-Bake Greek Yogurt Key Lime Pie

    1. Can I use regular lime juice instead of key lime juice?
    Absolutely! While key limes offer a unique flavor, regular limes can be used as a substitute. Adjust the quantity slightly to taste, as regular limes can be more potent.

    2. Is it necessary to use gelatin?
    While gelatin helps the pie set, you can omit this if you prefer a softer filling. Alternatively, substitute it with agar-agar if you’re looking for a vegan option that provides similar results.

    3. How long should I refrigerate the pie before serving?
    For best results, refrigerate for at least 4-6 hours. However, overnight is recommended to achieve the optimum texture and flavor.

    4. Can I use a different sweetener instead of honey?
    Definitely! Maple syrup, agave nectar, or even stevia are great alternatives. Just keep in mind that this may slightly alter the sweetness and flavor profile.

    5. How do I know when the pie is ready to serve?
    The pie should be firm to the touch but still slightly creamy in texture. If it wobbles when shaken gently, it will need more time to set in the refrigerator.

    By addressing these common questions, you’ll make the baking experience more enjoyable and encourage more cooks to try their hands at this delightful recipe.

    Conclusion

    The No-Bake Greek Yogurt Key Lime Pie offers a fabulous combination of deliciousness, health benefits, and versatility, making it an extraordinary addition to the collection of dessert recipes out there. Whether you are looking for a quick treat for your family or a stunning dessert to impress guests, this recipe ticks all the boxes. It’s easy to prepare, adaptable for various dietary needs, and refreshingly light, perfect for any occasion. So gather your ingredients, unleash your inner chef, and savor this tropical delight that awaits!

  • IM Obsessed With Tender Instant Pot Rhubarb Crisp

    IM Obsessed With Tender Instant Pot Rhubarb Crisp

    I’M Obsessed With Tender Instant Pot Rhubarb Crisp!: A Tropical Delight

    Introduction to I’M Obsessed With Tender Instant Pot Rhubarb Crisp!

    If you’re on the hunt for dessert recipes that are simple, delicious, and bursting with flavor, look no further than this incredibly satisfying Instant Pot Rhubarb Crisp! This delightful dish combines the tartness of fresh rhubarb with a sweet and crunchy topping, creating a dessert that is not only mouth-wateringly good but also quick to whip up in your Instant Pot. Perfect for busy weeknights or as a sweet finish for your weekend gatherings, this recipe has become my absolute favorite.

    What sets this decadent treat apart is its versatility. Whether you are a health-conscious eater, vegan, or simply someone who enjoys a good dessert, this rhubarb crisp can be easily tailored to meet your dietary needs. With less added sugar than many traditional dessert recipes and the option to replace butter with coconut oil or a plant-based alternative, you can indulge without guilt. Plus, the Instant Pot cooks the rhubarb to tender perfection, reducing the overall cooking time and allowing you to spend more time enjoying your dessert rather than laboring over it. So grab your rhubarb and let’s get started on a recipe that is sure to become a staple in your collection!

    Benefits and Advantages of I’M Obsessed With Tender Instant Pot Rhubarb Crisp!

    The Instant Pot Rhubarb Crisp is not only a delicious addition to your dessert recipes repertoire but also boasts numerous advantages that cater to the modern cook. The convenience of using an Instant Pot means that you can streamline your cooking process. Instead of waiting an hour or more for your dessert to bake, the Instant Pot allows you to achieve the same rich flavors in a fraction of the time, making it ideal for busy parents or professionals who want to enjoy a wholesome dessert without the wait.

    Health Benefits

    When it comes to health benefits, rhubarb is a nutritional powerhouse! It is low in calories and high in fiber, making it a fantastic option for those watching their weight or looking for nutritious dessert options. Additionally, it’s loaded with antioxidants, which can aid in reducing inflammation and promoting overall health. By utilizing whole food ingredients in this recipe, you’ll feel confident knowing that you’re serving a dessert that is both indulgent and health-conscious.

    Ease of Preparation

    This rhubarb crisp stands out not just because of its delightful taste but also due to its ease of preparation. You don’t need to be a baking expert to create a winning dish! With just a few simple steps and minimal equipment, you’ll have a delightful dessert ready to be served. Moreover, the Instant Pot significantly reduces prep and cooking times, freeing you to focus on other activities—like relaxing or enjoying a glass of wine!

    Gluten-Free and Vegan-Friendly

    The adaptability of this recipe allows it to be gluten-free and suitable for vegans. By using gluten-free oats and substituting non-dairy alternatives for butter, anyone with dietary restrictions can savor a warm bowl of rhubarb crisp. This dessert continues to affirm the notion that healthy eating doesn’t mean sacrificing flavor or texture.

    In conclusion, the Instant Pot Rhubarb Crisp is not only simple to make and delicious to eat, but it also scores high in health benefits and accommodates various dietary needs. Incorporating this recipe into your collection is an excellent decision for anyone who loves dessert recipes that tick all the boxes!

    Ingredients Overview

    Essential Ingredients for I’M Obsessed With Tender Instant Pot Rhubarb Crisp!

    To prepare this incredible rhubarb crisp, gather the following ingredients:

    • Fresh Rhubarb (4 cups, chopped): The star of this dish, rhubarb adds a unique tartness and is packed with vitamins C and K.
    • Granulated Sugar (¾ cup): This balances the tartness of the rhubarb. You can substitute with coconut sugar or a sugar alternative like monk fruit for a healthier option.
    • Brown Sugar (½ cup): For added sweetness and depth of flavor. Again, you can opt for a brown sugar substitute suitable for your dietary needs.
    • Oats (1 cup): Provides texture and heartiness to the crisp topping; use certified gluten-free oats if needed.
    • All-Purpose Flour (½ cup): Serves as a binding agent in the crisp topping; you can substitute with almond flour or coconut flour for gluten-free needs.
    • Butter (½ cup): Alternatively, coconut oil or a vegan butter can be used to make this dessert suitable for vegans.
    • Ground Cinnamon (1 teaspoon): Adds a warm flavor that pairs beautifully with rhubarb.
    • Salt (¼ teaspoon): Enhances the flavors of the other ingredients.

    Dietary Substitutions to Customize Your I’M Obsessed With Tender Instant Pot Rhubarb Crisp!

    1. Vegan Option: Replace butter with coconut oil or a vegan butter alternative in the same quantity for a plant-based dish. Also, use flax seed meal mixed with water as a binding agent.

    2. Gluten-Free Option: Ensure you’re opting for gluten-free oats and substituting all-purpose flour with almond flour or gluten-free flour blends to accommodate gluten sensitivities.

    3. Lower Sugar: If you prefer a reduced-sugar version, consider using erythritol or stevia as a sweetener instead of granulated sugar. Adjust to taste since these substitutes can vary in sweetness.

    4. Nutty Twist: For added texture and nutrition, consider sprinkling chopped nuts (like walnuts or pecans) into the topping. This also adds healthy fats and boosts the flavor profile.

    With these options, you can easily customize your Instant Pot Rhubarb Crisp to fit your dietary preferences without compromising on taste.

    How to Prepare the Perfect I’M Obsessed With Tender Instant Pot Rhubarb Crisp!: Step-by-Step Guide

    Now that you have all your ingredients ready, it’s time to create this dreamy rhubarb crisp. Just follow these straightforward steps:

    1. Prepare the Rhubarb:
    2. Start by washing and chopping the fresh rhubarb into 1-inch pieces. This will ensure even cooking and a perfect texture.

    3. Mix the Rhubarb Filling:

    4. In a large bowl, combine the chopped rhubarb with granulated sugar, 1 tablespoon of cornstarch, and a dash of salt. Toss well to ensure the rhubarb is coated, which helps to create a sweet-tart base.

    5. Prepare the Crisp Topping:

    6. In another mixing bowl, combine oats, flour (or gluten-free flour), brown sugar, cinnamon, and melted butter (or coconut oil). Mix until crumbly and evenly distributed.

    7. Layer the Ingredients:

    8. Pour the rhubarb mixture into the bottom of the Instant Pot. Layer the crisp topping evenly over the rhubarb.

    9. Add Water to the Pot:

    10. Pour 1 cup of water into the bottom of the Instant Pot. This is crucial for steaming and cooking the rhubarb without burning.

    11. Seal the Instant Pot:

    12. Secure the lid and set the valve to sealing. Select the ‘Manual’ or ‘Pressure Cook’ setting and adjust the timer to 10 minutes.

    13. Pressure Cook:

    14. Once the cooking time is complete, allow the Instant Pot to naturally release pressure for 5 minutes before performing a quick release. Be cautious of the steam!

    15. Check for Doneness:

    16. Carefully remove the lid and check the rhubarb; it should be tender, and the topping should be slightly golden. If more browning is desired, transfer the crisp to a baking dish and broil briefly in the oven.

    17. Serve Warm:

    18. Serve your Instant Pot Rhubarb Crisp warm, ideally with a scoop of vanilla ice cream or whipped coconut cream to enhance the experience.

    19. Enjoy:

    20. Sit back, relax, and indulge in your delicious dessert!

    By following these steps, you are sure to prepare the perfect Instant Pot Rhubarb Crisp, an easy yet impressive addition to your dessert recipes!

    Mastering I’M Obsessed With Tender Instant Pot Rhubarb Crisp!: Advanced Tips and Variations

    Elevate your Instant Pot Rhubarb Crisp experience with these advanced tips and variations:

    • Flavor Boost: For a unique twist, consider adding a splash of vanilla extract to the rhubarb mixture or a hint of ginger for an aromatic spice.

    • Berry Addition: Mix in berries such as strawberries or blueberries along with the rhubarb for a richer flavor profile and color contrast. This playful variation will make your dessert even more delightful!

    • Nutty Topper: As mentioned above, you can add chopped nuts like walnuts or almonds to the crumble topping—you can also toast them lightly before incorporating them for added depth.

    • Decadent Drizzle: Drizzle a homemade glaze using powdered sugar and lemon juice over the cooled crisp to give it an elegant finish perfect for gatherings.

    • Serving Suggestions: Pair your crisp with a scoop of creamy vanilla ice cream or a dollop of whipped cream. For a more health-conscious option, consider coconut yogurt topped with sliced almonds.

    With these variations and tips, you can keep your Instant Pot Rhubarb Crisp fresh and exciting, ensuring it remains a favorite in your collection of dessert recipes!

    How to Store I’M Obsessed With Tender Instant Pot Rhubarb Crisp!: Best Practices

    Proper storage of your Instant Pot Rhubarb Crisp ensures that it stays fresh and delicious for days to come. Here are the best practices for storing this delightful treat:

    • Refrigeration: Once cooled, transfer any leftover rhubarb crisp to an airtight container. Refrigerate for up to 3-4 days. To reheat, simply pop it in the microwave for a minute until warmed through or warm it up in a preheated oven at 350°F (175°C) for about 10-15 minutes.

    • Freezing: If you know you won’t finish the dessert within a few days, consider freezing your rhubarb crisp. Wrap portions tightly in plastic wrap and place them in a freezer-safe container. It can last in the freezer for up to 2 months.

    • Reheating from Frozen: When ready to enjoy, take the crisp out of the freezer and let it thaw in the refrigerator overnight. Then reheat in the oven or microwave as mentioned for the refrigerated crisp.

    By following these storage techniques, you can make sure that your delightful Instant Pot Rhubarb Crisp can be enjoyed long after it’s made, maintaining the integrity of one of your go-to dessert recipes!

    Nutritional Value of I’M Obsessed With Tender Instant Pot Rhubarb Crisp!

    Understanding the nutritional composition of your Instant Pot Rhubarb Crisp can help you appreciate its health benefits even more. Below is the approximate nutritional information per serving, based on a typical recipe made with standard ingredients (serving size of 1/2 cup):

    • Calories: 200
    • Total Fat: 6g
    • Saturated Fat: 2g
    • Cholesterol: 18mg
    • Sodium: 50mg
    • Total Carbohydrates: 36g
    • Dietary Fiber: 4g
    • Sugars: 12g
    • Protein: 3g

    Health Benefits

    This dessert is quite nutritious considering its ingredients. The rhubarb provides essential vitamins and minerals, while the oats contribute to dietary fiber, aiding digestion and promoting a feeling of fullness. Reduction of sugars compared to many traditional dessert recipes allows you to enjoy a sweet treat without excessive guilt.

    For those adapting ingredients to fit their dietary needs, it’s important to recalculate the nutritional values if making significant changes, such as using sugar alternatives or gluten-free flour options.

    As you enjoy this delightful crisp, remember that it satisfies both your sweet tooth and your health-conscious considerations!

    FAQs: Frequently Asked Questions About I’M Obsessed With Tender Instant Pot Rhubarb Crisp!

    1. Can I use frozen rhubarb for this recipe?

    Yes! You can absolutely use frozen rhubarb. Just make sure to thaw it properly and drain excess liquid before combining with sugar.

    2. How do I know when my rhubarb crisp is done?

    The crisp is finished when the rhubarb is tender and the topping is golden brown. You can check this by piercing the rhubarb with a fork. It should easily break apart.

    3. Can I substitute other fruits for rhubarb?

    Certainly! You can swap rhubarb with fruits like apples, peaches, or berries, but keep in mind the sweetness level may differ.

    4. How can I make this rhubarb crisp lower in sugar?

    Consider using sugar substitutes like erythritol, stevia, or monk fruit. Adjust the quantity to achieve the desired sweetness.

    5. Can I prepare this ahead of time?

    Yes, you can prepare the rhubarb mixture and topping separately a day in advance and combine them just before cooking. This can save you time on busy days.

    With these FAQs addressed, you are all set to create and enjoy the extraordinary Instant Pot Rhubarb Crisp—a dessert that celebrates flavor, health, and sheer simplicity! Dive into this recipe and watch it become a favorite in your household. Happy cooking!

  • Juicy Low Sugar Strawberry Rhubarb Crisp

    Juicy Low Sugar Strawberry Rhubarb Crisp

    Juicy Low Sugar Strawberry Rhubarb Crisp: A Tropical Delight

    Introduction to Juicy Low Sugar Strawberry Rhubarb Crisp

    Are you ready to experience a delightful treat that embodies the essence of fresh fruit and wholesome ingredients? Introducing the Juicy Low Sugar Strawberry Rhubarb Crisp—a dessert that perfectly combines the vibrant flavors of strawberries and the tartness of rhubarb, all while maintaining a low sugar content. This recipe is not only simple to make, but it is also healthy, vegan, and gluten-free, making it an incredible option for anyone looking to enjoy strawberry recipes that align with their dietary needs.

    Whether you’re a busy parent seeking a quick dessert, a health-conscious individual craving something sweet, or an enthusiastic baker wanting to impress friends, this delightful crisp is the perfect choice. Its simplicity lies in its natural ingredients and straightforward preparation, which makes it a beloved staple in many households. The Juicy Low Sugar Strawberry Rhubarb Crisp is a testament to how wholesome ingredients can combine to create something delicious and satisfying.

    Moreover, this recipe allows you to take advantage of seasonal fruits and adapt to varying dietary preferences. So, gather your ingredients and let’s get started on making this exquisite treat that is bound to excite everyone around your kitchen table!

    Benefits and Advantages of Juicy Low Sugar Strawberry Rhubarb Crisp

    When it comes to desserts, the Juicy Low Sugar Strawberry Rhubarb Crisp shines for several reasons. First and foremost, its nutrient-rich ingredients provide various health benefits. Strawberries are packed with antioxidants, vitamin C, and fiber, while rhubarb contributes an excellent source of vitamins K and C, along with dietary fiber. By combining these fruits in a low sugar recipe, you ensure that your dessert not only satisfies a sweet tooth but also supports overall health.

    One of the standout features of this crisp is its ease of preparation. In just a few simple steps, you can combine fresh fruits, oats, and a sprinkle of sweetener to create a delightful dish that requires minimal fuss. This aspect is particularly valuable for busy parents or working professionals who crave a homemade dessert without sacrificing their limited time.

    Additionally, this recipe is adaptable, allowing you to customize it according to personal preferences or dietary restrictions. Whether you’re looking for a gluten-free option or seeking a sugar substitute, you can easily modify the ingredients without compromising the dish’s integrity. Plus, this low sugar recipe is ideal for those watching their calorie intake or managing conditions like diabetes.

    Not to forget, the crisp topping made of oats and nuts adds a crunchy texture that beautifully complements the tender fruit underneath. This contrast of flavors and textures makes every bite a joy. From families to seniors or even students, anyone can enjoy this delectable dessert.

    Ultimately, the Juicy Low Sugar Strawberry Rhubarb Crisp stands out as a sweet option that brings health and indulgence together effortlessly.

    Ingredients Overview

    Essential Ingredients for Juicy Low Sugar Strawberry Rhubarb Crisp

    To create the Juicy Low Sugar Strawberry Rhubarb Crisp, you will need the following ingredients:

    • Filling:
    • 3 cups fresh strawberries, hulled and sliced
    • 2 cups rhubarb, chopped
    • 2 tablespoons maple syrup (or more to taste)
    • 1 tablespoon cornstarch (for thickening)
    • 1 teaspoon vanilla extract
    • A pinch of salt

    • Crisp Topping:

    • 1 cup rolled oats (gluten-free if desired)
    • 1/2 cup almond flour (or all-purpose flour for a non-gluten-free option)
    • 1/2 cup chopped nuts (almonds or walnuts, for added crunch)
    • 1/4 cup coconut oil or unsalted butter, melted
    • 3 tablespoons maple syrup or honey
    • 1 teaspoon cinnamon

    Dietary Notes:

    • Vegan: To keep the recipe entirely plant-based, ensure you use maple syrup and coconut oil.
    • Gluten-Free: Opt for certified gluten-free oats and almond flour.
    • Low-Calorie: For a reduced calorie version, minimize the amount of sweetener and focus on using naturally sweetened fruits like ripe strawberries.

    Dietary Substitutions to Customize Your Juicy Low Sugar Strawberry Rhubarb Crisp

    Creating a dessert that fits various dietary needs is essential for many home cooks. Here are some substitutions to consider for the Juicy Low Sugar Strawberry Rhubarb Crisp:

    • Sweeteners: Instead of maple syrup, feel free to use stevia or erythritol to reduce the overall sugar content; adjust the quantities according to sweetness preference.
    • Flours: If nut allergies are a concern, try using oat flour or a gluten-free all-purpose flour blend instead of almond flour.
    • Fats: Coconut oil can be substituted with apple sauce or Greek yogurt to provide moisture without the added fats, particularly if you want to keep it light.
    • Fruits: If strawberries and rhubarb are not in season, you can try other combinations such as blueberries and peaches or blackberries for a fun twist on the original recipe.

    By incorporating these substitutions, you can easily tailor this delightful dessert to fit various dietary preferences while enjoying the same delicious flavors.

    How to Prepare the Perfect Juicy Low Sugar Strawberry Rhubarb Crisp: Step-by-Step Guide

    Follow these easy steps to create the Juicy Low Sugar Strawberry Rhubarb Crisp:

    1. Prepare the Base: Begin by preheating your oven to 350°F (175°C). In a large mixing bowl, combine the sliced strawberries and chopped rhubarb.

    2. Mix Sweetener and Flavoring: Add the maple syrup, cornstarch, vanilla extract, and a pinch of salt to the fruit mixture. Stir gently until all the fruits are well-coated. This blend will create a juicy filling that enhances the overall flavor.

    3. Transfer to Baking Dish: Pour the fruit mixture into a greased 9×9-inch baking dish or a similar-sized casserole dish, spreading it evenly.

    4. Prepare the Crisp Topping: In another bowl, combine rolled oats, almond flour, chopped nuts, melted coconut oil, maple syrup or honey, and cinnamon. Mix well until everything is incorporated into a crumbly texture.

    5. Top the Filling: Evenly distribute the crisp topping over the fruit mixture in the baking dish, ensuring it covers every part of the filling.

    6. Bake: Place the baking dish in the preheated oven and bake for 30-35 minutes or until the topping is golden brown and the fruit is bubbling.

    7. Cool and Serve: Once baked, allow the crisp to cool slightly for 10-15 minutes before serving. This cooling step lets the juices thicken, making every bite divine.

    8. Enjoy: Serve the Juicy Low Sugar Strawberry Rhubarb Crisp on its own or with a dollop of coconut whipped cream or dairy-free ice cream to elevate your dessert experience.

    Feel free to experiment with the recipe by adding your favorite spices or fresh herbs for a local twist!

    Mastering Juicy Low Sugar Strawberry Rhubarb Crisp: Advanced Tips and Variations

    To elevate your Juicy Low Sugar Strawberry Rhubarb Crisp beyond the basic recipe, consider these master tips and creative variations:

    • Add Spices: Enhance the flavor profile by adding nutmeg or allspice in addition to cinnamon. These spices create depth and warmth in the dish.

    • Use Fresh Herbs: Mixing in fresh mint or basil with the fruit filling can add an unexpected but refreshing twist. This is particularly delightful for summer gatherings.

    • Incorporate Other Fruits: Mix the rhubarb with other fruits like apples, peaches, or cherries to create new flavor combinations. Each option brings a unique sweetness or tartness!

    • Crisp Texture: For added crunch, experiment with different nuts or seeds, such as pumpkin seeds or flaxseed meal, within the topping. These ingredients not only provide a delightful textural contrast but increase the health benefits too.

    • Make it Ahead of Time: Preparing the filling and topping separately and refrigerating them before baking can save time when you’re ready to enjoy your crisp. Simply assemble and bake when you’re ready for a warm treat.

    By considering these additional tips, you can explore the endless possibilities of strawberry recipes, ensuring your Juicy Low Sugar Strawberry Rhubarb Crisp remains a beloved, versatile dessert that suits any occasion.

    How to Store Juicy Low Sugar Strawberry Rhubarb Crisp: Best Practices

    Properly storing your Juicy Low Sugar Strawberry Rhubarb Crisp ensures it stays fresh for longer while maintaining its delicious flavor. Here are the best practices for storage:

    • Refrigeration: After allowing the crisp to cool down to room temperature, you can store it covered in an airtight container in the refrigerator for up to 5-7 days. The crisp topping may soften slightly, but it will still taste delightful.

    • Freezing: To freeze, ensure the crisp is completely cooled. Cover it tightly with plastic wrap and then aluminum foil to protect it from freezer burn. It can be frozen for up to three months. When you’re ready to enjoy it, thaw it in the refrigerator overnight and reheat in the oven at 350°F (175°C) until warmed through.

    • Reheating: To bring the crisp back to life after refrigeration or freezing, reheat it in an oven rather than the microwave. This method will help crisp the topping once again, making it even more enjoyable to eat.

    By proper care and storage, you can indulge in your Juicy Low Sugar Strawberry Rhubarb Crisp even days after preparation!

    Nutritional Value of Juicy Low Sugar Strawberry Rhubarb Crisp

    Understanding the nutritional value of your meals can greatly assist you in managing your dietary needs. Here’s a breakdown of the nutritional content in an estimated serving of the Juicy Low Sugar Strawberry Rhubarb Crisp:

    • Calories: Approximately 180-220 calories
    • Carbohydrates: 30-35 grams
    • Protein: 3-5 grams
    • Fat: 7-9 grams
    • Fiber: 4-6 grams
    • Sugar: Approximately 5 grams (natural sugars from fruit and less added sugar)

    This dessert provides a fantastic way to satisfy your sweet tooth while remaining relatively low in sugar. The combination of fiber from oats and fruits contributes to a satisfying feeling, making this crisp a wholesome treat that doesn’t compromise on flavor.

    FAQs: Frequently Asked Questions About Juicy Low Sugar Strawberry Rhubarb Crisp

    Q: Can I use frozen fruits instead of fresh?

    A: Yes! You can substitute fresh strawberries and rhubarb with frozen versions. However, you may want to reduce the sugar since frozen fruit tends to be sweeter due to the concentration of juices.

    Q: How can I make this recipe lower in calories?

    A: To reduce calories, cut back on the amount of sweetener used, swap out coconut oil for Greek yogurt, or decrease the portion size served.

    Q: Can I prepare this crisp the night before serving?

    A: Absolutely! You can assemble the fruit filling and crumb topping separately, refrigerate, and bake the next day when you want to serve it.

    Q: How do I know when the crisp is done baking?

    A: The crisp is ready when the topping turns golden brown, and the fruit filling is bubbling up around the edges.

    Q: How can I substitute for rhubarb in this recipe?

    A: If rhubarb is not available, tart apples or pears can be used as a substitute to replicate a similar tart flavor profile.

    By exploring these frequently asked questions, you can easily create your perfect Juicy Low Sugar Strawberry Rhubarb Crisp while addressing common concerns and queries!

    So gather your ingredients, prepare to mix, and indulge in a dessert that is as wholesome as it is delicious. Your Juicy Low Sugar Strawberry Rhubarb Crisp awaits!

  • IM Obsessed With Super Fluffy Greek Yogurt Jello

    IM Obsessed With Super Fluffy Greek Yogurt Jello

    I’M Obsessed With Super Fluffy Greek Yogurt Jello!: A Tropical Delight

    Introduction to I’M Obsessed With Super Fluffy Greek Yogurt Jello!

    Are you searching for unique and delicious dessert recipes that are both simple and healthy? Look no further than this Super Fluffy Greek Yogurt Jello! This delightful dish combines the creamy texture of Greek yogurt with the refreshing taste of fruit jello, creating a light and fluffy dessert that feels indulgent yet is packed with nourishing benefits.

    Made from wholesome ingredients, this recipe caters to a variety of dietary needs, including being gluten-free and easily adaptable for those following a vegan lifestyle. Each spoonful offers a burst of flavor and a satisfying texture that makes it perfect for any occasion, whether you’re hosting a dinner party or simply satisfying a craving after a busy day.

    What’s more, this jello is rich in protein, thanks to the Greek yogurt, and contains no artificial preservatives or colors. It’s an ideal option for busy parents looking to whip something up quickly, students seeking a healthy snack, or anyone trying to maintain a balanced diet. So, let’s dive into why you’ll love making this Super Fluffy Greek Yogurt Jello!

    Benefits and Advantages of I’M Obsessed With Super Fluffy Greek Yogurt Jello!

    When it comes to dessert recipes, this Super Fluffy Greek Yogurt Jello stands out for several reasons. First and foremost, its ease of preparation makes it a go-to option for individuals ranging from novice cooks to culinary enthusiasts. There’s no need for complex baking skills – just mix, chill, and enjoy!

    Health Benefits

    One of the main advantages of this jello is its health benefits. Greek yogurt is known for being a rich source of protein and probiotics, which can aid in digestion and gut health. Since this dessert uses jello made from natural fruit juices, it is free from artificial flavors and colors, making it a better choice than traditional jelly desserts that may pack on sugar and unwanted additives.

    Additionally, this recipe is relatively low in calories compared to other dessert options. With its fluffy texture and fruity flavor, it satisfies sweet cravings without the guilt, making it a great alternative for diet-conscious individuals.

    Versatility

    The versatility of this dessert deserves a mention. It can be served at various events, whether it’s a birthday celebration, a family get-together, or simply as a refreshing treat on a hot summer day. With so many flavors and fruit combinations available, you could make a different version every week! From tropical mango to vibrant berry mixes, this jello helps you innovate and impress guests.

    Furthermore, the Super Fluffy Greek Yogurt Jello can easily be customized to fit specific dietary preferences. With substitutes readily available for lactose or refined sugars, it’s a wonderful solution to cater to everyone’s needs. For those who are looking to please all guests, this dessert checks all the boxes!

    Ingredients Overview

    Essential Ingredients for I’M Obsessed With Super Fluffy Greek Yogurt Jello!

    To make this delightful dessert, you will need the following ingredients:

    • 2 cups Greek yogurt (full-fat or low-fat, or vegan yogurt for plant-based version)
    • 1 cup fruit juice (orange, apple, or mixed berry; opt for 100% juice with no added sugar)
    • 1 tablespoon gelatin powder or vegan alternative (agar-agar for a plant-based option)
    • 1/4 cup honey or maple syrup (for sweetness; adjust based on juice sweetness)
    • 1 teaspoon vanilla extract (optional, for added flavor)
    • Fresh fruit pieces (for garnish; options like berries, kiwi, or tropical fruits)

    These ingredients combine to create a scrumptious dessert that is ideal for any occasion. Greek yogurt is a fantastic source of protein and adds creaminess, while the fruit juice provides natural sweetness and flavor. Choosing vegan options allows anyone to enjoy this recipe, making it suitable for diverse diets.

    Dietary Substitutions to Customize Your I’M Obsessed With Super Fluffy Greek Yogurt Jello!

    Depending on your dietary needs or ingredient availability, you can easily make substitutions. Here’s how:

    • Vegan Substitute: Use plant-based yogurt (like coconut or almond yogurt) in place of Greek yogurt.
    • Sweetener Alternatives: For those avoiding refined sugar, substitute honey with agave syrup or use a sugar substitute like stevia.
    • Gelatin Replacement: If you prefer a vegetarian or vegan option, replace gelatin powder with agar-agar, ensuring to follow package instructions for the right measurements.
    • Fruit Varieties: Feel free to swap out juices or add your favorite fruit blends. You could also incorporate pureed fruits for extra flavor if you prefer a less chunky texture.

    By keeping these simple adjustments in mind, you can easily cater to specific tastes and dietary restrictions while enjoying the fun freaky flavors!

    How to Prepare the Perfect I’M Obsessed With Super Fluffy Greek Yogurt Jello!: Step-by-Step Guide

    Creating your Super Fluffy Greek Yogurt Jello is a straightforward and rewarding process, guaranteed to delight your taste buds. Follow these detailed instructions, and in no time, you’ll have a delightful dessert on your hands!

    Step-by-Step Instructions

    1. Prepare the Gelatin Mixture:
    2. In a medium saucepan, pour 1 cup of fruit juice. Sprinkle the gelatin powder evenly over the juice and let it sit for about 5 minutes. This will allow the gelatin to bloom, ensuring a smooth consistency later.

    3. Dissolve the Gelatin:

    4. After 5 minutes, turn the heat to low and gently stir the mixture until the gelatin completely dissolves. Avoid boiling the mixture, as this may affect the gelatin’s setting properties.

    5. Combine Yogurt and Sweetener:

    6. In a large mixing bowl, add the Greek yogurt and honey (or maple syrup). Whisk them together until well combined. The yogurt should have a smooth and creamy consistency with a hint of sweetness.

    7. Add Flavor:

    8. Pour the warm gelatin mixture into the yogurt mixture, adding the vanilla extract if desired. Stir gently until well blended, ensuring there are no lumps.

    9. Add Fresh Fruit:

    10. Fold in any fresh fruit pieces you plan to use. It adds an appealing look and flavor to your dessert, making it even more enjoyable.

    11. Chill the Mixture:

    12. Divide the mixture into individual serving cups or a large bowl. Cover with plastic wrap or lids and place them in the refrigerator for a minimum of 4 hours, or until set. If you’d like to speed this up, consider placing them in the freezer for about 30 minutes but avoid freezing completely.

    13. Serve and Garnish:

    14. Once set, remove the jello from the refrigerator. If using a large bowl, cut into squares for serving. Garnish with extra fresh fruit pieces or a dollop of yogurt on top before serving.

    15. Store Leftovers:

    16. Any leftovers should be stored in an airtight container in the refrigerator. Consume within 3-4 days for the best flavor and texture.

    Following these steps allows you to create a beautiful and delicious dessert recipe that caters to every palate. Feel free to tweak the process based on your preferences or dietary needs, making it an adaptable dish for everyone to enjoy!

    Mastering I’M Obsessed With Super Fluffy Greek Yogurt Jello!: Advanced Tips and Variations

    To take your Super Fluffy Greek Yogurt Jello to the next level, here are some advanced tips and variations to try:

    • Experiment with Flavors: While the classic fruit juices work wonderfully, don’t hesitate to try different flavors like coconut milk for a tropical twist or matcha for a unique take!

    • Chocolate Delight: If you’re a chocolate lover, use chocolate almond milk as the base instead of fruit juice. Combine with Greek yogurt for a chocolatey dessert that still feels light.

    • Infuse with Herbs: For an unexpected twist, infuse your juice with fresh herbs such as mint or basil before combining with the gelatin. This can enhance flavors and create complex layers of taste.

    • Make It a Parfait: Layer the jello with granola and fresh berries for a pretty and delicious parfait that’s perfect for breakfast or brunch.

    • Hosting Variations: For a party or gathering, consider making mini jellos using shot glasses or small cups for individual servings. This not only looks cute but also makes it easy for guests to enjoy.

    These advanced tips and options allow you to personalize your jello even further, making this dessert a creative outlet that suits various tastes and occasions.

    How to Store I’M Obsessed With Super Fluffy Greek Yogurt Jello!: Best Practices

    Storing your Super Fluffy Greek Yogurt Jello ensures it stays fresh and delicious for as long as possible. Here are some best practices:

    • Refrigeration: Store your jello in airtight containers in the fridge. It’s best consumed within 3-4 days for optimal freshness, as the texture and flavor can diminish over time.

    • Freezing: While this dessert is best enjoyed fresh, you can freeze it for longer preservation. Portion the jello into freezer-safe containers but remember that texture may change slightly upon thawing due to the yogurt content.

    • Thawing: If you choose to freeze, thaw in the refrigerator overnight. Avoid using a microwave as it could negatively alter the texture. Once thawed, consume within a day for best taste.

    Using these storage methods guarantees you can enjoy your fluffy jello even after a few days, making meal prep a breeze!

    Nutritional Value of I’M Obsessed With Super Fluffy Greek Yogurt Jello!

    For those interested in the nutritional aspect of this delightful dessert, here’s a breakdown:

    • Calories: Approximately 120 calories (per serving)
    • Protein: About 6g (thanks to Greek yogurt)
    • Carbohydrates: Roughly 18g, depending on added fruit and sweeteners
    • Fat: About 2g, primarily from yogurt
    • Fiber: 0-1g, varies with fruit additions

    This jello is low in calories yet rich in protein, making it an excellent option for a healthier dessert recipes. The nutritional value not only supports a balanced diet but also ensures you feel satisfied without compromising your health goals.

    Health Benefits

    The yogurt provides probiotics for gut health, while the fruit juice adds essential vitamins and minerals. Customize it further by adding chia seeds or gluten-free granola for added fiber and nutritional punch!

    FAQs: Frequently Asked Questions About I’M Obsessed With Super Fluffy Greek Yogurt Jello!

    1. Can I use any type of yogurt for this recipe?

    Absolutely! While Greek yogurt is recommended for its thickness and protein content, you can use any type of yogurt. Make sure to choose a non-dairy yogurt if you want a vegan version.

    2. How long does Super Fluffy Greek Yogurt Jello last?

    The jello is best consumed within 3-4 days when stored in the refrigerator.

    3. Can I make this recipe sugar-free?

    Yes! Substitute honey or maple syrup with a sugar-free sweetener like stevia or erythritol. Adjust the amount according to your taste preference.

    4. Is it possible to make this jello without gelatin?

    Yes, you can use agar-agar, a vegan alternative, instead of gelatin. Make sure to follow the instructions on the package for the correct proportions.

    5. What fruits can I use?

    You can use any fruits you like! Fresh fruits such as berries, mangoes, or peaches work well, but feel free to get creative with your favorite fruits!

    With this comprehensive guide, you are now equipped to make and enjoy your Super Fluffy Greek Yogurt Jello. It’s not just a dessert, it’s a delightful addition to your array of dessert recipes. Enjoy creating and sharing this treat with family and friends!

  • Easy Lemon Tiramisu No Bake Dessert

    Easy Lemon Tiramisu No Bake Dessert

    Easy Lemon Tiramisu No Bake Dessert: A Tropical Delight

    Introduction to Easy Lemon Tiramisu No Bake Dessert

    If you’re on the hunt for an effortless yet scrumptious dessert that brightens up any occasion, look no further than this Easy Lemon Tiramisu No Bake Dessert. This delightful treat combines the classic flavors of traditional tiramisu with a zesty lemon twist, making it a refreshing choice for warm days or special celebrations. Unlike traditional dessert recipes that require baking, this no-bake version simplifies things significantly, allowing you to whip it up in record time.

    What sets this lemon tiramisu apart is not just its ease of preparation but also its versatility. Whether you’re vegan, gluten-free, or simply looking for a healthier option, this dessert can easily accommodate your dietary preferences. Packed with fresh lemon juice and zest, it provides a burst of flavor while being lower in calories compared to traditional tiramisu. The creamy layers of mascarpone cheese or vegan alternatives, along with a delightfully crumbly base, make each bite an indulgent experience.

    This recipe is perfect for various audiences—whether you’re a busy parent seeking a quick dessert for a family gathering, a student wanting to impress your friends, or a health-conscious individual looking for guilt-free sweets. The best part? You can prepare it ahead of time and let the flavors meld, freeing you up to enjoy your company. Let’s dive into the luscious world of Easy Lemon Tiramisu No Bake Dessert, and discover how you can create this sensational dish in your own kitchen!

    Benefits and Advantages of Easy Lemon Tiramisu No Bake Dessert

    This Easy Lemon Tiramisu No Bake Dessert is not just another addition to your roster of dessert recipes; it is genuinely a game changer. Here’s why this creamy delight stands out:

    1. Simplicity: The straightforward instructions and minimal preparation time make this recipe accessible. You don’t need to be a baking expert to create something exquisite. No-bake desserts, by their nature, are generally less labor-intensive, making them ideal for cooks of all skill levels.

    2. Health Benefits: The use of fresh lemon juice and zest not only imparts a refreshing taste but also adds a dose of vitamin C, which is essential for immune health. Depending on the ingredients you select, you can control the sweetness, allowing for lower sugar and calorie content.

    3. Dietary Flexibility: One of the highlights of this dessert is its adaptability. Whether you need a vegan dessert, a gluten-free treat, or a lower-calorie option—this recipe can be modified accordingly. For instance, you can swap mascarpone with coconut cream and ladyfingers with gluten-free cookies to create a dessert everyone can enjoy.

    4. Make-Ahead Convenience: This no-bake dessert can be prepared in advance and stored in the refrigerator, which is perfect for gatherings and parties. Simply assemble the layers, let them chill, and when it’s time to serve, you have an impressive dessert ready.

    5. A Crowd Pleaser: Everyone loves a good tiramisu, and the lemon twist will certainly surprise and delight your guests. It’s light enough for summer picnics yet decadent enough for a holiday dinner—truly a versatile choice for any occasion.

    Whether you want to impress at a dinner party, treat your family to something sweet, or simply enjoy a delightful creation on your own, this Easy Lemon Tiramisu No Bake Dessert presents an irresistible option. Let’s explore how you can create this masterpiece in your own kitchen!

    Ingredients Overview

    Essential Ingredients for Easy Lemon Tiramisu No Bake Dessert

    Here’s your shopping list for the Easy Lemon Tiramisu No Bake Dessert. With careful attention to each component, you can guarantee the best flavor and texture.

    • 8 ounces (225 grams) of mascarpone cheese (or dairy-free cream cheese for a vegan option): This creamy base gives the dessert its signature texture.
    • 1 cup (240 ml) of heavy whipping cream (or coconut cream for a vegan variant): This ingredient adds richness and lightness to the layers.
    • 1/2 cup (60 grams) of powdered sugar: Balance the tartness of the lemon with just the right amount of sweetness, though feel free to adjust based on your preference.
    • 1 cup (240 ml) of fresh lemon juice (approximately 4 lemons): Freshly squeezed lemon juice is crucial for an authentic lemon flavor.
    • Zest of 2 lemons: Enhances the citrus flavor, making the dessert fragrant and zesty.
    • 1 teaspoon of vanilla extract: Provides a rounded flavor.
    • 1 cup (240 ml) of brewed coffee (cooled): A traditional tiramisu flavor can be achieved by using coffee or espresso; however, you can skip this entirely for a citrus-only dessert.
    • 24 ladyfingers or gluten-free cookies: The classic base of tiramisu, though alternatives can be used if there are dietary restrictions.

    Dietary Substitutions to Customize Your Easy Lemon Tiramisu No Bake Dessert

    A beauty of this Easy Lemon Tiramisu No Bake Dessert is its flexibility to meet various dietary needs. Here are some suggested substitutions:

    • Vegan: Replace mascarpone cheese with dairy-free cream cheese or coconut cream. Use coconut whipped topping for the cream element.

    • Gluten-Free: Opt for gluten-free ladyfingers or any gluten-free biscuit. A crushed gluten-free graham cracker base can also serve as a great alternative.

    • Lower Calorie: For a lighter dessert, reduce the amount of powdered sugar or utilize a sugar substitute like stevia or erythritol. Additionally, using low-fat dairy options can help cut back on calories.

    • Dairy-Free: Utilize plant-based cream cheese and substitute heavy cream with either coconut cream or a dairy-free whipped topping.

    No matter which variations you choose, this dessert remains easy to assemble and enjoy. Now, let’s move on to how to prepare this delicious dish!

    How to Prepare the Perfect Easy Lemon Tiramisu No Bake Dessert: Step-by-Step Guide

    Creating this Easy Lemon Tiramisu No Bake Dessert is a straightforward process that yields satisfying results. Follow these steps to enjoy your own citrusy masterpiece!

    1. Prepare the Base: Begin by brewing your cup of coffee and allowing it to cool. If you prefer not to use coffee, you can set aside lemon juice and hot water to warm your ladyfingers lightly.

    2. Make the Cream Mixture: In a mixing bowl, combine the mascarpone cheese, powdered sugar, fresh lemon juice, lemon zest, and vanilla extract. Use an electric mixer to beat the mixture until smooth and creamy, ensuring all ingredients are fully integrated.

    3. Whip the Cream: In a separate bowl, beat the heavy whipping cream (or coconut cream) until stiff peaks form. Carefully fold the whipped cream into the mascarpone mixture. This will ensure a light and airy texture for the dessert.

    4. Dip the Ladyfingers: Quickly dip each ladyfinger into the cooled coffee (or the lemon-infused water mixture) for just a second, ensuring they are soaked but not overly soggy.

    5. Layer the Base: In a rectangular or square dish (about 9×9 inches works well), create the first layer by laying soaked ladyfingers side by side. This will be the base for your cream mixture.

    6. Spread Cream Layer: Spoon and evenly spread half of the lemon mascarpone mixture over the layer of ladyfingers. Use a spatula to smooth it out.

    7. Repeat Layers: Place another layer of dipped ladyfingers on top of the cream. Follow with the remaining lemon mascarpone mixture over these ladyfingers, making sure to spread the cream evenly.

    8. Chill the Dessert: Cover the dish with plastic wrap or foil, and refrigerate for at least 4 hours, or overnight if possible. This step allows the flavors to meld beautifully.

    9. Garnish and Serve: Just before serving, you can dust the top with cocoa powder or additional lemon zest for a beautiful presentation. Slice into squares and enjoy this fresh, delightful treat!

    This no-bake dessert is not just easy to make, but also offers a unique twist to conventional dessert recipes. So give it a try and impress everyone with your culinary skills!

    Mastering Easy Lemon Tiramisu No Bake Dessert: Advanced Tips and Variations

    As you become more comfortable with this Easy Lemon Tiramisu No Bake Dessert, here are some advanced tips and creative variations to enhance your experience:

    1. Flavor Enhancements: Experiment with different citrus fruits like lime or orange for a unique twist on the traditional flavor profile. Incorporating a splash of limoncello can elevate the taste to a more gourmet level.

    2. Add Texture: Consider adding sliced strawberries or raspberries between the layers. This not only adds flavor but also brings a delightful texture contrast.

    3. Chilling Time: The longer you let the dessert chill in the refrigerator, the better the flavors meld together. If you can wait overnight, you’ll be rewarded with an even richer flavor.

    4. Presentation: Serve individual portions in glasses or jars for a more sophisticated touch. Layering the ingredients in clear containers makes for beautiful presentation and is convenient for parties.

    5. Storage Options: If you have leftovers, store them in an airtight container in the refrigerator for up to 3 days. Any longer and the texture may start to degrade.

    These tips will help you master the Easy Lemon Tiramisu No Bake Dessert and make it uniquely yours. Share your creations with friends and family and watch them fall in love with this delightful treat!

    How to Store Easy Lemon Tiramisu No Bake Dessert: Best Practices

    Proper storage will ensure your Easy Lemon Tiramisu No Bake Dessert maintains its texture and flavor. Here are some best practices for refrigerating, freezing, and reheating:

    1. Refrigeration: Store the dessert covered in your refrigerator for up to 3 days. Keeping it covered prevents it from absorbing any unwanted odors or flavors from the fridge.

    2. Freezing: Although it is best enjoyed fresh, you can freeze the dessert for up to one month. Place it in an airtight container, and remember that the creaminess may alter once thawed.

    3. Thawing: If you freeze any portions, thaw them by placing them in the refrigerator overnight before serving. Avoid thawing them at room temperature to maintain the best texture and flavor profile.

    4. Reheating: This dessert does not require reheating, as serving it cold enhances its refreshing taste. However, if you want to serve individual portions slightly warmed, you can briefly microwave them for 10-15 seconds to take the chill off.

    By adhering to these storage and reheating guidelines, you ensure your Easy Lemon Tiramisu No Bake Dessert stays delicious for as long as possible.

    Nutritional Value of Easy Lemon Tiramisu No Bake Dessert

    Understanding the nutritional content of your creations is essential, especially if you’re mindful of health. Here’s a general breakdown of the nutritional profile for one serving (based on 12 servings total) of the Easy Lemon Tiramisu No Bake Dessert:

    • Calories: Approximately 250 – 300 calories
    • Protein: 4 grams
    • Fat: 15 grams (with options for vegan and lower-fat versions)
    • Carbohydrates: 27 grams
    • Fiber: 0 grams
    • Sugar: 12 grams
    • Vitamin C: Significant amount from fresh lemon juice

    Keep in mind that these values can change based on ingredient modifications if you choose vegan or gluten-free alternatives. Always consult nutrition labels on specific brands you’re using to get the most accurate nutritional information.

    The Easy Lemon Tiramisu No Bake Dessert is an excellent choice for anyone looking for a delicious, refreshing dessert with a relatively healthy profile.

    FAQs: Frequently Asked Questions About Easy Lemon Tiramisu No Bake Dessert

    If you have any questions about making, storing, or enjoying the Easy Lemon Tiramisu No Bake Dessert, you’re not alone! Here are some frequently asked questions, complete with clear and concise answers:

    Q1: Can I make this dessert in advance?

    Absolutely! This dessert can be prepared a day in advance, and in fact, chilling overnight allows the flavors to meld beautifully.

    Q2: How do I make a gluten-free version?

    To make a gluten-free version, substitute traditional ladyfingers with gluten-free cookies or ladyfingers specifically labeled as gluten-free.

    Q3: What if I can’t find mascarpone cheese?

    You can use cream cheese (dairy-free or regular) as a substitute. Additionally, a blend of cashew cream can work well for a vegan alternative.

    Q4: Can I use other citrus fruits?

    Yes! You can experiment with flavors by using limes, oranges, or even grapefruits. Each will give you a unique twist on the dessert.

    Q5: What’s the best way to serve leftovers?

    Store leftovers in an airtight container in the fridge for up to three days. Serve cold for the best experience.

    With this knowledge in hand, you’re well-equipped to successfully embark on making your Easy Lemon Tiramisu No Bake Dessert and enjoy this delectable treat. Happy cooking!

  • The Best Pecan Pie Dump Cake Dessert

    The Best Pecan Pie Dump Cake Dessert

    The Best Pecan Pie Dump Cake Dessert: A Tropical Delight

    Introduction to The Best Pecan Pie Dump Cake Dessert

    If you’re on the lookout for delightful dessert recipes that are not only easy to prepare but also cater to various dietary needs, then look no further than The Best Pecan Pie Dump Cake Dessert. This decadent dessert combines the rich flavors of traditional pecan pie with the convenience of a dump cake, creating a sweet sensation that’s perfect for holidays, family gatherings, or simply when you need a quick indulgence.

    What makes this recipe stand out is its effortless preparation process. With minimal steps and ingredients, even novice bakers can whip up this treat in no time. It is also customizable for health-conscious individuals, offering options that can be vegan, gluten-free, or low-calorie. The beautiful, nutty taste of pecans pairs perfectly with a warm, gooey texture that will leave everyone wanting more.

    Not only does this dessert cater to those with dietary restrictions, but it also packs a nutritional punch. Pecans are rich in healthy fats and proteins, making them a filling addition to your dessert repertoire. This dump cake serves as a wonderful end to any meal, providing a sweet treat that balances indulgence and health. Join me on this culinary journey to discover how you can create The Best Pecan Pie Dump Cake Dessert in your kitchen!

    Benefits and Advantages of The Best Pecan Pie Dump Cake Dessert

    When it comes to dessert-making, convenience is key, and this Pecan Pie Dump Cake excels in this area. Here are some reasons why this recipe has captured the hearts of many home cooks and food enthusiasts alike:

    1. Simplicity: One of the foremost advantages of this dump cake is its straightforward process. There’s no need for complex baking techniques; simply layer the ingredients and let the oven do the magic. This makes it ideal for busy parents and working professionals who are short on time but still want to create something special.

    2. Flexibility: The Best Pecan Pie Dump Cake Dessert is incredibly adaptable, allowing for various substitutions to fit different dietary requirements. Whether you’re gluten-sensitive or vegan, there’s a way to modify this recipe without sacrificing taste.

    3. Nutritional Benefits: Pecans are not only delicious but also packed with nutrients. They are a source of healthy fats, protein, and fiber, which can help keep you satiated. Additionally, they contain antioxidants that can provide various health benefits. By incorporating these nuts into your desserts, you’re making a more health-conscious choice that doesn’t compromise on flavor.

    4. Flavor Explosion: The combination of sweet and nutty flavors delivers a unique experience that rivals many store-bought options. The gooey filling inspired by traditional pecan pie, paired with a slightly crisp topping, makes this dessert incredibly satisfying.

    5. Great for Any Occasion: This dessert is versatile enough to be a hit at family dinners, holiday parties, or even casual weekday meals. Its appealing presentation and delightful taste can elevate any gathering.

    In summary, The Best Pecan Pie Dump Cake Dessert is a winning choice among dessert recipes because of its ease of preparation, health benefits, and unique flavor profile. Whether you’re a novice baker or a seasoned pro, this cake promises to excite your palate and impress your guests.

    Ingredients Overview

    Essential Ingredients for The Best Pecan Pie Dump Cake Dessert

    To create this delicious dessert, you’ll need the following ingredients. I have also included options for various dietary needs where applicable.

    • 1 cup pecan halves: These nuts provide the signature flavor and crunch of pecan pie. [Health Benefit: Rich in healthy fats and protein]
    • 1 box yellow cake mix (gluten-free if needed): This forms the base layer of the cake; for a gluten-free version, choose a gluten-free cake mix. [Health Consideration: Opt for a low-sugar mix if calorie conscious]
    • 1 cup unsalted butter, melted: This ingredient adds richness and helps bind the cake together. [Substitution: Coconut oil for vegan options]
    • 4 large eggs: Eggs help create a rich and custardy filling. [Substitution: Flaxseed meal mixed with water as a vegan replacement]
    • 1 cup light corn syrup: This sweet syrup gives the dessert its gooey texture. [Substitution: Agave syrup for a healthier alternative]
    • 1 cup brown sugar: This brings moisture and adds a deep caramel flavor. [Substitution: Coconut sugar for a low-calorie option]
    • 1 teaspoon vanilla extract: Enhances the overall flavor profile. [No substitutions needed here]
    • 1/2 teaspoon salt: Balances the sweetness.

    These ingredients come together to create a perfect juxtaposition of flavors that results in a truly memorable dessert experience.

    Dietary Substitutions to Customize Your The Best Pecan Pie Dump Cake Dessert

    When making The Best Pecan Pie Dump Cake Dessert, there are several substitutions you can consider based on dietary preferences or ingredient availability.

    1. Vegan Options:
    2. Egg Substitute: Instead of eggs, use 1 tablespoon of flaxseed meal mixed with 2.5 tablespoons of water per egg. Let it sit for about 5 minutes until it thickens.
    3. Butter Substitute: Replace unsalted butter with melted coconut oil or a plant-based butter alternative.

    4. Gluten-Free Options:

    5. For those avoiding gluten, simply opt for a gluten-free yellow cake mix. There are many brands available that taste just as good as traditional mixes.

    6. Lower-Calorie Variants:

    7. To cut down on sugar, consider using a sugar substitute in place of brown sugar and light corn syrup. Alternatives like stevia or monk fruit may work, but ensure you follow the conversion ratios as needed.

    These dietary substitutions allow anyone to enjoy this wonderful dessert while accommodating specific dietary preferences. The best part is that they don’t compromise the taste or overall enjoyment of the cake.

    How to Prepare the Perfect The Best Pecan Pie Dump Cake Dessert: Step-by-Step Guide

    Follow this simple step-by-step guide to create The Best Pecan Pie Dump Cake Dessert in your home.

    1. Preheat the Oven: Preheat your oven to 350°F (175°C) to ensure it’s hot when you’re ready to bake.

    2. Prepare the Baking Dish: Grease a 9×13-inch baking dish with non-stick spray or butter. This helps prevent sticking and makes cleanup easier.

    3. Mix the Base: In a large mixing bowl, combine the melted butter and brown sugar. Whisk together until smooth, followed by the corn syrup and vanilla extract. Then, beat in the eggs one at a time, mixing well after each addition.

    4. Add Pecans: Stir in the pecan halves until they are fully coated in the mixture. This will help distribute their flavor throughout the dump cake.

    5. Layer the Ingredients:

    6. Evenly pour the pecan mixture into the bottom of the prepared baking dish.
    7. Note for Gluten-Free Bakers: If using gluten-free cake mix, make sure to sift it before adding.
    8. Next, sprinkle the yellow cake mix evenly over the pecan layer. Do not mix; this creates the unique dump cake effect.

    9. Melt Butter for Top Layer: Drizzle the remaining melted butter evenly over the dry cake mix. This helps create a golden and crispy topping when baked.

    10. Bake the Cake: Place the dish in the preheated oven and bake for 35-40 minutes. The top should be golden brown. A toothpick inserted should come out clean, though it may be slightly sticky due to the pecan filling.

    11. Cool and Serve: Once baked, let the cake cool for at least 10 minutes before serving. This allows the filling to set slightly, making it easier to cut into squares.

    12. Garnish (optional): If desired, serve with whipped cream or vanilla ice cream for an added treat.

    Your Pecan Pie Dump Cake is ready to delight everyone around the table. It pairs well with coffee for an after-dinner treat or can be enjoyed on its own.

    Mastering The Best Pecan Pie Dump Cake Dessert: Advanced Tips and Variations

    To elevate The Best Pecan Pie Dump Cake Dessert and tailor it to your tastes, consider the following advanced tips and variations:

    1. Flavor Enhancements: Experiment with spices such as cinnamon or nutmeg for an extra depth of flavor. A dash of bourbon can also elevate the taste profile significantly, bringing a delicious twist reminiscent of classic pecan pie.

    2. Nut Variations: While pecans are traditional, you can also use walnuts or a combination of nuts for added complexity. Almonds provide a pleasing crunch and unique flavor if you’re looking for something a bit different.

    3. Chocolate Lovers Delight: For those who adore chocolate, add chocolate chips before baking. They melt into the cake, creating a rich, chocolatey contrast to the sweetness of the pecans and caramel.

    4. Dairy-free Options: If you’re making this dessert for someone with a dairy allergy or preference, ensure all ingredients used, including the butter and whipped cream, are dairy-free.

    5. Storage Tip: Before serving, consider allowing the cake to cool completely. It can be stored in the refrigerator for a couple of days, intensifying the flavors.

    The versatility of The Best Pecan Pie Dump Cake Dessert means that you can truly make it your own. Feel free to experiment with these variations until you find your perfect version!

    How to Store The Best Pecan Pie Dump Cake Dessert: Best Practices

    Storing The Best Pecan Pie Dump Cake Dessert correctly is vital to maintaining its deliciousness. Here are some best practices for refrigeration, freezing, and reheating:

    1. Refrigeration: If you have leftovers (which can be rare given how tasty this dessert is), store the cake in an airtight container in the refrigerator. It should keep well for 3-4 days. Always ensure that the cake is covered to prevent it from drying out or absorbing any odors from the fridge.

    2. Freezing: If you want to make a double batch or save some for later, you can freeze the cake. To do this, wrap it tightly in plastic wrap, then foil, before placing it in the freezer. It can be frozen for up to 2-3 months. To reheat, allow it to thaw in the refrigerator overnight.

    3. Reheating: When you’re ready to enjoy leftover cake, reheat individual servings in the microwave for about 15-30 seconds or until warmed through. Alternatively, you can place the whole cake in a preheated oven at 350°F (175°C) for about 10-15 minutes.

    These storage methods ensure that The Best Pecan Pie Dump Cake Dessert retains its flavor and texture, ready for any occasion.

    Nutritional Value of The Best Pecan Pie Dump Cake Dessert

    Understanding the nutritional value of The Best Pecan Pie Dump Cake Dessert helps you enjoy it while being mindful of your dietary choices. Below is a breakdown of approximate nutritional information per serving (assuming the recipe makes 12 servings):

    • Calories: 320 kcal
    • Total Fat: 20 g
    • Saturated Fat: 6 g
    • Cholesterol: 70 mg
    • Sodium: 150 mg
    • Total Carbohydrates: 33 g
    • Dietary Fiber: 2 g
    • Sugars: 18 g
    • Protein: 4 g

    Key Nutritional Highlights

    • Healthy Fats: Pecans provide beneficial monounsaturated fats which are good for heart health.
    • Protein Source: Eggs and pecans contribute to an increase in protein intake.
    • Fiber: The dessert includes pecans, which can help support digestive health due to their fiber content.

    As an indulgent treat, The Best Pecan Pie Dump Cake Dessert balances flavor with nutritional benefits. When you enjoy it in moderation, it can certainly fit into a balanced diet.

    FAQs: Frequently Asked Questions About The Best Pecan Pie Dump Cake Dessert

    1. Can I make The Best Pecan Pie Dump Cake Dessert in advance?

    Absolutely! It can be prepared a day in advance. Just store it in the fridge and reheat before serving for the best taste.

    2. How do I know when the cake is done baking?

    The cake is done when the top is golden brown, and a toothpick or knife inserted in the center comes out clean or with a few moist crumbs, not wet batter.

    3. Can I replace the pecans with another nut?

    Yes! While pecans are traditional, you can absolutely swap them for walnuts or almonds depending on your preference.

    4. Is it possible to make this recipe gluten-free?

    Yes! Simply use a gluten-free yellow cake mix and ensure your other ingredients are gluten-free.

    5. Can I use a sugar substitute in place of brown sugar?

    Yes! You can use coconut sugar or a suitable sugar alternative, like stevia or monk fruit, to lower the sugar content without losing flavor.

    By addressing these common inquiries, you can feel more confident in your baking journey with The Best Pecan Pie Dump Cake Dessert. Whether you’re a novice or an experienced baker, this recipe is sure to delight everyone who tries it!