Blog

  • Mediterranean Easter Tortellini Salad

    Mediterranean Easter Tortellini Salad

    Mediterranean Easter Tortellini Salad: A Tropical Delight

    Introduction to Mediterranean Easter Tortellini Salad

    Easter is a time for family gatherings, celebrating new beginnings, and embracing the beauty of spring. What better way to enjoy the delightful flavors of this season than with a Mediterranean Easter Tortellini Salad? This vibrant dish not only captures the essence of spring meals but also offers a medley of tastes and textures that celebrate the bounty of Mediterranean ingredients.

    Imagine al dente tortellini, tossed with fresh vegetables, aromatic herbs, and a zesty dressing. This salad is a beautiful addition to your Easter table, effortlessly combining health and flavor. Whether you’re a busy parent looking for quick, nutritious meals or a food enthusiast eager to explore new culinary horizons, this recipe suits all lifestyles.

    This Mediterranean Easter Tortellini Salad is incredibly versatile. It can cater to various dietary needs, as it can easily be made vegan, gluten-free, or low-calorie. Plus, the ease of preparation makes it ideal not just for festive occasions but also for any weekday lunch or dinner. With its nutrient-dense ingredients and vibrant aesthetics, it’s the perfect dish to bring joy to your spring meals. Ready to dive into this scrumptious recipe?

    Benefits and Advantages of Mediterranean Easter Tortellini Salad

    The Mediterranean Easter Tortellini Salad stands out for several compelling reasons. Firstly, it’s incredibly simple to prepare. You can have this salad ready in under thirty minutes, making it perfect for those last-minute spring gatherings or busy weeknights. This recipe requires minimal cooking skills, allowing anyone to whip up a delicious meal without stress.

    Moreover, this salad is packed with health benefits. Tortellini, commonly made from whole wheat or traditional pasta, can be a source of protein and fiber. When combined with a variety of fresh vegetables—such as bell peppers, cherry tomatoes, and cucumbers—you introduce essential vitamins and minerals into your dish. The incorporation of healthy fats, like olive oil and avocado, not only enhances flavor but also supports heart health and aids in nutrient absorption.

    Another significant advantage is its adaptability. This Mediterranean salad fits a range of dietary lifestyles, accommodating vegans and those seeking gluten-free options by simply choosing the right tortellini and substitutions.

    Moreover, this vibrant dish is suitable for various occasions. Whether you are celebrating Easter with family or enjoying a casual spring lunch with friends, the Mediterranean Easter Tortellini Salad pairs beautifully with grilled meats or can stand alone as a main course. With its eye-catching visuals and irresistible flavors, it is sure to become a staple in your collection of spring meals.

    Ingredients Overview

    Essential Ingredients for Mediterranean Easter Tortellini Salad

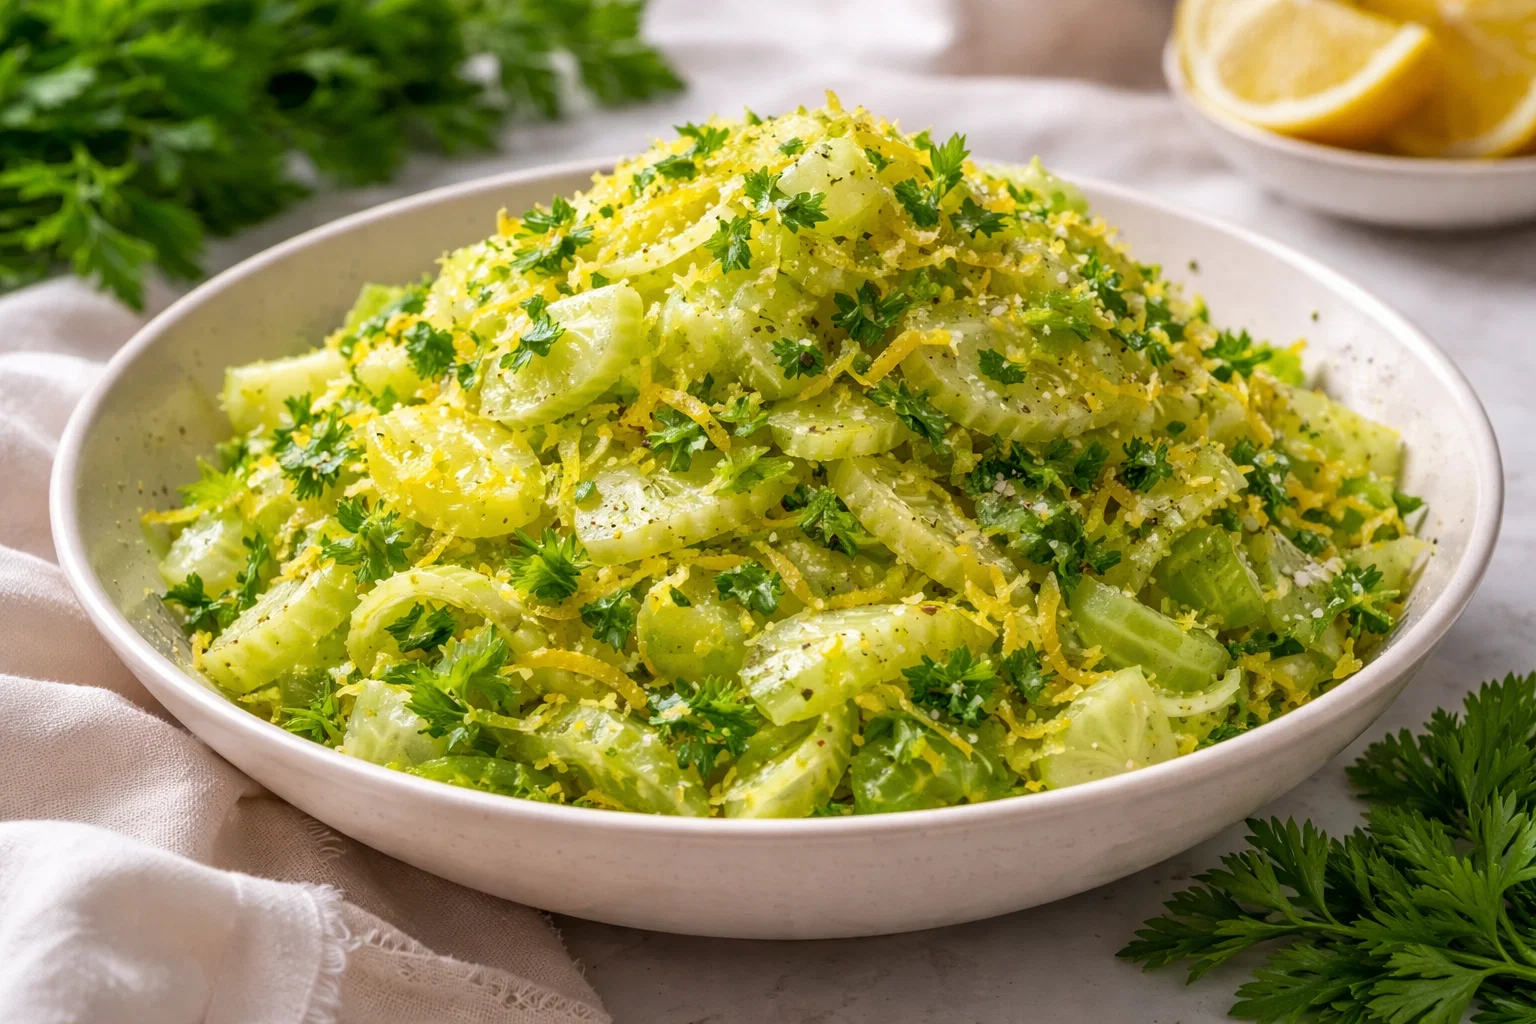
    Here’s a detailed list of the ingredients required to create a refreshing Mediterranean Easter Tortellini Salad. Each ingredient plays a specific role in enhancing the dish’s flavor and nutritional profile.

    • Tortellini: 2 cups (fresh or frozen). Opt for whole wheat or gluten-free options for a healthier or diet-friendly version.
    • Cherry Tomatoes: 1 cup, halved. These juicy gems add sweetness and color.
    • Cucumber: 1 medium, diced. Provides a refreshing crunch and hydration.
    • Bell Peppers: 1 cup (mixed colors), diced. Rich in vitamins A and C, and adds sweetness.
    • Red Onion: 1/4 cup, thinly sliced. Offers a mild bite and beautiful color.
    • Kalamata Olives: 1/2 cup, pitted and halved. A staple in Mediterranean cuisine that imparts a salty depth of flavor.
    • Feta Cheese: 1/2 cup crumbled or vegan feta. Adds creaminess; omit for a vegan version.
    • Fresh Parsley: 1/4 cup, chopped. Brightens the salad with a fresh, herbal note.
    • Olive Oil: 1/4 cup. A healthy fat that promotes satisfaction and adds flavor.
    • Lemon Juice: 2 tablespoons. Enhances flavor with brightness; ideal for spring meals.
    • Salt and Pepper: To taste. Essential for balancing flavors.

    This ingredient list serves as a guideline and can be adjusted based on your personal preferences or dietary restrictions.

    Dietary Substitutions to Customize Your Mediterranean Easter Tortellini Salad

    To cater to various dietary needs, consider these substitutions:

    • Gluten-Free Tortellini: Use gluten-free pasta options, such as quinoa or rice-based tortellini.
    • Vegan Cheese: Replace feta with a dairy-free alternative or skip it altogether for a lighter version.
    • Add proteins: For a heartier salad, incorporate grilled chicken, shrimp, or chickpeas as a protein source.
    • Vegetables: Feel free to add or substitute other vegetables such as spinach, arugula, or broccoli for added nutrition.
    • Herbs: Basil, mint, or dill can be great alternatives to parsley for a fresh twist.

    These variations and substitutions allow you to customize the Mediterranean Easter Tortellini Salad to suit your specific tastes and dietary requirements while keeping it delicious and healthy.

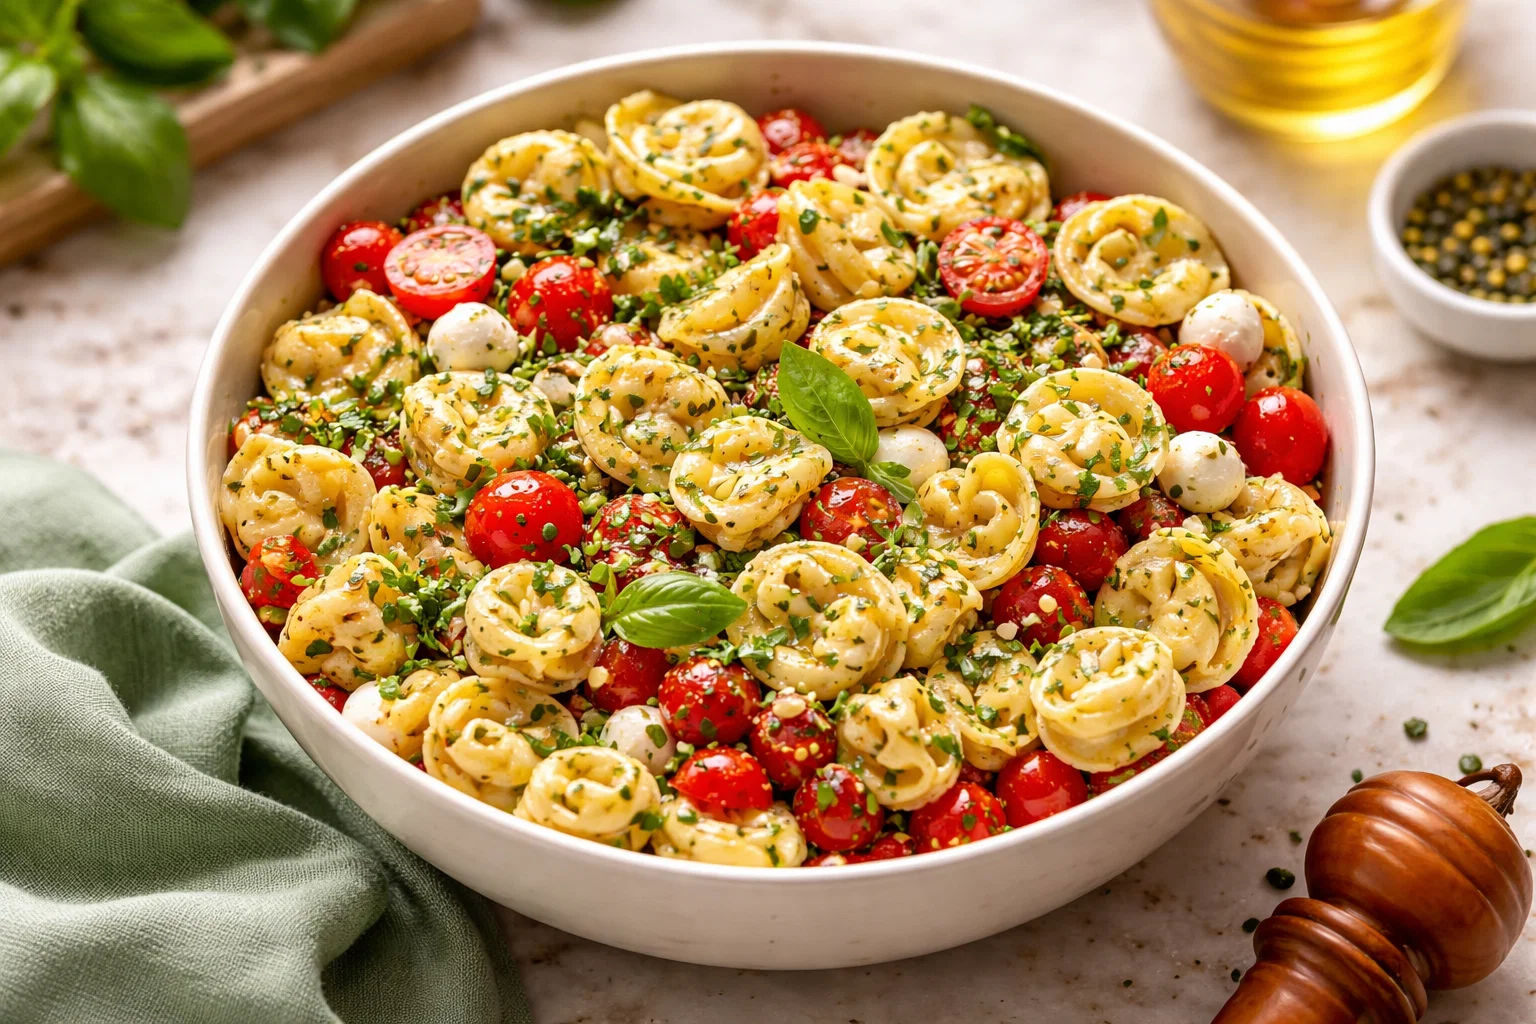
    How to Prepare the Perfect Mediterranean Easter Tortellini Salad: Step-by-Step Guide

    Follow these simple steps to create your Mediterranean Easter Tortellini Salad. Remember, this dish can adapt to different dietary preferences, making it a versatile addition to your spring meals!

    1. Boil the Tortellini: In a large pot, bring salted water to a rolling boil. Add 2 cups of tortellini and cook according to package instructions, usually about 3-5 minutes for fresh and 7-9 minutes for frozen varieties. You want the tortellini to be al dente. Drain and rinse under cold water to stop the cooking. Set aside.

    2. Prepare the Vegetables: While the tortellini cooks, wash and chop your vegetables. Dice the cucumber, halve the cherry tomatoes, chop the bell peppers, and slice the red onion.

    3. Mix Ingredients: In a large mixing bowl, combine the cooked tortellini, chopped vegetables, and olives. Add the crumbled feta cheese and chopped parsley for extra freshness.

    4. Make the Dressing: In a small bowl, whisk together 1/4 cup of olive oil, 2 tablespoons of lemon juice, salt, and pepper. Adjust seasoning to taste.

    5. Combine Everything: Pour the dressing over the tortellini and vegetable mixture. Toss gently but thoroughly to ensure everything is well coated.

    6. Chill and Serve: Let the salad sit in the refrigerator for 30 minutes to allow the flavors to meld together. This dish can be served cold or at room temperature, perfect for any spring occasion.

    7. Garnish if Desired: Right before serving, give your salad a light toss and garnish with additional parsley or some extra feta for aesthetics.

    This step-by-step guide ensures that your Mediterranean Easter Tortellini Salad turns out perfect every time. Enjoy the rich colors and delightful flavors as they come together in this fantastic dish!

    Mastering Mediterranean Easter Tortellini Salad: Advanced Tips and Variations

    To take your Mediterranean Easter Tortellini Salad to the next level, here are some advanced tips and variations:

    • Marinate Tortellini: For added flavor, consider marinating the tortellini in a mixture of olive oil, vinegar, garlic, and herbs for about 15 minutes before combining with vegetables.

    • Add Nuts or Seeds: Incorporate toasted pine nuts or sunflower seeds for added crunch and healthy fats.

    • Spices and Seasoning: Experiment with spices such as oregano, thyme, or Italian seasoning in the dressing to deepen the flavor.

    • Roast Your Veggies: For a different texture and flavor, roast bell peppers, zucchini, and red onions until slightly charred and tender before tossing them with the salad.

    • Create a Full Meal: Serve the salad alongside grilled chicken, salmon, or a side of garlic bread to create a complete spring meal that your family will love.

    These tips not only enhance the flavor and presentation of your Mediterranean Easter Tortellini Salad but also allow you to play with ingredients and make the dish uniquely your own.

    How to Store Mediterranean Easter Tortellini Salad: Best Practices

    Storing your Mediterranean Easter Tortellini Salad properly will keep it fresh and delicious. Here’s how to best store this delightful dish:

    1. Refrigeration: Place the salad in an airtight container in the refrigerator. It will stay fresh for up to 3 days, making it a great make-ahead option for your spring meals.

    2. Freezing: While freezing is not recommended for salads with fresh vegetables, if you have leftover tortellini or dressing, you can freeze those components separately. Note that the texture of the vegetables may alter.

    3. Reheating: If you want to enjoy leftover tortellini, you can reheat it in a saucepan over low heat or in the microwave until warm. Ensure that you do not overcook, as it may become mushy.

    Following these storage methods ensures that your Mediterranean Easter Tortellini Salad remains as tasty as the moment it was made.

    Nutritional Value of Mediterranean Easter Tortellini Salad

    Understanding the nutritional value of your Mediterranean Easter Tortellini Salad can help you make informed choices about your meals. Here’s a breakdown of the estimated nutritional information per serving (based on a standard recipe without protein additions):

    • Calories: Approximately 320
    • Carbohydrates: 40g
    • Protein: 10g (varies with the addition of protein ingredients)
    • Total Fat: 16g
    • Saturated Fat: 4g
    • Dietary Fiber: 5g
    • Sugars: 4g
    • Cholesterol: 20mg (if using feta cheese)

    This salad is rich in essential vitamins and minerals, making it an excellent option for health-conscious individuals. The combination of healthy fats, proteins, and carbohydrates means it’s a well-rounded meal, perfect for your collection of spring meals. The high fiber content also helps in digestion, promoting overall wellness.

    FAQs: Frequently Asked Questions About Mediterranean Easter Tortellini Salad

    To help you further, here are some frequently asked questions regarding the Mediterranean Easter Tortellini Salad:

    1. Can I make this salad ahead of time?
    2. Yes! This salad can be prepared a few hours or even a day in advance. Just remember to keep it refrigerated and give it a good stir before serving.

    3. What kind of tortellini is best for this recipe?

    4. You can use any type you prefer, whether cheese, meat, or plant-based. Whole wheat or gluten-free options are great for a healthier choice.

    5. Is this recipe suitable for vegans?

    6. Absolutely! Swap the feta cheese for a vegan alternative and ensure the tortellini is cruelty-free.

    7. What can I substitute for feta cheese?

    8. If you’re not a fan of feta, you can omit it entirely, replace it with tofu, or use nutritional yeast for a cheesy flavor.

    9. How can I modify the dressing for a creamier texture?

    10. You can add Greek yogurt or silken tofu to the dressing for a creamier consistency while maintaining freshness.

    By addressing common concerns and inquiries, you’ll be better equipped to create your Mediterranean Easter Tortellini Salad, tailored to your tastes and dietary preferences. Enjoy crafting this delightful dish as part of your memorable spring meals!


    The Mediterranean Easter Tortellini Salad is not just a dish; it’s a celebration of spring and health. With its palette of flavors and colors, it brings both joy and nourishment to your table. Embrace the season’s spices and herbs, channel your inner chef, and delight in this easy yet elegant recipe that will be cherished by all ages!

  • Classic Roasted Potatoes And Carrots

    Classic Roasted Potatoes And Carrots

    Classic Roasted Potatoes And Carrots: A Tropical Delight

    Introduction to Classic Roasted Potatoes And Carrots

    Are you looking for an easy yet delectable option to add to your repertoire of dinner recipes? Then look no further than Classic Roasted Potatoes and Carrots! This dish embodies comfort food while maintaining a nutritious edge, appealing to everyone from busy parents to college students. With its vibrant colors and delicious flavors, this recipe not only enhances your dinner table but also provides an excellent source of essential vitamins and minerals.

    The beauty of roasted potatoes and carrots lies in their simplicity. With just a handful of ingredients, you can create a dish that is not only gluten-free and vegan but also low in calories. It’s incredibly versatile too; whether you’re hosting a dinner party, prepping a meal for the week, or just looking for a satisfying side dish to accompany your favorite protein, classic roasted potatoes and carrots fit the bill perfectly.

    Furthermore, roasting vegetables is a fantastic way to bring out their natural sweetness, making this dish appealing even to those who might ordinarily shy away from eating their veggies. Plus, it requires minimal fuss—just chop, season, and roast. This dish can easily accommodate various dietary needs, making it an ideal choice for any gathering or a simple family dinner.

    Benefits and Advantages of Classic Roasted Potatoes And Carrots

    Why should classic roasted potatoes and carrots be a staple in your kitchen? Let’s explore some compelling benefits of this delightful recipe.

    Ease of Preparation

    First and foremost, the preparation of this dish is incredibly straightforward. You don’t need any culinary expertise or fancy techniques—just basic chopping and seasoning skills. This means that even if you’re a novice cook or a busy parent juggling multiple responsibilities, you can whip up this flavorful side dish without stress.

    Health Benefits

    The health benefits are noteworthy as well. Potatoes are a rich source of vitamin C, potassium, and fiber, while carrots are loaded with beta-carotene, antioxidants, and vitamins A and K. This combination makes roasted potatoes and carrots a satisfying choice that contributes to your daily nutritional intake. Also, baking minimizes the use of added fats, compared to frying, making this dish more heart-healthy.

    Versatility and Adaptability

    Due to the adaptability of this dish, it can easily cater to various dietary preferences. Are you vegan? Simply enjoy the dish as is, or add nutritional yeast for a cheesy flavor. Gluten-free? No need to worry; this dish fits right into your diet. Low-carb enthusiasts can substitute potatoes with cauliflower for a lighter option.

    Family-Friendly

    Another notable advantage is its family-friendly nature. Kids love the caramelized sweetness that develops during the roasting process, making it easier for parents to incorporate vegetables into their meals. This dish is not just about taste; it’s also a fun way to introduce children to the joys of cooking and enjoying vegetables.

    Overall, classic roasted potatoes and carrots make an ideal choice for nearly anyone. Featuring minimal prep time, packed with nutrients, and ready to please even the pickiest eaters, you’ll find it hard not to love this simple yet satisfying recipe.

    Ingredients Overview

    Essential Ingredients for Classic Roasted Potatoes And Carrots

    Before diving into the preparation, let’s go over the essential ingredients you’ll need:

    • Potatoes (2 lbs) – Use Yukon Gold or red potatoes for the best results. These are rich in nutrients and provide a creamy texture when roasted.
    • Carrots (1 lb) – Baby carrots or whole carrots both work well; they contribute sweetness and crunch.
    • Olive Oil (2-3 tbsp) – Acts as a healthy fat and helps achieve that crispy exterior. Opt for extra virgin for more flavor.
    • Garlic (4 cloves, minced) – Adds a wonderful aroma and depth of flavor.
    • Salt (1 tsp) – Enhances all the natural flavors.
    • Black Pepper (1/2 tsp) – Adds a touch of warmth and spice.
    • Fresh herbs (such as rosemary or thyme, 1 tbsp) – Provide freshness and elevate the dish, but these are optional.

    Dietary Options

    • Vegan: The dish is naturally vegan.
    • Gluten-Free: Safe for those who avoid gluten.
    • Low-Calorie: Omit or reduce the olive oil for a lower-calorie option.

    Dietary Substitutions to Customize Your Classic Roasted Potatoes And Carrots

    Customization is key to any great recipe! Here are some suggested substitutions which can allow your classic roasted potatoes and carrots to fit into various dietary needs:

    • For a low-carb option: Substitute potatoes with cauliflower florets. This will significantly reduce carbohydrates while still providing a delightful texture.
    • For added protein: Throw in some chickpeas or tempeh for a heartier dish.
    • For sweetness: Consider adding a drizzle of maple syrup or honey (if not strictly vegan) for additional sweetness, which works well with the carrots.
    • Herbs and spices: Experiment with cayenne pepper, paprika, or even a dash of balsamic vinegar for a flavor kick.

    Feel free to get creative with this versatile recipe by incorporating your favorite seasonal vegetables as well!

    How to Prepare the Perfect Classic Roasted Potatoes And Carrots: Step-by-Step Guide

    Follow this step-by-step guide to create the perfect classic roasted potatoes and carrots!

    1. Preheat the Oven: Begin by preheating your oven to 425°F (220°C). A hot oven will help in creating that lovely caramelized exterior while keeping the inside tender.

    2. Wash and Peel: Thoroughly wash your potatoes and carrots. If you’re using larger potatoes, peel them; baby potatoes and carrots can be left unpeeled for added texture and nutrients.

    3. Chop Vegetables: Cut the potatoes into uniform pieces, ideally 1-inch cubes, for even cooking. Carrots should be sliced into 1-inch pieces as well.

    4. Make the Marinade: In a large mixing bowl, whisk together olive oil, minced garlic, salt, and black pepper. This mixture will coat the vegetables evenly and enhance their flavors.

    5. Combine Ingredients: Add the chopped potatoes and carrots to the bowl. Toss until all pieces are thoroughly coated with the olive oil mixture.

    6. Spread on a Baking Sheet: Line a baking sheet with parchment paper for easy cleanup. Spread the coated potatoes and carrots in a single layer, ensuring that they’re not overcrowded. Overcrowding can lead to steaming rather than roasting.

    7. Add Herbs: Sprinkle your fresh herbs over the vegetables, and toss lightly again, allowing the flavors to meld beautifully.

    8. Roast: Place the baking sheet in the preheated oven and roast for 30-40 minutes. Halfway through the cooking time, stir the vegetables to promote even browning.

    9. Check Doneness: Look for a golden brown color and fork-tender texture. If the veggies are not yet to your liking, return them to the oven for another 5-10 minutes, keeping a close eye to avoid burning.

    10. Serve Immediately: Once done, remove from the oven and serve hot as a warm side alongside your favorite protein. Pair it with a drizzle of lemon juice for a refreshing finish!

    Adaptations for Dietary Needs:

    • Individuals following a vegan diet can enjoy the dish without alteration.
    • Gluten-free? No changes needed!
    • Need it low-calorie? Reduce oil and consider using cooking spray instead.

    By following these straightforward steps, you can prepare classic roasted potatoes and carrots with confidence and ease.

    Mastering Classic Roasted Potatoes And Carrots: Advanced Tips and Variations

    Once you’ve mastered the basics, consider these advanced tips and variations to elevate your classic roasted potatoes and carrots:

    Advanced Tips

    • Mix Up the Seasonings: Try adding smoked paprika or cumin for a Southwest twist. This can refine the flavor profile significantly and impress your guests.
    • Try Different Vegetable Combinations: Feel free to include seasonal vegetables such as parsnips, sweet potatoes, or beets. This makes for a colorful and nutrient-dense dish.
    • Add Cheese: For a cheesy flavor, sprinkle some parmesan or nutritional yeast (for a vegan option) before roasting. This adds a savory depth that balances the sweetness of the carrots.

    Variations

    • Mediterranean Style: Add olives, sun-dried tomatoes, and feta cheese to the roasted mix for a Mediterranean flare.
    • Balsamic Glaze: Drizzle balsamic reduction over the finished dish for a tangy-sweet finish that elevates the overall flavors.

    Ultimately, these tips and variations allow you to personalize classic roasted potatoes and carrots to suit any occasion or personal taste.

    How to Store Classic Roasted Potatoes And Carrots: Best Practices

    Proper storage will allow you to prolong the life of your roasted dish! Here are simple solutions for storage, reheat, and freeze:

    Refrigeration

    • Cool Down: Let the roasted potatoes and carrots cool to room temperature before storing.
    • Seal It Up: Place them in an airtight container to minimize exposure to air and moisture, which can lead to sogginess.
    • Time Frame: Stored properly, they can last up to 4 days in the fridge.

    Freezing

    • Freezer-Friendly: You can freeze the leftovers for up to 3 months.
    • Pre-Freeze: Spread the cooled veggies in a single layer on a baking sheet and flash freeze for about 1-2 hours before transferring them to freezer bags or airtight containers. This prevents clumping.
    • Thawing: Thaw overnight in the refrigerator before reheating.

    Reheating

    • In the Oven: For the best texture, reheat in the oven at 375°F (190°C) for about 15-20 minutes until heated through.
    • Microwave: You can also microwave in short intervals, stirring to ensure even heating. However, the texture may not be as crisp.

    With these storage tips, you can keep your classic roasted potatoes and carrots fresh and delicious long after you’ve made them!

    Nutritional Value of Classic Roasted Potatoes And Carrots

    Understanding the nutritional value of your meals is an essential part of maintaining a balanced diet. Here’s the approximate breakdown of classical roasted potatoes and carrots per serving (about 1 cup):

    • Calories: 180
    • Total Fat: 7g
    • Saturated Fat: 1g
    • Carbohydrates: 30g
    • Dietary Fiber: 5g
    • Sugars: 3g
    • Protein: 3g

    Vitamins & Minerals:

    • Vitamin A: 50% of Daily Value
    • Vitamin C: 40% of Daily Value
    • Potassium: 20% of Daily Value
    • Folate: 10% of Daily Value

    This dish provides a hearty serving of essential nutrients, making it not only satisfying but also nutritious. You can enjoy classic roasted potatoes and carrots guilt-free, knowing you’re fueling your body with beneficial foods.

    FAQs: Frequently Asked Questions About Classic Roasted Potatoes And Carrots

    Q: Can I use other vegetables in this recipe?
    A: Absolutely! Feel free to throw in vegetables such as bell peppers, zucchini, or onions. Just make sure to cut them to similar sizes to ensure even cooking.

    Q: How can I make this dish spicier?
    A: You can add cayenne pepper or red chili flakes to the olive oil mixture before tossing the vegetables. This will bring a delightful kick to your roasted dish.

    Q: How can I adapt this recipe for meal prep?
    A: Simply make a bigger batch and store them in portion-sized containers. They’re great for reheating during the week with no extra work.

    Q: What’s the best way to reheat leftover roasted vegetables?
    A: For optimal texture, reheat them in the oven, but a microwave can also work in a pinch. Just always check for even heating.

    Q: Can I prepare classic roasted potatoes and carrots ahead of time?
    A: Yes, you can chop and season the vegetables in advance. Store them in the fridge for up to 24 hours before roasting to add convenience to your cooking process.

    Arming yourself with this knowledge allows you to confidently cook and enjoy classic roasted potatoes and carrots, making it a go-to dish in your collection of dinner recipes!

  • Buttery Roasted Carrots With Whipped Ricotta

    Buttery Roasted Carrots With Whipped Ricotta

    Buttery Roasted Carrots With Whipped Ricotta: A Tropical Delight

    Introduction to Buttery Roasted Carrots With Whipped Ricotta

    Are you tired of the same old dinner ideas? It’s time to elevate your meal game with Buttery Roasted Carrots with Whipped Ricotta. This delightful dish is a compelling blend of simplicity, health benefits, and versatility, making it the perfect addition to any mealtime lineup. Not only does it serve as an exceptional side dish, but it can also hold its own as a light vegetarian main course.

    The beauty of this recipe lies in its straightforward preparation and wholesome ingredients. Roasting carrots brings out their natural sweetness while giving them a wonderfully tender texture that complements the creamy whipped ricotta. This dish is suitable for a variety of dietary preferences—it’s easy to make vegan, gluten-free, and low-calorie! With only a few simple components, you can create a dish that offers a burst of flavor and nutrition.

    The colors of vibrant roasted carrots topped with a cloud of whipped ricotta make for a visually stunning plate that will impress family, friends, and guests alike. Whether you’re a busy parent juggling multiple schedules, a food enthusiast seeking inventive recipes, or even a newlywed exploring new culinary ventures, this recipe is here to inspire your menu planning. So, grab your apron, and let’s delve into this delightful recipe that not only satisfies but nourishes!

    Benefits and Advantages of Buttery Roasted Carrots With Whipped Ricotta

    Exploring the benefits of Buttery Roasted Carrots with Whipped Ricotta reveals why it’s an exceptional choice for meal planning. First, this dish is incredibly easy to prepare. With minimal chopping and a short roasting time, busy cooks can have a delightful side or light main ready in under 30 minutes. The simplicity of this recipe allows it to fit seamlessly into any busy lifestyle.

    In addition to being easy to make, this meal is also packed with nutrients. Carrots are an excellent source of vitamins A and K, which are vital for maintaining a healthy immune system and good vision. Coupled with ricotta cheese, which offers a healthy dose of protein, this dish supports muscle maintenance and promotes a balanced diet. Moreover, the use of fresh herbs and spices enhances not only the flavor profile but also ensures that you’re serving a dish full of antioxidants and anti-inflammatory properties.

    Another significant advantage is the adaptability of this recipe. You can easily cater it to meet a range of dietary needs, making it an inclusive option for family dinners or gatherings with friends. For example, if you’re looking to keep it vegan, you can substitute the whipped ricotta with a dairy-free alternative, like cashew cream or a vegan cream cheese. With multiple customization options available, Buttery Roasted Carrots with Whipped Ricotta stands out among generic dinner ideas, offering a fresh, flavorful twist!

    Ingredients Overview

    Essential Ingredients for Buttery Roasted Carrots With Whipped Ricotta

    To create this delicious dish, you will need the following ingredients:

    • Carrots: 1 pound (about 4-5 medium-sized carrots). Choose fresh, vibrant carrots for the best flavor. You can use regular or rainbow carrots for visual appeal!

    • Olive Oil: 2 tablespoons. This healthy fat enhances the roasting process and adds flavor.

    • Salt: 1 teaspoon. For seasoning and drawing out the natural sweetness of the carrots during roasting.

    • Black Pepper: ½ teaspoon. Freshly ground pepper adds a hint of spice.

    • Fresh Thyme: 1 tablespoon, finely chopped. Thyme pairs beautifully with carrots and adds depth to the dish.

    • Ricotta Cheese: 1 cup. This creamy cheese forms the base for the whipped topping. Use low-fat ricotta for a lighter option.

    • Lemon Zest: 1 teaspoon, for brightness and acidity.

    • Honey or Maple Syrup: 1 tablespoon (optional). This adds a touch of sweetness to the ricotta. Omit or use agave for a vegan version.

    Dietary Substitutions to Customize Your Buttery Roasted Carrots With Whipped Ricotta

    1. Vegan Option: Substitute the ricotta cheese with cashew cream, vegan cream cheese, or silken tofu blended until smooth for a dairy-free alternative.

    2. Gluten-Free: This recipe is naturally gluten-free, but always check ingredient labels for packaged items, like ricotta cheese, to ensure they meet gluten-free standards.

    3. Low-Calorie: Opt for low-fat ricotta or Greek yogurt to reduce calorie content while maintaining protein levels.

    4. Sweetness Adjustment: For those avoiding sugar, simply omit the honey/maple syrup or use a sugar substitute without impacting the overall flavor profile.

    With these simple substitutions, everyone can enjoy Buttery Roasted Carrots with Whipped Ricotta, making it an exemplary choice among various dietary preferences!

    How to Prepare the Perfect Buttery Roasted Carrots With Whipped Ricotta: Step-by-Step Guide

    Now that you’ve gathered your ingredients, let’s dive into the preparation of your Buttery Roasted Carrots with Whipped Ricotta. Follow these easy steps to craft a beautiful dish that will leave everyone at your dinner table asking for seconds!

    1. Preheat the Oven: Preheat your oven to 425°F (220°C) to create that perfect roasting environment. This high temperature will caramelize the natural sugars in the carrots, resulting in extraordinary flavor.

    2. Prepare the Carrots: While the oven heats, wash and peel the carrots. Cut them diagonally into 1-inch pieces to help them roast uniformly. If you’re using baby carrots, you may leave them whole.

    3. Toss with Olive Oil and Seasonings: In a large mixing bowl, combine the sliced carrots with olive oil, salt, black pepper, and chopped thyme. Toss the mixture until all the carrots are evenly coated.

    4. Roast the Carrots: Spread the seasoned carrots in a single layer on a baking sheet lined with parchment paper. This will prevent sticking and promote even roasting. Roast for about 20-25 minutes, turning halfway through until the carrots are tender and caramelized.

    5. Prepare the Whipped Ricotta: While the carrots are roasting, prepare the whipped ricotta. In a medium bowl, combine the ricotta cheese, lemon zest, and honey (if using). Using a hand mixer or a food processor, whip until smooth and creamy. Adjust the seasoning with a pinch of salt.

    6. Serve the Dish: Once the carrots are beautifully roasted, remove them from the oven. Serve them warm on a platter, topped with dollops of whipped ricotta. Sprinkle additional fresh thyme leaves on top for a fresh finish.

    7. Enjoy!: This dish not only serves as a fantastic side but can also make a lovely light meal on its own. Pair it with a fresh salad or a grain like quinoa or farro for a complete dinner idea!

    With each step, feel free to adapt the recipe to meet your specific dietary preferences. The versatility of this dish means that it can easily accommodate busy weeknight dinners or elegant gatherings alike.

    Mastering Buttery Roasted Carrots With Whipped Ricotta: Advanced Tips and Variations

    To truly master your Buttery Roasted Carrots with Whipped Ricotta and impress your guests, consider these advanced tips and variations:

    • Add a Spice Twist: Incorporate spices like cumin or smoked paprika to the carrot mixture before roasting. These spices lend a whole new flavor dimension to the dish.

    • Nutty Crunch: For added texture, sprinkle some toasted nuts, such as walnuts or hazelnuts, over the finished dish. Their crunch complements the soft carrots and creamy ricotta beautifully.

    • Herb Infusion: Experiment with different herbs! Rosemary or oregano can replace thyme, offering distinct flavors that can internationalize your dish, especially if you are working on global dinner ideas.

    • Chili Flakes: For those who enjoy a little heat, sprinkle red chili flakes over the finished dish to provide a pleasant kick.

    • Roasted Garlic: For an extra layer of flavor, roast a few garlic cloves alongside the carrots. Mash them into the ricotta for a rich, garlicky whipped topping.

    Taking these tips into account will elevate your dish beyond the ordinary and allow you to create a wide variety of exciting meal options.

    How to Store Buttery Roasted Carrots With Whipped Ricotta: Best Practices

    Storing your Buttery Roasted Carrots with Whipped Ricotta properly will help to preserve both flavors and textures for later enjoyment. Here are the best practices:

    1. Refrigeration: Allow any leftovers to cool completely, then store them in an airtight container in the refrigerator. They should remain fresh for up to 4 days. When reheating, consider warming them in the oven to maintain crispness.

    2. Freezing: For longer storage, you can freeze roasted carrots. However, note that the texture may alter slightly after thawing. Spread the cooled carrots on a baking sheet in a single layer, freeze until solid, then transfer to a freezer-safe bag or container. They can be kept frozen for up to 3 months.

    3. Reheating: When ready to eat, reheat your roasted carrots in a 350°F (175°C) oven until heated through. If you previously thawed them, direct heat may result in mushiness, so the oven method is preferable to restore some crispness.

    These storage methods allow you to enjoy this delightful dish as part of your meal planning and dinner ideas throughout the week.

    Nutritional Value of Buttery Roasted Carrots With Whipped Ricotta

    Understanding the nutritional value of your Buttery Roasted Carrots with Whipped Ricotta can help you appreciate the health benefits it offers. Here’s a detailed breakdown of this dish’s nutritional components per serving:

    • Calories: Approximately 210 kcal (without optional sweeteners)

    • Total Fat: 10 g (primarily from olive oil and ricotta)

    • Saturated Fat: 4 g (from ricotta cheese)

    • Carbohydrates: 24 g (from carrots)

    • Fiber: 6 g (beneficial for digestion)

    • Sugars: 6 g (naturally sourced from carrots)

    • Protein: 6 g (from ricotta, contributing to muscle maintenance)

    • Vitamins & Minerals: High in Vitamin A, C, Calcium, and Potassium, supporting overall health.

    By incorporating Buttery Roasted Carrots with Whipped Ricotta into your meal plan, you not only indulge in a mouth-watering dish but also benefit from a range of essential nutrients.

    FAQs: Frequently Asked Questions About Buttery Roasted Carrots With Whipped Ricotta

    Here are some common questions regarding Buttery Roasted Carrots with Whipped Ricotta, along with clear answers to guide you through preparation and adjustments for your dietary needs.

    Q: Can I use different vegetables instead of carrots?
    A: Absolutely! This method works well with a variety of root vegetables, such as parsnips, sweet potatoes, or beets. Adjust roasting times accordingly based on the vegetable’s texture.

    Q: Is there a way to make this meal low-carb?
    A: Instead of carrots, consider using zucchini or cauliflower. Both options roast beautifully and can carry the flavor of whipped ricotta excellently.

    Q: How do I achieve a creamier whipped ricotta?
    A: For a silkier texture, blend the ricotta with an equal part of Greek yogurt or a splash of milk before whipping.

    Q: Can I prepare the dish ahead of time?
    A: Yes! You can roast the carrots and prepare the whipped ricotta a day in advance. Store both separately until you’re ready to serve to maintain their quality.

    Q: What can I serve this dish with?
    A: Buttery Roasted Carrots with Whipped Ricotta pairs as a stunning side dish with roasted meats, grilled chicken, or served over a bed of quinoa for a vegetarian meal.

    Q: Is this dish good for meal prep?
    A: Definitely! This dish stores well and reheats beautifully, making it a great addition to your meal-prepping routine for busy weeks.

    Using the above information, you can create a delightful dining experience with Buttery Roasted Carrots with Whipped Ricotta. Experiment with flavors and swaps to keep your dining table enticing and diverse. Enjoy your culinary adventure!

  • Classic Roasted Brussels Sprouts And Carrots

    Classic Roasted Brussels Sprouts And Carrots

    Classic Roasted Brussels Sprouts And Carrots: A Tropical Delight

    Introduction to Classic Roasted Brussels Sprouts And Carrots

    Are you on the lookout for scrumptious yet easy-to-make healthy dinner recipes that cater to all dietary needs? Look no further! Classic Roasted Brussels Sprouts and Carrots offer an incredible combination of flavor and nutrition that will brighten up your dinner table. This recipe showcases earthy Brussels sprouts, sweet carrots, and a few delightful seasonings that bring out the natural flavors of the vegetables.

    This classic dish is not only simple to prepare but also versatile enough to suit diverse tastes. It’s perfect for busy weeknights, family gatherings, or even a cozy dinner for two. Whether you’re a busy parent trying to pack in healthy options for your kids, a college student looking for quick and nutritious meals, or a renowned chef seeking some fresh inspiration, this recipe is bound to impress.

    Each serving is bursting with vitamins, minerals, and unique flavor, making it an excellent option for a vegan, gluten-free, and low-calorie dinner. Moreover, roasting enhances the sweetness of the carrots while giving Brussels sprouts a delightful crispness, transforming everyday ingredients into something spectacular. So, roll up those sleeves and let’s dive into this delightful journey of preparing Classic Roasted Brussels Sprouts and Carrots!

    Benefits and Advantages of Classic Roasted Brussels Sprouts And Carrots

    Embracing this recipe for Classic Roasted Brussels Sprouts and Carrots comes with numerous benefits that stretch beyond just taste. First and foremost, the preparation process is straightforward and manageable. In less than an hour, you can have a nutrient-rich side dish ready to complement your main course.

    Ease of Preparation

    In today’s fast-paced world, many people search for convenient yet healthy options. This dish requires minimal ingredients—just Brussels sprouts, carrots, olive oil, salt, and pepper. You can easily toss it all together and pop it in the oven, allowing the magic of roasting to work while you handle other dinner preparations. This makes it an ideal choice for busy parents, working professionals, and students alike.

    Health Benefits

    Brussels sprouts and carrots are nutritional powerhouses. They’re packed with vitamins A, C, and K, along with dietary fiber, antioxidants, and many other essential nutrients. Incorporating these vegetables into your meals can promote better digestive health and boost your immune system. Moreover, Brussels sprouts are known for their cancer-fighting properties, while carrots can improve vision and enhance skin health. Collectively, these benefits reinforce why selecting healthy dinner recipes is vital for maintaining a balanced diet.

    Versatility for Dietary Needs

    Not only does this recipe cater to individual health preferences, but it also adapts beautifully to varied diets. Whether you’re vegan, vegetarian, paleo, or gluten-free, this dish checks all the boxes. Additionally, you can easily incorporate other vegetables of choice or even add some protein toppings—the possibilities are endless!

    Ingredients Overview

    Essential Ingredients for Classic Roasted Brussels Sprouts And Carrots

    To create your Classic Roasted Brussels Sprouts and Carrots, you’ll need the following ingredients:

    • Brussels Sprouts (1 lb): Look for vibrant green sprouts, and discard any yellow or discolored leaves.
    • Carrots (2 medium): Fresh, sweet carrots enhance the earthy flavors. If possible, opt for rainbow carrots for added color and nutrients.
    • Olive Oil (3 tablespoons): This heart-healthy fat is essential for roasting. Alternatively, you can substitute with avocado oil for a different flavor profile.
    • Salt (1 teaspoon): A natural flavor enhancer, Himalayan pink salt is a great choice for added minerals.
    • Black Pepper (1 teaspoon): Freshly ground will impart more flavor than pre-ground varieties.
    • Optional Aromatics: Fresh garlic (2 cloves, minced) or herbs like rosemary or thyme can elevate the dish even further.

    Dietary Substitutions to Customize Your Classic Roasted Brussels Sprouts And Carrots

    Here are some substitutions to accommodate various dietary preferences:

    • For Vegan: No adjustments necessary, as the recipe is already vegan-friendly.
    • For Gluten-Free: Again, this recipe naturally adheres to gluten-free guidelines, making it perfect for those avoiding gluten.
    • For Oil-Free: You may omit the olive oil and opt for vegetable broth or water to facilitate roasting.
    • For Additional Flavor: Consider adding nutritional yeast for a cheesy flavor without dairy, or maple syrup for a hint of sweetness.

    How to Prepare the Perfect Classic Roasted Brussels Sprouts And Carrots: Step-by-Step Guide

    Now that you’ve gathered your ingredients let’s prepare your Classic Roasted Brussels Sprouts and Carrots with these easy steps:

    1. Preheat the Oven: Set your oven to 400°F (200°C). This temperature is perfect for roasting vegetables, allowing them to caramelize beautifully.

    2. Clean the Vegetables: Rinse Brussels sprouts and carrots under cold water. Pat dry with a towel. For the Brussels sprouts, trim the stem end and cut them in half. For the carrots, peel the outer layer and slice them into 1-inch pieces.

    3. Combine Ingredients: In a large mixing bowl, toss the Brussels sprouts and carrot chunks with olive oil, salt, and pepper. Ensure that every piece is well-coated for even roasting. For added flavor, it’s the perfect time to mix in minced garlic and fresh herbs.

    4. Spread on Baking Sheet: Spread the vegetables evenly on a baking sheet lined with parchment paper. This helps prevent sticking and makes for easy cleanup.

    5. Roast the Vegetables: Place the baking sheet in the preheated oven. Roast for about 25-30 minutes, stirring halfway through to ensure even cooking. You want them to be golden brown and tender.

    6. Check for Doneness: After 25 minutes, check the Brussels sprouts and carrots. They should be crisp-tender with a bit of caramelization. If you prefer them extra crispy, leave them in for an additional 5 minutes.

    7. Serve Warm: Once they’re perfectly roasted, remove them from the oven. Serve warm as a side dish for dinner or a delightful addition to your meal prep.

    8. Optional Toppings: Add toasted nuts, a squeeze of lemon juice, or a sprinkle of balsamic glaze to enhance flavors even further.

    Following these steps, you’ll create a delicious and nutritious dish that fits perfectly into your collection of healthy dinner recipes!

    Mastering Classic Roasted Brussels Sprouts And Carrots: Advanced Tips and Variations

    While the basic recipe for Classic Roasted Brussels Sprouts and Carrots is delightful enough, there are several tips and variations you could consider to master it even further.

    Advanced Cooking Tips:

    • Uniform Sizing: Cut your vegetables into uniform sizes to ensure even cooking. Larger pieces will take longer, resulting in uneven textures.

    • Experiment with Spices: Feel free to experiment by adding spices like paprika, garlic powder, or even curry powder for a distinct flavor profile.

    • High Heat for Extra Crispiness: For an extra crispy texture, try increasing the oven temperature to 425°F (220°C) for the last 5-10 minutes of roasting.

    Variations to Try:

    • Add Protein: Incorporate cooked chickpeas or lentils to make it a meal. They can roast alongside the veggies for extra flavor.

    • Herbed Variation: Try adding different herbs—like oregano or parsley—to change the flavor landscape. Fresh herbs can be added at the end for a vibrant touch.

    • Sweet-Lemon Glaze: Drizzle a sweet lemon glaze made from lemon juice and maple syrup over the veggies before serving to add a zesty sweetness.

    With these tips and variations, you can elevate the dish and make it your own, providing endless options for new flavors to explore in your healthy dinner recipes rotation.

    How to Store Classic Roasted Brussels Sprouts And Carrots: Best Practices

    Leftover Classic Roasted Brussels Sprouts and Carrots can last in your kitchen, so proper storage is essential to maintain flavor and freshness.

    Refrigeration

    Allow the roasted veggies to cool completely before storing. Place them in an airtight container or wrap them in plastic wrap. They can be stored in the refrigerator for up to 3-4 days. The flavors may deepen and improve after a day or two!

    Freezing

    If you want to keep them longer, consider freezing them. Spread the cooled roasted vegetables on a baking sheet in a single layer and freeze until solid. This step prevents them from sticking together. Once frozen, transfer them to a freezer-safe container or bag. They can be kept in the freezer for up to 3 months.

    Reheating

    To reheat, simply spread the vegetables on a baking sheet and warm them in the oven at 350°F (175°C) for about 10-15 minutes. You can also use a microwave, but be careful not to overcook them, which could lead to a mushy texture. Adding a dash of olive oil during reheating can help rejuvenate the flavors.

    By mastering these storage techniques, you will ensure your healthy dinner recipes remain delicious and nutritious for every meal.

    Nutritional Value of Classic Roasted Brussels Sprouts And Carrots

    Understanding the nutritional profile of Classic Roasted Brussels Sprouts and Carrots can reinforce your decision to include it in your meal plan. Here’s a general overview of the nutrition per serving (about 1 cup of finished dish):

    • Calories: Approximately 120 calories
    • Protein: 4g
    • Fat: 7g (mostly from olive oil)
    • Carbohydrates: 16g
    • Fiber: 5g
    • Sugars: 3g
    • Vitamins and Minerals:
      • Vitamin A: 140% of the Daily Value
      • Vitamin C: 100% of the Daily Value
      • Vitamin K: 120% of the Daily Value
      • Folate: 10% of the Daily Value
      • Potassium: 10% of the Daily Value

    This nutrient-rich profile should encourage you to incorporate more of these vegetables into your diet. Moreover, because it’s low in calories and high in fiber, it works exceptionally well for anyone looking to maintain or lose weight while enjoying flavorful dishes.

    FAQs: Frequently Asked Questions About Classic Roasted Brussels Sprouts And Carrots

    1. Can I make Classic Roasted Brussels Sprouts and Carrots ahead of time?

    Yes! You can prepare the vegetables a day in advance and store them in the refrigerator. Simply reheat them before serving.

    2. Is it possible to add other vegetables to this recipe?

    Absolutely! Feel free to add vegetables like sweet potatoes, bell peppers, or zucchini. Just ensure they have similar cooking times to the Brussels sprouts and carrots.

    3. Can I roast them in an air fryer instead?

    Yes, air fryers are an excellent option for roasting vegetables. You can cook them at 375°F (190°C) for about 15-20 minutes, shaking the basket halfway through for even cooking.

    4. How do I make this recipe more filling?

    To make it a complete meal, consider adding a protein source such as chickpeas, tofu, or chicken thighs. You can roast the protein with the vegetables or cook them separately.

    5. Can I use frozen Brussels sprouts and carrots for this recipe?

    Fresh vegetables are recommended for the best texture and flavor. Frozen vegetables may be used, but ensure they are fully thawed and drained before roasting.

    By addressing these FAQs, you can ensure a successful cooking experience with this outstanding recipe. As you experiment with Classic Roasted Brussels Sprouts and Carrots, you’ll discover new dimensions of flavor while sticking to your healthy dinner recipes goals.

    Final Thoughts

    After exploring the wonderful benefits, preparation tips, storage techniques, and nutritional value of this delightful dish, it’s time for you to bring Classic Roasted Brussels Sprouts and Carrots into your kitchen. It’s an effortless way to enjoy healthful, tasty vegetables that the whole family will love. Celebrate mindful cooking and nourished living by adding this recipe to your roster of go-to healthy dinner recipes!

  • My Asian GrandmaS Secret Recipe For Best Orange Salad

    My Asian GrandmaS Secret Recipe For Best Orange Salad

    My Asian Grandma’s Secret Recipe For Best Orange Salad!: A Tropical Delight

    Introduction to My Asian Grandma’s Secret Recipe For Best Orange Salad!

    Discovering new recipe ideas is a delight, especially when they come from cherished family traditions. My Asian Grandma’s Secret Recipe for Best Orange Salad is a beautiful blend of flavors and textures that is perfect for any occasion. Whether you are preparing a light lunch, a refreshing side dish for dinner, or a vibrant addition to your picnic basket, this salad is bound to impress.

    What makes this salad stand out? First and foremost, it’s exceptionally easy to prepare. With just a handful of fresh ingredients combined in a matter of minutes, you’ll have a dish that looks like a culinary masterpiece. It’s also a friend to your health—loaded with vitamins and antioxidants found in oranges, this salad is not only delicious but also nutritious.

    Vegan and gluten-free, this recipe caters to various dietary needs, making it an ideal choice for busy parents juggling multiple meal preferences or working professionals looking for a quick, yet satisfying option. Simply put, My Asian Grandma’s Orange Salad is a cheerful burst of flavor, packed into a bowl, and ready to be shared.


    Benefits and Advantages of My Asian Grandma’s Secret Recipe For Best Orange Salad!

    When seeking simple and delightful recipe ideas, My Asian Grandma’s Secret Recipe for Orange Salad should be on your radar. Here are some compelling reasons why it’s an excellent choice:

    1. Simplicity: This salad is unbelievably straightforward to prepare. With only a few fresh ingredients, you won’t need hours in the kitchen. A quick chop here and a toss there, and you’re ready to enjoy!

    2. Health Boost: Oranges are rich in vitamin C, which supports the immune system and promotes healthy skin. The addition of crunchy cucumbers and aromatic herbs offers fiber and antioxidants, making this dish ideal for anyone looking to boost their nutrient intake without sacrificing flavor.

    3. Versatile Option: This recipe is incredibly adaptable, allowing you to cater it to your preferences or dietary restrictions easily. Whether you’re a vegan, need gluten-free meals, or simply want a low-calorie option, this salad checks all the boxes.

    4. Appealing Presentation: The vibrant colors of the oranges, cucumbers, and fresh herbs create a visually stunning dish that can be a centerpiece on any table. It’s sure to impress guests and loved ones alike.

    5. Perfect for Meal Prep: This Orange Salad can be made ahead of time, making it a perfect candidate for meal prepping. Just pack it in your lunch box or store it in the refrigerator for a quick bite later.

    By integrating this salad into your repertoire of recipe ideas, you’ll have a dish that not only nourishes but also pleases the palate.


    Ingredients Overview

    Essential Ingredients for My Asian Grandma’s Secret Recipe For Best Orange Salad!

    To create My Asian Grandma’s Secret Recipe for Best Orange Salad, gather the following ingredients:

    • 4 large navel oranges (or any sweet variety)
    • Bright and juicy, these will be the star of your salad.

    • 1 medium cucumber

    • Adds a refreshing crunch, enhancing both texture and flavor.

    • 1 cup pomegranate seeds (optional)

    • Provides a delightful pop of color and sweetness alongside tangy notes.

    • 1/4 cup fresh mint leaves

    • Offers a cool, aromatic layer that complements the citrus beautifully.

    • 1 lime (juiced)

    • Brightens the dish and balances the sweetness of the oranges.

    • 1 tablespoon honey or agave syrup (for vegan)

    • Adds a touch of sweetness and helps to meld the flavors together.

    • Salt and pepper to taste

    • Elevates the flavors and brings the dish together.

    This salad is not only delicious but also mindful of dietary restrictions. With vegan and gluten-free options clearly noted, everyone can enjoy this refreshing dish without worry.

    Dietary Substitutions to Customize Your My Asian Grandma’s Secret Recipe For Best Orange Salad!

    Cooking should be inclusive and adaptable. Here are some substitutions you can easily make based on dietary needs or ingredient availability:

    1. Orange Alternatives: If oranges aren’t available, feel free to substitute them with grapefruits or mandarins for a unique twist.

    2. Cucumber Choices: You can use any variety of cucumber, or try zucchini for a different texture.

    3. Sweetener Swap: If you’re looking for a sugar-free option, consider using a stevia-based sweetener, or simply omit sweeteners altogether to rely on the natural sugars of the fruit.

    4. Herb Variations: While mint pairs beautifully with orange, cilantro or basil can also provide an interesting flavor profile. Feel free to experiment!

    5. Add Protein: For those looking to add more protein, chopped nuts like almonds or walnuts can lend a satisfying crunch and added nutrition.

    These substitutions highlight the versatility of My Asian Grandma’s Orange Salad, making it a flexible addition to your collection of recipe ideas.


    How to Prepare the Perfect My Asian Grandma’s Secret Recipe For Best Orange Salad!: Step-by-Step Guide

    Creating a delicious Orange Salad is simple and rewarding. Follow these easy steps to prepare this vibrant dish:

    1. Prepare the Oranges:
    2. Start by peeling the oranges and removing any pith. Cut them into bite-sized segments and place them into a large mixing bowl. This will be the base of your salad.

    3. Slice the Cucumber:

    4. Rinse and peel the cucumber if desired. Slice it into thin rounds or half-moons, depending on your texture preference. Add the sliced cucumber to the bowl with the orange segments.

    5. Add Pomegranate Seeds:

    6. If you’re including pomegranate seeds, add them to the mixture now. They will not only enhance the flavor but also provide a delightful crunch.

    7. Prepare the Dressing:

    8. In a small bowl, whisk together the lime juice, honey (or agave syrup), salt, and pepper. Taste it—adjust the sweetness with more honey or tang with more lime juice to match your preference.

    9. Combine Ingredients:

    10. Pour the dressing over the orange and cucumber mixture. Gently toss everything together to coat the ingredients evenly without smashing the delicate orange segments.

    11. Chop the Mint:

    12. Rinse the mint leaves, pat them dry, and chop them roughly. Add them to the salad, allowing the fresh aroma to fill the bowl.

    13. Toss and Serve:

    14. Give the salad one last gentle toss to combine everything. Serve immediately for the freshest taste, or let it sit for a few minutes to allow the flavors to meld.

    15. Optional Garnishes:

    16. Consider garnishing with additional mint leaves or a sprinkle of nuts for added flair.

    This step-by-step approach makes this dish approachable for home cooks of all levels, showcasing not just the simplicity of the recipe but also the adaptability that fits various recipe ideas and dietary needs.


    Mastering My Asian Grandma’s Secret Recipe For Best Orange Salad!: Advanced Tips and Variations

    Once you’ve mastered the basic preparation of My Asian Grandma’s Orange Salad, here are some advanced tips and variations to elevate your salad-making skills:

    1. Marinate for Flavor:
    2. Letting the salad sit for 30 minutes before serving can enhance the flavor. This allows the dressing to soak into the oranges and cucumber, creating a richer taste experience.

    3. Add Variety:

    4. Try incorporating other fruits such as strawberries, mangoes, or kiwi. This not only adds different flavors but also makes the salad look even more appealing.

    5. Experiment with Textures:

    6. Introducing crunchy toppings like roasted almonds or pumpkin seeds can add an enjoyable texture to the salad. Just be sure to add these just before serving to keep them crunchy.

    7. Make It a Meal:

    8. To transform this salad into a complete meal, consider adding grilled chicken, shrimp, or tofu. This helps cater to protein needs, especially if meal prepping for busy weeks.

    9. Seasonal Swaps:

    10. Adapt the recipe to suit seasonal fruits and veggies available in your area. This ensures your salad stays fresh and tailored to what’s in season.

    These tips will not only help you perfect My Asian Grandma’s Orange Salad, but they also encourage creative kitchen experimentation, allowing you to truly make this salad your own among your repertoire of recipe ideas.


    How to Store My Asian Grandma’s Secret Recipe For Best Orange Salad!: Best Practices

    Storing My Asian Grandma’s Orange Salad correctly is vital to maintain its freshness and flavor, especially if you’ve prepared a large batch. Here are best practices for storage:

    1. Refrigeration:
    2. Store any leftover Orange Salad in an airtight container in the refrigerator. This will prevent the salad from drying out and absorbing other odors from your fridge.

    3. Consume Quickly:

    4. For optimal freshness, consume the salad within 2-3 days. The oranges and cucumbers can lose their crispness over time.

    5. Avoid Soaking Dressing:

    6. If you know you’ll have leftovers, consider keeping the dressing separate until serving to prevent the salad ingredients from becoming soggy.

    7. Freezing?:

    8. Freezing this salad is not recommended, as the texture of oranges and cucumbers does not fare well in thawing. Instead, enjoy it fresh, which enhances the dish’s appeal.

    9. Transporting:

    10. If you’re taking the salad to a gathering, consider packing the dressing separately. This will allow for easy assembly right before serving and ensure the salad remains fresh and crisp.

    Proper storage will keep My Asian Grandma’s Orange Salad tasty and enjoyable, enabling you to continue indulging in your recipe ideas for days to come!


    Nutritional Value of My Asian Grandma’s Secret Recipe For Best Orange Salad!

    Understanding the nutritional aspects of your meals can empower healthier choices. Here’s a detailed breakdown of the nutritional content for one serving (approximately 1 cup) of My Asian Grandma’s Orange Salad:

    • Calories: 120
    • Total Fat: 0.5g
    • Saturated Fat: 0.1g
    • Cholesterol: 0mg
    • Sodium: 15mg
    • Total Carbohydrates: 30g
    • Dietary Fiber: 4g
    • Sugars: 18g
    • Protein: 2g
    • Vitamin C: 80% of the Daily Value (DV)
    • Calcium: 4% of the DV
    • Iron: 2% of the DV

    This salad is not only low in calories but is also a powerhouse of vitamins and minerals, thanks to the abundance of fruits and vegetables. The high vitamin C content makes it an excellent choice for an immune boost, while the healthy fiber supports digestion and promotes a feeling of fullness.

    Tracking the nutritional values helps you understand and balance your daily intake, allowing you to incorporate this fresh salad smoothly into your recipe ideas for a healthier lifestyle.


    FAQs: Frequently Asked Questions About My Asian Grandma’s Secret Recipe For Best Orange Salad!

    1. Can I make this salad ahead of time?
    Absolutely! You can prepare My Asian Grandma’s Orange Salad a few hours in advance. Just keep the dressing separate until you’re ready to serve to maintain freshness.

    2. Is it possible to add other fruits?
    Yes! Feel free to get creative by adding seasonal fruits like strawberries, mangoes, or avocados. The flavors will complement the oranges nicely.

    3. What can I use instead of honey for a vegan option?
    Agave syrup is a great alternative for those looking for a vegan-friendly sweetener. You can also use maple syrup if desired.

    4. How do I store leftovers?
    Keep the salad in an airtight container in the refrigerator. It’s best to consume it within 2-3 days for the best taste and texture.

    5. What can I substitute if I’m allergic to oranges?
    If you have an orange allergy, grapefruits or even diced apples can be great substitutes, offering a different, yet enjoyable taste.

    By addressing these common questions, it ensures that potential cooks can navigate the recipe with confidence while exploring the delightful world of recipe ideas that suit their individual needs.


    I hope this article has inspired you to try out My Asian Grandma’s Secret Recipe for Best Orange Salad! Fresh, vibrant, and packed with nutrition, this delicious dish is bound to become a beloved addition to your collection of recipe ideas. Enjoy your culinary journey!

  • Homemade Hot Cross Buns With Greek Yogurt

    Homemade Hot Cross Buns With Greek Yogurt

    Homemade Hot Cross Buns With Greek Yogurt: A Tropical Delight

    Introduction to Homemade Hot Cross Buns With Greek Yogurt

    If you’re looking for delicious and healthy breakfast ideas, look no further than these Homemade Hot Cross Buns with Greek Yogurt! The marriage of rich flavors, nutritious ingredients, and an easy-to-follow recipe makes these buns a standout choice for breakfast or brunch. Perfectly spiced with cinnamon and nutmeg, these soft, fluffy buns can bring a tropical twist to your table.

    What sets this recipe apart is the inclusion of Greek yogurt, which adds moisture and richness while packing in protein. Not only is this recipe simple to make, but it’s also adaptable for various dietary needs, making it suitable for busy parents seeking quick yet wholesome meals, students craving something special, or health-conscious individuals looking for lighter options.

    Beyond their delicious taste, these buns are versatile. You can enjoy them fresh out of the oven, toasted with a bit of butter, or even topped with some light cream cheese. They can also be infused with dried fruits such as apricots, cranberries, or even tropical fruits like pineapple for a unique twist. This recipe isn’t just for breakfast – it’s a delightful treat any time of the day!

    Benefits and Advantages of Homemade Hot Cross Buns With Greek Yogurt

    Homemade Hot Cross Buns with Greek Yogurt offer numerous benefits that make them an ideal choice for anyone looking to enhance their breakfast routine. Here are some compelling reasons to give this recipe a try:

    1. Ease of Preparation: These buns are incredibly easy to prepare, taking less time than traditional recipes. With a straightforward process that caters to even novice bakers, you can whip up a batch in no time. A little mixing, kneading, and rising, and you’re on your way to enjoying freshly baked goods.

    2. Health Benefits: Incorporating Greek yogurt not only makes the buns moist but also boosts the nutritional content. Greek yogurt is rich in protein and probiotics, promoting gut health. It contributes to a balanced breakfast, helping you stay full longer and reducing the temptation to reach for unhealthy snacks.

    3. Dietary Flexibility: Whether you’re vegan, gluten-free, or counting calories, this recipe can be easily adapted. With simple substitutions, such as using plant-based yogurt or gluten-free flour, everyone can enjoy these delightful buns.

    4. Delicious Flavor Profiles: The addition of spices like cinnamon and nutmeg gives these buns a warm, inviting flavor that might just remind you of your favorite bakery. You can add customizations like chocolate chips, nuts, or citrus zest to make each batch uniquely yours.

    5. Aesthetic Appeal: The signature cross on top of the buns makes them not only taste great but also look fantastic on your dining table. Their presentation can elevate any brunch gathering or holiday feast.

    6. Versatile Usage: While they shine as breakfast ideas, these buns can also be served as snacks, desserts, or sharing platters for gatherings. With a myriad of toppings or spreads, they can be dressed up or eaten simply to suit your mood.

    In summary, Homemade Hot Cross Buns with Greek Yogurt not only bring comfort and taste but are also a healthy and versatile addition to your cooking repertoire. They embody a delightful combination of flavor, nutrition, and practicality, making them a brilliant choice for any meal.

    Ingredients Overview

    Essential Ingredients for Homemade Hot Cross Buns With Greek Yogurt

    To successfully whip up your batch of Homemade Hot Cross Buns with Greek Yogurt, here’s a detailed list of essential ingredients along with their purposes:

    • 3 cups all-purpose flour (or gluten-free flour blend for a gluten-free version): This provides the foundation of your buns, making them fluffy and light.
    • 1/2 cup Greek yogurt (or dairy-free yogurt for a vegan option): Adds moisture and protein, enhancing the texture of the buns.
    • 1/4 cup sugar (coconut sugar as a lower-calorie substitute): Sweetens the dough and helps activate the yeast.
    • 1 packet (2 1/4 teaspoons) active dry yeast: Essential for making the buns rise.
    • 1/2 teaspoon salt: Enhances flavor while balancing the sweetness.
    • 1 teaspoon ground cinnamon: A warm spice that infuses the buns with a delightful aroma.
    • 1/4 teaspoon ground nutmeg: Adds depth to the flavor profile.
    • 1/2 cup warm milk (almond or coconut milk for vegan option): Activates the yeast.
    • 1/4 cup melted butter (coconut oil for vegan option): Adds richness; you can replace it with unsweetened applesauce for a lower-fat alternative.
    • 1/2 cup dried fruits (raisins, currants, or chopped apricots): Provides sweetness and texture; feel free to use tropical options like dried pineapple for an exotic twist.

    Dietary Substitutions to Customize Your Homemade Hot Cross Buns With Greek Yogurt

    To ensure everyone enjoys these delightful buns, consider these substitutions based on dietary needs:

    1. Gluten-Free: Use a gluten-free all-purpose flour blend. Make sure it includes xanthan gum for proper texture.
    2. Vegan: Replace Greek yogurt with your favorite dairy-free yogurt and use plant-based milk and coconut oil.
    3. Lower Sugar: Substitute sugar with stevia or monk fruit sweetener, adjusting the quantity based on sweetness preference.
    4. Nut-Free: Ensure your flour blend is free from nuts, particularly if using packaged alternatives which may contain traces.
    5. Fruit Variations: Instead of traditional dried fruits, consider using tropical dried fruits like mango or passionfruit for an exciting twist on flavor.
    6. Spice Variations: Incorporate different spices, such as cardamom or ginger, to adjust the flavor profile to your liking.

    These simple substitutions ensure that your Homemade Hot Cross Buns with Greek Yogurt can cater to various dietary preferences without sacrificing taste or texture.

    How to Prepare the Perfect Homemade Hot Cross Buns With Greek Yogurt: Step-by-Step Guide

    Here’s your step-by-step guide to creating these delightful buns, ensuring that your kitchen adventure is as smooth as your final product!

    1. Prepare the Yeast Mixture: In a small bowl, combine 1/2 cup of warm milk and 1/4 cup of sugar. Stir in the yeast and let it sit for about 5-10 minutes until it becomes frothy. This step is crucial as it activates the yeast, which is essential for fluffy buns.

    2. Combine Dry Ingredients: In a large mixing bowl, mix together 3 cups of flour, 1 teaspoon of cinnamon, 1/4 teaspoon of nutmeg, and 1/2 teaspoon of salt. Mix well to ensure spices are evenly distributed throughout the flour.

    3. Mix in Yogurt and Butter: Once the yeast mixture is foamy, add in 1/2 cup of Greek yogurt and 1/4 cup of melted butter. Stir until well combined, creating a thick paste.

    4. Make the Dough: Gradually add the dry ingredients to the wet mixture, stirring until all the flour is combined. If the mixture is too sticky, add a little more flour, one tablespoon at a time, until you achieve a soft dough that pulls away from the sides of the bowl.

    5. Knead the Dough: On a lightly floured surface, knead the dough for about 5-7 minutes until smooth and elastic. This action develops the gluten structure, which helps create the perfect bun texture.

    6. First Rise: Form the dough into a ball and place it in a greased bowl, covering it with a clean kitchen towel. Let it rise in a warm area for about 1-1.5 hours or until doubled in size.

    7. Shape the Buns: Once risen, punch down the dough to release air. Divide the dough into 12 equal pieces and shape each piece into a ball. Place the balls on a greased baking sheet, leaving space between them for further rising.

    8. Second Rise: Cover the shaped buns again with a towel and let them rise for another 30-40 minutes, or until they have expanded and are touching each other.

    9. Preheat Your Oven: While the buns rise, preheat your oven to 350°F (175°C). This ensures that your buns will bake perfectly once shaped.

    10. Create the Crosses: While waiting for the oven, prepare the cross mixture by mixing a little flour with water until it forms a thick paste. Using a piping bag or a zip-top bag with one corner snipped off, pipe a cross shape on top of each bun.

    11. Bake the Buns: Place the baking sheet in the preheated oven and bake for 20-25 minutes or until the buns are golden brown. The internal temperature should reach around 190°F (88°C).

    12. Prepare the Glaze: During the last few minutes of baking, prepare a simple glaze by boiling together 1/4 cup of sugar and 1/4 cup of water until the sugar completely dissolves.

    13. Glaze the Buns: Once baked, remove the buns from the oven and brush with the sugar glaze while still warm. This step will give your buns a beautiful sheen and enhance their sweetness.

    14. Cool and Serve: Allow the buns to cool slightly. Serve them warm or at room temperature. Enjoy them plain, with a smattering of butter, or your favorite spread!

    These step-by-step instructions will guide you through creating a batch of delicious Homemade Hot Cross Buns with Greek Yogurt. Each step is designed to be easy to follow, ensuring a delightful baking experience suitable for all skill levels.

    Mastering Homemade Hot Cross Buns With Greek Yogurt: Advanced Tips and Variations

    To truly master the art of Homemade Hot Cross Buns with Greek Yogurt, consider these advanced tips and variations:

    1. Making Ahead: If you’re planning for a festive breakfast or brunch, you can prepare the dough in advance. After the first rise, shape the buns and refrigerate them overnight. The next morning, let them come to room temperature for about 30 minutes before baking.

    2. Infuse with Flavors: When mixing your dough, feel free to incorporate zest from citrus fruits such as orange or lemon for an added freshness. Alternatively, a hint of vanilla extract can enhance the overall flavor profile.

    3. Alternate Fruity Additions: Instead of just dried fruits, mix in some chocolate chips for a decadent touch or nuts for added crunch. Experimenting with combinations can lead to delightful surprises!

    4. Different Types of Glazes: Instead of a sugar glaze, try a spiced syrup made with cinnamon and ginger or even a cream cheese icing for a richer treat. These alternative toppings can elevate the classic recipe into something extraordinary.

    5. Shape Variations: While traditional hot cross buns are typically round, you can try different shapes such as braiding the dough or making mini buns for bite-sized treats.

    6. Serve with Spreads: For an added layer of flavor, serve with flavored cream cheeses or nut butters. Honey or maple syrup drizzled on top can also enhance the eating experience.

    These tips and variations can turn your Homemade Hot Cross Buns into a cherished family recipe, bringing joy to your table during any meal.

    How to Store Homemade Hot Cross Buns With Greek Yogurt: Best Practices

    To keep your Homemade Hot Cross Buns with Greek Yogurt fresh and delicious, follow these storage methods:

    1. Refrigeration: If you have leftover buns, it’s ideal to store them in an airtight container in the refrigerator. This will keep them fresh for up to a week. Just reheat them in a toaster or microwave for a quick breakfast option.

    2. Freezing: For long-term storage, you can freeze the buns. Wrap each bun individually in plastic wrap or aluminum foil and place them in a freezer-safe bag. They can be frozen for up to three months. When ready to enjoy, simply thaw overnight in the refrigerator, then reheat.

    3. Reheating: For the best flavor, reheat your buns in the oven at 350°F (175°C) for about 10 minutes. This rejuvenates them, restoring their fluffy texture. Alternatively, you can microwave them for 20-30 seconds for fast warming.

    4. Storage Tips: If you’re storing the buns at room temperature, keep them in a sealed container or bread box away from direct sunlight. This will help prevent them from drying out or becoming stale.

    Being mindful of these storage best practices can help you enjoy your Homemade Hot Cross Buns with Greek Yogurt for days to come, ensuring that every bite is as delightful as the first.

    Nutritional Value of Homemade Hot Cross Buns With Greek Yogurt

    Understanding the nutritional value of your Homemade Hot Cross Buns with Greek Yogurt can help you make informed decisions, especially if you’re focused on maintaining a balanced diet.

    Nutritional Information (Per Bun, assuming 12 servings):

    • Calories: Approximately 180-220 calories depending on ingredients and toppings
    • Protein: 5-6g (protein content varies with yogurt substitutions)
    • Fat: 5-7g (can be reduced by using less butter or oil)
    • Carbohydrates: 32-36g
    • Dietary Fiber: 1-2g
    • Sugars: 5-7g (reduced through alternative sweeteners)
    • Sodium: 80-120mg (varies based on added salt)

    Given the inclusion of Greek yogurt, these buns provide a decent source of protein and can contribute to your daily calcium needs, especially if you use dairy products. The use of whole grains or gluten-free options can maximize dietary fiber, adding to their health benefits.

    These nutritional insights reveal that Homemade Hot Cross Buns with Greek Yogurt can be a healthier option compared to many commercially available versions, making them great breakfast ideas focused on both taste and nourishment.

    FAQs: Frequently Asked Questions About Homemade Hot Cross Buns With Greek Yogurt

    Here are some common questions and answers about making Homemade Hot Cross Buns with Greek Yogurt:

    Q: Can I make Homemade Hot Cross Buns with other types of yogurt?

    A: Absolutely! While Greek yogurt works best for its thickness and protein content, you can use any type of yogurt or even dairy-free alternatives. Just ensure the consistency is similar.

    Q: How can I make these buns vegan?

    A: To make these buns vegan, use plant-based yogurt, almond milk, and substitute butter with coconut oil or vegan margarine.

    Q: What if my dough doesn’t rise?

    A: If your dough fails to rise, ensure your yeast is fresh and the milk was lukewarm, not hot. If the mixture is too cold, the yeast won’t activate. Place it in a warm environment to encourage rising.

    Q: How long do these buns stay fresh?

    A: When stored properly, these buns can last about a week in the refrigerator or up to three months in the freezer.

    Q: Can I prepare the dough in advance?

    A: Yes! You can prepare the dough in advance and refrigerate it after shaping the buns. Let it rest until it comes to room temperature before baking.

    Q: Are these buns gluten-free?

    A: Yes, by using a gluten-free flour blend, you can make these buns suitable for gluten-sensitive individuals. Ensure all other ingredients are also gluten-free.

    These FAQs address some of the common inquiries, providing clarity and encouraging more bakers to enjoy this wholesome recipe.

    In conclusion, making Homemade Hot Cross Buns with Greek Yogurt is not only easy but highly rewarding. With their rich flavors, health benefits, and versatility, they offer the perfect opportunity to indulge in a cozy breakfast or make any meal special. Grab your ingredients, gather your loved ones, and let your kitchen be filled with the warm aroma of freshly baked buns. Happy baking!

  • Tasty Vegan Celery Salad

    Tasty Vegan Celery Salad

    Tasty Vegan Celery Salad: A Tropical Delight

    Introduction to Tasty Vegan Celery Salad

    Are you tired of the same old salads that don’t excite your taste buds? Introducing the Tasty Vegan Celery Salad, a refreshing and vibrant dish perfect for those seeking healthy dinner recipes! This salad stands out for its irresistible flavors, colorful presentation, and nutritional benefits, making it an ideal choice for various dining occasions. Whether you’re a busy parent looking to whip up something quick, a food enthusiast eager to try something fresh, or simply someone aiming for a wholesome meal, this salad has got you covered.

    This celery salad features a delightful medley of fresh ingredients that awaken your palate while providing a healthy dose of essential nutrients. Vibrant green celery paired with other crisp vegetables, fresh herbs, and a zesty dressing makes it a guilt-free option for any meal. Moreover, it’s not just vegan but also gluten-free, low-calorie, and packed with fiber, making it suitable for dietary-conscious individuals.

    As you dive into this recipe, you’ll discover that it’s not only simple to prepare but can also be customized to accommodate diverse tastes and dietary preferences. Let’s embrace the joy of cooking with this tropical delight that delivers on taste, health benefits, and simplicity. Get energized and inspired to transform ordinary ingredients into something extraordinary!

    Benefits and Advantages of Tasty Vegan Celery Salad

    Creating your own Tasty Vegan Celery Salad comes with numerous benefits that extend beyond just flavor. One of the primary reasons this dish is a must-try is its simplicity. The preparation is straightforward and doesn’t require pre-cooking, making it ideal for those who lead busy lives or for novice cooks just starting in the kitchen. Additionally, this recipe can be ready in under 30 minutes, allowing you to serve a nutritious meal even on the busiest of days.

    From a health standpoint, this salad is a powerhouse of vitamins and minerals. Celery is hydrating and low in calories, making it an excellent ingredient for weight-conscious individuals and anyone looking for healthy dinner recipes. It is also rich in antioxidants, which aid in reducing inflammation and promoting overall well-being. Combined with nutrient-dense ingredients like bell peppers, cucumbers, and avocado, you’ll find that this salad not only satisfies your hunger but also supports your health.

    Moreover, the versatility of this salad ensures that it caters to a wide range of dietary needs. Whether you’re vegan, gluten-free, or simply looking for low-carb meal options, this dish adapts easily. Plus, its delicious flavor profile ensures that it doesn’t compromise on taste while being healthy. With the Tasty Vegan Celery Salad, you can enjoy a colorful dish packed with nutrients that are as appealing to the eyes as they are to the palate!

    Ingredients Overview

    Essential Ingredients for Tasty Vegan Celery Salad

    To create your Tasty Vegan Celery Salad, gather the following essential ingredients. Each element not only contributes to the flavor but also enhances the nutritional value of the dish:

    1. Fresh Celery Stalks (4 cups, diced)
      Benefits: Loaded with vitamins A, C, and K, celery is incredibly hydrating and low in calories.

    2. Cucumber (1 medium, diced)
      Benefits: Provides a refreshing crunch while adding hydration and fiber to the salad.

    3. Bell Peppers (1 cup, diced; any color)
      Benefits: Rich in antioxidants and vitamin C, adding a sweet flavor and vibrant color.

    4. Cherry Tomatoes (1 cup, halved)
      Benefits: Packed with lycopene and vitamin C, these juicy gems enhance the salad’s visual appeal and taste.

    5. Avocado (1 medium, diced)
      Benefits: A healthy source of fats, avocados offer a creamy texture and essential nutrients like potassium.

    6. Fresh Herbs (¼ cup, chopped; parsley or cilantro)
      Benefits: Infuses additional flavor and antioxidants into the salad.

    7. Lemon Juice (3 tablespoons)
      Benefits: Adds a zesty flavor while providing vitamin C and aiding digestion.

    8. Olive Oil (2 tablespoons)
      Benefits: A heart-healthy fat that also enhances the absorption of fat-soluble vitamins.

    9. Salt and Pepper (to taste)
      Benefits: Elevates the flavors of the salad ingredients.

    Dietary Substitutions to Customize Your Tasty Vegan Celery Salad

    While the basic Tasty Vegan Celery Salad recipe is delicious on its own, you may want to customize it to fit your dietary preferences or ingredient availability. Below are some suggested substitutions:

    • Swap for More Greens: If you want to sneak in extra nutrition, consider substituting kale or spinach for some of the celery. These greens will add an additional layer of flavor and health benefits.

    • Protein Boost: To make the salad more filling, add chickpeas or black beans (1 cup), which are excellent plant-based protein sources.

    • Nuts and Seeds: Sprinkle some sunflower seeds or sliced almonds for a delightful crunch and extra healthy fats.

    • Different Dressings: For a flavor twist, try switching out olive oil and lemon juice for tahini or a vegan yogurt-based dressing.

    • Herb Variations: Experiment with different herbs like dill, mint, or basil to change the profile of the salad entirely.

    These substitutions make it easier for anyone—whether you’re gluten-free, vegan, or simply looking to expand your salad repertoire. Personalizing your Tasty Vegan Celery Salad will ensure that it meets your nutritional needs while keeping mealtime exciting!

    How to Prepare the Perfect Tasty Vegan Celery Salad: Step-by-Step Guide

    Creating your Tasty Vegan Celery Salad is a simple process that anyone can master. Follow these detailed steps to prepare this delightful dish:

    1. Prepare the Base:
      Begin by washing and thoroughly drying the celery stalks. Slice them into bite-sized pieces and add them to a large mixing bowl. Celery serves as the crunchy base of the salad.

    2. Chop the Vegetables:
      Dice the cucumber and bell peppers, then halve the cherry tomatoes. Each vegetable adds a unique texture and flavor to your salad, making it visually appealing and satisfying.

    3. Prepare the Avocado:
      Cut the avocado in half, remove the pit, and scoop the flesh into the bowl. Dice it into small cubes. Avocado not only offers a creamy texture but also enhances the nutrition of the salad.

    4. Add Fresh Herbs:
      Chop your chosen fresh herbs—parsley or cilantro work beautifully—and sprinkle them into the salad. Fresh herbs provide a burst of flavor and aroma, making your salad even more delicious.

    5. Mix Ingredients:
      Use a large spoon or spatula to gently combine the chopped vegetables, ensuring everything is evenly distributed. Be careful with the avocado, as you want it to hold its shape.

    6. Prepare the Dressing:
      In a separate small bowl, whisk together the lemon juice and olive oil. You can also add salt and pepper to taste. This will be the zesty dressing that enhances the flavors of your salad.

    7. Dress the Salad:
      Pour the dressing over the salad mixture and gently toss to coat all ingredients. This step is crucial as it unites the vibrant flavors in your Tasty Vegan Celery Salad.

    8. Taste and Adjust:
      Before serving, taste the salad and adjust the seasoning as needed. You can add more salt, pepper, or lemon juice based on your preference.

    9. Chill (Optional):
      For extra refreshment, let the salad chill in the refrigerator for about 30 minutes. This allows the flavors to meld together beautifully.

    10. Serve:
      Finally, serve your Tasty Vegan Celery Salad chilled or at room temperature. Enjoy it as a side dish for your healthy dinner recipes or as a refreshing main course!

    Mastering Tasty Vegan Celery Salad: Advanced Tips and Variations

    Once you’ve mastered the basic recipe for Tasty Vegan Celery Salad, you might want to explore some advanced tips and variations for greater culinary creativity:

    1. Include Grains:
      For a more filling option, consider adding cooked quinoa, barley, or bulgur wheat. This variation increases the fiber content of your salad and provides an excellent source of carbohydrates.

    2. Play with Textures:
      Incorporate various textures by adding roasted nuts (such as walnuts or pecans) or crispy chickpeas. These additions will not only elevate the taste but also make the salad more interesting.

    3. Grilled Variations:
      Grilling some of the vegetables, especially bell peppers and corn, can enhance their flavor and add a smoky touch to your salad. This variation brings richness that contrasts beautifully with the freshness of raw ingredients.

    4. Flavorful Additions:
      Experiment with additional flavors by including olives, capers, or sun-dried tomatoes to introduce a briny taste that balances the freshness of the salad.

    5. Spices and Seasonings:
      To bring the salad to another level, sprinkle some ground cumin, paprika, or nutritional yeast for additional depth of flavor and nutrition.

    6. Presentation:
      Serve your Tasty Vegan Celery Salad in a hollowed-out avocado or bell pepper to showcase it beautifully at gatherings. This presentation can impress your guests and make healthy eating fun!

    Through these variations, you can keep this recipe exciting and tailored to your tastes. The flexibility of the Tasty Vegan Celery Salad allows it to shine in a variety of settings, from casual lunch to dinner parties.

    How to Store Tasty Vegan Celery Salad: Best Practices

    Storing your Tasty Vegan Celery Salad correctly ensures that it remains fresh and delicious for as long as possible. Here are some best practices to keep in mind:

    1. Refrigeration:
      If you have leftovers, place the salad in an airtight container. This will help maintain its freshness while preventing it from absorbing other odors in the fridge. Consume it within 3-4 days for optimal flavor and texture.

    2. Preventing Browning:
      To prevent the avocado from browning (which can happen quickly), consider adding a bit of extra lemon juice over the cut avocado pieces before combining them with the rest of the ingredients.

    3. Freezing:
      While freezing the Tasty Vegan Celery Salad is not recommended due to the high water content of its ingredients, you can freeze individual components (like cooked quinoa or roasted vegetables) to make preparation easier when you want to whip up the salad again later.

    4. Reheating (for ingredients):
      If you’ve added grains or roasted elements, reheat those components independently before mixing them back into fresh salad ingredients. This will ensure your dish maintains its delightful crunch and flavor profile.

    Following these storage tips means you can enjoy the Tasty Vegan Celery Salad at your leisure without compromising its taste or safety. By implementing proper storage techniques, you’re setting yourself up for a delightful meal anytime!

    Nutritional Value of Tasty Vegan Celery Salad

    The Tasty Vegan Celery Salad not only tantalizes the taste buds but also offers significant nutritional benefits. Here’s a breakdown of the key nutritional components per standard serving (approximately 1 cup):

    • Calories: 150
    • Total Fat: 9g
    • Saturated Fat: 1g
    • Unsaturated Fat: 8g (from olive oil and avocado)

    • Cholesterol: 0mg

    • Sodium: 120mg
    • Total Carbohydrates: 15g
    • Dietary Fiber: 6g
    • Sugars: 3g

    • Protein: 4g

    • Vitamin A: 25% DV

    • Vitamin C: 35% DV
    • Calcium: 4% DV
    • Iron: 6% DV

    This nutritional profile demonstrates that the Tasty Vegan Celery Salad is not only a delicious meal choice but also an excellent source of vitamins, antioxidants, and healthy fats. The high fiber content aids digestion and promotes a feeling of fullness, making it a smart option for anyone looking for healthy dinner recipes that contribute to overall wellness.

    Moreover, by customizing your salad with extra protein or whole grains, you can further enhance its nutritional impact tailored to your dietary needs.

    FAQs: Frequently Asked Questions About Tasty Vegan Celery Salad

    Q1: Can I make the Tasty Vegan Celery Salad ahead of time?

    A1: Yes, you can prepare the salad a few hours in advance. However, it’s best to add the avocado and dressing just before serving to maintain their freshness and prevent browning.

    Q2: Is it possible to substitute celery with another vegetable?

    A2: Absolutely! While celery is the star of this salad, you can substitute with julienned carrots, radishes, or cucumber for a different flavor and texture.

    Q3: What other dressings can I use?

    A3: Besides the olive oil and lemon juice dressing, try vegan yogurt dressings, tahini dressings, or balsamic vinaigrette for a different taste experience. Each dressing can bring out a unique flavor in your salad.

    Q4: Can I add fruit to this salad?

    A4: Yes! Fruits like diced apples, cranberries, or mandarin oranges can add a sweet element that complements the savory flavors, enhancing the overall taste.

    Q5: How can I make this recipe more filling?

    A5: To make the salad more filling, consider adding cooked grains like quinoa or brown rice, or nuts and seeds for added protein and healthy fats.

    By answering these FAQs, we aim to clarify any uncertainties and assist you in achieving the best results with your Tasty Vegan Celery Salad experience.


    With the Tasty Vegan Celery Salad, you’re not just creating a meal; you’re crafting an experience filled with flavor, health benefits, and delightful colors. This recipe is more than just food—it’s a reflection of a healthy lifestyle that caters to a variety of diets and preferences. Enjoy exploring this nutritious carpaccio of your culinary creativity as you savor each bite!

  • Creamy Potato Salad With Eggs

    Creamy Potato Salad With Eggs

    Creamy Potato Salad With Eggs: A Tropical Delight

    Introduction to Creamy Potato Salad With Eggs

    Welcome to our delicious journey of creating a Creamy Potato Salad With Eggs, a tropical delight that’s not only simple to prepare but also packed with flavor and nutrition. This delightful dish is an essential addition to your collection of recipe ideas, effortlessly bringing a fresh perspective to your next meal. Whether you’re a busy parent looking for a quick side dish, a student mastering your cooking skills, or a food enthusiast eager to explore new culinary horizons, this creamy salad caters to all.

    The beauty of this creamy potato salad lies in its simplicity. With just a handful of ingredients, you can whip up a dish that is both satisfying and health-conscious. Rich in vitamins and minerals from the potatoes and eggs, this salad guarantees a nutritious boost for busy schedules. It’s also versatile—perfect for family gatherings, picnics, or just a cozy dinner at home.

    Moreover, the salad can easily be adapted for various dietary needs. vegan options are available, gluten-free substitutes are simple to implement, and it can be made low-calorie without sacrificing flavor. With a creamy dressing that binds the ingredients together, this dish is sure to become a family favorite.

    In this article, we’ll delve into the various aspects of this delightful dish, from its benefits and essential ingredients to detailed preparation steps and nutritional insights. Prepare to be inspired and eager to try your hands on this wonderful recipe!

    Benefits and Advantages of Creamy Potato Salad With Eggs

    The Creamy Potato Salad With Eggs isn’t just a side dish; it’s a powerhouse packed full of benefits that make it stand out as one of the best recipe ideas around.

    Easy to Prepare

    For those of you with busy schedules or limited cooking experience, you’ll appreciate how quick and easy this salad is to prepare. With minimal cooking involved—just boiling potatoes and eggs—you can have this dish ready in no time. The steps are straightforward and don’t require specialized culinary skills, making it an excellent option for novice home cooks.

    Nutritious Choice

    Nutrition-wise, potato salad with eggs is a winner. Potatoes, the main ingredient, are rich in potassium, vitamin C, and dietary fiber. The addition of eggs provides high-quality protein and essential nutrients like vitamin D and choline. This salad fuels your body while satisfying your taste buds, making it a smart choice for lunchboxes, family meals, or post-workout snacks.

    Versatility

    This salad offers incredible versatility, allowing you to customize it to fit multiple dietary needs. Whether you’re feeding vegetarian guests, creating gluten-free meals, or looking for low-calorie options, this salad can easily adapt. You can make it your own by swapping ingredients and using replacements, ensuring everyone at the table can enjoy it.

    Crowd-Pleaser

    The creamy texture and flavorful taste of this salad make it a perennial favorite at potlucks and gatherings. Its charming aesthetics and delectable flavor will impress your friends and family, ensuring that it disappears quickly from the serving tray.

    Incorporating all these benefits—ease of preparation, healthiness, versatility for dietary needs, and crowd-pleasing qualities—this Creamy Potato Salad With Eggs is a must-have in your recipe arsenal.

    Ingredients Overview

    Essential Ingredients for Creamy Potato Salad With Eggs

    To create this delightful salad, you will need the following ingredients:

    1. Potatoes (2 lbs) – Choose Yukon Gold or Red potatoes for their creamy texture, perfect for potato salads.
    2. Large Eggs (4) – Boiled and chopped, these add richness and protein to the salad.
    3. Mayonnaise (1 cup) – For creaminess; opt for vegan mayo for a plant-based version.
    4. Mustard (1 tablespoon) – Adds tanginess; yellow mustard works well, but Dijon provides a sophisticated twist.
    5. Celery (1 cup, chopped) – Adds crunch and fiber.
    6. Red Onion (½ cup, finely chopped) – Provides a slight bite; you can substitute green onions for a milder flavor.
    7. Salt (to taste) – Enhances flavors.
    8. Black Pepper (to taste) – Adds a bit of heat.
    9. Fresh Herbs (¼ cup, chopped) – Parsley or dill elevate the flavor.

    Dietary Substitutions to Customize Your Creamy Potato Salad With Eggs

    To cater to various dietary preferences, here are some substitutions:

    • Vegan Option: Swap the eggs with chopped tofu or chickpeas and replace regular mayonnaise with a vegan alternative.
    • Gluten-Free Adaptation: This dish is already gluten-free if you pay attention to ingredients.
    • Low-Calorie Version: Use Greek yogurt instead of mayonnaise for a lighter dressing, and reduce the quantity of potatoes without compromising the flavor.

    With these essential ingredients and substitutions, you can customize the Creamy Potato Salad With Eggs to fit various dietary needs, making it a go-to dish for any occasion.

    How to Prepare the Perfect Creamy Potato Salad With Eggs: Step-by-Step Guide

    Now that we have our ingredients ready, let’s walk through the preparation of this fabulous dish step by step. Follow these guidelines, and you’ll have a delicious potato salad that can serve as an amazing side dish for numerous meals.

    1. Prepare the Potatoes:
    2. Wash and peel the potatoes. Cut them into uniform cubes for even cooking. Place them in a large pot, cover them with water, and add salt. Bring to a boil over medium-high heat and cook for about 12-15 minutes until a fork easily pierces through them.

    3. Boil the Eggs:

    4. In a separate pot, add the eggs and cover them with cold water. Bring to a rapid boil, then turn off the heat. Cover and let the eggs sit for 10-12 minutes. After that, transfer them to an ice bath to cool before peeling.

    5. Chop the Vegetables:

    6. While the potatoes and eggs are cooking, wash and chop the celery and red onion. Set aside.

    7. Drain and Cool the Potatoes:

    8. Once the potatoes are tender, drain them and let them cool completely. This step is crucial, as hot potatoes can make the mayonnaise separate.

    9. Mix the Dressing:

    10. In a large mixing bowl, combine the mayonnaise, mustard, salt, pepper, and chopped herbs. Stir until well blended.

    11. Combine Ingredients:

    12. Once the potatoes and eggs have cooled, add them to the mixing bowl along with the chopped celery and onions. Gently fold the ingredients together, being careful not to mash the potatoes.

    13. Taste and Adjust:

    14. Take a small spoonful and taste the salad. Adjust the seasoning with more salt, pepper, or herbs according to your preference.

    15. Chill:

    16. Cover the salad with plastic wrap or transfer it to an airtight container. Refrigerate for at least an hour to allow the flavors to meld together. This chilling step enhances the flavors significantly, making it a richer experience.

    17. Serve:

    18. Serve chilled, either on its own, as a side dish during a barbecue, or in a sandwich for a delightful twist on lunch.

    This detailed, step-by-step guide will ensure you make the perfect Creamy Potato Salad With Eggs while allowing you to explore various recipe ideas with ease.

    Mastering Creamy Potato Salad With Eggs: Advanced Tips and Variations

    Now that you’ve mastered the basics of preparing Creamy Potato Salad With Eggs, consider these advanced tips and creative variations to enhance your experience:

    Enhance Flavor with Extra Ingredients

    • Add Spices: Introduce a pinch of paprika or cayenne pepper for a spicy kick. Garlic powder or onion powder adds depth.
    • Incorporate Veggies: For extra nutrition, include peas, carrots, or bell peppers for color and texture.
    • Fruity Twist: Consider adding diced apples or pineapples for a refreshing tropical twist that contrasts beautifully with the creamy base.

    Explore Different Dressings

    • Instead of traditional mayonnaise, try using ranch dressing, avocado, or a homemade vinaigrette for a zesty change.
    • Mixing different mayo flavors like garlic or chipotle can create a different palate experience.

    Dress It Up

    • Garnish the top of your potato salad with fresh herbs, a sprinkle of paprika, or even crispy bacon bits for added texture and flavor.

    Perfect Pairings

    • Serve this creamy salad as a side dish with grilled meats, sandwiches, or as part of a great picnic spread. Its versatility ensures it pairs well with various cuisines and dishes.

    Putting these tips and variations into practice will elevate your dish and provide an avenue for creativity, making it an exciting addition to your list of recipe ideas.

    How to Store Creamy Potato Salad With Eggs: Best Practices

    Knowing how to store your Creamy Potato Salad With Eggs is essential for preserving freshness. Here are some best practices:

    Refrigeration

    • Store the salad in an airtight container for optimal freshness. It can last in the refrigerator for up to 3-5 days.
    • Always ensure that the salad is well covered to prevent any contamination or odor absorption from other foods in the fridge.

    Freezing

    • Though freezing creamy salads can affect the texture, if you’ve made a large batch, consider freezing the portion without the dressing. Store it in freezer-safe containers or bags for up to three months.
    • When ready to use, defrost in the refrigerator overnight and mix in fresh dressing before serving.

    Reheating

    • For best results, avoid reheating the salad. Instead, serve it chilled or at room temperature. If you prefer a warm potato salad, gently heat the plain potatoes before mixing them with the dressing.

    These storage techniques will help maintain the quality of your salad while providing practical solutions for meal prep, making it an excellent addition for busy individuals and families looking for delicious recipe ideas.

    Nutritional Value of Creamy Potato Salad With Eggs

    Understanding the nutritional value of your meals is an essential part of a balanced diet. Below is the nutritional breakdown of a typical serving (1 cup) of Creamy Potato Salad With Eggs:

    • Calories: Approximately 250-300
    • Total Fat: 15g (Saturated Fat: 2g)
    • Cholesterol: 115mg
    • Sodium: 450mg (can be reduced by adjusting salt)
    • Total Carbohydrates: 28g (Dietary Fiber: 3g; Sugars: 1g)
    • Protein: 7g

    Health Benefits

    The nutrients present in this dish provide several health benefits:
    Potatoes: Great source of vitamin C, B6, potassium, and fiber, supporting heart health and digestion.
    Eggs: Packed with high-quality protein and important vitamins, including B2, B12, and D.
    Mayonnaise: While high in calories and fats, choosing a light or homemade mayo can keep it in moderation.

    Being aware of the nutritional aspects allows you to enjoy this Creamy Potato Salad with Eggs while aligning with your dietary goals. Don’t forget to consider more recipe ideas that balance flavor and healthiness!

    FAQs: Frequently Asked Questions About Creamy Potato Salad With Eggs

    1. Can I make this potato salad ahead of time?

    Absolutely! In fact, potato salad tastes better when allowed to sit in the refrigerator for a few hours or even overnight, giving the flavors a chance to blend.

    2. How can I make it more flavorful?

    You can add spices such as garlic powder or fresh herbs like dill and parsley. Consider adding a squeeze of lemon juice for extra freshness!

    3. Is this dish gluten-free?

    Yes! As long as your mayo is gluten-free, this salad is safe for those with gluten sensitivities.

    4. Can leftovers be frozen?

    While freezing is possible, the texture may change. It’s best to keep this salad refrigerated. If you need to freeze it, do so without the dressing.

    5. Can I use non-dairy mayo?

    Certainly! Vegan mayonnaise is an excellent alternative that mimics the creaminess of traditional mayo without dairy.

    These FAQs address some common questions about preparing and enjoying Creamy Potato Salad With Eggs, guiding you through practical aspects while being a great source of recipe ideas.

    Conclusion

    In conclusion, the Creamy Potato Salad With Eggs is an exceptional dish that combines simplicity, nutrition, and versatility. Perfect for any occasion or gathering, it’s a dish that everyone can enjoy regardless of dietary needs. Whether you are a busy parent, student, or working professional, this salad can fit seamlessly into your lifestyle, providing a delicious and satisfying option without compromising health.

    So, go ahead and try your hand at this tropical delight. Enjoy the process of making this refreshing salad, and remember that it’s not just a recipe, but a way to bring joy and nourishment to your table. Happy cooking!

  • Sweet Bunny Cookies With Royal Icing

    Sweet Bunny Cookies With Royal Icing

    Sweet Bunny Cookies With Royal Icing: A Tropical Delight

    Introduction to Sweet Bunny Cookies With Royal Icing

    Welcome to the delightful world of Sweet Bunny Cookies With Royal Icing! These charming, whimsical treats are perfect for any occasion, whether you’re planning a spring celebration, hosting a tea party, or simply indulging your sweet tooth. Cookie recipes that bring joy and creativity to your kitchen are always a hit, and this particular recipe stands out not only for its gorgeous presentation but also for its simplicity and versatility.

    Imagine crafting a batch of bunnies, each adorned with intricate royal icing patterns that mimic the softness of their fluffy tails. These cookies are not only a feast for the eyes but also a canvas for your creativity. The best part? They can cater to various dietary preferences. Whether you’re looking for vegan, gluten-free, or low-calorie options, this recipe adapts beautifully to meet your needs.

    Moreover, Sweet Bunny Cookies promote a sense of accomplishment. They’re simple enough for beginners yet detailed enough to challenge more experienced bakers. In this article, we’ll guide you step-by-step through the process, ensuring that anyone can embark on this baking adventure with confidence. So, grab your apron and let’s make some magical Sweet Bunny Cookies!

    Benefits and Advantages of Sweet Bunny Cookies With Royal Icing

    When considering which cookie recipes to try, Sweet Bunny Cookies With Royal Icing surely deserves a spot at the top of your list. Here are several benefits and advantages that highlight why this recipe is so effective and enjoyable:

    1. Simplicity and Speed: The ingredients for these cookies are straightforward and easy to find. With just a few pantry staples, you can whip up a delightful batch that showcases your baking skills. The royal icing, while stunning, requires minimal preparation and drying time, making it an accessible choice for busy parents and working professionals.

    2. Health-Conscious Adaptability: Unlike many traditional cookies, this recipe can easily be modified to suit various dietary needs. Want to go vegan? Substitute eggs with flaxseeds. Need a gluten-free option? Simply replace all-purpose flour with gluten-free flour alternatives. This adaptability allows health-conscious individuals and those with dietary restrictions to enjoy these sweet treats without compromise.

    3. Engagement and Creativity: Making cookie crafts like these bunnies can be a fun activity for families, especially during holidays. It’s an opportunity for children and adults alike to express themselves creatively while honing essential baking and decorating skills. Hosting a cookie-decorating party can be a great way for friends, students, or newlyweds to bond and build lasting memories.

    4. Visual Appeal: The enchanting design of the bunny cookies brings whimsy to any table setting, making them an ideal choice for celebrations, gifts, or simply to make a regular day special. Attractive cookie recipes like this one not only taste good but also add a decorative touch to gatherings.

    With these many advantages, it’s clear that Sweet Bunny Cookies With Royal Icing encompasses everything you could desire in a cookie recipe. It combines fun, health benefits, and deliciousness, making it a cherished addition to your baking repertoire.

    Ingredients Overview

    Essential Ingredients for Sweet Bunny Cookies With Royal Icing

    To recreate these beautifully decorated Sweet Bunny Cookies, gather the following essential ingredients:

    For the Cookies:
    2 ½ cups All-Purpose Flour: The foundation for your cookies; feel free to use gluten-free flour for a gluten-free version.
    1 tsp Baking Powder: Provides lift and helps the cookies maintain their shape.
    ½ tsp Salt: Enhances flavor and balances sweetness.
    1 cup Unsalted Butter (or Vegan Butter): Adds richness and flavor. Use vegan butter for a dairy-free option.
    1 cup Granulated Sugar: The sweetness is essential; consider coconut sugar for a lower glycemic index option.
    1 large Egg (or Flax Egg): Binds the ingredients together. A flax egg can be used for a vegan version.
    1 tsp Vanilla Extract: Adds aromatic sweetness; exchange with almond extract for a new flavor twist.

    For the Royal Icing:
    2 large Egg Whites (or aquafaba): Traditionally used for binding and aeration; use aquafaba for a vegan option.
    4 cups Powdered Sugar: Sweetens the icing while providing a smooth consistency.
    1 tsp Lemon Juice: Adds a pleasant acidity and helps stabilize the icing.
    Food Coloring (Optional): Gel coloring works best for vibrant designs.

    Dietary Substitutions to Customize Your Sweet Bunny Cookies With Royal Icing

    Flexibility in cookie recipes allows everyone to enjoy them, regardless of dietary restrictions. Below are some suggested substitutions to suit different dietary needs:

    • Gluten-Free: Substitute all-purpose flour with a 1:1 gluten-free flour blend like Bob’s Red Mill or King Arthur Flour.
    • Vegan: Use vegan butter in place of regular butter, flax eggs instead of chicken eggs, and aquafaba as an alternative to egg whites for royal icing.
    • Lower Sugar: Consider using monk fruit sweetener or stevia in your cookie mixture and icing to lower the overall sugar content without sacrificing flavor.

    Each of these substitutions will ensure you can enjoy Sweet Bunny Cookies tailored to your personal preferences, making these cookie recipes approachable for everyone.

    How to Prepare the Perfect Sweet Bunny Cookies With Royal Icing: Step-by-Step Guide

    Now that you have your ingredients ready, let’s dive into the delightful preparation of Sweet Bunny Cookies With Royal Icing. Follow these steps for a fun and successful baking experience:

    1. Prepare the Base: Preheat your oven to 350°F (180°C). Line two baking sheets with parchment paper to prevent sticking.

    2. Mix Dry Ingredients: In a separate mixing bowl, whisk together the flour, baking powder, and salt until well combined. Set aside.

    3. Cream Butter and Sugar: In a large mixing bowl, beat the unsalted butter and granulated sugar until light and fluffy, about 3-5 minutes using an electric mixer on medium speed. This is an important step that adds air to the mixture.

    4. Incorporate Egg and Vanilla: Add the egg and vanilla extract to the creamed mixture. Continue mixing until fully combined.

    5. Combine Dry and Wet Ingredients: Gradually add the dry mixture to the wet mixture, stirring until a soft dough forms. Be careful not to over-mix, as this can result in tough cookies.

    6. Chill the Dough: Divide the dough into two discs, wrap them in plastic wrap, and refrigerate for at least 30 minutes. This chilling step is crucial for shaping the cookies.

    7. Roll Out the Dough: Once chilled, place a disc of dough onto a lightly floured surface. Roll it out to about ¼-inch thickness for the perfect cookie texture. Use extra flour as needed to avoid sticking.

    8. Cut Out Bunny Shapes: Using a bunny-shaped cookie cutter, cut out your cookies and place them on the prepared baking sheets, leaving space in between each cookie.

    9. Bake the Cookies: Bake for 8-10 minutes or until the edges begin to turn golden brown. Keep an eye on them to prevent overbaking. Remove them from the oven and let them cool on a wire rack.

    10. Prepare Royal Icing: In a clean mixing bowl, beat the egg whites (or aquafaba) until frothy. Gradually add the powdered sugar and lemon juice, mixing until the icing reaches a stiff peak consistency.

    11. Color the Icing: Divide the royal icing into batches and color each with food coloring to create an array of vibrant colors for decorating your bunny cookies.

    12. Decorate Your Cookies: Once the cookies are completely cool, use a piping bag or a fine-tipped knife to outline and fill your bunny cookies with the royal icing. Allow the icing to dry completely for at least 2-3 hours.

    13. Store or Serve: Your Sweet Bunny Cookies With Royal Icing are now ready to be enjoyed! Serve them at gatherings, or store them in an airtight container.

    By following these clear steps, you can create extraordinary Sweet Bunny Cookies With Royal Icing that will impress anyone, from kids to sophisticated palates.

    Mastering Sweet Bunny Cookies With Royal Icing: Advanced Tips and Variations

    To elevate your baking game with Sweet Bunny Cookies, consider the following advanced tips and fun variations:

    1. Use Quality Ingredients: Always opt for high-quality vanilla extract and food coloring. The taste and appearance of your cookies will greatly benefit from it.

    2. Add Flavor Variations: Experiment with different extracts like almond or lemon to give your cookie dough unique flavor profiles.

    3. Elevation Techniques: For an even more refined finish, use a sifter to dust powdered sugar for an elegant touch on your decorated cookies.

    4. Themed Decor: Besides bunnies, why not create other animal shapes or designs relevant to seasons or occasions? Use cookie cutters all year round to change up the theme.

    5. Sprinkles and Accessories: Once your icing is applied, sprinkle edible glitter or colored sprinkles on the wet icing for added flair. These decorations can make the cookies even more enticing.

    6. Chill the Icing: If the royal icing becomes too runny while you’re decorating, refrigerate it briefly to stifle the mixing and restore its thickness.

    By integrating these advanced tips and exploring variations, you can take your Sweet Bunny Cookies With Royal Icing to the next level, transforming a simple recipe into a delightful masterpiece.

    How to Store Sweet Bunny Cookies With Royal Icing: Best Practices

    Keeping your Sweet Bunny Cookies fresh is essential if you want to enjoy them over several days or share them later. Here are some best practices for storing your cookie creations:

    1. Cool Completely: Ensure that all cookies are completely cooled and the royal icing is fully set before storing. This step prevents moisture buildup, which could ruin the decorations.

    2. Airtight Containers: Use airtight containers to store your cookies. They can typically be kept at room temperature for about a week. For added freshness, place a piece of bread or a few marshmallows inside the container to help retain moisture without making them soggy.

    3. Freezing Cookies: If you have leftover cookies or want to prepare ahead of time, consider freezing them. Wrap cookies tightly in plastic wrap, then place them in a freezer bag or airtight container. They can last up to three months in the freezer. When you’re ready to enjoy them, thaw them overnight in the refrigerator.

    4. Avoid Stacking Iced Cookies: Iced cookies should not be stacked before the icing has completely dried as it can smudge the designs. Store them in a single layer if possible.

    By following these storage tips, you can ensure your Sweet Bunny Cookies maintain their delightful taste and intricate designs.

    Nutritional Value of Sweet Bunny Cookies With Royal Icing

    Understanding the nutritional aspects of your baking can help you make informed choices. Here is the estimated nutritional value of Sweet Bunny Cookies With Royal Icing per cookie (based on standard ingredients):

    • Calories: 120
    • Total Fat: 5g
    • Saturated Fat: 3g
    • Cholesterol: 15mg
    • Sodium: 50mg
    • Total Carbohydrates: 18g
    • Dietary Fiber: 0g
    • Sugars: 10g
    • Protein: 1g

    Keep in mind that these values can vary significantly based on substitutions such as reduced sugar or the usage of alternative flours and fats. Additionally, for health-conscious bakers, modifying the recipe with lower-fat alternatives or reducing sugar can create a healthier treat without losing the essence of this delightful cookie recipe.

    FAQs: Frequently Asked Questions About Sweet Bunny Cookies With Royal Icing

    Below are some common questions regarding Sweet Bunny Cookies With Royal Icing, along with concise answers to guide you.

    1. Can I use a different shape for these cookies?
      Yes! Feel free to use any cookie cutter shape you desire. The recipe is versatile and can cater to various holidays and themes.

    2. How do I achieve perfectly smooth royal icing?
      To achieve smooth icing, ensure the consistency is right. It should be thick enough to hold its shape but thin enough to spread seamlessly when piped.

    3. Are there vegan options for the royal icing?
      Absolutely! Aquafaba (the liquid from canned chickpeas) is a great vegan substitute for egg whites in royal icing.

    4. Can I refrigerate the dough before rolling it out?
      Yes, refrigerating the dough helps it firm up, making it easier to roll and cut. Just ensure it’s wrapped well to prevent drying out.

    5. What if my royal icing hardens too quickly?
      If your royal icing hardens too fast while decorating, simply stir in a few drops of water until you reach the desired consistency.

    By addressing these common questions, you can bake confidently, ensuring your Sweet Bunny Cookies With Royal Icing turn out perfectly every time.

    Now that you’ve learned the ins and outs of crafting these delightful cookies, we encourage you to gather your ingredients, unleash your creativity, and share your cookie creations with loved ones. Happy baking!

  • Easy Keto Chicken Quesadilla Low Carb

    Easy Keto Chicken Quesadilla Low Carb

    Easy Keto Chicken Quesadilla Low Carb: A Tropical Delight

    Introduction to Easy Keto Chicken Quesadilla Low Carb

    If you’re excited about elevating your culinary adventures while adhering to a low-carb lifestyle, the Easy Keto Chicken Quesadilla Low Carb is precisely what you need. This dish deliciously blends succulent chicken and indulgent cheese, wrapped in a crispy, keto-friendly tortilla, making it an enticing addition to your chicken recipes repertoire. Not only is it straightforward to prepare, but it also emphasizes health without sacrificing flavor, perfect for busy parents, students, or anyone looking to whip up a quick, nutritious meal.

    What makes this recipe truly remarkable is its versatility. Whether you prefer it as a quick lunch, a satisfying dinner, or a snack, this quesadilla fits the bill. It’s low-calorie, gluten-free, and high in protein, which means you can enjoy every bite without the guilt. Moreover, you can tailor it to suit various dietary needs, including vegan alternatives and other substitutions. Imagine delighting your friends or family with a crescent of melted cheese and tasty chicken tucked away in a crisp tortilla—this crowd-pleasing dish won’t just satisfy hunger but will also provide a nourishing experience that aligns with health-conscious choices.

    In this article, we will dive deeply into every aspect of creating the perfect Easy Keto Chicken Quesadilla, from ingredient selection to preparation steps. Preparing delicious chicken recipes can be simple and enjoyable—let’s get cooking!

    Benefits and Advantages of Easy Keto Chicken Quesadilla Low Carb

    Why should you consider making this Easy Keto Chicken Quesadilla Low Carb? The advantages are plentiful, making it a standout option among chicken recipes. First and foremost, its simplicity is commendable. With concise preparation steps and readily available ingredients, it requires minimal cooking skills and time. You can easily whip it up on a busy weeknight or even prepare it in advance for a quick meal.

    Health benefits abound as well. This quesadilla is a low-carb delight, ensuring you can maintain your dietary goals without compromise. By utilizing low-carb tortillas or maybe even making your own, you can significantly reduce carbohydrates while keeping the overall flavor intact. The chicken is a rich source of protein, helping keep your energy levels up throughout the day. Paired with nutrient-dense veggies, this dish becomes more than just a tasty option; it transforms into a balanced meal.

    Moreover, it’s incredibly versatile. If you’re catering to a variety of dietary needs, this recipe can easily adapt. You can make it vegan using plant-based proteins or cheese, or swap traditional ingredients for gluten-free ones—the options are boundless. Its adaptability and quick preparation make it suitable for everyone, including busy professionals, food enthusiasts, and health-conscious individuals.

    Not only do these quesadillas satisfy hunger, but they can also encourage healthy eating habits, making them a perfect fit for families looking to develop better meal routines. By preparing homemade quesadillas, you’re opting out of processed, store-bought alternatives that often contain hidden sugars and unhealthy additives. Overall, the Easy Keto Chicken Quesadilla Low Carb is not just a recipe; it’s a wholesome choice for anyone striving to maintain a balanced lifestyle.

    Ingredients Overview

    Essential Ingredients for Easy Keto Chicken Quesadilla Low Carb

    To create the perfect Easy Keto Chicken Quesadilla Low Carb, you’ll need the following ingredients:

    • 2 cups cooked chicken, shredded: This serves as the primary protein source. Feel free to use leftover rotisserie chicken for convenience.
    • 1 cup shredded cheese (cheddar or mozzarella): Provides that gooey, delicious texture we’re all familiar with.
    • 4 low-carb tortillas: Options like almond flour or cauliflower tortillas work well to keep the carbs low.
    • 1/2 cup bell peppers (sliced): Adds a pop of color and nutrition.
    • 1/2 cup onions (sliced): Enhances flavor and adds natural sweetness.
    • 1 tablespoon olive oil: For sautéing the vegetables.
    • 1 teaspoon taco seasoning: Incorporates a burst of flavor (make sure it’s low-carb friendly).
    • Salt and pepper to taste: Essential for rounding out the flavor profiles.

    Dietary Options:
    Vegan: Substitute chicken with jackfruit or tempeh and use vegan cheese.
    Gluten-free: Ensure tortillas and taco seasoning are certified gluten-free.

    These ingredients not only build a flavorful quesadilla but also provide a balanced nutritional profile, making it appealing to anyone watching their dietary intake.

    Dietary Substitutions to Customize Your Easy Keto Chicken Quesadilla Low Carb

    If you’re looking to customize your Easy Keto Chicken Quesadilla, here are some substitutions that can cater to different needs:

    • For Dairy-Free or Vegan Options: Use nutritional yeast or dairy-free cheese to achieve a cheesy flavor without the dairy. Jackfruit can be used as a chicken alternative for a vegan-friendly version.
    • To Boost Nutrients: Incorporate spinach, kale, or zucchini for added vitamins and minerals. You could also mix in some black beans for additional fiber if you’re not strictly following a keto diet.
    • Low Sodium: Use fresh herbs such as cilantro, basil, or parsley in place of taco seasoning to keep sodium levels down while maintaining lots of flavor.
    • Spicy Variants: If you love heat, add diced jalapeños or a sprinkle of chili flakes to the chicken mixture.

    These substitutions not only enhance the recipe’s appeal but also ensure that everyone can enjoy it regardless of their dietary preferences or restrictions. Your Easy Keto Chicken Quesadilla can remain deliciously versatile!

    How to Prepare the Perfect Easy Keto Chicken Quesadilla Low Carb: Step-by-Step Guide

    Follow these clear, step-by-step instructions to create your Easy Keto Chicken Quesadilla Low Carb.

    1. Prepare the Base: Start by gathering all the ingredients. If you haven’t already cooked the chicken, you can boil or grill it until fully cooked, then shred it with two forks.

    2. Sauté the Vegetables: In a skillet over medium heat, add the olive oil. Once hot, toss in the sliced bell peppers and onions. Sauté them for about 5 minutes, or until they become tender. Season with salt and pepper to taste.

    3. Mix Chicken with Vegetables: Combine the shredded chicken with the sautéed vegetables in the skillet. Add the taco seasoning and stir until everything is evenly coated. Allow this mixture to heat through for a couple of minutes.

    4. Assemble the Quesadilla: Lay one tortilla flat in the skillet or on a clean surface. Sprinkle a thin layer of cheese over one half of the tortilla. Next, spoon the chicken and vegetable mixture over the cheese. Top it with an additional layer of cheese before folding the tortilla over to create a half-moon shape.

    5. Cook Until Crispy: Wipe the skillet clean and add a touch more olive oil if needed. Heat the quesadilla on medium heat for about 3-4 minutes, or until the cheese has melted and the tortilla turns slightly golden and crispy. Flip carefully and allow the other side to get crispy as well.

    6. Slice and Serve: Once cooked, carefully remove the quesadilla from the skillet. Let it cool for a minute, then slice it into wedges. Serve with toppings such as guacamole, sour cream, or salsa for that extra flair.

    This step-by-step guide ensures that even novice cooks can create a tantalizing Easy Keto Chicken Quesadilla. And remember, you can easily tailor each step to suit various dietary requirements or preferences without losing any of the tasty goodness. Enjoy your culinary creation!

    Mastering Easy Keto Chicken Quesadilla Low Carb: Advanced Tips and Variations

    To take your Easy Keto Chicken Quesadilla to the next level, consider these advanced tips and variations:

    • Experiment with Cheese: While cheddar and mozzarella are delightful, you can try pepper jack for a spicy kick or cream cheese for a rich and creamy texture. Mixing different types can create a unique flavor profile.

    • Herbs and Spices: Fresh herbs such as cilantro, oregano, or even dill can enhance the overall flavor. Additionally, consider adding smoked paprika or cumin to the chicken mixture for a smoky depth.

    • Make it a Meal: Serve your quesadilla alongside a fresh salad or a bowl of low-carb soup. This way, you can create a well-rounded meal that covers all nutritional bases.

    • Leftover Enjoyment: Repurpose leftover quesadilla fillings for tacos, lettuce wraps, or as a salad topping. This adds variety to your meals and minimizes food waste.

    • Cooking Methods: While frying in a skillet yields crispy results, cooking your quesadilla in an air fryer can also produce a crunchy exterior with less oil, making it a healthier option.

    Implementing these tips and variations will help you master the Easy Keto Chicken Quesadilla, making it your go-to option for busy weekdays or entertaining occasions.

    How to Store Easy Keto Chicken Quesadilla Low Carb: Best Practices

    Storing your Easy Keto Chicken Quesadilla properly will ensure its freshness for future meals. Follow these best practices:

    • Refrigeration: Place any leftovers in an airtight container and store them in the refrigerator. The quesadillas can last up to three days in the fridge. When reheating, simply place them back in a skillet or microwave until heated through.

    • Freezing: For long-term storage, freeze the quesadilla before cooking. Wrap each assembled and cooled quesadilla tightly in foil or plastic wrap, then place it in a freezer-safe bag. They can be stored in the freezer for up to three months. When ready to eat, thaw in the refrigerator overnight and cook as per the recipe.

    • Reheating: For the best results, reheat quesadillas in a skillet over medium heat to preserve the crispiness. If you need to use a microwave, place a paper towel beneath the quesadilla to absorb moisture and help maintain texture.

    By following these storage guidelines, you’ll ensure that your Easy Keto Chicken Quesadilla is always ready to enjoy, whether for a quick lunch or a satisfying dinner!

    Nutritional Value of Easy Keto Chicken Quesadilla Low Carb

    Understanding the nutritional value of your Easy Keto Chicken Quesadilla is crucial for making informed dietary choices. Below are estimates for a serving containing one quesadilla (one-fourth of the total recipe):

    • Calories: 300
    • Protein: 30g
    • Carbohydrates: 10g
    • Fat: 15g
    • Fiber: 5g
    • Sugars: 2g

    These nutritional values highlight the health benefits of this dish. Packed with high protein, low carbohydrates, and healthy fats, the Easy Keto Chicken Quesadilla stands out among various chicken recipes. This dish is friendly for those adhering to keto diets, aiding in fat-burning processes while keeping you satisfied.

    For those counting macros or following specific dietary needs, always adjust toppings and ingredient proportions. For example, using less cheese or opting for lower-calorie tortillas can mitigate calorie intake. Tailoring the recipe according to each person’s unique requirements is part of the magic that makes cooking enjoyable!

    FAQs: Frequently Asked Questions About Easy Keto Chicken Quesadilla Low Carb

    1. Can I make the Easy Keto Chicken Quesadilla ahead of time?
    Absolutely! You can prepare the filling and assemble the quesadillas ahead of time. Store them in the fridge until ready to cook. They are also great for meal prep!

    2. Can I use any type of tortilla?
    For a successful low-carb dish, stick to low-carb tortillas made with almond flour or other keto-friendly flours. Traditional tortillas have a higher carb content and may not fit into your dietary plan.

    3. How can I make this recipe spicier?
    If you love a little heat, consider adding diced jalapeños to the chicken mix or using spicy cheese. You can also sprinkle red pepper flakes over the finished quesadilla!

    4. Can leftover quesadilla filling be used?
    Definitely! You can use the leftover chicken and vegetable mixture in salads, wraps, or even stuffed bell peppers for another healthy meal.

    5. Is it possible to bake the quesadilla instead of frying?
    Yes! Preheat your oven to 400°F (200°C). Place the assembled quesadilla on a baking sheet and bake for about 10-15 minutes, flipping halfway through, until the cheese is melted and the tortilla is crispy.

    This FAQ section addresses common concerns and provides solutions to potential issues related to the Easy Keto Chicken Quesadilla, enhancing your cooking experience and ensuring you enjoy every bite of this delightful dish.


    In conclusion, the Easy Keto Chicken Quesadilla Low Carb is a must-try recipe that combines flavor, health, and convenience into one satisfying dish. Versatile, quick to prepare, and compatible with various dietary preferences, this quesadilla can easily become a cherished part of your culinary repertoire.