Blog

  • Easy Mediterranean Chicken Zucchini Bake

    Easy Mediterranean Chicken Zucchini Bake

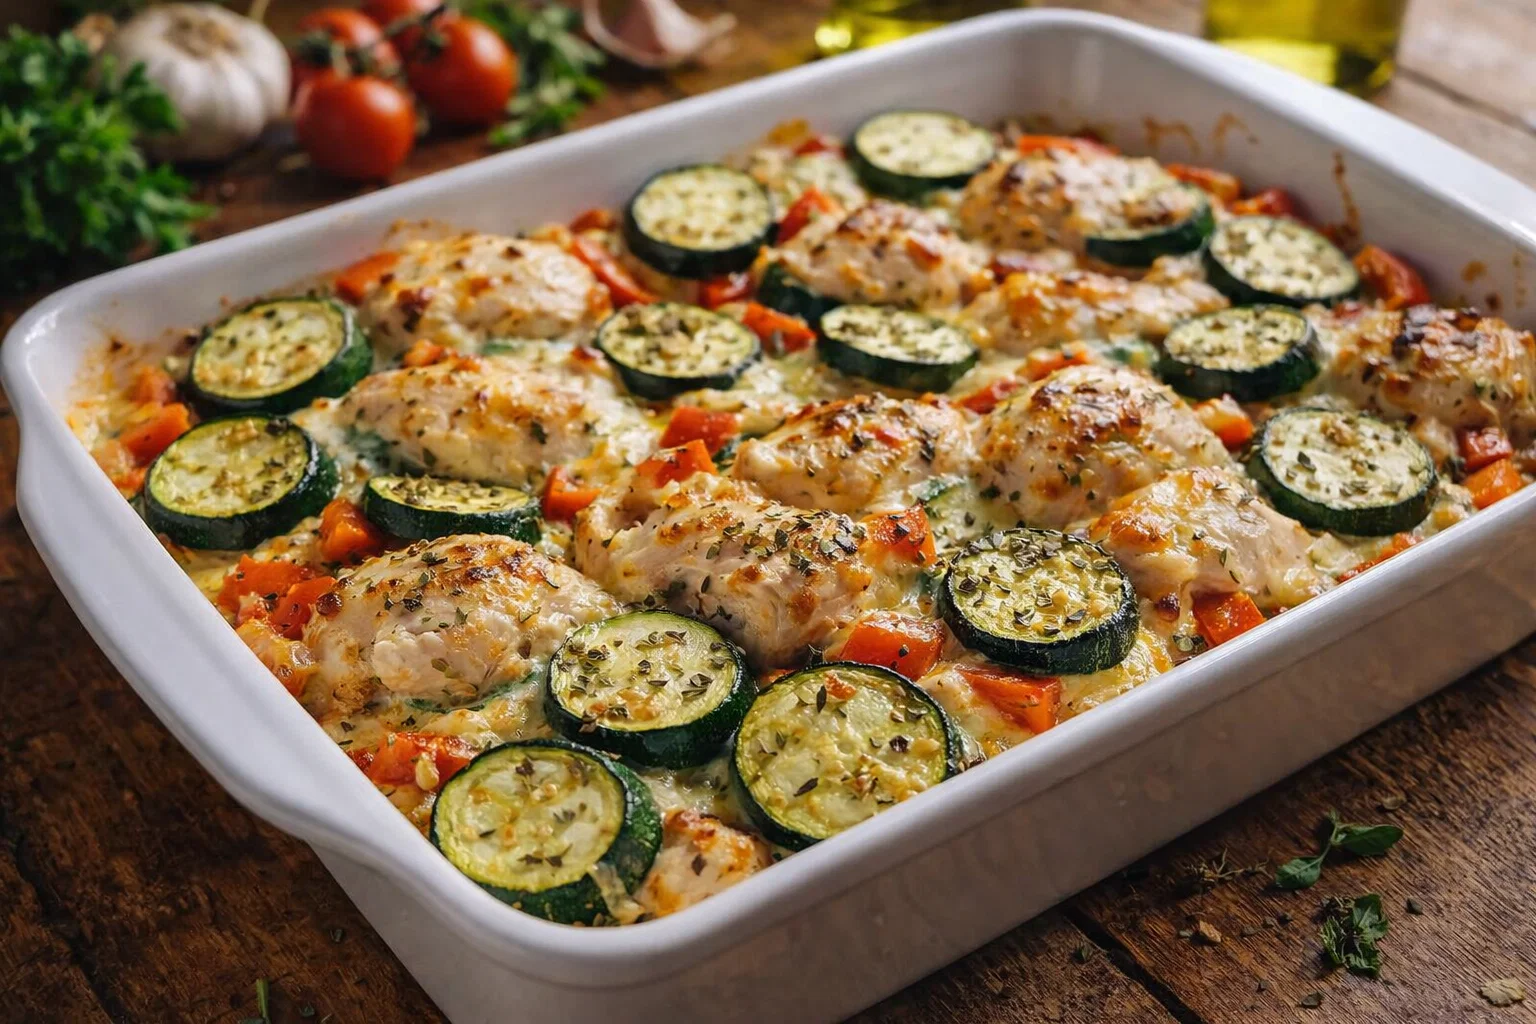
    Easy Mediterranean Chicken Zucchini Bake: A Tropical Delight

    Introduction to Easy Mediterranean Chicken Zucchini Bake

    Are you looking for easy dinner recipes that are not only delicious but also straightforward to prepare? Look no further! The Easy Mediterranean Chicken Zucchini Bake combines succulent chicken, fresh zucchini, and vibrant Mediterranean flavors into a single dish that is sure to delight the taste buds of everyone in your home. This recipe is a perfect choice for busy parents, students, and working professionals who want to enjoy a nutritious meal without spending hours in the kitchen.

    What makes this bake so special? First, it’s incredibly simple. In just a few steps, you can assemble the ingredients and let the oven do the work for you. Second, it’s packed with wholesome ingredients that promote health and wellbeing. Chicken is a great source of lean protein, while zucchini is low in calories and high in vitamins. Additionally, it can be easily adapted to suit various dietary preferences, making it an excellent option for vegan or gluten-free diets.

    Whether you’re a seasoned cook or just starting out, this Easy Mediterranean Chicken Zucchini Bake offers a delicious way to enjoy a balanced meal. It’s perfect for serving at family gatherings or for a cozy dinner for two yet flexible enough to suit any occasion. By the end of this article, you will not only be inspired to whip up this tasty dish but also equipped with everything you need to make it your own.

    Benefits and Advantages of Easy Mediterranean Chicken Zucchini Bake

    The Easy Mediterranean Chicken Zucchini Bake stands out in the world of easy dinner recipes for several reasons. For starters, its preparation is incredibly straightforward. With minimal effort, you can have this dish on your table in under an hour. This is a huge relief for those hectic weeknights when time is of the essence. You won’t need to tackle complicated cooking techniques or spend excessive time chopping ingredients. Simply layer, bake, and enjoy!

    Health benefits abound in this Mediterranean-inspired dish. It combines lean protein from the chicken and an abundance of vitamins and minerals from zucchini and herbs. This unique combination supports not only muscle health but also digestion and overall wellbeing. Zucchini, in particular, is a low-calorie vegetable that is high in fiber, which promotes satiety and helps maintain a healthy weight. This makes the Easy Mediterranean Chicken Zucchini Bake an excellent choice for those who are diet-conscious or looking to maintain a balanced lifestyle.

    Moreover, this recipe’s versatility allows for various substitutions, meaning you can cater to a wide array of dietary needs. High-protein, low-carb, or vegetarian options are just a few examples of how you can modify this dish. Plus, it’s an excellent way to make use of fresh produce, helping you avoid food waste while enjoying the vibrant flavors of the Mediterranean.

    Finally, the Easy Mediterranean Chicken Zucchini Bake is deliciously comforting, making it suitable for all ages – from kids to seniors. This dish transforms ordinary chicken and zucchini into a festive feast, making it a go-to for those home-cooked meals that create lasting memories.

    Ingredients Overview

    Essential Ingredients for Easy Mediterranean Chicken Zucchini Bake

    Here’s a closer look at the ingredients you’ll need to prepare this Easy Mediterranean Chicken Zucchini Bake:

    • 2 medium zucchinis (sliced): Zucchini acts as both a nutritious vegetable and a moisture provider, keeping the dish juicy.
    • 1 pound boneless, skinless chicken breasts (cut into bite-sized pieces): Provides essential protein.
    • 1 cup cherry tomatoes (halved): Add sweetness and acidity, enhancing the Mediterranean flavor profile.
    • 1 medium onion (sliced): Offers a savory base and complements the other ingredients well.
    • 3 cloves garlic (minced): Infuses the dish with aromatic flavor.
    • 1/4 cup olive oil: A heart-healthy fat that also helps in cooking the dish evenly.
    • 1 teaspoon dried oregano: Common in Mediterranean cooking, it imparts a fragrant quality.
    • 1 teaspoon dried basil: Another aromatic herb that elevates the flavor.
    • Salt and pepper to taste: Essential for balancing the flavors.
    • 1/2 cup feta cheese (optional): Adds creaminess and a salty bite; can be omitted for a vegan option.
    • Fresh parsley (for garnish): Enhances presentation and adds freshness to the dish.

    Vegan, Gluten-Free, and Low-Calorie Options

    • To make it vegan: Substitute chicken with chickpeas or tofu for a protein-rich alternative, and use nutritional yeast instead of feta cheese.
    • For a gluten-free option: This recipe is already gluten-free, making it suitable for anyone avoiding gluten.
    • Low-calorie modifications: Reduce the amount of olive oil or use a cooking spray to decrease overall calories without sacrificing flavor.

    Dietary Substitutions to Customize Your Easy Mediterranean Chicken Zucchini Bake

    To cater to different dietary preferences or ingredient availability, consider these substitutions:

    • For Protein: Instead of chicken, you can use turkey, shrimp, or even plant-based protein options like lentils or tempeh.
    • For Cheese: If you’re aiming for dairy-free or lower-fat options, consider using goat cheese, reduced-fat feta, or a sprinkle of nutritional yeast.
    • Herbs: Feel free to experiment with different herb combinations. Fresh herbs can replace dried ones if you have them on hand – just increase the quantity to maintain flavor.

    Making these adjustments allows you to tailor the Easy Mediterranean Chicken Zucchini Bake to fit any lifestyle or dietary requirement, ensuring that everyone at your table can enjoy it!

    How to Prepare the Perfect Easy Mediterranean Chicken Zucchini Bake: Step-by-Step Guide

    Follow these simple steps to create a mouthwatering Easy Mediterranean Chicken Zucchini Bake that your family will love.

    1. Preheat the Oven: Preheat your oven to 400°F (200°C). This will ensure that your dish cooks evenly and thoroughly.

    2. Prepare the Vegetables: Slice the zucchinis, halve the cherry tomatoes, and slice the onion. Mince the garlic as well. This step is crucial for achieving a balanced blend of flavors.

    3. Sauté the Onions and Garlic: In a large skillet, heat 2 tablespoons of olive oil over medium heat. Add the sliced onion and sauté for about 5 minutes until it’s softened. Next, add minced garlic and cook until fragrant, about 1 more minute.

    4. Combine Ingredients: In a large mixing bowl, combine the sautéed onions and garlic with the sliced zucchini, cherry tomatoes, and chicken pieces. Drizzle in the remaining olive oil, then sprinkle with oregano, basil, salt, and pepper. Mix everything together, ensuring all the ingredients are well-coated.

    5. Transfer to Baking Dish: Spread the mixture into a greased 9×13-inch baking dish. Make sure the ingredients are evenly distributed for uniform cooking.

    6. Add Feta Cheese: If you are using feta cheese, crumble it evenly over the top of the dish at this point. This will melt and create a delicious crust as it cooks.

    7. Bake the Dish: Place the baking dish in the preheated oven and bake for 25-30 minutes. You’ll know it’s done when the chicken is cooked through and the vegetables are tender.

    8. Garnish: Once out of the oven, garnish the dish with freshly chopped parsley for a pop of color and flavor.

    9. Serve and Enjoy: Your Easy Mediterranean Chicken Zucchini Bake is now ready to be served! Enjoy on its own or with a side salad for a complete meal.

    Feel free to adapt cooking times and temperatures based on your oven and personal preferences, ensuring the perfect bake every time. This high-vegetable, low-carb option is an excellent way to enjoy easy dinner recipes that deliver on both nutrition and taste.

    Mastering Easy Mediterranean Chicken Zucchini Bake: Advanced Tips and Variations

    Unlocking the full potential of your Easy Mediterranean Chicken Zucchini Bake can be a rewarding experience. Here are some advanced tips and variations to take your dish to the next level:

    • Add More Veggies: Feel free to incorporate other vegetables such as bell peppers, mushrooms, or even spinach for additional flavors and nutritional benefits.

    • Marinate the Chicken: For an extra depth of flavor, marinate the chicken in olive oil, lemon juice, and herbs for at least 30 minutes before mixing it with the vegetables.

    • Cheese Variations: Experiment with different types of cheese such as mozzarella or gouda for a unique taste, depending on your personal preference.

    • Spice it Up: If you enjoy a little heat, consider adding some crushed red pepper flakes or chopped jalapeños to the mix.

    • Herb Substitutions: You can explore other Mediterranean herbs like thyme or rosemary to experiment with different flavor profiles.

    By implementing these variations or tips, you can keep this Easy Mediterranean Chicken Zucchini Bake fresh and exciting every time you prepare it. Whether you make it simpler or more gourmet, the foundational flavors should always shine through, making it a staple in your collection of easy dinner recipes.

    How to Store Easy Mediterranean Chicken Zucchini Bake: Best Practices

    Storing leftovers properly is crucial to maintaining the flavor and quality of your Easy Mediterranean Chicken Zucchini Bake. Here are some best practices to extend its shelf life:

    1. Refrigeration: Allow the bake to cool completely before moving it to an airtight container. It can be stored in the fridge for up to 3-4 days. Just reheat it in the oven or microwave before serving.

    2. Freezing: If you wish to keep it for a longer period, this dish freezes wonderfully. Portion it into individual servings in freezer-safe containers. Make sure to label each container with the date, as it can be kept frozen for up to 3 months.

    3. Reheating: For optimal taste, thaw frozen portions in the refrigerator overnight before reheating. Reheat in the oven at 350°F (175°C) for about 10-15 minutes, or until heated through. If using a microwave, cover the dish to avoid drying it out.

    By adhering to these storage techniques, you’ll ensure that your Easy Mediterranean Chicken Zucchini Bake remains a delicious go-to option on those busy weeknights when you want something quick yet satisfying.

    Nutritional Value of Easy Mediterranean Chicken Zucchini Bake

    Understanding the nutritional value of your meals is essential, especially when you’re focusing on healthful eating. Here’s a general breakdown of the nutritional content for one serving (based on six servings) of Easy Mediterranean Chicken Zucchini Bake:

    • Calories: Approximately 280
    • Protein: 25 grams
    • Total Fat: 15 grams
    • Saturated Fat: 3 grams
    • Cholesterol: 75 mg
    • Sodium: 400 mg (can be reduced by adjusting salt)
    • Carbohydrates: 10 grams
    • Dietary Fiber: 3 grams
    • Sugars: 4 grams

    Vitamins and Minerals

    • Vitamin A: 20% of the Daily Value (DV)
    • Vitamin C: 30% of the DV
    • Calcium: 10% of the DV
    • Iron: 8% of the DV

    When compared to many standard dinner options, the Easy Mediterranean Chicken Zucchini Bake is a fantastic choice. The balance of protein and vegetables contributes to a nutrient-dense meal that is not just low in calories but also satisfies your palate. As part of your arsenal of easy dinner recipes, this dish supports various health goals while still being comforting and flavorful.

    FAQs: Frequently Asked Questions About Easy Mediterranean Chicken Zucchini Bake

    Q: Can I make this dish ahead of time?
    A: Absolutely! You can prep it a day in advance, store it in the fridge before baking, then simply pop it in the oven when ready to serve.

    Q: What can I substitute for chicken?
    A: Great substitutions include turkey, tofu, or even legumes like chickpeas if you’re looking for a vegetarian option.

    Q: Is this dish gluten-free?
    A: Yes, the Easy Mediterranean Chicken Zucchini Bake is gluten-free as long as you ensure that any additional ingredients, like chicken broth or seasoning blends, are also gluten-free.

    Q: How spicy is this recipe?
    A: This recipe is not inherently spicy. However, you can add crushed red pepper flakes or fresh chilies according to your heat preference.

    Q: Can I add more vegetables?
    A: Definitely! Feel free to toss in other vegetables like bell peppers, spinach, or eggplant to make it even more nutritious.

    Incorporating FAQs into your recipe content not only provides value to your readers but also improves your article’s SEO by addressing common concerns related to easy dinner recipes such as this one.


    With this comprehensive guide, you’re all set to create the marvelous Easy Mediterranean Chicken Zucchini Bake. By focusing on simplicity, health, and adaptability, this dish is a true winner in the world of easy dinner recipes. Happy cooking!

  • Tasty Cheddar Bacon Potato Wedges

    Tasty Cheddar Bacon Potato Wedges

    Tasty Cheddar Bacon Potato Wedges: A Tropical Delight

    Introduction to Tasty Cheddar Bacon Potato Wedges

    Are you looking for an irresistible addition to your repertoire of dinner recipes? Tasty Cheddar Bacon Potato Wedges are a delightful option that combines savory flavors with a satisfying crunch. This dish is not only simple to prepare but also delivers a burst of deliciousness that caters to a variety of taste buds. Whether you’re a busy parent looking to create a quick yet appealing meal, a student in search of a satisfying snack, or a newlywed attempting to impress with your culinary skills, these wedges can fit seamlessly into your lifestyle.

    What makes Tasty Cheddar Bacon Potato Wedges an excellent choice is their versatility. They can be enjoyed as a side dish, a snack, or even a light meal on their own. Additionally, they can be adjusted for various diets—making them suitable for vegetarians or gluten-free eaters. With each bite, you get a blend of creamy cheddar cheese, crispy bacon, and perfectly roasted potatoes, fulfilling both your comfort food cravings and nutritional needs. These wedges are indeed a winner when it comes to hearty yet healthy dinner recipes.

    Benefits and Advantages of Tasty Cheddar Bacon Potato Wedges

    This delightful recipe stands out for numerous reasons. Firstly, its ease of preparation attracts home cooks of all levels. With just a few ingredients and minimal cooking time, you can whip up a tray of golden, cheesy potato wedges that will please everyone at your dinner table. Ideal for busy weeknights, they require little effort while delivering maximum flavor.

    Furthermore, Tasty Cheddar Bacon Potato Wedges offer nutritional benefits, particularly when you choose healthier ingredient alternatives. Potatoes are a good source of vitamins C and B6, potassium, and fiber. When roasted rather than deep-fried, these wedges can contribute positively to your dietary habits. Additionally, bacon provides flavor but can be swapped for turkey bacon or omitted entirely for a vegetarian variant, making it easier to cater to different dietary preferences.

    Another advantage of this dish lies in its adaptability. You can easily customize the seasoning to suit your family’s tastes—be it spicy, herby, or even cheesy. Furthermore, you can serve them as a side for grilled chicken or fish or as a standalone appetizer during parties. With this recipe, you have endless possibilities to elevate your meal, making it a true gem among dinner recipes.

    Ingredients Overview

    Essential Ingredients for Tasty Cheddar Bacon Potato Wedges

    The following ingredients list outlines everything you’ll need to create these delectable potato wedges:

    • 4 large russet potatoes (approximately 2 pounds)
    • Benefit: High in fiber and potassium, these potatoes provide a sturdy base for your wedges.

    • 1 cup shredded sharp cheddar cheese

    • Benefit: Adds a rich flavor and creamy texture.

    • ½ cup cooked bacon bits (or turkey bacon)

    • Benefit: Offers a savory, crispy element—can be replaced with vegetarian bacon for a plant-based version.

    • 2 tablespoons olive oil

    • Benefit: Provides healthy fats and helps achieve a crispy exterior while cooking.

    • 1 teaspoon garlic powder

    • Benefit: Enhances flavor without adding extra calories.

    • 1 teaspoon onion powder

    • Benefit: Complements the garlic and creates depth in flavor.

    • 1 teaspoon smoked paprika (optional)

    • Benefit: Adds a delightful smokiness that elevates the dish.

    • Salt and pepper to taste

    This straightforward ingredient list makes it easy for anyone to recreate this dish while still accommodating dietary preferences.

    Dietary Substitutions to Customize Your Tasty Cheddar Bacon Potato Wedges

    Whether you’re cooking for someone with dietary restrictions or simply want to mix things up, here are a few substitutions you can explore:

    • Potato Alternative: Swap out russet potatoes for sweet potatoes for a healthier twist. Sweet potatoes add a vibrant color and provide extra nutrients.

    • Cheese Alternatives: Use vegan cheese shreds or nutritional yeast to offer a cheesy flavor in a dairy-free recipe.

    • Bacon Alternatives: For a vegetarian or vegan option, you can skip the bacon altogether or use chopped mushrooms, which can add a savory umami flavor.

    • Oil Modifications: Substitute olive oil with avocado oil or coconut oil for different flavor profiles and health benefits.

    • Spice Variations: Feel free to add red pepper flakes, Italian seasoning, or your favorite spice blend to change up the taste.

    These alternatives enhance your culinary creativity while keeping the essence of the dish intact.

    How to Prepare the Perfect Tasty Cheddar Bacon Potato Wedges: Step-by-Step Guide

    Creating delicious Tasty Cheddar Bacon Potato Wedges is straightforward. Just follow these step-by-step instructions:

    1. Preheat the Oven: Start by preheating your oven to 425°F (220°C). This high temperature will help achieve the crispy texture we desire.

    2. Prepare the Potatoes: Wash and scrub the russet potatoes thoroughly. Pat them dry with a kitchen towel, then cut each potato into wedges (about 8 wedges per potato).

    3. Season the Potatoes: In a large mixing bowl, toss the potato wedges with olive oil, garlic powder, onion powder, smoked paprika, salt, and pepper. Ensure every wedge is well-coated with the oil and spices.

    4. Spread on a Baking Sheet: Line a baking sheet with parchment paper for easy cleanup. Arrange the seasoned potato wedges in a single layer, ensuring they are not overcrowded. This allows for even cooking and crisping.

    5. Bake the Wedges: Place the baking sheet in the oven and bake for 25-30 minutes. Halfway through, flip the wedges to ensure they cook evenly. The exterior should look golden and crispy when finished.

    6. Add Cheese and Bacon: Remove the baking sheet from the oven and sprinkle the shredded cheddar cheese and cooked bacon bits over the wedges. Return the sheet to the oven for an additional 5 minutes, or until the cheese has melted and become bubbly.

    7. Garnish and Serve: Take the wedges out of the oven and allow them to cool slightly. For an added touch, sprinkle with chopped fresh herbs like chives or parsley before serving.

    8. Enjoy with Dipping Sauces: Pair your cheesy potato wedges with your favorite dips—ranch, BBQ sauce, or spicy mayo are excellent options!

    This step-by-step guide makes the cooking process accessible while allowing for variations to meet your dietary needs.

    Mastering Tasty Cheddar Bacon Potato Wedges: Advanced Tips and Variations

    Cooking can be an art, and here are some advanced tips to elevate your Tasty Cheddar Bacon Potato Wedges experience:

    • Double Bake for Extra Crispiness: For even crispier wedges, consider parboiling the potatoes before baking. Boil them for about 5 minutes, then let them dry before seasoning and baking as outlined above.

    • Herb Infusion: Adding fresh rosemary or thyme to your seasoning mix can introduce a delightful herbaceous note, enhancing the overall flavor of your dish.

    • Zesty Twist: For those who enjoy vibrant flavors, try adding a teaspoon of lime or lemon zest before baking, which can add a refreshing zing.

    • Loaded Wedges Variation: To create loaded potato wedges, top your finished dish with ingredients like sour cream, jalapeños, and green onions for an extravagant twist that resembles loaded nachos.

    Experimenting with these tips and variations can create an exciting culinary journey, ensuring that your Tasty Cheddar Bacon Potato Wedges are never boring.

    How to Store Tasty Cheddar Bacon Potato Wedges: Best Practices

    If you happen to have leftovers (which is rare, given how delicious they are!), you’ll want to store them properly:

    1. Refrigeration: Allow the wedges to cool completely before transferring them to an airtight container. They can be stored in the refrigerator for up to 3 days.

    2. Freezing: For long-term storage, freeze the cooked potato wedges. Lay them in a single layer on a baking sheet until frozen solid, then transfer them to a freezer-safe bag or container. They can be frozen for up to 2 months.

    3. Reheating: To reheat refrigerated or frozen wedges, preheat your oven to 375°F (190°C). Bake for about 10-15 minutes, or until heated through and crispy again. For extra crispiness, you can broil them for a minute or two at the end.

    Adhering to these storage methods ensures that your delicious Tasty Cheddar Bacon Potato Wedges maintain their flavor and texture.

    Nutritional Value of Tasty Cheddar Bacon Potato Wedges

    Understanding the nutritional composition of our Tasty Cheddar Bacon Potato Wedges is essential for those monitoring their diets. Here’s a breakdown of the nutrition per serving (approximately 4 wedges):

    • Calories: 330 kcal
    • Total Fat: 18g
    • Saturated Fat: 7g
    • Cholesterol: 25mg
    • Sodium: 600mg
    • Total Carbohydrates: 35g
    • Dietary Fiber: 4g
    • Sugars: 1g
    • Protein: 10g

    These wedges are flavorful yet can fit within a balanced diet. By modifying the ingredients (like using less cheese or bacon), you can further reduce fat and calories.

    The presence of dietary fiber from potatoes supports digestion, while the addition of protein from cheese and bacon can keep you feeling satisfied longer. This data enables you to enjoy these delectable wedges while being mindful of your nutritional intake, adding them to your collection of delicious dinner recipes.

    FAQs: Frequently Asked Questions About Tasty Cheddar Bacon Potato Wedges

    Can I make Tasty Cheddar Bacon Potato Wedges ahead of time?

    Yes, you can prepare the wedges ahead of time by pre-baking them and then adding cheese and bacon just before serving. This way, you retain the wedges’ crispiness while still saving time when dinner comes around.

    What can I serve with Tasty Cheddar Bacon Potato Wedges?

    These potato wedges can pair well with a variety of main dishes such as grilled chicken, burgers, or hot dogs. They also work wonderfully as a snack at parties or game days.

    How can I make this recipe vegan?

    To make the Tasty Cheddar Bacon Potato Wedges vegan, simply substitute cheddar cheese with vegan cheese and use plant-based bacon alternatives. You can also explore spices to enhance flavors without cheese.

    Are these wedges gluten-free?

    Yes! As long as you use gluten-free bacon or omit it entirely and ensure that your seasonings are gluten-free, Tasty Cheddar Bacon Potato Wedges can easily fit into a gluten-free diet.

    Can I use other potatoes besides russets?

    Absolutely! You can use fingerling potatoes, Yukon Golds, or even sweet potatoes to create unique variations of this recipe. Each type will yield a slightly different flavor and texture.

    How do I make the wedges spicier?

    If you love heat, consider adding crushed red pepper flakes or a pinch of cayenne pepper when seasoning the potatoes before baking. You can also serve with a spicy dipping sauce to elevate the heat factor.

    With all these aspects covered, Tasty Cheddar Bacon Potato Wedges are not just a tasty option; they represent an adaptable recipe that can bring joy and satisfaction to numerous dining occasions. Enjoy your cooking adventure and the savory delights that come along with it!

  • Cozy Chewy Peanut Butter Brownies

    Cozy Chewy Peanut Butter Brownies

    Cozy Chewy Peanut Butter Brownies: A Tropical Delight

    Introduction to Cozy Chewy Peanut Butter Brownies

    If you’re on the hunt for delightful dessert recipes that are as comforting as they are delicious, look no further than these Cozy Chewy Peanut Butter Brownies. This recipe balances the rich, nutty flavor of peanut butter with the indulgent decadence of brownies, creating a treat that is perfect for any occasion. Their chewy texture and rich taste are simply irresistible!

    What makes these brownies so appealing is their versatility; they are simple enough for a busy weeknight but impressive enough to serve at gatherings. Plus, they cater to various dietary preferences. This recipe can be easily transformed into a vegan or gluten-free delight, ensuring everyone can enjoy this scrumptious dessert. The use of wholesome ingredients means you can satisfy your sweet tooth without the guilt!

    So, whether you’re a novice baker or a seasoned pro, grab your apron and let’s embark on a journey to create these delightful brownies that you and your loved ones will cherish.

    Benefits and Advantages of Cozy Chewy Peanut Butter Brownies

    Creating Cozy Chewy Peanut Butter Brownies offers several noteworthy advantages. First and foremost, the ease of preparation cannot be overstated. In just one bowl, you can combine ingredients and bake your way to chocolatey perfection. No complicated techniques or tools are required, making this an ideal recipe for home cooks and busy parents.

    Health-wise, these brownies can be guilt-free. Substituting traditional ingredients with healthier alternatives turns them into a nutritious treat. For instance, using whole grain flour instead of white flour adds fiber, while opting for natural peanut butter can reduce sugar intake. Additionally, they can easily be made vegan by using flax eggs or applesauce, thus accommodating plant-based diets.

    Finally, these brownies stand out due to their delightful texture—chewy, fudgy, and decadent. You can enjoy them warm right out of the oven, or let them cool for a richer taste. Whether you’re satisfying a late-night craving or sharing them with friends, these brownies are sure to impress.

    Ingredients Overview

    Essential Ingredients for Cozy Chewy Peanut Butter Brownies

    To make these amazing Cozy Chewy Peanut Butter Brownies, here’s what you’ll need:

    • 1 cup peanut butter (smooth or chunky): The star of the show! Peanut butter provides flavor, moisture, and healthy fats.
    • 1 cup brown sugar: This adds sweetness and a hint of molasses flavor, enhancing the richness of the brownies.
    • 1/2 cup all-purpose flour (or gluten-free flour): This gives structure to the brownies. For a gluten-free option, use almond flour or a gluten-free baking blend.
    • 2 large eggs (or 1/2 cup unsweetened applesauce for vegan): Eggs bind the ingredients together, while applesauce also adds moisture.
    • 1/2 teaspoon baking soda: This helps the brownies rise and become soft and chewy.
    • 1/4 teaspoon salt: Salting balances the sweetness and enhances flavor.
    • 1 teaspoon vanilla extract: For added depth and aroma.
    • Optional add-ins: Chopped nuts, chocolate chips, or even swirls of caramel for extra indulgence.

    With these ingredients, your brownies are set for success!

    Dietary Substitutions to Customize Your Cozy Chewy Peanut Butter Brownies

    One of the great things about this recipe is its adaptability. Here are some substitutions you might consider:

    • Peanut Butter Alternatives: If you’re allergic to peanuts, try almond butter, sunflower seed butter, or cashew butter as alternatives.
    • Vegan Options: To maintain a vegan profile, replace eggs with flaxseed meal (1 tablespoon ground flaxseed mixed with 2.5 tablespoons water = 1 egg) or unsweetened applesauce.
    • Sugars: For a lower-calorie option, consider using Stevia or coconut sugar, bearing in mind that the taste may vary slightly.
    • Flour: Along with gluten-free blends, you can use oat flour or chickpea flour to make the brownies gluten-free.

    These substitutions allow you to cater to various diets and preference while still creating delicious brownies!

    How to Prepare the Perfect Cozy Chewy Peanut Butter Brownies: Step-by-Step Guide

    Follow these clear, step-by-step instructions to create your Cozy Chewy Peanut Butter Brownies. Each step ensures that even novice bakers can achieve delicious results.

    1. Preheat Your Oven: Start by preheating your oven to 350°F (175°C). This sets the stage for perfectly baked brownies.

    2. Prepare Your Baking Dish: Grease a square 9×9-inch baking dish with a little oil or butter, or line it with parchment paper for easy removal later.

    3. Mix the Peanut Butter and Sugar: In a large mixing bowl, combine 1 cup of peanut butter and 1 cup of brown sugar. Using a hand mixer, blend until the mixture is smooth and creamy.

    4. Incorporate the Eggs: Add 2 large eggs or your chosen substitutes (e.g., applesauce) to the mixture. Beat until fully incorporated and smooth.

    5. Add Vanilla: Stir in 1 teaspoon of vanilla extract, mixing thoroughly for a burst of flavor.

    6. Combine Dry Ingredients: In a separate bowl, whisk together 1/2 cup of flour, 1/2 teaspoon of baking soda, and 1/4 teaspoon of salt. Gradually add this dry mixture to your wet ingredients, stirring until just combined. Be careful not to over-mix to keep your brownies soft and chewy!

    7. Fold in Add-Ins: If desired, fold in chocolate chips or chopped nuts. This extra touch adds delightful texture and flavor.

    8. Pour into Baking Dish: Transfer the brownie batter into your prepared baking dish, spreading it evenly with a spatula.

    9. Bake Your Brownies: Place the dish in the preheated oven and bake for 20-25 minutes. The brownies should still be slightly soft in the center but firm around the edges.

    10. Cool Down: Once baked, remove them from the oven and let them cool in the pan for at least 10 minutes. Then transfer to a wire rack to cool completely before slicing.

    11. Slice and Enjoy: Cut into squares and enjoy your delicious, chewy brownies! Perfect for any occasion or simply to satisfy a quick craving.

    Feel free to adapt these steps for any dietary requirements or preferences. With a little creativity, these brownies will quickly become a favorite in your dessert repertoire.

    Mastering Cozy Chewy Peanut Butter Brownies: Advanced Tips and Variations

    For those looking to enhance their baking skills, here are additional tips and variations to master the art of Cozy Chewy Peanut Butter Brownies:

    • Experiment with Flavors: Consider adding spices like cinnamon or instant espresso powder for a deeper flavor profile. A little sprinkle of sea salt on top before baking can also elevate the taste.
    • Layered Brownies: For an even more decadent treat, create a layered brownie by swirling half of the brownie batter with cream cheese or Nutella.
    • Storage Tips: If you find that you’re left with extra brownies, storing them properly can help retain their moisture. Place them in an airtight container at room temperature for up to a week, or refrigerate them to extend their shelf life.

    Incorporating these advanced techniques not only enhances your brownie-making skills but also allows you to create truly unique variations that will impress even the most discerning dessert lovers.

    How to Store Cozy Chewy Peanut Butter Brownies: Best Practices

    To make the most of your Cozy Chewy Peanut Butter Brownies, proper storage is vital. Here’s how to maintain their freshness:

    • Room Temperature: If consumed within a few days, store brownies in an airtight container at room temperature. To prevent them from drying out, place a slice of bread in the container; it will help keep the brownies moist.

    • Refrigeration: For longer shelf life, refrigerate the brownies in an airtight container. They can stay fresh for up to a week when properly cooled.

    • Freezing: If you want to enjoy them later, freezing is a great option. Wrap individual brownies tightly in plastic wrap, then place them in a freezer-safe bag or container. They can last for up to three months in the freezer. Just thaw them at room temperature for a few hours before serving.

    With these storage tips, your brownies can remain delectable for days, ready to satisfy your sweet cravings!

    Nutritional Value of Cozy Chewy Peanut Butter Brownies

    Nutritional value is an essential aspect when enjoying dessert recipes. Here’s a general breakdown of nutritional information per serving (based on 16 servings):

    • Calories: Approximately 200-220 calories
    • Total Fat: 12g (including healthy fats from peanut butter)
    • Saturated Fat: 3g
    • Cholesterol: 45mg
    • Sodium: 110mg
    • Total Carbohydrates: 22g
    • Dietary Fiber: 1g
    • Sugars: 10g
    • Protein: 5g

    This nutritional overview indicates that these brownies offer a satisfying treat without being overly indulgent. Their protein content from peanut butter makes them a great option for a post-workout snack or a sweet treat in moderation.

    FAQs: Frequently Asked Questions About Cozy Chewy Peanut Butter Brownies

    1. Can I make these brownies in advance?

    Absolutely! You can bake the brownies ahead of time and store them in an airtight container. They stay fresh for a few days at room temperature or about a week in the fridge.

    2. What type of peanut butter can I use?

    You can use any style of peanut butter, whether creamy or crunchy. Just ensure it is the natural kind without added sugars or hydrogenated oils for the healthiest option.

    3. Can I substitute ingredients for dietary restrictions?

    Yes! This recipe is highly adaptable. You can substitute eggs with applesauce for a vegan version, use gluten-free flour for a gluten-free option, and try different nut butters if you have allergies.

    4. How can I tell when the brownies are done baking?

    The brownies are done when the edges start to pull away from the pan and a toothpick inserted in the center comes out with a few moist crumbs. Avoid over-baking to keep them chewy!

    5. Can I add chocolate chips or nuts?

    Definitely! Adding mix-ins like semi-sweet chocolate chips or chopped nuts creates an extra delicious texture and flavor in your brownies.

    These frequently asked questions offer insights to help you make the best out of your Cozy Chewy Peanut Butter Brownies, ensuring a delightful baking experience!


    In conclusion, your journey to baking perfect Cozy Chewy Peanut Butter Brownies is simple and enjoyable. With their rich flavor and chewy texture, they are certain to become a staple in your collection of beloved dessert recipes. Don’t hesitate to make this treat with your personal culinary twists. Happy baking!

  • The Best Neiman Marcus Chicken Casserole

    The Best Neiman Marcus Chicken Casserole

    The Best Neiman Marcus Chicken Casserole: A Tropical Delight

    Introduction to The Best Neiman Marcus Chicken Casserole

    Are you looking for a dish that embodies simplicity and flavor while satisfying dietary needs? Look no further! The Best Neiman Marcus Chicken Casserole is the perfect recipe to include in your collection of chicken recipes. This delightful casserole encapsulates the essence of comfort food while also providing a nutritious bite. It’s a one-dish wonder that blends succulent chicken with an array of vegetables and creamy goodness, making it a family favorite.

    Imagine serving a meal that pleases both the picky eaters and the health-conscious members of your family! The Best Neiman Marcus Chicken Casserole can be adapted to be gluten-free, low-calorie, or even plant-based, ensuring that everyone at the dinner table leaves satisfied. It is an easy-to-follow recipe that fits perfectly into busy lifestyles without compromising on taste or nutrition. Perfect for home cooks, busy parents, and even culinary enthusiasts, this casserole is bound to make an impression.

    Whether you’re cooking for a potluck, a meal prep session for the week, or just a cozy dinner on a weeknight, this recipe serves up delicious leftovers that only get better with time. In short, The Best Neiman Marcus Chicken Casserole is not just a meal; it’s an experience that everyone will want to recreate time and time again.

    Benefits and Advantages of The Best Neiman Marcus Chicken Casserole

    When it comes to chicken recipes, few can compare to the practicality and appeal of The Best Neiman Marcus Chicken Casserole. Here are several compelling reasons why you should consider adding this dish to your mealtime rotation:

    1. Ease of Preparation: This casserole is incredibly straightforward, featuring a mix of fresh ingredients and pantry staples that come together with minimal fuss. Perfect for even the busiest home cooks, it requires less than an hour to prepare and bake. Just chop, mix, and pop it into the oven—dinner is done!

    2. Health Benefits: Packed with lean protein from chicken and a variety of colorful vegetables, this casserole is a nutritious meal that can support your wellness goals. It’s a great way to incorporate dietary fiber and essential vitamins into your diet. You can even substitute ingredients to make it lower in calories if you’re watching your intake without sacrificing flavor.

    3. Versatility: One of the standout features of The Best Neiman Marcus Chicken Casserole is its adaptability. You can modify this recipe to fit various dietary lifestyles—including gluten-free and vegetarian options—without losing its essence. Whether you’re cooking for children, seniors, or health-conscious eaters, this casserole accommodates a wide range of preferences.

    4. Flavorful Comfort Food: Let’s not forget the rich, creamy taste that this dish provides. With just the right balance of seasonings and textures, it’s a hearty meal that satisfies cravings and warms the soul. Your family will love the taste, and you’ll appreciate how simple it is to throw together.

    5. Meal Prep Friendly: This casserole is fantastic for meal prepping or making ahead of time. It freezes well, so you can store leftovers for a quick meal later in the week. Simply reheat, and you have a satisfying dinner ready to go.

    The combination of convenience, health benefits, and sensational flavor makes The Best Neiman Marcus Chicken Casserole a standout choice among chicken recipes. You won’t just have dinner; you’ll create lasting memories.

    Ingredients Overview

    Essential Ingredients for The Best Neiman Marcus Chicken Casserole

    To create this mouthwatering casserole, gather the following essential ingredients:

    • 2 cups cooked chicken (shredded or cubed; use rotisserie chicken for convenience)
    • 1 cup fresh broccoli florets
    • 1 cup chopped bell peppers (red, yellow, or green for color)
    • 1 cup canned mushrooms (drained; or you can use fresh)
    • 1 cup low-fat sour cream (or Greek yogurt for added protein)
    • 1 cup shredded cheese (cheddar or a cheese blend)
    • 1 can cream of chicken soup (can be substituted with a gluten-free version)
    • 1 cup breadcrumbs (panko for extra crunch or gluten-free for dietary needs)
    • 1 tablespoon olive oil
    • 1 teaspoon garlic powder
    • 1 teaspoon onion powder
    • Salt and pepper to taste

    Dietary Substitutions to Customize Your The Best Neiman Marcus Chicken Casserole

    Don’t hesitate to customize this casserole based on your dietary preferences or ingredient availability. Here are a few suggested substitutions:

    • For Gluten-Free Options: Substitute regular breadcrumbs with gluten-free breadcrumbs or use crushed gluten-free crackers for the topping. Ensure the cream of chicken soup is also gluten-free.

    • For a Vegan Delight: Replace the chicken with cooked chickpeas or vegan chicken alternatives. Use a plant-based cream of chicken soup or create your own using vegetable broth and cashew cream, and opt for vegan cheese.

    • For Added Nutrition: Incorporate more fiber and nutrients by adding black beans, spinach, or kale to the mix. These vegetables not only enhance the flavor but also boost the health benefits.

    • Low-Calorie Version: Use low-fat versions of sour cream and cream of chicken soup, and consider reducing the amount of cheese or replacing it with nutritional yeast for a cheesy flavor without the extra calories.

    By tailoring the ingredients to fit your dietary requirements, The Best Neiman Marcus Chicken Casserole can satisfy a variety of taste buds while keeping health in mind.

    How to Prepare the Perfect The Best Neiman Marcus Chicken Casserole: Step-by-Step Guide

    Now, let’s dive into the steps for creating this delicious casserole! Follow these detailed instructions for a dish that’s sure to impress:

    1. Prepare the Base: Begin by preheating your oven to 350°F (175°C). While the oven is heating, cook your chicken if it’s not already prepared. Shredded rotisserie chicken is a great and convenient option.

    2. Mix the Vegetables: In a large mixing bowl, combine the cooked chicken, broccoli florets, chopped bell peppers, and canned mushrooms. Stir until well mixed. This colorful medley will not only add flavor but also enhance the casserole’s presentation.

    3. Combine the Creamy Ingredients: In a separate bowl, blend the low-fat sour cream, cream of chicken soup, garlic powder, onion powder, salt, and pepper. Mix until smooth. This creamy mixture brings everything together, creating a luscious texture.

    4. Fold the Mixtures Together: Gradually pour the creamy mixture into the chicken and vegetable bowl. Gently fold all the ingredients together until everything is evenly coated. Ensuring every ingredient is covered with the sauce will result in the best flavor.

    5. Prepare the Baking Dish: Lightly grease a 9×13-inch baking dish with olive oil or cooking spray. Evenly spread the chicken mixture in the dish, smoothing the top with a spatula to create an even layer.

    6. Add the Cheese: Sprinkle the shredded cheese evenly over the top of the casserole. Feel free to use your favorite cheese blend to up the flavor, or you can omit this step for a healthier version.

    7. Top With Breadcrumbs: Finally, sprinkle the breadcrumbs evenly over the cheese layer. This step adds a delightful crunch and texture to your casserole.

    8. Bake: Place the dish in your preheated oven and bake for 30-35 minutes or until the casserole is bubbling and the top is golden brown.

    9. Cool and Serve: Once out of the oven, allow the casserole to cool for 5-10 minutes. This will help it hold its shape when serving. Cut into squares and serve warm.

    10. Storage: If you have leftovers (which is likely, as this dish serves 6-8), let it cool completely before storing in an airtight container. This casserole can be kept in the fridge for up to three days or frozen for up to three months.

    By following these steps, you can ensure that The Best Neiman Marcus Chicken Casserole comes out perfectly every time. Enjoy the process and don’t be afraid to get creative!

    Mastering The Best Neiman Marcus Chicken Casserole: Advanced Tips and Variations

    To elevate your casserole experience, consider these advanced tips and variations that will not only enhance the flavor but also impress your family and friends.

    1. Herb Infusion: Fresh herbs can dramatically elevate the flavor profile of your casserole. Try adding chopped fresh thyme, rosemary, or parsley to the chicken and vegetable mixture. The fragrant herbs will provide an aromatic depth that is irresistible.

    2. Cheese Variations: While cheddar cheese is a classic choice, experiment with different cheese options. Gouda, Monterey Jack, or even a spicy pepper jack can provide unique taste experiences. Mix cheeses for a more complex flavor.

    3. Add Spices: Depending on your personal preference, a dash of cayenne pepper, smoked paprika, or Italian seasoning can give your casserole an exciting twist. Just a pinch can make a big difference!

    4. Topping Alternatives: Instead of breadcrumbs, try topping with crushed tortilla chips or corn flakes for a different crunch. For a healthful twist, consider sprinkling some nutritional yeast on top for a cheesy flavor without dairy.

    5. Seasonal Vegetables: When making this casserole, tailoring the vegetable selection to what’s in season can bring fresh and vibrant flavors to your dish. Use zucchini, asparagus, or cauliflower based on what’s available in your region.

    6. Ultimate Comfort Food: For heartier comfort food, layer the casserole with cooked rice or quinoa at the bottom of the baking dish. This not only adds substance but also increases the nutritional value.

    By incorporating these advanced tips and variations into your casserole preparation, you’ll create a dish that is uniquely yours while maintaining the tried-and-true elements of The Best Neiman Marcus Chicken Casserole.

    How to Store The Best Neiman Marcus Chicken Casserole: Best Practices

    To ensure that The Best Neiman Marcus Chicken Casserole maintains its flavor and texture after cooking, proper storage is essential. Here’s how to best store, refrigerate, and reheat your delicious leftovers:

    1. Refrigeration: Allow the casserole to cool to room temperature before covering it tightly with plastic wrap or aluminum foil. It can be stored in the refrigerator for up to 3 days. When you’re ready to serve it, simply reheat portions in the microwave or in the oven at a low temperature until warmed through.

    2. Freezing: If you want to save the casserole for longer, you can freeze it for up to three months. Here’s how:

    3. Before Baking: Assemble the casserole as instructed, but do not bake it. Wrap the dish tightly in plastic wrap and then in aluminum foil to protect against freezer burn.
    4. After Baking: If you’ve baked the casserole and have leftovers, let it cool completely, then cut it into portions. Each portion can be wrapped individually and placed in freezer-safe bags or containers.

    5. Reheating: When you’re ready to eat your frozen casserole, you can either:

    6. Thaw in the refrigerator overnight and then reheat it in the oven at 350°F (175°C) until heated through (approximately 25-30 minutes).
    7. Bake from Frozen: If you’re short on time, you can bake it directly from the freezer. Just increase the cooking time by about 15-20 minutes until hot throughout.

    By following these best practices for storage, you can ensure that The Best Neiman Marcus Chicken Casserole remains just as delightful upon reheating as it was fresh out of the oven.

    Nutritional Value of The Best Neiman Marcus Chicken Casserole

    Understanding the nutritional content of your meals is critical for maintaining a balanced diet. Here’s a breakdown of the approximate nutrition information for a single serving of The Best Neiman Marcus Chicken Casserole (based on 8 servings):

    • Calories: 350-400
    • Protein: 30g
    • Carbohydrates: 30g
    • Fat: 15g
    • Saturated Fat: 7g
    • Cholesterol: 90mg
    • Sodium: 600mg
    • Fiber: 3g
    • Sugar: 2g

    These values can change based on ingredient substitutions; for instance, using low-fat cheese and sour cream will reduce calorie and fat content. Including more vegetables can increase fiber and vitamins without significantly raising calories.

    This casserole offers a balanced mix of macros, making it a hearty yet nutritious option for a family meal. It’s packed with protein to keep your energy levels up, making it an ideal meal for those who lead active lifestyles or need a filling dish to support their daily activities.

    FAQs: Frequently Asked Questions About The Best Neiman Marcus Chicken Casserole

    1. Can I use leftover chicken in this recipe?

    Absolutely! Leftover chicken works perfectly for this casserole. Shredded rotisserie chicken is an excellent option because it saves time and adds flavor.

    2. Is this casserole suitable for freezing?

    Yes, The Best Neiman Marcus Chicken Casserole freezes well. You can freeze it before baking or after it has been cooked. Just make sure to wrap it tightly to prevent freezer burn.

    3. What can I use as a substitute for cream of chicken soup?

    If you want a healthier or gluten-free option, consider making your own cream of chicken soup using chicken broth and a creamy base like pureed cashews or using a store-bought gluten-free version.

    4. How can I make this dish vegetarian or vegan?

    To make the casserole vegetarian or vegan, simply replace the chicken with cooked chickpeas or a plant-based protein. Use a vegan sour cream alternative and a plant-based cream of chicken soup to keep the dish flavorful.

    5. Can I add more vegetables?

    Definitely! Feel free to customize the vegetables in the casserole to include your favorites or whatever you have on hand. Spinach, zucchini, or cauliflower add great nutritional value.

    6. How long will leftovers last in the fridge?

    Leftover casserole can be stored in the refrigerator for up to 3 days. Just make sure to cover it well to maintain freshness.

    With these answers and tips, you can confidently try your hand at making The Best Neiman Marcus Chicken Casserole, catering to your dietary preferences, and ultimately enjoying every delicious bite!

  • Tasty Hot Honey Pepperoni Ricotta Pizza

    Tasty Hot Honey Pepperoni Ricotta Pizza

    Tasty Hot Honey Pepperoni Ricotta Pizza: A Tropical Delight

    Introduction to Tasty Hot Honey Pepperoni Ricotta Pizza

    If you’re on the lookout for a standout meal that fits into your nightly lineup of dinner recipes, then the Tasty Hot Honey Pepperoni Ricotta Pizza is your answer. This delightful dish brings together the tangy richness of ricotta cheese, the spice of pepperoni, and the sweet kick of hot honey, creating a unique flavor combination that will elevate your pizza game.

    What makes this pizza a must-try is its versatility. Whether you’re a busy parent looking for a quick weeknight dinner, a student needing an easy recipe for meal prep, or a food enthusiast eager to impress your dinner guests, this pizza fits the bill. It’s incredibly simple to prepare, allowing you to whip up a delicious meal without extensive time in the kitchen. Plus, with the right substitutions, it can cater to a variety of dietary preferences, including gluten-free and vegetarian options.

    Beyond taste, the health benefits of this pizza cannot be overlooked. Ricotta cheese offers protein and calcium, while the hot honey adds a unique wellness boost with its antioxidants. With simple steps, fresh ingredients, and the ability to customize based on your cravings or dietary needs, this recipe is bound to become a staple in your collection of dinner recipes. Let’s dive deeper into what makes this pizza not just tasty, but also an all-around fantastic choice for any occasion.

    Benefits and Advantages of Tasty Hot Honey Pepperoni Ricotta Pizza

    One of the standout advantages of the Tasty Hot Honey Pepperoni Ricotta Pizza is its ease of preparation. Home cooks, even those short on time, can follow the simple steps to create a gourmet meal that tastes like it came from a restaurant. Loaded with flavor and love, you won’t find yourself spending hours on end in the kitchen. The dish typically takes about 30 minutes from start to finish, making it an ideal choice for weeknight meals.

    When considering health benefits, ricotta offers a good source of protein and vitamins, contributing to a balanced diet without sacrificing flavor. The addition of hot honey not only contributes a sweet, spicy twist but also contains beneficial properties like antioxidants that can enhance well-being. Moreover, pepperoni—while traditionally high in saturated fat—can be substituted with turkey or plant-based options, making it easier for health-conscious diners to indulge without remorse.

    In terms of dietary adaptability, this pizza can suit a variety of needs. Ingredients can be readily replaced to accommodate gluten-free diets, such as using pre-made gluten-free crusts or a cauliflower crust. Vegan alternatives also exist; you can use almond ricotta and plant-based pepperoni. This flexibility allows the Tasty Hot Honey Pepperoni Ricotta Pizza to cater to everyone at the table.

    Lastly, this dish stands out for its ability to spark creativity in the kitchen. Feel free to experiment with different toppings or spice levels to suit your unique palate, making it a perfect canvas for adding your favorite ingredients. With all these benefits, it’s clear that the Tasty Hot Honey Pepperoni Ricotta Pizza is a fantastic addition to your collection of go-to dinner recipes.

    Ingredients Overview

    Essential Ingredients for Tasty Hot Honey Pepperoni Ricotta Pizza

    To make your Tasty Hot Honey Pepperoni Ricotta Pizza, here’s what you need:

    1. Pizza Dough (1 pound)
    2. Purpose: The foundation of your pizza that holds everything together. Use store-bought or homemade for convenience.
    3. Diet Note: Gluten-free options are widely available in grocery stores.

    4. Ricotta Cheese (1 cup)

    5. Purpose: Adds creaminess and protein. It balances the spice of the pepperoni with its mild flavor.
    6. Diet Note: Look for vegan ricotta for a plant-based version.

    7. Pepperoni (1 cup, sliced)

    8. Purpose: Traditional topping that adds a savory kick.
    9. Diet Note: Substitute with turkey pepperoni or a vegetarian/vegan alternative for a healthier twist.

    10. Hot Honey (1/4 cup)

    11. Purpose: Infuses a sweet and spicy flavor that elevates the pizza experience.
    12. Diet Note: Check labels for added sugar and consider making your own with honey, red pepper flakes, and a dash of vinegar.

    13. Tomato Sauce (1/2 cup)

    14. Purpose: Provides a flavorful base—use marinara or pizza sauce for enhanced taste.
    15. Diet Note: Opt for low-sugar versions if you’re watching your sugar intake.

    16. Mozzarella Cheese (1 cup, shredded)

    17. Purpose: Adds a cheesy pull and richness to the pizza.
    18. Diet Note: To make it lactose-free, look for cashew or almond-based mozzarella alternatives.

    19. Fresh Basil (1/4 cup, chopped)

    20. Purpose: Provides a nice freshness and aromatic hint.
    21. Diet Note: Feel free to use dried basil if fresh isn’t available.

    22. Olive Oil (1 tablespoon)

    23. Purpose: Brush the crust for added moisture and flavor.
    24. Diet Note: Use avocado oil for a different flavor profile.

    Dietary Substitutions to Customize Your Tasty Hot Honey Pepperoni Ricotta Pizza

    To make this pizza adaptable for various dietary concerns, consider these substitutions:

    • Crust Substitutions: For a gluten-free option, use gluten-free pizza crusts available at grocery stores or make a cauliflower crust at home.
    • Cheese Alternatives: If you’re avoiding dairy, try using almond or cashew-based ricotta, mozzarella, and sprinkle nutritional yeast for added flavor.
    • Protein Options: For lower-fat diets, swap traditional pepperoni with turkey or plant-based varieties. For a protein boost, consider adding grilled chicken or roasted vegetables.
    • Vegan Options: Utilize a combination of vegan cheese and vegetables like bell peppers, onions, or mushrooms as toppings to create a delicious pie.
    • Spice Level: Adjust the amount of hot honey according to your taste—reduce it for a milder flavor or replace with spicy sriracha for an intense finishing touch.

    Much like other cherished dinner recipes, this pizza allows you to showcase your creativity and respect your individual dietary preferences.

    How to Prepare the Perfect Tasty Hot Honey Pepperoni Ricotta Pizza: Step-by-Step Guide

    Creating your Tasty Hot Honey Pepperoni Ricotta Pizza is as delightful as consuming it! Follow these simple steps to achieve pizza perfection:

    1. Prepare the Oven: Preheat your oven to 475°F (245°C). Using a high temperature ensures a crispy crust.

    2. Roll Out the Dough: On a floured surface, roll the pizza dough into a 12-inch circle. Place it on a parchment-lined pizza stone or baking sheet.

    3. Prepare the Base: Brush the rolled-out dough with a tablespoon of olive oil. This step ensures a beautifully golden crust.

    4. Spread the Tomato Sauce: Evenly spread 1/2 cup of tomato sauce over the base, leaving about half an inch clear at the edges for the crust.

    5. Layer with Ricotta: Spoon and dollop 1 cup of ricotta cheese evenly across the sauced dough. Use a spatula to create smoothness while ensuring coverage.

    6. Add Pepperoni: Scatter 1 cup of sliced pepperoni over the ricotta layer, spacing the slices evenly for maximum flavor.

    7. Sprinkle Mozzarella: Shred and distribute 1 cup of mozzarella cheese evenly over the top, ensuring all toppings are covered adequately.

    8. Drizzle Hot Honey: Drizzle 1/4 cup of hot honey over the cheese and toppings. Adjust the quantity based on your spice preference for a customized experience.

    9. Bake: Place the pizza in the preheated oven and bake for 12-15 minutes, or until the crust is golden brown and the cheese is bubbling.

    10. Garnish with Basil: Once out of the oven, sprinkle 1/4 cup of fresh basil over the hot pizza, allowing the residual heat to infuse the herb’s flavor.

    11. Slice and Serve: Allow the pizza to cool for a couple of minutes before slicing into 8 even pieces. Serve warm and enjoy your delicious creation!

    This pizza offers an effortless yet mouthwatering addition to your roster of dinner recipes. Remember, each step can be customized based on your dietary needs and preferences, making this dish as unique as your taste buds!

    Mastering Tasty Hot Honey Pepperoni Ricotta Pizza: Advanced Tips and Variations

    To take your Tasty Hot Honey Pepperoni Ricotta Pizza to the next level, here are some advanced tips and potential variations for you to explore:

    • Experiment with Toppings: You can personalize your pizza further by adding vegetables like bell peppers, mushrooms, or artichokes. Adding fresh arugula or spinach after baking can elevate the dish nutritionally and aesthetically.

    • Use Different Cheeses: For a more gourmet experience, try mixing different cheeses. Adding parmesan or gorgonzola can create depth in flavor.

    • Add a Spice Kick: If you love heat, sprinkle some red pepper flakes before baking, or replace hot honey with your favorite hot sauce.

    • Make a Dessert Version: Consider using a sweetened ricotta and topping it with fresh fruits and a drizzle of honey for a dessert pizza.

    • Grilling Option: During summer, utilize a grill instead of an oven. Prepare the pizza directly on a grill to achieve a smoky flavor and crispy crust.

    • Pizza Seasoning: For additional depth of flavor, sprinkle Italian seasoning or garlic powder on the cheese before baking; this enhances the overall taste profile.

    These tips ensure you never tire of your Tasty Hot Honey Pepperoni Ricotta Pizza and helps keep it fresh among your repertoire of dinner recipes.

    How to Store Tasty Hot Honey Pepperoni Ricotta Pizza: Best Practices

    Proper storage of your Tasty Hot Honey Pepperoni Ricotta Pizza ensures you savor its deliciousness another day. Here are best practices for refrigeration, freezing, and reheating:

    1. Refrigeration: Allow the pizza to cool completely before covering it with plastic wrap or aluminum foil. Store in the fridge for up to 3-4 days. This preserves the taste and prevents sogginess.

    2. Freezing: If you want to freeze leftovers, wrap individual slices in plastic wrap and then place them in an airtight container. The pizza can be frozen for up to 2-3 months.

    3. Reheating: For the best results, reheat slices in the oven at 375°F (190°C) for approximately 10-15 minutes, or until heated through. This method keeps the crust crispy. Alternatively, you can reheat in a skillet over low heat for a crunchy bottom.

    Following these storage guidelines allows you to transform this pizza into a convenient choice for future dinner recipes, ensuring minimal waste.

    Nutritional Value of Tasty Hot Honey Pepperoni Ricotta Pizza

    Understanding the nutritional profile of your Tasty Hot Honey Pepperoni Ricotta Pizza helps you make informed choices:

    • Calories: Approximately 320 per slice
    • Total Fat: 18g (Saturated Fat: 8g)
    • Cholesterol: 40mg
    • Sodium: 660mg
    • Total Carbohydrates: 30g (Dietary Fiber: 1g, Sugars: 4g)
    • Protein: 14g

    This nutritional breakdown makes the pizza a balanced option for a satisfying meal, providing a good dose of protein from the ricotta and mozzarella, as well as a mix of carbohydrates for energy. Adjustments can be made based on substitutions; for instance, opting for cauliflower crust may significantly lower calorie count and carbohydrates, offering a guilt-free indulgence without sacrificing flavor.

    When incorporating this pizza into your dinner recipes, remember to balance it with a side of greens or a fresh salad to round out your meal nutritionally.

    FAQs: Frequently Asked Questions About Tasty Hot Honey Pepperoni Ricotta Pizza

    Q: Can I make this pizza ahead of time?

    A: Absolutely! You can assemble the pizza, cover it, and store it in the fridge for up to 24 hours before baking.


    Q: Is this recipe suitable for vegans?

    A: Yes, you can easily make this pizza vegan by using plant-based ricotta and pepperoni, along with a dairy-free mozzarella substitute.


    Q: How can I ensure a crispy crust?

    A: Preheating the oven at a high temperature (475°F) and baking the pizza directly on a pizza stone or baking sheet will help achieve that crispy crust.


    Q: What can I substitute for hot honey?

    A: You can mix regular honey with red pepper flakes or use sriracha for a different spicy-sweet experience.


    Q: Are there gluten-free options for this recipe?

    A: Yes, simply use a gluten-free pizza crust, or make a cauliflower crust to keep it both gluten-free and low-carb.


    Q: What’s the best way to serve leftovers?

    A: The best way to reheat leftovers is in the oven for a few minutes at 375°F for a crispy texture, or you can use a skillet.


    The Tasty Hot Honey Pepperoni Ricotta Pizza is not just a meal; it’s an experience that tantalizes your taste buds while offering versatility for various dietary needs. Dive into this recipe today and add it to your list of favorite dinner recipes that you will turn to time and time again!

  • Crispy Air Fryer Cheesy Mashed Potato Balls

    Crispy Air Fryer Cheesy Mashed Potato Balls

    Crispy Air Fryer Cheesy Mashed Potato Balls: A Tropical Delight

    Introduction to Crispy Air Fryer Cheesy Mashed Potato Balls

    If you’re on the hunt for delicious appetizer recipes that are not only mouth-watering but also easy to make, then look no further than these crispy air fryer cheesy mashed potato balls! This dish combines the comforting texture of mashed potatoes with the delightful taste of ooey-gooey cheese, all wrapped in a crunchy exterior. It’s a fantastic choice for busy weeknights, entertaining guests, or just satisfying your cravings for something crispy and cheesy.

    What makes these potato balls stand out is their versatility. They are simple enough for home cooks at all skill levels, providing a fun way to involve kids in the kitchen or create a delightful snack for a movie night. Whether you’re a busy parent needing a quick bite, a food enthusiast looking for your next kitchen adventure, or anyone with dietary restrictions, these mashed potato balls can cater to your needs. You can easily adjust ingredients to make them vegan, gluten-free, or low-calorie, ensuring that everyone can enjoy this tropical-themed delight.

    In just a matter of minutes, you can transform leftover mashed potatoes into a gourmet appetizer that’s sure to impress family and friends alike. Nuts about cheese? Feel free to get creative with the type of cheese you use. Additionally, air frying offers a healthier alternative to traditional frying, allowing you to indulge without the excess grease. As you dive deeper into this guide, you’ll discover why these cheesy mashed potato balls are becoming a staple in homes everywhere!

    Benefits and Advantages of Crispy Air Fryer Cheesy Mashed Potato Balls

    The benefits of making Crispy Air Fryer Cheesy Mashed Potato Balls go beyond their irresistible taste. First and foremost, their ease of preparation makes this recipe a favorite among busy families and cooking beginners. Simply use leftover mashed potatoes, and within a short period, you will have a delectable appetizer that’s great for snacking or entertaining.

    Another advantage is the health aspect of air frying. Traditional frying methods often add unnecessary calories and unhealthy fats, but the air fryer requires little to no oil. This allows you to enjoy the crispy texture without the guilt. Additionally, air frying locks in nutrients while still giving you that satisfying crunch.

    These potato balls also cater wonderfully to various dietary preferences. Want them gluten-free? Just use gluten-free breadcrumbs. Prefer them vegan? Substitute cheese with a plant-based alternative. This adaptability means you can serve them at gatherings without worrying about dietary restrictions making it impossible for some guests to partake in the fun.

    Moreover, the cheesy flavor combined with the crispy outer layer creates an indulgent experience that both kids and adults will love. Combining the comforting appeal of mashed potatoes with the fun of finger food, these crispy balls are perfect for potlucks, parties, or a quiet snack at home.

    By focusing on simplicity, dietary variability, and health benefits, you can see why these appetizer recipes have quickly gained popularity. They fit into your routine seamlessly while delivering on taste and satisfaction!

    Ingredients Overview

    Essential Ingredients for Crispy Air Fryer Cheesy Mashed Potato Balls

    To whip up a batch of Crispy Air Fryer Cheesy Mashed Potato Balls, you’ll need the following ingredients:

    • 2 cups of mashed potatoes (preferably leftover; for vegan options, use plant-based butter)
    • 1 cup shredded cheese (cheddar, mozzarella, or your favorite vegan cheese)
    • 1/2 cup breadcrumbs (use gluten-free breadcrumbs if necessary)
    • 1 egg (or a flax egg for a vegan option)
    • 1/4 cup chopped green onions (or chives for added flavor)
    • Salt and pepper to taste

    These ingredients will create a delightful juxtaposition of creamy and crunchy textures—perfect for a satisfying snack or appetizer.

    Dietary Substitutions to Customize Your Crispy Air Fryer Cheesy Mashed Potato Balls

    These cheesy mashed potato balls are versatile, and the ingredients can easily be customized based on dietary needs or ingredient availability. Here are some suggestions:

    • For Vegan Options: Replace the egg with a flaxseed egg (mix one tablespoon of flaxseed meal with three tablespoons of water and let it sit for a few minutes until it becomes gel-like) and use vegan cheese.
    • For Gluten-Free Options: Use certified gluten-free breadcrumbs instead of regular breadcrumbs.
    • Low-Calorie Adaptation: Consider reducing the amount of cheese or opting for a low-fat cheese option. You can also bake the balls for a few additional minutes instead of frying them to cut down on calories further.

    Feel free to mix and match ingredients to make these potato balls uniquely yours while still retaining that classic flavor and texture.

    How to Prepare the Perfect Crispy Air Fryer Cheesy Mashed Potato Balls: Step-by-Step Guide

    Creating these appetizer recipes is a simple process you can master in no time. Follow these detailed steps for perfectly crispy cheesy mashed potato balls:

    1. Prepare the Base: Start with two cups of mashed potatoes in a bowl. If you’re using leftover potatoes, ensure they are at room temperature for better consistency.

    2. Mix Ingredients: Add in your shredded cheese, chopped green onions, salt, and pepper to the bowl. In a separate small bowl, whisk together one egg (or flax egg) and then fold it into the potato mixture. This will help bind everything together and give your balls structure.

    3. Shape the Balls: With clean hands, take smaller portions of the mixture and roll them into balls about one to two inches in diameter. Place them onto a plate or tray as you form them.

    4. Prepare the Coating: In a shallow dish, add the breadcrumbs. For an extra crunch, you can season them with more salt, pepper, or even some garlic powder if desired.

    5. Coat the Balls: Roll each potato ball in the breadcrumb mixture until evenly coated. This will create the crispy exterior when air-fried.

    6. Preheat the Air Fryer: Set your air fryer to 375°F (190°C) and allow it to preheat for about 5 minutes. This step helps in achieving a crispy finish.

    7. Arrange in the Air Fryer: Carefully place the coated potato balls in the air fryer basket. Make sure to leave some space between each ball so they crisp up nicely on all sides.

    8. Air Fry: Cook for 10-12 minutes, shaking the basket halfway through to ensure even cooking. You’re looking for a golden, crispy exterior.

    9. Serve Hot: Once cooked, remove the potato balls from the air fryer and let them cool slightly. Serve them hot with your favorite dipping sauce or enjoy them plain!

    10. Store Leftovers: If you end up with any leftovers, allow the balls to cool completely and store them in an airtight container in the fridge for up to three days.

    By following these straightforward steps, you can adapt the recipe to cater to various dietary needs, ensuring everyone can join in on the fun of enjoying these delightful crispy air fryer cheesy mashed potato balls!

    Mastering Crispy Air Fryer Cheesy Mashed Potato Balls: Advanced Tips and Variations

    To take your crispy cheesy mashed potato balls from good to great, consider these advanced tips and variations:

    • Experiment with Flavors: Try adding cooked bacon bits, jalapeños for a kick, or different herbs and spices like paprika, dill, or Italian seasoning to elevate the flavor profile.

    • Double Breaded Option: For a truly crunchy exterior, consider double breading your potato balls. After the first breadcrumb coating, dip them again in the egg (or flax egg) and coat them in breadcrumbs once more before air frying.

    • Serve with Dipping Sauces: Enhance the flavor experience by serving these balls with homemade dipping sauces such as ranch, spicy mayo, or your favorite salsa.

    • Freezing for Later: If you want to prep ahead of time, you can freeze the uncoated potato balls on a baking sheet until solid, then transfer them to a freezer bag. Cook them directly from frozen; just add a few extra minutes to the air frying time.

    By incorporating these tips and variations, you can ensure that your potato balls are a culinary hit, impressing guests at every opportunity!

    How to Store Crispy Air Fryer Cheesy Mashed Potato Balls: Best Practices

    To keep your appetizer recipes fresh and tasty, it’s important to store them correctly:

    • Refrigeration: If you have leftovers, allow the crispy potato balls to cool completely. Place them in an airtight container in the refrigerator, where they will stay fresh for up to three days.

    • Freezing: For long-term storage, you can freeze the uncoated mashed potato balls. Lay them in a single layer on a baking sheet and freeze until solid. Then, transfer them to a freezer-safe bag or container. When you’re ready to enjoy them, simply cook from frozen, adding a few minutes to the cooking time.

    • Reheating: To reheat the crispy potato balls, place them in the air fryer at 350°F (175°C) for 5-7 minutes or until warmed through and crispy. Avoid microwaving, as it can make them soggy.

    By following these best practices, you can ensure your crispy air fryer cheesy mashed potato balls retain their delightful texture and flavor, making them perfect for snacking or entertaining at any time.

    Nutritional Value of Crispy Air Fryer Cheesy Mashed Potato Balls

    When it comes to appetizer recipes, it’s essential to consider the nutritional value. Here’s a breakdown of the approximate nutritional information for one serving (about 3-4 potato balls, or roughly 150 grams) made with standard ingredients:

    • Calories: 350-400 kcal
    • Protein: 12-15g
    • Fat: 18-22g
    • Carbohydrates: 40-45g
    • Fiber: 2-3g
    • Sugar: 1-2g
    • Sodium: 300-400mg

    This nutrient summary varies depending on the specific ingredients you use. Opting for low-fat cheese or using less cheese can help reduce calories and fat content significantly. By using vegan cheese and whole-grain breadcrumbs, you can increase fiber and decrease refined carbohydrates, catering to those who are more health-conscious.

    Given their caloric content, these cheesy mashed potato balls can fit nicely into a balanced diet when enjoyed in moderation, especially when combined with other healthy foods.

    FAQs: Frequently Asked Questions About Crispy Air Fryer Cheesy Mashed Potato Balls

    Can I make these potato balls ahead of time?

    Absolutely! You can prepare them the day before and store them in the refrigerator. Simply reheat in the air fryer just before serving for that fresh, crispy goodness.

    What type of cheese works best?

    While cheddar and mozzarella are popular choices, feel free to experiment with your favorite cheeses. Vegan options work exceptionally well too!

    Is there a way to keep these crispy after cooking?

    To maintain crispiness, serve and eat immediately after air frying. If stored, reheating in the air fryer is your best option to regain that crunchy texture.

    Can I bake these instead of using an air fryer?

    Yes, you can bake them in an oven preheated to 400°F (200°C). Arrange them on a baking sheet lined with parchment paper and bake for 20-25 minutes or until golden brown. Just keep in mind the texture may differ slightly.

    How do I know when they’re done?

    They should be a golden brown color and feel firm to the touch. If you’re unsure, a quick internal temperature check should read at least 165°F (74°C).

    By addressing these common queries, you can ensure a smooth cooking experience while making your crispy air fryer cheesy mashed potato balls! Don’t hesitate to adjust ingredients and try new flavors—it’s all part of the culinary journey!

    In conclusion, this guide has equipped you with everything you need to create delicious, mouthwatering appetizer recipes that are sure to satisfy any crowd. Enjoy this delightful dish and watch it quickly become a favorite in your home!

  • Creamy Street Corn Pasta Salad

    Creamy Street Corn Pasta Salad

    Creamy Street Corn Pasta Salad: A Tropical Delight

    Introduction to Creamy Street Corn Pasta Salad

    If you’re looking for a dish that combines bold flavors, vibrant colors, and a delightful creamy texture, look no further than our Creamy Street Corn Pasta Salad. This refreshing pasta salad is a celebration of summer in every bite, reminiscent of traditional street corn but in a convenient, shareable format. Perfect for picnics, potlucks, or a simple weeknight dinner, this recipe is designed to cater to various tastes and dietary needs.

    The beauty of this salad lies not only in its taste but also in its simplicity. It calls for minimal cooking and bursts with fresh ingredients like sweet corn, juicy tomatoes, and crisp herbs. Plus, it’s easily customizable to accommodate vegan diets, gluten-free preferences, and low-calorie lifestyles, making it a great choice for everyone—from busy parents and students to health-conscious individuals and food enthusiasts.

    Beyond its enticing flavors and versatility, its health benefits are noteworthy. Packed with fiber from the corn and whole grains from the pasta, this dish provides sustained energy and supports digestion. Whether you’re a seasoned cook or a novice in the kitchen, this creamy pasta salad is sure to inspire, offering a delicious way to enjoy nutritious ingredients effortlessly.


    Benefits and Advantages of Creamy Street Corn Pasta Salad

    The Creamy Street Corn Pasta Salad shines in various aspects that make it a standout recipe. First and foremost, its ease of preparation is a game-changer. In just under thirty minutes, you can whip up a vibrant and satisfying meal that requires minimal effort. For busy parents juggling hectic schedules or students cramming for exams, this dish is a lifesaver. Just cook your pasta, mix in the remaining ingredients, and you have a delightful meal that’s ready to serve.

    Moreover, the health benefits of this pasta salad cannot be overstated. With fresh ingredients overflowing with vitamins, such as corn and tomatoes, coupled with the added wholesomeness of whole-grain pasta, this dish is both nourishing and filling. The creamy dressing adds a rich flavor without overwhelming the palate, striking a perfect balance. Unlike typical pasta salads that can feel heavy, this recipe remains light and refreshing.

    Another advantage is its adaptability. This salad is ideal for various dietary restrictions, making it a versatile choice for gatherings or family meals. For vegan enthusiasts or those avoiding dairy, the creamy dressing can be made using plant-based alternatives or yogurt substitutes, ensuring everyone can enjoy it. Plus, with numerous toppings options—like avocado, black beans, or bell peppers—customization is easy.

    Lastly, the visual appeal of this street corn pasta salad transforms any meal into an occasion worth celebrating. Its bright colors and inviting look make it the star of any table, earning compliments from friends and family alike. When it’s not just about feeding the body but also the soul, this pasta salad is a true winner.


    Ingredients Overview

    Essential Ingredients for Creamy Street Corn Pasta Salad

    To create the most delicious Creamy Street Corn Pasta Salad, gather the following ingredients:

    1. Pasta (8 ounces) – You can use any type of pasta; whole grain or gluten-free varieties are excellent options.
    2. Sweet Corn (2 cups) – Fresh, frozen, or canned (drained) will work. Corn is the star ingredient, providing sweetness and crunch.
    3. Bell Pepper (1 cup, diced) – Any color adds crispness and enhances the salad’s vibrant appearance.
    4. Cherry Tomatoes (1 cup, halved) – Sweet and juicy, these tomatoes add freshness and cut through the creaminess.
    5. Red Onion (1/4 cup, finely chopped) – For bites of flavor that add zesty depth; you can substitute green onions if desired.
    6. Fresh Cilantro (1/4 cup, chopped) – For that quintessential fresh flavor of street corn. If you don’t like cilantro, try fresh basil or parsley instead.
    7. Greek Yogurt or Vegan Yogurt (1/2 cup) – Adds creaminess and nutrition. If avoiding dairy, opt for plant-based yogurt.
    8. Mayo or Vegan Mayo (1/4 cup) – Enhances creaminess. You can adjust based on your preference for richness.
    9. Lime Juice (2 tablespoons) – A splash of acidity to brighten all the flavors.
    10. Chili Powder (1 teaspoon) – Provides a hint of spice; you can adjust according to your heat preference.
    11. Salt and Pepper – To taste.

    This salad is loaded with nutrients while allowing for substitutions to accommodate any dietary preferences, making it a great addition to your culinary repertoire.

    Dietary Substitutions to Customize Your Creamy Street Corn Pasta Salad

    The Creamy Street Corn Pasta Salad is designed to be adaptive. Here are some substitutions based on dietary needs:

    • Gluten-Free: Use gluten-free pasta made from brown rice or quinoa for a satisfying alternative.
    • Vegan: Swap the Greek yogurt and may with plant-based yogurt and vegan mayo. Ensure all other ingredients, especially the pasta, are certified vegan.
    • Low-Calorie Option: For a lighter version, use plain low-fat yogurt instead of mayo, and reduce the overall amount of pasta while increasing the vegetable content.
    • Nut-Free: All ingredients listed are nut-free; ensure any dressings or add-ins do not contain nuts.
    • Extra Protein: Add black beans, chickpeas, or grilled chicken for additional protein without sacrificing freshness.

    These substitutions allow you and your guests to enjoy this festival of flavors, regardless of dietary preferences.


    How to Prepare the Perfect Creamy Street Corn Pasta Salad: Step-by-Step Guide

    Creating the perfect Creamy Street Corn Pasta Salad doesn’t have to be a hassle. Just follow these straightforward steps, and you’ll have a beautiful dish in no time:

    1. Prepare the Pasta:
    2. Bring a large pot of salted water to a boil. Add your pasta and cook according to package instructions until al dente.
    3. Once cooked, drain the pasta under cold running water to stop the cooking process. This also helps cool the pasta for the salad.

    4. Cook the Corn:

    5. If using fresh or frozen corn, you can roast or sauté it for an added depth of flavor. For fresh corn, cut the kernels off the cob and sauté in a hot skillet with a little olive oil for about 5-7 minutes until slightly charred.
    6. If using canned corn, simply drain it and set it aside.

    7. Combine the Vegetables:

    8. In a large mixing bowl, combine the cooked pasta, corn, diced bell pepper, halved cherry tomatoes, and chopped red onion. Toss gently until combined.

    9. Prepare the Creamy Dressing:

    10. In a small bowl, mix together Greek yogurt, vegan mayo, lime juice, chili powder, salt, and pepper. Adjust seasoning according to your taste preferences.

    11. Toss the Salad:

    12. Pour the creamy dressing over the pasta and vegetable mixture. Toss gently to coat all ingredients evenly.
    13. Add chopped cilantro and mix well again.

    14. Adjust Seasoning:

    15. Taste the salad and adjust any seasonings as necessary. More lime juice can enhance freshness, while extra chili powder adds a bit more heat.

    16. Chill (optional):

    17. For best results, refrigerate the pasta salad for at least 30 minutes before serving. This allows the flavors to meld beautifully.

    18. Serve:

    19. Serve chilled or at room temperature, garnished with additional cilantro or lime wedges if desired.

    Following these steps will help you craft a flavorful and satisfying pasta salad that’s sure to impress.


    Mastering Creamy Street Corn Pasta Salad: Advanced Tips and Variations

    To take your Creamy Street Corn Pasta Salad to the next level, consider the following tips and variations:

    • Incorporate More Vegetables: For extra nutrition and flavor, consider adding diced avocado, chopped spinach, or shredded carrots. They add color and increase the health benefits.
    • Experiment with Dressings: While the creamy dressing is fantastic, try experimenting with vinaigrettes or citrus-based dressings for a different flavor profile. A simple olive oil and balsamic vinegar dressing can also work wonders.
    • Grill the Vegetables: Grilling the veggies adds a smoky flavor that elevates the dish significantly. As you grill the corn and peppers, they develop char and sweetness that meld beautifully with the creamy base.
    • Make it a Meal: Turn this pasta salad into a robust meal by adding proteins like grilled shrimp, diced chicken, or chickpeas to keep it filling and satisfying.
    • Add Crunch: Consider topping the salad with toasted pumpkin seeds or crushed tortilla chips for added texture and crunch.
    • Savory Enhancements: Fresh herbs like mint or dill can enhance flavor profiles, bringing new dimensions to your creamy pasta salad.

    These little adjustments can help personalize your dish and impress your guests with every serving.


    How to Store Creamy Street Corn Pasta Salad: Best Practices

    To prolong the freshness of your Creamy Street Corn Pasta Salad, consider the following storage methods:

    • Refrigeration: Store any leftover pasta salad in an airtight container in the refrigerator. It can last up to 3 days, but it’s best consumed within 1-2 days for optimal freshness. Be sure to stir it before serving to reintroduce the creamy dressing that may settle.

    • Freezing: While it’s not typically recommended to freeze pasta salads due to the creamy components, you can freeze the pasta and corn mixture without the dressing. Portion them into freezer-safe bags, seal tightly, and store for up to 2 months. To serve, thaw in the fridge overnight and mix with fresh dressing just before serving.

    • Reheating: If you choose to reheat any leftovers, do so gently in the microwave, or in a skillet over low heat. However, remember that the creamy dressing may not hold up well to reheating.

    Following these storage tips can ensure your pasta salad stays delicious and safe to eat for several days post-preparation.


    Nutritional Value of Creamy Street Corn Pasta Salad

    Understanding the nutritional components of our Creamy Street Corn Pasta Salad can assist you in making informed dietary choices. The following nutritional values are approximate per serving (based on 6 servings):

    • Calories: 320 kcal
    • Fat: 14g (Saturated Fat: 2.5g)
    • Carbohydrates: 45g
    • Fiber: 6g
    • Protein: 10g
    • Vitamins: High in Vitamin A and C
    • Minerals: Good source of Iron and Calcium

    Note that values may vary based on specific ingredients used, particularly substitutes for yogurt, mayo, and pasta. This recipe is not only delicious but also offers a well-rounded nutrient profile to support your healthy lifestyle.


    FAQs: Frequently Asked Questions About Creamy Street Corn Pasta Salad

    Here are some common questions about the Creamy Street Corn Pasta Salad and their answers to guide you through making this scrumptious dish.

    Q: Can I make this pasta salad ahead of time?
    A: Yes! This salad can be made a day prior to your event. Just store it in the fridge and enjoy as the flavors develop.

    Q: How can I make this dish dairy-free?
    A: Use vegan yogurt and vegan mayo as substitutes for the dairy products in the recipe. Many brands offer delicious alternatives.

    Q: What type of pasta should I use?
    A: While traditional pasta is great, consider whole grain or gluten-free options if needed. Both work well in this recipe.

    Q: Can I add protein to the salad?
    A: Absolutely! Add grilled chicken, shrimp, or even chickpeas to turn this salad into a more filling meal.

    Q: How can I make the dressing lower in calories?
    A: Use a lower-fat yogurt and reduce the mayo or replace it with a simple vinaigrette for fewer calories.

    Q: What other vegetables should I add?
    A: Feel free to add your favorites! Cucumbers, zucchini, or any colorful veggies will complement this salad nicely.

    These FAQs aim to address any concerns and encourage a successful culinary experience, ensuring your Creamy Street Corn Pasta Salad exceeds expectations.


    With its delightful taste, ease of preparation, and adaptability, the Creamy Street Corn Pasta Salad is a fun and refreshing dish that’s perfect for any occasion. Whether you serve it at a summer picnic, potluck, or family dinner, this pasta salad is sure to be a crowd-pleaser! Don’t hesitate to make it your own by experimenting with flavors and ingredients, as this recipe is as much about creativity as it is about nourishment. Enjoy making and sharing this delicious dish!

  • Easy Italian Stromboli Recipe

    Easy Italian Stromboli Recipe

    Easy Italian Stromboli Recipe: A Tropical Delight

    Introduction to Easy Italian Stromboli Recipe

    Searching for easy dinner recipes that add a taste of Italy to your table? Look no further than this delightful Easy Italian Stromboli Recipe! This dish isn’t just a meal; it’s an experience. Stromboli is a rolled pizza filled with a blend of savory ingredients, packed with flavor, and wonderfully simple to prepare.

    What makes this recipe stand out is how adaptable it is. You can easily customize the fillings to suit your dietary preferences, whether you’re craving a vegetarian option, looking for something gluten-free, or adhering to a vegan diet. Plus, this recipe comes together in no time, ideal for busy weeknights or casual get-togethers. Imagine savory meat, cheeses, and vegetables, all enveloped in golden-brown dough—every bite is a moment of joy!

    In addition to being effortless, Stromboli can be a healthier alternative to traditional takeout. By choosing wholesome ingredients, you control what goes into your meal. It’s a fantastic way to incorporate nutritious vegetables into your diet while keeping flavor at the forefront. Not only does it cater to various diets, but it also offers a filling meal that can easily serve a family or be prepped for lunches throughout the week.

    So, why not ignite your culinary adventures and create this delicious Easy Italian Stromboli? This guide will provide everything you need, making cooking simpler and more enjoyable.

    Benefits and Advantages of Easy Italian Stromboli Recipe

    The Easy Italian Stromboli Recipe brings numerous benefits that elevate it as a top contender among easy dinner recipes. First and foremost, it simplifies meal preparation without compromising on taste. With minimal ingredients and straightforward steps, you can whip up this dish even on the busiest of nights. As a busy parent or working professional, the convenience of preparing a meal that pleases the palate and fits into your schedule is invaluable.

    Health-conscious individuals will appreciate the opportunity to customize this recipe. By selecting lean meats, low-fat cheeses, and a variety of colorful vegetables, you can create a wholesome meal with essential nutrients. Moreover, the inclusion of whole-wheat dough or gluten-free alternatives ensures that it suits various dietary needs. This flexibility makes it suitable for families with diverse preferences, whether you have picky eaters or someone who’s vegan or gluten-intolerant.

    Another remarkable benefit of the Easy Italian Stromboli is its crowd-pleasing nature. When served at gatherings or dinner parties, it can win over guests of all ages! Its portability allows it to be enjoyed hot or cold, making it a great option for picnics and potlucks. Moreover, the dish can easily be adapted to highlight seasonal ingredients, ensuring enjoyment year-round.

    Finally, preparing Stromboli allows aspiring cooks and baking enthusiasts to experiment in the kitchen. The dough can be shaped and stuffed creatively, fostering an enjoyable cooking experience. You can even involve your kids or loved ones, enhancing connections and creating delightful memories along the way.

    In conclusion, the Easy Italian Stromboli Recipe provides a fusion of convenience, health, and taste that is hard to beat. With these advantages in mind, let’s explore the essential ingredients that make up this gastronomic treat!

    Ingredients Overview

    Essential Ingredients for Easy Italian Stromboli Recipe

    To create the best Easy Italian Stromboli, you’ll need the following ingredients:

    Dough:

    • 2 cups of all-purpose flour (or gluten-free flour for gluten-free options)
    • 1 packet (2.25 tsp) of instant yeast
    • 1 tsp of salt
    • 1 tsp of sugar
    • ¾ cup of warm water (105-110°F)
    • 2 tbsp of olive oil

    The dough serves as the foundation for your stromboli, providing texture and flavor. Using whole-wheat or gluten-free flour can enhance its nutritional profile.

    Fillings:

    • 1 ½ cups of mozzarella cheese (substitute with vegan cheese for a dairy-free option)
    • ½ cup of pepperoni or salami (omit or replace with sliced bell peppers or mushrooms for a vegetarian version)
    • 1 cup of assorted vegetables (such as bell peppers, spinach, mushrooms, and onions—choose your favorites)
    • ½ tsp of Italian seasoning (add more or less based on your preference)
    • ¼ cup of marinara sauce (for dipping, opt for a low-sodium version for health-conscious readers)

    These fillings create a delightful mix of textures and flavors, elevating your Stromboli experience. Customize according to your tastes and dietary preferences!

    Dietary Substitutions to Customize Your Easy Italian Stromboli Recipe

    To adapt the Easy Italian Stromboli for various dietary needs, consider the following substitutions:

    • Gluten-Free Option: Replace all-purpose flour with a gluten-free flour blend or use store-bought gluten-free pizza dough.
    • Vegan Version: Substitute mozzarella cheese with a nut-based or soy-based cheese alternative, and use plant-based deli slices or skip the meat entirely.
    • Low-Calorie Variant: Use a lighter cheese like part-skim mozzarella and load up on vegetables to bulk up the meal without excess calories.

    If you’re looking for additional flavor, sprinkle in fresh herbs like basil or cilantro. You can also experiment with different sauces for a twist; pesto and garlic dip work wonderfully!

    The flexibility of your Easy Italian Stromboli allows you to cater to your health goals while ensuring everyone enjoys a satisfying meal. Let’s move on to the preparation guide where you can learn how to put it all together!

    How to Prepare the Perfect Easy Italian Stromboli Recipe: Step-by-Step Guide

    Creating the perfect Easy Italian Stromboli involves a simple step-by-step process that caters to various palates and dietary needs. Follow these clear instructions to achieve a delightful dinner!

    1. Prepare the Dough:
    2. In a large bowl, combine the warm water, sugar, and instant yeast. Let it sit for about 5 minutes until frothy. This step activates the yeast and is crucial for proper dough rising.

    3. Mix Dry Ingredients:

    4. In another bowl, mix the flour and salt. Slowly add the flour mixture to the yeast mixture, stirring with a wooden spoon until combined. Gradually add in the olive oil.

    5. Knead the Dough:

    6. On a floured surface, knead the dough for about 5-7 minutes until it becomes smooth and elastic. If using gluten-free dough, follow package instructions as it will differ.

    7. Let it Rise:

    8. Place the kneaded dough in a lightly greased bowl. Cover with a damp cloth, and let it rise in a warm area for about 1 hour until doubled in size.

    9. Preheat Oven:

    10. While the dough is rising, preheat your oven to 400°F (200°C).

    11. Prepare the Filling:

    12. As the dough rises, chop your selected vegetables and meats. Combine them with mozzarella cheese, Italian seasoning, and a little marinara sauce in a separate bowl.

    13. Roll Out the Dough:

    14. Once the dough has risen, punch it down and roll it out on a floured surface into a rectangular shape, about 12×16 inches.

    15. Layer Fillings:

    16. Spread the filling mixture evenly over the dough, leaving a small border around the edges. Be generous, as this is where the flavor comes from!

    17. Roll it Up:

    18. Starting from one end, roll the dough tightly into a log. Make sure the filling is secure, and pinch the edges to seal completely.

    19. Prepare for Baking:

      • Place the rolled Stromboli seam-side down on a baking sheet lined with parchment paper. Use a sharp knife to make a few slits on top for ventilation.
    20. Bake:

      • Bake the Stromboli in the preheated oven for 20-25 minutes or until golden brown. Keep an eye on it to avoid burning.
    21. Cool and Slice:

      • Once baked, let the Stromboli cool for about 5 minutes before slicing. Serve it hot with extra marinara sauce on the side for dipping!

    This easy step-by-step guide should empower you to create your Easy Italian Stromboli effortlessly. Now that you’ve perfected your dish, let’s look into advanced tips and variations to elevate your Stromboli game.

    Mastering Easy Italian Stromboli Recipe: Advanced Tips and Variations

    To ensure your Easy Italian Stromboli stands out, here are some advanced tips and variations to explore:

    • Herbs and Spices: Don’t hesitate to enhance the flavors of your fillings with fresh herbs such as basil, oregano, or parsley. A pinch of red pepper flakes can add a delightful kick!

    • Cheese Variations: Incorporate a mix of cheeses. While mozzarella is classic, adding provolone, ricotta, or even a sprinkle of parmesan can create depth in flavor.

    • Sauce for an Extra Layer: For a fun twist, consider mixing different sauces in the layers. A touch of pesto and a drizzle of balsamic glaze can elevate the taste!

    • Stuffing alternatives: Explore alternative fillings like cooked chicken, artichokes, or sun-dried tomatoes for a gourmet version. You can even experiment with international flavors by adding hummus or curry spices.

    • Serving Suggestions: Pair your Stromboli with a fresh salad or garlic bread for a complete meal. Consider adding a simple arugula salad with lemon vinaigrette for a nutritious complement.

    • Make It Ahead: For busy schedules, prepare your Stromboli in advance and freeze it before baking. Just ensure you wrap it tightly in foil. On baking day, pop it directly from the freezer into the oven, adding a few extra minutes to the cooking time.

    By integrating these tips and variations, you can fine-tune your Easy Italian Stromboli Recipe to perfection, pleasing even the most discerning foodie.

    How to Store Easy Italian Stromboli Recipe: Best Practices

    Storing your Easy Italian Stromboli properly ensures you enjoy it longer and minimizes food waste. Here’s how to do it right:

    • Refrigeration: If you have leftovers, let them cool completely before wrapping them tightly in plastic wrap or aluminum foil. Store in an airtight container in the refrigerator for up to 3-4 days.

    • Freezing: For extended storage, you can freeze Stromboli before or after baking. If freezing unbaked, wrap it tightly in plastic wrap and foil. When you’re ready to bake, simply place it in the oven from frozen, adding a few extra cooking minutes. If freezing baked Stromboli, cool it completely before wrapping it the same way. It can last up to 2-3 months in the freezer.

    • Reheating: To reheat refrigerated Stromboli, preheat your oven to 350°F (175°C) and bake for about 15-20 minutes until warmed through. If reheating from frozen, increase the time to 30-40 minutes, checking for doneness.

    By following these storage tips, you can ensure your Easy Italian Stromboli remains delicious and ready to enjoy whenever you crave a quick and satisfying meal.

    Nutritional Value of Easy Italian Stromboli Recipe

    The nutritional value of your Easy Italian Stromboli largely depends on the ingredients used. Below is an approximate breakdown based on a standard recipe filled with mozzarella cheese, pepperoni, veggies, and using traditional dough:

    • Calories: Approximately 350-400 calories per serving (1/4 of a Stromboli)
    • Total Fat: 18g
    • Saturated Fat: 6g
    • Cholesterol: 30mg
    • Sodium: 600-700mg
    • Total Carbohydrates: 38g
    • Dietary Fiber: 2g
    • Sugars: 2g
    • Protein: 15g

    By choosing healthier fillings, like reduced-fat cheese or increasing the ratio of vegetables, you can further lower calorie counts. Additionally, employing whole-grain flour can increase fiber content, making it more filling and nutritious.

    If you utilize vegan or gluten-free ingredients, remember that the calories and nutritional values will shift accordingly. Always adjust ingredients according to your health goals and dietary restrictions, ensuring your Easy Italian Stromboli aligns with your nutritional needs.

    FAQs: Frequently Asked Questions About Easy Italian Stromboli Recipe

    Can I make the dough ahead of time?

    Yes! You can prepare the dough ahead of time and store it in the refrigerator for up to 24 hours before using it.

    How often can I customize the fillings?

    You can customize fillings as often as you’d like! Get creative and experiment with your favorite ingredients.

    Can I make a vegan version of this recipe?

    Absolutely! Substitute cheese with vegan cheese and omit meat or replace it with plant-based alternatives.

    How do I know when the Stromboli is fully baked?

    Look for a golden-brown crust and ensure that the cheese inside is melted. A well-baked Stromboli will sound hollow when tapped on the bottom.

    Can I prepare Stromboli in advance?

    Yes! You can assemble it ahead of time and refrigerate it before baking or freeze it for later use.

    How can I improve the taste of the dough?

    Consider adding garlic powder, dried herbs, or even grated cheese into the dough while mixing to enhance its flavor.

    What is a good dipping sauce for Stromboli?

    Traditional marinara sauce works wonderfully, but you could also serve it with ranch dressing, garlic aioli, or even a spicy sriracha mayo for a kick!

    With these FAQs, you’re now equipped with the guidance necessary to make an unforgettable Easy Italian Stromboli Recipe. Try it out for dinner tonight, add a personal touch, and enjoy a meal that speaks to your culinary creativity!

  • Creamy Cowboy Butter Pasta

    Creamy Cowboy Butter Pasta

    Creamy Cowboy Butter Pasta: A Tropical Delight

    Introduction to Creamy Cowboy Butter Pasta

    Welcome to a delightful culinary journey with our Creamy Cowboy Butter Pasta! If you’re searching for pasta recipes that effortlessly blend flavor, simplicity, and health benefits, look no further. This creamy dish merges the richness of butter with the savory goodness of spices and fresh ingredients. It’s an appealing choice for busy parents, students in need of quick meals, or anyone aiming to impress their loved ones without spending hours in the kitchen.

    The allure of this pasta recipe lies not only in its taste but also in its versatility. Whether you’re looking for a comforting weeknight dinner or a dish to serve at a gathering, this recipe offers a balance of comfort and nutrition. Plus, it’s customizable to suit various dietary preferences such as vegan, gluten-free, or even low-calorie!

    As you dive into this recipe, you’ll find that preparation is straightforward, making it accessible for cooks of all skill levels. The Creamy Cowboy Butter Pasta combines the heartiness of pasta with a creamy sauce that feels indulgent yet remains health-conscious. So, gather your ingredients, and let’s explore how to create this culinary masterpiece that will delight your palate and impress your guests.

    Benefits and Advantages of Creamy Cowboy Butter Pasta

    Embracing pasta recipes like Creamy Cowboy Butter Pasta offers numerous benefits that make it an attractive option for any meal. First and foremost, the preparation time is minimal—this is crucial for working professionals and busy families who often have tight schedules. From stovetop to serving in less than 30 minutes, it’s unbeatable in terms of convenience.

    Moreover, the health benefits of this dish are noteworthy. Traditionally, pasta can be viewed as a carbohydrate-heavy dish, but with the right ingredients, it can be transformed into a nutritious meal. By opting for whole grain or legume-based pasta, you can enhance the fiber content, promote digestive health, and keep you fuller for longer. The creamy sauce, enriched with healthy fats from butter and infused with fresh herbs, provides essential nutrients and antioxidants beneficial for overall health.

    What sets this recipe apart is its dietary adaptability. For those keeping an eye on their calorie intake or following specific diets, Creamy Cowboy Butter Pasta can easily accommodate your needs. With substitutions for dairy and gluten, as discussed in the ingredients section, everyone can enjoy a satisfying plate of pasta without compromising their dietary goals.

    In essence, this dish is an inviting blend of flavor and health, making it perfect for students, seniors, food enthusiasts, and new cooks alike. The creamy texture and rich taste create a fulfilling experience that everyone can appreciate, whether they are conscious eaters or indulgent taste seekers!

    Ingredients Overview

    Essential Ingredients for Creamy Cowboy Butter Pasta

    Creating Creamy Cowboy Butter Pasta requires a handful of essential ingredients that come together to deliver rich flavors. Below are the ingredients you’ll need along with their benefits:

    1. Pasta of Choice (8 oz): Select whole grain or gluten-free pasta varieties for a nutritious foundation. These options provide extra fiber and nutrients versus traditional white pasta.

    2. Unsalted Butter (½ cup): This is the star ingredient, imparting a rich and creamy texture to the sauce. For vegan adaptations, feel free to use plant-based butter.

    3. Garlic (4 cloves, minced): Garlic adds aromatic flavor and numerous health benefits, including improved immunity.

    4. Chicken or Vegetable Broth (1 cup): Enhances the sauce’s flavor profile while offering an additional layer of savory essence. Opt for low-sodium versions if you’re watching your salt intake.

    5. Heavy Cream (1 cup): For that luxurious creaminess, heavy cream is essential. For lower-calorie options, use coconut cream or cashew cream for a delicious vegan alternative.

    6. Parmesan Cheese (½ cup, grated): This cheese adds a delightful umami flavor and depth. Nutritional yeast can be a perfect substitute for a vegan version.

    7. Fresh Herbs (2 tbsp, chopped, e.g., parsley, chive): Fresh herbs brighten up the dish and offer antioxidants.

    8. Salt and Pepper to taste: These essential seasonings enhance all the flavors.

    Each ingredient plays a crucial role in achieving that creamy, delicious taste everyone will love. Whether you’re following a specific diet or just looking for a comforting meal, this pasta recipe can be easily adjusted.

    Dietary Substitutions to Customize Your Creamy Cowboy Butter Pasta

    Not only is Creamy Cowboy Butter Pasta delectable, but it’s also easily adaptable for various dietary requirements. Here are several recommended substitutions:

    • For Vegan Options: Use plant-based butter and coconut or cashew cream instead. Nutritional yeast can replace Parmesan cheese, delivering a cheesy flavor without the dairy.

    • Gluten-Free Needs: Simply swap regular pasta for gluten-free varieties made from quinoa, rice, or chickpeas, ensuring a delightful texture without any gluten concerns.

    • Lower Calorie Version: Instead of heavy cream, consider evaporated skim milk or Greek yogurt as lighter alternatives, maintaining the creaminess while cutting calories.

    • Increased Protein: Add cooked chicken, shrimp, or tofu to boost the protein content in this pasta recipe, perfect for anyone wanting a more filling dish.

    These substitutions allow for creative flexibility, ensuring everyone can enjoy this comforting dish without sacrificing flavor or dietary needs.

    How to Prepare the Perfect Creamy Cowboy Butter Pasta: Step-by-Step Guide

    Creating Creamy Cowboy Butter Pasta is a breeze. Here’s a step-by-step guide that ensures you follow along effortlessly:

    1. Prepare the Pot: Begin by boiling a large pot of salted water. Add your choice of pasta and cook according to the package instructions until al dente.

    2. Drain and Set Aside: Once the pasta reaches the perfect texture, drain it using a colander. Set it aside while you prepare the sauce.

    3. Melt the Butter: In a large skillet over medium heat, melt the unsalted butter. Allow it to bubbles gently; this adds depth to your creamy base.

    4. Sauté Garlic: Add the minced garlic to the melted butter, stirring frequently until fragrant, which usually takes about 1-2 minutes. Avoid browning the garlic as it can lead to bitterness.

    5. Pour in the Broth: Carefully add the chicken or vegetable broth to the skillet, stirring to combine. The liquid will help in emulsifying the sauce.

    6. Incorporate Heavy Cream: Slowly pour in the heavy cream, then mix thoroughly to create a velvety sauce. Simmer for a few minutes to let the flavors meld.

    7. Add Cheese: Stir in the grated Parmesan cheese until smoothly incorporated. If you’re opting for nutritional yeast, sprinkle it in at this stage.

    8. Season to Taste: Taste the sauce and season with salt and pepper. Adjust according to your preferences for the perfect balance of flavors.

    9. Combine Pasta and Sauce: Add the drained pasta into the skillet, using tongs or a spatula to toss everything together, ensuring every piece is coated in that luscious sauce.

    10. Garnish with Fresh Herbs: Finally, remove the skillet from heat. Sprinkle freshly chopped herbs over the top for a burst of flavor and color.

    11. Serve Immediately: Plate your Creamy Cowboy Butter Pasta while it’s still warm. Pair it with a fresh garden salad or garlic bread for a complete meal.

    12. Store Leftovers: If there are any leftovers, store them in an airtight container in the fridge for easy reheating later.

    By following these steps, you’ll create a creamy, delicious pasta dish that impresses at any table. And remember, you can adjust any step or ingredient based on dietary needs, making it an inclusive pasta recipe for everyone!

    Mastering Creamy Cowboy Butter Pasta: Advanced Tips and Variations

    To elevate your Creamy Cowboy Butter Pasta experience, here are some advanced tips and variations:

    • Add Vegetables: Toss in seasonal vegetables such as spinach, cherry tomatoes, or zucchini to introduce more nutrients and flavors. Simply sauté them along with the garlic.

    • Spice It Up: For those who appreciate a bit of kick, consider adding red pepper flakes during the cooking process. This not only enhances the flavor but also offers a delightful heat.

    • Experiment with Cheeses: Instead of Parmesan, try different cheese varieties such as mozzarella for stretchiness or goat cheese for a tangier flavor.

    • Lemon Zest: A sprinkle of lemon zest at the end can brighten the dish substantially. It adds freshness without overpowering the creamy flavors.

    • Protein Boosts: Incorporate protein sources like grilled chicken, shrimp, or sautéed tofu, transforming the dish into a more balanced meal that keeps you fuller for longer.

    These variations help you bring new life to a classic recipe, ensuring it never gets boring. Play around with ingredients based on your preferences or what’s available in your pantry!

    How to Store Creamy Cowboy Butter Pasta: Best Practices

    Storing your Creamy Cowboy Butter Pasta properly is essential for maintaining its flavor and texture. Here are some effective methods:

    • Refrigeration: Allow the pasta to cool completely before transferring it to an airtight container. Stored this way, it can last for up to 3-5 days in the refrigerator.

    • Freezing: For longer storage, you can freeze your Creamy Cowboy Butter Pasta. Ensure it’s placed in a freezer-safe container. It will hold up well for about 2-3 months. However, keep in mind that cream-based sauces may change texture when frozen.

    • Reheating: When you’re ready to enjoy leftovers, reheat them on a stovetop over low heat. You may need to add a splash of milk or broth to regain the creamy consistency.

    Using these storage methods allows you to enjoy Creamy Cowboy Butter Pasta on your terms, ensuring minimal food waste while still enjoying its delightful flavors.

    Nutritional Value of Creamy Cowboy Butter Pasta

    To make informed decisions about your meals, understanding the nutritional value is crucial. Here’s a breakdown of the typical serving size of Creamy Cowboy Butter Pasta (based on using traditional ingredients):

    • Calories: Approximately 500-600 calories per serving
    • Protein: 15-20g
    • Carbohydrates: 60-70g
    • Dietary Fiber: 3-5g
    • Fat: 25-30g
    • Saturated Fat: 15-18g
    • Cholesterol: 50-60mg
    • Sodium: 700-800mg

    These values will vary based on ingredient substitutions, such as using lower fat options or gluten-free pasta. When opting for healthier choices, you may lower the calorie and fat content while increasing fiber through whole grain or legume-based pasta options.

    Understanding the nutritional breakdown assists in meal planning, making this dish fitting with various dietary lifestyles—whether you’re monitoring calories, seeking to boost protein, or eating for pleasure.

    FAQs: Frequently Asked Questions About Creamy Cowboy Butter Pasta

    Here are some common questions and answers regarding Creamy Cowboy Butter Pasta to help enhance your culinary adventure:

    Can I make this pasta ahead of time?

    Absolutely! You can prep the sauce in advance and simply cook your pasta to combine when you’re ready to serve. However, pasta may absorb the sauce over time, so it’s best to eat it shortly after combining.

    What if I don’t have heavy cream?

    If heavy cream isn’t on hand, consider alternatives like evaporated milk, Greek yogurt, or plant-based cream. While each will impart a different flavor, they can still yield a creamy sauce.

    How do I reheat leftovers?

    Reheat on a low flame on the stovetop, adding a splash of broth or milk to help maintain the sauce’s creaminess. Avoid microwaving for extended periods to avoid drying out the dish!

    Can I add protein to this recipe?

    Certainly! Cooked chicken, shrimp, or tofu are excellent options that can be added to enhance the dish’s nutritional profile. Just mix them in once the pasta is combined with the sauce.

    Is this recipe suitable for special diets?

    Yes! With a few substitutions, Creamy Cowboy Butter Pasta can easily accommodate vegan, gluten-free, or low-calorie diets. Refer to the ‘Ingredients Overview’ section for more on alternatives.

    In conclusion, Creamy Cowboy Butter Pasta is a versatile and delicious dish that caters to various dietary needs while being easy to prepare. As you embark on this culinary project, let the comfort of creamy pasta bring joy to your table. Enjoy making it, sharing it, and, most importantly, savoring every bite!

  • The Best Cheesy Stromboli

    The Best Cheesy Stromboli

    The Best Cheesy Stromboli: A Tropical Delight

    Introduction to The Best Cheesy Stromboli

    If you are on the lookout for easy and delicious dinner recipes, then you’re in for a treat with this Best Cheesy Stromboli. This delightful dish combines a golden, crispy crust with an ooey-gooey cheesy filling that will satisfy any cheese lover. Perfect for home cooks, busy parents, food enthusiasts, or anyone simply looking to whip up a tasty meal, this stromboli is exceptionally versatile and can cater to various dietary needs, including vegan and gluten-free options.

    The Best Cheesy Stromboli is not just about being mouthwatering; it also offers a plethora of health benefits. By using fresh ingredients and allowing you to control the filling, you can make it as healthy or indulgent as you desire. Plus, it’s a fantastic choice for those who need a quick weeknight dinner or meal prep option. With its delightful flavors and endless customization possibilities, this dish makes it easy to bring a little culinary adventure into your home. Embark on this culinary journey and learn how to create a dish that not only fills your stomach but also warms your heart.

    Benefits and Advantages of The Best Cheesy Stromboli

    There are several reasons why The Best Cheesy Stromboli should be your go-to choice for dinner recipes. First and foremost, it’s incredibly easy to prepare. Even if you’re not an accomplished cook, you can make this dish in a matter of minutes. The premise is simple: you roll out the dough, add your favorite fillings, and bake until golden brown. Anyone can achieve stromboli success!

    Another standout attribute of this recipe is its health benefits. By making it at home, you can choose fresh, wholesome ingredients while avoiding the preservatives and excess sodium typical of store-bought alternatives. For those who prefer a lighter meal, you can use low-fat cheeses, whole wheat dough, or add in more vegetables for extra fiber and nutrients.

    Moreover, this cheesy creation is not just a hit among adults but also a kid-friendly option. Children love cheese, and incorporating spinach, bell peppers, or other vegetables discreetly into the filling makes it easier to sneak in some health benefits even for the picky eaters among us.

    Lastly, The Best Cheesy Stromboli shines because of its versatility. You can customize the filling based on dietary preferences or leftovers in your fridge. Be it savory meats, vegetables, or plant-based alternatives, the possibilities are infinite. This way, you can serve impressive and varied dinner recipes to your family without repetitive meals.

    Ingredients Overview

    Essential Ingredients for The Best Cheesy Stromboli

    Here are the ingredients you’ll need to make The Best Cheesy Stromboli, along with precise measurements and benefits of key components:

    Essential Ingredients:

    • Dough:
    • 1 pound pizza dough
    • Purpose: Acts as the base structure for the stromboli. You can use store-bought for convenience or homemade for a personal touch.

    • Cheeses:

    • 1 cup shredded mozzarella cheese
    • ½ cup grated Parmesan cheese
    • Purpose: These two cheeses meld together for a delightful melt that oozes from each slice.

    • Fillings:

    • 1 cup chopped cooked ham, salami, or cooked chicken (optional)
    • 1 cup baby spinach (optional)
    • 1 bell pepper, diced (optional)
    • ½ teaspoon Italian seasoning
    • Purpose: These add flavor and dimension while providing protein and nutrients.

    • Sauce:

    • ½ cup pizza or marinara sauce for dipping
    • Purpose: A delicious accompaniment to enhance the flavor with each bite.

    • Egg Wash:

    • 1 egg, beaten
    • Purpose: Gives the outside of the stromboli a beautiful golden sheen when baked.

    Dietary Options:

    • Vegan Version:
    • Substitute mozzarella with a vegan cheese alternative and omit traditional deli meats.

    • Gluten-Free Version:

    • Use gluten-free pizza dough to cater to dietary needs.

    • Low-Calorie Variation:

    • Opt for a thin crust using whole wheat flour and low-fat cheeses. Add more vegetables for bulk without calories.

    Dietary Substitutions to Customize Your The Best Cheesy Stromboli

    Making dietary adjustments to The Best Cheesy Stromboli is simple, allowing everyone to join the fun regardless of their preferences. Here are some possible substitutions:

    • For a vegan option, replace the cheeses with cashew cheese or a favorite dairy-free brand. Use tempeh or tofu marinated in soy sauce or your favorite spices to mirror the savory flavor of meat.

    • If you need a gluten-free option, check your local grocery store for gluten-free pizza dough or make your own using almond flour or a gluten-free all-purpose blend.

    • To pack more nutrients, feel free to add a variety of vegetables, such as mushrooms, zucchini, or onions. These can be diced and mixed in with the cheese.

    With these adjustments, The Best Cheesy Stromboli can quickly transform into meals that cater to multiple dietary requirements, ensuring everyone can enjoy this delightful dish.

    How to Prepare the Perfect The Best Cheesy Stromboli: Step-by-Step Guide

    Creating The Best Cheesy Stromboli is a fulfilling experience that can be done by anyone, regardless of cooking skill. Follow these easy steps:

    1. Prepare the Base: Preheat your oven to 400°F (200°C). If using store-bought dough, let it sit at room temperature for about 20 minutes to make it easier to roll out.

    2. Roll Out the Dough: On a lightly floured surface, roll the pizza dough into a rectangle about 12×15 inches. Ensure the thickness is even to guarantee an enjoyable outcome.

    3. Mix Ingredients: In a bowl, combine the shredded mozzarella cheese, grated Parmesan cheese, and your choice of protein (ham, salami, or chicken) with any optional vegetables you prefer (spinach or bell pepper works great!). Mix well.

    4. Add Seasoning: Sprinkle the Italian seasoning evenly over the dough to infuse flavor.

    5. Build Your Stromboli: Spread your cheese and filling mixture down the center of the dough, leaving the edges clear. This will help contain everything as you roll it up.

    6. Roll the Dough: Carefully fold the sides of the dough over the filling and roll it up tightly from the bottom to the top, sealing the edges with fingertips to keep the filling inside. Pinch the ends to seal completely.

    7. Egg Wash: Place the rolled stromboli on a lined baking sheet and brush the outside with the beaten egg. This will give it a beautiful, glossy finish.

    8. Bake: Bake in the preheated oven for 25-30 minutes until the dough is golden brown and crispy. Keep an eye to prevent over-baking.

    9. Cool Down: Once done, allow the stromboli to cool for about 10 minutes before slicing. This will help the cheese set a little, making it easier to cut without a melty mess.

    10. Serve: Slice and serve with marinara or pizza sauce on the side for dipping. Enjoy with your favorite drink or side salad for a complete meal.

    With these clear, actionable steps, making The Best Cheesy Stromboli becomes a breeze, inviting you to explore various variations based on personal dietary choices and preferences.

    Mastering The Best Cheesy Stromboli: Advanced Tips and Variations

    To elevate your stromboli-making experience, consider these advanced tips and variations:

    • Add More Flavors: Experiment with herbs and spices beyond Italian seasoning. Fresh basil, oregano, or red pepper flakes can add an extra kick to your stromboli.

    • Try Different Cheeses: Consider mixing cheeses like fontina or gouda for a different taste profile. Just remember that different cheeses will melt at different rates, so adjust baking time if necessary.

    • Include Sweets: For a unique twist, fill your stromboli with a blend of cheeses and a fruit preserve or even chocolate for dessert variations.

    • Different Shapes: While the traditional stromboli is rolled, why not try twists or braids for a visual treat? This works wonderfully with puff pastries too.

    These additional tips will allow you to take The Best Cheesy Stromboli to the next level, adapting it for entertaining guests or simply enjoying a cozy night at home.

    How to Store The Best Cheesy Stromboli: Best Practices

    Proper storage can extend the life of your delicious creation. Here’s how:

    • Refrigeration: Store leftovers in an airtight container in the fridge. They can last for up to four days. Allow the stromboli to cool completely before packaging to avoid moisture buildup and sogginess.

    • Freezing: For longer storage, you can freeze your stromboli before it’s baked. Wrap the assembled stromboli tightly in plastic wrap and then in aluminum foil. It can be frozen for up to 3 months. To bake, simply remove it from the freezer, unwrap, and bake from frozen for an additional 10-15 minutes.

    • Reheating: When you want to enjoy leftover stromboli, reheat it in the oven at 350°F (175°C) for about 10-15 minutes, or until it’s warmed through. This helps to retain the crispiness of the crust, making it just as delicious as the day it was made.

    By following these storage guidelines, you can enjoy The Best Cheesy Stromboli multiple times without compromising on flavor or texture.

    Nutritional Value of The Best Cheesy Stromboli

    Understanding the nutritional profile of your meals is crucial, and The Best Cheesy Stromboli is no exception. Here’s a breakdown of a standard serving (1/4 of the stromboli prepared with mozzarella cheese and ham):

    • Calories: Approximately 350
    • Protein: 20g
    • Fat: 15g
    • Carbohydrates: 40g
    • Fiber: 2g
    • Sodium: 600mg

    Health Considerations:

    • For Fitness Enthusiasts: By switching to low-fat cheeses and whole grain dough, you significantly cut the calorie count while increasing fiber intake.
    • For Vegans: Choosing plant-based ingredients will adjust protein and fat content, so be sure to check labels on your vegan cheese and meat alternatives.

    These nutritional insights can guide you towards modifying the recipe for your dietary goals without compromising flavor, making it one of your favorite dinner recipes!

    FAQs: Frequently Asked Questions About The Best Cheesy Stromboli

    1. Can I prepare the stromboli in advance?

    Absolutely! This stromboli can be assembled a day ahead. Simply refrigerate it wrapped in plastic wrap and bake when you’re ready.

    2. What can I substitute for pizza dough?

    If you don’t have pizza dough on hand, you can use puff pastry or even phyllo dough as an alternative to create a flaky version of stromboli.

    3. Can I use any cheese for the filling?

    Yes! You can experiment with any cheese you love. Just remember that different cheeses will give varying flavors and textures.

    4. Is this dish kid-friendly?

    Definitely! The cheesy components usually appeal to children, and you can sneak in veggies for added nutrition without them noticing.

    5. How do I prevent the filling from leaking out?

    Ensure to seal the edges of the dough tightly and avoid overfilling your stromboli. A well-rolled stromboli will keep the ingredients contained.

    6. Can this be made gluten-free?

    Yes! Just use gluten-free pizza dough, and you can still enjoy this cheesy delight.

    With this comprehensive guide to The Best Cheesy Stromboli, you’ll find cooking a fun, easy, and inspiring experience. Tailor it to suit dietary preferences, experiment with flavors, and enjoy this delightful dish that truly is fantastic for any occasion!