Easy Strawberry Blueberry Salad Fresh Healthy: A Tropical Delight
Introduction to Easy Strawberry Blueberry Salad Fresh Healthy
Welcome to the world of refreshing flavors with our Easy Strawberry Blueberry Salad Fresh Healthy! This delightful recipe is a celebration of nutritious ingredients that not only invigorate your palate but also boost your well-being. Imagine plump, juicy strawberries and blueberries combining harmoniously with a light dressing, creating a dish that’s as beautiful as it is delicious.
This vibrant salad is perfect for anyone seeking healthy strawberry recipes. It is simple to prepare, making it ideal for busy parents, students, or anyone who may not have the time to whip up complex meals. Whether enjoyed as a light breakfast, an afternoon snack, or a side dish at your next summer barbecue, this salad caters to all dietary needs, being naturally vegan, gluten-free, and low-calorie.
Packed with antioxidants from the berries and vitamins from added greens, this salad supports your health while tantalizing your taste buds. A few simple ingredients turn into a fresh bowl of delight, making it a great choice for food enthusiasts and health-conscious individuals alike. So, gather your ingredients, and let’s dive into the benefits of this incredible dish!
Benefits and Advantages of Easy Strawberry Blueberry Salad Fresh Healthy
When it comes to healthy eating, simplicity is key—this is where our Easy Strawberry Blueberry Salad Fresh Healthy truly shines. Here are several compelling reasons why this recipe is a must-try:
-
Easy Preparation: This salad requires minimal steps—simply chop the ingredients, toss them together, and you’ve got an instant dish.
-
Health Benefits: Both strawberries and blueberries are packed with essential nutrients. They are high in fiber, low in calories, and rich in vitamins C and K. Studies suggest that these berries can improve heart health, support immunity, and aid in digestion.
-
Versatility: This salad can be tailored to meet various preferences, making it suitable for a wide range of dietary needs. You can easily switch out ingredients, add nuts for protein, or mix in your favorite greens to elevate the dish.
-
Seasonal Appeal: Berries are at their peak in the summer, offering a refreshing treat that’s perfect for hot days. This colorful salad is not only visually appealing but also thirst-quenching.
-
Dietary Friendliness: By using plant-based ingredients, this salad is vegan and gluten-free, making it rival any traditional dish while pleasantly catering to multiple dietary preferences.
In essence, this Easy Strawberry Blueberry Salad is not just a dish; it’s a celebration of nature’s bounty. Its health benefits, ease of preparation, and versatility make it an excellent choice for anyone wanting to incorporate fresh, wholesome flavors into their diets.
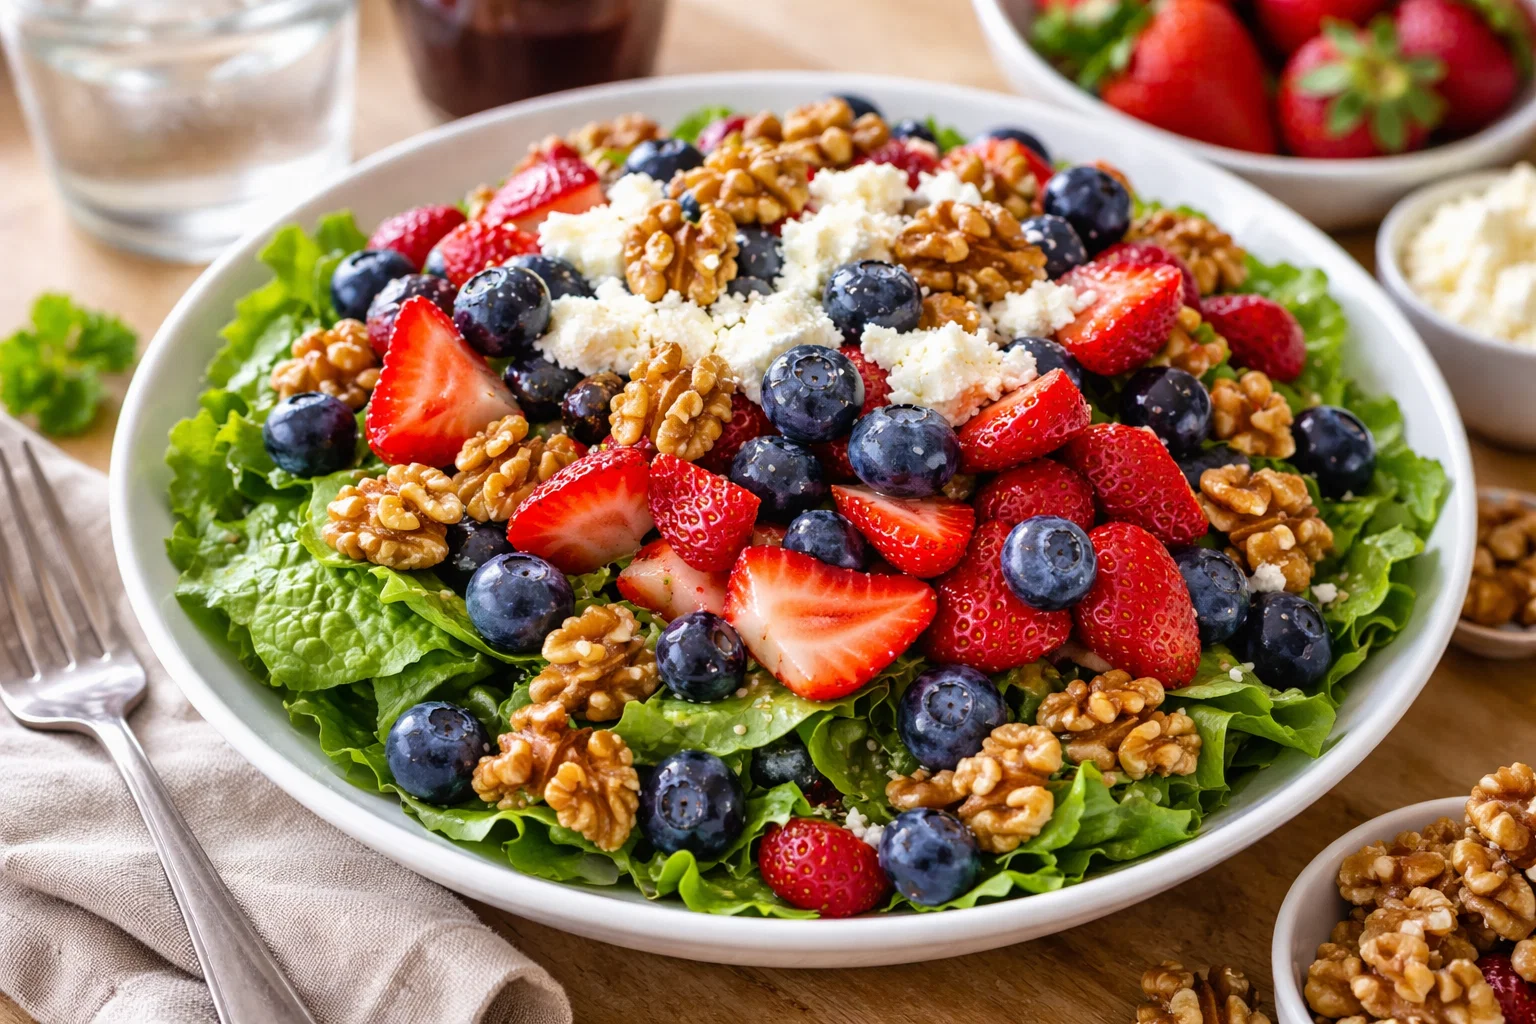
Ingredients Overview
Essential Ingredients for Easy Strawberry Blueberry Salad Fresh Healthy
To create this vibrant dish, you will need the following incredibly simple yet nutritious ingredients:
-
2 cups of fresh strawberries, sliced
These berries are rich in antioxidants and vitamins, making them a flavorful base for your salad. -
2 cups of fresh blueberries
Packed with nutrients, blueberries provide a natural sweetness and vibrant color. -
4 cups of mixed greens (spinach, arugula, or spring mix)
Adding greens to the salad incorporates necessary vitamins and minerals. -
1/4 cup of nuts (such as sliced almonds or walnuts) (optional)
These add crunch and healthy fats, making your salad more filling. -
1/4 cup of feta cheese or goat cheese (optional for non-vegan)
A sprinkle of cheese adds an exquisite creaminess to the dish. -
2 tablespoons of balsamic vinaigrette or a light dressing of choice
This dressing enhances flavors without overpowering the freshness of the berries.
All these ingredients are gluten-free and can easily fit into a low-calorie diet when portioned properly.
Dietary Substitutions to Customize Your Easy Strawberry Blueberry Salad Fresh Healthy
Adapting this recipe to suit different dietary needs is a breeze! Here are some alternative options:
-
Nut-free: If you prefer a nut-free salad, simply omit the nuts and consider adding seeds like pumpkin or sunflower seeds instead for added crunch.
-
Dairy-Free: For a completely vegan dish, skip the cheese or substitute it with a plant-based feta alternative or nutritional yeast for a cheesy flavor without dairy.
-
Low-Calorie Option: Use a vinegar-based dressing or make your own using lemon juice, olive oil, salt, and pepper to keep the calories in check.
-
Fruit Variations: If strawberries or blueberries are out of season, feel free to mix in other fruits like raspberries, peaches, or even diced apples for added sweetness and flavor.
By utilizing these substitutions, you can customize this Easy Strawberry Blueberry Salad to fit your unique tastes and dietary preferences.
How to Prepare the Perfect Easy Strawberry Blueberry Salad Fresh Healthy: Step-by-Step Guide
Creating your Easy Strawberry Blueberry Salad Fresh Healthy is straightforward—follow these step-by-step instructions for a beautiful and delicious result:
-
Wash the Fruits: Ensure all fruits are thoroughly washed under running water. This removes any pesticides or residues for a clean dish.
-
Prepare the Ingredients:
- Slice the strawberries into quarters or halves, depending on their size.
- Place the rinsed blueberries in a bowl.
-
If using mixed greens, wash and dry them using a salad spinner or paper towels.
-
Toss the Greens:
-
In a large mixing bowl, add the mixed greens. This forms a nutritious base for your salad.
-
Add in the Fruits:
-
Gently toss in the sliced strawberries and blueberries. Make sure the fruits are evenly distributed.
-
Incorporate Optional Ingredients:
-
If you’re adding nuts, cheese, or any additional toppings, sprinkle them over the salad at this stage.
-
Dress the Salad:
-
Drizzle your choice of dressing over the salad. Start with a small amount and add more as needed to avoid over-saturating the ingredients.
-
Toss Gently Again:
-
Using salad tongs or two large spoons, delicately mix the salad to combine all ingredients without bruising the fruits.
-
Plate and Serve:
-
Serve the salad in individual bowls or on a large platter for sharing. Garnish with a few whole berries over the top for presentation.
-
Enjoy Fresh:
- This salad is best enjoyed fresh, but it can be stored for a short time if needed.
This Easy Strawberry Blueberry Salad is designed to be flexible, allowing you to adapt the steps based on your preferences.
Mastering Easy Strawberry Blueberry Salad Fresh Healthy: Advanced Tips and Variations
To elevate your Easy Strawberry Blueberry Salad even further, here are some advanced tips and variations:
-
Herb Infusion: For an added layer of flavor, consider incorporating fresh herbs like mint or basil. These herbs complement the sweetness of the berries beautifully.
-
Citrus Twist: Add a zing by including citrus slices or a splash of fresh lime or lemon juice. This brings brightness to the dish.
-
Grilled Fruits: Give the salad a unique twist by grilling fruits such as peaches or pineapples alongside the berries to bring out their natural sugars.
-
Superfood Boost: Consider sprinkling chia seeds or hemp seeds for an extra dose of omega-3 fatty acids and protein.
-
Dressing Variations: Experiment with different dressings like poppy seed dressing or a citrus vinaigrette to find your favorite flavor combination.
By trying these tips and variations, you can create a signature version of the Easy Strawberry Blueberry Salad that resonates with your specific tastes.
How to Store Easy Strawberry Blueberry Salad Fresh Healthy: Best Practices
Storing your Easy Strawberry Blueberry Salad requires careful attention to maintain freshness:
-
Refrigeration: If you have leftovers, store the salad in an airtight container in the refrigerator. It is best consumed within 1-2 days.
-
Separate Dressings: If possible, keep the dressing in a separate container to prevent the greens and fruits from wilting.
-
Freezing Not Recommended: Because of the delicate nature of fresh fruits and greens, freezing is not recommended. The texture will degrade significantly upon thawing.
By following these storage methods, you can make sure your vibrant salad remains crisp and delicious for future meals.
Nutritional Value of Easy Strawberry Blueberry Salad Fresh Healthy
Understanding the nutritional value of your Easy Strawberry Blueberry Salad is essential for health-conscious individuals. Here’s a breakdown of the approximate nutritional content per serving:
- Calories: 120 (without cheese and nuts)
- Fat: 5g (varies based on nuts and dressing)
- Carbohydrates: 18g
- Fiber: 4g
- Sugar: 9g
- Protein: 3g (increases with added nuts or cheese)
Rich in antioxidants, fiber, and vitamins, this salad not only promotes good health but also supports dietary goals for those seeking weight management or better overall nutrition.
FAQs: Frequently Asked Questions About Easy Strawberry Blueberry Salad Fresh Healthy
Can I prepare this salad in advance?
Yes, while the salad is best enjoyed fresh, you can prepare the ingredients a few hours in advance. Just store them separately until you’re ready to serve to maintain the quality.
What can I substitute for the nuts in this recipe?
If you have nut allergies, consider using seeds such as sunflower or pumpkin seeds for a nut-free crunchy alternative.
How can I add protein to this salad?
To enhance the protein content, incorporate grilled chicken, chickpeas, or quinoa into the salad for a heartier meal.
Are there any other fruits I can add to this salad?
Absolutely! Feel free to experiment with other fruits such as kiwi, raspberries, or even oranges, based on your preference and seasonal availability.
Is this salad suitable for kids?
Yes, the vibrant colors and sweet taste of the berries make this salad appealing to children. You can even involve them in the preparation process to make it a fun activity!
By addressing these common questions, you can empower readers to customize and enjoy the Easy Strawberry Blueberry Salad according to their preferences and lifestyle.
Incorporating this Easy Strawberry Blueberry Salad into your culinary repertoire not only brings refreshing flavors to your table but also promotes a healthier lifestyle. Enjoy experimenting with variations, impressing your guests, and nourishing your body, all while celebrating the delightful essence of strawberries and blueberries!