Blog

  • Easy Matcha Rose Latte

    Easy Matcha Rose Latte

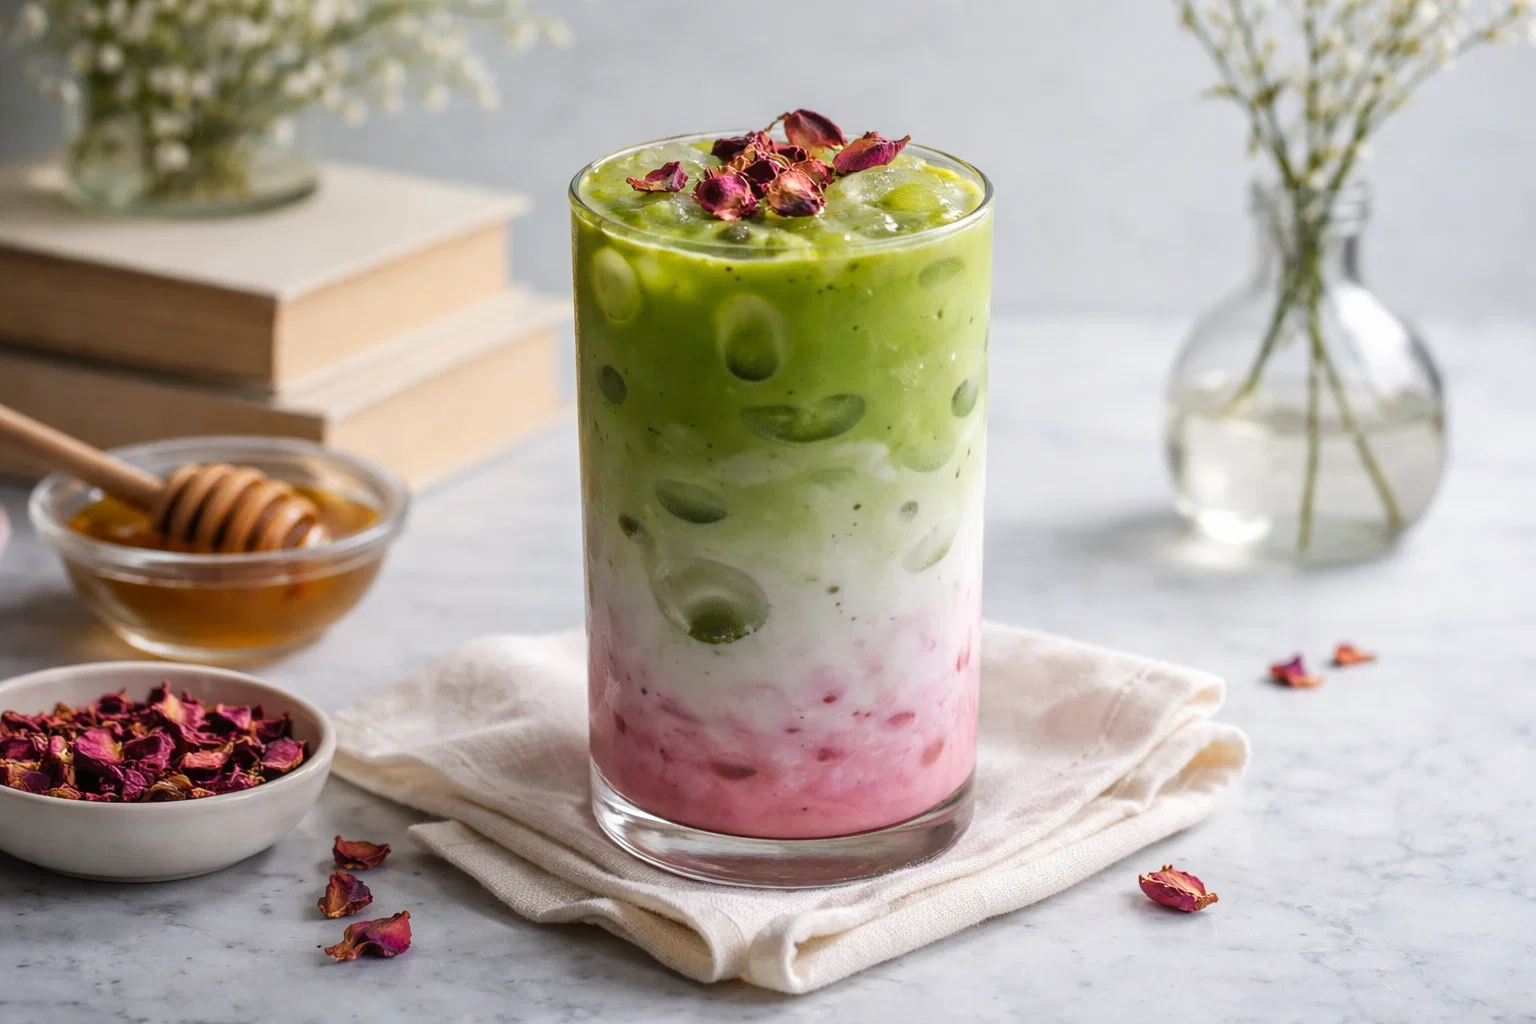
    Easy Matcha Rose Latte: A Tropical Delight

    Introduction to Easy Matcha Rose Latte

    Who doesn’t love a cool, refreshing drink that not only tastes divine but also aligns with health-conscious choices? Enter the Easy Matcha Rose Latte—a recipe that’s perfect for those who wish to bring a touch of café indulgence into their homes. This delightful beverage is more than a tasty treat; it’s a healthful choice that’s simple to prepare and suitable for a variety of dietary needs, including vegan and gluten-free diets.

    The texture of matcha, combined with the floral hints of rose, creates a unique flavor profile that tantalizes the taste buds. Imagine sipping on this vibrant green drink that’s not only beautiful but also packed with antioxidants, thanks to the matcha. You can enjoy this latte warm or cold, making it a versatile drink for any season! For those interested in Starbucks copycat recipes, this one tops the list as it mimics the exotic taste of commercial beverages while using wholesome ingredients that you can easily find in your pantry.

    The Easy Matcha Rose Latte is made with minimal ingredients and is lightning-fast to whip up, perfect for busy lifestyles, whether you’re a student rushing to class, a parent juggling family meals, or a professional in need of a midday pick-me-up. So, grab your whisk, and let’s dive into this captivating recipe that brings a touch of charm and health to your daily routine!

    Benefits and Advantages of Easy Matcha Rose Latte

    The Easy Matcha Rose Latte stands out not just because of its unique flavor, but also due to its numerous health benefits and ease of preparation. Here are some compelling reasons to try this rejuvenating beverage:

    1. Rich in Antioxidants: Matcha is known for its high levels of catechins, particularly EGCG (epigallocatechin gallate), which can help fight free radicals in the body. The antioxidants found in matcha may contribute to improved heart health and support weight management.

    2. Boosts Energy and Focus: Unlike traditional coffee, matcha provides a calm alertness, thanks to the amino acid L-theanine. This means you’ll feel energized without the jitters often associated with coffee consumption.

    3. Hydration and Taste: Infusing your drink with rose water not only enhances the flavor but also provides hydration. Additionally, rose petals are known for their anti-inflammatory properties.

    4. Diet-Friendly: This latte is naturally vegan, gluten-free, and low in calories, making it a reliable option for those who are health-conscious. You can customize it according to your dietary preferences without sacrificing flavor.

    5. Quick and Easy to Make: The preparation time is swift, making it a superb choice for individuals who lead busy lives yet crave a moment of indulgence.

    6. Impressive Presentation: Aesthetics matter, especially for social media-savvy individuals. The beautiful pink and green colors of this drink make it Instagram-worthy, perfect for sharing with friends or enjoying a moment of self-care.

    These qualities position the Easy Matcha Rose Latte as a wonderful addition to anyone’s beverage repertoire, especially for those exploring delicious and healthy Starbucks copycat recipes. Its simplicity allows even novice cooks to create a café-style experience in their own kitchens!

    Ingredients Overview

    Essential Ingredients for Easy Matcha Rose Latte

    To create this vibrant latte, you will need the following ingredients:

    • 1 tsp Matcha Powder: Provides the base flavor and a wealth of health benefits.
    • 1 cup Milk (dairy or plant-based, such as almond, oat, or coconut): Choose your preference; ensure it’s unsweetened for a healthier option.
    • 1 tbsp Rose Water: Adds the distinct floral flavor of rose; look for culinary-grade rose water.
    • 1-2 tsp Sweetener (honey, agave syrup, or maple syrup): Optional, for those who like it sweeter; adjust based on your preference.
    • Ice (optional): For those who prefer iced drinks, especially in warmer months.
    • Edible Rose Petals (for garnish): An optional yet stunning addition that elevates the drink’s presentation.

    Choosing vegan milk alternatives makes this latte accessible for plant-based eaters, while the overall low-calorie nature also caters to those mindful of their diet.

    Dietary Substitutions to Customize Your Easy Matcha Rose Latte

    The great news about the Easy Matcha Rose Latte is its flexibility. Here are some suggested substitutions to customize the recipe to fit various dietary needs:

    • Milk Options: You can substitute the cow’s milk with non-dairy alternatives like soy, almond, coconut, or oat milk. Each offers a unique flavor and texture, with almond milk being a favorite for its low calorie content.

    • Sweeteners: For a sugar-free option, consider using stevia or erythritol. If you prefer a low-glycemic option, opt for monk fruit sweetener.

    • Rose Water Alternatives: If rose water is unavailable, you can replace it with vanilla extract for an entirely different flavor experience.

    • Matcha Quality: Some matcha is ceremonial-grade, while others are culinary-grade. If you’re on a budget, culinary-grade matcha works perfectly for lattes!

    These adjustments make this Easy Matcha Rose Latte an inclusive recipe that can be enjoyed by everyone, regardless of dietary restrictions!

    How to Prepare the Perfect Easy Matcha Rose Latte: Step-by-Step Guide

    Making the Easy Matcha Rose Latte is an easy and enjoyable process. Follow these step-by-step instructions to achieve latte perfection:

    1. Gather Your Ingredients: Start by collecting all necessary ingredients listed above to ensure a smooth preparation process.

    2. Sift Matcha Powder: In a small bowl, sift 1 teaspoon of matcha powder to remove any clumps. This step will ensure a smooth mixture when whisking.

    3. Whisk with Water: Add 2 tablespoons of hot water (not boiling) to the sifted matcha. Use a bamboo whisk (chasen) or a frother to whisk until frothy and well combined. This should take about 1-2 minutes.

    4. Heat the Milk: In a saucepan, heat 1 cup of your chosen milk over medium heat until warm but not boiling. If you prefer an iced latte, skip this step.

    5. Combine Matcha and Milk: Once the milk is heated, pour it into the bowl with the matcha mixture, or use a pitcher to combine them. Stir well to integrate all flavors.

    6. Add Rose Water: Add 1 tablespoon of rose water to the mixture, adjusting the quantity based on your taste preference. For more floral intensity, you may add another teaspoon.

    7. Sweeten to Taste: If desired, add 1-2 teaspoons of your chosen sweetener to the latte. Stir until completely dissolved.

    8. Serve Warm or Cold: For a warm latte, pour it directly into a cup, and garnish with edible rose petals if desired. For an iced version, fill a tall glass with ice and then pour the matcha mixture over the ice.

    9. Enjoy and Customize: Sip your delightful Easy Matcha Rose Latte slowly, savoring the creamy texture and floral essence. Feel free to adjust the sweetness or rose flavor to your liking.

    This simple yet elegant recipe is a fantastic example of Starbucks copycat recipes, offering café-quality flavor right at home.

    Mastering Easy Matcha Rose Latte: Advanced Tips and Variations

    Here are some advanced tips and potential variations to make your Easy Matcha Rose Latte even more extraordinary:

    1. Experiment with Different Milks: Try different types of milk to find your perfect match. For instance, coconut milk will give a richer texture, while almond milk is lighter.

    2. Froth Your Milk: For a barista-style experience, froth your milk using a milk frother or by shaking it in a sealed jar before heating.

    3. Add Vanilla or Chai Spice: Consider enhancing your latte with a dash of vanilla extract or a sprinkle of chai spice for a creative twist.

    4. Layering Flavors: For a more complex flavor profile, you might want to add a layer of flavors, such as turmeric or cocoa powder blended with the matcha.

    5. Make It a Smoothie: Blend the latte ingredients with ice for a delicious matcha rose smoothie, perfect for a summer day!

    These tips will help you elevate your Easy Matcha Rose Latte experience while giving you various options to play with flavors and textures.

    How to Store Easy Matcha Rose Latte: Best Practices

    While this refreshing drink is best enjoyed fresh, you can store leftovers properly to maintain its quality:

    1. Refrigeration: If you have extras, store the Easy Matcha Rose Latte in an airtight container in the refrigerator. It’s best used within 24 hours for optimal flavor.

    2. Iced Lattes: If you’ve made an iced version, avoid storing it with ice cubes, as this could dilute the flavor. Instead, pour the drink into a container and chill.

    3. Reheating: If you’ve stored the latte due to leftovers, you can reheat it on the stovetop over low heat or in the microwave. Stir well to combine before serving.

    These practices can help keep your homemade latte delicious for later enjoyment, offering a practical solution that aligns with the concept of Starbucks copycat recipes!

    Nutritional Value of Easy Matcha Rose Latte

    Understanding the nutritional value of what you consume is crucial, especially in a health-conscious world. Here is the approximate nutrition information for one serving (without sweeteners) of the Easy Matcha Rose Latte:

    • Calories: 80 (approx.)
    • Total Fat: 4g
    • Saturated Fat: 2g (if using coconut or whole milk)
    • Protein: 3g
    • Carbohydrates: 9g
    • Fiber: 0g
    • Sugar: 7g (if sweetened)
    • Calcium: 120mg (depends on milk choice)
    • Antioxidants: High, due to matcha content

    This nutritional overview makes the Easy Matcha Rose Latte an appealing drink that can fit well into a balanced diet. It offers minimal calories and provides antioxidants while being adaptable to lower sugar versions based on your preference or diet.

    FAQs: Frequently Asked Questions About Easy Matcha Rose Latte

    Can I make this latte without matcha?

    While matcha is the star ingredient, you can use green tea instead, but the flavor profile will change.

    How can I make this recipe sugar-free?

    Substituting your sweetener with a sugar-free alternative like stevia or monk fruit will achieve the desired sweetness without calories.

    Is rose water safe to consume?

    Yes, culinary-grade rose water is safe for consumption. Always check the label to ensure it’s food-grade.

    Can I use flavored milk instead of plain?

    Absolutely! Using vanilla almond milk, for instance, will add a delightful flavor to your latte!

    What else can I use this rose matcha for?

    Besides lattes, you can add rose matcha to smoothies, baked goods, or even overnight oats for a unique touch.

    This friendly FAQ section provides insights that will help amateur cooks succeed in making this easy yet elegant Easy Matcha Rose Latte, framing it as an essential recipe among Starbucks copycat recipes.


    Your journey to creating an idyllic beverage begins with this Easy Matcha Rose Latte recipe! With its health benefits, ease of preparation, and endless customization options, it’s sure to become a favorite in your home. So why not give it a try today? Enjoy the rich flavors, the health boosts, and the sheer indulgence of this tropical delight that can elevate any time of day!

  • My Asian GrandmaS Secret Recipe For Best Shrimp Noodles

    My Asian GrandmaS Secret Recipe For Best Shrimp Noodles

    “`markdown

    My Asian Grandma’s Secret Recipe For Best Shrimp Noodles!: A Tropical Delight

    Introduction to My Asian Grandma’s Secret Recipe For Best Shrimp Noodles!

    Welcome to the culinary world of My Asian Grandma’s Secret Recipe for Best Shrimp Noodles! This delightful dish not only satisfies your cravings but also brings a taste of tropical bliss right to your kitchen. The beauty of this recipe lies in its simplicity and versatility. It’s a dish that’s not only easy to prepare but also packed with flavors and nutrients, making it an excellent choice for various audiences—from busy parents to health-conscious individuals.

    Incorporating shrimp, a fantastic source of lean protein, and a variety of colorful vegetables, this dish embraces health benefits that are too good to miss. Packed with vitamins, minerals, and antioxidants, our shrimp noodles stand out in the array of shrimp recipes available today. Moreover, this meal can be tailored to meet various dietary needs, being naturally gluten-free and adaptable for vegans.

    Whether you’re a seasoned chef or a beginner, the vibrant flavors and textures will inspire you to whip up this dish anytime. So, roll up your sleeves and prepare to be amazed by this simple, healthy, and utterly delicious recipe that’s sure to impress!

    Benefits and Advantages of My Asian Grandma’s Secret Recipe For Best Shrimp Noodles!

    Why is My Asian Grandma’s Secret Recipe for Best Shrimp Noodles so effective and adored? Let’s delve into its many advantages.

    First and foremost, the preparatory process is straightforward. You can have this dish on your table within half an hour—perfect for busy families or those who are often on the go. A blend of proteins, vegetables, and carbohydrates, this meal showcases balance and nutrition, which is increasingly essential in our fast-paced lives.

    Health-wise, shrimp is an incredible choice. It’s low in calories, and high in protein, making it a favorable option for anyone pursuing a fitness goal or focusing on a healthier lifestyle. Moreover, using fresh vegetables enhances the meal’s nutritional profile by adding fiber, which promotes digestion, and crucial vitamins that bolster immunity.

    Another standout feature of this recipe is its adaptability. Any home cook can easily customize it to their taste or dietary requirements. Whether you aim to incorporate more vegetables, switch to gluten-free noodles, or modify spices to cater to varying heat preferences, the flexibility of the recipe ensures everyone walks away satisfied.

    Additionally, the majestic flavors presented through a melange of sauces and spices elevate your dining experience, transporting you to a cozy Asian kitchen with every bite. In a world with an overwhelming number of shrimp recipes, this one stands out for maintaining health, simplicity, and delectable taste simultaneously.

    Ingredients Overview

    Essential Ingredients for My Asian Grandma’s Secret Recipe For Best Shrimp Noodles!

    To create the Best Shrimp Noodles, you’ll need the following ingredients:

    • 8 oz shrimp (peeled and deveined): This star ingredient is essential. It is packed with protein and rich in nutrients.
    • 8 oz rice noodles (gluten-free): This versatile base retains the dish’s authenticity while catering to gluten-sensitive individuals.
    • 1 cup mixed vegetables (carrots, bell peppers, broccoli): A colorful addition that provides essential vitamins and adds crunch.
    • 2 cloves garlic (minced): Enhances the flavor profile and adds a myriad of health benefits.
    • 2 tbsp sesame oil (or avocado oil for a vegan option): Helps with cooking and provides heart-healthy fats.
    • 3 tbsp soy sauce (tamari for gluten-free option): Adds umami flavor, and enhances the overall taste.
    • 1 tbsp oyster sauce (or mushroom sauce for vegan): Provides a rich depth, elevating flavors.
    • 1/2 tsp black pepper: A simple seasoning that complements the other flavors.
    • 1 tbsp lime juice: Brightens the dish, adding freshness.

    Dietary Substitutions to Customize Your My Asian Grandma’s Secret Recipe For Best Shrimp Noodles!

    • Shrimp Substitution: For a vegetarian or vegan option, you can substitute shrimp with tofu or tempeh, providing a comparable protein punch.
    • Noodle Alternatives: If rice noodles are not available, you can try zucchini noodles or egg noodles, depending on dietary needs.
    • Veggies Varieties: Feel free to use any seasonal vegetables like sugar snap peas, spinach, or bok choy. These not only add nutrition but also visually enhance your dish.
    • Sauce Adjustments: If you prefer a low-sodium version, opt for low-sodium soy sauce or alternative sauces made with coconut aminos.
    • Gluten-Free Options: Ensure you choose gluten-free noodles and tamari sauce to maintain a gluten-free dish while preserving the taste.

    With these options, My Asian Grandma’s Secret Recipe for Best Shrimp Noodles can easily fit into diverse dietary preferences while remaining delicious and satisfying!

    How to Prepare the Perfect My Asian Grandma’s Secret Recipe For Best Shrimp Noodles!: Step-by-Step Guide

    Creating the Best Shrimp Noodles is a delightful adventure that combines simple steps with flavorful ingredients. Here’s your step-by-step guide:

    1. Prepare the Noodles: Start by cooking the rice noodles according to package instructions. Generally, you’ll soak them in hot water for about 10-15 minutes until tender, then drain and set aside.

    2. Sauté the Vegetables: In a large pan or wok, heat 1 tablespoon of sesame oil over medium heat. Add the minced garlic and cook until fragrant, which takes about 30 seconds. Then, toss in your mixed vegetables and stir-fry for approximately 5 minutes until they start to soften.

    3. Cook the Shrimp: Push the vegetables to one side of the pan. Add the shrimp to the other side, cooking them for about 3-4 minutes or until they turn pink and opaque. This brings a beautiful color to your dish.

    4. Combine Ingredients: Incorporate the cooked noodles into the pan with the shrimp and veggies. Add the remaining sesame oil, soy sauce, oyster sauce, black pepper, and lime juice. Gently toss everything together, ensuring the noodles soak up all the delicious flavors.

    5. Taste and Adjust Seasoning: This step is crucial! Taste the dish and adjust seasoning if necessary. A little more soy sauce or lime juice can elevate the taste, depending on your preference.

    6. Serve: Once everything is well combined and heated through, serve the Best Shrimp Noodles hot. They are magnificently vibrant and fragrant!

    Feel free to experiment with this dish based on your tastes. For example, you could add chili flakes for heat or sprinkle sesame seeds for an added crunch.

    Mastering My Asian Grandma’s Secret Recipe For Best Shrimp Noodles!: Advanced Tips and Variations

    To take your culinary skills to the next level and deepen your understanding of My Asian Grandma’s Secret Recipe for Best Shrimp Noodles, consider these advanced tips and tempting variations:

    • Broth-based Variation: For a noodle soup version, add vegetable or seafood broth to the stir-fry before mixing in the noodles. This change adds warmth and comfort to your meal.

    • Herbs and Garnishes: Top your dish with fresh herbs like cilantro or basil for a burst of flavor and freshness. They are visually appealing and enhance the overall taste experience.

    • Make It Spicy: If you enjoy a kick, add fresh chili peppers or a dash of sriracha when incorporating the sauces. A spicy version of shrimp recipes is often a hit among spice lovers!

    • Meal Prep and Freezing: These shrimp noodles can be made ahead of time and reheated. While preparing, make a larger batch, divide it into portions, and store them in airtight containers for quick meals throughout the week.

    With these tips, you can not only perfect your technique but also put your own spin on this extraordinary dish, ensuring it never becomes monotonous!

    How to Store My Asian Grandma’s Secret Recipe For Best Shrimp Noodles!: Best Practices

    To retain the delightful flavors of My Asian Grandma’s Secret Recipe for Best Shrimp Noodles, proper storage is key. Here’s how to ensure your dish stays delicious:

    • Refrigeration: Store leftover shrimp noodles in an airtight container in the refrigerator. Properly stored, they will last for about 3-4 days while retaining quality.

    • Freezing: If you want to extend the shelf life even further, you can freeze the dish. Cool the noodles completely, then transfer them to freezer-safe bags or containers. When stored correctly, they can last up to 2-3 months.

    • Reheating: To reheat, first allow the dish to thaw in the refrigerator overnight if frozen. Then, warm it up in a pan over low heat. You may want to add a little water or extra soy sauce to ensure that the noodles do not dry out during reheating.

    With these best practices, you can enjoy My Asian Grandma’s Secret Recipe for Best Shrimp Noodles any time, fresh or reheated, and it will taste just as delightful!

    Nutritional Value of My Asian Grandma’s Secret Recipe For Best Shrimp Noodles!

    Understanding the nutritional profile of My Asian Grandma’s Secret Recipe for Best Shrimp Noodles is crucial for those mindful of their diets. Here’s a breakdown of its components:

    • Serving Size: Approximately 1 cup
    • Calories: 350-400 kcal
    • Protein: 25 grams
    • Fat: 10 grams (mostly healthy fats from sesame oil)
    • Carbohydrates: 50 grams (including fiber from vegetables and rice noodles)
    • Fiber: 4 grams
    • Sodium: 800-900 mg (may be lower with low-sodium sauce)

    This dish is rich in protein and provides essential nutrients from vegetables, while also being relatively low in calories. With thoughtful modifications, such as opting for low-sodium soy sauce, you can further enhance its nutritional value.

    By following your dietary preferences or restrictions, you can elevate this dish to not only be delicious but also a balanced meal option.

    FAQs: Frequently Asked Questions About My Asian Grandma’s Secret Recipe For Best Shrimp Noodles!

    Can I make this dish vegan?

    Absolutely! You can substitute shrimp with tofu or tempeh, and replace oyster sauce with mushroom sauce. This ensures a delightful meal for vegan enthusiasts.

    How can I store leftovers?

    Store leftover shrimp noodles in an airtight container in the fridge for 3-4 days. You can freeze the dish for up to 2-3 months for longer preservation.

    Are there gluten-free options?

    Yes, this recipe is naturally gluten-free if you use gluten-free soy sauce and rice noodles. Always check labels to ensure products fit your dietary needs.

    Can I prepare this meal ahead of time?

    Yes! You can make this dish ahead of time, store it in the refrigerator, and simply reheat it when ready to serve!

    What vegetables can I add to the noodles?

    You can customize this recipe with various seasonal vegetables such as bok choy, sugar snap peas, or spinach, according to your preference.

    These FAQs serve to clear common doubts about My Asian Grandma’s Secret Recipe for Best Shrimp Noodles and encourages readers to create their own delightful versions of this beloved dish!
    “`

    Feel free to further customize it to better fit your intended tone or platform!

  • Best Bang Bang Shrimp With Sweet Chili Sauce

    Best Bang Bang Shrimp With Sweet Chili Sauce

    Best Bang Bang Shrimp With Sweet Chili Sauce: A Tropical Delight

    Introduction to Best Bang Bang Shrimp With Sweet Chili Sauce

    Are you ready to indulge in a culinary adventure that captures the essence of the tropics? The Best Bang Bang Shrimp with Sweet Chili Sauce is a delightful recipe that will transport your taste buds to a sunny beachside paradise. This marvelous dish is not only a feast for the eyes but also a symphony of flavors that meld beautifully together. With its crispy coating, succulent shrimp, and the perfect balance of sweetness and heat from the chili sauce, it is sure to become a favorite in your home.

    What sets this dish apart from typical shrimp recipes is its simplicity and versatility. Whether you’re a busy parent looking for a quick weeknight dinner or a food enthusiast eager to impress guests at your next gathering, this recipe fits the bill. It is also gluten-free and can be tailored for vegan diets depending on your ingredient choices, making it suitable for a wide array of dietary preferences.

    Beyond its delicious taste, this Bang Bang Shrimp recipe offers numerous health benefits. Shrimp is a lean protein rich in essential nutrients while the sauce, made from wholesome ingredients, can be adjusted to suit your health goals. With this dish, you can satisfy your cravings guilt-free. Grab your apron and join me in creating this tropical delight that promises to be a hit at any mealtime!

    Benefits and Advantages of Best Bang Bang Shrimp With Sweet Chili Sauce

    When it comes to versatility in the kitchen, nothing quite compares to shrimp recipes, and the Best Bang Bang Shrimp with Sweet Chili Sauce stands out for various reasons. First and foremost, one of its key advantages is the ease of preparation. The cooking process involves simple techniques that can be managed even by novice cooks. In just a few steps, you can create a mouthwatering dish that looks like it came from a gourmet restaurant!

    This shrimp recipe doesn’t just cater to taste buds; it also provides numerous health benefits. High in protein, shrimp is an excellent alternative to heavier meats, making it a smart choice for individuals looking to maintain or lose weight. Additionally, the shrimp contains vital nutrients, including selenium and vitamin B12, which support overall health. This dish can be made using minimal oil, keeping it on the lighter side without sacrificing flavor.

    Another advantage is its adaptability. This recipe is perfect for various dietary needs—from gluten-free to light-calorie options, and even vegan adaptations. Busy parents can whip up this dish in under 30 minutes, while newlyweds can impress each other with a romantic dinner. Food enthusiasts will appreciate the exquisite flavor profile, while seniors and working professionals can enjoy a quick and healthy meal after a hectic day.

    Whether you’re hosting a gathering or just satisfying your own culinary flair, this Bang Bang Shrimp creates an inviting atmosphere that encourages togetherness over a shared meal. It instills warmth and creativity in the kitchen, inviting you to explore more shrimp recipes and expand your cooking repertoire!

    Ingredients Overview

    Essential Ingredients for Best Bang Bang Shrimp With Sweet Chili Sauce

    To create your Best Bang Bang Shrimp with Sweet Chili Sauce, you’ll need the following ingredients. Each component contributes to the overall experience of this tropical dish:

    • 1 lb large shrimp (peeled and deveined) – Provides essential proteins and nutrients.
    • 1 cup cornstarch – For a light and crispy batter.
    • 1 cup panko breadcrumbs – Adds crunchiness.
    • 1 large egg – Binds the coating ingredients.
    • 1/2 cup mayonnaise – Offers creaminess and balances the sweetness of the sauce.
    • 1/4 cup sweet chili sauce – The star of the show, lending sweetness with a hint of spice.
    • 1 tablespoon sriracha – For an extra kick (optional).
    • Salt and black pepper – For seasoning.
    • Green onions (for garnish) – Adds freshness and color when serving.

    To accommodate different dietary preferences:
    For gluten-free: Ensure the panko breadcrumbs are labeled gluten-free.
    For a lighter option: Consider using air-fried shrimp instead of deep-frying.
    Vegan version: Substitute shrimp with plant-based shrimp alternatives that are widely available.

    Dietary Substitutions to Customize Your Best Bang Bang Shrimp With Sweet Chili Sauce

    Customizing your Bang Bang Shrimp is easy, given the recipe’s flexibility. Here are some suggested substitutions to cater to dietary restrictions or ingredient availability:

    • Shrimp Alternatives: For a vegan version, try using plant-based shrimp alternatives like those made from konjac or soy protein. This substitute retains the texture that mimics shrimp to still give that unique mouthfeel.

    • Egg: If you’re looking to make the recipe vegan-friendly, you can replace the egg with a flaxseed mixture (1 tbsp flaxseed + 3 tbsp water, let sit to thicken) or vegan mayonnaise. Both options help the panko adhere to the main ingredient beautifully.

    • Low-Calorie Sauce: You can swap traditional mayonnaise for Greek yogurt or a vegan yogurt alternative to significantly reduce the calorie content while maintaining a creamy texture. This choice also adds a probiotic element to the dish.

    • Sauce Variations: Experiment with different sauces! If you want a sweeter blend, consider adding pineapple juice to the sauce instead of sweet chili sauce for a tropical twist. Conversely, if you love spice, add more sriracha or cayenne pepper to amp up the heat.

    Each substitution ensures that everyone, regardless of dietary preferences or restrictions, can enjoy the vibrant flavors of this Best Bang Bang Shrimp with Sweet Chili Sauce recipe.

    How to Prepare the Perfect Best Bang Bang Shrimp With Sweet Chili Sauce: Step-by-Step Guide

    Creating the Best Bang Bang Shrimp with Sweet Chili Sauce is a straightforward process. Follow these step-by-step instructions to get this crowd-pleaser on the table in no time!

    1. Prep the Shrimp: Start by rinsing the shrimp under cold water. Pat them dry with paper towels. This step is crucial as it ensures your coating adheres well.

    2. Set Up a Breading Station: In one shallow dish, place the cornstarch. In a second dish, beat the egg. In a third dish, combine the panko breadcrumbs with a pinch of salt and black pepper.

    3. Coat the Shrimp:

      • First, dip each shrimp in cornstarch, ensuring it’s evenly coated.
      • Next, dip the shrimp in the beaten egg mixture.
      • Finally, roll the shrimp in the panko breadcrumbs, pressing gently to ensure the breadcrumbs adhere well.
    4. Heat the Oil: In a large frying pan, heat about 1 inch of oil over medium heat. You can use vegetable oil, peanut oil, or an oil of choice that has a high smoke point.

    5. Fry the Shrimp: Once the oil is hot (you can test it by placing a breadcrumb in—if it sizzles, you’re ready!), carefully add the coated shrimp. Fry in batches, if necessary, to avoid overcrowding. Cook each side for about 2-3 minutes or until golden brown and crispy.

    6. Drain Excess Oil: Use a slotted spoon to transfer the fried shrimp to a plate lined with paper towels to drain any excess oil.

    7. Create the Sauce: In a bowl, mix the mayonnaise, sweet chili sauce, and sriracha (if using). Taste it and adjust to your preference. You can control the heat level based on how much sriracha you add!

    8. Toss the Shrimp: If you prefer your shrimp fully coated, toss them gently in the sauce. Alternatively, serve the sauce on the side for dipping.

    9. Garnish and Serve: Plate the shrimp and garnish with freshly chopped green onions. Feel free to add lime wedges on the side for a citrusy kick.

    10. Enjoy: Finally, gather your family or friends, and enjoy this delightful Bang Bang Shrimp! Consider serving it alongside a fresh salad or steamed vegetables for a complete meal.

    This step-by-step guide ensures you can whip up a delicious dish that’s sure to become a favorite among shrimp recipes.

    Mastering Best Bang Bang Shrimp With Sweet Chili Sauce: Advanced Tips and Variations

    To truly master your Bang Bang Shrimp, consider these advanced tips and creative variations to enhance this dish further:

    • Air Fryer Version: If you wish to keep it lighter, consider using an air fryer. Simply coat the shrimp as instructed, then place them in an air fryer basket and cook at 400°F (200°C) for about 8-10 minutes, flipping halfway through, until crispy.

    • Baking Option: For another healthy alternative, preheat your oven to 425°F (220°C). Place the coated shrimp on a parchment-lined baking sheet and lightly spray them with cooking spray. Bake for 15-20 minutes or until crispy and golden.

    • Flavorful Marinade: For an extra dimension of flavor, marinate the shrimp in a mixture of lime juice, garlic, and ginger for about 30 minutes before breading. This step intensifies the shrimp’s flavor, creating a more succulent bite.

    • Experiment with Sauces: Instead of just sweet chili sauce, consider mixing a dollop of honey with the sauce for a more robust sweetness. Alternatively, try a peanut sauce or a tangy mango salsa to contrast the spicy elements.

    • Serving Suggestions: Serve the shrimp on skewers or atop a bed of rice or quinoa for a complete meal. Additionally, you can serve it with a crisp cucumber salad or crunchy slaw for refreshing contrast.

    These tips and variations ensure that your Bang Bang Shrimp with Sweet Chili Sauce remains versatile and delicious. Feel free to get creative with each new preparation for an exciting dining experience!

    How to Store Best Bang Bang Shrimp With Sweet Chili Sauce: Best Practices

    To maintain the quality and flavor of your Best Bang Bang Shrimp with Sweet Chili Sauce, follow these storage best practices:

    • Refrigeration: If you have leftovers, allow the shrimp to cool down to room temperature before transferring them to an airtight container. They can be stored in the fridge for up to 2-3 days. When reheating, be cautious not to overcook, as shrimp tends to become chewy when reheated.

    • Freezing: For long-term storage, you can freeze the cooked shrimp. Place them in an airtight freezer-safe container, ensuring no excess air is present, and freeze for up to 3 months. When ready to enjoy, thaw overnight in the fridge before reheating.

    • Reheating: You can reheat the shrimp in the oven or air fryer for the best results, allowing them to stay crispy. Preheat your oven or air fryer to 350°F (175°C), place the shrimp on a baking sheet or in the fryer basket, and heat for about 5-10 minutes.

    By following these storage methods, you can enjoy your Bang Bang Shrimp days after you make it, preserving its irresistible taste.

    Nutritional Value of Best Bang Bang Shrimp With Sweet Chili Sauce

    Understanding the nutritional content of the Best Bang Bang Shrimp with Sweet Chili Sauce can help you appreciate its benefits. Here’s a breakdown of the approximate nutrition information for one serving (about 5 shrimp):

    • Calories: 350
    • Total Fat: 20g
    • Saturated Fat: 4g
    • Cholesterol: 150mg
    • Sodium: 600mg
    • Total Carbohydrates: 30g
    • Dietary Fiber: 1g
    • Sugars: 5g
    • Protein: 15g

    Nutritional Benefits:

    • High Protein: The shrimp provides an excellent source of high-quality protein, essential for building and repairing tissues.
    • Low Carbohydrate: Depending on your sauce and additional ingredients, this dish can be adapted to cater to low-carb diets.
    • Nutrients Provide Source: Shrimp contains various nutrients, including selenium, which is essential for thyroid function and immune health.

    By making mindful ingredient choices, you can tailor the dish to be as healthy or indulgent as you desire. This makes shrimp recipes like the Bang Bang Shrimp not only delicious but nutritious as well.

    FAQs: Frequently Asked Questions About Best Bang Bang Shrimp With Sweet Chili Sauce

    1. Can I make this recipe ahead of time?
    2. Yes, the shrimp can be breaded beforehand and stored in the refrigerator for a few hours before frying them just before serving. However, for the best texture, it is recommended to fry them fresh.

    3. Can I use frozen shrimp?

    4. Absolutely! Just make sure to thaw them thoroughly and pat them dry before proceeding with the recipe.

    5. Can I bake the shrimp instead of frying them?

    6. Yes, you can bake the shrimp at 425°F (220°C) for about 15-20 minutes. This method is a healthier alternative to frying.

    7. What can I use instead of sweet chili sauce?

    8. If sweet chili sauce isn’t available, consider using a combination of honey, soy sauce, and sriracha for a similar taste profile.

    9. How can I make this recipe spicier?

    10. Add more sriracha to the sauce or include diced jalapeños in the coating for an extra kick.

    11. Is this dish suitable for meal prepping?

    12. Yes, Bang Bang Shrimp can be prepared in batches and stored in the refrigerator or freezer for meal prep throughout the week.

    This FAQ section is designed to address your common concerns and enhance your cooking experience, ensuring that your adventures in shrimp recipes remain delightful and stress-free.

    With this detailed guide, you’re well on your way to mastering the Best Bang Bang Shrimp with Sweet Chili Sauce. Happy cooking!

  • Juicy Air Fryer Bang Bang Shrimp

    Juicy Air Fryer Bang Bang Shrimp

    Juicy Air Fryer Bang Bang Shrimp: A Tropical Delight

    Introduction to Juicy Air Fryer Bang Bang Shrimp

    If you’re on the lookout for an enticing dish that beautifully showcases the versatility of shrimp, then Juicy Air Fryer Bang Bang Shrimp is a must-try! This delightful recipe combines succulent shrimp with a creamy, spicy sauce and crispy coating, making it an extraordinary addition to your culinary repertoire. Not only is this dish simple to whip up, but it is also packed with flavor and health benefits. It can easily be tailored to suit various dietary needs, including gluten-free and low-calorie options.

    Bang Bang Shrimp is a contemporary twist on traditional shrimp dishes, known for its creamy, spicy sauce that tantalizes your taste buds. The air fryer makes the process healthier by using significantly less oil than conventional frying methods, yet still yielding that satisfying crunch that everyone loves. Perfect for busy weeknights, special gatherings, or whenever you’re craving something extraordinary, this recipe appeals to a wide variety of audiences—from busy parents to newlyweds and culinary enthusiasts. Plus, you can indulge guilt-free, knowing it’s a healthier shrimp recipe that doesn’t compromise on taste. Let’s dive into why this dish deserves a place in your kitchen!

    Benefits and Advantages of Juicy Air Fryer Bang Bang Shrimp

    There are countless benefits to whipping up a batch of Juicy Air Fryer Bang Bang Shrimp. First and foremost, the simplicity of preparation is astonishing. With minimal ingredients and straightforward steps, you can have a restaurant-quality dish ready in no time. For those who are continually on the go, you’ll find that the process can easily fit into your hectic schedule.

    Health Benefits: One of the standout features of this shrimp recipe is its health-conscious nature. The air fryer reduces the need for excessive oil; thus, you can enjoy a crispy texture without the added calories. Shrimp itself is rich in protein, low in calories, and contains essential nutrients like selenium and vitamin B12. Here’s a closer look at some of the health advantages:

    • Low in Calories: Shrimp is a lean source of protein, making it ideal for anyone managing their weight.
    • Heart-Healthy: Shrimp is low in fat and cholesterol, making this dish heart-healthy when prepared correctly.
    • Rich in Nutrients: Packed with essential vitamins and minerals, shrimp can contribute to a balanced diet.

    What makes this dish even more appealing is its adaptability. You can easily modify the spiciness of the sauce to suit your palate, making it a family-friendly meal. The versatility of serving options allows for everything from tacos to salads, making it perfect for various dining situations. Each bite offers an explosion of flavor, delivering that “wow” factor that can transform any meal into a celebration.

    Finally, whether you have dietary preferences like vegan or gluten-free, don’t worry! There’s an option for you. Let’s explore the essential ingredients that make this dish such a hit!

    Ingredients Overview

    Essential Ingredients for Juicy Air Fryer Bang Bang Shrimp

    To prepare the perfect Juicy Air Fryer Bang Bang Shrimp, it’s essential to gather the right ingredients. Here’s what you’ll need:

    • Shrimp (1 lb): Fresh or frozen shrimp works well. Be sure to peel and devein them.
    • All-Purpose Flour (1/2 cup): Flour helps create a crispy outer layer. For a gluten-free option, you can use almond flour or gluten-free all-purpose flour.
    • Egg (1 large): This acts as a binding agent for the coating.
    • Panko Breadcrumbs (1 cup): These breadcrumbs create a crunchy texture. Use gluten-free panko for a wheat-free version.
    • Salt (1 tsp): Enhances flavor.
    • Pepper (1/2 tsp): For a hint of spiciness.

    For the Bang Bang Sauce:

    • Mayonnaise (1/2 cup): Provides creaminess. For a lighter option, consider using Greek yogurt.
    • Sweet Chili Sauce (1/4 cup): Adds both sweetness and heat.
    • Sriracha (2-3 tbsp): For those who like extra spice. Adjust the amount per your heat tolerance.
    • Lime Juice (1 tbsp): Fresh lime juice will brighten the flavors.

    Each ingredient plays a crucial role in achieving that signature balance between creaminess and spiciness.

    Dietary Substitutions to Customize Your Juicy Air Fryer Bang Bang Shrimp

    1. Shrimp: For a non-seafood version, consider using tofu or chicken breast as an alternative protein source.
    2. Flour: Substitute all-purpose flour with almond flour or chickpea flour for a gluten-free option. For a lower-calorie alternative, use coconut flour.
    3. Egg: If you’re looking for a vegan option, aquafaba (the liquid from canned chickpeas) works beautifully as an egg substitute.
    4. Mayonnaise: Greek yogurt or a vegan mayo can replace traditional mayonnaise for a lighter or plant-based version.
    5. Sweet Chili Sauce: You can create a homemade version using cane sugar and a bit of water mixed with chili paste if you want to control sweetness.

    This flexibility ensures that you can cater to dietary preferences, making this a versatile recipe that everyone can enjoy!

    How to Prepare the Perfect Juicy Air Fryer Bang Bang Shrimp: Step-by-Step Guide

    Now that you have your ingredients sorted, let’s jump into the preparation! Follow these detailed steps to create your Juicy Air Fryer Bang Bang Shrimp:

    1. Prepare the Shrimp:
    2. If using frozen shrimp, make sure they are completely thawed. Pat them dry with paper towels to remove any excess moisture.

    3. Set Up Your Dredging Station:

    4. In one bowl, place the all-purpose flour mixed with salt and pepper.
    5. In a second bowl, beat the egg.
    6. In a third bowl, spread the panko breadcrumbs.

    7. Dredge the Shrimp:

    8. Take each shrimp and coat it in the flour mixture, then dip it into the beaten egg, followed by the panko breadcrumbs. Ensure every shrimp is well-coated for optimal crispiness.

    9. Preheat the Air Fryer:

    10. Preheat your air fryer to 400°F (200°C) for about 5 minutes. Preheating ensures your shrimp cook evenly and get that nice crispy texture.

    11. Air Fry the Shrimp:

    12. Spray the air fryer basket lightly with cooking spray to prevent sticking. Place the shrimp in the basket in a single layer, ensuring they aren’t overcrowded. You may need to do this in batches, depending on the size of your air fryer.

    13. Cook the Shrimp:

    14. Cook for 8-10 minutes, shaking the basket halfway through to ensure even cooking. The shrimp should be golden brown and crispy.

    15. Prepare the Bang Bang Sauce:

    16. While the shrimp are in the air fryer, mix together mayonnaise, sweet chili sauce, sriracha, and lime juice in a bowl. Adjust spice levels according to your preference.

    17. Toss the Shrimp in the Sauce:

    18. Once cooked, toss the shrimp in the Bang Bang sauce until they’re well coated. You can leave some shrimp plain for those who prefer less spice.

    19. Serve:

    20. Serve immediately with lime wedges, on a bed of lettuce, or as a filling in tacos.

    21. Customize:

    22. You can garnish with chopped green onions or sesame seeds for added flavor and presentation.

    This step-by-step guide will help you create restaurant-quality shrimp recipes in your own kitchen. Enjoy every delicious bite!

    Mastering Juicy Air Fryer Bang Bang Shrimp: Advanced Tips and Variations

    Taking your Juicy Air Fryer Bang Bang Shrimp to the next level can be incredibly rewarding. Here are some additional tips and variations:

    • Crispier Texture: For an even crunchier result, double-dip the shrimp in the egg before the breadcrumbs. This technique creates a thicker crust.
    • Flavor Variation: Experiment with different seasonings in the flour mixture, such as garlic powder, paprika, or even a Cajun spice mix for a unique twist.
    • ** Serving Suggestions:** Beyond the classic addition of lettuce or tacos, consider serving the shrimp over cauliflower rice for a low-carb option or as a topping for a noodle bowl.
    • Meal Prep: This dish can also be a great candidate for meal prepping. Cook and store the shrimp in an airtight container for up to three days, reheating in the air fryer for a few minutes to regain crispiness before serving.

    Understanding these advanced techniques and variations will help you master the art of Bang Bang Shrimp while impressing your family and friends with these exciting flavors!

    How to Store Juicy Air Fryer Bang Bang Shrimp: Best Practices

    When it comes to storing your leftover Juicy Air Fryer Bang Bang Shrimp, following some simple best practices ensures you maintain the dish’s deliciousness.

    • Refrigeration: Allow the shrimp to cool completely before transferring them to an airtight container. They can be refrigerated for up to 3 days.
    • Freezing: If you need to store them longer, they can be frozen for up to 1 month. Lay them in a single layer on a baking sheet to freeze before transferring them to a freezer-safe bag. This prevents them from clumping together.
    • Reheating: The best way to reheat Bang Bang Shrimp is in the air fryer. Preheat the air fryer to 350°F (175°C) and cook for about 3-5 minutes until heated through and crispy. Avoid the microwave, as it can make the shrimp soggy.

    Following these storage tips will help keep your delicious shrimp recipes ready to eat when you need a quick meal!

    Nutritional Value of Juicy Air Fryer Bang Bang Shrimp

    Understanding the nutritional value of your food is crucial, particularly for health-conscious individuals. Below is a breakdown of the nutritional data for a serving of Juicy Air Fryer Bang Bang Shrimp. (Please note that these figures are estimates and can vary based on exact ingredient measurements.)

    • Calories: Approximately 300 calories per serving
    • Protein: 23 grams
    • Fat: 17 grams
    • Carbohydrates: 24 grams
    • Fiber: 2 grams
    • Sugar: 5 grams
    • Sodium: 450 mg

    With a good protein content and relatively low carbs, this dish can fit well into many diets, including those emphasizing protein consumption. The nutritional balance makes it a satisfying choice, whether you’re chasing fitness goals or just craving a delicious meal.

    FAQs: Frequently Asked Questions About Juicy Air Fryer Bang Bang Shrimp

    1. Can I use frozen shrimp for this recipe?

    Yes! You can use frozen shrimp, but ensure they are completely thawed and dried before coating and air frying for the best texture.

    2. Is there a vegan option for Bang Bang Shrimp?

    Absolutely! You can substitute shrimp with tofu and use plant-based mayonnaise to create a vegan version of this delicious dish.

    3. How spicy is the Bang Bang sauce?

    The spice level can be adjusted by varying the amount of sriracha you use. If you prefer it milder, start with a teaspoon and taste test before adding more.

    4. What should I serve with Bang Bang Shrimp?

    Bang Bang Shrimp makes an excellent filling for tacos, or you can serve it over rice or mixed greens for a refreshing salad.

    5. How can I store leftovers?

    Store leftovers in an airtight container in the refrigerator for up to 3 days or freeze for up to a month. Reheat in the air fryer to maintain crispiness.

    By addressing these common queries, you’ll alleviate any doubts your readers may have, encouraging them to try this fantastic recipe!


    By following this comprehensive guide, you’ll master the art of crafting Juicy Air Fryer Bang Bang Shrimp, a dish that promises flavor, versatility, and health benefits in every bite. Happy cooking!

  • Easy Red Velvet Oreo Cupcakes Dessert

    Easy Red Velvet Oreo Cupcakes Dessert

    Easy Red Velvet Oreo Cupcakes Dessert: A Tropical Delight

    Introduction to Easy Red Velvet Oreo Cupcakes Dessert

    Are you searching for a show-stopping dessert that combines the rich flavors of red velvet cake with the beloved taste of Oreo cookies? Look no further than these Easy Red Velvet Oreo Cupcakes! This delightful treat is not only visually stunning but also incredibly easy to prepare, making it a perfect option for busy parents, students, and baking enthusiasts alike.

    What’s more? Dessert recipes like these cupcakes can easily cater to various dietary preferences, whether you’re on a vegan or gluten-free diet. They showcase the classic flavors you love while being adaptable to meet diverse nutritional needs. These cupcakes can serve as an impressive centerpiece for special occasions, birthday parties, or casual gatherings with friends.

    Furthermore, with their iconic red color and creamy Oreo frosting, these cupcakes carry an inviting appeal that will entice anyone looking for a sweet indulgence. You don’t need to be a professional baker to whip up this fantastic dessert; with easy-to-follow steps and accessible ingredients, anyone can achieve scrumptious results. So, why wait? Get ready to impress your friends and family with these delectable Easy Red Velvet Oreo Cupcakes!

    Benefits and Advantages of Easy Red Velvet Oreo Cupcakes Dessert

    One of the most significant advantages of Easy Red Velvet Oreo Cupcakes is their uncomplicated preparation method. This recipe simplifies the baking process while still delivering a luxuriously moist cupcake that tantalizes the taste buds. You can prepare this delightful dessert in just a few simple steps, allowing you more time to enjoy the finished product and share it with loved ones.

    Moreover, these cupcakes offer health-conscious bakers numerous benefits. Red velvet cake often contains added cocoa powder, which is rich in antioxidants. By incorporating a flexible recipe, participants can easily modify the ingredients to create a healthier alternative. For instance, you can substitute all-purpose flour with almond or coconut flour for a gluten-free option, and whole cane sugar can replace refined sugars for a more wholesome option.

    These cupcakes are also incredibly versatile, allowing bakers to cater to diverse dietary requirements. For our vegan friends, using plant-based substitutes for eggs and dairy can create a deliciously satisfying treat without compromising flavor or texture. As a result, Easy Red Velvet Oreo Cupcakes can appeal to everyone, regardless of their dietary preferences.

    In a world filled with complexity, this dessert simplifies your baking experience without sacrificing taste or nutritional value, making it an ideal choice for anyone who loves to indulge in a delightful treat.

    Ingredients Overview

    Essential Ingredients for Easy Red Velvet Oreo Cupcakes Dessert

    To create these scrumptious cupcakes, you’ll need the following essential ingredients:

    • 1 ½ cups all-purpose flour (or gluten-free flour blend)
    • 1 cup granulated sugar (or coconut sugar for a healthier option)
    • 1 tsp baking powder
    • ½ tsp baking soda
    • ½ tsp salt
    • 2 tbsp unsweetened cocoa powder
    • 1 cup vegetable oil (or applesauce for a lower-calorie version)
    • 1 cup buttermilk (or plant-based milk mixed with 1 tbsp vinegar for a vegan recipe)
    • 1 large egg (or ¼ cup unsweetened applesauce for vegan)
    • 1 tbsp red food coloring (natural alternatives are available)
    • 2 tsp vanilla extract
    • Oreo cookies (for topping and frosting)

    For the frosting, you will need:
    8 oz cream cheese (or vegan cream cheese for a vegan option)
    ½ cup butter (or plant-based butter)
    4 cups powdered sugar
    1 tsp vanilla extract
    Crushed Oreo cookies for garnish

    These ingredients come together to form a luscious cupcake that is not only a feast for the eyes but also a treat for your taste buds. The main ingredients facilitate a moist and rich flavor, while the Oreo cookies provide an extra crunch and chocolatey surprise, leading to an unforgettable dessert experience.

    Dietary Substitutions to Customize Your Easy Red Velvet Oreo Cupcakes Dessert

    Customizing your Easy Red Velvet Oreo Cupcakes can be as simple as swapping certain ingredients to suit your dietary preferences or ingredient availability:

    • Gluten-Free: Substitute all-purpose flour with a gluten-free flour blend or almond flour to create a gluten-free version.
    • Vegan: Use plant-based milk mixed with vinegar instead of buttermilk, apple sauce instead of eggs, and plant-based butter instead of regular butter.
    • Lower-Calorie: Replace vegetable oil with unsweetened applesauce, which helps to reduce fat content while still ensuring moistness.
    • Naturally Sweetened: Instead of granulated sugar, consider using honey, maple syrup, or a sugar substitute for a healthier option.
    • Dietary Restrictions: Feel free to experiment with lactose-free cream cheeses or dairy-free butter for lactose intolerant individuals.

    These substitutions not only accommodate various dietary needs but also enhance the overall appeal of the dessert. By providing inclusive options, you ensure everyone has the chance to enjoy this delightful treat without compromising their preferences or health directives.

    How to Prepare the Perfect Easy Red Velvet Oreo Cupcakes Dessert: Step-by-Step Guide

    Now let’s dive into the preparation of these delightful Easy Red Velvet Oreo Cupcakes. Follow this step-by-step guide to make the magic happen:

    1. Preheat Your Oven: Preheat your oven to 350°F (175°C) and line a muffin tin with cupcake liners. This ensures easy removal and a tidy presentation.

    2. Sift Dry Ingredients: In a large bowl, sift together the flour, granulated sugar, baking powder, baking soda, salt, and cocoa powder. This helps to ensure your cupcakes are light and fluffy.

    3. Mix Wet Ingredients: In a separate bowl, whisk together the vegetable oil, buttermilk, red food coloring, vanilla extract, and egg (or applesauce for a vegan option). Combine until the mixture is homogeneous.

    4. Combine Mixtures: Gradually add the wet ingredients to the dry ingredients, mixing gently until just combined. Be careful not to overmix, as this can lead to dense cupcakes.

    5. Fill Muffin Tin: Evenly distribute the cupcake batter into the prepared muffin tin, filling each liner about two-thirds full. This gives room for the cupcakes to rise without overflowing.

    6. Add Oreos: If desired, place a whole Oreo cookie at the bottom of each cupcake liner before adding the batter. This creates a surprise center that will delight everyone!

    7. Bake Your Cupcakes: Bake in the preheated oven for 18-20 minutes, or until a toothpick inserted into the center comes out clean. Keep an eye on them to avoid overbaking.

    8. Cool Completely: Once baked, remove the cupcakes from the oven and allow them to cool in the tin for 5 minutes before transferring them to a wire rack to cool completely.

    9. Prepare the Frosting: In a large bowl, beat the cream cheese and butter until creamy. Gradually add the powdered sugar and vanilla extract, mixing until smooth. If it’s too thick, you can add a splash of milk or your desired liquid for a lighter texture.

    10. Frost and Garnish: Once the cupcakes have completely cooled, use a piping bag or a knife to frost them generously with the cream cheese frosting. Finish with crushed Oreo cookies on top for that extra special touch.

    11. Enjoy!: Lastly, serve your Easy Red Velvet Oreo Cupcakes at room temperature, and watch them disappear as friends and family indulge in this delightful dessert!

    Feel free to adapt any of these steps to ensure they meet your dietary needs and preferences for a truly personalized baking experience!

    Mastering Easy Red Velvet Oreo Cupcakes Dessert: Advanced Tips and Variations

    While the basic recipe for Easy Red Velvet Oreo Cupcakes is fantastic on its own, let’s explore some advanced tips and variations to elevate your baking experience:

    • Chocolate Ganache Topping: For an extra layer of indulgence, melt dark chocolate and drizzle it over the frosted cupcakes. This creates a beautiful contrast with the red velvet, making it visually stunning.

    • Oreo Frosting: Instead of the standard cream cheese frosting, you can blend crushed Oreos directly into the frosting for an intensified flavor. This could take your cupcakes to a whole new level of deliciousness!

    • Oreo-Inspired Filling: Create a surprise filling by combining crushed Oreo cookies with whipped cream and pipette a dollop into the center of your baked cupcakes after they’ve cooled.

    • Mini Cupcakes: If you’re short on time or looking for bite-sized treats, you can make mini cupcakes instead. Just reduce the baking time to about 10-12 minutes for perfectly sized portions.

    • Red Velvet Layer Cake: Take this recipe on a different path by using the batter to create a red velvet layer cake instead of cupcakes. Simply divide the batter between two round cake pans and bake. Frost with your Oreo cream cheese frosting for a stunning cake worthy of any celebration!

    These tips and variations not only enhance your dessert’s flavors and presentation but also offer opportunities to experiment and impress your guests or family.

    How to Store Easy Red Velvet Oreo Cupcakes Dessert: Best Practices

    To ensure your Easy Red Velvet Oreo Cupcakes remain fresh and delicious, it’s important to store them properly. Here are some best practices for refrigeration, freezing, and reheating:

    • Refrigeration: If you have leftover cupcakes, store them in an airtight container in the fridge. They will stay fresh for up to 5 days. Keeping them sealed will prevent the cupcakes from drying out.

    • Freezing: To prolong the life of your cupcakes, freezing is an excellent option. Place the frost-less cupcakes in a single layer on a baking sheet and freeze until solid. Once frozen, transfer them to a zip-top freezer bag for up to 3 months. When you’re ready to enjoy, allow the cupcakes to thaw at room temperature and frost as desired.

    • Reheating: If you prefer warm cupcakes, pop them in the microwave for about 10-15 seconds. This will refresh their softness and make the frosting slightly melt for a gooey experience. If reheating frozen cupcakes, allow them to thaw in the fridge overnight before warming them.

    These storage methods ensure your cupcakes maintain their deliciousness and quality, so you can enjoy them at your leisure!

    Nutritional Value of Easy Red Velvet Oreo Cupcakes Dessert

    Understanding the nutritional value of your Easy Red Velvet Oreo Cupcakes allows for informed choices for those watching their diets. Here’s a breakdown of the estimated nutrition per cupcake, assuming the recipe yields 12 cupcakes:

    • Calories: Approximately 265 kcal
    • Protein: 3 g
    • Carbohydrates: 36 g
    • Fat: 12 g
    • Saturated Fat: 5 g
    • Cholesterol: 40 mg
    • Fiber: 1 g
    • Sugar: 22 g

    As you adapt the recipe to accommodate dietary needs (like lowering sugar or using lighter fats), keep in mind that the nutritional information will also change. For example, using applesauce in place of oil reduces calories and fat considerably, making it a lighter dessert option. Always consider the modifications to achieve a balance between indulgence and nutritional considerations.

    FAQs: Frequently Asked Questions About Easy Red Velvet Oreo Cupcakes Dessert

    Q1: Can I make these cupcakes gluten-free?
    Absolutely! Use a gluten-free flour blend in place of all-purpose flour for a deliciously gluten-free cupcake.

    Q2: How can I make this recipe vegan?
    You can replace the egg with ¼ cup apple sauce or a flaxseed egg, use plant-based milk with vinegar instead of buttermilk, and utilize vegan butter for the frosting.

    Q3: Can I freeze these cupcakes?
    Yes, you can freeze unfrosted cupcakes. Once they’re completely cool, place them in an airtight container or freezer bag. They will last for up to 3 months.

    Q4: How do I prevent my cupcakes from sinking?
    Ensure your oven is fully preheated before placing the cupcakes in it. Avoid overmixing your batter, as this could incorporate too much air, leading to denser cupcakes.

    Q5: Can I modify the frosting?
    Definitely! Get creative by adding flavors such as chocolate, lemon, or even peanut butter to the frosting. You can also incorporate crushed Oreo cookies for an extra kick of flavor.

    With these FAQ responses, home cooks can easily address their concerns and confidently embark on their cupcake baking journey.

    In conclusion, the Easy Red Velvet Oreo Cupcakes are an irresistible dessert recipe that caters to a variety of tastes and dietary needs. Their ease of preparation, customization options, and sheer deliciousness make them a fantastic choice for any occasion. Give this recipe a try, and watch as your friends and family rave about your baking skills!

  • Tasty Spicy Brazilian Coconut Chicken Dinner

    Tasty Spicy Brazilian Coconut Chicken Dinner

    Tasty Spicy Brazilian Coconut Chicken Dinner: A Tropical Delight

    Introduction to Tasty Spicy Brazilian Coconut Chicken Dinner

    Welcome to a culinary journey that offers an explosion of flavors in your kitchen! The “Tasty Spicy Brazilian Coconut Chicken Dinner” is not just another dish—it’s an experience that you can easily recreate at home. With its rich coconut milk base, a kick of spice, and tender chicken, this chicken recipe seamlessly combines simplicity and sophistication. This dish is crafted to inspire all cooks, whether you’re a busy parent looking for a quick dinner solution, a student aiming to impress your friends, or a seasoned food enthusiast wanting to explore Brazilian cuisine.

    What makes this meal particularly appealing is its focus on health and well-being. Packed with nutrients from fresh vegetables and coconut milk, it caters to various dietary preferences, making it vegan, gluten-free, and suitable for those seeking low-calorie options. The vibrant flavors and fresh ingredients not only hit the taste buds but also offer numerous health benefits, including anti-inflammatory properties and essential fats that promote heart health.

    Moreover, this Brazilian-inspired dish is ideal for various occasions—be it a cozy family dinner, a casual gathering with friends, or even a romantic date night. Once you master this recipe, you’ll likely find yourself returning to it again and again. Now, let’s venture deeper into what makes this culinary delight so incredible!

    Benefits and Advantages of Tasty Spicy Brazilian Coconut Chicken Dinner

    Opting for the Tasty Spicy Brazilian Coconut Chicken Dinner comes with numerous advantages that go beyond just delightful flavors. This dish stands out among other chicken recipes because of its remarkable ease of preparation. Perfectly suited for busy lifestyles, you can have this delicious meal ready in under an hour without sacrificing quality or taste.

    One of the most appealing attributes of this recipe is its health benefits. The primary ingredient, coconut milk, is not only creamy and aromatic but also packed with healthful components. It contains medium-chain triglycerides (MCTs), which support weight loss and improve metabolism. Furthermore, the use of fresh vegetables like bell peppers, onions, and garlic adds a rich array of vitamins and antioxidants that aid in boosting overall health and immunity.

    Additionally, the versatility of this dish is worth mentioning. You can adjust the spices according to your taste preferences, making it mild or hot, depending on who you’re serving. This flexibility ensures that your chicken recipe can accommodate various taste profiles, enhancing its appeal to a wide audience. Moreover, considering dietary restrictions, the dish can easily be modified to be gluten-free, vegan, or low-carb by using alternative ingredients.

    In conclusion, the Tasty Spicy Brazilian Coconut Chicken Dinner is not just about filling your stomach; it’s about nourishing your body while enjoying the vibrant flavors of Brazil. This meal strikes a chord with every type of cook, making it easier than ever to serve an uplifting blend of taste and health at your dining table.

    Ingredients Overview

    Essential Ingredients for Tasty Spicy Brazilian Coconut Chicken Dinner

    Here’s what you’ll need for this delicious recipe, perfectly balancing flavor and nutrition:

    • 2 cups of chicken breast (cubed, skinless; can use tofu or tempeh for a vegan option)
    • 1 can (14 ounces) of coconut milk (provides creaminess and richness)
    • 1 medium onion (chopped; adds sweetness and flavor)
    • 2 cloves of garlic (minced; enhances flavor and aroma)
    • 1-2 tablespoons of olive oil (for sautéing; can substitute with coconut oil)
    • 1 bell pepper (chopped; use red, yellow, or green for variety)
    • 1-2 tablespoons of red curry paste (adjust according to spice preference; adds depth)
    • 1 tablespoon of soy sauce (substitute with tamari for gluten-free)
    • Salt and pepper (to taste; optional)
    • Fresh cilantro (for garnish; adds freshness)

    This ingredient list ensures that every bite of your chicken recipe is filled with rich tropical flavors.

    Dietary Substitutions to Customize Your Tasty Spicy Brazilian Coconut Chicken Dinner

    This recipe can be easily customized to meet various dietary needs:

    1. For a Vegan Version: Substitute chicken with firm tofu or tempeh. Ensure to press the tofu first to remove excess moisture. This will help it absorb flavors better.

    2. Gluten-Free: Use tamari instead of soy sauce. Always check labels to confirm ingredients meet gluten-free standards.

    3. Low-Calorie Option: Use skinless chicken breast or go completely plant-based with vegetables and tofu. You can reduce the amount of coconut milk used and add more vegetable broth for a lighter base.

    4. Additional Veggies: Feel free to add vegetables like zucchini, spinach, or carrots for added nutrition and color.

    By making these adjustments, you can tailor the Tasty Spicy Brazilian Coconut Chicken Dinner to fit your dietary preferences and needs, ensuring a meal that everyone can enjoy.

    How to Prepare the Perfect Tasty Spicy Brazilian Coconut Chicken Dinner: Step-by-Step Guide

    Preparing this Tropical Delight is simple and straightforward. Follow these steps, and you’ll have a taste of Brazil right from your kitchen!

    1. Prep the Ingredients: Begin by gathering all your ingredients. Dice the chicken into bite-sized pieces and chop the onion and bell pepper. Mince the garlic and set everything aside.

    2. Heat the Oil: In a large pan, add olive oil (or coconut oil) over medium heat. Allow it to warm up for a minute.

    3. Sauté Aromatics: Once the oil is hot, add the chopped onion and cook for 3-4 minutes until it becomes soft and translucent. Stir in the minced garlic and sauté for an additional 1-2 minutes until fragrant.

    4. Cook the Chicken: Add the cubed chicken to the pan (or tofu, if making it vegan) and season with a little salt and pepper. Cook for about 7-10 minutes until the chicken is browned and cooked through.

    5. Incorporate the Vegetables: Add the chopped bell pepper to the pan and stir well to combine. Allow the mixture to cook for another 3-4 minutes until the bell peppers soften slightly.

    6. Stir in the Curry Paste: Add the red curry paste and soy sauce to the pan. Mix everything thoroughly, allowing the spices to coat the chicken and vegetables evenly.

    7. Pour in the Coconut Milk: Slowly pour in the coconut milk, stirring continuously. Bring the mixture to a gentle simmer.

    8. Simmer to Perfection: Lower the heat and let the dish simmer for 10-15 minutes. This allows the flavors to meld beautifully. You can adjust the thickness by adding more coconut milk or broth if desired.

    9. Taste and Adjust: After simmering, taste the sauce and adjust seasoning as needed. If you prefer more heat, feel free to add a dash of chili powder or hot sauce.

    10. Serve Hot: Once ready, serve your Tasty Spicy Brazilian Coconut Chicken Dinner over steamed rice, quinoa, or cauliflower rice. Garnish with freshly chopped cilantro for an extra pop of flavor.

    This step-by-step guide ensures that your dish turns out perfect every time!

    Mastering Tasty Spicy Brazilian Coconut Chicken Dinner: Advanced Tips and Variations

    Everyone loves experimenting with their dishes, and this chicken recipe is no exception. Here are some advanced tips and fun variations to help elevate your culinary adventure:

    1. Add More Heat: If you’re a fan of spice, consider adding sliced jalapeños or a sprinkle of red pepper flakes during the cooking process. This will give your dish an extra kick!

    2. Texture Variations: To add crunch, toss in some roasted peanuts or cashews just before serving. They provide an interesting textural contrast to the creamy sauce.

    3. Herbal Enhancements: Experiment with different herbs! Fresh basil or mint can add a refreshing twist to the dish. Simply chop them finely and sprinkle on top when serving.

    4. Fruit Integration: Consider incorporating fruits like mango or pineapple into the dish for a sweet balance to the spice. Add them in during the last few minutes of simmering to prevent them from breaking down completely.

    5. Use of Other Proteins: Instead of chicken, try shrimp, fish, or even legumes for variation. Each protein brings its own unique flavor and mouthfeel to this vibrant dish.

    By incorporating these advanced tips and variations, you can ensure that your Tasty Spicy Brazilian Coconut Chicken Dinner remains exciting and fresh each time you prepare it.

    How to Store Tasty Spicy Brazilian Coconut Chicken Dinner: Best Practices

    After a delightful meal, you may want to save leftover Tasty Spicy Brazilian Coconut Chicken Dinner for later. Proper storage is essential to maintain its flavor and freshness. Here’s how to do it right:

    • Refrigeration: Allow the dish to cool to room temperature. Transfer it to an airtight container and store it in the fridge. It will remain fresh for up to 3-4 days.

    • Freezing: If you wish to store it for a more extended period, freezing is a great option. Place the cooled dish into a freezer-safe container, leaving some space at the top for expansion. It can last up to 2-3 months in the freezer.

    • Reheating: To reheat, simply thaw it overnight in the refrigerator if frozen. You can reheat it on the stove over a medium flame or in the microwave until heated through. If the sauce thickens during storage, feel free to add a splash of coconut milk or broth to regain its creamy consistency.

    With these simple storage techniques, you can enjoy your chicken recipes even after the first meal!

    Nutritional Value of Tasty Spicy Brazilian Coconut Chicken Dinner

    Understanding the nutritional value of your food is key, especially when embracing a healthy lifestyle. Here’s a breakdown of the nutritional content per serving of the Tasty Spicy Brazilian Coconut Chicken Dinner (approximately one cup):

    • Calories: 450
    • Total Fat: 22g
    • Saturated Fat: 9g (mostly from coconut milk)
    • Cholesterol: 75mg (if using chicken)
    • Sodium: 600mg
    • Carbohydrates: 30g
    • Dietary Fiber: 3g
    • Sugars: 5g
    • Protein: 36g (if using chicken; protein will vary if using tofu or other proteins)

    This dish is not only flavorful but also provides a well-rounded nutrient profile. With a good balance of protein, carbohydrates, and healthy fats, it can fit into most health-conscious diets while satisfying your cravings for something exotic.

    FAQs: Frequently Asked Questions About Tasty Spicy Brazilian Coconut Chicken Dinner

    Can I make this dish vegetarian or vegan?

    Absolutely! Simply replace the chicken with tofu, tempeh, or virtually any protein source that suits your diet.

    How spicy is this dish?

    The level of spiciness mainly depends on the amount of red curry paste you use. For milder heat, start with one tablespoon and increase it as per your preference.

    Can I use other types of meat?

    Yes! You can swap the chicken for shrimp, fish, or even beef if desired. Just adjust the cooking time accordingly to avoid overcooking.

    How well does this dish freeze?

    The Tasty Spicy Brazilian Coconut Chicken Dinner freezes very well. Just ensure you store it appropriately in an airtight container to avoid freezer burn.

    What can I serve this dish with?

    This dish pairs wonderfully with rice, quinoa, or even sautéed greens to balance out the flavors.

    How long does this recipe take to prepare?

    Total preparation and cooking time is about 45 minutes, making it a quick and easy option for busy weeknights.

    With all your questions answered, you are now fully prepared to embark on your culinary adventure with the Tasty Spicy Brazilian Coconut Chicken Dinner! Dive into this delightful recipe and jazz up your table with a vibrant, tropical flair that’s bound to impress everyone at the dinner table!

  • Easy Crispy Roasted Cauliflower Side Dish

    Easy Crispy Roasted Cauliflower Side Dish

    Easy Crispy Roasted Cauliflower Side Dish: A Tropical Delight

    Introduction to Easy Crispy Roasted Cauliflower Side Dish

    Are you searching for easy dinner recipes that not only taste delicious but are also packed with nutrients? Look no further than the delightful Easy Crispy Roasted Cauliflower Side Dish. This simple yet satisfying dish transforms humble cauliflower into a crispy and golden treat that will make both your taste buds and your body rejoice.

    Cauliflower, a superstar in the vegetable world, is incredibly versatile. Its mild flavor allows it to soak up spices and seasonings beautifully, making it an excellent base for various culinary creations. With this roasted cauliflower recipe, you get a dish that is not only easy to prepare but also fits perfectly into a range of dietary preferences—whether you’re vegan, gluten-free, or simply looking to cut down on carbs.

    Loaded with vitamins C and K, this dish boasts a myriad of health benefits, including anti-inflammatory properties and high fiber content. Its lightness makes it the perfect accompaniment to heavier mains, yet it’s substantial enough to stand on its own as a light meal. Busy parents, students, food enthusiasts, and everyone in between will find that this roasted cauliflower side dish is the embodiment of effortless cooking with maximal impact.

    If you’re on a quest for satisfying food that inspires nourishment while being a feast for the eyes, the Easy Crispy Roasted Cauliflower Side Dish should sit at the top of your must-try list!

    Benefits and Advantages of Easy Crispy Roasted Cauliflower Side Dish

    Why is this Easy Crispy Roasted Cauliflower Side Dish a worthy addition to your recipe repertoire? Let’s explore the many benefits and advantages that make it stand out:

    1. Simplicity in Preparation

    This recipe shines in its simplicity. If you’re a busy parent or working professional, you’ll appreciate how quick it is to prepare. Just a few ingredients, minimal chopping, and you’re ready to enjoy a tasty side dish that complements any main course. This roasted cauliflower can be in and out of the oven in no time, leaving you free to focus on other meal components or spend time with loved ones.

    2. Health Benefits Galore

    Cauliflower is often hailed as a “superfood,” and for good reason. High in antioxidants and vitamins, it provides a significant health boost with each bite. By choosing this roasted dish, you embrace benefits such as:

    • Weight Management: Low in calories and high in fiber, cauliflower can help you feel fuller for longer.
    • Heart Health: Its rich content of vitamins and nutrients can contribute to overall cardiovascular health.
    • Digestive Health: The fiber in cauliflower promotes a healthy digestive tract, aiding in regularity.

    3. Versatility for Various Dietary Needs

    This Easy Crispy Roasted Cauliflower Side Dish aligns beautifully with vegan, keto, and gluten-free diets, making it an adaptable option for gatherings with diverse dietary preferences. You can easily modify spices or add additional toppings to cater to taste variations, ensuring everyone at the table is satisfied.

    4. Aesthetic Appeal

    In addition to its flavor and health benefits, this dish is visually appealing. The beautifully caramelized exterior of the roasted cauliflower provides a vibrant addition to your plate, making it a feast for the eyes too. Prepare to wow your guests—not just with the taste, but also with the vibrant presentation!

    5. Cost-Effectiveness

    Cauliflower is usually budget-friendly and widely available at grocery stores. This affordability, combined with the minimal quantity of ingredients needed, makes for an economical side dish without compromising on taste or health benefits. It’s a great choice for students and newlyweds looking to create delicious meals on a budget.

    By choosing to incorporate the Easy Crispy Roasted Cauliflower Side Dish into your menu, you’re not just opting for a healthy meal but a dish that resonates with flavor, ease, and versatility. Incorporate this into your roster of easy dinner recipes, and watch your family and friends keep coming back for more!

    Ingredients Overview

    Essential Ingredients for Easy Crispy Roasted Cauliflower Side Dish

    To prepare the Easy Crispy Roasted Cauliflower Side Dish, you’ll need the following essential ingredients, along with their benefits:

    Ingredients List:

    • 1 medium head of cauliflower (about 2 pounds), cut into florets
    • 3 tablespoons olive oil (or avocado oil): Provides healthy fats and aids in crisping.
    • 1 teaspoon garlic powder: Adds a depth of flavor without the fuss of fresh garlic.
    • 1 teaspoon onion powder: Enhances the savory notes.
    • ½ teaspoon smoked paprika: Infuses a slight smokiness for complexity.
    • Salt and pepper to taste: Essential for balancing flavors.
    • Fresh herbs for garnish (optional): Parsley or cilantro can add freshness and color.

    Nutritional Considerations:

    • Vegan: This recipe is entirely plant-based, ensuring it’s suitable for those following a vegan lifestyle.
    • Gluten-Free: Contains no gluten, making it ideal for gluten-sensitive individuals.
    • Low-Calorie: Cauliflower is a low-calorie vegetable, making this dish perfect for calorie-conscious eaters.

    Dietary Substitutions to Customize Your Easy Crispy Roasted Cauliflower Side Dish

    While this recipe is fantastic as is, don’t hesitate to customize it based on your dietary needs or ingredient availability. Here are some suggestions:

    • Oil Substitutes: If you’re looking to reduce calories, you can replace olive oil with a cooking spray or use a smaller amount of oil.
    • Protein Additions: To enhance the nutritional profile, consider tossing in some chickpeas or cooked quinoa alongside the cauliflower prior to roasting. This adding a source of plant-based protein can make it even more satisfying.
    • Herb Variations: Feel free to swap out the spices based on your preferences. For a spicy kick, try adding chili powder or cayenne pepper.

    With these ingredients and variations, you can easily create the Easy Crispy Roasted Cauliflower Side Dish, allowing for both customization and flexibility according to your palate and dietary requirements.

    How to Prepare the Perfect Easy Crispy Roasted Cauliflower Side Dish: Step-by-Step Guide

    Ready to bring this delightful dish to life? Follow these detailed, step-by-step instructions for Making Easy Crispy Roasted Cauliflower Side Dish:

    1. Preheat the Oven: Preheat your oven to 425°F (220°C). Preheating is crucial for achieving that crispy texture we’re after.

    2. Prepare the Cauliflower: Rinse and cut the cauliflower into even-sized florets. Consistent sizes will ensure they roast evenly.

    3. Measure Your Ingredients: In a small bowl, combine olive oil, garlic powder, onion powder, smoked paprika, salt, and pepper. This spice mix is what transforms the cauliflower from simple to sensational!

    4. Combine Florets and Oil Mixture: In a large mixing bowl, add the cauliflower florets. Drizzle the olive oil mixture over the florets, tossing to coat thoroughly and evenly.

    5. Arrange on a Baking Sheet: Spread the cauliflower florets in a single layer on a baking sheet lined with parchment paper to prevent sticking. This is essential for ensuring each piece gets enough space to roast properly.

    6. Roast for 25-30 Minutes: Place the baking sheet in the preheated oven and roast for 25-30 minutes. Halfway through, stir the cauliflower to promote even browning.

    7. Check for Doneness: The cauliflower is done when it turns golden brown and becomes crispy on the edges. Use a fork to test tenderness—if it goes through easily, you’re ready!

    8. Garnish and Serve: Remove the roasted cauliflower from the oven and let it cool for a couple of minutes. Garnish with fresh herbs if desired, then serve warm and enjoy!

    Adapt for Dietary Needs

    For individuals adhering to specific diets—vegan, gluten-free, or low-carb—this recipe can easily be modified, allowing everyone to enjoy this easy dinner recipe. Consider swapping spices or experimenting with additional toppings like nutritional yeast for a cheesy flavor without dairy.

    Now you have a fool-proof recipe ready to impress at your dinner table!

    Mastering Easy Crispy Roasted Cauliflower Side Dish: Advanced Tips and Variations

    To elevate your cooking game and take your Easy Crispy Roasted Cauliflower to the next level, consider the following advanced tips and variations:

    Advanced Tips:

    • Add Complexity with Cheese: For those who are not dairy-free, sprinkling some grated parmesan cheese on top of the florets during the last few minutes of roasting can create an irresistibly cheesy crust.
    • Experiment with Seasonings: Pepper, cayenne for heat, or even curry powder can be excellent additions, allowing you to diversify the flavors based on your mood or the main dish.
    • Try Different Cooking Techniques: Instead of roasting, you could try air-frying for an even crispier texture. Alternatively, grill the cauliflower on skewers for a summer barbecue twist.

    Variations:

    • Mediterranean Style: Add kalamata olives and cherry tomatoes halfway through roasting for a Mediterranean-inspired version.
    • Asian-Inspired: Drizzle with soy sauce, sesame oil, and sprinkle sesame seeds before serving for an Asian fusion feel.
    • Herbaceous Twist: Fresh dill or basil sprinkled on just before serving can invoke other culinary traditions and enhance the fresh profile.

    These tips and variations will inspire creativity in the kitchen, aligning with your journey toward achieving effortless easy dinner recipes that are sure to delight everyone at your table.

    How to Store Easy Crispy Roasted Cauliflower Side Dish: Best Practices

    To extend the life of your Easy Crispy Roasted Cauliflower Side Dish and enjoy it again later, proper storage is essential. Here are the best practices:

    Refrigeration:

    • Allow the roasted cauliflower to cool to room temperature before transferring it to an airtight container. Store in the refrigerator for up to 3-4 days.
    • When ready to eat, simply reheat it in a preheated oven at 375°F (190°C) for about 10 minutes to regain that desirable crispiness.

    Freezing:

    • For longer storage, freeze the roasted cauliflower. Spread pieces on a baking sheet in a single layer and flash freeze until solid. Once frozen, transfer to a freezer-safe bag or container, where it can be stored for up to three months.
    • To reheat from frozen, place it straight into the oven at 425°F (220°C) for about 15-20 minutes until warmed through and crispy.

    Reheating Best Practices:

    • For the best results, reheat in the oven rather than the microwave. The microwave may lead to sogginess, while the oven will help retain the crispy texture.

    By following these best practices, you can ensure that your Easy Crispy Roasted Cauliflower Side Dish becomes a versatile addition to your easy dinner recipes, providing quick and delicious meals at any time.

    Nutritional Value of Easy Crispy Roasted Cauliflower Side Dish

    When it comes to nutrition, opting for healthy side dishes like Easy Crispy Roasted Cauliflower makes a significant difference in your overall diet.

    Nutritional Information per Serving (approximation based on 4 servings):

    • Calories: 120
    • Protein: 4g
    • Fat: 9g
    • Carbohydrates: 8g
    • Fiber: 3g
    • Vitamin C: 77% of daily value
    • Vitamin K: 21% of daily value
    • Folate: 14% of daily value

    Health Benefits:

    • The high fiber content promotes digestive health and helps regulate blood sugar levels.
    • Rich in vitamins C and K, this side dish supports your immune system and aids in calcium absorption, promoting strong bones.
    • Cauliflower’s low-calorie nature makes it excellent for weight management without sacrificing flavor.

    Including the Easy Crispy Roasted Cauliflower Side Dish in your rotation of easy dinner recipes ensures you’re providing your body with essential nutrients while enjoying a delicious flavor experience.

    FAQs: Frequently Asked Questions About Easy Crispy Roasted Cauliflower Side Dish

    Here are some common questions readers may have about the Easy Crispy Roasted Cauliflower Side Dish:

    1. Can I use frozen cauliflower instead of fresh?

    Yes! While fresh cauliflower offers the best texture, frozen cauliflower can also be used. Just make sure to thaw it and pat it dry to avoid excess moisture during roasting.

    2. Is it possible to make this dish ahead of time?

    Absolutely! You can prepare the roasted cauliflower and store it in the refrigerator for up to four days or freeze for longer storage. Reheat in the oven before serving to maintain the crispy texture.

    3. What are some gluten-free options to pair with this dish?

    You can pair the Easy Crispy Roasted Cauliflower with gluten-free grains like quinoa or rice, making it an excellent accompaniment to any main dish, especially for those following gluten-free diets.

    4. Can I include other vegetables?

    Certainly! You can add other vegetables to the mix, such as Brussels sprouts or carrots, for a more colorful and varied dish. Just make sure to adjust cooking times based on your veggie selections.

    5. How many servings does this recipe yield?

    This recipe generally yields about four servings, depending on portion sizes. Feel free to double the recipe if you’re serving a larger crowd.

    Incorporating the Easy Crispy Roasted Cauliflower Side Dish into your meal planning will meet both flavor and health expectations, ensuring it’s a favorite among your collection of easy dinner recipes. Dive into this delightful side dish and experience culinary joy!


    With the Easy Crispy Roasted Cauliflower Side Dish, cooking becomes an enjoyable experience filled with mouth-watering flavors that cater to both health and taste, making it ideal for any occasion. Enjoy this versatile recipe and share it with those around you for lasting culinary memories!

  • Tasty Chicken Shawarma With Yogurt Sauce

    Tasty Chicken Shawarma With Yogurt Sauce

    Tasty Chicken Shawarma With Yogurt Sauce: A Tropical Delight

    Introduction to Tasty Chicken Shawarma With Yogurt Sauce

    If you’re on the lookout for easy yet delicious chicken recipes that can amaze your family and impress your friends, look no further than this Tasty Chicken Shawarma With Yogurt Sauce. Originating from the Middle East, this dish is not only simple to prepare but also packed with vibrant flavors and healthy ingredients. Utilizing tender chicken marinated in a blend of aromatic spices, this recipe features a rich yogurt sauce that complements the smoky, savory profile of shawarma beautifully.

    What makes this recipe stand out is its versatility. It caters to a range of dietary preferences, making it a great option for everyone—busy parents can quickly whip it up for dinner, students can enjoy a filling meal on a budget, and health-conscious individuals will appreciate its nutritious components. Moreover, the shawarma spice blend is gluten-free, while the yogurt sauce is a delightful addition that can easily be prepared vegan by substituting with plant-based yogurt.

    In essence, Tasty Chicken Shawarma With Yogurt Sauce is more than just a meal—it’s an experience, offering a tropical delight that transports you to sun-kissed markets brimming with the rich aromas of spices and grilling meats. This dish is not just a feast for the taste buds but also an opportunity to bond with loved ones over a delicious meal, making it a fantastic addition to your collection of go-to chicken recipes.

    Benefits and Advantages of Tasty Chicken Shawarma With Yogurt Sauce

    Tasty Chicken Shawarma With Yogurt Sauce is not only a flavorful dish but also embodies numerous benefits that make it an ideal choice for home cooks of all kinds. Here’s why you’ll love making this dish:

    1. Simplicity and Convenience: One of the standout features of this recipe is that it can be prepared in under an hour. The marination process allows the spices to penetrate the chicken deeply, requiring minimal cook time. This simplicity is perfect for busy parents juggling busy schedules or students who need to prepare meals quickly.

    2. Health Benefits: Chicken is a great source of lean protein, which is vital for building and repairing tissues. The addition of yogurt introduces probiotics, which promote gut health. Plus, the featured spices—such as garlic, cumin, and paprika—bring antioxidants and anti-inflammatory properties into the mix, making your meal both delicious and nutritious.

    3. Versatility: This shawarma recipe is designed to suit various dietary needs. Whether you’re gluten-free, dairy-free, or simply looking to reduce calories, this dish can accommodate. You can serve it on whole-grain pita, over a fresh salad, or even in a lettuce wrap for a light and low-carb option.

    4. Flavor Explosion: The unique marination process allows for the fusion of spices, creating a tantalizing flavor profile that elevates the humble chicken to new heights. The yogurt sauce adds a creamy balance and enhances the overall taste, making every bite a delightful experience.

    5. Cultural Experience: Cooking Tasty Chicken Shawarma with Yogurt Sauce opens up a window to Middle Eastern cuisine. By trying out this recipe, you offer your family a delicious taste of diverse cultures, enriching their food experiences and fostering an appreciation for global flavors.

    Incorporating Tasty Chicken Shawarma With Yogurt Sauce into your routine not only caters to varying dietary preferences but also helps you embrace health and enjoyable cooking. With its balance of simplicity, health benefits, and adaptability, this dish joins the ranks of the best chicken recipes to keep in your rotation.

    Ingredients Overview

    Essential Ingredients for Tasty Chicken Shawarma With Yogurt Sauce

    1. For the Chicken Marinade:
    2. Chicken Breast (500g): Cut into thin strips; a lean protein source for this recipe.
    3. Garlic (4 cloves): Minced; adds a fragrant depth and enhances the flavor.
    4. Ground Cumin (2 tsp): A warm spice that contributes to the savory profile.
    5. Paprika (2 tsp): Offers a subtle sweetness and red color.
    6. Turmeric (1 tsp): Adds earthiness and health benefits due to its anti-inflammatory properties.
    7. Cinnamon (½ tsp): Provides warmth and a hint of sweetness.
    8. Salt (1 tsp): Enhances all flavors; can be reduced for low-sodium diets.
    9. Black Pepper (½ tsp): For an added kick.
    10. Olive Oil (2 tbsp): Adds moisture and richness, can be replaced with avocado oil for a higher smoke point.

    11. For the Yogurt Sauce:

    12. Greek Yogurt (1 cup): A thick, creamy base rich in protein; use coconut yogurt for a non-dairy option.
    13. Lemon Juice (2 tbsp): Adds brightness and acidity.
    14. Fresh Parsley (2 tbsp): Chopped; provides color and freshness.
    15. Salt (to taste): For seasoning, can be adjusted according to dietary needs.
    16. Cucumber (1, grated): Optional, adds crunch and freshness, especially useful in the heat of summer.

    17. Extras for Serving:

    18. Pita Bread or Wraps: Whole-grain for added fiber; a gluten-free alternative works too.
    19. Vegetables (lettuce, tomatoes, onions): Fresh toppings to build your shawarma.
    20. Pickles: Optional, for tanginess to balance flavors.

    This comprehensive list ensures that your Tasty Chicken Shawarma With Yogurt Sauce is both rich in flavor and nourishing, while also providing options for various dietary needs. Whether you are preparing a meal for a family gathering or a quick dinner for yourself, these ingredients will help to create a delightful experience.

    Dietary Substitutions to Customize Your Tasty Chicken Shawarma With Yogurt Sauce

    When it comes to customizing this classic recipe, there are plenty of substitutions you can make to cater to your dietary preferences. Here are some options to consider:

    • For a Vegan Version: Substitute the chicken with marinated tofu or tempeh, which absorbs the marinade’s flavors beautifully. Additionally, replace Greek yogurt with a plant-based yogurt or tahini sauce to maintain the creamy element.

    • For Gluten-Free Needs: Use gluten-free pita bread or wrap alternatives such as lettuce leaves or cauliflower wraps. This keeps the essence of the dish intact without compromising dietary restrictions.

    • Lower Calorie Options: You can opt for skinless chicken thighs instead of breast for a bit more flavor with fewer calories, or simply reduce the oil in the marinade without sacrificing taste.

    • Spice Variations: Feel free to add or replace spices according to your taste. For example, if you’re a fan of heat, consider adding cayenne pepper or chili flakes to the marinade for an extra kick.

    By embracing these substitutions, you can make Tasty Chicken Shawarma With Yogurt Sauce a versatile dish, perfect for anyone at the dining table while still fitting within your dietary goals.

    How to Prepare the Perfect Tasty Chicken Shawarma With Yogurt Sauce: Step-by-Step Guide

    Now that you have assembled all the necessary ingredients, it’s time to dive into the cooking process. Follow these detailed, easy-to-follow steps to prepare your exquisite Tasty Chicken Shawarma With Yogurt Sauce:

    1. Prepare the Marinade:
    2. In a mixing bowl, combine minced garlic, ground cumin, paprika, turmeric, cinnamon, salt, black pepper, and olive oil. Mix well to create a fragrant marinade.

    3. Marinate the Chicken:

    4. Add the chicken strips to the marinade, ensuring they are well-coated. Cover the bowl with plastic wrap or transfer to a sealable bag. Let it marinate in the refrigerator for at least 30 minutes, preferably 2-4 hours for maximum flavor enhancement.

    5. Preheat the Grill or Oven:

    6. If you’re grilling: Preheat your grill to a medium-high heat. If using the oven: Preheat to 400°F (200°C) with a baking sheet placed inside to warm it.

    7. Prepare the Yogurt Sauce:

    8. While the chicken is marinating, prepare the yogurt sauce. In a separate bowl, mix Greek yogurt, lemon juice, chopped parsley, and grated cucumber. Adjust salt to taste, then refrigerate until needed.

    9. Cook the Chicken:

    10. Once the chicken has marinated, remove it from the refrigerator. If grilling, place the strips directly on the grill and cook for 6-8 minutes per side, until they have nice grill marks and are cooked through. If baking, spread the chicken on the preheated baking sheet and roast for about 20-25 minutes, or until fully cooked.

    11. Serve with Fresh Toppings:

    12. Remove the chicken from the grill or oven and let it rest for a few minutes. Serve it on warm pita bread or wraps, drizzled with the yogurt sauce, topped with your choice of lettuce, tomatoes, onions, and pickles.

    13. Garnish and Enjoy:

    14. Garnish with extra parsley for a pop of color. This dish is best enjoyed fresh, but it’s perfect for meal prep too!

    Additional Cooking Tips:

    • Skewering Option: If you prefer, you can skewer the marinated chicken onto wooden skewers before grilling for an authentic street-food vibe.
    • Flavor Depth: For a more complex flavor, try adding a splash of apple cider vinegar or a dash of soy sauce to the marinade.
    • Batch Cooking: This recipe saves exceptionally well, so consider making a double batch for easy meal prep.

    By following these steps, you can easily create Tasty Chicken Shawarma With Yogurt Sauce that everyone will love, turning your kitchen into a hub of savory aromas and tropical delights.

    Mastering Tasty Chicken Shawarma With Yogurt Sauce: Advanced Tips and Variations

    To take your Tasty Chicken Shawarma With Yogurt Sauce to the next level, here are some advanced tips and variations to experiment with:

    1. Spice Your Marinade: Don’t shy away from experimenting with spices! Adding smoked paprika instead of regular can give a wonderful depth to the chicken. Furthermore, consider marinating overnight for even richer flavors.

    2. Alternative Proteins: While chicken is the star here, you can also use beef, lamb, or even shrimp for a different twist. Just adjust marinating and cooking times based on the protein chosen.

    3. Homemade Flatbreads: For a truly gourmet experience, try making your own pita bread or wraps. While it requires a bit more effort, the result is exceptionally rewarding and complements the shawarma beautifully.

    4. Vegetarian Shawarma: Not a fan of meat? This recipe can be easily modified using roasted vegetables like bell peppers, zucchini, and eggplant. Marinate them similarly and grill until tender and juicy.

    5. Experiment with Sauces: While the yogurt sauce is a classic pairing, consider tzatziki or tahini sauce for exciting variations. These alternatives can introduce varying flavors and textures to your dish.

    6. Serving Styles: Enjoy the shawarma in various forms—serve it as a bowl with fresh greens, grains, and toppings, or pile it on a platter for guests to build their own. This makes for a fun dining experience.

    By incorporating these tips and variations, you can master Tasty Chicken Shawarma With Yogurt Sauce, ensuring it remains a staple in your recipe collection for years to come!

    How to Store Tasty Chicken Shawarma With Yogurt Sauce: Best Practices

    Storing Tasty Chicken Shawarma With Yogurt Sauce properly not only preserves its flavors but also ensures that you can enjoy it later without compromising quality. Here’s how to do it:

    1. Refrigeration: Once the chicken has cooled down, place it in an airtight container. It will keep well in the fridge for up to 3 days. Make sure the yogurt sauce is stored separately to prevent it from turning runny.

    2. Freezing: If you’d like to store it for a more extended period, consider freezing the cooked chicken. Place the chicken in a freezer-safe container, ensuring to remove as much air as possible. It can be frozen for up to 2 months. When ready to eat, defrost it overnight in the refrigerator before reheating.

    3. Reheating: To enjoy your leftover chicken shawarma, reheat it in an oven preheated to 375°F (190°C) for about 10-15 minutes or until heated thoroughly. If using a skillet, add a drizzle of oil to prevent it from drying out.

    4. Yogurt Sauce: The yogurt sauce is best consumed fresh. However, if you’re storing it, keep it in an airtight container in the fridge and use it within 3-4 days. If it separates, simply stir to recombine before serving.

    By following these best practices, you can minimize food waste while ensuring that each serving of Tasty Chicken Shawarma With Yogurt Sauce remains as delicious as when it was first made.

    Nutritional Value of Tasty Chicken Shawarma With Yogurt Sauce

    Understanding the nutritional value of your meals is crucial for maintaining a balanced diet. Here’s a breakdown of the key nutritional components of Tasty Chicken Shawarma With Yogurt Sauce per serving (approximately 250g of marinated chicken and sauce):

    • Calories: 350-400
    • Protein: 30g (dependable on chicken used)
    • Fat: 15g (varying with the amount of olive oil)
    • Carbohydrates: 18g (from pita or wraps, if included)
    • Fiber: 3g (primarily from vegetables)
    • Sugar: 4g (natural from yogurt)

    Key Nutritional Highlights:

    • High in Protein: Essential for muscle growth and repair, making this dish beneficial for active individuals or those looking to maintain a healthy lifestyle.
    • Rich in Healthy Fats: Olive oil and optional toppings like nuts introduce healthy fats, supporting cardiovascular health.
    • Packed with Vitamins: The vegetables not only enhance flavor but also contribute essential vitamins and minerals to your meal.

    Tailoring to Your Needs:

    To adapt this recipe further:
    – Opt for grilled rather than fried chicken to reduce calories.
    – Choose whole wheat or low-carb pita for more fiber or fewer carbohydrates.
    – Adjust portion sizes to fit your dietary goals.

    By understanding the nutritional value of Tasty Chicken Shawarma With Yogurt Sauce, you can enjoy it guilt-free, knowing it supports your health and wellness objectives.

    FAQs: Frequently Asked Questions About Tasty Chicken Shawarma With Yogurt Sauce

    1. Can I use other meats besides chicken for shawarma?

    Absolutely! You can use beef, lamb, or even seafood like shrimp. Just adjust cooking times according to the protein you’ve chosen.

    2. Is this dish suitable for meal prep?

    Yes, this dish is excellent for meal prep! The chicken and yogurt sauce can be made in advance, making it easy to assemble when you’re ready to eat.

    3. Can I make the yogurt sauce vegan?

    Yes! Simply replace the Greek yogurt with a plant-based yogurt, like coconut or almond yogurt, for a vegan version.

    4. How spicy is this chicken shawarma?

    The spice level can vary based on your personal preference. If you prefer it spicier, consider adding crushed red pepper flakes or cayenne pepper to the marinade.

    5. What sides go well with Tasty Chicken Shawarma?

    This dish pairs beautifully with a side salad, roasted vegetables, or even quinoa tabbouleh. Additionally, serving fresh pita bread and dips like hummus can create a well-rounded meal.

    6. Can I freeze my leftovers?

    Yes! You can freeze the cooked chicken in an airtight container for up to 2 months. Be sure to store the yogurt sauce separately, as it is best enjoyed fresh.

    In conclusion, Tasty Chicken Shawarma With Yogurt Sauce is a delightful recipe that elevates simple ingredients into a world of flavor. Through understanding the preparation, variations, storage, and nutritional information, you’re equipped to add this dish to your collection of favorite chicken recipes—one that you can confidently serve at any occasion. So gather your ingredients, follow the steps above, and enjoy a meal that’s as vibrant and fulfilling as it is easy to make!

  • The Best Garlic Butter Steak Bites

    The Best Garlic Butter Steak Bites

    The Best Garlic Butter Steak Bites: A Tropical Delight

    Introduction to The Best Garlic Butter Steak Bites

    Are you in search of an exciting and succulent addition to your dinner recipes? Look no further than these delectable Garlic Butter Steak Bites! This dish is a perfect blend of rich flavors and incredible simplicity, making it a superb choice for home cooks, busy parents, students, and food enthusiasts alike. With minimal ingredients and straightforward instructions, you can have a mouthwatering meal ready in no time.

    One of the standout benefits of this recipe is its versatility. Whether you’re someone who leans towards a low-carb diet or is simply looking for quick weeknight dinner ideas, these steak bites fit the bill beautifully. They are not only packed with protein but also flavorful enough to satisfy even the pickiest of eaters. Furthermore, they can be made gluten-free and incorporate various dietary preferences without compromising on taste.

    The balance of garlic and butter creates a luxurious flavor profile, making these steak bites an impressive dish suitable for gatherings or an intimate family dinner. The recipe is designed to inspire cooks of all skill levels, encouraging even the most novice chef to try their hand at making something memorable. Let’s dive into the world of the Best Garlic Butter Steak Bites that promise to elevate your dinner experiences!

    Benefits and Advantages of The Best Garlic Butter Steak Bites

    The allure of Garlic Butter Steak Bites lies not only in their taste but also in their multitude of benefits. If you are among those seeking hassle-free dinner recipes, this dish stands out for many reasons:

    1. Ease of Preparation: One of the most appealing features of this recipe is its simplicity. In under 30 minutes, you can create a hearty and satisfying meal. With straightforward steps to follow, even beginner cooks will find success.

    2. Health Benefits: Each bite is a protein powerhouse, making it an excellent option for those mindful of their macros. Steak provides essential nutrients such as iron and zinc, while the garlic in the recipe boasts various health properties, including boosting the immune system and enhancing cardiovascular health. For health-conscious individuals, this meal supports a balanced, protein-rich diet.

    3. Dietary Flexibility: One of the most rewarding aspects of cooking is adjusting recipes to meet dietary needs. You can easily modify the ingredients to accommodate different restrictions. For instance, if you’re looking for gluten-free dinner recipes or prefer a vegan version, the steak can be swapped out for mushrooms or tofu while maintaining the garlic butter sauce for flavor.

    4. Great for Any Occasion: These Garlic Butter Steak Bites are perfect for various occasions, whether you have guests over or just want to treat yourself to a sumptuous dish after a long day. Their appealing presentation can elevate casual dining into a gourmet experience.

    5. Quick Cleanup: With minimal cookwear needed, cleanup is a breeze. You can spend less time scrubbing pots and pans and more time enjoying your delicious creation.

    By choosing to cook Garlic Butter Steak Bites, you embrace a meal that is undeniably delicious and efficient, making it a must-try for your next dinner recipes!

    Ingredients Overview

    Essential Ingredients for The Best Garlic Butter Steak Bites

    Creating your own successful Garlic Butter Steak Bites begins with gathering the right ingredients. Here’s a comprehensive list that includes precise measurements along with the role of each component in enhancing the dish.

    • 1 lb (450g) of Steak (such as sirloin or ribeye)
    • 1/4 cup of Unsalted Butter: The star of the dish; adds richness and helps create the garlic butter sauce.
    • 4-5 Cloves of Garlic: Freshly minced, this brings the aromatic halo and health benefits.
    • Salt and Pepper: For seasoning, adjust to taste.
    • Optional: Fresh Parsley (for garnish): Adds color and freshness to the dish.

    Diet-conscious options:
    For gluten-free: Ensure steak is fresh and unprocessed, avoiding any marinade or sauces containing gluten.
    For low-calorie: Consider using a leaner cut of steak without added fats, or substitute steak with mushrooms or eggplant for a vegetable-based option.

    With these ingredients rounded up, you are on your way to crafting the most delightful Garlic Butter Steak Bites.

    Dietary Substitutions to Customize Your The Best Garlic Butter Steak Bites

    Cooking is an art that allows room for creativity and adaptation. Here are some helpful substitutions to cater to different dietary needs or ingredient availability.

    • Vegan Alternative: Substitute the steak with mushrooms (like portobello or oyster) or tofu, soaking them in seasonings for added flavor. Use vegan butter to replace unsalted butter for a delicious plant-based version.

    • Paleo Diet Adjustments: If you’re following a paleo diet, ensure no added fillers in your chosen steak. Complement with fresh herbs and vegetables like zucchini or bell peppers for a well-rounded meal.

    • Low-Carb Options: Use flank steak or sirloin to keep carbs below the threshold while enjoying the richness of the garlic butter sauce.

    • Dairy-Free: For those avoiding dairy, consider nut-based butters or olive oil, which can mimic the richness without the lactose.

    By making these simple adjustments, you can create an array of delicious adaptations of Garlic Butter Steak Bites, aligning perfectly with your dietary needs.

    How to Prepare the Perfect The Best Garlic Butter Steak Bites: Step-by-Step Guide

    Preparing Garlic Butter Steak Bites is an effortless process. Below, you’ll find a clear and sequential guide to ensure you nail this recipe from start to finish.

    1. Prepare the Steak: Begin by cutting the steak into bite-sized cubes. This allows for quicker cooking and a generous caramelization, which enhances flavor.

    2. Season the Steak: Sprinkle salt and pepper on the steak cubes to ensure even seasoning. Let them sit at room temperature for about 15 minutes. This process promotes better cooking.

    3. Melt the Butter: In a cast-iron skillet or large frying pan, melt the unsalted butter over medium heat until bubbly. Adjust the heat level if necessary to prevent burning.

    4. Sauté the Garlic: Add the minced garlic to the pan, cooking until fragrant. This should take around 1-2 minutes. Be cautious not to let it brown too much, as burnt garlic can turn bitter.

    5. Cook the Steak: Increase the heat to medium-high and add the cubed steak to the skillet. Sear the steak bites for about 2-3 minutes per side, resulting in a perfect medium-rare finish. Adjust cooking time depending on your preferred doneness.

    6. Toss in Butter: While the steak is cooking, drizzle some of the melted garlic butter over the steak bites, allowing them to soak up the flavor.

    7. Garnish: Once cooked to your preferred doneness, remove from heat, and sprinkle freshly chopped parsley for a vibrant touch.

    8. Serve Hot: Transfer the stake bites to a serving platter and enjoy while hot. Pair with a side salad or roasted vegetables for a complete meal.

    With these straightforward steps, you can craft a beautiful and delicious dish right in your kitchen that reflects the charm of the best dinner recipes.

    Mastering The Best Garlic Butter Steak Bites: Advanced Tips and Variations

    To truly master Garlic Butter Steak Bites, let’s delve into some advanced tips and variations that will take this delicious dish to the next level.

    1. Add Spice: For a little kick, consider incorporating red pepper flakes during the garlic sautéing stage. This will add a vibrant heat while complementing the richness of the butter.

    2. Marinate for Flavor: If you have extra time, marinate the steak overnight in a mixture of olive oil, soy sauce, and Worcestershire sauce. This can add depth and complexity to the overall flavor.

    3. Mix of Proteins: Feel free to mix and match different proteins—like shrimp or chicken —for a surf-and-turf experience that elevates your dinner recipes to a gourmet level.

    4. Serve with Dipping Sauces: Introduce a variety of dipping sauces ranging from chimichurri to spicy aioli to enhance the meal’s enjoyment. This also allows guests to customize each bite according to their preferences.

    5. Try Different Butters: Experiment with flavored butters by adding herbs (such as thyme or rosemary) to the melted butter. This can introduce a new aromatic aspect to the dish while still being simple.

    By integrating these advanced tips and variations into your preparation of Garlic Butter Steak Bites, you can further enrich flavors and make each meal unique and delightful.

    How to Store The Best Garlic Butter Steak Bites: Best Practices

    If you have leftover Garlic Butter Steak Bites—or if you are preparing ahead for a busy week—the right storage methods can extend their freshness.

    1. Refrigeration: Store any leftover steak bites in an airtight container in the refrigerator. They will remain good for about 3-4 days. To reheat, simply microwave or sauté in a pan over low heat until warmed through. Adding a splash of butter can help refresh the flavors.

    2. Freezing: To freeze, lay the cooked steak bites on a baking sheet in a single layer and place them in the freezer for about 1-2 hours until firm. Then, transfer them to a freezer-safe container or bag. They can be preserved for up to 3 months. When ready to eat, thaw overnight in the fridge and reheat in the microwave or on a skillet.

    3. Quick Reheating: When reheating, avoid overheating them for an extended time as this can lead to a rubbery texture. Quick heating preserves the juicy and tender essence of the steak bites.

    Incorporating these storage methods not only ensures minimal food waste but also allows you to enjoy this flavorful dish multiple times, fitting conveniently into your busy lifestyle.

    Nutritional Value of The Best Garlic Butter Steak Bites

    When considering dinner recipes, it’s essential to be aware of their nutritional content. Below is the nutritional breakdown for one serving (approximately 4-5 steak bites) of Garlic Butter Steak Bites made with lean sirloin:

    • Calories: 350
    • Protein: 28g
    • Carbohydrates: 2g
    • Fat: 25g
    • Saturated Fat: 10g
    • Cholesterol: 80mg
    • Sodium: 500mg

    Note: The above values can vary based on specific ingredients used, portion sizes, and cooking methods.

    By being mindful of the nutritional aspects of Garlic Butter Steak Bites, they can make a wonderful addition to your diet without compromising on flavor or satisfaction. Additionally, these bites offer significant protein content, making them an excellent option for muscle repair and recovery.

    FAQs: Frequently Asked Questions About The Best Garlic Butter Steak Bites

    1. Can I use a different cut of steak for this recipe?

    Absolutely! While sirloin and ribeye are popular options due to their flavor, you can use any preferred cut of steak, like filet mignon or flank steak. Keep in mind the cooking time may vary depending on the thickness of the meat.

    2. How do I make this dish gluten-free?

    To ensure this recipe is gluten-free, check that the steak does not come pre-marinated or packaged with any sauces containing gluten. Using pure and unprocessed meat guarantees that your Garlic Butter Steak Bites remain gluten-free.

    3. Can I make this recipe in advance?

    Indeed! Garlic Butter Steak Bites can be made ahead of time. Just store them in an airtight container in the fridge and reheat before serving. They are also perfect for meal prep during your weekly cook-offs.

    4. Can I modify the recipe to make it vegan?

    Yes, simply substitute the steak with a plant-based alternative, such as mushrooms or tofu. Use vegan butter or olive oil to achieve a similar richness and maintain the garlic flavor.

    5. What sides would pair nicely with Garlic Butter Steak Bites?

    These steak bites can be served with various sides like a fresh salad, mashed potatoes, roasted vegetables, or even a bread roll to soak up the delicious garlic butter.

    With these FAQs answered, you’re well-equipped to approach your Garlic Butter Steak Bites adventure confidently. Get ready to impress your family and friends with this effortless yet indulgent dish!

  • Classic Bunny Cookies With Royal Icing

    Classic Bunny Cookies With Royal Icing

    Classic Bunny Cookies With Royal Icing: A Tropical Delight

    Introduction to Classic Bunny Cookies With Royal Icing

    If you’re looking for a delightful treat that brings fun and creativity into the kitchen, Classic Bunny Cookies with Royal Icing are just the thing! These adorable cookies are not only visually appealing but also incredibly easy to make, making them perfect for bakers of all skill levels. With the added bonuses of being customizable, healthy, and suitable for various dietary preferences, these cookies can cater to everyone—from busy parents looking for special snack ideas to newlyweds eager to impress guests at their first gathering.

    These delightful confections conjure images of spring and Easter celebrations, making them a festive choice for family gatherings, parties, or simply enjoying with loved ones at home. The royal icing adds a touch of elegance, transforming simple cookies into artistic delights. Moreover, you can easily adapt the base recipe to be gluten-free or vegan, ensuring that nobody misses out on the fun! So whether you’re a seasoned baking enthusiast or just starting your culinary journey, these cookies are sure to inspire and delight.

    With vibrant colors and intricate designs made possible through royal icing, these bunny cookies serve not only as a delicious treat but also as a canvas for creativity. Imagine presenting a tray of these charming cookies at your next gathering; they will surely brighten up the table and bring smiles to the faces of both young and old alike. So grab your apron and let’s dive into the wonderful world of baking!

    Benefits and Advantages of Classic Bunny Cookies With Royal Icing

    When considering the advantages of Classic Bunny Cookies with Royal Icing, several aspects come to light that make this recipe particularly beneficial for both your health and enjoyment. First and foremost, the simplicity of the preparation is a significant draw. These cookies do not require an extensive list of ingredients or complicated techniques—perfect for home cooks and busy parents alike. With just a few straightforward steps, you can whip up a batch of cookies that look and taste divine!

    One of the remarkable aspects of these cookies is their versatility. The basic cookie dough can be flavored with vanilla, almond, or even citrus zest, allowing you to customize the taste to your liking. Additionally, the royal icing can be tinted with natural food colorings, making these cookies not only delicious but also visually stunning. This customization aspect not only makes baking fun but also allows health-conscious individuals to modify the recipe according to dietary preferences.

    For those keeping a close eye on calories or ingredients, substituting traditional sugar with healthier alternatives or using gluten-free flour can make a significant difference. This means you can enjoy guilt-free indulgence without sacrificing flavor. Additionally, by making these cookies in smaller sizes, you can satisfy your sweet tooth while controlling portion sizes.

    Moreover, these cute little bunnies are perfect for various occasions—from Easter gatherings to birthdays and festive celebrations. Their playful and appealing shapes can serve as the centerpiece of your dessert table. As more people look for ways to incorporate more joy into their everyday lives, baking these cookies can be a delightful experience for families and a wonderful activity to share with children. Whether you’re exploring your culinary skills or simply looking to customize a fun treat, the potential for joy and creativity is limitless with these bunny cookies!

    Ingredients Overview

    Essential Ingredients for Classic Bunny Cookies With Royal Icing

    Creating Classic Bunny Cookies with Royal Icing requires a delicious blend of ingredients that ensure both taste and aesthetic appeal. Here’s a detailed list of what you will need, along with some insightful tips on select ingredients:

    • 2 ¾ cups all-purpose flour: Provides the structure and texture for these cookies.
    • 1 cup unsalted butter (or vegan butter for a dairy-free option): Adds richness and flavor; vegan butter can be used without compromising texture.
    • 1 cup granulated sugar: Sweetens the cookie base, but can be substituted with coconut sugar or agave for a healthier option.
    • 1 large egg (flax egg for a vegan option): Binds the ingredients together; a flax egg can be made by mixing 1 tablespoon of ground flaxseed with 3 tablespoons of water.
    • 2 teaspoons vanilla extract: Enhances the flavor; consider using almond extract for a different twist.
    • ½ teaspoon baking powder: Helps the cookies rise slightly.
    • ¼ teaspoon salt: Balances the sweetness and enhances flavors.

    For the royal icing:
    4 cups powdered sugar: The base for the icing; can be substituted with sugar-free powdered sugar if desired.
    2-3 tablespoons meringue powder (or aquafaba for a vegan alternative): Helps to achieve the right consistency for spreading and decorating.
    Water as needed: Used to thin out the icing to your preferred consistency.

    This combination of ingredients can cater to various dietary needs, making it easier for everyone to enjoy these yummy cookies. Always remember to check the labels for allergen information if you’re accommodating dietary restrictions.

    Dietary Substitutions to Customize Your Classic Bunny Cookies With Royal Icing

    One of the true highlights of Classic Bunny Cookies with Royal Icing is their adaptability. There are numerous substitutions you can make to fit almost any dietary requirement:

    • Gluten-Free Version: Replace all-purpose flour with a gluten-free flour blend, ensuring it contains xanthan gum for structure.
    • Vegan Option: As mentioned earlier, substitute the egg with a flax egg or a store-bought egg replacer. Use vegan butter in place of regular butter.
    • Low-Calorie Sweetener: Opt for natural sweeteners like stevia or erythritol in place of granulated sugar to reduce calorie content, while keeping in mind that the texture may slightly vary.
    • Natural Dyes for Icing: Instead of commercial food coloring, opt for beet juice, spirulina, or turmeric to color your royal icing naturally, making it healthier while still fun.
    • Fruit Purees: Add fruit purees to the cookie dough for a burst of flavor and color. You could include raspberry for a touch of sweetness and vibrant hue.

    Every baker has different preferences and needs, and the beauty of this recipe is that it empowers you to create your dream cookie while still ensuring everyone can enjoy them, regardless of dietary restrictions.

    How to Prepare the Perfect Classic Bunny Cookies With Royal Icing: Step-by-Step Guide

    Now that you have all the essentials, let’s get started on preparing Classic Bunny Cookies with Royal Icing! Follow this detailed step-by-step guide:

    1. Prepare the Base: In a large mixing bowl, cream together the unsalted butter and granulated sugar until light and fluffy. This should take about 3-5 minutes using a hand mixer or stand mixer.

    2. Mix in the Egg: Add the egg (or flax egg) and vanilla extract to the butter and sugar mixture. Continue mixing until fully combined.

    3. Combine Dry Ingredients: In a separate bowl, whisk together the all-purpose flour, baking powder, and salt. Gradually add this mixture to the wet ingredients, mixing on low speed until a dough forms.

    4. Chill the Dough: Divide the cookie dough into two halves, wrap each portion in plastic wrap, and chill in the refrigerator for at least 1 hour. This helps the cookies maintain their shape while baking.

    5. Preheat the Oven: Preheat your oven to 350°F (177°C) while your dough chills.

    6. Roll Out the Dough: On a lightly floured surface, roll out the chilled dough to about ¼ inch thick. Use a bunny-shaped cookie cutter to cut out shapes.

    7. Bake the Cookies: Place the cut-out cookies on parchment-lined baking sheets, spaced a few inches apart. Bake in the preheated oven for 8-10 minutes or until the edges are lightly golden.

    8. Cool Completely: Once baked, remove the cookies from the oven and let them cool on the baking sheets for a few minutes before transferring them to a wire rack to cool completely.

    9. Prepare the Royal Icing: In a mixing bowl, combine the powdered sugar and meringue powder. Gradually add water to achieve the desired consistency (thicker for outlines and thinner for flooding). Mix on medium speed until glossy and holds peaks.

    10. Decorate the Cookies: Use piping bags fitted with small round tips to outline your cookies with royal icing. After outlining, flood the inside with thinned icing, using a toothpick to help spread if necessary.

    11. Let Icing Dry: Allow the decorated cookies to set for at least 6 hours or overnight for best results. Once dry, they can be stored or given as gifts.

    12. Show off Your Creativity: Add additional details with colored icing, edible glitter, or sprinkles to give your bunny cookies a whimsical look!

    By following these detailed steps, you’ll create charming bunny cookies that are sure to impress your family and friends. The process is fun and allows for experimentation, so don’t hesitate to add your personal touch along the way!

    Mastering Classic Bunny Cookies With Royal Icing: Advanced Tips and Variations

    To truly elevate your baking experience with Classic Bunny Cookies with Royal Icing, consider these advanced tips and fun variations:

    • Texture Tweaks: For thicker cookies, try chilling your dough longer or adding a tablespoon of cornstarch to the dry ingredients. This will give your cookies a more tender crumb.

    • Flavor Infusions: Experiment with flavor extracts! Almond, coconut, or even peppermint can be fantastic alternatives to vanilla that add unique taste profiles.

    • Glazing Instead of Icing: If you prefer a less time-consuming decorating method, consider using a simple glaze made with powdered sugar and milk or water. This provides a sweet finish without the intricate detailing of royal icing.

    • Themed Cookies: Beyond bunny shapes, use other seasonal cookie cutters for holidays (like hearts for Valentine’s Day or stars for Christmas). The same royal icing technique works across forms!

    • Layered Flavors: Try sandwiching two cookies with a layer of jam, chocolate ganache, or a thicker cream filling for an exciting twist on the standard cookie.

    • Workshops and Gatherings: Consider hosting a cookie-decorating party! Provide various toppings, colors, and other decorative elements; it’s a delightful way to bond with friends and family.

    By incorporating these tips and variations, you will further enhance your skills in the kitchen while whipping up these Classic Bunny Cookies. Have fun experimenting, and enjoy the process!

    How to Store Classic Bunny Cookies With Royal Icing: Best Practices

    Proper storage is crucial to ensure your Classic Bunny Cookies with Royal Icing remain fresh and delicious. Here are the best practices for storing your creations:

    • Cool Completely: It’s essential to let your cookies cool entirely after baking before frosting. This prevents condensation from forming, which could lead to sogginess.

    • Storage Method: Store unfrosted cookies in an airtight container at room temperature for up to one week. If already decorated with royal icing, they can also be stored similarly, but make sure they are not stacked directly on top of each other to avoid smudging the icing.

    • Freezing for Longevity: If you need to keep your cookies longer, consider freezing them. Place the cooled, unfrosted cookies in a single layer on a baking sheet until solid, then transfer them to a freezer-safe bag or container. They will maintain freshness for up to three months.

    • Thawing Instructions: To thaw, simply remove the cookies from the freezer and allow them to come to room temperature. Once thawed, you can frost them if desired, or enjoy them as they are.

    Following these storage tips will prolong the life of your lovely cookie creations and keep them as delightful as the day you made them!

    Nutritional Value of Classic Bunny Cookies With Royal Icing

    Understanding the nutritional value of your delightful Classic Bunny Cookies with Royal Icing is essential for those mindful of their dietary goals. The nutritional content can vary based on ingredient choices, but here is an approximate breakdown of a standard cookie (using all the ingredients in the main recipe):

    • Serving Size: 1 cookie
    • Calories: ~120 kcal
    • Total Fat: 5g
    • Saturated Fat: 3g
    • Cholesterol: 15mg
    • Sodium: 40mg
    • Total Carbohydrates: 18g
    • Dietary Fiber: 0.5g
    • Sugars: 8g
    • Protein: 1g

    By making dietary substitutions (like using coconut sugar, reducing butter, or using a vegan butter substitute), you can lower overall calories, sugars, and fats even further. Always consider your ingredient choices when assessing nutritional profiles.

    This breakdown is particularly useful for diet-conscious individuals or those with specific health goals. Remember that enjoying cookies in moderation can absolutely fit within a balanced diet!

    FAQs: Frequently Asked Questions About Classic Bunny Cookies With Royal Icing

    1. Can I make the dough ahead of time?

    Yes! You can prepare the dough and refrigerate it for up to 3 days. This allows for quick baking later. Just ensure it’s wrapped tightly in plastic wrap.

    2. Can I use different types of flour?

    Absolutely! For gluten-free options, a gluten-free flour blend works well. Just ensure it has xanthan gum for texture.

    3. What’s the best method to color the royal icing?

    Natural food dyes or gel food colorings are great for vibrant colors. Gradually add coloring until your desired shade is reached.

    4. How long does royal icing take to dry?

    Royal icing typically needs at least 6 hours to set completely. For best results, leave it overnight after decorating.

    5. Can I use store-bought cookies instead of making my own?

    While making your cookies from scratch ensures quality, you can certainly use store-bought cookies if you need a quicker option. Just be mindful of the texture.

    6. How can I prevent my cookies from spreading during baking?

    Chilling the dough before baking is crucial. If the dough is warm, the cookies will spread more. Also, make sure your baking sheets are cool when placing the dough on them.

    7. What if my royal icing is too thick?

    You can thin royal icing by adding a few drops of water until you reach the desired consistency. Mix thoroughly to avoid lumps.

    8. Can I freeze my decorated cookies?

    While it’s technically possible, it’s better to freeze undecorated cookies to preserve the design. Decorated cookies can be stored airtight at room temperature for up to a week.

    9. How can I make my cookies more flavorful?

    Consider adding spices such as cinnamon, nutmeg, or citrus zests to the dough for additional flavor profiles.

    By addressing these frequently asked questions, we hope to enhance your baking experience and help you create delightful bunny cookies that everyone will enjoy. Remember, experimentation in the kitchen is key, so embrace your creative side! Happy baking!