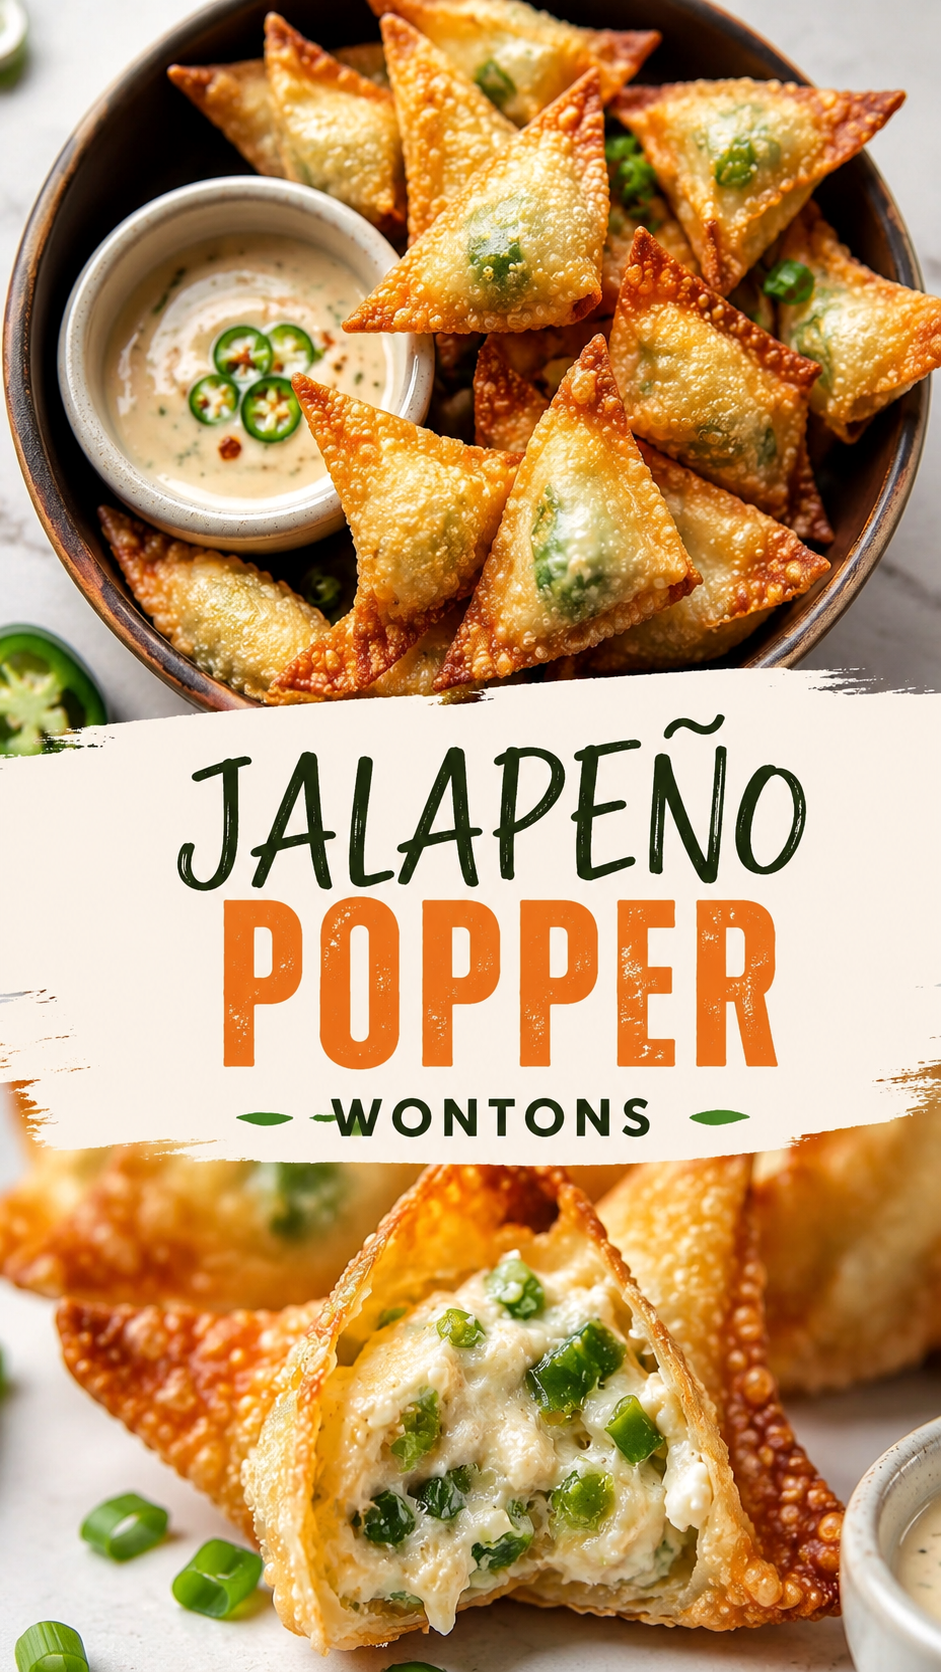
Blog

  • Easy Mediterranean Chickpea Salad Recipe

    Easy Mediterranean Chickpea Salad Recipe

    Easy Mediterranean Chickpea Salad Recipe: A Tropical Delight

    Introduction to Easy Mediterranean Chickpea Salad Recipe

    Welcome to a fiesta of flavors with our Easy Mediterranean Chickpea Salad Recipe! This vibrant and refreshing salad is more than just a feast for the eyes; it embodies everything you could ask for in healthy dinner recipes. It’s simple to make, brimming with nutrients, and suitable for a variety of dietary preferences—vegan, gluten-free, and rich in protein. This dish combines the earthiness of chickpeas with the fresh burst of Mediterranean flavors, making it an ideal choice for anyone looking to incorporate healthier options into their meals without compromising on taste.

    Chickpeas, often celebrated for their health benefits, are the star of this salad. They are a fantastic plant-based protein source, packed with fiber and essential vitamins. But this recipe isn’t just about nutrition; it’s also about convenience. With minimal prep time and no cooking required, it’s perfect for busy weeknights, picnics, or even meal preps for the entire week. Whether you’re a student juggling studies, a busy parent seeking quick meal options for the family, or just someone who wants a light yet satisfying meal, this salad will surely delight.

    Let’s unlock the culinary magic of Mediterranean cuisine and discover how easy it is to whip up this colorful dish that is sure to impress both your taste buds and your health-conscious lifestyle!

    Benefits and Advantages of Easy Mediterranean Chickpea Salad Recipe

    When it comes to effortless, healthy dinner recipes, this Easy Mediterranean Chickpea Salad stands out for numerous reasons. First and foremost, it’s incredibly simple to prepare. No intricate cooking techniques or endless hours in the kitchen are required. Just gather your ingredients, toss them together, and you’re ready to serve a dish that is as nutritious as it is delicious.

    1. Health Benefits: The chickpeas provide ample protein and fiber, promoting satiety and aiding digestion. Furthermore, the variety of fresh vegetables adds an abundance of nutrients, including vitamins A and C, iron, and potassium. The dressing, often comprised of olive oil and lemon juice, is both flavorful and rich in healthy fats, which can support heart health.

    2. Versatility: This salad is remarkably versatile. You can enjoy it as a main course or a delightful side dish. It can be served chilled or at room temperature, making it perfect for outdoor gatherings or packed lunches alike. Feel free to add your favorite ingredients, such as feta cheese, olives, or even roasted vegetables, transforming it to suit your personal taste.

    3. Time-Saving: For those grappling with busy schedules, this salad is a lifesaver. Prepare it in under 15 minutes, making it an ideal option for meal prep. Plus, it stores well in the refrigerator, maintaining its freshness for days. As a result, you can prepare a large batch in advance and have a nutritious meal ready whenever hunger strikes.

    4. Dietary Inclusivity: This chickpea salad can easily accommodate various dietary needs. Whether you’re vegan, gluten-free, or looking for low-calorie meal options, this salad conforms gracefully, ensuring everyone at the table can enjoy it.

    All in all, this Easy Mediterranean Chickpea Salad is a supreme fusion of flavors and health benefits, making it a stellar inclusion in your collection of healthy dinner recipes.

    Ingredients Overview

    Essential Ingredients for Easy Mediterranean Chickpea Salad Recipe

    Here’s a detailed list of ingredients you’ll need to create your Easy Mediterranean Chickpea Salad. Each component not only contributes to the flavor but also provides various health benefits:

    • 1 can (15 oz) chickpeas, drained and rinsed – A great source of protein and fiber, keeping you full longer.
    • 1 cup cherry tomatoes, halved – Rich in vitamins A and C, and adds sweetness.
    • 1 cucumber, diced – Hydrating and refreshing, low in calories.
    • 1 bell pepper (red or yellow), diced – Antioxidant-rich and vibrant.
    • 1/4 red onion, finely chopped – Adds crunch and is a good source of vitamins and minerals.
    • 1/4 cup fresh parsley, chopped – Packed with antioxidants and enhances flavor.
    • 1/4 cup feta cheese (optional) – Provides creaminess and an extra flavor dimension.
    • 3 tablespoons olive oil – A healthy fat that can help reduce heart disease risk.
    • 2 tablespoons lemon juice – Adds brightness and acts as a natural preservative.
    • Salt and pepper, to taste – Simple seasonings that elevate the dish.
    • 1 teaspoon dried oregano or Italian seasoning – Infuses Mediterranean flavor.

    Dietary Considerations:

    • Vegan: Omit feta cheese for a completely plant-based version.
    • Gluten-Free: This salad is inherently gluten-free. Ensure all packaged ingredients like chickpeas are certified gluten-free.
    • Low-Calorie Option: Use less olive oil or substitute with balsamic vinegar to reduce calorie intake.

    Dietary Substitutions to Customize Your Easy Mediterranean Chickpea Salad Recipe

    Flexibility is one of the many beautiful aspects of this Mediterranean dish. Here are some creative substitutions tailored to fit different dietary needs or ingredient availability:

    • Chickpeas: Replace with black beans or kidney beans for a different flavor profile while retaining protein levels.
    • Vegetables: If cherry tomatoes are out of season, use sun-dried tomatoes for a deeper flavor. Instead of cucumber, consider zucchini for added crunch.
    • Herbs: Fresh herbs can be swapped depending on availability. Mint or basil can also add a delightful twist.
    • Dressing: Instead of olive oil, adapt this dish by using avocado oil or a tahini-based dressing for a creamier texture. For a tangy kick, try apple cider vinegar instead of lemon juice.
    • Feta Cheese: Substitute with diced avocado for creaminess without the dairy, or use a vegan feta option available in many health food stores.

    With these substitutions, you can cater to various palates and maintain the recipe’s integrity while accommodating special dietary needs.

    How to Prepare the Perfect Easy Mediterranean Chickpea Salad Recipe: Step-by-Step Guide

    Creating the Easy Mediterranean Chickpea Salad is a straightforward process that will yield impressive results. Follow this step-by-step guide to prepare this healthy dish:

    1. Prepare the Base: Begin by draining and rinsing the chickpeas under cold water. This will help remove excess sodium and prevent a mushy texture.

    2. Chop the Vegetables: Dice the cucumber, bell pepper, and red onion. Halve the cherry tomatoes, ensuring uniform sizes enhance the dish’s aesthetics and eating experience.

    3. Mix Ingredients: In a large mixing bowl, combine the chickpeas, chopped vegetables, and parsley. If you’re using feta cheese, add it at this stage for better distribution.

    4. Create the Dressing: In a separate small bowl or jar, whisk together olive oil, lemon juice, oregano, salt, and pepper. Adjust the seasoning to your taste and whisk until well combined.

    5. Combine and Toss: Drizzle the dressing over the salad mixture. Toss gently, ensuring that all ingredients are evenly coated with the dressing. This step is essential as it infuses the flavors throughout the dish.

    6. Taste and Adjust: Sample the salad and adjust seasoning if necessary. Adding more lemon juice can brighten the flavors, while additional spices can enhance the aroma.

    7. Chill Before Serving: Ideally, let the salad sit for about 20 to 30 minutes in the refrigerator. This rest period allows the flavors to meld beautifully, creating a more harmonious taste.

    8. Serve: Serve chilled or at room temperature. Feel free to garnish with extra parsley or sesame seeds for a lovely presentation.

    9. Storing Leftovers: If you made more than you can consume, store the salad in an airtight container in the refrigerator. It can last for up to 3 days, making it a convenient meal prep option.

    By following these straightforward steps, you can easily create a dish that serves as both a quick meal and a healthy dinner recipe within minutes!

    Mastering Easy Mediterranean Chickpea Salad Recipe: Advanced Tips and Variations

    Now that you have the basics down, let’s talk about how to elevate your Easy Mediterranean Chickpea Salad. Here are some advanced tips and entertaining variations you can experiment with:

    Advanced Tips:

    • Use Fresh Herbs: Freshly chopped herbs like dill or mint offer flavor that dried herbs cannot match. They elevate the taste profile, adding a fresh dimension to this classic recipe.
    • Add Nuts or Seeds: Consider incorporating roasted pine nuts, walnuts, or sunflower seeds for added crunch and omega-3 fatty acids.
    • Include Grains: For a heartier version, add cooked quinoa or bulgur wheat. These grains complement the chickpeas and provide additional nutrients.

    Variations:

    • Mediterranean Quinoa Salad: Swap out chickpeas for quinoa for a gluten-free variation that keeps the same flavor integrity.
    • Spicy Mediterranean Salad: Introduce elements of spice by adding chopped jalapeños or a sprinkle of crushed red pepper flakes to the mix for a fiery kick.
    • Tropical Twist: Toss in some diced pineapple or mango for a refreshing contrast, providing both sweetness and a hint of tropical flair.

    With these enhancements and variations, your Easy Mediterranean Chickpea Salad can transform and adapt to various tastes, ensuring it’s never boring.

    How to Store Easy Mediterranean Chickpea Salad Recipe: Best Practices

    If you’ve made a large batch of this delicious salad, proper storage becomes essential to preserve its freshness and flavors. Here’s how to store your Easy Mediterranean Chickpea Salad:

    1. Refrigeration: Store your prepared salad in an airtight container. Ensure that the lid is sealed tightly to prevent air exposure, which could lead to spoilage. Placed in the refrigerator, it can last for 3 to 5 days, allowing for healthy, accessible meals throughout the week.

    2. Freezing: While this salad is best enjoyed fresh, if you’re looking to extend its life, consider freezing the chickpeas separately. However, be cautious freezing the dressed salad, as fresh vegetables may not retain their texture when thawed.

    3. Reheating: If you’ve decided to include grains or legumes that you previously cooked, it may need a quick reheat in the microwave. However, for the salad, it’s best enjoyed chilled. Just let it sit at room temperature for a few minutes if coming straight from the fridge before serving.

    4. Make-Ahead Options: To save time, prep the salad ingredients but leave the dressing separate. Combine them just before serving to achieve optimum freshness.

    These storage and meal prep tips will help you maintain the quality of your Easy Mediterranean Chickpea Salad, ensuring it remains a staple among your healthy dinner recipes.

    Nutritional Value of Easy Mediterranean Chickpea Salad Recipe

    Understanding the nutritional profile of your meals is vital, especially when choosing among healthy dinner recipes. Here is the approximate nutritional breakdown for one serving (based on 6 servings):

    • Calories: 250
    • Protein: 10g
    • Fat: 12g (mostly healthy fats from olive oil)
    • Carbohydrates: 30g
    • Fiber: 9g
    • Sugars: 3g
    • Sodium: 200mg (varies depending on the type of chickpeas used)

    Nutritional Highlights:

    • High in Protein and Fiber: Chickpeas are not just delicious; they also provide a substantial amount of protein and fiber, promoting satiety and supporting digestive health.
    • Heart Health: Olive oil is rich in monounsaturated fats, which can help lower cholesterol levels, enhancing heart health.
    • Rich in Vitamins and Minerals: The fresh vegetables bring in vital vitamins (A, C) and minerals (potassium, magnesium) essential for daily bodily functions.

    Incorporating this Mediterranean salad into your diet not only aligns with your healthy goals but also introduces a delightful taste of the Mediterranean right into your kitchen.

    FAQs: Frequently Asked Questions About Easy Mediterranean Chickpea Salad Recipe

    Here are some common questions regarding the Easy Mediterranean Chickpea Salad, offering further insights into this versatile dish:

    1. Can I make this salad ahead of time?
      Yes! Prep this salad 1-2 days in advance. Store in the refrigerator, and dress just before serving for maximum freshness.

    2. What can I substitute for chickpeas if I’m allergic?
      If chickpeas pose an allergy risk, opt for white beans, kidney beans, or even faux chickpeas like artichoke hearts for a unique twist.

    3. Is this salad suitable for meal prep?
      Absolutely. It stores well in the refrigerator for 3-5 days and can be packed as a quick grab-and-go meal.

    4. Can I customize the vegetable ingredients?
      Certainly! Feel free to swap any of the vegetables with your favorites or use what’s available, such as shredded carrots or roasted zucchini.

    5. How can I make it more filling?
      To turn it into a more substantial meal, add cooked quinoa, farro, or grains of your choice for extra protein and fiber.

    6. What is the best way to serve this salad?
      Serve chilled or at room temperature. It pairs wonderfully with grilled meats, fish, or as a light lunch on its own.

    7. Is this recipe kid-friendly?
      Yes! The cheerful colors and crunch of fresh veggies may entice children. You can make it more appealing by allowing them to help prepare it!

    By addressing these questions, you can better appreciate the versatility and adaptability of the Easy Mediterranean Chickpea Salad and inspire others to include it in their repertoire of healthy dinner recipes.

    In conclusion, not only does this Easy Mediterranean Chickpea Salad serve as a vibrant and nutritious meal option, but it also stands as a canvas for culinary creativity. Whether you adhere to strict dietary standards or simply seek out wholesome convenience, this salad offers a medley of possibilities that tantalize the palate and support a healthy lifestyle. Get ready to experience a delightful blend of flavors that keep your meals exciting and your health on track! Enjoy!

  • Tasty Caribbean Chicken And Rice Recipe

    Tasty Caribbean Chicken And Rice Recipe

    Tasty Caribbean Chicken And Rice Recipe: A Tropical Delight

    Introduction to Tasty Caribbean Chicken And Rice Recipe

    Welcome to a culinary journey to the Caribbean! Our Tasty Caribbean Chicken and Rice Recipe is a delightful blend of flavors, aromas, and textures that promises to transport your taste buds to sun-kissed beaches and vibrant islands. This recipe not only embodies the spirit of Caribbean cooking but is also simple enough for busy weeknights or casual gatherings. As one of the most beloved chicken recipes, it caters to various dietary needs, making it suitable for health-conscious individuals, busy parents, or anyone seeking a family-friendly meal.

    What makes this dish extraordinary is its ability to be both satisfying and nourishing. Packed with tender chicken, nutritious vegetables, and fragrant spices, it offers numerous health benefits. It is also easily adaptable for vegan or gluten-free diets, ensuring everyone at your table can enjoy a tropical feast. With simple ingredients available at your local grocery store, you can whip this dish up in no time—even if you’re a novice in the kitchen.

    In essence, the Tasty Caribbean Chicken and Rice Recipe is not just about feeding your family but also about creating memories around the dinner table. So, grab your apron and get ready to embark on this delicious culinary adventure!

    Benefits and Advantages of Tasty Caribbean Chicken And Rice Recipe

    This Tasty Caribbean Chicken and Rice Recipe stands out not only for its wonderful flavor but also for the numerous advantages it brings to your dining experience.

    1. Simplicity in Preparation: One of the most appealing aspects of this recipe is its simplicity. With just a few ingredients and straightforward steps, even beginner cooks can create a stunning dish. You can prepare it in under an hour, making it perfect for those hectic evenings after a long workday or busy weekends filled with family activities.

    2. Versatile and Customizable: This chicken dish is highly adaptable. Whether you’re looking to accommodate dietary restrictions or personalize the flavors, this recipe has endless possibilities. For instance, you can substitute the chicken with tofu or chickpeas for a hearty vegan option. Use brown rice or quinoa instead of white rice for added nutrients and fiber.

    3. Nutritional Benefits: This dish is not only tasty but also health-conscious. Chicken is an excellent source of protein, promoting muscle growth and repair. The addition of colorful vegetables like bell peppers and peas increases the intake of essential vitamins and minerals. Additionally, incorporating spices like turmeric and ginger can enhance immune function and aid digestion.

    4. Family-Friendly Meal: This recipe appeals to all ages. It’s a great way to encourage children to endure different flavors and ingredients while still being enjoyable for adults. The mild spices and tropical flavors make it a crowd-pleaser, ensuring everyone leaves the table satisfied.

    By choosing the Tasty Caribbean Chicken and Rice Recipe, you’re not just preparing a meal; you’re making a strategic choice to prioritize health, flavor, and convenience.

    Ingredients Overview

    Essential Ingredients for Tasty Caribbean Chicken And Rice Recipe

    To create this mouthwatering dish, gather the following ingredients:

    • 2 cups of long-grain white rice: Provides the base of the dish and absorbs the delicious flavors.
    • 1.5 pounds of chicken thighs (boneless, skinless): Tender and flavorful, making it a favorite in many chicken recipes.
    • 1 medium onion, chopped: Adds sweetness and depth to the flavor profile.
    • 3 cloves of garlic, minced: Infuses the dish with aromatic goodness.
    • 1 bell pepper (red or green), chopped: Brings crunch and color.
    • 1 small can of coconut milk (about 14 ounces): Gives a creamy texture and tropical essence.
    • 2 cups of chicken broth (low-sodium): Enhances the dish without overwhelming it with salt.
    • 1 cup of frozen peas: Adds sweetness, color, and nutrients.
    • 1 teaspoon of turmeric: Provides health benefits and a beautiful golden color.
    • 1 teaspoon of thyme (dried or fresh): Infuses a lovely earthy flavor.
    • Salt and pepper to taste: Essential for seasoning.
    • 1 tablespoon of olive oil: For sautéing.

    Dietary Note: To make this dish vegan, substitute chicken with pressed tofu or chickpeas and use vegetable broth instead of chicken broth. Opt for brown rice for a gluten-free and high-fiber option.

    Dietary Substitutions to Customize Your Tasty Caribbean Chicken And Rice Recipe

    This recipe is super versatile and can be easily modified to suit various dietary needs. Here are some substitutions to consider:

    • For a Gluten-Free Option: Use gluten-free grains such as quinoa or brown rice, which maintain the recipe’s integrity and nutritional value.
    • To Make it Vegan: As mentioned earlier, substitute the chicken with chickpeas, lentils, or tofu. Replace chicken broth with vegetable broth, and you can still enjoy a hearty, plant-based meal.
    • Low-Calorie Modification: If you’re watching your calorie intake, opt for skinless chicken breasts instead of thighs and use light coconut milk.
    • Spice Adjustments: For those who prefer milder flavors, reduce the amount of garlic or opt for mild spices. Conversely, if you’re looking for a spicy kick, add crushed red pepper flakes or a dash of hot sauce to excite your taste buds!

    By using these substitutions, you can make the Tasty Caribbean Chicken and Rice Recipe work for your dietary preferences while maintaining its delicious taste and essence.

    How to Prepare the Perfect Tasty Caribbean Chicken And Rice Recipe: Step-by-Step Guide

    Ready to dive into preparation? Here’s your step-by-step guide to making the Tasty Caribbean Chicken and Rice Recipe:

    1. Prepare the Base: Rinse the rice under cold water until the water runs clear. This removes excess starch and helps the rice cook up light and fluffy.

    2. Sauté the Aromatics: In a large pot or deep skillet, heat olive oil over medium heat. Add the chopped onion and sauté for about 3-4 minutes until it becomes translucent. Then, stir in the minced garlic and cook for an additional minute until fragrant.

    3. Cook the Chicken: Add the chicken thighs to the pot. Season with salt, pepper, and thyme. Sear the chicken on both sides until golden brown, about 5-7 minutes. It doesn’t have to be fully cooked through, but a nice color will boost flavor.

    4. Mix Ingredients: Stir in the chopped bell pepper, turmeric, and frozen peas. Mix everything together, allowing the bell pepper to soften slightly for about 3 minutes.

    5. Add the Liquids: Pour in the coconut milk and chicken broth, bringing everything to a gentle simmer. Scrape the bottom of the pot to deglaze any browned bits, infusing extra flavors into the dish.

    6. Incorporate the Rice: Add the rinsed rice into the pot, stirring to ensure it’s evenly distributed. Bring the mixture back to a boil.

    7. Cover and Cook: Once boiling, reduce the heat to low. Cover the pot with a tight-fitting lid and let it simmer for 15-20 minutes, or until the rice is tender and has absorbed the liquid.

    8. Let it Rest: After cooking, remove the pot from heat and let it sit, covered, for another 5 minutes. This step allows the rice to finish cooking and makes it fluffier.

    9. Fluff and Serve: Use a fork to fluff the rice and chicken gently. Serve hot, garnished with fresh cilantro or lime wedges for an added burst of flavor.

    10. Meal Prep Tip: This recipe can be easily made in advance. Cooking in batches allows for easy reheating and enjoying throughout the week.

    By following these steps, you’ll create a delicious Tasty Caribbean Chicken and Rice dish that will impress your family and friends.

    Mastering Tasty Caribbean Chicken And Rice Recipe: Advanced Tips and Variations

    While the base recipe is irresistible, here are some advanced tips and variations to help you master the Tasty Caribbean Chicken and Rice Recipe:

    1. Spice it Up: Feel free to experiment with spices! Adding curry powder or allspice can change the flavor profile of the dish significantly. Adjust the quantity according to your desired spice level.

    2. Use Fresh Herbs: Incorporating fresh herbs like cilantro or parsley just before serving will elevate the dish. Fresh ingredients enhance the flavor and provide a great visual appeal.

    3. Tropical Additions: Consider adding sliced pineapple or mango during the last five minutes of cooking for a hint of sweetness and a truly tropical touch.

    4. One-Pan Meal: This recipe works as a complete one-pot meal. You can toss in other proteins, such as shrimp or fish, during the final few minutes of cooking for added variety.

    5. Broth Substitutes: For deeper flavor, use homemade chicken broth or add a hint of lime juice for acidity. It brightens the dish and complements the coconut milk beautifully.

    These tips will allow you to put your own spin on the Tasty Caribbean Chicken and Rice, ensuring that no two servings are alike!

    How to Store Tasty Caribbean Chicken And Rice Recipe: Best Practices

    Storing your delicious Tasty Caribbean Chicken and Rice Recipe is simple—follow these best practices to enjoy leftovers while retaining flavor and quality:

    Refrigeration: Store any leftovers in an airtight container in the refrigerator. The dish will keep for about 3-4 days. Make sure to let it cool completely before sealing it to prevent moisture buildup.

    Freezing: For longer storage, this dish can be frozen. Divide the chicken and rice into meal-sized portions and place them in freezer-safe containers or zip-lock baggies. It will stay fresh for up to 3 months. Make sure to label the containers with the date for easy tracking.

    Reheating: To reheat, thaw frozen portions overnight in the refrigerator. You can reheat in the microwave or in a saucepan over low heat, adding a splash of water or broth if it seems dry. Stir occasionally until heated through.

    By following these storage tips, you ensure that your Tasty Caribbean Chicken and Rice will maintain its delicious flavors for future enjoyment!

    Nutritional Value of Tasty Caribbean Chicken And Rice Recipe

    Understanding the nutritional profile of the Tasty Caribbean Chicken and Rice Recipe is essential, particularly if you’re watching your diet. Here’s a breakdown of the average nutritional value per serving (based on four servings):

    • Calories: Approximately 450-500 kcal
    • Protein: Roughly 30-35 grams
    • Fat: About 15-20 grams (depends on the use of coconut milk)
    • Carbohydrates: Around 50-55 grams
    • Fiber: Approximately 3-5 grams
    • Sugars: 2-3 grams (varies based on the specific vegetables used)
    • Sodium: Varies based on broth and seasoning use, but aimed for a low-sodium version when possible.

    This recipe offers a balanced combination of protein, healthy fats, and carbohydrates, making it a wholesome meal. The presence of fiber from the rice and vegetables aids in digestion, while essential vitamins and minerals from colorful ingredients contribute to overall health.

    FAQs: Frequently Asked Questions About Tasty Caribbean Chicken And Rice Recipe

    Q: Can I use brown rice instead of white rice?
    A: Yes! Brown rice can be used, but it will require a longer cooking time—approximately 40-45 minutes. Be sure to adjust the liquid accordingly.

    Q: How can I make this dish spicier?
    A: To add heat, incorporate chopped jalapeños or a dash of hot sauce during cooking. Alternatively, use cayenne pepper in moderation for a zesty kick!

    Q: Is this recipe good for meal prepping?
    A: Absolutely! This dish stores well in the refrigerator or freezer, making it perfect for meal prep. Just reheat and enjoy!

    Q: Can I double the recipe?
    A: Yes, feel free to double the recipe while ensuring you use a larger pot to accommodate all ingredients without crowding.

    Q: What can I serve with this dish?
    A: The Tasty Caribbean Chicken and Rice Recipe can be served with a side of fresh salad, roasted vegetables, or even plantains for a complete Caribbean experience.

    With these answers to common questions, cooking the Tasty Caribbean Chicken and Rice Recipe becomes even more approachable, ensuring everyone can create this delightful meal with ease. Enjoy your culinary adventure into the Caribbean!

  • High Protein Mediterranean Chicken Salad Recipe

    High Protein Mediterranean Chicken Salad Recipe

    High Protein Mediterranean Chicken Salad Recipe: A Tropical Delight

    Introduction to High Protein Mediterranean Chicken Salad Recipe

    If you’re searching for a delicious and nutritious dish that embodies the spirit of the Mediterranean, look no further than this High Protein Mediterranean Chicken Salad recipe. Perfect for busy families, health-conscious individuals, and culinary enthusiasts alike, this dish is a vibrant blend of fresh ingredients, lean protein, and zesty flavors.

    This recipe not only tantalizes the taste buds but also packs a hefty protein punch, making it an ideal choice for those looking to boost their protein intake. Whether you’re meal-prepping for the week or serving a delightful lunch to friends, this high-protein salad is sure to impress. Plus, it’s versatile enough to adapt to various dietary preferences—think vegan, gluten-free, or Mediterranean diet-friendly options.

    Imagine succulent grilled chicken breast paired with crunchy cucumbers, juicy tomatoes, and a sprinkling of feta cheese, all brought together with a herby dressing. Perfect for home cooks looking to whip up chicken recipes in no time, this salad is both simple and satisfying. Let’s dive into the benefits of this nutritious dish!

    Benefits and Advantages of High Protein Mediterranean Chicken Salad Recipe

    One of the standout features of this High Protein Mediterranean Chicken Salad recipe is its ease of preparation. In under 30 minutes, you can create a dish that not only looks beautiful but also nourishes your body. The simplicity lies in its fresh ingredients and straightforward assembly—perfect for those hectic weeknights or packed schedules.

    Additionally, this salad boasts a myriad of health benefits. Firstly, it’s high in protein, thanks to the chicken, which aids in muscle repair and growth. For the diet-conscious, this dish is low in carbs and can be made gluten-free by omitting croutons or using gluten-free substitutes. The inclusion of colorful vegetables also ensures that you’re getting a variety of vitamins and minerals, making this dish a nutrient powerhouse.

    Moreover, the Mediterranean diet is known for its heart-healthy benefits. Rich in olive oil, fresh vegetables, and lean proteins, meals adhering to this style of cooking can support cardiovascular health and even promote weight loss. This recipe incorporates all these elements, making it a wholesome and guilt-free option for any meal of the day.

    Finally, what makes this recipe particularly effective is its adaptability. If you have picky eaters in the family or specific dietary restrictions to navigate, this salad can easily be customized to accommodate everyone’s needs. So whether you’re meal prepping, hosting a gathering, or simply looking for an easy lunch option, the High Protein Mediterranean Chicken Salad is a perfect fit.

    Ingredients Overview

    Essential Ingredients for High Protein Mediterranean Chicken Salad Recipe

    To create this High Protein Mediterranean Chicken Salad, you will need the following essential ingredients:

    • 2 cups cooked chicken breast (grilled, shredded, or diced): A lean protein source that is low in fat and high in protein.
    • 1 cup cherry tomatoes, halved: Juicy and vibrant, they provide antioxidants and vitamin C.
    • 1 cup cucumber, diced: Refreshing and hydrating, cucumbers add a crisp texture to the salad.
    • 1 bell pepper (any color), diced: Bell peppers are rich in vitamins A and C, adding color and crunch to your salad.
    • 1/2 cup red onion, thinly sliced: This adds a pungent, savory kick that complements the fresh ingredients.
    • 1/2 cup feta cheese, crumbled: A creamy addition that brings in a distinct flavor, and provides calcium.
    • 1/4 cup Kalamata olives, pitted and sliced: Olives add healthy fats and a briny taste that enhances the Mediterranean flair.
    • 1/4 cup extra virgin olive oil: This heart-healthy oil serves as a base for the dressing and adds richness.
    • 2 tablespoons red wine vinegar: For a tangy kick, complementing the other ingredients nicely.
    • 1 teaspoon dried oregano: Adds aromatic flavor that is synonymous with Mediterranean cooking.
    • Salt and pepper to taste: Essential seasonings for bringing out all the flavors.

    Diet-Friendly Options:
    For a vegan modification, substitute the chicken with chickpeas or tempeh, and use a vegan cheese alternative. To create a gluten-free version, ensure the feta is gluten-free or omit it entirely.

    Dietary Substitutions to Customize Your High Protein Mediterranean Chicken Salad Recipe

    Customizing your High Protein Mediterranean Chicken Salad is both easy and rewarding. Here are some substitutions to suit various dietary needs:

    • Protein Source: Instead of chicken, you could opt for Mediterranean chickpeas or grilled shrimp. Both alternatives are equally high in protein and provide different flavor profiles.

    • Cheese Alternatives: If you’re looking to reduce dairy, consider using nutritional yeast for a cheesy flavor without the calories and fat.

    • Dressing Variations: For a lighter dressing option, replace the olive oil with Greek yogurt mixed with lemon juice. This adds creaminess while keeping the calories in check.

    • Vegetable Variants: Feel free to incorporate any vegetables you have on hand. Spinach, kale, or even roasted vegetables work beautifully in this salad.

    By swapping ingredients based on personal preferences or dietary restrictions, you can enjoy this Mediterranean chicken salad while meeting your nutritional goals.

    How to Prepare the Perfect High Protein Mediterranean Chicken Salad Recipe: Step-by-Step Guide

    Creating the perfect High Protein Mediterranean Chicken Salad is a breeze when you follow these straightforward steps. Prepare yourself for a delightful culinary journey!

    1. Prepare the Base: Start by ensuring your cooked chicken breast is either grilled, baked, or poached. If you’re using leftovers, simply dice or shred the chicken to bite-sized pieces.

    2. Chop the Vegetables: Dice the cucumbers, bell peppers, and red onions into uniform pieces. Halve the cherry tomatoes. The key is to maintain a similar size for even distribution in each bite.

    3. Combine Ingredients: In a large mixing bowl, combine the cooked chicken with all the chopped vegetables—cucumbers, bell peppers, cherry tomatoes, and red onions.

    4. Add Cheese and Olives: Gently fold in the crumbled feta cheese and sliced Kalamata olives. These ingredients will bring both creaminess and a savory depth to your high protein salad.

    5. Prepare the Dressing: In a small bowl, whisk together the olive oil, red wine vinegar, dried oregano, salt, and pepper. Adjust the seasoning according to your taste preference.

    6. Dress the Salad: Pour the dressing over the chicken and vegetable mixture. Gently toss until all the ingredients are evenly coated. This is where the magic happens, so mix thoroughly!

    7. Taste and Adjust: After tossing, take a moment to taste your salad. If required, add more salt, pepper, or vinaigrette to ensure it’s bursting with flavor.

    8. Chill (Optional): For an enhanced flavor, refrigerate the salad for at least 30 minutes before serving. This allows the ingredients to marinate and meld together.

    9. Serve: When ready to serve, give the salad another quick toss. You can place it on a bed of greens for a salad-style presentation or enjoy it as is.

    10. Store Leftovers: Any leftovers can be transferred to an airtight container and stored in the refrigerator for up to 3 days.

    This High Protein Mediterranean Chicken Salad not only comes together quickly but also provides a nourishing meal ideal for any occasion.

    Mastering High Protein Mediterranean Chicken Salad Recipe: Advanced Tips and Variations

    To take your High Protein Mediterranean Chicken Salad to the next level, consider these advanced tips and tasty variations:

    • Add Nuts and Seeds: For an extra crunch and healthy fats, include toasted pine nuts, walnuts, or pumpkin seeds.

    • Experiment with Herbs: Fresh herbs like parsley, basil, or mint can add vibrancy and freshness to the dish. Try integrating these for a flavor boost.

    • Spicy Twist: If you enjoy a bit of heat, add sliced jalapeños or a dash of red pepper flakes to your dressing for a spicy kick.

    • Meal Prep Friendly: As this salad can last in the fridge for several days, it’s excellent for meal prep. Portion it into containers for quick grab-and-go lunches throughout the week.

    • Whole Grain Addition: Consider serving the salad over a base of quinoa or farro for added texture and nutritional benefits.

    Exploring these tips will not only enhance your experience but also provide an opportunity to customize this Chicken Salad to your liking.

    How to Store High Protein Mediterranean Chicken Salad Recipe: Best Practices

    Storing your High Protein Mediterranean Chicken Salad correctly ensures its freshness and deliciousness for days. Here are the best practices for storage:

    • Refrigeration: Transfer any leftover salad into an airtight container. This helps maintain its freshness while preventing moisture loss. Stored this way, your salad can last in the refrigerator for up to three days.

    • Freezing (Not Recommended): Due to the ingredients’ textures, especially the fresh veggies and feta, freezing is not recommended. The ice crystals may compromise their quality upon thawing.

    • Reheating: If you prefer warm chicken in your salad, gently reheat the chicken in the microwave or on the stovetop before combining it with cold ingredients.

    By following these storage guidelines, you’ll prolong the shelf life of your delicious Mediterranean salad and ensure it’s ready to enjoy at any time.

    Nutritional Value of High Protein Mediterranean Chicken Salad Recipe

    Understanding the nutritional profile of your High Protein Mediterranean Chicken Salad can help you appreciate its health benefits. Here’s a general breakdown of the nutrition you can expect from one serving (assuming a recipe serves four):

    • Calories: Approximately 350-400 kcal
    • Protein: 30-40 g
    • Fat: 20 g (mostly healthy fats from olive oil and cheese)
    • Carbohydrates: 12-15 g (mainly from vegetables)
    • Fiber: 4-6 g
    • Sugar: 3-5 g

    This salad not only provides a significant amount of protein to help with muscle recovery and satiety but also contains essential vitamins and minerals from the fresh vegetables. The healthy fats contribute to heart health, making this salad a sound addition to your meal rotation.

    FAQs: Frequently Asked Questions About High Protein Mediterranean Chicken Salad Recipe

    What if I don’t have chicken on hand?

    No problem! You can easily substitute chicken with chickpeas or quinoa for a plant-based alternative. Both options will maintain high protein content while catering to vegan diets.

    Is this salad gluten-free?

    Yes, as long as you omit any croutons or ensure that all ingredients, including feta cheese, are gluten-free.

    Can I prepare this salad ahead of time?

    Absolutely! This salad can be made a day in advance. Just keep the dressing separate until you’re ready to serve to maintain the ingredients’ freshness.

    How can I make it spicy?

    To add some heat, incorporate sliced jalapeños or use a spicy dressing variation using chili flakes or hot sauce.

    Can I freeze the leftovers?

    While you can store the salad in a fridge for a couple of days, freezing is not recommended due to the fresh vegetable texture changes.

    This High Protein Mediterranean Chicken Salad is a flexible and delightful addition to your culinary repertoire. Whether you’re someone who enjoys trying new chicken recipes or simply seeking nutritious meal options, this salad will become a go-to in your kitchen. Dive in, enjoy the tropical flavors, and share with friends and family for a gratifying dining experience!

  • Easy Mediterranean Baked Fish Recipe

    Easy Mediterranean Baked Fish Recipe

    “`markdown

    Easy Mediterranean Baked Fish Recipe: A Tropical Delight

    Introduction to Easy Mediterranean Baked Fish Recipe

    Are you on the lookout for healthy dinner recipes that are simple yet bursting with flavor? Look no further than this Easy Mediterranean Baked Fish recipe! This delightful dish brings the vibrant tastes of the Mediterranean straight to your dining table. Imagine succulent fish fillets seasoned with fragrant herbs, fresh vegetables, and a drizzle of olive oil, all baked to perfection.

    Not only is this recipe a breeze to prepare, but it also boasts numerous health benefits. Packed with lean protein and heart-healthy fats, it makes for a guilt-free meal option that appeals to a wide range of dietary preferences. It’s vegan, gluten-free, and low-calorie options are available for those mindful of their dietary needs.

    Whether you’re a busy parent trying to whip up a nutritious meal, a student craving gourmet flavors without the fuss, or a home cook wanting to impress your guests, this Easy Mediterranean Baked Fish recipe definitely deserves a spot in your regular meal rotation. And don’t worry if you’re not a seasoned chef; with easy-to-follow steps and minimal prep time, you’ll have a delectable dish ready in no time!

    Benefits and Advantages of Easy Mediterranean Baked Fish Recipe

    The Easy Mediterranean Baked Fish recipe stands out for various reasons and offers a plethora of benefits that will surely entice home cooks of all skill levels. First and foremost, its simplicity is a game-changer. Anyone can follow the straightforward steps, making it a smart choice for busy weeknights or entertaining guests without undergoing a culinary marathon.

    Moreover, the health benefits of this recipe are remarkable. Fish is an excellent source of omega-3 fatty acids, which are known to support heart health, reduce inflammation, and improve brain function. This recipe incorporates a medley of fresh vegetables—like tomatoes, garlic, and bell peppers—infused with Mediterranean herbs that enhance the nutritional profile and flavor.

    Additionally, this dish caters to a variety of dietary preferences. It’s highly customizable, allowing you to omit certain ingredients or substitute with alternatives to fit vegan, gluten-free, or low-calorie diets. In this way, not only are you enjoying a meal packed with health benefits, but you’re also able to tailor it according to your or your family’s dietary restrictions.

    This Easy Mediterranean Baked Fish recipe is more than just a meal; it’s a means to nourish your body and delight your taste buds. By incorporating this dish into your routine, you’re not only serving up healthy dinner recipes but also creating joyful culinary experiences for you and your loved ones.

    Ingredients Overview

    Essential Ingredients for Easy Mediterranean Baked Fish Recipe

    Here’s a list of all requisite ingredients that will help make your Easy Mediterranean Baked Fish a mouthwatering masterpiece. Don’t forget to check for vegan and gluten-free options where applicable!

    1. Fresh Fish Fillets (e.g., cod, tilapia, or any sustainable whitefish) – approximately 4 fillets (6 oz each)
    2. Benefit: A great source of lean protein.

    3. Olive Oil – 1/4 cup

    4. Benefit: Heart-healthy fat packed with antioxidants.

    5. Fresh Garlic – 3 cloves, minced

    6. Benefit: Known for its immune-boosting properties.

    7. Cherry Tomatoes – 1 cup, halved

    8. Benefit: Rich in vitamins C and K and low in calories.

    9. Bell Peppers – 1 cup, chopped (any color)

    10. Benefit: Provides color and a good source of fiber.

    11. Lemon Juice – Juice of 1 lemon

    12. Benefit: Adds flavor and is high in vitamin C.

    13. Dried Oregano – 1 tablespoon

    14. Benefit: Known for anti-inflammatory properties.

    15. Salt and Pepper – To taste

    16. Benefit: Essential seasonings for flavor enhancement.

    17. Fresh Basil or Parsley – For garnish

    18. Benefit: Adds freshness and visual appeal.

    Dietary Substitutions to Customize Your Easy Mediterranean Baked Fish Recipe

    Not everyone has the same dietary requirements, and that’s perfectly okay! Here are a few substitutions you can make for this Easy Mediterranean Baked Fish recipe to cater to your specific needs:

    • Fish Substitutes: If you’re vegan, consider using marinated tofu or tempeh as a protein alternative. You could also opt for eggplant or zucchini slices as your base to maintain a Mediterranean flavor.

    • Gluten-Free Options: The original recipe is naturally gluten-free, but if you’re worried about cross-contamination, choose gluten-free alternatives to any processed ingredients (like certain spices or packaged items).

    • Lower Calorie Variations: If you’re watching your calorie intake, you could reduce the amount of olive oil or swap it out for a calorie-free cooking spray for that crispy finish.

    • Herb Variations: Feel free to mix and match the herbs. If oregano isn’t your favorite, try rosemary or thyme instead, or even add fresh herbs like dill or cilantro for a unique twist.

    With these substitutions, you can easily make this recipe fit your lifestyle. It’s all about enjoying the vibrant flavors of the Mediterranean while accommodating everyone’s preferences.

    How to Prepare the Perfect Easy Mediterranean Baked Fish Recipe: Step-by-Step Guide

    Ready to dive into making your Easy Mediterranean Baked Fish? Follow these simple, actionable steps, and enjoy your healthy dinner recipes experience!

    1. Preheat the Oven: Set your oven to 400°F (200°C) and allow it to preheat while you prepare your ingredients.

    2. Prepare the Baking Dish: Lightly grease a large baking dish with olive oil to prevent the fish from sticking.

    3. Arrange the Vegetables: Spread your halved cherry tomatoes and chopped bell peppers in a single layer at the bottom of the baking dish. This will create a flavorful bed for the fish to rest on and infuse it with moisture.

    4. Season the Vegetables: Drizzle the olive oil over the vegetables, and sprinkle with salt, pepper, and half of the minced garlic. Toss gently until the vegetables are well coated.

    5. Place the Fish Fillets: Now, lay your fish fillets on top of the seasoned vegetable mix, ensuring they are spaced evenly apart.

    6. Add Remaining Garlic and Seasonings: Sprinkle the minced garlic over the fish, followed by the lemon juice and dried oregano. This is where the magic happens—these seasonings will elevate the flavors significantly.

    7. Bake the Fish: Transfer the baking dish to the preheated oven and bake for about 15-20 minutes, or until the fish flakes easily with a fork. Cooking time may vary depending on the thickness of your fillets.

    8. Check for Doneness: Use a fork to test if the fish is thoroughly cooked; it should be opaque and flaky.

    9. Garnish and Serve: Once your fish is done, remove it from the oven and garnish with fresh basil or parsley for a pop of color and extra flavor.

    10. Plating: Serve immediately alongside your favorite side dishes—this fish pairs beautifully with a light salad, quinoa, or couscous for a complete Mediterranean meal!

    Cooking this Easy Mediterranean Baked Fish is not only interactive but also highlights the wonderful ability to accommodate different dietary needs for your family and friends.

    Mastering Easy Mediterranean Baked Fish Recipe: Advanced Tips and Variations

    Want to take your Mediterranean Baked Fish to the next level? Check out these advanced tips and delicious variations to inspire your culinary creativity!

    • Herb Infusion: Consider infusing your olive oil with fresh herbs before adding it to the dish. Simple heating of olive oil with fresh rosemary or thyme for a few minutes can extract their essential flavors beautifully.

    • Use a Variety of Fish: For an exciting twist on taste, try substituting different types of fish. Salmon or trout would lend a richer flavor, while shrimp or scallops add a touch of elegance.

    • Spice it Up: If you enjoy heat, incorporate red pepper flakes or diced jalapeños into the vegetable mix or sprinkle them over the fish for an added kick.

    • Mediterranean Spice Blend: Experiment with your seasoning! Try adding a Mediterranean spice blend that includes cumin, paprika, or coriander for a flavor explosion.

    • Serve with Dips: Accompany your dish with Mediterranean staples like tzatziki, hummus, or a lemony tahini sauce for dipping or drizzling.

    These tips and variations can help you infuse unique flavors and showcase your culinary expertise while using this easy, healthy dinner recipe as your foundation.

    How to Store Easy Mediterranean Baked Fish Recipe: Best Practices

    Knowing how to store your cooked Mediterranean Baked Fish can help you enjoy leftovers without compromising on taste or quality. Here are some best practices to consider:

    • Refrigeration: Allow the baked fish to cool to room temperature before transferring it to an airtight container. Stored in the refrigerator, it will be best enjoyed within 2-3 days.

    • Freezing: To freeze, place the cooled fish and accompanying vegetables in a freezer-safe container or tightly sealed bag. It can be stored in the freezer for up to 3 months. Make sure to label the container with the date for easy tracking!

    • Reheating: When you’re ready to enjoy your leftovers, simply preheat your oven to 350°F (175°C). Place the fish and vegetables in an oven-safe dish, cover with foil, and reheat for about 15-20 minutes until heated through. Microwaving is an option too, but remember that it may not keep the fish flaky and could dry it out.

    By following these guidelines, you can ensure that you make the most of your culinary efforts and enjoy this healthy and delicious dish more than once!

    Nutritional Value of Easy Mediterranean Baked Fish Recipe

    Wondering how healthy this Easy Mediterranean Baked Fish recipe truly is? Here’s a breakdown of the nutritional value based on using a typical serving of white fish, fresh vegetables, and olive oil:

    • Calories: Approximately 350 per serving
    • Protein: 30g
    • Total Fat: 15g (of which saturated fat is 2g)
    • Carbohydrates: 12g
    • Fiber: 3g
    • Sugar: 4g
    • Sodium: 300mg

    These figures can vary based on the specific fish and variations used, but overall, this Easy Mediterranean Baked Fish recipe fits perfectly into the realm of healthy dinner recipes. Since it’s rich in lean protein, healthy fats, and packed full of vitamins and minerals from vegetables, it can be a satisfying and balanced meal option for everyone.

    FAQs: Frequently Asked Questions About Easy Mediterranean Baked Fish Recipe

    1. Can I use frozen fish fillets for this recipe?

    Absolutely! If using frozen fish, ensure it’s fully thawed before proceeding with the recipe for optimal cooking results.

    2. What types of fish are best for baking?

    White fish like cod, tilapia, or halibut are ideal due to their light flavor and flaky texture. Salmon and trout can also be wonderful, though they have a richer taste.

    3. Is this recipe suitable for meal prep?

    Definitely! This Easy Mediterranean Baked Fish recipe is excellent for meal prep. Simply store in individual containers and refrigerate or freeze for easy grab-and-go options.

    4. Can I substitute olive oil in this recipe?

    Yes, feel free to substitute olive oil with avocado oil or another healthy fat of your choice, such as coconut oil, for different flavor profiles.

    5. What side dishes pair well with this baked fish?

    This dish pairs beautifully with quinoa, couscous, roasted vegetables, or a light salad for a well-rounded meal.

    6. How can I adjust the recipe for kids?

    To make this recipe more kid-friendly, consider reducing the number of seasonings or serving with a side of cheesy pasta or baked potatoes to balance the flavors.

    In conclusion, the Easy Mediterranean Baked Fish recipe is a fantastic choice for a satisfying, heart-healthy meal that caters to various dietary needs. By combining wholesome ingredients with simple methods, you can create a dish that’s not only delicious but also nourishing for you and your loved ones. Enjoy your culinary adventure!
    “`

  • Tasty Key West Grilled Chicken Recipe

    Tasty Key West Grilled Chicken Recipe

    Tasty Key West Grilled Chicken Recipe: A Tropical Delight

    Introduction to Tasty Key West Grilled Chicken Recipe

    Are you searching for a vibrant and delicious addition to your meal rotation? Look no further than the Tasty Key West Grilled Chicken Recipe! This dish not only brings the tropical flavors of the Florida Keys to your kitchen but also offers a healthy and satisfying option that’s perfect for any occasion. Many chicken recipes can be lackluster, but this one shines bright with its lush ingredients and spicy marinade.

    Perfect for busy parents, newlyweds, or even students who crave a taste of adventure, this grilled chicken is easy to prepare and packed with health benefits. It’s a wonderful dish for those mindful of their diets, as it is low in calories, high in protein, and gluten-free. The simplicity of this recipe makes it suitable for all cooking levels, providing a chance to impress family and friends with minimal effort.

    Additionally, this flavorful chicken can be paired with rice, salad, or served atop tacos, making it versatile for various dietary preferences. Whether you’re hosting a barbecue, needing a quick weeknight meal, or simply want to indulge in something exotic, this grilled chicken recipe is a delightful choice.

    Benefits and Advantages of Tasty Key West Grilled Chicken Recipe

    This Tasty Key West Grilled Chicken Recipe stands out from other chicken recipes due to several factors. Firstly, the ease of preparation cannot be overstated. The marinade requires only a handful of ingredients, many of which you might already have in your pantry. This makes it an ideal choice for those busy days when you want a wholesome meal on the table without the hassle.

    Health enthusiasts will appreciate the numerous health benefits offered by this chicken dish. Not only is chicken a great source of lean protein, aiding in muscle building and repair, but the flavorful marinade incorporates fresh citrus and herbs—both of which are rich in vitamins and antioxidants. The zest of lime and the aromatic garlic create a symphony of flavors that elevate the simple chicken breast without adding unnecessary calories.

    Moreover, this grilled chicken is perfect for various dietary needs. It can easily be adapted to vegan and gluten-free options. By substituting chicken with tofu or tempeh and ensuring that all ingredients are gluten-free, everyone can enjoy this dish, regardless of their dietary restrictions.

    Finally, the dish’s versatile nature makes it an excellent option for any occasion, from casual family dinners to more sophisticated gatherings. Impress your guests with an exotic meal without spending hours in the kitchen!

    Ingredients Overview

    Essential Ingredients for Tasty Key West Grilled Chicken Recipe

    To create the Tasty Key West Grilled Chicken, here’s what you’ll need:

    • 4 boneless, skinless chicken breasts (or tofu for a vegan option)
    • 1/4 cup fresh lime juice (approximately 2-3 limes)
    • 1/4 cup olive oil (healthy fat)
    • 3 cloves garlic, minced (adds flavor and health benefits)
    • 1 tablespoon honey (can be omitted or replaced with agave syrup for a strict vegan option)
    • 1 teaspoon cumin (for warmth and depth)
    • 1 teaspoon paprika (adds a smoky flavor)
    • Salt and pepper to taste

    Measurements and Substitutions:
    – For a lower-calorie alternative, consider using skinless chicken thighs.
    – You may also substitute honey with maple syrup for a vegan-friendly sweetener.

    Dietary Substitutions to Customize Your Tasty Key West Grilled Chicken Recipe

    This Tasty Key West Grilled Chicken Recipe can easily cater to various dietary preferences. Here are some substitutions to consider:

    • Vegan Option: Replace chicken with tofu, tempeh, or even seitan. Press the tofu to remove excess moisture before marinating.
    • Gluten-Free: Ensure all condiments, such as soy sauce (if used), are gluten-free.
    • Low-Carb Option: Instead of honey, substitute with a zero-calorie sweetener like stevia or erythritol.
    • Dairy-Free: This recipe is naturally dairy-free; however, if you want a creamy marinade, consider using coconut yogurt.

    These options help ensure that everyone can enjoy the recipe while maintaining their dietary choices.

    How to Prepare the Perfect Tasty Key West Grilled Chicken Recipe: Step-by-Step Guide

    Get ready to impress your family with this step-by-step guide to making the Tasty Key West Grilled Chicken Recipe.

    1. Prepare the Marinade: In a medium-sized bowl, whisk together the fresh lime juice, olive oil, minced garlic, honey, cumin, paprika, salt, and pepper. This marinade will infuse the chicken with flavor.

    2. Marinate the Chicken: Place your chicken breasts in a large resealable plastic bag or shallow dish. Pour the marinade over the chicken, ensuring each piece is well-coated. Seal the bag or cover the dish, then refrigerate for at least 1 hour, or ideally overnight, to allow the flavors to meld.

    3. Preheat the Grill: When you are ready to cook, preheat your grill to medium-high heat. This ensures a nice sear on the chicken, locking in all the juices.

    4. Grill the Chicken: Remove the marinated chicken from the fridge, shaking off any excess marinade. Place the chicken on the preheated grill. Grill for about 6-7 minutes on each side, depending on thickness, until the internal temperature reaches 165°F (75°C).

    5. Rest the Chicken: After grilling, remove the chicken from the grill and let it rest for about 5 minutes. This allows the juices to redistribute, making your chicken more tender and flavorful.

    6. Slice and Serve: Slice the grilled chicken and serve it with your choice of sides. Options include a vibrant salad, brown rice, or salsa for an added punch.

    Adapt this process for any of your dietary needs—grilling time may vary for vegan options, so ensure they are thoroughly cooked as well.

    Mastering Tasty Key West Grilled Chicken Recipe: Advanced Tips and Variations

    To master your Tasty Key West Grilled Chicken Recipe, consider these advanced tips and variations:

    • Marinating Time: While marinating for an hour is effective, extending this time to 4-12 hours can enhance the flavor substantially.
    • Using a Meat Thermometer: To ensure perfectly cooked chicken, invest in a meat thermometer. When the internal temperature reaches 165°F (75°C), the chicken is ready.
    • Adding Fruit: Consider adding fresh fruits to the marinade, such as pineapple or mango, to impart a sweet and tangy flavor.
    • Grilling Vegetables: Toss some seasonal vegetables on the grill alongside the chicken for a complete meal. Bell peppers, zucchini, and asparagus grill beautifully and pair nicely with the chicken.
    • Sauces and Salsas: Top the grilled chicken with a mango salsa or a cilantro-lime dressing for an extra layer of flavor.

    These tips help you elevate the dish while experimenting with flavors, turning every meal into a culinary adventure!

    How to Store Tasty Key West Grilled Chicken Recipe: Best Practices

    To properly store your Tasty Key West Grilled Chicken, follow these best practices:

    • Refrigeration: Leftover grilled chicken can be stored in an airtight container in the refrigerator for up to 4 days. This will keep it fresh and safe to eat.

    • Freezing: If you want to store the chicken for a longer period, wrap it tightly in plastic wrap or aluminum foil and place it in a freezer-safe bag. It can be frozen for up to 3 months.

    • Reheating: When ready to eat, thaw the chicken overnight in the refrigerator if frozen and reheat on the grill for the best flavor and texture. Alternatively, you can reheat in the oven at 350°F (175°C) until warmed through.

    These methods ensure that this delicious chicken remains enjoyable and safe to eat for several days after preparation.

    Nutritional Value of Tasty Key West Grilled Chicken Recipe

    Understanding the nutritional value of your meals is essential, especially for diet-conscious individuals. Here’s the breakdown for one serving of the Tasty Key West Grilled Chicken Recipe (approximately 4 oz of chicken):

    • Calories: 220
    • Protein: 30 grams
    • Fat: 10 grams (mostly from olive oil)
    • Carbohydrates: 5 grams
    • Fiber: 0 grams
    • Sugars: 1 gram

    This dish is an excellent source of lean protein, making it a great choice for those looking to build muscle or maintain a healthy lifestyle. The use of olive oil provides healthy fats that are beneficial for heart health, while the spices and lime juice incorporate antioxidants that contribute to overall well-being.

    FAQs: Frequently Asked Questions About Tasty Key West Grilled Chicken Recipe

    1. Can I use frozen chicken for this recipe?
    Absolutely! Just ensure to thaw the chicken completely before marinating to allow for better flavor absorption.

    2. What if I don’t have lime juice?
    If lime juice isn’t available, or if you prefer a different flavor, lemon juice makes an excellent substitute.

    3. How can I make this recipe spicier?
    Add some cayenne pepper or crushed red pepper flakes to the marinade to kick up the heat!

    4. Can I make this recipe ahead of time?
    Certainly! The grilled chicken can be marinated the night before and grilled the next day for an easy meal prep solution.

    5. What’s a good side dish to serve with this chicken?
    Pair it with a fresh salad, grilled vegetables, or coconut rice to complement the tropical flavors of the chicken.

    With this comprehensive guide, you’re ready to embark on a culinary journey with the Tasty Key West Grilled Chicken Recipe. Embrace the freshness and zesty flavor of this dish, and enjoy the satisfaction of serving a meal that is not only delicious but also healthy and accommodating to various dietary preferences. Happy cooking!

  • The Best Marry Me Chicken Recipe

    The Best Marry Me Chicken Recipe

    The Best Marry Me Chicken Recipe: A Tropical Delight

    Introduction to The Best Marry Me Chicken Recipe

    Are you ready to discover a dish that combines simplicity, incredible flavor, and irresistible appeal? Enter The Best Marry Me Chicken Recipe—a delightful choice among chicken recipes that’s perfect for busy weeknights or special occasions. This mouthwatering meal showcases tender chicken breasts smothered in a creamy, dreamy sauce crafted from sun-dried tomatoes, garlic, and rich herbs. It’s not just easy to prepare; it also provides health advantages that fit well into various dietary needs.

    Imagine serving a dish that not only impresses your loved ones but could also be the key to igniting romance at the dinner table! The incredible flavor profile and creamy texture of this recipe make it an ideal comfort meal for newlyweds and busy parents alike. Moreover, the recipe is adaptable to suit those who may prefer gluten-free or low-calorie diets. Whether you’re a working professional looking for a quick weeknight meal or a baking enthusiast hoping to impress your guests, this dish is sure to resonate with everyone.

    In less than an hour, you can whip up a wholesome dinner that everyone will rave about. With Marry Me Chicken, you gain the confidence of a chef and the satisfaction of nourishing loved ones with quality ingredients. Let’s dive deeper into the benefits and advantages of this amazing dish!

    Benefits and Advantages of The Best Marry Me Chicken Recipe

    When it comes to chicken recipes, The Best Marry Me Chicken stands out for several compelling reasons. Firstly, its ease of preparation is unparalleled. With minimal cooking skills required and quick cooking time, this recipe allows even the busiest of home cooks to enjoy a gourmet-like experience. The combination of chicken, a creamy sauce, and a hint of tangy goodness from the sun-dried tomatoes and herbs makes for an unforgettable dish.

    Moreover, the health benefits are noteworthy. Each serving is packed with lean protein, which is essential for muscle health and overall well-being. Chicken is also a good source of various vitamins and minerals, including B vitamins and phosphorus. If you’re looking for a meal that’s nutritious and satisfying, Marry Me Chicken is the way to go.

    Another advantage is its adaptability. You can customize the dish to meet diverse dietary preferences—making it a perfect match for your guests or family members following gluten-free, dairy-free, or low-calorie diets. This versatility opens up avenues for every cook, regardless of their dietary restrictions. Plus, the flavors can be amplified through easy variations, allowing you to explore exciting ingredients like fresh spinach, mushrooms, or even a sprinkle of Parmesan cheese, enhancing its overall appeal.

    This recipe not only fills plates; it fills hearts! Its simplicity makes it feasible for anyone, whether you’re a student learning the ropes of cooking or a seasoned chef looking for a delicious quick meal. Plus, the delightful aroma will have everyone rushing to the dining room when dinner is served!

    Ingredients Overview

    Essential Ingredients for The Best Marry Me Chicken Recipe

    To create this delicious dish, you’ll need the following key ingredients:

    • 2 large boneless, skinless chicken breasts (about 1.5 lbs) – The star of the dish; chicken provides protein and versatility.
    • 1 cup sliced sun-dried tomatoes (packed in oil) – Adds a sweet, tangy flavor and vibrant color.
    • 1 cup heavy cream – For that rich, creamy sauce; alternative options are below for those with dietary restrictions.
    • 4 cloves garlic, minced – Infuses the dish with aromatic flavor.
    • 1 teaspoon Italian seasoning – A blend of dried herbs that enhances the fragrance of the chicken.
    • Salt and pepper, to taste – Essential for seasoning.
    • 2 tablespoons olive oil – Required for searing the chicken; additionally, you could use avocado oil or coconut oil for a different flavor profile.
    • Fresh basil or parsley, chopped (for garnish) – Provides a beautiful finish and fresh flavor.

    Dietary Options:

    • Vegan Option: Substitute chicken breasts with firm tofu or chickpeas, and use coconut cream or a nut-based alternative for the cream.
    • Gluten-Free: This recipe is naturally gluten-free. Just ensure to confirm that the sun-dried tomatoes are gluten-free as some brands may vary.
    • Low-Calorie: Use a low-fat cream or alternative milk like almond or cashew for a lighter version.

    Dietary Substitutions to Customize Your The Best Marry Me Chicken Recipe

    To cater to different dietary preferences, consider the following substitutions:

    • Chicken to Tofu or Tempeh: For a plant-based version, replacing chicken with tofu or tempeh offers a flavorful and satisfying meal.
    • Heavy Cream Variants: Heavy cream can be swapped with Greek yogurt or light cream alternatives to reduce caloric intake while still maintaining creaminess.
    • Garlic Alternatives: Use garlic powder if you don’t have fresh garlic on hand.
    • Fresh Herbs: If fresh basil isn’t available, dried herbs like thyme or oregano can also work beautifully, adding depth to your dish.
    • Vegetable Additions: Feel free to include fresh spinach, asparagus, or bell peppers for extra nutrients and color.

    The versatility of this Marry Me Chicken recipe makes it easy to adapt to any dietary requirements or ingredient availability, ensuring that it can become a staple in your rotation of chicken recipes.

    How to Prepare the Perfect The Best Marry Me Chicken Recipe: Step-by-Step Guide

    Follow these clear steps to create your own version of The Best Marry Me Chicken Recipe.

    1. Prepare the Base: Start by patting the chicken breasts dry with a paper towel. This will help the chicken sear beautifully.
    2. Season the Chicken: Sprinkle salt, pepper, and Italian seasoning on both sides of the chicken breasts, ensuring an even coating.
    3. Heat the Oil: In a large skillet over medium-high heat, add the olive oil. Allow it to warm up for about 2 minutes.
    4. Sear the Chicken: Add the chicken breasts to the skillet. Sear them for 5-7 minutes on each side or until golden brown. The internal temperature should reach 165°F (75°C).
    5. Remove and Set Aside: Once cooked, take the chicken out of the skillet and place it on a plate. Cover with foil to keep warm.
    6. Sauté the Garlic: In the same skillet, add minced garlic. Sauté for about 1 minute until fragrant, stirring frequently to prevent burning.
    7. Add Sun-Dried Tomatoes: Once the garlic is fragrant, toss in the sun-dried tomatoes. Stir them in for about 1-2 minutes, allowing their flavors to meld with the garlic.
    8. Create the Sauce: Slowly pour in the heavy cream, stirring continuously. Bring the mixture to a gentle simmer.
    9. Combine Ingredients: After the sauce has thickened slightly, return the chicken breasts to the skillet, spooning the creamy mixture over them.
    10. Simmer for Flavor: Allow everything to simmer together for an additional 2-3 minutes, ensuring the chicken is well-coated and warmed through.
    11. Garnish and Serve: Once everything is combined, remove the skillet from the heat. Top with freshly chopped basil or parsley and serve warm.

    Feel free to modify the cooking time based on the size of your chicken breasts, or substitute the chicken with tofu or vegetables as discussed, maintaining the same delicious creamy sauce!

    Tips for Preparation

    • Check Doneness: Use a meat thermometer to ensure the chicken is cooked perfectly.
    • Flavor Enhancements: Consider adding different spices or herb blends to customize the flavor profile to your liking.
    • Cook in Batches: If you are making a larger portion, consider searing the chicken in batches to ensure they cook evenly.

    Mastering The Best Marry Me Chicken Recipe: Advanced Tips and Variations

    Once you’ve mastered the basic preparation, consider these advanced tips and variations to elevate your dish:

    • Cooking Methods: For a healthier twist, you can bake the chicken at 375°F (190°C) in a baking dish for about 20-25 minutes instead of pan-frying, ensuring it remains juicy.
    • Flavor Boost: To heighten the flavor, add white wine to deglaze the skillet before adding the cream. This gives the sauce an added layer of richness.
    • Additional Textures: Incorporate sautéed mushrooms for an earthy flavor or fresh spinach for a touch of vibrancy and nutrition.
    • Cheesy Goodness: If you enjoy a cheesy flavor, sprinkle grated Parmesan or mozzarella cheese on top in the last minutes of cooking. Cover the skillet to melt the cheese perfectly.
    • Serving Suggestions: Pair the dish with a side of garlic bread, spinach salad, or creamy mashed potatoes to complement the savory chicken flavors.

    As you experiment and find the variations that best suit your taste, you’ll make this Marry Me Chicken recipe truly your own!

    How to Store The Best Marry Me Chicken Recipe: Best Practices

    Storing leftover Marry Me Chicken properly is crucial for maintaining its flavors and texture. Here’s how:

    • Refrigeration: Allow the chicken to cool completely before transferring it to an airtight container. Store in the refrigerator for up to 3 days.
    • Freezing: If you plan to freeze the dish, ensure it’s stored in a freezer-safe airtight container. It can be kept frozen for up to 3 months. To prevent freezer burn, wrap the container with plastic wrap before sealing.
    • Reheating: For best results, thaw the chicken overnight in the refrigerator if frozen. To reheat, place it in a skillet over medium heat, adding a splash of water or broth to the pan to prevent drying out. Alternatively, you can use a microwave-safe dish covered with a damp paper towel to keep moisture while reheating.

    Using these storage practices will help keep your delicious Marry Me Chicken tasting fresh and delightful for your next meal.

    Nutritional Value of The Best Marry Me Chicken Recipe

    Understanding the nutritional value of your meals is important, especially when trying to maintain a balanced diet. Here is an approximate nutritional breakdown per serving (1 chicken breast with sauce):

    • Calories: 420
    • Total Fat: 25g
    • Saturated Fat: 12g
    • Cholesterol: 130mg
    • Sodium: 350mg
    • Total Carbohydrates: 6g
    • Dietary Fiber: 1g
    • Sugars: 2g
    • Protein: 45g

    If you’re opting for substitutions like tofu or low-fat cream, the nutrition facts will change, typically resulting in lower caloric intake and fat content. Always check labels for the specific products used in your recipe.

    Getting familiar with the nutritional aspects can help you enjoy this dish while keeping it aligned with your dietary goals and needs!

    FAQs: Frequently Asked Questions About The Best Marry Me Chicken Recipe

    • Can I use chicken thighs instead of breasts?
      Absolutely! Chicken thighs are a great alternative and will add an even richer flavor and texture to the dish.

    • Is it possible to make this dish dairy-free?
      Yes, you can substitute the heavy cream with coconut cream or any nut-based cream alternative to achieve a delicious dairy-free version.

    • How do you recommend serving this dish?
      This Marry Me Chicken is best served over a bed of rice, pasta, or alongside crusty bread to soak up the creamy sauce.

    • Can I prepare this meal ahead of time?
      While the chicken can be marinated and prepared ahead, we recommend cooking it fresh for the best flavor. However, you can refrigerate leftovers for easy reheating!

    • Is this recipe spicy?
      The recipe is not inherently spicy, but you can add red pepper flakes or your favorite spicy seasoning to adapt it to your taste!

    By addressing common queries in a clear fashion, you equip readers with confidence and knowledge that will encourage them to try this wonderful recipe.

    Conclusion

    The Best Marry Me Chicken Recipe is an outstanding dish that blends flavor and ease, making it a prized addition to your collection of chicken recipes. With its numerous health benefits, dietary adaptability, and delicious taste, it will surely become a favorite in your household. Whether for a cozy family dinner or an impressive date night, this enchanting meal promises to leave a lasting impression. So, put on your apron, gather your ingredients, and get ready to create a culinary experience that may just be the key to “marrying” the hearts around your dinner table!

  • Easy Low Calorie Banana Muffins Recipe

    Easy Low Calorie Banana Muffins Recipe

    Easy Low Calorie Banana Muffins Recipe: A Tropical Delight

    Introduction to Easy Low Calorie Banana Muffins Recipe

    If you’re scouting for a delicious, health-conscious treat, look no further than this Easy Low Calorie Banana Muffins Recipe. With its delightful taste and soft texture, these muffins transform ripe bananas into a scrumptious dessert while remaining mindful of your waistline. This banana bread recipe is not only low in calories but also incredibly simple to prepare — perfect for busy parents, students, and anyone seeking a healthier option without sacrificing flavor.

    What makes this recipe particularly advantageous is its versatile nature. It caters to various dietary needs, appealing to vegans, gluten-free eaters, and those conscious about their calorie intake. In mere minutes, you can whip up a batch of banana muffins that are low in sugar and packed with heart-healthy ingredients.

    Can you imagine the comforting aroma of freshly baked muffins wafting through your home? Whether you savor these muffins for breakfast, as a post-workout snack, or a guilt-free dessert, they deliver a delightful fudgy bite that keeps you coming back for more. By using ripe bananas, you’ll not only reduce sugar levels but also infuse natural sweetness and moisture into the muffins, enhancing their flavor and overall appeal.

    Join the ranks of home bakers who enjoy the fruity, wholesome goodness of banana muffins while maintaining a healthy lifestyle. Let’s dive deeper into the many benefits this recipe has to offer.

    Benefits and Advantages of Easy Low Calorie Banana Muffins Recipe

    The Easy Low Calorie Banana Muffins Recipe stands out as a quintessential choice for those who appreciate simplicity without compromising on taste. One of the remarkable aspects of this recipe is its ease of preparation. With a few straightforward steps, anyone can bake delicious muffins right from the comfort of their kitchen. This accessibility makes it a favorite among busy parents, students cramming for exams, and young professionals seeking a quick and satisfying treat.

    Now, let’s talk health benefits. These banana muffins are a powerhouse of nutrition! By utilizing ripe bananas as the base, you’re benefiting from their natural sugars, fiber, and essential vitamins like B6 and C. Not only do they help to naturally sweeten the recipe, but they also provide potassium, vital for heart health and muscle function.

    Another advantage is the flexibility this recipe offers. You can easily substitute elements based on your specific dietary requirements. Want a gluten-free version? Simply swap the all-purpose flour with a gluten-free blend. Looking for a vegan option? Banish the eggs and use flaxseed meal or applesauce instead. By making these small modifications, you can create muffins that align with your lifestyle without compromising on taste or texture.

    Moreover, these muffins freeze exceptionally well. You can bake a batch on a quiet Sunday and have nutritious snacks ready for the week ahead. This makes them a fabulous option for meal prep enthusiasts, whether you’re a culinary novice or a seasoned baker. In essence, this banana bread recipe caters to health-conscious food lovers, giving you a good reason to indulge, guilt-free.

    Ingredients Overview

    Essential Ingredients for Easy Low Calorie Banana Muffins Recipe

    Creating the perfect batch of easy low-calorie banana muffins requires only a handful of essential ingredients. Here’s your complete shopping list:

    • 3 ripe bananas (mashed): The star ingredient, providing natural sweetness and moisture.
    • 1 cup of whole wheat flour (or gluten-free flour): For a nutritious base; opt for gluten-free flour if needed.
    • 1/2 cup of oats: Adds texture and fiber, aiding digestion and providing long-lasting energy.
    • 1/4 cup of honey or maple syrup: A natural sweetener to replace refined sugar; use maple syrup for a vegan option.
    • 1/2 cup unsweetened applesauce: Acts as a low-calorie fat alternative while keeping the muffins moist.
    • 1 teaspoon of baking powder: Helps the muffins rise, creating a light texture.
    • 1/2 teaspoon of baking soda: Works in tandem with the baking powder for the perfect bake.
    • 1/2 teaspoon of cinnamon: Adds warm flavor; optional for those who prefer a plain taste.
    • Pinch of salt: Balances sweetness and highlights all the flavors.
    • Optional add-ins: Walnuts, chocolate chips, or dried fruits can elevate your muffins while adding nutrients.

    These ingredients not only contribute to the delightful taste but also support various dietary preferences. Make sure to pick ripe bananas; they not only blend better but also offer the most natural sugars.

    Dietary Substitutions to Customize Your Easy Low Calorie Banana Muffins Recipe

    Customization is all about personal preferences and dietary needs. Here are some suggested substitutions for your easy low-calorie banana muffins:

    • Gluten-Free: Swap the whole wheat flour for a gluten-free mix or almond flour for a nutty flavor.
    • Vegan: Rather than eggs, use flaxseed meal mixed with water (1 tablespoon of flaxseed + 2.5 tablespoons of water = 1 egg). Alternatively, unsweetened applesauce is an excellent binding agent in vegan baking.
    • Low Sugar: If opting for a lower sugar intake, you can reduce the honey or syrup by half or use a sugar substitute like stevia or erythritol.
    • Nut-Free: For those with nut allergies, avoid adding walnuts or any nut-based flour. Instead, try sunflower seeds or pumpkin seeds for crunch.
    • Flavor Variations: Consider adding blueberries, chocolate chips (dark for a healthier version), or coconut flakes for a tropical twist.

    These substitutions not only cater to various dietary restrictions but create opportunities for creativity in the kitchen. Feel free to experiment and make these muffins uniquely yours!

    How to Prepare the Perfect Easy Low Calorie Banana Muffins Recipe: Step-by-Step Guide

    Now that you’ve gathered your ingredients, it’s time to bring your Easy Low Calorie Banana Muffins Recipe to life. Follow these simple steps to create your delicious muffins:

    1. Preheat the Oven: Set your oven to 350°F (175°C) for optimal baking conditions. This ensures your muffins bake evenly.

    2. Prepare the Muffin Pan: Grease a muffin pan or line it with muffin liners. This prevents sticking and also makes for easy cleanup.

    3. Mash the Bananas: In a large mixing bowl, mash the ripe bananas until smooth. Aim for a creamy texture — lumps can lead to uneven baking.

    4. Mix Wet Ingredients: Add the honey (or maple syrup) and unsweetened applesauce to the mashed bananas. Stir well to combine.

    5. Combine Dry Ingredients: In another bowl, whisk together the whole wheat flour, oats, baking powder, baking soda, cinnamon, and salt. This ensures even distribution of leavening agents.

    6. Incorporate Dry into Wet: Gradually add the dry mixture to the wet ingredients, stirring until just combined. It’s essential not to overmix; a few lumps are perfectly fine.

    7. Add Optional Ingredients: If you decided to add walnuts, chocolate chips, or any other extras, fold them in gently at this stage.

    8. Scoop into Muffin Pan: Using a spoon or an ice cream scoop, evenly distribute the batter among the muffin cups, filling each about 2/3 full. This gives them room to rise without overflowing.

    9. Bake: Place the muffin pan in the preheated oven and bake for 15-20 minutes. You’ll know they’re done when a toothpick inserted in the center comes out clean.

    10. Cool: Remove the muffins from the oven and let them sit for a few minutes in the pan, then transfer them to a wire rack to cool completely.

    By following these clear, actionable steps, you’ll create delicious muffins that not only taste fantastic but also cater to various dietary preferences. Don’t hesitate to make adjustments to suit your taste; after all, this banana bread recipe is all about personalization and enjoyment!

    Mastering Easy Low Calorie Banana Muffins Recipe: Advanced Tips and Variations

    Now that you’ve got the essentials down, here are some advanced tips and exciting variations to elevate your banana muffins even further:

    • Extra Moisture: For those who enjoy extra moist muffins, consider adding 1/4 cup of Greek yogurt or sour cream to the batter. This adds creaminess and enhances texture.

    • Flavored Extracts: Vanilla or almond extract can give your muffins a flavorful boost. Add 1 teaspoon to the wet mixture for added depth.

    • Sprinkle with Oats: For a beautiful finish, sprinkle some oats on top before baking. This adds a delightful crunch to the muffin tops.

    • Add Spices: Feel free to experiment with spices such as nutmeg or ginger for a warm flavor profile. This can make your muffins incredibly aromatic and inviting.

    • Chocolate Swirls: For a surprising twist, melt dark chocolate and swirl it into the muffin batter before baking. This adds richness and gourmet flair.

    • Mini Muffins: If you fancy bite-sized treats, use a mini muffin pan and adjust the bake time to around 10-12 minutes.

    These tips not only enhance your muffins but also provide avenues for creativity in the kitchen. Don’t shy away from experimenting — after all, baking should be fun!

    How to Store Easy Low Calorie Banana Muffins Recipe: Best Practices

    To make sure your Easy Low Calorie Banana Muffins Recipe remains fresh and delicious, proper storage is crucial. Here are the best practices to keep your muffins in top shape:

    • Room Temperature: If you plan to consume the muffins within a few days, simply store them in an airtight container or a zip-top bag at room temperature. They should last about 2-3 days.

    • Refrigeration: For longer storage, place them in the refrigerator. They can last up to a week; however, do note that refrigeration may alter the texture slightly.

    • Freezing: If you want to prolong their life even further, freezing is your best option. Wrap individual muffins in plastic wrap or foil, then place them in a freezer-safe bag. They can last up to 3 months. When you’re ready to enjoy one, simply thaw it at room temperature or pop it in the microwave for a quick reheat.

    Utilizing these storage tips allows you to savor your muffins longer and decreases waste, making this banana bread recipe not just enjoyable but also economical.

    Nutritional Value of Easy Low Calorie Banana Muffins Recipe

    Understanding the nutritional information of your Easy Low Calorie Banana Muffins Recipe is essential for making informed dietary choices. Here’s a breakdown of the approximate nutritional values per muffin (based on a recipe yielding 12 muffins):

    • Calories: About 100-120
    • Total Fat: 2g
    • Saturated Fat: 0.5g
    • Cholesterol: 0mg
    • Sodium: 150mg
    • Total Carbohydrates: 22g
    • Dietary Fiber: 3g
    • Sugars: 5g (natural sugar from bananas)
    • Protein: 3g

    These muffins are a fantastic option for those individuals looking to indulge without compromising their health goals. Loaded with fiber, they provide essential nutrients that support overall well-being. Whether you’re a health enthusiast or someone just looking for a delicious treat, these muffins tick all the boxes.

    FAQs: Frequently Asked Questions About Easy Low Calorie Banana Muffins Recipe

    Can I substitute the flour in this recipe?

    Absolutely! You can use a gluten-free flour blend, almond flour, or even oat flour for a nutty flavor. Just ensure it measures similarly to all-purpose flour.

    How ripe should the bananas be for this recipe?

    Aim for bananas with plenty of brown spots — this indicates they are sweet and have developed more intense flavor, making your muffins even more delicious.

    Can I use frozen bananas?

    Yes, feel free to use frozen bananas! Just thaw them, and drain any extra liquid before mashing. They work surprisingly well in baking, contributing moisture and sweetness.

    How do I know when my muffins are done baking?

    To check for doneness, insert a toothpick into the center of a muffin. If it comes out clean or with just a few crumbs attached, they’re ready. Avoid overbaking to keep them moist.

    What’s the best way to prevent my muffins from sticking?

    Using cupcake liners is the easiest way to prevent sticking. Alternatively, you can grease your muffin pan with cooking spray or oil to ensure easy removal.

    Can I add nuts or chocolate chips to this recipe?

    Definitely! Adding walnuts, pecans, or chocolate chips can provide extra texture and flavor. Just fold them in gently at the end of mixing.

    These FAQs address some of the most common queries, ensuring you feel confident and well-informed as you embark on your baking adventure. With this banana bread recipe, the possibilities are endless, inviting a world of culinary creativity. Enjoy your baking journey!

  • Easy Frozen Yogurt Granola Cups Recipe

    Easy Frozen Yogurt Granola Cups Recipe

    Easy Frozen Yogurt Granola Cups Recipe: A Tropical Delight

    Introduction to Easy Frozen Yogurt Granola Cups Recipe

    Welcome to the world of Easy Frozen Yogurt Granola Cups! If you’re searching for healthy snacks that satisfy your sweet tooth without the guilt, you’ve landed in the right place. This delightful recipe combines the creaminess of frozen yogurt with the satisfying crunch of granola, making for a delicious and nutritious treat. Not only is it easy to prepare, but this recipe is also incredibly versatile. Whether you’re vegan, gluten-free, or just trying to eat a bit healthier, these granola cups can cater to your dietary needs.

    Busy parents, students, or working professionals will find these frozen yogurt cups to be a quick and rewarding way to indulge. They’re great for breakfast on the go, an afternoon snack, or even a dessert that won’t derail your healthy eating plans. With just a few simple ingredients, you can create a tropical treat that’s perfect for anyone, at any time. Get ready to impress your family and friends with your culinary skills while also taking a step towards healthier eating!

    Benefits and Advantages of Easy Frozen Yogurt Granola Cups Recipe

    The Easy Frozen Yogurt Granola Cups Recipe is more than just a delightful snack—it’s an excellent choice for a variety of reasons. First and foremost, this recipe is incredibly simple to prepare. With minimal ingredients and a straightforward process, it’s perfect for both novice cooks and seasoned bakers alike. This accessibility encourages everyone, even kids, to get involved in the kitchen.

    Health Benefits: The beauty of these yogurt granola cups lies in their nutritional profile. Frozen yogurt is often lower in calories than ice cream, and it retains the goodness of probiotics that benefit your digestive health. Paired with granola, which is packed with whole grains, fiber, and essential nutrients, you’re not only satisfying your cravings but also nourishing your body. Moreover, by preparing these snacks at home, you can control the amount of sugar and other additives, making them even healthier.

    The versatility of this recipe also stands out. It can adapt to various dietary preferences and restrictions. For instance, you can use dairy-free yogurt for a vegan option or substitute traditional granola for a gluten-free variety. How wonderful is it that a single recipe can cater to the diverse dietary needs of family and friends? Plus, these cups are perfect for meal prep. You can make a batch ahead of time and enjoy them throughout the week, ensuring you always have healthy snacks on hand.

    Ingredients Overview

    Essential Ingredients for Easy Frozen Yogurt Granola Cups Recipe

    To create these delightful frozen yogurt granola cups, here’s what you’ll need:

    1. 1 cup of plain Greek yogurt (for a creamier texture; choose a dairy-free version for vegan options)
    2. 2 tablespoons of honey or maple syrup (adjust according to your sweetness preference)
    3. 1 teaspoon of vanilla extract (to add flavor)
    4. 1 cup of granola (opt for gluten-free granola if required)
    5. Fresh fruits (like strawberries, blueberries, or banana slices for topping)
    6. Mini muffin tin (to shape the cups)
    7. Optional toppings (such as shredded coconut, nuts, or seeds for added crunch)

    Dietary Substitutions to Customize Your Easy Frozen Yogurt Granola Cups Recipe

    1. Greek Yogurt Alternatives: For those who are vegan or dairy-sensitive, choose coconut yogurt, almond yogurt, or soy yogurt. Each will still deliver a silky texture while keeping the recipe plant-based.

    2. Sweetener Options: If you’re aiming for a low-calorie treat, consider using stevia or another calorie-free sweetener instead of honey or maple syrup.

    3. Granola Choices: For gluten-free diets, many brands offer gluten-free granola options made from oats that are certified gluten-free. Alternatively, you could make your granola at home with oats, nuts, seeds, and a sweetener of your choice.

    4. Fruit Toppings: The beauty of this recipe is in its versatility. Feel free to throw in your favorite seasonal fruits or berries. You can even mix in some nut butter or chia seeds for added nutrition.

    How to Prepare the Perfect Easy Frozen Yogurt Granola Cups Recipe: Step-by-Step Guide

    Now let’s dive into creating these scrumptious frozen yogurt granola cups. Follow these simple steps, and you’ll have your healthy snacks ready in no time!

    1. Prepare the Base: In a mixing bowl, combine 1 cup of plain Greek yogurt, 2 tablespoons of honey or maple syrup, and 1 teaspoon of vanilla extract. Stir until the mixture is smooth and creamy.

    2. Fill the Muffin Tin: Using a spoon or a piping bag, add the yogurt mixture into the mini muffin tin, filling each cavity about halfway.

    3. Mix Ingredients: In another bowl, take 1 cup of granola and gently fold it into the remaining yogurt mixture. This will add the perfect crunch to your granola cups.

    4. Add Granola to Cups: Spoon the granola-yogurt mix into the muffin tins over the base layer, ensuring each cup is filled almost to the top.

    5. Top with Fresh Fruits: Add slices of fresh fruits on top of each cup. This not only enhances the flavor but also adds a pop of color!

    6. Freeze the Cups: Place the muffin tin in the freezer for at least 4 hours, or until the cups are fully set. This step is crucial for achieving that delightful frozen texture.

    7. Remove from Muffin Tin: Once frozen, take the muffin tin out of the freezer. Let it sit for a couple of minutes at room temperature for easier removal. Pop each cup out gently using a butter knife if needed.

    8. Store or Serve: You can enjoy them immediately or store them in an airtight container in the freezer for later.

    These key steps ensure that you end up with delicious, creamy, and crunchy frozen yogurt granola cups, perfect for any time of day!

    Mastering Easy Frozen Yogurt Granola Cups Recipe: Advanced Tips and Variations

    To elevate your frozen yogurt granola cups, consider these advanced tips and variations:

    • Flavor Infusions: Experiment with different extracts; almond or coconut extracts can add a unique twist to your yogurt base.

    • Nutty Addition: For an extra protein boost, sprinkle some chopped nuts or seeds into the cups along with the granola.

    • Chocolate Lovers: Melt some dark chocolate and drizzle it on top of your cups just before serving for a delicious chocolate-y twist.

    • Spice It Up: Add a pinch of cinnamon or nutmeg to the yogurt base for a subtle warmth that pairs perfectly with the fruits.

    • Change it Up: Instead of granola, try crumbled protein bars for an extra protein kick or use crushed graham crackers for a different texture.

    Always remember, the key to mastering these cups is the balance of flavors and textures. Feel free to mix, match, and create your own unique versions that cater to your taste buds.

    How to Store Easy Frozen Yogurt Granola Cups Recipe: Best Practices

    Storing your Easy Frozen Yogurt Granola Cups correctly is essential for maintaining their deliciousness and texture. Since these cups are meant to be eaten frozen, here are some best practices for storage:

    • Airtight Containers: After popping the yogurt cups out of the muffin tin, place them in an airtight container. This prevents freezer burn and helps maintain their creamy texture.

    • Layering: If you make a large batch, consider adding parchment paper between layers to avoid sticking.

    • Freezer Lifespan: For optimal taste and texture, enjoy your frozen yogurt granola cups within 2-3 months. However, they can last longer in the freezer if stored properly.

    • Serving Tip: When you’re ready to enjoy one, let it sit at room temperature for about 5-10 minutes for easy eating. They’ll soften slightly, making for a perfect melt-in-your-mouth experience every time.

    Nutritional Value of Easy Frozen Yogurt Granola Cups Recipe

    Here’s a breakdown of the nutritional value of one Easy Frozen Yogurt Granola Cup, assuming you’re using the standard ingredients:

    • Calories: Approximately 150 calories
    • Total Fat: 4g
    • Saturated Fat: 2g
    • Cholesterol: 10mg
    • Sodium: 50mg
    • Total Carbohydrates: 24g
    • Dietary Fiber: 2g
    • Sugars: 8g
    • Protein: 5g

    Keep in mind, the nutritional values can change depending on substitutions made (e.g., using low-fat yogurt, different sweeteners, or adding nuts). These granola cups not only satisfy your cravings but also contribute to a balanced diet filled with essential nutrients.

    FAQs: Frequently Asked Questions About Easy Frozen Yogurt Granola Cups Recipe

    1. Can I make these cups vegan?
    Yes, simply use a dairy-free yogurt and substitute honey with maple syrup or another vegan sweetener.

    2. How long do these frozen yogurt cups last in the freezer?
    Properly stored in an airtight container, they can last up to 2-3 months in the freezer.

    3. What granola should I use?
    You can use any granola, but make sure to check for gluten-free options if needed. Homemade granola allows for more control over ingredients.

    4. Can I use frozen fruit instead of fresh?
    While fresh fruit provides nice texture, frozen fruit can also work if you let it thaw slightly before topping the cups.

    5. How can I adapt the recipe for allergies?
    Always read labels to ensure ingredient safety. If you have nut allergies, choose nut-free granola and skip any additional nut toppings.

    By addressing these frequently asked questions, you can feel more confident about preparing and enjoying your Easy Frozen Yogurt Granola Cups. Now that you have all the tools and information needed, get in the kitchen and start creating these fabulous, healthy snacks!

  • I CanT Stop Making This Perfect Rhubarb Crisp Recipe

    I CanT Stop Making This Perfect Rhubarb Crisp Recipe

    I Can’t Stop Making This Perfect Rhubarb Crisp Recipe: A Tropical Delight

    Introduction to I Can’t Stop Making This Perfect Rhubarb Crisp Recipe

    If you’re on the lookout for irresistible dessert recipes that are also simple and healthy, look no further! This Perfect Rhubarb Crisp is not only delicious but also versatile enough to cater to various dietary requirements. Whether you are a busy parent, student, or a food enthusiast, you’ll find this recipe a delightful addition to your baking repertoire.

    Rhubarb is a unique vegetable often treated as a fruit in desserts. It’s packed with vitamins like C and K, as well as fiber, making it a healthier choice for those sweet tooth cravings. This rhubarb crisp recipe brings out the tartness of the rhubarb, perfectly complemented by a crisp, buttery topping that will have everyone at the table asking for more.

    Moreover, this recipe is impressively easy to make. With minimal prep time and cooking required, you can whip it up in no time—perfect for those with busy lifestyles. Plus, it’s adaptable. You can swiftly modify it to cater to vegan or gluten-free diets, ensuring that anyone can enjoy this tantalizing dish. Dive into this tropical delight, and enjoy simple yet delectable flavors that balance health and indulgence!

    Benefits and Advantages of I Can’t Stop Making This Perfect Rhubarb Crisp Recipe

    This Perfect Rhubarb Crisp recipe stands out for its ease of preparation and health benefits. Let’s explore the reasons why this dish is a must-try.

    Simplicity in Preparation

    One of the greatest advantages of this recipe is its simplicity. It requires just a few household ingredients, and the process is straightforward, making it an excellent choice for novice bakers. You won’t need any specialized skills or equipment. A basic set of measuring cups and a baking dish is all you need.

    Health Benefits

    Rhubarb is inherently low in calories but full of flavor and nutrients. It boasts high fiber content; this not only promotes a healthy digestive system but also keeps you feeling full. Unlike many traditional dessert recipes laden with sugar, our rhubarb crisp can be sweetened according to your taste. You can easily adjust the sweetness by reducing sugar and enhancing natural sweeteners.

    Additionally, this recipe can be tailored to be gluten-free and vegan. Substitute butter with coconut oil or a vegan butter alternative, and use gluten-free oats in the topping. This flexibility ensures that everyone in your household, including those with dietary restrictions, can enjoy it.

    Versatility

    This dessert is not seasonal! Although rhubarb is typically available in spring, you can use frozen rhubarb any time of year. Plus, feel free to mix in other fruits like strawberries or apples for a unique twist. The combination of flavors can elevate your dessert experience, making it suitable for every palate and occasion.

    In summary, this Perfect Rhubarb Crisp is a fantastic way to add a delicious yet healthy dessert to your table. Its ease of preparation, adaptability, and health benefits make it a go-to recipe for all seasons and occasions.

    Ingredients Overview

    Essential Ingredients for I Can’t Stop Making This Perfect Rhubarb Crisp Recipe

    Here’s a detailed list of the essential ingredients you’ll need:

    • 4 cups of fresh rhubarb (chopped) – Rich in vitamins, giving the crisp its signature tart flavor.
    • 1 cup of granulated sugar (or maple syrup for a healthier option) – Sweetens the tartness of the rhubarb; feel free to adjust according to your taste preference.
    • 1 tablespoon of cornstarch – Helps to thicken the rhubarb filling, giving it a nice consistency.
    • 1 tablespoon of lemon juice – Enhances flavor and balances the sweetness.
    • 1 ½ cups of rolled oats (gluten-free if needed) – Forms the base of the crisp topping, providing texture.
    • 1 cup of all-purpose flour (or almond flour for gluten-free) – Creates the perfect crumble; almond flour offers a nutty flavor.
    • ½ cup of brown sugar – Deepens the sweetness and adds richness.
    • 1 teaspoon of cinnamon – Brings warmth and enhances the overall aroma of the dish.
    • ½ cup of unsalted butter (or coconut oil for vegan) – Binds the topping together and adds rich flavor.

    Dietary Substitutions to Customize Your I Can’t Stop Making This Perfect Rhubarb Crisp Recipe

    Consider these substitutions based on your dietary needs:

    • For Vegan Option: Substitute the butter with coconut oil or a vegan alternative. The result will be equally delicious and maintain the crisp texture.
    • For Gluten-Free Option: Use certified gluten-free oats and replace all-purpose flour with almond flour or a gluten-free baking blend.
    • For Low-Sugar Option: Experiment with natural sweeteners such as honey, agave, or simply reduce the quantity of sugar.
    • Mix In Fruits: Add berries like strawberries or blueberries to the rhubarb filling for extra flavor and nutrients.

    With these substitutions, you can personalize your dessert to fit various dietary requirements without compromising on taste or quality.

    How to Prepare the Perfect I Can’t Stop Making This Perfect Rhubarb Crisp Recipe: Step-by-Step Guide

    Now that you have your ingredients ready, it’s time to dive into the detailed preparation of the Perfect Rhubarb Crisp. Follow these steps carefully:

    1. Preheat the Oven: Preheat your oven to 375°F (190°C). This ensures that your crisp bakes evenly.

    2. Prepare the Rhubarb Filling:

    3. In a large mixing bowl, combine the chopped rhubarb, granulated sugar, cornstarch, and lemon juice.
    4. Mix gently until the rhubarb is evenly coated with the sugar and cornstarch.

    5. Transfer to Baking Dish:

    6. Take a greased baking dish (9×13 inches is ideal).
    7. Pour the rhubarb mixture into the dish, spreading it out evenly.

    8. Make the Crisp Topping:

    9. In another bowl, combine rolled oats, all-purpose flour, brown sugar, cinnamon, and salt.
    10. Add the melted butter (or coconut oil) and mix until the mixture resembles coarse crumbs.

    11. Top the Rhubarb Filling:

    12. Sprinkle the crisp topping evenly over the rhubarb filling, ensuring complete coverage.

    13. Bake in the Oven:

    14. Place the baking dish in the preheated oven and bake for about 35-40 minutes or until the topping is golden brown and the rhubarb is bubbly.

    15. Cool and Serve:

    16. Once baked, remove the dish from the oven and let it cool for about 10-15 minutes.
    17. Serve warm with a scoop of vanilla ice cream or whipped cream on top for an unforgettable experience!

    This Perfect Rhubarb Crisp is more than just a dessert; it’s a celebration of flavors, textures, and nutritional goodness. You can easily adjust certain ingredients or portions to cater to dietary preferences, making it a fantastic choice for gatherings or a cozy family dinner.

    Mastering I Can’t Stop Making This Perfect Rhubarb Crisp Recipe: Advanced Tips and Variations

    To elevate your Perfect Rhubarb Crisp further, consider these advanced tips and variations:

    1. Spice it Up: Enhance flavor by adding spices like nutmeg, ginger, or allspice to the crisp topping or filling. This will introduce a warm, fragrant aroma, especially appealing during cooler months.

    2. Mix with Other Fruits: Combine rhubarb with fruits like strawberries or cherries for a mixed fruit crisp. The sweet juices from other fruits will balance the tartness of rhubarb.

    3. Add Nuts or Seeds: Incorporate chopped almonds, walnuts, or pumpkin seeds into the topping for added crunch and nutrients. This will transform your dessert into a more filling option, ideal for brunch.

    4. Serving Suggestions: Serve with a dollop of fresh whipped cream or a scoop of vanilla ice cream. For a fun twist, consider adding a drizzle of chocolate or caramel sauce for a rich indulgence.

    5. Personalize the Sweetness: Adjust the sugar levels based on personal preference. You might find that less sugar highlights the natural tartness of the rhubarb even more delightfully.

    By implementing these tips and variations, you can consistently create a Perfect Rhubarb Crisp that’ll keep your love for this classic dessert alive!

    How to Store I Can’t Stop Making This Perfect Rhubarb Crisp Recipe: Best Practices

    To store your Perfect Rhubarb Crisp and keep it fresh for longer, here are some recommended methods:

    • Refrigeration: After baking, allow your rhubarb crisp to cool completely. Cover it with plastic wrap or transfer it to an airtight container. It can be stored in the refrigerator for up to 3-4 days.

    • Freezing: For longer storage, consider freezing the crisp. Prepare the dish, allow it to cool, and cover it tightly with plastic wrap, followed by aluminum foil. Properly stored, it can last in the freezer for up to 3 months.

    • Reheating: To reheat, thaw the crisp overnight in the refrigerator, then bake at 350°F (175°C) until warmed through, about 20-25 minutes. If reheating from frozen, increase the time to 40-50 minutes.

    By following these storage best practices, you ensure that your Perfect Rhubarb Crisp remains delicious and ready to enjoy at a moment’s notice!

    Nutritional Value of I Can’t Stop Making This Perfect Rhubarb Crisp Recipe

    Understanding the nutritional value of your food is vital for health-conscious cooks. Below is an estimated breakdown of the nutrients per serving (assuming about 12 servings):

    • Calories: 180-210
    • Total Fat: 6-8g
    • Saturated Fat: 3-4g (if using butter)
    • Cholesterol: 20mg (using butter)
    • Sodium: 50-90mg
    • Total Carbohydrates: 32-35g
    • Dietary Fiber: 3g
    • Sugars: 10-15g
    • Protein: 2-3g

    Health Highlights:
    – Rhubarb provides essential vitamins and minerals while being low in calories.
    – The fiber content supports digestion and contributes to feeling full.
    – Using alternatives like reduced sugar and coconut oil can enhance the health profile significantly.

    Remember, the nutritional content may vary based onIngredient substitution or portion sizes, so it’s a good idea to tailor these to your dietary goals.

    FAQs: Frequently Asked Questions About I Can’t Stop Making This Perfect Rhubarb Crisp Recipe

    Can I use frozen rhubarb for this recipe?

    Yes! Frozen rhubarb works perfectly in this recipe. Just make sure to thaw and drain it slightly to remove excess moisture before mixing it with the other ingredients.

    Is this recipe suitable for a gluten-free diet?

    Absolutely! Simply substitute the all-purpose flour with gluten-free alternatives, and ensure that your oats are certified gluten-free.

    How can I adjust the sweetness of this crisp?

    You can easily reduce the sugar or use natural sweeteners like maple syrup or honey. Start with less sugar and taste the filling before baking; you can always add more if necessary.

    Can I make this dessert ahead of time?

    Yes! You can prepare the rhubarb filling and topping separately, then assemble and bake it right before serving. Alternatively, make it a day in advance and simply reheat it in the oven.

    What are some good toppings for this rhubarb crisp?

    Top it off with vanilla ice cream, whipped cream, or a decadent caramel sauce. You can also sprinkle some coconut flakes or chopped nuts for added texture.


    With this comprehensive guide, you’re now ready to create your own Perfect Rhubarb Crisp that everyone will love! Whether for a special occasion, a cozy family dinner, or a simple weeknight treat, you can’t go wrong with this delicious recipe. Happy baking!

  • Mouthwatering Rhubarb Crisp With Yellow Cake Mix

    Mouthwatering Rhubarb Crisp With Yellow Cake Mix

    Mouthwatering Rhubarb Crisp With Yellow Cake Mix: A Tropical Delight

    Introduction to Mouthwatering Rhubarb Crisp With Yellow Cake Mix

    Are you searching for delectable dessert recipes that combine simplicity with a burst of flavor? Look no further! This Mouthwatering Rhubarb Crisp With Yellow Cake Mix is a delightful twist on a classic treat that requires minimal effort while delivering maximum taste. Whether you’re a busy parent looking to whip up a quick dessert after dinner, a college student needing an easy yet delightful treat, or even a baking enthusiast wanting to impress guests, this recipe fits all profiles.

    Rhubarb, often overlooked in the world of desserts, brings a tartness that complements the sweetness of the yellow cake mix perfectly. The result? A perfectly balanced dish that’s both hearty and refreshing. Plus, this recipe can be adapted for various dietary needs, making it a fantastic option for vegans, those following a gluten-free diet, or anyone keen on enjoying a healthier dessert.

    Where health benefits and indulgence coexist, this rhubarb crisp stands out. The rhubarb is a rich source of vitamins K and C, while the transition with yellow cake mix adds a comforting texture. So, gather your ingredients and prepare yourself for a mouthwatering experience that will delight your taste buds and leave your kitchen aglow with warm, inviting aromas!

    Benefits and Advantages of Mouthwatering Rhubarb Crisp With Yellow Cake Mix

    The Mouthwatering Rhubarb Crisp With Yellow Cake Mix is not just a dessert; it’s a celebration of flavors and convenience rolled into one. Here are some benefits and advantages of this scrumptious recipe that make it a hit in any kitchen:

    1. Simplicity in Preparation: With only a handful of ingredients and easy-to-follow steps, even novice cooks can successfully create this sweet, fruity dessert. No complex techniques or specialized tools are required—just mix, bake, and enjoy!

    2. Versatility: This dessert can easily adapt to various dietary preferences. Want to make it vegan? Swap out butter for coconut oil or vegan margarine. Gluten-free? Use a suitable cake mix or a homemade version. The options are endless!

    3. Health-Conscious Appeal: With rhubarb at its heart, this recipe carries delightful health benefits. Rhubarb is low in calories and rich in antioxidants, vitamins A, C, and K. By preparing your crisp with less sugar or opting for a gluten-free cake mix, you can even cater to dietary restrictions while still indulging in a delicious dessert.

    4. Universal Appeal: This is a dessert that caters to everyone—from seniors reminiscing about their childhood favorites to busy working professionals looking for a quick and satisfying treat. The fusion of textures in this recipe is sure to delight all age groups.

    5. Perfect for Gatherings: Whether you’re hosting a family gathering or a casual get-together with friends, this rhubarb crisp makes a stunning dessert that can feed a crowd while still being simple to prepare. Everyone will be impressed, and the recipe is bound to become a staple in your dessert repertoire.

    By choosing to whip up this wonderful rhubarb crisp, you’re not just creating a dessert, but also memories with family and friends. So, embrace its benefits and enjoy the ride into the world of easy and delicious dessert recipes!

    Ingredients Overview

    Essential Ingredients for Mouthwatering Rhubarb Crisp With Yellow Cake Mix

    To create the perfect Mouthwatering Rhubarb Crisp With Yellow Cake Mix, you will need the following ingredients. Below is a detailed list along with precise measurements and the purpose or benefits each ingredient adds to the dish.

    • 3 cups of fresh rhubarb, chopped (can substitute with frozen rhubarb)
      Purpose: Rhubarb is rich in fiber, vitamins, and antioxidants. It provides the tart flavor that balances the sweetness.

    • 1 cup granulated sugar (adjust to taste)
      Purpose: Acts as a sweetener and balances out the tartness of the rhubarb. You can substitute with coconut sugar or a sugar alternative for a healthier version.

    • 1 teaspoon vanilla extract
      Purpose: Enhances overall flavor and aroma of the dessert.

    • 1 box of yellow cake mix (approx. 15.25 oz)
      Purpose: This is the cornerstone of the crisp, providing a sweet, cake-like topping that contrasts beautifully with the tangy filling.

    • 1/2 cup unsalted butter (melted; or use coconut oil for vegan option)
      Purpose: Helps to bind the cake mix together and adds richness to the topping.

    • 1 teaspoon ground cinnamon (optional)
      Purpose: Adds warmth and depth to the flavors, complementing the rhubarb.

    • 1/2 cup chopped nuts (such as pecans or walnuts; optional)
      Purpose: Adds a crunch factor and enhances nutritional value. For gluten-free, choose nuts that are labeled gluten-free.

    Dietary Substitutions to Customize Your Mouthwatering Rhubarb Crisp With Yellow Cake Mix

    One of the best aspects of this rhubarb crisp recipe is its flexibility. Here are some suggested dietary substitutions to cater to different needs:

    • For a Vegan Version: Substitute the unsalted butter with melted coconut oil or a vegan butter alternative. Ensure the yellow cake mix is also vegan-friendly (there are several brands available that comply).

    • Gluten-Free Adaptation: Many stores offer gluten-free cake mixes. Choose one that suits your taste and dietary requirements to make this dessert accessible to everyone.

    • Low-Calorie Option: Replace granulated sugar with stevia or monk fruit sweetener to cut down on calories while still maintaining sweetness.

    • Nut-Free: If you or your guests have nut allergies, simply omit the chopped nuts or replace them with seeds like sunflower or pumpkin seeds for added crunch and nutrition.

    These substitutions allow you to fully enjoy the benefits of this wonderful rhubarb crisp while catering to various dietary preferences, ensuring everyone can indulge in a slice!

    How to Prepare the Perfect Mouthwatering Rhubarb Crisp With Yellow Cake Mix: Step-by-Step Guide

    Follow these straightforward steps to prepare your delicious rhubarb crisp. This recipe is perfect for anyone looking for quick and tasty dessert recipes that don’t compromise on flavor!

    1. Preheat the Oven: Begin by preheating your oven to 350°F (175°C). This prepares your oven for the crisp, ensuring even baking.

    2. Prepare the Rhubarb Filling: In a medium-sized bowl, combine the chopped rhubarb with the granulated sugar and vanilla extract. Toss them until the rhubarb is well-coated. Place this mixture in a greased 9×13-inch baking dish, spreading it evenly.

    3. Mix the Yellow Cake Layer: In another bowl, mix the yellow cake mix with melted butter. Stir until the mixture is crumbly. This texture is essential for creating a topping that crisps up beautifully in the oven.

    4. Add Cinnamon: If you choose to include ground cinnamon, sprinkle it over the cake mixture and toss it in for an extra layer of flavor.

    5. Top the Rhubarb: Evenly sprinkle the cake mixture over the rhubarb layer in the baking dish. Do not press down; allow the cake mix to sit as a crumbled topping.

    6. Add Nuts (Optional): If you opted for nuts, sprinkle them evenly over the top of the cake mixture for added crunch.

    7. Bake Your Crisp: Place the baking dish in the preheated oven and bake for 40-45 minutes, or until the top is golden brown and the rhubarb is bubbly. You can check for doneness by inserting a toothpick into the top; it should come out clean or slightly moist.

    8. Cool and Serve: Once baked, remove the dish from the oven and let your rhubarb crisp cool for about 15 minutes. This cooling time allows the filling to set slightly, making it easier to serve.

    9. Serve with Ice Cream (Optional): For a delightful twist, serve slices of the crisp warm with a scoop of vanilla or dairy-free ice cream. The cold creaminess balances the warm, tangy filling perfectly!

    Feel free to experiment with the quantities or additional ingredients as you like. Adapting the recipe according to dietary needs and personal preferences will make it even more special.

    Mastering Mouthwatering Rhubarb Crisp With Yellow Cake Mix: Advanced Tips and Variations

    To elevate your rhubarb crisp experience, consider these advanced tips and variations:

    1. Layered Flavors: Add sliced strawberries or blueberries along with the rhubarb to create a mixed berry crisp. This addition enhances both the flavor and nutrition while making the dessert visually stunning.

    2. Change the Topping: Instead of sticking with the traditional crumble, try mixing oats and brown sugar with the cake mix for a more textured topping. Oats will add crunch and heartiness to the dish.

    3. Flavor Enhancements: For an adult version, try adding a splash of your favorite liqueur (like amaretto or peach schnapps) to the rhubarb mixture for depth and complexity.

    4. Seasonal Twist: Celebrate various seasons with this recipe. In the fall, add chopped apples alongside the rhubarb, or incorporate peaches in the summer for a refreshing twist.

    5. Serve with Sauce: Drizzle caramel or chocolate sauce over individual servings for a luxurious dessert that’ll delight everyone.

    Trying out different combinations and approaches will help you master this crisp recipe, leaving guests raving about your creativity and flavor choices while you enjoy delicious dessert recipes!

    How to Store Mouthwatering Rhubarb Crisp With Yellow Cake Mix: Best Practices

    To maintain the freshness of your Mouthwatering Rhubarb Crisp, consider these storage techniques:

    • Refrigeration: Once the dessert has cooled completely, cover it with plastic wrap or aluminum foil, or transfer it to an airtight container. You can store it in the refrigerator for up to 5 days, making it easy to enjoy leftovers without sacrificing flavor.

    • Freezing: If you plan to save your crisp for a more extended period, you can freeze it. Wrap it tightly in plastic wrap and aluminum foil, or use a freezer-safe container. It can be stored in the freezer for up to 3 months. To serve, simply thaw it in the fridge overnight and reheat in the oven at 350°F (175°C) until warmed through.

    • Reheating: To reheat your rhubarb crisp, place it in a preheated oven until it’s heated thoroughly—about 15-20 minutes. The goal is to restore its delightful texture and warmth.

    By following these best practices, you can enjoy this irresistible dessert recipe for days on end without losing any of its delicious charm.

    Nutritional Value of Mouthwatering Rhubarb Crisp With Yellow Cake Mix

    Understanding the nutritional content of your dessert is vital for healthy eating. Below is the approximate nutritional information per serving (based on an 8 servings) for the Mouthwatering Rhubarb Crisp With Yellow Cake Mix recipe.

    • Calories: 220
    • Total Fat: 9g
    • Saturated Fat: 4g
    • Trans Fat: 0g
    • Cholesterol: 30mg
    • Sodium: 150mg
    • Total Carbohydrates: 34g
    • Dietary Fiber: 1g
    • Sugars: 14g
    • Protein: 2g

    Health Benefits:

    • Rhubarb: High in water and fiber, low in calories. It helps promote digestive health, and its antioxidant properties boost your immune system.
    • Nuts (if added): Provide healthy fats and protein, essential for a balanced diet.
    • Reduced Sugar Options: Substituting with lower-sugar alternatives can help meet dietary needs, lower calorie count, and still provide satisfaction.

    While it’s essential to enjoy your sweet treats in moderation, knowing the nutritional benefits can help you make informed choices without guilt.

    FAQs: Frequently Asked Questions About Mouthwatering Rhubarb Crisp With Yellow Cake Mix

    Q: Can I use frozen rhubarb for this recipe?
    A: Absolutely! Frozen rhubarb works perfectly in this recipe. Just thaw and drain any excess liquid before using it in your filling.

    Q: How can I make this rhubarb crisp gluten-free?
    A: To make the recipe gluten-free, substitute the regular yellow cake mix with a gluten-free version, as many brands offer cake mixes free from gluten.

    Q: Can I replace the granulated sugar with a sugar alternative?
    A: Yes! Feel free to use coconut sugar, stevia, or any preferred sweetener. Adjust the quantity to suit your taste, as different sweeteners have varying levels of sweetness.

    Q: How do I know when it’s done baking?
    A: The top should be golden brown, and the filling should be bubbling around the edges. Inserting a toothpick into the topping should come out clean or with a few moist crumbs.

    Q: Can I prepare the crisp ahead of time?
    A: Yes, you can prepare the filling and topping separately and refrigerate them. Assemble and bake just before serving for the best flavor and texture.

    By addressing these common questions, you can navigate ingredient adjustments and cooking methods with confidence, allowing your dessert experience to be enjoyable and seamless!


    The Mouthwatering Rhubarb Crisp With Yellow Cake Mix stands as a perfect blend of ease, flavor, and nutritional benefits. Not only will it leave your taste buds delighted, but it will also align seamlessly with various dietary preferences. So go ahead, try this recipe, and share the joy of simple, wholesome, and delicious dessert recipes with your loved ones!