Tag: salad

  • Tasty Cold Sesame Noodle Salad Easy

    Tasty Cold Sesame Noodle Salad Easy

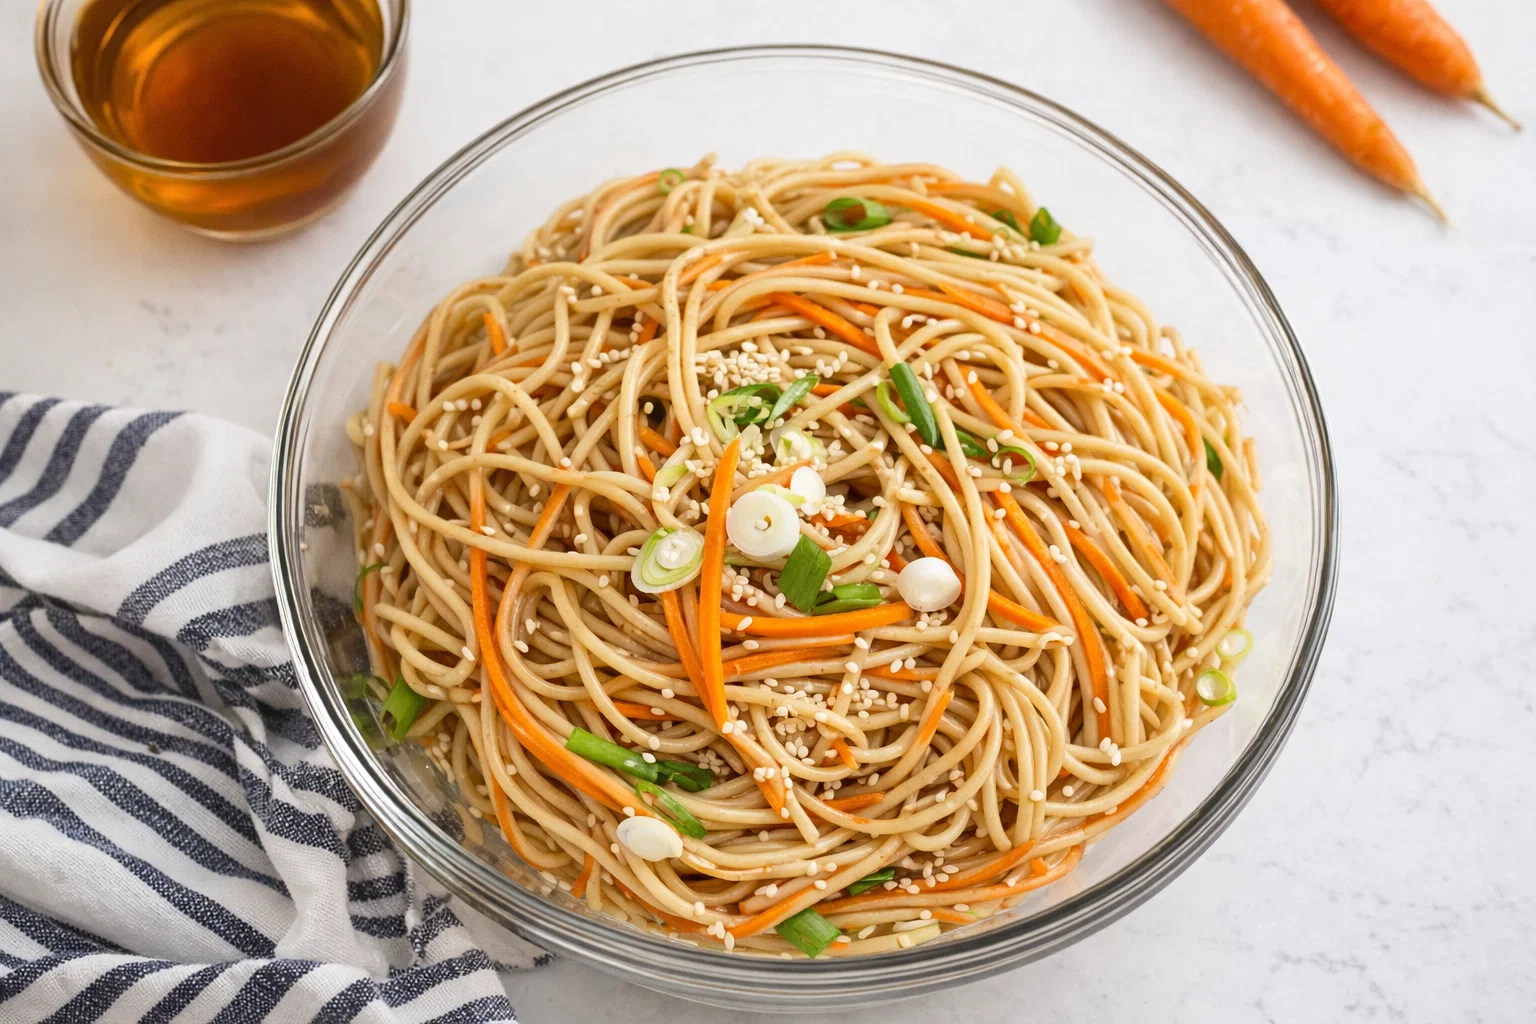
    Tasty Cold Sesame Noodle Salad Easy: A Tropical Delight

    Introduction to Tasty Cold Sesame Noodle Salad Easy

    If you’re on the lookout for a refreshing and easy-to-make dish, look no further than Tasty Cold Sesame Noodle Salad Easy. This delightful pasta salad not only ticks all the boxes for being quick and straightforward, but it also serves as a nutritious meal perfect for any occasion. Packed with flavor and health benefits, this salad is a stellar blend of nutrient-rich ingredients, making it suitable for various dietary preferences.

    Whether you are a busy parent striving for a speedy meal, a student seeking culinary simplicity, or a health-conscious individual wanting to lighten your load, this cold noodle salad is a fantastic choice. It’s vegan, can be gluten-free with the right noodles, and is customizable to your heart’s content. You can whip up this dish in under 30 minutes, and it works wonderfully as a side dish for barbecues and picnics or as a main course. With its rich, nutty sesame dressing and fresh vegetables, it’s a dish that satisfies the taste buds while nourishing the body.

    So grab your ingredients, and let’s dive into why this Tasty Cold Sesame Noodle Salad Easy is not just a meal but an experience worth savoring.

    Benefits and Advantages of Tasty Cold Sesame Noodle Salad Easy

    The Tasty Cold Sesame Noodle Salad Easy stands out for multiple reasons, making it a compelling choice for all you cooks out there looking for simplicity and nourishment.

    Ease of Preparation

    First and foremost, the beauty of this recipe lies in its uncomplicated preparation process. With minimal cooking involved, you can have a stunning bowl of pasta salad ready in about 30 minutes or less. The steps are straightforward, making it accessible for novice chefs and busy professionals alike. Plus, it’s a great dish to involve kids in cooking, offering a fun opportunity for family bonding in the kitchen.

    Health Benefits

    This salad is not just easy to make; it’s packed with health benefits too. By featuring whole grain or gluten-free noodles, you provide essential carbohydrates for energy while keeping it lighter than heavy pasta dishes. Fresh veggies like bell peppers, cucumbers, and carrots deliver vital vitamins and minerals, contributing to a well-rounded meal. The sesame dressing, made from tahini or sesame oil, adds healthy fats that can promote brain health and heart health.

    Dietary-Friendly Options

    Another great advantage of this dish is its versatility. It is vegan-friendly and can easily cater to a gluten-free diet by selecting the right noodles. With a few simple swaps, you can also create a nut-free or lower-calorie version, making this salad adaptable for various dietary needs. Whether you’re cooking for a family with diverse dietary restrictions or for yourself, this pasta salad is your go-to solution.

    Overall, Tasty Cold Sesame Noodle Salad Easy not only embodies flavor and texture but is also a nutritious dish that can be enjoyed by everyone. It’s perfect for meal prep, picnic gatherings, or even as a light dinner on a warm evening.

    Ingredients Overview

    Essential Ingredients for Tasty Cold Sesame Noodle Salad Easy

    Here’s what you need to prepare the perfect bowl of Tasty Cold Sesame Noodle Salad Easy:

    • 200g of Whole Wheat or Gluten-Free Noodles: Provides the base of your pasta salad and is rich in fiber.
    • 1 Cup of Shredded Carrots: Adds crunch and sweetness.
    • 1 Cup of Sliced Cucumbers: Provides a refreshing bite.
    • 1 Red Bell Pepper, Thinly Sliced: Brings vibrant color and additional nutrients.
    • 1/2 Cup of Edamame (shelled): A great source of plant protein, contributing to satiety.
    • 1/4 Cup of Spring Onions (scallions), Chopped: Adds a mild onion flavor that complements the salad.
    • 1/4 Cup of Toasted Sesame Seeds: Enhances the nutty flavor and improves texture.
    • 1/4 Cup of Soy Sauce (or Tamari for gluten-free option): Offers umami and depth in flavor.
    • 3 Tablespoons of Sesame Oil: Provides a rich, nutty flavor that rounds out the dish.
    • 2 Tablespoons of Rice Vinegar: Adds tanginess that brightens the flavors.
    • 1 Tablespoon of Honey or Maple Syrup (optional): For a touch of sweetness.

    Dietary Substitutions to Customize Your Tasty Cold Sesame Noodle Salad Easy

    Customizing this dish is incredibly easy! Here’s how you can adapt the ingredients based on dietary needs or preferences:

    • Noodles: Instead of wheat noodles, opt for rice noodles or zucchini noodles (zoodles) for a low-carb option.
    • Vegetables: Feel free to swap in seasonal veggies like snap peas, broccoli, or even cherry tomatoes. Get creative with your produce!
    • Protein: For a heartier salad, add ingredients like grilled chicken, shrimp, or tofu. This increases the protein content and makes it more filling.
    • Sauce: If you’re looking for a nut-free alternative, replace sesame oil with coconut aminos and tahini with sunflower seed butter.
    • Sweetener: Replace honey with agave syrup for a vegan option, or simply omit it for no added sugars.

    By tailoring this Tasty Cold Sesame Noodle Salad Easy to your liking, you ensure that every bite is perfect for you while still retaining its delicious flavor.

    How to Prepare the Perfect Tasty Cold Sesame Noodle Salad Easy: Step-by-Step Guide

    Now that we’ve covered the essentials, let’s get down to the nitty-gritty of creating this scrumptious dish. Follow these steps to make your own Tasty Cold Sesame Noodle Salad Easy:

    1. Prepare the Noodles: Start by cooking your chosen noodles according to the package instructions. Generally, whole wheat or gluten-free noodles require about 7-10 minutes of boiling. Once cooked, drain and rinse under cold water to stop them from cooking further. This step helps achieve that delightful cold texture.

    2. Chop the Vegetables: While the noodles are cooking, take this time to chop your vegetables. Slice the cucumbers, thinly slice the red bell pepper, and shred the carrots. You want them to be bite-sized for easy eating!

    3. Mix the Sauce: In a small bowl, whisk together the soy sauce, sesame oil, rice vinegar, and honey (if using). This sauce acts as the flavor powerhouse of your pasta salad, so ensure it’s mixed well.

    4. Combine Ingredients: In a large mixing bowl, add the cooled noodles, chopped vegetables, and shelled edamame. Pour the sauce over the top. Use tongs or salad forks to gently toss the mixture together until everything is beautifully coated in that rich sesame dressing.

    5. Add Toppings: Sprinkle the toasted sesame seeds and chopped spring onions over the noodle salad. These toppings not only add flavor but also enhance the overall presentation of the dish.

    6. Taste and Adjust: Before serving, taste your salad. If you prefer it a bit saltier, add more soy sauce. If you want it a touch sweeter, feel free to drizzle a bit more honey. Remember, cooking is all about personal preference!

    7. Chill and Serve: For the best flavor, allow the salad to sit in the fridge for 15-30 minutes before serving. This resting time allows the flavors to meld beautifully. Serve chilled and enjoy the fresh, vibrant taste of your Tasty Cold Sesame Noodle Salad Easy!

    Mastering Tasty Cold Sesame Noodle Salad Easy: Advanced Tips and Variations

    Now that you have the basic recipe down, here are some advanced tips and variations to elevate your Tasty Cold Sesame Noodle Salad Easy experience:

    1. Spice It Up: If you enjoy heat, consider adding a drizzle of sriracha or a sprinkle of red pepper flakes to your sesame sauce. This adds an exciting kick that can awaken your taste buds.

    2. Incorporate Herbs: Fresh herbs, like cilantro or mint, can bring a refreshing note to the salad. Chop up some leaves and toss them in for extra flavor.

    3. Experiment with Textures: For an exciting variation, add some crispy tempura vegetables or fried tofu pieces as a topping. This creates a mix of textures that will keep each bite intriguing.

    4. Create a Meal Prep Version: If you are meal-prepping for the week, keep the dressing separate until you’re ready to eat. Storing it separately prevents the noodles and vegetables from getting soggy.

    5. Regional Variations: Every culture has its twist on noodle salads. Feel free to draw inspiration from other cuisines. For example, use peanut sauce in your dressing for a Thai twist or a miso dressing for a Japanese vibe.

    How to Store Tasty Cold Sesame Noodle Salad Easy: Best Practices

    Proper storage can enhance the longevity of your Tasty Cold Sesame Noodle Salad Easy. Here’s how to do it right:

    • Refrigeration: Store your salad in an airtight container in the refrigerator for up to 3-4 days. This makes it perfect for meal prep or leftovers.

    • Freezing: While it’s not typically recommended to freeze noodle salads due to texture changes, you can freeze the cooked noodles separately. Allow them to cool completely, then store them in freezer bags. When ready to use, thaw and reheat them before mixing with fresh vegetables and dressing.

    • Reheating and Serving: If enjoying leftovers, you can serve them cold or give them a quick toss in a skillet over low heat. However, it’s best enjoyed fresh or cold to retain the crunch of the vegetables.

    By following these storage tips, you can easily make this pasta salad ahead and enjoy it all week long.

    Nutritional Value of Tasty Cold Sesame Noodle Salad Easy

    Now that you’ve prepared your pasta salad, let’s take a closer look at its nutritional value. Below is an approximate breakdown per serving, considering this recipe serves four.

    • Calories: 290
    • Protein: 10g
    • Fat: 12g
    • Saturated: 2g
    • Carbohydrates: 36g
    • Dietary Fiber: 5g
    • Sugars: 3g
    • Sodium: 450mg

    This nutritional profile makes the Tasty Cold Sesame Noodle Salad Easy a balanced meal. High in fiber and healthy fats while being relatively low in calories, it provides a satisfying meal without the guilt. The addition of vegetables boosts its vitamin and mineral content, making it a wholesome choice for lunch, dinner, or a healthy snack.

    FAQs: Frequently Asked Questions About Tasty Cold Sesame Noodle Salad Easy

    Can I use different types of noodles for this pasta salad?

    Absolutely! You can substitute whole wheat noodles with rice noodles, zucchini noodles, or any gluten-free alternatives. Experiment with flavors to find what you love most.

    How long does this salad last in the refrigerator?

    Your Tasty Cold Sesame Noodle Salad Easy can last up to 3-4 days in an airtight container in the refrigerator. To enjoy optimal freshness, consume it within this time frame.

    What can I substitute for soy sauce in the dressing?

    If you’re looking for alternatives, consider coconut aminos for a soy-free option or tamari for a gluten-free alternative. Both provide a similar umami flavor.

    Can I make this salad ahead of time?

    Certainly! This salad is perfect for meal prep. Just combine the dressing with the noodles and veggies right before serving to keep everything fresh.

    Is this salad suitable for weight loss?

    Yes, due to its high fiber content and low-calorie profile, this salad can fit into a weight-loss diet. Just be mindful of portion sizes and dressing amounts.

    How can I add protein to my Tasty Cold Sesame Noodle Salad Easy?

    You can easily boost the protein content by adding ingredients like grilled chicken, shrimp, or tofu. Edamame also adds a good amount of protein and is a great vegetarian option!

    Now that you have all the information and inspiration you need, it’s time to get cooking! Enjoy your Tasty Cold Sesame Noodle Salad Easy and feel free to share your variations with friends and family. Happy cooking!

  • Mouthwatering Greek Yogurt Pea Salad

    Mouthwatering Greek Yogurt Pea Salad

    Mouthwatering Greek Yogurt Pea Salad: A Tropical Delight

    Introduction to Mouthwatering Greek Yogurt Pea Salad

    If you’re on the hunt for healthy dinner recipes that can be made in a flash, look no further than this Mouthwatering Greek Yogurt Pea Salad. Bursting with flavor and nutrition, this delightful dish brings a refreshing twist to your meal plan. Perfectly creamy yet light, the base of Greek yogurt adds a rich, tangy taste while keeping the dish low in calories and high in protein. Plus, it’s completely vegan-friendly and gluten-free, making it suitable for a wide variety of dietary needs.

    This Greek Yogurt Pea Salad is not only simple to prepare but it also maximizes the use of fresh, vibrant ingredients like peas, herbs, and spices, ensuring that every bite is not just delicious but also a feast for your palate. Consider it an ideal quick fix for busy parents, students on a budget, or anyone looking to whip up a nutritious meal without spending hours in the kitchen. Whether you serve it as a standalone dish or a side for grilled meats, this salad is sure to impress and nourish your guests.

    Ready to discover how to make this refreshing yet satisfying salad? Let’s dive into the benefits and advantages of the Mouthwatering Greek Yogurt Pea Salad that will leave you craving more!

    Benefits and Advantages of Mouthwatering Greek Yogurt Pea Salad

    Creating a healthy meal doesn’t have to be complicated, and the Mouthwatering Greek Yogurt Pea Salad is a shining example of this principle. Here are a few standout benefits that make this salad an excellent choice for your dinner table:

    1. Simplicity in Preparation: This recipe easily comes together in under 30 minutes. You only need to mix a handful of fresh ingredients, making it an ideal option for those busy weeknights or when you’re short on time. You can involve your kids in the preparation process, turning it into a fun family activity while fostering healthy eating habits.

    2. Nutritional Powerhouse: Peas are one of the protagonists of this dish—not only do they add a lovely crunch, but they’re also rich in vitamins A, C, and K, and contribute a significant amount of protein. The Greek yogurt base offers probiotics, which support gut health, and its creamy nature allows you to enjoy the satisfaction of a rich dish without the unhealthy fats often found in heavy dressings.

    3. Versatility: This salad is incredibly flexible. Feel free to customise the ingredients based on what you have on hand or your personal preferences. You can easily swap out herbs, add some nuts for crunch, or mix in different vegetables as the seasons change. It’s a salad that fits every occasion—from casual family dinners to elegant al fresco dining.

    4. Diet-Friendly: More than just a side dish, it’s a complete meal well-suited for vegan, gluten-free, and low-calorie diets. In fact, the recipe can be easily modified to suit various dietary needs, ensuring that everyone at the table can enjoy it. Whether you’re a fitness enthusiast tracking your macros or someone simply trying to eat healthier, this recipe fits the bill.

    5. Flavor Explosion: The medley of herbs and spices elevates the simple ingredients to gourmet status. With every bite, you’ll experience the delightful contrast of textures, complemented by the creamy yogurt dressing that binds everything harmoniously.

    In summary, the Mouthwatering Greek Yogurt Pea Salad isn’t just another dish; it’s a celebration of nutritious eating that satisfies your taste buds while aligning with your health goals. It’s one of those healthy dinner recipes you’ll want to return to week after week.

    Ingredients Overview

    Essential Ingredients for Mouthwatering Greek Yogurt Pea Salad

    To whip up this delicious Greek Yogurt Pea Salad, you will need the following ingredients:

    • 1 cup of fresh or frozen peas (about 150g): Rich in protein, fiber, and essential nutrients.
    • 1 cup of Greek yogurt (plain, full-fat or low-fat): Offers a creamy texture and probiotic benefits.
    • 1 tablespoon of lemon juice: Adds brightness and balances the richness of the yogurt.
    • 2 tablespoons of fresh dill (chopped): For a fresh, aromatic flavor; can be substituted with parsley or mint.
    • 1/4 cup of red onion (finely chopped): Provides a sharp, tangy note; omit if sensitive to the flavor.
    • 1/4 teaspoon of garlic powder (or to taste): For depth and flavor; fresh garlic can be used if preferred.
    • Salt and pepper: To taste; essential for enhancing overall flavors.
    • Optional: 1/4 cup of chopped nuts (such as walnuts or almonds): For added crunch and healthy fats.

    Dietary Options: Ensure the Greek yogurt is dairy-free or made from nut-based sources like cashew yogurt to make this dish vegan.

    Dietary Substitutions to Customize Your Mouthwatering Greek Yogurt Pea Salad

    1. Greek Yogurt Substitution:
    2. For a dairy-free version: Use coconut yogurt or any plant-based yogurt that is unsweetened and plain.

    3. Peas:

    4. If fresh peas are out of season or unavailable, frozen peas add convenience and still retain nutritional value. Simply thaw and rinse before using.

    5. Herbs:

    6. Experiment with other herbs like cilantro or basil for a unique flavor profile. Each herb brings its distinct character, making it easier to have variety.

    7. Nuts:

    8. For a nut-free option, explore adding seeds (like sunflower or pumpkin seeds) for that satisfying crunch while remaining allergy-friendly.

    9. Add More Veggies:

    10. Enhance the salad by incorporating diced cucumbers, bell peppers, or cherry tomatoes for extra color and nutrients while keeping the dish light and refreshing.

    With these substitutions, you can craft a Greek Yogurt Pea Salad that suits your dietary preferences while still being a delicious, healthy dinner recipe to share with friends and family!

    How to Prepare the Perfect Mouthwatering Greek Yogurt Pea Salad: Step-by-Step Guide

    Creating the perfect Mouthwatering Greek Yogurt Pea Salad is straightforward and quick. Follow these easy steps for a fantastic meal that perfectly balances taste and health:

    1. Prepare the Base:
    2. If you’re using fresh peas, bring a pot of water to a boil. Add peas and cook for 2-3 minutes until tender, then remove and quickly transfer them to an ice bath to halt cooking.

    3. Combine Yogurt and Seasonings:

    4. In a large mixing bowl, add the Greek yogurt, lemon juice, garlic powder, salt, and pepper. Whisk until smooth and well-combined. Taste and adjust seasoning if needed.

    5. Mix Ingredients:

    6. To the yogurt mixture, fold in the cooked peas, chopped red onion, and dill until everything is evenly coated. Use a spatula for gentle mixing to keep the peas intact.

    7. Taste and Adjust:

    8. This is your opportunity to add more salt, pepper, or even a pinch of sugar if the yogurt is too tangy. Add chopped nuts if using, and stir them lightly into the mixture.

    9. Chill:

    10. Cover the bowl with plastic wrap or a lid and refrigerate for at least 30 minutes. This allows the flavors to meld beautifully, although it can be eaten immediately.

    11. Serve:

    12. Serve chilled or at room temperature as a standalone salad or alongside grilled meats, whole grains, or as a part of a veggie platter. Garnish with additional herbs or nuts before serving for a pop of color.

    13. Store Leftovers:

    14. If you have any leftovers, they can be stored in an airtight container in the refrigerator for up to three days.

    By following these simple steps, anyone can create a delectable Mouthwatering Greek Yogurt Pea Salad that is sure to impress at any gathering or bring comfort on a quiet evening home. It is one of the healthy dinner recipes you need in your weekly rotation.

    Mastering Mouthwatering Greek Yogurt Pea Salad: Advanced Tips and Variations

    Now that you know how to prepare the traditional version, let’s unlock some tips and variations to take your Mouthwatering Greek Yogurt Pea Salad to the next level:

    1. Spice it Up:
    2. If you enjoy spicy food, add a pinch of cayenne pepper or a dash of hot sauce to the yogurt mix. This adds an unexpected kick that complements the creaminess beautifully.

    3. Add Color:

    4. Incorporate a rainbow of veggies to make the salad visually enticing. Ingredients like diced carrots, colorful bell peppers, or shredded cabbage will not only brighten up the dish but also increase its nutritional profile.

    5. Make it a Meal:

    6. Transform this salad into a more filling option by adding chickpeas or quinoa. Both ingredients boost protein and fiber content, making it a nutritious and satisfying meal choice.

    7. Cheese Lovers:

    8. For cheese enthusiasts, consider adding feta cheese or goat cheese crumbles, which pair perfectly with the salad and elevate the flavor profile.

    9. Herb Variations:

    10. Experiment with different herbs like tarragon or chives to vary the pairing. Each herb will uniquely brighten the yogurt dressing while complementing the peas.

    11. Creative Serving Suggestions:

    12. Serve the Greek Yogurt Pea Salad in lettuce cups for a fresh, low-carb version. Alternatively, spoon it onto whole grain bread for a nutritious sandwich filling.

    By incorporating these tips and variations, you can customize the Mouthwatering Greek Yogurt Pea Salad to suit your family’s tastes and dietary preferences while keeping meal times exciting.

    How to Store Mouthwatering Greek Yogurt Pea Salad: Best Practices

    To ensure freshness and maximize the flavor of your Mouthwatering Greek Yogurt Pea Salad, proper storage is essential:

    1. Refrigeration:
    2. Store any leftover salad in an airtight container in the refrigerator. This keeps it fresh and prevents it from absorbing odors from other foods.

    3. Freezing:

    4. While freezing is not recommended due to the yogurt’s texture changes, if you do need to freeze it, be aware the peas may lose their crunch. However, freezing can work if you’ve only mixed yogurt with peas, without additional ingredients. When ready to use, simply thaw in the refrigerator overnight.

    5. Reheating:

    6. If you’ve added cooked ingredients like quinoa or chickpeas, reheat them in a microwave or stovetop. However, it’s best to consume the salad cold or at room temperature to enjoy its refreshing taste and texture.

    By following these best practices for storage, you can maintain the integrity of your Mouthwatering Greek Yogurt Pea Salad so it remains as delightful as it was when freshly prepared. This is key for those who are looking for healthy dinner recipes that are both delicious and practical.

    Nutritional Value of Mouthwatering Greek Yogurt Pea Salad

    Understanding the nutritional value of your meals is important, especially when seeking healthy dinner recipes. Here’s a breakdown of the estimated nutritional content per serving of the Mouthwatering Greek Yogurt Pea Salad (based on standard measurements and ingredients used):

    • Calories: Approximately 200-250 kcal per serving
    • Protein: 12-15 grams
    • Fat: 5-7 grams (depends on yogurt choice)
    • Carbohydrates: 30 grams
    • Fiber: 7 grams
    • Sugar: 5 grams (natural from peas and yogurt)
    • Vitamins and Minerals: High in Vitamins A, C, and K. Offers potassium, magnesium, and calcium depending on the yogurt used.

    Finally, always be sure to adjust the ingredient quantities to suit dietary restrictions or personal health goals, such as increasing protein content with more Greek yogurt or lowering calories by using a reduced-fat yogurt.

    The Mouthwatering Greek Yogurt Pea Salad offers a splendid way to incorporate nutrition without compromising flavor, making it one of your go-to healthy dinner recipes.

    FAQs: Frequently Asked Questions About Mouthwatering Greek Yogurt Pea Salad

    1. Can I make the Greek Yogurt Pea Salad ahead of time?

    Absolutely! You can prepare this salad a day in advance and store it in the refrigerator. Allowing the flavors to meld overnight often enhances the taste.

    2. What if I don’t like peas?

    You can substitute peas with other vegetables like diced cucumber or bell peppers. Just remember that they will change the flavor profile, but the salad will still be delightful.

    3. Is it possible to use non-dairy yogurt?

    Yes! You can easily enjoy this salad using coconut yogurt or any other non-dairy alternative. Look for brands that are unsweetened and plain to mimic the acidity and creaminess of Greek yogurt.

    4. How long will leftovers last?

    When stored properly in an airtight container, the salad will stay fresh for about 2-3 days in the refrigerator. However, it’s best consumed the sooner the better for texture and flavor.

    5. Can I serve this salad warm?

    While this salad is intended to be enjoyed cold, you can serve it slightly chilled. If you prefer warm, consider an option like tossing in some lightly sautéed vegetables or beans.

    6. Could I add proteins like chicken or tuna to this salad?

    Definitely! Adding grilled chicken or canned tuna can turn this salad into a heartier meal that still promotes healthy eating with balanced nutrition.

    By addressing these common inquiries, you can ensure a seamless cooking experience with your Mouthwatering Greek Yogurt Pea Salad. It remains one of the easiest, most versatile healthy dinner recipes to cater to a wide range of tastes and preferences.

    So there you have it! Your ultimate guide to creating a delicious, nutritious, and satisfying Mouthwatering Greek Yogurt Pea Salad that should become a staple in your recipe collection!

  • This Healthy Pea Side Dish Will Change Your Life

    This Healthy Pea Side Dish Will Change Your Life

    This Healthy Pea Side Dish Will Change Your Life!: A Tropical Delight

    Introduction to This Healthy Pea Side Dish Will Change Your Life!

    If you’re on the lookout for healthy dinner recipes that are not only simple to prepare but also delicious and nutritious, then you’re in for a treat! This healthy pea side dish is bursting with vibrant flavors and promising health benefits, making it a fantastic addition to any meal. Imagine colorful green peas mingling with tropical flavors—this dish is a delightful way to elevate your dining experience.

    This pea side dish is perfect for busy parents looking for a healthy option their kids will love, yet sophisticated enough to impress dinner guests. Whether you’re a student trying to eat healthy on a budget, a food enthusiast eager to try new ingredients, or someone navigating dietary restrictions, this recipe is designed for you. It’s vegan, gluten-free, and low-calorie, making it not only inclusive but also suitable for various dietary needs.

    As you embark on your culinary adventure, you’ll gain the satisfaction of creating a dish that’s as good for your body as it is for your palate. Healthy dinner recipes need not be dull or time-consuming, and this colorful side dish is a testament to that. Let’s delve deeper into the benefits that make this recipe a game changer for your dinner table!

    Benefits and Advantages of This Healthy Pea Side Dish Will Change Your Life!

    There’s a vast world of literature on the benefits of adding more vegetables to your diet, and this healthy pea side dish taps into the advantages of one of nature’s most nutrient-dense offerings—green peas. Rich in vitamins A, C, and K, as well as essential minerals like iron and magnesium, peas provide a wealth of nutrients that support overall health.

    1. Ease of Preparation: Perhaps one of the most appealing aspects of this recipe is its simplicity. With just a handful of ingredients, this side dish can be prepared in under 30 minutes, making it ideal for busy weeknights or last-minute dinner parties.

    2. Health Benefits: Incorporating peas into your meals can enhance digestive health, boost heart health, and even aid in weight management. They are high in protein and fiber, both of which contribute to feeling fuller for longer periods.

    3. Versatile Flavor Profiles: The combination of peas with tropical ingredients—think coconut, lime, and fresh herbs—creates a refreshing delight that pairs well with various main courses. This adaptability makes it a standout in the realm of healthy dinner recipes.

    Given the variety of preferences and dietary restrictions today, this pea side dish stands out as a health-conscious choice that suits families, individuals with specific diets, and even adventurous vegan diners. Let’s explore the ingredients next!

    Ingredients Overview

    Essential Ingredients for This Healthy Pea Side Dish Will Change Your Life!

    To create this delicious pea side dish, you will need the following ingredients:

    • 2 cups fresh or frozen green peas (double-check if using frozen as they may already be cooked)
    • 1 tablespoon olive oil (provides healthy fats)
    • 1 cup coconut milk (this gives a tropical flavor and creaminess; light coconut milk is a good low-calorie substitute)
    • 1 tablespoon lime juice (adds tanginess)
    • 1 teaspoon garlic, minced (enhances flavor)
    • ½ teaspoon sea salt (to taste)
    • ¼ teaspoon black pepper (optional, adds a bit of kick)
    • ¼ cup fresh cilantro or parsley, chopped (for garnish)

    Note: All ingredients are vegan and gluten-free. The use of coconut milk keeps this dish low-calorie compared to heavy cream options.

    Dietary Substitutions to Customize Your This Healthy Pea Side Dish Will Change Your Life!

    To cater to various dietary preferences, consider the following substitutions:

    • Dairy-Free: As mentioned, you can easily substitute coconut milk with almond milk or another plant-based milk if you prefer a lighter base, though the flavor profile will shift slightly.
    • Nut-Free: Ensure that the plant-based milk used is free of nuts if you’re accommodating nut allergies.
    • Spicy Kick: For those who enjoy heat, adding a pinch of red pepper flakes or diced jalapeños can elevate the dish without compromising its health benefits.

    These substitutions not only make the recipe adaptable but also enable everyone to enjoy it regardless of dietary concerns. Next, let’s move on to how to prepare this life-changing side dish!

    How to Prepare the Perfect This Healthy Pea Side Dish Will Change Your Life!: Step-by-Step Guide

    Creating this healthy pea side dish is not only straightforward, but it also allows for personalization along the way. Here’s a step-by-step guide you can easily follow:

    1. Prepare the Base: Begin by heating the olive oil in a medium saucepan over medium heat. Allow the oil to warm up for about a minute, ensuring it reaches the right temperature.

    2. Sauté Garlic: Add the minced garlic to the pan and sauté it for about 30 seconds, stirring continuously until it becomes fragrant but not browned.

    3. Add Peas: Now, mix in the green peas. If you’re using fresh peas, you may need to cook them for about 5-7 minutes until tender. If using frozen peas, they typically only need about 3-4 minutes to cook through.

    4. Incorporate Coconut Milk: Pour in the coconut milk and stir well to combine with the peas. Allow the mixture to simmer for around 3-5 minutes, letting all the flavors meld together.

    5. Season the Mixture: Add lime juice, sea salt, and black pepper, adjusting the seasoning to your personal taste preferences. Stir well to ensure everything is evenly coated in the sauce.

    6. Garnish: Remove the pan from heat, and sprinkle with chopped cilantro or parsley for a burst of freshness. This also serves as a great visual enhancement.

    7. Serve Warm: Transfer your prepared dish into serving bowls and enjoy! This dish pairs beautifully with grilled chicken, fish, or even as part of a vegetarian platter.

    This healthy pea side dish is not only easy to make but also versatile for various dietary needs. It’s an excellent way to add a pop of color and nutrition to your dinner table.

    Mastering This Healthy Pea Side Dish Will Change Your Life!: Advanced Tips and Variations

    While the recipe is fantastic as is, consider these advanced tips and variations to enhance the experience:

    1. Add More Texture: Consider mixing in some crunchy toppings, such as toasted pine nuts or walnuts, before serving. This adds a divergent texture to each bite, making the dish even more exciting.

    2. Herb Variations: Feel free to experiment with different herbs; fresh mint can provide a cool, refreshing touch, while thyme can add a lovely aroma.

    3. Creamy Alternative: If creaminess is your goal, substitute half of the coconut milk with Greek yogurt (for those not strictly vegan), which adds protein while keeping the dish healthy.

    4. Make it a Meal: Transform this side dish into a full meal by tossing in cooked quinoa or farro, packing in more nutrients and making it heartier.

    Exploring these variations will not only keep the dish interesting but also allow you to adapt it to suit the season or whatever fresh ingredients you have on hand.

    How to Store This Healthy Pea Side Dish Will Change Your Life!: Best Practices

    Storing leftovers correctly can help maintain the flavor and texture of your healthy pea side dish.

    • Refrigerate: Allow the dish to cool completely before placing it in an airtight container. It can be stored in the refrigerator for up to 3-4 days. Reheating may require a few drops of water or additional coconut milk to regain that luscious texture.

    • Freeze: If you wish to prepare this dish in advance, consider freezing portions in airtight containers. You can freeze it for up to 2-3 months. Simply thaw overnight in the refrigerator before reheating.

    • Reheating: Heat it on the stovetop over low heat, stirring frequently. If needed, add a splash of coconut milk or water to restore creaminess.

    Proper storage ensures that this nutritious dish remains just as delightful on the second day as it is fresh.

    Nutritional Value of This Healthy Pea Side Dish Will Change Your Life!

    One of the best aspects of this healthy pea side dish is its impressive nutritional profile. Here’s a breakdown per serving (approximately):

    • Calories: 150 kcal
    • Protein: 5g
    • Fat: 8g (mainly from olive oil and coconut milk)
    • Carbohydrates: 17g
    • Fiber: 5g
    • Sugars: 3g
    • Vitamins and Minerals: Rich in Vitamin A, C, K, iron, and magnesium

    With each serving packed full of nutrients, you can enjoy this healthy food without any guilt. Moreover, every component contributes to overall wellness, emphasizing the benefits of incorporating peas into a balanced diet. This dish not only satisfies hunger but also aligns with those searching for healthy dinner recipes that provide nutrition without sacrificing flavor.

    FAQs: Frequently Asked Questions About This Healthy Pea Side Dish Will Change Your Life!

    Here are some frequently asked questions about this incredible recipe:

    Q: Can I use canned peas instead of fresh or frozen?
    A: Yes, canned peas can work in this recipe. Be sure to drain and rinse them well to reduce sodium content.

    Q: How can I adjust this dish to be more filling?
    A: To make the dish more filling, consider adding cooked quinoa, brown rice, or even diced potatoes to the mixture.

    Q: What other vegetables could I incorporate?
    A: This dish can be easily customized by adding diced carrots, corn, or bell peppers for more color and nutrition.

    Q: Is this dish suitable for meal prep?
    A: Absolutely! It stores well in the refrigerator and can also be frozen, making it a great option for meal prep.

    Q: Can I serve it cold?
    A: Yes, if you prefer, this healthy pea side dish can be served cold as part of a salad or a cold plate.

    By addressing common concerns and showcasing the versatility of the recipe, your intended audience will feel empowered to try this healthy pea side dish confidently.


    This article has provided a comprehensive look at how this healthy pea side dish can transform meal times into an exploration of flavors, nutrition, and creativity while staying rooted in practicality and ease of preparation. With healthy dinner recipes like this one, enjoying wholesome meals at home has never been more rewarding. Enjoy your cooking adventure!

  • Classic Pea Salad With Green Onion

    Classic Pea Salad With Green Onion

    Classic Pea Salad With Green Onion: A Tropical Delight

    Introduction to Classic Pea Salad With Green Onion

    If you’re on the hunt for a refreshing dish to brighten your spring meals, look no further than the Classic Pea Salad with Green Onion. This delightful recipe combines the gentle sweetness of peas with the crispness of green onions, creating a vibrant salad that’s not only visually appealing but also packed with flavor and nutrition.

    Perfect for busy parents, students, health-conscious individuals, and everyone in between, this salad is a breeze to prepare, taking only a few simple steps. It caters to various dietary preferences, including vegan and gluten-free options, which makes it a fantastic addition to any meal or gathering.

    The versatility of this pea salad is one of its greatest assets. Serve it alongside grilled dishes for a delicious side at summertime barbecues or present it as a light lunch for your busy workweek. With a few extra ingredients, it can also transform into a heartier main dish. Enjoying wholesome ingredients has never been easier or more satisfying, making this Classic Pea Salad With Green Onion a must-try for anyone looking to elevate their spring meals.

    Benefits and Advantages of Classic Pea Salad With Green Onion

    The Classic Pea Salad With Green Onion shines for several reasons. Firstly, its preparation is incredibly straightforward, making it a practical choice for busy cooks. In just a matter of minutes, you can whip up a delicious, hearty side dish that appeals to virtually everyone.

    Additionally, this salad is brimming with health benefits. Peas are high in fiber, vitamins, and other essential nutrients, making them an excellent addition to a balanced diet. They are known to support heart health and aid digestion—ideal for those looking to maintain a healthy lifestyle. The green onions add a delightful crunch, along with essential vitamins like vitamin K, which is crucial for bone health.

    One of the standout features of this Classic Pea Salad is its adaptability. With minimal effort, you can customize the ingredients to fit any dietary restrictions or preferences. Whether you are feeding picky eaters or catering to guests with food sensitivities, this salad can be modified to suit any palate. Furthermore, it’s a great option for potlucks and family gatherings, as it stands out not only in taste but also in its colorful presentation.

    Ultimately, the Classic Pea Salad With Green Onion offers a wonderful combination of flavor, nutrition, and versatility, making it an ideal choice for your spring meals and beyond.

    Ingredients Overview

    Essential Ingredients for Classic Pea Salad With Green Onion

    To create this delightful Classic Pea Salad With Green Onion, you will need the following ingredients:

    • 2 cups fresh or frozen peas (thawed if frozen) – Peas serve as the base of the salad, providing sweetness and a dose of protein.
    • 1/2 cup chopped green onionsThese add a slight crunch and a mild onion flavor, enhancing the overall taste.
    • 1/2 cup mayonnaiseFor a creamy texture; use vegan mayonnaise for a plant-based version.
    • 1 tablespoon lemon juiceAdds brightness and acidity to balance the flavors in the salad.
    • Salt and pepper to tasteFor seasoning; essential in bringing out the flavors of the ingredients.
    • Optional additions:
    • 1/2 cup diced celeryFor an extra crunch; this ingredient can bring additional fiber.
    • 1/4 cup chopped fresh dill or parsleyFor added freshness and flavor. You can choose herbs based on your preference, making it versatile for spring meals.

    Vegan, Gluten-Free, and Low-Calorie Options:
    Replace regular mayonnaise with a vegan version to cater to plant-based diets. Additionally, this recipe is naturally gluten-free, making it suitable for those avoiding gluten. For a lower-calorie option, consider subbing Greek yogurt for mayonnaise.

    Dietary Substitutions to Customize Your Classic Pea Salad With Green Onion

    Customizing this Classic Pea Salad With Green Onion is simple, ensuring that everyone at your table can enjoy it. Here are some substitutions to consider:

    • Mayo Alternatives:
    • For a lighter version, use low-fat mayo or Greek yogurt.
    • For a nut-free option, use sunflower seed butter mixed with a splash of vinegar.

    • Protein Boost:

    • Add diced cooked chicken or tofu for additional protein, perfect for a filling lunch or dinner.
    • Chickpeas can serve as a satisfying vegan source of protein.

    • Herb Variations:

    • Swap green onions for chives or shallots for a different flavor profile.
    • Fresh mint can also be added for a refreshing twist.

    • Vegetable Variations:

    • Incorporate other colorful vegetables, such as bell peppers, carrots, or cucumber, to enhance both texture and nutrition.
    • Use spinach or arugula as a base for an even heartier salad.

    The beauty of this Classic Pea Salad is its flexibility—it allows for creativity while accommodating a wide range of dietary preferences, ensuring that everyone can enjoy it during their spring meals.

    How to Prepare the Perfect Classic Pea Salad With Green Onion: Step-by-Step Guide

    Now that you’ve gathered your ingredients, let’s dive into the step-by-step instructions on how to prepare the Classic Pea Salad With Green Onion. This recipe is straightforward, ensuring that you’ll have a delightful dish ready in no time!

    1. Prepare the Base: If using frozen peas, ensure they are fully thawed. Place the peas in a mixing bowl, and if you prefer a chilled salad, you may briefly rinse them with cold water.

    2. Chop the Green Onions: While the peas are resting in the bowl, take your green onions and chop them into small pieces, using both the white and green parts for flavor.

    3. Combine Ingredients: In the mixing bowl with the peas, add the chopped green onions. If you decided to use celery for extra crunch, now’s the time to include that too.

    4. Make the Dressing: In a separate, small bowl, mix the mayonnaise and lemon juice until smooth. This dressing will provide a creamy base for the salad. Adjust seasoning with salt and pepper as per your taste preferences.

    5. Mix It All Together: Pour the dressing over the peas and green onions. Gently fold the mixture together, taking care not to mash the peas, until everything is evenly coated.

    6. Incorporate Optional Ingredients: If you want to take your salad to the next level, add in any optional extras you’ve chosen, such as fresh herbs or chicken/tofu.

    7. Chill Before Serving: Cover the bowl with plastic wrap and refrigerate the salad for at least 30 minutes. This allows the flavors to meld beautifully—great for spring meals outdoors!

    8. Serve and Enjoy: When ready to serve, give the salad a final gentle stir and check the seasoning. Serve it cold as a side dish for any grilled meats, sandwiches, or enjoy it on its own as a refreshing lunch.

    This Classic Pea Salad with Green Onion is not only delicious but also provides plenty of room for personalization. Feel free to adapt any step to cater to your personal dietary needs or preferences!

    Mastering Classic Pea Salad With Green Onion: Advanced Tips and Variations

    To elevate your Classic Pea Salad with Green Onion and make it truly your own, consider these tips and variations:

    • Use Fresh Herbs: If you grow herbs in your garden or buy fresh at the market, indulge in their flavor by adding generous amounts. Dill and parsley work especially well, but don’t hesitate to experiment with basil or cilantro for an unexpected twist.

    • Texture Play: For a delightful crunch, add chopped nuts, such as almonds or walnuts, or toasted pumpkin seeds. Nuts add healthy fats and an additional layer of flavor that complements the sweetness of the peas.

    • Cheese Lovers: If you enjoy cheese, consider adding crumbled feta or goat cheese to the salad for a creamy and tangy kick. This extra ingredient can turn your salad into a lovely main dish.

    • Spice it Up: Feeling adventurous? Add a dash of hot sauce or sprinkle in some chili flakes for a bit of heat. This can brighten the flavors and provide a unique twist to the typical salad.

    • Other Dressings: While mayonnaise is traditional, don’t be afraid to experiment with different dressings. A vinaigrette made from olive oil, vinegar, and mustard provides a lighter dressing that complements spring meals beautifully.

    These tips not only enhance flavor but also allow you to master this Classic Pea Salad with Green Onion, making it a versatile choice for any gathering or weeknight meal.

    How to Store Classic Pea Salad With Green Onion: Best Practices

    Proper storage of your Classic Pea Salad With Green Onion will maximize freshness and extend its shelf life. Here’s how to keep it safe and delicious:

    • Refrigeration: Store the salad in an airtight container in the refrigerator if you plan to enjoy it within 3-4 days. This helps maintain the crispness of the vegetables and keeps the flavors vibrant.

    • Freezing: While freezing is not typically recommended for salads with mayonnaise, if you want to save portions for later, consider freezing the base (peas and any crunchy veggies) without dressing. Just thaw and add your dressing before enjoying.

    • Reheating: If you decide to prepare a portion of the Classic Pea Salad as part of a meal prep, remember not to mix the dressing until you’re ready to serve. This ensures the vegetables remain fresh and crunchy.

    Remember, fresh ingredients yield the best results! These practices will keep your Classic Pea Salad vibrant and enjoyable, making it a staple in your spring meals.

    Nutritional Value of Classic Pea Salad With Green Onion

    When considering the health aspect of your meals, understanding the nutritional value of the Classic Pea Salad With Green Onion is key. Here’s a breakdown of the primary nutrients you can expect from a standard serving (approximately 1 cup):

    • Calories: ~150-200 (depends on the amount of mayonnaise)
    • Protein: ~5g (from peas mainly)
    • Total Fat: ~9g
    • Saturated Fat: ~1g
    • Carbohydrates: ~15g
    • Dietary Fiber: ~5g
    • Sugars: ~4g
    • Vitamin A: 8% DV
    • Vitamin C: 30% DV
    • Vitamin K: 25% DV
    • Iron: 6% DV

    This Classic Pea Salad packs a nutritious punch with its fiber-rich peas and fresh ingredients. The salad is low in calories, offers healthy fats from the dressing, and provides crucial vitamins and minerals. Customize it further with added protein or healthy fats to fit your dietary needs.

    For those keeping track of specific dietary numbers or looking to improve their health, this Classic Pea Salad is an excellent option not only for spring meals but any meals throughout the year.

    FAQs: Frequently Asked Questions About Classic Pea Salad With Green Onion

    Q: Can I use canned peas for this salad?
    A: Yes! However, opt for low-sodium canned peas. Drain and rinse them before adding to the salad to reduce their sodium content and improve the flavor significantly.

    Q: How can I make this salad more filling?
    A: To transform this salad into a heartier dish, add diced chicken, chickpeas, or quinoa. These additions provide extra protein and make it a complete meal.

    Q: Is this salad suitable for meal prep?
    A: Absolutely! The Classic Pea Salad holds up well in the fridge for several days. Just ensure it’s stored in an airtight container to keep it fresh.

    Q: Can I make this salad in advance?
    A: Yes, you can prepare the salad a day ahead, but it’s recommended to add the dressing shortly before serving to keep the vegetables crunchy.

    Q: What other vegetables can I add?
    A: You can experiment with adding bell peppers, diced cucumbers, or shredded carrots for additional color and nutrients!

    Q: Can I use a different dressing?
    A: Definitely! If you want a lighter option, create a simple vinaigrette using olive oil and lemon juice, or mix in yogurt instead of mayonnaise for a tangy taste.

    This Classic Pea Salad with Green Onion stands as a wonderful representation of versatility and flavor. With its bright colors and distinctive tastes, it’s sure to be a crowd-pleaser, making it an essential recipe for your spring meals and gatherings to remember!

  • Summer Zucchini, Pea  Goat Cheese Orzo Salad

    Summer Zucchini, Pea Goat Cheese Orzo Salad

    Summer Zucchini, Pea & Goat Cheese Orzo Salad: A Tropical Delight

    Introduction to Summer Zucchini, Pea & Goat Cheese Orzo Salad

    Are you looking for a refreshing and delightful pasta salad that captures the essence of summer? Look no further than the Summer Zucchini, Pea & Goat Cheese Orzo Salad. This vibrant dish not only bursts with flavors but also caters to various dietary preferences—making it the perfect choice for busy weeknights, weekend gatherings, or even special occasions.

    Imagine the soft pasta perfectly coated in a light dressing, mingling with fresh zucchini, sweet peas, and tangy goat cheese. This recipe is simple yet elegant, satisfying individuals who embrace a healthy lifestyle while also delighting those who appreciate indulgent flavors. Whether you’re a parent rushing to prepare dinner, a student looking for a quick meal, or simply a food enthusiast wanting to explore culinary delights, this orzo salad checks all the boxes.

    Furthermore, it’s incredibly easy to make. In less than 30 minutes, you can whip up a nourishing pasta salad that becomes a go-to dish in your summer repertoire. Not only is this salad visually pleasing, but it is also packed with nutrients, thanks to the fresh vegetables and wholesome orzo. Here, we’ll guide you through the key benefits and ingredients, enticing you to give this delightful salad a try.

    Benefits and Advantages of Summer Zucchini, Pea & Goat Cheese Orzo Salad

    This Summer Zucchini, Pea & Goat Cheese Orzo Salad is more than just a pretty dish at the table; it offers an array of benefits that make it a fantastic addition to your cooking arsenal.

    1. Ease of Preparation

    With straightforward steps, this pasta salad requires minimal effort, making it ideal for individuals with busy schedules. Simply cook the orzo, chop your veggies, and toss everything together. It’s a no-fuss recipe that allows anyone, from budding cooks to seasoned chefs, to create a beautiful meal effortlessly.

    2. Health Benefits

    Packed with essential vitamins and minerals, this salad promotes a balanced diet. The zucchini adds fiber and antioxidants while peas bring in protein and vitamins A, C, and K. Goat cheese complements the dish with a good dose of calcium and contributes to heart health. As a result, you get a nourishing bowl of goodness that leaves you feeling satisfied without compromising on health.

    3. Versatility and Adaptability

    One of the standout features of this orzo salad is its versatility. It works well as a standalone dish, side dish, or even a hearty lunch! If you want to customize it, you can easily incorporate proteins like chicken or chickpeas for added nutrition.

    4. Diet-Friendly Options

    This recipe accommodates various dietary needs. Whether you’re looking for vegetarian, gluten-free, or low-calorie options, this orzo salad can easily adapt. For those with dietary restrictions, we’ll explore substitutions in more detail so everyone can enjoy this delightful summer dish.

    The combination of ease, health benefits, adaptability, and dietary inclusivity makes the Summer Zucchini, Pea & Goat Cheese Orzo Salad a standout recipe that you’ll want to make time and time again.

    Ingredients Overview

    Essential Ingredients for Summer Zucchini, Pea & Goat Cheese Orzo Salad

    To prepare this vibrant pasta salad, you will need the following essential ingredients:

    • Orzo Pasta (1 cup): The base of your salad; orzo’s small, rice-like shape makes it perfect for a salad.
    • Zucchini (1 medium, finely diced): Adds texture and a burst of color while being low in calories.
    • Fresh Peas (1 cup, shelled or frozen): Sweet peas contribute a delightful sweetness and are rich in vitamins.
    • Goat Cheese (½ cup, crumbled): Offers creaminess and a tangy flavor, which balances the freshness of the vegetables.
    • Olive Oil (3 tablespoons): A healthy fat that helps dress the pasta salad.
    • Lemon Juice (2 tablespoons): Provides a zesty kick and brightens the flavors.
    • Garlic (1 clove, minced): Adds depth and aroma.
    • Salt and Pepper (to taste): Essential for enhancing flavor.

    Dietary Options:
    – For a gluten-free version, substitute traditional orzo with gluten-free orzo or brown rice.
    – To make it vegan, replace goat cheese with crumbled tofu or a cashew cheese alternative and use agave nectar in place of honey in dressings.

    Dietary Substitutions to Customize Your Summer Zucchini, Pea & Goat Cheese Orzo Salad

    1. Pasta Substitutes: If you’re avoiding gluten, opt for quinoa, brown rice, or gluten-free pasta. Conversely, if you prefer a lower-carb option, try cauliflower rice or shirataki noodles.

    2. Cheese Alternatives: For a dairy-free version, use vegan cheese options or nutritional yeast for a cheesy flavor without dairy.

    3. Protein Boosters: Consider adding cooked chicken, shrimp, or chickpeas for additional protein and texture. These can help turn the salad into a complete meal.

    4. Vegetable Variations: Feel free to experiment with different vegetables such as bell peppers, asparagus, or spinach. This not only enhances the flavor but also provides a variety of nutrients.

    5. Herbs and Spices: For extra flavor, consider adding fresh herbs such as basil, mint, or parsley. A pinch of red pepper flakes can provide a pleasant kick.

    By considering these substitutions, you can tailor the Summer Zucchini, Pea & Goat Cheese Orzo Salad to meet various dietary needs without sacrificing taste or nutrition.

    How to Prepare the Perfect Summer Zucchini, Pea & Goat Cheese Orzo Salad: Step-by-Step Guide

    Creating the Summer Zucchini, Pea & Goat Cheese Orzo Salad is a delightful and simple process. Follow these easy steps to prepare the perfect pasta salad:

    1. Prepare the Base

    Begin by bringing a large pot of salted water to a boil. Once boiling, add 1 cup of orzo and cook according to the package instructions (about 8-10 minutes) until al dente. Make sure to stir occasionally to avoid clumping.

    2. Prepare Your Vegetables

    While the orzo is cooking, wash and finely dice 1 medium zucchini. If you’re using fresh peas, shell them now as well. If using frozen peas, they can be rinsed under cold water to thaw while you prepare the other ingredients.

    3. Combine Ingredients in a Bowl

    Once the orzo is cooked, drain it and transfer it to a large mixing bowl. Add the diced zucchini and peas immediately—this will allow some of the heat from the orzo to gently cook the zucchini, enhancing its flavor without making it mushy.

    4. Add the Goat Cheese

    Next, crumble ½ cup of goat cheese over the warm ingredients. The warmth will soften the cheese, allowing it to blend nicely into the salad.

    5. Prepare the Dressing

    In a small bowl, mix together 3 tablespoons of olive oil, the juice of 2 tablespoons of lemon, and 1 minced garlic clove. Whisk together until fully combined. This dressing will bring all the flavors together beautifully.

    6. Combine Dressing and Salad

    Pour the dressing over the orzo mixture. Use a large spoon to toss everything together gently, ensuring that the ingredients evenly coat with the dressing.

    7. Season to Taste

    Finally, add salt and pepper to taste. Feel free to adjust depending on your flavor preferences.

    8. Chill (Optional)

    For best results, let the salad chill in the refrigerator for at least 15-30 minutes. This allows the flavors to meld together, but it can also be served immediately if you’re in a hurry!

    9. Serve and Enjoy

    Serve your Summer Zucchini, Pea & Goat Cheese Orzo Salad as a refreshing side dish or a light main course. Garnish with fresh herbs if desired, and enjoy this vibrant summer treat!

    Mastering Summer Zucchini, Pea & Goat Cheese Orzo Salad: Advanced Tips and Variations

    Once you’ve mastered the basic recipe, consider these advanced tips and variations to elevate your pasta salad game:

    1. Opt for Roasted Vegetables

    For a deeper flavor profile, consider roasting the zucchini and peas instead of adding them raw. Just toss them in olive oil, season with salt and pepper, and roast in a preheated oven at 400°F (200°C) for 15-20 minutes until tender and caramelized.

    2. Infuse with Fresh Herbs

    Adding fresh herbs like dill, parsley, or mint can significantly enhance the flavor of your pasta salad. These herbs are not only tasty but also add a vibrant touch to the presentation.

    3. Add Crunch

    Incorporate some toasted nuts or seeds, like pine nuts or sunflower seeds. These ingredients will give your salad a satisfying crunch.

    4. Experiment with Dressings

    Feel free to get creative with dressings! Try balsamic vinaigrette, a tahini-based dressing, or even a yogurt dressing for creamy texture.

    5. Make it a Meal

    Transform this salad into a hearty meal by adding cooked shrimp, grilled chicken, or chickpeas. This variation makes it a filling option for lunch or dinner.

    6. Presentation is Key

    Serve your salad in a large bowl featuring contrasting colors for an appealing presentation. Layer the ingredients or serve individually in jars for a stylish picnic option.

    These tips not only help to make your Summer Zucchini, Pea & Goat Cheese Orzo Salad more enticing, but they also encourage creativity in the kitchen!

    How to Store Summer Zucchini, Pea & Goat Cheese Orzo Salad: Best Practices

    Storing your Summer Zucchini, Pea & Goat Cheese Orzo Salad properly ensures that it remains fresh and delicious for days. Here’s how to do it:

    1. Refrigeration

    Place the salad in an airtight container and store it in the refrigerator. Properly stored, it can last up to 3-4 days.

    2. Freezing

    While it’s not recommended to freeze the entire salad due to the dairy in goat cheese and the texture of the orzo, you can freeze individual components (like cooked orzo or some veggies) separately for longer shelf life. Just remember to defrost them before adding to fresh ingredients later.

    3. Reheating

    If you choose to reheat the salad (for example, if it’s been altered with proteins), do so gently in a microwave or on the stovetop over low heat, adding a drizzle of olive oil or a splash of water to help revitalize the dish.

    Following these steps ensures your pasta salad remains tasting fresh and delicious, ready to enjoy at a moment’s notice.

    Nutritional Value of Summer Zucchini, Pea & Goat Cheese Orzo Salad

    Understanding the nutritional value of your Summer Zucchini, Pea & Goat Cheese Orzo Salad is crucial, especially if you are keeping an eye on your diet. Below is a rough estimate of the nutritional profile based on a serving size of approximately one bowl (including orzo, vegetables, and goat cheese):

    • Calories: 320
    • Total Fat: 15g
    • Saturated Fat: 6g
    • Cholesterol: 20mg
    • Sodium: 200mg
    • Total Carbohydrates: 40g
    • Dietary Fiber: 5g
    • Sugars: 4g
    • Protein: 10g

    Vitamins and Minerals:

    • Vitamin A: Essential for vision and immune function.
    • Vitamin C: Important for the growth and repair of tissues.
    • Calcium: Crucial for bone health.
    • Iron: Provides energy and helps in transporting oxygen in the blood.

    Since this pasta salad is versatile, you can make it even healthier by adjusting the portions and ingredients to fit your nutritional goals. Enjoy this salad guilt-free, knowing it nourishes your body as much as it delights your taste buds.

    FAQs: Frequently Asked Questions About Summer Zucchini, Pea & Goat Cheese Orzo Salad

    1. Can I use a different type of pasta besides orzo?

    Absolutely! You can use any small pasta shape like ditalini, farro, or even whole grain options. Just remember to adjust the cooking time as needed.

    2. Is this pasta salad suitable for meal prep?

    Yes! The Summer Zucchini, Pea & Goat Cheese Orzo Salad is perfect for meal prep. Simply prepare the salad, store it in airtight containers, and enjoy throughout the week.

    3. Can I make this salad vegan?

    Certainly! To make a vegan version, substitute goat cheese with plant-based cheese or nutritional yeast. Ensure that the dressing doesn’t contain honey if you want it to be fully vegan.

    4. What proteins can I add for extra nutrition?

    You can add grilled chicken, shrimp, chickpeas, or even beans to enhance the protein content of your salad while keeping it nutritious.

    5. How long can I keep leftovers?

    If stored properly in the refrigerator, your salad will stay fresh for up to 3-4 days. Make sure to check its appearance and smell before consuming.

    6. Can I serve this pasta salad warm?

    Yes! While it’s often served cold, you can also serve this salad warm for a comforting meal option.

    This comprehensive guide aims to inspire you to create your own Summer Zucchini, Pea & Goat Cheese Orzo Salad. Its healthful ingredients, ease of preparation, and remarkable flavor make it a must-try for anyone looking to refresh their meal options this season. Enjoy the summer vibes with this tropical delight on your dining table!

  • Honey Roasted Carrots With Whipped Feta

    Honey Roasted Carrots With Whipped Feta

    Honey Roasted Carrots With Whipped Feta: A Tropical Delight

    Introduction to Honey Roasted Carrots With Whipped Feta

    Are you looking for a scrumptious addition to your meal that stands out with vibrant flavors and health benefits? Introducing Honey Roasted Carrots With Whipped Feta, a dish that not only excites your palate but also aligns perfectly with your quest for healthy dinner recipes. This elegant, yet simple dish combines the natural sweetness of carrots with the creamy texture of whipped feta and a drizzle of honey, creating a delightful balance of flavors that is hard to resist.

    The allure of Honey Roasted Carrots With Whipped Feta lies in its ease of preparation and its impressive taste. It’s perfect for busy parents looking to whip up something nutritious or for food enthusiasts eager to impress at their next dinner party. This recipe is not just delicious; it’s also versatile. It caters to various dietary needs, being gluten-free and easily adaptable for vegans. Moreover, it’s a dish filled with vitamins and minerals, thanks to the carrots, making it an ideal side for anyone conscious about their health.

    In this article, we’ll explore the numerous benefits of this recipe, list its essential ingredients, and guide you through the preparation process. Whether you’re a newlywed creating culinary experiences together or a busy professional seeking quick yet healthy options, this Honey Roasted Carrots With Whipped Feta recipe will surely become a staple in your healthy dinner repertoire.

    Benefits and Advantages of Honey Roasted Carrots With Whipped Feta

    When it comes to preparing healthy dinner recipes, simplicity and flavor are key. Honey Roasted Carrots With Whipped Feta checks both of these boxes beautifully. The recipe requires minimal ingredients and can be made in just a few steps, making it accessible for cooks of all levels. Moreover, the whole process is straightforward and does not demand hours spent in the kitchen, offering a perfect solution for busy weeknights.

    Health Benefits

    The primary ingredient, carrots, are renowned for their high beta-carotene content, which is converted to vitamin A in the body. This vital vitamin promotes healthy vision, supports immune function, and contributes to skin health. Additionally, they offer dietary fiber, which aids in digestion and promotes a sense of fullness, making this dish an excellent option for those following a weight management plan.

    Furthermore, the whipped feta brings another layer of health benefits to the meal. Feta is typically lower in calories compared to many other cheeses and provides a source of protein, calcium, and beneficial bacteria. When whipped, the feta becomes creamy and indulgent while still being healthier than traditional cheesy sauces. Those who are vegan can easily substitute whipped feta with a plant-based alternative without sacrificing flavor.

    Ingredients Overview

    Essential Ingredients for Honey Roasted Carrots With Whipped Feta

    To create your own Honey Roasted Carrots With Whipped Feta, gather the following ingredients:

    • Carrots: 4 cups, peeled and cut into sticks (about 1/2 inch thick)
    • Health Benefit: Rich in vitamins A, C, and K; promotes eye health.

    • Honey: 3 tablespoons (or maple syrup for a vegan version)

    • Health Benefit: Natural sweetener that contains antioxidants.

    • Feta Cheese: 1 cup, crumbled (or vegan feta for a dairy-free option)

    • Health Benefit: Offers protein and calcium.

    • Olive Oil: 2 tablespoons

    • Health Benefit: Healthy monounsaturated fats good for heart health.

    • Salt and Black Pepper: To taste

    • Purpose: Enhances flavor.

    • Fresh Thyme or Rosemary: 1 tablespoon, chopped (optional)

    • Health Benefit: Contains antioxidants and adds aroma.

    Each ingredient serves a distinct purpose, ensuring that the final product not only tastes good but also packs a nutritional punch.

    Dietary Substitutions to Customize Your Honey Roasted Carrots With Whipped Feta

    The beauty of Honey Roasted Carrots With Whipped Feta lies in its adaptability for various dietary needs. Here are some suggested substitutions:

    • Vegan Options:
    • Substitute honey with maple syrup or agave nectar. This not only fits a vegan lifestyle but gives a unique flavor hint that pairs well with carrots.
    • Use vegan feta or simply blend silken tofu with lemon juice and salt to achieve a creamy texture without dairy.

    • Gluten-Free Needs:

    • This recipe is inherently gluten-free, making it suitable for those with gluten intolerance.

    • Low-Calorie Alternatives:

    • Reduce honey if you’re looking to cut back on sugar. Opt for a sugar-free sweetener like erythritol or stevia, adjusting to taste.

    • Herb Variations:

    • If you’re not a fan of thyme or rosemary, consider using dried oregano or parsley for a different twist.

    By customizing the ingredients, you can cater to your family’s or guests’ dietary restrictions while still serving a delicious and nutritious side dish.

    How to Prepare the Perfect Honey Roasted Carrots With Whipped Feta: Step-by-Step Guide

    Ready to bring your cooking skills to the next level? Follow this detailed, step-by-step guide to prepare Honey Roasted Carrots With Whipped Feta, an easy addition to your list of healthy dinner recipes.

    1. Prepare the Oven: Preheat your oven to 425°F (220°C). This ensures a perfect roasting temperature that gives the carrots a nice caramelization.

    2. Prep the Carrots: Wash and peel the carrots. Cut them into uniform sticks, roughly 1/2 inch thick. This consistency helps them cook evenly.

    3. Toss with Olive Oil: In a large bowl, add the carrot sticks and drizzle 2 tablespoons of olive oil over them. Toss well to ensure all pieces are coated. This step is crucial as it allows for uniform cooking and flavors.

    4. Seasoning: Add salt and black pepper to the oiled carrots to taste. If you’re using fresh herbs like thyme or rosemary, include them now to infuse flavor.

    5. Roasting: Spread the carrots in a single layer on a baking sheet. This prevents steaming and promotes that irresistible caramelized exterior. Roast in your preheated oven for about 25–30 minutes, turning halfway through to ensure even roasting.

    6. Prepare the Whipped Feta: While the carrots are roasting, it’s time to whip the feta. In a food processor, combine 1 cup of crumbled feta with 2 tablespoons of honey (or the vegan alternative). Blend until the mixture is smooth and creamy. If it’s too thick, add a splash of milk (dairy or plant-based) to achieve your desired consistency.

    7. Check the Carrots: The carrots are done when they’re golden brown and tender. You can check doneness by poking them with a fork—if they’re easily pierced, they’re ready!

    8. Assemble the Dish: To serve, plate the roasted carrots, and generously dollop the whipped feta on top. Drizzle with a little more honey for added sweetness if desired.

    9. Garnish: Finish off with an additional sprinkle of fresh herbs for color and flavor.

    10. Serve and Enjoy: Enjoy your Honey Roasted Carrots With Whipped Feta warm, either as a side or a focal point of your meal.

    By following these steps, you can successfully create a dish that is not only visually appealing but also packed with flavor and nutrition, making it perfect for healthy dinner recipes.

    Mastering Honey Roasted Carrots With Whipped Feta: Advanced Tips and Variations

    To elevate your Honey Roasted Carrots With Whipped Feta, consider these advanced tips and variations:

    • Add Nuts: Top the dish with toasted walnuts or pecans for added crunch and healthy fats. Just toss them in the oven for the last 5-10 minutes of roasting.

    • Experiment with Spices: For a kick, add a pinch of cayenne pepper or smoked paprika to the carrots before roasting. This will enhance their flavor profile and create an exciting contrast with the sweetness of the honey.

    • Mix in Other Vegetables: For a medley, mix in parsnips, sweet potatoes, or even Brussels sprouts with the carrots. Just ensure to cut them to similar sizes for even cooking.

    • Use Different Cheeses: If feta isn’t your preference, consider using goat cheese or ricotta for a twist. Each will impart a different flavor but still contribute creaminess.

    • Make It a Meal: Serve the roasted carrots over a bed of quinoa or farro, and add grilled chicken or chickpeas on top for a complete meal.

    These variations not only enhance flavor but also transform Honey Roasted Carrots With Whipped Feta from a side dish to a main event, making it an exciting option for your healthy dinner recipes.

    How to Store Honey Roasted Carrots With Whipped Feta: Best Practices

    If you have leftovers (if you can resist!), proper storage is essential to maintain their flavor and texture. Here are best practices:

    • Refrigeration: Allow the Honey Roasted Carrots With Whipped Feta to cool completely at room temperature. Store them in an airtight container in the fridge. They can typically last up to 3–5 days.

    • Freezing: While freezing roasted carrots isn’t ideal due to texture changes, if you must, place them in a freezer-safe container after cooling. Try to consume them within 2-3 months for quality.

    • Reheating: To reheat, place the carrots in a preheated oven at 350°F (175°C) for about 10-15 minutes, or until warmed through. This will help to retain their original flavor and texture. If you’re reheating the whipped feta, do so in the microwave for short bursts, stirring in between.

    By following these storage tips, you can enjoy Honey Roasted Carrots With Whipped Feta even days after your initial preparation, maintaining its status as one of your go-to healthy dinner recipes.

    Nutritional Value of Honey Roasted Carrots With Whipped Feta

    Understanding the nutritional value of your meals is essential, especially when aiming for healthy dinner recipes. Here’s an estimated breakdown per serving of Honey Roasted Carrots With Whipped Feta (based on the recipe serving 4 people):

    • Calories: 220
    • Protein: 6g
    • Total Fat: 10g
    • Saturated Fat: 4g
    • Carbohydrates: 27g
    • Fiber: 5g
    • Sugars: 10g
    • Vitamin A: 120% DV
    • Vitamin C: 8% DV
    • Calcium: 15% DV
    • Iron: 5% DV

    These values can vary based on ingredient choices (like the type of sweetener used or the fat percentage of the feta), but they illustrate the overall health benefits of this recipe. Rich in vitamins and minerals, Honey Roasted Carrots With Whipped Feta is a nutritious option that supports many dietary goals. By featuring this dish in your meals, you not only enjoy a delicious creation but also contribute positively to your dietary wellbeing.

    FAQs: Frequently Asked Questions About Honey Roasted Carrots With Whipped Feta

    Q1: Can I make Honey Roasted Carrots With Whipped Feta ahead of time?

    Absolutely! You can prepare the carrots a day in advance and reheat them when ready to serve. However, it’s best to whip the feta right before serving for the best taste and texture.

    Q2: What can I substitute for honey?

    If you’re looking for a vegan option or simply want to reduce sugar, maple syrup or agave nectar works great as a substitute. Adjust to your taste preference!

    Q3: How can I make this dish spicier?

    Want to add some heat? You can mix a pinch of cayenne pepper or red pepper flakes into your caramelized carrots before serving. The sweetness of the carrots balances well with the spice!

    Q4: How do I know when my carrots are done roasting?

    Carrots are done when they are tender and slightly caramelized, which typically takes 25-30 minutes at 425°F (220°C). A fork should slide in easily without much resistance.

    Q5: Can I use other vegetables in this recipe?

    Absolutely! This recipe is versatile. You can add other root vegetables like parsnips or sweet potatoes for additional flavor and nutrients. Just make sure to cut them into similar sizes for even cooking.

    Engage with these FAQs to enhance reader understanding and interest in making one of the best healthy dinner recipes available!


    With this guide, you’re now equipped to create Honey Roasted Carrots With Whipped Feta, a dish bursting with flavor and nutritional benefits. Enjoy the journey of cooking and the delight of sharing a healthy meal with others!

  • Easy Frito Cowboy Cabbage Salad Recipe

    Easy Frito Cowboy Cabbage Salad Recipe

    Easy Frito Cowboy Cabbage Salad Recipe: A Tropical Delight

    Introduction to Easy Frito Cowboy Cabbage Salad Recipe

    The Easy Frito Cowboy Cabbage Salad Recipe is a delightful blend of flavors and textures, making it a perfect addition to your repertoire of quick and simple meals. If you’re looking for easy dinner recipes that are not only delicious but also cater to various dietary preferences, this salad is your answer. It’s a fun combination of fresh cabbage, crunchy Fritos, and zesty dressing, delivering a symphony of flavors in every bite. Not only is it refreshing and vibrant, but it also packs a nutritional punch, making it a great choice for busy parents trying to juggle healthy eating with their hectic schedules, students looking for a nutritious but affordable meal, and food enthusiasts eager to experiment in the kitchen.

    One of the best things about this salad is its versatility. You can easily customize it to fit a range of dietary needs, whether you are vegan, gluten-free, or simply looking to incorporate more vegetables into your diet. In under 30 minutes, you can whip up a bright, colorful salad that’s perfect for weekdays, picnics, or even as a side dish at gatherings. Packed with fresh ingredients, this recipe highlights the importance of wholesome foods while still allowing for a touch of indulgence with the addition of crispy Fritos—making every bite a treat.

    Prepare to dive into a recipe that will not just satisfy your taste buds but will also inspire you to embrace healthier eating habits. Let’s explore the remarkable benefits and advantages of the Easy Frito Cowboy Cabbage Salad Recipe!

    Benefits and Advantages of Easy Frito Cowboy Cabbage Salad Recipe

    The Easy Frito Cowboy Cabbage Salad Recipe is more than just a salad; it’s a culinary experience that offers numerous benefits, making it an ideal choice for those searching for easy dinner recipes. Here are several compelling reasons why this recipe stands out:

    1. Ease of Preparation: The simplicity of this recipe cannot be overstated. Within just a few quick steps, you can have a vibrant salad ready to serve. Perfect for novice cooks or those who want to whip up a meal without spending hours in the kitchen. With minimal chopping and mixing, you’re well on your way to a delicious meal.

    2. Health Benefits: This salad is predominantly made with fresh cabbage, a fantastic source of vitamins K and C, as well as fiber. Incorporating fiber-rich foods into your diet can promote digestive health and help you feel full longer. Plus, cabbage is low in calories, making it a fantastic option for those watching their weight.

    3. Dietary Versatility: The Easy Frito Cowboy Cabbage Salad Recipe is naturally gluten-free, and with simple substitutions, you can make it vegan and low-calorie. For instance, you can opt for a dairy-free dressing and skip the traditional cheese toppings, ensuring that everyone can enjoy this dish regardless of their dietary restrictions.

    4. Family-Friendly: This recipe is a hit with both adults and kids, meaning that even picky eaters can find something to love. The crunchy Fritos add an element of fun that children will adore, encouraging them to try new vegetables.

    5. Great for Meal Prep: This salad holds up well when stored, making it an excellent candidate for meal prepping. You can make a big batch at the beginning of the week and enjoy it for lunches or dinners, giving you delicious meals when you’re short on time.

    6. Perfect for Social Gatherings: Whether it’s a barbecue, family reunion, or potluck, this Easy Frito Cowboy Cabbage Salad Recipe will be a crowd-pleaser. It’s visually appealing and packed with flavor, making it a great dish to share and enjoy with others.

    These benefits make this salad not just an easy dinner option but a delightful and practical choice for anyone looking to enhance their mealtime without sacrificing flavor or nutrition.

    Ingredients Overview

    Essential Ingredients for Easy Frito Cowboy Cabbage Salad Recipe

    To make the Easy Frito Cowboy Cabbage Salad, you’ll need the following ingredients:

    • 4 cups of shredded green cabbage: The base of the salad, providing essential vitamins and fiber.
    • 1 cup of shredded carrots: Adds a splash of color and sweetness while contributing nutritional value.
    • 1 cup of halved cherry tomatoes: For juiciness and freshness; you can use diced regular tomatoes if preferred.
    • 1/2 cup of diced red onion: Adds a sharp flavor that complements the other ingredients; you can reduce or omit based on taste preferences.
    • 1 1/2 cups of Fritos corn chips: The crunchy element that brings everything together. This could be replaced with any gluten-free crispy snacks.

    Dressing Ingredients

    • 1 cup of ranch dressing: A creamy dressing that ties all the flavors together. Alternatively, you can use a vegan ranch dressing for a plant-based option.
    • 1 tablespoon of apple cider vinegar: Provides a tangy kick that enhances the salad’s overall flavor.
    • Salt and pepper: To taste, balancing the flavors without overpowering the fresh ingredients.

    Dietary Substitutions to Customize Your Easy Frito Cowboy Cabbage Salad Recipe

    Customization is key when considering dietary needs. Here are some substitutions:

    • Vegan: Replace ranch dressing with a dairy-free ranch or tahini-based dressing. Ensure your Fritos or any crunchy ingredient used is also vegan.
    • Gluten-Free: Ensure that any added ingredients, such as the Fritos or dressings, are certified gluten-free.
    • Low-Calorie: Use a light version of ranch dressing or substitute it with a vinaigrette made from olive oil and vinegar to cut calories while still retaining flavor.
    • Low-Carb: Swap Fritos with a crunchy seed mix or almond flakes to reduce carbohydrate content.
    • Additional Protein: Add black beans or chickpeas for extra protein, ideal for those looking to make it a more filling meal.

    By tailoring the ingredients to fit specific dietary requirements, you can make the Easy Frito Cowboy Cabbage Salad a versatile and enjoyable dish for everyone at your table.

    How to Prepare the Perfect Easy Frito Cowboy Cabbage Salad Recipe: Step-by-Step Guide

    Ready to create a refreshing Easy Frito Cowboy Cabbage Salad? Follow these step-by-step instructions. Let’s dive right into this easy dinner recipe!

    1. Prepare the Base: Start by washing your heads of cabbage and then removing the outer leaves. Slice the cabbage in half, then shred it finely. Place the shredded cabbage into a large mixing bowl.

    2. Chop the Vegetables: Next, take your carrots and either use a grater or a knife to shred them finely. Halve the cherry tomatoes and dice the red onion. Add these to the bowl with the cabbage.

    3. Mix Ingredients: Gently toss together the cabbage, carrots, tomatoes, and onion until evenly combined. The colors should be visually appealing, resembling a rainbow of fresh vegetables.

    4. Prepare the Dressing: In a smaller bowl, combine the ranch dressing with the apple cider vinegar. Stir well to ensure it’s mixed thoroughly, adjusting salt and pepper to taste. You want a tangy, flavorful dressing that will complement your salad ingredients.

    5. Combine Dressing and Salad: Pour the dressing over the cabbage and vegetable mixture. Toss gently. Ensure every vegetable piece gets a hug from the dressing, enhancing the flavor.

    6. Add the Fritos: Just before serving, sprinkle the Fritos on top. This keeps them crunchy. If you’re preparing the salad for a gathering or meal prep, store the Fritos separately and add them just before serving.

    7. Taste and Adjust: Before serving, taste the overall salad. Adjust the salt, pepper, or dressing if necessary.

    8. Serve and Enjoy: Serve the Easy Frito Cowboy Cabbage Salad immediately or transfer it into an attractive bowl for serving.

    Tips for Customization During Preparation

    • You can include various herbs for extra flavor, such as cilantro or parsley.
    • For a spicier kick, consider adding jalapeños or a few dashes of hot sauce to the dressing.

    Completing your salad will be a breeze, as preparation takes less than 30 minutes. It’s an “easy dinner recipe” that you will want to repeat!

    Mastering Easy Frito Cowboy Cabbage Salad Recipe: Advanced Tips and Variations

    To truly master the Easy Frito Cowboy Cabbage Salad, consider these advanced tips and variations that can elevate the dish from a simple salad to a signature recipe!

    1. Add Protein: Incorporate shredded rotisserie chicken, grilled shrimp, or tofu for an added protein boost. This creates a more filling meal, making it great for lunch or dinner.

    2. Spice It Up: Experiment with different dressings. For instance, a spicy chipotle ranch dressing can give your salad a smoky flavor. Alternatively, a light lemon vinaigrette can add brightness.

    3. Seasonal Vegetables: Use seasonal vegetables to keep the dish fresh and aligned with local produce availability. Adding corn in summer or diced bell peppers can enhance flavors and textures.

    4. Change the Crunch: Instead of Fritos, try crushed taco-flavored corn chips or even roasted chickpeas for a lower-calorie crunch.

    5. Herb Variations: Fresh herbs can completely transform the flavor profile. Consider adding basil, dill, or mint to introduce new flavor notes into your salad.

    6. Try a Layered Approach: For an impressive presentation, consider layering ingredients in a clear glass bowl. Begin with cabbage at the bottom, followed by carrots, tomatoes, onion, and finally, sprinkle the Fritos on top.

    These variations not only keep the salad intriguing but also allow you to adapt to seasonal changes and personal tastes.

    How to Store Easy Frito Cowboy Cabbage Salad Recipe: Best Practices

    To ensure the freshness of your Easy Frito Cowboy Cabbage Salad Recipe, proper storage is essential, especially if you’ve made a larger portion.

    1. Refrigeration: Store leftover salad in a sealed container in the refrigerator. Try to keep the Fritos separate to maintain their crunchy texture. The salad will last about 3-4 days when stored properly.

    2. Freezing: While freezing is not recommended for this salad due to the high water content in the cabbage and dressing, you can freeze the dressing separately.

    3. Reheating: If you choose to add a protein that requires reheating, ensure it’s warmed separately and then layered back into the fresh salad just before serving.

    By following these storage practices, you can enjoy your Easy Frito Cowboy Cabbage Salad for days while retaining its crispness and flavor.

    Nutritional Value of Easy Frito Cowboy Cabbage Salad Recipe

    Understanding the nutritional value of your meals is essential, especially when focusing on healthy eating. The Easy Frito Cowboy Cabbage Salad is not only satisfying but also packs quite the nutritious punch. Here’s a breakdown:

    • Serving Size: 1 cup of salad (without Fritos)
    • Calories: Approximately 150 calories
    • Protein: 3g
    • Fat: 10g (includes dressing)
    • Carbohydrates: 15g
    • Fiber: 4g
    • Sugar: 2g
    • Iron: 2% of Daily Value
    • Vitamin A: 25% of Daily Value
    • Vitamin C: 35% of Daily Value

    (Nutritional values can vary based on specific ingredients used, so consider this a general guideline.)

    The nutrients from cabbage, carrots, and other vegetables make this salad a healthful addition to any meal. Coupled with the protein and fiber, it provides a wholesome option for those exploring easy dinner recipes while prioritizing their health.

    FAQs: Frequently Asked Questions About Easy Frito Cowboy Cabbage Salad Recipe

    As you explore the Easy Frito Cowboy Cabbage Salad Recipe, here are some common questions that may arise, along with helpful answers:

    Q: Can I make the salad ahead of time?
    A: Yes! To keep the vegetables crisp, it’s best to prepare the salad a few hours ahead. However, store the Fritos and dressing separately and add them just before serving.

    Q: What If I don’t have ranch dressing?
    A: No problem! Substitute with any creamy dressing or a vinaigrette. You can even make a simple lemon vinaigrette using olive oil and lemon juice.

    Q: Is there a way to make this salad ahead for meal prep?
    A: Absolutely. You can chop veggies and store them in the fridge for a few days. For meal prep, combine each portion in meal containers without the dressing and Fritos until you’re ready to eat.

    Q: Can I omit the Fritos for a healthier option?
    A: Yes, feel free to leave out the Fritos if you prefer a lower-calorie dish. For crunch, consider roasted chickpeas or sunflower seeds instead.

    Q: How long does the salad stay fresh in the fridge?
    A: When stored in an airtight container, the salad lasts about 3-4 days, but it’s best enjoyed within the first two days for optimal freshness.

    With these tips and tricks, you’ll be fully equipped to create, enjoy, and share the Easy Frito Cowboy Cabbage Salad Recipe, making it a staple in your collection of easy dinner recipes. Enjoy the blend of flavors, and above all, have fun creating this light and refreshing dish!

  • My FamilyS Secret Deviled Egg Recipe Is Incredible

    My FamilyS Secret Deviled Egg Recipe Is Incredible

    My Family’S Secret Deviled Egg Recipe Is Incredible!: A Tropical Delight

    Introduction to My Family’S Secret Deviled Egg Recipe Is Incredible!

    Welcome to a taste experience that will elevate your gatherings and impress your guests. My family’s secret deviled egg recipe is not just any ordinary dish; it’s an incredible appetizer that brings a burst of tropical flavor while being deeply rooted in tradition. These egg delights are not only simple to prepare but are also adaptable to suit various dietary needs, including vegan and gluten-free options.

    Deviled eggs are a timeless classic in the realm of appetizer recipes, yet our family’s unique twist transforms the ordinary into the extraordinary. With its creamy filling balanced by a hint of spice and a touch of sweetness, this recipe is sure to become an essential part of your culinary repertoire. Not only do these deviled eggs please the palate, but they also offer a healthy snack packed with protein and essential nutrients.

    Whether you’re a busy parent looking for quick snack ideas, a food enthusiast eager to try new flavors, or a newlywed exploring culinary traditions, this recipe is perfect for you. It’s quick to whip up, making it an ideal choice for impromptu gatherings and special occasions alike. Join me as I share my family’s secret deviled egg recipe and discover why it’s an incredible addition to both your appetizer recipes collection and your heart.

    Benefits and Advantages of My Family’S Secret Deviled Egg Recipe Is Incredible!

    Here’s why my family’s deviled egg recipe is particularly special and beneficial:

    Ease of Preparation

    This recipe is remarkably straightforward, allowing even novice cooks to shine in the kitchen. With just a few simple steps, you can create a delightful dish that requires minimal effort yet yields impressive results. You don’t need to be a culinary expert; just follow the outlined instructions to create a masterpiece.

    Health Benefits

    Deviled eggs are a classic example of a healthy snack that doesn’t compromise on taste. Eggs are an excellent source of protein, providing essential amino acids necessary for muscle repair and growth. They are also rich in vitamins B6, B12, and D, along with choline, a nutrient that contributes to brain health. For families or anyone following a diet-conscious lifestyle, incorporating this protein-rich snack can lead to positive health outcomes.

    Dietary Flexibility

    One of the most notable advantages of this recipe is its versatility. With minor adjustments, it can cater to various dietary needs, including vegan and gluten-free versions. By swapping traditional ingredients with alternatives, everyone can enjoy this incredible dish, regardless of their dietary restrictions. This makes it a superb choice for potlucks, holiday gatherings, or any event where diverse dietary needs arise.

    In summary, the simplicity of preparation, substantial health benefits, and adaptability for various diets are just a few reasons why my family’s secret deviled egg recipe stands out. The next section will explore the essential ingredients that make this dish so remarkable.

    Ingredients Overview

    Essential Ingredients for My Family’S Secret Deviled Egg Recipe Is Incredible!

    To create this incredible deviled egg dish, you will need the following ingredients:

    1. Eggs (6 large): The foundation of your deviled eggs, providing the rich and creamy texture everyone loves.

    2. Mayonnaise (1/4 cup): This adds creaminess and richness to the filling. For a lighter version, use Greek yogurt or a vegan mayonnaise alternative.

    3. Dijon Mustard (2 tablespoons): Provides a delightful tangy kick that elevates the flavor profile. Feel free to substitute with yellow mustard if preferred.

    4. Apple Cider Vinegar (1 teaspoon): A splash adds acidity to balance the fat from the mayo and eggs.

    5. Salt (to taste): Enhances all the flavors, making each bite enjoyable.

    6. Black Pepper (to taste): A sprinkle of this spice gives a touch of heat.

    7. Paprika (for garnish): Adds a pop of color and mild flavor. Smoked paprika can be used for a smoky twist.

    8. Chives (optional, for garnish): Fresh herbs can brighten up the dish and add a layer of flavor.

    Special Dietary Considerations

    • Vegan Option: Substitute traditional mayonnaise with a vegan mayonnaise and add more seasonings or plant-based yogurt to mimic the creaminess.
    • Gluten-Free: All ingredients listed are naturally gluten-free, making this dish suitable for gluten-sensitive individuals.
    • Low-Calorie Option: Opt for low-fat mayonnaise or Greek yogurt to reduce calorie count while maintaining flavor.

    Dietary Substitutions to Customize Your My Family’S Secret Deviled Egg Recipe Is Incredible!

    For those looking to customize this recipe further, here are some substitutions that cater to various dietary preferences:

    1. Egg-Free Alternative: You can create a chickpea salad mixture (mashed chickpeas, mayo, mustard, and spices) to serve as a delightful, eggless option for vegans.

    2. For Keto Dieters: Reduce the mayonnaise and focus on adding avocado to keep the creaminess while adhering to low-carb guidelines.

    3. Spicy Alternative: If you enjoy a bit of heat, add diced jalapeños or a dash of hot sauce to the filling for an extra kick.

    4. Herb Variations: Substitute chives with other fresh herbs like dill or parsley for a different flavor profile.

    We now have a solid foundation for our incredible deviled eggs. Let’s dive into the preparation process!

    How to Prepare the Perfect My Family’S Secret Deviled Egg Recipe Is Incredible!: Step-by-Step Guide

    Creating these amazing deviled eggs is easier than you might think. Let’s go through the steps to ensure you master this incredible appetizer.

    1. Prepare the Eggs:
    2. Place your six large eggs in a saucepan and cover them with cold water (about an inch above the eggs).
    3. Bring the water to a boil over medium-high heat. Once boiling, cover the pan and remove it from heat.
    4. Let the eggs sit covered for about 12-15 minutes.

    5. Cool the Eggs:

    6. After the timer goes off, transfer the eggs to an ice bath (a bowl filled with ice and cold water) for about 5-10 minutes. This stops the cooking process and makes peeling easier.

    7. Peel the Eggs:

    8. Once cooled, gently tap each egg on a hard surface and roll it between your hands to loosen the shell. Begin peeling from the wider end, where there’s usually an air pocket.

    9. Slice the Eggs:

    10. Using a sharp knife, slice each egg in half lengthwise. Gently scoop out the yolks into a mixing bowl and place the egg whites on a serving platter.

    11. Mix Ingredients:

    12. Add to the yolks the mayonnaise, Dijon mustard, apple cider vinegar, salt, and black pepper. Mix until smooth and creamy. For a fun twist, you can incorporate components like spices or herbs at this stage to elevate the dish further.

    13. Fill the Egg Whites:

    14. Using a spoon or an icing bag, fill each egg white half with the yolk mixture. If you wish for an aesthetically pleasing garnishing, consider using a piping bag for an elegant touch.

    15. Garnish as Desired:

    16. Lightly dust the filled deviled eggs with paprika and sprinkle with fresh chives or your preferred herbs.

    17. Chill Before Serving:

    18. For the best flavor, cover and refrigerate the deviled eggs for at least an hour before serving. This allows the flavors to meld and ensures a refreshing experience.

    And there you have it—your beautiful and incredible deviled eggs ready to amaze everyone!

    Mastering My Family’S Secret Deviled Egg Recipe Is Incredible!: Advanced Tips and Variations

    To ensure your deviled eggs are perfect every time and leave an impression on your guests, consider these additional tips and variations:

    1. Try Different Flavors:

    • Curry Deviled Eggs: Stir in curry powder into the yolk mixture for a unique twist.
    • Avocado Deviled Eggs: Replace half of the mayonnaise with ripe mashed avocado for a creamy, nutrient-rich filling.

    2. Make It Zesty:

    • Consider incorporating citrus zest (like lemon or lime) to add vibrant flavor to the filling.

    3. Experiment with Toppings:

    • Add pickled jalapeños, crispy bacon bits, or even a drizzle of sriracha for flavor bursts that will thrill your taste buds.

    4. Plating:

    • Display your deviled eggs on a decorative platter, garnished with greens to elevate the presentation. This adds an enticing visual element that will impress your guests.

    By applying these tips, anyone can elevate their culinary game with this classic dish, transforming it into a gourmet delight worthy of any occasion.

    How to Store My Family’S Secret Deviled Egg Recipe Is Incredible!: Best Practices

    To keep your incredible deviled eggs tasting fresh and delicious, follow these storage practices:

    1. Refrigeration:
    2. Store leftover deviled eggs in an airtight container in the refrigerator for up to three days. They are best enjoyed fresh but will hold up well for a short period.

    3. Freezing:

    4. Freezing is not recommended for deviled eggs, as the texture of the egg whites may become worse once thawed. If you do have egg yolk filling leftover, it can be frozen in a sealed container and used later with fresh egg whites.

    5. Reheating:

    6. If you wish to serve them warm, you can allow the eggs to come to room temperature first and then lightly warm them in the oven at a low temperature for about 5-10 minutes.

    Following these guidelines will ensure you maintain the best flavor and quality of this incredible appetizer recipe.

    Nutritional Value of My Family’S Secret Deviled Egg Recipe Is Incredible!

    In terms of nutrition, deviled eggs are a powerhouse of wholesome ingredients. Below is the estimated nutritional breakdown per serving (about 2 halves of a standard deviled egg):

    • Calories: 75-85
    • Protein: 6 grams
    • Total Fat: 5-6 grams
    • Saturated Fat: 1-2 grams
    • Cholesterol: 186 mg
    • Carbohydrates: 1-2 grams
    • Dietary Fiber: 0 grams
    • Sugars: 0 grams
    • Vitamin A: 5% of the Daily Value (DV)
    • Vitamin B12: 10% of the DV
    • Vitamin D: 7% of the DV
    • Calcium: 1% of the DV
    • Iron: 2% of the DV

    These nutritional values may vary depending on specific ingredients used, particularly if alternative or low-fat ingredients are chosen. Deviled eggs provide a complex of nutrients that contribute to overall health, making them an excellent choice for those focused on balanced eating.

    FAQs: Frequently Asked Questions About My Family’S Secret Deviled Egg Recipe Is Incredible!

    1. Can I use egg white substitutes for a lower cholesterol version?

    Yes, you can create a filling using a chickpea salad or egg white substitutes for those needing cholesterol management while still enjoying the delicious flavor.

    2. How do I make my deviled eggs spicy?

    Add chili powder, diced jalapeños, or a dash of sriracha to the yolk mixture to incorporate some heat.

    3. Can I prepare deviled eggs in advance?

    Definitely! Deviled eggs can be prepared a day ahead and stored in the refrigerator. Just remember they taste best the day they’re made.

    4. What can I serve with my deviled eggs?

    Deviled eggs pair wonderfully with a variety of sides such as fresh veggies, crackers, or assorted cheeses. Consider offering a selection for dipping and munching.

    5. Can I use flavored mayonnaise?

    Using flavored mayonnaise can add an extra layer of uniqueness to your deviled eggs, so feel free to experiment with varieties.

    These FAQs aim to address common concerns and offer clarity on various aspects of creating and enjoying my family’s secret deviled egg recipe.


    Feel inspired yet? This simple yet incredible deviled egg recipe is sure to become a staple in your home. Whether you prepare them for family gatherings, special occasions, or simply as a nutritious snack, you’ll feel the joy that comes from sharing such a delightful dish! Enjoy your cooking adventure!

  • Easy Deviled Eggs With Cottage Cheese

    Easy Deviled Eggs With Cottage Cheese

    Easy Deviled Eggs With Cottage Cheese: A Tropical Delight

    Introduction to Easy Deviled Eggs With Cottage Cheese

    Looking for a simple yet satisfying addition to your appetizer recipes arsenal? Look no further than Easy Deviled Eggs With Cottage Cheese! These impeccable snacks bring together the classic flavor of deviled eggs with the creamy nourishment of cottage cheese. Perfect for any occasion—from family gatherings to picnics—these eggs are not only delicious but also cater to various dietary needs.

    What sets this recipe apart is its simplicity: In under 30 minutes, you can whip up a fresh batch that’s sure to impress guests and family alike. Better still, this dish is health-conscious, ensuring you can indulge without the guilt. High in protein and low in fat, the inclusion of cottage cheese lends a creamy texture and richness while also boosting the nutritional profile. Plus, this recipe is naturally gluten-free and can be adapted as a vegan option by using plant-based cottage cheese alternatives.

    So whether you’re a busy parent looking for quick yet nutritious snacks for the kids, a student preparing for a gathering, or simply someone who loves cooking, this deviled egg recipe is your ticket to an easy and flavorful dish. Let’s dive deeper into why our Easy Deviled Eggs With Cottage Cheese stand out and how you can master them in your own kitchen.

    Benefits and Advantages of Easy Deviled Eggs With Cottage Cheese

    When it comes to appetizer recipes, Easy Deviled Eggs With Cottage Cheese shine in various ways. Here are some of the standout attributes that make them a favorite among home cooks and food lovers alike:

    1. Ease of Preparation: You don’t need to be a culinary expert to prepare these deviled eggs. The recipe entails a few straightforward steps that anyone can follow, making it accessible for all cooking skills. Busy parents and working professionals will appreciate how quickly this dish comes together.

    2. Health Benefits: Cottage cheese is often praised for its nutrition. It’s rich in protein, which is essential for muscle building and repair. Additionally, it is lower in fat than traditional mayonnaise often used in deviled egg recipes. This makes it a wise choice for health-conscious individuals looking to maintain a balanced diet or shed some extra pounds.

    3. Versatile Ingredient: This dish can be modified to meet various dietary preferences. If you’re vegan, consider using a plant-based alternative to cottage cheese. For those with specific allergies or dietary restrictions (like gluten intolerance), you have peace of mind knowing that these deviled eggs fit seamlessly within those needs.

    4. Flavorful and Satisfying: Thanks to the addition of cottage cheese, the flavor profile is rich and satisfying. You can easily customize it with your preferred spices, herbs, or even a touch of hot sauce for an extra kick. This ability to personalize your dish makes it appealing for every palate.

    5. Aesthetic Appeal: Deviled eggs are visually delighting, often becoming the centerpiece of any appetizer spread. Using cottage cheese allows for a unique presentation while still keeping the classic look of deviled eggs, often adorned with colorful toppings like herbs or paprika.

    With these advantages in mind, Easy Deviled Eggs With Cottage Cheese offer a delicious and healthy choice for any gathering, meal prep, or casual snack. Now that you see the benefits, let’s look at the essential ingredients that make this dish a breeze to create.

    Ingredients Overview

    Essential Ingredients for Easy Deviled Eggs With Cottage Cheese

    For a delightful batch of Easy Deviled Eggs With Cottage Cheese, the following ingredients are required:

    1. 6 Large Eggs: Eggs are the base of this dish; they provide protein and a rich flavor.

    2. 1/2 Cup Cottage Cheese: This ingredient not only adds creaminess but also contributes to the health quotient. Opt for low-fat varieties to reduce the calorie count, or explore lactose-free options if needed.

    3. 2 Tbsp Mayonnaise: While optional, a little mayonnaise can help bind the ingredients and add richness. You can use vegan mayonnaise if you wish for a dairy-free version.

    4. 1 Tsp Dijon Mustard: This adds a zesty tang to the filling. Adjust the amount based on your taste preferences for a stronger or milder flavor.

    5. Salt and Pepper to Taste: Basic seasonings to enhance all the flavors in the dish.

    6. Optional Spices: Consider adding paprika, chives, or dill for an extra punch of flavor. These are particularly great for someone wanting to take their appetizer recipes up a notch.

    7. Garnish: Fresh herbs, paprika, or even sliced olives can elevate the presentation of your deviled eggs.

    Dietary Substitutions to Customize Your Easy Deviled Eggs With Cottage Cheese

    Customizing your Easy Deviled Eggs With Cottage Cheese to accommodate various dietary needs can be simple. Here are some substitutions and alternatives to consider:

    • Vegan Version: Replace the cottage cheese with a vegan cheese spread or tofu blended until smooth. Likewise, opt for plant-based mayonnaise and ensure all ingredients such as mustard are free from animal products.

    • Gluten-Free: Luckily, this recipe is naturally gluten-free, as most of its primary ingredients, such as eggs and cottage cheese, do not contain gluten. Just ensure any additional toppings or garnishes meet gluten-free standards.

    • Low-Calorie Option: Choose a reduced-fat cottage cheese and mayonnaise to lower the calorie count. You can also limit the use of mayonnaise altogether to keep it lighter.

    • Flavored Variations: You can experiment with different ingredients based on seasonal availability or personal preferences. For example, incorporating avocado can add healthy fats and creaminess, while fresh herbs can enhance the dish’s fragrance and flavor.

    Armed with the proper substitutions and ingredient options, you’re on your way to creating your perfect version of Easy Deviled Eggs With Cottage Cheese!

    How to Prepare the Perfect Easy Deviled Eggs With Cottage Cheese: Step-by-Step Guide

    Now that you have your ingredients sorted out, it’s time to dive into the preparation process with our detailed step-by-step guide. Follow these easy instructions to make the perfect batch of Easy Deviled Eggs With Cottage Cheese:

    1. Boil the Eggs: Place the large eggs in a saucepan and cover them with cold water. Bring the water to a boil over medium-high heat. Once boiling, cover the pot with a lid, remove it from the heat, and let it sit for about 12-15 minutes. This method creates hard-boiled eggs with a perfectly cooked yolk.

    2. Cool the Eggs: Carefully transfer the boiled eggs to a bowl of ice water or run cold water over them in the sink. Let the eggs cool for about 10 minutes. This step makes peeling much easier.

    3. Peel the Eggs: Once the eggs have cooled, gently tap each egg on a hard surface to crack the shell, then roll it between your hands to loosen the shell. Peel under running water if it helps. Cut each egg in half lengthwise.

    4. Prepare the Filling: Remove the yolks from the egg halves and place them in a mixing bowl. Add the cottage cheese, mayonnaise (if using), Dijon mustard, salt, and pepper. Mash the mixture together with a fork until smooth. For a creamier texture, you can blend this mixture with an immersion blender.

    5. Taste and Adjust: Give your mixture a taste! Depending on your personal preference, you might want to add more salt, pepper, or mustard. If you enjoy a spicy kick, consider adding hot sauce or cayenne pepper.

    6. Fill the Egg Whites: Using a spoon or piping bag, generously fill the egg white halves with the cottage cheese mixture. Be generous—you want every bite to be delicious!

    7. Garnish: Finish preparing your deviled eggs with a sprinkle of paprika, fresh herbs, or any additional toppings you desire. A bit of diced chives can add a fresh crunch, while smoked paprika offers a smokey flavor.

    8. Chill: For the best flavor, place the prepared deviled eggs in the refrigerator for at least 30 minutes prior to serving. This allows the flavors to meld wonderfully.

    9. Serve: Arrange your deviled eggs on a platter and enjoy this delectable addition to your appetizer recipes!

    Congratulations! You’ve just made Easy Deviled Eggs With Cottage Cheese. This dish is perfect for entertaining or simply enjoying as a snack. Feel free to explore different variations and spices as your taste buds guide you.

    Mastering Easy Deviled Eggs With Cottage Cheese: Advanced Tips and Variations

    To really achieve perfection with your Easy Deviled Eggs With Cottage Cheese, consider the following advanced tips:

    1. Flavor Enhancements: Don’t shy away from experimenting with flavored cottage cheese options. Brands often offer variations with herbs or spices that can elevate your filling even further.

    2. Mixing Techniques: For a super smooth filling, you can use a food processor instead of a fork for mixing the ingredients. This can help achieve an ultra-creamy consistency that is perfect for piping.

    3. Innovative Toppings: Instead of traditional garnishes, try topping your deviled eggs with bacon bits, pickled jalapeños, or even a sprinkle of truffle oil for a gourmet touch.

    4. Sharing is Caring: If serving at a party, consider preparing a few different variations such as a classic, one with spices, and maybe another with a hint of curry powder. Having a variety can cater to different tastes and take your appetizer recipes to the next level.

    5. Taking Them on the Go: For picnic or travel-friendly versions, place your filled egg whites in a container and keep the filling separate until serving. Fill them right before eating to keep them fresh.

    By using these advanced techniques, not only will you impress your family and friends, but you’ll also develop your own signature touch to your Easy Deviled Eggs With Cottage Cheese.

    How to Store Easy Deviled Eggs With Cottage Cheese: Best Practices

    Sometimes, you might end up with leftover Easy Deviled Eggs With Cottage Cheese, and that is perfectly okay! Here’s how to store them effectively:

    1. Refrigeration: Store your deviled eggs in an airtight container in the refrigerator. They are best consumed within 2-3 days for optimal freshness and flavor. Be sure to cover them if they are opened to prevent them from absorbing any unwanted odors from your fridge.

    2. Freezing Not Recommended: Unfortunately, freezing deviled eggs isn’t recommended. The texture of both the eggs and cottage cheese will be affected once thawed, resulting in a less-than-desirable consistency.

    3. Reheating: If you have leftover filling but no egg whites, you can use the leftover mixture in sandwiches, wraps, or on crackers as a tasty spread.

    By ensuring proper storage, you can extend the enjoyment of your Easy Deviled Eggs With Cottage Cheese!

    Nutritional Value of Easy Deviled Eggs With Cottage Cheese

    One of the most appealing aspects of Easy Deviled Eggs With Cottage Cheese is their nutritional value. Let’s take a look at the typical nutritional breakdown for one serving (of two filled egg halves):

    • Calories: ~120 calories
    • Protein: ~10g
    • Carbohydrates: ~2g
    • Fat: ~8g (depending on the fat content of the cottage cheese and mayonnaise)
    • Fiber: 0g
    • Cholesterol: ~186mg

    This makes deviled eggs an excellent snack option that is protein-rich and low in carbohydrates, perfect for those following a keto or low-carb diet. It’s also worth noting the high calcium content from cottage cheese, crucial for bone health.

    For those who wish to better understand the benefits of their food, use this nutritional breakdown to inform your meal planning and enjoy your deviled eggs guilt-free!

    FAQs: Frequently Asked Questions About Easy Deviled Eggs With Cottage Cheese

    1. Can I make these deviled eggs ahead of time?

    Absolutely! You can prepare Easy Deviled Eggs With Cottage Cheese a day in advance. Store them in an airtight container in the refrigerator until serving for the best flavor.

    2. Can I substitute the cottage cheese with other ingredients?

    Yes, you can substitute cottage cheese with other alternatives such as Greek yogurt, mashed avocado, or vegan cheese spread depending on your dietary preference.

    3. How can I make my deviled eggs spicier?

    To add spice, include cayenne pepper or diced jalapeños in the filling mixture. A splash of hot sauce can also enhance the heat level if you’re a fan of spice!

    4. What are some creative toppings I can use?

    Try options like crispy bacon bits, a drizzle of sriracha, fresh herbs, or even crumbled feta cheese. The sky’s the limit when it comes to garnishing!

    5. Is this recipe suitable for a gluten-free diet?

    Yes, this recipe is naturally gluten-free! Just ensure that any additional toppings or ingredients you use are also gluten-free.

    6. How can I change the servings for larger gatherings?

    Simply double or triple the recipe according to your needs. Keep in mind that having a variety of flavors allows for a delightful appetizer spread!

    By addressing these commonly asked questions, we hope to encourage more home cooks to try their hand at this delicious and healthy appetizer. Enjoy your culinary adventures with Easy Deviled Eggs With Cottage Cheese, and share your creations with friends and family!

  • Perfect Creamy Potato Salad With Eggs

    Perfect Creamy Potato Salad With Eggs

    Perfect Creamy Potato Salad With Eggs: A Tropical Delight

    Introduction to Perfect Creamy Potato Salad With Eggs

    Welcome to the world of delightful recipe ideas, where creamy textures and robust flavors collide! One such recipe that stands out is our Perfect Creamy Potato Salad With Eggs. This dish not only showcases the classic elements of a potato salad but elevates it with the addition of hard-boiled eggs, making it richer and more satisfying.

    What makes this potato salad so special? First and foremost, it’s incredibly simple to prepare, leaving you with more time to enjoy moments with family and friends. The salad is also adaptable; it can easily cater to various dietary needs, including options for vegetarian and gluten-free lifestyles.

    Moreover, potatoes are packed with nutrients like potassium and vitamin C, while eggs add a boost of protein, making this dish both filling and nutritious. This potato salad makes a perfect side dish for any gathering, picnic, or barbecue, but can also stand proudly on its own as a light meal.

    So, why not dive into this Perfect Creamy Potato Salad With Eggs, which promises to not only satisfy your cravings but also inspire you to experiment with other healthy recipe ideas?

    Benefits and Advantages of Perfect Creamy Potato Salad With Eggs

    When searching for recipe ideas, it’s essential to consider the ease of preparation, health benefits, and adaptability of the dish. The Perfect Creamy Potato Salad With Eggs ticks all these boxes effortlessly.

    1. Ease of Preparation

    One of the most significant advantages is how straightforward this recipe is. With minimal cooking skills required, even novice cooks can whip it up in under an hour. The ingredients are basic and commonly found in most kitchens, so you won’t have to scour specialty stores to gather them.

    2. Health Benefits

    Potatoes are often misconceived as unhealthy, but they are actually a nutrient-rich food. They are an excellent source of complex carbohydrates and provide fiber, helping promote digestion. Coupled with eggs, this potato salad turns into a protein powerhouse. The recipe can also be made healthier by utilizing yogurt instead of mayonnaise, making it lighter without compromising flavor.

    3. Dietary Versatility

    This potato salad can cater to various dietary needs with a few simple modifications. For instance, you can prepare a vegan version by substituting eggs and traditional mayo with alternatives like vegan mayonnaise and tofu. Gluten-free? No problem! Simply ensure your mayonnaise or dressing is certified gluten-free. The adaptability of this recipe makes it an ideal choice for family gatherings where guests might have different dietary preferences.

    4. Perfect for Any Occasion

    Whether it’s a summertime cookout, holiday gathering, or a packed lunch for the week ahead, this creamy potato salad fits the bill. It is versatile enough to accompany grilled meats, serve as a side for sandwiches, or even be enjoyed on its own.

    In summary, the Perfect Creamy Potato Salad With Eggs is not just a dish but an experience filled with flavor, health benefits, and adaptability, making it a go-to in your collection of satisfying recipe ideas.

    Ingredients Overview

    Essential Ingredients for Perfect Creamy Potato Salad With Eggs

    • 2 pounds of potatoes (Yukon Gold or red potatoes are ideal)
    • 4 large eggs
    • 1 cup Greek yogurt or mayonnaise (can be substituted with vegan mayo for a plant-based option)
    • 2 tablespoons Dijon mustard
    • 1 tablespoon apple cider vinegar (add a touch of tanginess)
    • 1 teaspoon sugar (to enhance flavors)
    • 1 teaspoon salt (more to taste)
    • ½ teaspoon black pepper
    • 1 cup diced celery (for crunch)
    • 1 cup diced red onion (adds color and sharpness)
    • ¼ cup chopped fresh parsley (for a fresh finish)
    • Optional: paprika or dill for garnish

    Dietary Substitutions to Customize Your Perfect Creamy Potato Salad With Eggs

    1. Egg Replacement: For those looking to enjoy a vegan variation, tofu or chickpeas can substitute eggs. Just use mashed tofu to replicate the texture, or toss in some chickpeas for added protein.

    2. Dairy-Free Options: If you’re lactose intolerant, Greek yogurt can be replaced with a dairy-free yogurt alternative or a blend of blended silken tofu with lemon juice to create a creamy consistency.

    3. Gluten-Free Adaptations: This recipe is naturally gluten-free as most ingredients, including potatoes, eggs, and authentic mayonnaise, do not contain gluten. However, ensure that any pre-packaged items like mustard or dressing are certified gluten-free for complete peace of mind.

    4. Flavor Variations: You can spice things up by adding roasted garlic, dill, or chopped pickles. For an extra kick, consider incorporating jalapeños or hot sauce, making it a truly unique dish rich in flavor.

    By understanding the ingredient benefits and substitutions available, you’re well-equipped to create your own Perfect Creamy Potato Salad With Eggs, tailored to your taste and dietary preferences.

    How to Prepare the Perfect Creamy Potato Salad With Eggs: Step-by-Step Guide

    Now that you have gathered all your ingredients, let’s get started on preparing this delectable dish! Follow these straightforward steps to make the Perfect Creamy Potato Salad With Eggs. Don’t forget, this section offers some excellent recipe ideas about how to customize the dish!

    1. Prepare the Base: Begin by cleaning 2 pounds of potatoes under running water to remove any dirt. Peel if desired, but I recommend leaving the skin on for extra fiber. Cut them into equally sized chunks for even cooking.

    2. Cook the Potatoes: In a large pot, add enough water to cover the potatoes by about an inch. Bring to a boil over medium-high heat, then reduce to a simmer and cook for about 15-20 minutes. The potatoes should be tender enough to poke with a fork but not mushy. Once cooked, drain and let them cool.

    3. Boil the Eggs: While the potatoes are cooling, also bring water to a boil in a smaller pot. Gently place the eggs into the boiling water and let them boil for about 9-10 minutes for hard-boiled. Afterward, transfer them to an ice bath to cool before peeling.

    4. Mix the Dressing: In a large mixing bowl, combine 1 cup of Greek yogurt or mayonnaise, 2 tablespoons of Dijon mustard, 1 tablespoon of apple cider vinegar, 1 teaspoon of sugar, salt, and pepper. Stir until the mixture is well combined and smooth.

    5. Combine Ingredients: Once the potatoes have cooled, add them to your mixing bowl along with diced celery, diced red onion, and parsley.

    6. Add the Eggs: Peel the eggs and chop them into quarter pieces. Add the eggs carefully to avoid breaking them too much. Gently fold all ingredients together until every piece is coated with the creamy dressing.

    7. Taste and Adjust: At this point, give your salad a taste. Feel free to adjust seasonings (salt, pepper) and add any additional ingredients such as dill or paprika if desired.

    8. Chill: For the best flavor, cover the salad with plastic wrap and refrigerate for at least an hour, allowing the flavors to meld together.

    9. Serve: Serve cold as a side dish or a light lunch, garnished with additional parsley or a sprinkle of paprika if desired. Enjoy your Perfect Creamy Potato Salad With Eggs!

    This step-by-step guide offers a simple way to enjoy a classic dish, and remember, the key ideas shared here can serve as a launchpad for your culinary creativity!

    Mastering Perfect Creamy Potato Salad With Eggs: Advanced Tips and Variations

    To truly master this Perfect Creamy Potato Salad With Eggs, consider these advanced tips and variations that can enhance the recipe even further.

    1. Herb Infusion:

    Incorporate fresh herbs like dill, chives, or tarragon into your potato salad for an additional layer of flavor. Fresh herbs not only elevate the taste but also provide a health boost due to their antioxidant content.

    2. Change Up the Veggies:

    Experiment with different vegetables. Add diced pickles, bell peppers, or grated carrots for a colorful presentation and added crunch. You can also include seasonal vegetables like peas or corn for a fresh twist.

    3. Flavor Add-ins:

    For a Mediterranean twist, think about adding feta cheese and olives. This could transform your potato salad into a more robust side dish. People enjoy a variety of flavor profiles, so don’t hesitate to get creative!

    4. Smoke Flavor:

    If you enjoy a smoky flavor, consider adding smoked paprika or grilling the potatoes before mixing to incorporate that distinctive charred taste.

    5. Texture Play:

    A variety of textures can enhance the eating experience. Consider adding roasted nuts for crunch or seeds like sunflower seeds to provide a nutty flavor.

    6. Dressings Other than Mayo:

    Try swapping the creamy dressing with vinaigrettes or experiment with flavored oils. A balsamic vinaigrette can yield a delightful tang and lightness, suitable for summer gatherings.

    With these tips and variations, you’ll not only enhance your potato salad but also enrich your collection of recipe ideas for future culinary delights.

    How to Store Perfect Creamy Potato Salad With Eggs: Best Practices

    Once you’ve made your Perfect Creamy Potato Salad With Eggs, it’s essential to know how to store it properly to maintain its flavor and texture.

    Refrigeration

    • Ensure that the potato salad is placed in an airtight container before storing it in the refrigerator. Properly stored, it can last for up to 3-5 days.
    • Be sure to keep it in the coldest part of the refrigerator and not in the door, as door temperatures can fluctuate.

    Freezing

    • While freezing potato salad isn’t generally recommended due to texture changes, if you must, omit the eggs and mayo, and add those components after thawing. Freeze in an airtight container; it can last for up to 3 months.
    • To thaw, simply place in the refrigerator overnight and stir well upon serving.

    Reheating

    • If you prefer to warm your potato salad slightly, do so in the microwave on low power, stirring gently. However, most people enjoy it cold for the refreshing taste.

    By following these storage practices, you’ll be able to enjoy your Perfect Creamy Potato Salad With Eggs throughout the week, and it remains an inviting option when you consider future recipe ideas for your meal planning.

    Nutritional Value of Perfect Creamy Potato Salad With Eggs

    Understanding the nutritional value of your food is crucial, especially for those on specific diets. Here’s a breakdown of what’s in the Perfect Creamy Potato Salad With Eggs.

    Nutritional Information (per serving, approximately 1 cup):

    • Calories: 250-300 kcal
    • Total Fat: 15g
    • Saturated Fat: 3.5g
    • Cholesterol: 150mg
    • Sodium: 400mg
    • Total Carbohydrates: 25g
    • Dietary Fiber: 3g
    • Sugars: 2g
    • Protein: 8g

    Health Benefits

    • Protein and Sustenance: The eggs provide a substantial amount of protein, which is essential for muscle growth and repair.
    • Vitamins and Minerals: Potatoes are a great source of potassium, which can help regulate blood pressure. They are also rich in vitamin C, supporting immune health.
    • Low Calorie Optional: If you replace mayonnaise with Greek yogurt or silken tofu, you significantly reduce calories while maintaining creaminess.

    This nutritional overview makes it clear that the Perfect Creamy Potato Salad With Eggs is a balanced dish suitable for various dietary needs, proving to be a reliable addition to your meal rotation and a delightful part of your recipe ideas collection!

    FAQs: Frequently Asked Questions About Perfect Creamy Potato Salad With Eggs

    1. Can I make this potato salad vegan?

    Absolutely! You can replace the eggs with mashed tofu or chickpeas and use a vegan mayonnaise. This allows you to keep the creamy texture while adhering to vegan dietary requirements.

    2. How long can I store the potato salad?

    If stored in an airtight container, the potato salad can last in the refrigerator for about 3-5 days. However, it’s best enjoyed fresh for optimal taste and texture.

    3. What type of potatoes work best for potato salad?

    Yukon Gold and red potatoes are highly recommended due to their buttery flavor and ability to hold their shape after cooking. Avoid starchy potatoes like Russets, as they can become mushy.

    4. Is this potato salad gluten-free?

    Yes, this recipe is naturally gluten-free! Just make sure that the Dijon mustard and mayonnaise you use do not contain gluten.

    5. Can I make this potato salad ahead of time?

    Definitely! In fact, making it a day ahead is often beneficial, as it allows the flavors to meld beautifully. Just be sure to store it correctly in the refrigerator.

    6. What can I use instead of mayonnaise for a healthier option?

    Consider using Greek yogurt, which is lower in calories and higher in protein. This can lighten the dish while keeping it creamy and delicious.

    With these answers, you are now fully equipped to enjoy the Perfect Creamy Potato Salad With Eggs and can anticipate fun experiments with a variety of recipe ideas for future gatherings or everyday meals!


    Enjoy your culinary adventure with the Perfect Creamy Potato Salad With Eggs, and don’t forget to share your adaptations, ideas, and experiences! This recipe not only makes for a delicious dish but also allows for creativity to shine through, making it perfect for any home cook or culinary enthusiast.