Category: salad

  • Homemade Deviled Eggs Without Mayo

    Homemade Deviled Eggs Without Mayo

    Homemade Deviled Eggs Without Mayo: A Tropical Delight

    Introduction to Homemade Deviled Eggs Without Mayo

    Eggs have long been a staple in many kitchens, celebrated for their versatility and nutritional value. One of the most popular ways to enjoy eggs is by making deviled eggs. However, if you are looking for appetizer recipes that are healthier and different from the traditional versions, look no further! These homemade deviled eggs without mayo offer a delightful twist that will please both your palate and your health-conscious friends.

    Imagine creamy egg yolks mixed with zesty ingredients, all while eliminating mayo. This recipe is not only simple to follow but is also vegan-friendly, gluten-free, and low-calorie. The lack of mayonnaise means that it is lighter, allowing the natural flavors of the eggs and accompanying spices to shine through. This dish is perfect for a variety of occasions—from casual family meals to festive gatherings, ensuring there’s something for everyone to enjoy.

    Furthermore, the ease of preparation means that even busy parents, students, and working professionals can whip up a batch with minimal effort. Whether you’re traveling, newlywed, or simply someone who loves to try new snacks, these deviled eggs provide a burst of flavor and can be made quickly, requiring just a few basic ingredients. So roll up your sleeves and get ready to impress your family and friends with this delectable and healthy version of a classic appetizer.

    Benefits and Advantages of Homemade Deviled Eggs Without Mayo

    Homemade deviled eggs without mayo truly stand out for several reasons. First and foremost, the simplicity of the recipe makes it accessible for cooks of all skill levels. You don’t have to be a culinary expert to execute this dish perfectly. Moreover, this appetizer is a breeze to assemble, requiring little more than eggs and a few flavorings.

    Health-minded individuals will appreciate that this recipe excludes mayonnaise, which can be high in calories and fats. Instead, ingredients like avocado, Greek yogurt, or mustard can be utilized to create that creamy texture while adding beneficial nutrients. Avocado, for example, contributes healthy fats that promote heart health and keep you feeling satiated longer. Including Greek yogurt adds protein and probiotics, making this dish not only delicious but also nutritious.

    These deviled eggs are an excellent option for anyone with dietary restrictions. They are naturally gluten-free and can be tailored to meet vegan needs by using plant-based substitutes, ensuring that no one misses out at gatherings. For busy parents or working professionals, these deviled eggs serve as a quick snack or a nutritious addition to a lunch box, providing essential protein and vitamins on the go.

    To top it all off, homemade deviled eggs without mayo are every bit as delightful as their traditional counterparts, making them perfect for gatherings. These flavorful little bites will surely earn rave reviews and are versatile enough to fit into any party spread or meal plan.

    Ingredients Overview

    Essential Ingredients for Homemade Deviled Eggs Without Mayo

    To create these delectable homemade deviled eggs without mayo, you will need the following ingredients:

    • 6 large eggs: The foundation of the recipe; hard-boiled for the right texture.
    • 1 ripe avocado: Acts as a creamy substitute for mayo, packed with healthy fats.
    • 2 tablespoons Greek yogurt (use dairy-free versions for vegan option): Adds creaminess and a slight tang, while also boosting protein content.
    • 1 teaspoon Dijon mustard: Provides a kick of flavor and depth.
    • 1 tablespoon freshly squeezed lemon juice: Brightens and enhances the overall taste while preventing browning of the avocado.
    • Salt and pepper to taste: Essential seasoning to bring all flavors together.
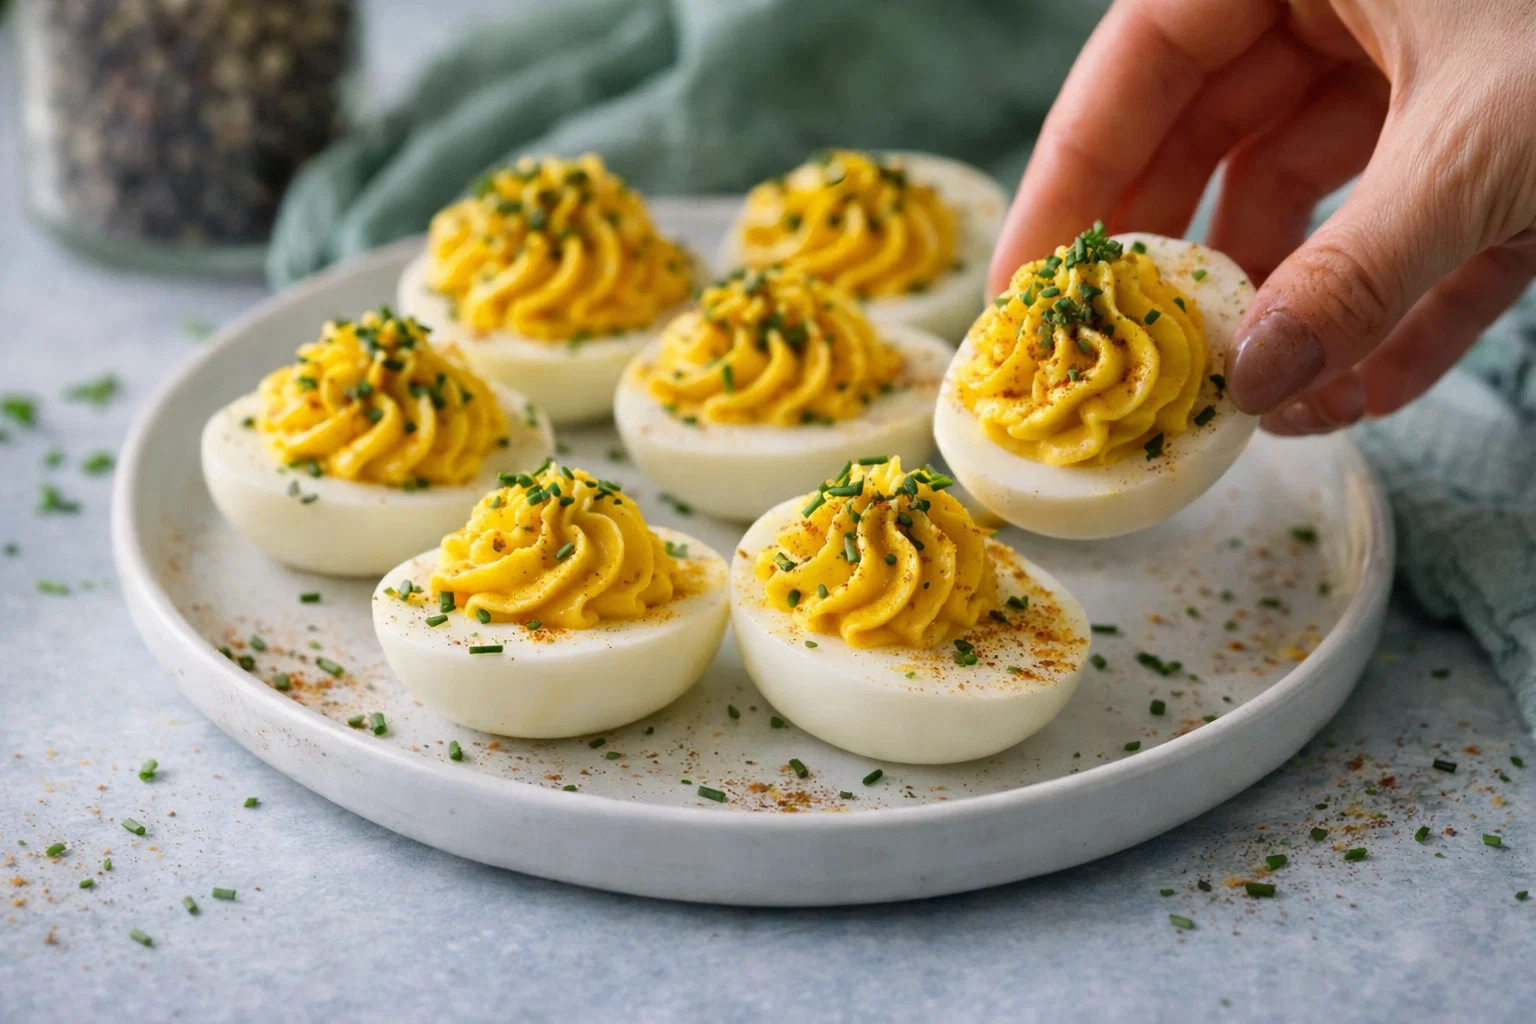
    • Paprika or cayenne pepper for garnish: Enhances visual appeal and adds a hint of spice.

    This ingredient list caters specifically to those who seek health benefits without sacrificing taste. Feel free to experiment with additional seasonings or herbs such as chives, dill, or cilantro to further personalize your deviled eggs to suit your taste buds.

    Dietary Substitutions to Customize Your Homemade Deviled Eggs Without Mayo

    This recipe is highly adaptable, making it easy to modify based on dietary needs. Here are some suggested substitutions:

    • For a Vegan Option: Use an additional avocado in place of Greek yogurt, blending it until smooth. You could also opt for a store-bought vegan mayo if you desire that vegan creaminess.
    • For a Lower-Calorie Version: Substitute the Greek yogurt with plain yogurt (fat-free or low-fat) or omit it entirely and use additional lemon juice to keep the structure.
    • Spice Variations: Swap out the Dijon mustard for hot sauce or horseradish for a spicier kick.
    • Herb Add-Ins: Add finely chopped fresh herbs like parsley or dill to infuse more flavor.

    Tailoring the ingredients to fit your dietary needs or personal preferences is part of what makes this recipe exciting. No matter how you choose to customize it, the delightful essence of deviled eggs remains intact!

    How to Prepare the Perfect Homemade Deviled Eggs Without Mayo: Step-by-Step Guide

    Creating the perfect homemade deviled eggs without mayo is as easy as following these step-by-step instructions:

    1. Hard Boil Your Eggs: Place the eggs in a saucepan and cover them with cold water. Bring to a boil over medium heat. Once boiling, cover the pot, remove it from the heat, and let it sit for 12-15 minutes.

    2. Cool the Eggs: Carefully drain the hot water and transfer the eggs to an ice bath. Let them cool for about 5-10 minutes before peeling.

    3. Peel the Eggs: Once cooled, gently tap each egg on a hard surface and roll it to crack the shell. Peel under running water for easier removal of the shell.

    4. Cut and Scoop: Slice each egg in half lengthwise. Carefully scoop out the yolks and place them in a mixing bowl. You should have 12 egg halves ready for stuffing.

    5. Mix Ingredients: In the bowl with the yolks, add the ripe avocado, Greek yogurt, Dijon mustard, lemon juice, salt, and pepper. Mash the ingredients together using a fork or potato masher until smooth and creamy.

    6. Taste and Adjust: Taste the mixture and adjust the seasoning by adding more salt, pepper, or mustard if needed. You want the filling to be flavorful and refreshing.

    7. Fill the Eggs: Using a spoon or a piping bag, fill each egg white half with the yolk mixture until they are heaping.

    8. Garnish and Serve: Sprinkle paprika or cayenne pepper over the top for a touch of color and flavor. You can also garnish with fresh herbs or chopped vegetables for an extra pop.

    9. Chill Before Serving (optional): For best taste, refrigerate the deviled eggs for 15-30 minutes before serving to allow the flavors to meld.

    This simple guide ensures that you can create delicious homemade deviled eggs without mayo that everyone will love. Whether you serve them as an appetizer at a gathering, a snack at home, or a packed lunch, they are guaranteed to be a hit every time.

    Mastering Homemade Deviled Eggs Without Mayo: Advanced Tips and Variations

    To truly master the art of homemade deviled eggs without mayo, consider these advanced tips and variations for even better results:

    • Experiment with Flavors: Try incorporating spices like curry powder, smoked paprika, or even tahini for unique flavor profiles that surprise your guests.
    • Texture Enhancements: Add crunch by mixing in finely chopped celery, pickles, or bell peppers into the yolk mixture with the avocado for an exciting texture.
    • Herbed Variations: Try using flavored oils or vinegar (like truffle oil or red wine vinegar) mixed into the filling for an aromatic flair.
    • Presentation: Serve your deviled eggs on a decorative platter or individual egg racks for a beautiful display. You could even use avocado skins as natural cups for a fun presentation!
    • Themed Twists: Create themed deviled eggs for holidays. For Halloween, use black olives for spiders, or for Christmas, sprinkle red and green herbs and spices for a festive touch.

    The versatility of this recipe means that there are endless ways to make it your own! Your friends and family will marvel at your creativity with variations that keep them coming back for more.

    How to Store Homemade Deviled Eggs Without Mayo: Best Practices

    To enjoy your homemade deviled eggs without mayo at their best, knowing how to store them properly is essential. Here’s how to maximize freshness:

    • Refrigeration: After preparing your deviled eggs, store them in an airtight container in the refrigerator. They can last for up to 3 to 5 days if stored correctly. Cover the eggs with a piece of plastic wrap or parchment paper to retain moisture and flavors.
    • Freezing: It’s generally not recommended to freeze deviled eggs, as the texture of the egg whites may become rubbery after thawing. However, if you must make a large batch, you can freeze the yolk filling mixture separately. Just ensure to blend it well after thawing before using.
    • Ready-to-Eat: When it’s almost time for serving, you can make an as-needed garnish with herbs or spices just before serving for maximum freshness.

    Storing your deviled eggs properly ensures they remain flavorful and safe to eat, so you can savor them at your leisure!

    Nutritional Value of Homemade Deviled Eggs Without Mayo

    When it comes to nutritional content, homemade deviled eggs without mayo shine. Each serving (2 halves) contains:

    • Calories: Approximately 70-80 calories
    • Protein: 5-6 grams
    • Fat: 5-6 grams (dependent on the use of avocado or yogurt)
    • Carbohydrates: 1-2 grams
    • Fiber: 1-2 grams (from avocado)
    • Cholesterol: 186 mg (from eggs, which is still within heart-healthy limits for most people)

    Many vitamins and minerals can also be found in deviled eggs, including B vitamins, vitamin K, and selenium. The presence of avocado increases fiber intake and provides an array of healthy fats beneficial for heart health.

    This nutritious snack can easily fit within various dietary plans, making it a flexible option for any health-conscious individual. Enjoy these homemade deviled eggs as part of a balanced diet, and relish the knowledge that you’re fueling your body with positive nutrition.

    FAQs: Frequently Asked Questions About Homemade Deviled Eggs Without Mayo

    Can I use regular mayonnaise in this recipe instead of Greek yogurt or avocado?
    Yes, you can! However, the aim of this recipe is to create a healthier version without mayo. For a creamier texture while maintaining health benefits, consider the alternative options listed.

    What if I don’t have Dijon mustard? Can I use regular mustard?
    Absolutely! Any type of mustard will work, whether it’s yellow, spicy brown, or whole grain. Adjust the amount according to your taste preference.

    How can I make this recipe vegan?
    To make vegan deviled eggs, substitute the Greek yogurt with additional avocado or use a plant-based yogurt alternative. Additionally, ensure to avoid any egg products.

    How do I prevent the avocado from browning?
    Add lemon juice to the avocado immediately after cutting it. The acidity helps slow down the browning process and keeps your filling looking fresh.

    Can these be served at room temperature?
    While they can be served at room temperature, it’s advised to keep them refrigerated until just before serving for best flavors and food safety.

    Can I prepare them ahead of time?
    Yes! You can prepare the filling a day ahead and store it separately in the refrigerator. Just fill the egg whites right before serving to keep them fresh and visually appealing.

    Discover the joy of homemade deviled eggs without mayo—this recipe encourages healthy living without sacrificing flavor. Perfect for any gathering, these delightful little bites will quickly become a favorite among friends and family alike. Enjoy your culinary adventure!

  • Quick Cucumber Pea Salad

    Quick Cucumber Pea Salad

    Quick Cucumber Pea Salad: A Tropical Delight

    Introduction to Quick Cucumber Pea Salad

    When it comes to light and refreshing dishes, Quick Cucumber Pea Salad is the undisputed champion. This vibrant cucumber salad combines crisp cucumbers and sweet peas to create a delightful medley that is not only delicious but also incredibly nourishing. Perfect for busy home cooks and individuals following a health-conscious lifestyle, this salad is a fantastic choice for any meal. Packed with essential vitamins and minerals, it is suitable for various dietary needs, including vegan, gluten-free, and low-calorie options.

    Imagine serving this colorful dish at a picnic, cookout, or even as a quick weekday lunch. Its simple preparation makes it a go-to for busy parents and students alike. You can easily whip up this cucumber salad in just 15 minutes, making it an ideal option for those pressed for time but still wanting to enjoy a wholesome meal. Furthermore, the light and refreshing flavors can transport you to tropical paradises, while the crispness of the cucumbers and the sweetness of the peas tantalize your taste buds.

    As we delve deeper into this quick cucumber pea salad recipe, prepare yourself to be inspired by its simplicity, health benefits, and versatility. Whether you are a seasoned cook or a novice in the kitchen, this salad is sure to become a staple in your culinary repertoire.

    Benefits and Advantages of Quick Cucumber Pea Salad

    Nutritional Powerhouse

    The combination of cucumbers and peas in this cucumber salad ensures that you consume a wealth of nutrients in every serving. Cucumbers are low in calories, high in water content, and an excellent source of vitamin K. They also provide potassium and magnesium, crucial for maintaining muscle function and electrolyte balance. On the other hand, peas are a powerhouse of protein, fiber, and essential vitamins such as vitamin A, vitamin C, and B vitamins. Together, these ingredients create a nutritious salad that supports overall health and well-being.

    Easy Preparation

    One of the main advantages of the Quick Cucumber Pea Salad is how convenient it is to prepare. In just a few straightforward steps, you can have a delicious dish ready that serves as a side or main course. For busy parents or working professionals, this means you can put together a healthy meal without a significant time investment. Simply chop your vegetables, mix the dressing, and toss everything together in a bowl—easy peasy!

    Versatility for Everyone

    This cucumber salad caters to a wide range of dietary requirements. Whether you’re following a vegan diet, need something gluten-free, or are watching your calorie intake, this salad has it all covered. You can easily adjust the recipe based on available ingredients or personal preferences. This adaptability also makes it a perfect dish for potlucks, barbecues, and family gatherings, ensuring that everyone can enjoy it, no matter their dietary restrictions.

    Great for Meal Prepping

    Another noteworthy benefit of the Quick Cucumber Pea Salad is its suitability for meal prepping. It can be made in bulk and stored in the refrigerator for a few days, allowing you to plan healthy lunches or dinners throughout the week effortlessly. In fact, the flavors continue to meld together as it sits, which can enhance the overall taste of the dish! Simply pack it in meal prep containers, and you’ve got lunch sorted for several days.

    Refreshing Taste

    The crispness of cucumbers and the sweetness of peas create a light, refreshing taste that can brighten up any meal. This makes the cucumber salad the perfect companion alongside heavier dishes, adding balance to your plate. Furthermore, its refreshing nature makes it an excellent option for warm summer days or alongside grilled meats at a cookout.

    Ingredients Overview

    Essential Ingredients for Quick Cucumber Pea Salad

    This cucumber salad recipe features a simple list of essential ingredients, each playing a crucial role in the dish’s flavor and texture. Here’s what you’ll need:

    1. Cucumbers (2 medium-sized): Slice them for a refreshing base. Cucumbers have high-water content, which is excellent for hydration.

    2. Fresh Peas (1 cup): You can use fresh or frozen peas (thawed) for sweetness and color.

    3. Cherry Tomatoes (1 cup, halved): For vibrant color and a burst of flavor. They are also rich in antioxidants.

    4. Red Onion (1 small, finely chopped): Adds tanginess to the salad. You can opt for shallots for a milder taste.

    5. Fresh Dill or Mint (2 tablespoons, chopped): These herbs enhance the salad’s fresh flavor profile. Mint offers a cooling effect, while dill adds a savory twist.

    6. Olive Oil (3 tablespoons): Acts as a flavorful dressing base, providing healthy fats.

    7. Lemon Juice (2 tablespoons): Adds acidity to balance the flavors.

    8. Salt and Pepper (to taste): Essential for enhancing all flavors in the salad.

    Dietary Substitutions to Customize Your Quick Cucumber Pea Salad

    Customizing the cucumber salad to suit various dietary needs is easy. Here are some substitution ideas:

    • Cucumbers: For individuals who are looking for something crunchier, zucchini can serve as an alternative.

    • Peas: Chickpeas or black beans can replace peas for those seeking a higher protein content.

    • Cherry Tomatoes: If you dislike tomatoes, you could use bell peppers for a different texture and flavor.

    • Olive Oil: Avocado oil or any light oil can be an alternative, particularly for those who prefer different flavor profiles.

    • Lemon Juice: In case of citrus allergies or preferences, apple cider vinegar can provide a similar tang.

    • Herbs: Don’t have dill or mint on hand? Basil or cilantro could lend unique flavors and freshness.

    For vegan eaters, the salad remains entirely plant-based as it has no animal products. This flexibility makes the Quick Cucumber Pea Salad a delightful option for gatherings and meal prep, aligning with diverse tastes and requirements.

    How to Prepare the Perfect Quick Cucumber Pea Salad: Step-by-Step Guide

    Now that you have all your ingredients ready, let’s dive into the step-by-step guide to preparing your cucumber salad.

    1. Prepare the Base: Begin by washing your cucumbers thoroughly. Slice them in half lengthwise, then cut them into half-moon shapes for easy eating.

    2. Mix Ingredients: Place the sliced cucumbers in a large mixing bowl. Next, add the fresh peas, diced cherry tomatoes, and chopped red onion.

    3. Make the Dressing: In a separate small bowl, whisk together olive oil, lemon juice, salt, and pepper. Adjust the seasoning to your preference—add more salt or lemon juice if desired.

    4. Combine Everything: Drizzle the dressing over the cucumber and pea mixture. Use a spatula or spoon to toss the ingredients gently until everything is well-coated.

    5. Add Herbs: Lastly, sprinkle the chopped dill or mint over the salad. Toss again gently, ensuring the herbs are distributed evenly.

    6. Chill: For the best flavor, allow the salad to sit in the refrigerator for about 20 minutes. This waiting period helps all the flavors meld together nicely.

    7. Serve: Once chilled, give the salad a final toss before serving. You can garnish with additional herbs or seeds for extra flair.

    Optional Cooking Steps (For Those Who Prefer Cooked Peas)

    If you prefer your peas cooked, simply bring a pot of water to a boil, add the peas, and cook for about 2-3 minutes until tender. Drain and cool the peas before adding them to your salad.

    Presentation Tips

    To elevate your cucumber salad, serve it in a chilled bowl or over a bed of greens. You can also add some crumbled feta or goat cheese for an extra layer of flavor.

    Mastering Quick Cucumber Pea Salad: Advanced Tips and Variations

    To truly master the Quick Cucumber Pea Salad, consider these advanced tips and variations:

    • Add Crunch: For an extra crunch, toss in some chopped nuts or seeds, like sunflower seeds or sliced almonds.

    • Spice it Up: If you enjoy heat, a pinch of red pepper flakes can add a delightful spice.

    • Change the Dressing: Experiment with different dressings like tahini or yogurt-based dressings for a creamier texture.

    • Protein Boost: Incorporate some protein by adding grilled chicken or shrimp, making the salad more filling for larger meals.

    • Social Gatherings: Make a larger batch and serve it as a refreshing dish at barbecues or parties, where guests can help themselves.

    These ideas will not only add variety but also ensure that your cucumber salad stays interesting, no matter how often you make it.

    How to Store Quick Cucumber Pea Salad: Best Practices

    To ensure your Quick Cucumber Pea Salad remains fresh and delicious, proper storage is essential. Here are some best practices to keep in mind:

    • Refrigeration: Place the salad in an airtight container and store it in the refrigerator. The salad should last 3-4 days when properly stored. Note that the cucumbers may release water over time, making the dressing thinner. This is normal, and you can always give it a quick toss before serving.

    • Freezing: It’s not recommended to freeze this salad due to the high-water content of cucumbers, which can turn mushy after thawing. Enjoy it fresh instead!

    • Reheating: If you choose to add cooked peas or any other ingredients that need to be heated, gently warm them in a pot before mixing them with the other cold ingredients to avoid sogginess.

    Nutritional Value of Quick Cucumber Pea Salad

    The nutritional benefits of this cucumber salad are noteworthy. Here’s a rough estimate of the nutritional profile per serving (approximately 1 cup):

    • Calories: 120
    • Protein: 4g
    • Fat: 7g (mostly from olive oil)
    • Carbohydrates: 13g
    • Fiber: 4g
    • Sugars: 3g

    Vitamins and Minerals

    • Vitamin A: 10% of Daily Value (DV)
    • Vitamin C: 40% of DV
    • Vitamin K: 35% of DV
    • Potassium: 10% of DV

    This balance of macronutrients and the abundance of vitamins make the cucumber salad an excellent choice for maintaining a healthy diet. The high fiber content aids digestion, while the healthy fats from olive oil promote heart health.

    FAQs: Frequently Asked Questions About Quick Cucumber Pea Salad

    1. Can I add other vegetables to this cucumber salad?

    Absolutely! Feel free to add any veggies you enjoy. Bell peppers, carrots, or avocados can add a delightful crunch and additional nutrients.

    2. How long does Quick Cucumber Pea Salad last in the fridge?

    When stored in an airtight container, this salad can last for up to 3-4 days. However, for the freshest flavor, it’s best enjoyed within the first couple of days.

    3. Is the salad suitable for a vegan diet?

    Yes! The Quick Cucumber Pea Salad is entirely plant-based, making it suitable for vegans and those avoiding animal products.

    4. Can I use dried herbs instead of fresh?

    Certainly! If fresh herbs are unavailable, you can use dried herbs, keeping in mind that dried herbs are more concentrated. Typically, one tablespoon of fresh herbs equals about one teaspoon of dried.

    5. What can I use instead of peas?

    If you don’t have peas, consider using diced avocado, cooked chickpeas, or edamame for a similar texture. Each will lend a unique flavor profile to your salad.

    6. How can I enhance the flavor of my cucumber salad?

    Consider adding a splash of balsamic vinegar, a pinch of garlic powder, or even a dash of hot sauce for an extra kick, depending on your taste preferences.

    In conclusion, the Quick Cucumber Pea Salad is not only simple and quick to make but also serves as a nutritious addition to your meal plans. With its versatility and vibrant flavors, it’s sure to become a favorite recipe for any occasion. Dive into this tropical delight and enjoy the health benefits it has to offer!

  • Homemade Pea Salad Lettuce Cups

    Homemade Pea Salad Lettuce Cups

    Homemade Pea Salad Lettuce Cups: A Tropical Delight

    Introduction to Homemade Pea Salad Lettuce Cups

    Are you searching for a refreshing and easy-to-prepare dish that fits perfectly within your healthy lifestyle? Look no further than Homemade Pea Salad Lettuce Cups. This vibrant and colorful recipe stands out as one of the most delightful healthy recipes you can add to your culinary repertoire. Not only does it burst with flavor, but it also boasts a plethora of health benefits, making it an excellent choice for anyone, whether you’re a busy parent, a student, or just someone looking to eat better.

    This recipe shines particularly during warmer months or as an appetizer for gatherings. The crunch of fresh lettuce cups combined with the sweet and savory tastes of peas creates a delightful contrast that is both satisfying and nutritious. Each bite is packed with protein, vitamins, and minerals while remaining vegan, gluten-free, and low-calorie. This is a versatile dish that caters to various dietary needs without skimping on flavor.

    Homemade Pea Salad Lettuce Cups are perfect for those who appreciate simple, yet delicious meals. Whether you are entertaining guests, prepping quick lunches for the week, or simply enjoying a fresh snack, this recipe checks all the boxes. So, roll up your sleeves and get ready to dive into the world of effortless, healthy cooking!

    Benefits and Advantages of Homemade Pea Salad Lettuce Cups

    When it comes to quick and nutritious dishes, Homemade Pea Salad Lettuce Cups rise to the top for several reasons.

    1. Ease of Preparation: This delightful dish requires minimal cooking time and effort. With just a few simple steps, you can whip this up in less than 30 minutes. Grab your fresh ingredients, toss them together, and serve!

    2. Health Benefits: Peas are a powerhouse of nutrients. They are high in protein and fiber, both of which promote satiety and aid in weight management. Additionally, peas are rich in antioxidants such as vitamins A, C, and K, and they have been linked to numerous health benefits, including improved digestion and heart health.

    3. Dietary Versatility: Because this recipe is naturally vegan and gluten-free, it can be easily adapted for various dietary needs. It’s a great meal prep option for health-conscious individuals and can be modified to fit a variety of diet plans, making it accessible for everyone, from busy professionals to homes filled with food enthusiasts.

    4. Customizable Flavor: You can make the salad to suit your taste preferences; for example, adding ingredients like nuts for extra crunch, herbs for freshness, or alternative dressings for different flavor profiles. This adaptability ensures that you’ll never tire of this dish.

    5. Suitable for All Occasions: Whether you’re hosting a weekend barbecue, packing school lunches, or enjoying a quiet dinner at home, these lettuce cups can transition seamlessly from casual to elegant dining.

    Thanks to these wonderful advantages, Homemade Pea Salad Lettuce Cups are not just another dish; they are a celebration of health, simplicity, and flavor.

    Ingredients Overview

    Essential Ingredients for Homemade Pea Salad Lettuce Cups

    To create these scrumptious Healthy Pea Salad Lettuce Cups, you’ll need the following key ingredients:

    • 2 cups of fresh or frozen peas: Peas form the base of this recipe. Fresh peas bring a delightful sweetness, while frozen peas can be used when fresh ones aren’t available.

    • 1 cup of diced bell peppers (red and yellow for color): Bell peppers offer a nice crunch and a boost of vitamins A and C.

    • ½ cup of finely chopped red onion: This adds a pop of flavor and a bit of color. If you’re sensitive to raw onion, consider soaking it in cold water for a few minutes before using.

    • 1 avocado, diced: Avocados add creaminess and healthy fats, enriching the salad’s texture and nutritional profile.

    • 2 tablespoons of fresh lime juice: Lime juice brightens the salad, bringing all the flavors together while also providing a source of vitamin C.

    • ¼ cup of chopped fresh herbs (like cilantro or parsley): Fresh herbs enhance flavor and add health benefits, including anti-inflammatory properties.

    • Salt and pepper to taste: These are essential for seasoning, ensuring each component shines.

    • For the dressing (optional):

    • 2 tablespoons of olive oil for healthy fats (or a vegan alternative if desired).
    • A pinch of cumin or chili powder for an extra kick.

    These ingredients are not only packed with nutrients but also work together harmoniously to create a mouthwatering dish.

    Dietary Substitutions to Customize Your Homemade Pea Salad Lettuce Cups

    Further enhance your Homemade Pea Salad Lettuce Cups with the following substitutions and modifications:

    1. For a Protein Boost: Consider adding cooked quinoa, chickpeas, or black beans. These ingredients will not only increase the protein content but will also keep you full longer.

    2. For Gluten-Free: All the ingredients listed are naturally gluten-free. However, if you choose to add a dressing or toppings, ensure they are gluten-free to maintain the dish’s dietary integrity.

    3. Vegan Friendly: The recipe is already vegan. If you want a creamier texture, a vegan mayonnaise or tahini could substitute for traditional dressings.

    4. Herb Variations: If you want a different flavor, you can try using dill instead of cilantro or even add some chopped green onions for a milder onion flavor.

    5. Change the Greens: Instead of lettuce cups, you can serve this salad in whole grain wraps, or over a bed of mixed greens for a salad bowl presentation.

    By incorporating these suggestions, you can make tailor-made versions of the salad that cater to specific tastes or dietary preferences, ensuring that everyone can indulge in this delicious healthy recipe.

    How to Prepare the Perfect Homemade Pea Salad Lettuce Cups: Step-by-Step Guide

    Preparing Homemade Pea Salad Lettuce Cups is straightforward and enjoyable! Follow these easy steps to create your new favorite healthy recipe:

    1. Gather Your Ingredients: Ensure you have all the ingredients ready for a smooth preparation process. Wash the vegetables and herbs thoroughly.

    2. Prepare the Peas:

    3. If you’re using fresh peas, shell them and quickly blanch in boiling water for 1-2 minutes until vibrant green. Drain and set them aside to cool.
    4. If using frozen peas, just thaw and drain well.

    5. Chop the Vegetables: Dice the bell peppers, red onion, and avocado. The key here is to keep all pieces roughly the same size for uniform flavor and texture.

    6. Combine Ingredients: In a large mixing bowl, add your peas, bell peppers, red onion, and avocado. Gently toss the mixture with a spatula to combine.

    7. Add Fresh Herbs: Sprinkle the chopped cilantro or parsley over the top of your mixture for added flavor. Mix it all gently so the herbs are evenly distributed.

    8. Mix the Dressing: In a small bowl, whisk together the lime juice, olive oil, cumin, salt, and pepper. This will create a zesty dressing for your salad.

    9. Dress the Salad: Drizzle the dressing over the pea mixture. Be mindful to add it gradually and mix gently to avoid mashing the avocado.

    10. Prepare the Lettuce Cups: Carefully separate the leaves from the head of lettuce. Choose larger leaves to hold your filling—these will serve as your cups.

    11. Assemble the Cups: Spoon the pea salad mixture generously into each lettuce leaf. Ensure each cup is filled without overstuffing to prevent spills.

    12. Serve: Transfer the filled lettuce cups to a serving dish. They can be served immediately or chilled in the refrigerator for 30 minutes before serving for a refreshing bite!

    13. Garnish (optional): A sprinkle of more herbs or a dash of chili powder can add visual appeal and an extra flavor pop.

    This step-by-step guide ensures that you’ll be making these delightful, health-conscious lettuce cups effortlessly. They are deliciously versatile, adapting beautifully to the ingredients on hand or your preferred taste profiles.

    Mastering Homemade Pea Salad Lettuce Cups: Advanced Tips and Variations

    To take your Homemade Pea Salad Lettuce Cups to the next level, consider the following advanced tips and variations:

    1. Add Crunch: For more texture, throw in some chopped nuts or seeds, such as sunflower seeds or slivered almonds. These additions will not only lend a satisfying crunch but also enrich the nutritional profile.

    2. Spice it Up: If you like it hot, consider layering in some diced jalapeños or a splash of hot sauce to elevate the flavor. Adjust the amount according to your heat preference.

    3. Experiment with Fruits: For a refreshing twist, add diced mango or pineapple to the pea salad. The sweetness of these fruits can beautifully complement the savory aspects of the peas and vegetables.

    4. Create a Layered Salad: If you want to serve this as a main dish, layer the salad on quinoa or rice to create a satisfying bowl meal. This adds dimensions to the flavors.

    5. Marinated Peas: For an added depth of flavor, marinate the peas in lime juice, balsamic vinegar, or your favorite vinaigrette before mixing. The marination process enhances their flavor profile.

    6. Herbal Infusion: Select herbs like mint or basil instead of traditional herbs to transform the flavor completely. These will provide a refreshing twist.

    By implementing these advanced variations, you can turn these healthy recipes into a unique dish that resonates with your personal tastes or showcases your creativity in the kitchen.

    How to Store Homemade Pea Salad Lettuce Cups: Best Practices

    Storing your Homemade Pea Salad Lettuce Cups correctly ensures that you can enjoy your healthy dish later without sacrificing flavor or texture. Here are some best practices:

    1. Refrigeration: If you have leftovers, store any uneaten salad mixture in an airtight container in the refrigerator. The salad will last for about 2-3 days. However, it’s best to store the salad filling and the lettuce cups separately to maintain the crispness of the leaves.

    2. Freezing: While freezing is not recommended due to the high water content in the peas and avocado, if you’ve made a larger batch of the pea mixture without the dressing, it can be frozen in an airtight container. To use, thaw in the refrigerator overnight and stir in fresh ingredients upon serving.

    3. Reheating: If you’ve frozen the mixture, gently reheat it in a saucepan over low heat, stirring frequently to prevent it from becoming mushy. There’s no need to reheat if you enjoy it cold.

    By following these best practices for storage, you can ensure the longevity and quality of your Homemade Pea Salad Lettuce Cups.

    Nutritional Value of Homemade Pea Salad Lettuce Cups

    Understanding the nutritional value of your food is critical in a health-conscious diet. Here’s a breakdown of the nutritional value for one serving (approximately two lettuce cups filled with pea salad):

    • Calories: 150
    • Protein: 7 grams
    • Total Fat: 9 grams (with healthy fats primarily from avocado and olive oil)
    • Carbohydrates: 16 grams
    • Fiber: 6 grams (excellent for digestive health)
    • Sugars: 5 grams (natural sugars from vegetables)
    • Vitamins:
    • Vitamin A: 30% DV
    • Vitamin C: 60% DV
    • Vitamin K: 40% DV
    • Minerals:
    • Iron: 15% DV
    • Potassium: 10% DV

    These nutritional facts highlight why Homemade Pea Salad Lettuce Cups are one of the best healthy recipes you can prepare. They are low in calories but packed with essential nutrients, making them the perfect meal or snack for individuals of all ages.

    FAQs: Frequently Asked Questions About Homemade Pea Salad Lettuce Cups

    1. Can I make this salad ahead of time?

    Yes! You can prepare the pea salad mixture up to 2-3 days in advance. However, it’s best to assemble the lettuce cups just before serving to maintain the crispness of the lettuce.

    2. How can I make this dish spicier?

    If you enjoy a kick, add diced jalapeños or sprinkle in some cayenne pepper or chili powder to the mixture. Adjust the amount based on your preferred spice tolerance.

    3. Is there a way to make this salad without avocado?

    Absolutely! If you prefer to omit avocado, you could add diced cucumbers or add a nut-based yogurt for creaminess.

    4. What type of lettuce should I use for the lettuce cups?

    Butter lettuce, romaine, or even cabbage leaves work well as cups. Choose leaves that are sturdy enough to hold the salad without tearing.

    5. Can I use canned peas for the recipe?

    Yes, you can use canned peas, but make sure to rinse and drain them well to remove excess sodium and to improve the flavor.

    6. How do I store leftover salad?

    Keep any uneaten salad mixture in an airtight container in the refrigerator for 2-3 days. For best results, store the salad filling and lettuce leaves separately until serving.

    7. What other ingredients can I add to customize the flavor?

    Feel free to experiment! Additional ingredients like nuts, seeds, or different herbs can change the flavor and texture of your salad.

    8. How protein-rich is this dish?

    Each serving of Homemade Pea Salad Lettuce Cups contains about 7 grams of protein, primarily sourced from peas and optional enhancements like chickpeas or quinoa.

    By addressing these FAQs, you can prepare a stellar dish knowing that you’ll be able to accommodate various questions and preferences.


    With these instructions, tips, and nutritional insights, you are now well-equipped to create your own Homemade Pea Salad Lettuce Cups, a delectable example of how healthy recipes can be both simple and satisfying. Enjoy your culinary journey!

  • IM Obsessed Been Making This Pea Salad Non-Stop

    IM Obsessed Been Making This Pea Salad Non-Stop

    I’M Obsessed! Been Making This Pea Salad Non-Stop!: A Tropical Delight

    Introduction to I’M Obsessed! Been Making This Pea Salad Non-Stop!

    Spring is the perfect time to embrace fresh ingredients and bring vibrant flavors to your table. If you’re searching for an easy and delightful addition to your spring meals, look no further than this incredibly versatile pea salad! Bursting with bright green peas, crunchy vegetables, and a zesty dressing, this dish embodies the freshness of the season.

    What makes me rave about this pea salad is its simplicity and the joy it brings to any meal. With minimal prep time and straightforward ingredients, even the busiest of home cooks can whip this up in a flash. Moreover, this salad is not just easy; it’s incredibly healthy. Packed with fiber, protein, and essential vitamins, it caters effortlessly to various dietary needs—including vegan and gluten-free.

    Whether you’re a busy parent looking for quick meal solutions, a student wanting healthy options on a budget, or simply someone who loves good food, this pea salad offers something for everyone. It’s perfect for picnic lunches, holiday gatherings, or just as a light snack during those warm spring afternoons. So, let’s dive into why this salad has become my go-to recipe that simply can’t be missed!

    Benefits and Advantages of I’M Obsessed! Been Making This Pea Salad Non-Stop!

    This pea salad is more than just a dish; it’s a wholesome experience packed with benefits that speak to both your taste buds and your health. Here are some key reasons why you should make it part of your regular spring meals lineup:

    1. Ease of Preparation: One of the best aspects of this recipe is that it requires minimal cooking skills and time. With just a few simple steps, anyone can combine these ingredients, making it accessible for everyone—no fancy equipment or lengthy processes necessary.

    2. Health Benefits: Peas are an excellent source of plant protein, making this salad a fantastic option for vegetarians and vegans alike. Packed with vitamins such as Vitamin A, C, and K, as well as essential minerals like iron and magnesium, this salad helps you maintain a balanced diet. The combination of ingredients offers a wealth of fiber, promoting gut health and supporting digestion.

    3. Versatility: This salad can easily adapt to your dietary needs. Whether you’re following a low-carb regimen, a gluten-free lifestyle, or a vegan diet, this pea salad provides a delicious foundation. You can also incorporate seasonal vegetables for a personalized touch, making this a staple dish for your spring meals.

    4. Great for Meal Prep: If you’re a busy professional or a parent juggling multiple tasks, this pea salad can be prepped in advance. It stores well, allowing you to have nutritious meals ready in the refrigerator, making your week much easier.

    5. Colorful and Appealing: Not only is this salad nutritious, but it’s also visually appealing. The vibrant colors of green peas, crisp vegetables, and fresh herbs make it a feast for the eyes, enticing even the pickiest eaters.

    With all these benefits combined, this pea salad transcends being just another dish on your table; it becomes a reliable ally in your quest for health, flavor, and convenience during springtime feasts.

    Ingredients Overview

    Essential Ingredients for I’M Obsessed! Been Making This Pea Salad Non-Stop!

    Here’s a detailed list of the essential ingredients, complete with measurements and their roles in the salad:

    • 2 cups of fresh or frozen peas (340g): Peas are the star of this salad, providing sweetness and protein.
    • 1 cup of diced bell peppers (150g): Adds crunch and a burst of color. You can use any color you prefer.
    • 1/2 cup of red onion, finely chopped (75g): Offers a sharp flavor that complements the sweetness of the peas.
    • 1/2 cup of cherry tomatoes, halved (75g): These add juiciness and a touch of acidity.
    • 1/4 cup of fresh herbs (e.g., parsley or mint): Enhances flavor and provides freshness. Fresh herbs can also support immune health.
    • 1/3 cup of olive oil (80ml): Acts as a healthy fat to help absorb the fat-soluble vitamins and adds richness to the dish.
    • 1/4 cup of apple cider vinegar (60ml): Provides acidity to balance the flavors and aids in digestion.
    • 1 tablespoon of honey or maple syrup (optional for sweetness): This is a vegan option if you choose maple syrup.
    • Salt and pepper to taste: Essential for seasoning, enhancing the flavors of the ingredients.

    This combination of ingredients not only tastes amazing but also meets various dietary requirements. The salad is naturally vegan and gluten-free, and it can be modified further to lower calories or eliminate certain allergens.

    Dietary Substitutions to Customize Your I’M Obsessed! Been Making This Pea Salad Non-Stop!

    If you’re looking to adjust this spring meal to suit specific dietary needs or to use what you have on hand, consider the following substitutions:

    • Peas: For a different flavor and texture, consider using edamame or chickpeas.
    • Bell Peppers: Substitute with finely diced cucumbers for a lighter taste, or go for roasted red peppers for a smoky flavor.
    • Red Onion: Sweet onions or shallots can work too. If you prefer a milder taste, use green onions or omit them entirely.
    • Fresh Herbs: Basil, cilantro, or dill can replace the traditional herbs, offering varied flavor profiles. For those allergic or sensitive to herbs, spinach or arugula adds a green dimension without the herbaceous notes.
    • Vinegar: Any type of vinegar can be used, such as lemon juice, balsamic vinegar, or red wine vinegar for varied acidity and flavor.
    • Olive Oil: Substitute with avocado oil for a different healthy fat profile. For a low-cal option, use a light vinaigrette.

    These substitutions ensure that everyone can enjoy the pea salad according to personal preferences, making it truly adaptable while still being a highlight of your spring meals!

    How to Prepare the Perfect I’M Obsessed! Been Making This Pea Salad Non-Stop!: Step-by-Step Guide

    Now, let’s dive into the preparation of this delightful pea salad with a step-by-step guide. Follow these actions closely to create a dish that is sure to impress!

    1. Gather Your Ingredients: Start by collecting all your fresh ingredients for the salad, ensuring they are properly washed and prepped.

    2. Prepare the Base: If you are using frozen peas, cook them according to the package instructions until just tender. For fresh peas, simply shell them and rinse under cold water. Drain and set aside.

    3. Chop the Vegetables: Dice the bell peppers and finely chop the red onion. Cut the cherry tomatoes in half and remove any excess seeds for a less watery salad.

    4. Combine the Veggies: In a large mixing bowl, combine the peas, bell peppers, red onion, and cherry tomatoes.

    5. Chop Fresh Herbs: Finely chop your choice of fresh herbs (parsley or mint recommended). Add them to the mixing bowl, stirring gently to combine.

    6. Mix the Dressing: In a separate small bowl, whisk together the olive oil, apple cider vinegar, honey or maple syrup, salt, and pepper. Taste and adjust the seasoning if needed.

    7. Dress the Salad: Pour the dressing over the vegetable mixture in the large bowl. Toss gently until everything is beautifully coated.

    8. Chill (Optional): For optimal flavor, cover the mixing bowl with plastic wrap or a lid and refrigerate for at least 30 minutes to 1 hour. This step allows the flavors to meld together, making your spring meals even more delightful!

    9. Serve and Enjoy: After chilling, give the salad a light toss one more time before serving. This pea salad pairs excellently with grilled meats, as a side dish, or as a light meal on its own.

    10. Store Leftovers: Should you have any leftovers, store them in an airtight container for up to 3 days for freshness.

    Follow these steps, and you’ll end up with a vibrant, healthy pea salad that exemplifies what spring meals should be about—freshness, ease, and deliciousness!

    Mastering I’M Obsessed! Been Making This Pea Salad Non-Stop!: Advanced Tips and Variations

    To truly master your pea salad, here are some advanced tips and exciting variations you can embrace for even more flavor:

    • Add Protein: For a more filling meal, feel free to add cooked quinoa, grilled chicken, or even feta cheese to boost protein content. This makes the salad more substantial while enriching its flavor profile.

    • Experiment with Textures: For added crunch, consider including toasted nuts or seeds, such as sunflower seeds or nuts like almonds. These not only enhance flavor but also provide healthy fats.

    • Spice It Up: If you enjoy a little kick, add some red pepper flakes or diced jalapeños to your dressing. This simple adjustment can bring an exciting twist to your spring meal.

    • Use What’s Seasonal: Embrace the seasons by including other spring vegetables like asparagus, radishes, or even diced zucchini. This allows the salad to evolve with each culinary season, giving you a reason to keep making it!

    • Creative Dressings: Don’t be afraid to venture beyond the classic dressing! Consider a tahini dressing or a yogurt-based dressing for a creamy alternative.

    • Make It a Pasta Salad: If you desire a heartier version, incorporate cooked pasta like orzo or bow-tie pasta. This turns your pea salad into a satisfying pasta salad perfect for picnics!

    These variations help you keep your pea salad interesting and new. Whether you’re meal prepping for the week or serving at a family gathering, experimenting with these tips elevates this dish, keeping everyone excited about your spring meals!

    How to Store I’M Obsessed! Been Making This Pea Salad Non-Stop!: Best Practices

    To enjoy the freshness of your pea salad for longer, following precise storage methods is key. Here are the best practices for storing your spring meal:

    1. Refrigeration: Store your pea salad in an airtight container as soon as you’re finished eating. If you’re not serving immediately, keep it in the fridge to maintain its freshness. It can last up to 3 days in the refrigerator.

    2. Freezing: If you want to save leftovers for a longer period, consider freezing! However, be cautious—freezing can change the texture of fresh vegetables. Instead, freeze only the components like peas and herbs if you anticipate them lasting longer without changing flavor. Also, refrain from freezing any dressing.

    3. Reheating: To enjoy your salad again, it’s best to let it thaw in the fridge overnight before re-serving. If it loses some crunch, consider adding fresh ingredients—like diced cucumber or new herbs—to revive its texture.

    Following these best practices ensures that your spring meals remain fresh and enjoyable, allowing you to savor every bite long after you first prepare it.

    Nutritional Value of I’M Obsessed! Been Making This Pea Salad Non-Stop!

    Understanding the nutritional value of your meals is vital, especially when striving for a balanced diet. Here’s the estimated nutritional breakdown of one serving of this pea salad (approx. 1 cup):

    • Calories: 150
    • Total Fat: 9g
    • Saturated Fat: 1.5g
    • Cholesterol: 0mg
    • Sodium: 300mg
    • Total Carbohydrates: 15g
    • Dietary Fiber: 5g
    • Sugars: 3g
    • Protein: 5g

    The nutritional benefits of this salad are vast. The healthy fats from olive oil contribute to heart health, while the vivid veggies provide essential vitamins and dietary fiber, helping maintain a healthy digestive system. Additionally, substituting sweeteners or adjusting the additional ingredients can easily alter the calorie content, making it adaptable for various dietary requirements.

    Enjoy your spring meals while taking comfort in knowing you are satisfying both your taste buds and nutritional needs with this refreshing pea salad!

    FAQs: Frequently Asked Questions About I’M Obsessed! Been Making This Pea Salad Non-Stop!

    Can I use frozen peas instead of fresh peas?

    Absolutely! Frozen peas are an excellent option. They are often just as nutritious as fresh since they are frozen shortly after harvest. If using frozen peas, make sure to thaw them before adding them to the salad.

    How long can I store the pea salad?

    You can store the leftover pea salad in an airtight container in the refrigerator for up to 3 days. However, for the best taste and texture, it’s recommended to consume it within the first two days.

    Can I make this salad ahead of time?

    Yes! This salad can definitely be made ahead of time. Just keep the dressing separate until you are ready to serve to ensure the salad doesn’t become watery.

    What can I substitute for honey in the dressing?

    If you prefer a vegan option, maple syrup is a great substitute for honey. For a sugar-free alternative, consider using stevia or an equivalent sweetener.

    Is this salad gluten-free?

    Yes! The pea salad is naturally gluten-free, making it an excellent choice for those with gluten sensitivities. Just be sure to check the labels of any added ingredients for gluten content.

    With this recipe, tips, and answers to your questions, you’re well-equipped to create a delectable pea salad that is sure to elevate your spring meals and keep your taste buds entertained! Enjoy the journey of culinary creativity as you explore this refreshing salad!

  • Asparagus Easter Quinoa Salad

    Asparagus Easter Quinoa Salad

    Asparagus Easter Quinoa Salad: A Tropical Delight

    Introduction to Asparagus Easter Quinoa Salad

    As the vibrant colors of spring emerge, so does the perfect time for fresh, wholesome recipes that celebrate the season’s bounty. One such delightful dish is the Asparagus Easter Quinoa Salad. This colorful, nutrient-packed salad is not just a feast for the eyes but also a symphony of flavors perfect for spring meals. It brings together the crunchy goodness of asparagus, the nutty texture of quinoa, and a splash of zesty dressing that awakens your taste buds.

    What makes this salad particularly appealing is its simplicity and versatility. It caters to a variety of dietary preferences, being naturally gluten-free, vegan, and low-calorie, ensuring everyone can enjoy it. Furthermore, this dish can serve as a light main course or a vibrant side dish, making it an ideal choice for Easter gatherings, picnics in the park, or a quick lunch on a busy day.

    In addition to its flavor profile, the Asparagus Easter Quinoa Salad is packed with health benefits. Quinoa is a complete protein, rich in fiber and essential amino acids, while asparagus is a powerhouse of vitamins A, C, E, and K, along with folate and antioxidants. Together, these ingredients create a refreshing dish that not only satisfies hunger but also nourishes the body, setting you up for a glowing spring.

    Benefits and Advantages of Asparagus Easter Quinoa Salad

    What sets the Asparagus Easter Quinoa Salad apart from other spring meals is its unique combination of benefits that cater to various lifestyles. First and foremost, the recipe is incredibly easy to prepare. With minimal cooking required, you can whip it up in less than 30 minutes, which is ideal for busy individuals or families. Simply cook the quinoa, blanch the asparagus, and toss everything together with a light dressing for a quick and delicious meal.

    Beyond its ease, this salad offers a wealth of health benefits. Incorporating quinoa adds a protein-rich component, making it an excellent option for vegetarians and vegans seeking to increase their protein intake without resorting to meat. Furthermore, quinoa is gluten-free, making it suitable for those with gluten sensitivities or celiac disease.

    The vibrant asparagus not only adds a pop of color but also boasts numerous health benefits. Its high antioxidant content supports overall health, and it’s known for its diuretic properties that help in detoxification. The combination of fresh herbs and lemon juice in the dressing elevates the dish, providing a refreshing zing while enhancing the body’s absorption of nutrients.

    This salad’s adaptability means it can fit into various dietary plans — whether you’re following a ketogenic, low-carb, or Mediterranean diet, you can modify it to suit your needs. Additionally, it serves as a fantastic option for meal prep. Prepare a larger batch and enjoy its flavors for several days, making it an excellent choice for those looking to eat healthier or save time throughout the week.

    Ingredients Overview

    Essential Ingredients for Asparagus Easter Quinoa Salad

    To prepare the Asparagus Easter Quinoa Salad, you will need the following ingredients:

    • 1 cup quinoa (rinsed and drained) – a nutrient-dense whole grain, packed with protein and fiber.
    • 1 bunch of asparagus (about 1 pound) – rich in vitamins and fiber, plus it adds crunch and flavor.
    • 1 cup cherry tomatoes (halved) – juicy and sweet, providing antioxidants and color.
    • 1/2 cup cucumber (diced) – refreshing and hydrating, with a mild flavor that complements other ingredients.
    • 1/4 cup red onion (finely diced) – adds a bit of sharpness and depth to the salad.
    • 1/4 cup fresh parsley (chopped) – a source of vitamins K and C, adding freshness.
    • 1/4 cup olive oil (extra virgin) – heart-healthy fat that helps absorb fat-soluble vitamins.
    • 2 tablespoons lemon juice (freshly squeezed) – adds brightness and balances flavors.
    • Salt and pepper to taste – enhances the overall flavor of the dish.

    All these ingredients are vegan, gluten-free, and low-calorie, making them perfect for spring meals.

    Dietary Substitutions to Customize Your Asparagus Easter Quinoa Salad

    The beauty of the Asparagus Easter Quinoa Salad is its customizable nature. Here are a few substitutions to cater to different dietary preferences:

    • Quinoa: For those who are avoiding grains, consider using riced cauliflower or chickpeas as a base instead. Both options are low-carb and can increase the protein content.

    • Asparagus: If you can’t find fresh asparagus, you can replace it with green beans or broccoli for a similar crunch and flavor profile.

    • Dressing: For a creamier alternative, consider using tahini or a dairy-free yogurt. This will provide a different texture while still being delicious.

    • Herbs: If parsley isn’t available, you can substitute with cilantro or basil for a unique twist. Each will impart a different flavor, making the salad distinct.

    • Vegetables: Feel free to add other seasonal vegetables like bell peppers, radishes, or zucchini. This adds variety and additional nutrients to your salad.

    The adaptability of this recipe allows everyone to enjoy a delightful dish that meets their dietary restrictions, making it perfect for gatherings and family meals.

    How to Prepare the Perfect Asparagus Easter Quinoa Salad: Step-by-Step Guide

    Creating the Asparagus Easter Quinoa Salad is a straightforward process. Follow these steps to ensure a perfect dish every time:

    1. Cook the Quinoa: Start by rinsing 1 cup of quinoa under cold water to remove its natural coating, called saponin, which can taste bitter. In a medium saucepan, combine the quinoa with 2 cups of water and a pinch of salt. Bring it to a boil, then reduce the heat, cover, and simmer for about 15 minutes or until the water is absorbed. Once finished, fluff it with a fork and let it cool.

    2. Prepare the Asparagus: While the quinoa is cooking, take 1 bunch of asparagus and trim the woody ends. Bring a pot of salted water to boil and blanch the asparagus for 3-4 minutes, until it’s bright green and tender-crisp. Immediately transfer it to an ice bath to halt the cooking process. Once cooled, chop the asparagus into bite-sized pieces.

    3. Chop the Vegetables: In a large mixing bowl, combine the cooled quinoa, chopped asparagus, 1 cup of halved cherry tomatoes, 1/2 cup diced cucumber, and 1/4 cup finely diced red onion. Mix gently to combine all the ingredients.

    4. Make the Dressing: In a small bowl, whisk together 1/4 cup of extra virgin olive oil, 2 tablespoons of freshly squeezed lemon juice, salt, and pepper to taste. You can also add a teaspoon of Dijon mustard for extra flavor. Taste and adjust the seasoning if needed.

    5. Combine Ingredients: Pour the dressing over the quinoa and vegetable mixture. Gently toss everything together until well coated. The lemony dressing will enhance all the flavors while bringing freshness to the dish.

    6. Serve or Refrigerate: For the best flavor, allow the salad to sit for at least 15 minutes before serving. This will let the dressing soak into the quinoa and vegetables. You can serve it at room temperature or chilled, depending on your preference.

    7. Garnish and Enjoy: Just before serving, toss in 1/4 cup of fresh chopped parsley for an added burst of flavor and garnish. This dish not only makes for a delectable meal but also presents beautifully for spring gatherings.

    Feel free to customize with additional ingredients or toppings such as nuts (like almonds or walnuts), seeds (like pumpkin or sunflower seeds), or even vegan feta for a creamier texture. This Asparagus Easter Quinoa Salad is bound to be a hit at any table!

    Mastering Asparagus Easter Quinoa Salad: Advanced Tips and Variations

    Now that you’ve grasped the basics of making the Asparagus Easter Quinoa Salad, consider trying out these advanced tips and variations to elevate your dish further:

    • Add Texture: For added crunch, toss in some toasted nuts or seeds, such as slivered almonds or pumpkin seeds. They will not only enhance the texture but also provide healthy fats.

    • Experiment with Herbs: While parsley is a great addition, you can substitute it with dill, mint, or even cilantro, depending on the flavor profile you prefer. Fresh herbs can dramatically change the salad’s taste.

    • Include a Protein Boost: If you’re looking to make the salad more substantial, add some plant-based protein like chickpeas, black beans, or even chopped tempeh. This makes it a fulfilling meal option.

    • Try Different Dressings: Switch up the dressing by incorporating different flavors. For instance, use a tahini dressing or a balsamic vinaigrette to create a different zing.

    • Spice it Up: If you enjoy a bit of heat, consider adding red pepper flakes or a dash of hot sauce to the dressing to give the salad a kick.

    • Seasonal Variations: This salad is incredibly versatile. In the summer, you might swap out the asparagus for grilled zucchini or roasted bell peppers. In the fall, try adding roasted sweet potatoes or butternut squash for a cozy twist.

    By experimenting with these variations, you can master different takes on the base recipe while keeping it fresh and exciting, perfect for any spring meal occasion.

    How to Store Asparagus Easter Quinoa Salad: Best Practices

    Storing your Asparagus Easter Quinoa Salad properly can extend its freshness and flavor. Here are some best practices for refrigeration, freezing, and reheating:

    • Refrigeration: If you have leftovers, transfer the salad to an airtight container and store it in the refrigerator. It can last for about 3 to 5 days, making it a fantastic option for meal prep.

    • Freezing: While quinoa salads don’t always freeze well due to the texture of the vegetables, if you want to freeze it, consider omitting dressings and fresh ingredients like tomatoes and cucumber. Instead, freeze the quinoa and asparagus mixture separately, then combine and dress it after thawing.

    • Reheating: If you prefer your salad warm, you can reheat the quinoa mixture (without any dressings) in the microwave or on the stovetop. However, avoid reheating dressed salads as it alters the texture and flavor.

    With these storage tips, you can enjoy your Asparagus Easter Quinoa Salad throughout the week without losing its deliciousness.

    Nutritional Value of Asparagus Easter Quinoa Salad

    The Asparagus Easter Quinoa Salad serves not only as a delightful dish but also as a nutritious powerhouse. Here’s a breakdown of the nutritional value per serving (approximately 1 cup):

    • Calories: 220
    • Total Fat: 10g (healthy fats from olive oil)
    • Saturated Fat: 1g
    • Cholesterol: 0mg (vegan-friendly)
    • Sodium: 120mg (adjustable based on salt added)
    • Total Carbohydrates: 30g
    • Dietary Fiber: 6g
    • Sugars: 3g
    • Protein: 8g (complete protein from quinoa)

    This salad is a fantastic source of antioxidants, vitamins A, C, and K, thanks to the asparagus and vegetables. The fiber content supports healthy digestion, while the healthy fats from olive oil aid in nutrient absorption. Such properties make it an excellent option for anyone conscious of their dietary intake.

    By integrating this Asparagus Easter Quinoa Salad into your meal rotation, you can enjoy not just the culinary experience but significant health benefits that contribute to your overall well-being.

    FAQs: Frequently Asked Questions About Asparagus Easter Quinoa Salad

    1. Can I make Asparagus Easter Quinoa Salad ahead of time?
    Yes, you can prepare the salad a day in advance. Just keep the dressing separate until you are ready to serve to maintain the freshness of the ingredients.

    2. What can I substitute for quinoa?
    If you’re looking for alternatives, consider using brown rice, bulgur, or even cauliflower rice for a low-carb option. Each will provide a different texture and flavor.

    3. Is this salad suitable for meal prep?
    Absolutely! This salad is great for meal prep. Just store it in airtight containers and keep the dressing separate until you are ready to eat.

    4. Can I add protein to this salad?
    Yes, you can add shredded chicken, chickpeas, or even tofu for additional protein. These options enhance the salad while keeping it fulfilling.

    5. How can I cater this recipe for kids?
    If you’re preparing this salad for kids, consider omitting the onions or using different vegetables according to their preferences. It’s still delicious while being nutritious.

    6. Will the salad keep its texture after freezing?
    While quinoa freezes well, vegetables such as asparagus can lose their texture upon thawing. It’s better to freeze only the quinoa and asparagus without dressing, then add fresh vegetables when serving.

    In conclusion, the Asparagus Easter Quinoa Salad is not just a dish but a celebration of health, flavor, and fresh ingredients, making it an excellent addition to your roster of spring meals. With its simple preparation and healthy ingredients, this recipe is destined to become a cherished favorite for all, no matter the dietary preference. Enjoy!

  • Tasty Easter Romaine Salad

    Tasty Easter Romaine Salad

    Tasty Easter Romaine Salad: A Tropical Delight

    Introduction to Tasty Easter Romaine Salad

    Spring is in the air, and with it comes the joyous celebration of Easter, a time for family gatherings, colorful decorations, and above all, delicious meals! This Tasty Easter Romaine Salad is the perfect dish to grace your spring table. Not only does it capture the vibrant essence of the season, but it also serves as a fabulous option for those seeking to indulge in healthy choices. As one of the best spring meals, this salad showcases crisp romaine lettuce combined with a medley of fresh and colorful ingredients.

    What makes this salad an exceptional choice is its simplicity and versatility. Whether you’re a busy parent, a health-conscious individual, or someone simply seeking a delightful dish to share, this recipe fits the bill. It’s vegan, gluten-free, and can easily be modified to suit various dietary needs, making it perfect for all your guests. Plus, this dish takes only minutes to prepare, so you can spend less time in the kitchen and more time enjoying the company of loved ones. Packed with nutrients yet incredibly satisfying, the Tasty Easter Romaine Salad is sure to inspire you to elevate your culinary repertoire this spring.

    Benefits and Advantages of Tasty Easter Romaine Salad

    When it comes to preparing spring meals, the Tasty Easter Romaine Salad stands out for several compelling reasons. First and foremost, it’s exceptionally easy to prepare, making it an ideal choice even for novice cooks. The primary components—fresh romaine, vibrant vegetables, and a zesty dressing—can be assembled in just a few simple steps.

    Nutritionally speaking, romaine lettuce is a fantastic base for any salad. It’s low in calories while rich in vitamins A, C, and K. This makes our Tasty Easter Romaine Salad an excellent choice for those looking to maintain a balanced diet. The array of colorful ingredients not only enhances the visual appeal but also introduces a variety of textures and flavors that delight the palate. With the inclusion of seasonal fruits like oranges or strawberries, you’ll add natural sweetness and essential vitamins to your plate.

    Moreover, the salad is incredibly versatile. If you’re catering to guests with dietary restrictions, there are no worries here! The basic recipe is easily adaptable to be both gluten-free and vegan, allowing everyone at your gathering to partake in this colorful dish.

    In summary, the Tasty Easter Romaine Salad is more than just an excellent option for spring meals; it’s an opportunity to bring family and friends together around a table filled with vibrant flavors and health-conscious choices.

    Ingredients Overview

    Essential Ingredients for Tasty Easter Romaine Salad

    To create your Tasty Easter Romaine Salad, you will need the following ingredients:

    • Romaine Lettuce (1 large head): The star of this salad, romaine provides crunch and essential nutrients.
    • Cherry Tomatoes (1 cup): Halved for added sweetness and a pop of color.
    • Cucumber (1 medium): Sliced thinly for crunch and refreshing taste.
    • Bell Pepper (1 medium, any color): Chopped to add vibrant color and vitamin C.
    • Avocado (1 large): Diced for creaminess and healthy fats.
    • Red Onion (1 small): Thinly sliced for a kick of flavor.
    • Fresh Herbs (e.g., parsley or cilantro, ¼ cup): Chopped for added freshness.
    • Olive Oil (3 tablespoons): A heart-healthy fat and the base for the dressing.
    • Apple Cider Vinegar (2 tablespoons): Adds tanginess and aids in digestion.
    • Salt and Pepper (to taste): Enhances flavor.

    This recipe is particularly appealing because it can be modified to suit various dietary preferences. For instance, it is naturally vegan, gluten-free, and low-calorie, making it a great choice for anyone looking to eat healthily while still enjoying delicious flavors.

    Dietary Substitutions to Customize Your Tasty Easter Romaine Salad

    Adapting this Tasty Easter Romaine Salad to meet different dietary needs or to make use of what you have on hand is easy. Here are some suggested substitutions:

    • Lettuce Base: If you do not have romaine lettuce available, feel free to use kale, spinach, or mixed greens as an alternative. Each will provide its unique taste and texture.
    • Protein Addition: To enhance the protein content, consider adding chickpeas, tofu, or grilled chicken. This is especially beneficial for vegetarians or those looking to increase their protein intake.
    • Dressing Variations: For those who may prefer a creamier dressing, substitute olive oil and vinegar with a tahini or hummus dressing. This will still keep the dish dairy-free but increase the creaminess.
    • Fruits: The cherries can be replaced by seasonal fruits like strawberries or peaches, depending on what is readily available in your area during spring.

    With these easy substitutions, the Tasty Easter Romaine Salad can cater to diverse tastes and dietary requirements, ensuring everyone at your table can enjoy this delightful dish.

    How to Prepare the Perfect Tasty Easter Romaine Salad: Step-by-Step Guide

    Crafting the perfect Tasty Easter Romaine Salad is remarkably straightforward. Follow these steps, and you will have a delicious dish ready in no time, ensuring your spring meals are as delightful as they are nutritious!

    1. Prepare the Lettuce: Start by thoroughly washing the romaine lettuce under cold water. Tear the leaves into bite-sized pieces and place them in a large salad bowl. The torn leaves provide a better texture for the salad.

    2. Chop the Vegetables: Next, prepare your vegetables. Halve the cherry tomatoes, slice the cucumber, chop the bell pepper into bite-sized pieces, and thinly slice the red onion. The more colorful your veggies, the more appealing your salad will be!

    3. Add the Avocado: Carefully slice the avocado in half, remove the pit, and scoop the flesh out with a spoon. Dice it into small cubes and gently add it to the salad bowl, taking care not to mash it.

    4. Incorporate Fresh Herbs: Rinse the fresh herbs, then pat them dry. Chop them finely and sprinkle them over the salad for an extra burst of freshness that perfectly complements the other flavors.

    5. Mix Your Dressing: In a small bowl, whisk together the olive oil, apple cider vinegar, salt, and pepper. Taste the dressing—adjust the seasoning if necessary by adding more vinegar or salt according to your preference. This dressing is a key component that ties together all the flavors in your salad.

    6. Combine Everything: Drizzle the dressing over the prepared salad. With two forks or salad tongs, gently toss the ingredients together until the salad is well-coated in the dressing. Be cautious not to mash the avocado.

    7. Serve and Enjoy: Divide the salad into serving bowls or plates. Optionally, top each serving with additional diced avocado or a sprinkle of seeds or nuts for extra crunch.

    Your Tasty Easter Romaine Salad is now ready to be enjoyed as one of the most delightful spring meals on your table!

    Mastering Tasty Easter Romaine Salad: Advanced Tips and Variations

    To elevate your Tasty Easter Romaine Salad beyond the basic recipe, consider these advanced tips and variations:

    • Balsamic Reduction: Create a balsamic reduction by simmering balsamic vinegar until it becomes syrupy. Drizzle this over your salad for a touch of sweetness and enhanced flavor.
    • Seed and Nut Toppings: Add toasted sunflower seeds, pumpkin seeds, walnuts, or almonds for extra texture and a nutrient boost.
    • Grains: Incorporate cooked quinoa, farro, or barley for a heartier salad. These grains not only add depth to the dish but also provide additional fiber and protein.
    • Feta or Nutritional Yeast: For an additional layer of flavor, sprinkle crumbled feta cheese (if not vegan) or nutritional yeast (for a vegan option) on top of the salad.

    With these tips, you’ll master the art of creating not only a delightful Tasty Easter Romaine Salad, but one that radiates with creativity and flavor, making your spring meals memorable.

    How to Store Tasty Easter Romaine Salad: Best Practices

    Storing leftovers or prepped ingredients properly can ensure your Tasty Easter Romaine Salad remains fresh and delicious. Here are the best practices:

    • Refrigeration: If you have leftovers, store the salad in an airtight container in the fridge. It’s best eaten within 2 days since the lettuce may become soggy over time.

    • Separation of Ingredients: To maintain the crispness of the salad, consider storing the dressing separately from the salad. Only dress the portion of the salad you plan to eat right away. This way, your salad remains fresh for multiple servings.

    • Freezing: Generally, it’s not advisable to freeze this salad as the texture of the lettuce and fresh vegetables fails to hold up. However, if you have leftover dressing, it can be frozen in ice cube trays for future use.

    Following these storage guidelines will ensure that your Tasty Easter Romaine Salad remains delightful even the next day!

    Nutritional Value of Tasty Easter Romaine Salad

    When considering spring meals, it’s important to understand their nutritional value. The Tasty Easter Romaine Salad not only offers a colorful palette but also a well-rounded nutritional profile. Here’s a general overview based on the estimated servings:

    • Calories: Approximately 180 calories per serving
    • Fat: 14g (primarily healthy fats from avocado and olive oil)
    • Carbohydrates: 12g
    • Fiber: 6g (excellent source due to romaine, vegetables, and optional grains)
    • Protein: 3g (can increase with additional protein options like chickpeas or chicken)
    • Vitamin A: An excellent source, over 100% of the daily requirement
    • Vitamin C: Approximately 40% of the daily requirement

    This salad is rich in vitamins, minerals, and dietary fiber, making it ideal for anyone seeking a nutritious yet satisfying meal.

    FAQs: Frequently Asked Questions About Tasty Easter Romaine Salad

    1. Can I make Tasty Easter Romaine Salad ahead of time?

    Absolutely! You can prep the ingredients beforehand, but do not dress the salad until you are ready to serve. This will keep the lettuce fresh and crisp.

    2. What can I substitute for olive oil in the dressing?

    You can use any other light oil like avocado oil or canola oil, or even a plant-based yogurt for a creamy dressing option.

    3. Is the Tasty Easter Romaine Salad gluten-free?

    Yes! The recipe is naturally gluten-free. Just ensure that any additional ingredients or dressings used do not contain gluten.

    4. Can I add protein to this salad?

    Yes! Adding grilled chicken, chickpeas, or tofu can enhance the protein content of the salad.

    5. What other vegetables can I include?

    Feel free to add or substitute other favorite vegetables like radishes, shredded carrots, or even fresh sprouts depending on your taste preferences.

    This Tasty Easter Romaine Salad is a fantastic addition to your spring meals, offering a burst of flavors and nutrients. With its flexibility and ease of preparation, it’s bound to be a favorite at your table this Easter! Enjoy making and sharing this delightful dish with family and friends.

  • Best Easter Spinach Salad

    Best Easter Spinach Salad

    Best Easter Spinach Salad: A Tropical Delight

    Introduction to Best Easter Spinach Salad

    As we welcome the vibrant season of spring, many of us look for light, refreshing dishes that celebrate nature’s bounty. The Best Easter Spinach Salad is a perfect embodiment of this seasonal spirit. Not only is this dish colorful and eye-catching, but it also embodies the essence of healthy spring meals. Loaded with nutrients and flavor, it’s a versatile salad that shines brightly on any festive table, inviting guests to indulge without the guilt.

    Crafted with fresh spinach, crisp fruits, and a zesty vinaigrette, this salad is designed to cater to a variety of dietary preferences. It’s simple enough for busy parents to whip up on chaotic weekdays and satisfies the craving for something delectable while being vegan, gluten-free, and low-calorie. Additionally, the vibrant greens and fruity accents make it a delightful addition to any Easter spread, embodying both taste and visual appeal.

    Whether you’re looking to impress your dinner guests or make a quick, nourishing meal for yourself, this spinach salad provides an easy solution. The fragrant herbs and colorful ingredients remind us that healthy eating doesn’t have to be boring; instead, it can be a joy to prepare and share. Join me as we dive deeper into the delicious world of spinach salads, showcasing the benefits and simple preparation of the Best Easter Spinach Salad.

    Benefits and Advantages of Best Easter Spinach Salad

    The Best Easter Spinach Salad is not just a treat for the taste buds; it also packs a powerful nutritional punch. Here are several benefits and advantages that make it a top contender among spring meals:

    Easy Preparation

    One of the biggest draws of this salad is its incredible ease of preparation. With minimal cooking required—just a few chopping and mixing steps—this dish can come together in under 20 minutes. This makes it perfect for busy individuals, students, or anyone who might hesitate in the kitchen. Being able to quickly toss together healthy ingredients in a bowl empowers you to maintain a wholesome diet without feeling overwhelmed.

    Nutritional Benefits

    Packed with vitamins and minerals, spinach is a superfood that offers a plethora of health benefits. Rich in iron, vitamin K, and antioxidants, it’s known to promote healthy blood circulation, support bone health, and combat oxidative stress. Combined with fresh fruits like strawberries and oranges, which provide additional vitamin C and fiber, this salad becomes a nutritional powerhouse. The contrasting flavors and textures elevate each bite, making healthy eating a delicious experience.

    Versatile for All Dietary Needs

    The Best Easter Spinach Salad champions inclusivity by catering to diverse dietary needs. The recipe can be easily customized to align with various lifestyles—indeed, it is:

    • Vegan: The salad can be made entirely plant-based by using a vegan-friendly dressing, such as tahini or an oil-vinegar combination.
    • Gluten-Free: Ingredients are naturally gluten-free, making it accessible for those with gluten sensitivities.
    • Low-Calorie: The absence of calorie-laden dressings and heavy ingredients makes it a favorable choice for those watching their weight.

    In essence, this salad is not just healthy; it’s a delightful way to add more greens to your diet while enjoying the flavors of early spring.

    Ingredients Overview

    Essential Ingredients for Best Easter Spinach Salad

    When preparing your Best Easter Spinach Salad, gathering the right ingredients is essential for achieving that perfect balance of flavors. Below is a comprehensive list of what you’ll need:

    • 5 cups fresh spinach – This forms the base of your salad, offering a nutritious punch.
    • 1 cup sliced strawberries – Adds a sweet and juicy dimension to the dish.
    • 1 orange, segmented – Lends a refreshing citrus note and vibrant color.
    • 1/2 cup walnuts, chopped – Provide a crunchy texture and healthy fats (optional for nut allergies).
    • 1/4 cup feta cheese, crumbled (or dairy-free alternative) – Adds a creamy, salty touch (omit for vegan variations).
    • 1/2 cup red onion, thinly sliced – For a bit of sharpness.
    • 1/4 cup olive oil – Essential for the dressing, providing healthy fats.
    • 2 tablespoons balsamic vinegar – Adds depth and sweetness to the dressing.
    • Salt and pepper to taste – Simple seasonings to enhance all flavors.

    By combining these ingredients, we create a colorful, nutritious, and satisfying salad that shines at any table.

    Dietary Substitutions to Customize Your Best Easter Spinach Salad

    Customization is key when it comes to preparing the best version of your salad. Below are some suggestions for dietary substitutions that maintain the spirit of the dish while catering to specific needs:

    1. For a Nut-Free Version:
    2. Substitute walnuts with sunflower seeds or pumpkin seeds for crunch.

    3. Dairy-Free Option:

    4. Instead of feta cheese, use avocado for creaminess or vegan cheese.

    5. Swap the Dressing:

    6. For a lighter dressing, replace balsamic vinegar with lemon juice mixed with olive oil for a fresh twist.

    7. Add Protein:

    8. For those who want a heartier salad, consider adding grilled chicken, tofu, or chickpeas for additional protein and satisfaction.

    By adjusting these ingredients, you can ensure that everyone can enjoy the Best Easter Spinach Salad tailored to their preferences and dietary restrictions.

    How to Prepare the Perfect Best Easter Spinach Salad: Step-by-Step Guide

    Creating the Best Easter Spinach Salad is simple when you follow these step-by-step instructions. The key here is to savor the bright, fresh ingredients as you mix them together!

    1. Wash the Spinach: Gently rinse the spinach leaves under cold water to remove any dirt or grit. Pat dry with a clean kitchen towel or use a salad spinner to remove excess moisture.

    2. Cut the Fruits: Slice the strawberries into thin pieces and segment the orange, being careful to remove any seeds. Set aside the fruit in a separate bowl for easy mixing later.

    3. Prepare the Nuts: If using walnuts or any other nuts, chop them into smaller pieces. You can toast them lightly in a dry skillet over medium heat for added flavor, but this is optional.

    4. Slice the Onion: Thinly slice the red onion and soak the pieces in cold water for a few minutes to reduce their pungent flavor. Drain before adding to the salad.

    5. Mix Dressing Ingredients: In a small bowl, whisk together the olive oil, balsamic vinegar, a pinch of salt, and pepper until the mixture is well combined.

    6. Combine Ingredients: In a large salad bowl, add the fresh spinach leaves, sliced strawberries, orange segments, chopped nuts, and drained red onion.

    7. Dress the Salad: Drizzle the dressing over the salad and gently toss everything together, ensuring the dressing evenly coats all ingredients.

    8. Add Feta (or Alternative): If using feta or a dairy-free alternative, sprinkle it over the top. Give the salad a gentle toss to combine everything without crushing the cheese.

    9. Serve: Plate the salad individually or serve it in the large bowl as a centerpiece on your Easter table. Enjoy immediately for optimal freshness.

    This step-by-step guide ensures that your Best Easter Spinach Salad is not only easy to prepare but also guarantees a burst of flavor that will delight your senses. Remember, you can always adapt each step to suit different dietary needs or ingredient availability.

    Mastering Best Easter Spinach Salad: Advanced Tips and Variations

    To take your Best Easter Spinach Salad to the next level, consider these advanced tips and variations. They can help you to master the recipe while keeping things interesting!

    Flavor Enhancements

    1. Herbs: Add chopped fresh herbs such as basil, parsley, or mint. They elevate flavor and provide an aromatic quality to your salad.

    2. Texture Play: For a gourmet touch, add toasted breadcrumbs or crispy chickpeas for extra crunch.

    3. Cheese Variations: Experiment with different cheeses— goat cheese, blue cheese, or spicy pepper jack can completely change the flavor profile.

    Dressing Options

    1. Dressing Variations: Try using a honey mustard vinaigrette or a citrus-based dressing to create a tangy twist that brightens the dish. Utilizing different vinegar types—apple cider, white wine, or even a citrus-infused vinegar—can also enhance flavor.

    Seasonal Adjustments

    1. Seasonal Ingredients: In summer, swap strawberries for peaches, or in autumn, incorporate roasted sweet potato cubes for warmth and depth.

    By incorporating these tips and variations, your Best Easter Spinach Salad will remain fresh and intriguing throughout various occasions and seasons. Don’t hesitate to get creative with presentation and flavors.

    How to Store Best Easter Spinach Salad: Best Practices

    To prolong the enjoyment of your Best Easter Spinach Salad, it’s essential to know how to store it correctly. Understanding proper storage techniques will help you maintain freshness while keeping flavors intact, enabling you to enjoy this delicious dish beyond your Easter celebrations.

    Refrigeration

    • Short Term: If you have leftover salad, store it in an airtight container in the refrigerator for up to 3 days. However, it’s best to keep the dressing separate until you’re ready to enjoy it again to avoid soggy spinach.

    Freezing

    • Not Recommended: It’s best to avoid freezing the salad, as spinach and other fresh vegetables tend to lose their crispness and texture when thawed.

    Reheating

    • For Leftovers: If you’ve added protein to your salad, you can lightly reheat it in a microwave for 30 seconds. However, it’s generally tastiest when enjoyed cold.

    Being mindful of how you store your Best Easter Spinach Salad will ensure you can relish its flavors and nutrients longer than just the holiday season.

    Nutritional Value of Best Easter Spinach Salad

    The Best Easter Spinach Salad packs a multitude of health benefits while remaining low-calorie. Below is a rough estimation of the nutrition per serving, making it an excellent choice for health-conscious individuals:

    • Calories: Approximately 180 calories
    • Total Fat: 12 grams (healthy fats from olive oil and nuts)
    • Saturated Fat: 2 grams
    • Cholesterol: 5 mg (if feta is included)
    • Sodium: 220 mg (without added salt)
    • Total Carbohydrates: 15 grams
    • Dietary Fiber: 4 grams
    • Sugars: 5 grams
    • Protein: 4 grams

    This salad is rich in vitamins A, C, K, and folate, making it a nutritious option for any spring meal. The blend of fresh produce and nuts contributes to heart health and aids digestion while providing energy.

    It’s a guilt-free choice that aligns perfectly with a balanced lifestyle, ensuring that you can enjoy decadent flavors without compromising on wellness.

    FAQs: Frequently Asked Questions About Best Easter Spinach Salad

    1. Can I make this salad ahead of time?
    2. Yes! You can prepare all ingredients ahead of time. Just keep the dressing separate until you’re ready to serve to keep the spinach fresh.

    3. What can I substitute for spinach?

    4. If spinach isn’t available, kale or arugula can be great alternatives. Just ensure to massage them gently with the dressing to soften their texture.

    5. Can I add other fruits?

    6. Absolutely! Feel free to experiment with other fruits like blueberries, mangoes, or apples based on what you have available or prefer.

    7. Is this salad kid-friendly?

    8. Yes! The sweetness from the strawberries and orange segments usually makes it appealing to children. You can also involve them in the preparation for added fun.

    9. How can I make this salad heartier?

    10. To make it more filling, add grilled chicken, quinoa, or chickpeas. These proteins will maintain the salad’s fresh, vibrant taste while ensuring it serves as a complete meal.

    Armed with these FAQs, you’ll be better equipped to enjoy your Best Easter Spinach Salad and share it with your family and friends!


    Now that you have a complete guide for the Best Easter Spinach Salad, it’s time to gather your ingredients and start creating this delicious and uplifting dish. Your family and friends will be delighted with this refreshing addition to your spring meals, making it a recipe worth repeating throughout the season!

  • Mediterranean Easter Tortellini Salad

    Mediterranean Easter Tortellini Salad

    Mediterranean Easter Tortellini Salad: A Tropical Delight

    Introduction to Mediterranean Easter Tortellini Salad

    Easter is a time for family gatherings, celebrating new beginnings, and embracing the beauty of spring. What better way to enjoy the delightful flavors of this season than with a Mediterranean Easter Tortellini Salad? This vibrant dish not only captures the essence of spring meals but also offers a medley of tastes and textures that celebrate the bounty of Mediterranean ingredients.

    Imagine al dente tortellini, tossed with fresh vegetables, aromatic herbs, and a zesty dressing. This salad is a beautiful addition to your Easter table, effortlessly combining health and flavor. Whether you’re a busy parent looking for quick, nutritious meals or a food enthusiast eager to explore new culinary horizons, this recipe suits all lifestyles.

    This Mediterranean Easter Tortellini Salad is incredibly versatile. It can cater to various dietary needs, as it can easily be made vegan, gluten-free, or low-calorie. Plus, the ease of preparation makes it ideal not just for festive occasions but also for any weekday lunch or dinner. With its nutrient-dense ingredients and vibrant aesthetics, it’s the perfect dish to bring joy to your spring meals. Ready to dive into this scrumptious recipe?

    Benefits and Advantages of Mediterranean Easter Tortellini Salad

    The Mediterranean Easter Tortellini Salad stands out for several compelling reasons. Firstly, it’s incredibly simple to prepare. You can have this salad ready in under thirty minutes, making it perfect for those last-minute spring gatherings or busy weeknights. This recipe requires minimal cooking skills, allowing anyone to whip up a delicious meal without stress.

    Moreover, this salad is packed with health benefits. Tortellini, commonly made from whole wheat or traditional pasta, can be a source of protein and fiber. When combined with a variety of fresh vegetables—such as bell peppers, cherry tomatoes, and cucumbers—you introduce essential vitamins and minerals into your dish. The incorporation of healthy fats, like olive oil and avocado, not only enhances flavor but also supports heart health and aids in nutrient absorption.

    Another significant advantage is its adaptability. This Mediterranean salad fits a range of dietary lifestyles, accommodating vegans and those seeking gluten-free options by simply choosing the right tortellini and substitutions.

    Moreover, this vibrant dish is suitable for various occasions. Whether you are celebrating Easter with family or enjoying a casual spring lunch with friends, the Mediterranean Easter Tortellini Salad pairs beautifully with grilled meats or can stand alone as a main course. With its eye-catching visuals and irresistible flavors, it is sure to become a staple in your collection of spring meals.

    Ingredients Overview

    Essential Ingredients for Mediterranean Easter Tortellini Salad

    Here’s a detailed list of the ingredients required to create a refreshing Mediterranean Easter Tortellini Salad. Each ingredient plays a specific role in enhancing the dish’s flavor and nutritional profile.

    • Tortellini: 2 cups (fresh or frozen). Opt for whole wheat or gluten-free options for a healthier or diet-friendly version.
    • Cherry Tomatoes: 1 cup, halved. These juicy gems add sweetness and color.
    • Cucumber: 1 medium, diced. Provides a refreshing crunch and hydration.
    • Bell Peppers: 1 cup (mixed colors), diced. Rich in vitamins A and C, and adds sweetness.
    • Red Onion: 1/4 cup, thinly sliced. Offers a mild bite and beautiful color.
    • Kalamata Olives: 1/2 cup, pitted and halved. A staple in Mediterranean cuisine that imparts a salty depth of flavor.
    • Feta Cheese: 1/2 cup crumbled or vegan feta. Adds creaminess; omit for a vegan version.
    • Fresh Parsley: 1/4 cup, chopped. Brightens the salad with a fresh, herbal note.
    • Olive Oil: 1/4 cup. A healthy fat that promotes satisfaction and adds flavor.
    • Lemon Juice: 2 tablespoons. Enhances flavor with brightness; ideal for spring meals.
    • Salt and Pepper: To taste. Essential for balancing flavors.

    This ingredient list serves as a guideline and can be adjusted based on your personal preferences or dietary restrictions.

    Dietary Substitutions to Customize Your Mediterranean Easter Tortellini Salad

    To cater to various dietary needs, consider these substitutions:

    • Gluten-Free Tortellini: Use gluten-free pasta options, such as quinoa or rice-based tortellini.
    • Vegan Cheese: Replace feta with a dairy-free alternative or skip it altogether for a lighter version.
    • Add proteins: For a heartier salad, incorporate grilled chicken, shrimp, or chickpeas as a protein source.
    • Vegetables: Feel free to add or substitute other vegetables such as spinach, arugula, or broccoli for added nutrition.
    • Herbs: Basil, mint, or dill can be great alternatives to parsley for a fresh twist.

    These variations and substitutions allow you to customize the Mediterranean Easter Tortellini Salad to suit your specific tastes and dietary requirements while keeping it delicious and healthy.

    How to Prepare the Perfect Mediterranean Easter Tortellini Salad: Step-by-Step Guide

    Follow these simple steps to create your Mediterranean Easter Tortellini Salad. Remember, this dish can adapt to different dietary preferences, making it a versatile addition to your spring meals!

    1. Boil the Tortellini: In a large pot, bring salted water to a rolling boil. Add 2 cups of tortellini and cook according to package instructions, usually about 3-5 minutes for fresh and 7-9 minutes for frozen varieties. You want the tortellini to be al dente. Drain and rinse under cold water to stop the cooking. Set aside.

    2. Prepare the Vegetables: While the tortellini cooks, wash and chop your vegetables. Dice the cucumber, halve the cherry tomatoes, chop the bell peppers, and slice the red onion.

    3. Mix Ingredients: In a large mixing bowl, combine the cooked tortellini, chopped vegetables, and olives. Add the crumbled feta cheese and chopped parsley for extra freshness.

    4. Make the Dressing: In a small bowl, whisk together 1/4 cup of olive oil, 2 tablespoons of lemon juice, salt, and pepper. Adjust seasoning to taste.

    5. Combine Everything: Pour the dressing over the tortellini and vegetable mixture. Toss gently but thoroughly to ensure everything is well coated.

    6. Chill and Serve: Let the salad sit in the refrigerator for 30 minutes to allow the flavors to meld together. This dish can be served cold or at room temperature, perfect for any spring occasion.

    7. Garnish if Desired: Right before serving, give your salad a light toss and garnish with additional parsley or some extra feta for aesthetics.

    This step-by-step guide ensures that your Mediterranean Easter Tortellini Salad turns out perfect every time. Enjoy the rich colors and delightful flavors as they come together in this fantastic dish!

    Mastering Mediterranean Easter Tortellini Salad: Advanced Tips and Variations

    To take your Mediterranean Easter Tortellini Salad to the next level, here are some advanced tips and variations:

    • Marinate Tortellini: For added flavor, consider marinating the tortellini in a mixture of olive oil, vinegar, garlic, and herbs for about 15 minutes before combining with vegetables.

    • Add Nuts or Seeds: Incorporate toasted pine nuts or sunflower seeds for added crunch and healthy fats.

    • Spices and Seasoning: Experiment with spices such as oregano, thyme, or Italian seasoning in the dressing to deepen the flavor.

    • Roast Your Veggies: For a different texture and flavor, roast bell peppers, zucchini, and red onions until slightly charred and tender before tossing them with the salad.

    • Create a Full Meal: Serve the salad alongside grilled chicken, salmon, or a side of garlic bread to create a complete spring meal that your family will love.

    These tips not only enhance the flavor and presentation of your Mediterranean Easter Tortellini Salad but also allow you to play with ingredients and make the dish uniquely your own.

    How to Store Mediterranean Easter Tortellini Salad: Best Practices

    Storing your Mediterranean Easter Tortellini Salad properly will keep it fresh and delicious. Here’s how to best store this delightful dish:

    1. Refrigeration: Place the salad in an airtight container in the refrigerator. It will stay fresh for up to 3 days, making it a great make-ahead option for your spring meals.

    2. Freezing: While freezing is not recommended for salads with fresh vegetables, if you have leftover tortellini or dressing, you can freeze those components separately. Note that the texture of the vegetables may alter.

    3. Reheating: If you want to enjoy leftover tortellini, you can reheat it in a saucepan over low heat or in the microwave until warm. Ensure that you do not overcook, as it may become mushy.

    Following these storage methods ensures that your Mediterranean Easter Tortellini Salad remains as tasty as the moment it was made.

    Nutritional Value of Mediterranean Easter Tortellini Salad

    Understanding the nutritional value of your Mediterranean Easter Tortellini Salad can help you make informed choices about your meals. Here’s a breakdown of the estimated nutritional information per serving (based on a standard recipe without protein additions):

    • Calories: Approximately 320
    • Carbohydrates: 40g
    • Protein: 10g (varies with the addition of protein ingredients)
    • Total Fat: 16g
    • Saturated Fat: 4g
    • Dietary Fiber: 5g
    • Sugars: 4g
    • Cholesterol: 20mg (if using feta cheese)

    This salad is rich in essential vitamins and minerals, making it an excellent option for health-conscious individuals. The combination of healthy fats, proteins, and carbohydrates means it’s a well-rounded meal, perfect for your collection of spring meals. The high fiber content also helps in digestion, promoting overall wellness.

    FAQs: Frequently Asked Questions About Mediterranean Easter Tortellini Salad

    To help you further, here are some frequently asked questions regarding the Mediterranean Easter Tortellini Salad:

    1. Can I make this salad ahead of time?
    2. Yes! This salad can be prepared a few hours or even a day in advance. Just remember to keep it refrigerated and give it a good stir before serving.

    3. What kind of tortellini is best for this recipe?

    4. You can use any type you prefer, whether cheese, meat, or plant-based. Whole wheat or gluten-free options are great for a healthier choice.

    5. Is this recipe suitable for vegans?

    6. Absolutely! Swap the feta cheese for a vegan alternative and ensure the tortellini is cruelty-free.

    7. What can I substitute for feta cheese?

    8. If you’re not a fan of feta, you can omit it entirely, replace it with tofu, or use nutritional yeast for a cheesy flavor.

    9. How can I modify the dressing for a creamier texture?

    10. You can add Greek yogurt or silken tofu to the dressing for a creamier consistency while maintaining freshness.

    By addressing common concerns and inquiries, you’ll be better equipped to create your Mediterranean Easter Tortellini Salad, tailored to your tastes and dietary preferences. Enjoy crafting this delightful dish as part of your memorable spring meals!


    The Mediterranean Easter Tortellini Salad is not just a dish; it’s a celebration of spring and health. With its palette of flavors and colors, it brings both joy and nourishment to your table. Embrace the season’s spices and herbs, channel your inner chef, and delight in this easy yet elegant recipe that will be cherished by all ages!

  • Classic Roasted Brussels Sprouts And Carrots

    Classic Roasted Brussels Sprouts And Carrots

    Classic Roasted Brussels Sprouts And Carrots: A Tropical Delight

    Introduction to Classic Roasted Brussels Sprouts And Carrots

    Are you on the lookout for scrumptious yet easy-to-make healthy dinner recipes that cater to all dietary needs? Look no further! Classic Roasted Brussels Sprouts and Carrots offer an incredible combination of flavor and nutrition that will brighten up your dinner table. This recipe showcases earthy Brussels sprouts, sweet carrots, and a few delightful seasonings that bring out the natural flavors of the vegetables.

    This classic dish is not only simple to prepare but also versatile enough to suit diverse tastes. It’s perfect for busy weeknights, family gatherings, or even a cozy dinner for two. Whether you’re a busy parent trying to pack in healthy options for your kids, a college student looking for quick and nutritious meals, or a renowned chef seeking some fresh inspiration, this recipe is bound to impress.

    Each serving is bursting with vitamins, minerals, and unique flavor, making it an excellent option for a vegan, gluten-free, and low-calorie dinner. Moreover, roasting enhances the sweetness of the carrots while giving Brussels sprouts a delightful crispness, transforming everyday ingredients into something spectacular. So, roll up those sleeves and let’s dive into this delightful journey of preparing Classic Roasted Brussels Sprouts and Carrots!

    Benefits and Advantages of Classic Roasted Brussels Sprouts And Carrots

    Embracing this recipe for Classic Roasted Brussels Sprouts and Carrots comes with numerous benefits that stretch beyond just taste. First and foremost, the preparation process is straightforward and manageable. In less than an hour, you can have a nutrient-rich side dish ready to complement your main course.

    Ease of Preparation

    In today’s fast-paced world, many people search for convenient yet healthy options. This dish requires minimal ingredients—just Brussels sprouts, carrots, olive oil, salt, and pepper. You can easily toss it all together and pop it in the oven, allowing the magic of roasting to work while you handle other dinner preparations. This makes it an ideal choice for busy parents, working professionals, and students alike.

    Health Benefits

    Brussels sprouts and carrots are nutritional powerhouses. They’re packed with vitamins A, C, and K, along with dietary fiber, antioxidants, and many other essential nutrients. Incorporating these vegetables into your meals can promote better digestive health and boost your immune system. Moreover, Brussels sprouts are known for their cancer-fighting properties, while carrots can improve vision and enhance skin health. Collectively, these benefits reinforce why selecting healthy dinner recipes is vital for maintaining a balanced diet.

    Versatility for Dietary Needs

    Not only does this recipe cater to individual health preferences, but it also adapts beautifully to varied diets. Whether you’re vegan, vegetarian, paleo, or gluten-free, this dish checks all the boxes. Additionally, you can easily incorporate other vegetables of choice or even add some protein toppings—the possibilities are endless!

    Ingredients Overview

    Essential Ingredients for Classic Roasted Brussels Sprouts And Carrots

    To create your Classic Roasted Brussels Sprouts and Carrots, you’ll need the following ingredients:

    • Brussels Sprouts (1 lb): Look for vibrant green sprouts, and discard any yellow or discolored leaves.
    • Carrots (2 medium): Fresh, sweet carrots enhance the earthy flavors. If possible, opt for rainbow carrots for added color and nutrients.
    • Olive Oil (3 tablespoons): This heart-healthy fat is essential for roasting. Alternatively, you can substitute with avocado oil for a different flavor profile.
    • Salt (1 teaspoon): A natural flavor enhancer, Himalayan pink salt is a great choice for added minerals.
    • Black Pepper (1 teaspoon): Freshly ground will impart more flavor than pre-ground varieties.
    • Optional Aromatics: Fresh garlic (2 cloves, minced) or herbs like rosemary or thyme can elevate the dish even further.

    Dietary Substitutions to Customize Your Classic Roasted Brussels Sprouts And Carrots

    Here are some substitutions to accommodate various dietary preferences:

    • For Vegan: No adjustments necessary, as the recipe is already vegan-friendly.
    • For Gluten-Free: Again, this recipe naturally adheres to gluten-free guidelines, making it perfect for those avoiding gluten.
    • For Oil-Free: You may omit the olive oil and opt for vegetable broth or water to facilitate roasting.
    • For Additional Flavor: Consider adding nutritional yeast for a cheesy flavor without dairy, or maple syrup for a hint of sweetness.

    How to Prepare the Perfect Classic Roasted Brussels Sprouts And Carrots: Step-by-Step Guide

    Now that you’ve gathered your ingredients let’s prepare your Classic Roasted Brussels Sprouts and Carrots with these easy steps:

    1. Preheat the Oven: Set your oven to 400°F (200°C). This temperature is perfect for roasting vegetables, allowing them to caramelize beautifully.

    2. Clean the Vegetables: Rinse Brussels sprouts and carrots under cold water. Pat dry with a towel. For the Brussels sprouts, trim the stem end and cut them in half. For the carrots, peel the outer layer and slice them into 1-inch pieces.

    3. Combine Ingredients: In a large mixing bowl, toss the Brussels sprouts and carrot chunks with olive oil, salt, and pepper. Ensure that every piece is well-coated for even roasting. For added flavor, it’s the perfect time to mix in minced garlic and fresh herbs.

    4. Spread on Baking Sheet: Spread the vegetables evenly on a baking sheet lined with parchment paper. This helps prevent sticking and makes for easy cleanup.

    5. Roast the Vegetables: Place the baking sheet in the preheated oven. Roast for about 25-30 minutes, stirring halfway through to ensure even cooking. You want them to be golden brown and tender.

    6. Check for Doneness: After 25 minutes, check the Brussels sprouts and carrots. They should be crisp-tender with a bit of caramelization. If you prefer them extra crispy, leave them in for an additional 5 minutes.

    7. Serve Warm: Once they’re perfectly roasted, remove them from the oven. Serve warm as a side dish for dinner or a delightful addition to your meal prep.

    8. Optional Toppings: Add toasted nuts, a squeeze of lemon juice, or a sprinkle of balsamic glaze to enhance flavors even further.

    Following these steps, you’ll create a delicious and nutritious dish that fits perfectly into your collection of healthy dinner recipes!

    Mastering Classic Roasted Brussels Sprouts And Carrots: Advanced Tips and Variations

    While the basic recipe for Classic Roasted Brussels Sprouts and Carrots is delightful enough, there are several tips and variations you could consider to master it even further.

    Advanced Cooking Tips:

    • Uniform Sizing: Cut your vegetables into uniform sizes to ensure even cooking. Larger pieces will take longer, resulting in uneven textures.

    • Experiment with Spices: Feel free to experiment by adding spices like paprika, garlic powder, or even curry powder for a distinct flavor profile.

    • High Heat for Extra Crispiness: For an extra crispy texture, try increasing the oven temperature to 425°F (220°C) for the last 5-10 minutes of roasting.

    Variations to Try:

    • Add Protein: Incorporate cooked chickpeas or lentils to make it a meal. They can roast alongside the veggies for extra flavor.

    • Herbed Variation: Try adding different herbs—like oregano or parsley—to change the flavor landscape. Fresh herbs can be added at the end for a vibrant touch.

    • Sweet-Lemon Glaze: Drizzle a sweet lemon glaze made from lemon juice and maple syrup over the veggies before serving to add a zesty sweetness.

    With these tips and variations, you can elevate the dish and make it your own, providing endless options for new flavors to explore in your healthy dinner recipes rotation.

    How to Store Classic Roasted Brussels Sprouts And Carrots: Best Practices

    Leftover Classic Roasted Brussels Sprouts and Carrots can last in your kitchen, so proper storage is essential to maintain flavor and freshness.

    Refrigeration

    Allow the roasted veggies to cool completely before storing. Place them in an airtight container or wrap them in plastic wrap. They can be stored in the refrigerator for up to 3-4 days. The flavors may deepen and improve after a day or two!

    Freezing

    If you want to keep them longer, consider freezing them. Spread the cooled roasted vegetables on a baking sheet in a single layer and freeze until solid. This step prevents them from sticking together. Once frozen, transfer them to a freezer-safe container or bag. They can be kept in the freezer for up to 3 months.

    Reheating

    To reheat, simply spread the vegetables on a baking sheet and warm them in the oven at 350°F (175°C) for about 10-15 minutes. You can also use a microwave, but be careful not to overcook them, which could lead to a mushy texture. Adding a dash of olive oil during reheating can help rejuvenate the flavors.

    By mastering these storage techniques, you will ensure your healthy dinner recipes remain delicious and nutritious for every meal.

    Nutritional Value of Classic Roasted Brussels Sprouts And Carrots

    Understanding the nutritional profile of Classic Roasted Brussels Sprouts and Carrots can reinforce your decision to include it in your meal plan. Here’s a general overview of the nutrition per serving (about 1 cup of finished dish):

    • Calories: Approximately 120 calories
    • Protein: 4g
    • Fat: 7g (mostly from olive oil)
    • Carbohydrates: 16g
    • Fiber: 5g
    • Sugars: 3g
    • Vitamins and Minerals:
      • Vitamin A: 140% of the Daily Value
      • Vitamin C: 100% of the Daily Value
      • Vitamin K: 120% of the Daily Value
      • Folate: 10% of the Daily Value
      • Potassium: 10% of the Daily Value

    This nutrient-rich profile should encourage you to incorporate more of these vegetables into your diet. Moreover, because it’s low in calories and high in fiber, it works exceptionally well for anyone looking to maintain or lose weight while enjoying flavorful dishes.

    FAQs: Frequently Asked Questions About Classic Roasted Brussels Sprouts And Carrots

    1. Can I make Classic Roasted Brussels Sprouts and Carrots ahead of time?

    Yes! You can prepare the vegetables a day in advance and store them in the refrigerator. Simply reheat them before serving.

    2. Is it possible to add other vegetables to this recipe?

    Absolutely! Feel free to add vegetables like sweet potatoes, bell peppers, or zucchini. Just ensure they have similar cooking times to the Brussels sprouts and carrots.

    3. Can I roast them in an air fryer instead?

    Yes, air fryers are an excellent option for roasting vegetables. You can cook them at 375°F (190°C) for about 15-20 minutes, shaking the basket halfway through for even cooking.

    4. How do I make this recipe more filling?

    To make it a complete meal, consider adding a protein source such as chickpeas, tofu, or chicken thighs. You can roast the protein with the vegetables or cook them separately.

    5. Can I use frozen Brussels sprouts and carrots for this recipe?

    Fresh vegetables are recommended for the best texture and flavor. Frozen vegetables may be used, but ensure they are fully thawed and drained before roasting.

    By addressing these FAQs, you can ensure a successful cooking experience with this outstanding recipe. As you experiment with Classic Roasted Brussels Sprouts and Carrots, you’ll discover new dimensions of flavor while sticking to your healthy dinner recipes goals.

    Final Thoughts

    After exploring the wonderful benefits, preparation tips, storage techniques, and nutritional value of this delightful dish, it’s time for you to bring Classic Roasted Brussels Sprouts and Carrots into your kitchen. It’s an effortless way to enjoy healthful, tasty vegetables that the whole family will love. Celebrate mindful cooking and nourished living by adding this recipe to your roster of go-to healthy dinner recipes!

  • My Asian GrandmaS Secret Recipe For Best Orange Salad

    My Asian GrandmaS Secret Recipe For Best Orange Salad

    My Asian Grandma’s Secret Recipe For Best Orange Salad!: A Tropical Delight

    Introduction to My Asian Grandma’s Secret Recipe For Best Orange Salad!

    Discovering new recipe ideas is a delight, especially when they come from cherished family traditions. My Asian Grandma’s Secret Recipe for Best Orange Salad is a beautiful blend of flavors and textures that is perfect for any occasion. Whether you are preparing a light lunch, a refreshing side dish for dinner, or a vibrant addition to your picnic basket, this salad is bound to impress.

    What makes this salad stand out? First and foremost, it’s exceptionally easy to prepare. With just a handful of fresh ingredients combined in a matter of minutes, you’ll have a dish that looks like a culinary masterpiece. It’s also a friend to your health—loaded with vitamins and antioxidants found in oranges, this salad is not only delicious but also nutritious.

    Vegan and gluten-free, this recipe caters to various dietary needs, making it an ideal choice for busy parents juggling multiple meal preferences or working professionals looking for a quick, yet satisfying option. Simply put, My Asian Grandma’s Orange Salad is a cheerful burst of flavor, packed into a bowl, and ready to be shared.


    Benefits and Advantages of My Asian Grandma’s Secret Recipe For Best Orange Salad!

    When seeking simple and delightful recipe ideas, My Asian Grandma’s Secret Recipe for Orange Salad should be on your radar. Here are some compelling reasons why it’s an excellent choice:

    1. Simplicity: This salad is unbelievably straightforward to prepare. With only a few fresh ingredients, you won’t need hours in the kitchen. A quick chop here and a toss there, and you’re ready to enjoy!

    2. Health Boost: Oranges are rich in vitamin C, which supports the immune system and promotes healthy skin. The addition of crunchy cucumbers and aromatic herbs offers fiber and antioxidants, making this dish ideal for anyone looking to boost their nutrient intake without sacrificing flavor.

    3. Versatile Option: This recipe is incredibly adaptable, allowing you to cater it to your preferences or dietary restrictions easily. Whether you’re a vegan, need gluten-free meals, or simply want a low-calorie option, this salad checks all the boxes.

    4. Appealing Presentation: The vibrant colors of the oranges, cucumbers, and fresh herbs create a visually stunning dish that can be a centerpiece on any table. It’s sure to impress guests and loved ones alike.

    5. Perfect for Meal Prep: This Orange Salad can be made ahead of time, making it a perfect candidate for meal prepping. Just pack it in your lunch box or store it in the refrigerator for a quick bite later.

    By integrating this salad into your repertoire of recipe ideas, you’ll have a dish that not only nourishes but also pleases the palate.


    Ingredients Overview

    Essential Ingredients for My Asian Grandma’s Secret Recipe For Best Orange Salad!

    To create My Asian Grandma’s Secret Recipe for Best Orange Salad, gather the following ingredients:

    • 4 large navel oranges (or any sweet variety)
    • Bright and juicy, these will be the star of your salad.

    • 1 medium cucumber

    • Adds a refreshing crunch, enhancing both texture and flavor.

    • 1 cup pomegranate seeds (optional)

    • Provides a delightful pop of color and sweetness alongside tangy notes.

    • 1/4 cup fresh mint leaves

    • Offers a cool, aromatic layer that complements the citrus beautifully.

    • 1 lime (juiced)

    • Brightens the dish and balances the sweetness of the oranges.

    • 1 tablespoon honey or agave syrup (for vegan)

    • Adds a touch of sweetness and helps to meld the flavors together.

    • Salt and pepper to taste

    • Elevates the flavors and brings the dish together.

    This salad is not only delicious but also mindful of dietary restrictions. With vegan and gluten-free options clearly noted, everyone can enjoy this refreshing dish without worry.

    Dietary Substitutions to Customize Your My Asian Grandma’s Secret Recipe For Best Orange Salad!

    Cooking should be inclusive and adaptable. Here are some substitutions you can easily make based on dietary needs or ingredient availability:

    1. Orange Alternatives: If oranges aren’t available, feel free to substitute them with grapefruits or mandarins for a unique twist.

    2. Cucumber Choices: You can use any variety of cucumber, or try zucchini for a different texture.

    3. Sweetener Swap: If you’re looking for a sugar-free option, consider using a stevia-based sweetener, or simply omit sweeteners altogether to rely on the natural sugars of the fruit.

    4. Herb Variations: While mint pairs beautifully with orange, cilantro or basil can also provide an interesting flavor profile. Feel free to experiment!

    5. Add Protein: For those looking to add more protein, chopped nuts like almonds or walnuts can lend a satisfying crunch and added nutrition.

    These substitutions highlight the versatility of My Asian Grandma’s Orange Salad, making it a flexible addition to your collection of recipe ideas.


    How to Prepare the Perfect My Asian Grandma’s Secret Recipe For Best Orange Salad!: Step-by-Step Guide

    Creating a delicious Orange Salad is simple and rewarding. Follow these easy steps to prepare this vibrant dish:

    1. Prepare the Oranges:
    2. Start by peeling the oranges and removing any pith. Cut them into bite-sized segments and place them into a large mixing bowl. This will be the base of your salad.

    3. Slice the Cucumber:

    4. Rinse and peel the cucumber if desired. Slice it into thin rounds or half-moons, depending on your texture preference. Add the sliced cucumber to the bowl with the orange segments.

    5. Add Pomegranate Seeds:

    6. If you’re including pomegranate seeds, add them to the mixture now. They will not only enhance the flavor but also provide a delightful crunch.

    7. Prepare the Dressing:

    8. In a small bowl, whisk together the lime juice, honey (or agave syrup), salt, and pepper. Taste it—adjust the sweetness with more honey or tang with more lime juice to match your preference.

    9. Combine Ingredients:

    10. Pour the dressing over the orange and cucumber mixture. Gently toss everything together to coat the ingredients evenly without smashing the delicate orange segments.

    11. Chop the Mint:

    12. Rinse the mint leaves, pat them dry, and chop them roughly. Add them to the salad, allowing the fresh aroma to fill the bowl.

    13. Toss and Serve:

    14. Give the salad one last gentle toss to combine everything. Serve immediately for the freshest taste, or let it sit for a few minutes to allow the flavors to meld.

    15. Optional Garnishes:

    16. Consider garnishing with additional mint leaves or a sprinkle of nuts for added flair.

    This step-by-step approach makes this dish approachable for home cooks of all levels, showcasing not just the simplicity of the recipe but also the adaptability that fits various recipe ideas and dietary needs.


    Mastering My Asian Grandma’s Secret Recipe For Best Orange Salad!: Advanced Tips and Variations

    Once you’ve mastered the basic preparation of My Asian Grandma’s Orange Salad, here are some advanced tips and variations to elevate your salad-making skills:

    1. Marinate for Flavor:
    2. Letting the salad sit for 30 minutes before serving can enhance the flavor. This allows the dressing to soak into the oranges and cucumber, creating a richer taste experience.

    3. Add Variety:

    4. Try incorporating other fruits such as strawberries, mangoes, or kiwi. This not only adds different flavors but also makes the salad look even more appealing.

    5. Experiment with Textures:

    6. Introducing crunchy toppings like roasted almonds or pumpkin seeds can add an enjoyable texture to the salad. Just be sure to add these just before serving to keep them crunchy.

    7. Make It a Meal:

    8. To transform this salad into a complete meal, consider adding grilled chicken, shrimp, or tofu. This helps cater to protein needs, especially if meal prepping for busy weeks.

    9. Seasonal Swaps:

    10. Adapt the recipe to suit seasonal fruits and veggies available in your area. This ensures your salad stays fresh and tailored to what’s in season.

    These tips will not only help you perfect My Asian Grandma’s Orange Salad, but they also encourage creative kitchen experimentation, allowing you to truly make this salad your own among your repertoire of recipe ideas.


    How to Store My Asian Grandma’s Secret Recipe For Best Orange Salad!: Best Practices

    Storing My Asian Grandma’s Orange Salad correctly is vital to maintain its freshness and flavor, especially if you’ve prepared a large batch. Here are best practices for storage:

    1. Refrigeration:
    2. Store any leftover Orange Salad in an airtight container in the refrigerator. This will prevent the salad from drying out and absorbing other odors from your fridge.

    3. Consume Quickly:

    4. For optimal freshness, consume the salad within 2-3 days. The oranges and cucumbers can lose their crispness over time.

    5. Avoid Soaking Dressing:

    6. If you know you’ll have leftovers, consider keeping the dressing separate until serving to prevent the salad ingredients from becoming soggy.

    7. Freezing?:

    8. Freezing this salad is not recommended, as the texture of oranges and cucumbers does not fare well in thawing. Instead, enjoy it fresh, which enhances the dish’s appeal.

    9. Transporting:

    10. If you’re taking the salad to a gathering, consider packing the dressing separately. This will allow for easy assembly right before serving and ensure the salad remains fresh and crisp.

    Proper storage will keep My Asian Grandma’s Orange Salad tasty and enjoyable, enabling you to continue indulging in your recipe ideas for days to come!


    Nutritional Value of My Asian Grandma’s Secret Recipe For Best Orange Salad!

    Understanding the nutritional aspects of your meals can empower healthier choices. Here’s a detailed breakdown of the nutritional content for one serving (approximately 1 cup) of My Asian Grandma’s Orange Salad:

    • Calories: 120
    • Total Fat: 0.5g
    • Saturated Fat: 0.1g
    • Cholesterol: 0mg
    • Sodium: 15mg
    • Total Carbohydrates: 30g
    • Dietary Fiber: 4g
    • Sugars: 18g
    • Protein: 2g
    • Vitamin C: 80% of the Daily Value (DV)
    • Calcium: 4% of the DV
    • Iron: 2% of the DV

    This salad is not only low in calories but is also a powerhouse of vitamins and minerals, thanks to the abundance of fruits and vegetables. The high vitamin C content makes it an excellent choice for an immune boost, while the healthy fiber supports digestion and promotes a feeling of fullness.

    Tracking the nutritional values helps you understand and balance your daily intake, allowing you to incorporate this fresh salad smoothly into your recipe ideas for a healthier lifestyle.


    FAQs: Frequently Asked Questions About My Asian Grandma’s Secret Recipe For Best Orange Salad!

    1. Can I make this salad ahead of time?
    Absolutely! You can prepare My Asian Grandma’s Orange Salad a few hours in advance. Just keep the dressing separate until you’re ready to serve to maintain freshness.

    2. Is it possible to add other fruits?
    Yes! Feel free to get creative by adding seasonal fruits like strawberries, mangoes, or avocados. The flavors will complement the oranges nicely.

    3. What can I use instead of honey for a vegan option?
    Agave syrup is a great alternative for those looking for a vegan-friendly sweetener. You can also use maple syrup if desired.

    4. How do I store leftovers?
    Keep the salad in an airtight container in the refrigerator. It’s best to consume it within 2-3 days for the best taste and texture.

    5. What can I substitute if I’m allergic to oranges?
    If you have an orange allergy, grapefruits or even diced apples can be great substitutes, offering a different, yet enjoyable taste.

    By addressing these common questions, it ensures that potential cooks can navigate the recipe with confidence while exploring the delightful world of recipe ideas that suit their individual needs.


    I hope this article has inspired you to try out My Asian Grandma’s Secret Recipe for Best Orange Salad! Fresh, vibrant, and packed with nutrition, this delicious dish is bound to become a beloved addition to your collection of recipe ideas. Enjoy your culinary journey!