Tag: snack

  • CanT Stop Making These Crispy Asparagus Puff Bites

    CanT Stop Making These Crispy Asparagus Puff Bites

    Can’T Stop Making These Crispy Asparagus Puff Bites!: A Tropical Delight

    Introduction to Can’T Stop Making These Crispy Asparagus Puff Bites!

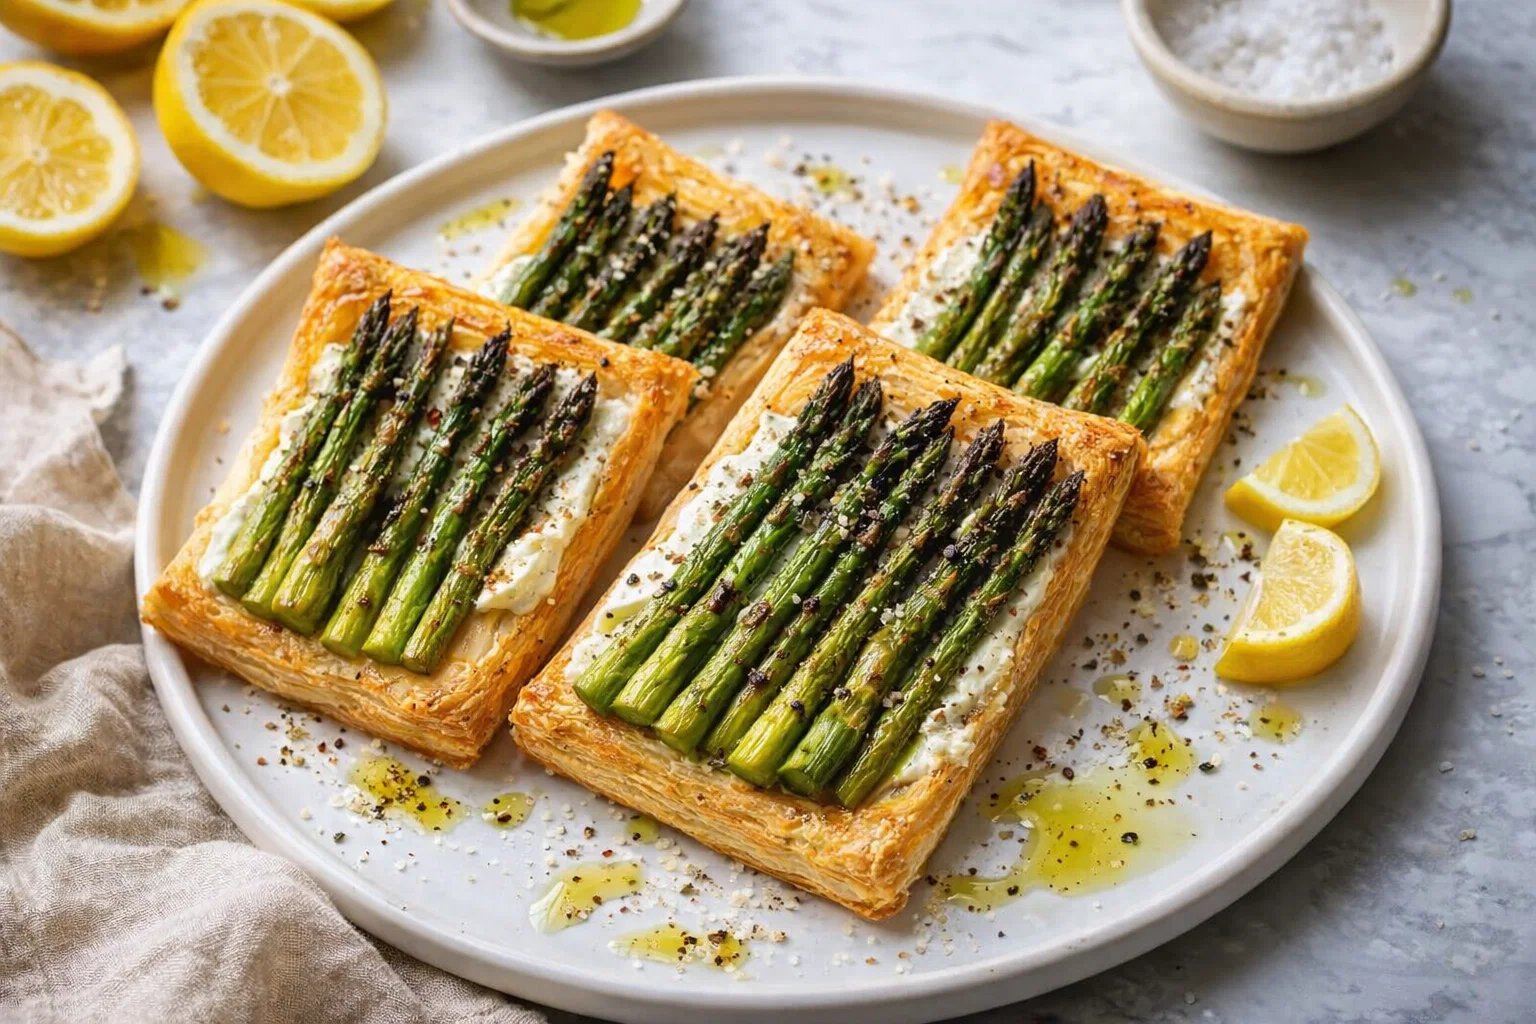
    Looking for a delightful twist on traditional appetizer recipes? Can’T Stop Making These Crispy Asparagus Puff Bites! are not only deliciously tempting but also incredibly simple to make. They serve as the ideal hors d’oeuvre for gatherings, parties, or even as a satisfying snack for yourself. These bites offer a perfect combination of crispy, flaky pastry and tender asparagus spears, creating an irresistible snack that tantalizes the taste buds.

    Packed with health benefits, asparagus is a nutritional powerhouse—the green stalks are loaded with vitamins A, C, E, and K, as well as folate and iron. Given their preparation using puff pastry, these bites are as versatile as they are tasty. They can easily be tailored to meet individual dietary needs, being vegan, gluten-free, or low-calorie with a few minor adjustments.

    These crispy asparagus puff bites offer not only mouthwatering flavors but also a fun hands-on cooking experience for home cooks of all skill levels. Whether you’re a parent looking for a quick treat for your kids, a busy professional wanting to impress your colleagues, or just a food enthusiast eager to try new flavors, this recipe fits the bill. With a few simple ingredients and minimal cooking time, you will find yourself not just making these puff bites but craving them again and again!

    Benefits and Advantages of Can’T Stop Making These Crispy Asparagus Puff Bites!

    There are numerous reasons to love Can’T Stop Making These Crispy Asparagus Puff Bites!, starting with their exceptional ease of preparation. The recipe is straightforward, making it accessible even for novice cooks. In no time, you can whip up a batch of these bites that are sure to delight friends and family, even for those unexpected visitors.

    The health benefits of asparagus cannot be overstated. This superfood is low in calories and a fantastic source of dietary fiber, promoting gut health and keeping you feeling full longer. Asparagus is also a natural diuretic, which means it can help flush excess salt and fluid from your body, making it an excellent option for those looking to maintain a healthy diet.

    Another unique aspect of this dish is its adaptability. You can make these puff bites to fit dietary preferences by using vegan puff pastry or gluten-free options. This versatility means they can cater to a wide array of guests—those who are health-conscious, plant-based eaters, or gluten-intolerant individuals can all enjoy these savory snacks.

    Lastly, the delightful crunch of the pastry combined with the tender asparagus creates a unique textural experience. The flavor profile is simple yet satisfying, making it an instant favorite that could easily become the star of any appetizer spread. With these crisp bites, you not only provide delicious food but also a healthy alternative to many fried options. So make it your mission to try these crispy puff bites; they will tick all the boxes for your next appetizer gathering!

    Ingredients Overview

    Essential Ingredients for Can’T Stop Making These Crispy Asparagus Puff Bites!

    To create these scrumptious asparagus puff bites, you’ll need the following ingredients:

    • 1 sheet puff pastry (thawed if frozen)
      This will serve as the crispy base for the bites. For a vegan alternative, look for a plant-based puff pastry.

    • 1 bunch of fresh asparagus (about 1 pound)
      Fresh asparagus adds flavor and nutrients. Choose thick stalks for the best crunch.

    • 1 tablespoon olive oil
      This adds richness and flavor while helping the pastry crisp up nicely. Use coconut oil for a dairy-free option.

    • 1 teaspoon garlic powder
      For added flavor, this amplifies the dish without the need for chopping fresh garlic.

    • 1 teaspoon salt
      Essential for enhancing the overall taste.

    • ½ teaspoon black pepper
      Provides a hint of spice and balances the flavors.

    • 1 tablespoon nutritional yeast (optional)
      This ingredient gives a cheesy flavor without dairy.

    For the topping:

    • 1 egg (for egg wash)
      This helps achieve that beautiful golden-brown color. For a vegan option, use almond milk or aquafaba.

    These ingredients combine to create a crispy, flaky snack perfect for any occasion. For dietary-conscious individuals, vegan, gluten-free, and low-calorie variations can effortlessly be achieved!

    Dietary Substitutions to Customize Your Can’T Stop Making These Crispy Asparagus Puff Bites!

    Substituting ingredients can make this dish accessible for various diets. Here are some suggestions:

    1. Puff Pastry:
    2. Vegan: Use a plant-based puff pastry, commonly found in stores or easily made at home.
    3. Gluten-Free: Look for gluten-free puff pastry options at your local grocery store or make your own using gluten-free flour.

    4. Olive Oil:

    5. For those who prefer a different flavor, you can use avocado oil or melted coconut oil.

    6. Nutritional Yeast:

    7. If you’re not vegan or seeking alternatives, regular grated Parmesan cheese can add a similar flavor.

    8. Egg Wash:

    9. For a vegan egg wash alternative, brush with almond milk, soy milk, or aquafaba to achieve that golden finish.

    10. Spices:

    11. Feel free to substitute garlic powder with onion powder or add red pepper flakes for an added kick.

    These substitutes ensure everyone can enjoy these scrumptious bites. You can experiment with ingredient swaps based on your dietary needs and preferences, creating a personalized appetizer experience!

    How to Prepare the Perfect Can’T Stop Making These Crispy Asparagus Puff Bites!: Step-by-Step Guide

    Ready to dive into making these scrumptious crispy asparagus puff bites? Follow this straightforward step-by-step guide that will help elevate your appetizer game:

    1. Preheat the Oven:
      Begin by preheating your oven to 400°F (200°C). A properly heated oven will ensure that your puff pastry turns golden brown and crispy, offering that perfect crunch.

    2. Prepare the Asparagus:
      Rinse the asparagus under cold water. Trim off the tough ends (about 1-2 inches from the bottom) to make them tender and easier to bite.

    3. Season the Asparagus:
      In a large mixing bowl, toss the trimmed asparagus with olive oil, garlic powder, salt, black pepper, and nutritional yeast if using. Ensure the spears are evenly coated for maximum flavor.

    4. Roll Out the Puff Pastry:
      Lightly flour your work surface and roll out the thawed puff pastry sheet to about 1/8-inch thickness. This will help create even bites that are flakier when baked.

    5. Cut the Dough:
      Using a sharp knife or pizza cutter, cut the pastry into rectangles or squares, approximately 3 inches by 3 inches, depending on your preferred size.

    6. Assemble the Puff Bites:
      Place a piece of the seasoned asparagus in the center of each pastry square. Be careful not to overload them as this may cause issues during baking.

    7. Wrap the Asparagus:
      Gently fold the edges of the pastry over the asparagus to create a small pocket or parcel. Press down the seams lightly to ensure they stick together.

    8. Apply Egg Wash:
      In a small bowl, whisk the egg (or your vegan egg wash) and brush it over the tops of each puff bite; this will provide that lovely golden color when baked.

    9. Bake the Bites:
      Arrange your assembled puff bites on a lined baking sheet and place them in the preheated oven. Bake for 15-20 minutes or until the pastry is puffed and golden brown.

    10. Cool and Serve:
      Once baked, remove the puff bites from the oven and let them cool on a wire rack to keep them crispy. Serve warm or at room temperature. Enjoy these delicious appetizers with your favorite dipping sauce!

    This simple, step-by-step guide ensures every cook can create these mouth-watering crispy asparagus puff bites with ease while allowing personalization for various dietary needs!

    Mastering Can’T Stop Making These Crispy Asparagus Puff Bites!: Advanced Tips and Variations

    While Can’T Stop Making These Crispy Asparagus Puff Bites are already a delectable treat, there are several tips and variations to elevate your experience:

    • Add Cheese: Consider adding a cream cheese or goat cheese layer inside the puff pastry before placing the asparagus for an extra creamy texture.

    • Spice it Up: Want a bit of heat? Add crushed red pepper flakes or cayenne pepper to your seasoning mix for a zesty twist.

    • Fresh Herbs: Enhance the flavor profile with fresh herbs such as thyme, rosemary, or parsley. Sprinkle chopped herbs on the asparagus before wrapping them in dough.

    • Experiment with Dipping Sauces: Pair these puff bites with a variety of sauces, such as a tangy lemon aioli, spicy sriracha, or a creamy ranch dressing. This can really elevate the dish and make it unique!

    • Make Ahead: For busy days, prepare the puff bites in advance, freeze them, and bake directly from the freezer—just add a few extra minutes to the baking time!

    • Mix Vegetables: Feel free to experiment with other vegetables in addition to asparagus. Green beans, zucchini, and even roasted red peppers work excellently in the pastry.

    With these advanced tips and variations, the possibilities for customizing your crispy asparagus puff bites are endless!

    How to Store Can’T Stop Making These Crispy Asparagus Puff Bites!: Best Practices

    If you find yourself with leftover Can’T Stop Making These Crispy Asparagus Puff Bites, proper storage will maintain their flavor and texture. Consider the following best practices:

    • Refrigeration: Store leftovers in an airtight container in the refrigerator for up to 3 days. However, note that the pastry may begin to soften over time.

    • Freezing: For longer storage, you can freeze uncooked assembled puff bites. Place them on a baking sheet to freeze individually before transferring them to a freezer-safe bag. When ready to enjoy, bake directly from freezing—simply add 5-10 more minutes to your cooking time.

    • Reheating: To reheat, preheat your oven to 350°F (175°C) and place the puff bites on a lined baking sheet. Bake for 10-15 minutes or until they’re heated through and crispy again. Avoid microwave reheating; it can make the pastry soggy.

    By following these simple storage tips, you can savor your crispy asparagus puff bites for days to come!

    Nutritional Value of Can’T Stop Making These Crispy Asparagus Puff Bites!

    Understanding the nutritional value of your food is essential, especially for those who are diet-conscious. Below is an approximate breakdown of the nutrition for one serving (two puff bites), which is approximately 90 calories:

    • Calories: 90
    • Total Fat: 6g
    • Saturated Fat: 1g
    • Cholesterol: 10mg
    • Sodium: 200mg
    • Total Carbohydrates: 8g
    • Dietary Fiber: 2g
    • Sugars: 1g
    • Protein: 2g

    Nutritional Benefits

    • Low in Calories: These bites are a great addition to any appetizer list as they’re light yet satisfying.
    • High in Fiber: Asparagus is rich in dietary fiber, which supports digestive health.
    • Vitamins and Minerals: A generous serving of vitamins A, C, E, and K makes this appetizer both nutritious and delicious.

    These nutritional benefits make Can’T Stop Making These Crispy Asparagus Puff Bites a guilt-free indulgence, perfect for health-conscious individuals and those seeking appetizing yet nutritious appetizer recipes!

    FAQs: Frequently Asked Questions About Can’T Stop Making These Crispy Asparagus Puff Bites!

    Q1: Can I make these crispy asparagus puff bites ahead of time?
    A: Yes! You can prepare and freeze them before baking. Arrange on a baking sheet, freeze until firm, then transfer to a freezer bag until ready to bake.

    Q2: How can I make these bites gluten-free?
    A: Simply use a gluten-free puff pastry option available at your local grocery store, and the recipe will accommodate your needs perfectly.

    Q3: Can I use other vegetables instead of asparagus?
    A: Absolutely! Feel free to try with other veggies like zucchini, broccoli, or bell peppers. Just ensure they’re tender and cooked properly before wrapping in pastry.

    Q4: What dipping sauces pair well with these puff bites?
    A: Great options include lemon aioli, sriracha mayo, sweet chili sauce, or a yogurt-based dip. They add extra flavor and elevate the overall experience!

    Q5: Are these puff bites suitable for a vegan diet?
    A: Yes! Simply use vegan puff pastry, skip the egg wash, and substitute nutritional yeast for cheese for a delicious vegan version.

    Creating Can’T Stop Making These Crispy Asparagus Puff Bites! is not just about preparing food; it’s about crafting an experience that is simple, enjoyable, and filled with flavor. Perfect for any occasion, these bites will surely hold a special spot in your collection of go-to appetizer recipes! Enjoy the cooking process and, of course, the delicious results!

  • Easy Ham and Cheese Pinwheels Snack

    Easy Ham and Cheese Pinwheels Snack

    Easy Ham and Cheese Pinwheels Snack: A Tropical Delight

    Introduction to Easy Ham and Cheese Pinwheels Snack

    Are you looking for a delectable yet straightforward appetizer? Our Easy Ham and Cheese Pinwheels Snack comes to the rescue! In just a matter of minutes, you can prepare these delightful rolled-up snacks, perfect for any occasion — from casual family gatherings to elegant soirées. This recipe emphasizes simplicity and healthiness, making it a great fit for busy parents, students, and diet-conscious individuals alike. With the versatility to adapt the ingredients to various dietary needs, these ham and cheese pinwheels can cater to everyone’s taste, whether you’re gluten-free, vegan, or looking for a low-calorie treat.

    These bite-sized wonders are not just easy to make; they also provide a satisfying flavor that will leave a lasting impression. Their fresh ingredients coupled with a creamy filling create a culinary masterpiece that feels indulgent but is filled with wholesome goodness. Thanks to the nutritious aspects of this recipe, you can indulge guilt-free while impressing your guests with an amazing snack that defies the “just another appetizer” stereotype. Let’s dive deeper into the benefits and beauty of this quick and easy recipe that your family and friends will adore!

    Benefits and Advantages of Easy Ham and Cheese Pinwheels Snack

    One of the leading advantages of making Easy Ham and Cheese Pinwheels Snack is the time efficiency. This fantastic recipe only requires a handful of ingredients, making it suitable for both novice and experienced cooks. You can whip these up in no time, making them a go-to option for last-minute gatherings or busy weekday lunches. What’s more, they are incredibly versatile! You can easily adjust the ingredients to meet your dietary preferences and needs.

    Health Benefits

    In addition to being quick and easy, these pinwheels offer a healthy balance of nutrients. They provide lean protein from the ham and essential calcium from the cheese. If you choose to incorporate whole grain tortillas, you’re augmenting the snack’s nutritional profile with added fiber.

    Moreover, most people enjoy ham and cheese combinations; they create a satisfying snack that curbs hunger without empty calories. With their compact size, you can easily manage portion control, which is crucial for anyone trying to maintain a balanced diet. These ham and cheese pinwheels can also be tailored to fit various dietary restrictions. You can swap traditional ingredients for vegan cheese, gluten-free tortillas, or other low-calorie options.

    In conclusion, when you consider ease of preparation, health benefits, and dietary flexibility, these pinwheels surpass many other appetizer recipes on the market. They offer delectable flavors while remaining simple enough for anyone to enjoy!

    Ingredients Overview

    Essential Ingredients for Easy Ham and Cheese Pinwheels Snack

    Here’s a detailed list of all the ingredients you’ll need to create this delightful dish, including options for various dietary needs:

    • Whole Wheat Tortillas (or gluten-free tortillas) – 4 large
    • These tortillas serve as a wholesome base, offering fiber and necessary nutrients. Gluten-free tortillas are perfect for those with gluten intolerance.

    • Sliced Ham (or turkey for a healthier option) – 200 grams

    • Opt for lean, low-sodium varieties to enhance the health benefits. Turkey is a fantastic lower-calorie alternative that still provides great flavor.

    • Cream Cheese (or vegan cream cheese) – ½ cup

    • The cream cheese serves as a spread, adding creaminess. Vegan cream cheese can be utilized for a dairy-free version without sacrificing taste.

    • Shredded Cheese (like Cheddar, Swiss, or dairy-free cheese) – 1 cup

    • Choose your preferred cheese type! Vegan cheese options allow those following a plant-based diet to enjoy these pinwheels.

    • Bell Peppers (finely diced) – ½ cup

    • These add a colorful crunch and an extra hit of vitamins. They can be omitted or substituted based on personal preference.

    • Fresh Spinach (or arugula) – 1 cup

    • Adding a handful of greens boosts the nutritional value while ensuring that your snack is as healthy as possible.

    • Seasoning (like garlic powder, Italian seasoning, or pepper) – to taste

    • This is optional but adds a flavor twist. Feel free to adjust the herbs and spices to your liking!

    As you gather your ingredients, feel free to play with combinations. The key is ensuring that the taste and texture match your requirements and preferences!

    Dietary Substitutions to Customize Your Easy Ham and Cheese Pinwheels Snack

    To ensure everyone can enjoy these delicious ham and cheese pinwheels, consider these substitutions:

    • Tortilla Options:
    • Swap regular tortillas for whole grain, low-carb, or gluten-free tortillas depending on dietary preferences.

    • Meat Substitutes:

    • For those who prefer not to consume pork, turkey or chicken slices work well. Alternatively, smoked tofu or tempeh can serve as excellent substitutions for a plant-based option.

    • Cheese Variations:

    • Use non-dairy cheese alternatives for a lactose-free version, or opt for reduced-fat cheese if you are calorie-conscious. Nutritional yeast is also a popular cheese substitute for vegan dishes.

    • Vegetables:

    • Feel free to get creative by adding or substituting veggies! Ingredients like cucumbers, carrots, or avocados can enhance flavor and nutrition.

    • Spread Choices:

    • Cream cheese can be swapped for hummus, pesto, or even guacamole, adding a unique spin to the traditional recipe.

    With these suggestions, you can easily modify the dish to accommodate your friends and families’ tastes, ensuring that these pinwheels satisfy everyone’s cravings!

    How to Prepare the Perfect Easy Ham and Cheese Pinwheels Snack: Step-by-Step Guide

    Creating Easy Ham and Cheese Pinwheels Snack is an exciting and straightforward cooking adventure! Follow this step-by-step guide to prepare these delicious bites:

    1. Prepare the Base:
      Begin by laying out your tortillas on a clean, flat surface. Ensure they are room temperature so that they roll up easily without cracking.

    2. Mix Ingredients:
      In a bowl, combine the cream cheese (or vegan cream cheese) with your chosen seasonings. Blend well until smooth. This flavorful spread will act as the glue holding your pinwheels together.

    3. Spread the Cream Cheese:
      Take a spatula and even out the cream cheese spread across one side of the tortilla, ensuring you cover it entirely, leaving a small border around the edges.

    4. Layer the Ham and Cheese:
      Lay out slices of ham evenly over the cream cheese, covering the surface. Next, sprinkle a generous layer of shredded cheese on top of the ham. This creates that delicious melty goodness.

    5. Add Veggies:
      Sprinkle diced bell peppers and fresh spinach over the cheese and ham layers. This adds color, crunch, and nutrition to your snacks!

    6. Roll It Up:
      Starting from one end, tightly roll the tortilla toward the other end, creating a log shape. Make sure to keep it tight to prevent the filling from spilling out.

    7. Chill the Roll:
      Wrap the rolled tortilla in plastic wrap and refrigerate for at least 30 minutes. This step allows the cheese to set, making it easier to slice.

    8. Slice the Pinwheels:
      Once chilled, carefully remove the plastic wrap and place the roll on a cutting board. Using a sharp knife, slice into 1-inch pieces to create bite-sized pinwheels.

    9. Serve and Enjoy!
      Arrange your pinwheels on a platter! Feel free to add some dips like mustard, ranch, or a zesty salsa on the side.

    10. Store Leftovers:
      If you have leftovers, store them properly in an airtight container to enjoy later.

    These steps highlight the ease of making these delicious appetizer recipes while ensuring that ingredients can be modified to suit your family’s dietary needs!

    Mastering Easy Ham and Cheese Pinwheels Snack: Advanced Tips and Variations

    Once you’ve mastered the basics of preparing Easy Ham and Cheese Pinwheels Snack, consider experimenting with these tips and variations to elevate your dish even further!

    • Experiment with Spreads:
      Try different spreads like homemade pesto, cream cheese mixed with fresh herbs, or spicy mayo to kick things up a notch. These will add a new layer of flavor to your pinwheels.

    • Incorporate Unique Ingredients:
      Think outside the box! Try adding jalapenos for extra heat or sliced olives for a Mediterranean twist. You can incorporate roasted red peppers or sun-dried tomatoes for added texture and taste.

    • Make It Sweet:
      For a sweet version, substitute ham and cheese with nut butter and fruit slices such as banana or strawberries, and roll them up in a whole wheat or cinnamon tortilla!

    • Serve with Dips:
      Pair these pinwheels with various dips like hummus, ranch dressing, or a tangy yogurt-based dip to enhance the snacking experience.

    • Cut into Shapes:
      Instead of traditional pinwheels, cut the rolled tortillas into bite-sized cubes or use cookie cutters to create fun shapes that appeal to children and adults alike.

    By incorporating these ideas, you’ll create a diverse array of pinwheel options that will keep things exciting at your next gathering.

    How to Store Easy Ham and Cheese Pinwheels Snack: Best Practices

    Storing your Easy Ham and Cheese Pinwheels Snack correctly will keep them fresh and tasty! Here are some best practices for refrigeration, freezing, and reheating:

    • Refrigeration:
      Place any leftover pinwheels in an airtight container and refrigerate. They should last up to three days in the fridge. To enjoy them at their best quality, consume them within the first 24 hours.

    • Freezing:
      If you would like to make them ahead of time, freezing is an excellent option! Wrap the rolled-up pinwheels in plastic wrap and then place them inside a freezer-safe container or bag. They can be kept in the freezer for up to 2 months.

    • Reheating:
      If frozen, allow the pinwheels to thaw overnight in the refrigerator before using. You can enjoy them cold or heat them in the microwave for about 10-15 seconds until warmed through. If you prefer a crispy texture, place them on a baking sheet and pop them in the oven for a few minutes.

    Following these simple storage practices will ensure that your pinwheels maintain their delicious flavor and texture, letting you enjoy them long after they’ve been made!

    Nutritional Value of Easy Ham and Cheese Pinwheels Snack

    Understanding the nutritional value of Easy Ham and Cheese Pinwheels Snack can help you make informed choices. Here’s a breakdown of the nutrition facts per serving, based on the ingredients discussed:

    • Calories: Approximately 200-250 calories per serving
    • Total Fat: 10-15 grams
    • Saturated Fat: 3-5 grams
    • Cholesterol: 30-40 mg
    • Sodium: 500-700 mg
    • Total Carbohydrates: 25-30 grams
    • Dietary Fiber: 2-4 grams
    • Sugars: 1-2 grams
    • Protein: 12-15 grams

    Healthier Choices

    If you’re aiming for a lower-calorie version, opt for low-fat cheese, swap traditional cream cheese for Greek yogurt, or use turkey instead of ham. Remember that using whole-grain ingredients will not only enhance the flavor but also provide additional nutrients, such as dietary fiber.

    These insights make it simple to track your intake while still enjoying delicious snacks that don’t compromise your health goals!

    FAQs: Frequently Asked Questions About Easy Ham and Cheese Pinwheels Snack

    1. Can I make these pinwheels ahead of time?

    Absolutely! You can prepare the pinwheels 1-2 days in advance. Just remember to store them in an airtight container in the refrigerator until ready to serve.

    2. Are these suitable for a gluten-free diet?

    Yes! Simply utilize gluten-free tortillas to create a delicious version that fits your dietary needs.

    3. Can I use different types of cheese?

    Certainly! Feel free to experiment with different cheese types or even use vegan cheese for a dairy-free option that tastes fantastic.

    4. How can I add more veggies?

    Incorporate your favorite vegetables, like cucumbers, carrots, or arugula, into the pinwheels for an extra nutritional boost. The possibilities are endless!

    5. What are some good dips to serve with these pinwheels?

    You can serve them with a variety of dips such as hummus, ranch dressing, or a spicy salsa. Try multiple dips to offer a fun selection!

    With these frequently asked questions answered, you’re well-equipped to make delightful Easy Ham and Cheese Pinwheels Snack at home! Whether serving guests or satisfying a craving, these snacks will always receive rave reviews. Enjoy your cooking adventures!

  • Tasty Cheddar Bacon Potato Wedges

    Tasty Cheddar Bacon Potato Wedges

    Tasty Cheddar Bacon Potato Wedges: A Tropical Delight

    Introduction to Tasty Cheddar Bacon Potato Wedges

    Are you looking for an irresistible addition to your repertoire of dinner recipes? Tasty Cheddar Bacon Potato Wedges are a delightful option that combines savory flavors with a satisfying crunch. This dish is not only simple to prepare but also delivers a burst of deliciousness that caters to a variety of taste buds. Whether you’re a busy parent looking to create a quick yet appealing meal, a student in search of a satisfying snack, or a newlywed attempting to impress with your culinary skills, these wedges can fit seamlessly into your lifestyle.

    What makes Tasty Cheddar Bacon Potato Wedges an excellent choice is their versatility. They can be enjoyed as a side dish, a snack, or even a light meal on their own. Additionally, they can be adjusted for various diets—making them suitable for vegetarians or gluten-free eaters. With each bite, you get a blend of creamy cheddar cheese, crispy bacon, and perfectly roasted potatoes, fulfilling both your comfort food cravings and nutritional needs. These wedges are indeed a winner when it comes to hearty yet healthy dinner recipes.

    Benefits and Advantages of Tasty Cheddar Bacon Potato Wedges

    This delightful recipe stands out for numerous reasons. Firstly, its ease of preparation attracts home cooks of all levels. With just a few ingredients and minimal cooking time, you can whip up a tray of golden, cheesy potato wedges that will please everyone at your dinner table. Ideal for busy weeknights, they require little effort while delivering maximum flavor.

    Furthermore, Tasty Cheddar Bacon Potato Wedges offer nutritional benefits, particularly when you choose healthier ingredient alternatives. Potatoes are a good source of vitamins C and B6, potassium, and fiber. When roasted rather than deep-fried, these wedges can contribute positively to your dietary habits. Additionally, bacon provides flavor but can be swapped for turkey bacon or omitted entirely for a vegetarian variant, making it easier to cater to different dietary preferences.

    Another advantage of this dish lies in its adaptability. You can easily customize the seasoning to suit your family’s tastes—be it spicy, herby, or even cheesy. Furthermore, you can serve them as a side for grilled chicken or fish or as a standalone appetizer during parties. With this recipe, you have endless possibilities to elevate your meal, making it a true gem among dinner recipes.

    Ingredients Overview

    Essential Ingredients for Tasty Cheddar Bacon Potato Wedges

    The following ingredients list outlines everything you’ll need to create these delectable potato wedges:

    • 4 large russet potatoes (approximately 2 pounds)
    • Benefit: High in fiber and potassium, these potatoes provide a sturdy base for your wedges.

    • 1 cup shredded sharp cheddar cheese

    • Benefit: Adds a rich flavor and creamy texture.

    • ½ cup cooked bacon bits (or turkey bacon)

    • Benefit: Offers a savory, crispy element—can be replaced with vegetarian bacon for a plant-based version.

    • 2 tablespoons olive oil

    • Benefit: Provides healthy fats and helps achieve a crispy exterior while cooking.

    • 1 teaspoon garlic powder

    • Benefit: Enhances flavor without adding extra calories.

    • 1 teaspoon onion powder

    • Benefit: Complements the garlic and creates depth in flavor.

    • 1 teaspoon smoked paprika (optional)

    • Benefit: Adds a delightful smokiness that elevates the dish.

    • Salt and pepper to taste

    This straightforward ingredient list makes it easy for anyone to recreate this dish while still accommodating dietary preferences.

    Dietary Substitutions to Customize Your Tasty Cheddar Bacon Potato Wedges

    Whether you’re cooking for someone with dietary restrictions or simply want to mix things up, here are a few substitutions you can explore:

    • Potato Alternative: Swap out russet potatoes for sweet potatoes for a healthier twist. Sweet potatoes add a vibrant color and provide extra nutrients.

    • Cheese Alternatives: Use vegan cheese shreds or nutritional yeast to offer a cheesy flavor in a dairy-free recipe.

    • Bacon Alternatives: For a vegetarian or vegan option, you can skip the bacon altogether or use chopped mushrooms, which can add a savory umami flavor.

    • Oil Modifications: Substitute olive oil with avocado oil or coconut oil for different flavor profiles and health benefits.

    • Spice Variations: Feel free to add red pepper flakes, Italian seasoning, or your favorite spice blend to change up the taste.

    These alternatives enhance your culinary creativity while keeping the essence of the dish intact.

    How to Prepare the Perfect Tasty Cheddar Bacon Potato Wedges: Step-by-Step Guide

    Creating delicious Tasty Cheddar Bacon Potato Wedges is straightforward. Just follow these step-by-step instructions:

    1. Preheat the Oven: Start by preheating your oven to 425°F (220°C). This high temperature will help achieve the crispy texture we desire.

    2. Prepare the Potatoes: Wash and scrub the russet potatoes thoroughly. Pat them dry with a kitchen towel, then cut each potato into wedges (about 8 wedges per potato).

    3. Season the Potatoes: In a large mixing bowl, toss the potato wedges with olive oil, garlic powder, onion powder, smoked paprika, salt, and pepper. Ensure every wedge is well-coated with the oil and spices.

    4. Spread on a Baking Sheet: Line a baking sheet with parchment paper for easy cleanup. Arrange the seasoned potato wedges in a single layer, ensuring they are not overcrowded. This allows for even cooking and crisping.

    5. Bake the Wedges: Place the baking sheet in the oven and bake for 25-30 minutes. Halfway through, flip the wedges to ensure they cook evenly. The exterior should look golden and crispy when finished.

    6. Add Cheese and Bacon: Remove the baking sheet from the oven and sprinkle the shredded cheddar cheese and cooked bacon bits over the wedges. Return the sheet to the oven for an additional 5 minutes, or until the cheese has melted and become bubbly.

    7. Garnish and Serve: Take the wedges out of the oven and allow them to cool slightly. For an added touch, sprinkle with chopped fresh herbs like chives or parsley before serving.

    8. Enjoy with Dipping Sauces: Pair your cheesy potato wedges with your favorite dips—ranch, BBQ sauce, or spicy mayo are excellent options!

    This step-by-step guide makes the cooking process accessible while allowing for variations to meet your dietary needs.

    Mastering Tasty Cheddar Bacon Potato Wedges: Advanced Tips and Variations

    Cooking can be an art, and here are some advanced tips to elevate your Tasty Cheddar Bacon Potato Wedges experience:

    • Double Bake for Extra Crispiness: For even crispier wedges, consider parboiling the potatoes before baking. Boil them for about 5 minutes, then let them dry before seasoning and baking as outlined above.

    • Herb Infusion: Adding fresh rosemary or thyme to your seasoning mix can introduce a delightful herbaceous note, enhancing the overall flavor of your dish.

    • Zesty Twist: For those who enjoy vibrant flavors, try adding a teaspoon of lime or lemon zest before baking, which can add a refreshing zing.

    • Loaded Wedges Variation: To create loaded potato wedges, top your finished dish with ingredients like sour cream, jalapeños, and green onions for an extravagant twist that resembles loaded nachos.

    Experimenting with these tips and variations can create an exciting culinary journey, ensuring that your Tasty Cheddar Bacon Potato Wedges are never boring.

    How to Store Tasty Cheddar Bacon Potato Wedges: Best Practices

    If you happen to have leftovers (which is rare, given how delicious they are!), you’ll want to store them properly:

    1. Refrigeration: Allow the wedges to cool completely before transferring them to an airtight container. They can be stored in the refrigerator for up to 3 days.

    2. Freezing: For long-term storage, freeze the cooked potato wedges. Lay them in a single layer on a baking sheet until frozen solid, then transfer them to a freezer-safe bag or container. They can be frozen for up to 2 months.

    3. Reheating: To reheat refrigerated or frozen wedges, preheat your oven to 375°F (190°C). Bake for about 10-15 minutes, or until heated through and crispy again. For extra crispiness, you can broil them for a minute or two at the end.

    Adhering to these storage methods ensures that your delicious Tasty Cheddar Bacon Potato Wedges maintain their flavor and texture.

    Nutritional Value of Tasty Cheddar Bacon Potato Wedges

    Understanding the nutritional composition of our Tasty Cheddar Bacon Potato Wedges is essential for those monitoring their diets. Here’s a breakdown of the nutrition per serving (approximately 4 wedges):

    • Calories: 330 kcal
    • Total Fat: 18g
    • Saturated Fat: 7g
    • Cholesterol: 25mg
    • Sodium: 600mg
    • Total Carbohydrates: 35g
    • Dietary Fiber: 4g
    • Sugars: 1g
    • Protein: 10g

    These wedges are flavorful yet can fit within a balanced diet. By modifying the ingredients (like using less cheese or bacon), you can further reduce fat and calories.

    The presence of dietary fiber from potatoes supports digestion, while the addition of protein from cheese and bacon can keep you feeling satisfied longer. This data enables you to enjoy these delectable wedges while being mindful of your nutritional intake, adding them to your collection of delicious dinner recipes.

    FAQs: Frequently Asked Questions About Tasty Cheddar Bacon Potato Wedges

    Can I make Tasty Cheddar Bacon Potato Wedges ahead of time?

    Yes, you can prepare the wedges ahead of time by pre-baking them and then adding cheese and bacon just before serving. This way, you retain the wedges’ crispiness while still saving time when dinner comes around.

    What can I serve with Tasty Cheddar Bacon Potato Wedges?

    These potato wedges can pair well with a variety of main dishes such as grilled chicken, burgers, or hot dogs. They also work wonderfully as a snack at parties or game days.

    How can I make this recipe vegan?

    To make the Tasty Cheddar Bacon Potato Wedges vegan, simply substitute cheddar cheese with vegan cheese and use plant-based bacon alternatives. You can also explore spices to enhance flavors without cheese.

    Are these wedges gluten-free?

    Yes! As long as you use gluten-free bacon or omit it entirely and ensure that your seasonings are gluten-free, Tasty Cheddar Bacon Potato Wedges can easily fit into a gluten-free diet.

    Can I use other potatoes besides russets?

    Absolutely! You can use fingerling potatoes, Yukon Golds, or even sweet potatoes to create unique variations of this recipe. Each type will yield a slightly different flavor and texture.

    How do I make the wedges spicier?

    If you love heat, consider adding crushed red pepper flakes or a pinch of cayenne pepper when seasoning the potatoes before baking. You can also serve with a spicy dipping sauce to elevate the heat factor.

    With all these aspects covered, Tasty Cheddar Bacon Potato Wedges are not just a tasty option; they represent an adaptable recipe that can bring joy and satisfaction to numerous dining occasions. Enjoy your cooking adventure and the savory delights that come along with it!

  • Crispy Parmesan Cauliflower Bites

    Crispy Parmesan Cauliflower Bites

    Crispy Parmesan Cauliflower Bites: A Tropical Delight

    Introduction to Crispy Parmesan Cauliflower Bites

    If you’re searching for healthy snacks that are simple, delicious, and perfect for any occasion, look no further than Crispy Parmesan Cauliflower Bites. This delightful recipe transforms a humble vegetable into a tasty treat that both adults and kids will love. By incorporating fresh cauliflower and the rich, nutty flavor of parmesan cheese, these bites deliver not just on taste but also on nutrition.

    Cauliflower is packed with essential vitamins, including Vitamin C, K, and B6, and is an excellent source of fiber. This makes Crispy Parmesan Cauliflower Bites a fantastic option for those who appreciate health-conscious eats, whether you’re a busy parent in need of a quick appetizer for the kids, a student looking for nutritious study snacks, or a work professional preparing healthy munchies for the office.

    Moreover, this recipe caters to a variety of dietary needs. With minimal ingredients and a straightforward preparation method, it fits well into gluten-free and low-carb diets, and it can easily be adapted to be vegan by substituting cheese. The fun and crispy texture of the bites offer a satisfying crunch that will make you forget you’re eating something healthy! So, grab your apron and prepare to be impressed by these delightful Cauliflower Bites.

    Benefits and Advantages of Crispy Parmesan Cauliflower Bites

    Crispy Parmesan Cauliflower Bites are not only a joy to eat; they also offer numerous health benefits that elevate them far beyond regular snacks. For starters, they are incredibly easy to prepare—perfect for those who may not have a lot of time for elaborate cooking. With just a handful of ingredients, you can create a dish that tastes gourmet and impresses everyone around your dining table.

    One of the standout advantages of this recipe is its versatility. You can customize it to suit your dietary requirements, making it an excellent choice for family gatherings, game nights, or even romantic dinners. It’s a fantastic way to sneak more vegetables into your diet, helping you and your loved ones consume essential nutrients without sacrificing flavor.

    Health-wise, cauliflower is truly a superfood, rich in antioxidants that help combat inflammation and support overall well-being. The addition of parmesan cheese boosts the flavor while also providing protein and calcium, rounding out the nutritional profile of these healthy snacks.

    Additionally, they are oven-baked rather than fried, significantly reducing the calorie count while keeping that satisfying crispy texture. This means you can enjoy a guilt-free indulgence. Moreover, since these bites are finger food, they are perfect for parties, allowing guests to mingle without worrying about utensils.

    Overall, Crispy Parmesan Cauliflower Bites stand out as not just a tasty treat, but a health-conscious option that you will want to keep in your culinary repertoire.

    Ingredients Overview

    Essential Ingredients for Crispy Parmesan Cauliflower Bites

    Creating perfect Crispy Parmesan Cauliflower Bites requires only a few essential ingredients, each serving a unique role in both flavor and texture. Here’s what you’ll need:

    • 1 medium cauliflower head (about 4 cups, broken into florets)
    • The star ingredient, cauliflower, is low in calories and packed with vitamins.

    • 1 cup grated parmesan cheese (or nutritional yeast for a vegan option)

    • Provides a rich, nutty flavor; nutritional yeast is perfect for creating a cheesy taste without dairy.

    • 1/2 cup breadcrumbs (gluten-free breadcrumbs optional)

    • Delivers a satisfying crunch; you can also use almond flour for a low-carb option.

    • 2 tablespoons olive oil

    • Helps to achieve that golden-brown color and crispy texture while adding healthy fats.

    • 1 teaspoon garlic powder

    • Adds depth and flavor to the bites, making them even more irresistible.

    • 1 teaspoon onion powder

    • Enhances the overall taste profile, complementing the garlic.

    • Salt and pepper to taste

    • Essential for seasoning.

    These ingredients come together to form crispy, cheesy bites that you won’t want to put down. They are also naturally gluten-free if you use the appropriate breadcrumbs, making them suitable for those with gluten sensitivities.

    Dietary Substitutions to Customize Your Crispy Parmesan Cauliflower Bites

    Customization is key for any recipe, and Crispy Parmesan Cauliflower Bites are no exception. Here are some adjustments you can make to cater to various dietary needs:

    • Vegan Variation
    • Substitute parmesan cheese with nutritional yeast. This will give you the cheesy flavor without any dairy. For binders, you might want to try flaxseed meal mixed with water to help hold your bites together.

    • Gluten-Free Option

    • Use gluten-free breadcrumbs instead of regular ones. Additionally, substituting almond flour for breadcrumbs is excellent for those on a low-carb or Paleo diet.

    • Spice it Up

    • If you enjoy a little heat, add cayenne pepper or chili flakes to the mix for an extra kick. You can also sprinkle paprika for a smoky flavor.

    • Herbs

    • Fresh herbs like parsley, rosemary, or thyme can elevate the flavor even further. Consider adding them into the mix for a fresh twist.

    These substitutions highlight the adaptability of the recipe, making it easy to accommodate various dietary preferences without compromising taste.

    How to Prepare the Perfect Crispy Parmesan Cauliflower Bites: Step-by-Step Guide

    Now that you’ve gathered your ingredients, it’s time to prepare your Crispy Parmesan Cauliflower Bites! Follow these straightforward steps to achieve that perfect crunch:

    1. Preheat the Oven:
      Preheat your oven to 425°F (220°C). This high temperature will help make your cauliflower bites crispy and golden.

    2. Prepare the Cauliflower:
      Wash the cauliflower and cut it into bite-sized florets. The more uniform your pieces, the better they will cook.

    3. Blanch the Florets (Optional):
      For extra crispiness, you can blanch the cauliflower in boiling water for about 2-3 minutes before proceeding. Drain and pat dry. This step is optional but can enhance the texture.

    4. Mix the Dry Ingredients:
      In a large bowl, combine the parmesan cheese, breadcrumbs, garlic powder, onion powder, salt, and pepper. Mix thoroughly to ensure an even distribution.

    5. Coat the Cauliflower:
      Drizzle the olive oil over the cauliflower florets. Toss to coat evenly. Next, add the dry mixture from the previous step, tossing again until each floret is well-covered with the cheesy mix.

    6. Arrange on a Baking Sheet:
      Line a baking sheet with parchment paper for easy cleanup. Spread the coated cauliflower evenly on the baking sheet, making sure they are not overcrowded. This will guarantee all sides bake up crispy.

    7. Bake:
      Place the baking sheet in the oven and bake for 25-30 minutes. Halfway through, flip the florets to ensure they become golden and crispy on all sides.

    8. Check for Doneness:
      The bites are done when they turn a beautiful golden brown and feel crispy to the touch. If you desire extra crunch, feel free to turn on the broiler for an additional 2-3 minutes, but watch closely to prevent burning.

    9. Serve Warm:
      Remove from the oven and allow to cool for a minute before serving. Enjoy your Crispy Parmesan Cauliflower Bites as a snack, appetizer, or side dish!

    This recipe is simple and adaptable. By following these steps, you can create a batch of delicious bites that cater to your dietary needs, ensuring everyone can enjoy them!

    Mastering Crispy Parmesan Cauliflower Bites: Advanced Tips and Variations

    Now that you’re well-acquainted with the base recipe, here are some advanced tips and variations to master your Crispy Parmesan Cauliflower Bites:

    • Experiment with Seasonings:
      Go beyond garlic and onion powder. Try spices like Italian seasoning, curry powder, or even smoked paprika for different flavor profiles.

    • Serve with Dips:
      Pair your bites with flavorful dips like homemade ranch, marinara sauce, or sriracha mayo. This not only adds flavor but also enhances the snacking experience.

    • Batch Cooking:
      Consider making larger batches and freezing them for future healthy snacks. This way, you have a nutritious option ready to go at any time.

    • Vegetable Mix:
      To introduce variety, you can mix in other vegetables like broccoli florets or zucchini. Just adjust the cooking time accordingly to ensure even cooking.

    • Cauliflower Puree:
      If you’re feeling adventurous, you can blend some of the cauliflower into a puree and fold it into the batter for a creamier texture without sacrificing crispness.

    These advanced tips will help you elevate your Crispy Parmesan Cauliflower Bites, adding endless possibilities and flavors to your snacking routine!

    How to Store Crispy Parmesan Cauliflower Bites: Best Practices

    Storing your Crispy Parmesan Cauliflower Bites properly is crucial to maintain their delightful crunch and flavor. Here’s how to do it effectively:

    • Refrigeration:
      Store any leftover bites in an airtight container in the refrigerator for up to 3 days. When you’re ready to enjoy them again, simply reheat them in the oven for about 10-15 minutes at 375°F (190°C) to bring back the crispiness.

    • Freezing:
      If you want to preserve them for a more extended period, you can freeze uncooked bites. Place them on a baking sheet in a single layer and freeze until solid, then transfer them to a freezer-safe bag. They can last up to 3 months in the freezer. To cook, bake straight from frozen, adding an extra 5-10 minutes to your baking time.

    • Re-heating:
      For the best results, reheat in an oven or air fryer rather than the microwave. Microwaving can make them soggy, while baking or air-frying will help retain that crispy exterior.

    By following these storage tips, your Crispy Parmesan Cauliflower Bites will remain one of your go-to healthy snacks, ready whenever the craving strikes.

    Nutritional Value of Crispy Parmesan Cauliflower Bites

    Understanding the nutritional value of your food is essential for maintaining a balanced diet. Each serving of Crispy Parmesan Cauliflower Bites provides a wholesome balance of macronutrients and important vitamins. Here is an approximate nutritional breakdown for one serving (which is about 4-5 bites):

    • Calories: 150
    • Total Fat: 9g
    • Saturated Fat: 3g
    • Cholesterol: 15mg
    • Sodium: 200mg
    • Total Carbohydrates: 12g
    • Dietary Fiber: 3g
    • Sugars: 1g
    • Protein: 8g

    Vitamin C: 50mg (about 60% of daily value)
    Calcium: 200mg (about 15% of daily value)
    Iron: 1.2mg (about 6% of daily value)

    Note: These values may vary based on specific ingredient choices and portion sizes. Adjustments such as using less cheese or replacing breadcrumbs with a lower-calorie alternative can alter the overall nutrition.

    Crispy Parmesan Cauliflower Bites offer a nutritious and delicious way to enjoy your veggies, making them a fantastic choice for those seeking healthy snacks that don’t compromise on flavor.

    FAQs: Frequently Asked Questions About Crispy Parmesan Cauliflower Bites

    1. Can I make these bites ahead of time?
    Yes, you can prepare the bites ahead of time and store them in the refrigerator for a day or freeze them for longer storage. Just reheat them before serving.

    2. Are these bites suitable for vegans?
    Absolutely! Simply replace the parmesan cheese with nutritional yeast and choose appropriate binders as necessary.

    3. How do I keep the bites crispy after cooking?
    To keep your bites crispy, store them in an airtight container and reheat in the oven instead of the microwave when ready to eat.

    4. Can I use frozen cauliflower?
    Yes, you can use frozen cauliflower florets, but make sure to thaw and pat them dry to prevent excess moisture, which can result in sogginess.

    5. What’s a good way to spice up the flavor?
    You can add spices like cayenne pepper, smoked paprika, or fresh herbs to the dry mixture for an extra flavor boost, tailoring the bites to your preferred taste.

    These frequently asked questions should help clarify any concerns you might have regarding making and enjoying your Crispy Parmesan Cauliflower Bites. Dive right in and experience the joy of a truly healthy snack option! Enjoy!

  • Crispy Parmesan Onion Ring Chips

    Crispy Parmesan Onion Ring Chips

    Crispy Parmesan Onion Ring Chips: A Tropical Delight

    Introduction to Crispy Parmesan Onion Ring Chips

    Are you ready to elevate your appetizer game? If so, our Crispy Parmesan Onion Ring Chips are a delightful way to do just that! Perfect as a snack, party starter, or even a side dish, these crispy treats offer a unique twist on traditional onion rings, transforming them into chip-like delights that are both flavorful and fun to eat. Not only are they easy to prepare, but they also cater to a variety of dietary preferences – making them the ideal choice for busy parents, college students, or anyone looking to impress their guests without spending hours in the kitchen.

    This recipe focuses on using wholesome ingredients, and if you’re health-conscious, you’ll love the fact that they can be made gluten-free and even vegan, depending on your choice of substitutions. Plus, they’re a wonderful source of fiber and antioxidants, thanks to the onions, while the Parmesan cheese adds a savory depth and richness that takes these chips to the next level.

    Perfect for gatherings or quiet nights in, these Crispy Parmesan Onion Ring Chips are a must-try. Gather your ingredients, set aside some time, and let’s dive into one of the most exciting appetizer recipes you’ll ever prepare!

    Benefits and Advantages of Crispy Parmesan Onion Ring Chips

    Creating dishes that are both enjoyable and healthy can sometimes feel like a daunting task, but our Crispy Parmesan Onion Ring Chips demonstrate that it doesn’t have to be! One of the significant advantages of this recipe lies in its simplicity. With just a handful of ingredients and minimal preparation time, you can whip up a snack that tastes gourmet without the fancy fuss.

    Health Benefits

    When compared to conventional fried onion rings, our recipe significantly reduces the oil content, making it a healthier option. By utilizing an oven instead of deep-frying, you keep calories in check while still achieving a satisfying crunch. Plus, onions, known for their various health benefits, provide nutrients such as vitamin C, dietary fiber, and antioxidants, contributing to heart health and potentially lowering the risk of chronic diseases.

    Dietary Amenities

    Versatility stands at the forefront of this recipe. Due to its customizable nature, you can easily tweak the ingredients to match dietary requirements, from gluten-free to vegan. This adaptability means that nearly anyone can enjoy these chips, regardless of their background or dietary restrictions. Whether you’re a busy parent wanting to whip up something nutritious for the kids or a health-conscious individual looking for low-calorie snack options, these chips fit the bill perfectly.

    A Delight for All Occasions

    Besides their health advantages, the Crispy Parmesan Onion Ring Chips promise to be a hit at any social gathering. Their appealing texture and flavor offer a departure from standard snack options. Whether served at a casual barbecue or a formal dinner party, these chips are sure to impress, creating a memorable culinary experience. Because they are easy to prepare, you can cater to spontaneous gatherings without stress.

    With these key benefits in mind, it’s clear why our Crispy Parmesan Onion Ring Chips stand out as an iconic addition to your collection of appetizer recipes.

    Ingredients Overview

    Essential Ingredients for Crispy Parmesan Onion Ring Chips

    Creating delicious Crispy Parmesan Onion Ring Chips requires a handful of essential ingredients. Below, you’ll find a detailed list with precise measurements along with explanations of how each component plays a significant role in the final result.

    • 2 large onions (preferably sweet onions, like Vidalia): The star ingredient, providing the foundational flavor. Their sweetness along with a slight tang makes them absolutely irresistible once baked.
    • 1 cup all-purpose flour (can substitute with gluten-free flour): This coats the onions, providing a crisp exterior.
    • 1 cup breadcrumbs (panko recommended for extra crunch): This adds texture and becomes the crunchy shell around the onion rings.
    • ½ cup grated Parmesan cheese (can use nutritional yeast for a vegan option): Adds a savory flavor and richness to each bite.
    • 2 large eggs (or flaxseed eggs for a vegan alternative): Binds the flour and breadcrumbs to the onions.
    • 1 teaspoon garlic powder: Compliments the sweetness of the onions and enhances flavor.
    • 1 teaspoon paprika: Adds a subtle smokiness and beautiful color.
    • Salt and black pepper to taste: Essential for seasoning and enhancing the flavors of all ingredients.
    • Olive oil or cooking spray: Helps achieve that perfect crispy texture, used lightly to coat the chips before baking.

    These ingredients combine to create a symphony of flavors, ensuring each bite of your Crispy Parmesan Onion Ring Chips is savory and satisfying.

    Dietary Substitutions to Customize Your Crispy Parmesan Onion Ring Chips

    Given the diverse dietary needs of today’s eaters, ensuring your Crispy Parmesan Onion Ring Chips are adaptable is key. Below are suggested substitutions that maintain the dish’s integrity while catering to various preferences:

    • Gluten-Free: Replace all-purpose flour with a gluten-free flour blend and use gluten-free breadcrumbs to accommodate those with gluten intolerance. Many brands offer delicious options that maintain crunch.

    • Vegan: Substitute eggs with a flaxseed egg (1 tablespoon flaxseed meal mixed with 3 tablespoons water, let sit until gelatinous) for binding. Additionally, replace Parmesan cheese with nutritional yeast or a store-bought vegan cheese alternative for a similar flavor profile.

    • Low-Calorie: To lower calories further, consider air frying them instead of baking and reduce oil usage. You can also monitor the amounts of the breadcrumbs and cheese to suit calorie goals.

    • Spicy Version: Add cayenne pepper or chili powder for those who enjoy a spicy kick. This variation adds zing and makes the snack even more exciting!

    This flexibility ensures that these Crispy Parmesan Onion Ring Chips can bring joy to a wider audience, allowing individuals with different dietary preferences to delight in this versatile dish.

    How to Prepare the Perfect Crispy Parmesan Onion Ring Chips: Step-by-Step Guide

    Now that you’ve gathered your ingredients, let’s dive into preparing these Crispy Parmesan Onion Ring Chips with a thorough, step-by-step guide. This detailed process ensures simplicity while highlighting how easy it is to create gourmet-style snacks at home.

    1. Preheat the Oven: Set your oven to 400°F (200°C), allowing it to reach the desired temperature for a perfect bake.

    2. Prepare the Onions: Peel and slice the onions into ¼-inch thick rings. Maintain a consistent thickness for even cooking.

    3. Set Up a Breading Station:

      • In one bowl, add the flour and season it with salt, pepper, garlic powder, and paprika.
      • In a second bowl, beat the eggs (or prepare your flaxseed egg).
      • In a third bowl, combine your breadcrumbs and Parmesan cheese. (If you’re making a vegan version, omit cheese and use nutritional yeast.)
    4. Dredge the Onion Rings:

      • Take an onion ring and coat it lightly in the flour mixture, ensuring it’s fully covered.
      • Tap off any excess flour and then dip it into the egg mixture (or flaxseed egg).
      • Finally, coat the onion ring in the breadcrumb mixture, pressing gently to adhere. Repeat this process for all onion rings.
    5. Arrange on a Baking Sheet: Line a baking sheet with parchment paper. Place the breaded onion rings in a single layer, ensuring they don’t touch. If desired, lightly spray or drizzle olive oil on top of the rings to enhance crispiness.

    6. Bake: Place the baking sheet in the preheated oven and bake for 15-20 minutes, or until they are golden brown and crispy. Flip the rings halfway through baking for even browning.

    7. Cool & Serve: Once cooked, remove the rings from the oven and allow them to cool slightly before serving. Pair them with your favorite dipping sauce for an even better experience!

    This step-by-step method emphasizes the ease of preparation. Plus, it allows you to tailor elements depending on dietary needs or taste preferences, ensuring everyone can enjoy these fantastic appetizer recipes.

    Mastering Crispy Parmesan Onion Ring Chips: Advanced Tips and Variations

    After perfecting your Crispy Parmesan Onion Ring Chips, why not take your endeavor a step further? Here are some advanced tips and variations that can add complexity and flavor to your dish:

    Tips for Success

    1. Choose the Right Onion: Experiment with different types of onions. Sweet yellow or red onions deliver varying flavor profiles, while white onions provide a sharper bite.

    2. Make it Extra Crispy: For even greater crunch, consider double-breading your onion rings. After the first coating, dip them back in the egg mixture, followed by a second coat of breadcrumbs.

    3. Season to Taste: Don’t hesitate to play with a variety of spices and herbs to create unique flavor combinations. A sprinkle of Italian herbs or a dash of lemon zest can elevate the dish significantly.

    4. Avoid Sogginess: Ensure the onion rings are thawed and patted dry before breading; wet onions may lead to sogginess.

    Flavor Variations

    • Cheesy Garlic Onion Rings: Add minced garlic to the breadcrumb mixture for a zesty kick.

    • Buffalo-Style Chips: Toss your crispy onion ring chips in buffalo sauce before serving for a tangy and spicy flair.

    • Herb-Infused: Use fresh herbs like thyme or rosemary mixed with the breadcrumb coating for more aromatic chips.

    These advanced techniques and variations can help you master your Crispy Parmesan Onion Ring Chips, allowing for endless exploration and flavor combinations well beyond standard appetizer recipes.

    How to Store Crispy Parmesan Onion Ring Chips: Best Practices

    If you happen to have leftover Crispy Parmesan Onion Ring Chips or want to prepare them ahead of time, knowing the best methods for storing them is essential to maintain their crispiness and taste. Here are some best practices for refrigeration, freezing, and reheating:

    Refrigeration

    Allow the chips to cool completely, then store them in an airtight container. Place parchment paper between layers to prevent sticking, and keep them in the refrigerator for up to 3 days. When ready to eat, reheat to restore their crunchiness.

    Freezing

    For longer storage, freeze the breaded but uncooked onion rings. Arrange them in a single layer on a baking sheet and place them in the freezer. Once they are solid, transfer them to airtight freezer bags and keep them frozen for up to a month. When ready to cook, you can bake them from frozen, adding an extra 5 minutes to the baking time.

    Reheating

    To reheat cooked onion rings, use the oven or air fryer rather than the microwave, which can make the chips soggy. Preheat your oven to 375°F (190°C) and bake for 5-10 minutes, or until hot and crispy again.

    Knowing these storage solutions ensures that your Crispy Parmesan Onion Ring Chips can be enjoyed fresh, even on a busy schedule. Accessible appetizer recipes can be made ahead of time without sacrificing quality or taste!

    Nutritional Value of Crispy Parmesan Onion Ring Chips

    Understanding the nutritional profile of your food can aid in making informed choices, especially when it comes to enjoying snacks. Here’s a breakdown of the approximate nutrition content of one serving (about 10 chips) of Crispy Parmesan Onion Ring Chips:

    • Calories: 220
    • Total Fat: 10g
    • Saturated Fat: 3g
    • Cholesterol: 50mg
    • Sodium: 350mg
    • Total Carbohydrates: 26g
    • Dietary Fiber: 3g
    • Sugars: 2g
    • Protein: 5g

    These values can vary based on ingredient substitutions (like cheese or types of flour), cooking methods, and serving sizes. For lower-calorie versions, consider using less cheese or opting for air frying instead of baking.

    By being aware of the nutritional aspects of your dish, you can enjoy your Crispy Parmesan Onion Ring Chips guilt-free and make choices aligned with your dietary goals. Providing healthy appetizer recipes allows everyone to savor delicious flavors without compromising their health!

    FAQs: Frequently Asked Questions About Crispy Parmesan Onion Ring Chips

    Can I make these onion ring chips ahead of time?

    Absolutely! You can prepare the onion rings ahead of time, either bread them and refrigerated or freeze them. They can be baked from frozen when needed for freshness.

    What can I serve with these crispy onion rings?

    These delicious chips pair wonderfully with various homemade dips such as marinara sauce, ranch dressing, or even creamy garlic sauce. They also complement burgers and can serve as a side with salads.

    Why are my onion rings soggy?

    If the onion rings end up soggy, consider two key factors: make sure they are fully dried before breading, and avoid overcrowding during baking, as this can trap steam and inhibit crispness.

    How do I store leftover onion rings?

    Once cooled, store any leftover onion rings in airtight containers in the refrigerator. For longer storage, they can be frozen before cooking, or they can be reheated in the oven for a crisp finish.

    Can I use a different cheese?

    Yes! Feel free to experiment with various cheese options. Cheddar, gouda, or even vegan cheese can work well if you’re seeking an alternative that aligns with your dietary preferences.

    Offering answers to these common queries helps enhance the cooking experience, making it easier for readers to dive into creating wonderful appetizer recipes like Crispy Parmesan Onion Ring Chips.


    With this blog post, you have a complete guide to preparing and enjoying Crispy Parmesan Onion Ring Chips. Its simplicity, health-conscious options, and delightful flavors will make this recipe a repeated favorite among your friends and family. Have fun cooking and inspiring others with your newfound appetizer recipe!