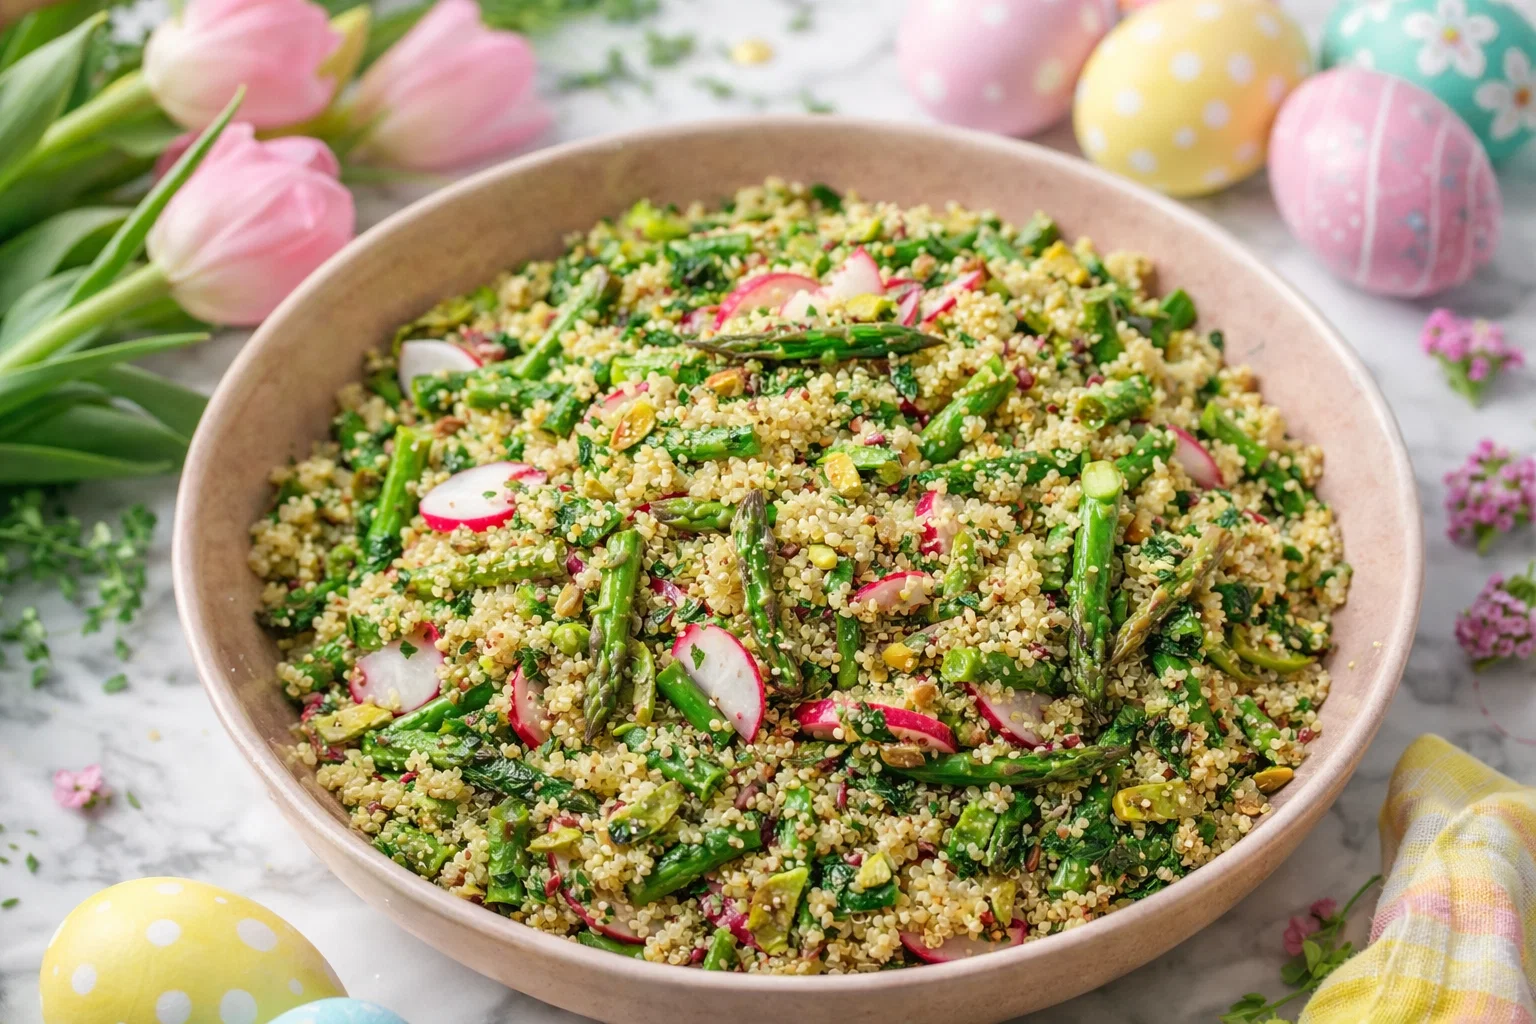
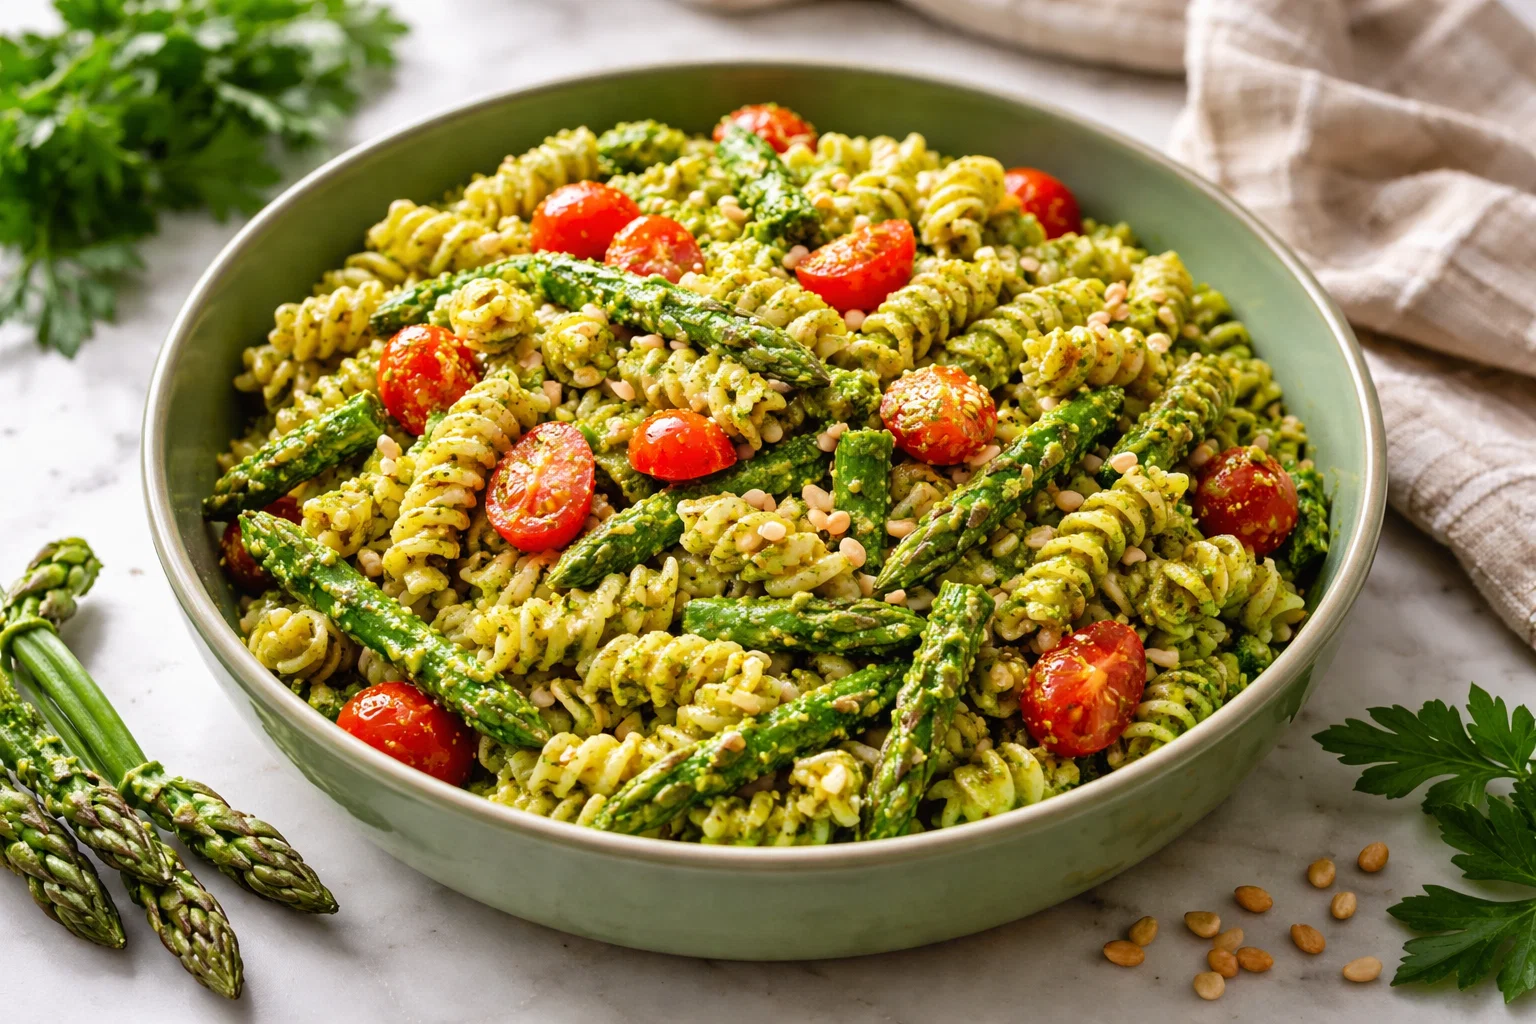
Tag: salad

  • IM Obsessed Been Making These Carrots Non-Stop

    IM Obsessed Been Making These Carrots Non-Stop

    I’M Obsessed! Been Making These Carrots Non-Stop!: A Tropical Delight

    Introduction to I’M Obsessed! Been Making These Carrots Non-Stop!

    If you’re looking for a vibrant addition to your dinner recipes repertoire, then you’re in for a treat with this carrot recipe! Not only is it incredibly simple and quick to make, but it also makes eating your veggies enjoyable and exciting. Imagine perfectly roasted carrots glazed with a sweet and spicy tropical sauce that bursts with flavors. This dish is perfect for everyone—whether you’re a busy parent, a health-conscious individual, or a food enthusiast.

    In just a matter of minutes, you can whip up this dish that caters to various dietary needs. The carrots can be prepared vegan, gluten-free, and low-calorie, making them suitable for almost anyone at your dining table. This recipe not only highlights the humble carrot but transforms it into a tropical delight that is not only eye-catching but also packed with nutrients. So, come along as we dive into this colorful adventure that guarantees everyone will be obsessed with these roasted carrots, just like I am!

    Benefits and Advantages of I’M Obsessed! Been Making These Carrots Non-Stop!

    There are many benefits to adding this carrot dish to your meal planning, elevating its status beyond the average vegetable side. Firstly, the preparation is incredibly straightforward. With just a handful of ingredients that you likely already have at home, you can make a delicious side dish in under 30 minutes. This makes it ideal for those busy weeknights when you want to serve your family a healthy dinner but are short on time.

    Moreover, carrots are an excellent source of essential vitamins and minerals. They are rich in vitamin A, which is vital for good vision, and are packed with antioxidants that help protect the body from disease. Additionally, the natural sweetness of the carrots allows for a delightful flavor profile, especially when paired with a tropical glaze made from fruits, herbs, and spices. Not to mention, this dish is vegan and gluten-free, making it accessible for those following specific dietary restrictions.

    Another appealing aspect of this dish is its versatility. You can serve these roasted carrots as a side for grilled meats, stir them into a salad, or even mash them for a comforting vegetarian main course. This adaptability means that you can easily integrate this dish into any meal or cuisine, making it one of those essential dinner recipes you’ll want to keep revisiting.

    Furthermore, the technique of roasting carrots enhances their natural flavors while also concentrating their sweetness. This method means you can enjoy the health benefits of the carrots while indulging in a rich and satisfying dish. With a handful of spices and herbs, you can customize the flavor to suit your preferences, ensuring every meal feels unique and tailored to your taste.

    Ingredients Overview

    Essential Ingredients for I’M Obsessed! Been Making These Carrots Non-Stop!

    To create these delicious roasted carrots, gather the following essential ingredients:

    • 2 pounds of fresh carrots: Select firm carrots that have a vibrant color. Baby carrots work too, but whole carrots offer a richer flavor.
    • 2 tablespoons of olive oil: For a healthy fat option, this helps achieve that golden-brown color and crispy texture.
    • 1 tablespoon maple syrup or agave nectar: This adds natural sweetness to enhance the caramelization of the carrots.
    • 1 teaspoon ground cumin: A warm spice that complements the carrots beautifully.
    • 1 teaspoon smoked paprika: Provides a hint of smokiness and depth of flavor.
    • Salt and black pepper (to taste): Essential seasonings to elevate the dish.
    • Fresh herbs like cilantro or parsley (for garnish): Adds freshness and color to the final plate.

    This base recipe is not just simple; it’s also wonderfully adaptable. You can make this entirely vegan and gluten-free, ensuring it fits numerous dietary needs.

    Dietary Substitutions to Customize Your I’M Obsessed! Been Making These Carrots Non-Stop!

    This carrot recipe can easily accommodate various dietary preferences with just a few simple substitutions:

    • Oil Alternative: For a lower-calorie version, you may replace olive oil with cooking spray or vegetable broth.
    • Sweetener Substitute: If you’re avoiding sugar, feel free to skip the maple syrup entirely or swap it with a sugar substitute like stevia or monk fruit.
    • Spice Variations: If you’re not keen on certain spices, consider using ground ginger for a zesty kick or cinnamon for a sweeter flavor.
    • Herb Choices: If cilantro isn’t available, parsley, dill, or even green onions could work as excellent alternatives for garnishing.

    These substitutions ensure that everybody can enjoy this vibrant dish while accommodating their dietary preferences without compromising flavor.

    How to Prepare the Perfect I’M Obsessed! Been Making These Carrots Non-Stop!: Step-by-Step Guide

    Creating these mouthwatering roasted carrots is a breeze, thanks to these easy-to-follow steps. Make sure to gather your ingredients before starting to streamline the process.

    1. Preheat the Oven: Start by preheating your oven to 425°F (220°C). This high temperature will allow the carrots to roast perfectly, developing that enticing caramelization.

    2. Wash and Cut the Carrots: Rinse the carrots thoroughly under cold water to remove any dirt. Trim the tops and tails, then slice them into equal-sized pieces: about 1-inch thick for optimal cooking. If using baby carrots, they can be left whole.

    3. Prepare the Dressing: In a mixing bowl, whisk together the olive oil, maple syrup, ground cumin, smoked paprika, salt, and black pepper until well combined. This mixture acts as both a glaze and a seasoning for the carrots.

    4. Toss the Carrots: In another large bowl, place the sliced carrots, then pour the dressing over them. Use your hands or a spatula to ensure every carrot piece is well-coated with the glaze. This step is crucial for maximum flavor.

    5. Arrange on a Baking Sheet: Spread the glazed carrots out in a single layer on a baking sheet lined with parchment paper. Make sure they have space between them to ensure even roasting. This prevents them from steaming and encourages that lovely char.

    6. Roast the Carrots: Place the baking sheet in the preheated oven and roast for about 20-25 minutes. After the first 15 minutes, you may want to stir the carrots to ensure even cooking. Keep an eye on them; they should be tender with a lovely golden-brown exterior.

    7. Garnish and Serve: Once cooked, remove the carrots from the oven and let them cool for a moment. If desired, sprinkle fresh herbs such as chopped cilantro or parsley on top for a burst of freshness before serving.

    8. Enjoy Your Creation: These beautifully roasted carrots can be served hot as a side to any of your favorite main courses or can be cooled and added to salads for a delicious twist on traditional dishes.

    You now have a colorful and delightful dish that elevates your dinner recipes effortlessly! Feel free to adjust seasonings or colors to suit your family’s preferences entirely.

    Mastering I’M Obsessed! Been Making These Carrots Non-Stop!: Advanced Tips and Variations

    While this recipe is perfectly delicious as is, there are ways to take it to the next level or customize it to make it even more exciting:

    • Spice It Up: If you’re looking for some heat, consider adding a pinch of cayenne pepper or some chili flakes to your glaze. This adds a fantastic kick that offsets the sweetness beautifully.

    • Add Nuts or Seeds: For a satisfying crunch, sprinkle some toasted walnuts, pecans, or pumpkin seeds over the dish just before serving. This addition adds texture and healthy fats.

    • Infuse with Citrus: For added brightness, toss the roasted carrots with a squeeze of fresh lemon or lime juice right before serving, enhancing their flavor even further.

    • Experiment with Sauces: Drizzle a tahini sauce or a yogurt-based sauce over the carrots for an extra layer of flavor and creaminess.

    These variations allow you to explore different cultures’ flavors, making this dish a versatile option for any occasion, laden with delightful surprises every time you prepare it.

    How to Store I’M Obsessed! Been Making These Carrots Non-Stop!: Best Practices

    Storing any leftover roasted carrots is quite simple, ensuring you can enjoy this delicious dish later. Here are some best practices:

    • Refrigerating Leftovers: After your meal, let the roasted carrots cool completely. Once cooled, store them in an airtight container in the refrigerator. They can be stored this way for up to 4 days.

    • Freezing: If you want to save leftovers for a longer period, consider freezing your cooked carrots. Spread them on a baking sheet in a single layer, freeze them until solid, and then transfer them to a freezer-safe bag or container. They can be stored in the freezer for up to 3 months.

    • Reheating: When you’re ready to enjoy your leftovers, simply preheat your oven to 375°F (190°C). Spread the leftovers on a baking sheet and heat for about 10-15 minutes until warmed through. Alternatively, you can use a microwave for quicker reheating, keeping in mind the texture may not be as crisp.

    By following these storage techniques, you can ensure your adored roasted carrots remain fresh and full of flavor, ready to elevate future meals.

    Nutritional Value of I’M Obsessed! Been Making These Carrots Non-Stop!

    Understanding the nutritional value of your food is essential, especially for dinner recipes where health and flavor collide. Here’s the nutritional breakdown for one serving (about ½ cup) of this roasted carrot dish:

    • Calories: 80
    • Fat: 4 g
    • Carbohydrates: 12 g
    • Fiber: 3 g
    • Sugars: 5 g (natural sugars from carrots and maple syrup)
    • Protein: 1 g
    • Vitamin A: 187% of the Daily Value (DV)
    • Vitamin C: 9% of the DV
    • Calcium: 3% of the DV
    • Iron: 2% of the DV

    The carrots provide a wealth of antioxidants, particularly beta-carotene, making them a superfood for eye health. The inclusion of healthy fats from olive oil amplifies nutrient absorption, ensuring you’re not only enjoying a delicious dish but also one brimming with health benefits.

    Note that these values may vary based on the exact ingredients used, particularly sweeteners or herbs. This dish is low-calorie and supports a balanced diet, perfect for anyone looking to maintain or lose weight without sacrificing taste.

    FAQs: Frequently Asked Questions About I’M Obsessed! Been Making These Carrots Non-Stop!

    Can I make this carrot recipe ahead of time?

    Yes! You can prepare the carrots in advance and store them in the refrigerator for a day before roasting. This can also help the flavors to meld together for an even tastier dish!

    What can I use instead of carrots?

    If you’re looking to mix things up, consider substituting other root vegetables like sweet potatoes or parsnips. Each will have its unique flavor and texture but will also roast beautifully!

    How can I achieve a sweeter glaze?

    If you prefer a sweeter flavor profile, feel free to increase the amount of maple syrup or add a touch of brown sugar. Honey is another option that can provide additional sweetness if you’re not strictly vegan.

    Are there any common allergies I should be aware of with this recipe?

    This dish is generally safe for most diets. However, if you are allergic to nuts, be cautious with toppings like walnuts or pecans. Always check ingredient labels for allergens in processed products like olive oil or seasonings.

    Can I grill these carrots instead?

    Absolutely! Grilling offers a fantastic smoky flavor. Follow the same steps for the glaze, then place the carrots on a grill basket or skewers and cook them over medium heat until tender.

    This vibrant and flavorful carrot dish ensures every meal shines. With these answers and helpful tips, you’re more than equipped to dive into making it your own!

    In conclusion, whether you’re a seasoned cook or a kitchen novice, the “I’M Obsessed! Been Making These Carrots Non-Stop!” recipe is an easy and delightful addition to your collection of dinner recipes. So gather your ingredients and let’s get cooking!

  • 5-Ingredient Roasted Brussels Sprouts And Carrots

    5-Ingredient Roasted Brussels Sprouts And Carrots

    5-Ingredient Roasted Brussels Sprouts And Carrots: A Tropical Delight

    Introduction to 5-Ingredient Roasted Brussels Sprouts And Carrots

    Are you on the hunt for healthy dinner recipes that require minimal effort yet bring maximum flavor? Look no further! This delightful combination of roasted Brussels sprouts and carrots is not only simple to prepare but also a healthful addition to your dinner table. This magical dish, crafted with just five ingredients, is vegetarian, gluten-free, and perfect for anyone looking to eat healthily without compromising on taste.

    Brussels sprouts are renowned for their nutrient density, packed with vitamins C and K, while carrots add a natural sweetness and a rich source of beta-carotene. Roasting these vibrant vegetables enhances their flavors, creating a caramelized exterior that is hard to resist. This dish is not just for busy weeknights; it works wonderfully as a side for festive gatherings or intimate dinners alike.

    As you dive into this recipe, you’ll discover that its versatility makes it suitable for a variety of dietary needs. Whether you’re a busy parent, a student, or someone following a specific diet plan, this roasted dish is a perfect fit. Give it a try, and you’ll see that healthy cooking doesn’t have to be complicated or time-consuming. Join us as we explore how to create a mouthwatering, nutritious side dish that will inspire your culinary journey!

    Benefits and Advantages of 5-Ingredient Roasted Brussels Sprouts And Carrots

    Why should you make the effort to include 5-Ingredient Roasted Brussels Sprouts And Carrots in your meal plan? Let’s uncover the numerous benefits of this delightful recipe that will have you reaching for it again and again.

    Quick and Easy Preparation

    One of the standout features of this recipe is its simplicity. With just five ingredients that you likely already have in your kitchen, it takes only minutes to prepare. Ideal for busy individuals and families, this dish is not only easy to make but also requires minimal clean-up. The straightforward steps ensure that even novice cooks can whip it up without any stress.

    Nutritional Powerhouse

    Next, let’s delve into the health benefits. Brussels sprouts and carrots are laden with essential nutrients. Brussels sprouts are an excellent source of antioxidants, which combat free radicals in your body, while carrots contribute to better vision and skin health thanks to their high beta-carotene content. Together, these vegetables pack a nutritional punch, making them a perfect fit for healthy dinner recipes. This dish keeps you full without weighing you down, promoting a balanced meal.

    Versatile and Customizable

    Another advantage of this recipe is its versatility. Feel free to get creative! You can easily customize it by adding other seasonal vegetables or spices. This flexibility makes Brussels sprouts and carrots a great base for experimentation, allowing those with specific dietary preferences, such as vegan or gluten-free, to enjoy a meal that aligns with their lifestyle.

    Budget-Friendly

    Let’s not forget about the cost-effectiveness. Both Brussels sprouts and carrots are affordable, especially when bought in bulk or during their peak seasons. This recipe focuses on keeping your grocery bill low while providing a delicious and nutritious meal, which is a bonus for students and families alike.

    Great for Meal Prep

    Lastly, this dish is perfect for meal prepping. Roasted Brussels sprouts and carrots keep well in the refrigerator, making them an excellent choice for quick meal options throughout the week. Simply make a large batch, store it in airtight containers, and enjoy it alongside other meals.

    In summary, the combination of ease, nutrition, versatility, affordability, and meal prep suitability makes these roasted Brussels sprouts and carrots a fantastic addition to your repertoire of healthy dinner recipes.

    Ingredients Overview

    Essential Ingredients for 5-Ingredient Roasted Brussels Sprouts And Carrots

    To recreate this roasted delight, you need only a handful of ingredients. Here’s a detailed overview of what you’ll need:

    1. Brussels Sprouts (1 pound)
    2. Purpose: The primary vegetable in this dish; they provide a rich source of vitamins and minerals. Choose fresh, bright green sprouts for the best flavor.

    3. Carrots (1 pound)

    4. Purpose: These add natural sweetness and crunch; they’re packed with beta-carotene. Opt for medium-sized carrots; baby carrots can also be used for convenience.

    5. Olive Oil (3 tablespoons)

    6. Purpose: This not only helps in roasting the vegetables evenly but also contributes healthy fats. You can substitute it with canola or avocado oil if preferred.

    7. Salt (1 teaspoon)

    8. Purpose: Enhances flavor; feel free to adjust according to your taste or dietary requirements. For those on low-sodium diets, consider using sea salt or herb-infused salt for extra taste.

    9. Black Pepper (½ teaspoon)

    10. Purpose: Adds a touch of spice and depth to the dish. This can be replaced with other spices or herbs, depending on your taste preferences.

    Dietary Substitutions to Customize Your 5-Ingredient Roasted Brussels Sprouts And Carrots

    Even with such a simple list, there are ways to adapt this recipe for various dietary needs:

    • Vegan: This recipe is inherently vegan, but if you want to add a gourmet twist, consider adding nutritional yeast for a cheesy flavor without the dairy.

    • Gluten-Free: This recipe is already gluten-free; enjoy it without any modifications!

    • Low-Carb or Keto: While carrots do contain carbs, you can substitute them with cauliflower or zucchini to keep the carbohydrate count lower.

    • For Extra Flavor: Add garlic cloves, fresh herbs like rosemary or thyme, or a splash of balsamic vinegar to elevate the taste profile.

    These substitutions allow you to tailor your roasted Brussels sprouts and carrots to accommodate your dietary preferences while maintaining nutritional balance.

    How to Prepare the Perfect 5-Ingredient Roasted Brussels Sprouts And Carrots: Step-by-Step Guide

    Ready to bring this vibrant dish to life? Here’s a detailed step-by-step guide on preparing your 5-Ingredient Roasted Brussels Sprouts and Carrots:

    1. Preheat the Oven: Start by preheating your oven to 425°F (220°C). A hot oven helps create that perfectly roasted, caramelized outer layer.

    2. Prepare the Brussels Sprouts: Rinse the Brussels sprouts under cold water to clean them. Trim the ends, removing any yellow or damaged leaves. Then, cut them in half for even roasting.

    3. Slice the Carrots: Peel the carrots and slice them into uniform pieces, approximately 1/2-inch thick. Uniformity ensures even cooking.

    4. Mix Ingredients: In a large mixing bowl, combine the halved Brussels sprouts and sliced carrots. Drizzle with olive oil and sprinkle with salt and black pepper. Toss well until all vegetables are coated evenly. This step is crucial for flavor and ensures that the spices adhere to the veggies.

    5. Spread on a Baking Sheet: Arrange the coated vegetables evenly on a large baking sheet, making sure they are not overcrowded. Overlapping can lead to steaming rather than roasting, preventing that desired crispiness.

    6. Roast in the Oven: Place the baking sheet in the preheated oven and set a timer for 20 minutes. Halfway through, take a moment to stir the vegetables to ensure even cooking.

    7. Check for Tenderness: After 20 minutes, check for doneness. The Brussels sprouts should be tender with golden brown edges, and the carrots should be fork-tender. If you prefer a more caramelized finish, leave them in for an additional 5-10 minutes.

    8. Serve: Remove the baking sheet from the oven and allow the vegetables to cool slightly before serving. This dish is best enjoyed warm, straight from the oven.

    9. Garnishing Optional: If desired, drizzle with balsamic glaze or sprinkle with toasted nuts or seeds for added texture. Fresh herbs can also add a pop of color and flavor.

    10. Enjoy: Place the roasted Brussels sprouts and carrots on a serving dish and watch them disappear as you serve your healthy dinner recipes to family and friends.

    By following these clear steps, you’ll create a delicious dish that not only fits into your busy lifestyle but also appeals to health-conscious diners. Feel free to adapt as needed!

    Mastering 5-Ingredient Roasted Brussels Sprouts And Carrots: Advanced Tips and Variations

    To elevate your dish further, here are some advanced tips and variations to try with your roasted Brussels sprouts and carrots:

    Explore Flavor Combinations

    1. Add Heat: Want more spice? Incorporate chili flakes or a sprinkle of cayenne pepper for a kick.

    2. Sweeten the Deal: Drizzle a little maple syrup or honey (if not vegan) over the vegetables before roasting for a sweet-savory profile.

    3. Cheesy Finish: If you’re not strictly vegan, top with grated Parmesan cheese right at the end of roasting for a rich flavor.

    Experiment With Herbs and Spices

    Try experimenting with different herbs such as thyme, rosemary, or even a hint of cumin for a unique twist. Fresh herbs can be either layered during the cooking or added post-roasting for a fresh taste.

    Add Extra Veggies

    You can easily add other vegetables like bell peppers, sweet potatoes, or zucchini to enhance the dish’s visual appeal and nutritional content. Just adjust the cooking time based on the vegetables used.

    Roasting Alternative

    If you’re short on time, consider blanching the Brussels sprouts and carrots in boiling water for a few minutes before roasting. This method reduces oven time while retaining vibrant color and flavor.

    Quick Turnaround: Pan-Fried Version

    For a quick version, consider pan-frying the vegetables instead of roasting. Heat a non-stick skillet, add your veggies with olive oil, and sauté until tender, allowing for a slightly different texture and flavor profile.

    These variations allow you to create a dish that never feels boring, maintaining excitement and creativity in your kitchen while exploring the wonders of healthy dinner recipes.

    How to Store 5-Ingredient Roasted Brussels Sprouts And Carrots: Best Practices

    If you happen to have leftovers (which is unlikely given how delicious this dish is!), storing them correctly ensures that you maintain their quality.

    Refrigeration

    • Cool Down: Allow the Brussels sprouts and carrots to cool before storing them. Hot vegetables can create moisture in the storage container, leading to sogginess.

    • Use Airtight Containers: Transfer the cooled vegetables to airtight containers. They can be stored in the refrigerator for up to 4 days.

    Freezing

    • Prepare for Freezing: For longer storage, consider flash freezing. Spread the cooled veggies on a baking sheet and freeze until solid. Once frozen, transfer them to freezer bags and store for up to 3 months.

    • Reheating: To reheat, bake from frozen without thawing, extending the cooking time, or sauté in a pan until heated through.

    Best Reheating Practices

    • Oven Reheat: Preheat your oven to 350°F (175°C). Spread the vegetables on a baking sheet and heat for about 10-15 minutes until warmed through.

    • Microwave Option: The microwave is a quick option too. Place the veggies in a microwave-safe dish with a splash of water and cover. Heat in short bursts, stirring every 30 seconds until hot.

    By following these storage tips, you can enjoy your roasted Brussels sprouts and carrots a second time, making it a convenient part of your healthy dinner recipes rotation.

    Nutritional Value of 5-Ingredient Roasted Brussels Sprouts And Carrots

    Understanding the nutritional value of your meal aids in maintaining a balanced diet. Here’s a breakdown of what’s in this fabulous dish:

    • Calories: Approximately 150 calories per serving
    • Total Fat: 7g (mostly healthy fats from olive oil)
    • Saturated Fat: 1g
    • Sodium: 300mg (adjustable based on salt used)
    • Total Carbohydrates: 20g
    • Dietary Fiber: 6g
    • Sugars: 6g
    • Protein: 4g

    Vitamins and Minerals

    • Vitamin A: Significant source due to carrots
    • Vitamin C: Abundant in Brussels sprouts
    • Vitamin K: High amounts to support bone health
    • Potassium: Aids in muscle function and electrochemical balance

    Balancing these nutrients while enjoying the wonderful flavors of this dish makes it not only a satisfying option but truly one of the best healthy dinner recipes out there.

    FAQs: Frequently Asked Questions About 5-Ingredient Roasted Brussels Sprouts And Carrots

    Have questions about your roasted Brussels sprouts and carrots? Let’s address some of the most common inquiries:

    Can I use frozen Brussels sprouts?

    While fresh is recommended for the best flavor and texture, you can use frozen Brussels sprouts. Just consider adjusting your cooking time, as frozen veggies may release extra moisture.

    Can I add other vegetables?

    Absolutely! Feel free to mix in other favorite vegetables like sweet potatoes, parsnips, or bell peppers. Just keep an eye on cooking times to ensure everything is perfectly tender.

    What can I serve with roasted Brussels sprouts and carrots?

    These roasted delights pair well with a variety of main dishes. Consider serving them with grilled chicken, salmon, or even as part of a hearty grain bowl. They also work wonderfully in salads.

    How can I adjust the recipe for a larger crowd?

    Scaling the recipe up is quite simple! Just maintain the 1:1 ratio for ingredients; however, ensure you have sufficient oven space and use larger baking sheets to avoid overcrowding.

    What is the best way to reheat leftovers?

    For the best results, reheating in the oven is preferred to retain crispness. Just note that microwaving can make them soggy. Following the suggested storage and reheating methods will help maintain quality.

    Using this detailed guide, you can navigate through cooking and serving 5-Ingredient Roasted Brussels Sprouts And Carrots with ease, ensuring that you and your loved ones enjoy a delicious and nutritious meal! With its undeniable health benefits, simplicity, and room for experimentation, this recipe is bound to become a household favorite.

  • Easy Vegan Celery Salad

    Easy Vegan Celery Salad

    Easy Vegan Celery Salad: A Tropical Delight

    Introduction to Easy Vegan Celery Salad

    If you are looking for a refreshing and healthy recipe to add to your collection of healthy snacks, look no further than this Easy Vegan Celery Salad. This vibrant dish is packed with an array of textures and flavors that will tantalize your taste buds while satisfying your crunch cravings. Not only is it incredibly simple to prepare, but it also fits seamlessly into various dietary lifestyles, making it a versatile option for busy parents, students, health-conscious individuals, and anyone who enjoys vibrant, plant-based meals.

    Celery, the star of this salad, offers a wealth of health benefits. It is low in calories, high in fiber, and rich in vitamins and minerals. Coupled with tantalizing ingredients like juicy cherry tomatoes, creamy avocado, and a zesty lemon vinaigrette, this salad is not just nutritious but also delightful. Making it vegan and gluten-free means that everyone at the table can enjoy it without concern.

    Whether you are looking for a quick lunch option, a side dish for dinner, or just a delightful afternoon snack, this Easy Vegan Celery Salad checks all the boxes. With its bright and crisp ingredients, it not only nourishes your body but also brings a smile to your face. So grab those fresh ingredients and let’s embark on a journey to create a dish that embodies health, simplicity, and deliciousness!

    Benefits and Advantages of Easy Vegan Celery Salad

    Creating an Easy Vegan Celery Salad comes with a multitude of benefits. First and foremost, the recipe is straightforward and quick, requiring minimal kitchen skills. This makes it perfect for novice cooks, busy professionals, or anyone who prefers to spend less time in the kitchen and more time enjoying their meals. You can have this dish prepped and ready in under 15 minutes, and it requires no cooking!

    The health advantages of this salad are significant. With celery as the primary ingredient, you get a low-calorie, high-water content veggie that keeps you hydrated and feeling full for longer periods. Celery is known for its anti-inflammatory properties and is rich in antioxidants and vitamins K and C, which are essential for maintaining good health. Moreover, combining celery with avocado provides healthy fats, which are crucial for overall well-being. This salad is not just a delicious side dish; it’s a powerhouse of nutrition, making it an excellent choice for anyone seeking to incorporate more healthy snacks into their diet.

    Another standout feature of the Easy Vegan Celery Salad is its adaptability. You can easily customize the recipe to suit various dietary preferences, whether you are following a vegan, vegetarian, or gluten-free lifestyle. It can also easily be transformed into a protein-packed meal by adding chickpeas or tofu for those looking for a more filling option. The vibrant colors and diverse textures of the ingredients showcase the beauty of plant-based eating, appealing to food enthusiasts and health-conscious individuals alike.

    Overall, the Easy Vegan Celery Salad not only nourishes your body with wholesome ingredients but also serves as a stunning centerpiece for any meal. Whether you’re hosting a casual gathering or enjoying a quiet dinner at home, this salad is sure to impress with its delightful flavors and health benefits.

    Ingredients Overview

    Essential Ingredients for Easy Vegan Celery Salad

    To create your Easy Vegan Celery Salad, you will need a few wholesome ingredients. Below is a comprehensive list, featuring specific measurements and the role each item plays in this flavorful dish.

    • 4 stalks of celery: The primary ingredient; packed with hydration and a satisfying crunch.
    • 1 cup of cherry tomatoes: Adds natural sweetness and a pop of color.
    • 1 ripe avocado: Provides creaminess and healthy fats, enhancing the salad’s texture.
    • 1/4 cup of red onion: Offers a sharp flavor and complements the other ingredients well.
    • 1/4 cup of fresh parsley: A burst of freshness and nutrients.
    • Juice of 1 lemon: Adds brightness and a tangy flavor.
    • 1 tablespoon of olive oil: A healthy fat that helps with nutrient absorption while enhancing flavor.
    • Salt and black pepper to taste: Essential seasonings for balancing flavors.

    This combination results in a well-rounded, delicious salad that feels indulgent while remaining healthy. All ingredients are vegan, gluten-free, and low in calories, making them perfect for those seeking healthy snacks.

    Dietary Substitutions to Customize Your Easy Vegan Celery Salad

    Customization is a key feature of the Easy Vegan Celery Salad! Here are some suggested substitutions that cater to various dietary needs or ingredient availability:

    • Celery: If you’re not a fan, you can replace it with cucumber for a different crunch or even shredded carrots for a sweeter, earthier flavor.
    • Cherry tomatoes: You may use diced bell peppers or shredded red cabbage for a different flavor profile, ensuring your salad remains colorful and delicious.
    • Avocado: If you’re looking for a lower-fat alternative, consider using silken tofu or a scoop of hummus for creaminess.
    • Red onion: This can be replaced with green onions for a milder flavor or omitted entirely for those sensitive to onion flavor.
    • Lemon juice: Apple cider vinegar is a great substitute that still offers acidity and brightness without the need for fresh lemons.

    Feel free to mix and match these substitutions according to your personal preferences and dietary requirements, ensuring your Easy Vegan Celery Salad is uniquely yours while still being a great addition to the world of healthy snacks.

    How to Prepare the Perfect Easy Vegan Celery Salad: Step-by-Step Guide

    Now that you have all your ingredients ready, it’s time to create your Easy Vegan Celery Salad. Follow these straightforward steps to achieve the perfect salad in no time!

    1. Prepare the Base: Start by washing the stalks of celery thoroughly under running water to remove any dirt and impurities. Pat them dry with a kitchen towel before chopping.

    2. Chop Celery: Slice the celery into thin, bite-sized pieces for the best texture. Place the chopped celery in a large mixing bowl.

    3. Dice Cherry Tomatoes: Next, wash the cherry tomatoes and cut each one in half. Add them to the bowl with the celery.

    4. Cut Avocado: Carefully slice the avocado in half, remove the pit, and scoop the flesh out using a spoon. Cut the avocado into cubes and layer them into the salad.

    5. Finely Chop Red Onion: Peel the red onion and slice it thinly. If the flavor is too strong for you, soak the slices in cold water for about 10 minutes. Then drain and add them to the salad bowl.

    6. Add Fresh Parsley: Rinse the fresh parsley, shake off excess water, and chop it finely. Toss the chopped parsley into the salad for a fresh flavor boost.

    7. Make the Dressing: In a small bowl, combine the freshly squeezed lemon juice, olive oil, salt, and black pepper. Whisk together until the mixture is well combined.

    8. Mix Ingredients: Drizzle the dressing over the salad ingredients and gently toss everything together. Make sure the dressing evenly coats all the ingredients for maximum flavor.

    9. Taste Test: Before serving, taste the salad and adjust the seasoning if necessary. You may want to add a pinch more salt or pepper, depending on your preferences.

    10. Chill and Serve: For optimal flavor, let the salad sit in the fridge for about 15 minutes. This allows the flavors to meld together beautifully. Serve chilled.

    11. Meal Preparation Tip: For those busy days, you can prepare a larger batch of this salad. Just store individual portions in airtight containers for quick and easy healthy snacks throughout the week!

    By following these simple steps, you can make a vibrant, delicious Easy Vegan Celery Salad that’s perfect for any occasion, whether it’s a casual lunch, a picnic, or as an appetizer at a dinner party.

    Mastering Easy Vegan Celery Salad: Advanced Tips and Variations

    Now that you know how to create the fundamental Easy Vegan Celery Salad, let’s explore some advanced tips and delicious variations that will take your salad to the next level!

    • Add Protein: To make this salad a complete meal, consider adding cooked chickpeas, black beans, or lentils. These protein-dense ingredients not only keep you full but also add a satisfying texture.

    • Incorporate Seeds and Nuts: Toss in some sunflower seeds, pumpkin seeds, or sliced almonds for added crunch and healthy fats. They bring a delightful nutty flavor to your salad.

    • Experiment with Dressings: While a lemon-olive oil dressing works wonders, feel free to try different dressings! A balsamic vinaigrette, tahini dressing, or even a simple vegan ranch can offer a new twist on flavors while ensuring they remain healthy snacks.

    • Use Seasonal Ingredients: Tailor your salad to reflect the seasons by adding fresh herbs like basil or cilantro in the summer, or diced apples in the fall for sweetness and crunch.

    • Spice It Up: If you enjoy a little heat, sprinkle in some red pepper flakes or chopped jalapeños to add a fiery kick to your salad.

    • Vegetable Variations: Don’t hesitate to get creative with the vegetables. Thinly sliced radishes, cucumber, bell peppers, or shredded zucchini can add color and flavor contrasts.

    With these tips and variations, you can master the art of preparing an Easy Vegan Celery Salad that goes beyond basic expectations, allowing you to impress family and friends with your culinary creativity.

    How to Store Easy Vegan Celery Salad: Best Practices

    Storing your Easy Vegan Celery Salad properly is key to maintaining freshness and flavor. Here are some best practices for refrigerator storage, freezing, and reheating:

    • Refrigeration: If you have leftover salad, place it in an airtight container and store it in the fridge. It’s best consumed within 1 to 2 days. The longer it sits, the more the ingredients may lose their crunch, especially the celery.

    • Freezing: While the entire salad doesn’t freeze well due to the avocados and tomatoes, you can freeze the chopped celery separately. This way, you can use it in soups or stir-fries later. Just remember, thawed celery will lose its crispness.

    • Reheating: Since this salad is enjoyed cold, there’s no reheating necessary. If you wish to enhance its flavors, however, refreshing it with a squeeze of lemon juice just before serving can perk it up wonderfully.

    • Meal Prep: For those who love to prepare meals in advance, keep the dressing separate from the salad until you are ready to eat. This will prevent the salad from becoming soggy, ensuring every bite remains fresh and inviting.

    Knowing how to store your Easy Vegan Celery Salad strengthens your pantry management skills and helps you stay on track with your healthy snacks plan!

    Nutritional Value of Easy Vegan Celery Salad

    Understanding the nutritional value of your Easy Vegan Celery Salad can help you appreciate how it fits into your overall diet. The following estimates provide a breakdown of commonly analyzed nutrients per serving (about one cup of prepared salad):

    • Calories: Approximately 150-200 calories
    • Protein: Around 3-4 grams
    • Fat: Roughly 10-15 grams (varies greatly depending on the amount of avocado added)
    • Carbohydrates: About 15-20 grams
    • Fiber: 5-6 grams
    • Vitamin C: 15-20% of the Daily Value (DV)
    • Vitamin K: 25-30% of the DV

    These nutritional facts highlight how this salad serves as a wonderful addition to your diet, aiding in hydration, providing essential vitamins, and promoting digestive health due to its high fiber content. It’s a perfect example of satisfying and nutritious healthy snacks.

    Additionally, adjusting the amounts or substituting some ingredients can impact nutritional values, allowing you to tailor the salad according to your dietary goals. Keeping this in mind, you can personalize your Easy Vegan Celery Salad to not only fit your taste preferences but also your nutritional needs.

    FAQs: Frequently Asked Questions About Easy Vegan Celery Salad

    Here are some common questions readers might have about the Easy Vegan Celery Salad:

    Can I make this salad ahead of time?

    Yes! You can prepare the salad a few hours in advance. Just remember to keep the dressing separate until you’re ready to serve to maintain freshness.

    What can I substitute for avocado?

    If you prefer not to use avocado, silken tofu or a few tablespoons of tahini can add creaminess without compromising flavor.

    Is this salad suitable for meal prep?

    Absolutely! You can prepare the ingredients ahead of time and store them separately, mixing them just before serving. This will ensure the salad maintains its crispness.

    How can I make this salad more filling?

    To increase the protein content and make the salad more satisfying, consider adding cooked quinoa, chickpeas, or diced grilled tofu.

    How long does this salad keep in the fridge?

    The salad is best eaten within 1-2 days. If you notice any ingredients wilting or losing texture, it’s best to consume it sooner rather than later.

    Can I add other vegetables to this salad?

    Yes, feel free to add whatever vegetables you enjoy! Cucumbers, bell peppers, or even sprouts can enhance flavor and nutritional diversity.

    With those questions addressed, you are well on your way to enjoying your Easy Vegan Celery Salad and the many healthy snacks it can inspire in your kitchen. Celebrate the joy of healthy cooking and enjoy the vibrant world of plant-based flavors!

  • Tangy Creamy Potato Salad With Eggs

    Tangy Creamy Potato Salad With Eggs

    Tangy Creamy Potato Salad With Eggs: A Tropical Delight

    Introduction to Tangy Creamy Potato Salad With Eggs

    Welcome to the vibrant world of Tangy Creamy Potato Salad With Eggs, where flavors mingle in perfect harmony! This recipe is a fantastic addition to your repertoire, especially if you are browsing through delicious and easy recipe ideas for gatherings, picnics, or even a cozy meal at home. You may wonder, what sets this dish apart? The answer lies in its simplicity. Made with just a handful of ingredients, it offers a delightful balance between creamy, tangy, and satisfying flavors.

    One of the standout features of this potato salad is its versatility. Not only is it easy to prepare, but it also caters to various dietary needs. Whether you are a busy parent, a student living away from home, or simply someone conscious about their health, this potato salad checks all the boxes. The key ingredients bring a treasure trove of health benefits: potatoes provide essential vitamins and minerals, eggs are a fantastic source of protein, and the dressing components offer a zing that invigorates the dish.

    Moreover, this potato salad can easily adapt to different diets, making it suitable for those who follow vegan or gluten-free lifestyles. Additionally, it packs beautifully for lunch boxes or picnic baskets, ensuring that you can relish this tropical delight anytime, anywhere. In the following sections, we will dive deeper into the benefits of this dish, provide an overview of the ingredients, and guide you through preparing the perfect tangy creamy potato salad.

    Benefits and Advantages of Tangy Creamy Potato Salad With Eggs

    Creating a dish that is both delicious and nourishing can sometimes feel challenging, but that’s where our Tangy Creamy Potato Salad With Eggs shines. This recipe is known for its exceptional ease of preparation, making it an ideal option for both novice cooks and seasoned chefs. With minimal time and effort, you can whip up a dish that is both filling and refreshing, perfect for any occasion.

    Health Benefits

    Understanding the health benefits of the key ingredients helps you appreciate this dish even more. Potatoes, the primary ingredient, are rich in potassium and vitamin C, essential for maintaining a healthy immune system. They are naturally gluten-free and low in calories, making them an excellent choice for those looking to enjoy a satisfying meal without the extra calories.

    Eggs, included in this delicious salad, provide high-quality protein and essential nutrients like Vitamin D and choline. These nutrients are beneficial, especially for busy parents and working professionals needing to fuel their bodies for a hectic day. The creamy dressing using natural yogurt or avocado not only adds richness but also offers healthy fats that keep you satiated longer.

    Incorporating a tangy element, like pickles or vinegar, elevates the flavor while providing a burst of freshness that pairs beautifully with the eggs and potatoes. All these components come together to create a delightful dish that satisfies your taste buds while nourishing your body.

    Versatility and Adaptability

    One of the greatest advantages of this potato salad is its versatility. You can easily modify the recipe to accommodate various dietary restrictions, making it an excellent option for gatherings. Whether you want to suit gluten-free eaters or those on a vegan diet, there’s room to play. For instance, if you’re opting for a vegan twist, simply replace the eggs with chickpeas for added protein or use a vegan mayo in the dressing.

    The adaptability of this recipe enables it to serve different occasions. Whether you’re attending a potluck, hosting a barbecue, or enjoying a simple weeknight dinner, this dish can be your go-to. Additionally, you can incorporate seasonal vegetables, add herbs, or even sprinkle nuts for an interesting twist. The endless recipe ideas and variations encouraged by this potato salad make it a worthwhile addition to your culinary collection.

    Ingredients Overview

    Essential Ingredients for Tangy Creamy Potato Salad With Eggs

    To make the finest Tangy Creamy Potato Salad With Eggs, you’ll need the following ingredients:

    1. Potatoes (2 lbs): Preferred varieties include Yukon gold or red potatoes, which are creamy and flavorful.
    2. Hard-Boiled Eggs (4 large): These provide texture and protein; consider adding more if desired.
    3. Celery (1 cup, diced): For crunch and freshness.
    4. Red Onion (½ cup, chopped): To add flavor and an appealing color contrast.
    5. Pickles (1 cup, diced): Adds tanginess; use dill or bread-and-butter pickles according to preference.
    6. Mayonnaise (½ cup): The base for the creamy dressing; substitute with Greek yogurt or plant-based mayo for healthier options.
    7. Dijon Mustard (1 tablespoon): For a zesty kick.
    8. Apple Cider Vinegar (2 tablespoons): Enhances flavor and adds acidity.
    9. Salt and Pepper (to taste): Essential for seasoning; adjust to your liking.

    For those looking to accommodate specific dietary constraints:
    Vegan Substitute: Use chickpeas in place of eggs and a vegan mayo blend.
    Gluten-Free Note: All listed ingredients are naturally gluten-free.

    Dietary Substitutions to Customize Your Tangy Creamy Potato Salad With Eggs

    Customization is one of the unique features of this potato salad. Here are a few suggested substitutions to cater to different dietary needs:

    • For a Creamier Texture: Swap out half of the mayonnaise with crushed avocado. This will not only provide a rich texture but also infuse healthy fats into your dish.
    • Egg-Free Version: Replace the hard-boiled eggs with tofu squares or omit them and add extra legumes like black beans or lentils for added protein.
    • Herbage and Greens: Consider adding chopped fresh herbs like dill, parsley, or chives for a burst of freshness. Spinach or kale can also provide nutrition and a colorful touch.
    • Fruity Twist: Some enjoy adding diced apples or grapes for a sweet contrast. Adjust the dressing slightly by adding a touch of honey or maple syrup to balance the flavors.

    With these modifications, this tangy creamy potato salad becomes a versatile recipe that suits everyone around the table!

    How to Prepare the Perfect Tangy Creamy Potato Salad With Eggs: Step-by-Step Guide

    Let’s jump into the preparation of this delectable Tangy Creamy Potato Salad With Eggs! Follow these simple steps to create a dish that is bound to impress:

    1. Prepare the Potatoes:
    2. Wash and peel the potatoes. Cut them into evenly sized cubes (about 1-inch thick) for consistent cooking.
    3. Place them in a large pot and cover with salted water. Bring to a boil, then reduce the heat and let simmer for 15-20 minutes until tender but not falling apart. Test doneness with a fork; they should be easy to pierce but firm.

    4. Boil the Eggs:

    5. While the potatoes cook, place the eggs in a separate saucepan and cover them with water. Bring to a soft boil, then turn off the heat, cover, and let them sit for about 12-15 minutes for hard-boiled eggs.
    6. Cool the eggs under cold running water, peel, and chop them. Set aside.

    7. Prepare the Vegetables:

    8. Drain the cooked potatoes and allow them to cool for a bit. In the meantime, dice the celery, red onion, and pickles.

    9. Make the Dressing:

    10. In a large mixing bowl, combine mayonnaise, Dijon mustard, apple cider vinegar, salt, and pepper. Whisk together until smooth. If using yogurt or a vegan mayonnaise, the same ratios apply.

    11. Combine Ingredients:

    12. In a large serving bowl, gently fold the cooled potatoes with the dressing. Mix in the diced celery, red onion, pickles, and chopped eggs.

    13. Final Seasoning:

    14. Taste and adjust seasoning as necessary by adding more salt, pepper, or vinegar according to your preference.

    15. Chill the Salad:

    16. Cover the potato salad and refrigerate for at least 30 minutes before serving. This step allows the flavors to meld fantastically.

    17. Serve and Enjoy:

    18. Garnish with fresh herbs if desired, serve chilled or at room temperature, and enjoy!

    With these detailed steps, each cook can carve their unique path to creating the perfect tangy creamy potato salad tailored to diverse dietary needs.

    Mastering Tangy Creamy Potato Salad With Eggs: Advanced Tips and Variations

    To elevate your potato salad game, consider these advanced tips and variations for mastering the dish:

    1. Experiment with Flavors: Adding a touch of smoked paprika or curry powder can introduce an intriguing depth of flavor.

    2. Incorporate Seasonal Ingredients: Depending on the season, feel free to throw in roasted bell peppers, fresh corn kernels, or even sun-dried tomatoes for an added taste adventure.

    3. Use Different Dressings: Try swapping out the mayonnaise for a yogurt-based dressing or a vinaigrette for a lighter touch.

    4. Texture Variations: Try roasting or grilling the potatoes for a charred flavor or swapping in different shapes, such as using spiraled potatoes or sweet potatoes for a unique texture.

    5. Layering Presentation: Serve the potato salad in a glass bowl to showcase the colorful layers.

    6. Smart Plate Up: If serving at gatherings, consider offering small cups or jars of potato salad for easy access and portion control.

    These masterful tips will allow any home cook the chance to explore fantastic recipe ideas while impressing dinner guests!

    How to Store Tangy Creamy Potato Salad With Eggs: Best Practices

    Proper storage ensures your Tangy Creamy Potato Salad With Eggs maintains its delicious flavors and freshness. Here are best practices:

    • Refrigeration: Store the potato salad in an airtight container in the refrigerator. It will last up to three to five days. However, it’s best consumed within the first 48 hours after preparation for optimal flavor and texture.

    • Freezing: While it’s generally not recommended to freeze potato salad due to the potential change in texture (especially with mayonnaise), you can freeze the potato and egg components separately before combining them. Prepare them fresh when you’re ready to enjoy your salad.

    • Reheating: If you have leftovers that need reheating, do so gently in the microwave, but keep in mind that the salad is typically best enjoyed cold. You can mix in a little extra dressing after reheating to revive any lost creaminess.

    These storage tips will ensure that your delightful potato salad remains a top choice in your upcoming meals, showcasing great recipe ideas that last!

    Nutritional Value of Tangy Creamy Potato Salad With Eggs

    Understanding the nutritional composition of the Tangy Creamy Potato Salad With Eggs can help you appreciate this dish even more. Here’s a breakdown of nutrients per serving (assuming 8 servings total):

    • Calories: Approximately 210
    • Protein: 5g
    • Total Fat: 10g
    • Saturated Fat: 2g
    • Carbohydrates: 29g
    • Dietary Fiber: 3g
    • Sugars: 2g
    • Cholesterol: 70mg
    • Sodium: 330mg
    • Vitamin A: 5%
    • Vitamin C: 20%
    • Calcium: 2%
    • Iron: 6%

    This is a healthy side dish that provides a balance of macronutrients while also delivering valuable vitamins and minerals. Being aware of its nutritional value can inspire you to customize portion sizes based on individual dietary goals, effectively transforming this potato salad recipe into an enjoyable and guilt-free treat.

    FAQs: Frequently Asked Questions About Tangy Creamy Potato Salad With Eggs

    Can I make this potato salad ahead of time?

    Yes, indeed! The flavors of the potato salad improve with time, so you can make it a day in advance. Just remember to store it in an airtight container.

    How can I make this dish vegan?

    To make it vegan, simply substitute the eggs with chickpeas or omit them entirely, and use a vegan mayonnaise alternative.

    Can I eat this potato salad warm?

    While many prefer it chilled, you can enjoy this dish at room temperature or slightly warm. Nevertheless, remember that the textures may differ, so adjust expectations.

    What if I don’t have mayonnaise?

    If mayonnaise isn’t an option, consider using Greek yogurt or avocado to achieve creaminess and moisture in your salad.

    Is it okay to add different vegetables to the potato salad?

    Absolutely! Incorporating ingredients like diced bell peppers, peas, or finely grated carrots can add an extra layer of flavor and nutrition.

    How long can I store leftover potato salad?

    Leftovers can be stored in the refrigerator for up to five days. Simply ensure it’s in an airtight container to maintain freshness.

    The Tangy Creamy Potato Salad With Eggs is a classic recipe filled with potential for creativity and adaptation, ensuring that it fits any dietary lifestyle or preferences. Gather your ingredients and give this tropical delight a try—your taste buds will thank you!

  • Easy Creamy Dill Potato Salad

    Easy Creamy Dill Potato Salad

    Easy Creamy Dill Potato Salad: A Tropical Delight

    Introduction to Easy Creamy Dill Potato Salad

    When you think of summer gatherings or casual picnics, nothing beats a classic potato salad. One such crowd-pleaser is the Easy Creamy Dill Potato Salad, which combines rich creaminess with the refreshing zestiness of dill. This hearty dish is not only simple to prepare but also offers incredible versatility, making it an excellent choice for busy home cooks, diet-conscious individuals, and anyone looking to serve something delicious and satisfying.

    Crafted with minimal effort, Easy Creamy Dill Potato Salad allows you to enjoy the perfect combination of textures and flavors in every bite. Freshly cooked potatoes provide a comforting base that pairs beautifully with a creamy dressing made from yogurt and mayonnaise, embellished with the unique flavors of dill. Additionally, this recipe is adaptable to accommodate various dietary preferences, including vegan, gluten-free, and low-calorie options, which means almost anyone can indulge in this delight.

    Incorporating this potato salad into your meals not only offers a refreshing side that pairs well with grilled meats, sandwiches, or a simple green salad, but it also brings a significant boost in nutrition. Potatoes are rich in vitamins and minerals, providing essential carbohydrates, potassium, and vitamin C. They can even be a filling option for those watching their caloric intake.

    This article inspires you to create your very own Easy Creamy Dill Potato Salad, demonstrating just how easy it is to whip up a dish that will win hearts and stomachs alike. Let’s dive into the benefits and advantages of this delightful blend!

    Benefits and Advantages of Easy Creamy Dill Potato Salad

    Creating a delicious potato salad does not require hours of preparation. With just a few straightforward steps, you can have a delightful dish ready in no time. Ease of preparation is one of the standout features of this Easy Creamy Dill Potato Salad. Suitable for both seasoned chefs and novice cooks, this recipe allows anyone to walk away with a gourmet touch without the hassle.

    Health Benefits

    Potato salad doesn’t have to be unhealthy; in fact, it can be quite the opposite! By using fresh ingredients, it becomes a nutrient-rich side dish. Potatoes are naturally low in calories while providing essential vitamins like B6 and vitamin C. The creamy dressing can easily be tailored to your liking or dietary needs; for instance, using Greek yogurt instead of traditional mayonnaise makes it lower in fat while boosting protein content. This salad can act as a light meal as it sustains energy levels and makes you feel full longer thanks to its high fiber content.

    A Dish for All

    Whether you are feeding a large gathering or enjoy intimate meals with loved ones, potato salad is perfect for every occasion. It is incredibly adaptable; you can serve it in warm weather alongside grilled meats or as a cooling counterpart to spicy dishes. Additionally, it’s an excellent recipe for meal prepping, as it stores well in the refrigerator.

    By incorporating fresh dill—a wonderful herb that not only enhances taste but offers its own health benefits—you elevate the dish. Dill is known for its anti-inflammatory properties and supports digestion, making it a perfect herb companion to the main ingredient.

    Whether you’re a busy parent looking to prepare a healthy dish for your family or a food enthusiast searching for new recipes, you can rely on Easy Creamy Dill Potato Salad. Everyone can enjoy this delightful, versatile dish!

    Ingredients Overview

    Essential Ingredients for Easy Creamy Dill Potato Salad

    To create a superb Easy Creamy Dill Potato Salad, you’ll need the following ingredients:

    • 2 pounds of baby potatoes: These are tender and flavorful, and their smaller size ensures they cook quickly.
    • 1 cup of Greek yogurt (or sour cream for creamier texture): Provides a protein-packed base with a tangy flavor.
    • 1/2 cup of mayonnaise: For a richer taste that complements the yogurt.
    • 1 tablespoon of fresh dill (or 1 teaspoon dried dill): Adds a fresh flavor with multiple health benefits.
    • 1 teaspoon of garlic powder: For an added depth of flavor.
    • 1 tablespoon of lemon juice: Brightens the potato salad and helps balance flavors.
    • 1/2 teaspoon of salt: Enhances all the other flavors.
    • 1/4 teaspoon of black pepper: Adds a hint of spice.
    • 1/2 cup of chopped celery: Adds a fresh crunch and enhances texture.
    • 1/2 cup of diced red onion: For sweetness and a bit of bite.

    Dietary Options: To cater to various diets:
    Vegan Option: Substitute Greek yogurt and mayonnaise with a plant-based yogurt and vegan mayo.
    Gluten-Free Option: Ensure all ingredients are certified gluten-free, as most of the main components are naturally gluten-free.
    Low-Calorie Option: Use low-fat versions of yogurt and mayonnaise.

    Dietary Substitutions to Customize Your Easy Creamy Dill Potato Salad

    When cooking, it’s essential to adjust recipes to fit dietary restrictions or personal preferences. Here are some substitutions to customize your Easy Creamy Dill Potato Salad:

    • Yogurt Alternatives: Instead of Greek yogurt, you can also use dairy-free products like almond or coconut yogurt.
    • Mayonnaise Alternatives: If you’re aiming for a lighter version, try using avocado instead of mayonnaise for extra creaminess while adding healthy fats.
    • Fresh Herbs: If dill isn’t available, swap it out for other fresh herbs such as parsley or chives for a different flavor profile.
    • Add-In Options: Consider including additional vegetables like bell peppers, radishes, or hard-boiled eggs for extra nutrition and taste.

    By experimenting with ingredients based on personal preferences and dietary needs, you can create a potato salad that is both delicious and suitable for everyone at the table.

    How to Prepare the Perfect Easy Creamy Dill Potato Salad: Step-by-Step Guide

    Now that you have gathered your ingredients, it is time to culminate your efforts into a delicious potato salad. By following these precise yet easy steps, you can master the art of making Easy Creamy Dill Potato Salad:

    1. Prepare the Potatoes: Begin by washing the baby potatoes thoroughly to remove any dirt. Place them in a large pot filled with cold water. Add a pinch of salt, and bring to a boil over medium-high heat. Cook until fork-tender, which typically takes about 15-20 minutes.

    2. Cool the Potatoes: Once the potatoes are tender, drain them in a colander and rinse under cold water to stop the cooking process. Let them cool completely before handling.

    3. Cut the Potatoes: Once cooled, slice the potatoes into bite-sized pieces. The skin can either be left on or peeled based on personal preference.

    4. Mix the Creamy Base: In a separate bowl, combine the Greek yogurt, mayonnaise, fresh dill, garlic powder, lemon juice, salt, and pepper. Whisk until smooth, ensuring all ingredients are well incorporated.

    5. Combine the Ingredients: Gently fold the cooled potatoes into the creamy mixture. Using a spatula, ensure each piece is well-covered without overly mashing them for a pleasant texture.

    6. Add Celery and Onions: Incorporate the chopped celery and diced red onion into the potato mixture. Stir gently to distribute evenly throughout the potato salad.

    7. Taste and Adjust: Give a final taste to the potato salad, adjusting salt and pepper as necessary. If you prefer a little more zing, feel free to add an additional squeeze of lemon juice.

    8. Chill: For optimal flavor, cover the salad and refrigerate for at least 1 hour before serving. This allows the flavors to meld beautifully.

    9. Serve: Transfer the potato salad to a serving platter or bowl. You can garnish with additional dill for a touch of elegance before serving.

    Following this step-by-step guide allows you to make a wonderful Easy Creamy Dill Potato Salad that caters to your taste and dietary needs. Your loved ones will surely appreciate the effort you put into crafting this delightful dish.

    Mastering Easy Creamy Dill Potato Salad: Advanced Tips and Variations

    To elevate your Easy Creamy Dill Potato Salad, here are some advanced tips and variations that will enhance its deliciousness:

    • Experiment with Textures: For an added crunch, consider incorporating chopped pickles, crushed nuts, or sunflower seeds. These elements introduce an exciting contrast to the creamy base.

    • Experiment with Flavors: Introduce spices or other flavors into the creamy mixture. For instance, a pinch of smoked paprika or a teaspoon of mustard can add delightful depth.

    • Create a Loaded Potato Salad: Take it a step further by adding toppings such as crispy bacon bits, cheese, or even fresh corn for a satisfying twist.

    • Try Different Cooking Methods: Instead of boiling, consider roasting the potatoes with olive oil and spices for a smoky, flavorful variation of the salad.

    • Serving Idea: This Easy Creamy Dill Potato Salad can be served as a filling in a sandwich or wrap—just layer it between two slices of whole grain bread or in a tortilla with fresh greens.

    These advanced tips and variations allow you to personalize the potato salad, ensuring it fits your unique taste buds. Your creativity knows no bounds!

    How to Store Easy Creamy Dill Potato Salad: Best Practices

    Proper storage of your Easy Creamy Dill Potato Salad is vital to maintain its flavor and freshness. Here are the best practices for refrigeration, freezing, and reheating:

    • Refrigeration: Store any leftover potato salad in an airtight container in the refrigerator. It will stay fresh for about 3-5 days. Be sure to take it out of the fridge approximately 30 minutes before serving to let it come to room temperature.

    • Freezing: Although freezing potato salad is generally not recommended due to the creamy ingredients, if you must, consider freezing the potato base without the dressing. Thaw overnight in the refrigerator, then prepare the dressing fresh before serving.

    • Reheating: If you choose to enjoy it warm, reheat gently in the microwave. Cover the bowl with a damp paper towel to prevent it from drying out. However, many prefer enjoying the potato salad cold or at room temperature to savor the fresh flavors.

    Following these storage solutions ensures that you get the most out of your Easy Creamy Dill Potato Salad, making it a convenient dish to have on hand for several meals.

    Nutritional Value of Easy Creamy Dill Potato Salad

    The Easy Creamy Dill Potato Salad is not just a tasty side; it also provides a variety of nutrients that can complement any diet. Here’s a basic breakdown of the nutritional value per serving (assuming 8 servings):

    • Calories: Approximately 200 calories
    • Total Fat: 8 grams
    • Saturated Fat: 2 grams
    • Cholesterol: 10mg (if using mayonnaise)
    • Sodium: 250mg
    • Total Carbohydrates: 30 grams
    • Dietary Fiber: 3 grams
    • Sugars: 1 gram
    • Protein: 5 grams

    Nutritional Benefits

    • Potatoes: Rich in potassium, fiber, and vitamin C, they provide energy and essential nutrients.
    • Greek Yogurt: Packed with protein that can aid in muscle repair and growth; it also contains probiotics that benefit digestive health.
    • Dill: This herb has both anti-inflammatory properties and is known to support digestion.

    By enjoying a serving of Easy Creamy Dill Potato Salad, you not only treat your palate, but you also nourish your body with important vitamins and minerals.

    FAQs: Frequently Asked Questions About Easy Creamy Dill Potato Salad

    1. Can I make this potato salad in advance?

    Absolutely! Preparing the Easy Creamy Dill Potato Salad a day ahead gives the flavors time to meld beautifully. Just remember to store it in an airtight container in the refrigerator.

    2. Is this potato salad gluten-free?

    Yes! Most ingredients in this recipe are naturally gluten-free. Just ensure that any products used, like mayonnaise, are certified gluten-free.

    3. Can I substitute Greek yogurt with something else?

    Yes, you can easily substitute Greek yogurt with regular yogurt, sour cream, or even dairy-free alternatives, depending on your dietary needs.

    4. What do I do if I don’t have fresh dill?

    If fresh dill is unavailable, you can substitute with dried dill. Keep in mind that dried herbs are more concentrated, so use about one-third of the amount.

    5. How can I spice up my potato salad?

    Consider adding ingredients like diced bell peppers, jalapeños, or bacon bits for an extra twist. Additionally, a dash of hot sauce can elevate the flavor!

    6. How long does the potato salad last in the fridge?

    The Easy Creamy Dill Potato Salad can last for 3-5 days in the refrigerator if stored properly in an airtight container.

    7. Can I freeze this potato salad?

    It’s not recommended to freeze potato salad due to the creamy dressing. However, you can freeze the potato base and prepare the dressing fresh later.

    By addressing these common inquiries, you can ensure that anyone exploring your recipe feels confident in adapting it to their own dietary needs. Your Easy Creamy Dill Potato Salad can become a staple in any household!


    In conclusion, Easy Creamy Dill Potato Salad is a simple yet scrumptious side dish that can elevate any meal. The bright flavors, creamy texture, and numerous benefits make it an excellent fit for any table, whether it’s a grand feast or a casual family gathering. By following the easy directions, dietary options, and tips provided here, you can create a delectable dish that will leave everyone craving more. With just a few ingredients and a bit of time, you can whip up a delightful dish that is not only healthy but incredibly satisfying! Enjoy your culinary journey and the smiles that come along with it.

  • Best Cashew Pea Salad

    Best Cashew Pea Salad

    Best Cashew Pea Salad: A Tropical Delight

    Introduction to Best Cashew Pea Salad

    Are you searching for healthy dinner recipes that are not only delicious but also easy to make? Look no further than the Best Cashew Pea Salad! This vibrant dish combines the crunchiness of cashews with the sweetness of peas, resulting in a tropical delight that appeals to a variety of palates. If you are a busy parent, a student looking to impress your friends, or simply someone who enjoys fresh, nourishing meals, this salad is perfect for you.

    This recipe stands out for its simplicity and versatility. It’s vegan, gluten-free, and packed with nutritional goodness. The freshness of the ingredients makes it ideal for warm summer days, while the richness of the cashews provides a satisfying crunch that will leave you feeling full and satisfied. Best of all, it’s a quick dish to prepare—ideal for those hectic weeknights when you want to whip up something healthy in no time!

    Not only does this Best Cashew Pea Salad showcase an enticing combination of textures and flavors, but it also boasts a wealth of health benefits that cater to various dietary needs. Not only can it serve as a main dish for dinner, but it also functions beautifully as a side or potluck contribution, ensuring you’ll make a great impression wherever you go.

    Benefits and Advantages of Best Cashew Pea Salad

    When it comes to healthy dinner recipes, the Best Cashew Pea Salad is unrivaled in terms of ease of preparation and health benefits. First and foremost, this recipe takes less than 30 minutes from start to finish, making it perfect for those with busy schedules who still prioritize nutritious meals. The ingredients are easily accessible and require no complicated cooking methods, allowing even novice cooks to shine in the kitchen.

    Nutritional Powerhouse

    Peas are not just a vibrant addition to your plate; they are also packed with vitamins A, C, and K, as well as essential minerals like iron and magnesium. They contribute to better digestion while being low in calories, making them a perfect component of any healthy dinner recipe. On the other hand, cashews provide healthy fats that help keep your heart in shape while providing a good source of protein, which enhances satiety.

    Frequency of Use

    This salad’s versatility means you can enjoy it throughout the year. In the summer, adding fresh herbs like mint or cilantro enhances the flavors, while in the fall or winter, roasted vegetables can provide additional warmth and sustenance. Being vegan and gluten-free, it’s suitable for various dietary needs, giving you the freedom to experiment with your ingredients.

    Suitable for Everyone

    Whether you’re a busy parent juggling a thousand tasks or a health-conscious individual, this dish aligns with your goals. Plus, it’s an excellent option for serving guests who may adhere to specific dietary restrictions, ensuring that everyone enjoys a delightful meal without compromise.

    Ingredients Overview

    Essential Ingredients for Best Cashew Pea Salad

    To create your Best Cashew Pea Salad, gather the following ingredients:

    • 2 cups green peas (fresh or frozen, thawed): Provides essential vitamins and a sweet flavor.
    • 1 cup raw cashews: A source of healthy fats and protein that adds crunch.
    • 1/4 cup red onion, diced: Adds a sharp flavor and color contrast to the salad.
    • 1 red bell pepper, diced: For sweetness and vibrant color.
    • 1/4 cup fresh cilantro, chopped: Enhances flavor with a fresh, herbal note.
    • 2 tablespoons olive oil: for a healthy fat source and to help meld the flavors.
    • 1 tablespoon apple cider vinegar: Offers a tangy balance to the dish.
    • Salt and pepper to taste: Essential for elevating flavor.

    This recipe is naturally vegan, gluten-free, and low-calorie, making it a fantastic option for those looking for healthy dinner recipes.

    Dietary Substitutions to Customize Your Best Cashew Pea Salad

    While the above ingredients create the perfect base for the Best Cashew Pea Salad, don’t hesitate to customize it according to your pantry inventory or personal dietary needs:

    1. Nut-Free Alternative: Swap cashews for sunflower seeds or pumpkin seeds to maintain the crunch without nuts.
    2. Low-Carb Option: Replace green peas with chopped broccoli or cauliflower florets to suit a low-carb lifestyle.
    3. Herb Variations: If cilantro isn’t your favorite, substitute it with parsley or dill for a different flavor profile.
    4. Add Your Own Twist: Toss in ingredients like cherry tomatoes, avocado, or even cooked quinoa to elevate the salad’s flavor and nutritional value.

    Feel free to mix and match according to your preferences; this salad can be as creative as you wish!

    How to Prepare the Perfect Best Cashew Pea Salad: Step-by-Step Guide

    Now, let’s dive into how to whip up this delightful dish in a few quick steps:

    1. Prepare the Veggies: Start by rinsing your fresh green peas (if using fresh) and letting them dry. If you’re using frozen peas, simply thaw them.
    2. Chop the Ingredients: Dice the red onion and red bell pepper. Be sure to chop everything finely for a harmonious blend of flavors.
    3. Mix the Base Ingredients: In a large mixing bowl, combine the peas, cashews, diced onion, and bell pepper. This colorful mixture will be the base of your salad.
    4. Add Fresh Herbs: Sprinkle the chopped cilantro over the mix, adding a freshness that brightens the dish.
    5. Prepare the Dressing: In a separate small bowl, whisk together olive oil, apple cider vinegar, and season with salt and pepper to taste.
    6. Combine Dressing and Salad: Pour the dressing over your salad and gently toss everything together until well combined.
    7. Taste and Adjust: Always taste your salad and adjust the seasoning if necessary. You might want to add a little more salt, pepper, or vinegar.
    8. Let it Sit: For the best flavor, let your salad sit for 10-15 minutes at room temperature or refrigerated to allow the flavors to meld.
    9. Serve & Enjoy: Serve chilled or at room temperature and enjoy your healthy dinner recipes with friends and family!

    Mastering Best Cashew Pea Salad: Advanced Tips and Variations

    Making the Best Cashew Pea Salad is straightforward, but there are a few advanced tips to elevate it further:

    • Toasting Cashews: For added depth of flavor, consider toasting cashews in a non-stick skillet over medium heat for about 5 minutes before adding them to the salad.
    • Veggie Variations: Integrate shredded carrots or chopped zucchini for an extra nutritional punch.
    • Switch Up the Dressing: Experiment with different salad dressings such as tahini or yogurt-based options for diverging flavor profiles.
    • Meal Prep: Advance preparation is a great way to keep the time spent on healthy dinner recipes at a minimum. You can chop the vegetables and prepare the dressing a day ahead for quick assembly.

    By employing these tips, you’ll create a Best Cashew Pea Salad that’s both traditional and innovatively tailored to your taste.

    How to Store Best Cashew Pea Salad: Best Practices

    Storing your Best Cashew Pea Salad correctly preserves its freshness and flavor:

    • Refrigeration: Keep the salad in an airtight container in the refrigerator for up to 3 days. The flavors will continue to deepen as it chills.
    • Freezing: For longer storage, consider freezing the salad—though this may alter the texture of fresh vegetables, it can still work in a pinch. Make sure to consume it within a month.
    • Reheating: If you prefer a warm salad, lightly sauté it in a pan for a few minutes before serving. However, fresh veggies are usually best enjoyed cold.

    Ensuring proper storage practices extends the life of your healthy dinner recipes, allowing you to enjoy them throughout the week.

    Nutritional Value of Best Cashew Pea Salad

    When striving for healthy dinner recipes, it’s essential to know the nutritional value of your meals. Here’s a rough breakdown of each serving (based on 4 servings):

    • Calories: 250
    • Fat: 17g (with healthy fats from cashews)
    • Protein: 8g (a considerable amount from both peas and nuts)
    • Carbohydrates: 25g (mostly from peas and bell peppers)
    • Fiber: 5g (beneficial for digestion, found in peas)
    • Vitamins and Minerals:
      • Vitamin A: 20% of the Daily Value (DV)
      • Vitamin C: 25% of the DV
      • Iron: 10% of the DV
      • Magnesium: 15% of the DV

    This salad balances macronutrients while packing a punch with essential vitamins and minerals, showcasing its role in your list of healthy dinner recipes.

    FAQs: Frequently Asked Questions About Best Cashew Pea Salad

    Q: Can I substitute frozen peas for fresh peas?
    A: Absolutely! Frozen peas work perfectly in this recipe—just make sure to thaw and drain them before using.

    Q: Is it safe to serve this salad during warm weather?
    A: Yes, just keep it chilled until serving. This salad is refreshing and ideal for summer gatherings.

    Q: Can I make this salad ahead of time?
    A: Yes, preparing the salad up to a day in advance gives flavors time to meld, enhancing the taste.

    Q: How can I make this salad spicier?
    A: Incorporate chopped jalapeños or a dash of cayenne pepper into the dressing to add heat.

    Q: Is this salad suitable for meal prep?
    A: Definitely! Just keep the dressing separate until you’re ready to serve to prevent the greens from wilting.

    The Best Cashew Pea Salad is a delightful meal that offers numerous benefits while fitting seamlessly into any modern kitchen. This dish not only enriches your list of healthy dinner recipes but also becomes a flavorful indulgence you’ll want to enjoy regularly. Embrace the culinary adventure, and feel inspired to share this delicious experience with family and friends!

  • Healthy Creamy Kale And Sweet Potato Salad

    Healthy Creamy Kale And Sweet Potato Salad

    Healthy Creamy Kale And Sweet Potato Salad: A Tropical Delight

    Introduction to Healthy Creamy Kale And Sweet Potato Salad

    Welcome to a culinary adventure that perfectly blends flavors, textures, and nutrition with our Healthy Creamy Kale And Sweet Potato Salad. This delightful dish is more than just a salad; it’s a versatile meal brimming with wholesome ingredients while also being a standout option among healthy dinner recipes.

    Packed with nutrient-dense kale and naturally sweet roasted sweet potatoes, this salad is a treat for your taste buds and your body. With its creamy dressing made from simple, clean ingredients, it serves as a convenient yet elegant option for busy parents, working professionals, and anyone looking to eat healthier without sacrificing flavor.

    This recipe is vegan, gluten-free, and can easily accommodate various dietary preferences, making it perfect for every table—from the family dinner to a potluck gathering. The ease of preparation is a bonus, allowing both novice and experienced cooks to whip it up in no time. In addition to its deliciousness, kale and sweet potatoes offer essential vitamins, minerals, and antioxidants—perfect for anyone looking to boost their health. So, whether you’re a student meal prepping for the week, a traveler looking for a nutritious bites, or simply someone who enjoys healthy dining experiences, this salad is for you!

    Benefits and Advantages of Healthy Creamy Kale And Sweet Potato Salad

    The Healthy Creamy Kale And Sweet Potato Salad stands out as one of the most remarkable healthy dinner recipes for a multitude of reasons. First and foremost, it is incredibly simple to prepare, requiring minimal kitchen skill yet yielding impressive results. This is particularly beneficial for busy parents and working professionals who may not have hours to spare in the kitchen.

    The health benefits are another highlight. Kale is often referred to as a superfood due to its high levels of vitamins A, C, and K, as well as calcium and iron. Sweet potatoes, on the other hand, are a fantastic source of beta-carotene, fiber, and complex carbohydrates, providing sustained energy and helping to improve digestion. When combined, these superfoods create a nutrient-rich foundation for your meal.

    Moreover, this salad is incredibly versatile. If you’re looking for healthy dinner recipes that fit into specific dietary restrictions, you’ll be pleased to know that this dish can be made vegan, gluten-free, and even low-calorie with simple ingredient adjustments. The creamy dressing complements the fresh flavors of the kale and sweet potatoes while adding a satisfying richness that elevates the dish without overwhelming it.

    Whether you’re meal-prepping for the week, needing an exquisite dish for entertaining, or just craving a fresh and filling salad, this Healthy Creamy Kale And Sweet Potato Salad checks all the boxes. Plus, its colorful presentation not only makes it visually appealing but also indicative of the nutritional wealth packed inside!

    Ingredients Overview

    Essential Ingredients for Healthy Creamy Kale And Sweet Potato Salad

    Here is your shopping list for creating the Healthy Creamy Kale And Sweet Potato Salad. Each ingredient has been selected for its unique flavor and health benefits:

    • 4 cups kale, chopped (about one large bunch)
    • Benefits: Rich in vitamins A, C, and K.
    • 2 medium sweet potatoes, peeled and diced (approximately 2 cups)
    • Benefits: High in beta-carotene, vitamin C, and fiber.
    • 1 cup cherry tomatoes, halved
    • Benefits: Adds freshness and is a source of antioxidants.
    • ½ cup red onion, thinly sliced
    • Benefits: Offers a zesty flavor and rich in antioxidants.
    • ½ cup quinoa, rinsed and cooked (optional for added protein)
    • Benefits: Complete protein source, gluten-free.
    • ¼ cup olive oil
    • Benefits: Healthy fat packed with omega-3s.
    • 3 tablespoons lemon juice
    • Benefits: Enhances flavors and provides vitamin C.
    • 2 tablespoons tahini (or Greek yogurt for a non-vegan option)
    • Benefits: Creamy texture and source of healthy fats.
    • Salt and pepper to taste
    • Benefits: Enhances the overall flavor profile.

    This salad can easily be customized based on your preferences.

    Dietary Substitutions to Customize Your Healthy Creamy Kale And Sweet Potato Salad

    When it comes to dietary restrictions or personal preferences, there are numerous ways to adapt this Healthy Creamy Kale And Sweet Potato Salad while still enjoying its deliciousness. Here are some suggested substitutions:

    • Kale Alternatives: If kale is not your favorite green, you can substitute it with spinach, Swiss chard, or arugula. Each green offers unique flavors and nutrients.
    • Sweet Potato Options: Swap sweet potatoes for roasted butternut squash or pumpkin for a different twist. Both are rich in vitamins and maintain a similar sweet flavor.
    • Dressing Changes: For those seeking a lighter dressing, consider using a vinaigrette made with apple cider vinegar, mustard, and a touch of honey. Alternatively, create a creamy dressing using avocado and Greek yogurt if tahini is not available.
    • Protein Boost: Include chickpeas, black beans, or diced grilled chicken for added protein if desired, making this salad perfect for a full meal.
    • Grain Alternatives: Quinoa can be replaced with brown rice or farro for those looking for different textures; all options offer excellent nutritional benefits.

    These substitutions make this Healthy Creamy Kale And Sweet Potato Salad adaptable for everyone, ensuring that all your guests can enjoy it!

    How to Prepare the Perfect Healthy Creamy Kale And Sweet Potato Salad: Step-by-Step Guide

    Now, let’s dive into the preparation process of our Healthy Creamy Kale And Sweet Potato Salad. Follow these easy steps for a delightful outcome:

    1. Prepare the Sweet Potatoes:
      Preheat your oven to 400°F (200°C). Peel and dice the sweet potatoes into bite-sized pieces. Spread them evenly on a baking sheet lined with parchment paper. Drizzle with 1 tablespoon of olive oil, and season with salt and pepper. Toss to coat. Roast in the oven for 25-30 minutes, or until tender and lightly caramelized.

    2. Cook the Quinoa (if using):
      While the sweet potatoes roast, rinse ½ cup of quinoa under cold water. Add it to a saucepan with 1 cup of water. Bring to a boil, reduce heat, and simmer for 15 minutes, or until all the water is absorbed. Fluff with a fork when done.

    3. Prepare the Kale:
      In a large mixing bowl, add 4 cups of chopped kale. Using your hands, massage the kale for 1-2 minutes until softened. This step enhances the flavors and texture.

    4. Mix in Additions:
      To the bowl with kale, add the roasted sweet potatoes, 1 cup of halved cherry tomatoes, ½ cup of thinly sliced red onion, and the cooked quinoa (if using).

    5. Make the Dressing:
      In a small bowl, whisk together the remaining 3 tablespoons of olive oil, 3 tablespoons of lemon juice, and 2 tablespoons of tahini until well combined. Season with salt and pepper to taste.

    6. Combine the Salad:
      Drizzle the dressing over the salad mixture in the large bowl. Gently toss to combine all ingredients well, ensuring the dressing coats everything evenly.

    7. Taste and Adjust:
      Taste the salad and adjust seasoning if necessary. If you’d like more creaminess, add a bit more tahini or a dollop of Greek yogurt.

    8. Serve and Enjoy:
      Transfer to a serving dish or individual bowls. Garnish with seeds or nuts for crunch, if desired. Enjoy this delicious and healthy dinner recipe immediately or store it for later!

    This step-by-step guide ensures that even novice cooks can recreate this delightful dish with ease. Feel free to adapt your preparation based on dietary preferences throughout!

    Mastering Healthy Creamy Kale And Sweet Potato Salad: Advanced Tips and Variations

    To elevate your culinary skills and maximize the enjoyment of your Healthy Creamy Kale And Sweet Potato Salad, try these advanced tips and variations:

    • Add Crunch: Incorporate toasted nuts (almonds, walnuts) or seeds (pumpkin, sunflower) for an extra textural layer. This not only enhances the flavor but also boosts the salad’s nutritional profile with healthy fats.
    • Herbs and Spices: Fresh herbs like parsley, cilantro, or mint bring freshness that complements the creamy elements. Spice it up with a pinch of cayenne or a dash of paprika for some heat.
    • Make it a Meal: Transform this salad into a hearty meal by adding cooked lentils or chickpeas to enhance protein content while keeping it plant-based.
    • Dress it Up: Experiment with different dressings! A balsamic vinaigrette or a sesame ginger dressing could create delightful variations that keep your taste buds excited.
    • Meal Prep: This salad stores exceptionally well, making it perfect for meal prep. Prepare portions in advance and store them in the refrigerator for quick and easy lunches throughout the week.

    These advanced tips will help you master not just the Healthy Creamy Kale And Sweet Potato Salad, but also become a more versatile cook in the kitchen. There is no wrong way to enjoy this salad—feel free to get creative!

    How to Store Healthy Creamy Kale And Sweet Potato Salad: Best Practices

    To maximize the freshness and taste of your Healthy Creamy Kale And Sweet Potato Salad, follow these best storage practices:

    • Refrigeration: Store any leftovers in an airtight container in the refrigerator. This salad is best consumed within 3-4 days. The kale holds its texture relatively well, ensuring you enjoy lovely crunch even the next day.

    • Freezing: While not recommended, you can freeze the sweet potatoes separately if you plan to make a large batch. However, the salad as a whole doesn’t freeze well due to kale’s texture and the creaminess of the dressing, which may separate.

    • Reheating: For those who prefer warm ingredients, gently reheat the sweet potatoes in the oven to preserve crispness, rather than using a microwave, which can make them mushy. Mix with the kale when serving.

    By following these storage tips, you can ensure your Healthy Creamy Kale And Sweet Potato Salad maintains its delightful flavor and texture!

    Nutritional Value of Healthy Creamy Kale And Sweet Potato Salad

    Understanding the nutritional value of your meals is essential, especially when selecting healthy dinner recipes. Here’s a breakdown of the estimated nutrition per serving (based on 4 servings):

    • Calories: 300 – 350
    • Total Fat: 15 – 17 grams
    • Saturated Fat: 2 – 3 grams
    • Cholesterol: 0 mg
    • Sodium: 150 – 200 mg
    • Total Carbohydrates: 45 – 50 grams
    • Dietary Fiber: 8 – 10 grams
    • Sugars: 4 – 6 grams
    • Protein: 8 – 10 grams
    • Vitamin A: 160% of Daily Value (DV)
    • Vitamin C: 50% of DV
    • Calcium: 8% of DV
    • Iron: 15% of DV

    These values can vary based on specific ingredient choices, but overall, this Healthy Creamy Kale And Sweet Potato Salad is a powerhouse of nutrition—rich in vitamins, healthy fats, and fiber, making it an excellent staple in any healthy eating routine.

    FAQs: Frequently Asked Questions About Healthy Creamy Kale And Sweet Potato Salad

    Q1: Can I make the salad ahead of time?

    A: Yes! You can prepare the salad components in advance and store them separately. Combine right before serving for optimal freshness, particularly the dressing.

    Q2: How long will leftovers last?

    A: Leftover salad will typically last 3-4 days in the refrigerator if stored in an airtight container. The kale retains its texture, allowing for enjoyable leftovers.

    Q3: Can I substitute regular potatoes for sweet potatoes?

    A: Absolutely! While sweet potatoes add a unique flavor, regular potatoes can work if that’s what you have on hand. Just be mindful of the difference in flavor and texture.

    Q4: Is this salad suitable for meal prepping?

    A: Yes! This salad is perfect for meal prepping. Prepare portions in advance for an easy, quick meal during the week.

    Q5: Can I use a different grain instead of quinoa?

    A: Yes, feel free to substitute quinoa with brown rice, farro, or even couscous based on your preference and dietary needs. Each grain brings its unique flavor and texture!

    Q6: What can I use instead of tahini for the dressing?

    A: If you don’t have tahini, you can use Greek yogurt for creaminess or make a simple vinaigrette using olive oil and vinegar. Both options work well!

    These FAQs aim to provide clarity on common queries regarding this delightful Healthy Creamy Kale And Sweet Potato Salad, helping ensure you have all the information for a successful dish ahead.


    With this comprehensive guide, you’re equipped to create an enticing and nutritious Healthy Creamy Kale And Sweet Potato Salad that is perfect for any occasion. Enjoy the delightful flavors and health benefits as you inspire others to explore healthier dining choices!

  • Easy Cucumber Avocado Salad Healthy Side

    Easy Cucumber Avocado Salad Healthy Side

    Easy Cucumber Avocado Salad Healthy Side: A Tropical Delight

    Introduction to Easy Cucumber Avocado Salad Healthy Side

    Discover a refreshing and versatile dish that takes advantage of the vibrant flavors of fresh cucumbers and creamy avocados—the Easy Cucumber Avocado Salad. This healthy side is not just designed for summer picnics but is a year-round delight that appeals to busy parents, health enthusiasts, and everyone in between. With the ever-growing demand for simple and nutritious recipes, this cucumber salad stands out as an accessible dish that anyone can master.

    One of the best parts about this salad is its simplicity. You don’t need cooking skills or time-consuming techniques to create a delicious meal. Whether you’re feeding a family, looking for a quick lunch, or prepping a healthy snack, this cucumber avocado combo is perfect. Additionally, it’s a vegan and gluten-free option, making it a suitable choice for various dietary preferences.

    By combining crisp cucumbers and buttery avocados, this salad offers a palette of taste that is both satisfying and nutrient-dense. Rich in vitamins, healthy fats, and antioxidants, it supports overall well-being while being low in calories. Easy to prepare, this cucumber salad can be customized with a variety of dressings, toppings, or additional ingredients to suit your palate. Join in on the culinary trend and serve this enticing salad at your next gathering or enjoy it as a quick, nutritious meal at home.

    Benefits and Advantages of Easy Cucumber Avocado Salad Healthy Side

    The advantages of making an Easy Cucumber Avocado Salad go beyond its delightful taste. This dish is a powerhouse of health benefits, nutritional content, and simplicity, which makes it appealing to a broad audience. Here are several reasons why this cucumber salad deserves a spot in your meal rotation:

    1. Simplicity and Speed: In today’s fast-paced world, finding the time to prepare a healthy meal can be challenging. Fortunately, this cucumber salad is made in under 15 minutes and requires only a handful of ingredients. Busy professionals, students, and parents will appreciate how easy it is to whip up this dish without sacrificing nutrition.

    2. Health Benefits: Cucumbers are hydrating and low in calories, while avocados are rich in healthy fats, particularly oleic acid, which can help reduce inflammation. Together, they form a nutrient-dense meal that keeps you energized and satisfied. This salad is loaded with vitamins C and K, potassium, and several essential phytonutrients.

    3. Versatile and Customizable: One of the standout features of this cucumber salad is its versatility. You can easily adjust the ingredients or dressings to suit your specific taste or dietary needs. Want to add some protein? Throw in some chickpeas or grilled chicken. Prefer a zesty twist? Incorporate lime juice or a sprinkle of chili flakes.

    4. Suitable for Various Diets: Whether you’re following a vegan, vegetarian, low-carb, or gluten-free diet, this salad checks all the boxes. It caters to various lifestyle choices and ensures that everyone can enjoy a healthy side without feeling limited by dietary restrictions.

    5. Perfect for Any Occasion: This cucumber salad is ideal for numerous events. It can be served as a side dish for barbecues, dinners, or picnics. You can also incorporate it into your meal prep, making it a convenient option for lunches throughout the week.

    In summary, the Easy Cucumber Avocado Salad combines health, simplicity, and flavor in a way that appeals to a wide range of individuals. Not only does it offer significant health benefits, but it also leaves room for creativity in the kitchen, making it a delightful dish that you simply have to try.

    Ingredients Overview

    Essential Ingredients for Easy Cucumber Avocado Salad Healthy Side

    Creating the Easy Cucumber Avocado Salad is as simple as gathering the right ingredients. Here’s a detailed list of what you’ll need along with their benefits:

    • 2 Medium Cucumbers (peeled and diced): High in water content, cucumbers keep you hydrated and are great for skin health.
    • 2 Ripe Avocados (diced): Packed with healthy fats and fiber, avocados are perfect for sustaining energy and helping with nutrient absorption.
    • 1/2 Red Onion (finely chopped): Adds a punch of flavor and is rich in antioxidants.
    • 1 Cup Cherry Tomatoes (halved): A great source of vitamins C and K, tomatoes bring a burst of color and flavor.
    • 1/4 Cup Fresh Cilantro (chopped): Adds a fresh herbaceous taste, and cilantro is known for its detoxifying properties.
    • Juice of 1 Lime: Brightens up the dish and provides vitamin C.
    • Salt and Pepper (to taste): Enhances the flavors of the salad.

    This combination of ingredients creates a refreshing and nutrient-rich salad that fits well into any diet.

    Dietary Substitutions to Customize Your Easy Cucumber Avocado Salad Healthy Side

    Flexibility is one of the best features of the Easy Cucumber Avocado Salad. Here are some suggested substitutions that can cater to different dietary needs or ingredient availability:

    • Cucumbers: If cucumbers aren’t available, try zucchini or even spinach for a different twist.
    • Avocados: For those who might have an avocado allergy or want a different flavor, use mashed banana or silken tofu for a creamy texture.
    • Red Onion: Substitute with green onions for a milder flavor or radishes for a crunchy bite.
    • Cherry Tomatoes: Any small tomato variety works, including grape or heirloom. If you prefer sweetness, try adding diced strawberries instead.
    • Cilantro: If you are not a fan of cilantro, fresh parsley or basil can be an excellent alternative.
    • Lime Juice: Replace lime juice with lemon juice or apple cider vinegar for a tangy flavor.
    • For Added Protein: Consider adding chickpeas, cooked quinoa, or grilled chicken, which can turn this salad into a full meal.

    By incorporating these substitutions, your cucumber salad will not only retain its deliciousness but also adapt to various preferences and dietary restrictions.

    How to Prepare the Perfect Easy Cucumber Avocado Salad Healthy Side: Step-by-Step Guide

    Now that you have your ingredients ready, it’s time to make the Easy Cucumber Avocado Salad. Follow this step-by-step guide for the best results. This recipe is designed to be straightforward and adaptable to different tastes or dietary requirements.

    1. Prepare the Base: Start by thoroughly washing all fresh ingredients. Use a vegetable brush if necessary to clean your cucumbers and tomatoes.

    2. Dice the Cucumbers: Peel the cucumbers if desired and then cut them into bite-sized cubes. Place them in a large mixing bowl.

    3. Add Avocados: Halve the avocados, remove the pits, and scoop the flesh into the bowl with cucumbers. Be gentle to maintain the avocado’s soft texture.

    4. Chop the Red Onion: Finely chop the red onion and add it to the mixing bowl. The red onion provides a flavorful kick that complements the creamy texture of avocados.

    5. Halve the Cherry Tomatoes: Cut the cherry tomatoes in half and add them to the mix. Their sweet, juicy flavor will balance the other ingredients.

    6. Incorporate Fresh Herbs: Chop the cilantro (or choose your substitute) and mix it into the bowl. Fresh herbs add a vibrant color and refreshing taste.

    7. Dress with Lime Juice: Squeeze the juice of one lime over the salad. This will enhance all the flavors while providing a zesty twist.

    8. Season to Taste: Sprinkle salt and pepper over the ingredients and toss gently to combine, ensuring all elements are well mixed.

    9. Taste and Adjust: Before serving, taste the salad and adjust the seasoning or acidity as necessary. Add more lime juice or salt if desired.

    10. Serve Immediately or Chill: This salad can be enjoyed right away, but for best flavor, let it chill in the fridge for 30 minutes before serving. The flavors meld beautifully that way.

    11. Presentation: When serving, consider placing the salad on a bed of mixed greens or garnishing with additional cilantro for a beautiful presentation.

    This step-by-step guide ensures that everyone can make the Easy Cucumber Avocado Salad at home, maintaining a delicious flavor and satisfying texture. Feel free to adapt any step based on your taste or dietary requirements.

    Mastering Easy Cucumber Avocado Salad Healthy Side: Advanced Tips and Variations

    To elevate your Easy Cucumber Avocado Salad, consider these advanced tips and variations:

    • Spice It Up: For those who enjoy a kick, add diced jalapeños or a sprinkle of chili powder. This can transform your salad into a spicy dish that ignites the palate.

    • Creamy Dressing: For a creamy version, blend Greek yogurt with lime juice, a pinch of salt, and garlic powder for an added layer of flavor. This dressing pairs excellently with the salad’s fresh ingredients.

    • Cheese Additions: If you are not lactose intolerant, sprinkle some feta or goat cheese on top. The creaminess of the cheese complements the salad beautifully.

    • Experiment with Nuts: Add a handful of nuts such as chopped almonds or walnuts. They provide an extra crunch and boost the flavor profile of the salad.

    • Make it a Full Meal: By adding cooked quinoa or lentils, you can turn the salad into a complete meal. This is especially ideal for lunch boxes or quick dinners.

    • Regional Variations: Try adding ingredients common in various cuisines. Asian-inspired versions might include sesame oil and sesame seeds, while Mediterranean styles might feature olives and oregano.

    By exploring these tips and variations, your Easy Cucumber Avocado Salad can become a signature dish that reflects your unique taste!

    How to Store Easy Cucumber Avocado Salad Healthy Side: Best Practices

    Storing your Easy Cucumber Avocado Salad properly ensures that it stays fresh and delicious. Here are the best practices:

    • Refrigeration: If you have leftover salad, keep it in an airtight container in the refrigerator. It can last for about 1-2 days. However, note that avocados may brown slightly due to oxidation, so consume within a day for the best visual appeal.

    • Freezing: Unfortunately, you shouldn’t freeze this cucumber salad because cucumbers and avocados have high water content. Freezing changes the texture, making them mushy when thawed. However, if you’re preparing ingredients separately for meal prep, consider freezing chopped cucumbers or avocados alone instead.

    • Reheating: There’s usually no need to reheat the salad, but if you’ve added proteins and stored the salad with these ingredients, make sure to heat only those portions thoroughly before serving.

    Following these storage guidelines will help maintain the freshness and taste of your delicious cucumber salad.

    Nutritional Value of Easy Cucumber Avocado Salad Healthy Side

    The Easy Cucumber Avocado Salad is not just appealing to the taste buds; it also packs a nutritional punch! Here’s a breakdown of its nutritional value per serving (based on a standard serving size):

    • Calories: 150 kcal
    • Total Fat: 12 g
    • Saturated Fat: 2 g
    • Cholesterol: 0 mg
    • Sodium: 120 mg
    • Total Carbohydrates: 14 g
    • Dietary Fiber: 7 g
    • Sugars: 3 g
    • Protein: 2 g

    Vitamins and Minerals:

    • Vitamin A: 8% of the DV (Daily Value)
    • Vitamin C: 20% of the DV
    • Vitamin K: 35% of the DV
    • Potassium: 10% of the DV

    This salad provides healthy fats from avocados and is rich in dietary fiber, making it a filling side dish without the extra calories. The various vitamins and minerals it contains support not only gut health but also boosts the immune system and aids in hydration, making this cucumber salad an excellent addition to your diet.

    FAQs: Frequently Asked Questions About Easy Cucumber Avocado Salad Healthy Side

    Here’s a compiled list of frequently asked questions regarding the Easy Cucumber Avocado Salad, aimed at helping you make this dish with confidence.

    1. Can I make this salad ahead of time?

    Yes, but it’s best to prepare the cucumber salad a few hours ahead rather than a day. To prevent the avocado from browning, add lime juice just before serving.

    2. Can I use frozen ingredients?

    While you can cook quinoa or lentils beforehand and freeze them for this salad, avoid using frozen cucumber or avocado; they do not hold up well once thawed.

    3. What can I replace the avocado with if I’m allergic?

    You can substitute avocado with mashed banana or a dollop of Greek yogurt for creaminess without allergens.

    4. How long does the salad last in the fridge?

    The salad keeps well for about 1 to 2 days, but for the best texture, consume it within one day.

    5. Can I add other ingredients?

    Absolutely! Feel free to add proteins like chicken or chickpeas or additional vegetables like bell peppers or carrots as per your preference.

    6. Is this recipe gluten-free?

    Yes, all the ingredients used in the Easy Cucumber Avocado Salad are naturally gluten-free, making it a great option for those with gluten sensitivities.

    By addressing these common questions, you’ll find that making this delicious salad is both easy and accommodating to various dietary preferences.

    In conclusion, the Easy Cucumber Avocado Salad is an inviting, nutrient-packed dish that’s sure to satisfy any palate. With its simple preparation and versatile nature, it fits seamlessly into a healthy lifestyle, serving as the perfect side dish or light meal. Enjoy crafting this tropical delight with family and friends, and let its refreshing flavors transport you to a warm, inviting culinary oasis!

  • Easy Crispy Roasted Cauliflower Side Dish

    Easy Crispy Roasted Cauliflower Side Dish

    Easy Crispy Roasted Cauliflower Side Dish: A Tropical Delight

    Introduction to Easy Crispy Roasted Cauliflower Side Dish

    Are you searching for easy dinner recipes that not only taste delicious but are also packed with nutrients? Look no further than the delightful Easy Crispy Roasted Cauliflower Side Dish. This simple yet satisfying dish transforms humble cauliflower into a crispy and golden treat that will make both your taste buds and your body rejoice.

    Cauliflower, a superstar in the vegetable world, is incredibly versatile. Its mild flavor allows it to soak up spices and seasonings beautifully, making it an excellent base for various culinary creations. With this roasted cauliflower recipe, you get a dish that is not only easy to prepare but also fits perfectly into a range of dietary preferences—whether you’re vegan, gluten-free, or simply looking to cut down on carbs.

    Loaded with vitamins C and K, this dish boasts a myriad of health benefits, including anti-inflammatory properties and high fiber content. Its lightness makes it the perfect accompaniment to heavier mains, yet it’s substantial enough to stand on its own as a light meal. Busy parents, students, food enthusiasts, and everyone in between will find that this roasted cauliflower side dish is the embodiment of effortless cooking with maximal impact.

    If you’re on a quest for satisfying food that inspires nourishment while being a feast for the eyes, the Easy Crispy Roasted Cauliflower Side Dish should sit at the top of your must-try list!

    Benefits and Advantages of Easy Crispy Roasted Cauliflower Side Dish

    Why is this Easy Crispy Roasted Cauliflower Side Dish a worthy addition to your recipe repertoire? Let’s explore the many benefits and advantages that make it stand out:

    1. Simplicity in Preparation

    This recipe shines in its simplicity. If you’re a busy parent or working professional, you’ll appreciate how quick it is to prepare. Just a few ingredients, minimal chopping, and you’re ready to enjoy a tasty side dish that complements any main course. This roasted cauliflower can be in and out of the oven in no time, leaving you free to focus on other meal components or spend time with loved ones.

    2. Health Benefits Galore

    Cauliflower is often hailed as a “superfood,” and for good reason. High in antioxidants and vitamins, it provides a significant health boost with each bite. By choosing this roasted dish, you embrace benefits such as:

    • Weight Management: Low in calories and high in fiber, cauliflower can help you feel fuller for longer.
    • Heart Health: Its rich content of vitamins and nutrients can contribute to overall cardiovascular health.
    • Digestive Health: The fiber in cauliflower promotes a healthy digestive tract, aiding in regularity.

    3. Versatility for Various Dietary Needs

    This Easy Crispy Roasted Cauliflower Side Dish aligns beautifully with vegan, keto, and gluten-free diets, making it an adaptable option for gatherings with diverse dietary preferences. You can easily modify spices or add additional toppings to cater to taste variations, ensuring everyone at the table is satisfied.

    4. Aesthetic Appeal

    In addition to its flavor and health benefits, this dish is visually appealing. The beautifully caramelized exterior of the roasted cauliflower provides a vibrant addition to your plate, making it a feast for the eyes too. Prepare to wow your guests—not just with the taste, but also with the vibrant presentation!

    5. Cost-Effectiveness

    Cauliflower is usually budget-friendly and widely available at grocery stores. This affordability, combined with the minimal quantity of ingredients needed, makes for an economical side dish without compromising on taste or health benefits. It’s a great choice for students and newlyweds looking to create delicious meals on a budget.

    By choosing to incorporate the Easy Crispy Roasted Cauliflower Side Dish into your menu, you’re not just opting for a healthy meal but a dish that resonates with flavor, ease, and versatility. Incorporate this into your roster of easy dinner recipes, and watch your family and friends keep coming back for more!

    Ingredients Overview

    Essential Ingredients for Easy Crispy Roasted Cauliflower Side Dish

    To prepare the Easy Crispy Roasted Cauliflower Side Dish, you’ll need the following essential ingredients, along with their benefits:

    Ingredients List:

    • 1 medium head of cauliflower (about 2 pounds), cut into florets
    • 3 tablespoons olive oil (or avocado oil): Provides healthy fats and aids in crisping.
    • 1 teaspoon garlic powder: Adds a depth of flavor without the fuss of fresh garlic.
    • 1 teaspoon onion powder: Enhances the savory notes.
    • ½ teaspoon smoked paprika: Infuses a slight smokiness for complexity.
    • Salt and pepper to taste: Essential for balancing flavors.
    • Fresh herbs for garnish (optional): Parsley or cilantro can add freshness and color.

    Nutritional Considerations:

    • Vegan: This recipe is entirely plant-based, ensuring it’s suitable for those following a vegan lifestyle.
    • Gluten-Free: Contains no gluten, making it ideal for gluten-sensitive individuals.
    • Low-Calorie: Cauliflower is a low-calorie vegetable, making this dish perfect for calorie-conscious eaters.

    Dietary Substitutions to Customize Your Easy Crispy Roasted Cauliflower Side Dish

    While this recipe is fantastic as is, don’t hesitate to customize it based on your dietary needs or ingredient availability. Here are some suggestions:

    • Oil Substitutes: If you’re looking to reduce calories, you can replace olive oil with a cooking spray or use a smaller amount of oil.
    • Protein Additions: To enhance the nutritional profile, consider tossing in some chickpeas or cooked quinoa alongside the cauliflower prior to roasting. This adding a source of plant-based protein can make it even more satisfying.
    • Herb Variations: Feel free to swap out the spices based on your preferences. For a spicy kick, try adding chili powder or cayenne pepper.

    With these ingredients and variations, you can easily create the Easy Crispy Roasted Cauliflower Side Dish, allowing for both customization and flexibility according to your palate and dietary requirements.

    How to Prepare the Perfect Easy Crispy Roasted Cauliflower Side Dish: Step-by-Step Guide

    Ready to bring this delightful dish to life? Follow these detailed, step-by-step instructions for Making Easy Crispy Roasted Cauliflower Side Dish:

    1. Preheat the Oven: Preheat your oven to 425°F (220°C). Preheating is crucial for achieving that crispy texture we’re after.

    2. Prepare the Cauliflower: Rinse and cut the cauliflower into even-sized florets. Consistent sizes will ensure they roast evenly.

    3. Measure Your Ingredients: In a small bowl, combine olive oil, garlic powder, onion powder, smoked paprika, salt, and pepper. This spice mix is what transforms the cauliflower from simple to sensational!

    4. Combine Florets and Oil Mixture: In a large mixing bowl, add the cauliflower florets. Drizzle the olive oil mixture over the florets, tossing to coat thoroughly and evenly.

    5. Arrange on a Baking Sheet: Spread the cauliflower florets in a single layer on a baking sheet lined with parchment paper to prevent sticking. This is essential for ensuring each piece gets enough space to roast properly.

    6. Roast for 25-30 Minutes: Place the baking sheet in the preheated oven and roast for 25-30 minutes. Halfway through, stir the cauliflower to promote even browning.

    7. Check for Doneness: The cauliflower is done when it turns golden brown and becomes crispy on the edges. Use a fork to test tenderness—if it goes through easily, you’re ready!

    8. Garnish and Serve: Remove the roasted cauliflower from the oven and let it cool for a couple of minutes. Garnish with fresh herbs if desired, then serve warm and enjoy!

    Adapt for Dietary Needs

    For individuals adhering to specific diets—vegan, gluten-free, or low-carb—this recipe can easily be modified, allowing everyone to enjoy this easy dinner recipe. Consider swapping spices or experimenting with additional toppings like nutritional yeast for a cheesy flavor without dairy.

    Now you have a fool-proof recipe ready to impress at your dinner table!

    Mastering Easy Crispy Roasted Cauliflower Side Dish: Advanced Tips and Variations

    To elevate your cooking game and take your Easy Crispy Roasted Cauliflower to the next level, consider the following advanced tips and variations:

    Advanced Tips:

    • Add Complexity with Cheese: For those who are not dairy-free, sprinkling some grated parmesan cheese on top of the florets during the last few minutes of roasting can create an irresistibly cheesy crust.
    • Experiment with Seasonings: Pepper, cayenne for heat, or even curry powder can be excellent additions, allowing you to diversify the flavors based on your mood or the main dish.
    • Try Different Cooking Techniques: Instead of roasting, you could try air-frying for an even crispier texture. Alternatively, grill the cauliflower on skewers for a summer barbecue twist.

    Variations:

    • Mediterranean Style: Add kalamata olives and cherry tomatoes halfway through roasting for a Mediterranean-inspired version.
    • Asian-Inspired: Drizzle with soy sauce, sesame oil, and sprinkle sesame seeds before serving for an Asian fusion feel.
    • Herbaceous Twist: Fresh dill or basil sprinkled on just before serving can invoke other culinary traditions and enhance the fresh profile.

    These tips and variations will inspire creativity in the kitchen, aligning with your journey toward achieving effortless easy dinner recipes that are sure to delight everyone at your table.

    How to Store Easy Crispy Roasted Cauliflower Side Dish: Best Practices

    To extend the life of your Easy Crispy Roasted Cauliflower Side Dish and enjoy it again later, proper storage is essential. Here are the best practices:

    Refrigeration:

    • Allow the roasted cauliflower to cool to room temperature before transferring it to an airtight container. Store in the refrigerator for up to 3-4 days.
    • When ready to eat, simply reheat it in a preheated oven at 375°F (190°C) for about 10 minutes to regain that desirable crispiness.

    Freezing:

    • For longer storage, freeze the roasted cauliflower. Spread pieces on a baking sheet in a single layer and flash freeze until solid. Once frozen, transfer to a freezer-safe bag or container, where it can be stored for up to three months.
    • To reheat from frozen, place it straight into the oven at 425°F (220°C) for about 15-20 minutes until warmed through and crispy.

    Reheating Best Practices:

    • For the best results, reheat in the oven rather than the microwave. The microwave may lead to sogginess, while the oven will help retain the crispy texture.

    By following these best practices, you can ensure that your Easy Crispy Roasted Cauliflower Side Dish becomes a versatile addition to your easy dinner recipes, providing quick and delicious meals at any time.

    Nutritional Value of Easy Crispy Roasted Cauliflower Side Dish

    When it comes to nutrition, opting for healthy side dishes like Easy Crispy Roasted Cauliflower makes a significant difference in your overall diet.

    Nutritional Information per Serving (approximation based on 4 servings):

    • Calories: 120
    • Protein: 4g
    • Fat: 9g
    • Carbohydrates: 8g
    • Fiber: 3g
    • Vitamin C: 77% of daily value
    • Vitamin K: 21% of daily value
    • Folate: 14% of daily value

    Health Benefits:

    • The high fiber content promotes digestive health and helps regulate blood sugar levels.
    • Rich in vitamins C and K, this side dish supports your immune system and aids in calcium absorption, promoting strong bones.
    • Cauliflower’s low-calorie nature makes it excellent for weight management without sacrificing flavor.

    Including the Easy Crispy Roasted Cauliflower Side Dish in your rotation of easy dinner recipes ensures you’re providing your body with essential nutrients while enjoying a delicious flavor experience.

    FAQs: Frequently Asked Questions About Easy Crispy Roasted Cauliflower Side Dish

    Here are some common questions readers may have about the Easy Crispy Roasted Cauliflower Side Dish:

    1. Can I use frozen cauliflower instead of fresh?

    Yes! While fresh cauliflower offers the best texture, frozen cauliflower can also be used. Just make sure to thaw it and pat it dry to avoid excess moisture during roasting.

    2. Is it possible to make this dish ahead of time?

    Absolutely! You can prepare the roasted cauliflower and store it in the refrigerator for up to four days or freeze for longer storage. Reheat in the oven before serving to maintain the crispy texture.

    3. What are some gluten-free options to pair with this dish?

    You can pair the Easy Crispy Roasted Cauliflower with gluten-free grains like quinoa or rice, making it an excellent accompaniment to any main dish, especially for those following gluten-free diets.

    4. Can I include other vegetables?

    Certainly! You can add other vegetables to the mix, such as Brussels sprouts or carrots, for a more colorful and varied dish. Just make sure to adjust cooking times based on your veggie selections.

    5. How many servings does this recipe yield?

    This recipe generally yields about four servings, depending on portion sizes. Feel free to double the recipe if you’re serving a larger crowd.

    Incorporating the Easy Crispy Roasted Cauliflower Side Dish into your meal planning will meet both flavor and health expectations, ensuring it’s a favorite among your collection of easy dinner recipes. Dive into this delightful side dish and experience culinary joy!


    With the Easy Crispy Roasted Cauliflower Side Dish, cooking becomes an enjoyable experience filled with mouth-watering flavors that cater to both health and taste, making it ideal for any occasion. Enjoy this versatile recipe and share it with those around you for lasting culinary memories!

  • Creamy Cashew Pea Salad

    Creamy Cashew Pea Salad

    Creamy Cashew Pea Salad: A Tropical Delight

    Introduction to Creamy Cashew Pea Salad

    Welcome to a refreshing culinary adventure with our Creamy Cashew Pea Salad! This vibrant dish effortlessly combines flavor and nutrition, making it one of the best healthy dinner recipes you’ll ever try. Imagine a creamy base crafted from cashews, perfectly complemented by sweet, tender peas and a medley of vibrant vegetables. It’s not only a feast for the eyes but also a nourishing option for those who prioritize wellness in their meals.

    One of the most delightful aspects of this salad is its simplicity. Whether you’re a busy parent juggling numerous commitments, a student hungry for a quick meal, or a newlywed looking to impress your partner, this salad fits seamlessly into your lifestyle. With its rich source of protein, healthy fats, and nutrients, it caters to vegan diets, is naturally gluten-free, and is low in calories. As we dive into this recipe, you’ll discover how easy it is to whip up something that not only tastes fantastic but is also packed with health benefits. This dish offers versatility, making it perfect for any occasion, from casual family meals to elegant dinners.

    In the following sections, we will explore the numerous benefits of this salad, a detailed ingredient overview, and a step-by-step guide to preparing this delightful dish. Get ready to inspire your culinary journey with a recipe that nourishes both the body and soul!

    Benefits and Advantages of Creamy Cashew Pea Salad

    The Creamy Cashew Pea Salad stands out for various reasons, making it a stellar addition to your list of healthy dinner recipes. Firstly, its preparation is incredibly straightforward. With minimal cooking involved, you can have this dish ready in under 30 minutes, which is a boon for busy individuals and parents.

    Health-wise, this salad is a powerhouse. Cashews provide a rich source of healthy fats, which are essential for brain function and are good for heart health. Peas not only add a pop of sweetness but are finely packed with protein, fiber, and essential vitamins, including vitamin K and vitamin C. This combination makes the salad not just filling but also revitalizing.

    Moreover, this dish is versatile in its dietary appeal. It’s vegan and gluten-free, appealing to those who might be lactose intolerant or adhering to a plant-based lifestyle. The freshness of the vegetables complements the creamy cashew base, ensuring that you get a balanced intake of nutrients without sacrificing flavor. This makes it an excellent option for anyone looking to maintain or improve their health.

    Another advantage is that the salad can be easily customized. Whether you want to make it lower in calories, increase the protein content, or add extra vegetables for more bulk, the options are countless. This flexibility ensures that it can cater to various dietary needs and preferences, making it suitable for everyone at your dinner table.

    Overall, whether you’re seeking simple solutions for quick weeknight meals or aiming to impress guests, this salad serves as a cornerstone of healthy eating.

    Ingredients Overview

    Essential Ingredients for Creamy Cashew Pea Salad

    Creating the Creamy Cashew Pea Salad is a delightful process that begins with gathering the right ingredients. Below is a detailed list of what you’ll need, along with precise measurements and the purpose or benefit of each component:

    • 1 cup raw cashews (soaked for 2-4 hours): The base of the salad dressing, providing creaminess and healthy fats.
    • 1 cup fresh or frozen peas (thawed if frozen): Adds natural sweetness, protein, and essential vitamins.
    • 1/2 cup red bell pepper, diced: Offers a crunchy texture and rich flavor, packed with antioxidants.
    • 1/4 cup red onion, finely chopped: Adds an aromatic flavor and contributes to heart health.
    • 1/4 cup fresh parsley, finely chopped: Provides freshness and a sprinkle of color, rich in vitamins A, C, and K.
    • 2 tablespoons lemon juice: Adds acidity to balance the flavors while providing vitamin C.
    • 1 tablespoon olive oil: Contributes heart-healthy monounsaturated fats that can lower bad cholesterol.
    • Salt and pepper to taste: Enhances the overall flavor profile.

    This combination results in a bowl that is not just visually appealing but also nutrition-packed, making it one of the best healthy dinner recipes you can prepare.

    Dietary Substitutions to Customize Your Creamy Cashew Pea Salad

    If you’re looking to tailor this salad to fit specific dietary needs or ingredient availability, here are some simple substitutions that can easily be made:

    • Cashew Alternative: If you’re allergic to nuts, you can use silken tofu or hummus as a creamy base.
    • Peas Substitute: For those who prefer different vegetables or might not have peas on hand, consider using edamame for a similar texture or diced cucumbers for a crunchy contrast.
    • Herb Variations: Instead of parsley, you could use cilantro or even basil to change the flavor profile. These herbs also come with their unique health benefits.
    • Yogurt Addition: For a creamier texture without sacrificing health, consider adding plain, non-dairy yogurt if you’re avoiding nuts but still want a creamy dressing.
    • Spice It Up: If you enjoy a bit of heat, don’t hesitate to add red pepper flakes or a dash of cayenne pepper for a kick.

    By incorporating these substitutions, you can create a personalized version of the Creamy Cashew Pea Salad that aligns with different dietary preferences while still being delicious and nutritious.

    How to Prepare the Perfect Creamy Cashew Pea Salad: Step-by-Step Guide

    Creating your Creamy Cashew Pea Salad is a straightforward process. Follow this step-by-step guide, and you’ll have a delicious dish in no time.

    1. Soak the Cashews: Start by soaking one cup of raw cashews in water for about 2-4 hours to soften them. Soaking helps achieve a creamy texture when blended.

    2. Prepare the Vegetables: While the cashews soak, wash and chop your vegetables. Dice the red bell pepper and finely chop the red onion and fresh parsley. If you’re using frozen peas, ensure they’re completely thawed.

    3. Blend the Dressing: After soaking, drain the cashews and add them to a blender or food processor. Include the lemon juice and olive oil. Blend until you achieve a smooth, creamy consistency. If the mixture is too thick, add a tablespoon of water to help it blend seamlessly.

    4. Mix Ingredients: In a large mixing bowl, combine the chopped vegetables (peas, bell pepper, onion, and parsley). Pour the creamy cashew dressing over the veggies.

    5. Season to Taste: Stir well to fully coat the vegetables with the dressing. Add salt and pepper according to your preference. Remember, you can always adjust the seasoning later if needed.

    6. Chill Before Serving: For the best flavor, allow the salad to sit in the refrigerator for at least 30 minutes. This lets the flavors meld beautifully, transforming the salad into a flavorful dish.

    7. Serve and Enjoy: When you’re ready, give it a final stir, taste, and adjust seasoning if needed before serving. This salad is great on its own or served alongside grilled proteins or on a leafy bed of greens.

    With these easy steps, you’ll create a fantastic dish that checks all the boxes of deliciousness and healthiness, making it one of your go-to healthy dinner recipes.

    Mastering Creamy Cashew Pea Salad: Advanced Tips and Variations

    To elevate your Creamy Cashew Pea Salad experience even further, consider the following advanced tips and variations:

    • Add Protein: If you’d like to incorporate more protein, toss in some cooked quinoa or chickpeas. These additions make the salad heartier and turn it into a complete meal.

    • Cheese Option: For non-vegan versions, crumbled feta cheese or goat cheese can add a delightful tang and creaminess that complements the salad beautifully.

    • Spice Up Your Dressing: Experiment with different herbs and spices. A dash of smoked paprika or cumin can impart warm, earthy notes that elevate the salad’s flavor profile.

    • Include Fruits: Adding diced apples, pears, or even pineapple can lend a sweet and unexpected twist to the salad. The sweetness pairs nicely with the richness of the cashew dressing.

    • Make It a Wrap: Use this salad as a filling for wraps. Simply spread it in a whole grain or lettuce wrap for an exciting bite that makes for convenient lunches or picnics.

    • Explore Different Bases: Instead of using the salad as a traditional side, try serving it atop a grain bowl or alongside roasted vegetables. It can also be a delightful topping for baked sweet potatoes.

    By branching out with these variations, you can ensure that each iteration of the Creamy Cashew Pea Salad feels fresh and exciting, making it a favorite among your rotation of healthy dinner recipes.

    How to Store Creamy Cashew Pea Salad: Best Practices

    Storing your Creamy Cashew Pea Salad properly is essential for ensuring freshness and maintaining flavor. Here are the best practices for refrigeration, freezing, and reheating:

    • Refrigeration: This salad can be stored in an airtight container in the refrigerator for up to 3 days. If you anticipate leftover salad, it’s best to store the dressing separately and mix it with the vegetables right before serving to maintain the freshness of the ingredients.

    • Freezing: While freezing is not ideal due to the creamy cashew dressing, you can freeze the peas and vegetables beforehand if you plan to prepare a batch. Thaw and mix with the dressing when ready to serve.

    • Reheating: If you’re adding components like quinoa or cooked beans that need reheating, do so gently to avoid the dressing separating. Warm ingredients slightly, then combine them with the fresh veggies and dress just before serving.

    Taking these simple storage steps will ensure that your Creamy Cashew Pea Salad remains delicious, making it a convenient option within the realm of your healthy dinner recipes.

    Nutritional Value of Creamy Cashew Pea Salad

    One of the most appealing aspects of the Creamy Cashew Pea Salad is its nutritional profile. Below is a detailed breakdown of the nutritional content per serving, making it easy for you to track your health goals:

    • Calories: Approximately 240 calories
    • Protein: About 10 grams
    • Fat: 18 grams (primarily from healthy fats in cashews)
    • Carbohydrates: 15 grams
    • Fiber: 5 grams
    • Sugars: 2 grams
    • Vitamin K: Significant percentage of daily value
    • Vitamin C: Significant percentage of daily value

    This salad is not only low in calories but also provides a healthy dose of protein, fiber, and essential vitamins, making it an excellent choice in the category of healthy dinner recipes. The balance of macronutrients ensures that you feel satisfied and nourished without the weight of heavy, calorie-laden options.

    FAQs: Frequently Asked Questions About Creamy Cashew Pea Salad

    To help clarify any questions about the Creamy Cashew Pea Salad, here are some frequently asked questions:

    1. Can I make the dressing in advance?
      Yes! You can prepare the cashew dressing a day ahead. Store it in an airtight container in the fridge until you’re ready to mix it with the salad.

    2. Is it necessary to soak the cashews?
      Soaking makes the cashews smoother and creamier when blended, but if you’re in a pinch, you can blend them dry. However, the texture may not be as rich.

    3. What can I substitute for cashews if I’m allergic?
      Silken tofu, hemp seeds, or tahini can all serve as excellent alternatives that offer creaminess while catering to nut allergies.

    4. Can I use canned peas instead of fresh or frozen?
      Yes, you can! However, rinsed and drained canned peas may have a softer texture. They can work well but aim to add them at the end to maintain some bite.

    5. How long will leftovers last?
      The salad can be kept in the fridge for up to 3 days. For best quality, store the dressing separately when possible.

    With these FAQs, you should have a greater clarity about how to prepare and customize your Creamy Cashew Pea Salad, making this a dish you’ll return to time and time again.

    Try incorporating this delightful salad into your repertoire of healthy dinner recipes. You’ll enjoy a culinary treat that’s quick, easy, and packed with nourishment!