Tag: chicken

  • Tasty Chicken Shawarma With Yogurt Sauce

    Tasty Chicken Shawarma With Yogurt Sauce

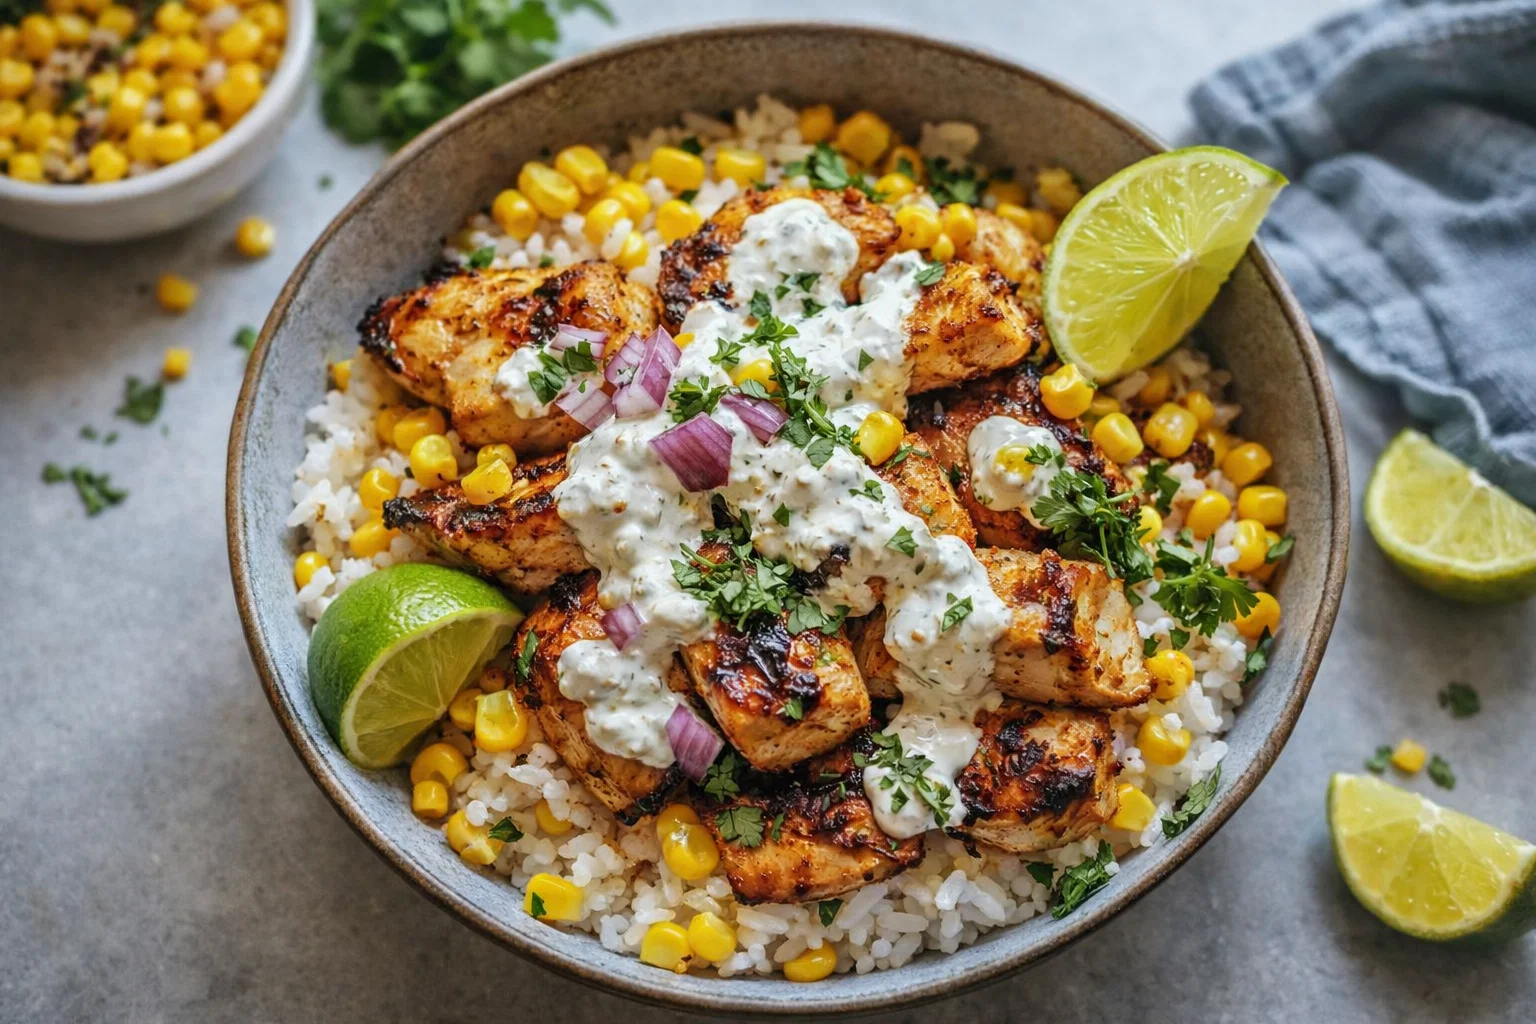
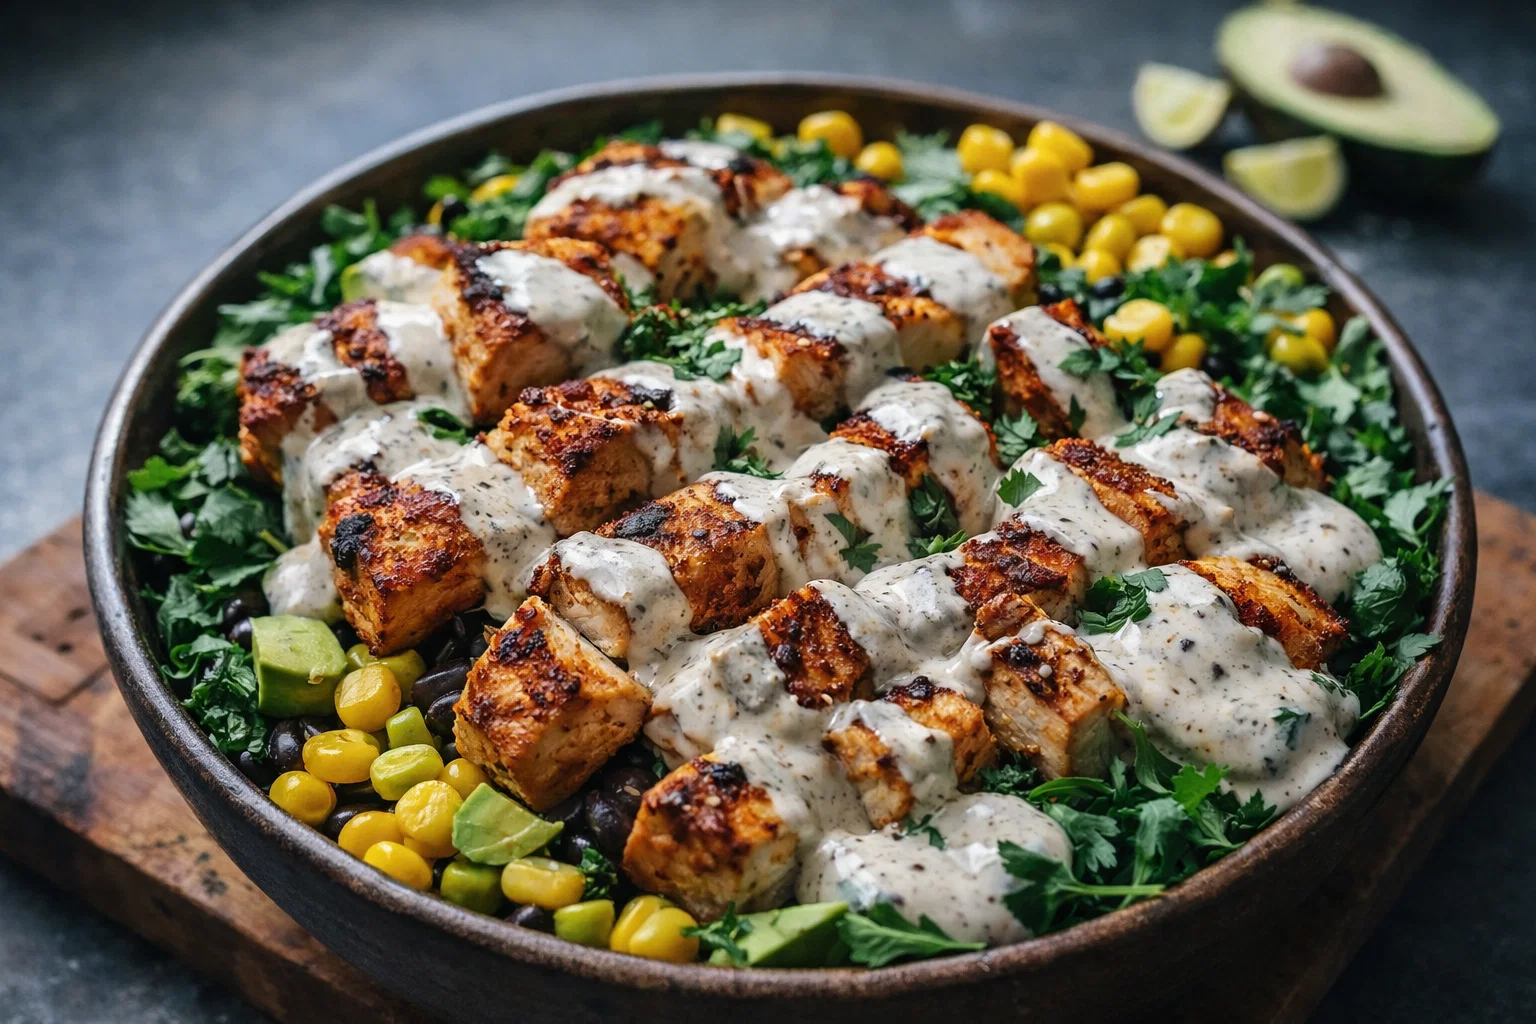
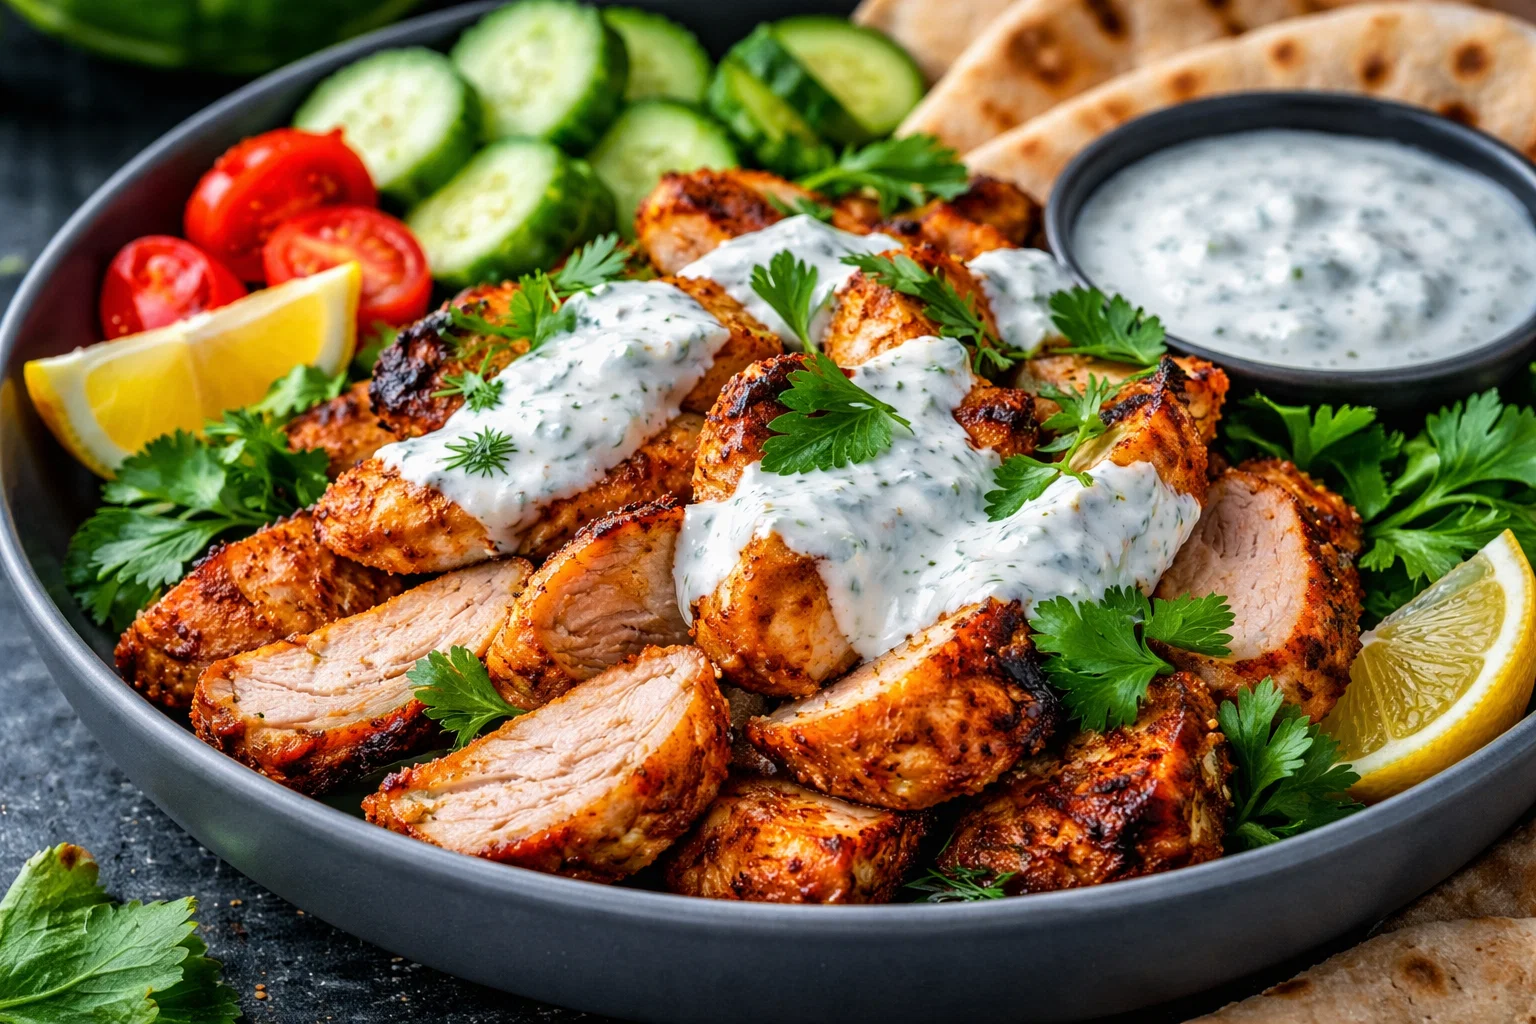
    Tasty Chicken Shawarma With Yogurt Sauce: A Tropical Delight

    Introduction to Tasty Chicken Shawarma With Yogurt Sauce

    If you’re on the lookout for easy yet delicious chicken recipes that can amaze your family and impress your friends, look no further than this Tasty Chicken Shawarma With Yogurt Sauce. Originating from the Middle East, this dish is not only simple to prepare but also packed with vibrant flavors and healthy ingredients. Utilizing tender chicken marinated in a blend of aromatic spices, this recipe features a rich yogurt sauce that complements the smoky, savory profile of shawarma beautifully.

    What makes this recipe stand out is its versatility. It caters to a range of dietary preferences, making it a great option for everyone—busy parents can quickly whip it up for dinner, students can enjoy a filling meal on a budget, and health-conscious individuals will appreciate its nutritious components. Moreover, the shawarma spice blend is gluten-free, while the yogurt sauce is a delightful addition that can easily be prepared vegan by substituting with plant-based yogurt.

    In essence, Tasty Chicken Shawarma With Yogurt Sauce is more than just a meal—it’s an experience, offering a tropical delight that transports you to sun-kissed markets brimming with the rich aromas of spices and grilling meats. This dish is not just a feast for the taste buds but also an opportunity to bond with loved ones over a delicious meal, making it a fantastic addition to your collection of go-to chicken recipes.

    Benefits and Advantages of Tasty Chicken Shawarma With Yogurt Sauce

    Tasty Chicken Shawarma With Yogurt Sauce is not only a flavorful dish but also embodies numerous benefits that make it an ideal choice for home cooks of all kinds. Here’s why you’ll love making this dish:

    1. Simplicity and Convenience: One of the standout features of this recipe is that it can be prepared in under an hour. The marination process allows the spices to penetrate the chicken deeply, requiring minimal cook time. This simplicity is perfect for busy parents juggling busy schedules or students who need to prepare meals quickly.

    2. Health Benefits: Chicken is a great source of lean protein, which is vital for building and repairing tissues. The addition of yogurt introduces probiotics, which promote gut health. Plus, the featured spices—such as garlic, cumin, and paprika—bring antioxidants and anti-inflammatory properties into the mix, making your meal both delicious and nutritious.

    3. Versatility: This shawarma recipe is designed to suit various dietary needs. Whether you’re gluten-free, dairy-free, or simply looking to reduce calories, this dish can accommodate. You can serve it on whole-grain pita, over a fresh salad, or even in a lettuce wrap for a light and low-carb option.

    4. Flavor Explosion: The unique marination process allows for the fusion of spices, creating a tantalizing flavor profile that elevates the humble chicken to new heights. The yogurt sauce adds a creamy balance and enhances the overall taste, making every bite a delightful experience.

    5. Cultural Experience: Cooking Tasty Chicken Shawarma with Yogurt Sauce opens up a window to Middle Eastern cuisine. By trying out this recipe, you offer your family a delicious taste of diverse cultures, enriching their food experiences and fostering an appreciation for global flavors.

    Incorporating Tasty Chicken Shawarma With Yogurt Sauce into your routine not only caters to varying dietary preferences but also helps you embrace health and enjoyable cooking. With its balance of simplicity, health benefits, and adaptability, this dish joins the ranks of the best chicken recipes to keep in your rotation.

    Ingredients Overview

    Essential Ingredients for Tasty Chicken Shawarma With Yogurt Sauce

    1. For the Chicken Marinade:
    2. Chicken Breast (500g): Cut into thin strips; a lean protein source for this recipe.
    3. Garlic (4 cloves): Minced; adds a fragrant depth and enhances the flavor.
    4. Ground Cumin (2 tsp): A warm spice that contributes to the savory profile.
    5. Paprika (2 tsp): Offers a subtle sweetness and red color.
    6. Turmeric (1 tsp): Adds earthiness and health benefits due to its anti-inflammatory properties.
    7. Cinnamon (½ tsp): Provides warmth and a hint of sweetness.
    8. Salt (1 tsp): Enhances all flavors; can be reduced for low-sodium diets.
    9. Black Pepper (½ tsp): For an added kick.
    10. Olive Oil (2 tbsp): Adds moisture and richness, can be replaced with avocado oil for a higher smoke point.

    11. For the Yogurt Sauce:

    12. Greek Yogurt (1 cup): A thick, creamy base rich in protein; use coconut yogurt for a non-dairy option.
    13. Lemon Juice (2 tbsp): Adds brightness and acidity.
    14. Fresh Parsley (2 tbsp): Chopped; provides color and freshness.
    15. Salt (to taste): For seasoning, can be adjusted according to dietary needs.
    16. Cucumber (1, grated): Optional, adds crunch and freshness, especially useful in the heat of summer.

    17. Extras for Serving:

    18. Pita Bread or Wraps: Whole-grain for added fiber; a gluten-free alternative works too.
    19. Vegetables (lettuce, tomatoes, onions): Fresh toppings to build your shawarma.
    20. Pickles: Optional, for tanginess to balance flavors.

    This comprehensive list ensures that your Tasty Chicken Shawarma With Yogurt Sauce is both rich in flavor and nourishing, while also providing options for various dietary needs. Whether you are preparing a meal for a family gathering or a quick dinner for yourself, these ingredients will help to create a delightful experience.

    Dietary Substitutions to Customize Your Tasty Chicken Shawarma With Yogurt Sauce

    When it comes to customizing this classic recipe, there are plenty of substitutions you can make to cater to your dietary preferences. Here are some options to consider:

    • For a Vegan Version: Substitute the chicken with marinated tofu or tempeh, which absorbs the marinade’s flavors beautifully. Additionally, replace Greek yogurt with a plant-based yogurt or tahini sauce to maintain the creamy element.

    • For Gluten-Free Needs: Use gluten-free pita bread or wrap alternatives such as lettuce leaves or cauliflower wraps. This keeps the essence of the dish intact without compromising dietary restrictions.

    • Lower Calorie Options: You can opt for skinless chicken thighs instead of breast for a bit more flavor with fewer calories, or simply reduce the oil in the marinade without sacrificing taste.

    • Spice Variations: Feel free to add or replace spices according to your taste. For example, if you’re a fan of heat, consider adding cayenne pepper or chili flakes to the marinade for an extra kick.

    By embracing these substitutions, you can make Tasty Chicken Shawarma With Yogurt Sauce a versatile dish, perfect for anyone at the dining table while still fitting within your dietary goals.

    How to Prepare the Perfect Tasty Chicken Shawarma With Yogurt Sauce: Step-by-Step Guide

    Now that you have assembled all the necessary ingredients, it’s time to dive into the cooking process. Follow these detailed, easy-to-follow steps to prepare your exquisite Tasty Chicken Shawarma With Yogurt Sauce:

    1. Prepare the Marinade:
    2. In a mixing bowl, combine minced garlic, ground cumin, paprika, turmeric, cinnamon, salt, black pepper, and olive oil. Mix well to create a fragrant marinade.

    3. Marinate the Chicken:

    4. Add the chicken strips to the marinade, ensuring they are well-coated. Cover the bowl with plastic wrap or transfer to a sealable bag. Let it marinate in the refrigerator for at least 30 minutes, preferably 2-4 hours for maximum flavor enhancement.

    5. Preheat the Grill or Oven:

    6. If you’re grilling: Preheat your grill to a medium-high heat. If using the oven: Preheat to 400°F (200°C) with a baking sheet placed inside to warm it.

    7. Prepare the Yogurt Sauce:

    8. While the chicken is marinating, prepare the yogurt sauce. In a separate bowl, mix Greek yogurt, lemon juice, chopped parsley, and grated cucumber. Adjust salt to taste, then refrigerate until needed.

    9. Cook the Chicken:

    10. Once the chicken has marinated, remove it from the refrigerator. If grilling, place the strips directly on the grill and cook for 6-8 minutes per side, until they have nice grill marks and are cooked through. If baking, spread the chicken on the preheated baking sheet and roast for about 20-25 minutes, or until fully cooked.

    11. Serve with Fresh Toppings:

    12. Remove the chicken from the grill or oven and let it rest for a few minutes. Serve it on warm pita bread or wraps, drizzled with the yogurt sauce, topped with your choice of lettuce, tomatoes, onions, and pickles.

    13. Garnish and Enjoy:

    14. Garnish with extra parsley for a pop of color. This dish is best enjoyed fresh, but it’s perfect for meal prep too!

    Additional Cooking Tips:

    • Skewering Option: If you prefer, you can skewer the marinated chicken onto wooden skewers before grilling for an authentic street-food vibe.
    • Flavor Depth: For a more complex flavor, try adding a splash of apple cider vinegar or a dash of soy sauce to the marinade.
    • Batch Cooking: This recipe saves exceptionally well, so consider making a double batch for easy meal prep.

    By following these steps, you can easily create Tasty Chicken Shawarma With Yogurt Sauce that everyone will love, turning your kitchen into a hub of savory aromas and tropical delights.

    Mastering Tasty Chicken Shawarma With Yogurt Sauce: Advanced Tips and Variations

    To take your Tasty Chicken Shawarma With Yogurt Sauce to the next level, here are some advanced tips and variations to experiment with:

    1. Spice Your Marinade: Don’t shy away from experimenting with spices! Adding smoked paprika instead of regular can give a wonderful depth to the chicken. Furthermore, consider marinating overnight for even richer flavors.

    2. Alternative Proteins: While chicken is the star here, you can also use beef, lamb, or even shrimp for a different twist. Just adjust marinating and cooking times based on the protein chosen.

    3. Homemade Flatbreads: For a truly gourmet experience, try making your own pita bread or wraps. While it requires a bit more effort, the result is exceptionally rewarding and complements the shawarma beautifully.

    4. Vegetarian Shawarma: Not a fan of meat? This recipe can be easily modified using roasted vegetables like bell peppers, zucchini, and eggplant. Marinate them similarly and grill until tender and juicy.

    5. Experiment with Sauces: While the yogurt sauce is a classic pairing, consider tzatziki or tahini sauce for exciting variations. These alternatives can introduce varying flavors and textures to your dish.

    6. Serving Styles: Enjoy the shawarma in various forms—serve it as a bowl with fresh greens, grains, and toppings, or pile it on a platter for guests to build their own. This makes for a fun dining experience.

    By incorporating these tips and variations, you can master Tasty Chicken Shawarma With Yogurt Sauce, ensuring it remains a staple in your recipe collection for years to come!

    How to Store Tasty Chicken Shawarma With Yogurt Sauce: Best Practices

    Storing Tasty Chicken Shawarma With Yogurt Sauce properly not only preserves its flavors but also ensures that you can enjoy it later without compromising quality. Here’s how to do it:

    1. Refrigeration: Once the chicken has cooled down, place it in an airtight container. It will keep well in the fridge for up to 3 days. Make sure the yogurt sauce is stored separately to prevent it from turning runny.

    2. Freezing: If you’d like to store it for a more extended period, consider freezing the cooked chicken. Place the chicken in a freezer-safe container, ensuring to remove as much air as possible. It can be frozen for up to 2 months. When ready to eat, defrost it overnight in the refrigerator before reheating.

    3. Reheating: To enjoy your leftover chicken shawarma, reheat it in an oven preheated to 375°F (190°C) for about 10-15 minutes or until heated thoroughly. If using a skillet, add a drizzle of oil to prevent it from drying out.

    4. Yogurt Sauce: The yogurt sauce is best consumed fresh. However, if you’re storing it, keep it in an airtight container in the fridge and use it within 3-4 days. If it separates, simply stir to recombine before serving.

    By following these best practices, you can minimize food waste while ensuring that each serving of Tasty Chicken Shawarma With Yogurt Sauce remains as delicious as when it was first made.

    Nutritional Value of Tasty Chicken Shawarma With Yogurt Sauce

    Understanding the nutritional value of your meals is crucial for maintaining a balanced diet. Here’s a breakdown of the key nutritional components of Tasty Chicken Shawarma With Yogurt Sauce per serving (approximately 250g of marinated chicken and sauce):

    • Calories: 350-400
    • Protein: 30g (dependable on chicken used)
    • Fat: 15g (varying with the amount of olive oil)
    • Carbohydrates: 18g (from pita or wraps, if included)
    • Fiber: 3g (primarily from vegetables)
    • Sugar: 4g (natural from yogurt)

    Key Nutritional Highlights:

    • High in Protein: Essential for muscle growth and repair, making this dish beneficial for active individuals or those looking to maintain a healthy lifestyle.
    • Rich in Healthy Fats: Olive oil and optional toppings like nuts introduce healthy fats, supporting cardiovascular health.
    • Packed with Vitamins: The vegetables not only enhance flavor but also contribute essential vitamins and minerals to your meal.

    Tailoring to Your Needs:

    To adapt this recipe further:
    – Opt for grilled rather than fried chicken to reduce calories.
    – Choose whole wheat or low-carb pita for more fiber or fewer carbohydrates.
    – Adjust portion sizes to fit your dietary goals.

    By understanding the nutritional value of Tasty Chicken Shawarma With Yogurt Sauce, you can enjoy it guilt-free, knowing it supports your health and wellness objectives.

    FAQs: Frequently Asked Questions About Tasty Chicken Shawarma With Yogurt Sauce

    1. Can I use other meats besides chicken for shawarma?

    Absolutely! You can use beef, lamb, or even seafood like shrimp. Just adjust cooking times according to the protein you’ve chosen.

    2. Is this dish suitable for meal prep?

    Yes, this dish is excellent for meal prep! The chicken and yogurt sauce can be made in advance, making it easy to assemble when you’re ready to eat.

    3. Can I make the yogurt sauce vegan?

    Yes! Simply replace the Greek yogurt with a plant-based yogurt, like coconut or almond yogurt, for a vegan version.

    4. How spicy is this chicken shawarma?

    The spice level can vary based on your personal preference. If you prefer it spicier, consider adding crushed red pepper flakes or cayenne pepper to the marinade.

    5. What sides go well with Tasty Chicken Shawarma?

    This dish pairs beautifully with a side salad, roasted vegetables, or even quinoa tabbouleh. Additionally, serving fresh pita bread and dips like hummus can create a well-rounded meal.

    6. Can I freeze my leftovers?

    Yes! You can freeze the cooked chicken in an airtight container for up to 2 months. Be sure to store the yogurt sauce separately, as it is best enjoyed fresh.

    In conclusion, Tasty Chicken Shawarma With Yogurt Sauce is a delightful recipe that elevates simple ingredients into a world of flavor. Through understanding the preparation, variations, storage, and nutritional information, you’re equipped to add this dish to your collection of favorite chicken recipes—one that you can confidently serve at any occasion. So gather your ingredients, follow the steps above, and enjoy a meal that’s as vibrant and fulfilling as it is easy to make!

  • Easy Street Corn Chicken Rice Bowl Dinner

    Easy Street Corn Chicken Rice Bowl Dinner

    Easy Street Corn Chicken Rice Bowl Dinner: A Tropical Delight

    Introduction to Easy Street Corn Chicken Rice Bowl Dinner

    Are you tired of the same old meal routines? Look no further than the Easy Street Corn Chicken Rice Bowl Dinner! This delightful dish brings a burst of tropical flavors right to your kitchen, making it one of the best easy dinner recipes for everyone from busy parents to culinary enthusiasts. With its luscious combination of tender chicken, flavorful corn, and fluffy rice, this recipe not only satisfies your taste buds but also nourishes your body.

    One of the significant advantages of this bowl dinner is its simplicity. It takes minimal preparation time, allowing you to whip up a nutritious meal even on the busiest weeknights. Plus, it’s versatile enough to cater to various dietary needs, making it the perfect choice for families who need a wholesome dinner that can please both picky eaters and health-conscious diners alike.

    Packed with proteins from chicken, fiber from corn, and wholesome carbohydrates from rice, this dish can give you energy without being heavy. Additionally, it can easily be made vegan or gluten-free, ensuring that everyone at the table can enjoy a delicious, fulfilling dinner. So, gather your ingredients and let’s embark on the culinary adventure of creating this tropical delight!

    Benefits and Advantages of Easy Street Corn Chicken Rice Bowl Dinner

    The Easy Street Corn Chicken Rice Bowl Dinner stands out as an exceptional meal for numerous reasons. First and foremost, it’s incredibly easy to prepare. With straightforward instructions and a manageable list of ingredients, even the most novice cook can master this dish without any hassle. This means less time stressing in the kitchen and more time enjoying dinner with your loved ones!

    Another great advantage is its health benefits. Each ingredient is chosen not just for its outstanding flavor but also for its nutritional profile. Chicken provides a lean source of protein vital for muscle repair and maintenance. Corn, whether fresh or canned, is packed with vitamins, minerals, and antioxidants. Moreover, it adds a sweet crunch that contrasts beautifully with the savory chicken. Rice, which can be swapped for brown rice or quinoa for those looking for a whole-grain option, offers a satisfying base that will fill you without weighing you down.

    This dish is also incredibly versatile, allowing you to customize it based on what you have on hand or your dietary preferences. Whether you want to make it gluten-free, low-carb, or vegan, this bowl dinner can effortlessly adapt. The endless possibilities mean you can enjoy it often without feeling bored or restricted in your culinary choices. With all these benefits combined, it’s clear why this meal deserves a spot in your collection of easy dinner recipes!

    Ingredients Overview

    Essential Ingredients for Easy Street Corn Chicken Rice Bowl Dinner

    Here’s a detailed list of all the ingredients needed to create your Easy Street Corn Chicken Rice Bowl Dinner:

    • Chicken Breast (2 cups, cooked and shredded): A lean protein source essential for muscle health.
    • Corn (1 cup, fresh or canned): Rich in fiber and vitamins, it adds both sweetness and crunch.
    • Rice (1 cup, uncooked white or brown): A hearty base that fills you up. For a low-calorie option, try riced cauliflower.
    • Bell Peppers (1 cup, diced): Adds color and nutrients; opt for red, yellow, or green for a vibrant dish.
    • Red Onion (½ cup, diced): Brings a hint of sweetness and a great crunch.
    • Garlic (2 cloves, minced): A must-have for flavor; offer numerous health benefits.
    • Olive Oil (2 tablespoons): For sautéing vegetables; high in healthy fats.
    • Cilantro (¼ cup, chopped; optional): Gives an added zesty flavor; can be substituted with parsley.
    • Lime (2, juiced): Adds a bright, refreshing flavor to the dish.
    • Salt and Pepper (to taste): Essential seasonings to balance flavors.

    Dietary Substitutions to Customize Your Easy Street Corn Chicken Rice Bowl Dinner

    Adapting the Easy Street Corn Chicken Rice Bowl Dinner to meet dietary needs is a breeze! Here are some substitutions:

    • Vegan Option: Replace chicken with grilled tempeh or chickpeas for protein.
    • Gluten-Free Option: Always check that soy sauces or additional condiments are gluten-free.
    • Low-Carb Option: Use riced cauliflower instead of traditional rice.
    • Spicy Option: Add jalapeños or a splash of hot sauce to give the dish a kick.
    • Nut-Free Option: Ensure that any additional toppings or dressings are free from nuts.

    By incorporating these substitutions, you can personalize your Easy Street Corn Chicken Rice Bowl Dinner to fit any dietary requirement or preference while still enjoying all the glorious flavors!

    How to Prepare the Perfect Easy Street Corn Chicken Rice Bowl Dinner: Step-by-Step Guide

    Creating your Easy Street Corn Chicken Rice Bowl Dinner is not just delicious—it’s also straightforward! Follow these detailed steps to prepare your meal:

    1. Prepare the Base: Start by cooking your rice according to the package instructions. If you’re using a rice cooker, simply add the appropriate amount of water and rice, set it, and forget it.

    2. Sauté the Vegetables: In a large skillet, heat 2 tablespoons of olive oil over medium heat. Add the diced red onion and cook until it becomes translucent, about 3-4 minutes.

    3. Add Garlic and Peppers: Stir in the minced garlic and diced bell peppers. Sauté for another 3-5 minutes, stirring occasionally, until the peppers are soft.

    4. Incorporate the Chicken: Once the vegetables are sautéed, add in the shredded chicken. Toss everything together until the chicken is heated through, about 2-3 minutes.

    5. Mix in the Corn: Stir in the corn. If using canned corn, make sure to drain it and rinse before adding. Allow everything to cook together for another 3-4 minutes.

    6. Season and Add Lime Juice: Sprinkle salt and pepper to taste. Drizzle the lime juice over the mixture, making sure everything is well combined.

    7. Build the Bowls: Once your rice is done, fluff it with a fork. Spoon a generous amount of rice into each bowl and top with the chicken and corn mixture.

    8. Garnish and Serve: Finally, sprinkle chopped cilantro on top for a fresh finish. Serve immediately and enjoy your tropical dinner!

    By following these steps, you can see how quickly and easily this bowl dinner comes together. The best part about this recipe is how you can make adjustments to suit everyone’s tastes and dietary needs, making it a true easy dinner recipe for any occasion.

    Mastering Easy Street Corn Chicken Rice Bowl Dinner: Advanced Tips and Variations

    Once you’ve mastered the basic Easy Street Corn Chicken Rice Bowl Dinner, consider these tips and variations:

    • Seasoning Variations: Experiment with different spices such as cumin, chili powder, or paprika to add depth to your dish.

    • Extra Veggies: Sneak in additional vegetables like zucchini, spinach, or carrots to enhance the flavor and nutrition.

    • Extra Creaminess: Top your rice bowl with a dollop of Greek yogurt or avocado for added creaminess and healthy fats.

    • Make it a Mixed Grill: Grill your chicken with lime, garlic, and spices for a smoky twist before adding it to the bowl.

    • Leftover Transformation: Utilize any leftover chicken or veggies to create a stir-fry or wrap using tortilla shells.

    These advanced tips and variations provide countless options to make this dish your own. Whether you are a seasoned cook or just starting, these ideas will encourage you to experiment while still keeping the dish easy and enjoyable!

    How to Store Easy Street Corn Chicken Rice Bowl Dinner: Best Practices

    Storing your Easy Street Corn Chicken Rice Bowl Dinner properly can extend its shelf life and keep it fresh for your next meal. Follow these best practices:

    • Refrigeration: Store any leftovers in an airtight container in the refrigerator. The bowl should keep well for up to 3-4 days. When reheating, add a splash of water to keep everything moist.

    • Freezing: If you want to prepare ahead, freeze individual portions. Allow the bowl to cool completely before sealing in a freezer-safe container or bag. It can last up to 3 months this way. To reheat, thaw overnight in the fridge and reheat in the microwave or stovetop until heated.

    • Avoiding Sogginess: To keep your rice from becoming mushy, consider storing the chicken and corn mixture separately from the rice. Combine them again right before serving.

    These storage solutions not only minimize waste but also help you to have one of your favorite easy dinner recipes ready to go when time is tight!

    Nutritional Value of Easy Street Corn Chicken Rice Bowl Dinner

    Understanding the nutritional profile of your meals helps you make informed choices. Here’s a breakdown for one serving of the Easy Street Corn Chicken Rice Bowl Dinner:

    • Calories: Approximately 450-500 calories depending on portion sizes and modifications
    • Protein: 30g (essential for muscle repair)
    • Carbohydrates: 60g (providing energy)
    • Fat: 10g (mostly healthy fats from olive oil)
    • Fiber: 8g (great for digestive health)
    • Vitamins and Minerals: Rich in Vitamin C from peppers and corn, and Iron from chicken

    This nutritional value showcases how the Easy Street Corn Chicken Rice Bowl Dinner is not just a delicious meal but also a healthful choice that supports various dietary needs.

    FAQs: Frequently Asked Questions About Easy Street Corn Chicken Rice Bowl Dinner

    Q1: Can I make this recipe ahead of time?
    Yes! You can meal prep this dish by cooking it in advance and storing it in the fridge for up to 4 days or freeze it for up to 3 months.

    Q2: Is this recipe gluten-free?
    The recipe can easily be made gluten-free, just ensure that any sauces or dressings you add do not contain gluten.

    Q3: Can I substitute chicken with something else?
    Absolutely! You can replace chicken with tofu, tempeh, or chickpeas for a vegan option.

    Q4: How can I add more flavor to the dish?
    Experiment with spices! Adding cumin, lime zest, or even a dollop of hot sauce can elevate the flavors to your liking.

    Q5: Is this recipe suitable for kids?
    Yes! The mild flavors and ability to customize ingredients make it appealing to even picky eaters.

    By addressing these common questions, you assist readers in understanding the versatility and adaptability of the Easy Street Corn Chicken Rice Bowl Dinner, making it easier for them to incorporate it into their meal plans.


    This extended guide provides an in-depth look at the Easy Street Corn Chicken Rice Bowl Dinner, highlighting its simplicity, health benefits, and adaptability for various dietary needs. It’s an excellent addition to any recipe collection and stands as one of the ultimate easy dinner recipes for both novice cooks and seasoned chefs alike!

  • Cozy Smothered Chicken Thighs With Gravy

    Cozy Smothered Chicken Thighs With Gravy

    Cozy Smothered Chicken Thighs With Gravy: A Tropical Delight

    Introduction to Cozy Smothered Chicken Thighs With Gravy

    If you’re seeking a comforting yet simple recipe that warms the heart, look no further than Cozy Smothered Chicken Thighs With Gravy. This delightful dish features succulent chicken thighs enveloped in a rich, creamy gravy that’s hard to resist. Ideal for home cooks looking for a one-pot solution, this meal not only satisfies cravings but also fits seamlessly into a busy lifestyle. With the emphasis on chicken thighs, a flavorful cut that’s both tender and juicy, you cannot go wrong with this choice.

    Crafting this savory dish is incredibly easy, making it suitable for anyone, including busy parents juggling their family’s needs or newlyweds eager to impress. Moreover, its versatility means it appeals to various dietary preferences: it can easily be adjusted to be gluten-free, low-calorie, or even plant-based with just a few substitutions. The richness of the dish, combined with its wholesome ingredients, provides a meal that’s not just delicious but is also nourishing. Let’s delve into the many benefits of making Cozy Smothered Chicken Thighs With Gravy in your home kitchen.

    Benefits and Advantages of Cozy Smothered Chicken Thighs With Gravy

    There are countless reasons to make Cozy Smothered Chicken Thighs With Gravy a staple in your recipe collection. First and foremost, its ease of preparation is a winner. With just a few straightforward steps, you can create a tantalizing dish that tastes like you spent hours in the kitchen. This simplicity is perfect for busy individuals, including working professionals and students, who crave a home-cooked meal after a long day.

    Moreover, using chicken thighs offers several health benefits. This cut of meat is revered not only for its flavor but also for its nutritional profile; chicken thighs are rich in protein and essential vitamins like B6 and B12, which are vital for energy metabolism. The gravy, often made from wholesome ingredients, adds an additional layer of nutrition without compromising taste.

    Another notable advantage is the meal’s adaptability. You can serve it over rice, mashed potatoes, or even gluten-free alternatives like quinoa, making it appropriate for nearly any dietary preference. For those who wish to cater to vegan diners, a few swift substitutions can transform the recipe into a plant-based delight, ensuring that no one misses out on this cozy experience.

    With such a rich flavor profile and health benefits, Cozy Smothered Chicken Thighs With Gravy is not just a meal; it’s a hug in food form.

    Ingredients Overview

    Essential Ingredients for Cozy Smothered Chicken Thighs With Gravy

    Here’s what you’ll need to create this delicious dish:

    • 4-6 Chicken Thighs (bone-in, skin-on for the best flavor)
    • Salt and Pepper (to taste)
    • 1 cup All-Purpose Flour (or gluten-free flour for a gluten-free option)
    • 1 medium Onion (chopped)
    • 2-3 cloves Garlic (minced)
    • 2 cups Chicken Broth (low-sodium recommended)
    • 1 cup Heavy Cream (or coconut cream for a dairy-free option)
    • 2-3 tablespoons Olive Oil (or butter)
    • 1 tablespoon Worcestershire Sauce (optional, for depth of flavor)
    • 1 teaspoon Thyme (fresh or dried)
    • 1 teaspoon Paprika
    • Fresh Parsley (for garnish)

    By using bone-in, skin-on chicken thighs, you ensure maximum flavor, but for those looking for a lighter option, skinless chicken thighs work just as well.

    Dietary Substitutions to Customize Your Cozy Smothered Chicken Thighs With Gravy

    Here are some substitutions you can use to accommodate dietary restrictions:

    • Gluten-Free: Substitute all-purpose flour with gluten-free flour or cornstarch for thickening the gravy. Ensure the chicken broth you select is labeled gluten-free.
    • Low-Calorie: Opt for skinless chicken thighs and replace heavy cream with low-fat options like Greek yogurt or a plant-based cream.
    • Vegan Version: Use jackfruit or tofu instead of chicken thighs, plant-based cream, and make your own vegetable broth as a substitute.

    These simple adjustments cater to diverse dietary preferences while keeping the essence of the dish intact.

    How to Prepare the Perfect Cozy Smothered Chicken Thighs With Gravy: Step-by-Step Guide

    Getting started with Cozy Smothered Chicken Thighs With Gravy is straightforward, and I’m here to walk you through each step.

    1. Prepare the Chicken Thighs: Begin by patting the chicken thighs dry with paper towels. This will help achieve a nice sear. Season them with salt, pepper, and paprika.

    2. Coat in Flour: Next, place the flour on a plate and coat each chicken thigh liberally. Shake off any excess flour—this will help create a crispy crust.

    3. Brown the Chicken Thighs: In a large skillet, heat olive oil over medium-high heat. Once hot, add the chicken thighs skin-side down. Brown for about 5-7 minutes on each side until golden brown. Remove from the skillet and set aside.

    4. Sauté the Vegetables: In the same skillet, add chopped onion and minced garlic. Sauté for about 3-4 minutes, or until the onion becomes translucent, scraping the flavorful bits from the bottom of the pan.

    5. Make the Gravy: Pour in the chicken broth and stir in Worcestershire sauce, thyme, and more salt and pepper to taste. Bring to a simmer, then add heavy cream or coconut cream, stirring well to combine.

    6. Return the Chicken Thighs: Gently nestle the browned chicken thighs back into the gravy. Make sure they’re partially submerged in the liquid.

    7. Simmer to Perfection: Reduce the heat to low and cover the skillet. Let simmer for 30-40 minutes until the chicken is fully cooked and tender, becoming infused with all the delicious flavors of the gravy.

    8. Thicken the Gravy: If you prefer a thicker gravy, remove the chicken thighs after cooking, and increase the heat to medium-high. Allow the gravy to simmer for another 5-10 minutes, stirring frequently until it reaches your desired consistency.

    9. Garnish and Serve: Once your gravy is ready, return the chicken thighs to the skillet for a final warm-up. Serve hot, and garnish with fresh parsley.

    By following these steps, you’ll create chicken thighs that are flavorful and moist, with a delectable gravy that complements them perfectly.

    Mastering Cozy Smothered Chicken Thighs With Gravy: Advanced Tips and Variations

    To truly master your Cozy Smothered Chicken Thighs With Gravy, consider these advanced tips and variations:

    • Herb Variations: While thyme is a great choice, basil, oregano, or rosemary can impart different flavor profiles. Try different herb combinations to find your favorite.

    • Spice It Up: For a kick, add red pepper flakes or a splash of hot sauce to the gravy. It’s easy to adjust to suit your taste.

    • Vegetable Add-ins: Consider adding mushrooms, bell peppers, or carrots into the mix for added nutrients and flavor.

    • Serving Suggestions: This dish pairs beautifully with mashed potatoes, rice, or even a fresh garden salad. Mixing things up with side dishes can breathe new life into your meal.

    • Garnishing Options: A sprinkle of grated Parmesan cheese or even a squeeze of lemon juice can elevate the flavors further, creating a delicious contrast with the rich gravy.

    With these advanced tips and variations, you’ll have the confidence to explore the flavors of Cozy Smothered Chicken Thighs With Gravy and make them uniquely yours.

    How to Store Cozy Smothered Chicken Thighs With Gravy: Best Practices

    Proper storage ensures that your Cozy Smothered Chicken Thighs With Gravy remains fresh and mouthwatering for days to come.

    • Refrigeration: Allow the dish to cool to room temperature before transferring it into an airtight container. It can be stored in the refrigerator for up to 3 days.

    • Freezing: For longer storage, Cozy Smothered Chicken Thighs With Gravy can be frozen. Make sure to store them in a freezer-safe container or a heavy-duty freezer bag to avoid freezer burn, where it can maintain quality for up to 3 months.

    • Reheating: When you’re ready to enjoy the leftovers, reheat them on the stove over low heat, adding a splash of chicken broth or water to maintain the gravy’s consistency. Alternatively, the microwave is suitable; just cover the dish to avoid splatters.

    By following these best practices, you ensure that every bite of your chicken thighs is just as delicious as the day you made it.

    Nutritional Value of Cozy Smothered Chicken Thighs With Gravy

    Understanding the nutritional value of your meals can help you make informed choices. Here’s a breakdown for Cozy Smothered Chicken Thighs With Gravy per serving (based on 4 servings):

    • Calories: Approximately 350-400 calories
    • Protein: 30g
    • Fat: 20g (with extensive healthy fats depending on ingredients)
    • Carbohydrates: 15g
    • Fiber: 1g

    These figures can vary based on ingredient choice, so feel free to adjust for your dietary needs. By incorporating lean cuts and healthy alternatives, you can modify the recipe to include low-calorie or low-fat options as well.

    FAQs: Frequently Asked Questions About Cozy Smothered Chicken Thighs With Gravy

    1. Can I use boneless chicken thighs in this recipe?

    Yes, boneless chicken thighs work well too. Just remember to adjust the cooking time as they might cook faster than bone-in thighs.

    2. How can I make this recipe dairy-free?

    To make it dairy-free, simply replace heavy cream with coconut cream or a dairy-free cream alternative.

    3. What can I serve with Cozy Smothered Chicken Thighs?

    This dish pairs wonderfully with mashed potatoes, rice, or even a fresh side salad for a balanced meal.

    4. Can I prepare this dish in advance?

    Absolutely! You can prepare Cozy Smothered Chicken Thighs with Gravy a day ahead and store it in the refrigerator. Just reheat before serving.

    5. How long can I store leftovers?

    Leftovers can be stored in the refrigerator for up to three days and can be frozen for up to three months for future meals.

    By following this comprehensive guide, you’re now equipped with all the information and inspiration needed to whip up your very own Cozy Smothered Chicken Thighs With Gravy. Enjoy the blend of flavors your kitchen will create as you experience this comforting dish! Enjoy cooking!

  • Irresistible Chicken Fettuccine Alfredo

    Irresistible Chicken Fettuccine Alfredo

    Irresistible Chicken Fettuccine Alfredo: A Tropical Delight

    Introduction to Irresistible Chicken Fettuccine Alfredo

    Welcome to your new favorite meal — Irresistible Chicken Fettuccine Alfredo! If you’re on the lookout for a delicious, creamy dish that not only tantalizes your taste buds but also suits a variety of dietary preferences, you’re in the right place. This recipe is an excellent addition to your collection of chicken recipes, as it is simple to make and loaded with flavor.

    What makes this fettuccine Alfredo remarkably delightful is its adaptability. It can be enjoyed as a classic dish or modified to accommodate vegan, gluten-free, or low-calorie needs. Using fresh ingredients, you’ll create a creamy sauce that combines tantalizing flavors with satisfying textures — perfect for any occasion, from a Friday night dinner to impressing guests. With easy-to-follow instructions, even the busiest home cooks can whip this up in under 30 minutes!

    Not only is this dish straightforward for any culinary skill level, but it also offers health benefits, such as protein from chicken and nutrition from garlic and herbs. Whether you’re a working professional, a busy parent, or just someone who loves food, this Irresistible Chicken Fettuccine Alfredo will make an ideal candidate for your weekly menu, giving you the comfort of home-cooked meals without the fuss!

    Benefits and Advantages of Irresistible Chicken Fettuccine Alfredo

    Ease of Preparation

    One of the biggest advantages of this chicken recipe is its simplicity. Within 30 minutes, you can create a mouth-watering meal that tastes like it was made by a professional chef. The preparation process is straightforward, allowing you to spend less time in the kitchen and more time with family and friends.

    Health Benefits

    Chicken is an excellent source of lean protein that supports muscle health and overall body function. The presence of garlic in the dish not only enhances flavor but also brings numerous health benefits, including anti-inflammatory and antibacterial properties. The cream can be replaced with healthier alternatives, making it easier to tailor it to your dietary requirements.

    Additionally, you can easily adapt the recipe for those who follow gluten-free or vegan diets. Using gluten-free pasta or dairy alternatives like cashew cream or coconut milk allows everyone at the table to enjoy this dish.

    Suitability for Various Dietary Needs

    Whether you’re meal-prepping for the week, accommodating picky eaters, or looking for a quick dinner option after a long day, this Irresistible Chicken Fettuccine Alfredo meets multiple dietary needs while still being absolutely delightful. Not only will it satisfy cravings for creamy, indulgent dishes, but it also provides a canvas for personalization.

    No matter if you’re a newlywed attempting to impress your spouse or a seasoned cook wanting to impress friends at a gathering, this fettuccine Alfredo stands in a league of its own!

    Ingredients Overview

    Essential Ingredients for Irresistible Chicken Fettuccine Alfredo

    To put together this exquisite dish, here’s what you’ll need:

    • Fettuccine Pasta (12 ounces): Traditional choice; feel free to substitute with gluten-free pasta.
    • Chicken Breast (1 pound): Boneless, skinless and cubed for convenience.
    • Heavy Cream (1 cup): Provides that rich, creamy consistency.
    • Parmesan Cheese (1 cup, grated): Adds a sharp, savory depth to your sauce.
    • Butter (4 tablespoons): For sautéing the chicken and enriching the sauce.
    • Garlic (4 cloves, minced): Enhances flavor; can be adjusted to preference.
    • Salt and Pepper: To taste; essential for bringing out the flavors.
    • Parsley (fresh, finely chopped for garnish): Adds color and a hint of freshness.

    Dietary Substitutions to Customize Your Irresistible Chicken Fettuccine Alfredo

    For various dietary needs, here are some substitutions you can employ:

    • Vegan Option: Substitute chicken with chickpeas or mixed vegetables. Use coconut or almond milk in place of heavy cream and nutritional yeast instead of Parmesan cheese.
    • Gluten-Free: Use gluten-free fettuccine or spaghetti, which can be easily found in grocery stores.
    • Lower-Calorie: Replace heavy cream with Greek yogurt for a creamy texture with lower fat content.

    These substitutions ensure that everyone can enjoy this flavorful fettuccine Alfredo, making it one of the most versatile chicken recipes in your culinary repertoire!

    How to Prepare the Perfect Irresistible Chicken Fettuccine Alfredo: Step-by-Step Guide

    Follow these simple yet effective steps to create Irresistible Chicken Fettuccine Alfredo at home.

    1. Cook the Fettuccine: Begin by boiling a large pot of salted water. Once boiling, add the fettuccine and cook according to package instructions until al dente. Drain and set aside.

    2. Prepare the Chicken: In a large skillet, melt 2 tablespoons of butter over medium heat. Add the cubed chicken and season with salt and pepper. Sauté until the chicken pieces are golden brown and fully cooked, about 6-7 minutes. Remove from the skillet and set aside.

    3. Make the Alfredo Sauce: In the same skillet, add the remaining 2 tablespoons of butter and minced garlic. Sauté for about a minute, stirring continuously until fragrant, but be careful not to burn the garlic.

    4. Add Cream: Pour in the heavy cream and bring to a gentle simmer. Stir frequently, allowing the cream to thicken slightly.

    5. Incorporate Cheese: Gradually add in the grated Parmesan cheese, stirring until it has melted and combined smoothly with the cream, creating a luscious sauce.

    6. Combine Chicken and Pasta: Return the cooked chicken to the skillet and add the drained fettuccine. Toss everything together until the pasta is well coated with the creamy Alfredo sauce.

    7. Season and Serve: Taste for seasoning and adjust with additional salt and pepper as necessary. Remove from heat and serve immediately, garnished with fresh parsley.

    Customization Notes

    • For a spicy kick, consider adding red pepper flakes during the simmer or sauté process.
    • Add vegetables like spinach or broccoli for an additional layer of flavor and nutrition!

    This step-by-step recipe remains approachable for home cooks of all skill levels and allows for flexibility based on your dietary needs.

    Mastering Irresistible Chicken Fettuccine Alfredo: Advanced Tips and Variations

    To elevate your dish even further, here are some expert tips and variations to try:

    • Infuse Flavors: Add sautéed mushrooms or sun-dried tomatoes to the sauce for a rich, earthy flavor.
    • Lemon Zest: Incorporate lemon zest into the sauce for a refreshing citrus note, balancing the richness.
    • Cheese Alternatives: Experiment with different cheeses like Asiago or Pecorino Romano for distinct flavors.
    • Herb Variations: Replace parsley with fresh basil or thyme for an aromatic twist.

    These enhancements can give your Irresistible Chicken Fettuccine Alfredo a unique flavor profile while still remaining true to its creamy comfort food roots.

    How to Store Irresistible Chicken Fettuccine Alfredo: Best Practices

    To ensure the quality of this delectable dish remains intact, follow these best practices for storage:

    1. Refrigeration: Allow any leftovers to cool fully before transferring them to an airtight container. Refrigerate within two hours of cooking. This dish can be stored in the fridge for up to 3 days.

    2. Freezing: If you wish to store it for longer, consider portioning the pasta into freezer-safe containers. It will keep well for about 2-3 months. Note that the cream might change in texture upon thawing but still remains tasty.

    3. Reheating: To reheat, microwave in short intervals or warm on the stove over low heat. Add a splash of cream or milk to reintroduce creaminess.

    By implementing these storage and reheating strategies, you can enjoy the Irresistible Chicken Fettuccine Alfredo long after the initial cooking, making it a convenient choice for meal prep!

    Nutritional Value of Irresistible Chicken Fettuccine Alfredo

    Understanding the nutritional value of your meals is crucial for maintaining a balanced diet. Here’s a breakdown of the estimated nutritional content per serving of Irresistible Chicken Fettuccine Alfredo (based on 4 servings):

    • Calories: 600-650 kcal
    • Protein: 35-40 g
    • Fat: 30-35 g
    • Carbohydrates: 60-65 g
    • Fiber: 2-3 g
    • Sugars: 2-3 g

    Adapting Nutritional Values

    To make this dish lighter, opting for whole-grain or vegetable-based pasta can increase the fiber content while decreasing carbs. Additionally, substituting heavy cream with lower-calorie options will make this dish even more diet-friendly. Remember, the beauty of this chicken recipe is its versatility to fit your health goals!

    FAQs: Frequently Asked Questions About Irresistible Chicken Fettuccine Alfredo

    1. Can I use store-bought Alfredo sauce?

    While it’s convenient, homemade Alfredo sauce made with fresh ingredients offers a superior flavor and texture!

    2. How can I make this recipe vegan-friendly?

    You can substitute the chicken with chickpeas, use dairy-free cream alternatives, and nutritional yeast instead of Parmesan cheese.

    3. Can I make this dish in advance?

    Yes! Cooked fettuccine Alfredo can be stored in the fridge for up to three days and reheated without losing its deliciousness!

    4. What can I serve alongside this dish?

    This creamy pasta pairs deliciously with a side salad, garlic bread, or roasted vegetables to balance the rich flavors.

    5. How can I add more veggies to the dish?

    Incorporate sautéed spinach, peas, or broccoli for added nutrients and texture while maintaining the creamy essence of the dish.

    6. What are some good substitutes for Parmesan cheese?

    Consider using Pecorino Romano or nutritional yeast if you’re vegan to give a similar cheesy flavor without dairy.

    Your adventure into the world of Irresistible Chicken Fettuccine Alfredo begins here, making every meal a delightful experience while catering to various dietary needs! Embrace simple, flavorful cooking that the entire family will love and savor together!

  • Easy Chicken Sausage Broccoli Orzo Meal

    Easy Chicken Sausage Broccoli Orzo Meal

    Easy Chicken Sausage Broccoli Orzo Meal: A Tropical Delight

    Introduction to Easy Chicken Sausage Broccoli Orzo Meal

    Welcome to a culinary adventure that perfectly blends taste and convenience: the Easy Chicken Sausage Broccoli Orzo Meal. This dish is an exemplary choice for those seeking easy dinner recipes that don’t compromise on flavor or nutrition. Packed with vibrant ingredients and delightful textures, this meal promises to satisfy even the most discerning palates. Imagine a nourishing blend of hearty chicken sausage, tender orzo pasta, and crisp broccoli—a combination that not only pleases the taste buds but also enriches the body.

    What makes this recipe stand out is its adaptability to various dietary preferences. Whether you’re cooking for busy parents, health-conscious individuals, or spontaneous home chefs, this dish provides flexibility. It can easily be tailored to be gluten-free, low-calorie, or even vegan, making it a delightful option for everyone at the table. The simplicity of this recipe ensures that even novice cooks can whip it up in minimal time, leaving you plenty of opportunity to relax and enjoy the company of your loved ones.

    As you prepare for this flavorful journey, get ready to be inspired by the combination of wholesome ingredients and delightful seasonings that create a meal not only delicious but also easy and quick. The Easy Chicken Sausage Broccoli Orzo Meal is indeed a culinary delight that makes busy evenings more manageable without sacrificing health or taste.


    Benefits and Advantages of Easy Chicken Sausage Broccoli Orzo Meal

    The Easy Chicken Sausage Broccoli Orzo Meal comes with a myriad of benefits that make it a standout choice for easy dinner recipes. For starters, its preparation is incredibly straightforward—perfect for busy weeknights when time is of the essence. With one pot and minimal prep, home cooks can assemble a hearty meal without the hassle of multiple dishes to clean afterward.

    Moreover, the nutritional profile of this dish is highly commendable. Chicken sausage provides a lean source of protein, and coupled with orzo—a type of pasta that cooks quickly—this meal becomes a balanced option that fulfills daily energy needs. Broccoli adds a vibrant pop of color and is rich in vitamins C and K. This recipe is not just about filling the stomach; it’s about nourishing the body with wholesome ingredients.

    It also caters to various dietary needs; for instance, substituting the chicken sausage for plant-based alternatives opens up the dish for vegans or those wanting to reduce meat consumption. The same applies to making the dish gluten-free by selecting gluten-free orzo. In essence, this recipe exemplifies culinary creativity while ensuring the healthiest options remain accessible.

    Furthermore, it is an excellent way to introduce young children to healthy eating without overwhelming them. The combination of flavors and textures makes it enjoyable for even the pickiest eaters. By preparing this meal, you’re not just putting food on the table—you’re fostering healthy habits for the future.

    Additionally, the nature of this dish makes it perfect for meal prep and leftovers, allowing you to enjoy its delightful flavors multiple times throughout the week. Overall, this Easy Chicken Sausage Broccoli Orzo Meal shines as an exemplary choice for anyone seeking convenient, tasty, and nutritious easy dinner recipes.


    Ingredients Overview

    Essential Ingredients for Easy Chicken Sausage Broccoli Orzo Meal

    Here, we outline the essential ingredients for crafting your Easy Chicken Sausage Broccoli Orzo Meal:

    • 1 pound (450g) Chicken Sausage (Italian or spicy sausage works best)
    • 1 cup (200g) Orzo Pasta
    • 2 cups (300g) Fresh Broccoli Florets
    • 4 cups (950ml) Chicken Broth (for added flavor; can use vegetable broth for a vegetarian option)
    • 1 medium Yellow Onion, diced
    • 3 cloves Garlic, minced
    • 2 tablespoons Olive Oil
    • Salt and Black Pepper, to taste
    • 1 teaspoon Dried Italian Herbs (or mixed herbs)
    • Grated Parmesan Cheese (optional, can be substituted with nutritional yeast for a vegan option)

    Purpose and Benefits:
    Chicken Sausage: Offers a quick source of protein and enhances flavor without excessive fat.
    Orzo Pasta: Cooks rapidly and has a pleasing texture that complements the dish.
    Broccoli: A nutritional powerhouse that adds color and crunch, packed with vitamins and minerals.
    Olive Oil: A heart-healthy fat that adds richness to the meal.
    Garlic and Onion: Enhance flavor and provide various health benefits, including anti-inflammatory properties.

    This collection of ingredients allows you to create a dish that is not only satisfying but also supports a variety of diets.

    Dietary Substitutions to Customize Your Easy Chicken Sausage Broccoli Orzo Meal

    To ensure everyone can enjoy this delightful meal, here are some thoughtful substitutions tailored to specific dietary needs:

    1. Vegan Option: Replace chicken sausage with plant-based sausage or sautéed mushrooms for a meaty texture.

    2. Gluten-Free Option: Substitute regular orzo with gluten-free orzo or couscous made from rice or corn flour.

    3. Low-Calorie Option: Utilize turkey sausage or chicken breast instead of chicken sausage for a lower calorie count. You can also reduce the amount of pasta in the dish and increase the vegetables.

    4. Dairy-Free Option: Omit the Parmesan cheese or substitute it with vegan cheese or nutritional yeast, which adds a cheesy flavor without dairy.

    With these adjustments, the Easy Chicken Sausage Broccoli Orzo Meal remains accessible to almost everyone, demonstrating its versatility as an easy dinner recipe for all occasions.


    How to Prepare the Perfect Easy Chicken Sausage Broccoli Orzo Meal: Step-by-Step Guide

    Creating a delicious Easy Chicken Sausage Broccoli Orzo Meal is simple with this step-by-step guide. Let’s dive into the kitchen!

    1. Sauté the Aromatics:
      Heat 2 tablespoons of olive oil in a large pot over medium heat. Add the diced onion and sauté for about 2-3 minutes until it becomes translucent. Then, add the minced garlic and continue to cook for another 1 minute, ensuring you don’t burn the garlic.

    2. Add the Sausage:
      Remove the casing from the chicken sausage and crumble it into the pot. Cook for about 5-7 minutes until browned and cooked through, stirring occasionally. This step infuses the dish with rich flavors from the sausage.

    3. Combine with Broth:
      Pour-in 4 cups of chicken broth (or vegetable broth for a vegetarian option) and bring to a simmer. Stir well to combine the sausage with the broth, allowing the flavors to meld together.

    4. Stir in the Orzo:
      Add 1 cup of orzo pasta to the pot. Cook according to the package instructions, usually around 8-10 minutes, stirring occasionally. The orzo will absorb the broth and become tender.

    5. Prepare the Broccoli:
      Five minutes before the orzo is fully cooked, add 2 cups of broccoli florets to the pot. This allows for steaming the broccoli until it is tender yet still vibrant in color.

    6. Season and Flavor:
      Once the orzo and broccoli are cooked, season with salt, black pepper, and 1 teaspoon of dried Italian herbs. Adjust the seasoning according to your taste.

    7. Serve:
      Ladle the meal into bowls and garnish with grated Parmesan cheese (if desired) or a sprinkle of nutritional yeast for a dairy-free option. Serve hot and enjoy your satisfying dish!

    8. Storage Options:
      If you have leftovers, let the meal cool to room temperature, then store in airtight containers in the refrigerator for up to 3 days. You can also freeze portions for later use.


    Mastering Easy Chicken Sausage Broccoli Orzo Meal: Advanced Tips and Variations

    To elevate your Easy Chicken Sausage Broccoli Orzo Meal, consider these advanced tips and variations:

    • Flavor Enhancements: Experiment with adding a splash of white wine or a spoonful of lemon juice during the cooking process for added depth and brightness to the flavor profile.

    • Add More Vegetables: Consider incorporating other vegetables such as bell peppers, spinach, or zucchini to boost the nutritional value and add variety.

    • Cook on a Sheet Pan: For a different cooking method, you can roast the chicken sausage and vegetables on a sheet pan in the oven. This creates a caramelized flavor that enhances the overall dish.

    • Top with Fresh Herbs: Fresh herbs such as parsley or basil can dramatically uplift the dish. Just sprinkle them on right before serving for vibrant flavor.

    • Experiment with Different Sausages: Feel free to try out various flavored sausages—like apple or chorizo—to introduce exciting twists to your meal.

    By utilizing these enhancements, this recipe can suit a variety of preferences while ensuring you never get bored of the same meal.


    How to Store Easy Chicken Sausage Broccoli Orzo Meal: Best Practices

    Storing your Easy Chicken Sausage Broccoli Orzo Meal properly allows you to enjoy the leftovers while maintaining its flavor and texture. Here are the best practices:

    1. Refrigeration: Allow the meal to cool completely before transferring it to an airtight container. It can be stored in the refrigerator for up to 3 days. Make sure to reheat portions in the microwave or on the stovetop—adding a bit of water or broth can help restore moisture.

    2. Freezing: If you wish to store it for a longer period, transfer the cooled meal into freezer-safe containers or bags. It should be kept in the freezer for up to 2 months. Thaw in the refrigerator overnight before reheating.

    3. Reheating: When reheating, do so until steaming hot, which ensures any leftovers are safe to eat. Reheat slowly on the stovetop or in the microwave, adding a splash of broth or water to prevent drying out.

    By mastering these storage techniques, you can enjoy the deliciousness of this easy dinner recipe even days or weeks after preparation.


    Nutritional Value of Easy Chicken Sausage Broccoli Orzo Meal

    Understanding the nutritional value of your meals is crucial for maintaining a balanced diet. Here’s a breakdown of the Easy Chicken Sausage Broccoli Orzo Meal.

    Per Serving (Approx. 1 cup):
    – Calories: 400
    – Protein: 24g
    – Total Fat: 15g
    – Saturated Fat: 4g (depends on the sausage used)
    – Carbohydrates: 45g
    – Dietary Fiber: 4g
    – Sugars: 3g
    – Sodium: 600mg (may vary based on broth and sausage choice)

    This meal is packed with protein from the chicken sausage and wholesome carbohydrates from the orzo while offering fiber from the broccoli. The inclusion of a variety of nutrients makes this dish not just a fantastic easy dinner recipe, but also a well-rounded option for your dietary needs.

    When making substitutions to meet dietary preferences, be sure to adjust the nutritional values accordingly, especially if you choose lower-fat meats or gluten-free options.


    FAQs: Frequently Asked Questions About Easy Chicken Sausage Broccoli Orzo Meal

    1. Can I use different types of pasta?
      Absolutely! While orzo is preferred for this recipe, you can substitute it with any small pasta, such as ditalini or even gluten-free pasta.

    2. Is this recipe suitable for freezing?
      Yes! It freezes well. Just ensure it is stored in an airtight container or freezer bag with as much air removed as possible to prevent freezer burn.

    3. Can I skip the sausage for a vegetarian option?
      Certainly! Omit the sausage and replace it with sautéed mushrooms, chickpeas, or any protein of your choice.

    4. How can I make this dish spicier?
      Add red pepper flakes or a dash of hot sauce to the dish before serving. If using spicy sausage, you’re already on track for some heat.

    5. What can I serve as a side with this meal?
      While this dish is hearty enough on its own, consider serving a simple side salad or garlic bread to round out the meal.

    In conclusion, the Easy Chicken Sausage Broccoli Orzo Meal perfectly embodies the spirit of easy dinner recipes that are quick, nutritious, and delicious. With its versatility and ease of preparation, it’s an ideal candidate for those seeking to enrich their weekly dinner rotation. This meal is sure to impress your family and friends alike!

  • Easy Greek Ground Turkey Gyro Bowls

    Easy Greek Ground Turkey Gyro Bowls

    Easy Greek Ground Turkey Gyro Bowls: A Tropical Delight

    Introduction to Easy Greek Ground Turkey Gyro Bowls

    When you think of easy dinner recipes, the classic Greek gyro surely comes to mind. The flavors, the ingredients, and that delightful Mediterranean flair all converge in a dish that satisfies both your hunger and your health goals. Today, we’re introducing a refreshing twist on this beloved dish by using ground turkey, making it a healthier yet equally delicious option. These Easy Greek Ground Turkey Gyro Bowls are packed with protein, rich in flavor, and incredibly simple to prepare, ensuring that you can whip up a wholesome meal even during the busiest weeknights.

    Imagine a bowl filled with seasoned ground turkey, fresh vegetables, and a creamy tzatziki sauce served over a bed of hearty grains. Not only does this recipe cater to various dietary needs—with options for vegan, gluten-free, or low-calorie variations—but it also brings the essence of the Mediterranean right into your kitchen. Easy Greek Ground Turkey Gyro Bowls encourage you to explore bold flavors without the fuss, making it perfect for busy parents, students, or anyone who appreciates a quick, scrumptious meal.

    Let’s delve into the benefits of this dish, dig into its ingredients, and learn how to prepare it step by step!

    Benefits and Advantages of Easy Greek Ground Turkey Gyro Bowls

    Simple and Quick Preparation

    One of the hallmarks of easy dinner recipes is how effortlessly they come together. Easy Greek Ground Turkey Gyro Bowls are designed for convenience, featuring a straightforward cooking process that doesn’t require hours in the kitchen. With minimal prep time and cooking time, this recipe serves as a perfect solution for busy weeknights when you don’t want to compromise on flavor or nutrition.

    Packed with Nutrition

    Using ground turkey instead of traditional lamb or beef not only lowers the fat content but also provides ample protein to keep you satiated longer. Turkey is an excellent source of lean protein, which is essential for muscle maintenance and overall health. Combined with fresh vegetables like cucumbers, tomatoes, and red onions, you’re getting a generous dose of vitamins, minerals, and antioxidants, making this a well-rounded meal.

    Versatile Dietary Options

    This recipe is highly adaptable, catering to many different dietary restrictions. For those who are vegan or vegetarian, swapping out the ground turkey for plant-based protein like lentils or chickpeas can maintain the integrity of the dish without sacrificing flavor. Additionally, you can serve the gyro bowl with gluten-free grains, such as quinoa or brown rice, ensuring everyone at your table can enjoy this delightful meal.

    Flavorful and Satisfying

    Besides its health benefits, what sets Easy Greek Ground Turkey Gyro Bowls apart is the rich and zesty profile that captures the essence of Greek cuisine. With herbs such as oregano and dill, along with the tangy tzatziki sauce, every bite is a burst of flavor. It’s a dish that inspires not just home cooks but also food enthusiasts and culinary adventurers craving a taste of the Mediterranean.

    In a nutshell, Easy Greek Ground Turkey Gyro Bowls are the perfect example of easy dinner recipes that offer simplicity, nutrition, and mouthwatering flavor all in one bowl. These bowls make any meal feel like a special occasion, whether it’s a family dinner, a gathering with friends, or a light lunch.

    Ingredients Overview

    Essential Ingredients for Easy Greek Ground Turkey Gyro Bowls

    To craft these Easy Greek Ground Turkey Gyro Bowls, you’ll need the following ingredients:

    • 1 pound ground turkey: A lean protein source rich in nutrients.
    • 1 tablespoon olive oil: Provides healthy fats and enhances flavor.
    • 2 cloves garlic, minced: Adds an aromatic element to the turkey.
    • 1 teaspoon dried oregano: A staple in Greek cooking, offering a savory profile.
    • ½ teaspoon ground cumin: Adds warmth and depth to the dish.
    • Salt and pepper to taste
    • 1 cup cooked quinoa or brown rice: A wholesome base that keeps you full. Use quinoa for gluten-free options.
    • 1 cup chopped cucumbers: Fresh and crisp, these add crunch.
    • 1 cup diced tomatoes: Juicy and nutritious, a staple in Greek salads.
    • ¼ cup red onion, thinly sliced: Adds a nice bite.
    • ½ cup tzatziki sauce: For that creamy, tangy finish. You can make your own or buy store-bought, ensuring it meets your dietary needs.
    • Fresh parsley or dill for garnish: Brightens the dish and adds visual appeal.

    Dietary Substitutions to Customize Your Easy Greek Ground Turkey Gyro Bowls

    This recipe is designed to be versatile, and there are numerous substitutions you can make to cater to different dietary needs:

    • Vegan Option: Replace ground turkey with 1 cup of lentils or hearty mushrooms for texture. You can use a plant-based tzatziki made with cashews or coconut yogurt instead of traditional yogurt.

    • Gluten-Free: Ensure you select gluten-free grains—quinoa is an excellent choice. Additionally, double-check that your tzatziki is gluten-free or make your own to ensure it fits your dietary needs.

    • Low-Calorie Option: Reduce the amount of olive oil used for cooking or opt for leaner cuts of turkey. You can also increase the quantity of vegetables while decreasing the grains, allowing for a lighter dish.

    With these adjustments, you can tailor the Easy Greek Ground Turkey Gyro Bowls to fit nearly any dietary preference while still keeping preparations simple.

    How to Prepare the Perfect Easy Greek Ground Turkey Gyro Bowls: Step-by-Step Guide

    Creating tasty Easy Greek Ground Turkey Gyro Bowls is a breeze! Just follow these detailed step-by-step instructions. You’ll see how simple it is to prepare your next go-to easy dinner recipe.

    1. Prepare the Base

    Start by cooking your quinoa or brown rice according to package instructions. Usually, quinoa requires a ratio of 2:1 water to quinoa, while brown rice may require about 2.5:1. Once cooked, fluff with a fork and set aside.

    2. Cook the Ground Turkey

    • Heat a skillet: Add 1 tablespoon of olive oil to the skillet over medium heat.
    • Sauté garlic: Add minced garlic and sauté for about 30 seconds until fragrant.
    • Brown the turkey: Add the ground turkey, breaking it apart with a spatula. Cook for about 6-8 minutes until it’s fully cooked and browned.

    3. Season the Turkey

    • Add spices: Sprinkle dried oregano, ground cumin, salt, and pepper over the turkey. Stir well to combine and cook for an additional 2-3 minutes to allow the flavors to meld together.

    4. Assemble the Bowls

    • Layer the base: In serving bowls, add a generous scoop of quinoa or brown rice as your base.
    • Add the turkey: Top with a hearty portion of the seasoned ground turkey.

    5. Fresh Vegetables

    • Top with veggies: Add chopped cucumbers, diced tomatoes, and sliced red onions to each bowl.

    6. Drizzle with Tzatziki

    • Creamy finish: Add a spoonful of tzatziki sauce on top of each bowl, or serve it on the side for dipping. Feel free to add more, depending on your preference!

    7. Garnish to Perfection

    • Herb touch: Finish with a sprinkle of fresh parsley or dill for an aromatic note.

    8. Serve and Enjoy!

    Your Easy Greek Ground Turkey Gyro Bowls are ready to be enjoyed! These vibrant bowls are not only visually appealing but also packed with flavor and nutrition.

    Mastering Easy Greek Ground Turkey Gyro Bowls: Advanced Tips and Variations

    To take your Easy Greek Ground Turkey Gyro Bowls to the next level, consider these advanced tips and enticing variations:

    1. Marinate the Turkey

    For an extra burst of flavor, consider marinating the ground turkey in a mixture of olive oil, lemon juice, garlic, and herbs for at least 30 minutes before cooking. This technique infuses more taste right into the meat.

    2. Grill the Veggies

    For a smoky and charred flavor, grill your vegetables instead of using them raw. Zucchini, bell peppers, and eggplant can be delightful additions when grilled.

    3. Explore Different Bases

    While quinoa and brown rice are excellent starts, feel free to experiment with other grains like couscous or farro. For a low-carb option, serve the turkey and veggies in lettuce wraps or over a bed of spiralized zucchini.

    4. Introduce New Sauces

    If you’re feeling adventurous, try variations of the traditional tzatziki sauce by adding avocado to create a creamy, rich version or mixing in fresh herbs for a unique twist.

    5. Try Different Proteins

    If you’re not in the mood for turkey, lean ground chicken or a cubed chicken breast are both tasty alternatives. For a completely different flavor profile, swap in lamb for a more traditional touch.

    These tips and variations will help personalize your dish while maintaining the essential flavors that make Easy Greek Ground Turkey Gyro Bowls a winner!

    How to Store Easy Greek Ground Turkey Gyro Bowls: Best Practices

    Storing your Easy Greek Ground Turkey Gyro Bowls properly can extend their freshness and keep your meal options ready for the week ahead. Here’s how to do it:

    Refrigeration

    • Store cooked turkey and grains in separate airtight containers to maintain freshness for up to 4 days in the fridge. Keeping them apart helps prevent sogginess.

    Freezing

    • If you wish to prepare a larger batch, the turkey can be frozen in portions for up to 3 months. Make sure to let it cool before transferring to freezer bags. To use, defrost overnight in the fridge before reheating.
    • Grains can also be frozen; however, freshly cooked grains may become slightly mushy after freezing.

    Reheating

    • Reheat the turkey in a skillet over medium heat until warmed through. Add a splash of water or broth to prevent it from drying out.
    • For reheating grains, sprinkle with a bit of water or broth to keep them moist, then gently microwave or reheat on the stove.

    By following these storage guidelines, you can enjoy Easy Greek Ground Turkey Gyro Bowls on demand without sacrificing quality or taste.

    Nutritional Value of Easy Greek Ground Turkey Gyro Bowls

    Understanding the nutritional profile of your meals helps you make informed choices. Here’s a breakdown of the approximate nutritional values per serving of Easy Greek Ground Turkey Gyro Bowls:

    • Calories: 450
    • Protein: 32g
    • Fat: 20g
    • Carbohydrates: 40g
    • Fiber: 6g
    • Sugars: 4g

    These healthy gyro bowls are considered a balanced meal option, providing a generous amount of protein from ground turkey, healthy fats from olive oil and tzatziki, and carbohydrates from quinoa or grains. Plus, with the inclusion of fresh veggies, you are boosting your intake of vitamins and minerals.

    Moreover, the ability to customize and adjust ingredients lets you easily cater to specific dietary needs without sacrificing nutrition or flavor, making these easy dinner recipes an excellent addition to your weekly meal plans.

    FAQs: Frequently Asked Questions About Easy Greek Ground Turkey Gyro Bowls

    1. How can I make a vegetarian version of the Easy Greek Ground Turkey Gyro Bowls?

    You can substitute the ground turkey with lentils, chickpeas, or a plant-based meat alternative, ensuring that the flavors of the spices still shine through.

    2. Can I use a different grain instead of quinoa or brown rice?

    Absolutely! You can opt for couscous, farro, or even cauliflower rice for a lower-carb alternative.

    3. How long do Easy Greek Ground Turkey Gyro Bowls last in the fridge?

    When stored properly in airtight containers, they can last up to 4 days in the fridge.

    4. What can I serve as a side dish to complement the gyro bowls?

    Consider serving with a fresh Greek salad, pita bread with a side of hummus, or roasted vegetables for a complete meal.

    5. Can I meal prep these gyro bowls?

    Yes! These bowls are perfect for meal prep. You can cook everything in advance and store the components separately, then assemble the bowls when ready to eat.

    6. How can I adjust the recipe to make it spicier?

    To add some heat, you can incorporate red pepper flakes or cayenne pepper into the turkey seasoning or serve with a spicy tahini or harissa sauce.

    With these easy dinner recipes, you can enjoy a nutritious, delicious meal that pleases everyone. Easy Greek Ground Turkey Gyro Bowls are a celebration of flavor and health, making them a must-try for your dinner table. Give them a shot and experience the delightful flavors of the Mediterranean today!

  • Tasty Smoky Chipotle Chicken Bowl

    Tasty Smoky Chipotle Chicken Bowl

    Tasty Smoky Chipotle Chicken Bowl: A Tropical Delight

    Introduction to Tasty Smoky Chipotle Chicken Bowl

    Welcome to the world of flavors with our Tasty Smoky Chipotle Chicken Bowl! This dish is an embodiment of culinary bliss combining smoky chipotle and succulent chicken, offering a delightful experience for any home cook eager to impress. If you’re searching for mouthwatering chicken recipes, this one stands out for its simplicity and health benefits.

    This easy-to-make bowl is not only packed with flavor but also caters to busy families, busy professionals, and health-conscious individuals alike. Whether you are a seasoned cook or a beginner in the kitchen, this recipe ensures gourmet satisfaction without extensive effort. The smoky chipotle adds a kick that elevates your meal, making it a fantastic option for lunch, dinner, or even meal prep.

    Additionally, this chicken bowl can effortlessly adapt to various dietary needs. It can easily transform into a vegetarian delight by swapping chicken for hearty legumes or tofu. Moreover, gluten-free options are also available in this recipe, ensuring it caters to everyone at your table. Let’s dive into this tropical delight and embark on a delicious culinary journey!

    Benefits and Advantages of Tasty Smoky Chipotle Chicken Bowl

    The Tasty Smoky Chipotle Chicken Bowl derives its popularity from a myriad of enticing benefits. First and foremost, it’s incredibly simple to prepare. With minimal ingredients and straightforward steps, you can whip up this bowl in no time. This ease of preparation is perfect for busy parents juggling work and home life, as well as students seeking quick yet satisfying meal solutions.

    But beyond convenience, this dish is a powerhouse of health benefits! Chicken, the star ingredient, is rich in high-quality protein that supports muscle growth and repair. Coupled with nutrient-rich vegetables and whole grains, each bite contributes to a balanced diet filled with essential vitamins and minerals. The inclusion of chipotle provides not just flavor but also various antioxidants known to boost heart health.

    Not to mention, the versatile nature of this recipe allows it to cater to dietary preferences or restrictions, making it one of those go-to chicken recipes that can be easily customized. You can effortlessly adjust ingredients based on what you have on hand or what fits your dietary needs. Whether you are vegan, gluten-free, or following a low-calorie diet, this recipe can adapt seamlessly to support your lifestyle objectives.

    When you create this Smoky Chipotle Chicken Bowl, you’re not just making a meal; you’re crafting a culinary experience that celebrates flavor while prioritizing well-being. This dish embodies an exciting blend of taste, nutrition, and cultural influences, making it a standout choice for any occasion.

    Ingredients Overview

    Essential Ingredients for Tasty Smoky Chipotle Chicken Bowl

    To whip up your delicious Tasty Smoky Chipotle Chicken Bowl, you’ll need the following key ingredients:

    • 1 pound boneless, skinless chicken breasts (or 1 pound firm tofu or cauliflower for a vegetarian/vegan option)
    • 2 tablespoons olive oil (helps in cooking and adds healthy fats)
    • 1 medium onion, diced
    • 1 bell pepper, chopped (red or green for added nutrients and flavor)
    • 2 cloves garlic, minced (for a flavor boost and health benefits)
    • 2-3 tablespoons smoked chipotle sauce (adjust according to spice preference)
    • 1 cup cooked brown rice or quinoa (for gluten-free grain options; quinoa is packed with protein)
    • 1 can black beans, drained and rinsed (excellent source of fiber and protein)
    • 1 cup corn kernels (fresh or frozen)
    • 1 avocado, sliced (optional; provides healthy fats)
    • Fresh cilantro, chopped (for garnish; adds freshness)
    • Salt and pepper to taste

    This combination of ingredients not only enhances flavor but also provides essential nutrients, making this one of the most rewarding chicken recipes you could try.

    Dietary Substitutions to Customize Your Tasty Smoky Chipotle Chicken Bowl

    If you have specific dietary restrictions or want to customize the Tasty Smoky Chipotle Chicken Bowl, consider these substitutions:

    • For Protein: Instead of chicken, try grilled shrimp, tempeh, or chickpeas. Each option offers a different flavor profile and texture, while still packing in protein and nutrients.
    • For Grains: If you prefer, substitute brown rice or quinoa with cauliflower rice for a low-carb option, or couscous for a different grain experience.
    • For Vegan Options: Use vegan sour cream or guacamole in place of cheese or yogurt topping, ensuring you keep the dish completely plant-based.
    • For Gluten-Free Needs: Always check labels on sauces and grains, opting for certified gluten-free products when required.
    • For Creaminess: If you’re looking for an even smoother texture, consider adding Greek yogurt or a dairy-free alternative as a rich topping.

    With such flexibility, you can tailor this chicken bowl to meet multiple dietary preferences or ingredient availability at any time.

    How to Prepare the Perfect Tasty Smoky Chipotle Chicken Bowl: Step-by-Step Guide

    Getting started with the Tasty Smoky Chipotle Chicken Bowl is straightforward. Follow this step-by-step guide to ensure success:

    1. Prepare the Base: Begin by cooking your grain. Rinse 1 cup of brown rice or quinoa, then bring 2 cups of water to a boil. Add the grains, reduce to a simmer, cover, and let cook until all the water is absorbed (15-20 minutes for rice, around 12-15 minutes for quinoa). Set aside when done.

    2. Cook the Chicken: While the grain cooks, heat 2 tablespoons of olive oil in a large skillet over medium-high heat. Season your 1 pound of chicken breasts with salt and pepper, then add them to the skillet. Cook for approximately 5-7 minutes on each side, or until the internal temperature reaches 165°F (75°C). Once cooked, remove from the skillet and let rest for a few minutes before slicing into strips.

    3. Sauté the Vegetables: In the same skillet, add 1 diced onion and 1 chopped bell pepper. Sauté for about 4-5 minutes until softened. Add the minced garlic and sauté for an additional minute, just until fragrant.

    4. Combine Chicken and Chipotle: Lower the heat, then return the sliced chicken to the skillet. Stir in 2-3 tablespoons of smoked chipotle sauce, tasting as you go to adjust the spiciness level. Let simmer for 2-3 minutes, ensuring the chicken is well-coated with the sauce.

    5. Add Beans and Corn: Stir in the can of black beans and the corn kernels, mixing everything thoroughly. Cook until heated through, about 3-4 minutes.

    6. Assemble Your Bowl: Take your cooked grain and serve it as the base in individual bowls. Top with the chipotle chicken and vegetable mixture.

    7. Add Toppings: Finish your bowl with sliced avocado and fresh cilantro sprinkled on top for added flavor. You may also drizzle more chipotle sauce for extra heat or add lime juice for a zesty kick!

    8. Serve and Enjoy: Serve the bowls warm, enabling each guest to enjoy their creation. This bowl is perfect for meal prep—store leftovers in air-tight containers.

    These detailed steps ensure that anyone can replicate this crowd-pleasing recipe, making it a stellar addition to your collection of chicken recipes.

    Mastering Tasty Smoky Chipotle Chicken Bowl: Advanced Tips and Variations

    To truly master the Tasty Smoky Chipotle Chicken Bowl, consider exploring these advanced tips and variations:

    • Marinate Your Chicken: For an extra depth of flavor, marinate the chicken in the chipotle sauce for at least an hour before cooking. This step infuses the meat with smoky goodness.

    • Veggies Galore: Feel free to add more vegetables, such as zucchini, spinaches, or roasted sweet potatoes to increase the nutrient content and add variety.

    • Toast Your Grains: Prior to boiling, toast your brown rice or quinoa in a dry skillet for a few minutes to enhance their nutty flavor.

    • Use Leftovers Creatively: Leftover chicken or vegetables can be transformed into a smoky chipotle wrap or salad the next day.

    • Experiment with Extra Spice: If you love heat, try adding more spices or chopped jalapeños when cooking the vegetables for an extra kick.

    By incorporating these thoughtful suggestions, you’ll enhance the flavor and texture of your Smoky Chipotle Chicken Bowl, creating a unique personalized experience with each meal.

    How to Store Tasty Smoky Chipotle Chicken Bowl: Best Practices

    Proper storage is key to maximizing the longevity and freshness of your Tasty Smoky Chipotle Chicken Bowl. Here are the best practices:

    • Refrigeration: Allow the chicken bowl to cool completely before transferring it to an airtight container. Store leftovers in the fridge for up to 4 days to maintain optimal freshness.

    • Freezing: For longer storage, you can freeze the chicken bowl components separately. Cooked chicken can last in the freezer for up to 4 months. Freezing grains and sauce separately can enhance the quality upon reheating.

    • Reheating: When ready to enjoy your leftovers, simply microwave them for a few minutes until heated through. Ensure even heating by stirring the contents during reheating. If frozen, thaw in the refrigerator overnight before reheating.

    Being mindful of these practices helps this dish maintain its delicious flavors while ensuring that busy lifestyles can still enjoy wholesome meals.

    Nutritional Value of Tasty Smoky Chipotle Chicken Bowl

    Understanding the nutrition embedded in your meals is vital for making informed choices. The Tasty Smoky Chipotle Chicken Bowl offers valuable nutrition and benefits. Here’s a breakdown per serving (assuming four servings):

    • Calories: Approximately 450 calories
    • Protein: 30g
    • Fat: 15g (healthy fats from olive oil and avocado)
    • Carbohydrates: 50g (fiber content from brown rice and black beans)
    • Fiber: 10g
    • Sugar: 5g
    • Vitamins: High in Vitamin A (from bell peppers) and C (from cilantro and peppers)
    • Iron and Calcium: Sourced from black beans and quinoa

    With this nutrient-dense meal, you support bodily functions, energy levels, and a satisfying dining experience. This is why the Tasty Smoky Chipotle Chicken Bowl is not just a meal; it’s an investment in your health through one of the best chicken recipes out there!

    FAQs: Frequently Asked Questions About Tasty Smoky Chipotle Chicken Bowl

    1. How can I make the Smoky Chipotle Chicken Bowl more or less spicy?

    You can adjust the spice level based on your preference by controlling the amount of smoked chipotle sauce. Start with 1 tablespoon, and increase it to taste, or substitute with a milder spice or sauce.

    2. Can I prepare the bowl in advance for meal prep?

    Absolutely! This chicken bowl is perfect for meal prep. Prepare the components ahead of time, store them separately, and simply assemble when you’re ready to eat.

    3. What can I substitute for chicken if I’m following a vegetarian diet?

    Instead of chicken, use firm tofu, tempeh, or even grilled vegetables. All these substitute proteins can absorb the chipotle flavors beautifully.

    4. How long can I store leftovers?

    Leftovers can stay in the refrigerator for up to 4 days. Ensure they are kept in airtight containers to maintain freshness.

    5. What other toppings can I add to the chicken bowl?

    Consider topping your bowl with shredded cheese, sour cream, and lime wedges or for a vegan version, cashew cream or nutritional yeast provide delicious alternatives.

    6. Is it possible to make this meal gluten-free?

    Yes! Utilize gluten-free grains like quinoa or rice, and check the labels of your sauces to ensure they are gluten-free.

    7. Can I use canned chicken or rotisserie chicken instead of cooking my own?

    Yes, using canned chicken or rotisserie chicken is a convenient time-saver. Just shred the chicken and mix it with the other ingredients until heated through.

    Embrace your culinary creativity and make the Tasty Smoky Chipotle Chicken Bowl your own favorite dish today. Enjoy its taste and health benefits, and indulge in the excitement of cooking with varied flavors!

  • Tasty General Tsos Cauliflower Bowls Healthy Dinner

    Tasty General Tsos Cauliflower Bowls Healthy Dinner

    Tasty General Tso’s Cauliflower Bowls Healthy Dinner: A Tropical Delight

    Introduction to Tasty General Tso’s Cauliflower Bowls Healthy Dinner

    If you’re on the lookout for delicious and nutritious healthy dinner recipes, Tasty General Tso’s Cauliflower Bowls might just be your next go-to meal. This recipe offers a delightful twist on the traditional General Tso’s chicken, transforming it into a mouthwatering vegan option that is both satisfying and heart-healthy. Cauliflower, the star of this dish, is a versatile vegetable known for its numerous health benefits, including high fiber content and low calories.

    What sets this recipe apart is not just its health-focused ingredients but also its simplicity. You won’t need to spend hours in the kitchen to whip up this delectable meal; it’s perfect for busy parents, students, or anyone juggling a hectic lifestyle. Moreover, this dish caters to various dietary needs—it’s vegan, gluten-free, and can easily be adapted to suit low-calorie preferences. Enjoy a hearty meal that pleases the palate without compromising on health.

    In this article, we will guide you step-by-step through the ingredients, preparation, and numerous benefits of Tasty General Tso’s Cauliflower Bowls, ensuring you feel confident to try this recipe out in your kitchen. Get ready to impress yourself and others with this wonderfully vibrant and healthy dinner!

    Benefits and Advantages of Tasty General Tso’s Cauliflower Bowls Healthy Dinner

    The appeal of Tasty General Tso’s Cauliflower Bowls lies in its numerous advantages that make it stand out among other healthy dinner recipes. First and foremost, the ease of preparation is something that both novice and experienced cooks appreciate. With straightforward steps and minimal cooking time, this recipe is designed to suit busy schedules. You can have a flavor-packed dinner on the table in under 30 minutes!

    Next, let’s talk health. Cauliflower is a nutritional powerhouse, rich in vitamins C and K, and contains antioxidants that are proven to reduce inflammation in the body. It’s low in calories, making it an excellent choice for those watching their weight. In addition, incorporating a variety of colorful vegetables not only elevates the dish’s aesthetics but also enhances its nutritional content.

    Furthermore, Tasty General Tso’s Cauliflower Bowls are highly versatile. They can easily fit into various dietary lifestyles, whether you’re vegan, gluten-free, or following a low-carb diet. The sauce used in this recipe combines soy sauce, agave or honey, garlic, and ginger, bringing out an authentic Asian taste without excessive sugar or unhealthy fats.

    In summary, this dish stands out because it is not just a healthy option; it also offers a well-rounded meal with the perfect balance of carbs, protein, and healthy fats. You can serve it over rice or cauliflower rice to up the nutritional ante and make it even more filling. Overall, Tasty General Tso’s Cauliflower Bowls reach the enjoyable intersection of flavor, nutrition, and ease—an ultimate win for healthy dinner recipes!

    Ingredients Overview

    Essential Ingredients for Tasty General Tso’s Cauliflower Bowls Healthy Dinner

    To bring the flavors of Tasty General Tso’s Cauliflower Bowls to life, gather the following essential ingredients:

    • 1 large head of cauliflower, cut into florets
      (Benefits: Low-calorie base rich in vitamins and fiber)
    • 2 tablespoons cornstarch
      (Purpose: Creates a crispy texture when frying)
    • 2 tablespoons olive oil (or avocado oil for higher smoke point)
      (Purpose: Healthy fat source)
    • Salt and pepper to taste
      (Enhances the overall flavor)

    • For the Sauce:

    • ¼ cup soy sauce (gluten-free optional)
      (Purpose: Provides salty, umami flavor)
    • 2 tablespoons agave syrup or honey
      (Purpose: Adds sweetness to balance the savory)
    • 1 tablespoon rice vinegar
      (Purpose: Adds acidity)
    • 2 cloves garlic, minced
      (Benefits: Antioxidant properties)
    • 1 teaspoon grated ginger
      (Purpose: Infuses freshness and zest)
    • 1 tablespoon sesame oil
      (Purpose: Adds rich flavor and aroma)

    • For Serving:

    • 2 green onions, sliced
      (Purpose: Adds freshness and a pop of color)
    • Sesame seeds for garnish (optional)
      (Purpose: Adds crunch and visual appeal)

    Make sure to choose a brand of soy sauce that fits your dietary restrictions. For those following a low-calorie plan, you can swap agave syrup for a sugar substitute like stevia. This recipe is not just a feast for the taste buds but also aligns well with a health-conscious lifestyle.

    Dietary Substitutions to Customize Your Tasty General Tso’s Cauliflower Bowls Healthy Dinner

    The beauty of Tasty General Tso’s Cauliflower Bowls is their adaptability. Here are some substitutions to cater to various dietary needs:

    • Gluten-Free: Use tamari sauce or coconut aminos instead of soy sauce to maintain the gluten-free profile of the recipe.
    • For a Low-Carb Version: Serve the cauliflower over a bed of sautéed zucchini noodles or shredded cabbage to skip the carbs from rice.
    • Sugar-Free Option: Consider using monk fruit sweetener or erythritol as a sweetener for the sauce instead of agave or honey.
    • Adding Protein: For added protein, consider tossing in some tofu or chickpeas. Be sure to adjust the cooking time accordingly if you decide to incorporate tofu.
    • Extra Veggies: Feel free to add a variety of vegetables such as bell peppers, broccoli, or snap peas. Not only will this add nutritional benefits, but it will also make the dish colorful and more appealing.

    These variations allow anyone, whether dietary-conscious or bustling families, to savor Tasty General Tso’s Cauliflower Bowls without compromise.

    How to Prepare the Perfect Tasty General Tso’s Cauliflower Bowls Healthy Dinner: Step-by-Step Guide

    Preparing Tasty General Tso’s Cauliflower Bowls is a straightforward process that guarantees flavor and satisfaction. Follow these steps diligently:

    1. Preheat the Oven:
      Preheat your oven to 425°F (220°C). This ensures the cauliflower gets the perfect golden crispiness.

    2. Prepare the Cauliflower:
      In a large mixing bowl, toss the cauliflower florets with cornstarch, salt, and pepper to coat evenly.

    3. Bake the Cauliflower:
      Spread the coated cauliflower on a baking sheet lined with parchment paper. Drizzle with olive oil and roast in the preheated oven for about 25 minutes, or until they are crispy and golden brown.

    4. Make the Sauce:
      While the cauliflower is baking, combine soy sauce, agave syrup (or honey), rice vinegar, garlic, and ginger in a small saucepan. Bring to a simmer over medium heat and stir continuously.

    5. Thicken the Sauce:
      Allow the sauce to thicken for about 5 minutes. If you prefer a thicker sauce, mix a teaspoon of cornstarch in a tablespoon of water and stir it in until the sauce reaches your desired consistency.

    6. Combine:
      Once the cauliflower is done baking, remove it from the oven and place it in a large bowl. Pour the sauce over the roasted cauliflower and gently toss to combine.

    7. Serve:
      Dish the General Tso’s Cauliflower into serving bowls. Garnish with sliced green onions and sesame seeds if desired.

    8. Optional Sides:
      For a complete meal, serve over cooked brown rice, quinoa, or cauliflower rice to keep the dish wholesome and nutritious.

    By following these steps, you’ll not only master a dish that delights your taste buds but also embrace the joy of creating healthy dinner recipes that work for everyone at your table.

    Mastering Tasty General Tso’s Cauliflower Bowls Healthy Dinner: Advanced Tips and Variations

    To enhance your experience with Tasty General Tso’s Cauliflower Bowls, consider the following tips and variations:

    • Crispier Cauliflower: Achieve a crunchier texture by broiling your baked cauliflower for an additional 3-5 minutes after roasting. Just keep an eye on it to prevent burning.

    • Flavor Boost: Try experimenting with the sauce by adding a pinch of crushed red pepper or some chili paste for heat. Alternatively, incorporating a bit of pineapple juice into the sauce can offer a sweet and tangy flair.

    • Meal Prep: This dish keeps well, making it ideal for meal prepping. Prepare several servings at once and store them in the fridge for quick lunches or dinners throughout the week.

    • Experiment with Vegetables: Don’t hesitate to use other vegetables! Broccoli, bell peppers, or snap peas can complement this dish wonderfully.

    • Make it a Salad: Serve the roasted cauliflower over a bed of greens for a refreshing salad option loaded with vitamins.

    With these tips and innovative variations, you’ll be well-equipped to master and modify this already delightful dish, adding your personal flair while ensuring it’s still classified among the best healthy dinner recipes.

    How to Store Tasty General Tso’s Cauliflower Bowls Healthy Dinner: Best Practices

    Proper storage is essential to ensure your Tasty General Tso’s Cauliflower Bowls maintain their freshness and flavor. Here are some best practices:

    • Refrigeration: Store leftover cauliflower bowls in an airtight container in the refrigerator for up to 3-4 days. Reheating can be done in the microwave or oven, although the oven will help restore some crispness.

    • Freezing: If you want to prepare a batch ahead of time, consider freezing the unbaked cauliflower florets. Toss them in the cornstarch and place them in a freezer-friendly bag. When ready to use, bake them straight from the freezer, adding an extra 5 minutes to the cooking time.

    • Reheating: For the best results, reheat your cauliflower bowls in the oven. Preheat your oven to 375°F (190°C), place the cauliflower on a baking sheet, and heat for about 10-15 minutes until warmed through. This method helps retain the crunchiness.

    Following these storage tips ensures your Tasty General Tso’s Cauliflower Bowls remain as delicious and nutritious as the day you made them, allowing this dish to shine among healthy dinner recipes.

    Nutritional Value of Tasty General Tso’s Cauliflower Bowls Healthy Dinner

    This nutritious dish not only tastes great but also offers a well-balanced nutritional profile. Here’s an overview of the estimated nutritional value per serving based on the primary ingredients used:

    • Calories: Approximately 210
    • Total Fat: 10g
    • Saturated Fat: 1.5g
    • Cholesterol: 0mg
    • Sodium: 800mg (can be reduced with low-sodium soy sauce)
    • Carbohydrates: 28g
    • Dietary Fiber: 7g
    • Sugars: 6g
    • Protein: 4g
    • Vitamins and Minerals: Packed with vitamin C, vitamin K, folate, and various antioxidants, making it a nutrient-dense option.

    Given its exciting flavor profile and nutrient-rich profile, Tasty General Tso’s Cauliflower Bowls can easily fit into a balanced dietary plan. With its health benefits and satisfying taste, this dish certainly marks its territory among the best healthy dinner recipes.

    FAQs: Frequently Asked Questions About Tasty General Tso’s Cauliflower Bowls Healthy Dinner

    Can I make this dish ahead of time?

    Absolutely! You can prepare the roasted cauliflower a day in advance. Store it in an airtight container and reheat when ready to serve. Just note that roasting it fresh before serving will retain optimal texture.

    Can I use a different vegetable?

    Yes! While cauliflower is the main ingredient in this recipe, you can substitute it with other veggies like broccoli or even tofu for a contrasting texture and taste.

    How do I make it spicier?

    To add some heat, you can include crushed red pepper flakes in the sauce or drizzle some sriracha on top before serving. Adjust according to your tolerance for spice!

    What side dishes pair well with this recipe?

    You can serve these cauliflower bowls over brown rice, quinoa, or enjoy them alongside a fresh salad for a light yet filling dinner.

    Is this recipe suitable for meal prep?

    Definitely! These cauliflower bowls are perfect for meal prep. Store them in separate containers, and they can last in the refrigerator for up to four days.

    By addressing these frequently asked questions, we hope to provide clarity and confidence for anyone looking to try Tasty General Tso’s Cauliflower Bowls, reinforcing its place in the realm of healthy dinner recipes.


    With all the components discussed, Tasty General Tso’s Cauliflower Bowls are a delightful, nutritious, and flavorful meal suitable for a variety of tastes and dietary preferences. Enjoy crafting this dish that embodies health-conscious eating without sacrificing flavor!

  • Cozy Chicken Mashed Potato Bowls

    Cozy Chicken Mashed Potato Bowls

    Cozy Chicken Mashed Potato Bowls: A Tropical Delight

    Introduction to Cozy Chicken Mashed Potato Bowls

    Welcome to the world of Cozy Chicken Mashed Potato Bowls, where comfort meets deliciousness, and healthy eating becomes an exciting culinary adventure! This dish is more than a simple meal; it embodies a harmony of flavors and textures that invite everyone to the dinner table. Packed with tender chicken, creamy mashed potatoes, and vibrant vegetables, these bowls are perfect for home cooks of all levels, busy parents, and anyone looking for a filling yet nutritious dish.

    Searching for chicken recipes that are easy to prepare and packed with flavor? Look no further! Cozy Chicken Mashed Potato Bowls come together in about 30 minutes, making them a great option for weeknight dinners. The best part? You can customize it to accommodate vegan, gluten-free, or low-calorie diets, all while keeping the essence of comfort food alive.

    Whether you’re a new parent juggling meal prep, a student trying to save time and money, or a senior seeking easy-to-digest meals, these bowls won’t disappoint. Moreover, each serving is designed to be not only satisfying but also offers a wealth of health benefits, from lean protein to essential vitamins. Prepare to discover your new favorite dinner one cozy bowl at a time!

    Benefits and Advantages of Cozy Chicken Mashed Potato Bowls

    Cozy Chicken Mashed Potato Bowls shine brightly in the realm of comfort food, largely due to their versatile nature. The benefits of this dish are not just about taste; they encompass simplicity, health, and adaptability.

    1. Simple Preparation: The beauty of this recipe lies in its straightforward approach. Busy individuals and families will appreciate that the dish is ready in about 30 minutes, from prep to table. You can even prepare the ingredients ahead of time to streamline the cooking process.

    2. Nutritious Components: Beyond being a savory delight, these chicken bowls are packed with essential nutrients. Lean chicken breast provides high-quality protein, while creamy mashed potatoes deliver satisfying carbohydrates. Adding colorful vegetables like peas and carrots not only boosts flavor but also supplies fiber, vitamins, and antioxidants, making this meal a balanced choice.

    3. Dietary Flexibility: Whether you’re gluten-free, dairy-free, or working on a low-calorie menu, these cozy bowls can be adjusted for your dietary needs. For instance, swap traditional mashed potatoes for cauliflower mash to reduce calories, or use plant-based chicken for a vegetarian twist. This flexibility allows anyone to enjoy the meal, making it a friendly choice for guests with dietary restrictions.

    4. Comfort Food Appeal: The tactile experience of digging into a bowl filled with hearty mashed potatoes and succulent chicken creates a sense of comfort. This dish evokes feelings of warmth and home, making it perfect for family gatherings or special occasions.

    In summary, Cozy Chicken Mashed Potato Bowls not only satisfy hungry bellies but also contribute to overall well-being. With their ease of preparation, health benefits, and adaptability, they quickly become a staple in the kitchen.

    Ingredients Overview

    Essential Ingredients for Cozy Chicken Mashed Potato Bowls

    To create the delightful Cozy Chicken Mashed Potato Bowls, gather the following ingredients:

    • 2 large chicken breasts (approximately 1.5 lbs)
      Lean protein, the superstar of your bowls.

    • 4 cups of mashed potatoes (about 2 lbs of potatoes)
      For a creamy and fulfilling base.

    • Alternative: Use 2 lbs of cauliflower for a low-carb version.

    • 1 cup frozen peas
      For added color and nutrients.

    • Alternative: Substitute with green beans or corn.

    • 1 cup carrots, diced
      Packed with vitamins and adds a sweet crunch.

    • 1/2 cup chicken broth
      Enhances flavor and keeps chicken moist.

    • 2 tbsp olive oil
      Heart-healthy fat to cook the chicken.

    • Alternative: Use cooking spray for a lighter option.

    • Salt and pepper (to taste)
      Classic seasonings that enhance the overall flavors.

    • 1/4 cup shredded cheese (optional)
      Great for a creamy, cheesy finish. Choose a dairy-free alternative if needed.

    This combination creates the heartiness and warmth everyone craves, while still being accessible to a wide range of dietary preferences.

    Dietary Substitutions to Customize Your Cozy Chicken Mashed Potato Bowls

    To make Cozy Chicken Mashed Potato Bowls suitable for various dietary needs, consider the following substitutions:

    • Vegan Option: Replace chicken breasts with plant-based chicken or beans and use cashew cream instead of traditional mashed potatoes.

    • Gluten-Free: Ensure all packaged ingredients (like broth or cheese) are labeled gluten-free. Use gluten-free kitchen staples if necessary.

    • Low-Calorie: Substitute mashed potatoes with mashed cauliflower or use low-calorie yogurt instead of heavy cream for creaminess.

    • Dairy-Free: Choose dairy-free cheese or almond milk for mashed potatoes to cater to lactose intolerance or dairy allergies.

    By being mindful of substitutes, you can tailor this recipe to fulfill your dietary requirements without compromising on flavor.

    How to Prepare the Perfect Cozy Chicken Mashed Potato Bowls: Step-by-Step Guide

    Ready to whip up a delicious batch of Cozy Chicken Mashed Potato Bowls? Follow these step-by-step instructions for a hassle-free experience!

    1. Prepare the Base:
    2. Peel and chop the potatoes into equal-sized pieces. This ensures they cook evenly. Place them in a large pot of salted water.
    3. Bring to a boil, then simmer until tender (about 15-20 minutes).

    4. Cook the Chicken:

    5. While the potatoes are cooking, heat 2 tablespoons of olive oil in a skillet over medium heat.
    6. Season the chicken breasts with salt and pepper. Sear them in the hot skillet for 5-7 minutes on each side until the internal temperature reaches 165°F (75°C). Once cooked, remove from heat and let rest.

    7. Add Vegetables:

    8. In the same skillet, add diced carrots and continue to cook for 3-4 minutes until slightly tender. Add in the frozen peas and cook for an additional 2 minutes.

    9. Mash the Potatoes:

    10. Drain the potatoes and return them to the pot. Mash with a potato masher or fork.
    11. For creaminess, stir in chicken broth (or butter and milk if desired). Season with salt and pepper to taste.

    12. Slice the Chicken:

    13. After resting, slice the cooked chicken breasts into bite-sized pieces.

    14. Assemble the Bowls:

    15. Start with a generous scoop of mashed potatoes as the base.
    16. Top with sliced chicken and sautéed vegetables.

    17. Finish with Cheese (Optional):

    18. If desired, sprinkle shredded cheese over the warm filling for an extra flavor twist.

    19. Serve and Enjoy:

    20. Serve warm and enjoy the coziness that each bite brings. Pair with a fresh salad or crusty bread for a complete meal.

    Feel free to adapt the preparation method based on available ingredients or dietary restrictions. The simplicity of this process makes Cozy Chicken Mashed Potato Bowls an ideal option for weeknight dinners!

    Mastering Cozy Chicken Mashed Potato Bowls: Advanced Tips and Variations

    Elevate your Cozy Chicken Mashed Potato Bowls with some advanced tips and variations that can make the experience even more delightful:

    • Herb Infusion: Incorporate fresh herbs like rosemary or parsley into your mashed potatoes for an aromatic twist. These herbs enhance depth of flavor while adding a pop of color.

    • Bacon Crumbles: For an added layer of richness, consider topping the finished dish with crispy bacon bits. This addition gives your bowls a savory crunch that contrasts beautifully with the creamy potatoes.

    • Spicy Kick: If you like heat, add a pinch of red pepper flakes or a dash of your favorite hot sauce to the chicken while cooking. This can create a deliciously spicy version of this cozy meal.

    • Make it a Casserole: For a twist, layer the ingredients in a baking dish, topping it with cheese and breadcrumbs before baking at 350°F (175°C) for about 20 minutes. This creates a deliciously crisp topping.

    • Seasonal Vegetables: Customize veggie options based on seasonal availability. Zucchini, bell peppers, or broccolini can add unique flavors and nutrients.

    These tips not only enhance the flavor profile of your Cozy Chicken Mashed Potato Bowls but also add an element of creativity to your meal prep.

    How to Store Cozy Chicken Mashed Potato Bowls: Best Practices

    Storing leftovers is key to reducing food waste. Here’s how to properly refrigerate, freeze, and reheat your Cozy Chicken Mashed Potato Bowls:

    • Refrigeration: Transfer any leftover bowls into airtight containers. They can be refrigerated for up to 3-4 days. Always ensure that the dish is coated in sauce or broth to prevent drying.

    • Freezing: For longer storage, Cozy Chicken Mashed Potato Bowls can be frozen in airtight freezer containers for up to 3 months. However, note that the potatoes may change texture slightly upon thawing.

    • Reheating: To reheat, thaw in the refrigerator overnight if frozen. You can warm the bowl in the microwave or on the stovetop over low heat. Add a splash of chicken broth or water if needed to keep the potatoes creamy.

    Proper storage techniques ensure your beloved Cozy Chicken Mashed Potato Bowls remain flavorful and enjoyable for days.

    Nutritional Value of Cozy Chicken Mashed Potato Bowls

    Understanding the nutritional value of your meals is essential, especially when it comes to preserving a balanced diet. Here’s the nutritional breakdown per serving of Cozy Chicken Mashed Potato Bowls (based on standard ingredients):

    • Calories: Approximately 450-500
    • Protein: 28g
    • Fat: 12g (can vary based on added ingredients)
    • Carbohydrates: 55g
    • Fiber: 5g
    • Sodium: 700mg (varies with seasonings and broth)

    These bowls offer a wholesome mix of macronutrients that satisfy both hunger and nutritional needs. Lean protein, healthy fats, and carbohydrates make this meal ideal for a balanced diet.

    FAQs: Frequently Asked Questions About Cozy Chicken Mashed Potato Bowls

    Q1: Can I use leftover chicken for this recipe?
    Absolutely! Shredded or diced leftover chicken works perfectly and reduces prep time.

    Q2: Is it possible to make this recipe in advance?
    Yes, you can prepare the elements separately ahead of time and assemble them when ready to serve.

    Q3: What can I substitute for chicken broth?
    Vegetable broth or even water can be used, although they may alter the depth of flavor slightly.

    Q4: How can I make this dish dairy-free?
    Choose dairy-free butter and milk alternatives to use in your mashed potatoes and omit the cheese.

    Q5: What vegetables can I add to the bowls?
    Feel free to experiment with seasonal vegetables like zucchini, spinach, or bell peppers to diversify your dish.

    By addressing common questions, we hope to make your cooking experience even smoother, allowing for a delightful mealtime filled with satisfaction!

    In conclusion, Cozy Chicken Mashed Potato Bowls create a warm and inviting dish that is not only delicious but also highly adaptable to fit various dietary needs. Whether you’re preparing it for a family dinner or meal prepping for the week, this comforting recipe is sure to become a favorite in your kitchen. Happy cooking!

  • The Best Chicken Cordon Bleu Rolls

    The Best Chicken Cordon Bleu Rolls

    The Best Chicken Cordon Bleu Rolls: A Tropical Delight

    Introduction to The Best Chicken Cordon Bleu Rolls

    Are you in search of a culinary masterpiece that combines flavor, convenience, and adaptability? Look no further! The best chicken cordon bleu rolls elevate your typical chicken recipes by transforming tender chicken breasts into savory rolls filled with delectable ham and gooey cheese. This dish is not only a crowd-pleaser but also offers versatility, making it suitable for family dinners, parties, and special occasions.

    The preparation method highlights its simplicity—in just a few steps, you can create a gourmet-looking meal that appears impressive yet requires minimal effort. Additionally, chicken cordon bleu rolls can be made healthier by using lean chicken cuts and low-fat cheese, or even adapted to cater to various dietary requirements. Whether you’re a busy parent needing a quick meal, a newlywed wanting to impress, or a health-conscious individual looking for nutritious options, this recipe has something for everyone.

    In this article, you’ll discover everything you need to know about making the best chicken cordon bleu rolls, including tips, ingredient alternatives, and nutritional information. So grab your apron, and let’s dive into an adventure of flavors and textures that will surely become a staple in your cooking repertoire!

    Benefits and Advantages of The Best Chicken Cordon Bleu Rolls

    Easy to Prepare

    One major advantage of the best chicken cordon bleu rolls is their simplicity. Even novice cooks can master this recipe, as the steps are straightforward and can be completed in a reasonable time frame. This means you can spend less time in the kitchen and more time enjoying a delicious meal with friends and family.

    Health Benefits

    Chicken is a lean protein that supports muscle development and overall health. By opting for whole, natural ingredients, you can create a dish that is not only fulfilling but also nourishing. Moreover, the versatility of this recipe allows for modifications such as using whole grain breadcrumbs, low-fat cheese, or even a vegetarian alternative to cater to lower-calorie or plant-based diets.

    Versatile Options

    The best chicken cordon bleu rolls can be customized for a wide range of dietary needs. Whether you’re gluten-sensitive, vegetarian, or looking to reduce calories, this recipe can easily accommodate your requirements. You can swap traditional ingredients for gluten-free options or plant-based proteins to satisfy those vegetarian cravings while still enjoying the rich flavors that make this dish a favorite among many.

    Crowd-Pleasing

    This dish is guaranteed to impress at any gathering. The combination of juicy chicken, savory ham, and melted cheese, all rolled up in a crispy exterior, delivers an explosion of flavor in every bite. Whether it’s a family dinner, holiday gathering, or casual get-together with friends, these rolls are sure to impress and leave your guests asking for seconds.

    In summary, the best chicken cordon bleu rolls are not just another addition to your collection of chicken recipes—they are a delightful culinary experience that combines health benefits, ease of preparation, and adaptability for various dietary needs.

    Ingredients Overview

    Essential Ingredients for The Best Chicken Cordon Bleu Rolls

    Below is a detailed list of ingredients needed to prepare the best chicken cordon bleu rolls, along with their specific purposes:

    • Chicken Breasts (4 boneless, skinless): The main protein component, lean and nutrient-rich.
    • Ham (4 slices): Adds savory flavor and a touch of saltiness. Turkey or vegan ham can be used for lighter or plant-based alternatives.
    • Cheese (4 slices, Swiss or Gruyere): Provides creaminess and melty texture. Substitute with dairy-free cheese for vegan options.
    • Bread Crumbs (1 cup): For a crispy outer layer. Gluten-free breadcrumbs are perfect for gluten-sensitive individuals.
    • Egg (1 large): Acts as a binding agent. A flaxseed mixture can be a vegan substitute.
    • Mustard (1 tbsp): Adds a bit of tang to the filling. Dijon or yellow mustard works well.
    • Salt & Pepper (to taste): Essential for seasoning.
    • Olive Oil or Cooking Spray (for baking): To help the rolls brown and crisp up in the oven.

    Dietary Substitutions to Customize Your The Best Chicken Cordon Bleu Rolls

    This recipe is incredibly adaptable. Here are some substitutions you may consider to fit various dietary needs:

    • For a Gluten-Free Version: Simply use gluten-free breadcrumbs and ensure that any processed meats or cheeses are also gluten-free.

    • For a Low-Calorie Option: Choose skinless chicken breasts, low-fat cheese, and omit any unnecessary oils or sauces.

    • Vegetarian Variation: Replace the chicken with thin slices of eggplant or zucchini as the base, and substitute ham with sautéed mushrooms or a store-bought plant-based meat alternative.

    • Low-Carb Option: You could wrap the ham and cheese in zucchini instead of using bread. This will keep the flavors intact while reducing the carb count.

    By implementing these substitutions, the best chicken cordon bleu rolls can suit almost anyone’s dietary preferences without sacrificing flavor or enjoyment.

    How to Prepare the Perfect The Best Chicken Cordon Bleu Rolls: Step-by-Step Guide

    Creating the best chicken cordon bleu rolls is a straightforward process that yields rewarding results. Follow these step-by-step instructions to prepare your gourmet dish that’s sure to impress!

    1. Prep the Chicken:
      Begin by preheating your oven to 375°F (190°C). While it heats, take the chicken breasts and gently pound them to an even thickness of about ¼ inch using a meat mallet or rolling pin. This ensures even cooking and makes them easier to roll.

    2. Season the Chicken:
      Sprinkle salt and pepper on the chicken breasts for basic seasoning. If desired, you can also add a touch of garlic powder or paprika for extra flavor.

    3. Layer the Ingredients:
      On each chicken breast, place one slice of ham followed by one slice of cheese. Position the cheese in the center of the ham to ensure it melts consistently.

    4. Roll it Up:
      Starting from one end, carefully roll the chicken breast tightly around the filling. Secure the roll with toothpicks or kitchen twine. Repeat the process until all chicken breasts are rolled.

    5. Prepare the Egg Wash:
      In a bowl, beat the egg. This will help the breadcrumbs adhere to the chicken once it’s rolled.

    6. Coat with Breadcrumbs:
      Dip each chicken roll into the beaten egg and then coat it generously with breadcrumbs. Make sure to cover all sides for that perfect crispy crust.

    7. Bake the Rolls:
      Place the prepared chicken rolls on a baking sheet lined with parchment paper or sprayed with cooking oil. Drizzle a little olive oil over each roll to enhance the crispiness. Bake in the preheated oven for 25-30 minutes, or until the chicken is fully cooked and golden brown.

    8. Cool and Serve:
      Once cooked, remove the rolls from the oven and let them cool for a few minutes. Carefully remove the toothpicks or twine before serving. The rolls can be served whole or sliced for beautiful presentation.

    Tips for Success:

    • Ensure that the chicken is pounded evenly to avoid overcooking certain parts.
    • You could also experiment with different cheeses such as cheddar or pepper jack for added flavor.
    • For a gourmet touch, serve the chicken rolls with a side of garlic mashed potatoes or a fresh salad.

    The best chicken cordon bleu rolls embody what it means to create delightful and flavorful chicken recipes that accommodate both taste and convenience.

    Mastering The Best Chicken Cordon Bleu Rolls: Advanced Tips and Variations

    Once you’ve mastered the basic version of the best chicken cordon bleu rolls, consider these advanced tips and variations to enhance your culinary experience:

    Sauce Pairing

    Adding a complementary sauce can elevate the dish even further. Consider serving the rolls with a homemade mustard sauce or creamy cheese dip that pairs beautifully with the flavors in the rolls.

    Herb Infusion

    Season your breadcrumbs with fresh or dried herbs such as thyme, rosemary, or oregano before coating. This adds depth to the flavor and complements the savory filling perfectly.

    Add Vegetables

    For added nutrition, incorporate finely chopped spinach or sautéed mushrooms into the filling. This extra veggies will not only enhance the nutritional profile but also add a delightful texture to each bite.

    Make It a Meal

    Enhance serving options by turning these rolls into a complete meal. Pair them with steamed vegetables or a refreshing arugula salad to balance the richness of the rolls.

    Experiment with Protein

    For those who love variety, consider substituting chicken with turkey, pork loin, or even tofu for a vegetarian version. Each protein provides a different flavor profile while retaining the essence of the dish.

    By experimenting with these variations, you can further personalize the best chicken cordon bleu rolls and keep your dining experience exciting.

    How to Store The Best Chicken Cordon Bleu Rolls: Best Practices

    To ensure the best chicken cordon bleu rolls retain their flavor and texture after cooking, proper storage is key.

    Refrigeration

    If you have leftovers, allow the rolls to cool completely, then store them in an airtight container in the refrigerator. They can last for up to 3-4 days. When reheating, consider using the oven to retain crispiness rather than the microwave.

    Freezing

    For longer storage, you can freeze the rolls before or after baking. To freeze them before baking, wrap each roll tightly in plastic wrap and aluminum foil, then place them in a freezer-safe bag. They can last for up to 2-3 months. To bake from frozen, adjust the oven time accordingly and ensure the internal temperature reaches 165°F (74°C).

    To freeze already cooked rolls, allow them to cool completely, store them in plastic freezer bags, remove excess air, and then freeze. Reheat in the oven for best results.

    Reheating

    When reheating chilled or frozen rolls, the oven is your best bet for maintaining that crispy exterior. Preheat the oven to 375°F (190°C) and reheat for about 15-20 minutes, or until heated through.

    Proper storage is essential to enjoying the best chicken cordon bleu rolls even after the initial cooking experience!

    Nutritional Value of The Best Chicken Cordon Bleu Rolls

    Understanding the nutritional content of your meals is essential for making informed dietary choices. Here’s a breakdown of the estimated nutritional values for one serving (one roll) of the best chicken cordon bleu rolls made with traditional ingredients:

    • Calories: 350-400
    • Protein: 30g
    • Fat: 18g
    • Carbohydrates: 20g
    • Fiber: 1g
    • Sodium: 700mg (varies based on the type of ham and cheese used)

    Health Considerations

    • For a lower-calorie option, consider using skinless chicken breasts, low-fat cheese, and reducing the amount of ham.
    • If you’re aiming for higher protein, you could add additional cheese or choose to pair it with a protein-rich side.

    Variability in ingredient choices can significantly impact the nutritional value, so be mindful of your selections for a healthier outcome.

    FAQs: Frequently Asked Questions About The Best Chicken Cordon Bleu Rolls

    1. Can I prepare the best chicken cordon bleu rolls ahead of time?
    Yes! You can prep them in advance, store them in the refrigerator, and bake them just before serving.

    2. How do I prevent the cheese from leaking out while baking?
    Ensuring a tight roll and using toothpicks to secure the ends will help minimize cheese leakage.

    3. What can I substitute for breadcrumbs if I want a gluten-free version?
    Almond flour or crushed gluten-free crackers can be excellent alternatives for breading.

    4. Can I use different meats?
    Absolutely! You can use turkey, ham, or even substitute with plant-based alternatives to fit dietary preferences.

    5. How can I make the rolls more visually appealing?
    You can top them with fresh herbs or a sprinkle of paprika before serving for added color and flavor.

    By addressing common questions and concerns about the best chicken cordon bleu rolls, we hope to inspire you to give this delicious recipe a try!

    With this comprehensive guide, you’ll experience the joy of creating and savoring the best chicken cordon bleu rolls in your kitchen. Whether for a simple weeknight dinner or a special gathering, this dish has the versatility and flavor to satisfy all palates. Happy cooking!