Tag: chicken

  • Easy Mediterranean Chicken Zucchini Bake Dinner

    Easy Mediterranean Chicken Zucchini Bake Dinner

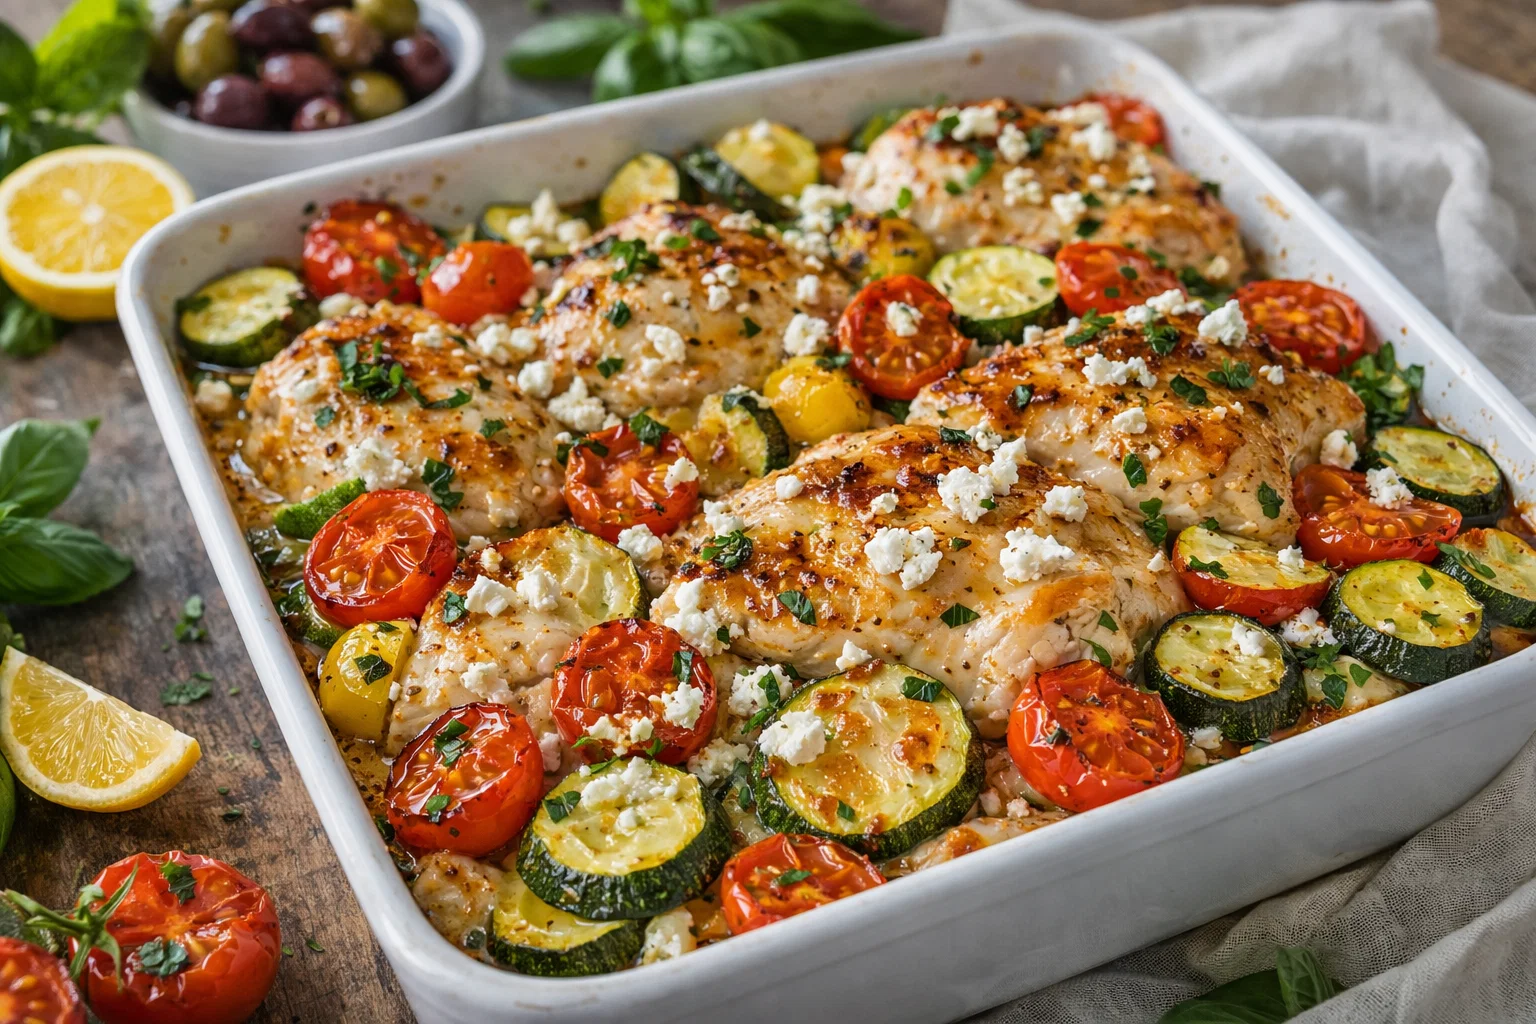
    Easy Mediterranean Chicken Zucchini Bake Dinner: A Tropical Delight

    Introduction to Easy Mediterranean Chicken Zucchini Bake Dinner

    If you’re on the lookout for easy dinner recipes that are both healthy and delicious, look no further than this Easy Mediterranean Chicken Zucchini Bake Dinner. This one-pan dish combines tender chicken, fresh zucchini, and an array of Mediterranean herbs that harmonize beautifully. The simplicity of this recipe makes it an excellent choice for home cooks of all skill levels, especially busy parents and working professionals who don’t have endless hours to spend in the kitchen.

    Not only is this dish straightforward to prepare, but it also packs a nutritious punch. Incorporating lean protein from chicken and fiber from zucchini, it fits well into many dietary plans, including those focusing on health and wellness. Moreover, it’s a versatile dish—you can easily make it gluten-free or even vegetarian by substituting the chicken with chickpeas or tofu.

    What sets this Mediterranean Chicken Bake apart is its vibrant flavor and delightful presentation. You’ll impress your family and friends without breaking a sweat in the kitchen. So grab your ingredients, and let’s embark on a culinary journey that promises ease, health benefits, and satisfaction in every bite!

    Benefits and Advantages of Easy Mediterranean Chicken Zucchini Bake Dinner

    When it comes to choosing healthy recipes, many search for options that are simple yet flavorful, and this Easy Mediterranean Chicken Zucchini Bake Dinner excels in both areas. Here are some key benefits that make this dish a standout choice among easy dinner recipes:

    1. Ease of Preparation

    This recipe requires minimal effort while delivering maximum taste. With just a handful of ingredients and a few easy steps, you can have a wholesome meal on the table in about an hour. Perfect for busy nights, it allows you to spend less time cooking and more time enjoying the meal with your loved ones.

    2. Health Benefits

    Rich in protein, vitamins, and minerals, this dish supports various health goals. Chicken is an excellent source of lean protein, which can aid in muscle building and recovery. Meanwhile, zucchini is low in calories yet high in fiber, which promotes healthy digestion and keeps you feeling full longer. Furthermore, the Mediterranean diet is renowned for its heart-friendly fats from olive oil and rich antioxidants from herbs and vegetables.

    3. Versatility

    This bake is incredibly versatile. Whether you’re vegan, gluten-free, or keto, it can easily be adapted to fit your dietary requirements. You can swap the chicken for beans or lentils for a plant-based version, and by choosing low-sodium substitutes, you can maintain a heart-healthy meal.

    4. Flavor Profiles

    The Mediterranean cuisine is famous for its bold and beautiful flavors that entice your palate. The combination of herbs such as oregano, thyme, and parsley creates layers of deliciousness that truly elevate this dish. You’ll delight in not only how easy it is to make but also how satisfying each bite will be.

    5. Meal Prep and Leftovers

    This Easy Mediterranean Chicken Zucchini Bake is an ideal meal-prepping option. You can prepare a larger batch and store leftovers for quick lunches or dinners throughout the week. Reheating is a breeze—just pop it in the microwave or oven, and you’ll have a tasty meal ready in minutes.

    In conclusion, this dish encompasses all the essential qualities of easy dinner recipes—convenience, health consciousness, and versatility—making it a compelling choice for anyone looking to minimize kitchen stress while maximizing flavor.

    Ingredients Overview

    Essential Ingredients for Easy Mediterranean Chicken Zucchini Bake Dinner

    Here’s what you’ll need to whip up this Easy Mediterranean Chicken Zucchini Bake Dinner:

    • 4 boneless, skinless chicken breasts (about 1.5 lbs)
      Provides lean protein essential for muscle repair.

    • 2 medium zucchinis (sliced)
      Adds fiber, low in calories; helps keep you full longer.

    • 1 bell pepper (any color, chopped)
      Adds a sweet crunch, rich in vitamins A and C.

    • 1 cup cherry tomatoes (halved)
      Adds juiciness, antioxidants, and vibrant color to the dish.

    • 3 tablespoons olive oil
      Heart-healthy, filled with mono-unsaturated fats; enhances flavor and moisture.

    • 2 teaspoons dried oregano
      Provides aromatic flavor, known for its anti-inflammatory properties.

    • 1 teaspoon dried thyme
      Adds an earthy flavor; rich in antioxidants.

    • Salt and pepper (to taste)
      Enhances overall flavor profile.

    • ¼ cup feta cheese (optional)
      Rich in calcium, adds creaminess; Omit for a vegan version.

    Dietary Substitutions to Customize Your Easy Mediterranean Chicken Zucchini Bake Dinner

    To accommodate different dietary needs and preferences, here are some substitutions:

    • Vegan Option: Replace chicken with chickpeas or tofu. Ensure that any cheese used is dairy-free.
    • Gluten-Free Option: This recipe is naturally gluten-free; just ensure any additional ingredients like condiments are labeled as such.
    • Low-Calorie Option: Use skinless chicken breasts and limit the amount of feta cheese, or eliminate it entirely.
    • Keto Option: Substitute zucchini with cauliflower rice for a lower-carb alternative, while still keeping the flavors intact.

    By utilizing these substitutions, you can ensure that everyone at your table can enjoy this Easy Mediterranean Chicken Zucchini Bake Dinner.

    How to Prepare the Perfect Easy Mediterranean Chicken Zucchini Bake Dinner: Step-by-Step Guide

    Follow these simple steps to create a delightful Easy Mediterranean Chicken Zucchini Bake Dinner that will impress your family and friends.

    1. Preheat the Oven:
      Preheat your oven to 400°F (200°C). This will ensure that your dish cooks evenly.

    2. Prepare the Vegetables:
      Slice the zucchinis and bell peppers into bite-sized pieces. Halve the cherry tomatoes. Set aside.

    3. Season the Chicken:
      In a large mixing bowl, combine olive oil, dried oregano, dried thyme, salt, and pepper. Add the chicken breasts and toss until they are well-coated with the seasoning.

    4. Mix Vegetables and Chicken:
      In a baking dish, arrange the seasoned chicken breasts. Surround them with the sliced zucchini, bell peppers, and halved cherry tomatoes. Feel free to tuck the vegetables in around the chicken.

    5. Bake the Dish:
      Place the baking dish in the preheated oven and bake for 30-35 minutes or until the chicken is cooked through (internal temperature reaches 165°F or 74°C) and the vegetables are tender.

    6. Add Cheese (Optional):
      If using feta cheese, sprinkle it on top of the dish in the last 5-10 minutes of baking. This will allow it to melt slightly.

    7. Serve Hot:
      Remove the dish from the oven and let it rest for a few minutes before serving. Enjoy your Easy Mediterranean Chicken Zucchini Bake Dinner warm, garnished with fresh herbs if desired.

    By following these straightforward steps, you will serve a delicious meal that can effortlessly cater to various dietary preferences—making it one of the best easy dinner recipes.

    Mastering Easy Mediterranean Chicken Zucchini Bake Dinner: Advanced Tips and Variations

    To elevate your Easy Mediterranean Chicken Zucchini Bake Dinner, consider these advanced tips and variations:

    1. Experiment with Herbs

    Feel free to play around with different herbs. Basil, rosemary, or even fresh parsley can align well with the Mediterranean theme. Fresh herbs can enhance the dish significantly compared to dried versions.

    2. Incorporate More Vegetables

    Add more seasonal vegetables, such as eggplant, asparagus, or spinach, for extra nutrition. The more colors on your plate, the more nutrients you receive!

    3. Spice It Up

    For a bit of kick, consider adding crushed red pepper flakes or a sprinkle of paprika. This will give your dish a lovely warmth without overwhelming it.

    4. Use Chicken Thighs or Drumsticks

    If you prefer darker meat, chicken thighs or drumsticks can be delicious alternatives. They offer more flavor and tenderness compared to breast meat.

    5. Try Cooking in a Cast Iron Skillet

    Using a cast iron skillet not only provides excellent heat distribution but also gives you the chance to serve directly from the skillet, adding a rustic touch to your dining experience.

    6. Leftover Remake

    If you have leftovers, consider shredding the chicken and using it in salads, wraps, or even on top of a grain bowl to create an entirely new meal.

    These tips and variations will make your Easy Mediterranean Chicken Zucchini Bake Dinner even more versatile and delicious, giving you more ways to enjoy this fantastic dish.

    How to Store Easy Mediterranean Chicken Zucchini Bake Dinner: Best Practices

    To prolong the enjoyment of your Easy Mediterranean Chicken Zucchini Bake Dinner, follow these best practices for storage:

    Refrigeration

    Once your dish has cooled down to room temperature, store any leftovers in an airtight container in the refrigerator. It will remain fresh for 3 to 4 days.

    Freezing

    For longer storage, consider freezing the dish. Allow it to cool completely before transferring it to a freezer-safe container or resealable bag. Properly stored, it can last up to 3 months in the freezer. Remember to label the container with the date for easy reference.

    Reheating

    To reheat, thaw your frozen dish in the refrigerator overnight before reheating. Use the oven at 350°F (175°C) for about 20-30 minutes, or until the internal temperature reaches 165°F (74°C). You can also use a microwave for a quicker solution; just be cautious as it may heat unevenly.

    By following these storage guidelines, you can enjoy the wonderful flavors of your Easy Mediterranean Chicken Zucchini Bake Dinner even after the initial meal.

    Nutritional Value of Easy Mediterranean Chicken Zucchini Bake Dinner

    Understanding the nutritional value of what you eat is crucial, especially when considering easy dinner recipes. Here’s a breakdown of the approximate nutritional profile per serving (assuming four servings):

    • Calories: 350-400 kcal
      This makes it a moderately-calorie meal suitable for most healthy diets.

    • Protein: 30-35g
      A significant source of protein which supports muscle health and satiety.

    • Fat: 12-15g
      The main source being healthy fats from olive oil and feta cheese, promoting heart health.

    • Carbohydrates: 15-20g
      Primarily from the vegetables, providing fiber and essential vitamins.

    • Fiber: 4-5g
      A beneficial amount for digestive health, aiding in maintaining a feeling of fullness.

    • Vitamins and Minerals: Rich in vitamins A and C (from bell peppers and zucchini), calcium (from feta cheese), and iron and potassium (found in chicken and vegetables).

    This nutritional overview showcases that the Easy Mediterranean Chicken Zucchini Bake is not only a delicious option but also a health-conscious choice that fits into various diets.

    FAQs: Frequently Asked Questions About Easy Mediterranean Chicken Zucchini Bake Dinner

    Q1: Can I make this recipe ahead of time?
    Yes, you can prepare the ingredients and assemble the dish in advance. Cover and refrigerate it before baking, then simply pop it in the oven when you’re ready to cook.

    Q2: What can I substitute for chicken?
    If you’re looking for a vegetarian option, consider using chickpeas, lentils, or firm tofu. If you’re not strictly vegetarian, turkey can be a leaner substitute as well.

    Q3: Can I add other vegetables?
    Absolutely! Feel free to throw in vegetables like eggplant, carrots, or spinach. Just keep in mind that cooking times may vary.

    Q4: Is this dish nut-free?
    Yes, provided you don’t add any nut-based ingredients. It naturally contains no nuts, making it a suitable option for nut-free diets.

    Q5: How do I ensure my chicken is juicy?
    To prevent the chicken from drying out, make sure to marinate it well. Cooking it at the right temperature also helps lock in moisture.

    Q6: Can I use fresh herbs instead of dried ones?
    Yes! Fresh herbs can provide a more vibrant flavor, and you can use three times the amount of fresh herbs as a substitute for dried ones.

    In summary, these FAQs address common queries related to the Easy Mediterranean Chicken Zucchini Bake Dinner, helping readers make informed decisions and tailor the recipe to fit their preferences.


    In conclusion, the Easy Mediterranean Chicken Zucchini Bake Dinner epitomizes what easy dinner recipes can achieve in terms of flavor, health benefits, and adaptability. Whether serving it to family on a busy evening or impressing guests at a gathering, this dish makes an excellent addition to any culinary repertoire. By embracing the versatility of this recipe, you can ensure that you have a nutritious, delicious meal ready to impress any time!

  • Best Honey Mustard Chicken Wrap

    Best Honey Mustard Chicken Wrap

    Best Honey Mustard Chicken Wrap: A Tropical Delight

    Introduction to Best Honey Mustard Chicken Wrap

    Welcome to the tantalizing world of chicken recipes! If you’re searching for a quick, delicious, and health-conscious meal, look no further than the Best Honey Mustard Chicken Wrap. This recipe combines juicy chicken with the perfect balance of sweet and tangy honey mustard and fresh vegetables, all wrapped up in a soft tortilla. It’s not just convenient for busy parents or working professionals; it’s also easy enough for students and food enthusiasts looking to whip up a delightful meal in no time.

    The beauty of this chicken wrap lies in its versatility. Whether you’re a fan of grilled, baked, or even shredded chicken, you can customize it to your liking. This recipe is crafted to be simple, allowing you to embrace a healthy lifestyle without compromising flavor. Furthermore, suitable options for vegan, gluten-free, and low-calorie adaptations ensure that everyone can enjoy it, regardless of dietary needs. This dish stands out not only for its taste but for its ability to fit seamlessly into any meal plan—whether for a lunch at work, a family dinner, or a road trip snack. Let’s embark on this culinary journey and discover how easy, nutritious, and delectable the Best Honey Mustard Chicken Wrap can be!

    Benefits and Advantages of Best Honey Mustard Chicken Wrap

    The Best Honey Mustard Chicken Wrap is not just another meal idea; it is a powerhouse of benefits that make it a must-try in your roster of chicken recipes. First and foremost, the preparation of this dish is incredibly straightforward. With just a handful of ingredients and minimal cooking time, even the busiest of individuals can rustle up this scrumptious wrap. Whether you are a novice in the kitchen or an experienced chef, you’ll find this recipe easy to master.

    Health-conscious individuals will delight in the nutritional content of this wrap. The chicken provides a high-quality source of protein, vital for maintaining energy levels and muscle health. Coupled with crunchy veggies such as lettuce, cucumbers, or bell peppers, this wrap is rich in vitamins and minerals. The honey mustard dressing adds a burst of flavor without loaded calories. You can easily adapt the components of this meal to be lower in fat and calories while maintaining delicious taste.

    Moreover, the flexibility of this recipe stands out, enabling you to cater to various dietary preferences. Want a vegan version? Substitute the chicken with grilled tofu or chickpeas. Need a gluten-free meal? Simply use a gluten-free wrap or lettuce leaves. The possibilities are endless, ensuring that this wrap can please even the most discerning of eaters. In short, the Best Honey Mustard Chicken Wrap is not just a meal; it’s a healthy solution that meets modern culinary demands.

    Ingredients Overview

    Essential Ingredients for Best Honey Mustard Chicken Wrap

    To create the Best Honey Mustard Chicken Wrap, gather the following essential ingredients:

    • Chicken Breast (500g): Grilled or baked until juicy. This is the star ingredient packed with protein.
    • Whole Wheat Tortillas (4): Provides fiber and keeps the meal wholesome. Substitute with gluten-free wraps if needed.
    • Honey Mustard Sauce (1/2 cup): This sweet and tangy combination binds the flavors together; homemade or store-bought is fine.
    • Lettuce (2 cups): Preferably romaine or spinach for crunch and additional nutrients.
    • Cucumbers (1 large, thinly sliced): For freshness and crunch.
    • Bell Peppers (1 cup, sliced): Any color will do; they add sweet flavor and a crunchy texture.
    • Avocado (1, sliced): An optional addition, bringing healthy fats and creaminess.
    • Salt and Pepper: To taste, for enhancing the flavors.

    Vegan and Gluten-Free Options

    • Vegan Option: Replace chicken with grilled tofu or chickpeas, and use a vegan honey mustard alternative.
    • Gluten-Free Option: Substitute whole wheat tortillas with gluten-free wraps or large lettuce leaves.

    Dietary Substitutions to Customize Your Best Honey Mustard Chicken Wrap

    This recipe’s beauty lies in its adaptability. While the foundational ingredients create a delightful experience, here are some substitutions to consider based on dietary restrictions or personal preferences:

    • Low-Calorie Version: Use lean chicken breast and a light honey mustard dressing, or make your own with Greek yogurt to cut calories.
    • Dairy-Free Option: Ensure that the honey mustard sauce doesn’t contain dairy, or opt for nut-based yogurts in your dressing to keep it creamy without dairy.
    • Extra Veggies: Feel free to add additional vegetables such as shredded carrots, radishes, or even roasted zucchini for a nutrition boost.

    With these versatile ingredients, the Best Honey Mustard Chicken Wrap can suit any dietary need while remaining delicious and satisfying.

    How to Prepare the Perfect Best Honey Mustard Chicken Wrap: Step-by-Step Guide

    Preparing the Best Honey Mustard Chicken Wrap is both fun and easy! Here’s a detailed step-by-step guide to help you master this tantalizing recipe quickly.

    1. Prepare the Chicken:
    2. If grilling, preheat your grill to medium-high heat. Season your chicken breast with salt and pepper and grill for 5-7 minutes on each side until it reaches an internal temperature of 165°F (75°C). Allow it to rest for a few minutes before slicing. For baking, season the chicken and place it in a preheated oven at 375°F (190°C) for 25-30 minutes.

    3. Make the Honey Mustard Sauce:

    4. In a mixing bowl, combine ½ cup of your preferred honey mustard sauce (store-bought or homemade). If you’re making it from scratch, simply mix equal parts mustard and honey, along with a dash of vinegar or lemon juice for extra zest.

    5. Assemble Your Ingredients:

    6. While the chicken is cooking, prepare your vegetables. Wash and slice your lettuce, cucumbers, bell peppers, and avocado if using.

    7. Warm the Tortillas:

    8. Heat the whole wheat tortillas on a dry skillet over medium heat for about 20-30 seconds on each side. This makes them pliable and easier to wrap.

    9. Layer the Wrap:

    10. Start with a tortilla and layer it with a generous tablespoon of honey mustard sauce. Add a handful of lettuce, some sliced cucumbers, bell peppers, and your deliciously cooked chicken on top.

    11. Wrap It Up:

    12. Fold in the sides of the tortilla and then roll tightly from the bottom to the top. Wrap tightly to avoid any fillings spilling out.

    13. Slice Diagonally:

    14. For an appealing presentation, slice the wrap diagonally in half.

    15. Serve and Enjoy:

    16. Serve your wraps immediately with extra honey mustard on the side for dipping. Enjoy this delightful meal as a refreshing lunch or a satisfying dinner.

    Feel free to adapt this recipe for various preferences. You can create a vegan version using tofu or chickpeas or substitute the tortillas with lettuce for a delightful low-carb option!

    Mastering Best Honey Mustard Chicken Wrap: Advanced Tips and Variations

    Now that you’ve learned how to create the Best Honey Mustard Chicken Wrap, let’s dive into some advanced tips and variations that can elevate your dish:

    • Add a Crunch: Consider including crispy bacon bits or crunchy nuts like walnuts or almonds for added texture.
    • Herbs and Spices: Incorporate fresh herbs such as cilantro or basil for extra freshness, or sprinkle some paprika or chili flakes for a kick.
    • Make Ahead: Prepare the chicken and vegetables in advance and store them separately. This makes for a quick assembly during busy days.
    • Serving Suggestions: Pair your wraps with a light salad, some baked sweet potato fries, or a side of fresh fruit to create a well-rounded meal.

    Each of these variations allows you to experiment with flavors while keeping within the realm of chicken recipes, ensuring there’s something for every palate.

    How to Store Best Honey Mustard Chicken Wrap: Best Practices

    To keep your Best Honey Mustard Chicken Wrap fresh, follow these storage practices:

    • Refrigeration: Place any leftover wraps in an airtight container and refrigerate them promptly. They can usually last for up to 3 days in the fridge, maintaining their flavor.

    • Freezing: To store longer, you can freeze the wraps. Wrap them individually in plastic wrap and then place them in a freezer-safe bag. When freezing, it’s best to omit any fresh vegetables to prevent sogginess upon reheating. These can be frozen for up to 2 months.

    • Reheating: When you’re ready to eat a refrigerated wrap, simply reheat it in the microwave for about 30-60 seconds, or toast it in a skillet until warm. For frozen wraps, allow them to thaw overnight in the refrigerator before reheating.

    Following these best practices will ensure your wraps remain delicious and ready for any occasion!

    Nutritional Value of Best Honey Mustard Chicken Wrap

    The Best Honey Mustard Chicken Wrap offers a well-rounded nutritional profile, making it an excellent choice for a wholesome meal. Here’s a breakdown of the approximate nutritional values per serving (one wrap):

    • Calories: 400-500 (depending on specific ingredients and portion sizes)
    • Protein: 30g (from chicken and any added ingredients)
    • Carbohydrates: 40g (largely from the whole wheat tortilla)
    • Fiber: 5-6g (primarily from the vegetables and wrap)
    • Fat: 15g (affected by dressing, avocado, and chicken preparation method)
    • Vitamins and Minerals: A good source of vitamin A, C, potassium, and calcium.

    These figures can vary based on ingredient choice, but overall, this wrap is a nutritional powerhouse rich in protein, vitamins, and flavorful goodness.

    FAQs: Frequently Asked Questions About Best Honey Mustard Chicken Wrap

    1. Can I use leftover chicken for this wrap?

    Absolutely! Leftover grilled or rotisserie chicken can be an excellent time-saver. Just shred or slice it and toss it with the honey mustard sauce for added flavor.

    2. What type of tortilla works best?

    While whole wheat tortillas provide extra fiber, feel free to use any type you like, including corn, spinach, or even gluten-free varieties depending on dietary needs.

    3. Can I make this wrap in advance?

    Yes, you can prepare the chicken and veggies ahead of time. However, for the best flavor and texture, it’s best to assemble the wrap just before serving.

    4. How can I lower the calorie count?

    To make a lighter wrap, opt for grilled chicken breast, use whole wheat or low-carb tortillas, and consider a reduced-fat honey mustard dressing.

    5. Is this wrap suitable for meal prep?

    Definitely! The Best Honey Mustard Chicken Wrap is great for meal prepping. Just follow the storage tips mentioned earlier, and you’ll have a week’s worth of lunches ready to go!

    6. What can I add for a spicier version?

    If you’re a fan of spice, consider adding jalapeños, red pepper flakes, or a spicier mustard variant to the honey mustard sauce for additional heat.

    Feel free to experiment with these answers and enjoy your delicious and healthy Honey Mustard Chicken Wrap! With the right ingredients and your creativity, you’ll transform this simple recipe into a standout dish that fits your lifestyle. Happy cooking!

  • I CanT Stop Making This Juicy Lemon Chicken Dish

    I CanT Stop Making This Juicy Lemon Chicken Dish

    I Can’T Stop Making This Juicy Lemon Chicken Dish: A Tropical Delight

    Introduction to I Can’T Stop Making This Juicy Lemon Chicken Dish

    Are you tired of the same old chicken recipes? Looking for something fresh and vibrant to add to your dinner rotation? Look no further than this Juicy Lemon Chicken Dish! Bursting with zesty flavor and succulent tenderness, this recipe is a delightful twist on traditional chicken dishes that will excite your taste buds and impress your family and friends.

    What makes this dish stand out? Its simplicity and health benefits! This lemon-infused delight is easy to prepare, making it perfect for busy home cooks, parents juggling multiple responsibilities, or students short on time. Additionally, it’s low in calories, high in protein, and rich in essential nutrients, making it an excellent choice for the health-conscious. Gluten-free and adaptable to vegetarian preferences, this recipe can easily cater to various dietary needs.

    In the paragraphs ahead, we will explore the benefits of this recipe, provide a comprehensive ingredient list, and guide you through an easy step-by-step preparation process. With just a few simple ingredients and utilizing everyday kitchen tools, you’ll create a vibrant meal that’s both delicious and visually appealing. Let’s dive into the wonders of this Juicy Lemon Chicken Dish that everyone will be raving about!

    Benefits and Advantages of I Can’T Stop Making This Juicy Lemon Chicken Dish

    This Juicy Lemon Chicken Dish is not just another ordinary meal; it is a culinary gem that offers several advantages. First and foremost, its ease of preparation makes it a go-to choice for individuals and families alike. You can have this dish on the table within 30 minutes, allowing you to spend more time enjoying dinner rather than slaving away in the kitchen.

    Another standout feature is the health benefits this dish provides. Chicken, being an excellent source of lean protein, supports muscle growth and repair, while the addition of fresh lemons offers a hearty dose of Vitamin C, helping boost the immune system. Moreover, the dish is low in carbohydrates, making it suitable for those following a low-carb or keto diet.

    This dish also accommodates various dietary preferences. For those on a gluten-free diet, simply ensure that your chicken broth is certified gluten-free. If you’re vegan or vegetarian, you can substitute chicken with tofu or tempeh, marinated in the same zesty lemon sauce for a similarly delightful flavor profile.

    The versatility of this recipe allows for endless adaptations. You can serve it with a side of roasted vegetables, quinoa, or a fresh salad. The bright, citrusy flavors complement dishes from various cuisines, making it just as suitable for a summer cookout as it is for a cozy winter dinner.

    In conclusion, this Juicy Lemon Chicken Dish is an exceptional choice for anyone seeking flavorful, healthy, and diverse chicken recipes. With its numerous benefits and easy adaptability, you’ll soon find this dish becoming a regular in your culinary repertoire!

    Ingredients Overview

    Essential Ingredients for I Can’T Stop Making This Juicy Lemon Chicken Dish

    To create this delicious Juicy Lemon Chicken Dish, you will need the following essential ingredients:

    • 4 chicken breasts (boneless and skinless): Provides the perfect canvas for absorbing flavors.
    • 3 tablespoons lemon juice (freshly squeezed): Adds tanginess and enhances the flavor of the dish while also acting as a natural tenderizer.
    • 1 tablespoon lemon zest: Enhances the dish’s citrus notes and freshness.
    • 2 tablespoons olive oil: Used for sautéing, providing healthy fats essential for cooking.
    • 3 cloves garlic (minced): Adds depth and aromatic flavor.
    • 1 teaspoon salt: Essential for seasoning and enhancing the overall taste.
    • 1/2 teaspoon black pepper: Provides a mild heat.
    • 1 teaspoon dried oregano: Adds an earthy element and depth of flavor.
    • 1 teaspoon fresh parsley or basil (for garnish): Provides a pop of color and freshness upon serving.

    Dietary Notes:
    Gluten-Free: Ensure the chicken broth is gluten-free or omit if necessary.
    Low-Calorie: This dish is low in calories due to lean chicken and minimal oil.
    Vegan Option: Substitute chicken breasts with firm tofu, marinating in the same lemon mixture.

    Dietary Substitutions to Customize Your I Can’T Stop Making This Juicy Lemon Chicken Dish

    If you have specific dietary needs or face ingredient shortages, don’t worry! Here are some suggested substitutions to make this recipe your own:

    • Protein Options:
    • Tofu: A great alternative for a plant-based version, use firm tofu and marinate it in the lemon mixture. This will give it the flavor depth similar to chicken.
    • Tempeh: Use tempeh for another vegan alternative; it holds up well to marinades.
    • Boneless Pork Chops: Swap chicken with pork chops for a different flavor experience.

    • Fats:

    • Coconut Oil: If you’re looking for a dairy-free fat option, coconut oil can be used instead of olive oil, bringing a hint of sweetness.

    • Herbs and Seasonings:

    • Thyme or Rosemary: If you don’t have oregano, you can substitute it with thyme or rosemary for a different aromatic experience.
    • Red Pepper Flakes: Want a little heat? Add red pepper flakes for an extra kick.

    By adapting this Juicy Lemon Chicken Dish to your dietary preferences, you’re ensuring that everyone at the table can enjoy this tantalizing meal—their taste preferences and dietary needs considered!

    How to Prepare the Perfect I Can’T Stop Making This Juicy Lemon Chicken Dish: Step-by-Step Guide

    Follow these simple steps to create the Juicy Lemon Chicken Dish that will surely impress your friends and family!

    1. Marinate the Chicken:
    2. In a large mixing bowl, combine the freshly squeezed lemon juice, lemon zest, minced garlic, olive oil, salt, black pepper, and dried oregano. Whisk well to combine.
    3. Add the chicken breasts to the marinade, ensuring they are fully coated. Cover and let it marinate in the refrigerator for at least 30 minutes. If time allows, marinating for a few hours or overnight will enhance the flavors even more.

    4. Preheat the Pan:

    5. Heat a large skillet or frying pan over medium-high heat. If you’re using a non-stick pan, there’s no need to add extra oil; otherwise, add a teaspoon of olive oil to prevent sticking.

    6. Cook the Chicken:

    7. Once the pan is hot, carefully add the marinated chicken breasts to the skillet. Don’t overcrowd the pan; you may need to cook in batches.
    8. Cook for about 6-7 minutes per side, or until the chicken is golden brown and internal temperature reaches 165°F (75°C).

    9. Add Remaining Marinade:

    10. After flipping the chicken, pour any remaining marinade into the pan, allowing it to reduce and create a delicious sauce as the chicken finishes cooking.

    11. Check for Doneness:

    12. Use a meat thermometer to ensure the chicken has reached the appropriate internal temperature (165°F/75°C). Cook longer if necessary.

    13. Rest the Chicken:

    14. Once cooked, remove the chicken from the skillet and let it rest on a cutting board for 5 minutes. This will ensure the juices are retained and the chicken remains succulent.

    15. Serve:

    16. Slice the chicken, drizzle with pan sauce, and garnish with fresh parsley or basil. Pair it with your choice of sides like roasted veggies or a refreshing salad.

    17. Delight in Your Creation:

    18. Enjoy the vibrant flavors of this Juicy Lemon Chicken Dish with your loved ones! Feel free to share your adaptations in the comments.

    This step-by-step guide is designed to make the preparation process as seamless as possible. Don’t hesitate to personalize the dish with your favorite sides or additional herbs and spices to make it your own!

    Mastering I Can’T Stop Making This Juicy Lemon Chicken Dish: Advanced Tips and Variations

    To elevate your Juicy Lemon Chicken Dish further, consider these advanced tips and variations:

    • Cooking Outdoors: To intensify the flavor, consider grilling the chicken on a barbecue or outdoor grill. The smoky char from the grill enhances the lemon flavor wonderfully.

    • Add Vegetables: Toss in seasonal vegetables such as asparagus, zucchini, or bell peppers in the last few minutes of cooking the chicken. This way, you’ll create a complete one-pan meal, packed with colors and nutrition.

    • Infuse Additional Flavors: Incorporate different flavors by adding a splash of white wine or chicken broth to the marinade for an extra layer of taste. You can also use fresh herbs like thyme or rosemary, or even a pinch of smoked paprika for a unique twist.

    • Change the Base: Swap lemon for another citrus fruit such as lime or orange for a different but equally delectable flavor profile. The cooking method remains the same, ensuring versatility in your chicken recipes.

    • Leftover Fun: If you have leftovers, shred the chicken and use it as a filling for wraps, tacos, or as a salad topper to enjoy its deliciousness in a new way!

    These tips and variations allow you to explore the potential of this Juicy Lemon Chicken Dish, turning it into a versatile meal that caters to numerous palates and preferences. Your culinary creativity has no bounds!

    How to Store I Can’T Stop Making This Juicy Lemon Chicken Dish: Best Practices

    Storing and preserving your Juicy Lemon Chicken Dish is simple. Follow these guidelines to ensure your meal stays fresh and delicious:

    • Refrigeration: Allow the chicken to cool to room temperature before transferring it to an airtight container. Store it in the refrigerator for up to 3 days.

    • Freezing: If you want to prepare meals ahead of time, this dish freezes well. Place the cooled chicken and sauce in a freezer-safe container or a freezer bag, removing all excess air. It can be frozen for up to 3 months. When ready to enjoy, thaw the chicken in the refrigerator overnight before reheating.

    • Reheating: To reheat the chicken, preheat your oven to 350°F (175°C) and place the chicken in an oven-safe dish. Cover it with foil to retain moisture. Heat for about 15-20 minutes or until warmed through. Alternatively, you can microwave individual portions on medium power until hot.

    By following these best practices, you’re set to enjoy your delicious Juicy Lemon Chicken Dish anytime, allowing busy weekdays or meal prep desires to accommodate flavorful and healthy dining options.

    Nutritional Value of I Can’T Stop Making This Juicy Lemon Chicken Dish

    Understanding the nutritional value of your meals is essential for making informed food choices. Here’s a general breakdown of the nutritional content of this Juicy Lemon Chicken Dish per serving (approximately 1 chicken breast):

    • Calories: 320
    • Protein: 47g
    • Fat: 14g
    • Saturated fat: 2g
    • Carbohydrates: 4g
    • Fiber: 0g
    • Sugar: 1g
    • Cholesterol: 125mg
    • Sodium: 600mg

    Please note that these values may vary based on the specific ingredients used and any side dishes you pair it with. This dish is packed with protein, low in carbohydrates, and free from refined sugars, making it not only delicious but also a nutritious option!

    FAQs: Frequently Asked Questions About I Can’T Stop Making This Juicy Lemon Chicken Dish

    What can I serve with the Juicy Lemon Chicken Dish?

    You can serve it with a variety of sides! Consider pairing it with steamed vegetables, a fresh garden salad, or whole grains like quinoa or brown rice.

    Can I make this dish ahead of time?

    Yes! You can marinate the chicken a day in advance or even prepare and cook the dish to reheat later. Storing it in the fridge allows for quick meals throughout the week.

    Is this lemon chicken recipe gluten-free?

    Absolutely! Just ensure that your chicken broth and any store-bought ingredients do not contain gluten.

    Can I use chicken thighs instead of breasts?

    Definitely! Chicken thighs will add more flavor and tenderness. Just ensure you adjust your cooking time as thighs may take a bit longer.

    What if I don’t have fresh lemons?

    If fresh lemons are unavailable, you can use bottled lemon juice. However, fresh lemons provide superior flavor, so try to use them whenever possible.

    How can I make this recipe spicier?

    If you enjoy some heat, consider adding red pepper flakes or diced jalapeños to the marinade or during cooking for an extra kick that perfectly complements the citrus!

    This Juicy Lemon Chicken Dish is versatile, delicious, and sure to become a regular part of your meal planning. Don’t hesitate to experiment with variations to suit your taste or dietary needs. Enjoy the cooking adventure!

  • Tasty Crockpot Lemon Chicken

    Tasty Crockpot Lemon Chicken

    Tasty Crockpot Lemon Chicken: A Tropical Delight

    Introduction to Tasty Crockpot Lemon Chicken

    If you’re in search of quick and delicious crockpot recipes that cater to various dietary needs, look no further than Tasty Crockpot Lemon Chicken. This succulent dish combines tender chicken thighs with a zesty lemon infusion, perfect for busy weeknights or lazy weekends. Not only is it easy to make—just toss everything in your slow cooker and let it work its magic—but it’s also packed with flavor and nutrition.

    What makes this crockpot lemon chicken uniquely appealing? For busy parents, working professionals, or anyone juggling a hectic schedule, this dish allows for effortless meal prep. Simply gather the ingredients, set your crockpot, and focus on your day, knowing a healthy meal is waiting for you at home. This recipe also shines in its versatility: it’s gluten-free, low-calorie, and can easily be made vegan by substituting the chicken with hearty vegetables or legumes.

    Moreover, this dish also stands out due to its health benefits. The lemon not only adds a bright flavor but is also packed with Vitamin C, promoting a healthy immune system. Paired with lean chicken, this recipe keeps you full and satisfied without compromising your dietary goals. Whether you’re a seasoned cook or a kitchen novice, you’ll find that Tasty Crockpot Lemon Chicken is not only simple but deeply rewarding. Get your crockpot ready for this tropical delight that’s destined to become a regular staple in your culinary repertoire.

    Benefits and Advantages of Tasty Crockpot Lemon Chicken

    When it comes to meal preparation, crockpot recipes provide unparalleled convenience and adaptability. The Tasty Crockpot Lemon Chicken recipe is no exception.

    Easy Preparation

    One of the biggest draws of this dish is the ease of preparation. With minimal chopping and just a few straightforward steps, this recipe is accessible to anyone from students to busy parents. All you need to do is combine your ingredients, set your slow cooker, and let it do the work. There’s something incredibly satisfying about coming home to the warm aromas of a home-cooked meal without having spent hours in the kitchen.

    Health Benefits

    This recipe is as nutritious as it is tasty. Chicken is a fantastic source of lean protein, which is essential for muscle growth, repair, and overall health. Pairing chicken with vibrant, vitamin-rich lemons not only elevates the flavor but also infuses the dish with health benefits. Lemons help detoxify, boost the immune system, and even enhance iron absorption. Therefore, if you’re health-conscious, this dish should be a go-to in your collection of crockpot recipes.

    Customizable and Versatile

    The customization options are endless. Use skinless chicken breast for a lower-fat version or substitute with plant-based protein sources for a vegan-friendly option. If you’re gluten intolerant or have dietary restrictions, you can easily tweak the ingredients. Incorporate a variety of vegetables such as bell peppers, zucchini, or even chickpeas, adapting it to your personal tastes or preferences. This adaptability makes Tasty Crockpot Lemon Chicken a dish that everyone can enjoy.

    Incorporating crockpot recipes like this into your meal planning not only saves time but also ensures you’re nourishing yourself and your family with wholesome ingredients. This recipe satisfies a variety of dietary needs while being delicious and easy to prepare.

    Ingredients Overview

    Essential Ingredients for Tasty Crockpot Lemon Chicken

    To bring this delightful dish to life, gather the following ingredients:

    • 2 lbs Chicken Thighs (or Chicken Breasts for a leaner option): Provides protein and tenderness.
    • 2 medium Lemons: Freshly juiced, these enhance flavor and add Vitamin C.
    • 4 cloves Garlic: Minced, for that aromatic kick.
    • 1 cup Low-Sodium Chicken Broth: Keeps the chicken moist and adds depth of flavor.
    • 1 tbsp Olive Oil: Adds richness while keeping it healthy. (Optional to omit for a lower-calorie version)
    • 1 tsp Dried Oregano: For added herby flavor.
    • 1 tsp Dried Thyme: A fragrant addition that complements the lemon.
    • Salt and Pepper: To taste, essential for balancing flavors.

    For gluten-free and vegan options, replace chicken with a mix of your favorite vegetables like bell peppers, zucchinis, and carrots or plant-based proteins such as chickpeas or lentils.

    Dietary Substitutions to Customize Your Tasty Crockpot Lemon Chicken

    Flexibility is key when it comes to creating meals that fit your dietary lifestyle. Here are some substitutions to make this recipe fit various needs:

    • For Protein Alternatives: Use firm tofu, seitan, or tempeh for a complete vegetarian or vegan dish. You can also opt for legumes like black beans or chickpeas that absorb flavors well.

    • Low Sodium: Use homemade chicken broth or water instead of store-bought broth to control sodium levels.

    • Oil-Free: Omit the olive oil and consider adding a small amount more broth or lemon juice to keep everything moist.

    • Warm Spices: For those who like a bit of heat, add red pepper flakes to give a spicy kick to the dish.

    Being cognizant of dietary restrictions or preferences can maximize the enjoyment of Tasty Crockpot Lemon Chicken. Each variation brings something new to the table, ensuring everyone can indulge.

    How to Prepare the Perfect Tasty Crockpot Lemon Chicken: Step-by-Step Guide

    Get ready to savor a delightful dish! Follow these simple steps to prepare your Tasty Crockpot Lemon Chicken. Remember that this recipe is very forgiving and can easily be adapted to suit your tastes.

    1. Prepare the Base: Start by thoroughly washing your chicken thighs or breasts under cold water. Pat them dry with paper towels. Season generously with salt and pepper.

    2. Mix Ingredients: In a bowl, combine the freshly squeezed juice of two lemons, minced garlic, dried oregano, dried thyme, and olive oil. Whisk the mixture until it’s well combined and set aside.

    3. Layer Your Chicken: Place the chicken in the bottom of your crockpot. This becomes the base layer that will soak up all the delicious flavors.

    4. Add Broth: Pour in one cup of low-sodium chicken broth, ensuring that the chicken is partially submerged in the liquid for optimal cooking.

    5. Top with Lemon Mixture: Drizzle the lemon and herb mixture over the chicken, covering it as evenly as possible.

    6. Cooking Time: Cover your crockpot and set it on low for 6-8 hours or high for 3-4 hours. This slow cooking allows the flavors to meld beautifully.

    7. Add Optional Vegetables: If you wish to add veggies, like bell peppers or zucchini, toss them in the last hour of cooking for a flavorful and colorful addition.

    8. Check for Doneness: The chicken should reach an internal temperature of 165°F (75°C) and be tender enough to shred easily with a fork.

    9. Serve & Enjoy: Once cooked, serve the chicken over rice, quinoa, or your favorite grain, and drizzle some of the remaining juices over the top for added flavor. Garnish with fresh herbs or lemon slices if desired.

    Crockpot recipes like this not only simplify meal preparation but also enhance the eating experience with vibrant flavors and textures. Your Tasty Crockpot Lemon Chicken is now ready to impress!

    Mastering Tasty Crockpot Lemon Chicken: Advanced Tips and Variations

    While the basic Tasty Crockpot Lemon Chicken recipe is delicious enough on its own, there are countless ways to elevate it even further. Here are some advanced tips and delicious variations you can try:

    Add More Flavor

    • Fresh Herbs: Incorporate fresh rosemary, parsley, or cilantro towards the end of cooking for an aromatic finish.

    • Citrus Variations: Experiment with different citrus fruits, such as limes or oranges, to bring a unique twist to the dish.

    Alternate Cooking Techniques

    • Searing for Depth: For a richer flavor, sear the chicken in a skillet with olive oil before placing it in the crockpot. This caramelization adds an extra layer of flavor you’ll love.

    Flavorful Substitutes

    • Different Proteins: Try using turkey, pork, or even fish for variation. Fish can be added during the last hour to prevent overcooking.

    Side Dish Pairing

    • Catering to Preferences: Serve the chicken with a side of garlic mashed potatoes, roasted vegetables, or a crisp salad. This enhances the meal and successfully caters to your guests’ preferences.

    Such variations within crockpot recipes can keep your meals exciting and cater to various dietary needs, making Tasty Crockpot Lemon Chicken a versatile favorite.

    How to Store Tasty Crockpot Lemon Chicken: Best Practices

    Storage is essential for ensuring that your Tasty Crockpot Lemon Chicken remains fresh and tasty. Here are the best practices for storing this delicious dish:

    Refrigerating

    • Allow the chicken to cool down completely before transferring it to an airtight container. Properly stored, it can last in the refrigerator for up to 3-4 days.

    Freezing

    • For longer storage, consider freezing your Tasty Crockpot Lemon Chicken. Place it in a freezer-safe container and it can last for up to 3 months. It’s wise to label the container with the date to keep track of its freshness.

    Reheating

    • To reheat, simply place the chicken in a saucepan with a splash of broth or lemon juice to prevent drying out. Heat on low until thoroughly warmed. You can also reheat it in the microwave in short bursts, stirring frequently.

    By following these storage practices, you’ll ensure that you can enjoy this delightful recipe anytime! With easy crockpot recipes, quick reheating makes it even more tempting to keep leftovers on hand.

    Nutritional Value of Tasty Crockpot Lemon Chicken

    Understanding the nutritional value of Tasty Crockpot Lemon Chicken helps you appreciate its health benefits. Here’s a breakdown of the nutritional information per serving (based on 4 servings when made with chicken thighs):

    • Calories: Approximately 320
    • Protein: 28g
    • Fat: 18g
    • Saturated Fat: 5g
    • Carbohydrates: 7g
    • Dietary Fiber: 1g
    • Sugars: 1g
    • Cholesterol: 120mg
    • Sodium: 530mg

    Nutritional Highlights

    • Lean Protein: Each serving provides a substantial amount of protein, vital for muscle repair and overall health.

    • Healthy Fats: The healthy fats from olive oil contribute to heart health.

    • Low-Carbohydrate: This dish is relatively low in carbs, making it a suitable option for low-carb diets.

    • Vitamins and Minerals: The inclusion of lemon, garlic, and herbs ensures a wealth of vitamins and minerals, while chicken provides essential nutrients like B vitamins and iron.

    Incorporating Tasty Crockpot Lemon Chicken into your weekly meal plans not only satisfies your taste buds but also provides essential nutrition. This dish is a great example of a healthy meal that doesn’t compromise on flavor, positioning itself as an excellent choice among all the fantastic crockpot recipes you can explore!

    FAQs: Frequently Asked Questions About Tasty Crockpot Lemon Chicken

    Can I make this recipe vegan?

    Absolutely! To make a vegan version, replace the chicken with hearty vegetables like mushrooms, zucchinis, or chickpeas. Adjust the cooking time accordingly, as vegetables may need less time to cook.

    How can I increase the flavor of the chicken?

    Searing the chicken before placing it in the crockpot can deepen the flavor. Additionally, adding fresh herbs or a splash of additional citrus juice before serving can heighten the taste experience.

    Can I use frozen chicken for this recipe?

    Yes, you can. However, ensure that you extend the cooking time appropriately. A frozen chicken might take 8-10 hours on low, depending on your crockpot’s power and how frozen the meat is.

    What sides pair well with Tasty Crockpot Lemon Chicken?

    This dish pairs beautifully with rice, quinoa, or roasted vegetables. A fresh green salad or crusty bread also complements the meal well.

    How do I store leftovers?

    Store any leftovers in an airtight container in the refrigerator for up to 4 days, or freeze for up to 3 months for longer storage. Reheat thoroughly before serving.

    By addressing these common queries, you not only enhance your experience in creating Tasty Crockpot Lemon Chicken but also help ensure that you and your loved ones can enjoy this delightful dish to its fullest. Whether you’re new to crockpot recipes or a seasoned pro, this dish is bound to become a favorite in your household!

    With its delicious flavor, health benefits, and customizable options, Tasty Crockpot Lemon Chicken is sure to inspire you to cook and share. Enjoy!

  • Easy Air Fryer Lemon Chicken

    Easy Air Fryer Lemon Chicken

    Easy Air Fryer Lemon Chicken: A Tropical Delight

    Introduction to Easy Air Fryer Lemon Chicken

    Imagine sinking your teeth into a juicy, zesty piece of lemon chicken, perfectly crisped up in an air fryer. This Easy Air Fryer Lemon Chicken recipe is not just another one of those chicken recipes; it offers a delightful burst of flavor that’s simple to prepare and packed with health benefits. If you’re someone who juggles a busy lifestyle or simply wants a nourishing dinner without the hassle, this dish is for you.

    Crafted for busy parents, students, and health-conscious individuals, this recipe stands out for its ease of preparation and wholesome ingredients. The air fryer allows you to create delicious meals with less oil compared to traditional frying methods, making it a healthier choice without sacrificing taste. Whether you’re a seasoned chef or a novice in the kitchen, this recipe is designed to inspire everyone to whip up something scrumptious in no time.

    Additionally, this recipe shines when it comes to dietary versatility. It’s naturally gluten-free and can be made low-calorie by adjusting certain ingredients. If you’re looking for chicken recipes that fit a variety of dietary needs, this lemon chicken dish is an excellent choice. In just 30 minutes, you can have a restaurant-quality meal that’s satisfying and good for you! Ready to make your taste buds tingle with excitement? Let’s dive into the benefits of this dish!

    Benefits and Advantages of Easy Air Fryer Lemon Chicken

    This Easy Air Fryer Lemon Chicken recipe isn’t just another meal; it’s a culinary masterpiece that brings together flavor and health. Here are some compelling reasons to try this dish:

    1. Ease of Preparation: One of the most significant benefits of this recipe is its straightforward preparation. You can gather all your ingredients and have the meal ready in less than an hour, making it perfect for weeknight dinners or meal preps.

    2. Health Benefits: With the air fryer, you use significantly less oil than traditional frying methods. This not only reduces the calorie count but also minimizes unhealthy fats. Lemon juice, a main ingredient, is known for its vitamin C benefits and its ability to aid digestion. Plus, chicken is a fantastic source of lean protein, which is essential for maintaining a healthy lifestyle.

    3. Customizable to Dietary Needs: This recipe is adaptable for various dietary preferences. It’s gluten-free and can be easily modified for low-carb diets or to include extra vegetables for added nutrition. The vibrant flavors of lemon paired with tender chicken make it a fantastic meal option for everyone at the table.

    4. Bursting with Flavor: The tangy notes of lemon combined with garlic and herbs create an explosion of taste that will keep you coming back for more. Who said healthy meals can’t be flavor-packed?

    5. Time-Saving Cooking Method: The air fryer not only cooks the chicken to perfection but also saves you valuable time in the kitchen. No need for marinating for hours; just a quick toss of ingredients and you’re on your way to a delicious dinner!

    In summary, this Easy Air Fryer Lemon Chicken dish is a fantastic choice among chicken recipes, thanks to its simplicity, health benefits, and adaptability. Whether you’re looking to impress guests or feed the family in a pinch, this recipe delivers on all fronts. Let’s take a closer look at what you’ll need to make this tasty dish.

    Ingredients Overview

    Essential Ingredients for Easy Air Fryer Lemon Chicken

    To make this delicious Easy Air Fryer Lemon Chicken, you’ll need the following ingredients:

    • Chicken Breasts: 4 boneless, skinless chicken breasts (preferably organic for better quality).
    • Olive Oil: 2 tablespoons (acts as a healthy fat that helps in flavor and moisture).
    • Fresh Lemon Juice: 3 tablespoons (provides freshness and zesty flavor).
    • Zest of 1 Lemon: Adds additional citrus flavors.
    • Garlic Powder: 1 teaspoon (for depth of flavor).
    • Salt and Black Pepper: To taste (essential seasonings for any savory dish).
    • Fresh Herbs: 1 tablespoon each of chopped parsley and thyme or any herbs of your choice (for an aromatic touch).

    Dietary Considerations

    • Vegan Option: Substitute chicken with tofu or tempeh marinated in the same lemon and spice blend for a plant-based version.
    • Gluten-Free: Naturally gluten-free as all specified ingredients are free of gluten.
    • Low-Calorie Option: Use skinless chicken thighs instead of breasts for a juicier, lower-calorie option.

    Dietary Substitutions to Customize Your Easy Air Fryer Lemon Chicken

    To further customize your Easy Air Fryer Lemon Chicken and meet various dietary needs or preferences, consider the following substitutions:

    1. For Low-Sodium Diets: Replace salt with low-sodium soy sauce or coconut aminos. This maintains flavor without adding excessive sodium.

    2. Spicy Kick: Add a pinch of cayenne pepper or crushed red pepper flakes for a spicy kick if desired.

    3. Gluten-Free Grains: Serve the chicken over a bed of quinoa or brown rice instead of traditional pasta or bread, catering to gluten-free diets.

    4. Herbal Variations: Experiment with different herbs like basil or rosemary to switch up the flavor profile based on your preference.

    By keeping these substitutions in mind, you can create a dish that perfectly aligns with your dietary preferences while keeping it delicious and satisfying.

    How to Prepare the Perfect Easy Air Fryer Lemon Chicken: Step-by-Step Guide

    Making your Easy Air Fryer Lemon Chicken is a breeze! Follow these simple steps for the perfect result:

    1. Prepare the Base: Start by washing the chicken breasts under cold water. Pat them dry with paper towels to absorb excess moisture, which allows the seasoning to adhere better.

    2. Marinate the Chicken: In a large mixing bowl, combine olive oil, fresh lemon juice, lemon zest, garlic powder, salt, and pepper. Add the chicken breasts to the bowl and coat them well with the marinade. Let them sit for at least 15-20 minutes for the flavors to meld. For a deeper flavor, marinate for up to 2 hours in the refrigerator.

    3. Preheat the Air Fryer: While the chicken is marinating, preheat your air fryer to 375°F (190°C) for about 5 minutes. Preheating ensures even cooking and crispiness.

    4. Arrange in the Air Fryer: Once marinated, place the chicken breasts in the air fryer basket in a single layer, ensuring they do not overlap. This is crucial for achieving that perfect crispy exterior.

    5. Cook the Chicken: Set the air fryer to cook at 375°F (190°C) for 12 minutes. Flip the chicken halfway through the cooking process to ensure even browning and crisping.

    6. Check for Doneness: After the cooking time is over, check the internal temperature of the chicken using a meat thermometer. It should reach 165°F (74°C). If not, return it to the air fryer for an additional 2-3 minutes.

    7. Rest Before Serving: Once cooked, remove the chicken from the air fryer and let it rest for about 5 minutes. This allows the juices to redistribute, making the chicken succulent and tender.

    8. Garnish and Serve: Slice the lemon chicken and plate it with fresh herbs on top for added flavor and presentation. Serve with your choice of sides, like roasted vegetables or a fresh salad, to complete the meal.

    This step-by-step guide demonstrates how easy it is to follow this chicken recipe. Feel free to adapt the steps for various dietary needs or preferences along the way!

    Mastering Easy Air Fryer Lemon Chicken: Advanced Tips and Variations

    Once you’re comfortable with the basic recipe, here are some advanced tips and variations to elevate your Easy Air Fryer Lemon Chicken experience:

    • Add Vegetables: Consider tossing some bell peppers, zucchini, or asparagus into the air fryer along with the chicken. These vegetables will infuse the dish with more nutrients and flavor.

    • Experiment with Marinades: While lemon is the classic choice, try using different citrus juices like lime or orange for a unique twist. Each will impart its distinctive taste, making it a versatile recipe.

    • Consider a Crispy Coating: If you desire an extra crunch, lightly coat the marinated chicken in some panko breadcrumbs or crushed almonds before placing them in the air fryer. This change adds texture and an interesting flavor profile.

    • Serve with Sauces: For added depth, pair with complementary sauces such as a creamy dill sauce or a bright chimichurri to dip or drizzle over the chicken after cooking.

    These tips not only enhance the flavors but also make your Easy Air Fryer Lemon Chicken an adventurous dish you can look forward to enjoying multiple times.

    How to Store Easy Air Fryer Lemon Chicken: Best Practices

    Once you’ve made your delectable Easy Air Fryer Lemon Chicken, you may want to store any leftovers for later enjoyment. Here’s how to do it properly:

    1. Refrigeration: If you have leftovers, store the chicken in an airtight container in the refrigerator. This will keep it fresh for up to 3 days. Make sure to allow the chicken to cool to room temperature before sealing it in the container to avoid condensation.

    2. Freezing: For longer storage, you can freeze the chicken. Wrap it tightly in plastic wrap or aluminum foil, and then place it in a freezer-safe bag. Properly frozen, it can last for up to 3 months. Make a note of the date on the bag for your reference.

    3. Reheating: To reheat your chicken, either use a microwave or place it back in the air fryer. If using the air fryer, preheat it to 350°F (175°C) and heat the chicken for about 5-7 minutes or until warmed through. This method helps retain its crispy texture, making it taste fresh.

    Properly storing your Easy Air Fryer Lemon Chicken ensures that you can enjoy it even after the initial cook, making it not just a one-time meal but something you can look forward to as leftovers.

    Nutritional Value of Easy Air Fryer Lemon Chicken

    Understanding the nutritional value of the Easy Air Fryer Lemon Chicken can help you make informed choices. Here’s a breakdown of the approximate nutritional content per serving:

    • Calories: 230
    • Protein: 28g
    • Total Fat: 10g
    • Saturated Fat: 1.5g
    • Carbohydrates: 2g
    • Dietary Fiber: 0g
    • Sugars: 0g
    • Cholesterol: 75mg
    • Sodium: 300mg

    This dish is rich in protein, making it ideal for those looking to build muscle or simply maintain a healthy diet. The low-calorie count, combined with healthy fats from olive oil, makes it suitable for various dietary regimes such as low-carb and gluten-free.

    In addition to the nutritional benefits, the lemon offers a boost of vitamin C, which is essential for immune health, among other bodily functions. Incorporating Easy Air Fryer Lemon Chicken into your meal rotation not only satisfies your taste buds but also supports overall well-being!

    FAQs: Frequently Asked Questions About Easy Air Fryer Lemon Chicken

    1. Can I use frozen chicken breasts for this recipe?

    Yes, you can use frozen chicken breasts! However, it is recommended to thaw them before marinating to ensure even flavor distribution. If you must cook them from frozen, increase the cooking time and ensure they reach an internal temperature of 165°F (74°C).

    2. How do I know when the chicken is done cooking?

    The best way to determine if the chicken is cooked through is to use a meat thermometer. The internal temperature should reach 165°F (74°C). Additionally, the juices should run clear when the chicken is cut.

    3. Can I make this recipe with skin-on chicken?

    Absolutely! While this recipe uses skinless chicken breasts for a lean option, using skin-on chicken thighs will add additional flavor and moisture. Just be mindful of the cooking time, as dark meat may take slightly longer.

    4. What can I serve with Easy Air Fryer Lemon Chicken?

    This dish pairs wonderfully with a variety of sides such as quinoa, brown rice, or a fresh green salad. You can also serve it alongside roasted vegetables for a balanced meal.

    5. Can I make this dish ahead of time?

    Yes! You can marinate the chicken a few hours in advance or even the night before for a more intense flavor. Just remember to store the chicken properly in the refrigerator until you’re ready to cook.

    6. How can I add more flavor to the chicken?

    Feel free to get creative with different marinades! Adding herbs, spices, or even a splash of soy sauce can enhance the flavor profile. You can also play with the acidity by incorporating different citrus juices like lime or orange.

    In conclusion, the Easy Air Fryer Lemon Chicken is a flavorful and health-conscious entry in the world of chicken recipes. Whether you’re cooking for yourself, family, or friends, this dish is bound to impress while offering simplicity and health benefits that all cooks can appreciate. So gather your ingredients, fire up the air fryer, and enjoy this tropical delight!

  • Easy Japanese Yakisoba Noodles Recipe

    Easy Japanese Yakisoba Noodles Recipe

    Easy Japanese Yakisoba Noodles Recipe: A Tropical Delight

    Introduction to Easy Japanese Yakisoba Noodles Recipe

    Welcome to the world of delicious and versatile Japanese recipes! Yakisoba, which translates to “fried noodles,” is a quintessential dish in Japanese cuisine that brings together fresh vegetables, savory sauces, and comforting noodles. This Easy Japanese Yakisoba Noodles Recipe offers a vibrant and satisfying meal that’s not only delightful to the palate but also incredibly straightforward to prepare.

    The beauty of yakisoba lies in its adaptability. Whether you’re a busy parent looking to whip up a quick dinner, a student with limited time, or a health-conscious individual trying to eat clean, this dish is your go-to option. Prepared in under 30 minutes, it’s packed with wholesome ingredients, making it a great choice for vegan and gluten-free diets, too.

    By choosing simple, fresh ingredients, you can create a meal that’s both nutritious and aesthetically pleasing. Add a splash of creativity with unique toppings like pickled ginger or a sprinkle of sesame seeds, and you’ll turn a simple dish into a culinary masterpiece. As we dive deeper, we’ll explore the numerous benefits of this amazing recipe, ingredients you’ll need, and step-by-step instructions to guide you through making your own yakisoba at home.

    Benefits and Advantages of Easy Japanese Yakisoba Noodles Recipe

    Yakisoba not only stands out in the realm of Japanese recipes because of its delightful taste, but it also offers a myriad of benefits that cater to various dietary needs and preferences.

    Time-Saving Preparation

    One of the biggest advantages of this yakisoba recipe is its quick cooking time. In just 30 minutes or less, you can prepare a delicious meal that serves as a complete dinner or lunch option. This makes it ideal for busy schedules—whether you’re a working professional, a student, or a parent juggling multiple responsibilities.

    Healthy and Wholesome

    Yakisoba is a well-rounded dish that allows you to include a variety of colorful vegetables. These ingredients are not only visually appealing but also rich in vitamins and minerals. By incorporating veggies like bell peppers, cabbage, and carrots, you transform your yakisoba into a nourishing meal that supports overall health.

    Versatile and Customizable

    Another great feature of yakisoba is its versatility. You can easily tweak the recipe to accommodate any dietary restrictions. Whether you’re vegan, vegetarian, or gluten-sensitive, you’ll find substitutions for traditional ingredients, ensuring that everyone at the table can enjoy this dish.

    Flavorful yet Economical

    Making yakisoba at home allows you to control the ingredients, which can save you money compared to dining out. Many of the necessary components can be found in your pantry or local grocery store, making this recipe not only easy but also budget-friendly.

    In essence, the Easy Japanese Yakisoba Noodles Recipe allows for creativity in the kitchen while being a healthy and satisfying choice. It invites you to experiment with flavors while catering to various dietary preferences, making it a perfect addition to your culinary repertoire.

    Ingredients Overview

    Essential Ingredients for Easy Japanese Yakisoba Noodles Recipe

    Here’s what you’ll need to create your delicious yakisoba:

    • 8 ounces Yakisoba noodles (or substitute with any stir-fry noodles for a gluten-free option)
    • 1 tablespoon vegetable oil (for frying)
    • 2 cups mixed vegetables (such as cabbage, bell pepper, and carrots; fresh or frozen)
    • 2 cloves garlic, minced
    • 1/4 cup soy sauce (use tamari for a gluten-free alternative)
    • 1 tablespoon Worcestershire sauce (optional for added flavor)
    • 1 teaspoon sugar (equally for sweetness)
    • Green onions (for garnishing)
    • Sesame seeds (for added crunch)

    Vegan and Gluten-Free Options

    • Noodles: Ensure that you select gluten-free noodles or use veggie noodles (like zucchini or carrot spirals) for a low-carb version.
    • Soy Sauce: Tamari provides the same umami flavor while remaining gluten-free.
    • Sugar: Substitute with agave nectar or coconut sugar for a healthy touch.

    Dietary Substitutions to Customize Your Easy Japanese Yakisoba Noodles Recipe

    Here’s how you can tailor the recipe to suit various dietary requirements:

    • Gluten-Free: Use rice noodles or gluten-free yakisoba noodles. Make sure all sauces (soy and Worcestershire) are gluten-free.
    • Vegan: This recipe is vegan as written. However, you can add tofu or tempeh for an extra protein boost. Simply cube and pan-fry them before adding the vegetables.
    • Low-Carb: Swap traditional noodles for spiralized vegetables like zucchini, or use shirataki noodles, which are made from konjac yam and are very low in calories.
    • Protein Additions: Feel free to include shrimp, chicken, or beef if you’re not adhering to a plant-based diet. Just pre-cook the protein of choice and add it before the veggies.

    These substitutions allow you to personalize the dish to align with your dietary needs while still enjoying the delightful flavors of traditional yakisoba.

    How to Prepare the Perfect Easy Japanese Yakisoba Noodles Recipe: Step-by-Step Guide

    Creating the perfect Easy Japanese Yakisoba Noodles Recipe can be a fun and straightforward experience. Below are detailed, step-by-step instructions that will guide you through the cooking process:

    1. Prepare the Noodles:
    2. Start by boiling water in a pot. Add the yakisoba noodles and cook according to the package instructions (usually for 3-4 minutes). Drain and rinse under cold water to prevent sticking. Set aside.

    3. Heat the Oil:

    4. In a large skillet or wok, heat the vegetable oil over medium heat. Once the oil is shimmering, it’s ready for the next step.

    5. Cook the Garlic:

    6. Add the minced garlic to the hot oil and sauté for about 30 seconds, allowing the fragrant aroma to fill your kitchen. Be careful not to burn the garlic.

    7. Add Vegetables:

    8. Incorporate the mixed vegetables into the skillet. Stir-fry for about 3-5 minutes or until they become tender but still crisp. This is your chance to incorporate seasonal veggies, so don’t hesitate to get creative!

    9. Combine Noodles and Sauce:

    10. Next, add the drained yakisoba noodles to the skillet with the vegetables. Pour the soy sauce, Worcestershire sauce, and sugar over the noodles. Toss everything together using tongs or two spatulas, ensuring that every noodle and vegetable is coated in the luscious sauce.

    11. Stir-Fry for Flavor:

    12. Continue to cook the mixture for another 2-3 minutes. Stir frequently so that the noodles slightly caramelize and take on a golden hue, enhancing the overall flavor.

    13. Final Touches:

    14. Taste the yakisoba and adjust the seasonings, adding more soy sauce or sugar if necessary. If you’re adding cooked proteins like shrimp or chicken, fold them in now to warm through.

    15. Garnish and Serve:

    16. Serve the hot yakisoba immediately, garnished with sliced green onions and a sprinkle of sesame seeds for an extra layer of flavor and crunch.

    Following these steps will ensure that you end up with a delicious and satisfying yakisoba that mirrors the authentic flavors found in Japan.

    Mastering Easy Japanese Yakisoba Noodles Recipe: Advanced Tips and Variations

    To ensure you master the art of making Easy Japanese Yakisoba Noodles, here are some advanced tips and creative variations to try:

    • Add Spice: If you enjoy heat, consider adding a splash of sriracha or crushed red pepper flakes throughout the cooking process. This brings another dimension of flavor to the dish.

    • Experiment with Sauces: While soy sauce is traditional, you can also try teriyaki or sweet chili sauce for a different flavor profile. Each variation will provide a distinct taste that makes the dish feel new each time.

    • Switch Up the Greens: Instead of the usual vegetables, try adding snap peas, bok choy, or mushrooms for a flavor twist. These ingredients not only enhance nutrition but also add unique textures.

    • Top with Fried Eggs: For an indulgent touch, top your yakisoba with a fried egg. This addition brings richness and pairs well with the savory noodles.

    • Make It a Meal Prep Item: Prepare a larger batch of yakisoba, portion it out, and store it in the refrigerator for easy lunches and dinners throughout the week. Just reheat and enjoy.

    • Try Different Proteins: Beyond classic meats, consider experimenting with plant-based protein sources like jackfruit or chickpeas for a unique take.

    These tips will enhance your cooking, making your Easy Japanese Yakisoba Noodles Recipe even more appealing and delicious, perfect for impressing family and friends.

    How to Store Easy Japanese Yakisoba Noodles Recipe: Best Practices

    Proper storage techniques can help you make the most of your Easy Japanese Yakisoba Noodles Recipe leftovers. Here’s how to do it effectively:

    • Refrigeration: After enjoying your yakisoba, allow the leftovers to cool completely before transferring them to an airtight container. Store it in the refrigerator for up to 3-4 days.

    • Freezing: While yakisoba is best enjoyed fresh, you can also freeze the leftovers. Place the cooled dish in freezer-safe containers, leaving some space for expansion. It can be stored for up to 2 months.

    • Reheating: When ready to eat, thaw frozen yakisoba in the refrigerator overnight. Reheat in a pan over medium heat, adding a splash of water or broth to prevent it from drying out. You may also use a microwave, heating in short intervals and stirring until thoroughly warmed.

    These best practices ensure your leftovers remain flavorful and enjoyable when you need a quick meal.

    Nutritional Value of Easy Japanese Yakisoba Noodles Recipe

    Understanding the nutritional value of the Easy Japanese Yakisoba Noodles Recipe is essential for those who are health-conscious or tracking their dietary intake. Here’s a general breakdown per serving:

    • Calories: Approximately 400-500 calories
    • Total Fat: 12-15 grams
    • Saturated Fat: 1 gram
    • Carbohydrates: 62-70 grams
    • Fiber: 5-7 grams
    • Protein: 10-15 grams
    • Sodium: Varies (depending on soy sauce used)

    Health Benefits

    • Low-Calorie Option: With a predominance of vegetables, the dish is packed with fiber while retaining a moderate calorie count, making it suitable for weight management.
    • Heart-Healthy Ingredients: Ingredients like soy sauce can have heart-healthy benefits, especially when used in moderation.
    • Rich in Micronutrients: The variety of vegetables provides essential vitamins and minerals necessary for maintaining good health.

    By keeping these nutritional values in mind, you can enjoy your homemade yakisoba knowing it aligns with your dietary goals.

    FAQs: Frequently Asked Questions About Easy Japanese Yakisoba Noodles Recipe

    1. Can I make yakisoba ahead of time?

    Yes! Yakisoba can be prepared ahead of time and stored in the refrigerator for up to 3-4 days. It’s a great meal prep option!

    2. What if I can’t find yakisoba noodles?

    No problem! You can substitute with ramen or udon noodles. Even rice or zucchini noodles work well for a gluten-free or low-carb version.

    3. Is yakisoba healthy?

    Absolutely! This dish is packed with vegetables and can be tailored for various dietary needs, making it a nutritious option for many. Opting for lower sodium soy sauce can also enhance its health profile.

    4. Can I add protein to yakisoba?

    Definitely! Chicken, beef, shrimp, tofu, or tempeh can be added for extra protein. Just ensure they’re cooked appropriately before mixing them into the dish.

    5. Can I freeze yakisoba?

    Yes! While fresh yakisoba is best, leftovers can be frozen for up to 2 months. Just ensure to properly store it in airtight containers and reheat when ready to enjoy.

    The Easy Japanese Yakisoba Noodles Recipe is an easy, delicious, and versatile dish that brings together a myriad of flavors and textures. Whether you’re new to cooking, short on time, or just looking to explore traditional Japanese recipes, this yakisoba will surely become a favorite in your household. Enjoy cooking, and happy eating!

  • Paleo Slow Cooker Honey Mustard Chicken

    Paleo Slow Cooker Honey Mustard Chicken

    Paleo Slow Cooker Honey Mustard Chicken: A Tropical Delight

    Introduction to Paleo Slow Cooker Honey Mustard Chicken

    Are you searching for a simple yet delectable recipe that fits seamlessly into your busy lifestyle? Look no further than Paleo Slow Cooker Honey Mustard Chicken. This dish is not only easy to make, but it’s also a healthier alternative to traditional creamy or fried chicken recipes. With its mind-blowing flavors and tender texture, this slow cooker meal is sure to impress both your family and guests.

    This crowd-pleaser is an ideal fit among crockpot recipes because it allows you to throw all the ingredients into your slow cooker and let them meld together over time without any fuss. Furthermore, it’s gluten-free, dairy-free, and free from refined sugars, making it suitable for various dietary needs. Whether you’re following a paleo diet or simply seeking healthier meal options, this recipe shines with its balance of protein and natural sweetness.

    In addition to its health benefits, this honey mustard chicken recipe exemplifies simplicity. Prepare it in just a few minutes, savor the aroma as it cooks throughout the day, and enjoy a comforting meal that nourishes your body and soul. Not only is it great for family dinners, but it’s also perfect for meal prepping for the week ahead, ensuring you always have a nutritious option ready.

    Let’s dive into the world of flavors and health benefits that this Paleo Slow Cooker Honey Mustard Chicken offers, and inspire you to create a dish that everyone will love.

    Benefits and Advantages of Paleo Slow Cooker Honey Mustard Chicken

    Creating delicious meals can sometimes be intimidating, especially on busy weekdays. However, the Paleo Slow Cooker Honey Mustard Chicken recipe transforms your cooking experience into something enjoyable and stress-free. Here are some key benefits you’ll appreciate:

    1. Effortless Preparation: One of the selling points of crockpot recipes like this honey mustard chicken is their convenience. All you need to do is chop, measure, and toss everything into the slow cooker. With minimal hands-on time, you can carry on with your day, allowing the flavors to deepen as they cook.

    2. Health Benefits: This dish is packed with protein from the chicken, while the honey mustard sauce provides a natural sweetness and tang. By using natural sweeteners and preventing the use of processed ingredients, this recipe supports your commitment to a healthier lifestyle. Furthermore, it’s low in carbohydrates, making it suitable for those observing low-carb or ketogenic diets.

    3. Versatile and Customizable: Whether you’re serving it over a bed of cauliflower rice, eating it plain, or incorporating it into a salad, this recipe accommodates various preferences. Swap ingredients as needed and adapt it to fit dietary restrictions or flavor cravings.

    4. Perfect for Meal Prep: Imagine coming home to a delicious, fully-cooked dinner after a long day! This recipe shines in its ability to make meal prep easy. Prepare a large batch, portion it, and store it in the fridge or freezer for quick meals during the week.

    5. Family-Friendly: Kids and adults alike will enjoy the sweet and savory flavors of the honey mustard glaze. It’s a great way to introduce kids to healthier options without sacrificing taste, making dinner time a breeze.

    By choosing Paleo Slow Cooker Honey Mustard Chicken, you not only simplify your dinner prep but also prioritize health and flavor. As you explore other crockpot recipes, you can experience the ease and enjoyment that slow cooking brings to your kitchen.

    Ingredients Overview

    Essential Ingredients for Paleo Slow Cooker Honey Mustard Chicken

    The beauty of this recipe lies in its simplicity. Below is a detailed list of every key ingredient you will need:

    • Chicken Thighs (2 lbs): Chicken thighs are juicy and flavorful, making them a superior choice for slow cooking. They remain tender during the long cooking process and absorb flavors beautifully. You can also use chicken breasts if preferred.

    • Honey (1/3 cup): Opt for raw honey to ensure it’s paleo-friendly. Honey offers natural sweetness and balances the tanginess of mustard. For a vegan alternative, you can use maple syrup.

    • Dijon Mustard (1/4 cup): Provides a delightful kick to the dish. Choose a brand without added sugar to keep it paleo.

    • Garlic (4 cloves, minced): Freshly minced garlic adds depth of flavor. If you don’t have fresh garlic, garlic powder can be used as a substitute (about 1 teaspoon).

    • Apple Cider Vinegar (2 tablespoons): This ingredient boosts the dish’s acidity, enhancing the overall flavor. It’s also known for its health benefits, including aiding digestion.

    • Olive Oil (2 tablespoons): This healthy fat helps to keep the chicken moist during cooking. Coconut oil can be used as a substitute for a different flavor profile.

    • Salt and Black Pepper (to taste): Essential for enhancing all dish flavors.

    • Fresh Herbs (e.g., thyme or rosemary): Chopped fresh herbs can elevate the dish’s aroma and taste. Feel free to add your favorite herbs.

    This combination of ingredients creates a delicious meal that’s nutritious and free from common allergens. When you explore other crockpot recipes, pay attention to the ingredient quality as it makes a significant difference in the final dish.

    Dietary Substitutions to Customize Your Paleo Slow Cooker Honey Mustard Chicken

    If you’re looking to adapt this recipe to suit specific dietary needs or preferences, several substitutions can be made without compromising flavor. Here are a few suggestions:

    • For a Vegetarian or Vegan Option: Replace the chicken with cubed tofu or chickpeas (cooked) and adjust cooking time accordingly. You can also try using jackfruit for a pulled meat texture.

    • Nut-Free Version: This recipe is already nut-free, but make sure to select condiments that don’t contain hidden nut ingredients or cross-contamination.

    • Low-Calorie Option: To reduce calories further, consider using skinless chicken breasts and minimizing the amount of honey or substituting it with a sugar-free sweetener like stevia or erythritol.

    • Spicy Kick: If you prefer a bit of heat, add red pepper flakes, sriracha, or diced jalapeños to the sauce for an exciting twist.

    By making these adjustments, you can easily tailor Paleo Slow Cooker Honey Mustard Chicken to meet your and your loved ones’ needs. Such versatility is one of the reasons this recipe stands out among other crockpot recipes.

    How to Prepare the Perfect Paleo Slow Cooker Honey Mustard Chicken: Step-by-Step Guide

    Now that you have all the ingredients ready, let’s walk through the preparation process. Follow these simple steps to prepare your Paleo Slow Cooker Honey Mustard Chicken effortlessly.

    1. Prepare the Base: Start by placing the chicken thighs in the bottom of your slow cooker. Make sure they are arranged evenly for optimal cooking.

    2. Mix Ingredients: In a mixing bowl, combine the honey, Dijon mustard, minced garlic, olive oil, apple cider vinegar, salt, and black pepper. Whisk until the ingredients are well blended.

    3. Coat the Chicken: Pour the honey mustard mixture over the chicken thighs in the slow cooker. Use a spatula to ensure the chicken is fully coated with the sauce for maximum flavor.

    4. Add Fresh Herbs: If using fresh herbs, sprinkle them on top of the chicken at this stage. Dry herbs can also be added along with the sauce for infused flavors.

    5. Set the Cooker: Securely place the lid on your slow cooker. Cook on low for 6-8 hours or high for 3-4 hours. The chicken should be fully cooked and fall-off-the-bone tender.

    6. Check for Doneness: Towards the end of cooking, check the chicken’s internal temperature to ensure it reaches 165°F (75°C). This ensures it’s safe to eat.

    7. Serve: Once done, shred the chicken in the slow cooker if desired, and serve hot! Well-paired side options include cauliflower rice, sautéed greens, or a fresh salad.

    8. Store Leftovers: If you have any leftovers, allow them to cool to room temperature before transferring them to airtight containers. This dish stores well in the refrigerator for up to 4 days, or you can freeze portions for later meals.

    As you prepare this delightful dish, remember that adapting the cooking times or ingredients can help accommodate various crockpot recipes for future meals.

    Mastering Paleo Slow Cooker Honey Mustard Chicken: Advanced Tips and Variations

    To elevate your cooking experience and enjoy this dish even more, consider the following advanced tips and variations:

    1. Caramelized Onions: For a sweet depth to the dish, sauté sliced onions until golden and add them to the slow cooker along with the chicken.

    2. Add Vegetables: Throw in some chopped veggies like carrots, bell peppers, or sweet potatoes with the chicken. They will absorb the flavors of the sauce and create a complete meal.

    3. Herb Infusion: For more complexity, you can add fresh herbs such as thyme, sage, or rosemary during the last hour of cooking. This will infuse the dish with aromatic flavors.

    4. BBQ Variation: Substitute honey with your choice of sugar-free barbecue sauce for a barbecue twist. Adjust the cooking time if necessary based on the sauce.

    5. Honey Mustard Dip: After cooking, shred the chicken and toss it in a bowl with the sauce before serving. This is perfect for a zen-like meal feel or as a filling for lettuce wraps.

    By implementing these variations, you can keep mealtime interesting and keep this Paleo Slow Cooker Honey Mustard Chicken fresh and exciting, cementing its place in your family’s recipe rotation alongside other favorite crockpot recipes.

    How to Store Paleo Slow Cooker Honey Mustard Chicken: Best Practices

    After enjoying your delicious Paleo Slow Cooker Honey Mustard Chicken, you may want to save some for later. Proper storage will enable you to enjoy leftovers while maintaining the dish’s flavor and safety.

    • Refrigeration: Allow any leftover chicken to cool down for no more than two hours after cooking. Store it in airtight containers in the refrigerator. It should be consumed within 3-4 days.

    • Freezing: If you want to keep your chicken for longer periods, it can be frozen. After cooling, portion the chicken into freezer-safe bags or containers, making sure to remove as much air as possible. It can last up to 3 months in the freezer.

    • Reheating: When reheating, utilize a slow cooker or countertop appliance to gently warm the chicken to allow for even heating. If using a microwave, ensure it’s heated thoroughly, reaching 165°F (75°C) before consumption.

    By following these practices, you can maintain the quality and taste of your Paleo Slow Cooker Honey Mustard Chicken, ensuring healthful meals throughout the week while saving time and effort.

    Nutritional Value of Paleo Slow Cooker Honey Mustard Chicken

    Understanding the nutritional profile of your meals is essential for maintaining a healthy lifestyle. Here’s a breakdown of the nutritional value of a serving (approximately 4 ounces) of Paleo Slow Cooker Honey Mustard Chicken:

    • Calories: 250-300 calories
    • Protein: 22-27 grams
    • Fat: 10-15 grams (primarily from healthy olive oil and chicken skin)
    • Carbohydrates: 8-12 grams (depending on honey content)
    • Fiber: 0-1 gram
    • Sugar: 5-9 grams (natural sugars from honey)

    This nutritional profile demonstrates that the dish is rich in protein while being relatively low in carbohydrates, making it suitable for various diets, including paleo, keto, and those focusing on protein-rich meals. The use of natural ingredients substantially enhances the meal’s value compared to conventional sugary or processed equivalents, placing this recipe in the upper echelon of healthy crockpot recipes.

    FAQs: Frequently Asked Questions About Paleo Slow Cooker Honey Mustard Chicken

    Q1: Can I use chicken breasts instead of thighs?
    A: Absolutely! Chicken breasts can be used, but they may dry out more quickly than thighs. Be sure to adjust the cooking time, and check for doneness sooner.

    Q2: Is there a way to make it spicier?
    A: Yes! You can incorporate red pepper flakes, diced jalapeños, or a spicy mustard into the marinade for that extra heat.

    Q3: How can I adapt this recipe for meal prep?
    A: Simply double the ingredients, cook as directed, and divide it into meal prep containers for a week’s worth of healthy lunches.

    Q4: Can this be made without honey?
    A: For those preferring no sugars, you can substitute honey with a sugar-free sweetener like stevia or simply omit it for a lower-carb alternative.

    Q5: What can I serve it with?
    A: This chicken pairs beautifully with cauliflower rice, steamed vegetables, or a fresh green salad. You can also use it in wraps for extra portability.

    With this knowledge at hand, you’re now equipped to create a stunning Paleo Slow Cooker Honey Mustard Chicken dish that nourishes and delights. Embarking on culinary adventures with crockpot recipes has never been this easy! Enjoy the benefits and flavors of this dish and incorporate it into your cooking repertoire today.

  • Juicy Honey Mustard Chicken Wrap

    Juicy Honey Mustard Chicken Wrap

    Juicy Honey Mustard Chicken Wrap: A Tropical Delight

    Introduction to Juicy Honey Mustard Chicken Wrap

    If you’re looking for a quick, delicious, and healthy option for lunch or dinner, look no further than this Juicy Honey Mustard Chicken Wrap. This recipe is not just one of those traditional chicken recipes; it brings a zesty twist that elevates your regular meal to something extraordinary. Picture tender chicken marinated in a sweet and tangy honey mustard sauce, wrapped up with fresh veggies, all nestled in a soft tortilla.

    This recipe is versatile, allowing it to fit various dietary requirements, making it apt for everyone—from busy parents and health-conscious individuals to students seeking quick meals. Not only is this wrap easy to prepare, but it is also packed with nutrients, making it a great fill for on-the-go lifestyles. Moreover, it can be customized for vegan and gluten-free diets, appealing to a broad audience seeking nutritious and simple options.

    In addition to the delicious flavor profile, the vibrant ingredients offer an array of health benefits. For busy professionals and families alike, this chicken wrap serves as an ideal solution for everyday meals without compromising on taste or nutrition. So roll up your sleeves and get ready to whip up a dish that is bound to please everyone at your table!

    Benefits and Advantages of Juicy Honey Mustard Chicken Wrap

    When it comes to weeknight meals, the Juicy Honey Mustard Chicken Wrap shines in many ways. First and foremost, it is incredibly easy to prepare, allowing you to whip it up in under 30 minutes. Perfect for anyone with a hectic schedule, this wrap requires minimal cooking skills, making it accessible for everyone from novice cooks to seasoned chefs.

    Health-conscious readers will appreciate that this recipe incorporates lean protein from chicken, which is low in calories and supports muscle building while also providing essential amino acids. The honey mustard sauce offers a delightful sweet and tangy flavor without the addition of heavy creams or oils, making it a lighter alternative to many dressings. You can even substitute full-fat sauces for healthier ingredients, making this wrap suitable for various dietary needs.

    Additionally, the fresh vegetables added to the wrap not only enhance flavor but also provide important vitamins and minerals, ensuring you’re getting balanced nutrition in every bite. Plus, the recipe can be easily adapted to meet dietary preferences such as vegan or gluten-free, making it a standout choice among traditional chicken recipes.

    There’s also an unmatched convenience factor. Prepare the wraps in advance for meal prep; they store well in the refrigerator and make for an easy grab-and-go option. The flexibility of the ingredients also allows you to swap in whatever veggies you have on hand, ensuring there’s little waste.

    Ingredients Overview

    Essential Ingredients for Juicy Honey Mustard Chicken Wrap

    Here’s what you’ll need to make your Juicy Honey Mustard Chicken Wrap:

    1. Chicken Breast (1 lb) – Use boneless, skinless chicken breast for tender meat that absorbs flavor well.
    2. Honey Mustard (1/4 cup) – A balanced blend of sweetness and tanginess; look for a low-calorie option if desired.
    3. Tortillas (4) – Whole wheat or low-carb tortillas are excellent for added fiber.
    4. Lettuce (2 cups) – Romaine or mixed greens for a refreshing crunch.
    5. Tomato (1 medium) – Adds juiciness and flavor.
    6. Cucumber (1/2 medium) – Provides extra crunch and hydration.
    7. Avocado (1 medium) – A source of healthy fats; alternatively, omit for a low-calorie option.
    8. Salt and Pepper (to taste) – Seasoning is important for enhancing flavors.

    Dietary Substitutions to Customize Your Juicy Honey Mustard Chicken Wrap

    • Vegan Option: Substitute chicken with grilled tofu, tempeh, or chickpeas. Use agave syrup mixed with yellow mustard to create a vegan-friendly honey mustard alternative.

    • Gluten-Free: Opt for gluten-free tortillas or lettuce wraps for a low-carb alternative.

    • Low-Calorie Option: Use a lean protein like turkey breast, and select low-calorie or fat-free honey mustard dressing.

    • Vegetable Variations: Feel free to include other vegetables such as bell peppers, celery, or shredded carrots depending on what you have available or your preferences.

    With these versatile ingredients and substitutions, you can easily adapt the Juicy Honey Mustard Chicken Wrap to suit your lifestyle and dietary needs.

    How to Prepare the Perfect Juicy Honey Mustard Chicken Wrap: Step-by-Step Guide

    Making your Juicy Honey Mustard Chicken Wrap is simple and straightforward. Just follow these easy steps:

    1. Prepare the Chicken:
    2. Begin by slicing the chicken breast into thin strips or bite-sized pieces. This increases cooking speed and allows the marinade to penetrate better.

    3. Marinate the Chicken:

    4. In a bowl, combine the sliced chicken and honey mustard. Mix well and let it marinate for at least 10 minutes. If you have time, letting the chicken marinate longer in the refrigerator enhances the flavors.

    5. Cook the Chicken:

    6. Heat a non-stick skillet over medium-high heat. Add a small amount of olive oil to the pan.
    7. Add the marinated chicken strips to the skillet and cook for approximately 5-7 minutes, turning occasionally until they are golden brown and cooked through. Ensure the internal temperature reaches 165°F (75°C).

    8. Prepare the Veggies:

    9. While the chicken is cooking, chop your lettuce, tomato, cucumber, and avocado. Set aside.

    10. Assemble the Wrap:

    11. Lay a tortilla flat on a clean surface.
    12. Place a handful of lettuce in the center of the tortilla, followed by a few spoonfuls of the cooked chicken. Add the chopped veggies on top, finishing with a bit more honey mustard if desired.

    13. Wrap It Up:

    14. Fold the sides of the tortilla inwards, then starting from the bottom, roll it tightly until fully wrapped. Ensure everything remains inside securely.

    15. Slice and Serve:

    16. Slice the wrap diagonally in half to show off the colorful filling inside. Serve immediately, or store it in the refrigerator for a quick meal later.

    This recipe can be adapted easily. For instance, you might have grilled chicken leftovers that can be used without additional cooking, simplifying the process even further.

    Mastering Juicy Honey Mustard Chicken Wrap: Advanced Tips and Variations

    For those who want to take their Juicy Honey Mustard Chicken Wrap to the next level, consider these advanced tips and variations:

    • Herbed Chicken: For a flavor twist, add herbs like rosemary, thyme, or garlic powder to the marinade. This adds depth to your wrap without much effort.

    • Crunchy Texture: For an extra crunch, consider adding in some toasted nuts or seeds such as sunflower seeds or almonds. This not only enhances texture but also boosts nutrient content.

    • Spicy Kick: If you love heat, add sliced jalapeños or a dash of hot sauce to the filling. This contrasts delightfully with the sweetness of the honey mustard.

    • Fruit Fusion: Try putting in slices of apple or pears for a touch of sweetness and crunch that complements the honey mustard flavor wonderfully.

    These variations allow for impressive customizations and can keep meals exciting and enjoyable!

    How to Store Juicy Honey Mustard Chicken Wrap: Best Practices

    Storing your Juicy Honey Mustard Chicken Wrap correctly can extend its freshness, making it an ideal meal prep option. Here’s how to do it effectively:

    • Refrigeration: Wrap the assembled tortillas tightly in plastic wrap or store them in an airtight container. They can stay fresh in the refrigerator for up to 3 days. Consume as soon as possible for maximum freshness.

    • Freezing: For longer storage, you can freeze the cooked chicken separately and assemble the wraps later. Wrap the tortillas tightly in foil or freezer-safe bags to prevent freezer burn. They can last for about 2 months in the freezer. When ready to eat, thaw the chicken and produce in the fridge overnight before wrapping and consuming.

    • Reheating: To ensure the chicken remains moist and flavorful upon reheating, use a microwave for quick warming while ensuring it doesn’t dry out—just a minute or two is usually sufficient. Alternatively, reheat in a skillet over low heat, covered, to keep the wrap nice and soft.

    Taking these storage tips into consideration can help you ensure every bite of your Juicy Honey Mustard Chicken Wrap remains delightful!

    Nutritional Value of Juicy Honey Mustard Chicken Wrap

    Understanding the nutritional value of your meal is vital, especially for health-conscious cooks. Here’s a rough breakdown of the Juicy Honey Mustard Chicken Wrap per serving (based on one wrap without additional ingredients):

    • Calories: 350-450 (varies with ingredients)
    • Total Fat: 12g (healthy fats typically come from the avocado, if used)
    • Saturated Fat: 2g
    • Protein: 30g
    • Carbohydrates: 35-40g
    • Dietary Fiber: 5g (more fiber can be obtained if whole grain tortillas are used)
    • Sugar: 3g (from the honey mustard and any vegetables added)
    • Sodium: 600mg (consider low-sodium versions for health control)

    This wrap is not just a meal; it’s a nutrient-rich bundle that provides a good balance of proteins, fats, and carbohydrates, all of which are essential for a healthy diet.

    FAQs: Frequently Asked Questions About Juicy Honey Mustard Chicken Wrap

    1. Can I use cooked chicken for this recipe?
    – Absolutely! Leftover rotisserie chicken or any pre-cooked chicken works wonderfully, making this wrap even easier to prepare.

    2. Is this recipe gluten-free?
    – Yes, you can easily make your Juicy Honey Mustard Chicken Wrap gluten-free by using gluten-free tortillas or lettuce as a wrap.

    3. How can I adjust the sweetness of the honey mustard?
    – You can control the sweetness level by adjusting the amount of honey mustard used or opting for a sugar-free or reduced-sugar alternative.

    4. Can I prepare this wrap in advance?
    – Yes, you can assemble the wraps a day prior. However, it’s best to add moist ingredients like tomatoes and avocados just before serving to prevent sogginess.

    5. Can I replace chicken with another protein?
    – Definitely! Feel free to use turkey, tofu, or even beans as alternatives. These options can make the recipe suitable for various dietary preferences.

    With its delightful flavors and vibrant ingredients, the Juicy Honey Mustard Chicken Wrap is an outstanding choice among chicken recipes for any occasion. Easy to prepare and loaded with nutrients, this dish will surely become a staple in your culinary repertoire! So why wait? Gather your ingredients and give this delightful wrap a try today!

  • Easy Pineapple Chicken And Rice Dinner

    Easy Pineapple Chicken And Rice Dinner

    Easy Pineapple Chicken And Rice Dinner: A Tropical Delight

    Introduction to Easy Pineapple Chicken And Rice Dinner

    In the world of easy dinner recipes, few dishes can compete with the vibrant flavors and simplicity of Easy Pineapple Chicken and Rice Dinner. This delightful dish combines tender chicken, succulent pineapple, and fluffy rice, all intertwined with the tangy sweetness of pineapple juice. Not only does this recipe deliver an explosion of tropical flavors, but it also fuels your body with nutritious ingredients, making it a great choice for busy families, health-conscious individuals, and adventurous foodies alike.

    This recipe shines with its versatility. Whether you’re a newlywed looking to impress your partner with minimal effort, a working professional seeking a healthy weeknight meal, or a parent trying to satisfy picky eaters, Easy Pineapple Chicken and Rice Dinner caters to all. It’s a crowd-pleaser, appealing to various dietary needs, as it can easily be adapted for gluten-free and low-calorie diets.

    With just minimal prep time required, this dish is perfect for anyone looking to whip up a quick and healthy meal without sacrificing flavor. In just under an hour, you can serve a nourishing dinner that encapsulates both tropical flair and homely comfort. So, let’s dive deeper into this easy dinner recipe that could become a staple in your kitchen!

    Benefits and Advantages of Easy Pineapple Chicken And Rice Dinner

    When it comes to easy dinner recipes, Easy Pineapple Chicken and Rice Dinner offers a plethora of benefits that make it stand out in anyone’s meal rotation.

    1. Quick and Convenient: This recipe is incredibly straightforward to prepare, making it ideal for busy weekday dinners. With straightforward steps and minimal ingredients, you’ll spend less time in the kitchen and more time with your family or enjoying your evening.

    2. Nutritious Ingredients: The key components of this dish—chicken, pineapple, and rice—combine to create a well-rounded meal that is rich in protein, vitamins, and minerals. Chicken provides lean protein which is essential for muscle health, while pineapple adds a dose of vitamin C, aiding in immune function. Brown rice or quinoa, often used as a substitute, adds complex carbohydrates and fiber for a healthy digestive system.

    3. Natural Sweetness: The pineapple not only enhances flavor but also provides natural sweetness, reducing the need for added sugars. This makes it a smart choice for those looking to cut down on processed carbohydrates.

    4. Versatile and Adaptable: Whether you are following a vegan, gluten-free, or low-calorie lifestyle, this easy dinner recipe can easily cater to your dietary preferences. You can substitute chicken with tofu or chickpeas for a vegan version, and use brown rice or cauliflower rice to lower carbs while keeping the flavor intact.

    5. Family-Friendly: Picky eaters might just have their minds changed with this dish, as the sweet and savory flavors come together beautifully to create an irresistible meal. Kids will love the fun pineapple chunks, and parents will appreciate the balance of nutrients.

    All of these benefits come together to create a delicious meal that not only satisfies hunger but also contributes to overall well-being. With Easy Pineapple Chicken and Rice Dinner, you get convenience, nutrition, and taste all in one dish.

    Ingredients Overview

    Essential Ingredients for Easy Pineapple Chicken And Rice Dinner

    To craft a tantalizing Easy Pineapple Chicken and Rice Dinner, gather the following ingredients:

    • 1.5 lbs (680g) Chicken Breast (boneless, skinless): This lean protein serves as the main component, ensuring a filling meal.
    • 1 can (14oz or 400g) Pineapple Chunks (in juice or water): Adds natural sweetness and vibrant flavor.
    • 1 cup (185g) Long-Grain Rice: Provides a wholesome base; brown rice can be a healthier option.
    • 1 medium Bell Pepper (any color): Adds crunch and nutrients.
    • 1 medium Onion: Enhances depth of flavor.
    • 2 cloves Garlic: Offers aromatic flavor.
    • 1 tablespoon Soy Sauce: For a hint of umami. (Use tamari for gluten-free).
    • 1 tablespoon Olive Oil or Coconut Oil: For cooking.
    • Salt and Pepper: To taste.
    • 1 teaspoon Ginger (fresh or powdered): Adds a spicy warmth.

    These ingredients come together to create a harmonious dish that packs both flavor and nutrition.

    Dietary Substitutions to Customize Your Easy Pineapple Chicken And Rice Dinner

    If you want to tailor the recipe to meet dietary preferences, consider these substitutions:

    • For a Vegan Version: Substitute chicken with 1.5 cups of cubed firm tofu or chickpeas. Marinate with soy sauce and spices to infuse flavor.

    • Make It Gluten-Free: Use tamari instead of regular soy sauce and ensure the rice used is certified gluten-free.

    • Low-Calorie: Swap regular rice for cauliflower rice to significantly cut down on calories while maintaining volume.

    • Additional Nutrients: Incorporate vegetables like carrots or snap peas for added vitamins and variety. Simply sauté them along with the onion and bell pepper.

    These adaptations allow you to enjoy Easy Pineapple Chicken and Rice Dinner while adhering to dietary needs, making it even more appealing to a wider audience.

    How to Prepare the Perfect Easy Pineapple Chicken And Rice Dinner: Step-by-Step Guide

    Cooking Easy Pineapple Chicken and Rice Dinner is an easy-going experience, perfect for novice cooks or anyone tight on time. Follow this step-by-step guide to create your tropical delight:

    1. Prepare the Base: Start by cooking your rice according to the package instructions. If using brown rice, allow for an additional 10-15 minutes cooking time compared to white rice.

    2. Chop Your Ingredients: While your rice is cooking, begin by chopping the bell pepper, onion, and garlic. Having everything prepped will streamline your cooking process.

    3. Marinate the Chicken (optional): For enhanced flavor, consider marinating your chicken breasts in a mix of soy sauce, garlic, and ginger for about 15-20 minutes prior to cooking.

    4. Heat the Oil: In a large skillet or wok, heat your olive or coconut oil over medium-high heat.

    5. Cook the Chicken: Add the chicken breasts to the skillet in a single layer. Cook for about 5-7 minutes on each side until golden brown and cooked through. They should reach an internal temperature of 165°F (75°C).

    6. Add the Vegetables: Once the chicken is cooked, add the chopped onion and bell pepper to the skillet. Sauté them for about 3-4 minutes until softened.

    7. Incorporate the Pineapple: Stir in the pineapple chunks along with a bit of the juice from the can. Cook for another 3 minutes to warm through and let the flavors meld.

    8. Combine with Rice: Once everything is heated through, add the cooked rice to the skillet. Mix well, ensuring the rice is coated with the pineapple and chicken mixture.

    9. Season to Taste: Taste the dish and adjust the salt, pepper, and any additional soy sauce if necessary.

    10. Serve and Garnish: Serve the dish warm, garnishing with fresh herbs like cilantro or green onions, if desired. Enjoy your Easy Pineapple Chicken and Rice Dinner!

    Each step is easy to follow, and you can adapt the cooking method to suit your kitchen equipment. Don’t hesitate to get creative by adding your favorite vegetables or adjusting the flavors!

    Mastering Easy Pineapple Chicken And Rice Dinner: Advanced Tips and Variations

    To elevate your Easy Pineapple Chicken and Rice Dinner, follow these advanced tips and variations that can add depth and excitement to your dish:

    Tips for Success

    • Use Fresh Pineapple: If possible, opt for fresh pineapple to maximize flavor and nutrition. It provides a vibrant sweetness that is hard to beat.

    • Pre-cook the Rice: For even quicker preparation, consider pre-cooking a batch of rice at the beginning of the week. Just reheat it when you’re ready to make the dish.

    • Pan-Searing Tips: For the perfect sear on your chicken, avoid overcrowding the pan. Cook in batches if necessary.

    Variations

    • Spicy Twist: Add crushed red pepper flakes or a drizzle of sriracha for those who enjoy a little heat.
    • Coconut Variation: Replace olive oil with coconut oil for a more tropical feel and drizzle some coconut milk into the rice for added richness.
    • One-Pan Wonders: For an even simpler cleanup, try making this dish all in one pot. After sautéing the chicken, add in all your ingredients and simmer with the rice.

    Exploring these variations allows for a new culinary experience and can keep this dish exciting for multiple meals throughout the week!

    How to Store Easy Pineapple Chicken And Rice Dinner: Best Practices

    Proper storage of your Easy Pineapple Chicken and Rice Dinner is crucial for maintaining taste and quality. Here are the best methods for refrigerating, freezing, and reheating your leftovers:

    Refrigeration

    Allow the meal to cool to room temperature before transferring it to an airtight container. This dish can last in the refrigerator for 3-4 days. Be sure to store it in smaller portions for convenient reheating.

    Freezing

    For longer storage, you can freeze the dish. Place it in a freezer-safe container or freezer bag. It will maintain its quality for up to 2-3 months. When you’re ready to eat, set it in the refrigerator to defrost overnight before reheating.

    Reheating

    To reheat, you can use the microwave or stovetop. If using the microwave, heat in 1-minute intervals, stirring in between until warmed through. On the stovetop, add a splash of water or pineapple juice to avoid drying out the dish, warming it on low heat.

    These storage tips ensure you can enjoy your Easy Pineapple Chicken and Rice Dinner even days after its initial preparation, with taste and texture intact.

    Nutritional Value of Easy Pineapple Chicken And Rice Dinner

    Easy Pineapple Chicken and Rice Dinner not only pleases the palate but also provides considerable nutritional value. Here’s a breakdown of its average nutritional content per serving (approximately 1 cup):

    • Calories: 400-450 kcal
    • Protein: 30 grams
    • Carbohydrates: 45 grams
    • Fiber: 3 grams
    • Fat: 10 grams
    • Sodium: 500-600 mg
    • Vitamin C: Significant amounts from pineapple and bell pepper
    • Calcium and Iron: Present in minor amounts, beneficial for overall health

    This simple dish offers a balanced profile of macronutrients; it’s rich in protein and carbohydrates with a moderate amount of healthy fats. The inclusion of fruits and vegetables boosts its vitamin and mineral content, making it a wholesome choice for all ages.

    FAQs: Frequently Asked Questions About Easy Pineapple Chicken And Rice Dinner

    1. Can I use frozen chicken for this recipe?
    2. Yes, but it’s best to thaw frozen chicken before cooking to ensure even cooking and flavor absorption.

    3. Is this dish suitable for meal prepping?

    4. Absolutely! This dish stores well and can be portioned out for quick meals throughout the week.

    5. What side dishes pair well with Easy Pineapple Chicken and Rice?

    6. A fresh garden salad, steamed broccoli, or a light coleslaw would all complement this dish beautifully.

    7. How can I make this recipe spicier?

    8. Incorporate chili flakes, sriracha, or even jalapeños to add some heat, depending on your preference.

    9. Can I swap the chicken for another protein?

    10. Yes, feel free to use shrimp, pork, or plant-based proteins like tofu to create delicious variations!

    By answering these frequently asked questions, you can help cater to a variety of readers while ensuring they have all the information they need to successfully create this delicious meal.

    Conclusion

    Easy Pineapple Chicken and Rice Dinner is a delightful, versatile dish that caters to an array of tastes and dietary needs, making it an excellent addition to any weeknight meal plan. It combines wholesome ingredients with tropical flavors, all while being simple to prepare and highly nutritious. Whether you’re feeding a family or simply looking for a quick meal for one, this easy dinner recipe is bound to become a favorite. So why not gather the ingredients today and embark on your culinary adventure? Enjoy!

  • Easy Spicy Chicken Ramen Dinner Recipe

    Easy Spicy Chicken Ramen Dinner Recipe

    Easy Spicy Chicken Ramen Dinner Recipe: A Tropical Delight

    Introduction to Easy Spicy Chicken Ramen Dinner Recipe

    If you’re searching for simple yet delicious easy dinner recipes, look no further! The Easy Spicy Chicken Ramen Dinner Recipe checks all the boxes for busy families, students, and anyone looking for a quick meal that doesn’t skimp on flavor. This recipe not only simplifies your dinner preparations but also introduces a delightful kick that will satisfy your taste buds.

    Picture a steaming bowl of ramen featuring tender chicken, vibrant vegetables, and a rich, spicy broth that warms the soul. With versatile ingredients, this dish is adaptable for various diets, including gluten-free and low-calorie options.

    Health-conscious eaters will appreciate the benefits as well—this ramen is loaded with protein, packed with vitamins from fresh veggies, and can be customized to your heart’s content. Whether you’re a seasoned cook or just beginning your culinary journey, this recipe encourages you to get creative in the kitchen. Enjoy the fun and flavor of making your own ramen while keeping it simple, nutritious, and satisfying, ideal for all occasions—dinner time, late-night snacks, or even meal prepping for the week ahead.

    So, grab your ingredients and prepare for a delightful and spicy culinary adventure that fits perfectly into the realm of quick and easy dinner recipes!

    Benefits and Advantages of Easy Spicy Chicken Ramen Dinner Recipe

    The Easy Spicy Chicken Ramen Dinner Recipe stands out for numerous reasons, making it a top choice for your family dinners or solo meals. Below, we explore the specific benefits this dish offers:

    1. Simplicity of Preparation

    One of the most significant advantages of this ramen recipe is its simplicity. With straightforward instructions and easy-to-find ingredients, you can whip up a hearty meal in under 30 minutes. Whether you’re a novice cook or pressed for time post-work, you’ll find this recipe incredibly approachable.

    2. Health Benefits

    This ramen isn’t just about flavor; it’s a nourishing meal! By incorporating chicken, you add a protein boost essential for muscle repair and recovery. The vegetables—such as spinach, carrots, and bell peppers—provide vital nutrients including fiber, vitamins A and C, and antioxidants.

    Moreover, using low-sodium broth allows you to control your salt intake, making this dish heart-healthier than conventional takeout options. If you’re seeking to reduce calories, consider replacing traditional ramen noodles with veggie noodles or gluten-free alternatives to lower the carb count while still delivering a satisfying meal.

    3. Versatility for Everyone

    Catering to diverse dietary needs is effortless with this recipe. You can easily modify it for different preferences, whether you’re accommodating gluten-free, low-carb, or even vegetarian diets. With simple substitutions, you can turn this spicy ramen into a completely vegan dish or adjust the heat level to suit children or spice lovers alike.

    4. Budget-Friendly

    Homemade meals can dramatically cut costs compared to dining out. This Easy Spicy Chicken Ramen Dinner Recipe uses affordable ingredients—and because it’s a one-pot dish, you save on cleanup too!

    In summary, this recipe offers convenience, health benefits, versatility, and economic savings, making it an excellent addition to your repertoire of easy dinner recipes.

    Ingredients Overview

    Essential Ingredients for Easy Spicy Chicken Ramen Dinner Recipe

    To create your Easy Spicy Chicken Ramen Dinner, gather the following ingredients:

    • Chicken Breast: 1 pound, sliced thinly (provides protein)
    • Ramen Noodles: 2 packs (traditionally wheat-based or opt for gluten-free options)
    • Chicken Broth: 4 cups (use low-sodium for healthier choice)
    • Soy Sauce: 2 tablespoons (use tamari for gluten-free)
    • Sriracha: 1-2 tablespoons (adjust for spice preference)
    • Garlic: 3 cloves, minced (adds flavor and health benefits)
    • Ginger: 1 tablespoon, grated (boosts immunity)
    • Carrots: 1 cup, julienned (for texture and vitamins)
    • Spinach: 2 cups (packed with nutrients)
    • Bell Pepper: 1, sliced (adds color and vitamins)
    • Green Onions: ½ cup, chopped (for garnish)
    • Sesame Oil: 1 teaspoon (optional for added flavor)
    • Salt and Pepper: to taste

    Vegan, Gluten-Free, and Low-Calorie Options

    • Substitute the chicken breast with tofu or tempeh for a vegan version.
    • Use zucchini noodles or shirataki noodles to reduce calories and carbs.
    • Ensure to use gluten-free soy sauce and gluten-free ramen for dietary adherence.

    Dietary Substitutions to Customize Your Easy Spicy Chicken Ramen Dinner Recipe

    This ramen is wonderfully adaptable! Here are some substitution options:

    • Chicken: For a vegetarian version, replace chicken with chickpeas or mushrooms to maintain protein content.
    • Noodles: Choose whole grain, or egg noodles if gluten isn’t a concern. For low-carb, zucchini noodles work beautifully.
    • Vegetables: Other vegetables like bok choy, broccoli, and snap peas can be substituted depending on your taste or what you have on hand.
    • Heat Level: Adjust the level of sriracha or omit altogether for a milder dish. You can also use chili flakes or fresh chili in its place.

    By offering these substitutions, the recipe broadens its appeal, ensuring that anyone can enjoy this delightful and spicy ramen dish!

    How to Prepare the Perfect Easy Spicy Chicken Ramen Dinner Recipe: Step-by-Step Guide

    Now, let’s dive into the preparation of your Easy Spicy Chicken Ramen Dinner. Here’s a clear, step-by-step guide to get you cooking deliciously:

    1. Prepare the Base: In a large pot, heat a tablespoon of sesame oil over medium heat. Add the minced garlic and grated ginger. Sauté for about 1-2 minutes until fragrant.

    2. Add Broth: Pour in 4 cups of low-sodium chicken broth, and bring to a boil. This creates a rich base for your ramen, enhancing the flavor profile.

    3. Introduce Spices: Stir in the soy sauce and sriracha. Use a whisk if necessary to combine them well with the broth to ensure a consistent flavor throughout.

    4. Cook the Chicken: Add the sliced chicken breast to the pot. Allow it to simmer for about 5-7 minutes, or until the chicken is fully cooked and tender. This step adds a nice protein kick.

    5. Prepare the Noodles: While the chicken cooks, prepare your ramen noodles according to package instructions. If using gluten-free noodles, adjust the cooking time as necessary to avoid mushiness.

    6. Add Vegetables: Incorporate the julienned carrots, spinach, and bell pepper into the pot. They just need a few minutes to soften—approximately 3-4 minutes. This step adds color, crunch, and nutrients to the dish.

    7. Combine Noodles and Broth: Once your noodles are cooked, drain them and then add them directly into the pot with the broth and chicken. Stir gently to ensure everything is well combined.

    8. Final Seasoning: Taste the ramen and adjust seasoning with salt and pepper as needed. Remember, the broth should have a rich flavor without being overwhelming.

    9. Garnish and Serve: Ladle the hot ramen into bowls and garnish with chopped green onions. Additional sriracha can be offered at the table for those who crave more heat!

    10. Enjoy: Relish your homemade Easy Spicy Chicken Ramen for a comforting dinner that packs a flavorful punch!

    Remember, this recipe is flexible! If you have leftovers, meal-prep some for lunches later in the week or adjust the portions for a smaller or larger crowd.

    Mastering Easy Spicy Chicken Ramen Dinner Recipe: Advanced Tips and Variations

    To elevate your Easy Spicy Chicken Ramen Dinner experience, consider these advanced tips and variations:

    Experiment with Broths

    While chicken broth is traditional, you can use vegetable broth for a lighter vegetarian version or miso broth for added umami. Each stock will impart a different flavor profile, allowing for personalization.

    Spice Levels

    With sriracha, you can control the heat. For a truly spicy experience, add fresh chilies during the cooking process. On the flip side, if you prefer milder flavors, reduce the sriracha amount or omit it altogether.

    Adopt Seasonal Ingredients

    Ramen can be customized based on the season. In spring, add fresh peas and asparagus; in winter, root vegetables like turnips and parsnips can add hearty texture. This rotational ingredient strategy makes your ramen fresh and exciting year-round.

    Protein Variations

    Apart from chicken, consider beef strips, shrimp, or even a soft-boiled egg for added richness. If creating a vegetarian version, chickpeas or tempeh can provide that protein element without sacrificing flavor.

    Add a Crunch

    For additional texture, top the ramen with fried onions, sesame seeds, or crushed peanuts when serving. This adds a fun crunch that balances the soupiness of the ramen.

    By exploring these variations and tips, you enhance your culinary skills while making your Easy Spicy Chicken Ramen truly your own.

    How to Store Easy Spicy Chicken Ramen Dinner Recipe: Best Practices

    Storing leftovers or preparing in advance is simple when it comes to Easy Spicy Chicken Ramen. Here are some storage tips:

    Refrigeration

    Store your ramen in an airtight container in the refrigerator for up to 3 days. However, if you notice the noodles getting mushy after refrigeration, you might prefer to keep noodles separate from the broth and vegetables. Simply reheat them together when you’re ready to enjoy.

    Freezing

    For longer storage, consider freezing your ramen. The best practice is to freeze the broth and chicken together, while keeping the noodles and vegetables separate in their own bags. This will prevent any textural issues when reheating. You can store the dish for up to 2 months.

    Reheating

    When you’re ready to enjoy your frozen ramen, thaw it overnight in the refrigerator. Reheat the broth on the stovetop, adding the cooked noodles and vegetables just before serving to prevent overcooking. For fresh ramen, you can use the microwave, but do so in bursts to avoid hot spots.

    By following these storage suggestions, you ensure your Easy Spicy Chicken Ramen remains tasty and satisfying, making it one of the most convenient easy dinner recipes out there.

    Nutritional Value of Easy Spicy Chicken Ramen Dinner Recipe

    Understanding the nutrition behind your meals can help you make informed choices. Here’s the breakdown for a typical serving of Easy Spicy Chicken Ramen:

    • Calories: Approximately 450 per serving
    • Protein: 30 grams (thanks to chicken and veggies)
    • Fat: 12 grams (varies with the use of oils and chicken skin)
    • Carbohydrates: 60 grams (from ramen noodles and vegetables)
    • Fiber: 4 grams (primarily from vegetables)
    • Sodium: Approx. 800 mg (reducing sodium in broth and soy sauce can lower this)

    Feel free to adjust serving sizes according to your dietary needs. For example, using zucchini noodles instead of traditional ramen can significantly reduce the carbohydrate content.

    Adding vegetable content will also boost fiber and nutrients without massively increasing calories. Through mindful substitutions and portions, this Easy Spicy Chicken Ramen can fit snugly into various dietary plans.

    FAQs: Frequently Asked Questions About Easy Spicy Chicken Ramen Dinner Recipe

    1. Can I make this dish vegetarian?

    Absolutely! Substitute chicken with tofu or chickpeas, and ensure to use vegetable broth instead of chicken broth.

    2. Is this ramen gluten-free?

    Yes, by using gluten-free ramen noodles and tamari in place of soy sauce, this recipe can be made gluten-free.

    3. How can I reduce the spiciness?

    To decrease the heat level, simply reduce the amount of sriracha or omit it entirely. You can also add a dollop of plain yogurt when serving for a cooling effect.

    4. Can I batch-cook this recipe?

    Yes, it’s perfect for batch cooking! Just store the noodles separately if you have leftovers to prevent them from becoming mushy.

    5. What can I use in place of ramen noodles?

    You can opt for zucchini noodles, shirataki noodles, or other whole grains that suit your dietary preferences for a different twist.

    6. How can I customize my ramen further?

    Feel free to add any veggies, proteins, or spices that fit your taste. You can mix in corn, peas, or seasonal vegetables based on availability and personal preference.

    In conclusion, the Easy Spicy Chicken Ramen Dinner Recipe is a delightful mix of flavors that caters to various dietary preferences while being easy to prepare and manipulate according to your tastes. So don’t hesitate—grab your ingredients, get cooking, and enjoy a scrumptious bowl of homemade ramen that’s sure to please everyone!