Category: seafood

  • Easy Coconut Lime Fish Dinner

    Easy Coconut Lime Fish Dinner

    Easy Coconut Lime Fish Dinner: A Tropical Delight

    Introduction to Easy Coconut Lime Fish Dinner

    Welcome to your next culinary adventure: the Easy Coconut Lime Fish Dinner! If you’ve been searching for simple yet flavorful easy dinner recipes, you’re in the right place. This dish combines the refreshing zest of lime with the creamy richness of coconut, creating a delightful experience for your taste buds without requiring hours of prep time.

    In today’s fast-paced world, it can often feel overwhelming to prepare healthy meals, especially for busy parents, working professionals, and students juggling various commitments. This recipe is fantastic for everyone, from food enthusiasts looking to explore tropical flavors to diet-conscious individuals seeking nourishing dinner options. Not only is this dish easy to whip up, but it is also gluten-free and can be made vegan using a few simple substitutions.

    The harmony of flavors in this dish will transport you to a sunny beach every time you take a bite. Each serving is not only delightful but also packed with health benefits, making it a perfect choice for your weeknight dinner rotation. With its vibrant ingredients and straightforward preparation, this coconut lime-themed dish is bound to impress everyone at your table.

    Benefits and Advantages of Easy Coconut Lime Fish Dinner

    What sets the Easy Coconut Lime Fish Dinner apart from other easy dinner recipes is its exceptional combination of flavor, nutrition, and ease of preparation. Here are some compelling reasons why this dish deserves a spot on your dinner table.

    Quick and Simple Preparation

    One of the standout qualities of this recipe is its simplicity. With just a few key ingredients and straightforward steps, preparing this meal can take less than 30 minutes. This makes it ideal for busy weeknights when you need a wholesome meal but don’t have the luxury of time.

    Health Benefits

    In a world where healthy eating often requires complicated meal plans, this dish emerges as a beacon of good nutrition. Fish is a lean protein source loaded with essential omega-3 fatty acids, which are vital for heart health. Coupled with coconut milk, which has been shown to offer anti-inflammatory properties, this meal is as nutritious as it is delicious. Plus, the lime juice helps enhance iron absorption, making it beneficial for those who follow plant-based diets.

    Versatility for Dietary Needs

    This dish accommodates various dietary restrictions, making it a fantastic choice for families and guests. The recipe can easily be converted to a vegan option by substituting fish with tofu or jackfruit and replacing dairy with coconut milk. Additionally, it is gluten-free, making it accessible for those with gluten intolerance. Whether you’re an adventurous eater or someone sticking to dietary preferences, the Easy Coconut Lime Fish Dinner is a flexible recipe that everyone can enjoy.

    Whether you’re preparing a cozy meal for yourself, cooking for family, or impressing guests, this dish is sure to be a hit. Its tropical flair and creamy textures not only provide comfort but also promote healthy eating habits without sacrificing flavor.

    Ingredients Overview

    Essential Ingredients for Easy Coconut Lime Fish Dinner

    Before we dive into the cooking process, let’s take a look at the ingredients you will need to create this flavorful dish:

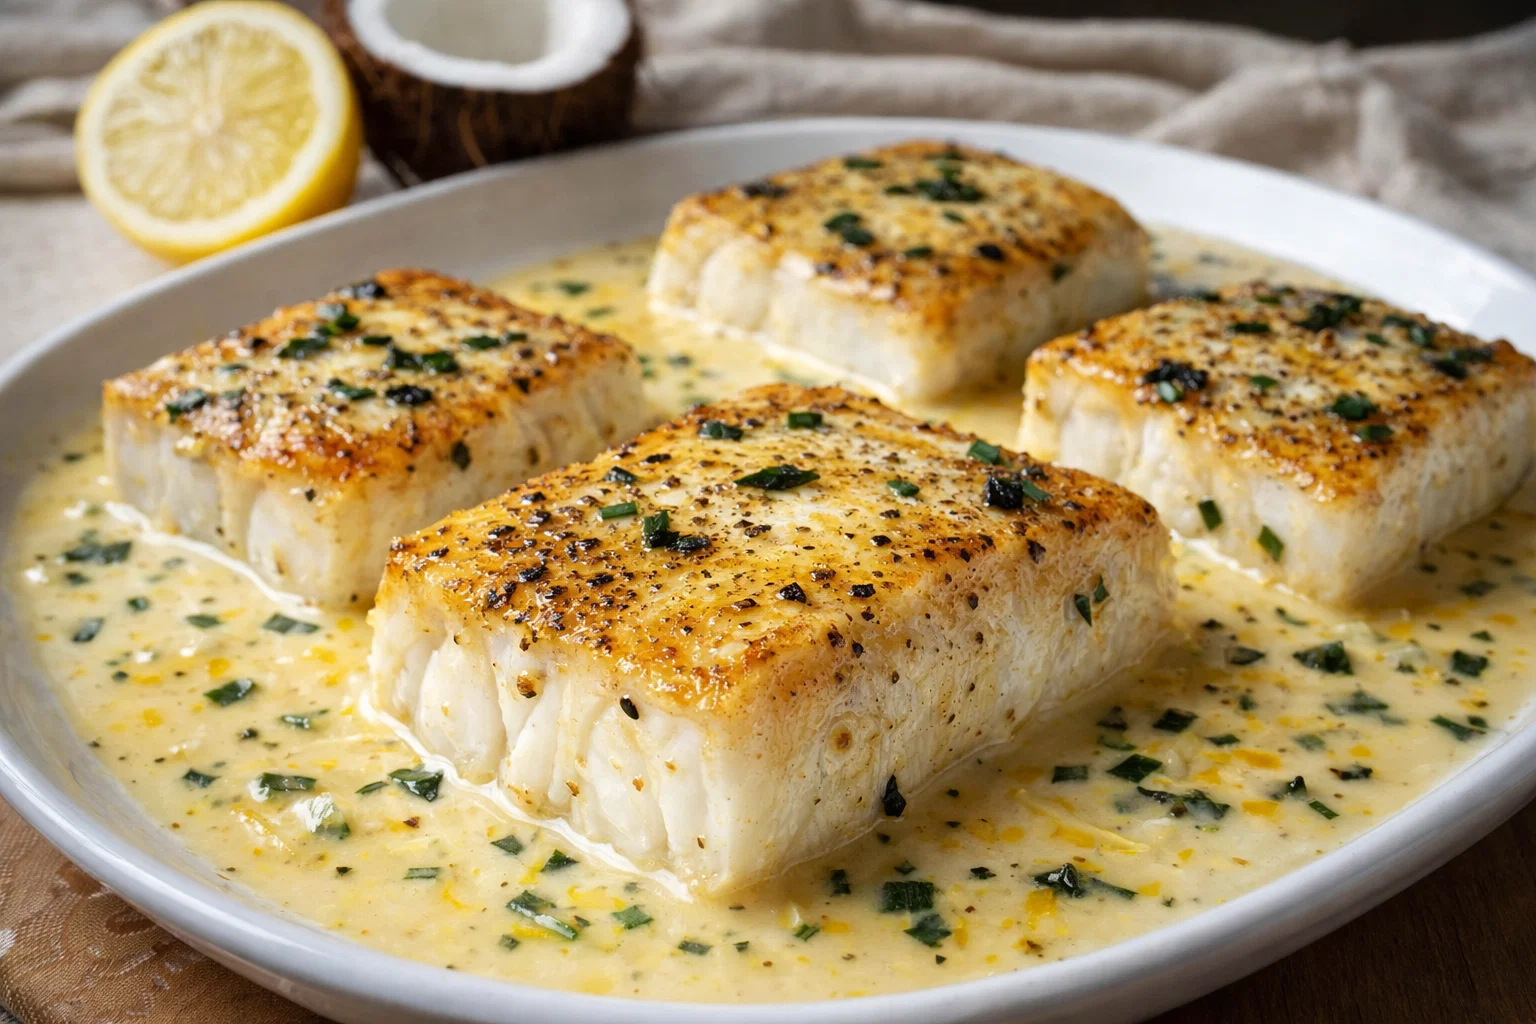
    • Fish: 4 fillets of white fish (like tilapia or cod) – a rich source of protein.
    • Coconut Milk: 1 can (13.5 oz) – provides richness and a fantastic flavor base.
    • Lime Juice: 2 tablespoons of fresh lime juice – adds that zesty kick.
    • Garlic: 2 cloves, minced – enhances flavor.
    • Onion: 1 medium onion, chopped – adds sweetness.
    • Bell Pepper: 1 bell pepper, sliced (red or yellow for sweetness).
    • Seasoning: Salt and pepper, to taste.
    • Fresh Cilantro: for garnish – ties in fresh flavors.

    Note: For a vegan option, substitute the fish with 16 oz of firm tofu, replacing fish seasoning with turmeric and a bit of soy sauce for added flavour.

    Dietary Substitutions to Customize Your Easy Coconut Lime Fish Dinner

    Depending on your preferences or dietary restrictions, several substitutions can be made without sacrificing flavor:

    • Fish Alternatives: If you’re looking for a non-fish option, consider using firm tofu, tempeh, or even jackfruit marinated in the same coconut lime mixture to capture the tropical essence.
    • Gluten-Free: Ensure your seasoning and sauces are gluten-free. Most coconut milk is naturally gluten-free, but check labels for added ingredients.
    • Dairy-Free and Vegan: Apart from using tofu, firm tempeh also works well, and coconut milk replaces any dairy to keep the dish creamy.
    • Healthier Fats: Instead of coconut milk, you can choose light coconut milk for lower calories and fat content.
    • Extra Veggies: For added nutrition and flavor, include vegetables such as spinach, zucchini, or snap peas into the dish.

    These substitutions ensure that the Easy Coconut Lime Fish Dinner can be enjoyed by all, reflecting your dietary needs while maintaining its tropical charm.

    How to Prepare the Perfect Easy Coconut Lime Fish Dinner: Step-by-Step Guide

    Ready to create your Easy Coconut Lime Fish Dinner? Follow this step-by-step guide for a foolproof preparation process!

    1. Prepare the Base: Begin by gathering all your ingredients and measuring them out. This will streamline your cooking process.
    2. Marinate the Fish: In a shallow dish, combine 1 cup of coconut milk, 2 tablespoons of lime juice, minced garlic, and a pinch of salt and pepper. Add the fish fillets and cover them in the marinade. Let marinate for at least 15 minutes to absorb the flavors.
    3. Sauté the Vegetables: While the fish is marinating, heat a non-stick skillet over medium heat. Add a splash of oil or a tablespoon of coconut milk and sauté the chopped onion and sliced bell pepper until softened (about 5 minutes).
    4. Add the Fish: Once your vegetables have softened, using a spatula, create space in the skillet and gently place the marinated fish fillets. Pour any remaining marinade over the top of the fish.
    5. Cook the Fish: Cook each side of the fish for about 4-5 minutes, depending on thickness, until the fish is cooked through and flakes easily with a fork.
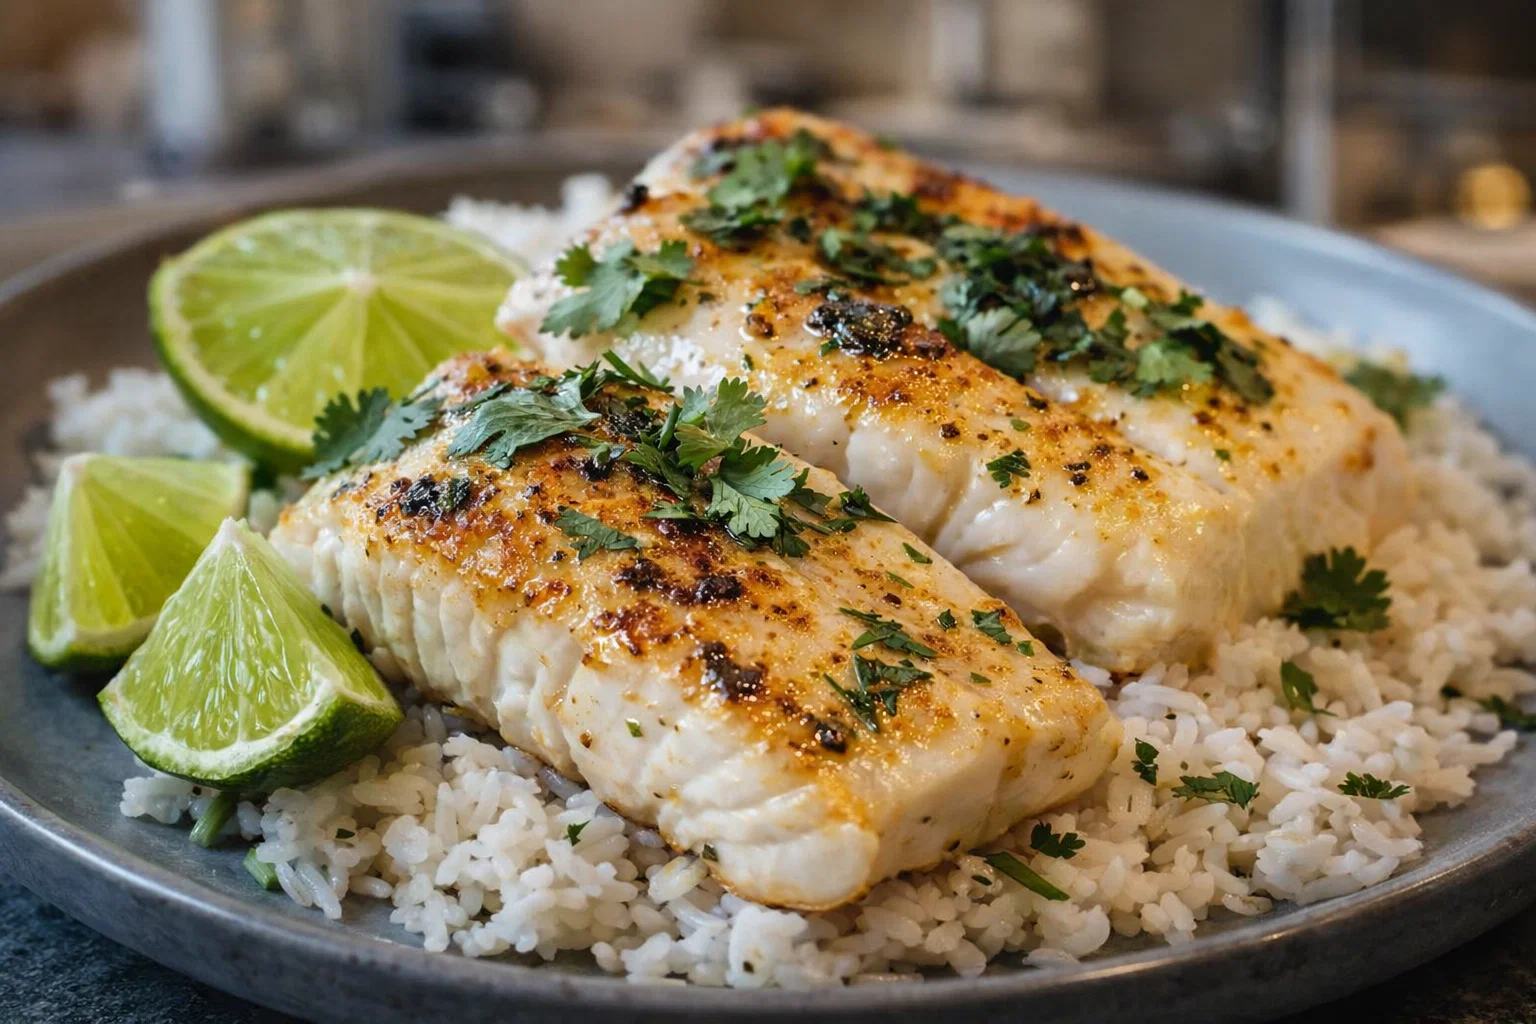
    6. Finish with Lime and Cilantro: Once the fish is cooked, squeeze fresh lime juice over the top and sprinkle with chopped cilantro for a pop of flavor and freshness.
    7. Serve: Transfer the fish and sautéed vegetables onto a serving platter. Consider pairing it with steamed rice, quinoa, or a light salad for a complete meal.

    Feel free to adapt the cooking time based on your preferred level of doneness for the fish, or substitute the fish with any protein of your choice, ensuring the cooking time reflects the changes.

    Mastering Easy Coconut Lime Fish Dinner: Advanced Tips and Variations

    To elevate your cooking experience with the Easy Coconut Lime Fish Dinner, here are a few advanced tips and variations you can incorporate:

    • Spice It Up: Experiment with spices to enhance the flavor. Consider adding in red pepper flakes or chili powder to introduce a spicy kick.
    • Herb Infusion: For an aromatic twist, use fresh herbs like basil or mint along with cilantro, supplying a unique flavor profile.
    • Grilled Variation: Instead of pan-cooking, opt for grilling your fish for a smoky flavor. Simply marinate as directed and grill for 3-4 minutes per side.
    • Coconut Curry Twist: Add a teaspoon of curry powder to the marinade for a coconut curry vibe that complements the lime beautifully.
    • Serve with Sides: To create a complete dinner experience, serve this dish alongside coconut rice or a refreshing citrus salad that echoes the dish’s tropical theme.

    These variations encourage creativity in the kitchen and empower you to customize the dish to suit your personal palate.

    How to Store Easy Coconut Lime Fish Dinner: Best Practices

    Properly storing your Easy Coconut Lime Fish Dinner ensures that you can enjoy leftovers safely while maintaining the flavors. Here’s how to do it:

    • Refrigeration: Allow the dish to cool to room temperature. Place it in an airtight container and store it in the refrigerator for up to 3 days.
    • Freezing: If you’ve cooked a large batch and want to save some for later, you can also freeze the dish. Portion it into freezer-safe containers, letting it cool first, and keep for up to 2 months.
    • Reheating: When you’re ready to enjoy your leftovers, you can reheat them in a skillet on medium heat or in the microwave. Ensure the fish reaches an internal temperature of 165°F. Be mindful to not overcook when reheating, as this could lead to a dry texture.

    By following these storage tips, you can make mealtime a breeze while enjoying this delicious fish dinner for days to come.

    Nutritional Value of Easy Coconut Lime Fish Dinner

    One of the highlights of the Easy Coconut Lime Fish Dinner is its nutritional profile. Here’s a breakdown of the nutritional value of a standard serving, which typically includes 1 fillet of fish with the accompanying sauce and veggies:

    • Calories: Approximately 350-400 calories
    • Protein: 25g of protein from fish
    • Fat: 20g of healthy fats (primarily from coconut milk)
    • Carbohydrates: 15g of carbohydrates from vegetables (bell pepper, onion)
    • Fiber: 3g, depending on the vegetables used
    • Vitamins and Minerals: Rich in Vitamin C and beneficial nutrients from fish, along with vital minerals.

    This dish offers a power-packed meal option that supports a balanced diet without compromising on taste. With its protein-rich fish content and nutrient-dense vegetables, this recipe is an excellent choice for anyone focused on maintaining a healthy lifestyle.

    FAQs: Frequently Asked Questions About Easy Coconut Lime Fish Dinner

    Q: Can I substitute the fish with chicken or another protein?
    A: Absolutely! While this recipe is tailored for fish, chicken, shrimp, or tofu can also work beautifully with the coconut lime flavors.

    Q: Is this recipe suitable for meal prep?
    A: Yes, the Easy Coconut Lime Fish Dinner can be prepared in advance. Just store the cooked dish in airtight containers for easy reheating during the week.

    Q: Can I use frozen fish?
    A: Yes, frozen fish can be used, but it’s advisable to thaw it completely before marinating and cooking to ensure even cooking.

    Q: How can I make this dish spicier?
    A: You can enhance the spice by adding chili pepper, red pepper flakes, or even a dash of sriracha in the marinade or sauce.

    Q: Is there a vegan version of this recipe?
    A: Yes! Simply replace the fish with firm tofu or jackfruit, and follow the same marinating process for a delightful vegan adaptation.

    By addressing these common queries, readers can feel more comfortable trying this exotic dish, facilitating their meal preparation with easy adjustments for their dietary preferences.


    Embark on this culinary journey with the Easy Coconut Lime Fish Dinner, transforming your weeknight meals into an exquisite tropical experience that is both simple and satisfying. With its myriad of flavors and health benefits, it’s sure to become a go-to recipe in your collection of easy dinner recipes!

  • Tasty Pappadeaux Mardi Gras Pasta Copycat

    Tasty Pappadeaux Mardi Gras Pasta Copycat

    Tasty Pappadeaux Mardi Gras Pasta Copycat: A Tropical Delight

    Introduction to Tasty Pappadeaux Mardi Gras Pasta Copycat

    If you’re searching for a lively, flavorful dish that combines the essence of Mardi Gras with the comforts of home, look no further than this Tasty Pappadeaux Mardi Gras Pasta Copycat recipe. Inspired by the famous restaurant dish, this recipe brings together a medley of vibrant ingredients, ensuring it’s not only pleasing to the palate but also beneficial for a variety of dietary needs. This is one of those pasta recipes that offer a delightful experience, and anyone—ranging from busy parents to culinary enthusiasts—can pull it off in no time.

    The beauty of this pasta dish lies in its versatility. Not only can it be tailored for different dietary requirements such as gluten-free or vegan, but it also packs a nutrient punch, making it a healthy choice that doesn’t skimp on flavor. By incorporating fresh vegetables, lean proteins, and aromatic spices, each bite invites you to celebrate the moment. Paired with an easy-to-follow preparation, this dish becomes an appealing option for any occasion, whether it’s a family dinner or a festive gathering with friends.

    In essence, making this Tasty Pappadeaux Mardi Gras Pasta Copycat is an opportunity to immerse yourself in an array of flavors while enjoying the simplicity that comes with cooking at home. It’s time to don your chef’s hat and let the magic of Mardi Gras unfold in your kitchen!

    Benefits and Advantages of Tasty Pappadeaux Mardi Gras Pasta Copycat

    This Tasty Pappadeaux Mardi Gras Pasta Copycat recipe stands out for multiple reasons, especially if you’re searching for easy pasta recipes that are both quick to prepare and delightful to consume. One of the primary benefits of this dish is its simplicity. With just a handful of ingredients and straightforward steps, even novice cooks will shine in the kitchen. Busy professionals, students, and home cooks alike will appreciate the short preparation time.

    In addition to being uncomplicated, this pasta dish is also nutrient-rich, brimming with colorful vegetables and proteins that promote health and vitality. The incorporation of bell peppers, onions, and spinach provides essential vitamins and minerals, while the choice of protein—be it shrimp, chicken, or plant-based alternatives—offers a good source of lean protein. For those mindful of calories, substitutions can be made, ensuring that it caters to the diet-conscious without sacrificing taste.

    Moreover, this recipe is inherently adaptable. If you’re following a gluten-free diet, swapping regular pasta for gluten-free options is a breeze. Vegetarians and vegans will find this recipe welcoming too, as you can easily enhance the dish with plant-based proteins, such as chickpeas or tofu. Whether you’re aiming for a hearty meal or a lighter fare, this recipe offers the flexibility necessary to cater to a wide range of personal preferences.

    Overall, the Tasty Pappadeaux Mardi Gras Pasta Copycat isn’t just a delightful dish; it is a meal that fosters creativity in your culinary journey. Whether you’re looking to impress guests or simply enjoy a comforting dish at home, this recipe is sure to elevate your cooking experience.

    Ingredients Overview

    Essential Ingredients for Tasty Pappadeaux Mardi Gras Pasta Copycat

    To prepare this sumptuous dish, you will need the following ingredients. Each of them plays a role in creating flavors and textures that evoke the spirit of Mardi Gras.

    • 8 oz. pasta (of your choice; gluten-free pasta can be used)
    • 1 lb. shrimp (peeled and deveined; substitute with chicken or tofu for dietary needs)
    • 1 cup heavy cream (or coconut milk for a dairy-free option)
    • 1 bell pepper (diced; use any color for visual appeal)
    • 1 onion (chopped; red or yellow for sweetness)
    • 2 cloves garlic (minced; fresh garlic enhances flavor)
    • 1 tsp. Cajun seasoning (adjust to taste; can be made homemade)
    • 2 tbsp. olive oil (to sauté the vegetables)
    • 1 cup spinach (fresh or frozen; packed with nutrients)
    • Salt and black pepper (to taste; necessary for seasoning)

    Dietary Substitutions to Customize Your Tasty Pappadeaux Mardi Gras Pasta Copycat

    This dish can be modified to accommodate a variety of dietary preferences.

    • For a vegan version:
    • Substitute shrimp with firm tofu or chickpeas.
    • Use coconut cream instead of heavy cream for a rich flavor without dairy.

    • For gluten-free diet:

    • Simply replace regular pasta with gluten-free pasta (brown rice or quinoa pasta works well).

    • To reduce calories:

    • Opt for low-fat versions of dairy products or decrease the quantity of cream.

    • For a low-carb option:

    • Replace pasta with spiralized zucchini or spaghetti squash as a healthier alternative.

    No matter your dietary preference, the Tasty Pappadeaux Mardi Gras Pasta Copycat can easily be adjusted to fit your needs without losing its spectacular taste.

    How to Prepare the Perfect Tasty Pappadeaux Mardi Gras Pasta Copycat: Step-by-Step Guide

    Get ready to create a beautiful dish with this step-by-step guide. It’s not just one of the many pasta recipes you might find; it’s an explosion of flavors waiting for you to unleash them. Let’s get started!

    1. Prepare the Pasta:
      Begin by cooking the pasta according to the package instructions until al dente. Once cooked, drain it and set it aside. Make sure to reserve some pasta water to adjust the sauce consistency later.

    2. Sauté the Vegetables:
      In a large skillet, heat 2 tablespoons of olive oil over medium heat. Add the chopped onion and bell pepper, sautéing until they’re soft and fragrant. This will usually take about 3-4 minutes.

    3. Add Garlic:
      Incorporate the minced garlic into the skillet and cook for an additional 1-2 minutes, just until the garlic is aromatic but not browned.

    4. Introduce the Shrimp:
      Add the peeled shrimp to the skillet. Cook until they’re pink and opaque, roughly 3-4 minutes. If using chicken, ensure it’s fully cooked at this stage.

    5. Season the Mixture:
      Sprinkle in the Cajun seasoning, salt, and black pepper. Toss everything together to ensure the shrimp and veggies are well-coated with the spices.

    6. Pour in the Cream:
      Slowly add the heavy cream (or coconut milk), stirring to combine. Allow the mixture to simmer for about 5 minutes, giving it time to thicken. If the sauce is too thick, add a little reserved pasta water to adjust the consistency.

    7. Fold in the Spinach:
      Once the sauce has thickened, add the spinach and mix well. Cook until the spinach wilts, approximately 2 minutes.

    8. Combine Pasta with Sauce:
      Finally, add the drained pasta to the skillet. Toss everything together to coat the pasta evenly with the sauce. Taste and adjust the seasoning if necessary.

    9. Serve:
      Transfer your delightful creation to plates or bowls. Optionally, garnish with fresh parsley or grated Parmesan cheese for an extra touch.

    10. Enjoy!
      This vibrant pasta is rich in flavor and color, making it perfect for any occasion.

    By following these steps, your Tasty Pappadeaux Mardi Gras Pasta Copycat will turn out fabulously! The great part? Each step can be tailored to your preferences, ensuring it meets dietary needs while still celebrating the essence of the original dish.

    Mastering Tasty Pappadeaux Mardi Gras Pasta Copycat: Advanced Tips and Variations

    As you embrace the Tasty Pappadeaux Mardi Gras Pasta Copycat recipe, consider these advanced tips and variations to elevate your cooking experience even further.

    • Spice Level Adjustments:
      For those who enjoy a kick, add diced jalapeños or extra Cajun seasoning. Balance out the heat with a hint of sweetness from a teaspoon of sugar or honey.

    • Experiment with Proteins:
      Instead of shrimp, try using scallops, crab meat, or a mix of seafood for a more authentic Louisiana feel. Alternatively, omit the animal proteins altogether for a plant-based explosion.

    • Add Fresh Herbs:
      Just before serving, stir in fresh herbs, such as basil or cilantro, for an additional layer of freshness and flavor.

    • Incorporate Citrus:
      A squeeze of lemon or lime juice can brighten the dish, providing a zesty contrast to the richness of the cream.

    • Roasted Veggies:
      For a smoky flavor, roast your vegetables (bell peppers, onions, and even zucchini) before adding them to the dish. This can bring an entirely new dimension to the dish.

    By implementing these tips, you can master the Tasty Pappadeaux Mardi Gras Pasta Copycat and customize it to your absolute liking. The possibilities are limitless!

    How to Store Tasty Pappadeaux Mardi Gras Pasta Copycat: Best Practices

    Once you’ve enjoyed your delicious Tasty Pappadeaux Mardi Gras Pasta Copycat, you might be wondering how to store the leftovers. Here are the best practices to ensure you enjoy every last bite.

    • Refrigeration:
      Allow your pasta to cool to room temperature before transferring it to an airtight container. It can be stored in the refrigerator for up to 3 days.

    • Freezing:
      If you want to save it for a longer time, you can freeze the pasta. Place it in a freezer-safe container or bag, making sure to label it with the date. You can freeze it for up to 3 months. Note that creamy sauces can change in texture when frozen, but it’s still safe to eat.

    • Reheating:
      To reheat, thaw any frozen leftovers in the refrigerator overnight. Heat in a microwave or on a stovetop over medium heat, adding a splash of water or additional cream to ensure it doesn’t dry out.

    Proper storage not only reduces food waste but also ensures you have a delicious meal ready for another day.

    Nutritional Value of Tasty Pappadeaux Mardi Gras Pasta Copycat

    Understanding the nutritional content of your meals can help you make informed choices about what you consume. Here’s a breakdown of the nutritional value for one serving (assuming the dish serves four):

    • Calories: Approximately 600 kcal
    • Protein: 25 g
    • Fat: 25 g
    • Carbohydrates: 70 g
    • Fiber: 5 g
    • Sugars: 5 g

    Key Nutritional Components:

    • Proteins: Comes from shrimp and cream; essential for muscle repair and overall health.
    • Vitamins and Minerals: The presence of vegetables like spinach and bell peppers ensures a good intake of vitamins A and C, and plenty of antioxidants.
    • Healthy Fats: Olive oil in moderation adds beneficial monounsaturated fats that support heart health.

    By tailoring the recipe to meet your dietary preferences, you can also modify the overall nutritional value, ensuring it aligns with your health goals.

    FAQs: Frequently Asked Questions About Tasty Pappadeaux Mardi Gras Pasta Copycat

    1. Can I use other types of pasta for this recipe?

    Yes! You can use any pasta variety, including whole wheat, gluten-free, or even zucchini noodles for a low-carb option.

    2. How can I make this dish spicier?

    To increase the spice factor, add more Cajun seasoning, or mix in some crushed red pepper flakes or diced jalapeños during the cooking process.

    3. Can I prepare the sauce ahead of time?

    Absolutely! Prepare the cream sauce ahead of time, store it in the refrigerator, and then combine it with freshly cooked pasta when you’re ready to serve.

    4. Is there a way to make this dish vegetarian?

    Sure! Simply omit the shrimp and use chickpeas or tofu as a protein source, keeping the rest of the recipe intact for a delightful vegetarian version.

    5. How do I adjust this for a smaller family?

    This recipe is easily adjustable. Simply halve the ingredients to suit your household size while keeping the same proportions.

    In conclusion, the Tasty Pappadeaux Mardi Gras Pasta Copycat is far more than just another pasta dish; it’s a celebration of flavors and a way to embrace culinary creativity in the kitchen. With its ease of preparation, healthy ingredients, and adaptability, this recipe is a vibrant addition to any meal planner. Enjoy exploring the tastes of Mardi Gras at home!

  • Easy Crispy Fish Taco Bowls

    Easy Crispy Fish Taco Bowls

    Easy Crispy Fish Taco Bowls: A Tropical Delight

    Introduction to Easy Crispy Fish Taco Bowls

    Are you tired of the same old meals and looking for easy dinner recipes that will excite your taste buds? Look no further than these Easy Crispy Fish Taco Bowls! Bursting with flavor and an incredible crunch, this dish not only satisfies your appetite but also promotes healthier eating habits. Imagine the succulent, crispy fish paired with fresh ingredients like avocados, mango salsa, and zesty lime. It’s the perfect balance of taste and nutrition.

    This recipe is designed for everyone, from busy parents needing quick meals to students looking for healthy, budget-friendly options. These bowls are not only easy to prepare but can also be customized to suit various dietary needs, making them a versatile choice for any home cook. Plus, they are ideal for future meal prep, allowing you to whip them up in advance and enjoy them throughout the week.

    Whether you’re vegan, gluten-free, or keeping an eye on your calorie intake, there’s a way to adapt this recipe to fit your lifestyle. Dive into the tropical flavors of these Easy Crispy Fish Taco Bowls; your dinner table will thank you!

    Benefits and Advantages of Easy Crispy Fish Taco Bowls

    The Easy Crispy Fish Taco Bowls present numerous benefits that set them apart from conventional recipes. Firstly, the preparation of this dish is incredibly straightforward. In less than 30 minutes, you can have a delicious meal ready to serve, making it perfect for busy weeknights. The dish showcases flaky fish, crisp vegetables, and a variety of toppings, adding layers of flavors without complicating the cooking process.

    In addition to their ease of preparation, these bowls are nutritious. Fish is an excellent source of high-quality protein and omega-3 fatty acids, which promote heart health. Pairing fish with avocado and fresh vegetables enhances the nutritional profile, providing a plethora of vitamins and minerals essential for overall well-being. When it comes to satisfying cravings, these bowls keep you feeling fuller longer, thanks to the combination of proteins and healthy fats.

    Lastly, easy dinner recipes like these bowls can be tailored to fit dietary restrictions or preferences. Whether you want a spicy kick from jalapeños, a cooling touch from Greek yogurt, or a totally vegan option using grilled portobello instead of fish, the choices are virtually limitless. This flexibility not only makes the dish appealing to a wide audience but also encourages creativity in the kitchen. Make it once, and you’ll likely find yourself coming back for more!

    Ingredients Overview

    Essential Ingredients for Easy Crispy Fish Taco Bowls

    To create the most delightful Easy Crispy Fish Taco Bowls, you will need the following essential ingredients:

    • Fish (Cod or Tilapia): 1 lb, cut into strips – These fish varieties are perfect for a crispy coating and cook quickly.
    • Oil (for frying): 1 cup (can use olive oil or avocado oil for healthier options)
    • Cornstarch: 1/2 cup – Creates a light crispy coating.
    • Eggs: 2, beaten – Helps the cornstarch adhere to the fish.
    • Panko breadcrumbs: 1 cup – Adds an incredible crunch.
    • Salt and pepper: To taste.
    • Taco seasoning: 1 tbsp – Adds flavor depth to the fish.
    • Tortillas (corn or flour): 4, for serving. (Consider gluten-free options.)
    • Cabbage: 2 cups, shredded – Provides crunch and color.
    • Avocado: 1, sliced – Packed with healthy fats and fibers.
    • Mango salsa: 1 cup (or store-bought) – A fruity contrast to the savory fish.
    • Fresh lime wedges: For garnish and added zing.

    Diet-Friendly Options:
    – For a vegan version, swap fish with firm tofu or portobello mushrooms.
    – To make it gluten-free, ensure your tortillas and breadcrumbs are gluten-free.

    Dietary Substitutions to Customize Your Easy Crispy Fish Taco Bowls

    Customization is key to making these Easy Crispy Fish Taco Bowls an instant favorite for everyone at your table. Below are some suggested substitutions suitable for dietary needs:

    • Protein Alternatives: Aside from fish, consider using shrimp, chicken, or jackfruit for a plant-based version. All these options can provide different textures and flavors keeping the essence of a taco bowl.

    • For Gluten-Free Needs: If you’re avoiding gluten, replace regular breadcrumbs with gluten-free panko or crushed gluten-free crackers. Ensure to use corn tortillas instead of flour.

    • Dairy-Free Options: If you’re looking to cut out dairy, replace sour cream or yogurt with cashew cream or silken tofu blended until smooth. Coconut yogurt is another delightful substitute.

    • Low-Calorie Options: For a lighter dish, consider baking the fish instead of frying it. Simply coat the fish with the eggs and breadcrumbs, then place on a baking sheet and lightly spray with oil before baking.

    By adapting these ingredients to your needs, you not only create a delicious meal but also ensure everyone can enjoy it!

    How to Prepare the Perfect Easy Crispy Fish Taco Bowls: Step-by-Step Guide

    Follow these step-by-step instructions to prepare your Easy Crispy Fish Taco Bowls effortlessly.

    1. Prepare the Fish: Start by patting the fish fillets dry with paper towels. This helps the coating stick better. Cut the fish into strips.

    2. Set Up the Breading Station: In one shallow bowl, mix together cornstarch with salt, pepper, and taco seasoning. In a second bowl, beat the eggs until smooth, and in a third, place the panko breadcrumbs.

    3. Coat the Fish:

    4. Dredge each fish strip in the cornstarch mixture, ensuring it’s well-coated.
    5. Next, dip it into the beaten eggs, allowing any excess to drip off.
    6. Finally, roll the fish in panko breadcrumbs, pressing slightly to ensure a good coating. Set aside.

    7. Heat the Oil: In a large skillet, heat oil over medium-high heat until hot. A good test is to drop a small piece of bread into the oil; if it sizzles, it’s ready!

    8. Fry the Fish: Carefully place the coated fish strips into the hot oil in batches to avoid overcrowding. Fry for about 3-4 minutes on each side until golden brown and crispy. Remove and place on a paper towel-lined plate to drain excess oil.

    9. Prepare the Tortillas: Warm tortillas in another pan or microwave until soft and pliable. This step enhances their flavor and texture.

    10. Assemble the Bowls:

    11. Start with a base of shredded cabbage in each bowl.
    12. Layer the crispy fish on top.
    13. Add slices of avocado and a generous scoop of mango salsa.
    14. Drizzle with lime juice and garnish with lime wedges.

    15. Serve: Present the bowls warm, allowing everyone to mix and match toppings to their liking. These Easy Crispy Fish Taco Bowls are best enjoyed fresh, with family and friends!

    Mastering Easy Crispy Fish Taco Bowls: Advanced Tips and Variations

    To elevate your Easy Crispy Fish Taco Bowls further, consider these advanced tips and variations:

    • Experiment with Seasonings: Feel free to customize the taco seasoning by adding chili powder, cumin, or paprika to suit your taste preferences.

    • Add Extra Crunch: Top the bowls with fried shallots or crispy onions for an extra crunchy kick.

    • Sauce It Up: Create a zesty sauce by mixing Greek yogurt (or vegan yogurt) with lime juice, a pinch of salt, and your favorite hot sauce. This creamy dressing adds a delightful creaminess that complements the crispy fish.

    • Explore Different Bases: Instead of cabbage, try quinoa or brown rice for a heartier and more filling base.

    • Pickled Veggies: Consider garnishing with pickled onions or carrots for added tang. This will brighten up the dish and provide a lovely contrast to the savory fish.

    These variations ensure that the recipe never gets boring and allows you to impress your guests with diverse flavors in each bowl!

    How to Store Easy Crispy Fish Taco Bowls: Best Practices

    Storing your Easy Crispy Fish Taco Bowls properly will help maintain their deliciousness for future meals. Here’s how to do it:

    • Refrigeration: If you have leftovers, store the fish and vegetables separately in airtight containers in the refrigerator. They will remain fresh for up to 2 days. Ensure the fish is completely cooled before sealing it to prevent moisture buildup.

    • Freezing: While it’s not recommended to freeze fried fish due to texture changes, you can freeze any uncooked fish coated in cornstarch and breadcrumbs. For this, assemble the coated fish in an airtight bag, layered with parchment paper to prevent sticking. Store for up to 3 months.

    • Reheating: When you’re ready to eat your leftovers, reheat the fish in a hot skillet to regain its crispiness or in an oven preheated to 400°F for about 10 minutes. Just be careful not to overcook it.

    Having these best practices in mind will help you enjoy your Easy Crispy Fish Taco Bowls even after the first delicious serving!

    Nutritional Value of Easy Crispy Fish Taco Bowls

    Understanding the nutritional value of your meals is essential, especially when seeking healthier alternatives. Here’s an approximate breakdown for one serving of Easy Crispy Fish Taco Bowls (based on average servings of fish, tortillas, and toppings):

    • Calories: approximately 450-550 kcal
    • Protein: 30g
    • Fat: 25g (Healthy fats from avocado and fish)
    • Carbohydrates: 35g
    • Fiber: 6g
    • Sugars: 2g

    These bowls are rich in protein and healthy fats, making them an excellent choice for a balanced meal. Adjust the toppings and base according to your dietary preferences, and you can even decrease caloric content by opting for less oil or using baking methods instead of frying.

    FAQs: Frequently Asked Questions About Easy Crispy Fish Taco Bowls

    Q1: Can I use frozen fish for this recipe?
    Yes! Frozen fish can work well; just ensure it is completely thawed and patted dry before proceeding with the recipe to achieve optimal crispiness.

    Q2: What can I use in place of fish?
    You can replace fish with shrimp, chicken, or a vegan alternative like firm tofu or grilled vegetables to suit different dietary preferences.

    Q3: Can I prepare this dish ahead of time?
    Yes, you can prepare the fish and chop your vegetables ahead of time. However, for best results, fry the fish just before serving to maintain its crunch.

    Q4: Can I make this gluten-free?
    Absolutely! Just ensure your breadcrumbs and tortillas are gluten-free, and follow the same steps to prepare your taco bowls.

    Q5: How do I make this recipe spicier?
    Add chili powder to the taco seasoning or top with fresh jalapeños or a drizzle of your favorite hot sauce to kick up the heat.

    These Easy Crispy Fish Taco Bowls are a treat, full of flavors and textures that are bound to impress anyone at your dinner table. With minimal effort and time, you can indulge in a meal that’s both satisfying and diverse in nutritional value. Whether you’re trying it out for a casual weeknight dinner or for entertaining guests, this recipe is sure to be a hit!

  • Tasty Pineapple Glazed Salmon Recipe

    Tasty Pineapple Glazed Salmon Recipe

    Tasty Pineapple Glazed Salmon Recipe: A Tropical Delight

    Introduction to Tasty Pineapple Glazed Salmon Recipe

    Welcome to a food adventure where culinary simplicity meets tropical flavors! This Tasty Pineapple Glazed Salmon Recipe is more than just another dish; it’s a vibrant celebration of taste and nutrition. Salmon recipes often stand out for their health benefits, and this one is no exception. With its perfect balance of sweet pineapple glaze and savory salmon, it is both nutritious and delicious, making it a fantastic choice for family dinners, quick weeknight meals, or special celebrations.

    This recipe comes together quickly and easily—making it ideal for busy parents, working professionals, or anyone who appreciates a wholesome meal without spending hours in the kitchen. Packed with protein, healthy fats, and essential nutrients, this dish meets various dietary needs, ensuring it can be enjoyed by everyone, including gluten-free and health-conscious eaters.

    Moreover, using fresh ingredients not only enhances the flavors but also supports a balanced lifestyle. The sweet-tart pineapple glaze adds a unique twist to the traditional salmon recipes you might have tried before, inviting adventurous eaters to explore new culinary horizons. Whether you’re a student living in a dorm, newlyweds looking to impress each other, or food enthusiasts searching for their next kitchen challenge, this dish is the perfect fit. Get ready to dive into the world of vibrant flavors and easy cooking with this delightful recipe!

    Benefits and Advantages of Tasty Pineapple Glazed Salmon Recipe

    Why should you choose to make this Tasty Pineapple Glazed Salmon Recipe? First and foremost, it’s incredibly easy to prepare. In just a few simple steps, you can transform basic salmon fillets into a gourmet meal that looks as amazing as it tastes. This simplicity makes it perfect for those who may not consider themselves expert cooks but want to impress family and friends.

    Not only is this recipe straightforward, but it also offers significant health benefits. Salmon is widely known for its omega-3 fatty acids, which are essential for heart health and cognitive function. Paired with the antioxidants found in pineapple, this dish provides a variety of nutrients that support overall well-being. The tropical ingredients also elevate the dish’s flavor profile, providing a burst of freshness, which is especially appealing during warmer months.

    Additionally, this recipe is adaptable to various dietary preferences. You can easily swap ingredients to create a vegan version using tofu, or you can opt for a low-sodium soy sauce to cater to those mindful of their salt intake. Moreover, the delightful pineapple glaze can be made with agave syrup for a vegan-friendly substitute that’ll still maintain a deliciously sweet flavor. Creative home cooks will love how versatile and customizable this dish can be while retaining its nutritional integrity.

    So, if you’re on the lookout for ideal salmon recipes that are not just healthy but also quick and easy to whip up, look no further! Your family will be raving about this memorable flavor combination, making it a go-to dish for any occasion.

    Ingredients Overview

    Essential Ingredients for Tasty Pineapple Glazed Salmon Recipe

    For this delicious Tasty Pineapple Glazed Salmon Recipe, you’ll need the following ingredients.

    • Salmon Fillets (4 pieces): Fresh, high-quality salmon is essential as it serves as the protein base for this dish. It offers a flaky texture and rich flavors that pair beautifully with the pineapple glaze.

    • Fresh Pineapple (1 medium-sized): A ripe, juicy pineapple brings natural sweetness and vibrant color. Alternatively, you can use canned pineapple for convenience, but ensure it’s packed in juice, not syrup.

    • Soy Sauce (1/4 cup): This will form the salty foundation of the glaze, enhancing the flavors of the salmon. For a gluten-free option, use tamari.

    • Honey or Brown Sugar (2 tablespoons): Both sweeteners provide the necessary sweetness to balance the saltiness of the soy sauce. You can substitute with agave syrup or maple syrup for a vegan option.

    • Garlic (2 cloves, minced): Fresh garlic adds an aromatic depth to the glaze.

    • Ginger (1 teaspoon, grated): Ginger brings a warm spiciness that complements the sweetness of pineapple.

    • Black Pepper (to taste): A pinch of freshly cracked black pepper enhances the flavors of the glaze.

    • Lime (1, juiced): This adds acidity, cutting through the richness of the salmon and brightening the dish.

    These ingredients offer a delightful mix of flavors and can be adjusted to suit dietary preferences, including gluten-free and low-calorie needs.

    Dietary Substitutions to Customize Your Tasty Pineapple Glazed Salmon Recipe

    If you’re looking to adapt this Tasty Pineapple Glazed Salmon Recipe for specific dietary restrictions, here are some suggested substitutions:

    • Vegan Option: Substitute the salmon with firm tofu or tempeh. Marinate them in the same glaze to capture the flavors.

    • Gluten-Free: Use tamari instead of regular soy sauce for a gluten-free alternative that maintains the richness of the glaze.

    • Low-Calorie: Reduce the amount of honey or use a sugar-free replacement. Opt for a low-calorie sweetener like stevia to keep the flavors robust without the extra calories.

    • Low-Carb: Serve over a bed of spiralized zucchini or cauliflower rice instead of traditional dishes like rice or quinoa.

    • Additional Flavor Variations: You can incorporate crushed red pepper flakes for a spicy kick or add sesame oil for an extra depth of flavor in the glaze.

    By making these modifications, you can ensure that this Tasty Pineapple Glazed Salmon Recipe perfectly aligns with your dietary needs without sacrificing flavor.

    How to Prepare the Perfect Tasty Pineapple Glazed Salmon Recipe: Step-by-Step Guide

    creating a delicious Tasty Pineapple Glazed Salmon Recipe is not just about the ingredients; it’s also about the method of preparation. Follow these simple, step-by-step instructions to whip up this tropical delight in no time.

    1. Prepare the Pineapple: Cut the fresh pineapple into bite-sized chunks. If using canned pineapple, drain well but reserve the juice for later use.

    2. Make the Marinade: In a medium-sized bowl, combine 1/4 cup of soy sauce, 2 tablespoons of honey or brown sugar, 2 minced garlic cloves, 1 teaspoon of grated ginger, juice from one lime, and a pinch of black pepper.

    3. Marinate the Salmon: Place your salmon fillets in a shallow dish or a zip-top bag and pour the marinade over them. Make sure the salmon is well-coated. Marinate in the fridge for at least 30 minutes, though 1-2 hours is ideal for maximum flavor infusion.

    4. Preheat the Grill or Oven: If you’re using a grill, preheat it to medium-high heat. If you’re baking, preheat your oven to 375°F (190°C).

    5. Prepare for Cooking: Remove the salmon from the marinade and let any excess marinade drip off. Save the marinade for glazing during cooking. If you’re using a grill, oil the grill grates lightly to prevent sticking.

    6. Cook the Salmon:

    7. Grilling: Place the salmon fillets skin-side down directly on the grill. Cook for about 6–8 minutes on each side, depending on the thickness. Baste with the reserved marinade occasionally to enhance flavor and moisture.
    8. Baking: Lay the salmon fillets on a baking sheet lined with parchment paper. Bake for 15-20 minutes, basting halfway through with the reserved marinade, until the salmon flakes easily with a fork.

    9. Add Pineapple: During the last 5 minutes of cooking, add the pineapple chunks around the salmon, allowing them to caramelize slightly and soak up the flavors of the glaze.

    10. Serve and Garnish: Once cooked, remove the salmon and pineapple from the heat and let it rest for a few minutes. Serve the salmon on a plate topped with the caramelized pineapple. Garnish with fresh cilantro or green onions for an additional pop of flavor.

    Following these steps ensures your Tasty Pineapple Glazed Salmon will impress even the fussiest eaters, making it a standout choice among salmon recipes.

    Mastering Tasty Pineapple Glazed Salmon Recipe: Advanced Tips and Variations

    To elevate your Tasty Pineapple Glazed Salmon Recipe and make it truly exceptional, consider these advanced tips and innovative variations:

    • Grilling for Flavor: For an added depth of flavor, grill the pineapple chunks separately until they are slightly charred, and use them as a garnish. The caramelization will enhance their natural sweetness.

    • Infusing Flavors: Experiment by adding fresh herbs like basil or mint to the marinade. This will give your dish a refreshing twist and enhance the tropical theme.

    • Serving Suggestions: Pair the salmon with coconut rice or a vibrant salad featuring avocado and mixed greens to create a beautifully balanced meal.

    • Make it Spicy: If you prefer extra heat, add jalapeño slices to the marinade or sprinkle some chili flakes over the cooked dish for a spicy kick.

    • Meal Prep Option: This recipe is excellent for meal prep. Cook extra portions and store them for lunches or future dinners throughout the week. You can also freeze portions for longer-lasting enjoyment.

    By experimenting with these tips and variations, you can easily customize your Tasty Pineapple Glazed Salmon Recipe, ensuring it becomes a favorite in your household among other salmon recipes.

    How to Store Tasty Pineapple Glazed Salmon Recipe: Best Practices

    So you’ve made the perfect Tasty Pineapple Glazed Salmon, but how do you store the leftovers? Here are some best practices to ensure your delicious dish stays fresh and safe to eat:

    • Refrigeration: Allow any leftovers to cool to room temperature. Place the salmon in an airtight container with a lid, and it will keep well in the refrigerator for up to 3–4 days.

    • Freezing: Have more leftovers? You can freeze cooked salmon! Wrap each piece tightly in plastic wrap and place it into a freezer-safe zip-top bag. If possible, try to remove any excess air to prevent freezer burn. Frozen salmon is best consumed within 2-3 months for ideal flavor and texture.

    • Reheating: When you’re ready to enjoy your leftover salmon, reheat it gently to avoid drying it out. Preheat your oven to 350°F (175°C) and place the salmon on a baking sheet; cover it loosely with foil to retain moisture, reheating for 10-15 minutes or until warmed through. Alternatively, you can reheat in a microwave, but be cautious to avoid overheating.

    Storing your Tasty Pineapple Glazed Salmon properly will ensure it retains its delicious character, making it an outstanding choice among salmon recipes for meal prep and leftovers.

    Nutritional Value of Tasty Pineapple Glazed Salmon Recipe

    When it comes to understanding the nutritional value of your Tasty Pineapple Glazed Salmon Recipe, it’s important to consider the health benefits you get with every bite. Here’s a breakdown of the estimated nutritional content per serving (based on a 6-ounce salmon fillet and glaze):

    • Calories: 320
    • Protein: 34g
    • Total Fat: 14g
    • Saturated Fat: 2g
    • Carbohydrates: 22g
    • Sugar: 12g
    • Fiber: 1g
    • Sodium: 580mg
    • Omega-3 Fatty Acids: Approximately 2.5g

    Salmon itself is an excellent source of high-quality protein and is rich in omega-3 fatty acids, which are beneficial for heart health. The pineapple adds a dose of vitamins and minerals, particularly vitamin C and manganese. This dish also boasts a good balance of healthy fats and carbohydrates, making it a filling option that fits well into a balanced diet.

    Experimenting with dietary substitutions can further enhance its health profile while retaining its delicious flavor, allowing you to enjoy the benefits of this Tasty Pineapple Glazed Salmon Recipe repeatedly!

    FAQs: Frequently Asked Questions About Tasty Pineapple Glazed Salmon Recipe

    1. Can I make this recipe in advance?
    Absolutely! You can marinate the salmon ahead of time and refrigerate it for a few hours, even overnight, for an extra flavor boost. Just cook it fresh before serving.

    2. What type of salmon should I use?
    Wild-caught salmon, such as Sockeye or King salmon, offers the best flavor and health benefits. However, farmed salmon also works well and is often more accessible.

    3. How can I adjust the sweetness of the glaze?
    Feel free to alter the amount of honey or brown sugar depending on your taste preferences. You can also use sugar substitutes for a lower-carb option.

    4. Can I use other fruits for the glaze?
    Absolutely! If you’re feeling adventurous, you can substitute pineapple with mango, peach, or even berries for a different flavor profile.

    5. What sides pair well with this dish?
    Serve the pineapple glazed salmon with sides like quinoa salad, sautéed vegetables, or coconut rice for a balanced meal.

    This comprehensive FAQ aims to address common questions, helping both novice and experienced cooks navigate the preparation of their Tasty Pineapple Glazed Salmon Recipe.

    So, ready to hit the kitchen? Well, you now have all the knowledge, tips, and techniques you need to create this delightful dish. Enjoy your culinary adventure with this unique addition to your collection of salmon recipes!

  • Cozy Baked Cod In Coconut Lemon

    Cozy Baked Cod In Coconut Lemon

    Cozy Baked Cod In Coconut Lemon: A Tropical Delight

    Introduction to Cozy Baked Cod In Coconut Lemon

    When it comes to dinner recipes, especially those that evoke a sense of both comfort and adventure, nothing quite compares to Cozy Baked Cod in Coconut Lemon. Imagine a dish that combines the gentle sweetness of coconut with the zesty brightness of lemon, all enveloping tender cod fillets. This recipe not only offers a tropical flair but is also incredibly easy to prepare, making it perfect for busy weekdays or leisurely weekends.

    Cozy Baked Cod in Coconut Lemon appeals to a wide range of dietary needs. It is inherently gluten-free and low in calories, making it an excellent choice for health-conscious individuals. Additionally, with simple substitutions, it can easily be adjusted to suit vegan diets as well. The dish’s rich but light flavor profile complements a variety of sides, from fluffy jasmine rice to fresh green salads, ensuring it fits seamlessly into any mealtime.

    But the best part? This recipe is as simple as it is delectable. You don’t need to be a culinary expert to bring this tropical delight to life. In just a few steps, you can create a wholesome meal that will impress your family and friends. So, put on your apron, and let’s dive into the details of this delightful recipe.

    Benefits and Advantages of Cozy Baked Cod In Coconut Lemon

    Cozy Baked Cod in Coconut Lemon stands out among dinner recipes for several reasons. First and foremost, its straightforward approach allows even novice cooks to master it in no time. The preparation requires minimal effort and ingredients, making it an ideal option for busy parents or students who need a quick, delicious meal.

    Health Benefits

    This dish is not only convenient; it is also loaded with health benefits. Cod is a lean source of protein that is low in calories and rich in essential nutrients, such as vitamin B12, iodine, and omega-3 fatty acids, which are known for their numerous health benefits, including heart health and improved brain function.

    Coconut milk, a star ingredient in this recipe, is rich in medium-chain triglycerides (MCTs), a type of saturated fat that can boost energy levels and contribute to weight loss. Moreover, the addition of fresh lemon juice adds not just zest but also vitamin C, enhancing the overall nutritional profile and boosting your immune system.

    Versatility

    Additionally, this recipe’s versatility allows for a range of adaptations based on dietary preferences. Whether you’re following a keto diet, vegetarian lifestyle, or simply want to sneak in more plant-based meals, Cozy Baked Cod in Coconut Lemon remains flexible. You can swap cod for other fish like tilapia or even tofu for a vegan twist, ensuring that everyone at your table can enjoy it.

    Ultimately, Cozy Baked Cod in Coconut Lemon is a dish that combines simplicity, nutrition, and adaptability – making it a must-try for anyone looking to expand their repertoire of dinner recipes.

    Ingredients Overview

    Essential Ingredients for Cozy Baked Cod In Coconut Lemon

    To bring this delightful dish to life, gather the following ingredients:

    • Cod Fillets (4 pieces, approx. 6 oz each): Fresh or frozen, cod serves as the lean protein base.
    • Coconut Milk (1 can, 13.5 oz): Provides creaminess and a hint of sweetness.
    • Lemon (1 large, juiced and zested): Adds brightness and acidity.
    • Garlic (3 cloves, minced): Enhances flavor and provides health benefits.
    • Fresh Ginger (1 inch, grated): Adds a subtle warmth and freshness.
    • Olive Oil (2 tablespoons): Improves texture and aids in browning.
    • Salt (to taste): Essential for enhancing flavors.
    • Black Pepper (to taste): Offers a mild heat.
    • Fresh Cilantro or Parsley (for garnish): Adds a pop of color and freshness.

    Dietary note: All ingredients listed above are naturally gluten-free and can be adjusted for low-calorie versions by reducing oil and coconut milk as desired.

    Dietary Substitutions to Customize Your Cozy Baked Cod In Coconut Lemon

    If you want to personalize your Cozy Baked Cod dish, consider these substitutions:

    • Fish Alternatives: Swap cod for another fish like salmon or tilapia, or for a vegetarian option, use firm tofu or jackfruit.
    • Coconut Milk Alternatives: If coconut milk isn’t your preference, almond milk or cashew cream can serve as dairy-free alternatives. Keep in mind these may alter the final flavor profile.
    • Lemon Zest Substitute: In the absence of lemon, lime can be a fresh alternative that maintains the dish’s citrusy zing.
    • Herbs for Garnish: Instead of cilantro, try fresh basil or chives for a different aromatic experience.

    By following these suggestions, you can easily tailor Cozy Baked Cod in Coconut Lemon to fit your dietary preferences while ensuring the essence of the dish remains intact.

    How to Prepare the Perfect Cozy Baked Cod In Coconut Lemon: Step-by-Step Guide

    Creating Cozy Baked Cod in Coconut Lemon is a straightforward process that yields exquisite results. Just follow these easy steps:

    1. Preheat Your Oven: Set your oven to 375°F (190°C) to prepare for baking.
    2. Prepare the Baking Dish: Lightly grease a baking dish with olive oil to prevent sticking.
    3. Mix Coconut Sauce: In a medium bowl, combine coconut milk, lemon juice, lemon zest, minced garlic, grated ginger, salt, and pepper. Whisk until well blended.
    4. Arrange Cod Fillets: Place cod fillets in the prepared baking dish, ensuring they are laid flat and not overcrowded.
    5. Pour the Coconut Mixture: Gently pour the coconut sauce over the cod fillets, making sure they are evenly coated.
    6. Bake the Dish: Place the baking dish in the preheated oven and bake for 20-25 minutes. The cod is done when it flakes easily with a fork.
    7. Turn on the Broiler: For an extra layer of flavor, switch to the broil setting for the last 2-4 minutes to create a beautiful golden crust.
    8. Garnish and Serve: Once cooked, remove the dish from the oven and let it rest for a few minutes. Garnish with fresh cilantro or parsley before serving.

    This step-by-step guide highlights how easy it is to prepare Cozy Baked Cod in Coconut Lemon, ensuring everyone can enjoy a delightful meal without feeling overwhelmed. You can easily adapt each step for specific dietary needs, whether by altering cooking times for different fish types or using suitable substitutes.

    Mastering Cozy Baked Cod In Coconut Lemon: Advanced Tips and Variations

    To elevate your Cozy Baked Cod experience, consider some of these advanced tips and variations:

    • Marinate the Fish: For added flavor, marinate the cod fillets in the coconut mixture for 30 minutes before baking. This step infuses the fish with extra depth and complexity.
    • Add Vegetables: Boost the nutritional value by incorporating vegetables. Slice bell peppers, zucchini, or cherry tomatoes, and nestle them around the cod. They will soften and release their flavors as the cod bakes.
    • Spice it Up: Incorporate red chili flakes or diced jalapeños into the coconut mixture for those who enjoy a little heat.
    • Experiment with Herbs: Beyond cilantro and parsley, herbs like dill, thyme, or even fresh mint can offer a refreshing twist to the dish.
    • Serving Suggestions: Pair your Cozy Baked Cod with coconut rice or quinoa to create a wholesome meal. A simple green salad dressed in vinaigrette also complements the flavors perfectly.

    By implementing these tips, you can create variations of Cozy Baked Cod in Coconut Lemon that suit your taste preferences while maintaining its core appeal as one of the best dinner recipes around.

    How to Store Cozy Baked Cod In Coconut Lemon: Best Practices

    Storing your Cozy Baked Cod in Coconut Lemon properly ensures you can enjoy leftovers while maintaining taste and quality. Here are the best practices:

    Refrigeration

    1. Let It Cool: Allow the dish to cool down to room temperature before transferring it to an airtight container.
    2. Store in the Fridge: Properly stored in the fridge, Cozy Baked Cod can last for up to 3 days.

    Freezing

    If you want to extend its lifespan, follow these steps:

    1. Cool Completely: Just like with refrigeration, ensure it cools completely.
    2. Container Choice: Place individual portions in freezer-safe containers or bags for easy reheating.
    3. Label and Date: Always label your containers with the date for future reference. Frozen, it can last for up to 2 months.

    Reheating

    To reheat:

    1. Oven Method: Preheat the oven to 350°F (175°C). Place the cod in a baking dish, cover it with foil, and bake until heated through (about 15-20 minutes).
    2. Microwave Method: For a quick option, microwave individual portions on medium heat for 2-3 minutes, checking regularly.

    Properly storing your Cozy Baked Cod in Coconut Lemon allows you to enjoy this delicious dish more than once, reinforcing its place among your go-to dinner recipes.

    Nutritional Value of Cozy Baked Cod In Coconut Lemon

    Understanding the nutritional value of Cozy Baked Cod in Coconut Lemon is essential for any diet-conscious cook. Here’s a detailed breakdown per serving (approx. 6 oz of cod with sauce):

    • Calories: 330 kcal
    • Protein: 30 g
    • Fat: 18 g
    • Saturated Fat: 15 g
    • Carbohydrates: 20 g
    • Dietary Fiber: 2 g
    • Sugars: 2 g
    • Cholesterol: 70 mg
    • Sodium: 300 mg

    Health Highlights

    • High in Protein: Beneficial for muscle repair and maintenance.
    • Rich in Omega-3 Fatty Acids: Supports heart and brain health.
    • Low in Carbohydrates: Suitable for low-carb diets.
    • Packed with Vitamins and Minerals: Offers a good dose of vitamins B12 and C.

    This nutritional profile unveils why Cozy Baked Cod in Coconut Lemon is an excellent choice among healthful dinner recipes, particularly appealing to those striving for balanced eating.

    FAQs: Frequently Asked Questions About Cozy Baked Cod In Coconut Lemon

    1. Can I use frozen cod for this recipe?

    Yes, frozen cod works well for this recipe. Just ensure it is fully thawed before cooking for optimal results.

    2. Is this recipe suitable for meal prep?

    Absolutely! Cozy Baked Cod in Coconut Lemon is perfect for meal prep, as it keeps well in the refrigerator and tastes delicious even as leftovers.

    3. Can I substitute coconut milk with something else?

    Yes, if you prefer a different flavor, you can use almond milk or cashew cream, though the flavor will change.

    4. How can I make this dish spicier?

    You can easily add red pepper flakes, diced jalapeños, or hot sauce to the coconut mixture for an extra kick.

    5. What should I serve with Cozy Baked Cod?

    This dish pairs beautifully with coconut rice, quinoa, or a simple green salad to add balance and freshness to the meal.

    6. How long do leftovers last?

    When stored properly in an airtight container in the refrigerator, the dish can last up to 3 days.


    Cozy Baked Cod In Coconut Lemon is more than just a meal; it’s a culinary journey to tropical flavors that works beautifully for a wide audience. With this guide, you’ll feel empowered to create this comforting dish and adapt it to meet your dietary needs and preferences. Bon appétit!

  • Easy Crispy Salmon Rice Bowl

    Easy Crispy Salmon Rice Bowl

    Easy Crispy Salmon Rice Bowl: A Tropical Delight

    Introduction to Easy Crispy Salmon Rice Bowl

    Are you looking for a deliciously simple recipe that will tantalize your taste buds without compromising your health? Look no further! The Easy Crispy Salmon Rice Bowl combines the rich flavors of crispy salmon with fluffy rice and vibrant vegetables, creating a tropical delight that can be ready in under 30 minutes. This dish is not only one of the most satisfying salmon recipes you’ll ever try, but it also caters to various dietary needs, making it perfect for busy parents, diet-conscious individuals, and food enthusiasts alike.

    Incorporating healthy ingredients like salmon, brown rice, and fresh vegetables, this dish packs a punch when it comes to nutrients. Rich in omega-3 fatty acids, the salmon boosts heart health and provides essential proteins while the rice offers a comforting base that can be customized to your liking. Whether you’re vegan, gluten-free, or budget-conscious, the Easy Crispy Salmon Rice Bowl can be adapted to fit your dietary requirements seamlessly.

    Furthermore, this dish is a feast for the eyes. With its colorful assortment of fresh produce and the glorious golden-brown salmon on top, it’s a beautiful centerpiece for any mealtime occasion. Easy to prepare and endlessly adaptable, this recipe inspires all cooks to embark on a culinary adventure. Let’s dive into why this Easy Crispy Salmon Rice Bowl should be on your dinner table tonight!

    Benefits and Advantages of Easy Crispy Salmon Rice Bowl

    The Easy Crispy Salmon Rice Bowl stands out not just for its taste but also for its impressive health benefits and ease of preparation. Here’s a breakdown of why this dish is a fantastic choice:

    1. Quick Preparation Time: One of the most significant advantages of this recipe is its simplicity. You can whip up this delightful bowl in just 30 minutes, making it an excellent option for busy weeknights or quick lunches.

    2. Nutrient-Dense Ingredients: Salmon is a nutritional powerhouse, loaded with omega-3 fatty acids, which are vital for heart health and brain function. On the other hand, the brown rice provides whole grains that contribute to lasting energy, while the vegetables are rich in vitamins, minerals, and fiber.

    3. Versatile and Customizable: The Easy Crispy Salmon Rice Bowl can easily cater to various dietary needs. You can substitute salmon for other proteins like tofu, chicken, or chickpeas for a vegetarian or vegan twist. Additionally, you can choose white or cauliflower rice for those seeking lower-carb options.

    4. Family-Friendly: Because this dish incorporates familiar ingredients and flavors, it appeals to a wide range of palates. Kids and adults alike will love the crispy salmon paired with soft rice and vibrant toppings, making mealtime enjoyable for the whole family.

    5. Meal Prep Friendly: This recipe is perfect for meal prepping, allowing you to create multiple servings in one go. Prepare the base and toppings separately to ensure freshness. The components can be mixed and matched, and enjoyed throughout the week.

    6. Packed with Flavor: The crispy crust on the salmon and the combination of fresh ingredients lend a delightful crunch and burst of flavor. Pair a spicy mayo drizzle or a tangy dressing to elevate your bowl even more.

    With all these benefits, it’s clear that the Easy Crispy Salmon Rice Bowl not only nourishes but also satisfies, making it a standout choice in the realm of salmon recipes.

    Ingredients Overview

    Essential Ingredients for Easy Crispy Salmon Rice Bowl

    Creating a delicious Easy Crispy Salmon Rice Bowl is simple, thanks to its straightforward ingredients. Here’s what you’ll need:

    • For the Bowl:
    • 1 pound fresh salmon fillets (skin on is ideal for crispiness)
    • 2 cups brown rice (or your choice of rice)
    • 1 tablespoon olive oil (or avocado oil for a neutral flavor)
    • Salt and pepper to taste
    • 1 teaspoon garlic powder
    • 1 teaspoon paprika (sweet or smoked, depending on your preference)

    • For the Toppings:

    • 1 cup slice cucumbers (high in hydration)
    • 1 cup shredded carrots (adds crunch and sweetness)
    • 1/2 cup sliced red cabbage (for fiber and antioxidants)
    • 1 avocado, sliced (provides healthy fats)
    • 2 green onions, sliced (for garnish)
    • 1 tablespoon sesame seeds (optional, for a nutty flavor)

    • Sauce Options (optional):

    • 2 tablespoons soy sauce or tamari (for a gluten-free option)
    • 1 tablespoon sriracha mayo (for a spicy kick)

    Dietary Information:

    • Vegan Option: Substitute salmon with tofu, tempeh, or chickpeas.
    • Gluten-Free Option: Use tamari instead of soy sauce, and ensure rice is certified gluten-free.
    • Low-Calorie Option: Opt for cauliflower rice and reduce the amount of sauce to minimize calories.

    With these ingredients, you’re already set to create a wholesome meal that meets a variety of dietary preferences.

    Dietary Substitutions to Customize Your Easy Crispy Salmon Rice Bowl

    Adapting this Easy Crispy Salmon Rice Bowl to cater to different dietary needs is as simple as switching out a few key ingredients. Here are some great substitutions:

    1. Salmon Substitutes:
    2. Tofu: For a vegan option, use firm tofu that’s pressed to remove excess water. Marinate it in the same seasonings as the salmon before pan-frying for a crispy exterior.
    3. Chicken Breast: For a lean protein that cooks quickly and pairs excellently with rice, use boneless, skinless chicken breast.

    4. Rice Alternatives:

    5. Quinoa: For a protein-packed and gluten-free option, substitute brown rice with quinoa. Rinse and cook it like rice for an added nutritional boost.
    6. Cauliflower Rice: For a low-carb alternative, opt for cauliflower rice, which is easy to make by grating fresh cauliflower and sautéing until tender.

    7. Vegetable Variations:

    8. Mixed Vegetables: Toss in any seasonal vegetables you have on hand, like bell peppers, snow peas, or edamame, to add color and crunch.
    9. Leafy Greens: Use spinach or mixed salad greens as an alternative base for a fresh and nutritious twist.

    10. Sauce Modifications:

    11. Nut-Free Alternative: Use coconut aminos instead of soy sauce to avoid allergens while still enhancing the flavor.
    12. Dairy-Free Sauce: For a creamy dressing without dairy, mix avocado with lime juice and spices to create a smooth, flavorful topping.

    These substitutions ensure that everyone can enjoy a personalized version of the Easy Crispy Salmon Rice Bowl, turning it into a truly versatile dish among salmon recipes.

    How to Prepare the Perfect Easy Crispy Salmon Rice Bowl: Step-by-Step Guide

    Now that you have all the necessary ingredients, let’s dive into the step-by-step instructions for making your Easy Crispy Salmon Rice Bowl. Following these guidelines will help ensure a beautifully cooked dish that meets everyone’s expectations:

    1. Prepare the Base:
    2. Start by cooking your rice according to package instructions. If you’re using brown rice, this typically involves rinsing it under cold water, then boiling it in a pot with water (2 cups water for every 1 cup of rice). Reduce heat to low, cover, and simmer for 30-40 minutes until fully cooked.

    3. Season the Salmon:

    4. While the rice cooks, pat the salmon fillets dry with a paper towel. Season both sides generously with salt, pepper, garlic powder, and paprika to enhance flavor. Let it marinate for at least 10 minutes.

    5. Sear the Salmon:

    6. In a large skillet, heat the olive oil over medium-high heat. Once hot, gently place the salmon fillets skin-side down in the skillet. Cook for about 4-5 minutes until the skin is crispy and golden. Flip the fillets carefully using a spatula and cook for an additional 3-4 minutes until cooked through and flaky.

    7. Prepare the Toppings:

    8. While the salmon is cooking, wash and slice your vegetables. Create an appealing presentation by arranging them neatly in bowls. Get your cucumber, shredded carrots, red cabbage, and sliced avocado ready.

    9. Assemble the Rice Bowls:

    10. Once the rice is cooked, fluff it with a fork and evenly distribute it into bowls. Place the crispy salmon fillets on top of the rice.

    11. Add Your Veggies:

    12. Pile on the fresh vegetables on the side of the salmon. Arrange them in a visually appealing manner for a vibrant look.

    13. Drizzle on the Sauce:

    14. If using, drizzle the soy sauce or sriracha mayo atop the salmon and vegetables. Sprinkle with sesame seeds and sliced green onions for that extra flair.

    15. Serve Immediately:

    16. Enjoy your Easy Crispy Salmon Rice Bowl while it’s warm! The combination of textures and flavors is best experienced straight away.

    This step-by-step guide ensures that anyone can replicate this Easy Crispy Salmon Rice Bowl successfully, making it one of the best salmon recipes to add to your regular rotation. Feel free to mix and match toppings and ingredients based on your preferences or what you have on hand.

    Mastering Easy Crispy Salmon Rice Bowl: Advanced Tips and Variations

    To elevate your Easy Crispy Salmon Rice Bowl even further, consider the following expert tips and creative variations:

    1. Marinate the Salmon:
    2. For an extra boost of flavor, you can marinate the salmon fillets in a mixture of soy sauce, honey, and ginger for 30 minutes before cooking. This adds a sweet and savory dynamic to the dish.

    3. Crispy Skin Trick:

    4. If you’re looking for an exceptionally crispy salmon skin, dry the skin thoroughly with paper towels after rinsing, and ensure that the skillet is hot enough before adding the fish.

    5. Spice It Up:

    6. Add some heat to your rice bowl by mixing in diced jalapeños or a sprinkle of red pepper flakes to the vegetables. This gives your bowl a spicy kick that pairs beautifully with the salmon.

    7. Switch Up the Grains:

    8. Feel free to experiment with different grains. Barley, millet, or farro can offer different textures and flavors if you want to shake up the classic rice base.

    9. Garnish with Fresh Herbs:

    10. Top your bowl with fresh cilantro or Thai Basil for an added layer of flavor that enhances the tropical vibe of this recipe.

    11. Dress It Up:

    12. Consider a dressing made with lime juice, olive oil, and a splash of sesame oil. This refreshing mixture will brighten the entire dish, making it even more delightful.

    13. Seasonal Variations:

    14. Tailor your bowl seasonally by using the freshest available produce, such as roasted butternut squash in autumn or grilled asparagus in spring.

    These tips and variations will not only help you master your Easy Crispy Salmon Rice Bowl but also allow you to put your unique spin on its preparation. By trying out these suggestions, you’ll see how versatile salmon recipes can be, tailor-made for every season and any occasion.

    How to Store Easy Crispy Salmon Rice Bowl: Best Practices

    If you find yourself with leftovers from your Easy Crispy Salmon Rice Bowl, do not fret! Here are the best methods to store and preserve its freshness:

    1. Refrigeration:
    2. Store leftover salmon, rice, and toppings in an airtight container in the refrigerator. Make sure that the food is cooled down to room temperature before sealing the container to prevent condensation.

    3. Freezing:

    4. If you’d like to keep your bowl for a longer duration, you can freeze components separately. The salmon can be wrapped tightly in plastic wrap and placed in a freezer-safe bag. The rice can also be stored in a freezer-safe container.
    5. Ensure the vegetables are fresh before freezing, as freezing can alter their texture. If necessary, blanch them briefly before freezing.

    6. Reheating:

    7. When you’re ready to enjoy your leftovers, simply reheat the salmon in a skillet over low to medium heat until warmed through, taking care not to overcook it. The rice can be reheated in the microwave or on the stovetop with a splash of water to keep it moist.

    8. Avoid Reheating Toppings:

    9. For best results, keep your toppings separate until serving. Cold vegetables and fresh avocado can bring brightness to the meal when served alongside the hot salmon and rice.

    By following these storage tips, your Easy Crispy Salmon Rice Bowl can remain delicious for days, making it not just a satisfying meal for today but also for tomorrow! This practicality further enhances its value among salmon recipes.

    Nutritional Value of Easy Crispy Salmon Rice Bowl

    Understanding the nutritional profile of your meals is essential for maintaining a balanced diet. The Easy Crispy Salmon Rice Bowl packs a flavorful punch alongside its health benefits. Here’s a breakdown of the key nutritional elements per serving (this will vary based on specific ingredients used):

    • Calories: Approximately 550-600 kcal
    • Protein: 38-40 grams (from the salmon and brown rice)
    • Carbohydrates: 60 grams (primarily from the brown rice and vegetables)
    • Fat: 20-25 grams (healthy fats from the salmon and avocado)
    • Fiber: 6-8 grams (from vegetables and brown rice)

    Key Nutritional Components:

    • Omega-3 Fatty Acids: Essential for heart health found richly in salmon.
    • Whole Grains: Brown rice or quinoa provides dietary fiber and helps maintain stable blood sugar levels.
    • Vitamins and Minerals: The variety of colorful toppings contributes to a range of vitamins (like Vitamin A from carrots and Vitamin C from cabbage), minerals, and antioxidants.

    This nutritional content ensures that the Easy Crispy Salmon Rice Bowl is not only a delicious meal option, but also a balanced choice for everyday consumption—making it a healthy, delectable addition to your repertoire of salmon recipes.

    FAQs: Frequently Asked Questions About Easy Crispy Salmon Rice Bowl

    1. Can I use frozen salmon for this recipe?

    Absolutely! If you opt for frozen salmon, be sure to thaw it in the refrigerator overnight or under cold running water before cooking to ensure it cooks evenly.

    2. Can I make this dish ahead of time?

    Yes, you can prepare the rice, salmon, and toppings separately and store them in the refrigerator. Assemble the bowl just before serving for the best flavor and freshness.

    3. What can I substitute for brown rice?

    You can substitute brown rice with quinoa, cauliflower rice, or even white rice if you prefer a softer texture. All options provide different health benefits and complement the salmon well.

    4. Are there vegetarian options available?

    For a vegetarian option, replace the salmon with firm tofu or chickpeas, marinated and cooked to your liking. This still delivers satisfying protein while keeping it plant-based.

    5. How spicy is this recipe?

    The spice level can be adjusted based on your preference. Use mild sauces like soy or enhance the heat with sriracha or jalapeños for those who enjoy a kick.

    By addressing these questions, readers can feel confident about diving into this Easy Crispy Salmon Rice Bowl recipe and tailoring it to their dietary needs. Its adaptability and ease reinforce its coveted place among delicious salmon recipes.

    In conclusion, the Easy Crispy Salmon Rice Bowl is not only a feast for the senses but also a versatile, health-forward meal. Whip it up for any occasion, and watch how it delights friends and family alike. Get cooking, and enjoy this simple yet delectable dish today!

  • Cozy Baked Cod Coconut Lemon Sauce

    Cozy Baked Cod Coconut Lemon Sauce

    Cozy Baked Cod Coconut Lemon Sauce: A Tropical Delight

    Introduction to Cozy Baked Cod Coconut Lemon Sauce

    If you’re searching for a delightful dish perfectly suited for your family dinner or a special occasion, look no further! The Cozy Baked Cod Coconut Lemon Sauce brings together the freshness of cod with the tropical flavors of coconut and lemon. This recipe embodies the essence of comfort food while being simple, healthy, and accommodating various dietary needs, making it one of the standout dinner recipes you can try.

    What sets this dish apart is not just its flavor but also its simplicity. With minimal prep time and cooking required, busy parents and working professionals can easily whip up this nutritious meal on a weeknight. The recipe is both gluten-free and low-calorie, ensuring that health-conscious individuals can indulge without guilt. Moreover, students and newlyweds will appreciate the affordable ingredients and straightforward techniques.

    In addition to being easy to prepare and delicious to taste, Cozy Baked Cod in Coconut Lemon Sauce offers numerous health benefits. The dish is packed with omega-3 fatty acids from the cod, which are essential for heart health. Coconut adds a creamy richness and beneficial medium-chain triglycerides, while citrus not only enhances flavor but is also a great source of vitamin C.

    As you dive into this recipe, you’ll discover a culinary adventure promising comfort and joy—a true tropical delight that enhances any dinner gathering!

    Benefits and Advantages of Cozy Baked Cod Coconut Lemon Sauce

    The Cozy Baked Cod Coconut Lemon Sauce recipe shines for many reasons, primarily revolving around its ease and nutritional benefits. Firstly, preparation is a breeze. With just a few minutes to prepare and about 20 minutes to cook, anyone can experience a homemade meal on a busy evening. Therefore, it stands out as one of the ideal dinner recipes for busy families, working individuals, and anyone looking to save time in the kitchen.

    Additionally, the health benefits of this dish are noteworthy. Cod is celebrated for its lean protein content, which supports muscle development and overall health. Its low calorie count makes it an excellent choice for those mindful of their caloric intake.

    Coconut milk is another hero ingredient in this recipe. It adds creamy texture and rich flavor while providing healthy fats. Unlike some other dairy options, coconut milk is typically safe for those with lactose intolerance; thus, it’s a fantastic alternative for gluten-free or vegan diets. The inclusion of fresh lemon zest and juice gives this dish a bright, zesty flavor, contributing to your daily intake of vitamins.

    This recipe is versatile as well. You can customize it easily to accommodate a variety of dietary restrictions, whether it’s avoiding allergens or adhering to specific dietary practices. Whether you’re catering to vegan guests or keeping your gluten-free friends happy, the Cozy Baked Cod Coconut Lemon Sauce can be adjusted without compromising on taste.

    To sum up, not only does this dish offer simplicity in preparation, but it also packs a nutritional punch. For families trying to maintain a balanced diet, or for anyone looking to indulge while remaining healthy, this recipe is exceptionally rewarding. It’s no wonder it ranks as one of the best dinner recipes available.

    Ingredients Overview

    Essential Ingredients for Cozy Baked Cod Coconut Lemon Sauce

    To create the Cozy Baked Cod Coconut Lemon Sauce, you will need the following ingredients:

    • Cod Fillets (4 fillets, approximately 4-6 oz each: High in protein and low in calories, cod is the star of this dish.)
    • Coconut Milk (1 can, full-fat or light: This adds a creamy texture and tropical flavor.)
    • Lemon Juice (2 tablespoons, freshly squeezed: Provides acidity and brightness to balance the flavors.)
    • Lemon Zest (1 teaspoon: Enhances the lemon flavor and adds a fresh aroma.)
    • Garlic (3 cloves, minced: Adds depth and aromatic qualities.)
    • Ginger (1 teaspoon, grated: Offers a warming, spicy note.)
    • Soy Sauce (or Tamari for a gluten-free option, 1 tablespoon: Contributes umami flavor.)
    • Salt (to taste)
    • Black Pepper (to taste)
    • Cilantro (for garnish, optional: Adds a fresh herby flavor.)

    This recipe is primarily gluten-free, and you can easily adapt it to vegan standards by substituting the cod with a plant-based protein like tofu or tempeh.

    Dietary Substitutions to Customize Your Cozy Baked Cod Coconut Lemon Sauce

    The great thing about the Cozy Baked Cod Coconut Lemon Sauce recipe is its flexibility. Here are some substitutions for various dietary preferences:

    • Vegan Option: Replace cod with tofu, tempeh, or another firm plant-based protein. Choose a product that can hold up during baking to absorb the delicious flavors.

    • Gluten-Free: As mentioned, using Tamari in place of regular soy sauce maintains the gluten-free status. Always check labels to ensure the other ingredients are gluten-free.

    • Dairy-Free: The entire dish is dairy-free, thanks to coconut milk. Ensure that none of your other ingredients contain dairy, especially if you’re using processed items.

    • Low-Carb/Keto: Replace the rice or side serving with steamed vegetables or a fresh salad to keep the meal low in carbohydrates.

    • Low-Calorie Version: Use light coconut milk instead of full-fat coconut milk to reduce calories without sacrificing flavor.

    This dish caters easily to differing dietary needs, making it one of the best dinner recipes for gatherings where guests have different restrictions.

    How to Prepare the Perfect Cozy Baked Cod Coconut Lemon Sauce: Step-by-Step Guide

    Now let’s get into the details of making this delightful Cozy Baked Cod Coconut Lemon Sauce. Follow these simple steps to ensure your dish turns out perfectly every time:

    1. Preheat the Oven: Preheat your oven to 400°F (200°C). A properly heated oven ensures even cooking and optimal texture.

    2. Prepare the Baking Dish: Lightly grease a baking dish with cooking spray or a drizzle of olive oil to prevent the cod from sticking.

    3. Arrange the Cod: Place the cod fillets in the dish in a single layer, ensuring they are evenly spaced.

    4. Mix the Coconut Sauce: In a mixing bowl, whisk together the coconut milk, lemon juice, lemon zest, minced garlic, grated ginger, soy sauce, salt, and black pepper until well combined.

    5. Pour the Sauce Over Cod: Carefully pour the coconut sauce over the cod fillets, ensuring they are well coated. This will allow the fish to absorb all the delicious flavors while baking.

    6. Bake the Cod: Transfer the baking dish to the preheated oven and bake for about 15-20 minutes or until the cod is cooked through and flakes easily with a fork. The internal temperature should reach 145°F (63°C) for safe consumption.

    7. Garnish and Serve: Remove the dish from the oven and let it sit for a couple of minutes. Sprinkle freshly chopped cilantro over the top for a burst of color and flavor.

    8. Pair It: Serve the Cozy Baked Cod Coconut Lemon Sauce on a bed of rice, quinoa, or alongside steamed vegetables for a complete meal. Enjoy the medley of flavors while reaping the health benefits!

    This step-by-step process makes it easy even for novice cooks to recreate this tropical dish. Plus, each step is adaptable for dietary considerations, ensuring that everyone at your table can enjoy this amazing part of the dinner recipes lineup.

    Mastering Cozy Baked Cod Coconut Lemon Sauce: Advanced Tips and Variations

    Once you’re comfortable preparing the Cozy Baked Cod Coconut Lemon Sauce, there are several tips and variations you can try to elevate the dish:

    1. Add Spice: If you enjoy a bit of heat, consider adding some red pepper flakes to the sauce for a spicy kick.

    2. Coconut Flakes: For extra texture, sprinkle some unsweetened coconut flakes over the top before baking to create a crunchy topping.

    3. Herb Variations: Switch up the herbs! Try basil or parsley if cilantro isn’t your favorite. Fresh herbs can completely alter the dish’s flavor profile.

    4. Citrus Alternatives: Experiment with different citrus fruits, like lime or orange, in place of lemon for a unique twist on the flavor.

    5. Topping Options: For added texture, serve the baked cod with a sprinkle of crushed nuts or seeds.

    6. Vegetable Additions: Feel free to add seasonal vegetables, such as bell peppers or snap peas, to the baking dish for a one-pan meal. They’ll soak up the tasty coconut sauce, making your meal even more nutritious.

    7. Fish Alternatives: While cod is delicious, other firm fish like halibut or salmon can work well in this recipe, ensuring that the sauce complements the protein beautifully.

    By playing with these variations and tips, you can continuously reinvent the dish and make it your very own while still enjoying a comforting, healthy meal that ranks high among the best dinner recipes.

    How to Store Cozy Baked Cod Coconut Lemon Sauce: Best Practices

    To preserve the freshness and flavor of your Cozy Baked Cod Coconut Lemon Sauce, proper storage is essential. Here are some best practices for refrigeration, freezing, and reheating:

    • Refrigeration: Allow the baked cod to cool completely before transferring it to an airtight container. Store it in the refrigerator for up to 3 days. This makes it perfect for meal prep or leftovers!

    • Freezing: While it’s best enjoyed fresh, you can freeze the cooked cod if necessary. Place it in a freezer-safe container and consume within 2 months for optimal texture and taste.

    • Reheating: When you’re ready to enjoy your leftovers, reheat them in the oven at 350°F (175°C) until warmed through. You can also microwave individual portions, but microwave reheating may alter the texture of the fish.

    By following these storage tips, you can ensure that your Cozy Baked Cod Coconut Lemon Sauce remains delicious and ready to be served as a quick meal anytime.

    Nutritional Value of Cozy Baked Cod Coconut Lemon Sauce

    Understanding the nutritional composition of the Cozy Baked Cod Coconut Lemon Sauce allows you to appreciate this dish even more as part of your diet. Here is a breakdown of the approximate nutrition for one serving (assuming 4 servings):

    • Calories: 310
    • Protein: 25g
    • Fat: 20g (with healthy fats from coconut milk)
    • Carbohydrates: 8g
    • Fiber: 1g
    • Sugar: 1g
    • Sodium: Varies depending on added salt and soy sauce

    The high protein content combined with healthy fats makes this dish not only satisfying but also filling. Plus, it’s low in carbohydrates, making it a suitable option for those watching their carb intake.

    Additionally, vitamins and minerals from the fish and coconut contribute significantly to your daily dietary needs. Cod is an excellent source of vitamin B12 and selenium, both of which are crucial for overall health. Meanwhile, coconut milk provides potassium and magnesium.

    Whether you’re watching your weight, seeking balanced nutrition, or simply trying to incorporate more fish into your diet, the Cozy Baked Cod Coconut Lemon Sauce hits all the marks and can proudly join your collection of go-to dinner recipes.

    FAQs: Frequently Asked Questions About Cozy Baked Cod Coconut Lemon Sauce

    1. Can I use frozen cod for this recipe?
    2. Yes, you can use frozen cod. Just make sure to thaw it completely before following the recipe instructions for the best texture and absorption of flavors.

    3. Is this dish suitable for kids?

    4. Absolutely! The flavors are mild yet delicious, making it appealing to children. Plus, it’s a great way to introduce them to fish in a fun way.

    5. What can I serve with the Cozy Baked Cod Coconut Lemon Sauce?

    6. This dish pairs well with a variety of sides. Consider serving it with rice, quinoa, or steamed vegetables for a well-rounded meal.

    7. How do I know when the cod is done cooking?

    8. The cod is cooked through when it flakes easily with a fork and reaches an internal temperature of 145°F (63°C).

    9. Can the recipe be doubled easily?

    10. Yes, you can double the recipe! Just ensure you use a larger baking dish to hold all the cod and sauce.

    11. Is this recipe suitable for meal prep?

    12. Yes! This dish reheats well, making it a fantastic option for weekly meal prep.

    By addressing these common questions, you can confidently prepare the Cozy Baked Cod Coconut Lemon Sauce, ensuring that it seamlessly fits into any busy lifestyle or family dinner.


    With its simple yet flavorful profile, the Cozy Baked Cod Coconut Lemon Sauce is not just a meal; it brings comfort and health to your table. Perfect for a variety of dietary needs and easy to prepare, you can count on it becoming a beloved dish among your collection of dinner recipes. Enjoy the tropical flavors and comfort of this unique dish at your next gathering or weeknight dinner—it’s sure to impress and satisfy!

  • The Best Salmon Patties Dinner

    The Best Salmon Patties Dinner

    The Best Salmon Patties Dinner: A Tropical Delight

    Introduction to The Best Salmon Patties Dinner

    If you’re searching for delicious and nutritious salmon recipes, look no further! The Best Salmon Patties Dinner offers a fantastic combination of taste, health benefits, and convenience, making it perfect for busy households or anyone looking for a satisfying meal. These patties are not only easy to prepare but also packed with essential nutrients, making them a wise choice for health-conscious eaters.

    Perfect for any occasion, whether it’s a family dinner, a casual gathering, or a quick weeknight meal, salmon patties can cater to a variety of dietary needs. They can easily be customized for gluten-free or low-calorie diets and can even be transformed into a vegan alternative, appealing to a broad audience base.

    In this recipe, you’ll discover how to create salmon patties that are crispy on the outside and tender on the inside, bursting with flavors that bring a hint of the tropics to your dinner table. With step-by-step instructions and handy tips for success, this dish is sure to become a staple in your kitchen.

    Benefits and Advantages of The Best Salmon Patties Dinner

    The Best Salmon Patties Dinner stands out for several reasons, making it an ideal choice for various types of cooks.

    1. Ease of Preparation: One of the most significant benefits of these salmon recipes is their simplicity. The ingredients come together quickly, allowing you to whip up a delightful meal even on the busiest days. Whether you’re a novice or a seasoned cook, this recipe is straightforward and easy to follow.

    2. Health Benefits: Salmon is rich in omega-3 fatty acids, which promote heart health, reduce inflammation, and contribute to brain function. Including salmon in your diet can also improve skin health and provide high-quality protein, an essential nutrient for maintaining muscle mass.

    3. Versatility: This recipe is incredibly adaptable. Whether served with a side of fresh salad, wrapped in lettuce leaves, or accompanied by a tangy dipping sauce, these salmon patties can be enjoyed in various ways. They also freeze well, making them a perfect meal prep option to stock your freezer for busy days.

    4. Diet Compatibility: The Best Salmon Patties can be tailored to meet various dietary needs. For those seeking gluten-free options, substituting breadcrumbs with almond flour or crushed gluten-free crackers works perfectly. Furthermore, vegetarians can enjoy a plant-based version using canned chickpeas or tofu, making these patties accessible to a wider audience.

    Additionally, the satisfying nature of these patties makes them a favorite among busy parents, working professionals, and meal-prepping enthusiasts alike. Whether you’re searching for easy salmon recipes for a weeknight dinner or impressive entrees to entertain guests, these salmon patties deliver.

    Ingredients Overview

    Essential Ingredients for The Best Salmon Patties Dinner

    Here’s a comprehensive list of all the necessary ingredients, along with their measurements and purposes:

    • Canned Salmon (15 oz): The star of the recipe, canned salmon is a convenient and affordable source of protein. It is rich in omega-3 fatty acids.

    • Breadcrumbs (1 cup): This acts as a binder. For gluten-free options, use gluten-free breadcrumbs or almond flour.

    • Eggs (2 large): Eggs provide moisture and help the patties hold together. For a vegan alternative, replace with ¼ cup of unsweetened applesauce or a flaxseed egg (1 tablespoon ground flaxseed mixed with 2.5 tablespoons water).

    • Green Onions (¼ cup, chopped): Adds freshness and flavor to the patties.

    • Dijon Mustard (1 tablespoon): Gives the patties a zesty kick. Greek yogurt can be a healthier alternative for a creamier texture.

    • Garlic (2 cloves, minced): Imparts aromatic flavor. You may use garlic powder as a substitute.

    • Lemon Juice (2 tablespoons): Brightens up the dish and enhances the flavors.

    • Salt and Pepper (to taste): Essential for enhancing all the flavors.

    • Olive Oil (for frying): Provides a crispy texture. Coconut oil or avocado oil can be alternatives for frying.

    Dietary Substitutions to Customize Your The Best Salmon Patties Dinner

    • For Gluten-Free Adaptation: Use gluten-free breadcrumbs or almond flour instead of regular breadcrumbs. Ensure all other ingredients are gluten-free.

    • For Vegan Version: Substitute the canned salmon with chickpeas or tofu. Replace the eggs with ground flaxseed or applesauce to bind the patties.

    • For Low-Calorie Option: Use a minimal amount of oil or opt for baking instead of frying.

    • For Spicy Flavors: Add chopped jalapeños or a dash of cayenne pepper for a spicy version.

    By implementing these dietary substitutions, you can ensure everyone can enjoy The Best Salmon Patties Dinner, regardless of their dietary restrictions or preferences.

    How to Prepare the Perfect The Best Salmon Patties Dinner: Step-by-Step Guide

    Follow this detailed step-by-step guide to create delicious salmon patties that everyone will love!

    1. Prepare the Base: Open and drain the canned salmon. Use a fork to flake the salmon into small pieces, ensuring there are no large chunks remaining.

    2. Mix Ingredients: In a large mixing bowl, combine the flaked salmon, breadcrumbs, chopped green onions, minced garlic, Dijon mustard, lemon juice, salt, and pepper. Mix well until all ingredients are combined.

    3. Add Eggs: Crack the eggs into the mixture. Stir thoroughly until the eggs are completely incorporated, binding the ingredients together.

    4. Form Patties: Using your hands, scoop out sizable portions of the mixture (about 1/4 cup each) and form them into patties. Aim for a uniform size to ensure even cooking.

    5. Heat Oil: In a large skillet, heat 2 tablespoons of olive oil over medium heat. Ensure the oil is hot enough for frying, which helps achieve the perfect crispy texture.

    6. Cook the Patties: Once the oil is ready, gently place the patties in the skillet, leaving enough space between each to prevent sticking. Cook until golden brown, approximately 4-5 minutes per side.

    7. Remove and Drain: Once they’re golden, remove the patties from the skillet and place them on a plate lined with paper towels to absorb any excess oil.

    8. Serve and Enjoy: Serve warm with your choice of dipping sauce or alongside a fresh salad.

    Optional Baking Method

    If you prefer a healthy alternative, you can bake the patties:
    – Preheat your oven to 400°F (200°C).
    – Place the formed patties on a baking sheet lined with parchment paper.
    – Brush lightly with olive oil and bake for about 15 minutes on each side, or until golden brown.

    By following these steps, you can easily create a wholesome and delightful salmon dinner that satisfies everyone at your table!

    Mastering The Best Salmon Patties Dinner: Advanced Tips and Variations

    While the basic recipe for The Best Salmon Patties Dinner is terrific, here are some advanced tips and variations that could take it to the next level:

    1. Flavor Enhancements: Consider adding herbs such as dill, parsley, or cilantro to the mix to elevate the flavor profile. Each herb provides a different twist, allowing you to customize the taste according to your liking.

    2. Add veggies: Incorporating finely chopped bell peppers, zucchini, or shredded carrots can add a boost of nutrients and vibrant color to your patties.

    3. Serving Suggestions: Serve these salmon patties atop a bed of mixed greens or inside a whole-grain wrap with avocado and salsa for a refreshing meal. Pairing with homemade tzatziki or remoulade can enhance the eating experience even further.

    4. Experiment with Flours: If you’re going for a gluten-free option, try chickpea flour instead of breadcrumbs for a different texture and added flavor.

    5. Make Mini Patties or Bites: For parties or appetizers, shape smaller versions of the patties. They cook faster and are perfect for sharing!

    6. Add Spices: For those who enjoy heat, consider adding cayenne pepper or paprika to the mixture for an extra kick.

    Each of these variations allows you to adapt the recipe to your tastes, ensuring everyone finds something they love in The Best Salmon Patties Dinner!

    How to Store The Best Salmon Patties Dinner: Best Practices

    To maintain the quality of The Best Salmon Patties, proper storage is key.

    Refrigeration: Allow any leftover patties to cool completely before transferring them to an airtight container. They can be refrigerated for up to 3 days. When ready to eat, you can reheat them in the skillet for a crisp finish or in the microwave for convenience.

    Freezing: For longer storage, freeze the cooked salmon patties. Place the patties in a single layer on a baking sheet and freeze until solid. Once frozen, transfer them to a freezer-safe bag or container, separating layers with parchment paper to prevent sticking. They can be kept frozen for up to three months. When ready to enjoy, simply reheat directly from frozen, allowing for a slightly longer cooking time.

    Reheating: For best results, reheat salmon patties in the oven or on a skillet. If using the microwave, consider wrapping them in a damp paper towel to prevent them from drying out.

    By following these storage guidelines, you can enjoy leftovers from The Best Salmon Patties Dinner at your convenience!

    Nutritional Value of The Best Salmon Patties Dinner

    Understanding the nutritional aspects of The Best Salmon Patties Dinner is essential for health-conscious individuals. Here’s a breakdown of the estimated nutrition per serving (2 patties):

    • Calories: 300
    • Total Fat: 15g
    • Saturated Fat: 2g
    • Cholesterol: 85mg
    • Sodium: 400mg
    • Total Carbohydrates: 20g
    • Dietary Fiber: 2g
    • Sugars: 1g
    • Protein: 21g

    This nutritional profile highlights the health benefits of salmon, offering a good source of protein along with healthy fats. By using alternative ingredients, such as vegan options or low-calorie substitutes, the nutritional content can be altered while maintaining a delicious flavor.

    Incorporating these salmon patties into your diet can enhance your overall health, providing essential nutrients while still being a flavorful and satisfying meal!

    FAQs: Frequently Asked Questions About The Best Salmon Patties Dinner

    Q1: Can I use fresh salmon instead of canned?
    Yes, you can use fresh salmon! Cook and flake it before mixing with the other ingredients. Fresh salmon will give the patties a different texture and flavor.

    Q2: How do I know when the patties are fully cooked?
    The patties should be golden brown on the outside. You can cut one in half to ensure it’s warm and fully cooked inside.

    Q3: Can these be made ahead of time?
    Absolutely! You can prepare the mixture a day ahead and store it in the fridge. Form the patties and cook them when you’re ready to serve.

    Q4: What dipping sauces pair well with salmon patties?
    Tzatziki sauce, spicy mayo, or a simple lemon dill sauce pair beautifully with salmon patties. These sauces enhance the flavors while adding moisture.

    Q5: How can I make these more kid-friendly?
    Involve your kids in the cooking process! You can make smaller patties or shape them into fun forms. Additionally, keeping seasonings mild will make them more appealing to young palates.

    These frequently asked questions aim to clarify any doubts and simplify the cooking process, allowing you to enjoy The Best Salmon Patties Dinner fully!


    Enjoy exploring this delightful recipe and feel confident in your culinary adventure. Whether you are a beginner or an experienced cook, The Best Salmon Patties Dinner will surely bring joy to your kitchen, promoting health and flavorful eating all around. Try it today and delight in every bite!

  • Easy Ginger Soy Cod

    Easy Ginger Soy Cod

    Easy Ginger Soy Cod: A Tropical Delight

    Introduction to Easy Ginger Soy Cod

    Are you in search of easy dinner recipes that bring a burst of flavor to your table while also being wholesome and healthy? Look no further than this delicious Easy Ginger Soy Cod! This delightful dish brings together the rich, savory taste of soy sauce with the warm spice of ginger, creating a culinary masterpiece that’s sure to excite your taste buds.

    Why choose cod for dinner? This lean fish is not only packed with protein but is also low in calories, making it an ideal ingredient for those watching their dietary intake. Moreover, this recipe is incredibly easy to whip up, making it perfect for busy weeknights or family gatherings. Whether you’re a busy parent, a student, or a newlywed looking to impress, Easy Ginger Soy Cod fits the bill.

    Additionally, its vegan and gluten-free components make it suitable for various dietary needs. You can enjoy this dish guilt-free, knowing that it’s not just a treat for your palate but also a nourishing option for your body. With a cooking time of under 30 minutes, this recipe truly epitomizes convenience without sacrificing flavor.

    Stay tuned as we delve into the benefits and advantages of this delightful dish, the ingredients you’ll need, and how to master the cooking process!

    Benefits and Advantages of Easy Ginger Soy Cod

    When it comes to choosing easy dinner recipes, the Easy Ginger Soy Cod stands out for multiple reasons. First, it emphasizes convenience and speed — you can prepare this dish in less than half an hour! In our fast-paced world, this is a game-changer, especially for working professionals or busy families. You no longer have to sacrifice quality for time.

    Second, this recipe is incredibly health-conscious. Cod is a fantastic source of high-quality protein while being low in fat and calories. In addition, ginger contains anti-inflammatory properties and has been shown to improve digestion, making this dish not just delicious but also beneficial for your health. Ditching heavy fats and opting for a soy sauce marinade adds a robust flavor profile that will satisfy your taste buds without the extra calories.

    Third, Easy Ginger Soy Cod is adaptable. Are you vegan or vegetarian? Substitute cod with firm tofu or tempeh. Gluten-free? Use tamari instead of standard soy sauce. You can effortlessly customize this dish to suit a range of dietary restrictions and preferences, making it a flexible choice for gatherings.

    Not only does this dish cater to various diets, but it also inspires creativity in the kitchen. Enhance the recipe with your favorite vegetables like bok choy or green beans for added texture and flavor. You have the freedom to experiment while keeping your meal nutritious and enjoyable!

    Overall, the advantages of Easy Ginger Soy Cod make it an excellent choice for anyone looking to maintain a balanced diet without compromising on flavor or presentation.

    Ingredients Overview

    Essential Ingredients for Easy Ginger Soy Cod

    Here are the ingredients you will need for crafting this delectable dish. Each ingredient has been selected for its flavor-enhancing properties as well as its health benefits.

    • Cod Fillets (4 pieces, about 6 ounces each): Rich in lean protein and Omega-3 fatty acids, cod is the star of our dish. This mild fish easily absorbs flavors, making it perfect for our marinade.
    • Soy Sauce (1/4 cup): Offers a savory umami flavor. For gluten-free options, substitute with tamari.
    • Fresh Ginger (2 tablespoons, grated): Adds a zesty kick. Moreover, ginger is known for its anti-inflammatory and digestive benefits.
    • Garlic (2 cloves, minced): This aromatic adds depth to the dish and enhances overall flavor.
    • Brown Sugar (1 tablespoon): Balances the saltiness of the soy sauce. For a sugar-free version, consider using stevia or coconut sugar.
    • Honey or Maple Syrup (optional, 1 tablespoon): This is a sweetener option that can enhance the taste, especially if you prefer a slightly sweeter sauce.
    • Sesame Oil (1 tablespoon): Adds nuttiness and enhances the overall flavor profile.
    • Chopped Green Onions (for garnish): These add a pop of color and freshness when sprinkled on top before serving.
    • Salt and Pepper (to taste): Essential for seasoning the dish precisely to your preference.
    • Lemon or Lime Wedges (for serving): Provides a fresh acidity that cuts through the richness of the fish.

    This selection of ingredients crafts a dish that is not only vibrant but also packed with nutrients. Additionally, you’ll find that most of these ingredients are pantry staples, making it easy to whip up this recipe on a whim.

    Dietary Substitutions to Customize Your Easy Ginger Soy Cod

    Here are some suggestions if you need to adjust the recipe for different dietary needs or ingredient availability:

    • If you’re vegan: Substitute the cod with firm tofu or tempeh. Marinate the tofu in the same ginger soy mixture, allowing it to absorb those rich flavors.
    • For a gluten-free version: Simply replace regular soy sauce with tamari or coconut aminos to keep the dish gluten-free without losing flavor.
    • Low-calorie alternatives: Use low-sodium soy sauce to reduce sodium intake. You can also skip the added sugars by using nominal amounts of garlic and ginger to enhance the flavor without additional calories.
    • For a spicy twist: Consider adding a teaspoon of red chili flakes or a dash of Sriracha to the marinade for a spicy kick.
    • Add vegetables: Enhance the nutrition by incorporating your favorite vegetables such as broccoli, bell peppers, or snap peas. Simply toss them into the marinade before cooking.

    Customizing recipes not only keeps your meals interesting but also ensures they meet your specific dietary requirements and preferences.

    How to Prepare the Perfect Easy Ginger Soy Cod: Step-by-Step Guide

    Now that you have your ingredients ready, let’s dive into how to prepare this delightful Easy Ginger Soy Cod! Follow these steps for a fail-proof dinner that’s ready in no time.

    1. Prepare the Marinade: In a bowl, whisk together 1/4 cup soy sauce, 2 tablespoons of grated ginger, 2 minced garlic cloves, 1 tablespoon brown sugar, and 1 tablespoon sesame oil. This harmonious blend creates a flavorful marinade that seeps into the fish and enhances its taste.

    2. Marinate the Cod: Place the cod fillets into a shallow dish. Pour the marinade over the fillets, ensuring each piece is well coated. Cover and refrigerate for at least 15 minutes, allowing the flavors to infuse the fish. If you’re pressed for time, even 5 minutes will do!

    3. Preheat the Pan: Heat a non-stick skillet over medium heat. You want a hot surface to achieve a beautiful sear that will lock in moisture.

    4. Cook the Cod: Remove the cod from the marinade, reserving it for later. Place the fillets in the skillet and cook for about 4-5 minutes on each side. The fish should be opaque and flake easily with a fork when done.

    5. Glaze the Fish: If you like a more concentrated flavor, pour the reserved marinade into the pan after flipping the fish. Let it simmer for a minute to thicken slightly, which adds an extra layer of flavor.

    6. Check for Doneness: To determine if the cod is cooked through, look for it to be completely opaque and flaky. You can also use a food thermometer; the internal temperature should reach 145°F (63°C).

    7. Garnish and Serve: Remove the cod from the skillet and transfer it to a serving plate. Sprinkle chopped green onions on top for a fresh finish. Serve with lemon or lime wedges for added zest!

    8. Pairing Suggestions: This dish pairs beautifully with steamed rice or quinoa. Add sautéed vegetables like bok choy or snap peas to complete the meal while keeping it balanced and nutritious.

    By following these step-by-step instructions, you’ll have an incredible meal that not only satisfies your hunger but also delights your senses. Feel free to adjust cooking times and seasonings to match your preferences, making each dinner a personal experience!

    Mastering Easy Ginger Soy Cod: Advanced Tips and Variations

    Taking your Easy Ginger Soy Cod to the next level can be achieved with some advanced tips and variations:

    • Sear and Bake: For an added dimension, sear the cod in a skillet, then transfer the pan to the oven at 400°F (200°C) for about 10 minutes. This method ensures a beautifully flaky texture with a delightful crust.
    • Add Fruits: Consider a tropical twist by adding slices of pineapple or mango during the last few minutes of cooking. Their natural sweetness beautifully complements the savory qualities of the dish.
    • Herb Infusion: Incorporate fresh herbs like cilantro or basil for an aromatic upgrade. Chopping them finely and sprinkling them over the top just before serving elevates the dish visually and flavor-wise.
    • Experiment with Spice Levels: If desired, transform this dish into a more fragrant experience by adding a dash of five-spice powder or a marinade with additional chili paste for spiciness.
    • Different Cooking Methods: Try grilling the cod on an outdoor grill for a smoky flavor or cooking it in foil for an easy clean-up while ensuring the fish retains moisture.

    These variations and tips not only enhance the dish’s flavor but also invite creativity into your kitchen, making every meal a unique experience.

    How to Store Easy Ginger Soy Cod: Best Practices

    Proper storage can extend the life of your Easy Ginger Soy Cod so you can enjoy it for days to come. Here are the best practices for refrigeration, freezing, and reheating:

    • Refrigeration: Store any leftover cod in an airtight container in the refrigerator for up to 3 days. Ensure it cools completely before sealing to prevent hastening spoilage.

    • Freezing: For longer storage, you can freeze cooked cod. Wrap the fillets tightly in plastic wrap, then place them in a freezer-safe bag or container. This method preserves flavor and texture, allowing for storage of up to 2 months.

    • Reheating: When ready to enjoy your leftovers, it’s best to reheat them in the oven at a low temperature (around 300°F or 150°C) for about 10-15 minutes. This gentle reheating will prevent drying out the fish. Alternatively, you can use the microwave on low power, but keep a close watch to avoid overcooking.

    Storing your Easy Ginger Soy Cod properly ensures you can enjoy it again while maintaining its flavor and nutritional benefits.

    Nutritional Value of Easy Ginger Soy Cod

    Understanding the nutritional make-up of your meals is essential for maintaining a well-balanced diet. Here’s a breakdown of approximate nutritional values per serving (based on one cod fillet):

    • Calories: 200-220 kcal
    • Protein: 22-25 g
    • Fat: 8 g (includes healthy fats from sesame oil)
    • Carbohydrates: 6-8 g (primarily from sugars in the marinade)
    • Fiber: 0 g
    • Sugar: 2 g (considered low, especially if you adjust the sugar content)
    • Sodium: 800-900 mg (varies based on the type of soy sauce used)

    This dish is rich in protein while remaining relatively low in calories, making it a great option for those looking to maintain a healthy diet. Plus, the added benefits of ginger contribute antioxidants and anti-inflammatory properties.

    Paying attention to these nutritional details allows you to make informed decisions about the meals you prepare, ensuring a diet that’s both enjoyable and nourishing.

    FAQs: Frequently Asked Questions About Easy Ginger Soy Cod

    Q1: Can I use frozen cod for this recipe?
    – Yes, you can use frozen cod. Just make sure to thaw it completely before marinating and cooking. This will ensure the fish cooks evenly and absorbs all the flavors.

    Q2: How can I make this dish spicier?
    – To add some heat, include red pepper flakes, Sriracha, or chili oil to your marinade. Adjust to taste according to your preference!

    Q3: Is this recipe suitable for meal prep?
    – Absolutely! This Easy Ginger Soy Cod is perfect for meal prep. Simply cook in bulk and store in individual containers. The flavors tend to enhance after marinating, so it remains a delicious option for several days.

    Q4: Can I use other fish instead of cod?
    – Yes, you can use other firm fish like haddock, tilapia, or even salmon. Just be mindful of the cooking times as they may vary depending on the type of fish.

    Q5: What should I serve with Easy Ginger Soy Cod?
    – This dish pairs well with steamed rice, quinoa, or a fresh salad. You can also serve it alongside roasted or stir-fried vegetables for a balanced meal.

    Q6: Can children enjoy this dish?
    – Yes! The flavors are mild and appealing to children. However, feel free to adjust the sweetness and spiciness based on their preferences!

    These FAQs address some of the most common inquiries regarding The Easy Ginger Soy Cod, helping clarify any uncertainties potential cooks may have.

    In conclusion, you now have all the tools, tips, and insights needed to create a stunning Easy Ginger Soy Cod that not only satisfies cravings but also supports a healthy lifestyle. Families, busy professionals, and food enthusiasts alike will appreciate its simplicity and flavor. So why wait? Gather your ingredients, roll up your sleeves, and make this delicious dish your own! Enjoy cooking, and happy eating!

  • Tasty Crispy Shrimp Cakes with Aioli

    Tasty Crispy Shrimp Cakes with Aioli

    Tasty Crispy Shrimp Cakes with Aioli: A Tropical Delight

    Introduction to Tasty Crispy Shrimp Cakes with Aioli

    If you’re on the hunt for a delicious and easy-to-make dish, look no further! Our Tasty Crispy Shrimp Cakes with Aioli are not just a tantalizing treat but also a healthy alternative to many traditional seafood recipes. As one of those delightful shrimp recipes that easily capture the essence of a tropical getaway, these shrimp cakes combine the goodness of fresh shrimp with an assortment of vibrant flavors. Perfect for busy parents, working professionals, and food enthusiasts alike, these cakes are not just a meal; they are a celebration on your plate.

    What makes this recipe stand out is its simplicity. Just a handful of ingredients come together to create an amazing experience for your taste buds. Whether you’re catering to dietary needs or simply looking to impress guests at a dinner party, these shrimp cakes can be made gluten-free and low-calorie without sacrificing flavor. The accompanying aioli, a creamy, garlicky wonder, elevates the dish even further and caters to those looking for vegan options as well—simply substitute the mayonnaise with a plant-based version.

    As you embark on a culinary journey with our Tasty Crispy Shrimp Cakes, you not only satisfy your cravings but also provide your body with the nutrients it deserves. These shrimp cakes are packed with protein, healthy fats, and tons of flavor, making them a great choice any day of the week.

    Benefits and Advantages of Tasty Crispy Shrimp Cakes with Aioli

    One of the primary advantages of making Tasty Crispy Shrimp Cakes with Aioli is their straightforward preparation process. This dish remarkably blends a variety of textures and flavors while being incredibly easy to whip up. Perfect for those busy weeknights or casual weekend gatherings, you can have a restaurant-quality dish ready in less than an hour.

    Health Benefits: Unlike many traditional fried seafood dishes, this recipe allows you to control the cooking method and ingredients, leading to a healthier meal overall. Shrimp is often considered a lean source of protein, low in calories but high in essential nutrients like vitamin B12, selenium, and even omega-3 fatty acids. By preparing these cakes at home, you can add fresh herbs and spices, enriching them with antioxidants and micronutrients.

    Versatility: When considering dietary needs, these shrimp recipes stand out for their adaptability. They can easily be transformed to accommodate gluten-free, low-carb, and even vegan diets with simple substitutions. Parents can feel good serving these cakes to their kids, knowing they contain wholesome ingredients rather than processed ones. The aioli, typically made with mayonnaise, can also be modified to suit different preferences, including adding herbs to the base or using alternative thickeners for a vegan-friendly sauce.

    Impressive Presentation: If you’re hosting a dinner or looking to impress your family and friends, these shrimp cakes provide a beautiful presentation and bursting flavors, making them an excellent choice for any occasion. Garnished with fresh herbs and served with a side salad, they make for a stunning plate that will have your guests raving.

    Ingredients Overview

    Essential Ingredients for Tasty Crispy Shrimp Cakes with Aioli

    For our Tasty Crispy Shrimp Cakes with Aioli, you’ll need the following ingredients:

    • 1 lb fresh shrimp (peeled and deveined): The star ingredient rich in protein and low in fat.
    • 1/2 cup breadcrumbs or panko bread crumbs (use gluten-free for gluten-free option): Provides structure and adds a crispy texture.
    • 1/4 cup finely chopped onion: Adds flavor and moisture to the cakes.
    • 1/4 cup chopped fresh parsley or cilantro: Fresh herbs enhance the taste and visual appeal.
    • 2 cloves garlic, minced: Garlic adds depth and a punch of flavor.
    • 1 egg (or flax egg for vegan option): Acts as a binding agent to hold everything together.
    • 1 teaspoon Old Bay seasoning (optional): A classic seasoning blend that emphasizes the shrimp flavor.
    • Salt and pepper to taste: Essential for balancing all the flavors.
    • 1/4 cup mayonnaise (or vegan mayonnaise): To make the aioli; includes a dash of lemon juice for tanginess.

    Dietary Substitutions to Customize Your Tasty Crispy Shrimp Cakes with Aioli

    1. Gluten-Free Option: Use gluten-free breadcrumbs instead of regular ones. This simple substitution will allow your gluten-sensitive friends and family to enjoy this dish without worry.

    2. Low-Calorie Adjustments: If you’re looking to cut calories, consider removing the egg or using a lower-fat mayonnaise alternative for the aioli. You can also bake the cakes instead of frying them to reduce fat content, cooking them in a lightly oiled pan until crisp on both sides.

    3. Vegan Version: To adapt the recipe for a vegan diet, replace shrimp with a plant-based alternative such as mashed chickpeas or lentils, season them well, and use a flax egg (1 tablespoon flaxseed meal mixed with 2.5 tablespoons water) for binding. Pair this with a creamy vegan aioli made from mashed avocado and a splash of lemon juice.

    4. Additional Spice: If you love heat, consider adding chopped jalapeños or a dash of cayenne pepper to the mixture. This will provide extra flavor and zest to your shrimp cakes.

    With these substitutions, you’ll cater to various dietary needs and create a dish that everyone can enjoy.

    How to Prepare the Perfect Tasty Crispy Shrimp Cakes with Aioli: Step-by-Step Guide

    Creating your Tasty Crispy Shrimp Cakes with Aioli is as easy as 1-2-3! Follow along with this step-by-step guide:

    1. Prepare the Shrimp:
      Begin by placing the fresh shrimp in a food processor. Pulse them a few times until the shrimp are roughly ground but not pureed. Alternatively, chop shrimp finely with a knife for a chunkier texture.

    2. Mix Ingredients:
      Transfer the chopped shrimp into a large mixing bowl. Add the breadcrumbs, onions, herbs, minced garlic, egg, seasoning, salt, and pepper. Mix everything thoroughly until well combined.

    3. Form Cakes:
      Using your hands, shape the mixture into patties of about 3 inches in diameter and 1 inch thick. Make sure to pack them tightly together so they hold their shape.

    4. Chill the Cakes:
      For better texture and easier handling, place the formed cakes on a tray and refrigerate them for at least 20 minutes. This step also helps them firm up, making them easier to cook.

    5. Make the Aioli:
      In a small bowl, combine mayonnaise, minced garlic, and lemon juice. Stir well until smooth and creamy, then season with salt and pepper to taste.

    6. Cook the Cakes:
      Heat a splash of oil in a large skillet over medium heat. Once hot, add the shrimp cakes (working in batches if necessary). Cook for about 4-5 minutes on each side or until golden brown and crispy.

    7. Drain and Serve:
      Once fully cooked, transfer the cakes to a paper towel-lined plate to drain excess oil. Serve immediately with homemade aioli on the side.

    8. Optional Garnish:
      For a fresh touch, garnish with additional chopped herbs or a slice of lemon to add a pop of color to your dish.

    Mastering Tasty Crispy Shrimp Cakes with Aioli: Advanced Tips and Variations

    To truly elevate your cooking game with our Tasty Crispy Shrimp Cakes with Aioli, consider these advanced tips and variations:

    • Additions and Mix-ins: Feel free to experiment with additional flavors such as diced bell peppers, corn, or even jalapeños for a spicy kick. Different types of herbs, like dill or chives, can also impart a unique character.

    • Cooking Methods: While pan-frying yields a delicious crispiness, consider baking them in a preheated oven at 400°F (200°C) for 20 minutes, flipping halfway through. This healthier method will provide a lovely texture with a fraction of the oil.

    • Serving Ideas: Pair these shrimp cakes with a fresh salad, slaw, or rice pilaf for a complete meal. For a fun appetizer, serve them as bite-sized cakes on toothpicks with a drizzle of aioli.

    • Experiment with Sauces: Besides aioli, consider serving with a zesty mango salsa, sweet chili sauce, or even a spicy remoulade, depending on your flavor preferences.

    With these tips and variations, you can tailor the recipe to suit your individual taste and impress your guests with your culinary prowess.

    How to Store Tasty Crispy Shrimp Cakes with Aioli: Best Practices

    Proper storage of Tasty Crispy Shrimp Cakes with Aioli ensures you get to enjoy every last bite. Here are some best practices:

    • Refrigeration: Allow the shrimp cakes to cool completely before placing them in an airtight container. They can be stored in the refrigerator for up to 3 days, retaining their flavor and texture.

    • Freezing: If you want to see how well these shrimp recipes freeze, place individual cakes on a baking sheet lined with parchment paper, and freeze until solid. Then transfer to a freezer-safe container or bag, layering parchment paper between each cake to prevent sticking. They can be stored in the freezer for up to 2 months.

    • Reheating: When you’re ready to enjoy the leftover shrimp cakes, you can reheat them in the oven at 350°F (175°C) for about 10-15 minutes, or until heated through. For a quicker option, use a microwave, but this may result in a softer texture.

    By following these storage tips, you ensure that your shrimp cakes remain delicious and ready to enjoy at a moment’s notice.

    Nutritional Value of Tasty Crispy Shrimp Cakes with Aioli

    It’s important to consider the nutritional value of your meals. Here’s a breakdown of the approximate nutritional information for one serving (two shrimp cakes with aioli):

    • Calories: 250
    • Protein: 20g
    • Fat: 15g
    • Carbohydrates: 10g
    • Fiber: 1g
    • Sugars: 1g
    • Sodium: 500mg

    This nutritional profile highlights the balance of high protein, moderate fat, and low carbohydrate content, making it suitable for many dietary preferences. By incorporating plenty of fresh ingredients and options for vegetarian or vegan adaptations, these shrimp recipes cater to diverse dietary habits while still offering flavor-packed servings.

    FAQs: Frequently Asked Questions About Tasty Crispy Shrimp Cakes with Aioli

    Can I use frozen shrimp for this recipe?

    Absolutely! Just ensure that the shrimp are fully thawed, peeled, and deveined before using. You might need to squeeze out excess moisture from thawed shrimp to avoid a watery mixture.

    How can I make this recipe gluten-free?

    Simply replace regular breadcrumbs with gluten-free breadcrumbs, and make sure all other ingredients are certified gluten-free, especially the mayonnaise.

    Can the shrimp cakes be baked instead of fried?

    Yes! Baking is a healthier alternative. Cook the cakes at 400°F (200°C) for 20 minutes, flipping halfway through, until they are golden brown and heated through.

    What can I substitute for mayonnaise in the aioli?

    You can make a delicious vegan aioli using mashed avocado, silken tofu, or a store-bought vegan mayonnaise. Customize it with herbs or spices for added flavor.

    How do I reheat leftover shrimp cakes without losing their crispiness?

    To maintain the crispy texture, reheat them in an oven at 350°F (175°C) for about 10-15 minutes until warmed through. Avoid microwave reheating if possible, as they can become soggy.

    These FAQs provide clarity for home cooks, ensuring everyone feels confident about making Tasty Crispy Shrimp Cakes with Aioli.

    By focusing on quality ingredients and a simple yet delicious method, you can create shrimp recipes that not only satisfy cravings but also provide a healthy and enjoyable dining experience. Dive into this tropical delight today!