Category: bread

  • Easy Sourdough Rhubarb Bread

    Easy Sourdough Rhubarb Bread

    Easy Sourdough Rhubarb Bread: A Tropical Delight

    Introduction to Easy Sourdough Rhubarb Bread

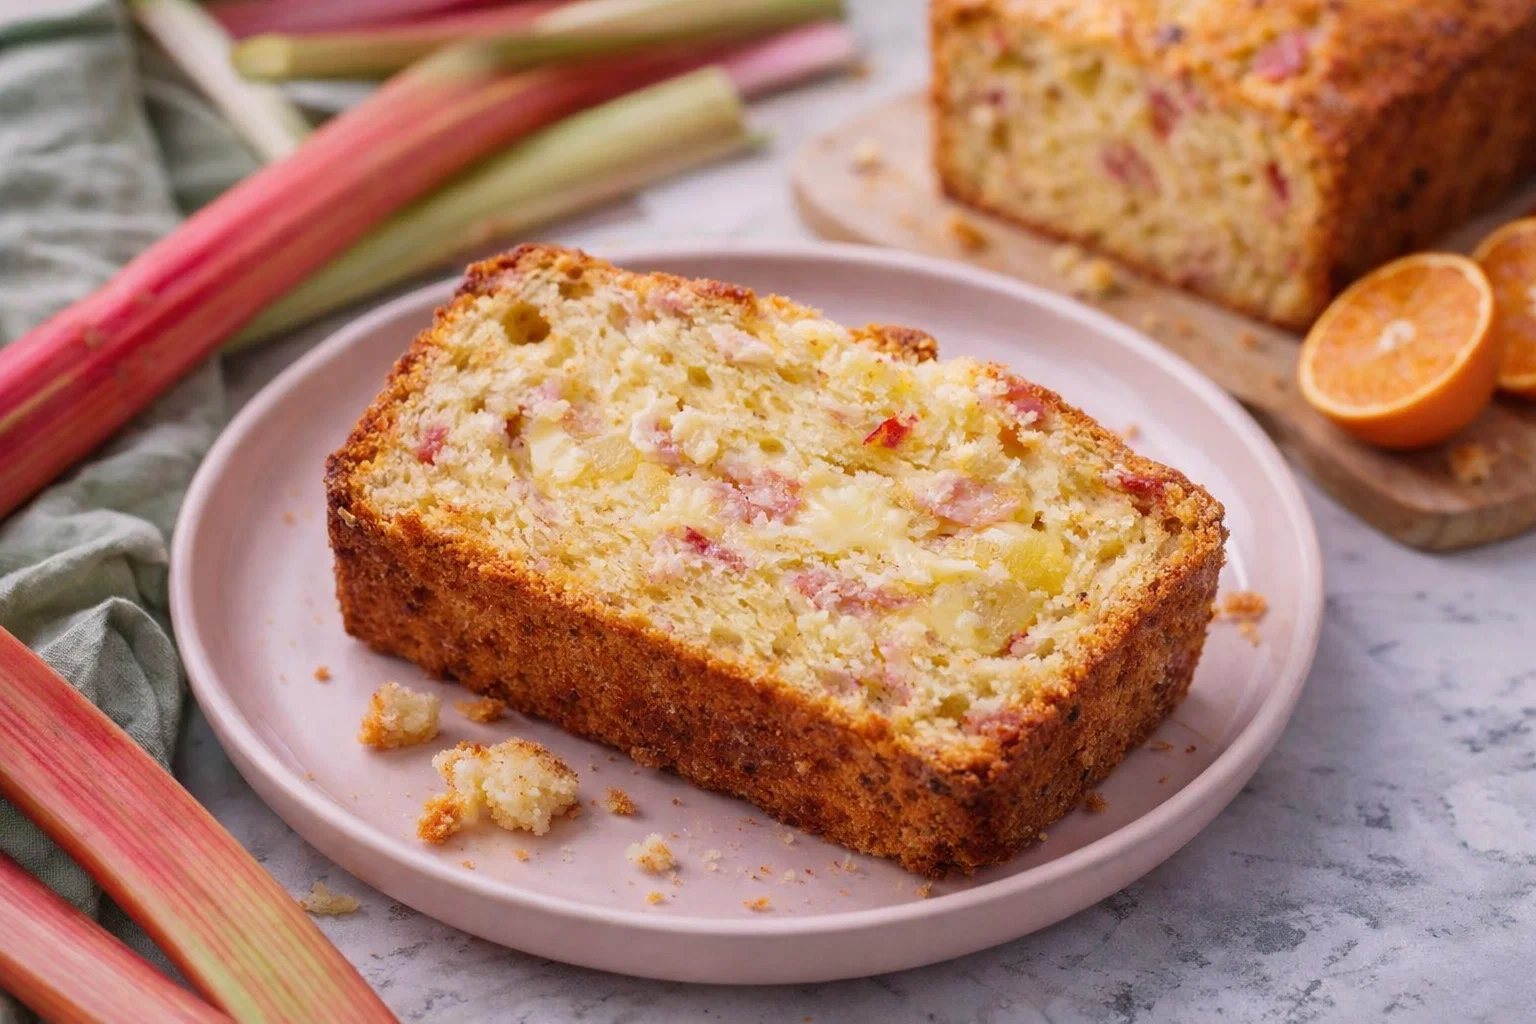
    As the flowers bloom and the days grow warmer, the arrival of spring meals awakens our taste buds and inspires our creativity in the kitchen. If you’re looking for a delightful recipe that embodies the freshness of the season, look no further than Easy Sourdough Rhubarb Bread. This recipe not only highlights the tartness of rhubarb, but it also infuses the wholesome qualities of sourdough, creating a loaf that’s both flavorful and nutritious.

    What earns this delectable bread a place in your spring cooking is its simplicity. With straightforward steps and minimal preparation, even novice bakers can tackle this recipe with confidence. Plus, you can customize it to meet various dietary needs; whether you’re vegan, gluten-free, or simply seeking a healthier alternative to traditional bread, this Easy Sourdough Rhubarb Bread can fit the bill. Its combination of nutritious ingredients also means you can enjoy it guilt-free, making it a splendid addition to breakfast or as a tasty snack.

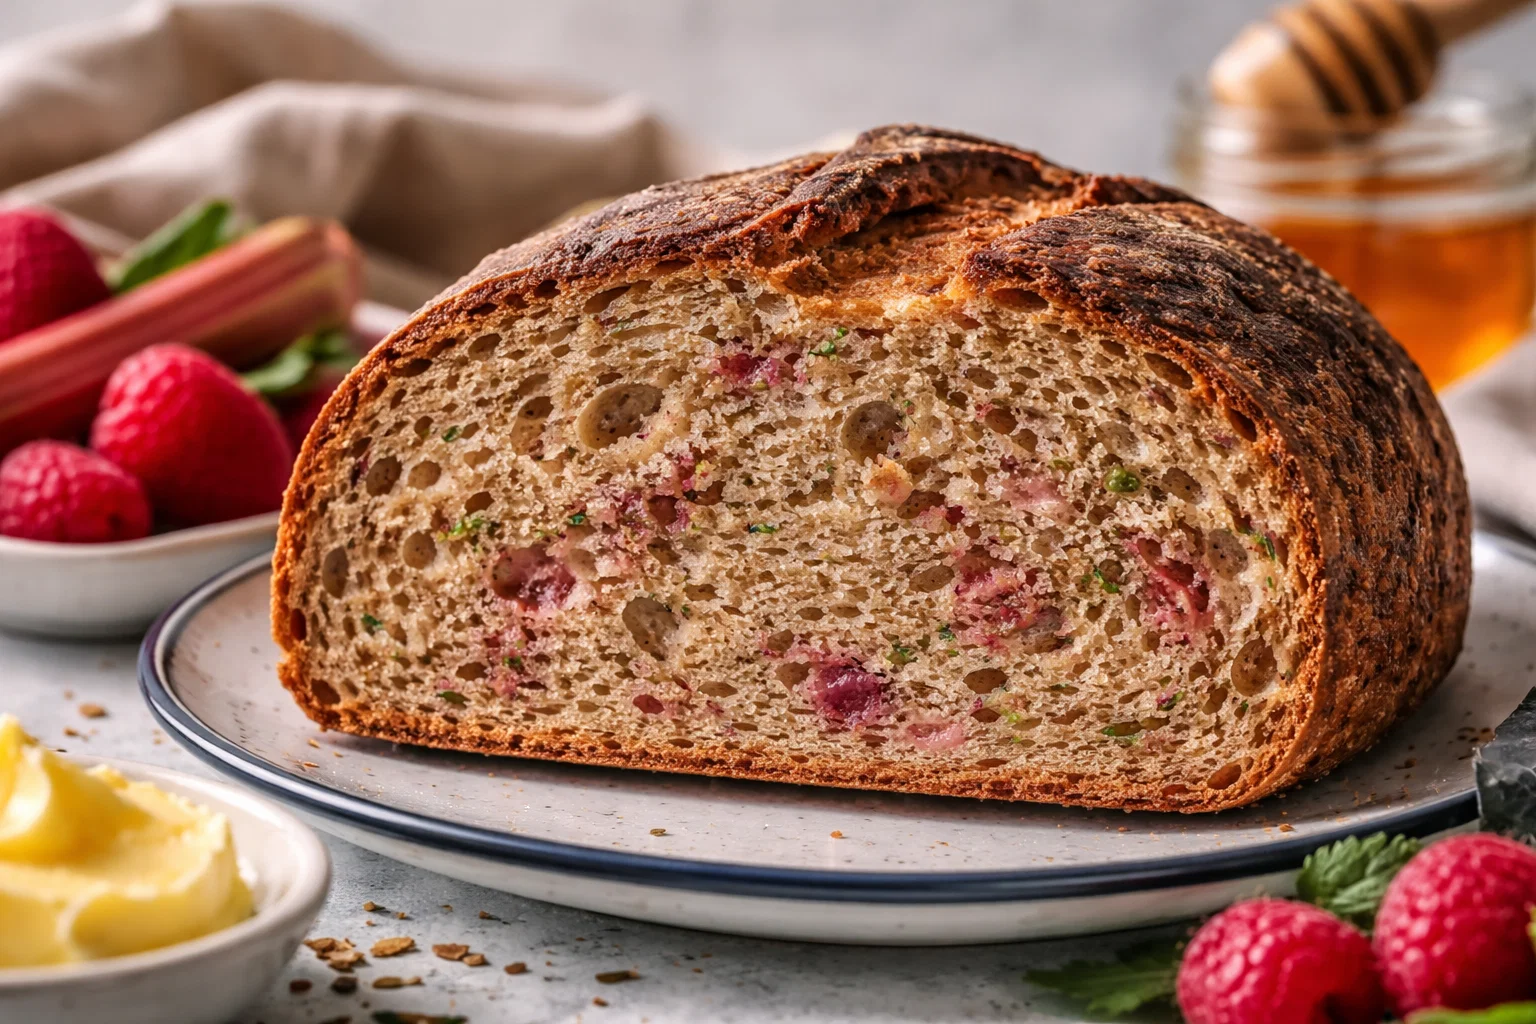
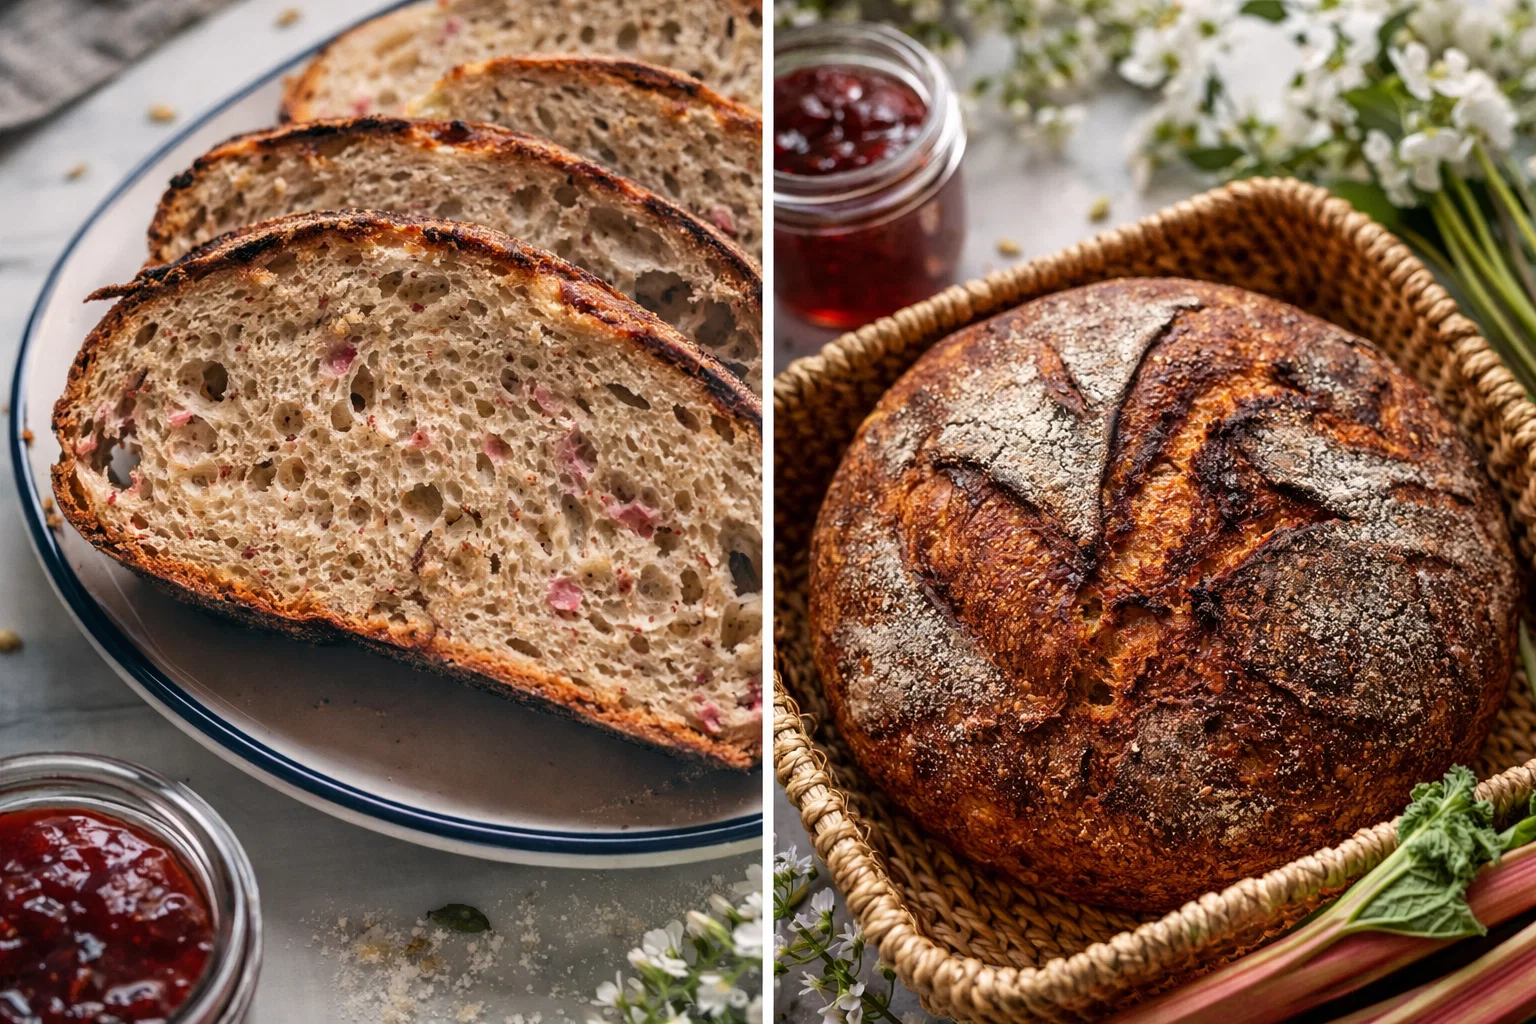
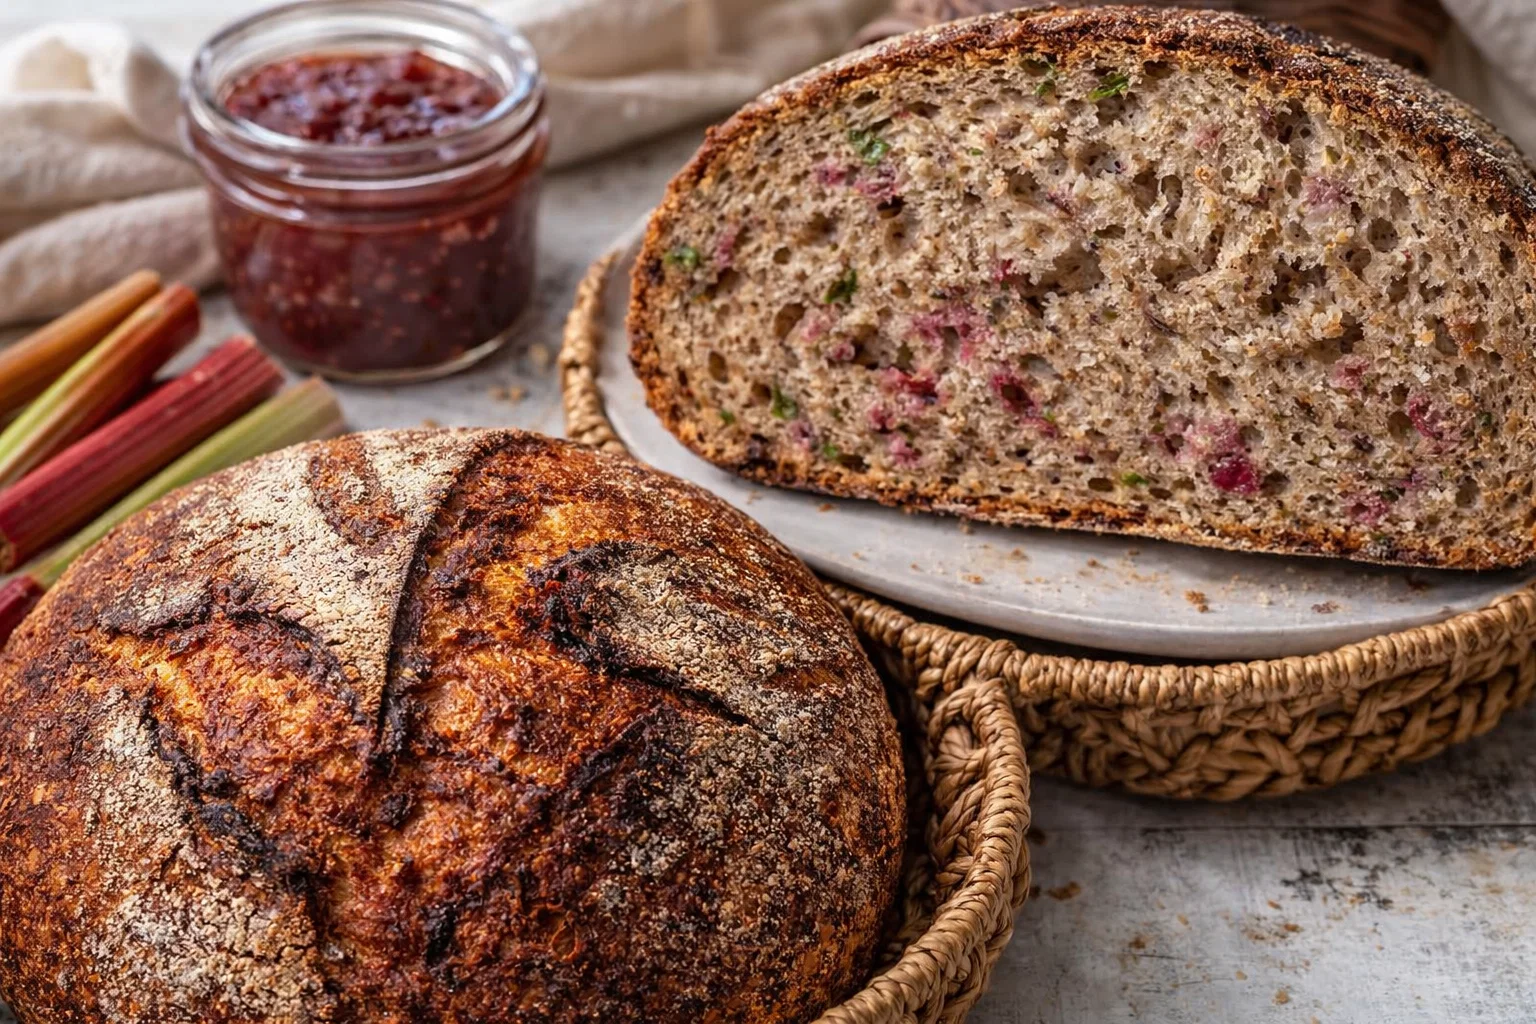
    Beyond its impressive taste and health benefits, the stunning visuals of the pink rhubarb peeking through the golden bread make this recipe a feast for the eyes as well. So gather your ingredients, preheat your oven, and let’s dive into this delightful spring treat!

    Benefits and Advantages of Easy Sourdough Rhubarb Bread

    There are countless reasons why Easy Sourdough Rhubarb Bread stands out in the world of spring meals. Here are a few compelling benefits that elevate this recipe:

    1. Ease of Preparation: One of the most attractive qualities of this recipe is its straightforwardness. You don’t need to be a seasoned baker to succeed—this bread is perfect for busy parents, students, or anyone looking for a quick yet rewarding baking project. Just combine your ingredients, let them mingle for a while, and soon you’ll be welcoming a fresh loaf into your home.

    2. Health Benefits: The tangy rhubarb is rich in vitamins C and K, while the sourdough process allows for easier digestibility. Using whole grain flour adds fiber, which contributes to a well-rounded diet. Those focusing on healthier eating—and looking for lighter spring meals—will appreciate this balancing act between taste and nutritional value.

    3. Versatility: This recipe can easily accommodate diverse dietary requirements. With simple substitutions, you can create a vegan or gluten-free version without sacrificing taste or texture. Enjoy it as a traditional loaf, create mini loaves for gifting, or experiment by adding nuts or seeds for an additional crunch.

    4. Seasonal Appeal: Harnessing the flavors of spring, this loaf is an ideal centerpiece for holiday gatherings, brunches, or picnics. It embodies spring meals that showcase seasonal produce, making it perfect for entertaining or enjoying a leisurely afternoon snack.

    5. A Treat for the Senses: Besides the incredible flavor, the aroma of baking bread mixed with the tang of rhubarb creates a warm, welcoming environment that beckons family and friends to the kitchen. Plus, its lovely appearance makes it an attractive addition to any table.

    As you can see, Easy Sourdough Rhubarb Bread brings a plethora of benefits to the table. Its simplicity, health attributes, and adaptability make it a must-try for anyone eager to embrace the flavors of the season.

    Ingredients Overview

    Essential Ingredients for Easy Sourdough Rhubarb Bread

    To make this delightful Easy Sourdough Rhubarb Bread, you’ll need the following ingredients:

    • 2 cups active sourdough starter (preferably fed and bubbly)—provides the leavening and flavor.
    • 1 cup whole wheat flour—adds fiber and nourishment. (For a gluten-free option, use 1 cup of gluten-free all-purpose flour).
    • 1 cup all-purpose flour—for the structure. You can substitute with a gluten-free blend for gluten-sensitive diets.
    • 1/2 cup brown sugar—for sweetness and moisture. Feel free to substitute with coconut sugar or a low-calorie sweetener.
    • 1 tsp baking powder—helpful for a tender crumb.
    • 1/2 tsp baking soda—adds a bit more lift.
    • 1/2 tsp salt—enhances the flavor.
    • 1 1/2 cups chopped fresh rhubarb—the star ingredient that lends tartness and moisture. (Frozen rhubarb can work well if fresh isn’t available).
    • 1/4 cup vegetable oil—adds moisture. You can replace with melted coconut oil for a vegan option.
    • 1 tsp vanilla extract—adds depth of flavor.
    • 1/2 cup non-dairy milk (for a vegan version)—or regular milk for a non-vegan loaf.

    Dietary Substitutions to Customize Your Easy Sourdough Rhubarb Bread

    1. Gluten-Free: As previously mentioned, opt for gluten-free flour blends in place of wheat flour. Adding xanthan gum can help replicate the bread’s texture.

    2. Vegan: Replace the non-dairy milk with almond, soy, or oat milk. Make sure to use a vegan sugar, as some sugars are processed with bone char.

    3. Lower Sugar: For a lower-sugar version, you can reduce the amount of brown sugar to 1/3 cup or use a natural sweetener like maple syrup or agave nectar.

    4. Add-ins: Feel free to mix in walnuts, pecans, or even chocolate chips for added texture and flavor if desired.

    With these ingredient variations, Easy Sourdough Rhubarb Bread can align perfectly with various dietary preferences while maintaining the essence of your spring meals!

    How to Prepare the Perfect Easy Sourdough Rhubarb Bread: Step-by-Step Guide

    Follow these simple steps to create your Easy Sourdough Rhubarb Bread. This section emphasizes how you can weave this recipe into your array of spring meals, ensuring it becomes a staple in your kitchen.

    1. Prepare the Base: In a large mixing bowl, combine your active sourdough starter and the non-dairy milk (or regular milk) until thoroughly mixed. If your starter has been refrigerated, allow it to come to room temperature before using.

    2. Mix Dry Ingredients: In another bowl, whisk together the whole wheat flour, all-purpose flour, baking powder, baking soda, and salt. This ensures that the leavening agents are evenly distributed throughout the loaf.

    3. Combine Mixtures: Gradually add the dry mixture into the wet mixture, stirring until just combined. Avoid over-mixing as it can lead to a dense texture.

    4. Incorporate Sweetener: Gently fold in your brown sugar, ensuring it’s evenly dispersed. The sweetness balances the tang of the rhubarb beautifully.

    5. Add Rhubarb: Carefully fold in the chopped rhubarb, making sure to distribute it evenly throughout the batter. The pieces should be coated in the batter for even baking.

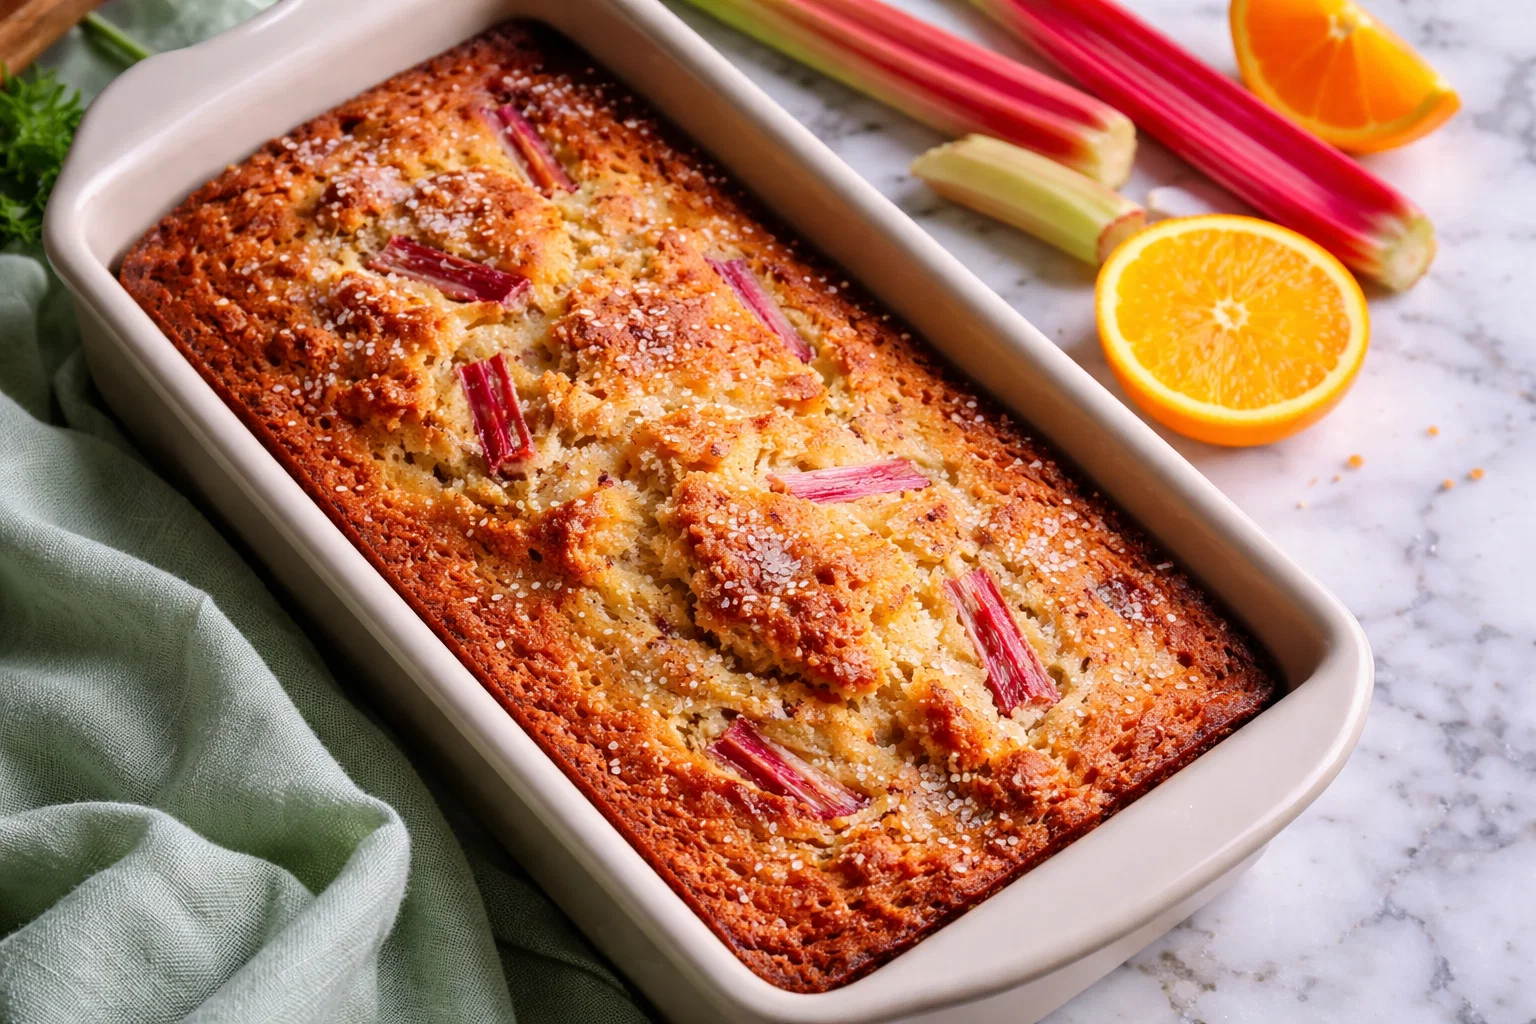
    6. Prepare the Baking Dish: Preheat your oven to 350°F (175°C) and grease a standard loaf pan with cooking spray or line it with parchment paper for easy removal.

    7. Pour the Batter: Spoon the batter into your prepared loaf pan, smoothing the top with a spatula for even baking. Optionally, you can sprinkle a bit of sugar on top for a lovely crust.

    8. Bake: Place the loaf pan in the preheated oven. Bake for about 50-65 minutes, or until a toothpick inserted into the center comes out clean. If the top begins to brown too quickly, cover it loosely with aluminum foil.

    9. Cool the Bread: Once done, remove the bread from the oven and allow it to cool for about 10 minutes in the pan. Then transfer it onto a wire rack to cool completely. Don’t rush this step; cooling allows the flavors to set!

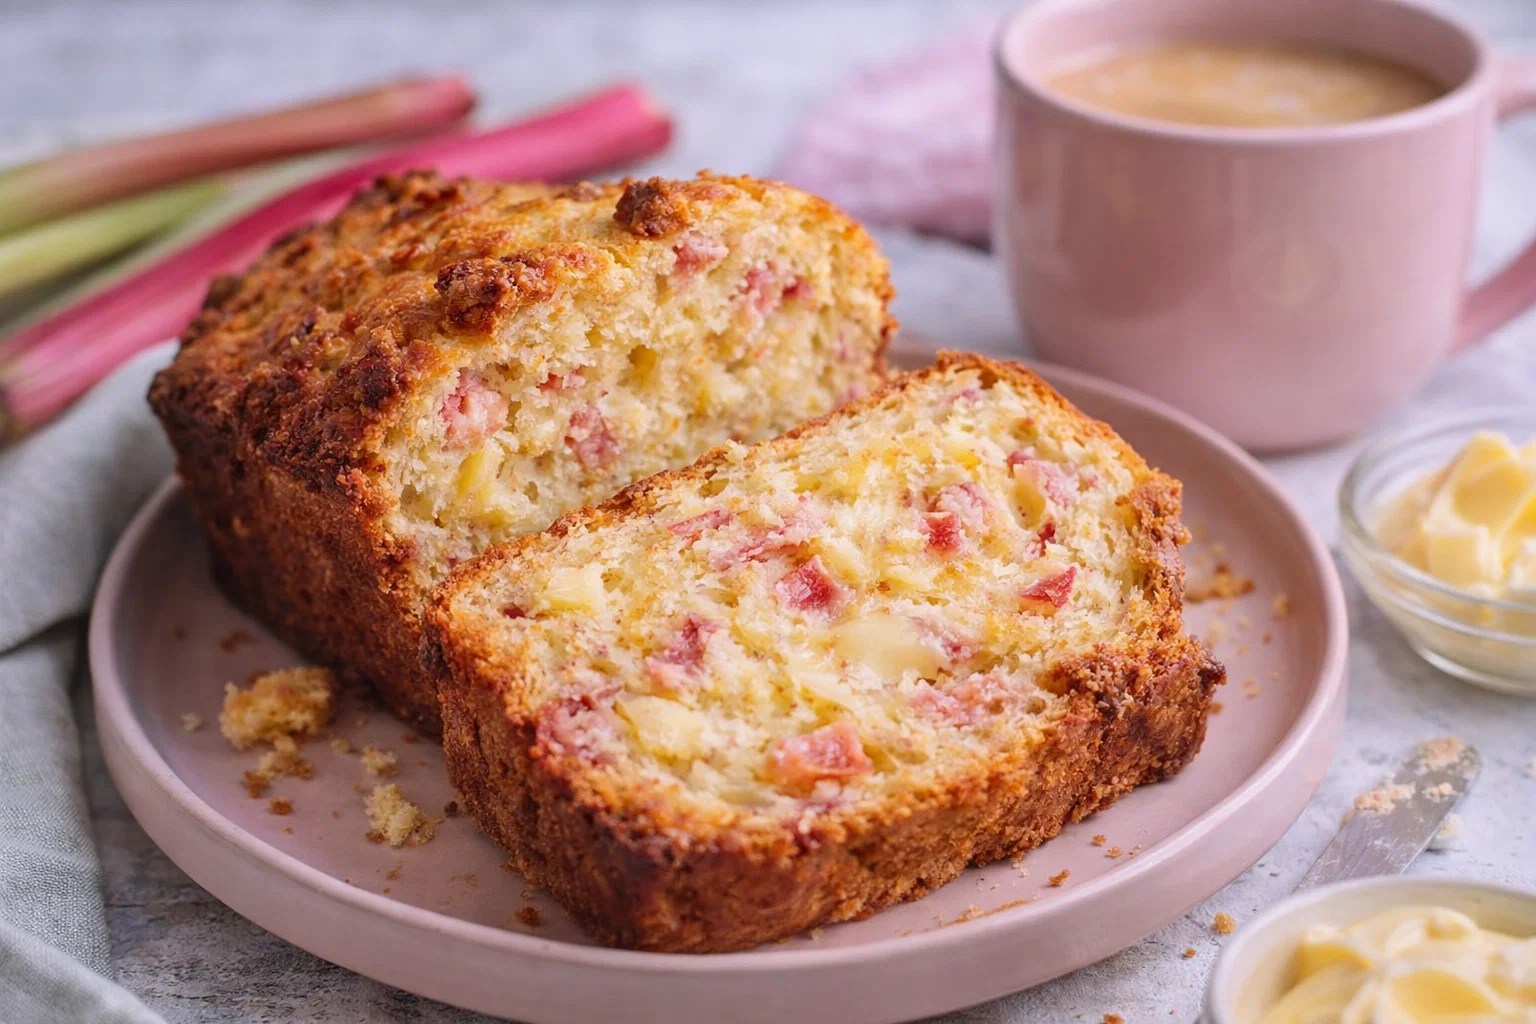
    10. Serve and Enjoy: Slice and serve the Easy Sourdough Rhubarb Bread warm or at room temperature. It pairs beautifully with a spread of butter or jam, adding a delightful layer to your spring meals.

    Each step has been designed to highlight the ease of preparation while allowing for customization, catering to different dietary needs.

    Mastering Easy Sourdough Rhubarb Bread: Advanced Tips and Variations

    To take your Easy Sourdough Rhubarb Bread to the next level, here are some advanced tips and exciting variations to consider:

    1. Rhubarb Compote: Before baking, you can create a rhubarb compote by simmering chopped rhubarb with a bit of sugar and lemon juice. Swirl this compote into the batter for an enhanced rhubarb flavor and moisture.

    2. Herbal Touch: Add a pinch of cinnamon, nutmeg, or cardamom to the dry ingredients to introduce a warm spice that complements the tartness of rhubarb beautifully.

    3. Experiment with Shapes: Instead of a standard loaf, consider baking mini loaves or muffins. This size is perfect for portion control and makes for an excellent on-the-go snack.

    4. Stay Aware of Seasonality: During autumn, try replacing the rhubarb with pears or apples for a seasonal twist while keeping the same basic sourdough method. It’s a great way to expand your repertoire of spring meals!

    5. Presentation: Serve your bread cut into slices, presented on a colorful platter with fruit and cheese, making a charming centerpiece for brunch or gatherings.

    6. Sourdough Discard: If you have sourdough discard from previous baking, don’t toss it—use it for this bread! Just ensure you adjust the amount of flour and liquid accordingly to maintain the right consistency.

    By following these tips and experimenting with variations, you’ll master the delightful art of baking Easy Sourdough Rhubarb Bread, making it a staple for your seasonal meals.

    How to Store Easy Sourdough Rhubarb Bread: Best Practices

    Storing your Easy Sourdough Rhubarb Bread properly can help prolong its freshness and flavor, allowing you to enjoy this delightful spring meal for days to come.

    1. Room Temperature: If you plan to consume the bread within a day or two, simply wrap it tightly in plastic wrap or place it in a bread box at room temperature to keep it fresh.

    2. Refrigeration: For longer storage of up to a week, consider wrapping the bread in foil or plastic wrap and placing it in the refrigerator. However, be aware that refrigeration may alter the bread’s texture slightly.

    3. Freezing: If you want to store the bread for a more extended period, freezing is the best option. First, slice the bread, then wrap each slice tightly in plastic wrap and aluminum foil, or place them in a freezer-safe bag. When you’re ready to enjoy it again, simply thaw at room temperature or toast slices directly from the freezer.

    4. Reheating: To enjoy your bread warm, preheat your oven to 350°F (175°C) and place it directly on the rack for about 5-10 minutes. If it’s frozen, you can toast individual slices in a toaster or oven for that warm, freshly baked taste.

    By following these storage methods, your Easy Sourdough Rhubarb Bread will stay delightful and ready to complement your spring meals throughout the week!

    Nutritional Value of Easy Sourdough Rhubarb Bread

    Understanding the nutritional value of your Easy Sourdough Rhubarb Bread will empower you to make informed choices for your dietary needs. Here’s a breakdown of the approximate nutrition per slice (based on 12 slices per loaf):

    • Calories: 150-200
    • Total Fat: 6g (saturated fat: 1g)
    • Cholesterol: 0mg
    • Sodium: 150mg
    • Total Carbohydrates: 30g (dietary fiber: 2g, sugars: 6g)
    • Protein: 4g

    These values can fluctuate based on ingredient substitutions made, but generally speaking, this bread offers a balanced profile that aligns with healthy spring meals. The rhubarb adds nutrients like vitamin C and antioxidants, while whole wheat flour contributes fiber.

    For those mindful of calories or sugar intake, you can easily reduce the sugar or substitute with healthier alternatives as discussed earlier.

    Incorporating Easy Sourdough Rhubarb Bread into your diet not only brightens your meals but also provides you with beneficial nutrients.

    FAQs: Frequently Asked Questions About Easy Sourdough Rhubarb Bread

    1. Can I use frozen rhubarb for this recipe?

    Absolutely! If fresh rhubarb isn’t available, frozen rhubarb can be used—just be sure to thaw and drain any excess moisture before incorporating it into the batter.

    2. How can I tell when the bread is done baking?

    Insert a toothpick or skewer into the center of the loaf. If it comes out clean or with just a few crumbs attached, the bread is done. As a tip, if the top of the loaf is browning too quickly, cover it loosely with aluminum foil.

    3. Can I make this bread without sourdough starter?

    While this recipe relies on sourdough starter for flavor and rise, you can try using instant yeast as a substitute, increasing the bread’s prep time.

    4. Is this bread suitable for gluten-free diets?

    Yes, with appropriate substitutions using gluten-free flour blends, this bread can be made gluten-free. Make sure to also verify that other ingredients, like baking powder, are gluten-free.

    5. How long does it take for the sourdough starter to rise?

    Typically, allowing your starter to rise for about 4-6 hours at room temperature will yield an active and bubbly starter, ready for baking. Just remember, the timing can vary based on the temperature and activity of your starter.

    6. Can I add nuts or seeds to this recipe?

    Definitely! Adding nuts like walnuts or seeds such as sunflower seeds can enhance the nutrition and texture of your Easy Sourdough Rhubarb Bread. Just ensure total mix-in ingredients don’t exceed your measured flour components.

    By addressing these common questions, we aim to provide clarity and encouragement to both novice and experienced bakers alike. Easy Sourdough Rhubarb Bread is not only a delightful treat but a recipe that invites creativity and adaptability, making it a fantastic addition to your spring meals.

    Now grab your ingredients, roll up those sleeves, and immerse yourself in the joyful process of baking!”

  • This Amazing Rhubarb Bread Recipe Has Me Hooked

    This Amazing Rhubarb Bread Recipe Has Me Hooked

    This Amazing Rhubarb Bread Recipe Has Me Hooked!: A Tropical Delight

    Introduction to This Amazing Rhubarb Bread Recipe Has Me Hooked!

    Rhubarb is often hailed as a superfood, bursting with flavor and nutrients. When transformed into a delightful bread, it becomes not just a treat but a versatile offering for every home cook—whether you’re a busy parent, a student, or someone just looking for delicious recipe ideas that cover various dietary needs. This amazing rhubarb bread recipe has me hooked because it strikes the perfect balance between sweet and tart, delivering a delightful slice that can be enjoyed at any time of the day.

    One of the great aspects of this recipe is its simplicity. You don’t need to be an expert baker to achieve a loaf that’s moist, flavorful, and utterly satisfying. Moreover, it accommodates various dietary preferences, as it can be easily adjusted to be gluten-free, vegan, or low-calorie. This makes it a perfect fit for those who might typically feel left out of the baking scene. It’s like having the best of all worlds in one delicious loaf!

    Not only does this recipe provide a burst of flavor, but it’s also packed with health benefits. Rhubarb is rich in vitamins C and K, and it has anti-inflammatory properties, making it a wholesome addition to your diet. If you’re looking for recipe ideas to impress guests or simply indulge in your love for baking, then this outstanding rhubarb bread is your go-to choice.


    Benefits and Advantages of This Amazing Rhubarb Bread Recipe Has Me Hooked!

    When considering the effectiveness of this rhubarb bread recipe, several beneficial attributes come to mind. First and foremost, its ease of preparation makes it ideal for home cooks of any skill level, whether they are seasoned bakers or just starting. In just a few simple steps, you can have a moist and delicious loaf baked and ready to share or enjoy on your own.

    Another notable feature is the health aspect. Rhubarb, often regarded as a vegetable but used like a fruit, is low in calories yet high in essential nutrients. It contains dietary fiber, which aids digestion and keeps you feeling full longer. This makes it a perfect incorporation into a balanced diet, especially for those monitoring their calorie intake or looking for healthier dessert options.

    In today’s fast-paced world, convenience is key. This amazing rhubarb bread can be prepared ahead of time, making it an excellent pick for busy parents, working professionals, or students who want something quick and easy. Plus, it holds its flavor and moisture exceptionally well, meaning you can bake it in batches to enjoy over several days.

    Additionally, this recipe shines brightly in its versatility. It can be tailored to suit various dietary preferences. For instance, gluten-free flour blends can easily replace regular flour, while flax eggs or applesauce can act as substitutes for traditional eggs, making it vegan. These adaptations ensure that everyone can partake in and savor the bread.

    Ultimately, the combination of its simplicity, nutritional benefits, and adaptability is what truly sets this amazing rhubarb bread recipe apart from others. It’s more than just dessert; it’s a wholesome treat that everyone can enjoy!


    Ingredients Overview

    Essential Ingredients for This Amazing Rhubarb Bread Recipe Has Me Hooked!

    Creating this delectable rhubarb bread requires a straightforward list of ingredients that you likely have on hand. Below are the essential components you’ll need, along with precise measurements and the purpose of each ingredient:

    • 2 cups rhubarb, chopped: The star of the recipe, rhubarb adds both moisture and a unique tart flavor.
    • 1 ½ cups all-purpose flour (or gluten-free flour): This forms the base of the bread. You can use a gluten-free blend to make this recipe accommodating for those on a gluten-free diet.
    • 1 cup granulated sugar (or coconut sugar for a healthier alternative): Sweetens the loaf and balances the tartness of the rhubarb.
    • ½ cup vegetable oil (or unsweetened applesauce for a lower-calorie option): Provides moisture; applesauce serves as a great substitute for a lower fatty content and a vegan-friendly option.
    • 2 large eggs (or flax eggs for a vegan version): Eggs add richness and structure. To make flax eggs, mix 2 tablespoons of ground flaxseed with 6 tablespoons of water, allowing it to sit until it thickens.
    • 1 teaspoon baking powder: Helps the bread rise.
    • ½ teaspoon baking soda: This addition also aids in leavening the bread to provide a light texture.
    • ½ teaspoon salt: Enhances overall flavor.
    • 1 teaspoon vanilla extract: Adds depth to the flavor profile.
    • Optional: 1 teaspoon cinnamon (or nutmeg): For an extra layer of warmth and spice.

    Feel free to adapt any of these ingredients based on your personal taste or dietary needs, ensuring everyone can enjoy this tasty loaf!

    Dietary Substitutions to Customize Your This Amazing Rhubarb Bread Recipe Has Me Hooked!

    Catering to various dietary restrictions can seem challenging, but this rhubarb bread recipe makes it easy to customize! Here, we’ll explore some substitutions to ensure that everyone can enjoy a slice:

    • Gluten-free Option: As mentioned, simply use a gluten-free flour blend in place of all-purpose flour. Make sure to check the ratio required, as some blends work differently.

    • Vegan Option: Instead of using traditional eggs, use flax eggs as described above, or you can experiment with commercial egg replacers.

    • Lower-Calorie Option: If you’re watching your calorie intake, swap out oil for applesauce, which keeps moisture without added fat. Also, consider reducing sugar by ¼ cup or using a natural sweetener like stevia or monk fruit extract to lower the calorie count even further.

    • Nut-Free: If allergies are a concern, be cautious with any additional mix-ins like walnuts or almonds, which can easily be omitted.

    By utilizing these substitutions, home cooks can modify this amazing rhubarb bread to meet diverse dietary preferences without sacrificing flavor or texture!


    How to Prepare the Perfect This Amazing Rhubarb Bread Recipe Has Me Hooked!: Step-by-Step Guide

    Baking this amazing rhubarb bread is an easy and enjoyable activity. Follow these step-by-step instructions, and you’ll be rewarded with a moist and tangy loaf that will have everyone coming back for more. Don’t forget to think of this as another one of your go-to recipe ideas!

    1. Preheat the Oven: Start by preheating your oven to 350°F (175°C). Grease or line a 9×5-inch loaf pan with parchment paper for easy removal.

    2. Prepare the Rhubarb: Chop the fresh rhubarb into small pieces, about ½ inch in length. Set aside while you prepare the other ingredients.

    3. Mix Dry Ingredients: In a mixing bowl, combine the flour, baking powder, baking soda, salt, and optional spices. Whisk these together to ensure they’re well combined, which helps create a consistent texture.

    4. Combine Wet Ingredients: In a separate large bowl, combine the sugar (or coconut sugar) with the oil (or applesauce). Mix until well combined. Add the eggs (or flax eggs) and vanilla extract, stirring until fully incorporated.

    5. Combine Wet and Dry Mixtures: Slowly add the dry mixture to the wet mixture, stirring gently with a spatula or wooden spoon. Do not overmix; it’s okay if there are a few lumps remaining.

    6. Fold in Rhubarb: Gently fold the chopped rhubarb into the batter until evenly distributed. This ensures that the rhubarb flavor is present in every bite without breaking down too much during mixing.

    7. Pour Batter into Pan: Transfer the batter into the prepared loaf pan, smoothing the top with a spatula.

    8. Bake the Bread: Place the loaf in the preheated oven and bake for approximately 50-60 minutes. To check for doneness, insert a toothpick in the center of the loaf; it should come out clean or with a few crumbs attached.

    9. Cool the Bread: Once baked, remove the loaf from the oven and allow it to cool in the pan for about 10 minutes. Then, transfer it to a wire rack to cool completely.

    10. Slice and Serve: Once cooled, slice your amazing rhubarb bread and serve it plain, or enjoy it with a spread of your choice, like butter or cream cheese!

    With these straightforward steps, you’ll create a fantastic loaf of rhubarb bread that is sure to become a favorite for all types of bakers. Whether it’s for a special occasion or an everyday delight, this recipe is a great addition to your collection of recipe ideas.


    Mastering This Amazing Rhubarb Bread Recipe Has Me Hooked!: Advanced Tips and Variations

    To elevate your baking experience and make this amazing rhubarb bread uniquely yours, consider these advanced tips and creative variations:

    • Add-ins for Extra Flavor: You can incorporate different add-ins into the batter, such as chopped nuts (like walnuts or pecans), dried cranberries, or even a swirl of cream cheese mixture for a richer taste.

    • Glaze or Frosting: Top the cooled bread with a lemon or vanilla glaze for extra sweetness. Simply mix powdered sugar with a splash of milk or lemon juice until smooth and drizzle it over the loaf.

    • Storing Variations: For extra convenience, feel free to bake mini loaves or muffins instead of a single large loaf, making them great for individual servings.

    • Spice Variations: Experimenting with different spices can enhance the flavor. Consider adding ground ginger for a warm, spicy twist, or lemon zest for a refreshing citrus note.

    • Fruit Combinations: While rhubarb is fantastic alone, you can also pair it with strawberries or blueberries for a mixed fruit bread.

    Using these tips, you can master this amazing rhubarb bread recipe and make it your own. Each variation offers a new flavor profile and texture, ensuring your baked goods will always be exciting and delicious.


    How to Store This Amazing Rhubarb Bread Recipe Has Me Hooked!: Best Practices

    To ensure your amazing rhubarb bread remains fresh and delicious, it’s important to store it properly. Here’s how to do just that:

    • Room Temperature: If you plan to consume the bread within a few days, simply store it in an airtight container at room temperature. This will keep the bread moist and flavorful.

    • Refrigeration: If you want to prolong its freshness, consider refrigerating the bread. Wrap it tightly in plastic wrap or foil, then place it in an airtight container. It can last for up to a week in the refrigerator.

    • Freezing: For longer storage, freeze the bread. Slice it first for easy thawing and wrap each slice in plastic wrap, then place them in a freezer-safe bag. This way, you can pull out individual slices whenever you desire! It’s best enjoyed within three months of freezing.

    • Reheating: To reheat, pop individual slices in the microwave for about 15-20 seconds, or toast it in a toaster oven to enjoy a warm slice that feels freshly baked.

    By following these best practices, you can enjoy this amazing rhubarb bread long after it has cooled, ensuring you always have a delicious treat ready to go!


    Nutritional Value of This Amazing Rhubarb Bread Recipe Has Me Hooked!

    Understanding the nutritional value of your amazing rhubarb bread can help you appreciate the health benefits it brings to your table. Here’s a general breakdown of the components per slice (based on a total of 12 slices):

    • Calories: 150-200 (depending on sugar and oil substitutes)
    • Total Fat: 6-8g (if using oil versus applesauce)
    • Saturated Fat: 1g (varies based on your ingredient choices)
    • Cholesterol: 37mg (use vegan options to lower)
    • Sodium: 150-200mg (may vary due to salt)
    • Total Carbohydrates: 25-30g
    • Dietary Fiber: 1-2g
    • Sugars: 8-12g (depending on sweetness adjustment)
    • Protein: 2-3g

    This bread is not only a delightful treat but also provides essential nutrients, thanks to rhubarb’s rich vitamin profile. Enjoying slices in moderation helps incorporate this healthy vegetable into your diet, aligning it with your health goals.


    FAQs: Frequently Asked Questions About This Amazing Rhubarb Bread Recipe Has Me Hooked!

    Q1: Can I substitute fresh rhubarb with frozen rhubarb in this recipe?

    Yes, you can use frozen rhubarb! Make sure to thaw, drain the excess liquid, and then chop it before adding it to the batter. The texture may be slightly softer, but it will still work well in the bread.

    Q2: Can I make this rhubarb bread sugar-free?

    Absolutely! You can replace granulated sugar with a sugar substitute like stevia, monk fruit, or erythritol. Just be sure to follow the specific conversion instructions provided by the brand for the best results.

    Q3: How can I make this recipe nut-free?

    To ensure your amazing rhubarb bread is nut-free, simply exclude any nuts from the add-ins. For a more robust flavor, you could try incorporating rolled oats instead of nuts for added texture.

    Q4: How long does this rhubarb bread last?

    When stored properly, this bread can last 3-5 days in an airtight container at room temperature, up to a week in the refrigerator, and for about three months in the freezer.

    Q5: Can I add other fruits to the bread, such as blueberries or strawberries?

    Yes, mixing in other fruits like blueberries or strawberries can add delightful flavors and a twist to your rhubarb bread. Adjust the quantity slightly to maintain a good batter consistency.


    This amazing rhubarb bread recipe is more than just a baking project; it’s a celebration of flavors and textures perfect for a wide range of audiences. Share it at a gathering, enjoy it by yourself, or customize it to fit your dietary needs—this recipe is indeed a treasure in your collection of recipe ideas! So grab your apron and enjoy the wonderful adventure of baking this delicious loaf today!

  • This Sweet Sourdough Recipe Will Change Your Life

    This Sweet Sourdough Recipe Will Change Your Life

    This Sweet Sourdough Recipe Will Change Your Life!: A Tropical Delight

    Introduction to This Sweet Sourdough Recipe Will Change Your Life!

    Are you ready to transform your baking game? Look no further than this sweet sourdough recipe! When it comes to recipe ideas, this one is a true gem that combines the tangy depth of traditional sourdough with a sweetness that makes it irresistibly delightful. Perfect for home cooks, busy parents, and baking enthusiasts alike, this recipe delivers an exceptionally simple yet scrumptious treat that everyone will love.

    What sets this sweet sourdough apart is its versatility. It’s not just another loaf of bread; it’s a canvas for creativity! You can easily adapt it to be vegan, gluten-free, or low-calorie, making it an inclusive option for various dietary needs. This recipe is not only simple but also packed with health benefits, boosting your well-being while satiating your sweet tooth.

    Imagine waking up to the enticing aroma of freshly baked bread, knowing that it’s both nutritious and delicious. Whether you share it with family or enjoy a slice yourself, it’s bound to make your day a little sweeter. This recipe will inspire you to experiment in the kitchen and create something genuinely extraordinary that your loved ones will cherish.

    Benefits and Advantages of This Sweet Sourdough Recipe Will Change Your Life!

    Embracing this sweet sourdough recipe is about more than just baking; it’s about discovering numerous benefits that elevate your culinary experience. First, let’s acknowledge its ease of preparation. You do not need to be a seasoned baker to navigate this recipe successfully. With just a few simple steps, you’ll find yourself crafting a delicious loaf that draws admiration from all who taste it.

    Additionally, making your own sourdough has incredible health benefits. Sourdough fermentation improves the digestibility of gluten and enhances the availability of nutrients. By utilizing fresh, wholesome ingredients, you’re also able to control what goes into your food, steering clear of hidden preservatives often found in store-bought options.

    This recipe is incredibly versatile, making it suitable for various dietary needs. You will find that it’s easy to modify for those following vegan or gluten-free diets. For instance, you can substitute traditional flour with gluten-free blends, and opt for plant-based ingredients to appeal to vegan eaters.

    Moreover, this sweet sourdough recipe offers a refreshing twist, combining the beloved tang of sourdough with a delightful sweetness. Whether you choose to enjoy this bread on its own, slathered with your favorite spread, or even as a base for creative sandwiches, your taste buds will thank you. This experience is certain to inspire you and your friends, turning any ordinary day into an extraordinary one.

    Ingredients Overview

    Essential Ingredients for This Sweet Sourdough Recipe Will Change Your Life!

    To make this sweet sourdough, gather the following ingredients:

    • Sourdough Starter: 1 cup (240g) – This key ingredient gives the bread its characteristic tang and flavor.
    • Warm Water: 1 cup (240ml) – Helps activate the yeast in your sourdough starter.
    • All-Purpose Flour or Gluten-Free Flour: 4 cups (480g) – The base of the bread; for gluten-free, use a blend like almond, oat, or brown rice flour.
    • Sugar: 1/4 cup (50g) – This adds a touch of sweetness; feel free to use alternatives like coconut sugar or honey.
    • Salt: 1 teaspoon (5g) – Essential for flavor enhancement; skip it if on a low-sodium diet.
    • Coconut Milk or Dairy Milk: 1/2 cup (120ml) – For added moisture and richness; can be substituted with almond milk or any plant-based milk.
    • Eggs (optional): 2 – Using eggs contributes to a richer texture; for a vegan option, substitute with flaxseed meal or chia seeds mixed with water (1 tablespoon of seeds + 2.5 tablespoons of water = 1 egg).

    Each ingredient plays a vital role in the recipe. Sourdough starter is critical for leavening and flavor, while flour forms the structure of your bread. The sugar balances flavors and promotes browning during baking. If you’re looking for healthy recipe ideas, substituting sugars and fats with wholesome options contributes to a more nutritious outcome, making it suitable for diet-conscious individuals.

    Dietary Substitutions to Customize Your This Sweet Sourdough Recipe Will Change Your Life!

    Customizing this recipe to meet various dietary needs is incredibly easy! Here are a few suggested substitutes to consider:

    • Gluten-Free: Substitute all-purpose flour with a 1:1 gluten-free flour blend. Ensure that it includes xanthan gum to help bind the ingredients.
    • Vegan: As mentioned, replace eggs with a flaxseed meal or chia seed mixture. Additionally, use plant-based milk to maintain the fluffiness of the dough.
    • Lower Sugar: You can reduce the sugar by half, or use natural sweeteners like maple syrup or stevia, depending on your taste preference.
    • Dairy-Free: Should you prefer to avoid dairy, coconut milk or almond milk is an excellent substitute for the milk in this recipe.

    These substitutions not only make the recipe versatile but also keep it adaptable to your personal dietary choices.

    How to Prepare the Perfect This Sweet Sourdough Recipe Will Change Your Life!: Step-by-Step Guide

    Baking this sweet sourdough bread is a rewarding endeavor! Follow these step-by-step instructions to get started:

    1. Gather All Ingredients: Before you start, ensure you have all essential ingredients measured and ready. This will streamline the process!

    2. Activate Your Sourdough Starter: In a bowl, mix the sourdough starter with warm water. Leave it to sit for about 30 minutes until it becomes bubbly and active.

    3. Combine Dry Ingredients: In a large mixing bowl, blend the flour, sugar, and salt using a whisk. This step ensures even distribution of all ingredients.

    4. Mix in Wet Ingredients: Add your activated starter and coconut milk to the dry ingredients. Stir until everything is fully combined and forms a shaggy dough.

    5. Knead the Dough: Lightly flour your work surface and transfer the dough onto it. Knead for about 10 minutes until the dough becomes smooth and elastic. If it’s too sticky, sprinkle a little extra flour.

    6. First Rise: Place the kneaded dough in a lightly greased bowl. Cover it with a damp cloth and let it rise for 4-6 hours at room temperature or until it has doubled in size.

    7. Shape the Dough: Once risen, gently punch down the dough to release air. Transfer it to your floured countertop and shape it into a round or oval loaf.

    8. Second Rise: Place the shaped loaf on a parchment-lined baking sheet. Cover it again with a cloth and let it rise for about 1-2 hours or until it has puffed up.

    9. Preheat the Oven: About 30 minutes before baking, preheat your oven to 450°F (230°C), ensuring it’s nice and hot.

    10. Score the Loaf: Before baking, use a sharp knife or razor to make shallow cuts on the top of the dough. This helps release steam during baking and adds a decorative touch.

    11. Bake: Place the loaf in the oven and bake for 25-30 minutes or until it’s golden brown and has a hollow sound when tapped on the bottom.

    12. Cool: Once baked, transfer your delicious sourdough to a wire rack. Allow it to cool completely before slicing.

    With these easy-to-follow steps, your sweet sourdough will be a standout feature in your kitchen! You can adapt each step easily to fit dietary preferences or ingredient availability, making it a recipe that works for everyone.

    Mastering This Sweet Sourdough Recipe Will Change Your Life!: Advanced Tips and Variations

    To elevate this recipe, consider exploring these advanced tips and creative variations:

    • Add Ins: For a unique flavor profile, try mixing in dried fruits like raisins, cranberries, or chopped nuts into the dough during the kneading process. They add texture and a nutritional boost!

    • Herbs and Spices: Experiment with adding cinnamon, vanilla extract, or even herbs like rosemary for a savory twist.

    • Glazing: Before baking, brush the loaf with an egg wash or plant-based milk for a beautiful golden crust.

    • Adjust Sweetness: If you prefer a sweeter loaf, consider increasing the sugar or adding a bit of honey or maple syrup directly into the mix.

    • Check Doneness: An instant-read thermometer is your best friend! The internal temperature should reach around 200°F (93°C) for perfectly baked sourdough.

    Remember, these variations are about being creative in the kitchen. With every modification, you take this recipe to new culinary heights, ensuring that it remains exciting and enjoyable.

    How to Store This Sweet Sourdough Recipe Will Change Your Life!: Best Practices

    Storing your sweet sourdough properly is essential to maintain its freshness and texture:

    • Room Temperature: If you plan to consume your bread within 3 days, you can keep it wrapped in a kitchen towel or placed in a paper bag at room temperature.

    • Refrigeration: For longer storage, consider refrigerating the bread. Wrap it tightly in plastic wrap or aluminum foil, as this helps retain moisture. However, fridge-treated bread may dry out faster, so it’s best consumed within a week.

    • Freezing: For extended storage (up to three months), slice the loaf and wrap each piece individually in plastic wrap before placing them in a freezer-safe bag. This allows you to thaw only what you need.

    • Reheating: To enjoy your sweet sourdough, you can toast slices straight from the freezer or reheat the whole loaf in a low oven (350°F/175°C) for about 10-15 minutes until warmed through.

    By following these best practices, you ensure that your sweet sourdough stays fresh and delicious for as long as possible.

    Nutritional Value of This Sweet Sourdough Recipe Will Change Your Life!

    Understanding the nutritional value of your sweet sourdough helps you make informed choices. Each slice offers a balanced combination of macronutrients and vitamins, including:

    • Calories: Approximately 150 calories per slice (based on a 12-slice loaf).
    • Carbohydrates: 30g, supplying a quick energy source.
    • Protein: 4g, helping repair tissues and supporting overall health.
    • Fat: 2g, depending on the use of eggs and milk.
    • Fiber: 2g, aiding digestion and promoting satiety.

    By using whole food ingredients and customizing your loaf, you can adjust these nutritional values. Opting for gluten-free flour could slightly alter the calorie count, while adding nuts or seeds increases protein and healthy fats.

    This sweet sourdough recipe is not only a delicious treat but a well-balanced addition to your diet when prepared mindfully.

    FAQs: Frequently Asked Questions About This Sweet Sourdough Recipe Will Change Your Life!

    1. Can I use whole wheat flour instead of all-purpose flour?

    Yes! Whole wheat flour will add a nuttier flavor and more fiber. However, it may make the bread denser. Consider combining it with all-purpose flour for a lighter loaf.

    2. How do I know when my sourdough is ready to bake?

    The dough should have doubled in size during the rising time and appear puffy. Performing the “poke test” is another trick; if your finger leaves a small dent without springing back, it’s ready.

    3. What can I use instead of sugar?

    You can replace sugar with honey, agave syrup, or coconut sugar. Just keep in mind the liquid adjustment if you’re using a liquid sweetener.

    4. Can this recipe be made without a sourdough starter?

    You can try using store-bought yeast; however, the sourdough flavor will not fully develop without the starter’s unique fermentation process.

    5. How should I store sourdough if it gets dry?

    If your sourdough starts to dry out, wrap it tightly in a damp cloth for a few hours to revive its moisture.

    6. Can I adapt the recipe for different flavors?

    Yes! Feel free to add various spices, herbs, or fruits to the dough. This way, you can experiment with flavors!

    By addressing these questions, we hope to clear any doubts and encourage you to embark on your baking adventure with this sweet sourdough recipe. Preparing it allows for creativity, dietary consideration, and, most importantly, a delightful outcome. Enjoy your baking!

  • Moist Rhubarb Quick Bread

    Moist Rhubarb Quick Bread

    Moist Rhubarb Quick Bread: A Tropical Delight

    Introduction to Moist Rhubarb Quick Bread

    Are you on the hunt for simple yet delectable breakfast ideas that can effortlessly elevate your morning routine? Look no further than this Moist Rhubarb Quick Bread! A delightful blend of sweet and tart, this quick bread is an ideal choice for busy parents, college students, or anyone looking to indulge in a heartwarming treat.

    Rhubarb—a fascinating vegetable often mistaken for fruit—adds a unique flavor profile, along with vibrant color, to this bread. It’s healthy, easy to prepare, and adaptable to a variety of dietary needs, including vegan and gluten-free options. This quick bread doesn’t just cater to those with specific dietary considerations; it’s also perfect for anyone who cherishes wholesome, homemade breakfast ideas that brighten up the morning.

    Not only is this recipe quick and hassle-free, but it also boasts several health benefits thanks to rhubarb, which is low in calories and high in fiber and antioxidants. Imagine the aroma wafting through your kitchen as you bake this delightful treat—perfect for a lazy Sunday brunch or even for meal prepping for busy weekdays. Let’s dive into how you can make the freshest and most scrumptious Moist Rhubarb Quick Bread in your own kitchen!

    Benefits and Advantages of Moist Rhubarb Quick Bread

    When considering breakfast ideas, it’s crucial to select recipes that are not only delicious but also beneficial to your health. Moist Rhubarb Quick Bread offers you a plethora of advantages that make this recipe stand out.

    One of the main attractions of any quick bread is its ease of preparation. Thanks to the straightforward mixing method, you won’t find yourself battling with complex instructions or lengthy prep times. This recipe is especially appealing for busy parents or working professionals who may not have hours to spend in the kitchen.

    Additionally, the health benefits of rhubarb cannot be overlooked. It’s packed with various nutrients, including vitamins K and C, as well as minerals like calcium and potassium. These nutrients contribute to better bone health, improved digestion, and stronger immunity. Incorporating rhubarb into your diet encourages healthy eating habits without sacrificing taste, making it an exceptional choice for those of you who are diet-conscious.

    Moreover, this recipe can be easily customized. Whether you need it to be gluten-free or vegan, substitutions can make it suitable for various dietary restrictions. Everybody deserves to enjoy delicious breakfast ideas, and this Moist Rhubarb Quick Bread is versatile enough to cater to everyone.

    In a world where convenience often trumps nutritional value, this quick bread provides an excellent balance. You’ll not only enjoy a flavorful breakfast but also reap the health benefits, making it a winning addition to your breakfast repertoire. Now let’s move on to the ingredients that make this dish so special!

    Ingredients Overview

    Essential Ingredients for Moist Rhubarb Quick Bread

    Creating this delicious Moist Rhubarb Quick Bread requires just a handful of ingredients, most of which you might already have in your pantry. Here’s a detailed breakdown:

    • 2 cups all-purpose flour: Gives the bread structure. For a gluten-free option, consider using almond or coconut flour.
    • 1 tsp baking soda: Helps the bread rise.
    • 1 tsp baking powder: Adds additional lift.
    • 1/2 tsp salt: Enhances overall flavor.
    • 1 cup granulated sugar: Sweetens the bread. You can substitute with coconut sugar or a sugar alternative for a lower-calorie option.
    • 1/2 cup vegetable oil (or melted coconut oil): Keeps the bread moist. Use unsweetened applesauce for a lighter, vegan alternative.
    • 2 large eggs: Provide richness and structure. For a vegan option, use flax eggs (1 tbsp ground flaxseed + 2.5 tbsp water per egg).
    • 1 cup chopped rhubarb (fresh or frozen): The star ingredient that offers a tangy flavor.
    • 1 tsp vanilla extract: Adds depth to the flavor.
    • Optional: 1/2 cup nuts or chocolate chips: For extra texture and flavor.

    This combination of ingredients is both simple and accessible. It allows you to bake a delicious breakfast that is also nutritious. If you’re seeking alternative ingredients due to dietary preferences or restrictions, continue reading to explore possible substitutions.

    Dietary Substitutions to Customize Your Moist Rhubarb Quick Bread

    • Flour Options: For a gluten-free option, substitute all-purpose flour with gluten-free flour blends or almond flour. This means you won’t have to miss out on delightful breakfast ideas because of dietary restrictions.

    • Sweeteners: If you’re watching your sugar intake, you can use natural sweeteners like agave nectar or stevia in place of granulated sugar. Just remember to adjust the liquid components of your recipe accordingly.

    • Oils: Swap vegetable oil for unsweetened applesauce to drastically reduce calorie count. Alternatively, use coconut or avocado oil for healthier fat options.

    • Eggs: If you’re making the recipe vegan, remember to use flax eggs instead of regular ones. One flax egg is made by mixing 1 tablespoon of ground flaxseed with 2.5 tablespoons of water; let it sit until it thickens.

    • Add-ins: Feel free to customize your quick bread with different add-ons. For example, nuts like walnuts or pecans can provide additional texture, while chocolate chips can cater to a sweet tooth.

    Tailoring this Moist Rhubarb Quick Bread to meet your specific dietary needs while not sacrificing flavor or texture makes this recipe a fantastic choice for everyone. Now that you have a comprehensive understanding of the ingredients, let’s dive into the step-by-step preparation process!

    How to Prepare the Perfect Moist Rhubarb Quick Bread: Step-by-Step Guide

    Are you ready to whip up a batch of this Moist Rhubarb Quick Bread? Follow these straightforward steps for an effortless baking experience:

    1. Preheat the Oven: Start by preheating your oven to 350°F (175°C). This ensures that the bread bakes evenly.

    2. Prepare Your Baking Pan: Grease a 9×5-inch loaf pan or line it with parchment paper. This step helps the bread to release effortlessly after baking.

    3. Whisk Dry Ingredients: In a large bowl, whisk together the flour, baking soda, baking powder, and salt. This helps to evenly distribute the leavening agents throughout the flour.

    4. Combine Wet Ingredients: In another bowl, beat together the sugar and oil until well combined. Then, add the eggs (or flax eggs for vegan) and vanilla extract. Mix until smooth.

    5. Mix the Two Bowls: Slowly incorporate the dry ingredients into the wet mixture. Stir until just combined—do not overmix, as this can result in a dense bread.

    6. Add Chopped Rhubarb: Gently fold in the chopped rhubarb. Make sure it’s evenly distributed, as this will ensure a delightful taste in every bite.

    7. Optional Add-ins: If you’re choosing to add nuts or chocolate chips, now is the time to fold them into the batter.

    8. Pour into the Pan: Transfer the batter to your prepared loaf pan, spreading it evenly.

    9. Bake: Place the loaf in the preheated oven and bake for about 60-70 minutes. To check if it’s done, insert a toothpick into the center; it should come out clean or with a few moist crumbs.

    10. Cool: Once baked, remove the loaf from the oven and let it cool in the pan for about 10 minutes before transferring it to a wire rack to cool completely.

    11. Slice and Serve: Once cooled, slice the bread and enjoy it plain or with a spread of butter or cream cheese. Your delicious, moist rhubarb quick bread is now ready to be devoured!

    By following these simple steps, you can create an irresistible breakfast idea that will delight your family and friends. Feel free to customize the steps according to your baking habits, and get creative with your add-ins!

    Mastering Moist Rhubarb Quick Bread: Advanced Tips and Variations

    To make the most out of your Moist Rhubarb Quick Bread, here are some advanced tips and variations that will elevate this recipe even further:

    • Test Your Rhubarb: Ensure your rhubarb is fresh and tender. It should be firm to the touch but not too hard; this ensures optimal texture in your finished bread.

    • Experiment with Spices: Consider adding a pinch of cinnamon or nutmeg for an aromatic kick. These spices not only add flavor but also bring out the natural sweetness of the rhubarb.

    • Top with Crumble: For added texture, top the batter with a crumble made from oats, flour, and butter before baking. This will create a lovely crust.

    • Zest It Up: Add citrus zest (like lemon or orange) to the batter for an extra burst of flavor. This will complement the tartness of the rhubarb beautifully.

    • Serve Warm: For a delightful twist, try serving the bread warm, perhaps with a drizzle of honey or maple syrup. Pairing it with coffee or tea increases your enjoyment!

    By utilizing these tips and variations, you’re on your way to mastering the art of creating Moist Rhubarb Quick Bread, a versatile addition to your breakfast ideas.

    How to Store Moist Rhubarb Quick Bread: Best Practices

    To ensure your Moist Rhubarb Quick Bread stays delicious for days, proper storage is essential. Here are some best practices:

    • Refrigeration: If you plan to consume the bread within a week, store it in an airtight container or wrap it tightly in foil or plastic wrap and refrigerate, where it can last for up to a week.

    • Freezing: For longer storage, wrap the bread tightly in plastic wrap and place it in a freezer-safe bag or container. Label the package with the date for easy identification. The bread can be frozen for up to 3 months.

    • Thawing and Reheating: When you’re ready to enjoy your frozen bread, transfer it to the refrigerator to thaw overnight. If you prefer warm bread, reheat slices in the microwave for about 20 seconds or in a toaster oven until warmed through.

    Following these storage methods will ensure that your Moist Rhubarb Quick Bread remains moist and flavorful, making it a convenient option for breakfast or snacks, even on the busiest days.

    Nutritional Value of Moist Rhubarb Quick Bread

    Understanding the nutritional value of your homemade Moist Rhubarb Quick Bread can help you make informed decisions about your diet. Here’s a breakdown of the key nutritional elements per slice (assuming 10 slices from the loaf):

    • Calories: Approximately 190 calories
    • Total Fat: 7g
    • Saturated Fat: 1.5g
    • Cholesterol: 30mg (omit for a vegan bread)
    • Sodium: 180mg
    • Total Carbohydrates: 30g
    • Dietary Fiber: 1g
    • Sugars: 10g
    • Protein: 2g

    This quick bread offers a relatively low-calorie option while providing a satisfying treat for breakfast. By implementing dietary substitutions, you can easily adjust calorie counts or enhance the nutritional profile further.

    In the quest for viable breakfast ideas, this recipe presents a delightful choice that balances enjoyment with health, giving you the satisfaction of a homemade pastry without added guilt.

    FAQs: Frequently Asked Questions About Moist Rhubarb Quick Bread

    1. Can I use frozen rhubarb for this recipe?

    Absolutely! Frozen rhubarb works well in this recipe. Just ensure to thaw and drain any excess moisture to avoid a soggy bread.

    2. Can I make this recipe gluten-free?

    Yes! Substitute all-purpose flour with a gluten-free flour blend to enjoy this delightful quick bread without gluten.

    3. What can I use instead of eggs for a vegan version?

    You can use flax eggs made by mixing 1 tablespoon of ground flaxseed with 2.5 tablespoons of water for each egg you want to replace.

    4. How long does this quick bread last?

    When stored in an airtight container, it can last up to a week in the refrigerator. If frozen, it can last up to 3 months.

    5. Can I add other fruits to the batter?

    Certainly! While rhubarb is the star of the show, you can add fruits like strawberries or blueberries for additional sweetness and flavor.

    6. Is this bread suitable for kids?

    Yes! This bread is not only kid-friendly but also makes a wholesome option for their breakfast ideas, especially when well-balanced with the addition of rhubarb.

    By providing clear answers to these frequently asked questions, you can further enhance your understanding of Moist Rhubarb Quick Bread, making it a go-to recipe for your home baking adventures. Its versatility and health benefits make it an excellent choice for all!

    Now that you’ve journeyed through the entire process of preparing Moist Rhubarb Quick Bread, it’s time to grab your apron and kick off your baking session! Enjoy the satisfaction of creating something delicious and nutritious that’s perfect for breakfast or any time of the day.

  • Fluffy Keto Greek Yogurt Bagels

    Fluffy Keto Greek Yogurt Bagels

    Fluffy Keto Greek Yogurt Bagels: A Tropical Delight

    Introduction to Fluffy Keto Greek Yogurt Bagels

    Looking for delectable breakfast ideas that cater to your health-conscious lifestyle? Look no further than Fluffy Keto Greek Yogurt Bagels! These delightful bagels are not only easy to make but also packed with nutrients. They’re perfect for busy parents, students, and anyone who needs a quick yet tasty option in the morning.

    What makes these bagels truly special is their simplicity. With just a few ingredients, you can whip up these fluffy delights without the hassle of traditional dough. This recipe calls for Greek yogurt, which not only adds moisture but is also a significant source of protein. Moreover, they are low in carbs, making them a perfect fit for keto dieters.

    These bagels can be enjoyed in various ways—serve them plain, top them with cream cheese, or add your favorite spreads. They fit seamlessly into a vegan or gluten-free diet as well. If you’ve been on the lookout for healthy breakfast ideas, this recipe is your answer to quick, satisfying, and nutritious meals that everyone can enjoy.

    Benefits and Advantages of Fluffy Keto Greek Yogurt Bagels

    Fluffy Keto Greek Yogurt Bagels stand out for several reasons that make them an excellent option for breakfast. First and foremost, they highlight the ease of preparation. The entire process takes only about 30 minutes, which is a huge time-saver for busy families and working professionals. There’s no need for elaborate mixing and kneading, making this an accessible recipe for novice cooks and baking enthusiasts alike.

    In addition to their quick preparation, these bagels come with a plethora of health benefits. They are low-carb, high-protein alternatives to traditional bagels, ensuring you stay fuller for longer while keeping your blood sugar levels stable. Greek yogurt offers numerous health perks, including probiotics that support gut health.

    Another significant advantage is their versatility. Whether you’re on a keto diet, following a gluten-free regimen, or seeking healthier breakfast ideas, these bagels can easily fit into your lifestyle. Busy parents can prep a batch ahead of time and pop them in the fridge for a quick grab-and-go option. Students can make them easily in their dorm kitchens, and even working professionals can have a nutritious breakfast ready before heading out the door.

    Lastly, the flavors can be adjusted to meet your taste preferences. The base recipe lends itself well to various toppings, making it easy to keep breakfast exciting. With all these benefits, it’s hard to resist trying out this fabulous recipe!

    Ingredients Overview

    Essential Ingredients for Fluffy Keto Greek Yogurt Bagels

    To create these heavenly bagels, you’ll need the following ingredients:

    • 1 ½ cups Greek yogurt (plain, unsweetened)
      Provides moisture and enhances protein content.

    • 1 ½ cups almond flour (or your preferred low-carb flour)
      Keeps the bagels gluten-free and low in carbohydrates.

    • 1 cup shredded mozzarella cheese
      Gives the bagels their famous chewy texture and rich flavor.

    • 2 teaspoons baking powder
      Acts as a leavening agent, helping the bagels rise and remain fluffy.

    • 1 teaspoon salt
      Enhances the flavor of the bagels.

    • 1 large egg
      Binds the ingredients together for structure.

    • Optional toppings: sesame seeds, poppy seeds, garlic powder
      Adds flavor and crunch to your bagels.

    These ingredients come together to create a bagel that’s both delicious and nutritious. Each component serves a purpose, from the Greek yogurt’s creaminess to the almond flour’s lightness. You can easily find all these components at your local grocery store.

    Dietary Substitutions to Customize Your Fluffy Keto Greek Yogurt Bagels

    While the base recipe is quite flexible, here are some substitutions you can consider based on dietary needs:

    • Vegan Option: Replace Greek yogurt with a plant-based yogurt and use flaxseed meal mixed with water instead of an egg as a binder.

    • Gluten-Free Option: Almond flour is already gluten-free. Other alternatives such as coconut flour can work, but adjust flour amounts since coconut flour is more absorbent.

    • Dairy-Free Alternative: Substitute mozzarella cheese with a dairy-free cheese shred that melts well.

    • Herb Variations: Adding herbs like rosemary or basil can infuse a gourmet touch. Similarly, you may include spices like onion powder for varied flavor.

    All these substitutions ensure these Fluffy Keto Greek Yogurt Bagels can cater to various dietary preferences while remaining tasty and satisfying.

    How to Prepare the Perfect Fluffy Keto Greek Yogurt Bagels: Step-by-Step Guide

    Now that you’re all set with the ingredients, let’s dive into the preparation of these delightful bagels. Follow these simple steps to create your own Fluffy Keto Greek Yogurt Bagels.

    1. Preheat the Oven:
      Preheat your oven to 350°F (175°C) and line a baking sheet with parchment paper to prevent sticking.

    2. Prepare the Base:
      In a large mixing bowl, combine the Greek yogurt and almond flour. Stir them together until they form a cohesive mixture.

    3. Mix in the Cheese:
      Add the shredded mozzarella cheese to your mixture. Use your hands or a spatula to thoroughly blend the cheese into the dough.

    4. Incorporate Dry Ingredients:
      Sprinkle the baking powder and salt over the dough and mix well until all ingredients are evenly distributed.

    5. Add the Egg:
      Crack the egg into the dough, then mix until fully integrated. The dough should be slightly sticky yet manageable.

    6. Knead the Dough:
      Dust your hands with a bit of almond flour and knead the dough gently for a minute or two until it becomes smooth.

    7. Shape the Bagels:
      Divide the dough into 6-8 equal pieces based on your preferred bagel size. Roll each piece into a ball, then use your finger to poke a hole in the center. Gently stretch the hole to shape it into a bagel.

    8. Place on Baking Sheet:
      Arrange the shaped bagels on the prepared baking sheet, leaving some space between each one.

    9. Add Toppings (Optional):
      If desired, sprinkle your bagels with sesame seeds, poppy seeds, or anything else you like.

    10. Bake to Perfection:
      Bake in the preheated oven for 20-25 minutes or until the bagels turn golden brown and slightly firm to the touch.

    11. Cool Before Serving:
      Once baked, remove them from the oven and let the bagels cool on a wire rack.

    These Fluffy Keto Greek Yogurt Bagels can be enjoyed warm or stored for later. They’re perfect breakfast ideas to wake up to!

    Mastering Fluffy Keto Greek Yogurt Bagels: Advanced Tips and Variations

    To ensure your experience making Fluffy Keto Greek Yogurt Bagels is seamless, consider these advanced tips and variations:

    • Experiment with Cheese: While mozzarella adds great texture, feel free to try other cheese types, such as cheddar or pepper jack, for a zesty taste.

    • Infuse Flavors: Consider adding dried herbs or spices to the dough for unique flavor profiles. Garlic powder, onion powder, or even sun-dried tomatoes can elevate your bagel game.

    • Make Mini Bagels: For a fun snack or appetizer, shape your dough into mini bagels. They bake quicker and can be served with dipping sauces.

    • Include Sweet Options: If you enjoy sweeter flavors, add 1-2 tablespoons of your preferred sweetener and cinnamon to the dough for a “cinnamon roll” version.

    With these advanced tips, you can customize Fluffy Keto Greek Yogurt Bagels to satisfy any palate, ensuring they remain exciting and delicious every time you make them.

    How to Store Fluffy Keto Greek Yogurt Bagels: Best Practices

    Once you’ve prepared your Fluffy Keto Greek Yogurt Bagels, you may want to know the best storage solutions. Proper storage ensures these delightful breakfast ideas remain fresh and ready for your enjoyment.

    • Refrigeration: Store bagels in an airtight container in the refrigerator for up to 4 days. When you’re ready to eat, simply pop them in a toaster for a few minutes until warmed through.

    • Freezing: For longer storage, freeze the bagels. Place each bagel in a freezer-safe bag, sealing tightly to avoid air exposure. They will keep well for up to 3 months. To enjoy, just remove from the freezer and reheat in the oven or microwave.

    • Reheating: For the best texture, reheat frozen bagels in the oven at 350°F for about 10 minutes. Alternatively, use a toaster oven if you’re short on time.

    With these simple storage practices, you’ll always have a delightful breakfast waiting for you!

    Nutritional Value of Fluffy Keto Greek Yogurt Bagels

    Knowing the nutritional content of what you eat is paramount. Here’s a brief breakdown of the nutritional value for one Fluffy Keto Greek Yogurt Bagel (without toppings):

    • Calories: Approximately 150
    • Carbohydrates: About 6g
    • Fiber: Roughly 3g
    • Protein: Approximately 11g
    • Fat: About 8g

    These bagels are a great source of protein and healthy fats while keeping carbs low—a perfect choice for anyone seeking nutritious breakfast ideas. Adjustments to the recipe may affect the nutritional values slightly, especially if you change flours or include higher-calorie toppings.

    FAQs: Frequently Asked Questions About Fluffy Keto Greek Yogurt Bagels

    Can I make these bagels without cheese?

    Yes, you can make cheese-less dough by replacing the mozzarella with a dairy-free cheese that melts well. Alternatively, it’s possible to make a variation with just yogurt and almond flour, though the texture may change.

    How can I make these bagels sweeter?

    You can easily sweeten the dough with sweetener of your choice. Use about 1-2 tablespoons of natural sweetener, like stevia or erythritol, along with some cinnamon for a delightful sweet treat!

    Can you freeze the dough before baking?

    Yes, you can freeze the shaped bagels before baking. Arrange them on a baking sheet, freeze until solid, then transfer to a freezer bag. Bake from frozen at 350°F, adding a few extra minutes to the cooking time.

    What’s the best way to add toppings to my bagels?

    To enhance flavor and create a crispy topping, brush the bagels lightly with egg wash before adding toppings like sesame seeds or poppy seeds.

    How do I ensure my bagels come out fluffy?

    Make sure to properly measure your almond flour, as too much can make them dense. Overmixing can also lead to tougher bagels, so mix just until combined.

    In conclusion, Fluffy Keto Greek Yogurt Bagels are an easy and healthy option for breakfast loved by many. Whether you’re catering to specific dietary needs or simply seeking delicious alternatives, this recipe is a must-try that beautifully encapsulates the essence of simple, wholesome cooking. Enjoy experimenting with flavors and toppings, and let these delightful bagels become a staple in your morning routine!

  • Simple Hot Cross Buns With Greek Yogurt

    Simple Hot Cross Buns With Greek Yogurt

    Simple Hot Cross Buns With Greek Yogurt: A Tropical Delight

    Introduction to Simple Hot Cross Buns With Greek Yogurt

    If you’re looking for a baking project that perfectly fits the spirit of spring meals, then these Simple Hot Cross Buns with Greek Yogurt are just the treat you need! Bursting with flavor and nutrition, this recipe is an ideal choice for all home cooks, whether you’re a busy parent juggling meal prep or a student looking to impress friends with your baking skills. The utilization of Greek yogurt not only lends a delightful moisture to the buns but also infuses them with health benefits, making them a great choice for those mindful of their dietary needs.

    These Hot Cross Buns are incredibly versatile too. You can make them vegan or gluten-free based on your preferences, and their simple preparation means they won’t take all day. The delicate spicing evokes the warmth of spring, while the cross on top symbolizes the joy of spring celebrations, making them perfect for Easter brunch or any festive gathering. Plus, they are free from refined sugars, relying instead on natural sweeteners for a guilt-free indulgence.

    Whether you’re a baking enthusiast looking to add an easy yet delicious recipe to your repertoire or someone simply browsing for light and healthy spring meals, these buns come together effortlessly and deliver joy to your breakfast table. The rich history of hot cross buns celebrates their versatility and significance, and now you can make your own delicious batch with this delightful twist.

    Benefits and Advantages of Simple Hot Cross Buns With Greek Yogurt

    These Simple Hot Cross Buns with Greek Yogurt come with an array of benefits making them an advantageous choice for your spring meals. Firstly, the addition of Greek yogurt enhances the moisture content and gives an unmistakable tenderness to the buns. This ingredient not only helps reduce the amount of butter typically required but also packs in extra protein, transforming a sweet treat into a more balanced option.

    Another significant advantage is ease of preparation. The process is straightforward—perfect for burgeoning bakers or for anyone who might feel intimidated by a traditional yeast bun recipe. With just a handful of ingredients and basic kitchen equipment, you can whip up a fresh batch of these buns without the stress. Moreover, the resting time for the dough can easily fit into a busy schedule, making it a suitable choice for working professionals or parents managing hectic routines.

    Health-conscious individuals will appreciate that Greek yogurt adds probiotics to the mix, which can promote gut health. You can also easily adapt the recipe to meet various dietary needs. For those seeking gluten-free options, substitute regular flour with a quality gluten-free blend, and for vegan alternatives, you can replace the egg and yogurt with plant-based options without sacrificing taste.

    These Hot Cross Buns are not just another baked good; they can quickly become a family favorite, enjoyed during festive occasions or quiet Sunday mornings. They store well, making them practical for meal prep, allowing everyone to appreciate a delicious homemade treat throughout the week. By incorporating these buns into your spring meals, you’re not only offering a taste of tradition but also ensuring that your baking sessions are both wholesome and enjoyable.

    Ingredients Overview

    Essential Ingredients for Simple Hot Cross Buns With Greek Yogurt

    To create these delectable Simple Hot Cross Buns with Greek Yogurt, you will need the following ingredients:

    • 2 cups all-purpose flour (or gluten-free flour for a gluten-free option)
    • 1/2 cup Greek yogurt (can be substituted with coconut yogurt for a dairy-free option)
    • 1/4 cup honey or maple syrup (sweetener of your choice)
    • 1/2 cup milk (dairy or plant-based)
    • 1 large egg (or flax egg for vegan)
    • 1 packet (2 1/4 tsp) instant yeast
    • 1 teaspoon cinnamon
    • 1/2 teaspoon nutmeg
    • 1/4 teaspoon salt
    • 1/2 cup mixed dried fruits (raisins, currants, or apricots, for a refreshing fruit flavor)
    • 2 tablespoons melted butter (or coconut oil for dairy-free)
    • Cross Topping: Simple mixture of flour and water (1/4 cup flour + 3 tablespoons water)

    These ingredients provide a great balance between taste and nutrition while accommodating various dietary needs. The Greek yogurt enriches the buns with creaminess, while the spices add warmth and complexity.

    Dietary Substitutions to Customize Your Simple Hot Cross Buns With Greek Yogurt

    Not everyone has the same dietary preferences, and that’s okay! Fortunately, these Simple Hot Cross Buns are highly customizable.

    1. Vegan Substitute: Replace the egg with a flax egg by mixing 1 tablespoon of ground flaxseed with 3 tablespoons of water and letting it sit for about 5 minutes. For the Greek yogurt, opt for a plant-based yogurt alternative.

    2. Gluten-Free Option: Use a high-quality gluten-free flour blend to maintain the bun’s structure without gluten. Be sure the flour blend includes xanthan gum, as it helps bind the ingredients together.

    3. Lower Sugar Version: If you’re looking to cut back on sugars, feel free to reduce the amount of honey or maples syrup, using just 2 tablespoons instead. The natural sweetness from the fruits can also help enhance the overall flavor.

    Incorporating these substitutions allows everyone to enjoy these delightful buns at any gathering. Adapting traditional recipes to meet various dietary preferences has never been easier, ensuring that all your loved ones can indulge in delicious spring meals!

    How to Prepare the Perfect Simple Hot Cross Buns With Greek Yogurt: Step-by-Step Guide

    Creating your own Simple Hot Cross Buns with Greek Yogurt is a fun and rewarding process that can be accomplished in just a few easy steps. Follow this step-by-step guide to ensure your buns turn out fluffy and flavorful!

    1. Prepare the Dough:
      Begin by combining your flour, salt, cinnamon, and nutmeg in a large bowl. Mix these dry ingredients well to ensure the spices are evenly distributed.

    2. Activate the Yeast:
      In a separate bowl, gently warm your milk to about 110°F (43°C). This temperature is ideal for activating the instant yeast. Stir in the honey or maple syrup until dissolved. Then, sprinkle the yeast on top and let it sit for about 5-10 minutes until it’s bubbly.

    3. Combine Ingredients:
      Add the yogurt, melted butter (or coconut oil), and the egg (or flax egg) into the yeast mixture. Whisk until smooth. Gradually add the wet mixture into the dry ingredients, stirring until a soft dough forms.

    4. Knead the Dough:
      Transfer the dough onto a lightly floured surface. Knead it for about 5-10 minutes, or until it becomes smooth and elastic. If needed, sprinkle a little more flour to prevent sticking.

    5. First Rise:
      Shape the dough into a ball and place it in an oiled bowl, covering it with a damp cloth. Allow it to rise in a warm place for about 1-2 hours, or until doubled in size.

    6. Shape the Buns:
      Once the dough has risen, punch it down gently. Turn it out onto a floured surface, then divide it into 8-12 equal portions. Shape each piece into a round bun and place them on a greased baking tray, leaving space between each.

    7. Second Rise:
      Cover the shaped buns with a kitchen towel and let them rise for another 30-45 minutes. Preheat your oven to 375°F (190°C) during this time.

    8. Prepare the Cross Topping:
      In a small bowl, mix the flour and water until it forms a paste. Transfer this mixture to a zip-lock bag, snip off a corner, and pipe crosses on top of the buns once they have finished rising.

    9. Bake:
      Bake the buns in your preheated oven for 18-20 minutes, or until they are golden brown and sound hollow when tapped on the bottom.

    10. Cool and Glaze (Optional):
      Allow buns to cool slightly before brushing them with a mixture of warm honey and water for a glossy finish.

    Your Simple Hot Cross Buns with Greek Yogurt are now ready to be enjoyed! Serve them warm, buttered, or even toasted for a delightful spring meal that everyone will love.

    Mastering Simple Hot Cross Buns With Greek Yogurt: Advanced Tips and Variations

    To elevate your baking experience, consider these advanced tips and variations:

    • Spice Variation: Try experimenting with other spices like cardamom or allspice to create a unique flavor profile. You can even incorporate citrus zest from oranges or lemons for a fresh twist.

    • Fruit Options: While dried mixed fruits are traditional, consider swapping them for chocolate chips or nuts for a rich and indulgent treat, keeping in mind that these variations may alter the nutritional profile.

    • Gluten-Free Flour: If you’re using gluten-free flour, be prepared for the buns to have a slightly different texture. Adding a bit of xanthan gum can help achieve that classic chewiness.

    • Serving Suggestions: Serve these buns with flavored butter like cinnamon or honey butter, or enjoy them with your favorite jam or spread for an extra touch.

    The beauty of hot cross buns lies in their adaptability. Experimenting with ingredients not only boosts creativity but also allows you to tailor your baking to your unique palates.

    How to Store Simple Hot Cross Buns With Greek Yogurt: Best Practices

    Storing your Simple Hot Cross Buns with Greek Yogurt properly ensures you can savor their deliciousness even after they’ve cooled. Here are the best practices:

    • Room Temperature: Store any leftover buns in an airtight container or a resealable bag at room temperature for up to 3 days. To maintain their freshness, you can place a slice of bread in the container to avoid them becoming stale.

    • Refrigeration: If you live in a particularly warm climate or have a larger batch, consider refrigerating the buns. They can last for about a week in the refrigerator. Before serving, just warm them in the microwave for a few seconds to bring back their soft texture.

    • Freezing: For longer storage, you can freeze these buns. Wrap them individually in plastic wrap, followed by a layer of aluminum foil, to prevent freezer burn. They will keep well for up to 3 months. Thaw them overnight in the refrigerator or warm them directly from the freezer in the oven.

    By following these storage methods, your Simple Hot Cross Buns will always be available for impromptu spring meals or cozy weekends at home.

    Nutritional Value of Simple Hot Cross Buns With Greek Yogurt

    When considering spring meals, it’s essential to factor in the nutritional benefits of your dishes. Here’s a general nutritional breakdown for one Simple Hot Cross Bun with Greek Yogurt (approximately 100g):

    • Calories: 180
    • Protein: 4g
    • Fat: 3g (mostly from yogurt and butter)
    • Carbohydrates: 34g
    • Fiber: 1g (depending on the flour used)
    • Sugar: 5g (natural sugars from honey and fruits)

    These nutritional values indicate that you can enjoy a delightful treat without excessive guilt. The incorporation of Greek yogurt not only boosts protein content but also aids digestion and provides essential probiotics.

    Note: Adjustments in ingredients can change these values, so always double-check when making variations. For example, using a sugar substitute or changing the flour type may yield different nutritional outcomes.

    FAQs: Frequently Asked Questions About Simple Hot Cross Buns With Greek Yogurt

    Here are some commonly asked questions that may help clarify your baking experience with Simple Hot Cross Buns with Greek Yogurt:

    1. Can I use regular yogurt instead of Greek yogurt?

    Yes, you can substitute regular yogurt for Greek yogurt, but the texture may be a little less rich due to its higher water content. Keep this in mind as it may affect the overall outcome.

    2. How can I make these buns dairy-free?

    To achieve a dairy-free version, substitute Greek yogurt with coconut yogurt or almond yogurt. Use plant-based milk such as almond or oat milk, and opt for coconut oil instead of butter.

    3. What should I do if my dough doesn’t rise?

    If your dough doesn’t rise, check the freshness of your yeast. Ensure the milk used to activate the yeast was warm enough (not hot) but not too cold. A warm, draft-free environment is essential for successful rising.

    4. Can I customize the mix-ins in the buns?

    Absolutely! You can add chocolate chips, nuts, or different dried fruits as per your taste. Just be mindful that this may change the flavor profile and nutritional values.

    5. How can I store leftover buns?

    Store leftover buns in an airtight container at room temperature for up to 3 days. They can also be refrigerated for about a week or frozen for longer storage.

    Embrace your baking journey this spring with these Simple Hot Cross Buns with Greek Yogurt! They offer the ideal blend of health and indulgence, ensuring everyone can enjoy a homemade treat tailored uniquely to their tastes and dietary needs. Happy baking!

  • Delicious Sourdough Rhubarb Bread

    Delicious Sourdough Rhubarb Bread

    Delicious Sourdough Rhubarb Bread: A Tropical Delight

    Introduction to Delicious Sourdough Rhubarb Bread

    Spring is a time for renewal, and what better way to embrace this season than with a batch of Delicious Sourdough Rhubarb Bread? This unique recipe melds the tangy flavor of rhubarb with the warm, comforting essence of sourdough, making it an ideal choice for your spring meals. Not only is this bread easy to make, but it also brings a touch of gourmet flair to your table.

    Regardless of your cooking proficiency, this recipe will inspire confidence in the kitchen, making it accessible for everyone—from busy parents seeking to whip up a quick snack to students experimenting with baking. Moreover, this bread is a fantastic option for health-conscious individuals. It can be easily adapted to vegan and gluten-free diets without losing its scrumptiousness.

    Imagine slicing into a loaf of freshly baked rhubarb bread, the aroma wafting through your home, enveloping you in a sense of comfort and joy. It’s the perfect dish for a spring brunch or as an accompaniment to your evening tea. The contrast of sweet, tart rhubarb strands with the chewy, crusty exterior and soft, warm interior will undoubtedly satisfy any palate.

    So, roll up your sleeves and join us in creating a delicious masterpiece that celebrates the bounty of spring! Whether you’re entertaining guests, or simply looking for a healthy treat, this sourdough rhubarb bread is bound to be the star of your next meal.

    Benefits and Advantages of Delicious Sourdough Rhubarb Bread

    Making Delicious Sourdough Rhubarb Bread has numerous benefits that align perfectly with modern cooking needs. Here are several reasons why this recipe stands out:

    1. Simple Preparation: Many baking recipes can feel intimidating, but this sourdough bread recipe is straightforward, with meticulous instructions that easily guide even novice bakers through the process. With a few essential ingredients and moderate effort, you’re on your way to creating a delightful spring meal.

    2. Health Benefits: Sourdough is known for its beneficial properties, including being easier to digest compared to conventional bread due to the fermentation process. Rhubarb, on the other hand, is high in vitamins K and C, and it boasts antioxidant properties. Additionally, this bread recipe can be customized to be low in calories, vegan, or gluten-free, ensuring that everyone can enjoy it.

    3. Versatile Culinary Use: Whether served as a breakfast option, a snack, or as part of a spring meal, this bread can be adapted to fit any occasion. You can toast it, slather it with nut butter, or even create a delicious sandwich. The possibilities are extensive, making it a highly versatile addition to your recipe collection.

    4. Seasonal Ingredient: Rhubarb is a quintessential spring vegetable, and utilizing it showcases seasonal cooking, which promotes sustainability. Incorporating seasonal produce into your meals is always a good practice, and this recipe does just that.

    5. Diet-Friendly Adaptability: Whether you’re following a vegan, gluten-free, or low-sugar diet, this bread can be tailored to suit your dietary needs. By offering various substitutions, you can easily customize the bread to accommodate everyone’s preferences.

    Incorporating this Delicious Sourdough Rhubarb Bread into your repertoire not only enhances your cooking skills but enriches your meals with nutrients and flavor, making it a top pick for spring meals.

    Ingredients Overview

    Essential Ingredients for Delicious Sourdough Rhubarb Bread

    To get started with your sourdough rhubarb adventure, here is a detailed list of ingredients you will need. Remember, each component contributes to the overall taste and texture of the bread.

    • Sourdough Starter (1 cup): This is the key ingredient. A healthy sourdough starter adds flavor and helps the bread to rise.
    • All-Purpose Flour (3 cups): Provides the bread with structure. For gluten-free options, you can use a gluten-free all-purpose flour blend.
    • Rhubarb (1 cup, chopped): Adds a tartness that beautifully contrasts with the bread’s sweetness.
    • Sugar (1/4 cup): Enhances the flavor profile. You can substitute with coconut sugar or a sweetener of your choice for a lower-calorie version.
    • Salt (1 tsp): Essential for bringing out the flavors in your bread.
    • Baking Soda (1/2 tsp): Adds lift to the bread and creates a lighter texture.
    • Water (3/4 cup): To hydrate the flour and activate the sourdough.
    • Oil (1/4 cup, optional): To add moisture to your bread. Use olive oil or any neutral vegetable oil.

    Optional Toppings and Mix-ins:

    • Nuts (1/2 cup, chopped): Walnuts or pecans enhance the crunch and flavor.
    • Spices (1 tsp cinnamon, optional): For an extra layer of flavor.

    This combination of ingredients makes Delicious Sourdough Rhubarb Bread not only tasty but also suitable for various dietary needs.

    Dietary Substitutions to Customize Your Delicious Sourdough Rhubarb Bread

    As everyone has different dietary preferences, here are some substitutions you can make to customize your delicious bread:

    • Gluten-Free: Use a gluten-free all-purpose flour blend in place of regular flour. Ensure that the mix contains xanthan gum for the right texture.
    • Vegan: To make this recipe vegan, substitute the oil with unsweetened applesauce or a flaxseed egg (1 tablespoon of flaxseed meal mixed with 2.5 tablespoons of water, let sit for 5 minutes until thick).
    • Low-Calorie: Substitute sugar with a natural sweetener like stevia or monk fruit sweetener. Using less oil or none at all by incorporating more fruits can also cut down the calories.
    • Enhanced Flavor: For those wanting to explore further, adding spices like nutmeg or cardamom can offer a different twist while maintaining freshness.

    Feel free to experiment, as the essence of sourdough is its adaptability. Each variation allows you to create a Delicious Sourdough Rhubarb Bread that fits your individual needs and tastes.

    How to Prepare the Perfect Delicious Sourdough Rhubarb Bread: Step-by-Step Guide

    Baking sourdough rhubarb bread is a rewarding process and with these step-by-step instructions, you’ll have a gorgeous loaf ready to impress.

    1. Prepare Your Starter: If using a dormant sourdough starter, feed it 4-6 hours before starting your bread. It should be bubbly and active before you begin.

    2. Gather Ingredients: Measure out your ingredients carefully. This ensures you have everything at hand to streamline the baking process. This preparation is key for successful spring meals.

    3. Mix Flour and Rhubarb: In a large mixing bowl, combine 3 cups of all-purpose flour, 1 cup of chopped rhubarb, and 1 teaspoon of salt. Mix well, ensuring that the rhubarb is evenly distributed throughout the flour.

    4. Combine Wet Ingredients: In a separate bowl, whisk together 1 cup of sourdough starter, 3/4 cup of water, and 1/4 cup of vegetable oil (if using).

    5. Mix Ingredients: Gradually pour the wet mixture into the dry ingredients. Stir with a wooden spoon until a shaggy dough forms. The dough should not be too wet; adjust flour or water accordingly.

    6. Knead the Dough: Turn the dough onto a lightly floured surface and knead for about 8-10 minutes. If the dough is sticky, sprinkle more flour gradually as needed. You’re aiming for a smooth, elastic dough.

    7. First Rise: Shape the dough into a ball and place it in a greased bowl, cover it with a kitchen towel, and let it rise in a warm area for about 2-3 hours, or until it has doubled in size.

    8. Shape the Dough: Once risen, punch down the dough gently to release excess air. Shape it into a loaf form and place it into a greased loaf pan or shape it into a round form for a baking stone.

    9. Second Rise: Cover the shaped bread again with a towel and let it rise for an additional hour until puffed.

    10. Preheat the Oven: During the last 30 minutes of rising, preheat your oven to 375°F (190°C) to ensure it’s ready for baking.

    11. Bake the Bread: Place the loaf in the oven for about 35-40 minutes until the crust is golden brown. Check for doneness by tapping the bottom of the loaf; it should sound hollow.

    12. Cool Down: Remove the bread from the oven and let it cool in the pan for 10 minutes. Then turn it out onto a wire rack to cool completely.

    13. Slice and Serve: After cooling, slice your Delicious Sourdough Rhubarb Bread and serve. Enjoy it plain, or with butter, jam, or your favorite spread.

    By following these steps, you’ll have successfully prepared a fantastic spring meal that brings warmth and joy to any gathering or quiet afternoon.

    Mastering Delicious Sourdough Rhubarb Bread: Advanced Tips and Variations

    Baking sourdough rhubarb bread is both an art and a science. Here are some advanced tips and variations to elevate your baking game:

    1. Incorporate More Flavor: Try adding different types of nuts or seeds, such as poppy seeds or sunflower seeds, to enhance texture and nutritional value.

    2. Create a Marble Effect: For a visually stunning effect, swirl in some fruit preserves or a dollop of cream cheese before baking. This will create a beautiful marbled pattern.

    3. Experiment with Spices: Spice things up by adding cinnamon, nutmeg, or even ginger. These spices will complement the rhubarb’s tartness and bring warmth to your bread.

    4. Adjust Sweetness According to Taste: Depending on your preference and the tartness of your rhubarb, adjust the sugar in the recipe. If your rhubarb is particularly sour, you may want to add a bit more sugar.

    5. Use a Baking Stone: If you own a baking stone, preheat it in the oven and bake your bread on it. This mimics the environment of a traditional bakery and results in a crustier loaf.

    6. Make Mini Loaves or Muffins: For a fun twist, try dividing the dough into smaller portions to create mini loaves or muffins. These are great for sharing or for portion control.

    7. Flavor Infused Oils: Experiment with infused oils, like rosemary or garlic, to brush on top of the loaf before baking for added depth of flavor.

    By utilizing these tips and variations, you’ll not only perfect your Delicious Sourdough Rhubarb Bread but also make it uniquely yours, ensuring it stands out on your table as a delightful option for any spring meal.

    How to Store Delicious Sourdough Rhubarb Bread: Best Practices

    Storing your Delicious Sourdough Rhubarb Bread correctly will ensure it remains fresh for days. Here are some optimal storing methods:

    1. Room Temperature: To keep the bread fresh for up to 3 days, store it at room temperature in a bread box or wrap it in a clean kitchen towel. Avoid plastic bags, as they can cause the crust to become soggy.

    2. Refrigeration: If you live in a humid climate or want to store it for longer than 3 days, slice the bread and place it in an airtight container in the refrigerator. This will keep it fresh for up to a week, although the crust may lose its crispness.

    3. Freezing: For even longer storage, freeze the bread. Wrap it tightly in plastic wrap and then in aluminum foil or place it in a freezer bag. It can last up to 3 months in the freezer. To defrost, simply set it out at room temperature for a few hours or warm it in the oven.

    4. Reheating: To regain the crusty texture of your bread, wrap it in foil and place it in a preheated oven at 350°F (175°C) for about 10-15 minutes. This will re-crisp the crust without drying out the interior.

    Taking steps to store your Delicious Sourdough Rhubarb Bread properly ensures that every slice is as delightful as the first, making it an exceptional addition to your spring meals.

    Nutritional Value of Delicious Sourdough Rhubarb Bread

    Understanding the nutritional value of your food is vital, especially when crafting meals around health-conscious choices. Here’s a breakdown of the approximate nutrition per slice (assuming 12 slices per loaf):

    • Calories: 150
    • Total Fat: 4g
    • Saturated Fat: 0.5g
    • Cholesterol: 0mg
    • Sodium: 150mg
    • Total Carbohydrates: 28g
    • Dietary Fiber: 2g
    • Sugars: 5g
    • Protein: 3g

    Health Benefits

    • High in Vitamins: Rhubarb is known for being an excellent source of Vitamin K, supporting bone health and cellular function.
    • Low-Calorie Snack: With only 150 calories per slice, it makes for an excellent energy-boosting snack.
    • Dietary Fiber: Contributes to digestive health and satiety.

    Incorporating this Delicious Sourdough Rhubarb Bread into your diet not only satisfies your taste buds but also provides you with essential nutrients, making it a perfect solution for your spring meals.

    FAQs: Frequently Asked Questions About Delicious Sourdough Rhubarb Bread

    Can I use frozen rhubarb for this recipe?

    Yes, frozen rhubarb can be used in this recipe. Just thaw it completely and drain any excess moisture before adding it to your dough.

    How do I know when my sourdough bread is done baking?

    A good way to check for doneness is to tap the bottom of the loaf after baking. If it sounds hollow, it is done. Additionally, the crust should be a golden-brown color.

    Can I reduce sugar in the recipe?

    Absolutely! The sugar can be adjusted according to your taste. If you prefer a less sweet bread, try reducing the sugar by half, and consider enhancing the flavor with spices like cinnamon.

    What if my dough isn’t rising?

    If your dough isn’t rising, check the activity of your sourdough starter. It should be bubbly and active. If it has not been fed recently, feed it and wait until it is active before attempting the recipe again.

    Can I substitute all-purpose flour with whole wheat flour?

    Yes, you can replace some of the all-purpose flour with whole wheat flour for added fiber. However, this may alter the texture slightly, so it may require a bit more water to achieve the desired consistency.

    How do I make this bread gluten-free?

    To make this bread gluten-free, use gluten-free all-purpose flour and a suitable substitute for the sourdough starter. Many specialty stores offer gluten-free starters, or you may consider using a gluten-free sourdough bread recipe.

    These FAQs cater to common queries and doubts home bakers may have, helping them successfully make their own Delicious Sourdough Rhubarb Bread while incorporating it into their delicious and nutritious spring meals.

    In conclusion, Delicious Sourdough Rhubarb Bread not only provides comfort and nourishment but also shines a spotlight on seasonal eating. Every bite offers a blend of flavors, textures, and health benefits that can appeal to everyone, no matter their cooking experience or dietary preferences. So, gather your ingredients, unleash your creativity, and discover the joy of baking this elegant bread!

  • I CanT Stop Making This Tender Rhubarb Quick Bread

    I CanT Stop Making This Tender Rhubarb Quick Bread

    I Can’T Stop Making This Tender Rhubarb Quick Bread: A Tropical Delight

    Introduction to I Can’T Stop Making This Tender Rhubarb Quick Bread

    Are you searching for simple and delightful recipe ideas that will tickle your taste buds while providing health benefits? Look no further! This tender rhubarb quick bread is not just easy to whip up but is also a feast for the eyes and palate. Rhubarb, often overshadowed by other fruits, is a vibrant addition that brings a unique tartness to this baked delight.

    What makes this recipe stand out? First, it is incredibly versatile. Whether you’re vegan, gluten-free, or just seeking a healthy snack option, this bread caters to you. Quick to assemble and bake, it fits seamlessly into even the busiest of schedules, ideal for parents, students, and working professionals alike. Imagine freshly baked banana bread wafting through your home, its warm aroma filling the air while providing a boost of energy and nourishment.

    In addition to its convenience and delightful flavor, rhubarb is rich in vitamins C and K, as well as fiber, contributing to your overall health and well-being. Whether enjoyed for breakfast, an afternoon snack, or as a subtle dessert, this quick bread is bound to become a favorite. Join countless other baking enthusiasts and discover why I can’t stop making this tender rhubarb quick bread!

    Benefits and Advantages of I Can’T Stop Making This Tender Rhubarb Quick Bread

    Making this tender rhubarb quick bread offers numerous advantages that will appeal to any home cook or baking enthusiast. First and foremost, the preparation is quick and straightforward. In under an hour, you can have a delicious loaf ready to enjoy!

    Health Benefits

    Rhubarb is often hailed for its health benefits. This vegetable (though often used like a fruit) is low in calories and high in fiber, making it a great addition to any recipe. Moreover, it’s packed with antioxidants, which help protect your body from oxidative stress. This makes our quick bread not only a delectable treat but also a nutritious option for various dietary preferences.

    Dietary Flexibility

    One of the standout features of this recipe is its adaptability to various dietary needs. If you’re looking for vegan options, simply substitute traditional dairy ingredients with plant-based alternatives, such as almond milk or coconut oil. Need to make it gluten-free? Swapping out all-purpose flour for a gluten-free blend will result in a fluffy and satisfying loaf. These substitutions allow everyone to savor the delight of this tender rhubarb quick bread.

    Exciting Flavor Profile

    Unlike many quick breads that can be overly sweet, the unique tartness of rhubarb provides a refreshing contrast to traditional ingredients. The balance shifts the flavor profile from plain to extraordinary, ensuring that each slice displays a vibrant color and taste. What’s more, it’s a great opportunity to explore flavor variations by adding spices or nut elements—giving you even more recipe ideas to consider down the line.

    Great for Any Occasion

    This quick bread is perfect for any event, be it a cozy family gathering, a potluck with friends, or simply enjoying a personal moment with a warm slice and a cup of tea. Its delightful appearance and taste bring joy to any table!

    Ingredients Overview

    Essential Ingredients for I Can’T Stop Making This Tender Rhubarb Quick Bread

    The success of your quick bread relies heavily on the quality and selection of ingredients. Here’s a detailed list of everything you’ll need:

    • 2 cups all-purpose flour (or gluten-free flour blend)
    • 1 teaspoon baking soda
    • 1 teaspoon baking powder
    • ½ teaspoon salt
    • 1 teaspoon cinnamon (adds warmth and flavor)
    • ¾ cup granulated sugar (can substitute with coconut sugar for lower glycemic index)
    • ½ cup brown sugar (to deepen sweetness and moisture)
    • 1 cup buttermilk (or plant-based alternative like almond milk with a splash of vinegar)
    • 1 large egg (or flax egg for vegan option)
    • ½ cup vegetable or coconut oil (healthy fats; coconut oil adds an enticing aroma)
    • 2 cups chopped rhubarb (fresh is best, but frozen can be used too)

    These ingredients together form a beautiful blend that is both simple and effective in creating a moist and tender loaf.

    Dietary Substitutions to Customize Your I Can’T Stop Making This Tender Rhubarb Quick Bread

    When it comes to adjusting the recipe to suit various dietary restrictions or preferences, here are some smart substitutions:

    • Vegan Adaptations:
    • Replace the egg with a flaxseed or chia seed egg (mix 1 tablespoon of ground flax or chia with 3 tablespoons of water).

    • Gluten-Free Adaptations:

    • Use a gluten-free all-purpose flour blend, ensuring it contains xanthan gum for better texture.

    • Sugar-Free Option:

    • If you’re looking to reduce sugars, consider using applesauce or mashed bananas to sweeten the bread naturally without added sugars.

    • Dairy-Free Options:

    • Use plant-based milk (like almond, soy, or oat milk) instead of buttermilk, and check that any margarine or oil used is dairy-free.

    Understanding the adaptability of this quick bread allows everyone to enjoy a slice without compromising dietary choices.

    How to Prepare the Perfect I Can’T Stop Making This Tender Rhubarb Quick Bread: Step-by-Step Guide

    Ready to create this scrumptious tender rhubarb quick bread? Here’s a clear step-by-step guide to making the process simple and approachable for you:

    1. Preheat the Oven: Preheat your oven to 350°F (175°C). This ensures an evenly baked loaf as you prepare your mixture.

    2. Prepare the Baking Pan: Grease a 9×5-inch loaf pan with cooking spray or oil, or line it with parchment paper for easy removal.

    3. Mix Dry Ingredients: In a large mixing bowl, whisk together the flour, baking soda, baking powder, salt, cinnamon, granulated sugar, and brown sugar. This will help combine the dry ingredients and distribute the leavening agents evenly.

    4. Combine Wet Ingredients: In a separate bowl, mix the buttermilk, egg (or flax egg), and oil. Stir these together until fully combined. If you’re using a plant-based option, ensure that the milk has curdled a bit with the vinegar for that buttermilk taste!

    5. Combine Both Mixtures: Slowly pour the wet mixture into the dry ingredients. Stir gently until just combined. Avoid overmixing, as this can lead to a dense loaf.

    6. Add Chopped Rhubarb: Carefully fold in the chopped rhubarb, ensuring it’s evenly distributed throughout the batter.

    7. Transfer to the Pan: Pour the batter into your prepared loaf pan, smoothing the surface with a spatula. This step helps with even baking.

    8. Bake the Bread: Place the loaf pan into the preheated oven. Bake for 50-60 minutes, or until a toothpick inserted into the center comes out clean or with a few crumbs.

    9. Cool the Bread: Once baked, allow the bread to cool in the pan for about 10 minutes before transferring it to a wire rack to cool completely. This will help maintain its moisture.

    10. Slice and Serve: Once cooled, slice the bread and serve it on its own or with a smear of butter or a drizzle of honey. Enjoy!

    By following these straightforward steps, you’ll have a mouthwatering loaf that’s perfect for a family gathering or a quiet day at home. You can consider adding other ingredients like nuts or chocolate chips for varied recipe ideas in the future!

    Mastering I Can’T Stop Making This Tender Rhubarb Quick Bread: Advanced Tips and Variations

    To elevate your experience further, consider the following advanced tips and variations while making your tender rhubarb quick bread:

    Experimenting with Flavors

    Understanding that flavors can be adjusted is essential for a well-rounded recipe. Consider adding a tablespoon of vanilla extract for sweetness or a dash of nutmeg for warmth. You could also explore new flavor profiles by incorporating citrus zest, like lemon or orange, that pairs beautifully with rhubarb.

    Adding Texture

    For those seeking a bit of crunch, fold in chopped nuts such as walnuts or pecans. They will add a delicious contrast to the soft bread, increasing the overall enjoyment of each bite!

    Topping Ideas

    To turn this quick bread into a special treat, consider adding a crumb topping. Combine equal parts brown sugar, flour, and butter, along with a dash of cinnamon, then sprinkle it over the top before baking. This will add a crunchy layer that’s simply irresistible.

    Incorporating Seasonal Variations

    Feel free to switch up the fruits according to the season! In the summer, peaches or berries can provide a refreshing alternative to rhubarb. Each season opens a world of new recipe ideas waiting to be discovered!

    Enhancing Presentation

    Presentation can take your quick bread to the next level. Once cooled, you can drizzle a simple glaze made from powdered sugar and milk over the loaf, or serve the slices topped with fresh fruit.

    How to Store I Can’T Stop Making This Tender Rhubarb Quick Bread: Best Practices

    Proper storage is crucial to maintaining the freshness of your tender rhubarb quick bread. Follow these best practices:

    Refrigeration

    If you’ve baked extra bread, you can store it wrapped tightly in plastic wrap or aluminum foil in the refrigerator for up to one week. This will keep it moist while allowing the flavors to meld together.

    Freezing

    For longer storage, consider freezing your loaf. Once cooled, wrap the bread in plastic wrap, then in aluminum foil to prevent freezer burn. It can last for up to three months in the freezer. Thaw it overnight in the refrigerator before consuming. Additionally, slicing the bread before freezing makes it easy to grab just what you need.

    Reheating

    Reheat slices in the microwave for about 10-15 seconds, or place them in the oven at 350°F for about 5-10 minutes until warmed through. This will bring back the freshly baked aroma of the quick bread that you love.

    By following these storage tips, you can prolong the life of your delightfully soft rhubarb quick bread, ensuring you have a delicious treat available whenever you crave it.

    Nutritional Value of I Can’T Stop Making This Tender Rhubarb Quick Bread

    Understanding the nutritional value can empower your culinary choices. Here’s a rough estimation of the nutritional content per slice (based on 12 slices from a loaf):

    • Calories: 180
    • Protein: 3g
    • Fat: 8g
    • Carbohydrates: 25g
    • Fiber: 1g
    • Sugar: 10g

    Health Benefits Breakdown

    • Low Calorie: This quick bread provides a treat that is lower in calories than many traditional cake options, making it suitable as a snack or light dessert.
    • Rich in Fiber: The inclusion of rhubarb adds dietary fiber, fostering healthy digestion.
    • Vitamins: Packed with vitamin C and K, rhubarb is a nutrient-dense addition to your diet.

    Feel free to adjust the ingredients to cater further to dietary needs, ensuring that everyone gets to enjoy the benefits this tender rhubarb quick bread brings!

    FAQs: Frequently Asked Questions About I Can’T Stop Making This Tender Rhubarb Quick Bread

    Can I use frozen rhubarb instead of fresh?

    Absolutely! Frozen rhubarb works perfectly in this recipe. Just make sure to thaw and drain any excess moisture before adding it to the batter.

    Can I make the bread without sugar?

    While you can experiment with fruit purees like applesauce for naturally sweetening the bread, it may alter the texture slightly. Adjust sugar levels based on your taste preference.

    How do I know when my bread is baked?

    A toothpick inserted in the center of the loaf should come out clean or with a few moist crumbs. Make sure not to overbake, as that can dry out the bread.

    What if I can’t find rhubarb?

    If rhubarb isn’t available, you could use other tart fruits like cranberries or sour cherries as a substitute. Be mindful of adjusting the sugar levels if the substitute is sweeter or tarter than rhubarb.

    How long does the bread last?

    When stored properly, the tender rhubarb quick bread can last up to a week in the refrigerator or three months in the freezer, making it great for meal prep or snacks on the go.

    Conclusion

    In conclusion, I Can’t Stop Making This Tender Rhubarb Quick Bread is not only a delightful treat but also a versatile recipe suited for all diets. With its simple preparation, rich taste, and health benefits, it’s set to become a staple in your culinary repertoire. So gather your ingredients, invite family or friends into the kitchen, and dive into the joy of baking this splendid quick bread today.

  • The Most Addictive Hot Cross Buns YouLl Ever Make

    The Most Addictive Hot Cross Buns YouLl Ever Make

    The Most Addictive Hot Cross Buns You’ll Ever Make!: A Tropical Delight

    Introduction to The Most Addictive Hot Cross Buns You’ll Ever Make!

    Are you looking for delightful breakfast ideas that will make your mornings just a little bit sweeter? Look no further than this recipe for The Most Addictive Hot Cross Buns You’ll Ever Make! These golden-brown, fluffy buns are bursting with a tropical flair, filled with luscious spices and topped with a sweet glaze.

    What makes these hot cross buns truly special is their versatility. They are not only simple to prepare but also cater to various dietary preferences, such as vegan and gluten-free options. The combination of warm spices and dried fruits makes them a satisfying choice for breakfast or brunch, and they are perfect for sharing with friends and family during festive occasions or just those cozy weekends when you want to indulge a bit.

    This recipe delivers not just on flavor but also on health benefits. With whole grains and the option for natural sweeteners, these hot cross buns can fit into a balanced diet while tantalizing your taste buds. They are a wonderful addition to your breakfast ideas repertoire and will surely become a favorite in your household. So, roll up your sleeves and let’s dive into the delightful world of hot cross buns!

    Benefits and Advantages of The Most Addictive Hot Cross Buns You’ll Ever Make!

    Creating The Most Addictive Hot Cross Buns You’ll Ever Make is a rewarding culinary experience with an array of benefits. Let’s explore why this recipe stands out among typical breakfast ideas.

    1. Ease of Preparation

    One of the foremost advantages of this recipe is its simplicity. With just a few straightforward steps, even novice bakers can achieve buns that are worthy of a bakery. This makes it an excellent choice for busy parents or working professionals who want to whip up something delightful without spending hours in the kitchen.

    2. Health Benefits

    Hot cross buns can often be laden with sugar and unhealthy fats, but this recipe allows you to control the ingredients. By using whole wheat flour and natural sweeteners, you can create a healthier version that still satisfies. Furthermore, the inclusion of dried fruits adds fiber and essential vitamins, making these buns a more nutritious option.

    3. Customizable for Dietary Needs

    Whether you are vegan, gluten-free, or simply trying to cut down on calories, this recipe is easily adaptable. You can opt for plant-based butter or milk and gluten-free flour to make the buns suitable for different dietary preferences. This flexibility ensures that everyone can enjoy these scrumptious delights.

    4. Flavorful Experience

    The blend of spices, such as cinnamon and nutmeg, combined with the sweetness of dried fruits like raisins and currants, creates a flavor explosion in every bite. This sensory experience makes them an indulgent yet guilt-free treat.

    5. Perfect for Any Occasion

    These buns are not just for Easter; they can be enjoyed year-round. From holidays to lazy Sunday breakfasts, they fit seamlessly into any gathering. Their delightful aroma fills the home, inviting everyone to slow down and savor the moment.

    In summary, The Most Addictive Hot Cross Buns You’ll Ever Make offer a plethora of benefits that extend far beyond their fluffy, delicious texture. They’re the epitome of breakfast ideas that combine health, simplicity, and pleasure.

    Ingredients Overview

    Essential Ingredients for The Most Addictive Hot Cross Buns You’ll Ever Make!

    For a successful batch of these addictive hot cross buns, you will need the following ingredients:

    • 3 ½ cups whole wheat flour (or gluten-free flour blend)
    • 1 cup warm milk (or almond milk for vegan option)
    • ¼ cup sugar (or coconut sugar for lower-calorie option)
    • 2 ¼ teaspoons instant yeast
    • 1 teaspoon salt
    • 1 teaspoon ground cinnamon
    • ½ teaspoon ground nutmeg
    • ¼ cup unsalted butter (or vegan butter)
    • 1 cup mixed dried fruits (raisins, currants, or cranberries)
    • 1 egg (or flaxseed egg for vegan option)
    • Zest from 1 orange
    • ¼ cup orange juice
    • For the glaze: 1 cup powdered sugar mixed with 2 tablespoons of water

    Each ingredient contributes uniquely to the final product. Whole wheat flour adds fiber, while the warm milk activates the yeast for a light and fluffy texture. Choosing natural sweeteners not only reduces calories but also enhances the flavor profile, making your buns even more appealing.

    Dietary Substitutions to Customize Your The Most Addictive Hot Cross Buns You’ll Ever Make!

    • Gluten-Free: Replace the whole wheat flour with a gluten-free blend that contains xanthan gum.
    • Vegan: Substitute the egg with a flaxseed egg made from 1 tablespoon of ground flaxseed mixed with 3 tablespoons of water. For milk, use any plant-based alternative.
    • Low-Calorie: Use unsweetened applesauce instead of sugar or reduce the amount of sugar by half.
    • Nut-Free: Exclude any mixed nuts that may be included with dried fruit; instead, add extra seeds for crunch.

    These substitutions allow you to enjoy delicious hot cross buns while catering to individual dietary needs without sacrificing flavor or texture.

    How to Prepare the Perfect The Most Addictive Hot Cross Buns!: Step-by-Step Guide

    Ready to embark on a culinary adventure? Follow this clear step-by-step guide to make The Most Addictive Hot Cross Buns you’ll ever create. It’s a recipe that blends tradition with modern dietary needs, all packed into a delicate bun.

    1. Prepare the Base: In a large mixing bowl, combine the warm milk, sugar, and yeast. Stir gently and let it sit for about 5-10 minutes until the mixture is frothy. This step is crucial, as it ensures that your buns will rise beautifully.

    2. Mix Ingredients: Add the melted butter, egg (or flaxseed egg), orange zest, and orange juice to the yeast mixture. Mix well until all ingredients are well integrated.

    3. Combine Dry Ingredients: In another bowl, whisk together the flour, salt, cinnamon, and nutmeg. Gradually add this dry mixture to the wet ingredients, stirring until a dough begins to form.

    4. Add the Dried Fruits: Gently fold in the mixed dried fruits until evenly distributed throughout the dough. These fruits will add sweetness and texture to the buns.

    5. Knead the Dough: On a floured surface, knead the dough for about 8-10 minutes until it becomes smooth and elastic. Don’t forget that kneading is vital; it develops the gluten needed for perfect buns.

    6. First Rise: Place the kneaded dough in a greased bowl, cover it with a damp cloth, and let it rise in a warm environment for about 1-2 hours or until it has doubled in size. This step is essential for the airy texture.

    7. Shape the Buns: Once the dough has risen, punch it down to release excess air. Divide it into 12 equal portions and shape each piece into a bun. You can arrange them closely together on a baking sheet lined with parchment paper, creating a lovely touch when baked.

    8. Second Rise: Cover the shaped buns with a clean kitchen towel and allow them to rise for another 30-45 minutes. This will ensure they remain fluffy and soft.

    9. Preheat Oven: While your buns are rising, preheat your oven to 375°F (190°C). Ensuring your oven is hot enough will give your buns a lovely golden crust.

    10. Bake: Bake the buns in the preheated oven for 25-30 minutes. You’ll know they are ready when they are golden-brown on top and sound hollow when tapped on the bottom.

    11. Glaze: Once baked, let them cool slightly on a wire rack. For the final touch, mix the powdered sugar and water to make a glaze. Drizzle it over the warm buns to create an irresistible finish.

    12. Serve and Enjoy: Your hot cross buns are ready to be enjoyed! Whether you enjoy them fresh out of the oven or warmed later, they will remain a delightful breakfast idea.

    By following these steps, you can successfully prepare The Most Addictive Hot Cross Buns that everyone will love, regardless of their dietary preferences.

    Mastering The Most Addictive Hot Cross Buns You’ll Ever Make!: Advanced Tips and Variations

    Once you have mastered the basic recipe, feel free to experiment with variations and tips to elevate your hot cross buns experience:

    1. Try Different Spices:

    If you want to shake things up, feel free to play with spices. Add some ginger, cardamom, or even a hint of allspice for an interesting twist.

    2. Different Fruit Options:

    Swap the dried fruits for nuts, seeds, or chocolate chips for an alternate explosion of flavors. For a tropical flavor, consider using pineapple or mango pieces.

    3. Incorporate a Cream Cheese Filling:

    For a richer version, make a cream cheese filling to add to the center of the buns before baking. This will create a melty surprise that everyone will adore.

    4. Top with Seeds:

    Before baking, sprinkle sesame or poppy seeds on top for a crunchy, nutty flavor that contrasts beautifully with the soft buns.

    5. Experiment with Expressions:

    Try shaping the dough into braids or individual rolls. These variations bring a new excitement to a classic recipe.

    6. Store Properly:

    If you have leftovers, consider slicing the hot cross buns and freezing them individually. This will make them ideal for on-the-go breakfast ideas later on.

    With these advanced tips, you’re ready to take your hot cross buns to the next level, creating custom bun experiences that everyone will enjoy.

    How to Store The Most Addictive Hot Cross Buns You’ll Ever Make!: Best Practices

    To keep your hot cross buns fresh and delicious, proper storage is necessary. Here’s how to ensure they maintain their delightful flavor and texture:

    • Room Temperature Storage: Store the buns in an airtight container at room temperature for up to 3 days. Sealing them helps prevent them from drying out.

    • Refrigeration: If you live in a particularly warm climate, consider refrigerating them for up to a week in an airtight container.

    • Freezing: For long-term storage, place baked and cooled buns in a freezer bag or airtight container and freeze them. They can last for up to 3 months in the freezer. When you’re ready to enjoy one, simply thaw and reheat in the oven or microwave.

    • Reheating: For best results, heat the buns in the oven at 350°F (175°C) for 5-10 minutes to restore their fluffy texture and warm them through. You can also microwave them for a quicker option.

    These storage practices ensure that your hot cross buns remain a delightful breakfast idea you can rely on anytime!

    Nutritional Value of The Most Addictive Hot Cross Buns You’ll Ever Make!

    Understanding the nutritional content of The Most Addictive Hot Cross Buns helps you make informed choices, especially for a health-conscious audience. Here’s a breakdown of the nutritional values per bun (based on a dozen servings):

    • Calories: Approximately 200 calories
    • Total Fat: 4g (Saturated Fat: 2g)
    • Cholesterol: 15mg (or 0mg if vegan)
    • Sodium: 150mg
    • Total Carbohydrates: 36g
    • Dietary Fiber: 3g
    • Sugars: 8g
    • Protein: 5g

    These buns provide a balanced mix of nutrients, making them a delightful, energy-boosting option to start your day. By adjusting the ingredients (like using less sugar or different flours), you can easily modify these values to fit your dietary needs.

    Calorie-conscious bakers can also enjoy the same great taste with healthier substitutions. Thus, these hot cross buns are not just indulgences but smart breakfast ideas that fit into a healthy lifestyle.

    FAQs: Frequently Asked Questions About The Most Addictive Hot Cross Buns You’ll Ever Make!

    1. Can I make these hot cross buns ahead of time?

    Yes! You can prepare the dough a day in advance and let it rise in the fridge overnight. Simply shape the buns the next morning and proceed with the second rise and baking.

    2. Is there a gluten-free option available?

    Absolutely! You can substitute the whole wheat flour with a gluten-free flour blend. Be sure to check the blend’s instructions for the best results.

    3. How long do these hot cross buns last?

    When stored properly, they can last up to three days at room temperature, one week in the refrigerator, and up to three months in the freezer.

    4. Can I use fresh fruit instead of dried fruit?

    Fresh fruit will increase moisture content and not yield the same texture. You can use dried fruit, which holds the right consistency and sweetness in the dough.

    5. What is the best way to reheat leftover hot cross buns?

    The best way is to warm them in the oven at 350°F (175°C) for about 5-10 minutes to restore their freshness. You can also microwave them for quicker options.

    6. Can I add nuts or seeds for a crunch?

    Definitely! You can incorporate nuts or seeds into the dough or sprinkle them on top before baking for added flavor and nutrition.

    By answering these frequently asked questions, we hope to clear any doubts you may have about preparing and enjoying The Most Addictive Hot Cross Buns you’ll ever make.


    With this comprehensive guide, you’re fully equipped to tackle this recipe and share the joy of fresh, delicious hot cross buns. Not only are they an enticing treat, but they also contribute positively to a balanced breakfast. Whether you enjoy them fresh out of the oven or with a cup of tea later in the day, these buns are set to become a beloved addition to your breakfast ideas!

  • Buttery Traditional British Hot Cross Buns

    Buttery Traditional British Hot Cross Buns

    Buttery Traditional British Hot Cross Buns: A Tropical Delight

    Introduction to Buttery Traditional British Hot Cross Buns

    If you’re looking for delightful breakfast ideas that combine tradition with taste, look no further than buttery traditional British hot cross buns. These soft, fragrant buns are not only a delightful treat for Easter but also a fantastic addition to your breakfast table at any time of the year. Warm, spiced, and slightly sweet, they feature a classic cross on the top—symbolizing the crucifixion and rich with historical flavor.

    What makes this recipe appealing is its simplicity. With just a handful of ingredients and a few straightforward steps, even beginner bakers can whip up these delectable buns in no time. Additionally, they can be customized to cater to different dietary needs; you can make vegan or gluten-free variations to ensure everyone at the breakfast table can enjoy them.

    These buns are also more than just a tasty treat. They are packed with health benefits, especially if you choose wholesome alternatives to conventional ingredients. Homemade hot cross buns offer a healthier option to commercially available ones, which might be loaded with preservatives and artificial flavors. Plus, the delightful smell that wafts through your kitchen as they bake is one of life’s simple pleasures, making it a perfect project for families, busy parents, or anyone looking to share a fun activity with loved ones.

    So why wait? Get ready to inspire your cooking journey with these buttery traditional British hot cross buns. They are not just a smart culinary choice but also a delightful way to start your day!

    Benefits and Advantages of Buttery Traditional British Hot Cross Buns

    When you consider breakfast ideas, the versatility of buttery traditional British hot cross buns sets them apart from other morning options. Here’s why:

    1. Ease of Preparation: These buns require minimal ingredients and are relatively easy to make, making them an excellent choice for home cooks of all skill levels. Even if you’re short on time, you can easily prepare the dough, allow it to rise, and bake it fresh within a few hours.

    2. Health Benefits: Hot cross buns can be a healthier breakfast option when made at home. By using whole grains and reducing sugar, you can create a nutritious treat. Whole wheat flour offers added fiber, which promotes digestion and helps maintain a healthy weight. You can also incorporate dried fruits such as raisins or currants, which add natural sweetness and a boost of vitamins and minerals.

    3. Customizable Recipes: This recipe’s adaptability is another massive advantage. You can easily swap out ingredients based on dietary preferences. For instance, you can replace dairy milk with almond milk for a dairy-free option or use gluten-free flour to cater to those with gluten sensitivities.

    4. Perfect for Any Occasion: While traditional hot cross buns are popularly enjoyed during Easter, they are ideal for any celebratory brunch, family gathering, or simply a cozy breakfast on a Sunday morning.

    5. Wonderful Aroma: There’s something magical about the way spices like cinnamon and nutmeg fill your kitchen as these buns bake. The aroma lingers, creating a warm and inviting atmosphere, which is especially comforting during the cooler months.

    In summary, buttery traditional British hot cross buns are more than mere pastries. They marry nutritional value, simplicity, and adaptability in a single delicious bite. Whether you’re a busy parent looking to whip up something quick for the kids or a baking enthusiast wanting to perfect your craft, this recipe is a must-try!

    Ingredients Overview

    Essential Ingredients for Buttery Traditional British Hot Cross Buns

    To start your journey towards baking the perfect buttery traditional British hot cross buns, gather the following ingredients:

    • 500g (4 cups) Bread Flour: This gives the buns their structure and chewiness.
    • 75g (1/3 cup) Sugar: Enhances sweetness and feeds the yeast for better rising.
    • 10g (2 teaspoons) Salt: Balances the flavors and strengthens the dough.
    • 10g (2 teaspoons) Instant Yeast: Essential for leavening and making the buns light.
    • 300ml (1 1/4 cups) Whole Milk: Provides moisture and richness. (For a vegan option, substitute almond or oat milk.)
    • 75g (5 tablespoons) Unsalted Butter: Adds a rich flavor and tenderness. (Use vegan butter for a dairy-free version.)
    • 1 Large Egg: Binds the ingredients together and adds moisture. (Substitute with flaxseed meal or a commercial egg replacer for vegan diets.)
    • 100g (1 cup) Mixed Dried Fruits: Such as raisins, currants, or sultanas for added flavor and sweetness.
    • 1 teaspoon Ground Cinnamon: For that warm and festive flavor.
    • 1/2 teaspoon Ground Nutmeg: Adds a unique fragrance and taste, elevating the overall flavor profile.

    Additionally, you’ll need extra flour for dusting and a few items for the glaze:

    • 75g (1/2 cup) Apricot Jam: For glazing and adding a lovely shine. (Optionally, use a vegan alternative.)
    • 1 tablespoon Water: To thin the jam, if necessary.

    Dietary Substitutions to Customize Your Buttery Traditional British Hot Cross Buns

    Creating the ideal hot cross buns means adjusting ingredients to suit all dietary preferences. Here are some suggestions:

    • Gluten-Free Version: Substitute regular bread flour with a high-quality gluten-free flour blend. Make sure it contains xanthan gum for better structure.
    • Vegan Option: Use plant-based milk and butter. Replace the egg with a mixture of 1 tablespoon of flaxseed meal mixed with 2.5 tablespoons of water, allowing it to sit for a few minutes until it thickens (this acts as a binder).
    • Sugar Reduction: To cut down on sugar, you can decrease the amount of sugar by half; the buns will still retain their sweetness from the dried fruits.
    • Fruit Choices: Substitute mixed dried fruits with fresh blueberries, cranberries, or chopped nuts for different flavor profiles and textures.

    By adjusting these ingredients, you can ensure that your buttery traditional British hot cross buns can be enjoyed by everyone, catering to various dietary needs while still being a delightful and nourishing breakfast treat.

    How to Prepare the Perfect Buttery Traditional British Hot Cross Buns: Step-by-Step Guide

    Now that you have your ingredients ready, it’s time to dive into making these delicious buttery traditional British hot cross buns. Here’s your simple, step-by-step guide:

    1. Prepare the Base:
    2. In a large mixing bowl, combine the bread flour, sugar, instant yeast, and salt. Make sure the salt and yeast are on opposite sides of the bowl initially, as salt can inhibit yeast activation.

    3. Warm the Liquid:

    4. In a saucepan, gently warm the milk until it’s lukewarm (about 37°C/98°F). Remove it from heat and add in the unsalted butter, stirring until melted. This mixture should feel warm to the touch without being hot.

    5. Combine Ingredients:

    6. Make a well in the center of the flour mixture and pour in the warm milk-butter mixture and the beaten egg. Mix together using a wooden spoon or your hands until a sticky dough forms.

    7. Kneading:

    8. Transfer the dough to a lightly floured surface. Knead the dough for about 8-10 minutes until it becomes smooth and elastic. If using a stand mixer, fit the dough hook and knead on medium speed for about 5-6 minutes.

    9. Incorporate Dried Fruits:

    10. Add the mixed dried fruits, ground cinnamon, and nutmeg into the dough. Knead for an additional 2-3 minutes until the fruits and spices are evenly distributed.

    11. First Rise:

    12. Place the dough in a lightly oiled bowl, cover with a damp cloth or plastic wrap. Let it rise in a warm place for about 1-2 hours, or until it has doubled in size.

    13. Shape the Buns:

    14. Once risen, punch down the dough gently to release air bubbles. Divide it into 12 equal portions. Shape each portion into a ball and place them closely together in a greased baking dish.

    15. Second Rise:

    16. Cover the buns with a damp cloth and allow them to rise again for 30-45 minutes or until puffy and almost touching.

    17. Prepare for Baking:

    18. Preheat your oven to 190°C (375°F). While the buns are resting, mix about 75g of flour with enough water to make a thick paste (this will be your cross). Transfer this mixture into a piping bag or a ziplock bag with one corner cut off and pipe crosses on the tops of the buns.

    19. Bake:

      • Bake the buns in the preheated oven for 20-25 minutes, or until they are golden brown on top and sound hollow when tapped on the bottom.
    20. Glazing:

      • While the buns are baking, prepare the glaze by heating apricot jam in a small saucepan, adding a tablespoon of water to thin it out. Once the buns are out of the oven, brush them with the warm glaze to give them a beautiful shine.
    21. Cool and Serve:

      • Allow the buns to cool in the pan for 10 minutes before transferring them to a wire rack to cool completely. Serve warm with butter or your favorite spreads; these buns are a delightful addition to your breakfast ideas collection!

    These buttery traditional British hot cross buns not only taste divine but are also good for gatherings or cozy mornings at home. Feel free to adapt these steps based on dietary preferences, ensuring everyone can relish these delightful treats.

    Mastering Buttery Traditional British Hot Cross Buns: Advanced Tips and Variations

    Once you’ve mastered the basics of making buttery traditional British hot cross buns, you may want to experiment with advanced techniques and variations. Here are some tips to elevate your baking game:

    1. Flavor Enhancements:
    2. Consider infusing your milk with spices like clove or cardamom for an aromatic twist. You can steep the spices in the milk as it warms to extract more flavor.

    3. Different Glazes:

    4. Swap out the apricot glaze for a simple icing made of powdered sugar and water or lemon juice for a sweeter finish. For a savory option, try brushing with melted butter sprinkled with a pinch of sea salt.

    5. Try Different Fruits:

    6. Experiment with interesting dried fruits such as candied orange peel or cherries to create a unique flavor. You might even try incorporating chocolate chips or nuts for a rich twist.

    7. Herbs and Zests:

    8. Add fresh orange or lemon zest for a fragrant burst of citrus. You might also consider adding finely chopped fresh herbs like rosemary or thyme for a savory and aromatic profile.

    9. Batch Freezing:

    10. If you make a large batch, consider freezing some of them. After they cool, wrap the buns individually in plastic wrap and store them in an airtight container. They can be reheated directly from the freezer.

    With these tips, you can personalize your buttery traditional British hot cross buns to your liking, bringing an exciting twist to this classic recipe.

    How to Store Buttery Traditional British Hot Cross Buns: Best Practices

    Storing your buttery traditional British hot cross buns correctly can greatly enhance their longevity and flavor retention. Here’s how to ensure they stay fresh:

    1. Room Temperature:
    2. If you plan to consume the buns within a couple of days, store them at room temperature. Keep them in a bread box or loosely wrapped in parchment paper to allow airflow while preventing them from drying out.

    3. Refrigeration:

    4. For storage beyond a few days, consider refrigerating them. Enclose the buns in a ziplock bag or an airtight container to avoid drying. The cool temperature will slow down spoilage.

    5. Freezing:

    6. To freeze the buns, wrap them tightly in plastic wrap, followed by aluminum foil, and place them in a freezer-safe bag or container. Properly stored, they can last for up to three months. When you’re ready to enjoy them, thaw the buns overnight in the refrigerator or at room temperature.

    7. Reheating:

    8. To reheat, you can either place them in a 150°C (300°F) oven for 10-15 minutes until warmed through or microwave them for about 10-15 seconds. This ensures the buns remain soft and fluffy.

    By following these best practices, you can savor the delightful flavors of your buttery traditional British hot cross buns even days after baking!

    Nutritional Value of Buttery Traditional British Hot Cross Buns

    When considering breakfast ideas, it’s important to understand their nutritional profile. Here’s a breakdown of the approximate nutritional value for one standard buttery traditional British hot cross bun (based on a recipe serving 12):

    • Calories: 220-250
    • Total Fat: 7g
    • Saturated Fat: 4g
    • Cholesterol: 30mg
    • Sodium: 120mg
    • Total Carbohydrates: 36g
    • Dietary Fiber: 1g
    • Sugars: 8g
    • Protein: 5g

    Health Benefits

    1. Source of Energy: These buns are rich in carbohydrates, making them a suitable option for energy replenishment in the morning.
    2. Vitamins & Minerals: The inclusion of dried fruits not only enriches the flavor but also adds important vitamins and minerals like iron and potassium.
    3. Customizable Nutrition: With the ability to swap in different flours or reduce sugar, you can create healthy versions of hot cross buns tailored to your dietary needs while maintaining deliciousness.

    Understanding the nutritional profile can help you enjoy buttery traditional British hot cross buns as part of a well-balanced diet, and when made at home, they can be a wholesome and delightful treat.

    FAQs: Frequently Asked Questions About Buttery Traditional British Hot Cross Buns

    1. Can I make hot cross buns ahead of time?
    2. Yes! You can prepare the dough a day ahead and let it rise in the fridge overnight. Just remember to bring it back to room temperature before baking.

    3. Are there gluten-free options for hot cross buns?

    4. Absolutely! Use a gluten-free flour blend and add xanthan gum to help with the dough’s structure. Many brands offer robust gluten-free blends that work well.

    5. Can I add other spices to the buns?

    6. Yes, you can definitely add spices like ginger or allspice for extra flavor. Get creative based on your preference!

    7. What’s the best way to enjoy my hot cross buns?

    8. While delicious on their own, these buns are also wonderful toasted with a spread of butter or your favorite jam.

    9. How should I store leftover buns?

    10. Keep leftover buns in an airtight container at room temperature for up to two days, or freeze them for later enjoyment. Reheat as needed for the best flavor.

    These FAQs serve to clarify common concerns, ensuring that anyone attempting this recipe feels informed and encouraged to try their hand at these delightful buttery traditional British hot cross buns. Perfect for breakfast or any time you want to indulge in a sweet, spicy treat!

    In conclusion, this comprehensive guide to buttery traditional British hot cross buns has not only offered you a delightful recipe but also outlined its myriad benefits, dietary customizations, and practical storage tips. Whether you’re a seasoned baker or just starting your culinary adventure, these buns will surely elevate your breakfast ideas and impress everyone at your table! Enjoy the process of baking, the rich flavors, and the joy they bring to your mornings. Happy baking!